Kitchen Project #76: Perfect peach tart
With yoghurt, honey and RUFFLES.
Hello,
Welcome to today’s edition of Kitchen Projects. Thanks so much for being here!
Today it’s all about peaches! AND nectarines. We’ll run down the whole stone fruit family and finish off with a fancy tart inspired by a very unfancy breakfast I had on holiday.
Over on KP+, I’m sharing my method for poaching perfect peaches in a dreamy, caramelly-winey poaching liquid. Its one of my faves and I can’t wait for you to try it. Click here to read it.
What's KP+? Well, Kitchen Projects+ aka KP+, is the level-up version of this newsletter. It only costs £5 per month, and your support makes this newsletter possible. By becoming a member of KP+, you directly support the writing and research that goes into the weekly newsletter and get access to lots of extra content, recipes and giveaways, including access to the entire archive. I really hope to see you there:
Love,
Nicola
Life’s a peach!
Last week I was travelling in Barcelona and Mallorca. And I ate REALLY well. From incredible prawn torta in a Barcelona tapas bar to perfect tomatoes picked up from Saint Antoni Market to sneaky bocadillos to a perfect huge sea bream crisped and blackened on the barbecue from our casa in Binisallem, every meal felt like a celebration; Maybe that’s down to the wine, but I do always wonder why we are so much better at nourishing ourselves whilst on holiday.
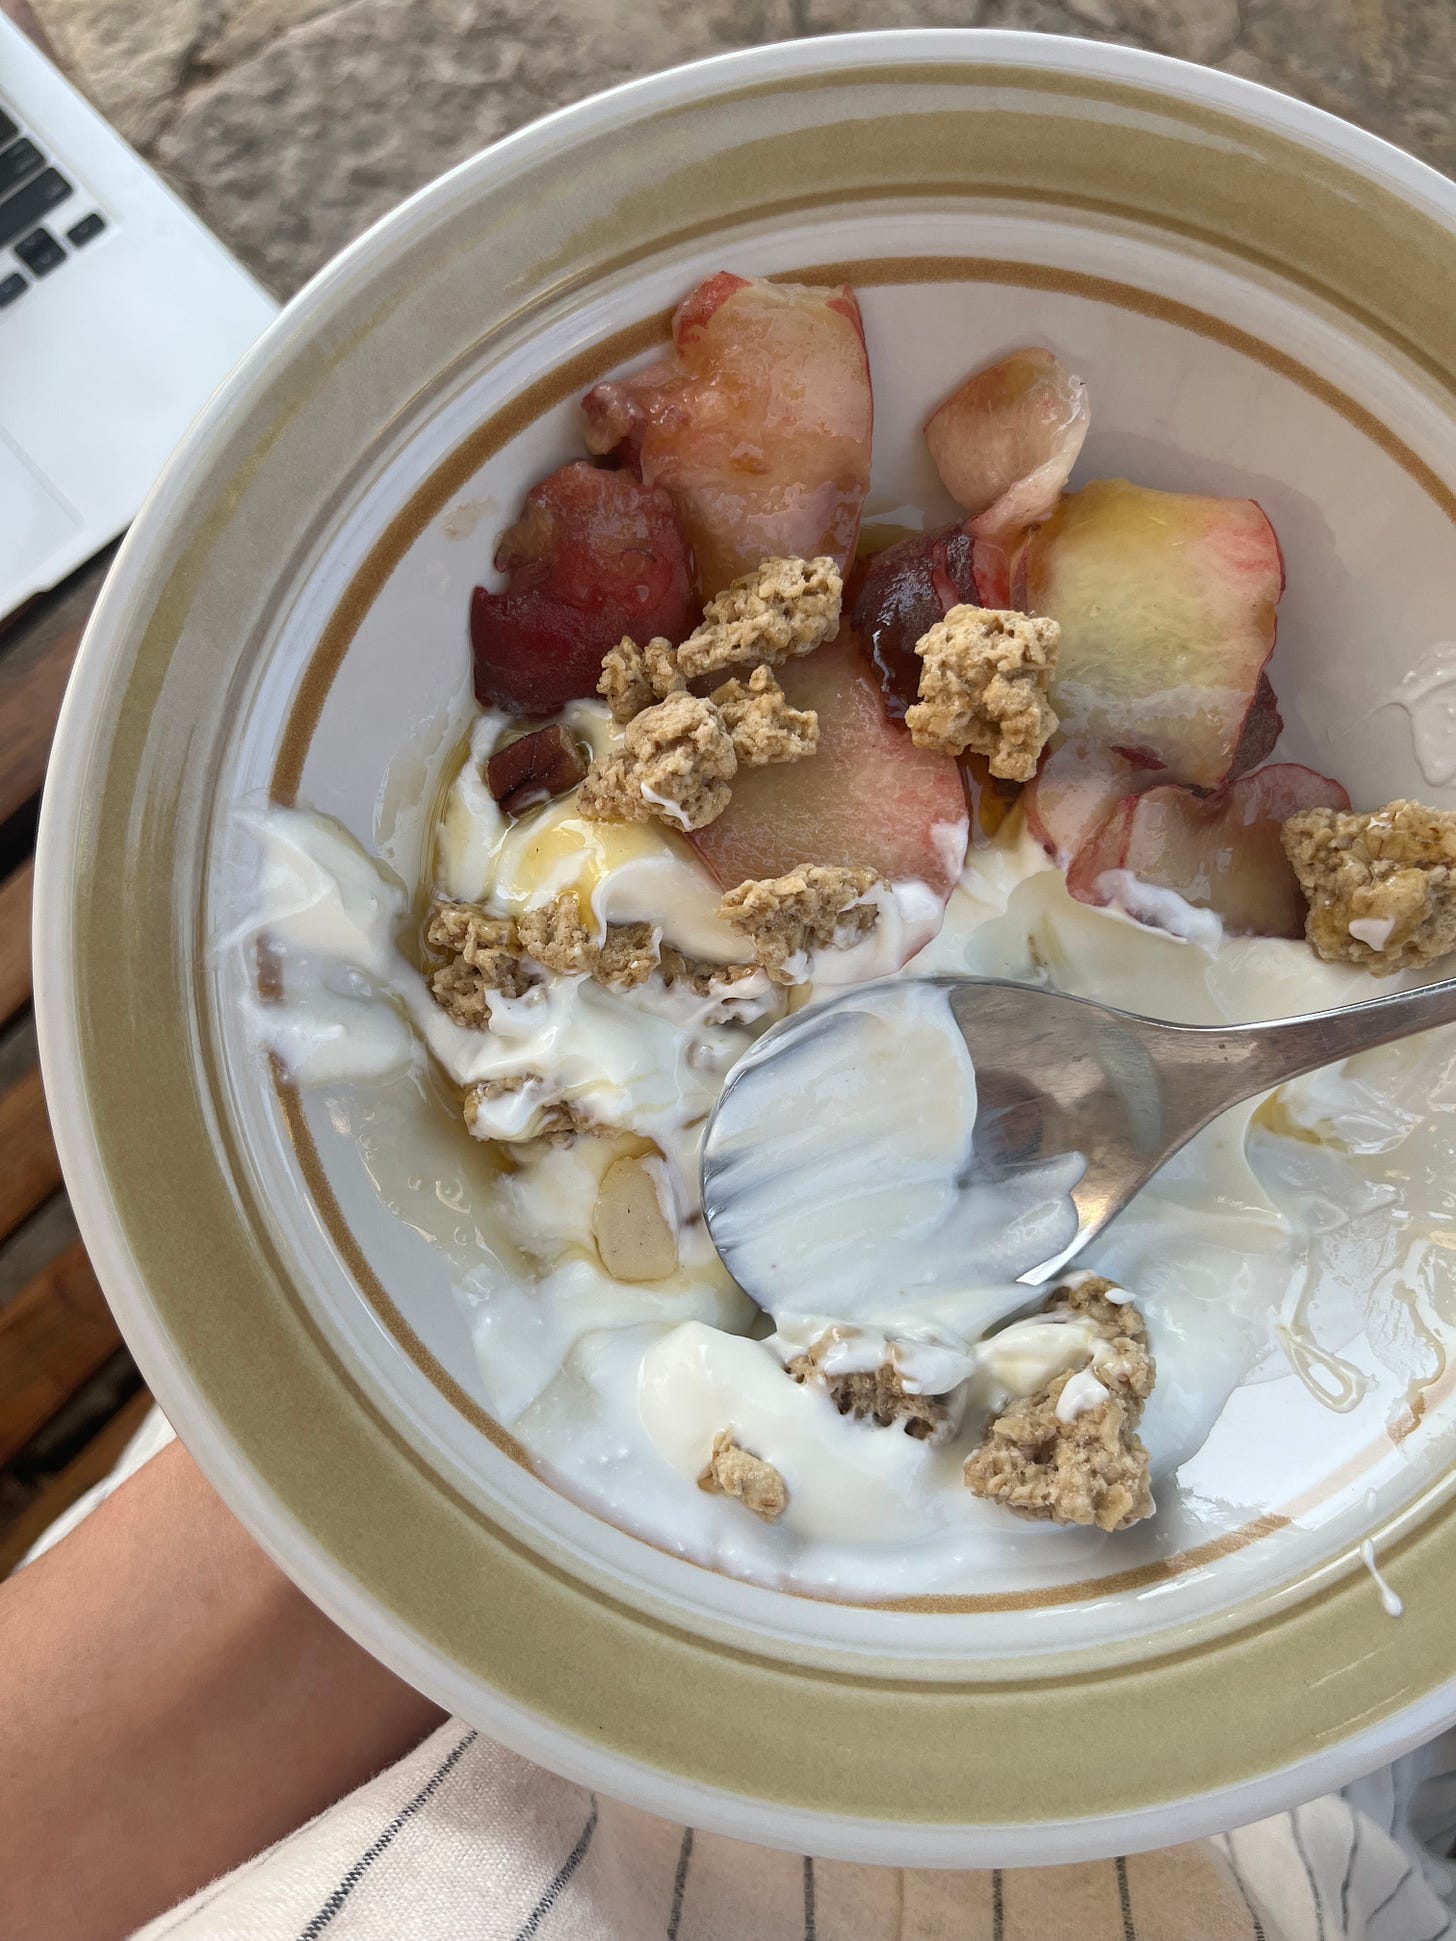
Even though I had countless brilliant meals, all shared with friends, and loved ones, one of the best things I ate was decidedly unglamorous. On the penultimate morning of our trip, everyone - except me - left early to go to the beach. I was going to have a lazy day relaxing at the house. By 10AM, it was close to 37c, so I fixed myself a plate of own-brand supermarket yoghurt, sliced flat peaches, a handful of non-descript oaty granola and a drizzle of honey. This is something I eat all the time in London. And yet, in the intense heat and pin-drop quiet surroundings of our beautiful Air B’n’B, it felt transcendent. Cold, creamy, crunchy, sweet, tangy, tender, juicy. In that moment, I really believed, no, KNEW, I really knew that this was a perfect plate. Utterly simple, perfectly undemanding, and entirely delicious. Looking back at the photo I took of it mid-amazement and mid-eating, I can see how unremarkable a plate of food it was. But I think that was also part of its charm
Whilst replicating that moment is entirely unobtainable - which, ironically, is precisely why it was so wonderful - I knew that I wanted to capture a little slice of that peaceful feeling for this week’s newsletter. So, first, I’ll guide you through the stone fruit family Nectarine-Peach Edition and finish off with a holiday-worthy yoghurt-honey tart with roasted peaches and topped with an array of peach ruffles.
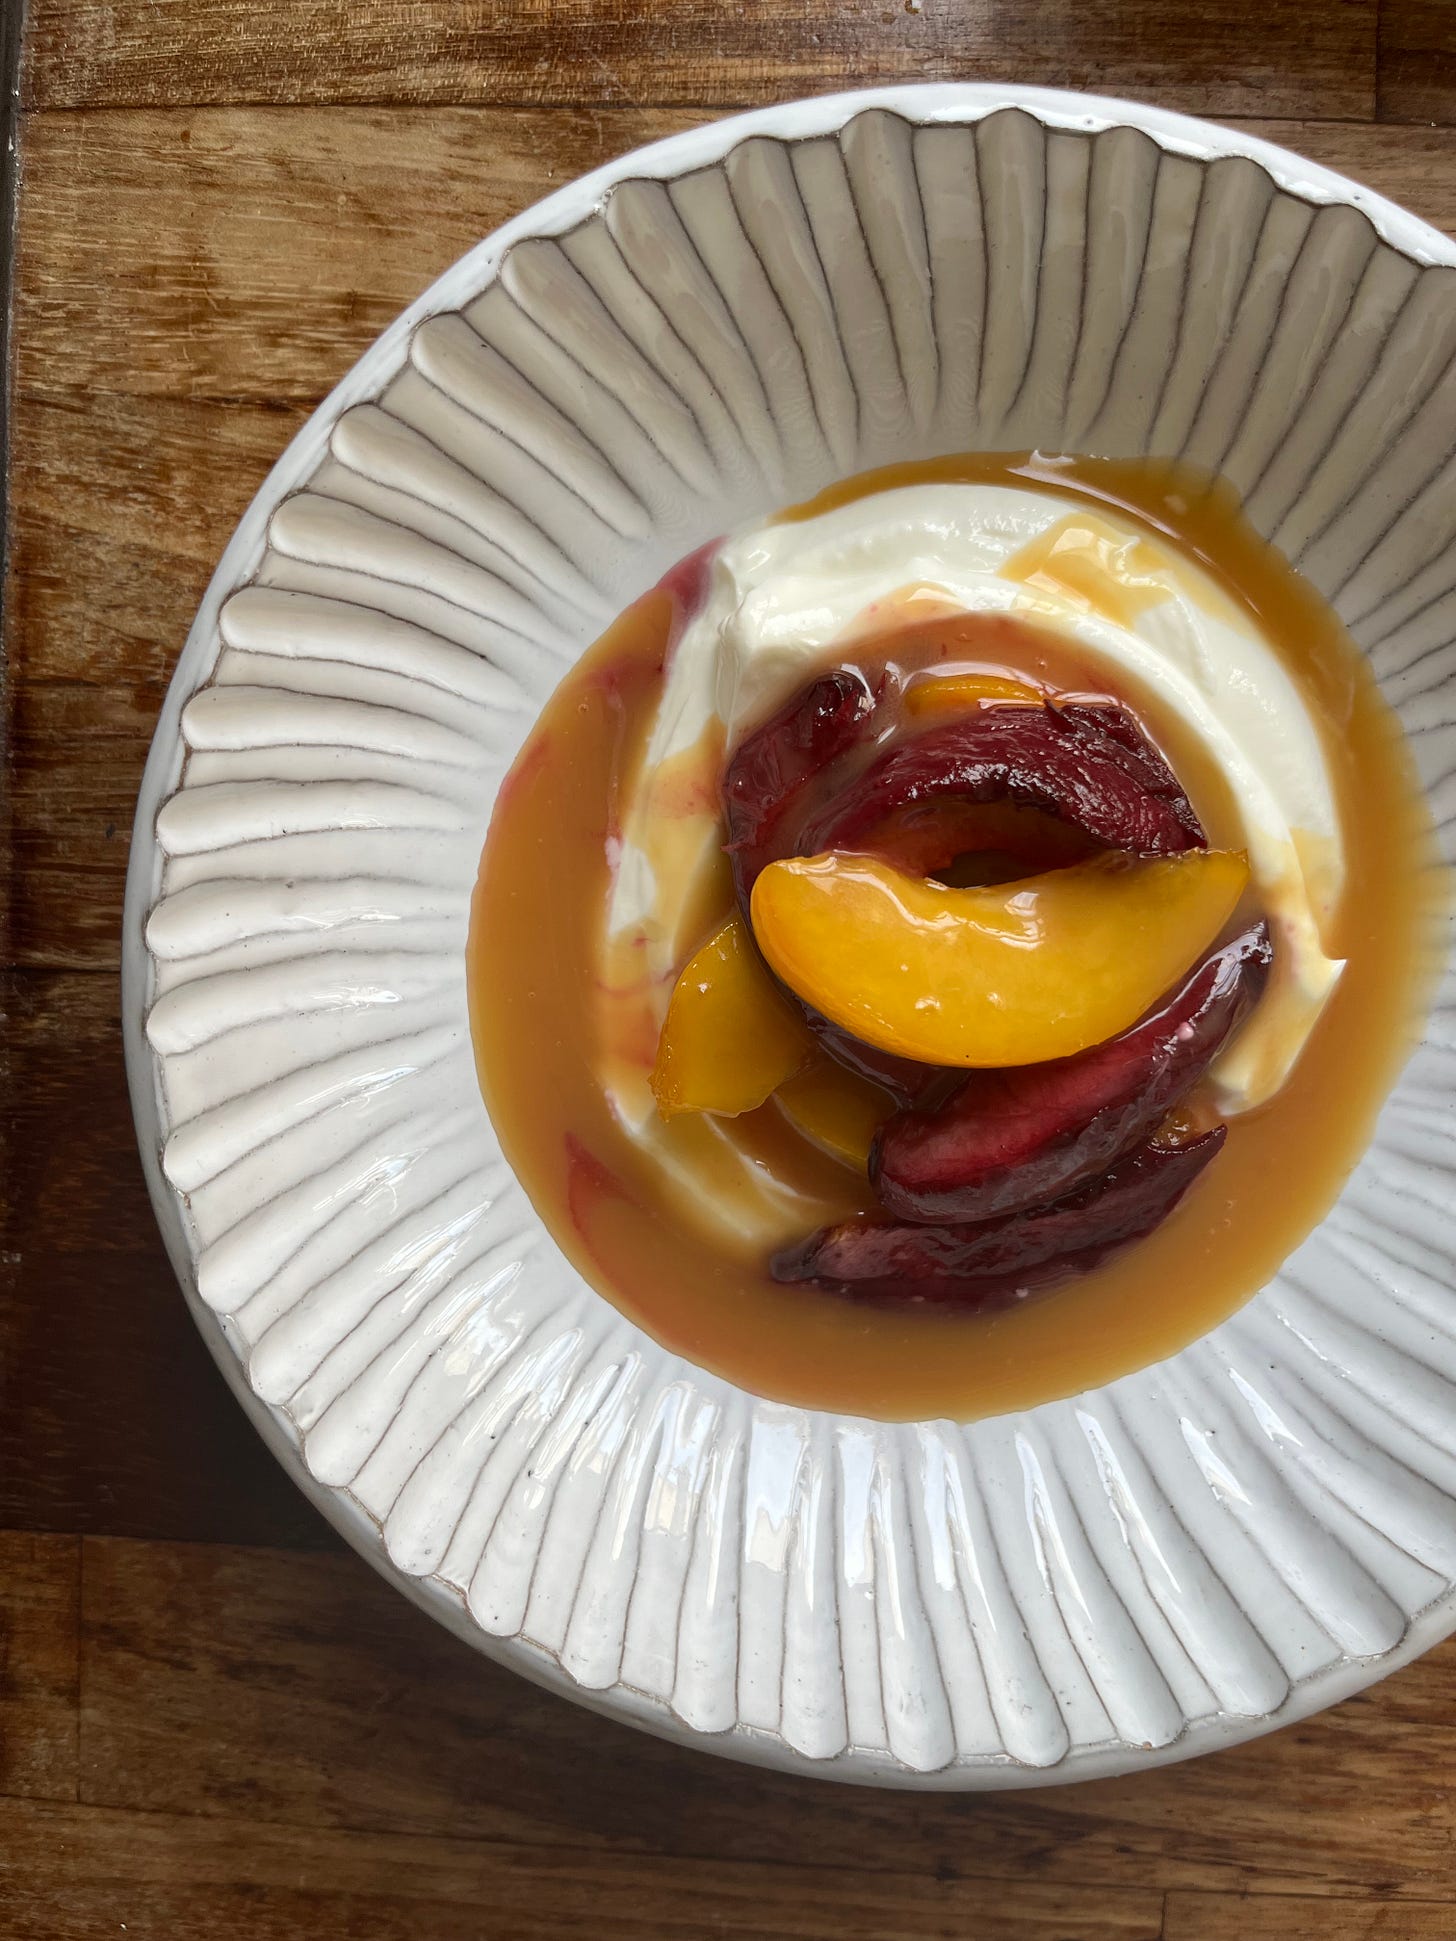
Over on KP+, I’m sharing my method for perfect poached peaches in a caramel, sweet wine and lemon verbena syrup - it’s outrageously good. Served on some thick yoghurt with a little of the sauce, it’s a stupidly simple rustic throw-together dessert:
Stone fruit forever
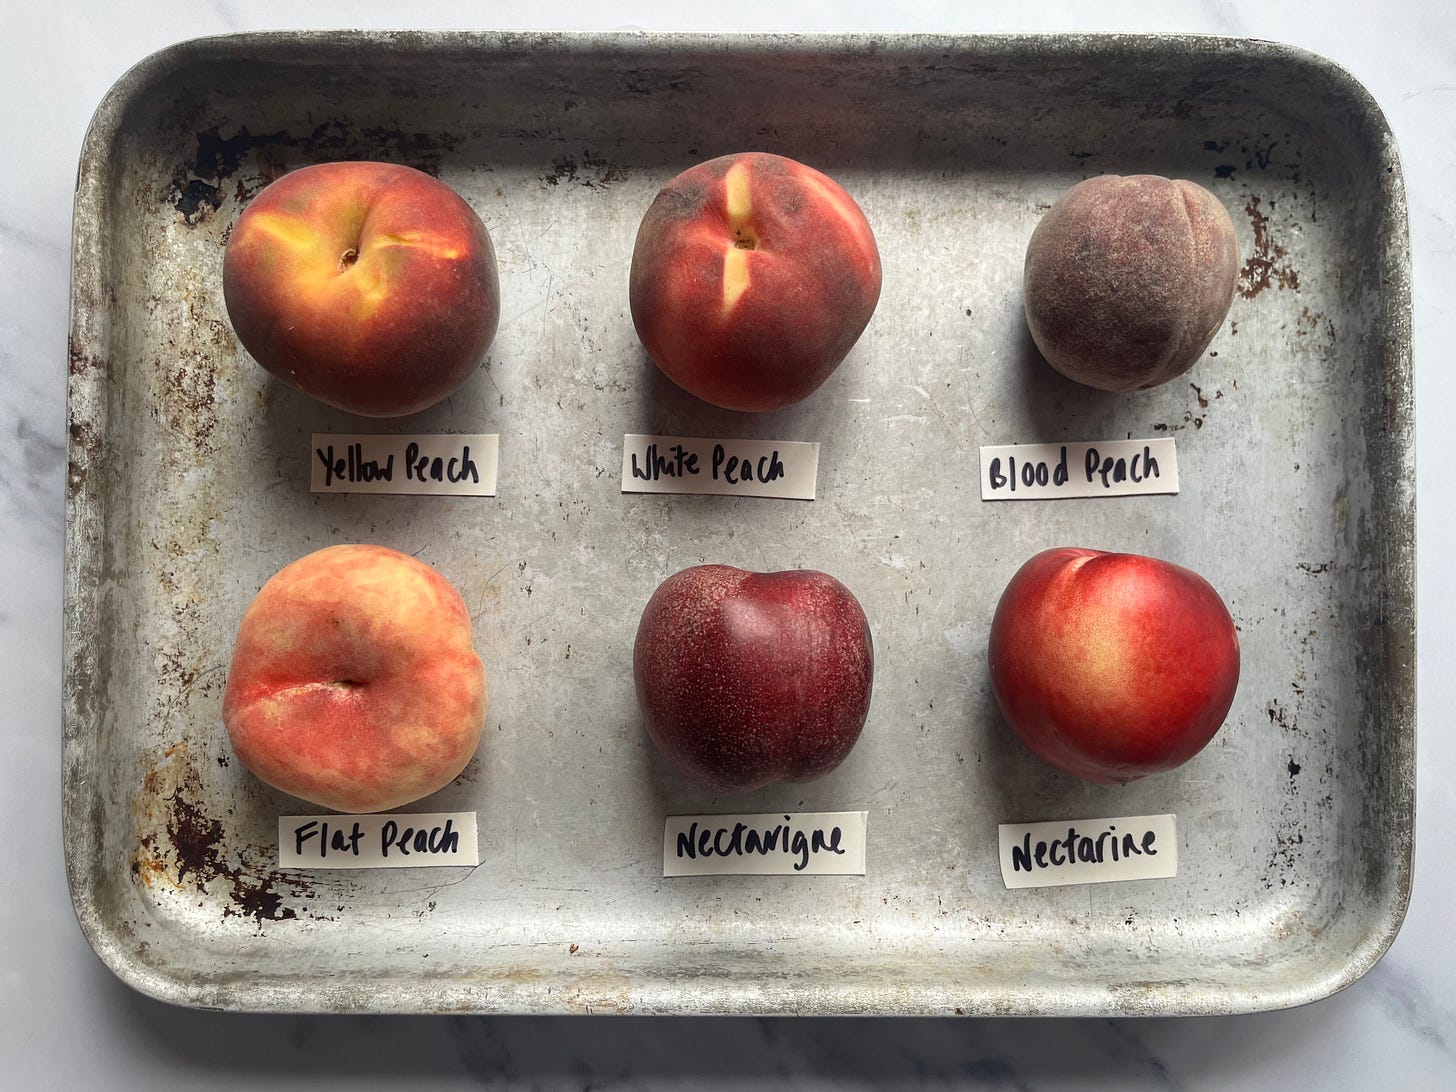
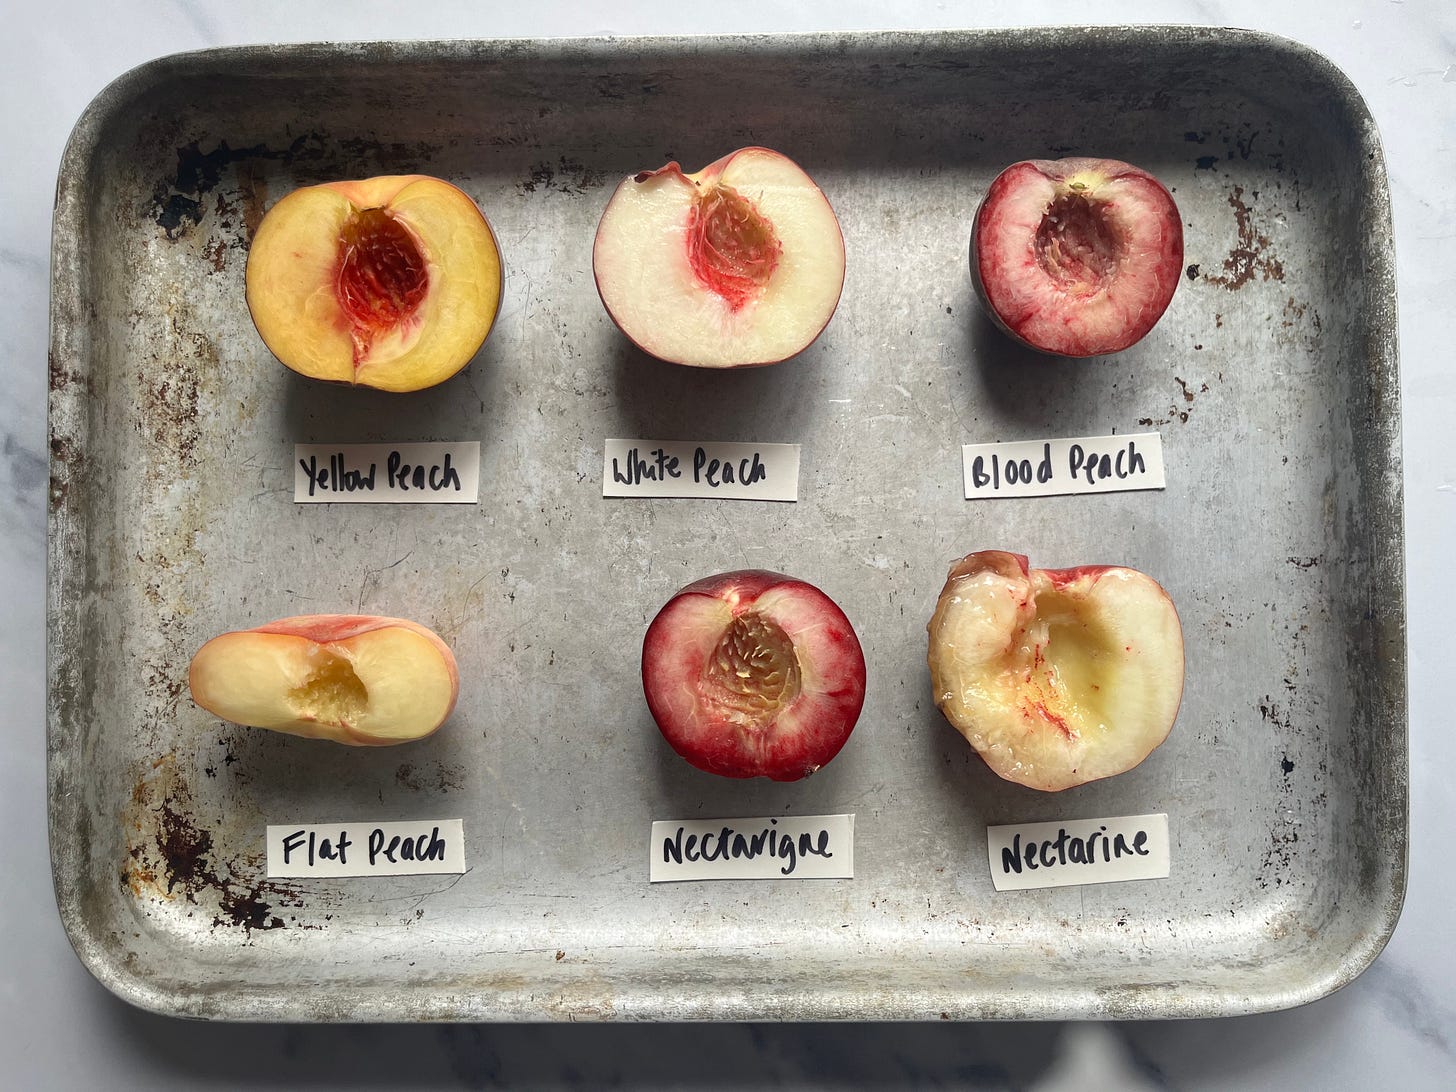
Oh stone fruit, how do I love thee? Let me count the ways… There’s just something about stone fruit that makes me want to make a fancy-schmancy tart. Now we are deep into summer (gulp, where did the year go?), we are in stone fruit heaven. European plums are cascading every shop I walk past, with some of the British varieties beginning to nudge their way in, too. The apricots are piled up like jewels - my favourites are the ones that are slightly blushing. And then, of course, we have whole families of peaches and nectarines. I bought all the varieties I could see at my local shop:
The reality is, that comparing each of these peaches/nectarines is difficult because stone fruit is so hard to judge on its own merit. So much of the experience is down to how ripe it is. AND as we’ll find out, there are a lot of fiddly marketing ploys in the world of peaches. There are a few commonalities we can rely on - white peaches tend to be less acidic and very sweet and mellow, whilst yellow peaches are more tart with a more robust flavour. As well as this, white peaches tend to have softer flesh and bruise more easily and are more delicate, making yellow peaches a better candidate for baking and processing. Lets run through them.
Peaches v Nectarines
One of the questions I always have but never investigate is what IS the difference between peaches and nectarines? Turns out it’s all about the fuzz. Fuzzy peach skin is the dominant gene in peaches - when the recessive gene comes into play, which results in a smooth, thin skin, you get a nectarine! Magic! Peaches and nectarines are so closely related that you’ll often find nectarines growing on peach trees and vice versa. There is such a thing, in New Zealand, called ‘Peacherines’ which is somewhere in the middle, though I think this is more marketing - the same species cannot really be crossed. I applaud the ad teams for trying.
Best eaten: Raw, poached or roasted - peaches are VERSATILE! The best treatment of peaches and nectarines is dependent on ripeness. For very hard fruit, try poaching. For slightly underripe to ripe fruit, roasting can really intensify the flavours. For perfectly ripe? Slice and enjoy!
As far as I can tell, the Nectavigne is a bit of a marketing ploy - also sold as a blood peach or blood nectarine. It has juicy red flesh with a sweet acidic flavour. It has dark plummy-looking smooth skin with speckles. This variety was founded over 250 years ago in vineyards in the Coteaux du Lyonnais in France; At the time, grape growers and winemakers would plant a peach trees in the middle of their vineyards. This tree would be a decoy for parasitic fungus - instead of attacking the vines, the fungus turned the susceptible peach trees into their home. As a result, the trees produced highly pigmented fruit as a result of the peaches producing more antioxidants to defend themselves from the parasites. What heroes!
Best eaten: Raw or roasted
Flat peaches are also known as doughnut peaches - they have smoother skin than standard fuzzy peaches but are not as smooth as nectarines. I personally think flat peaches have the best flavour - utterly floral and juicy and more complex than the standard peach.
Best eaten: Raw
The deal with pits
There are three ways to prep a stone fruit…. But which is best? Cutting down the seam/buttcrack seems to be the favourite, but, as my friend Talia pointed out, you can risk splitting the pit in half. If that worries you, cutting vertically or off-centre is also an option. If you want to do something to freak out your friends and colleagues, you can also cut horizontally around the equator of the fruit. But whatever method you choose, there may be other forces at play.
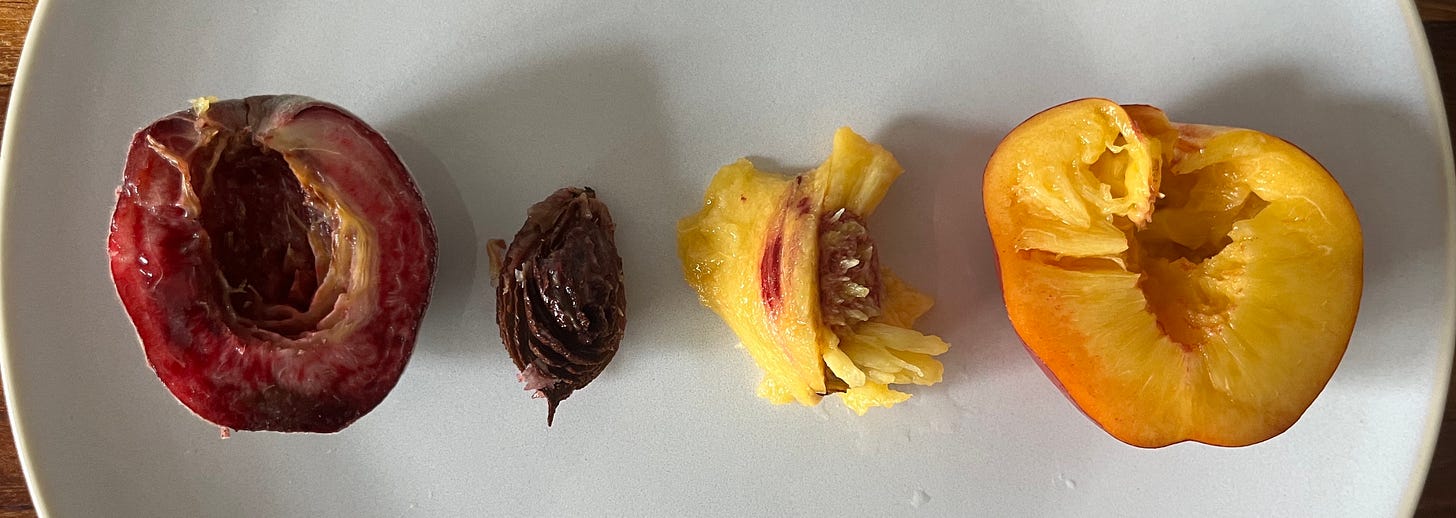
Ever driven yourself crazy wondering why on earth it seems so hard to get the pit out fruit-to-fruit?! Well, I’m here to let you know that it’s not your fault! One of the other varying factors of peaches and nectarines is whether the fruit is a ‘clingstone’ or ‘freestone’, meaning whether the flesh clings to the pit or whether it releases easily
Although you can’t tell from just looking at the fruit, clingstone fruit is harvested earlier in the season (May-August), whilst freestone fruit comes a little later and continues to be harvested later. Clingstone, apparently, is better for preserving whilst freestones are better for eating. Annoyingly, it’s pretty hard to know which you’re dealing with until they open! Chances are, though, the peaches and nectarines you and I are used to buying come somewhere in the middle. Not to back the wrong horse, supermarkets in the UK are most likely to stock ‘semi freestone’ peaches which are somewhere in the middle. So, don’t get frustrated - it's not your fault!
Cooking stone fruit
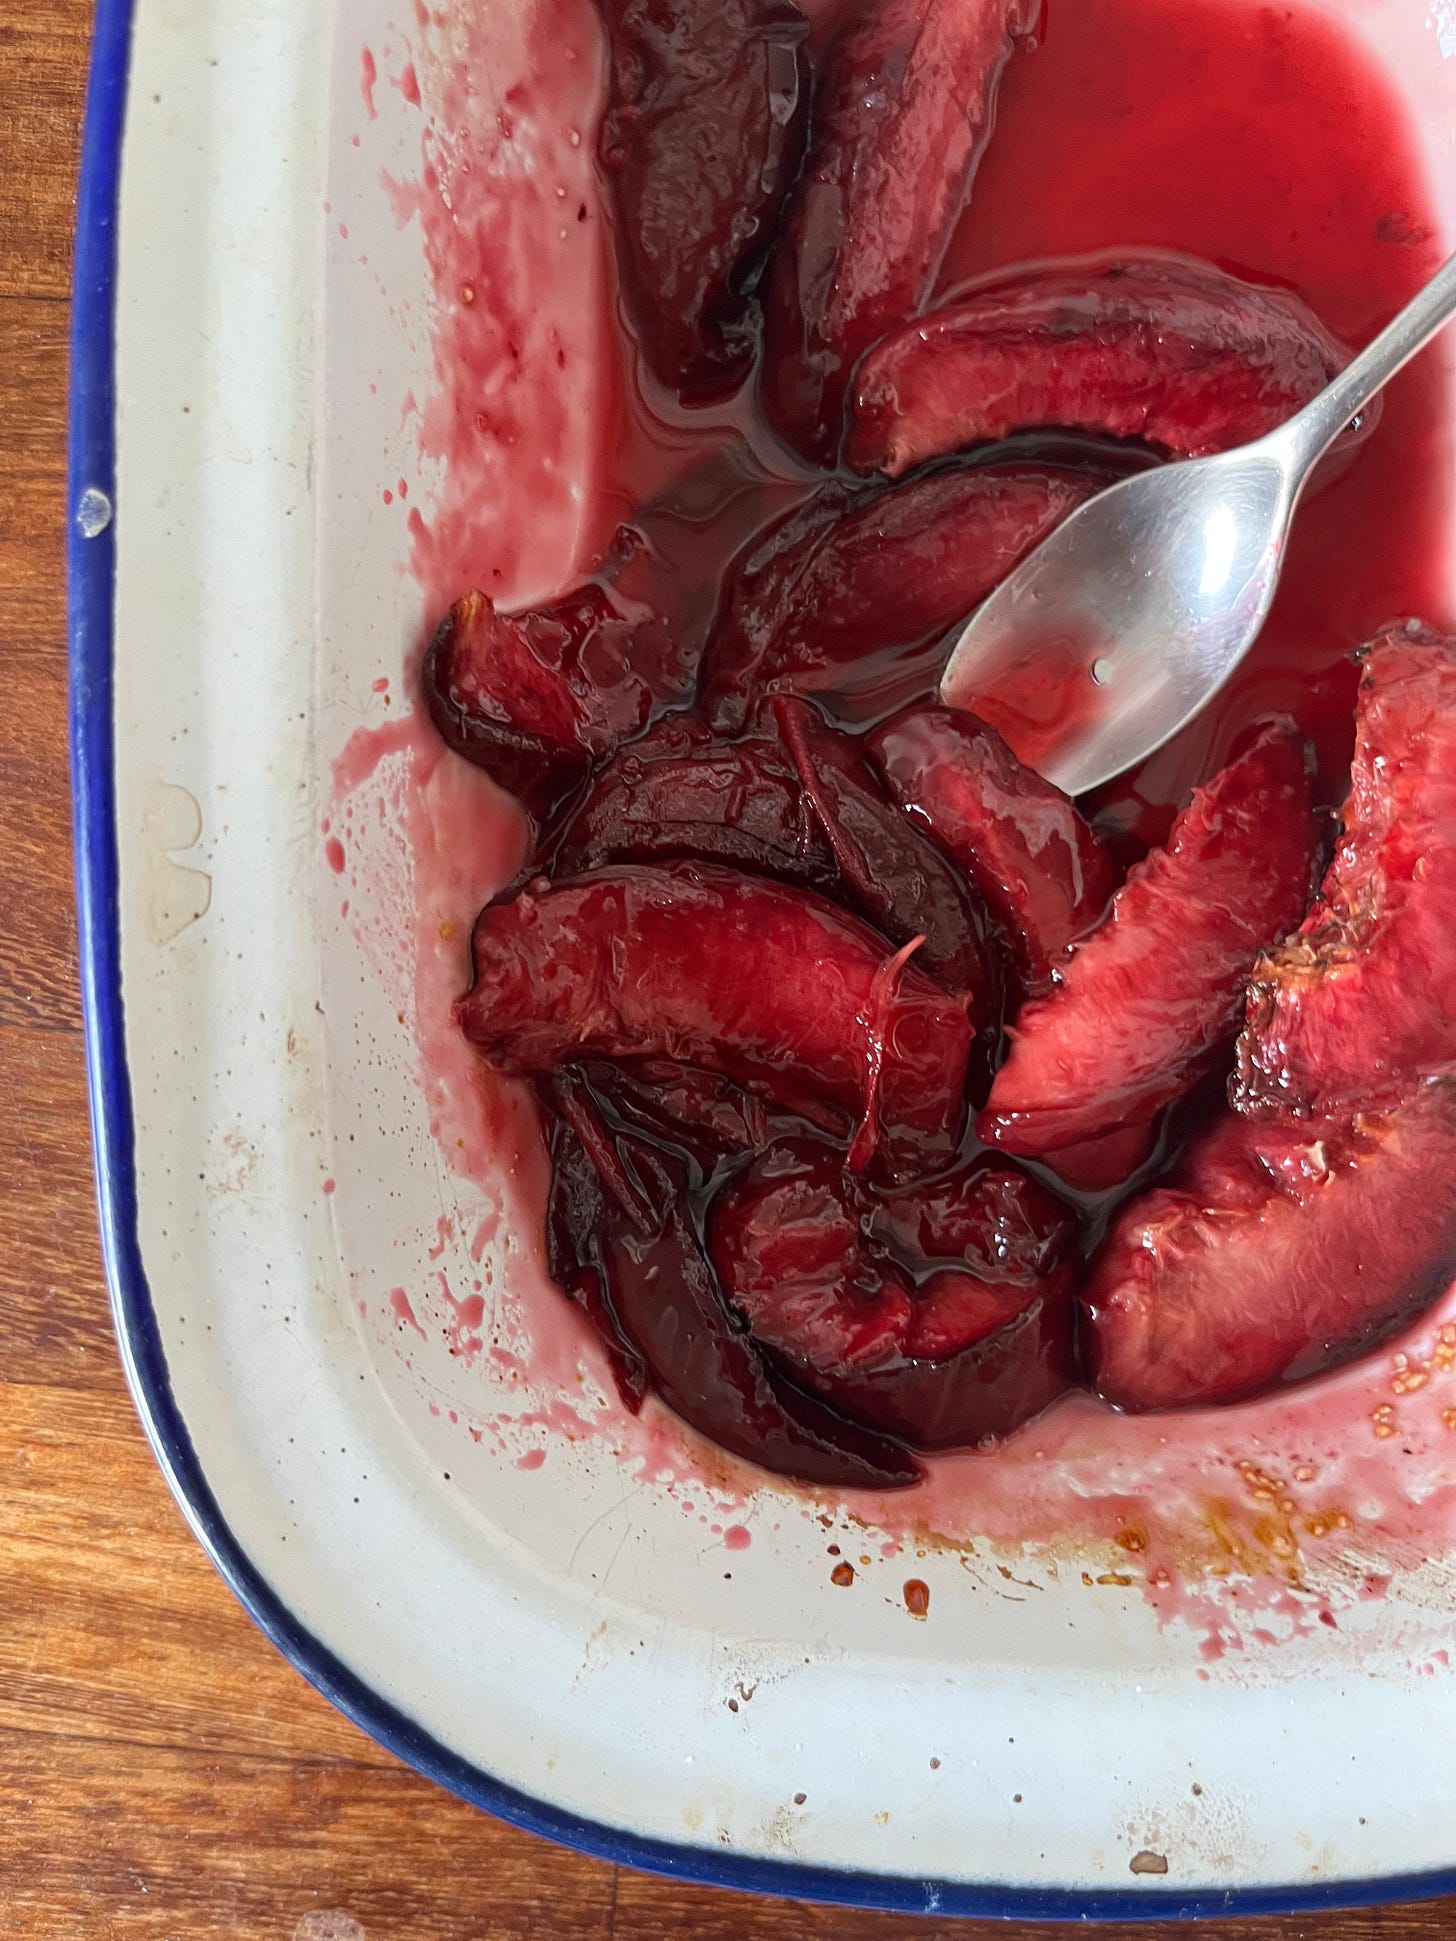
One of the best things about stone fruit is the sliding scale of textures and flavours that can be achieved and imparted through cooking. Lately, I’ve enjoyed using a mixture of fresh and cooked fruit - it helps create different dimensions in desserts. For today’s recipe, we will be roasting the peaches for the base of the tart. To ensure you get some nice caramelisation on the peaches, it’s best to go HOT! At least 200c for a short, firey burst of heat. I’ll talk you through it in the method.
To learn about how to poach peaches, check out KP+ now.
Let’s get onto the tart!
Peaches on peaches on peaches
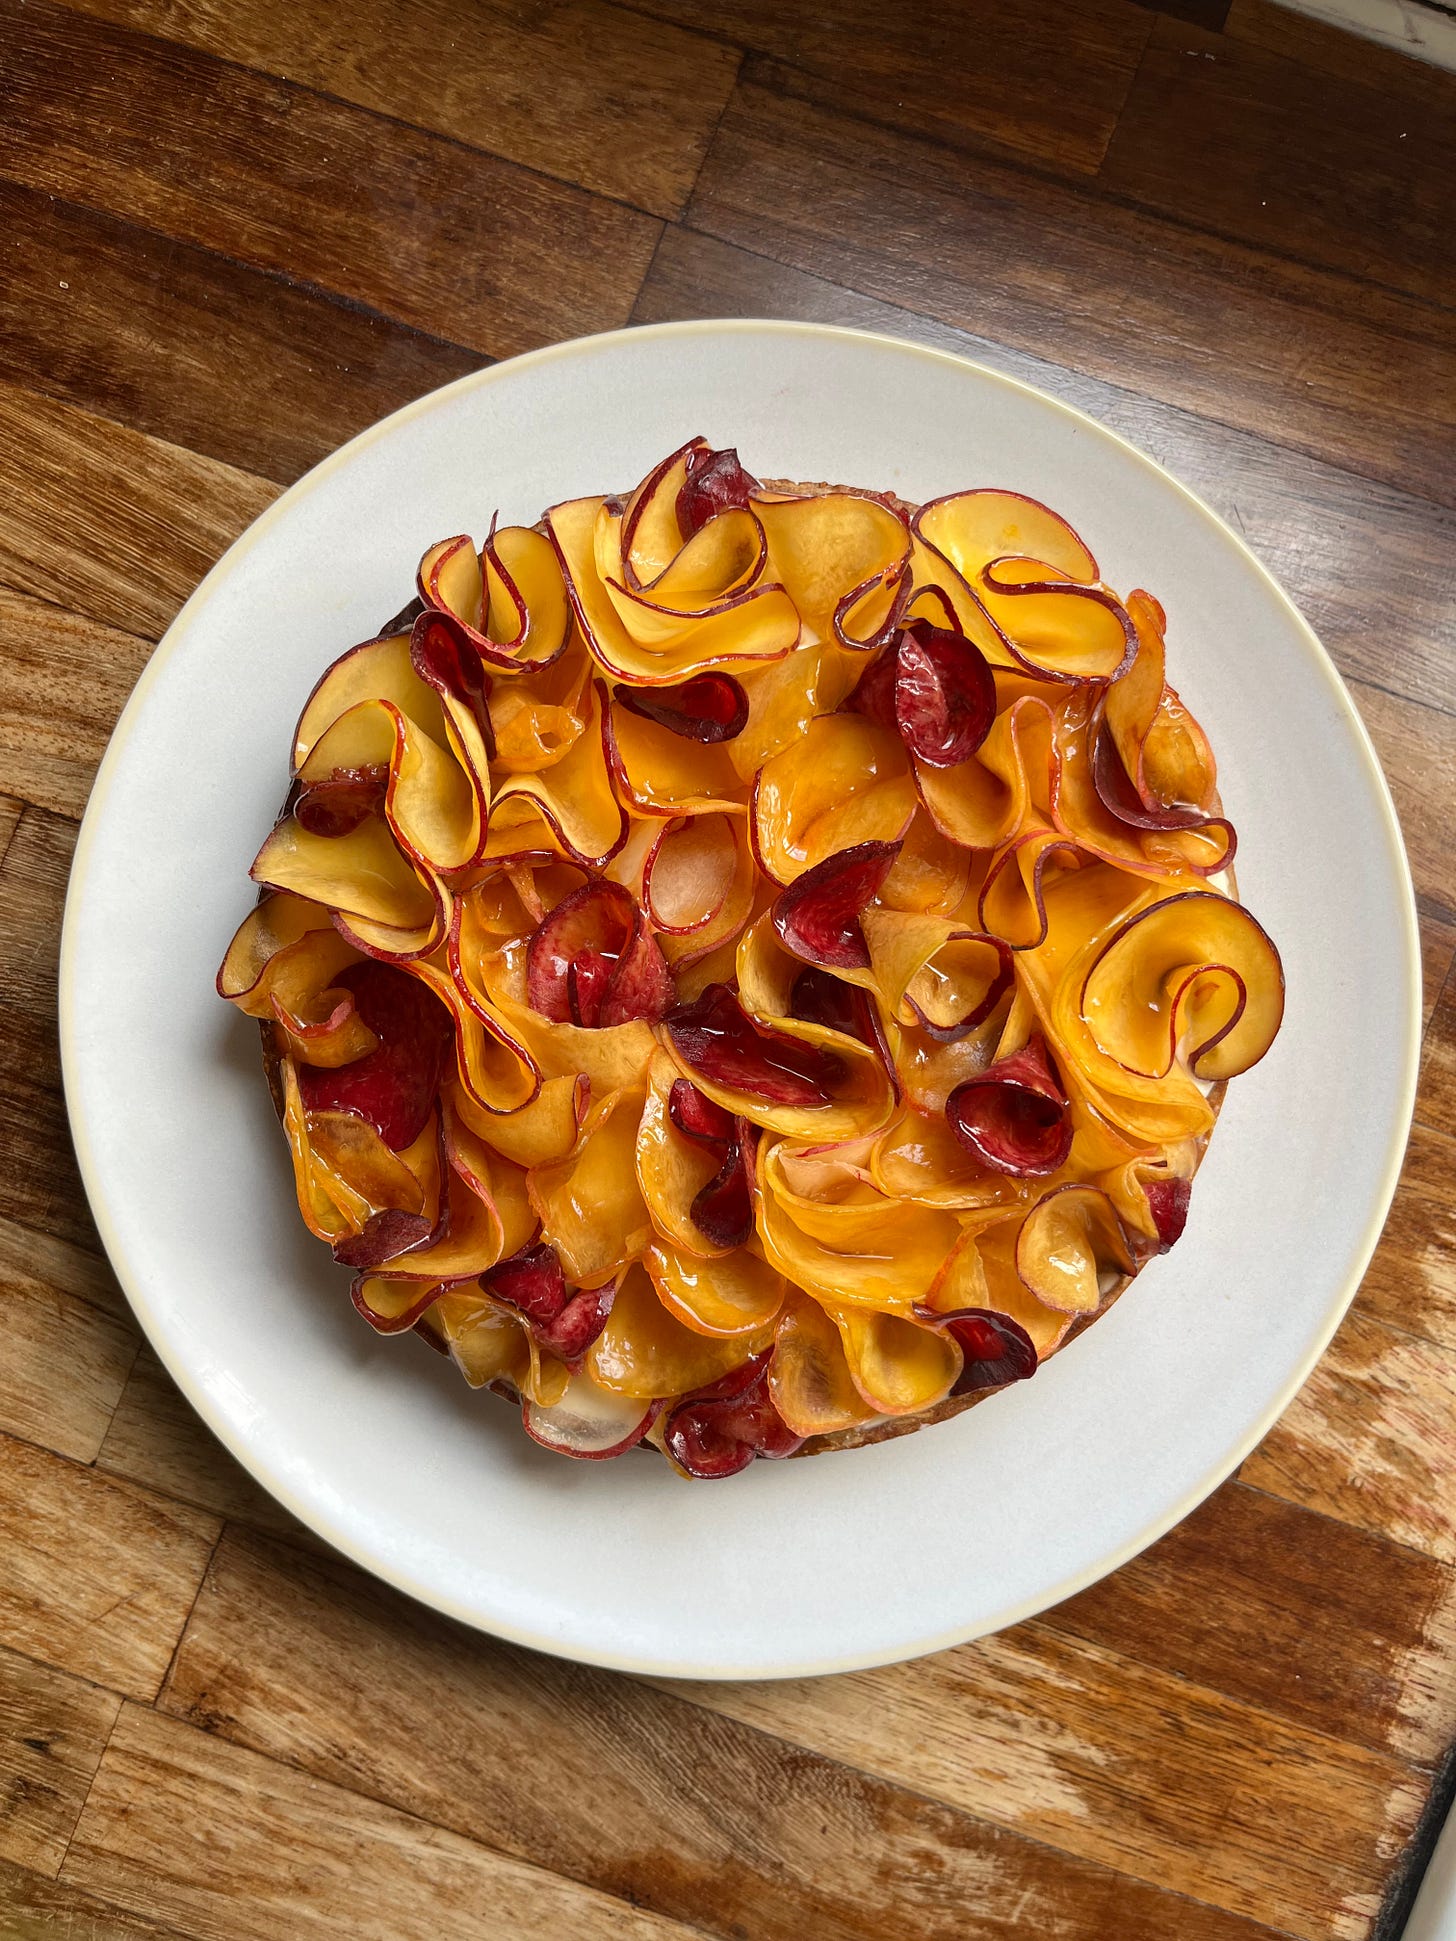
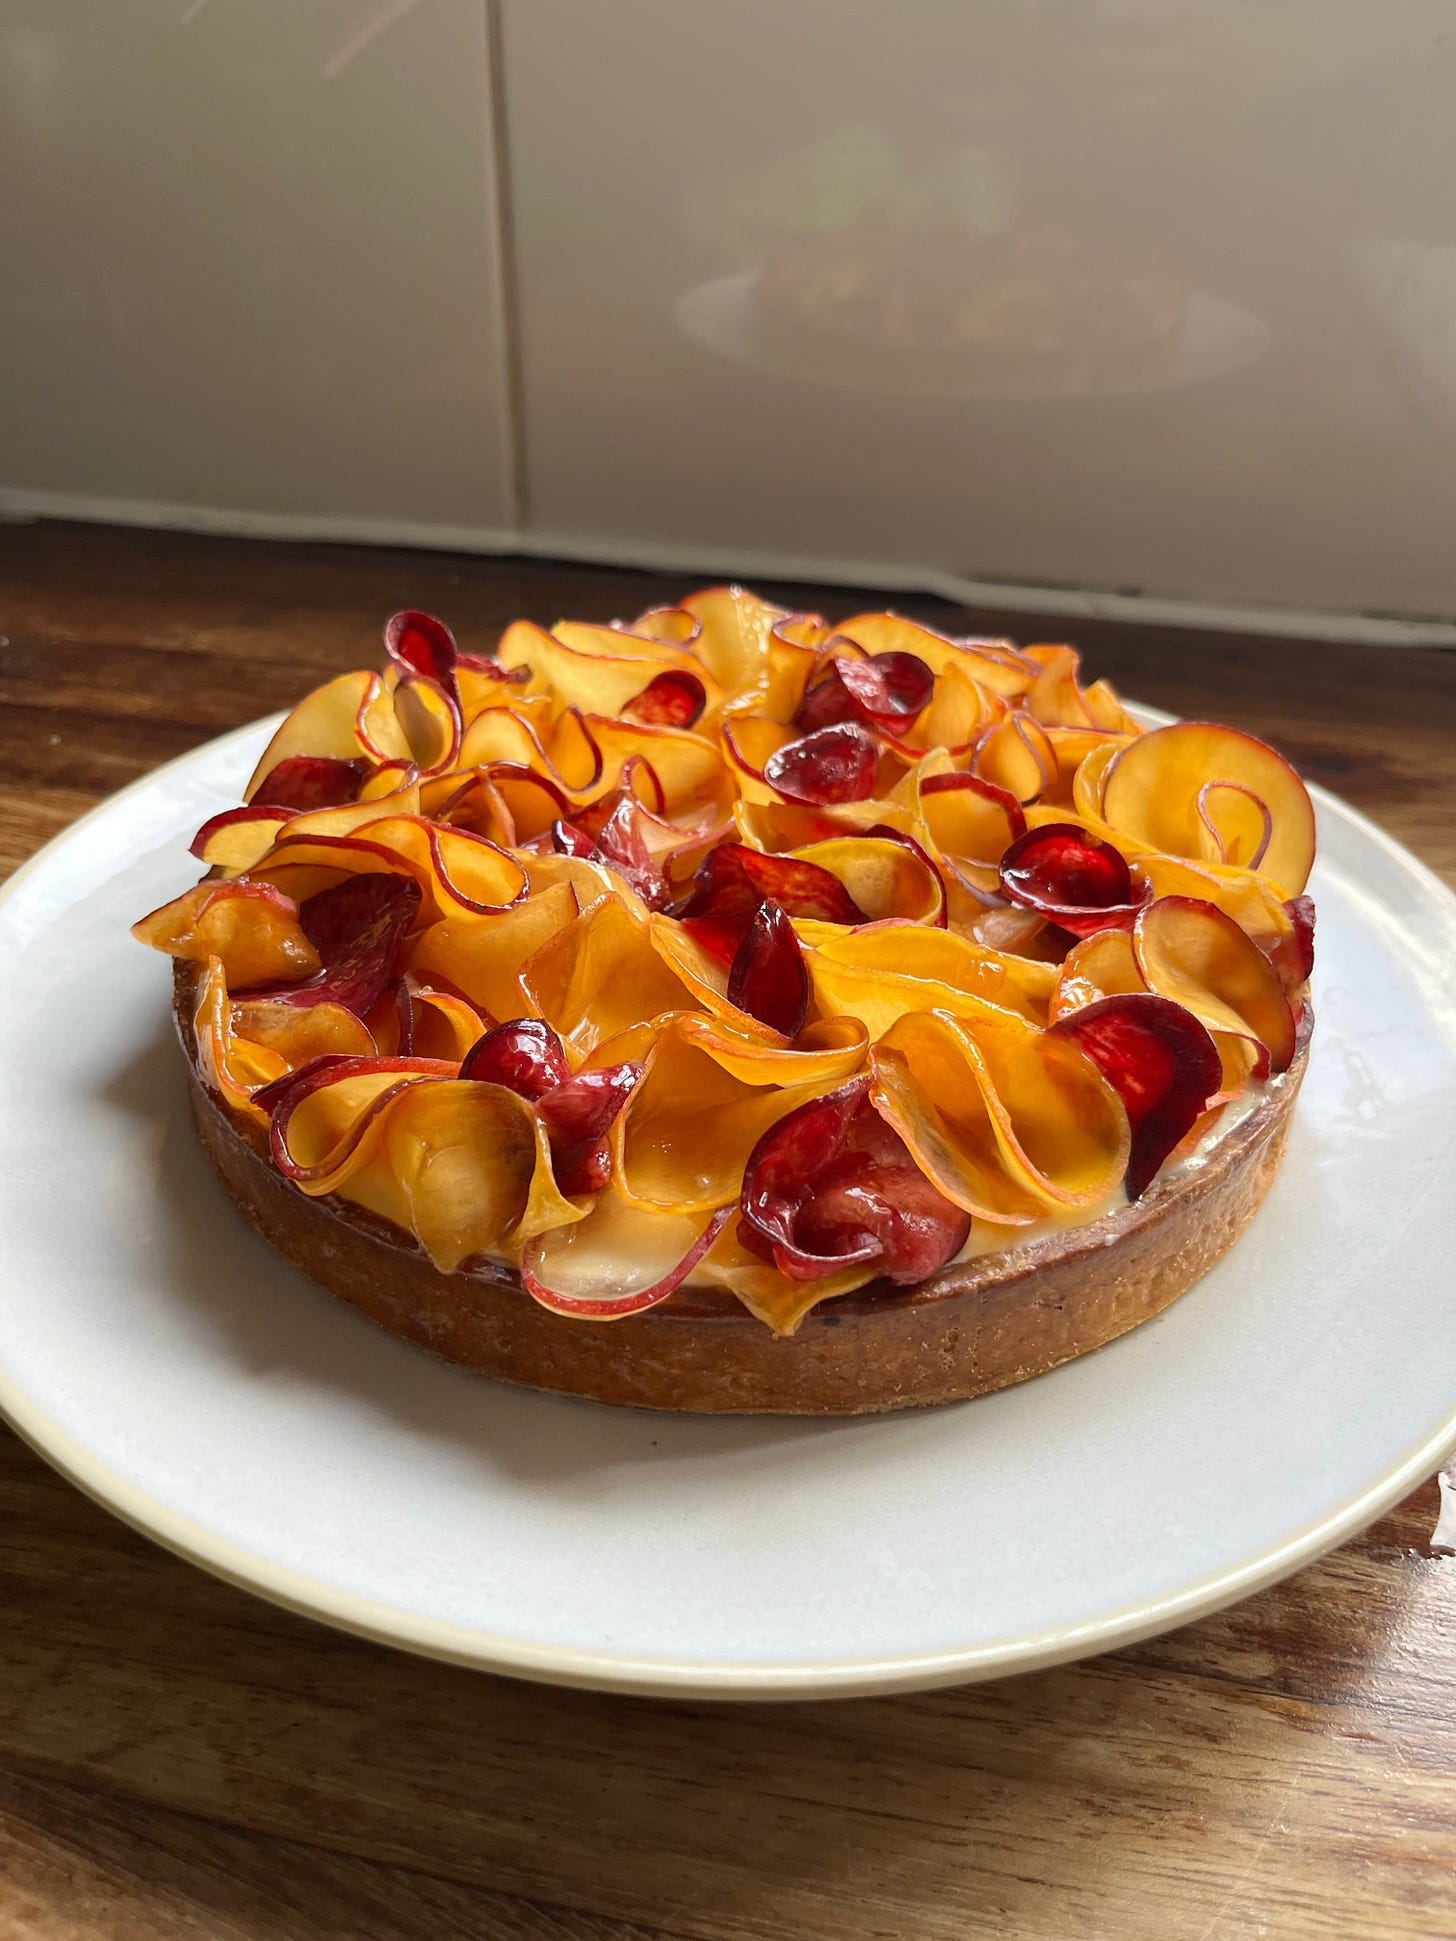
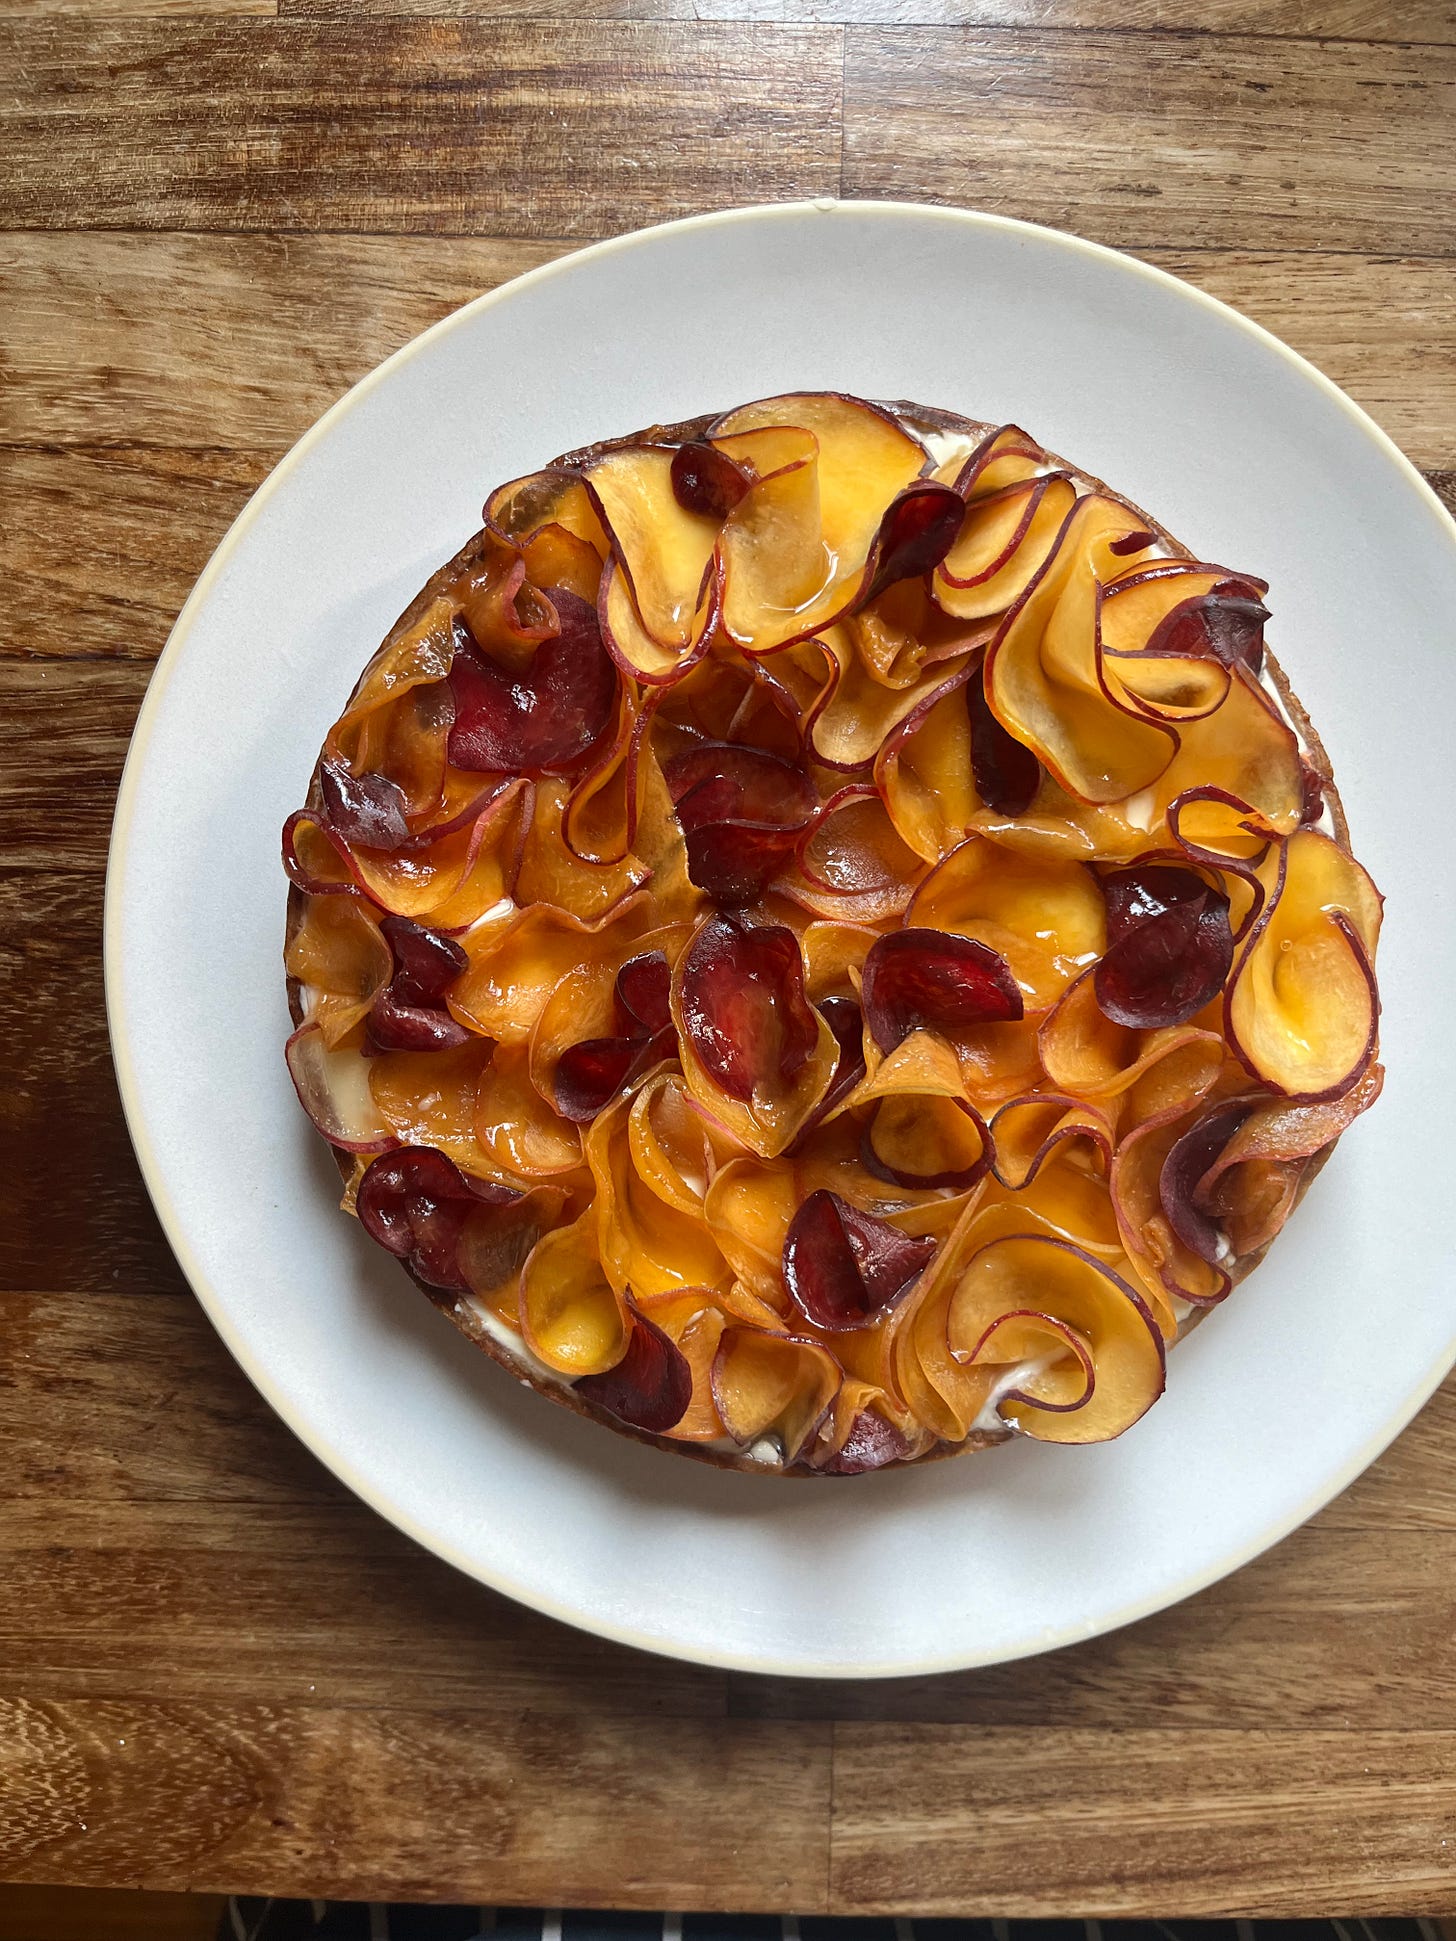
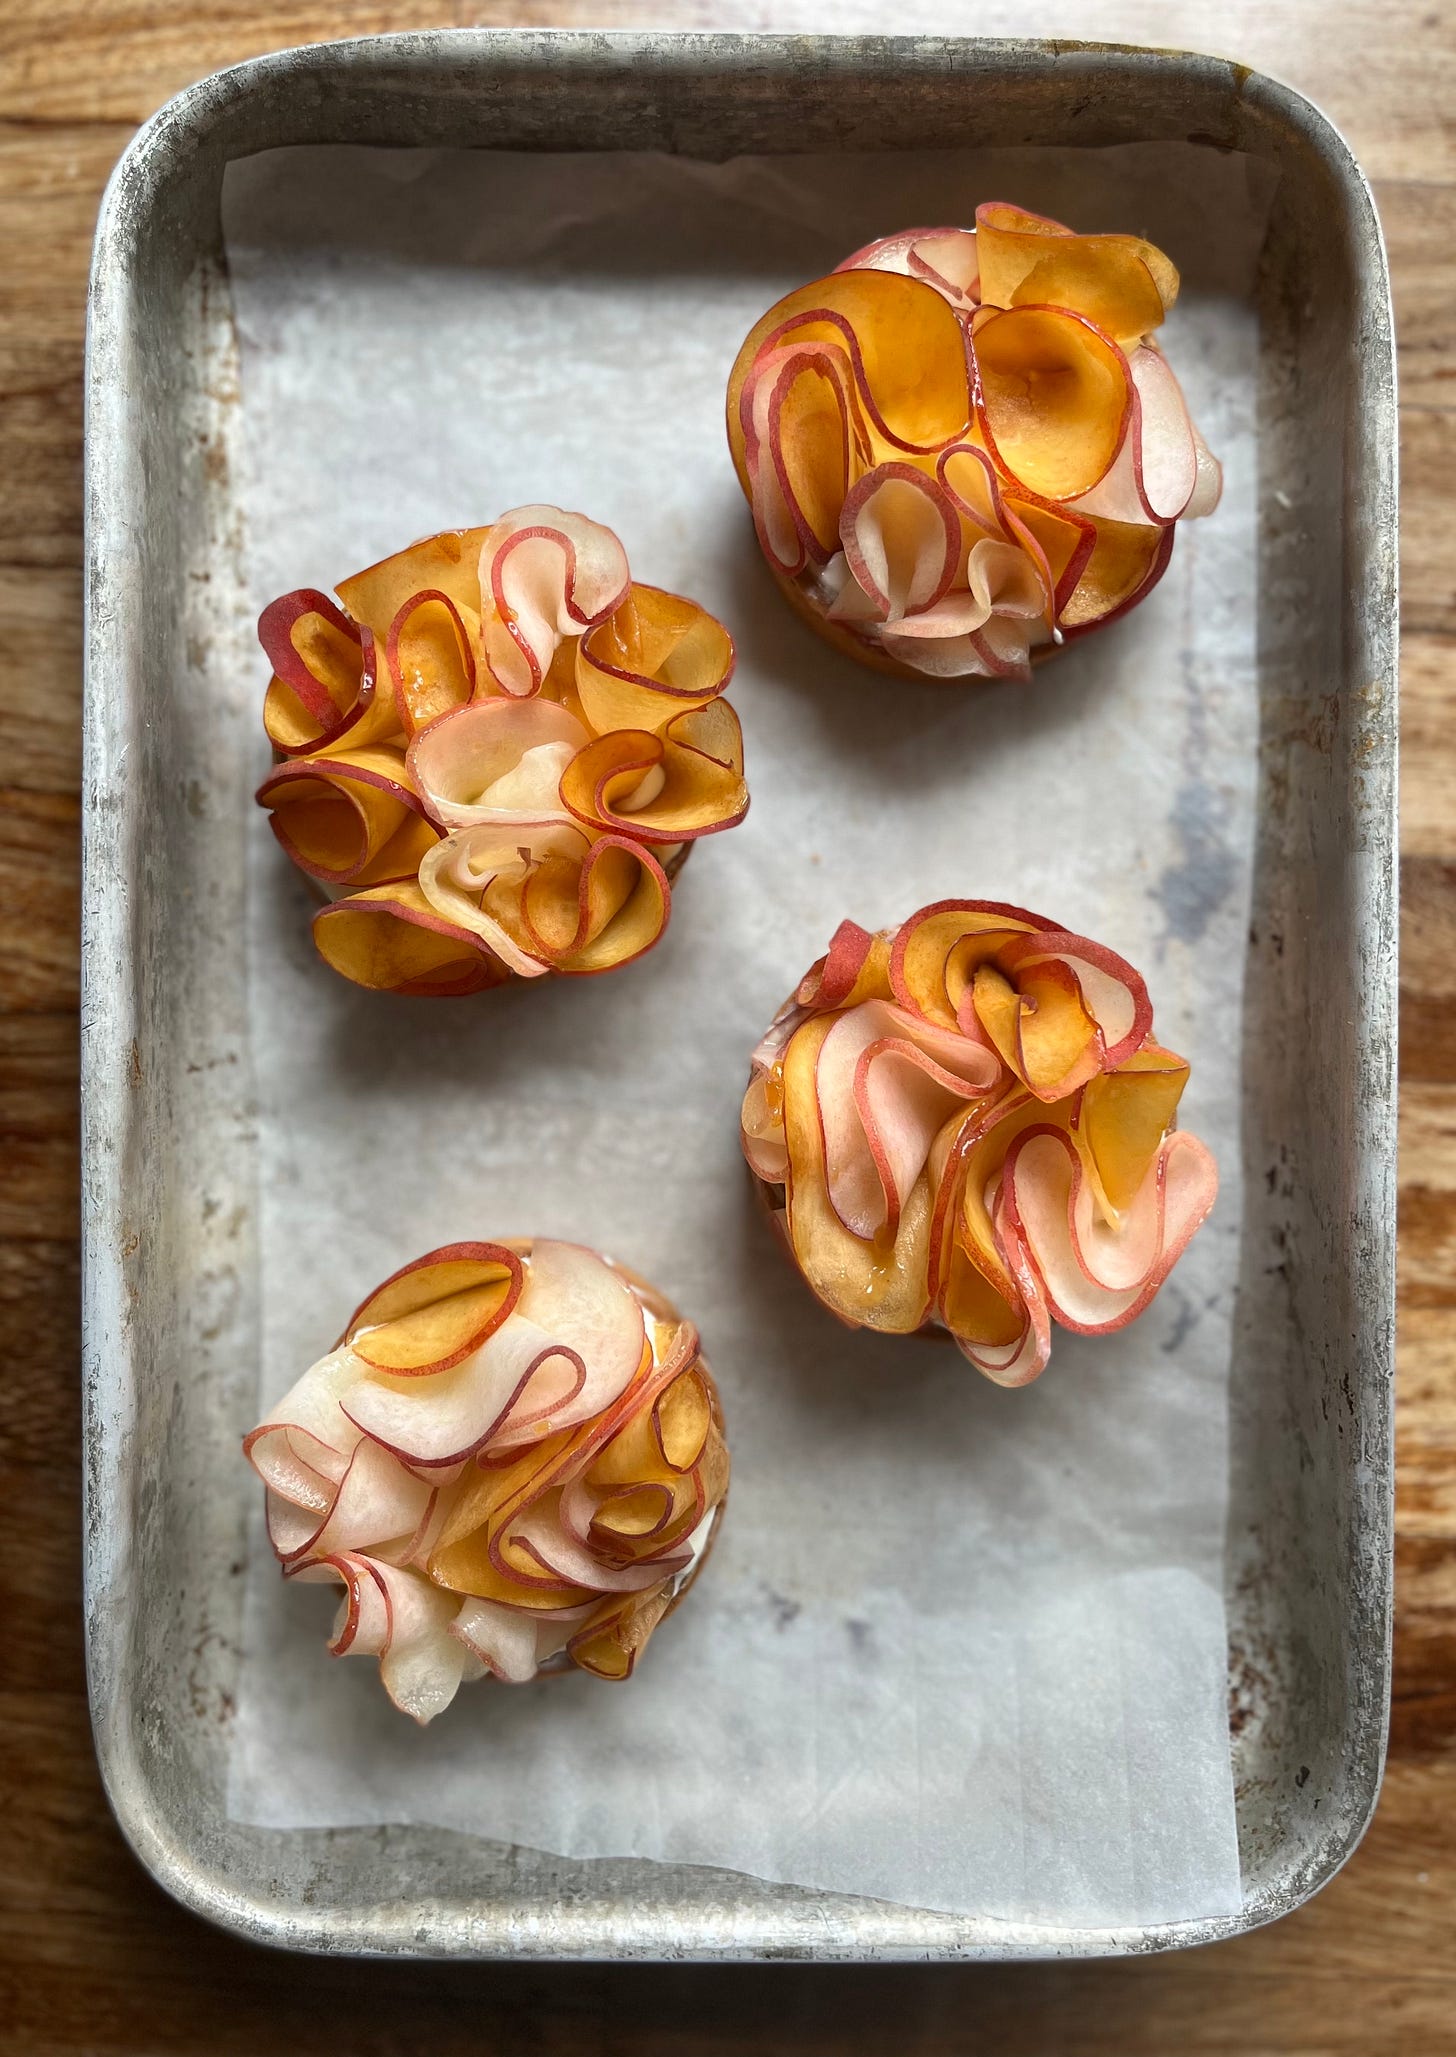
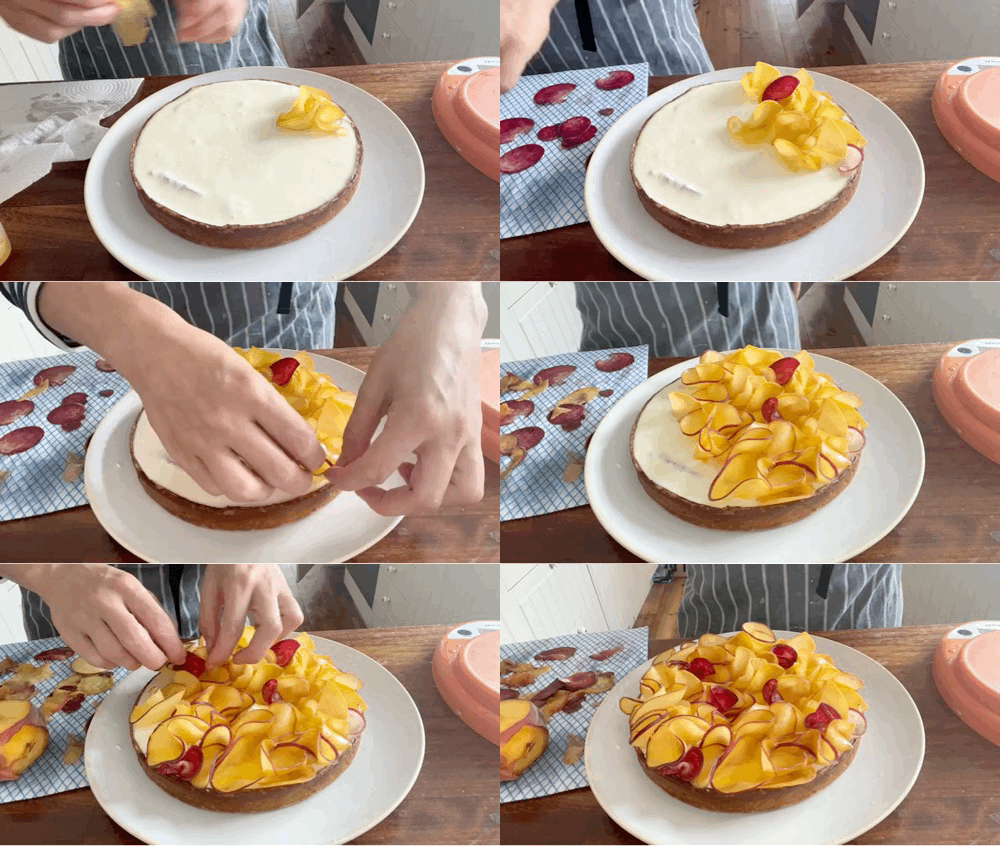
There are plenty of ways to decorate a tart, but I fell in love with the ruffled look of this week. Really easy to do, but looks posh! You need to use a mandolin or a very sharp knife & even hand to make nice slices that can be bent and wiggled into different angles. I initially thought that soaking the fruit in lemon juice and water might help prevent the slices from oxidising and browning, but soaking the fruit in water actually seemed to shock the fruit; Instead of curling nicely, the fruit snapped really easily. The best thing to do is cut the fruit and briefly lay it out on a clean kitchen towel, kitchen roll/paper or a j cloth to absorb any OTT juiciness.
After decorating this tart, my first thought (after woooowwww, this is beautiful!) was ‘this will look awful tomorrow’. So, I left it overnight to see. Amazingly, it still looked pretty great. Sure it wasn’t quite as perky, but it far exceeded my expectations. However, if I had to choose between serving it within a few hours or waiting overnight, I would definitely opt for decorating the tart as close to serving as possible.
The pastry
When I first shared the recipe for ‘go-to tart dough’ back in April last year, I really meant it! This tart dough is reliable, NEVER SHRINKS and can be adapted to suit your needs. I really hope you have the confidence to try adjusting it for yourself. Below you can compare the original and the oat version today:
The most manageable area to play around with is the almond meal quantity - in a 500g batch, this is about 30g. I felt that wasn’t going to be enough oaty joy, so I simply ‘borrowed’ some of the flour weight and gave it to the oats. Although flour has many vital roles in this pastry - its gluten-forming abilities are essential in making it homogenous and ‘stick together’ - flour is a ‘bulker’, so you can play around with the quantities a little bit - as you can see, the oaty dough has 7% less flour overall, which is well within a safe margin of adaption. As a rule of thumb, I would say changing up to 15% would not have a negative effect on your dough.
Setting the cream
To be true to my holiday breakfast inspiration, the cream for today’s tart is incredibly simple - equal parts thick yoghurt and cream, with honey added to taste. The result is a luscious cream that tastes like ULTIMATE yoghurt - still tangy but outrageously rich. You will have to stop yourself from eating it all. The cream itself also takes about 30 seconds to whip up - yes, this is about 25 seconds more than if you were just to spoon yoghurt into a bowl and eat it, but it’s worth it.
The problem with this mixture, though, is… it weeps. At room temperature, I found the cream and yoghurt begin to break down as it warms up, spilling watery whey. It comes back together with a quick whip, but this isn’t very helpful when it’s in the base of your tart. I was loathed to change this recipe into a cooked custard which would be more stable but would take away the essence of the tart, so I’d have to figure out a way to deal with the whey.
If you aren’t familiar with whey, it’s the protein-rich liquid that is naturally occurring in milk. When milk is cultured, i.e. turned into yoghurt with bacteria, a genuinely brilliant magic trick, the whey is suspended in the mixture. If the mixture splits or breaks, the whey is released. Some yoghurts contain stabilisers that ‘hold’ all of the water and prevent any unsightly leakage, but I prefer using natural products. As well as this, many greek-style yoghurts are hung for that thick texture - when hung, whey weeps out, and the yoghurt gets more solid. If you keep on hanging it, you get labneh! (see here for Jordon’s method for labneh)
So, although the cream is stable in the fridge, what about if you’re planning to hold it for longer or aren’t quite sure of your serving plan? Hi, gelatine, old friend.
Using gelatine
You absolutely do not need to use gelatine in this recipe - if you’re not planning on holding the tart at room temp for any time at all, and it’s pretty much going from fridge to mouth, and you’re making it on the same day as you’re eating it then you can ignore this whole section. But if, like me, you just want a little bit of an insurance policy… then let’s talk gelatine.
Creams and mousses made without chocolate are generally stabilised by the addition of gelatine. If you buy a fancy french pastry recipe book, gelatine seems to feature on almost every page. This is because gelatine brings long shelf stability for creams and foams. But how?
Let me tell you: Gelatine is a protein and is made up of chains of amino acids. The thing about amino acids? They are BFFs - like, they are obsessed with each other. At room temperature, they stick together in a strong formation. When you add gelatine into a hot liquid, it warms up the bonds loosen between the amino acids and move away from each other. As the amino acids break apart, they create bonds with other liquids, and the proteins are dispersed throughout the liquid. As the liquid is cooled, the BFF amino acids seek each other out again and create a formation. Only this time, other things are trapped within the mesh - this is what a gel is. If you reheat the gel, it will become liquid again and can be reset multiple times.
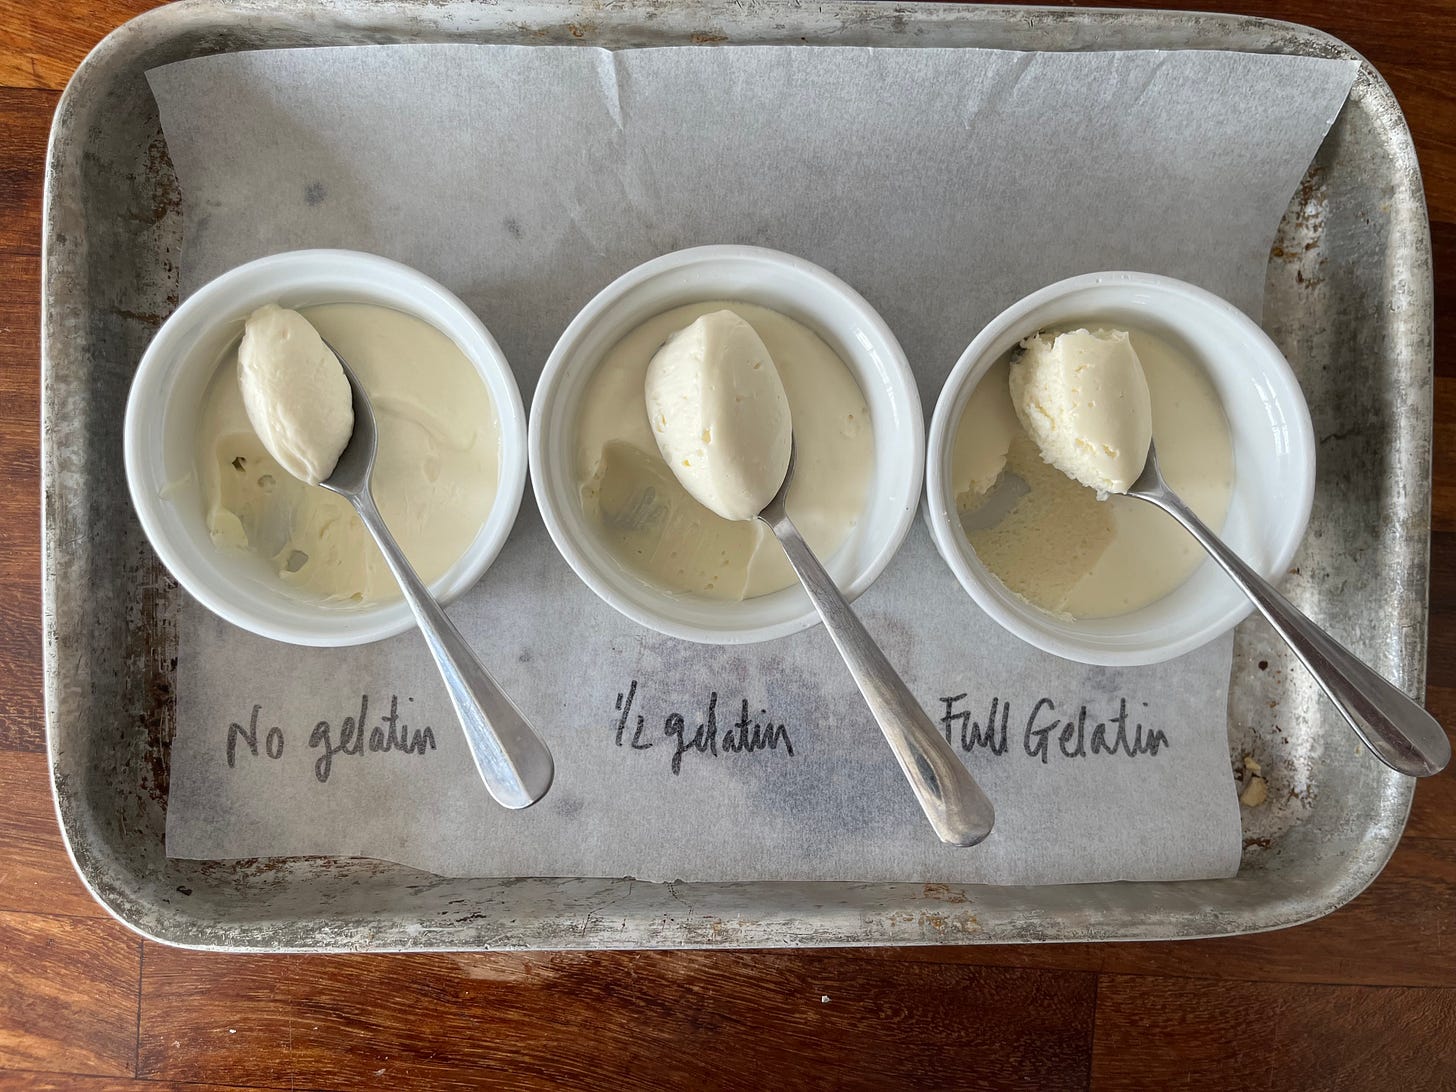
So, if we do use gelatine… How much? As I learned from previous Kitchen Projects, the guide on the back of the packet is not always that useful and setting water or fruit puree is different than setting a fattier mixture, like our yoghurt cream. And, since every mix I call on gelatine for is different, the best way - always - to test is by mixing up a few ratios. The full amount of gelatine was 1.5 leaves per 300g. The half amount is 0.75 leaves per 300g:
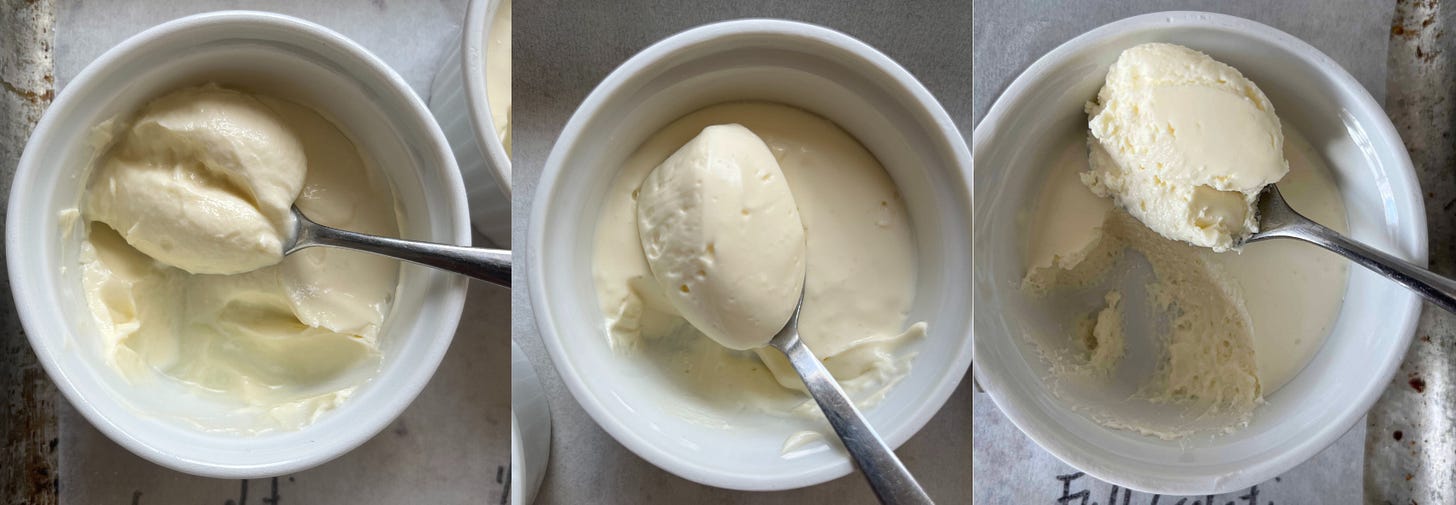
As we can see, the mixture on the left, with no gelatine, is dense and creamy after 2 hours in the fridge. The middle mixture, which has a small amount of gelatine, tastes almost the same. The mixture on the right has become moussey in texture - it is stiff but pleasantly airy. I prefer the middle and left-hand mixtures, but the real test is its staying power at room temperature. Here are the mixtures after 1 hour:
The no gelatine mixture has weeped. The small amount of gelatine mixture has held very smooth and firm. The full amount of gelatine mixture is unchanged. Anything beyond two hours, the mixture with the small amount of gelatine had weeped a bit. BUT it’s inadvisable - gelatine or not - not to leave this out for longer than an hour anyway!
The final verdict: It’s not necessary, but the small amount of gelatine was very helpful. Use it if it suits your diet, but no sweat if not!
A note on sheet gelatine
Gelatine remains a murky topic due to its seemingly endless variations (Powdered? Leaf? Bovine? Fish? Bronze? Platinum? ARGH!) and the inconsistency of its notation throughout pastry books. Some pastry books refer to sheets by number (but what size?), and some books will refer to sheets by weight.
Both of these have problems - let’s start with sheet size: Gelatine sheets in professional kitchens are double the length of those sold in supermarkets. Some fancy pastry books don’t take this into account. So annoying.
Let’s talk about weight: Sheet gelatine comes in many different blooms: titanium, bronze, silver, gold and platinum. These ‘blooms’ represent different strengths and qualities (namely clarity), titanium being the ‘weakest’ and platinum being the ‘strongest’. So, you need more bronze gelatine to set the same amount of liquid as you would need gold gelatine.
Somewhat confusingly, four sheets of bronze will set the same amount of liquid as four sheets of platinum. This means you can generally swap like-for-like between the blooms when you’re using sheets without any serious issues. WTF right?
This is because the sheets are actually produced at different thicknesses - pretty imperceptibly to the eye, though. However, if you were to weigh them, you’d find that the bronze weighs about 30% more than the platinum. It’s due to this difference in weight that gelatine sheets are actually interchangeable since the weight of a bronze sheet is larger than that of a gold sheet, even though they look the same.
Additional insurance policies
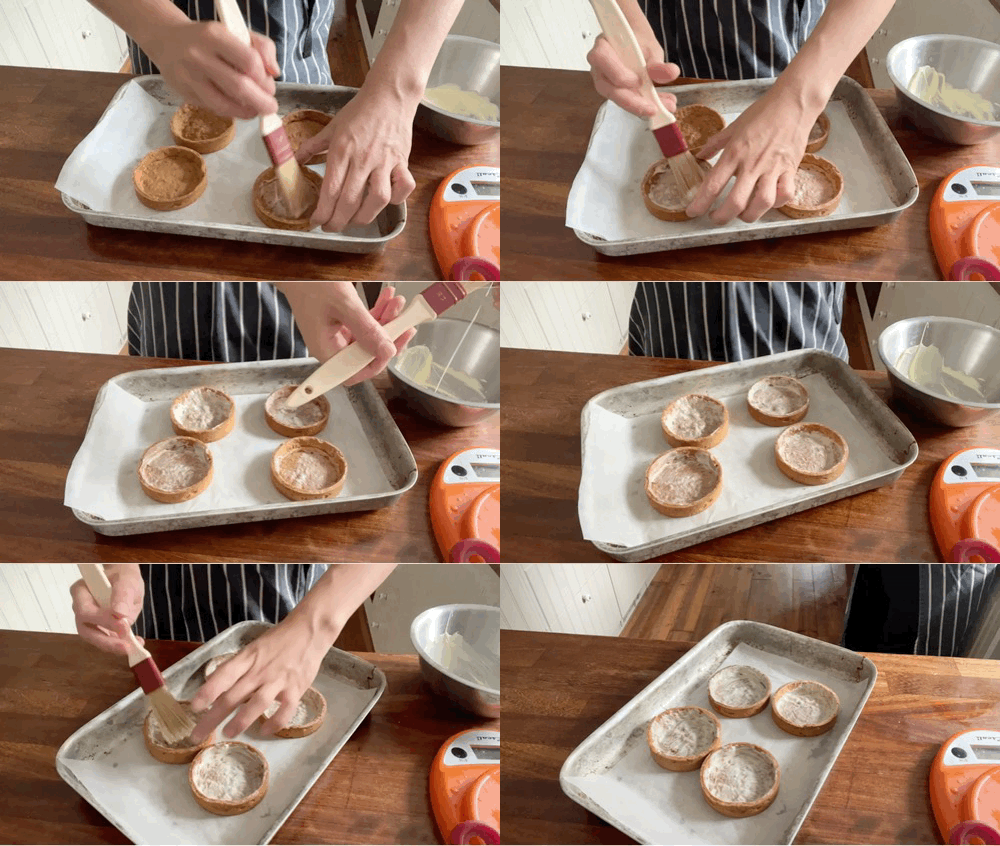
Since the tart filling is very wet, I’ve opted to bake my tart cases with extra egg wash to prevent getting soggy - this means returning your tart cases to the oven with a few layers of egg wash to create a barrier. It is also optional to brush the inside of your tart case with white chocolate - this is a useful tactic if you are planning to make it the night before and serve.
RIGHT, let’s make it.
Peach, yoghurt and honey tart
Makes 1 x 8-inch tart ring (I have this one) OR makes 8 individual tarts
Oat pastry **This recipe has been updated.**
45g icing sugar
45g butter
30g egg (half - save the rest for egg wash)
30g oats (I used jumbo)
100g plain flour
OPTIONAL: White chocolate, around 50g, melted to brush inside of the tart
Roasted peaches
200g blood peaches or small peaches, around 2
20g caster sugar
20g demerara
Optional: 20g of booze/fruit juice
I like using a mix of sugars - you can use any that you have.
Yoghurt Cream
155g natural or greek style yoghurt. I used Fage 5%
155g double cream
40g honey
Pinch of salt
IF USING GELATINE: 1 leaf (I used Dr Oetker platinum sheets)
Peach ruffles
3-4 large, slightly underripe or ‘just’ ripe peaches, a mixture of yellow and white. Very ripe peaches will not make clean slices
To finish
Honey
Apricot glaze
Tart dough method
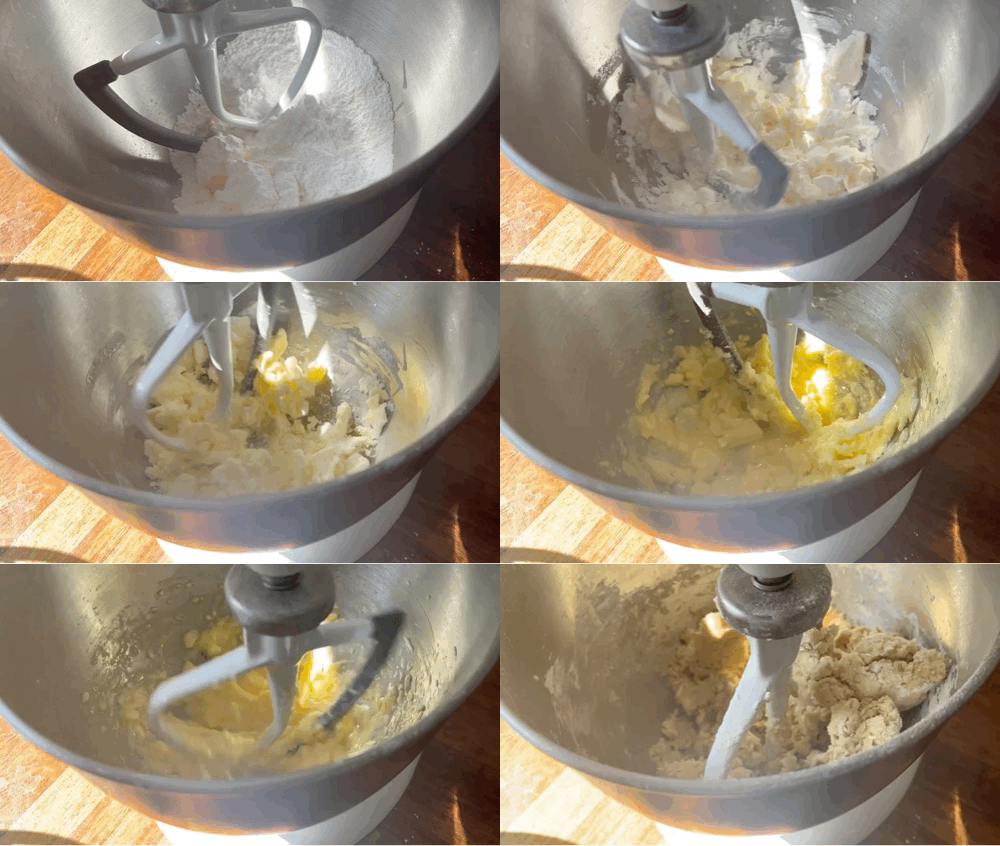
Cube your butter (cold is fine, using soft butter can lead to over-mixing or accidental whipping, so best to start with cold!) and mix with sifted icing sugar using the paddle attachment until well combined on a low speed. It does NOT have to be creamed! You just want to check there are no lumps of butter or sugar, and it is homogenous
Scrape down the sides of the bowl and add the egg. It will break up and look gross and split but don’t worry! Just scrape down the sides of the bowl and mix it in as best you can. Again, just use a low speed.
Mix the dries together - flour, oats, and salt - then pour into the mixer and mix on a low speed until it comes together. That’s it!
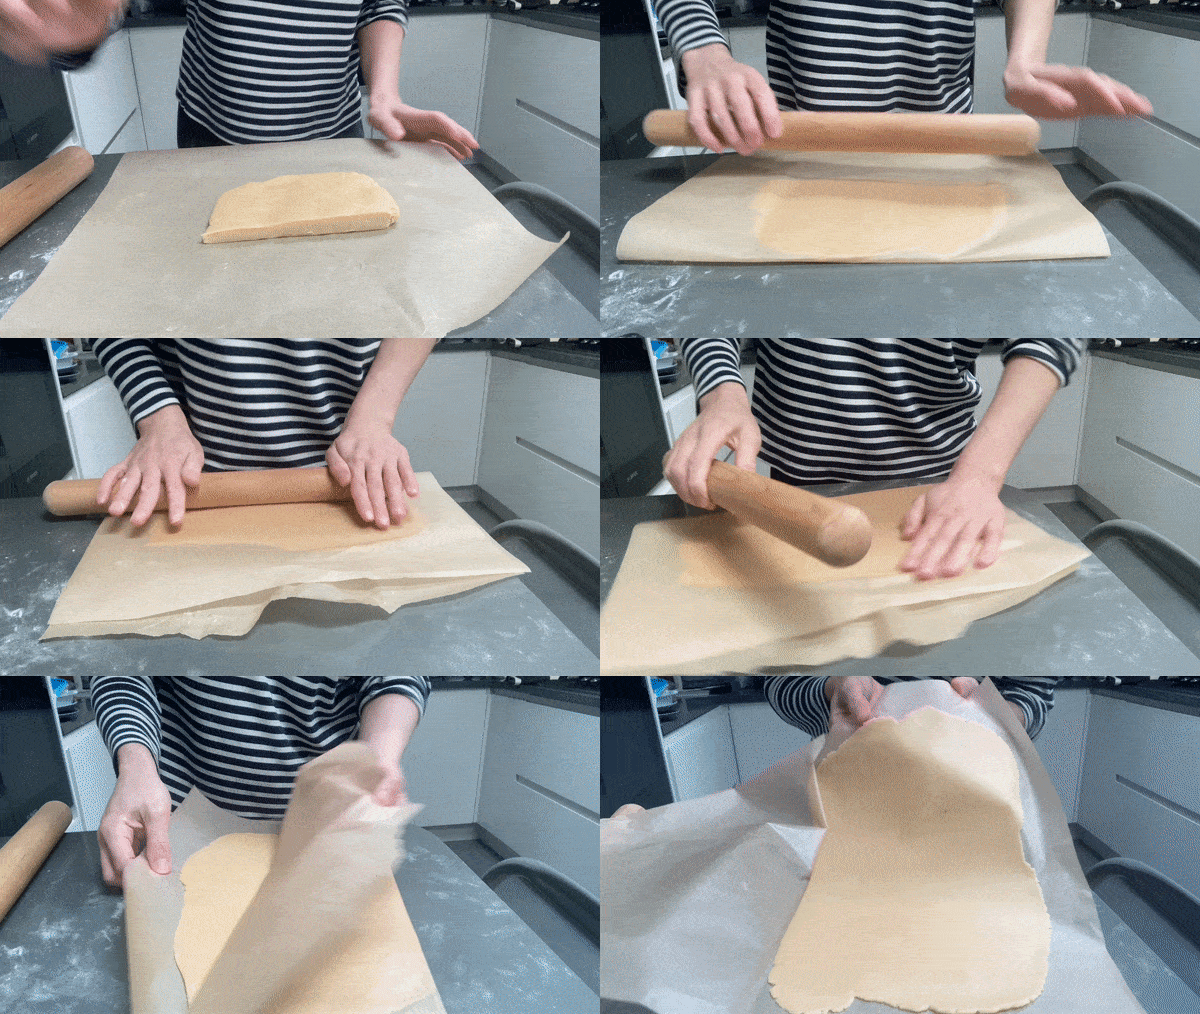
Roll out the dough between two sheets of paper to around 2-3mm thickness. Once you have got an even dough (hold the paper up to the light to check for any thick areas!), check the thickness by pressing with your finger into the dough and seeing how deep it is! You can then roll over the little press finger mark before chilling.
The thinner you roll it, the crisper your final product will be. But the thinner you go, the harder it is to handle. I would say 2mm is the thinnest.
Chill the rolled-out dough on a flat tray for 20 minutes to firm up - the freezer is helpful here.
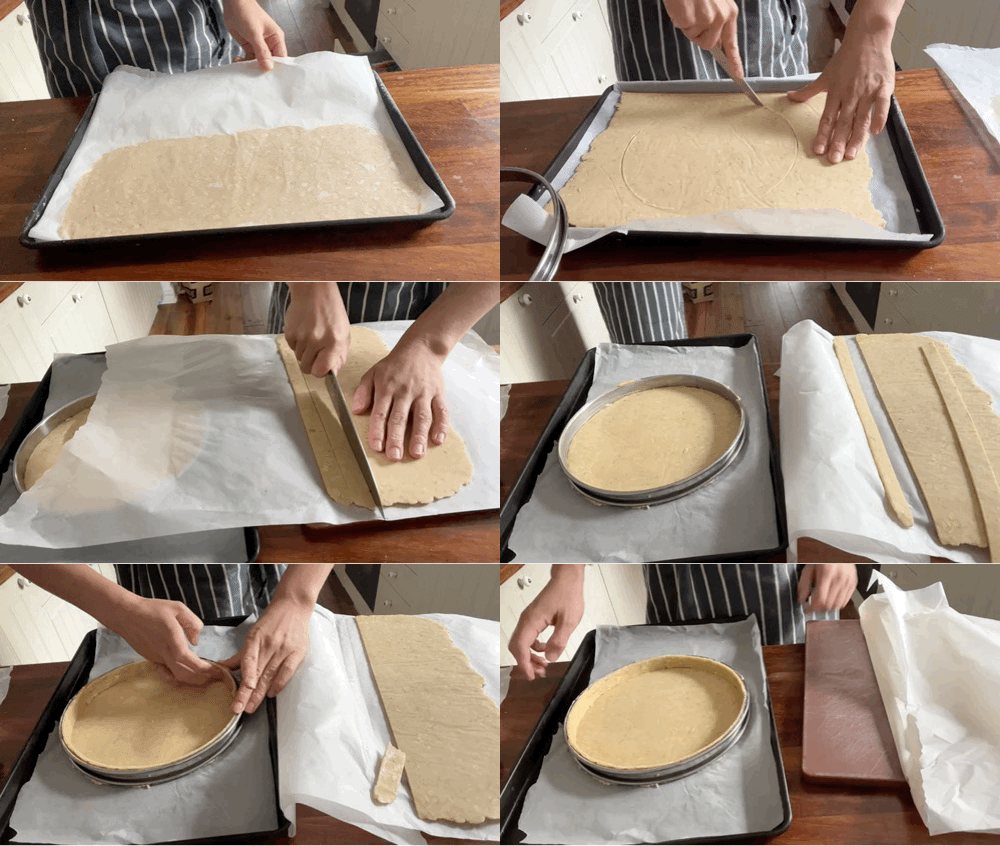
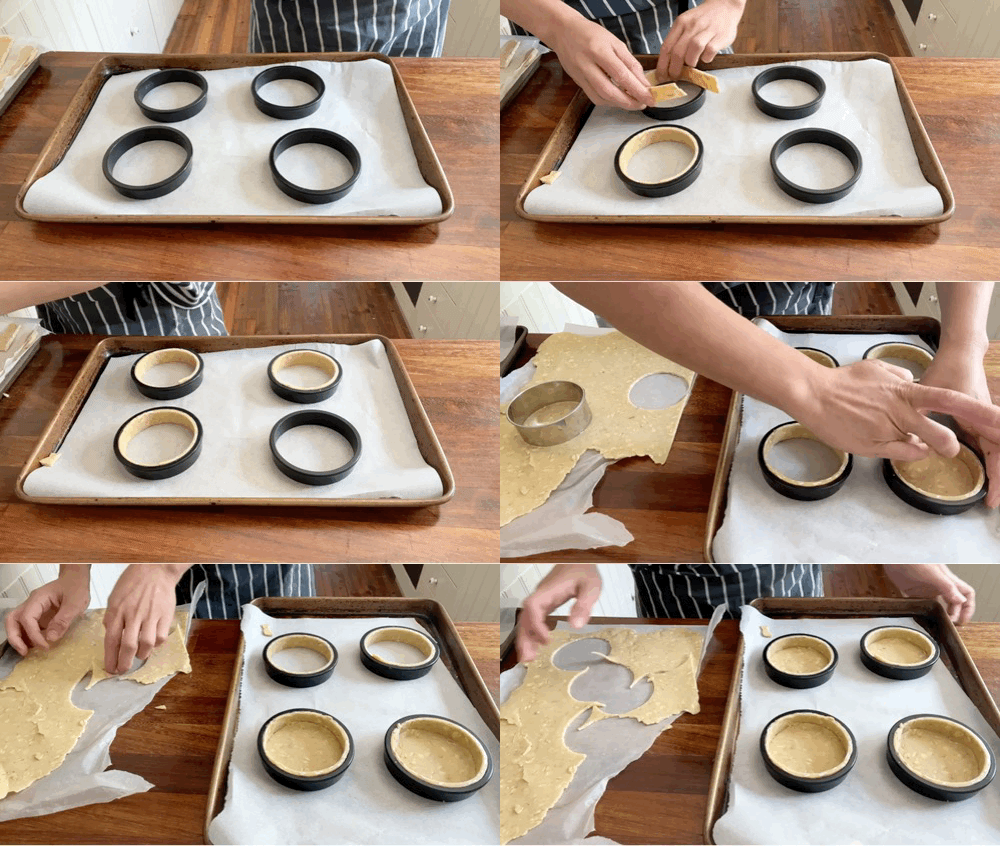
Cut strips the width of your tart ring and use your tart ring - or an equivalent cutter - to cut circles. The same applies to a large tart ring.
Place the circle at the base of the tart case, then place the strips around the edge of the tart case, then press to seal the two pieces.
Check the base once again to see if it is all together and! If the pastry is still firm enough, trim with a knife. Otherwise, wait until after it has rested. Try and keep the knife flat and not at an angle here if possible.
Put your lined tarts/tart in the fridge to rest for 20-30 mins.
Pre-heat oven to 170c fan
Put your tarts into the oven. If you want to weigh down the base, then a little ball of foil/something heavy (baking beans would work!) in the centre to stop the base from billowing. You don’t need to press your weights all the way to the edges in any case. I usually put my cases in without any beans and then check to see if it needs weights.
Bake for approx 15 mins until pale golden. Remove from the oven, then egg wash, then return for another 5-7 minutes until totally golden and properly baked.
Leave tart cases to cool completely.
If desired, brush tart cases with melted white chocolate in a thin layer to help prevent the tart from going soggy in the fridge.
Roasted peaches method
Pre-heat oven to 200c fan.
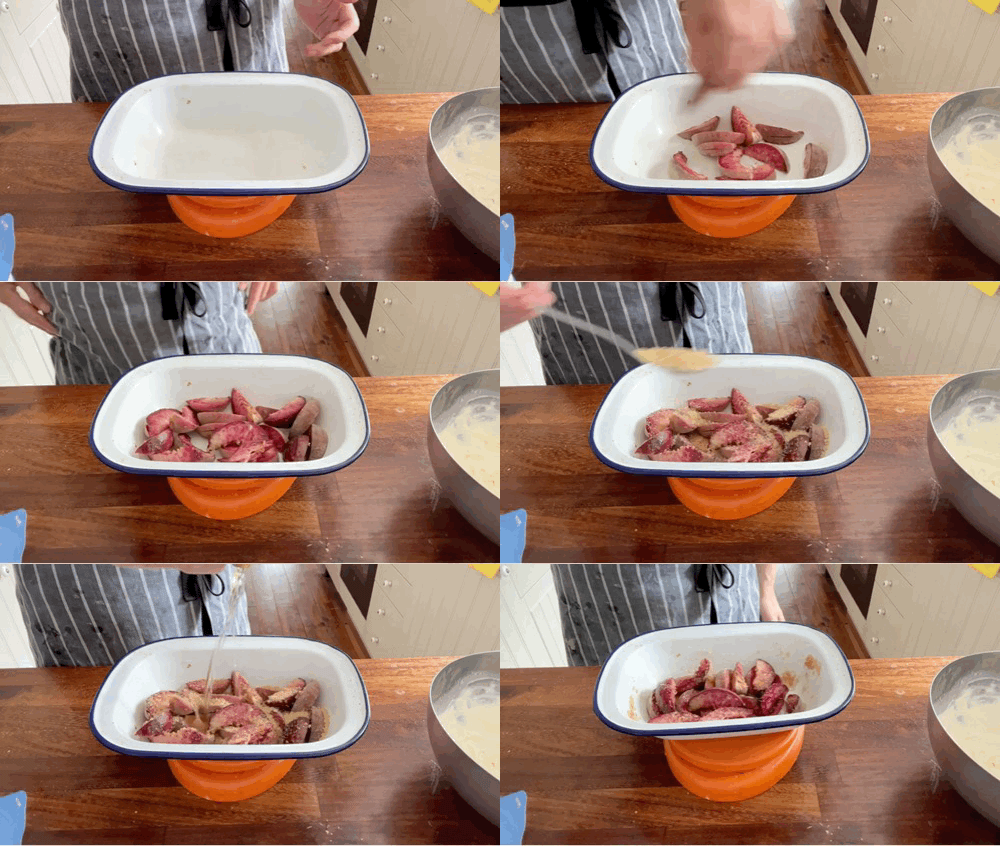
Cut peaches into slices, removing the pit. Place in a shallow tray and sprinkle sugar on top. Add alcohol/juice now if using.
Roast for 20 minutes until bubbling and tender
Yoghurt Cream method
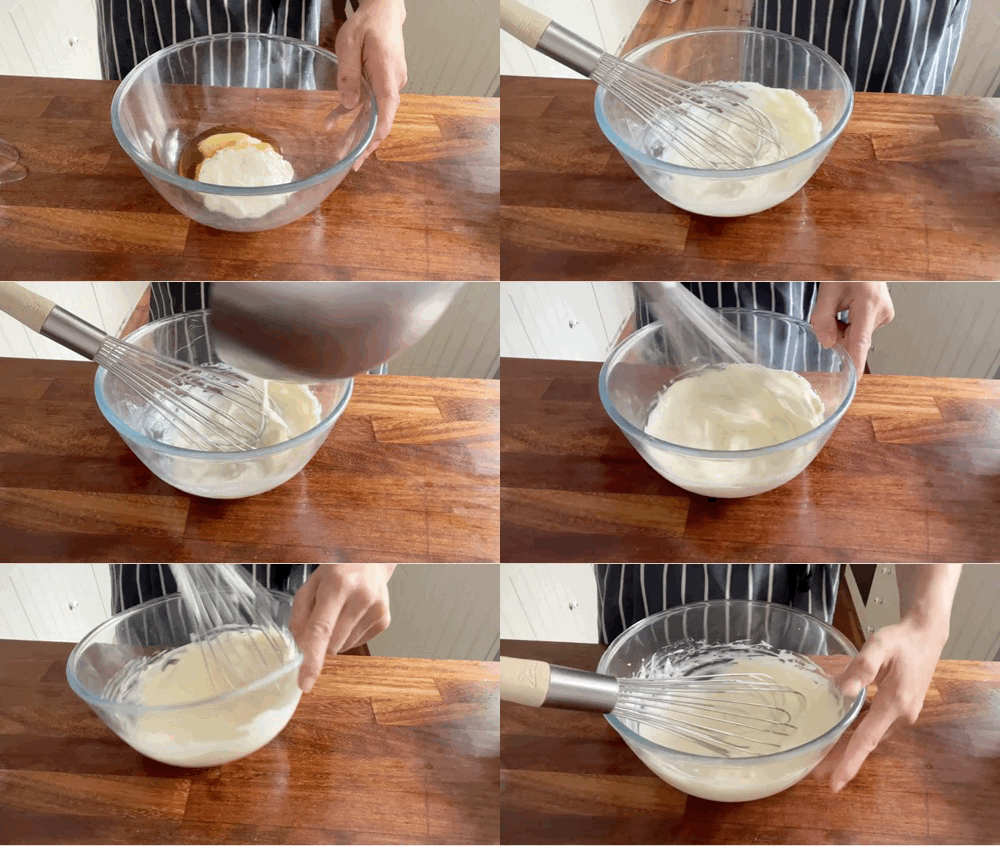
Without gelatine: Whisk honey with yoghurt until smooth, then add cream and whip until thick and shiny. Add salt to taste.
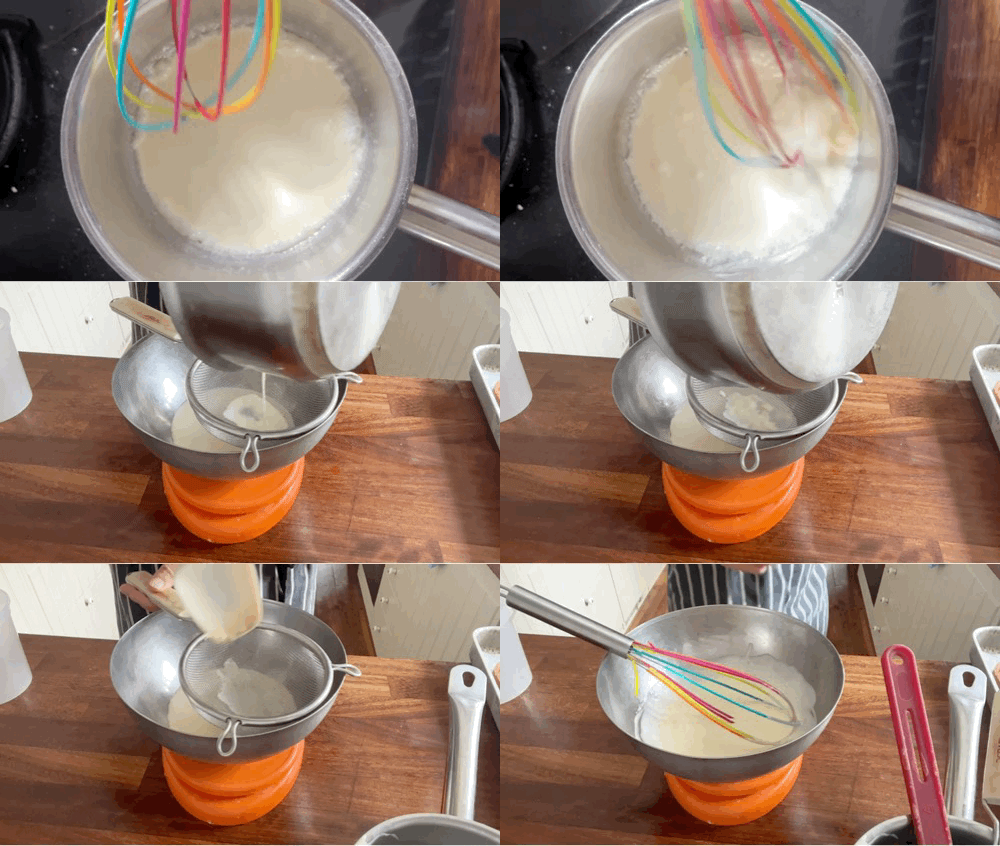
With gelatine: Bloom gelatine in cold water. Heat 50g double cream until almost simmering, then whisk in the bloomed gelatine. Pour the gelatine/cream mixture through a sieve and into the 100g cold cream. Whisk to combine. Put into the fridge for 10 minutes to cool down.
Whisk honey with yoghurt until smooth and set to one side. Add in the cooled gelatine/cream mixture and whisk until slightly thickened. Add salt to taste.
Tart - assembly
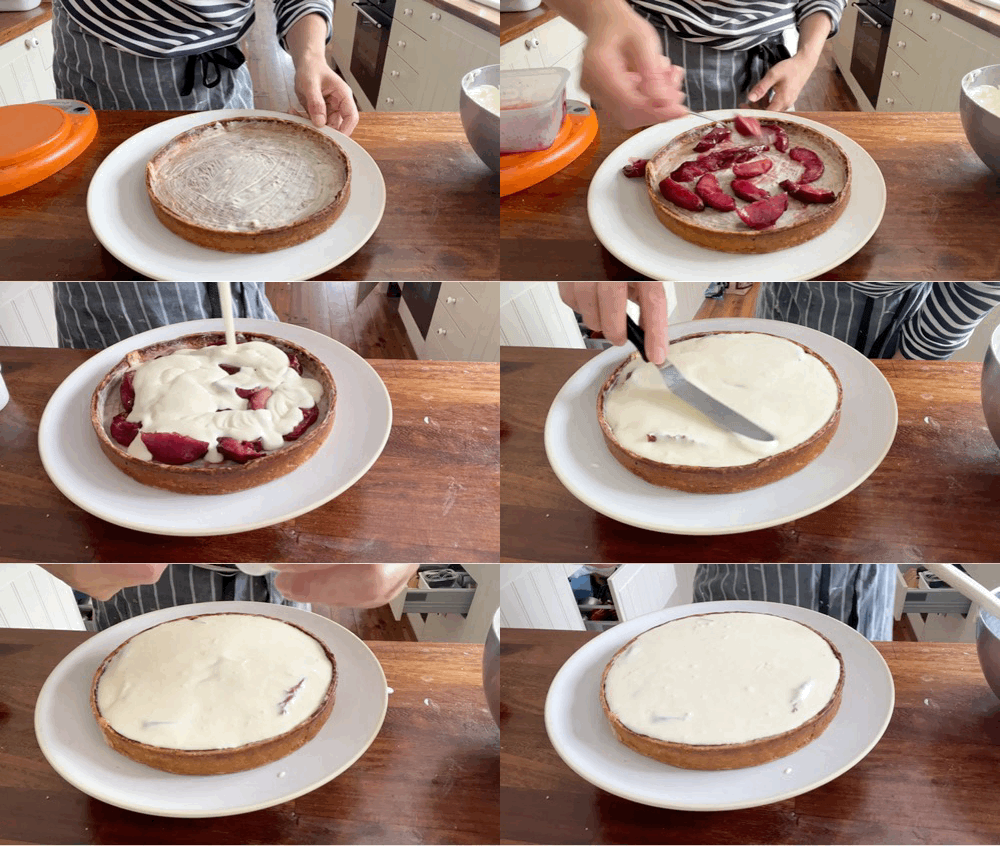
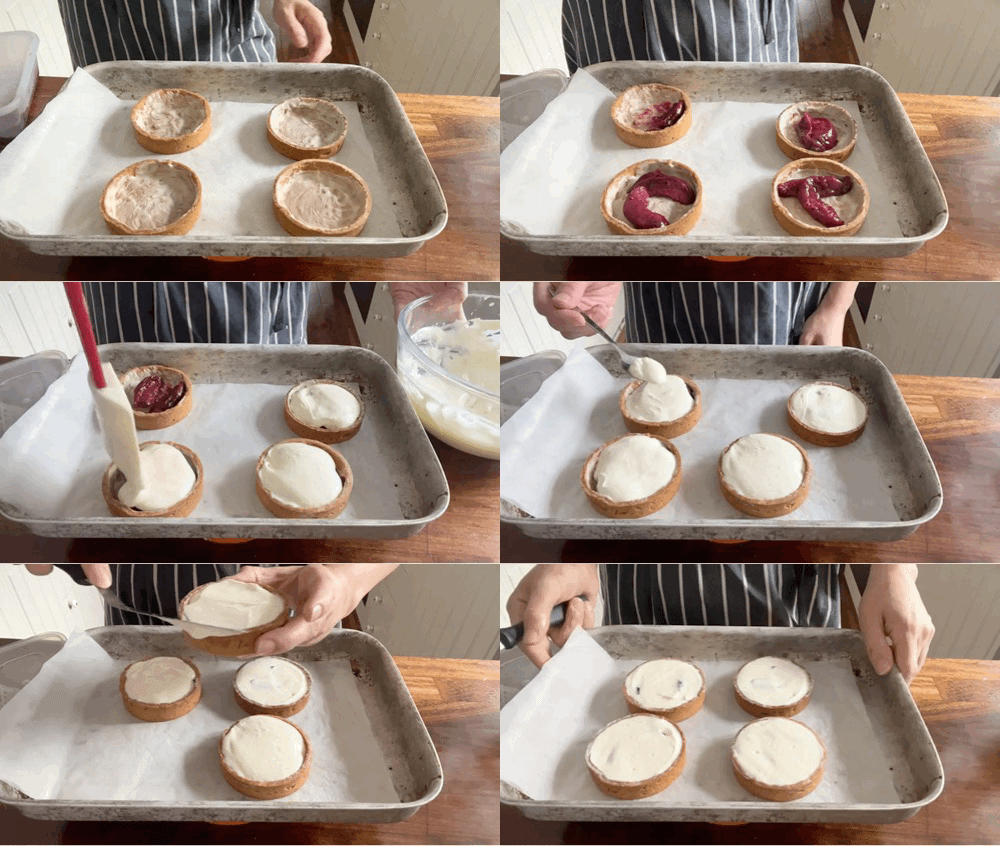
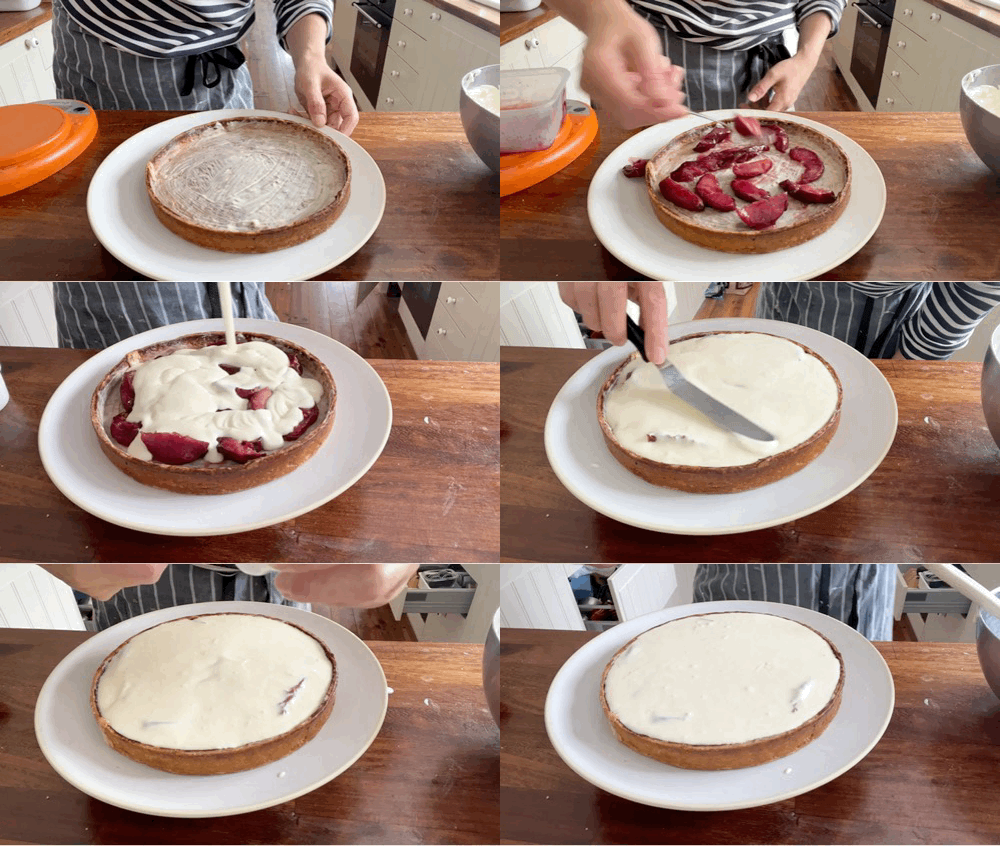
Dot roasted peaches around the base of the tart case. If you are doing mini cases, 2 pieces work well - about 15-20g
Pour over yoghurt cream and spread evenly. You need about 30g-40g per small tart case
Leave to chill for 1 hour before decorating.
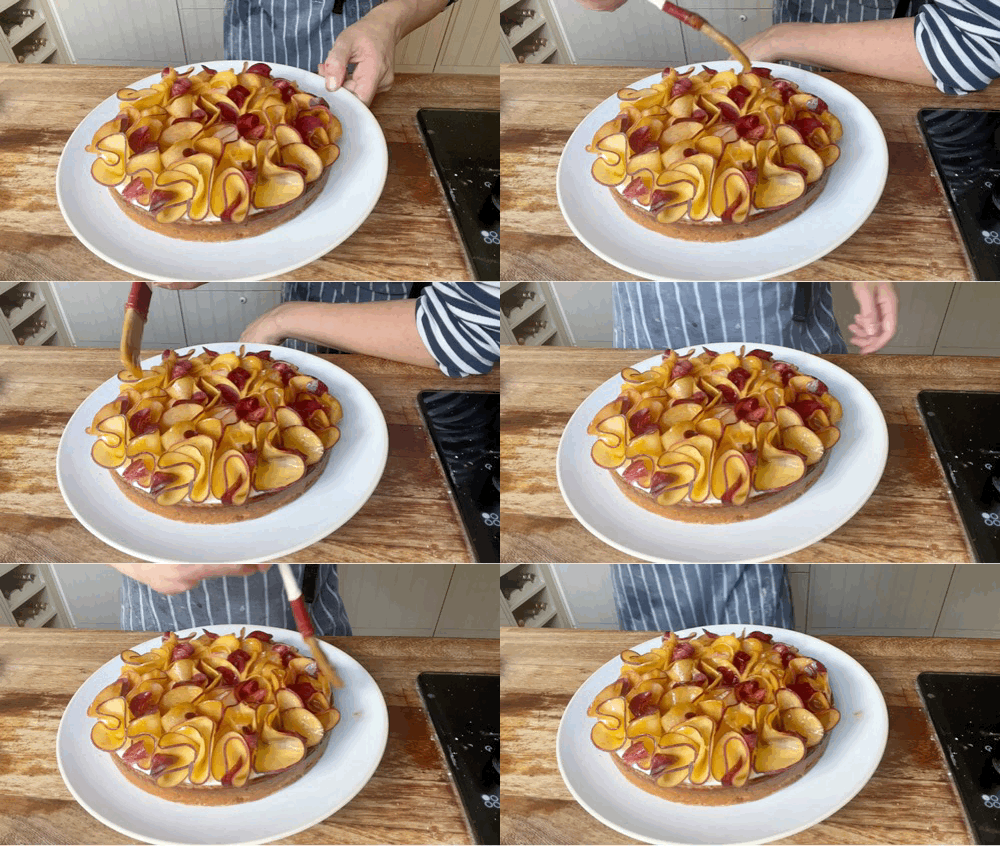
For the peach ruffles, slice peaches around 1mm thick and lay briefly on j-cloths/kitchen paper to absorb excess moisture. Twist and twizzle the slices into ruffles and cover the tart
Glaze with a little melted apricot jam
Leave to chill for 30 mins before serving or up to 24 hours. Just before serving, drizzle with honey
Thanks for reading! This newsletter is a reader-supported publication. The best way to support my work is to become a paid subscriber and help keep Sunday’s free for everyone.



Also Nicola, my pasty dough seems too dry to roll out. Should I add in some more liquid do you think?
Hey Nicola!
Can I ask roughly the size of your tart rings??