
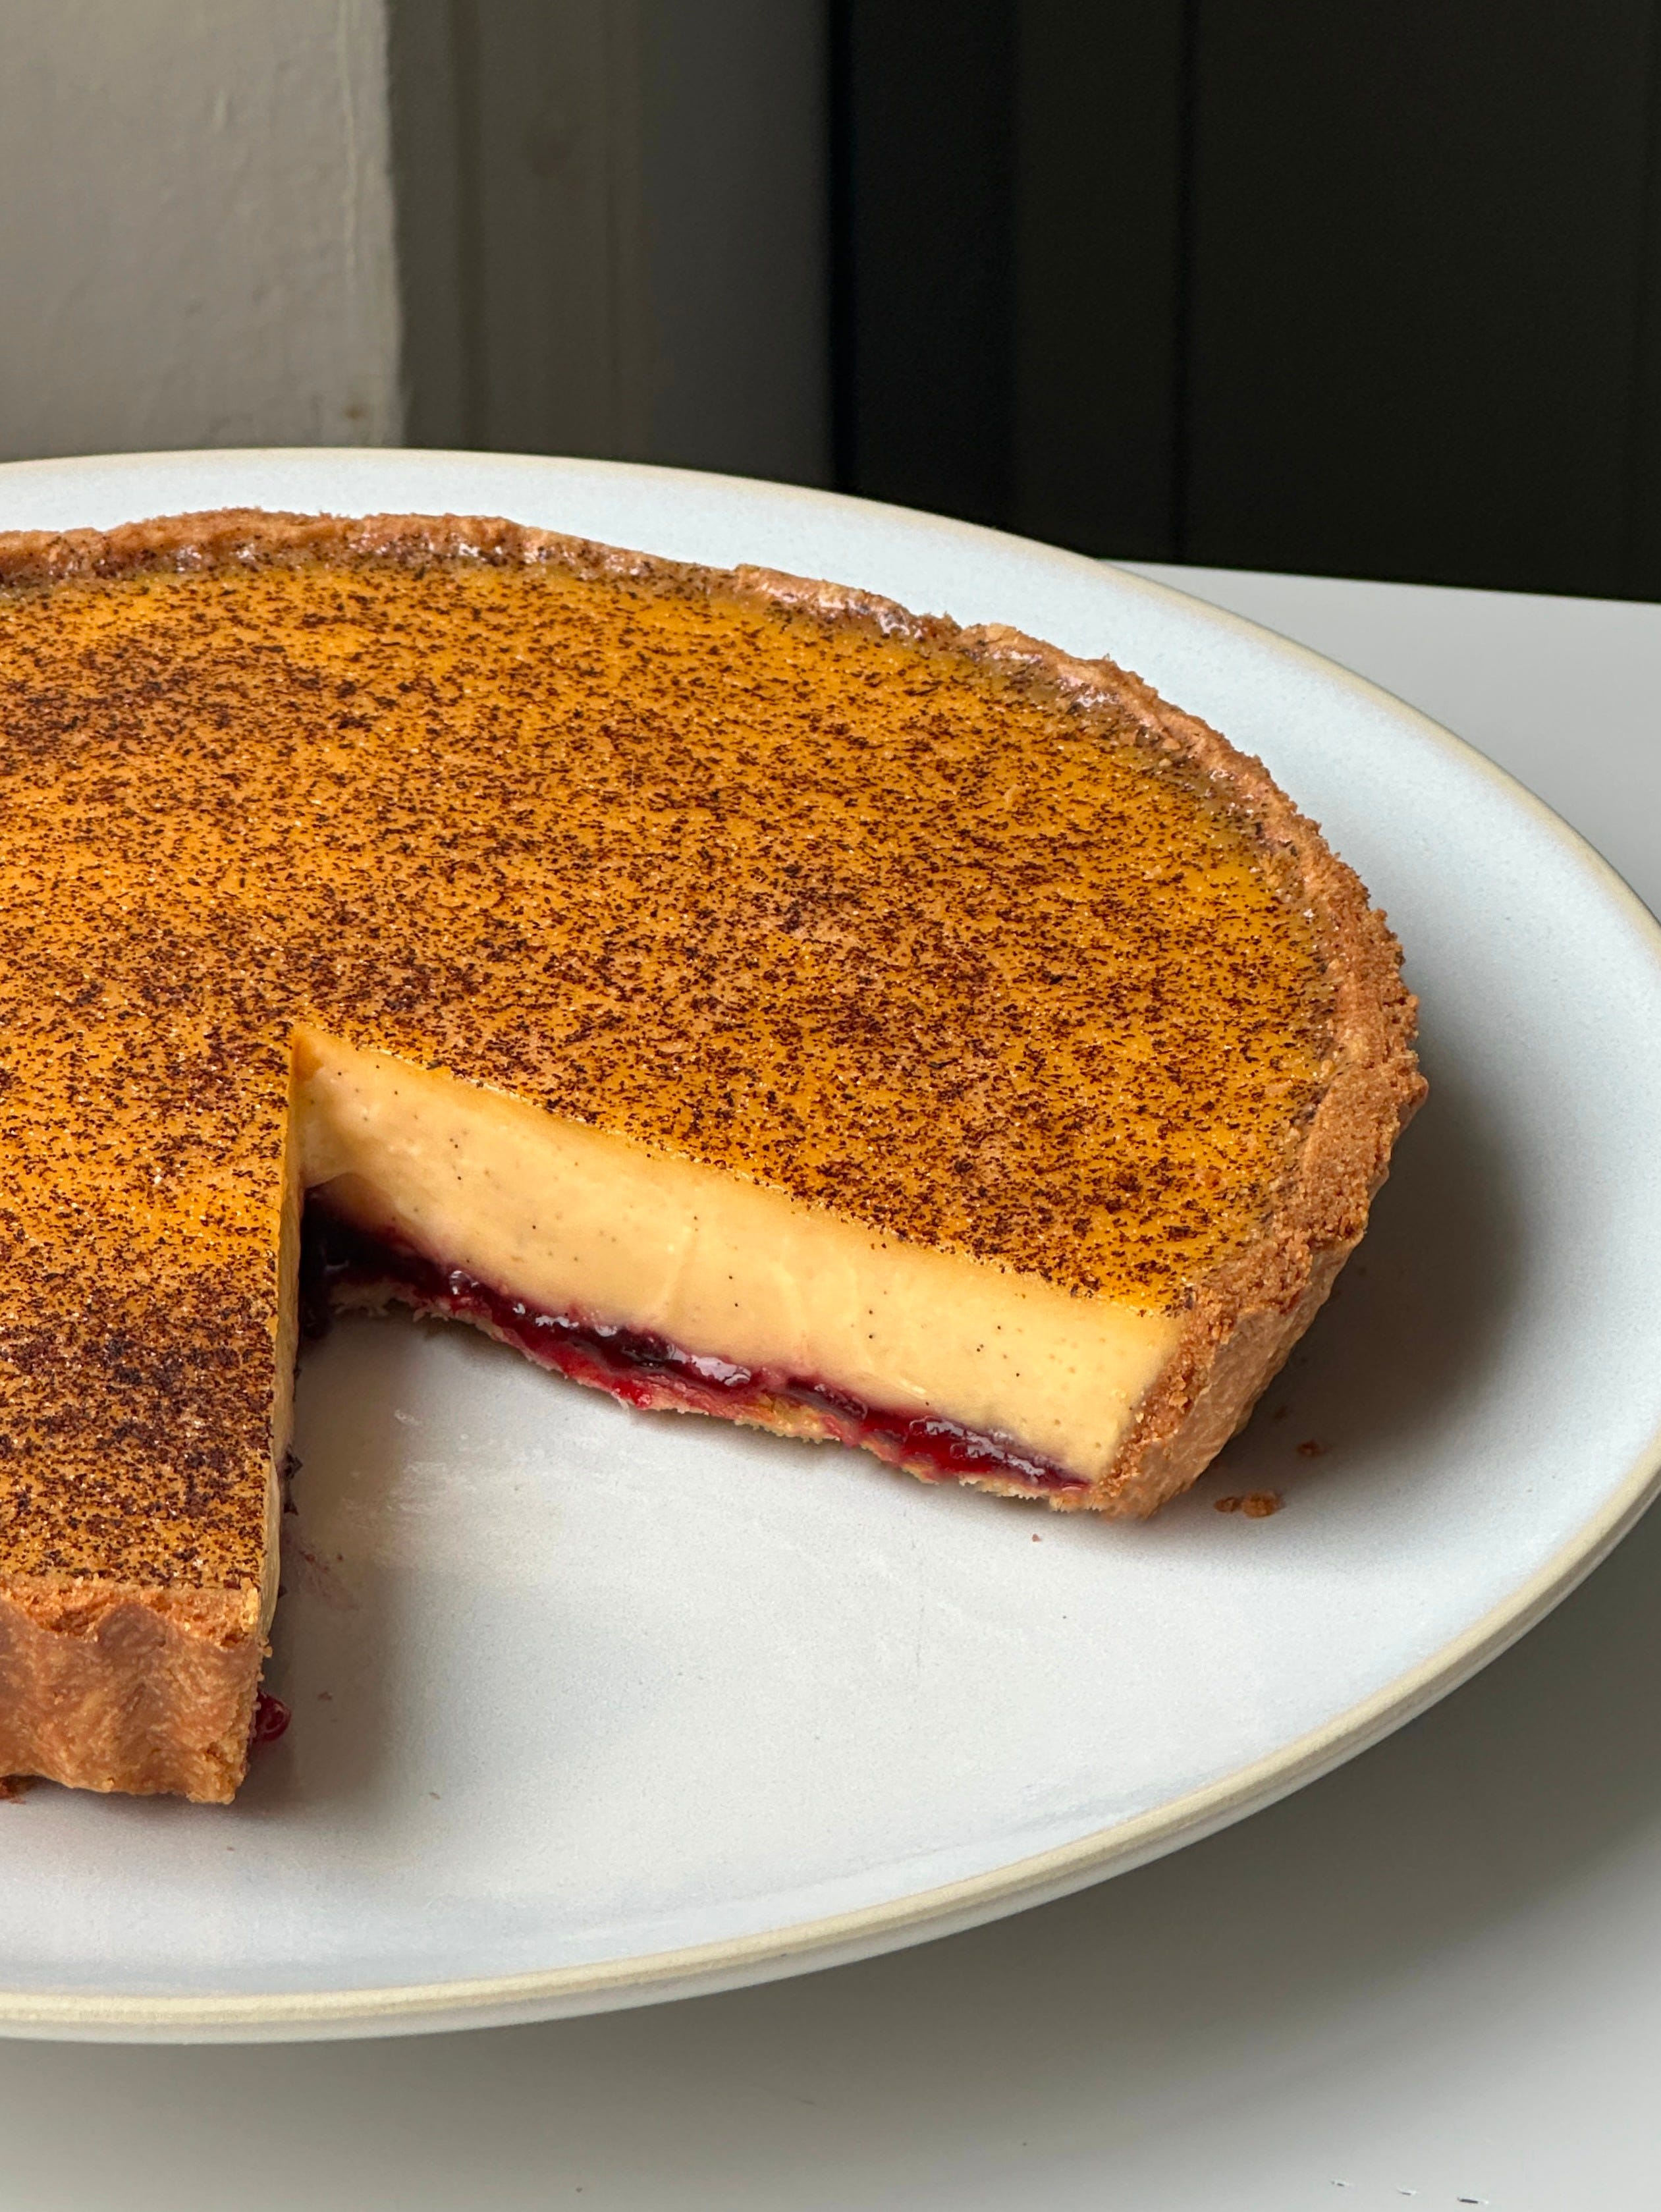
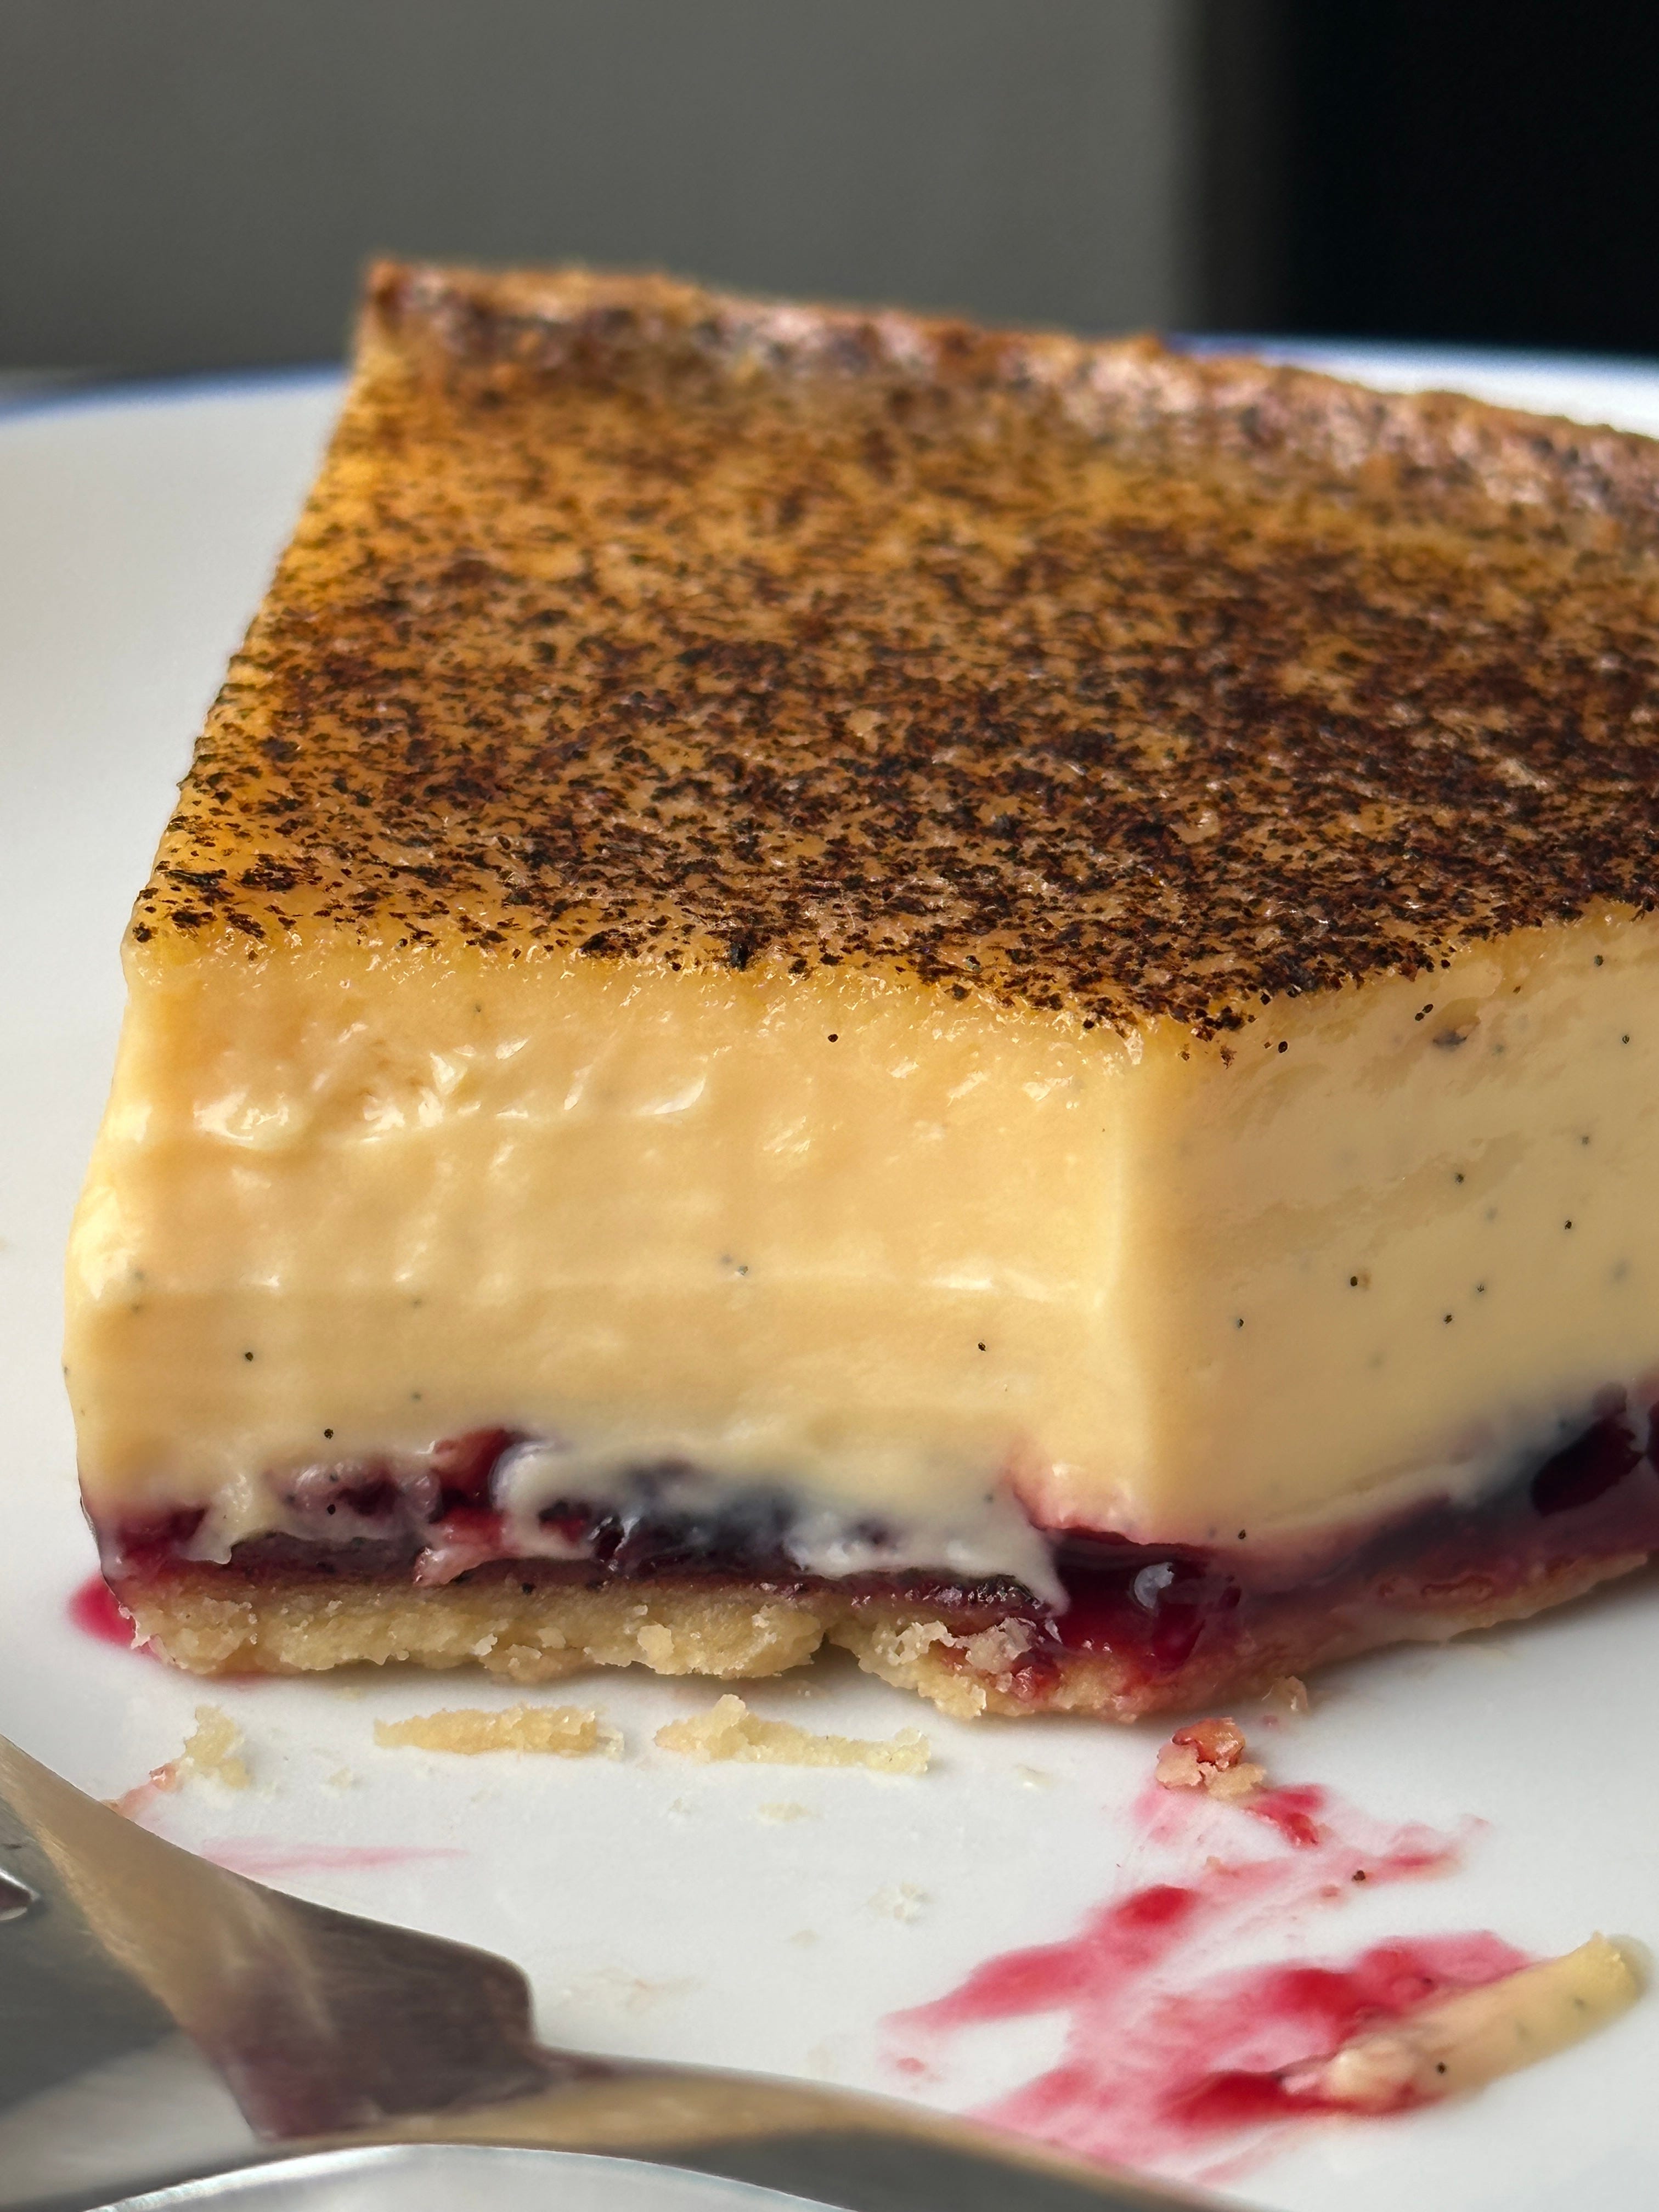
Kitchen Project #183: Vanilla Custard Tart
With Damson Jam

Hello,
Welcome to today’s edition of Kitchen Projects. Thank you so much for being here.
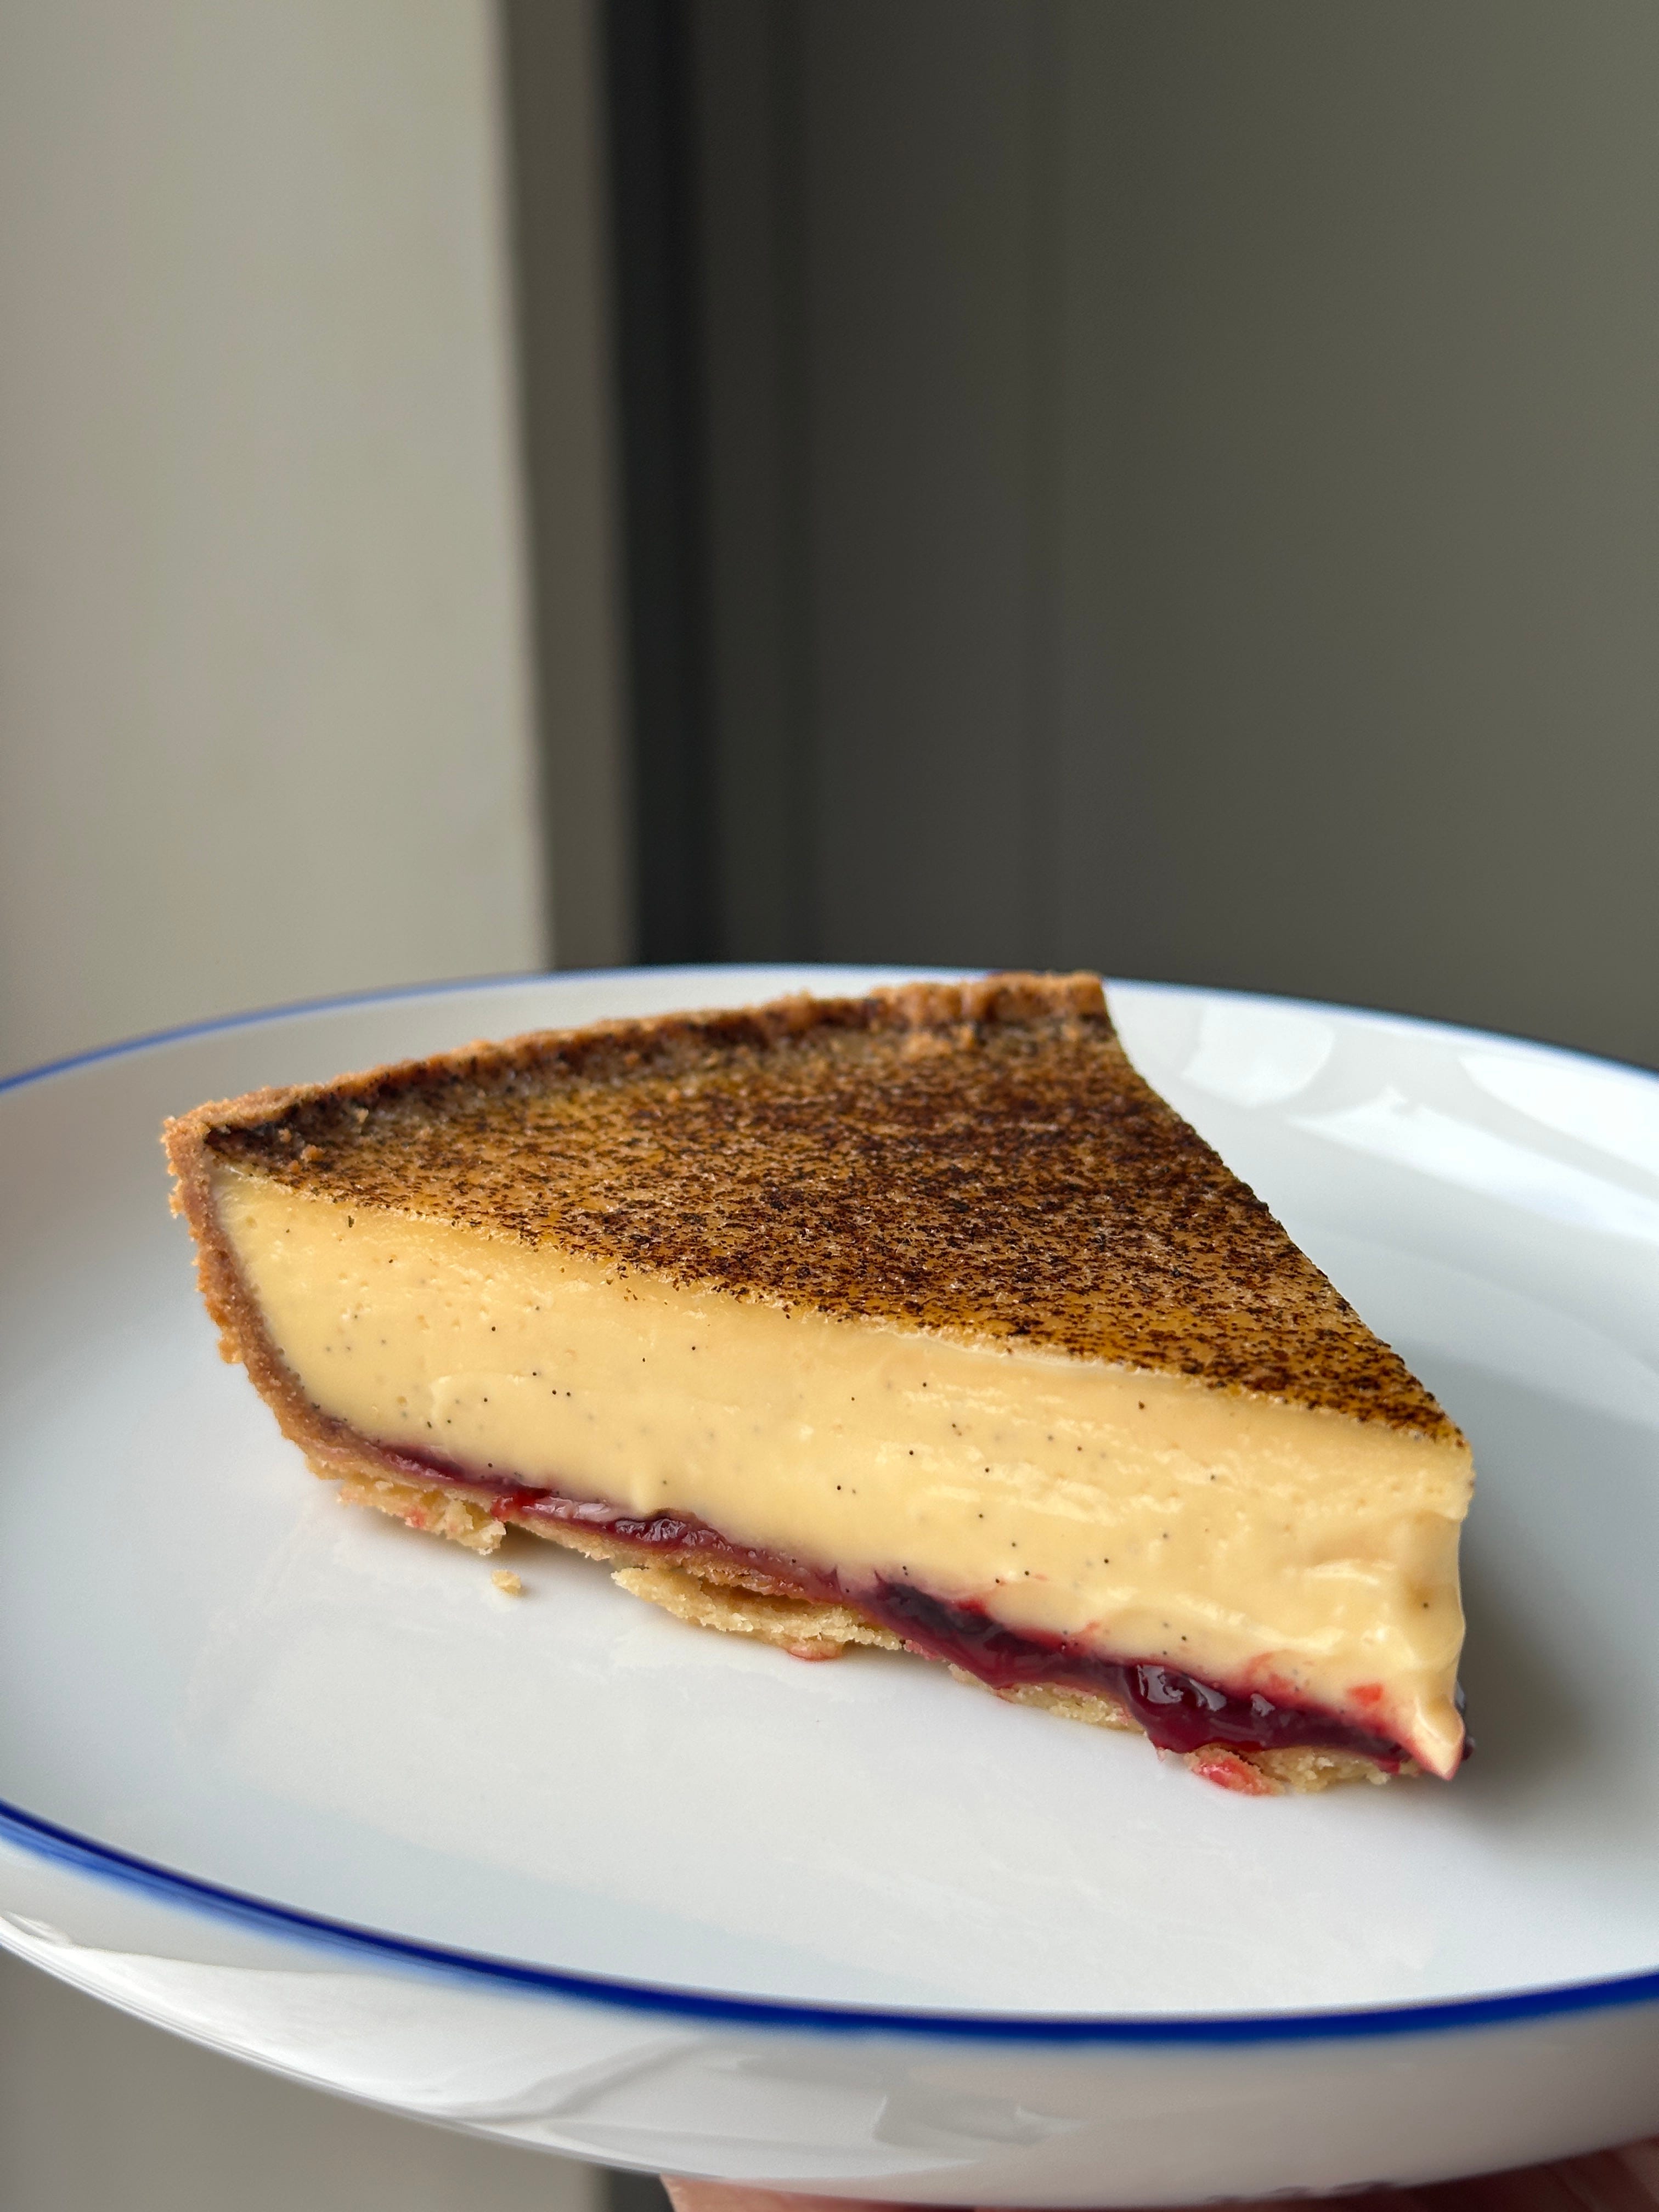
Today we’re going back to basics with an absolute classic: Custard Tart. You can keep it plain, or you can do as I do - give it a layer of bright, damson jam in the base.
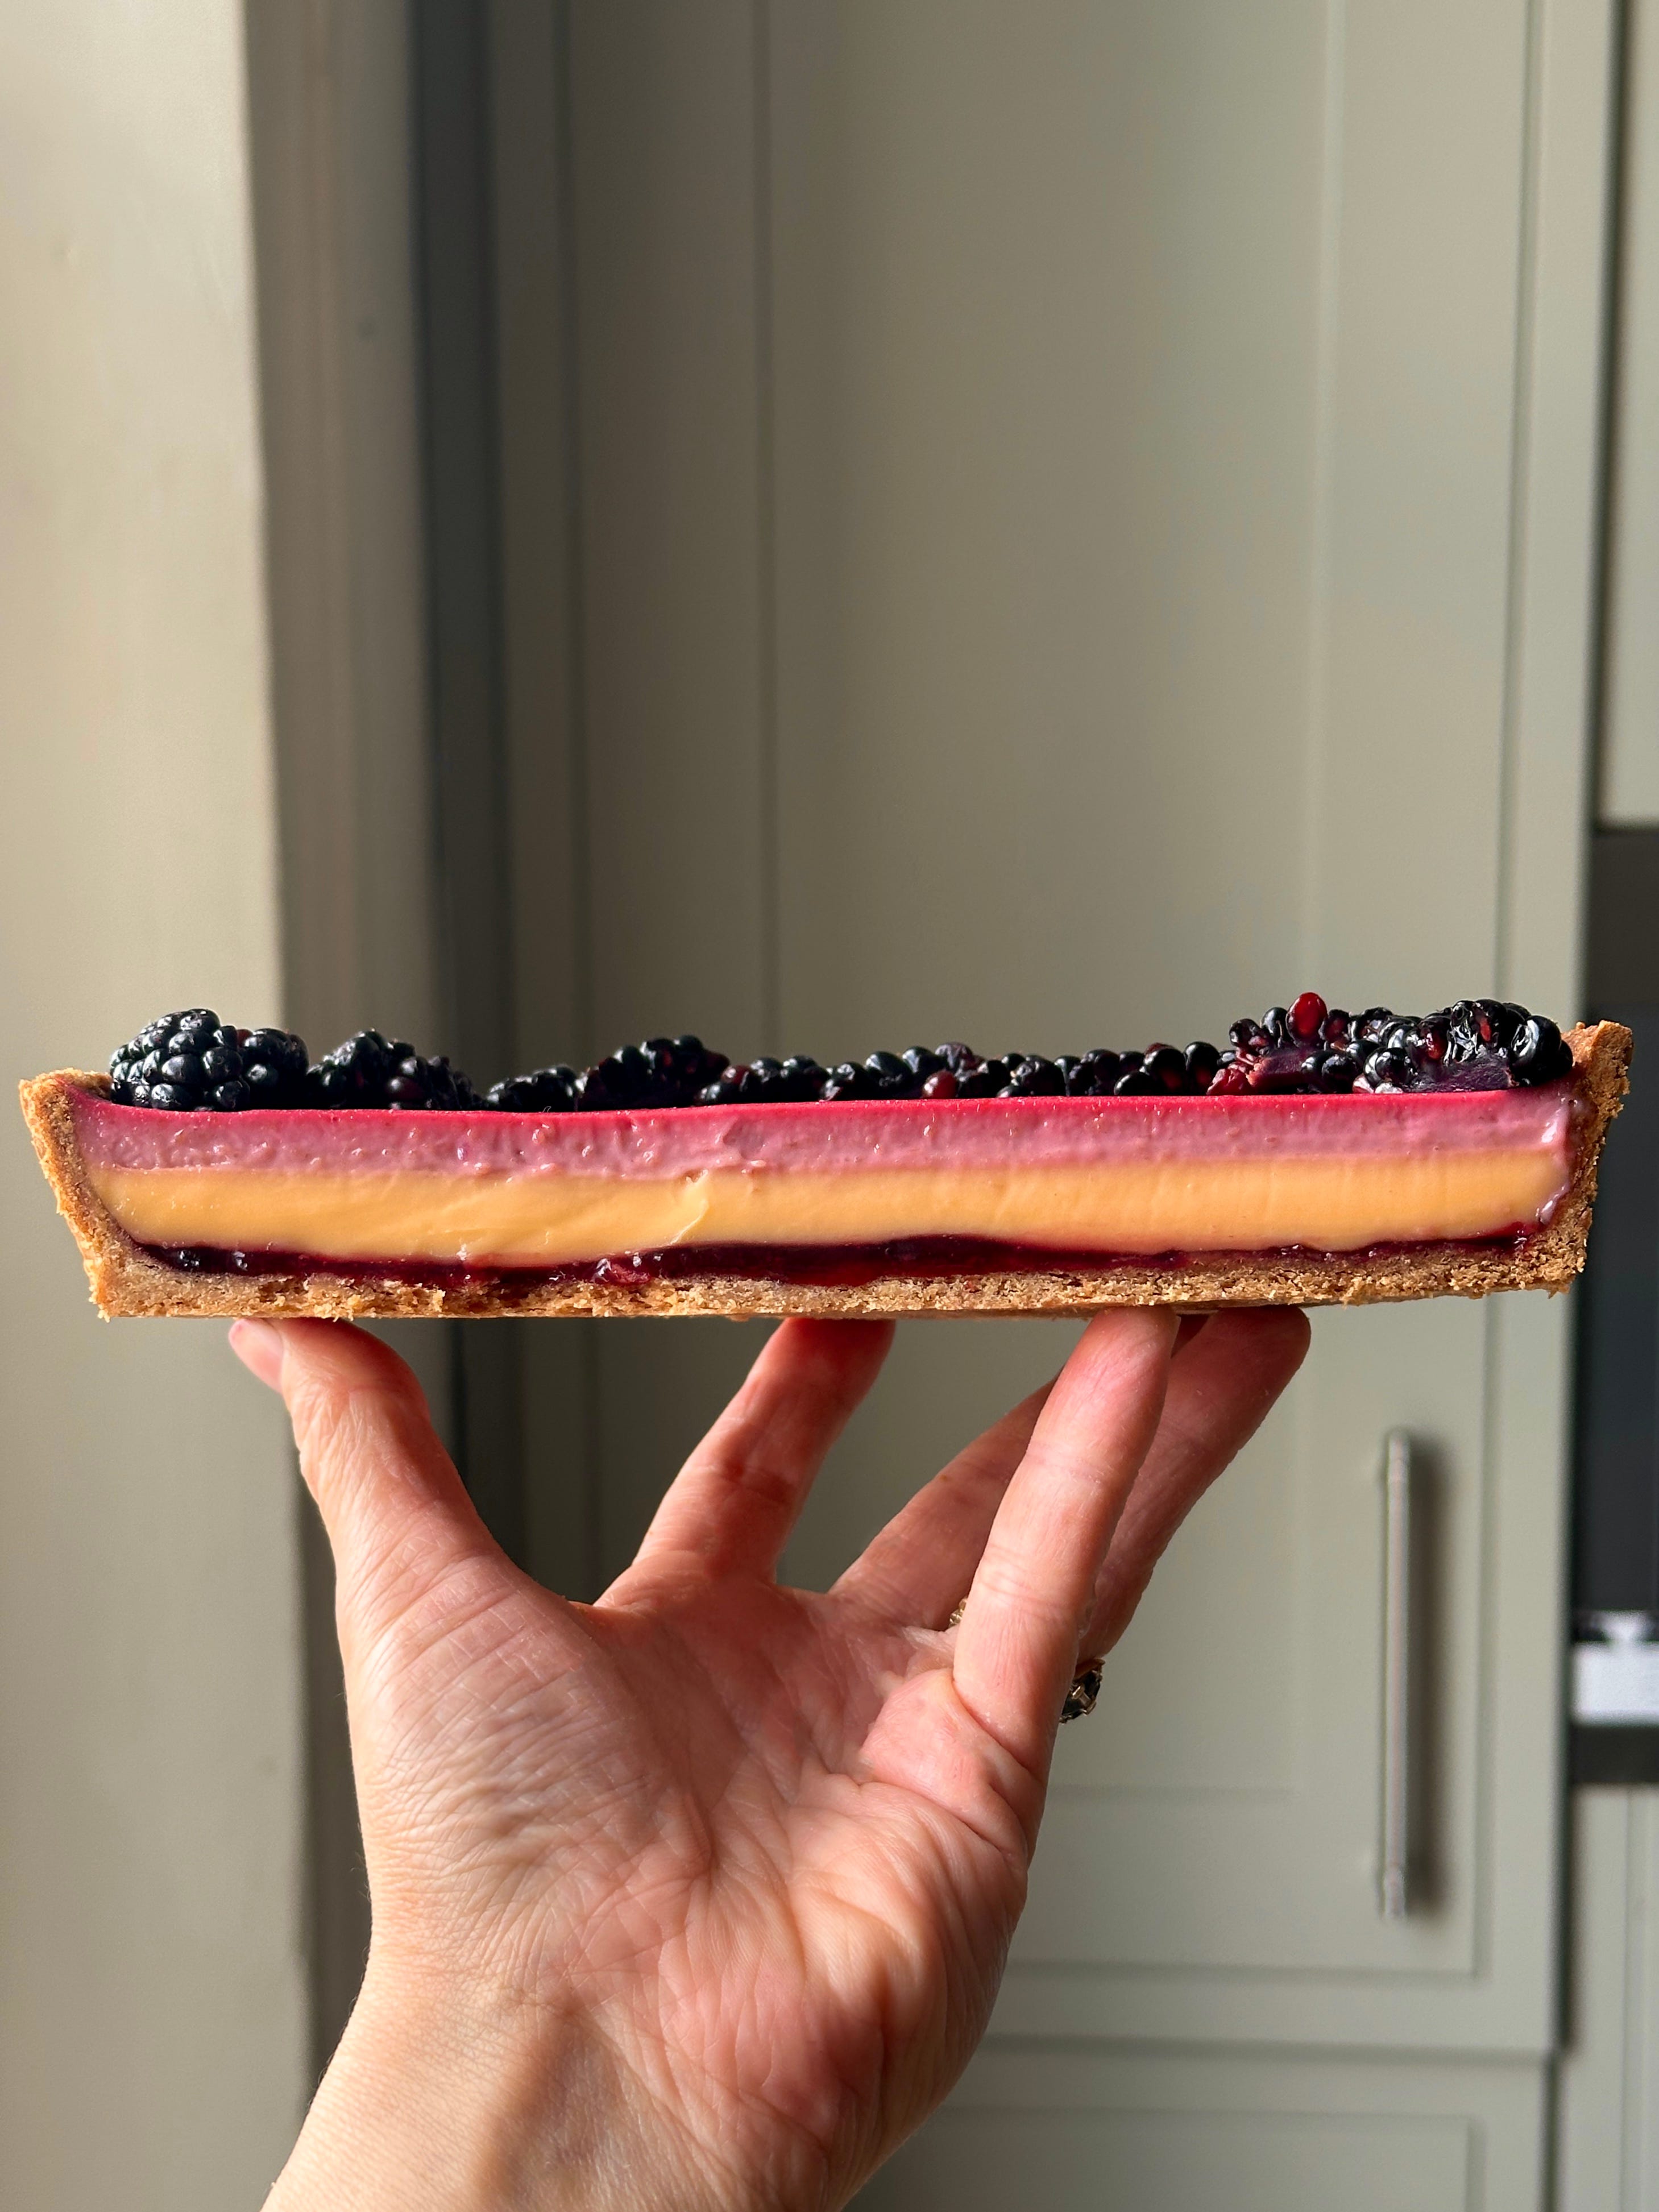
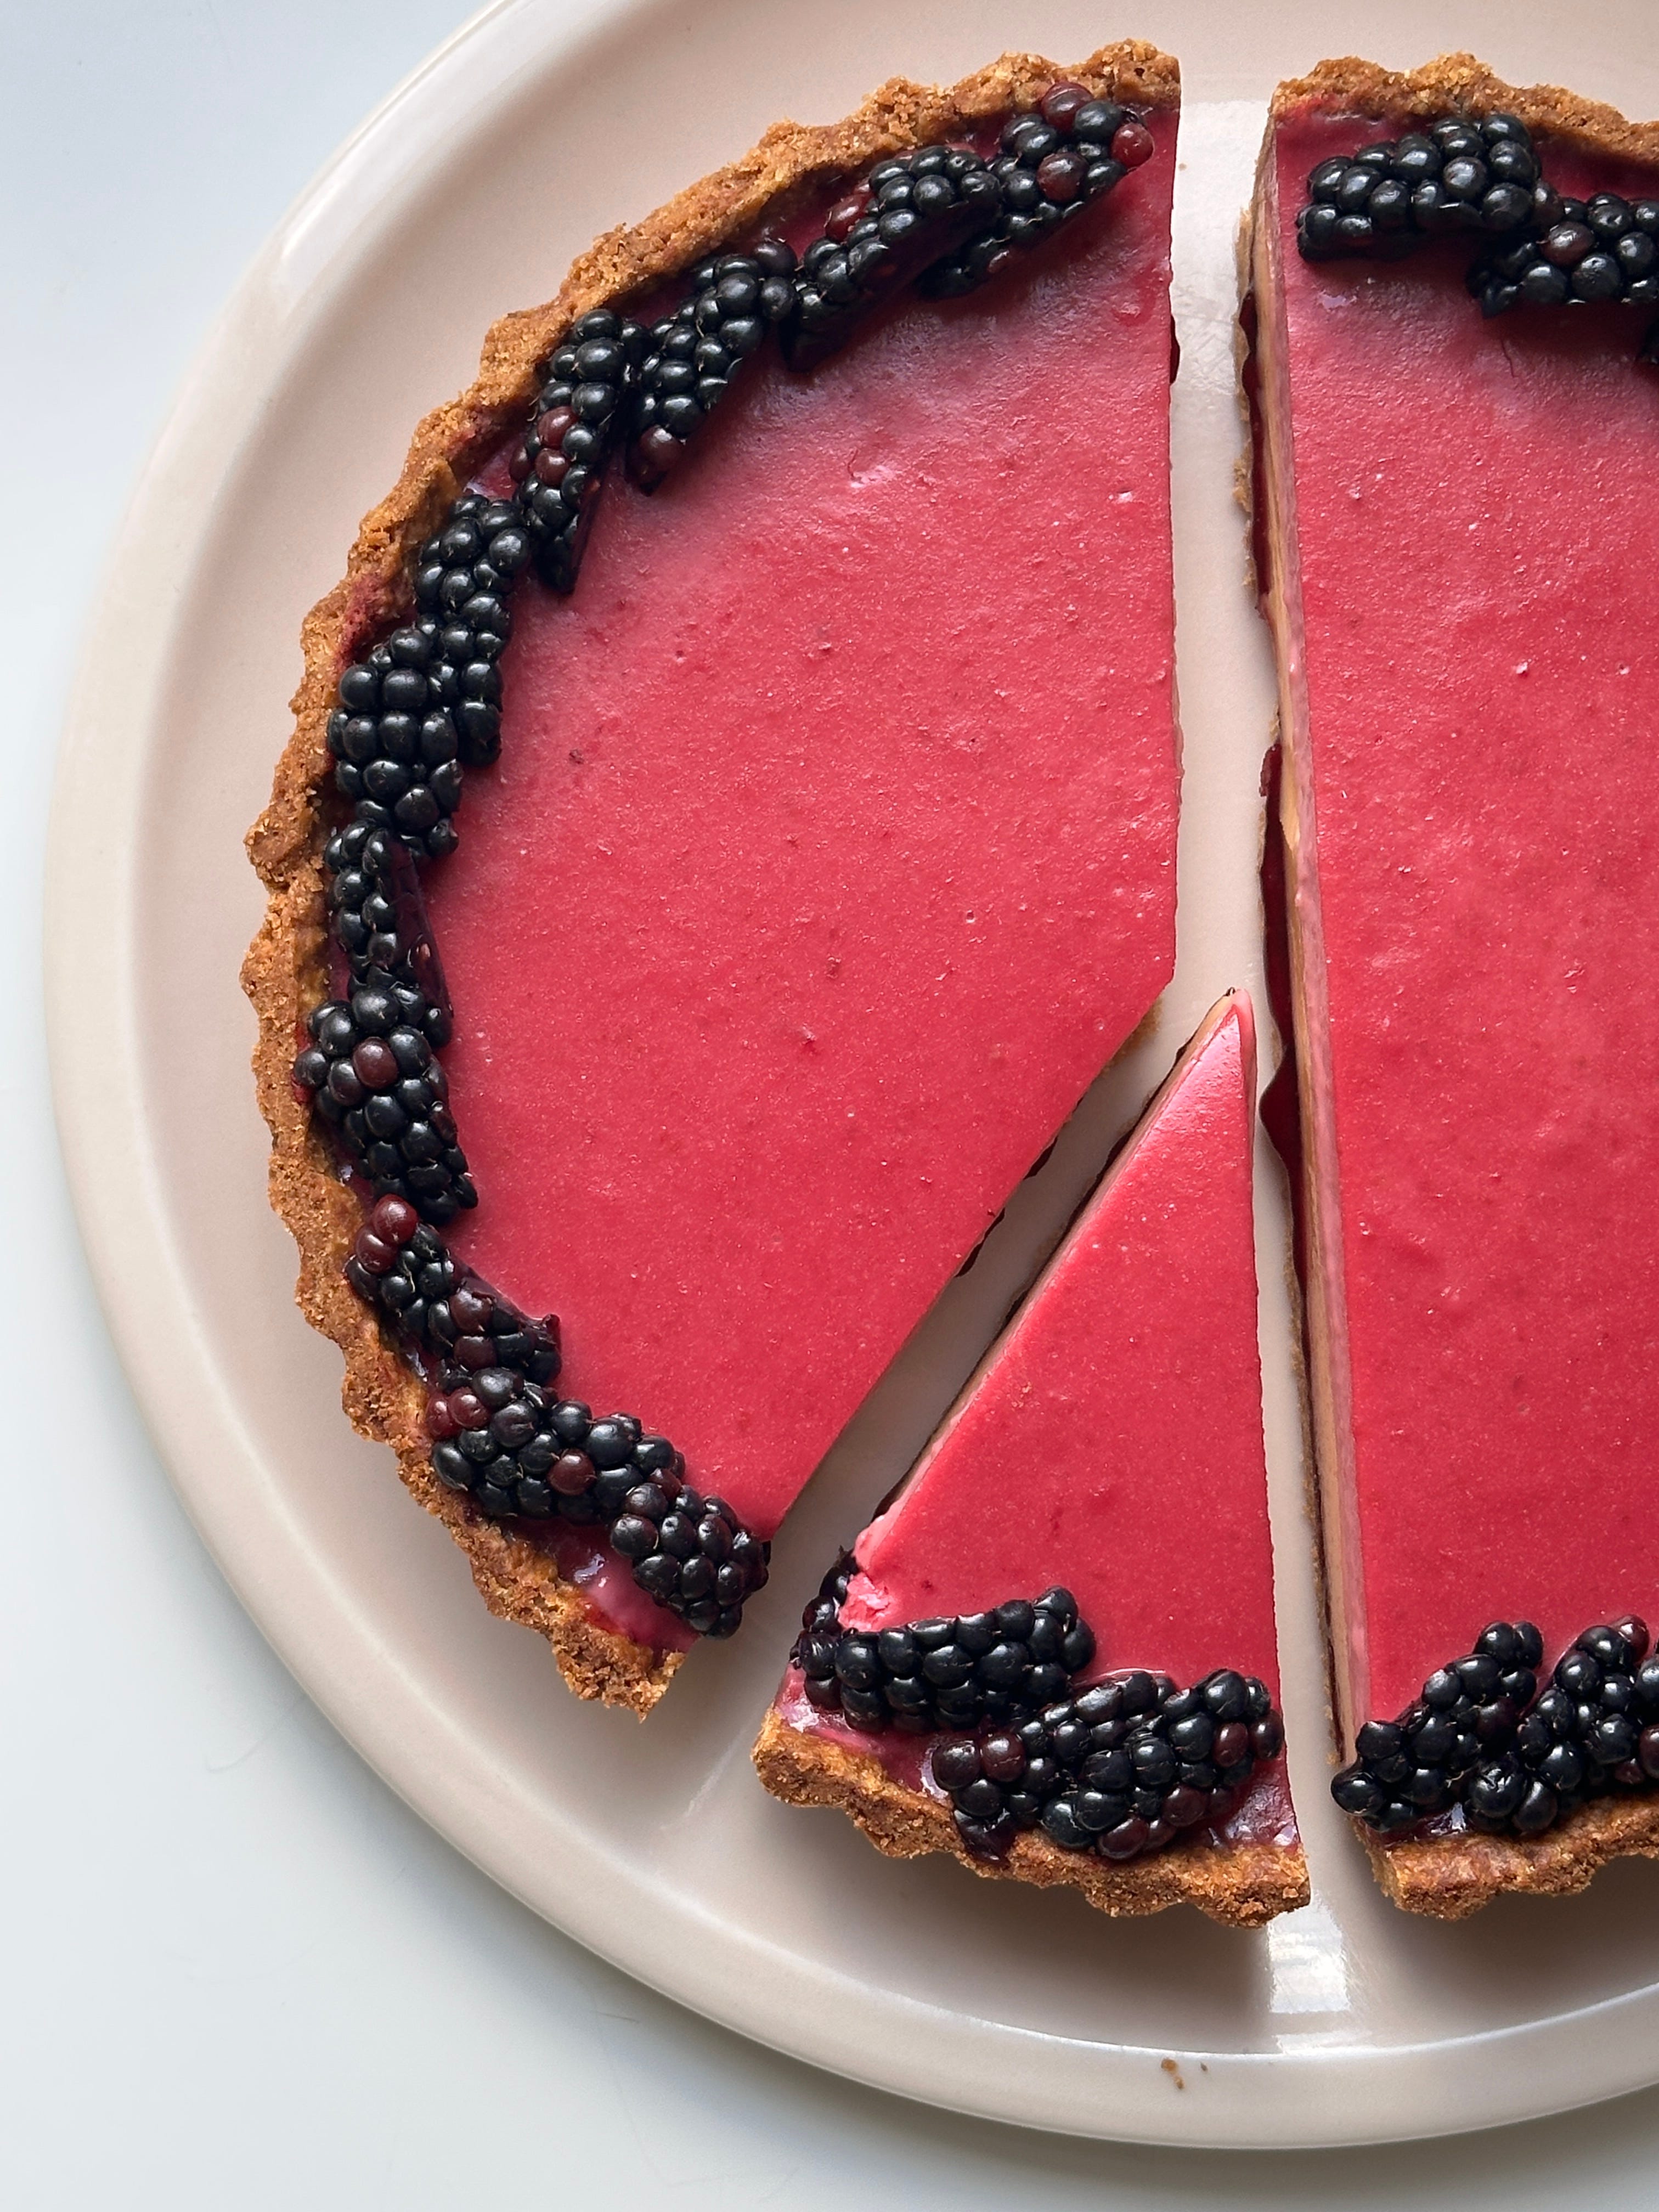
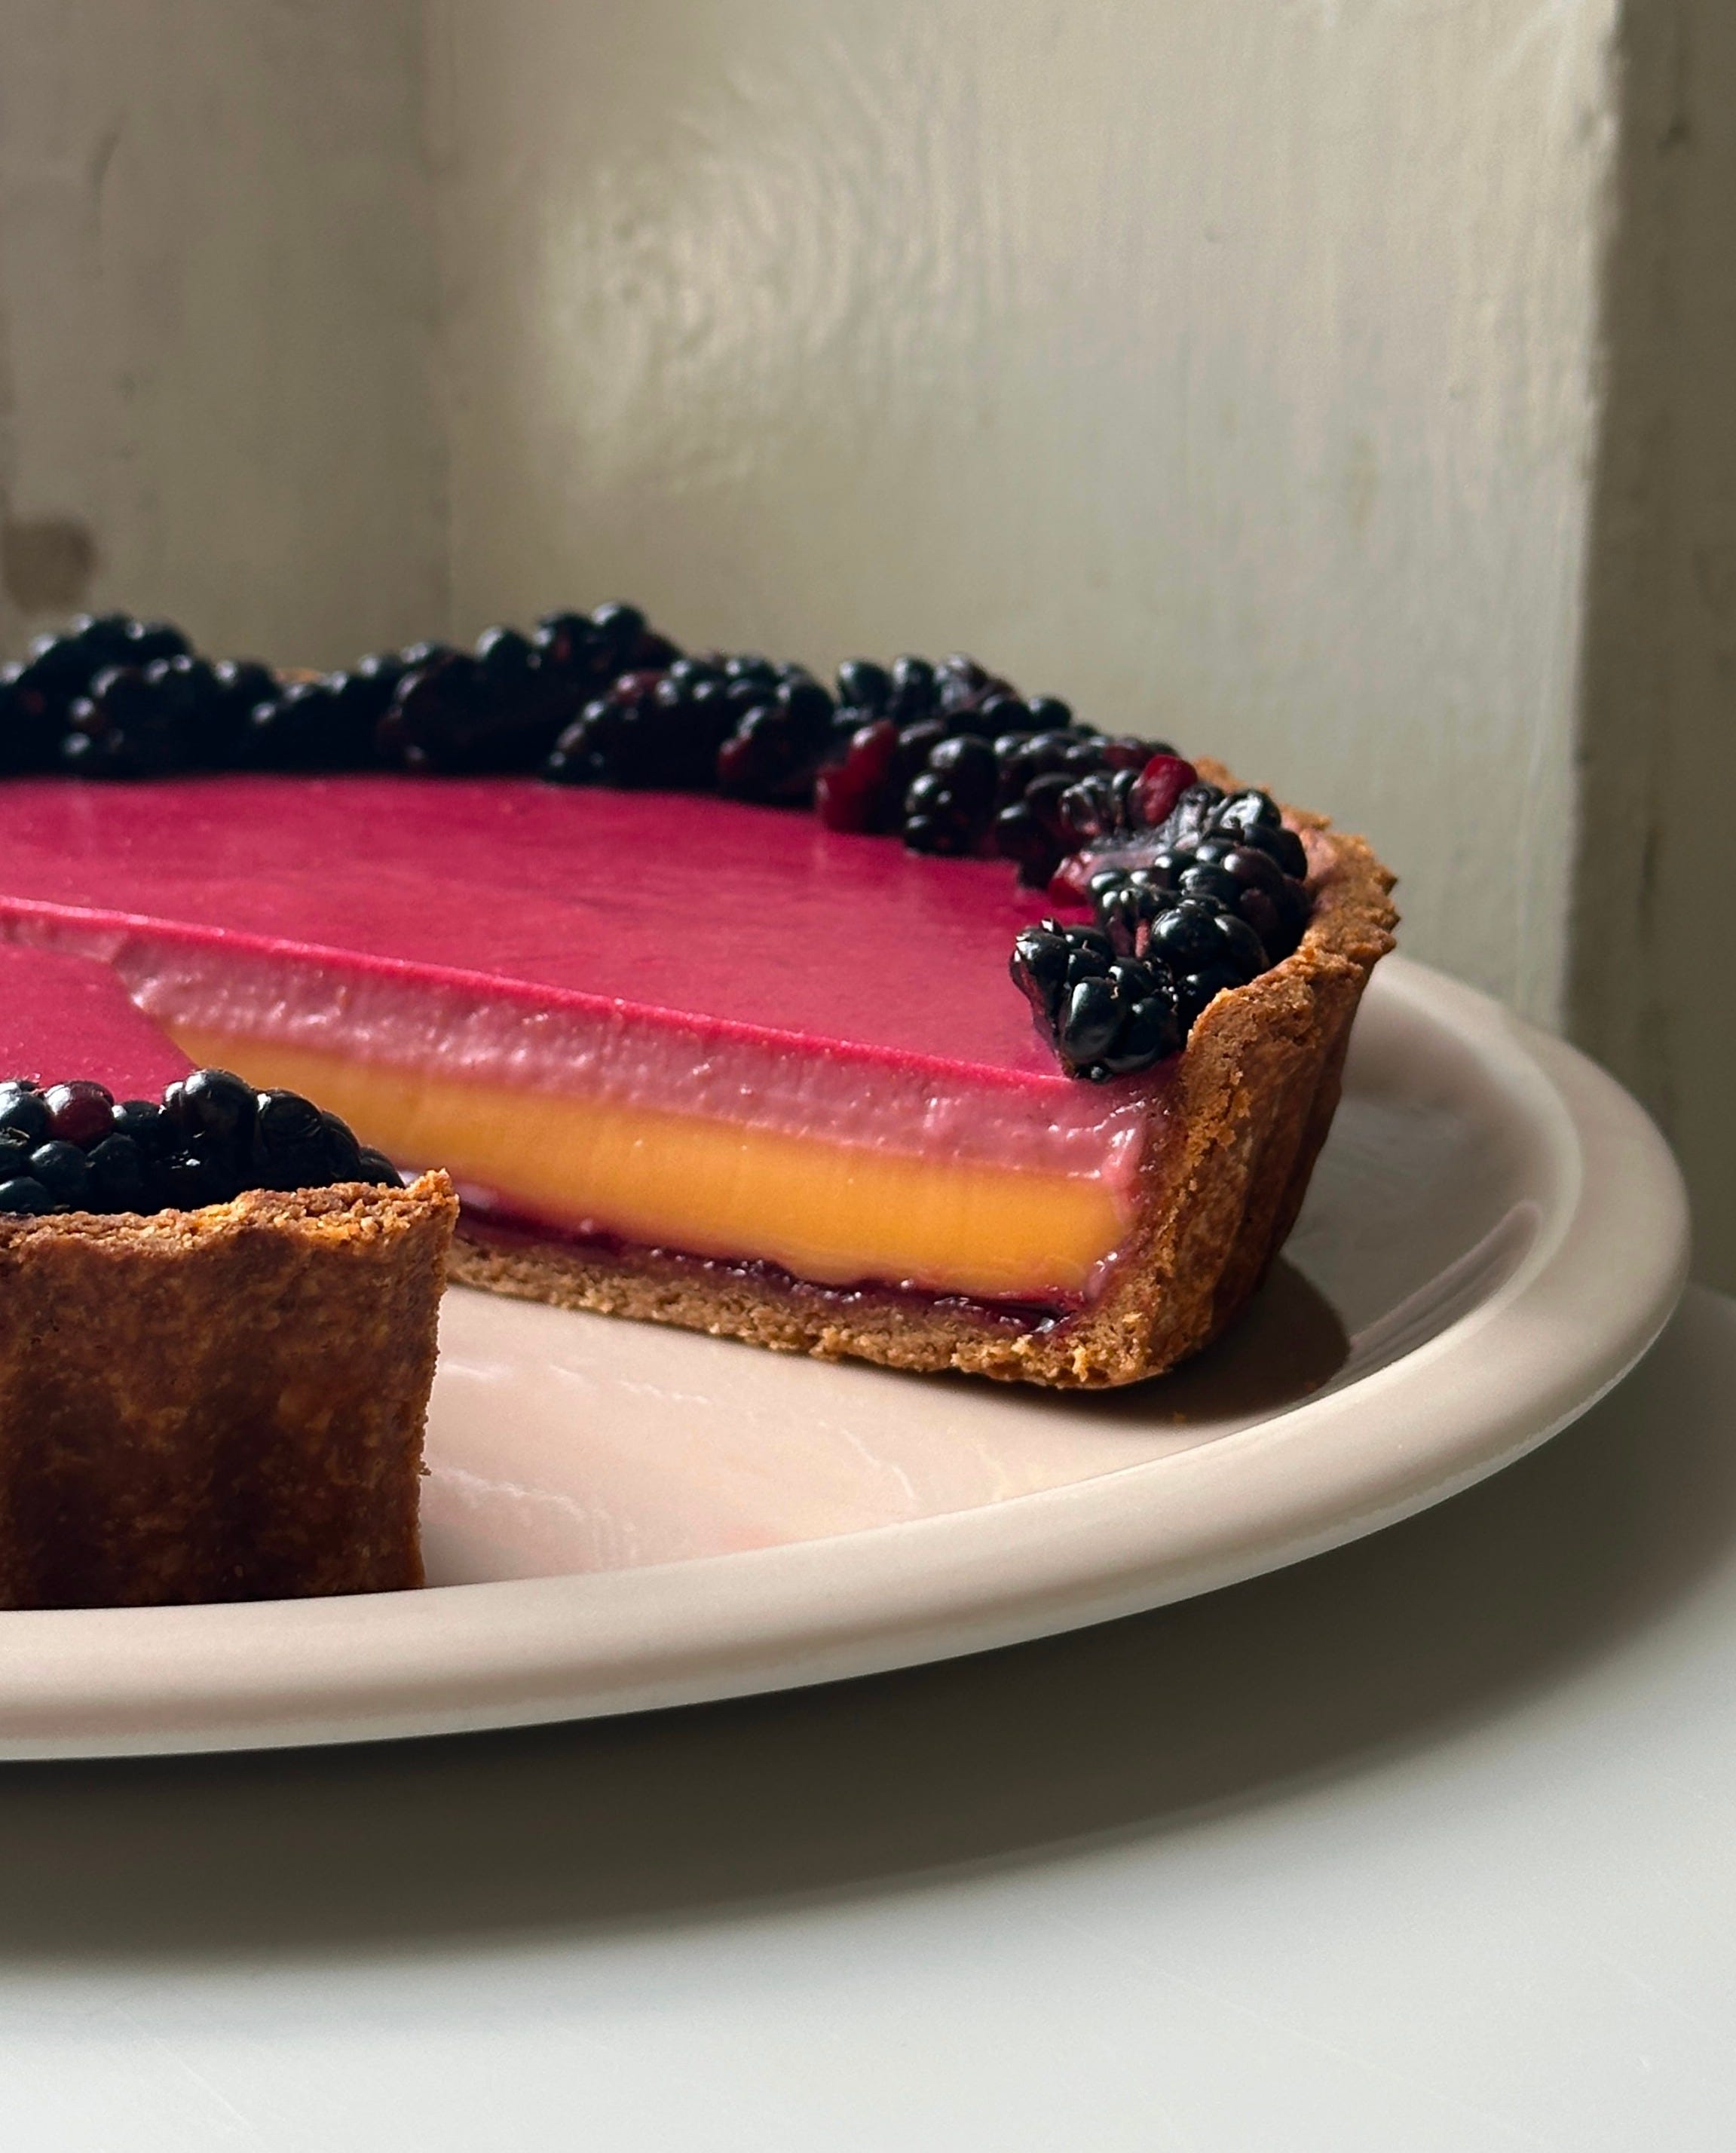
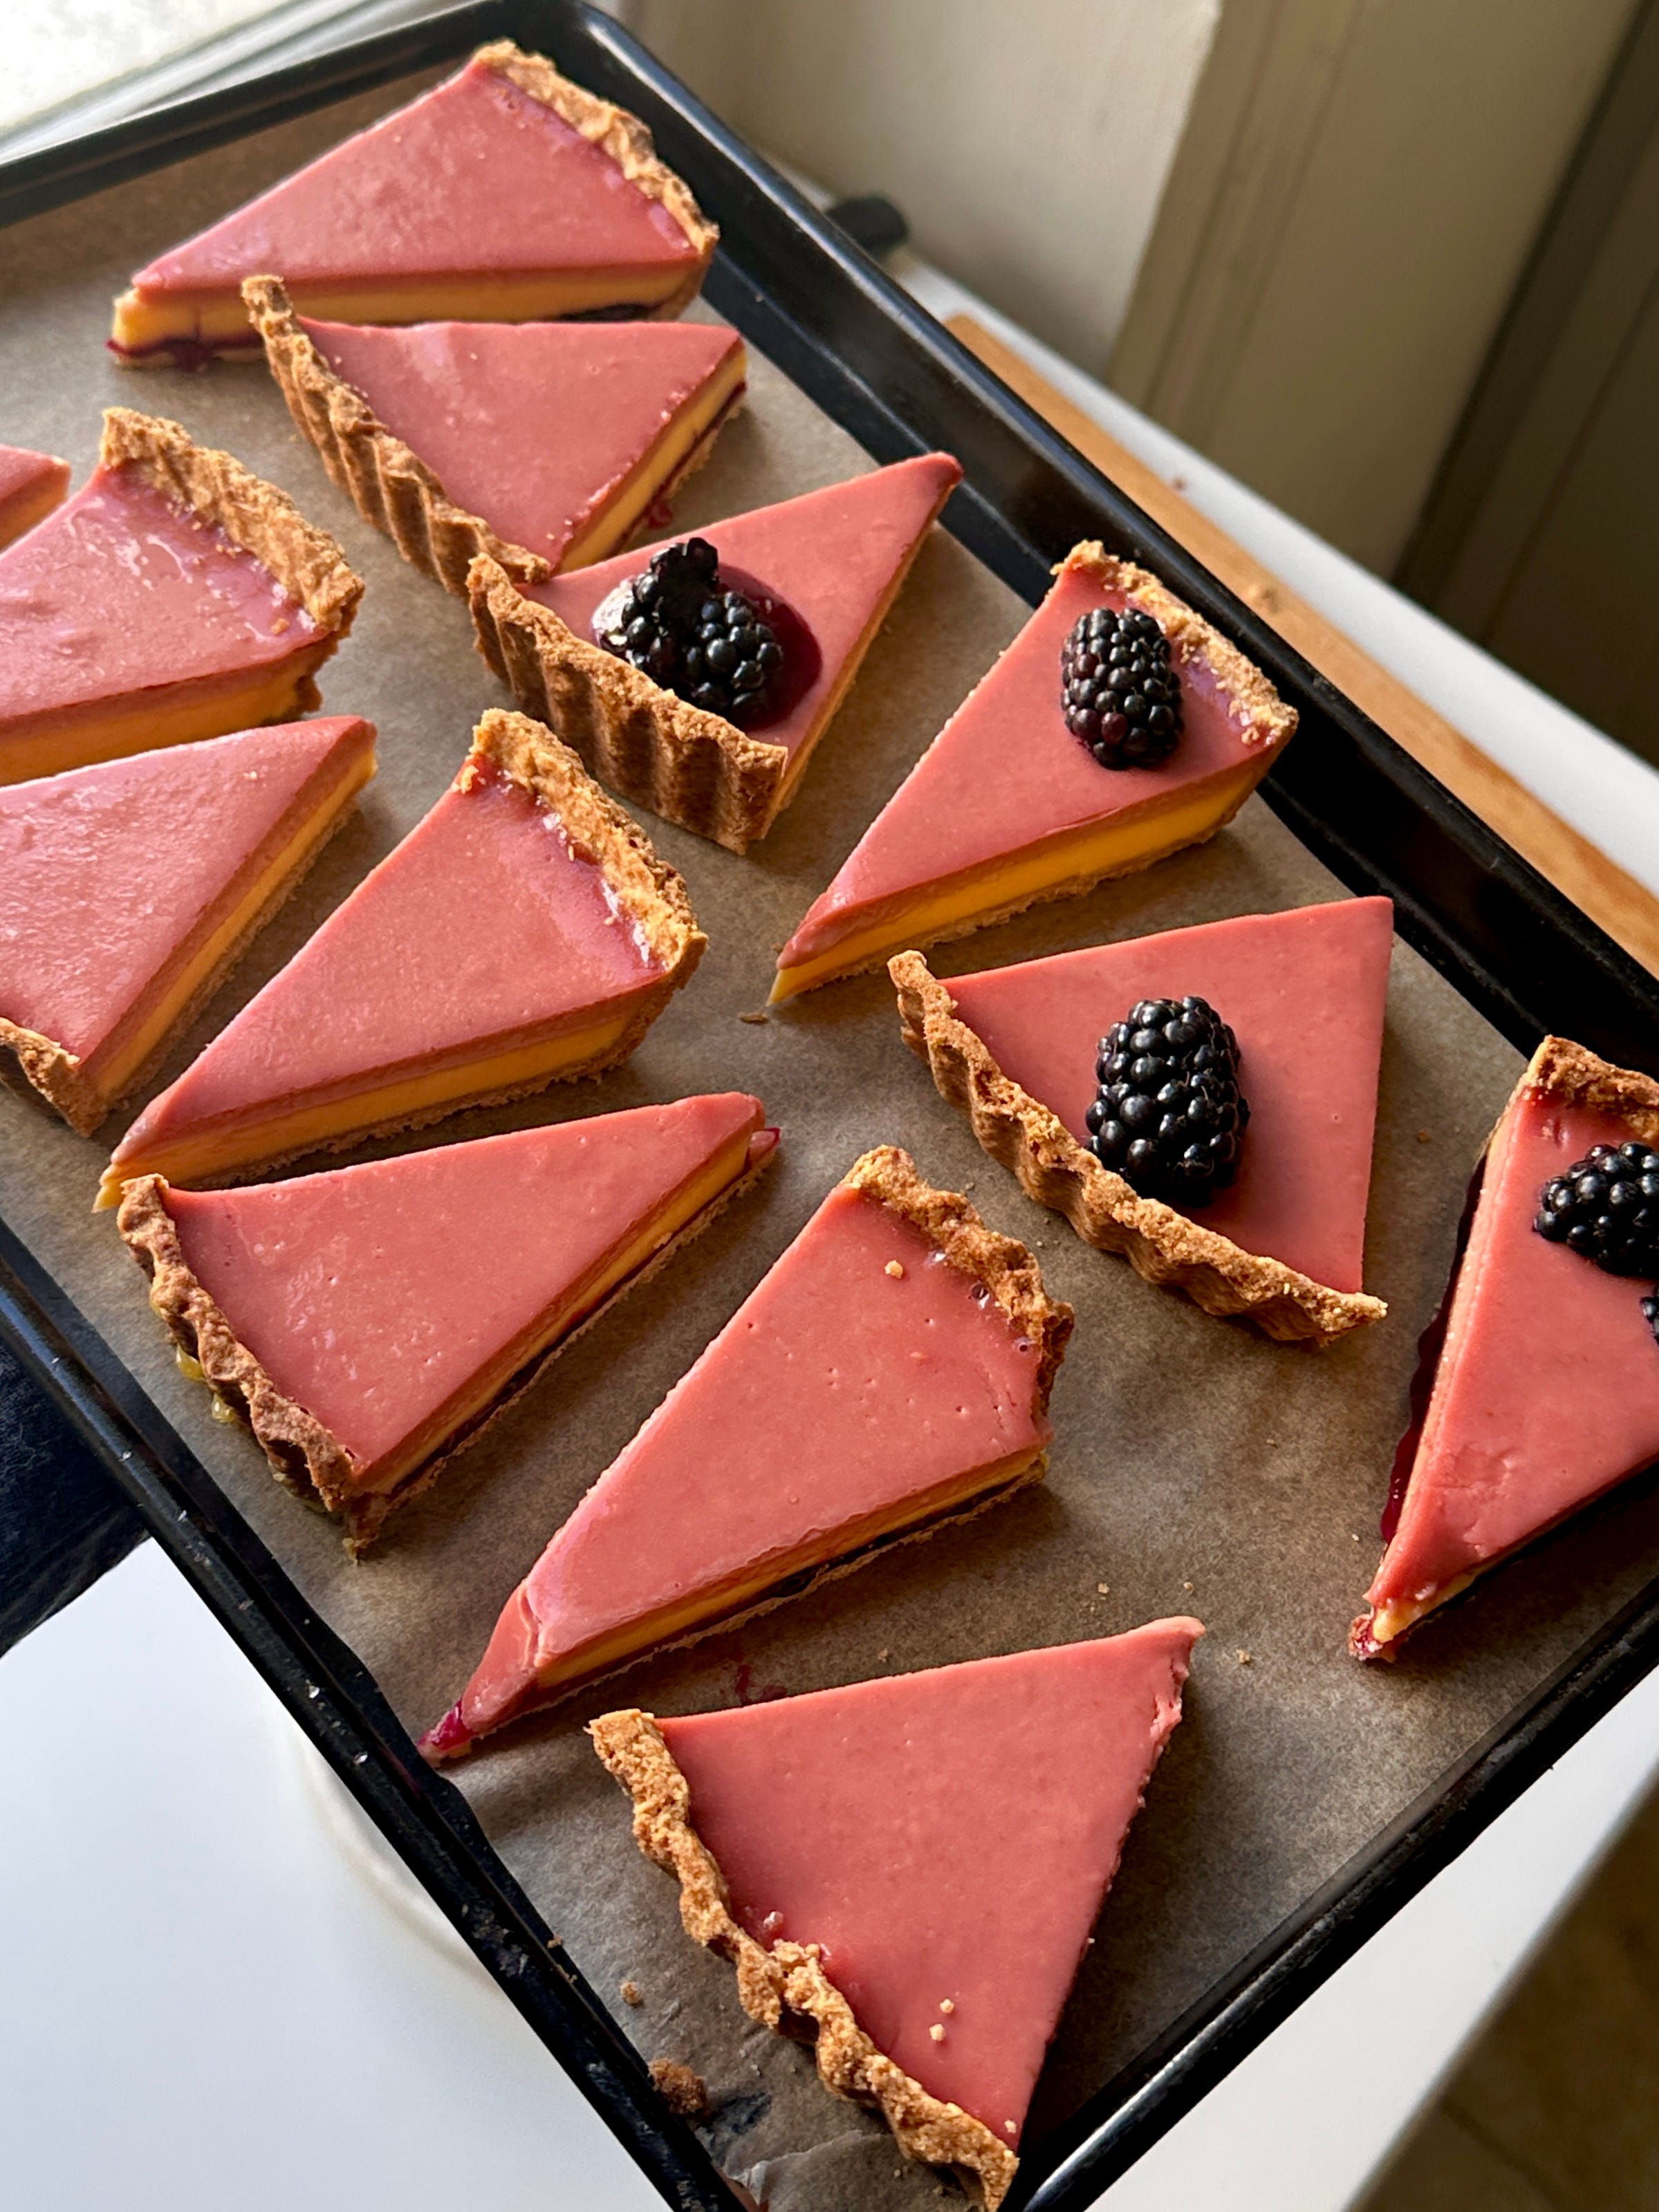
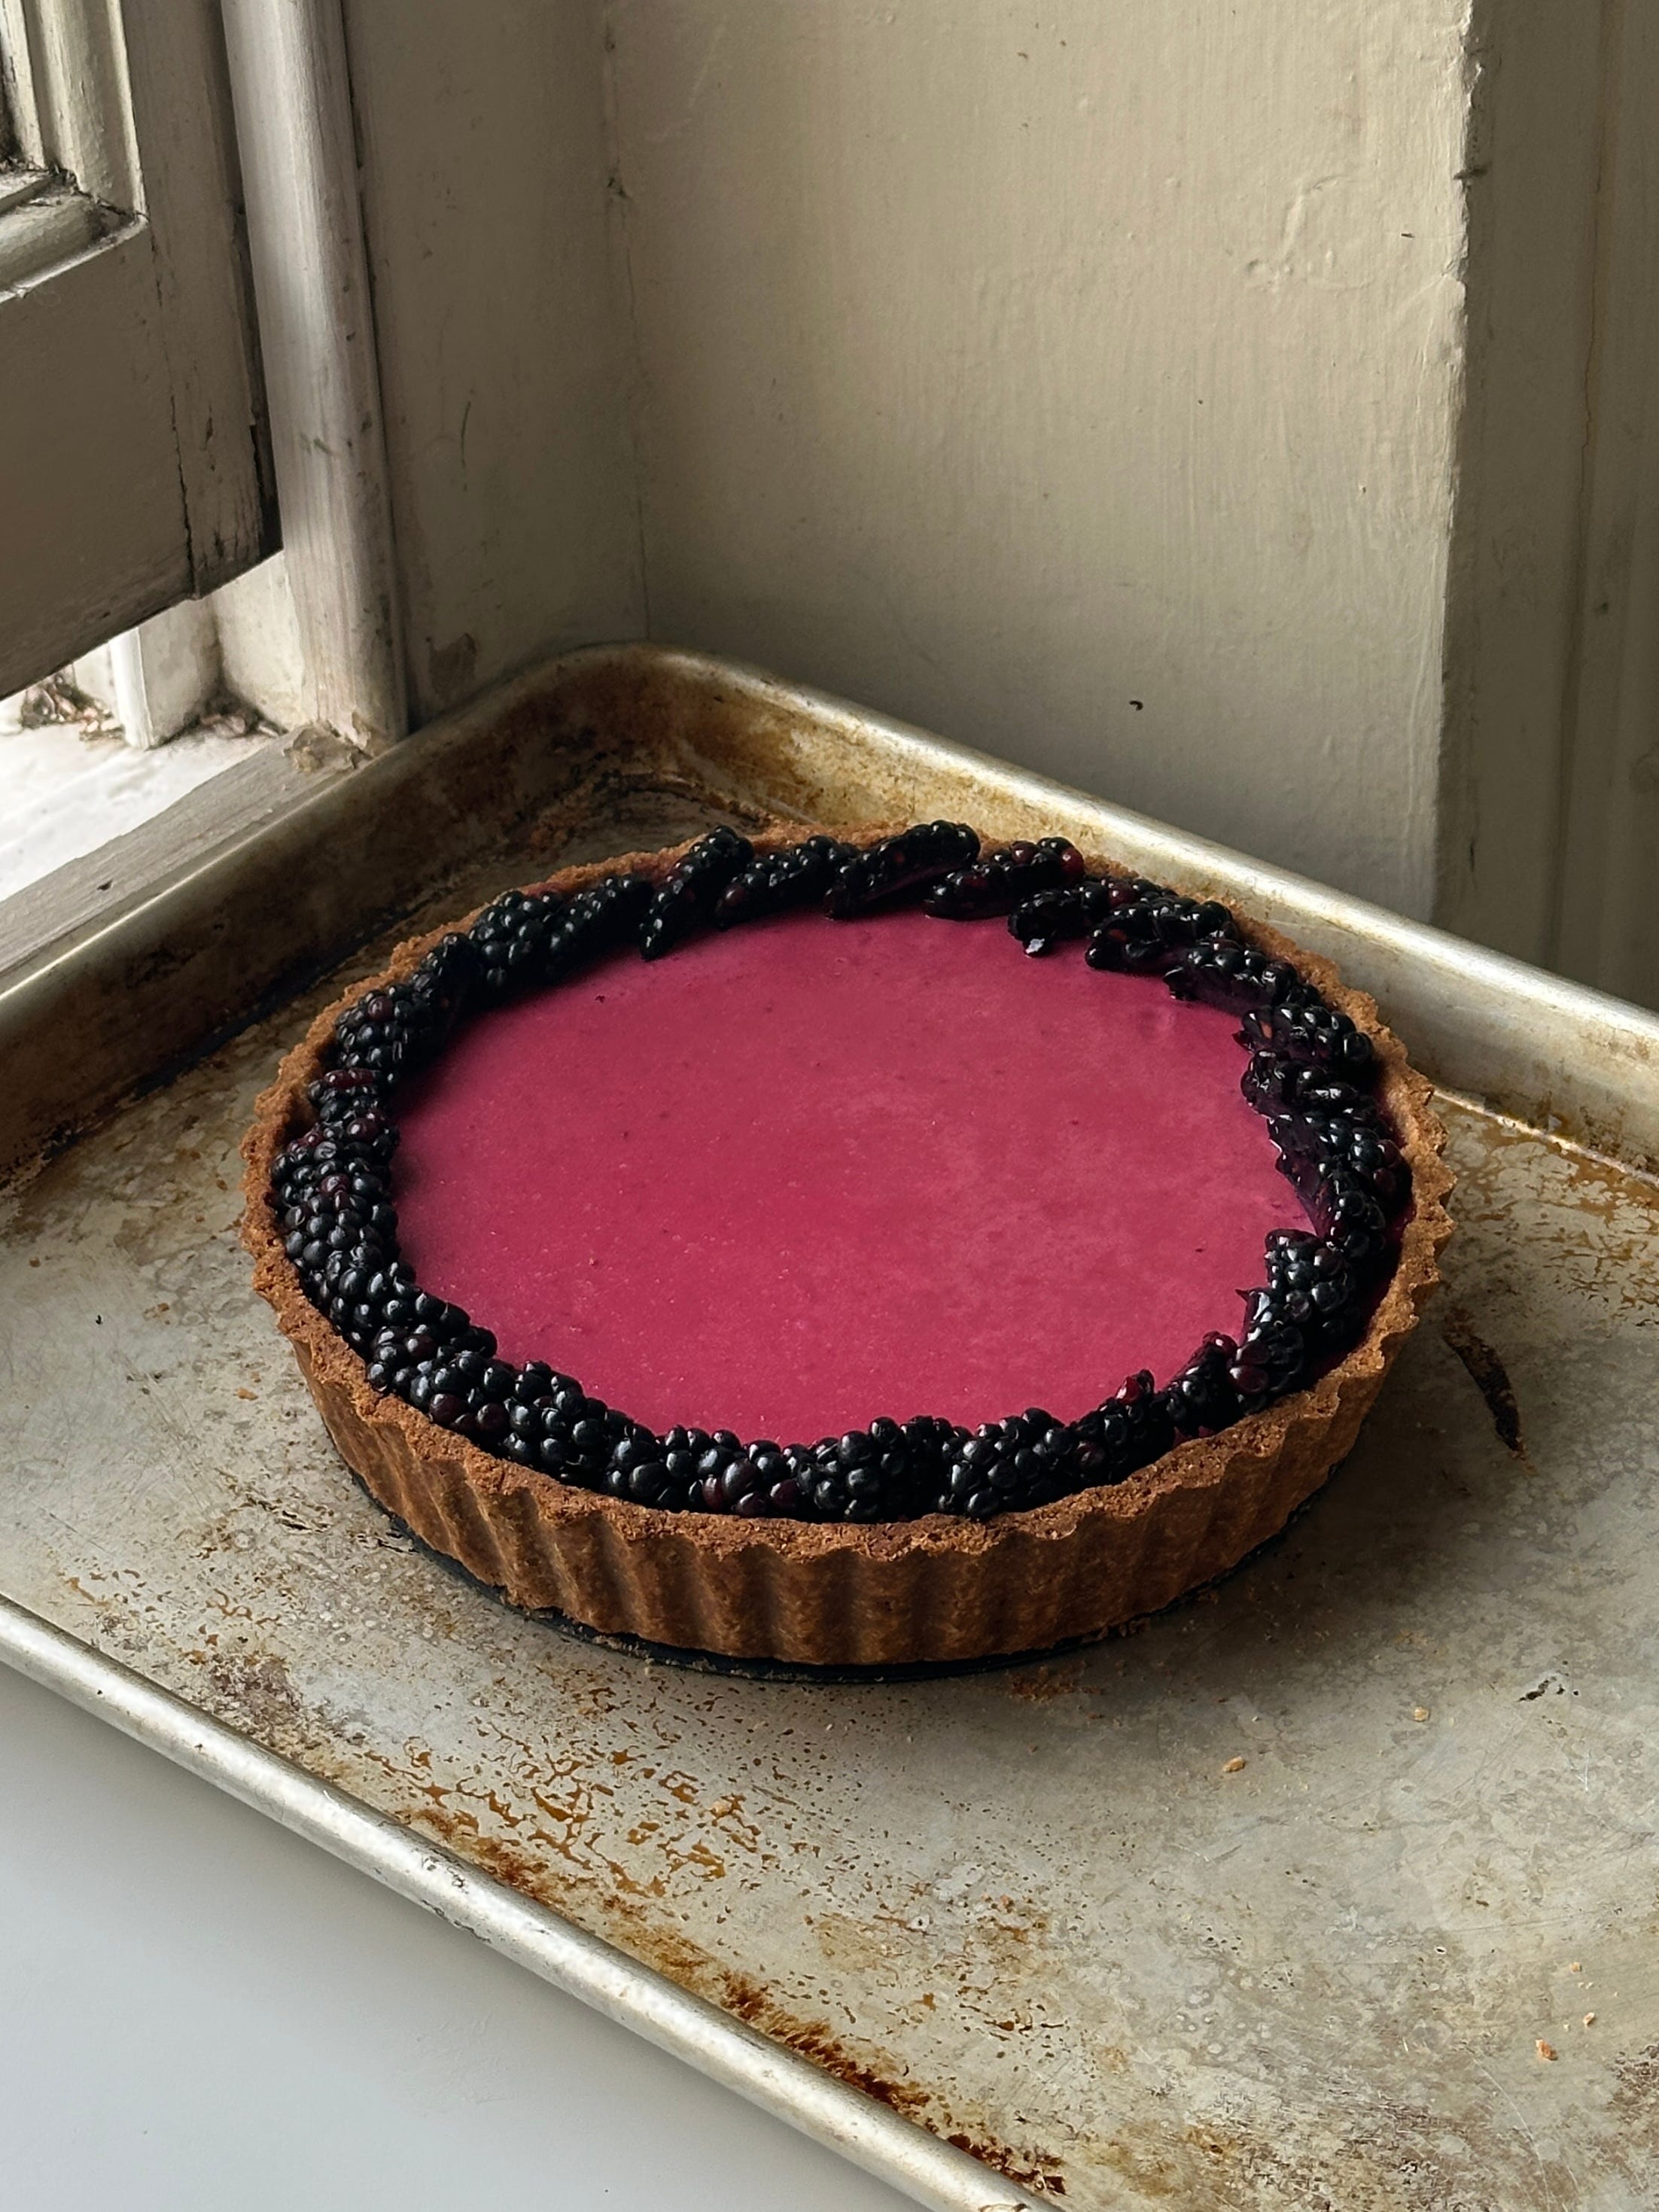
Over on KP+, you can get a level-up version of the tart - two layers of custard (a classic creamy and a bright purple damson fruit custard!) crowned with blackberries. Click here for the recipe.
What’s KP+? Well, it’s the level-up version of this newsletter. By joining KP+, you will support the writing and research that goes into the newsletter (including the commissioning - and fair payment - of all the writers), join a growing community, access extra content (inc., the entire archive) and more. Subscribing is easy and only costs £6 per month or £50 a year. Why not give it a go? Come and join the gang!
Love,
Nicola
A Work of Tart
It is September and I’ve been imbued with some ‘back to school’ energy that is forcing me to face subjects I often avoid.
For no good reason, tarts have some kind of mythic place in my mind. Difficult, scary, things to be avoided. From too many moving parts to bad memories of shrinking pastry, I still hold them in fearful regard. But, as with anything you fear, the best thing to do is look it right in the face and hold your nerve.
So, this week I decided it was time for a bit of a recipe review. Where better to start than an essential building block like pastry? Along with an endless source of fascination for me - custard formulations. That, plus a bag full of damsons rescued from an airbnb we stayed at a few weeks back, the path was clear: Damson. Custard. Tart.
As ever, I have several pastry spirit guides along with me. One such spirit guide is Tarts Anon. Or, specifically the eponymous Tarts Anon book since the IRL Tarts Anon is 10,000 miles away. A fantastic reference book, it is filled with tarts of all kinds - cake tarts! Custard tarts! Fruit tarts! Savoury tarts! It is a jewellery box of inspiration. In the intro, Tarts Anon co-founder Gareth Whitton explains the core principle of their recipe development process: Flavour Encapsulation. To quote “This means that instead of diluting the intensity of a certain flavour and increasing its volume, we add intensified and concentrated elements in a certain area of the tart, so that when it is eaten, then its flavour disperses evenly through the other elements, providing the balance.”
I absolutely love the idea of placing with precision and always developing recipes with intention. So, in today’s newsletter we’ll take a journey through each element of a custard tart, and figure out how to honour the damson the Tarts Anon way. A huge thanks to the team there for the inspiration and guidance for today’s newsletter.
On Damsons
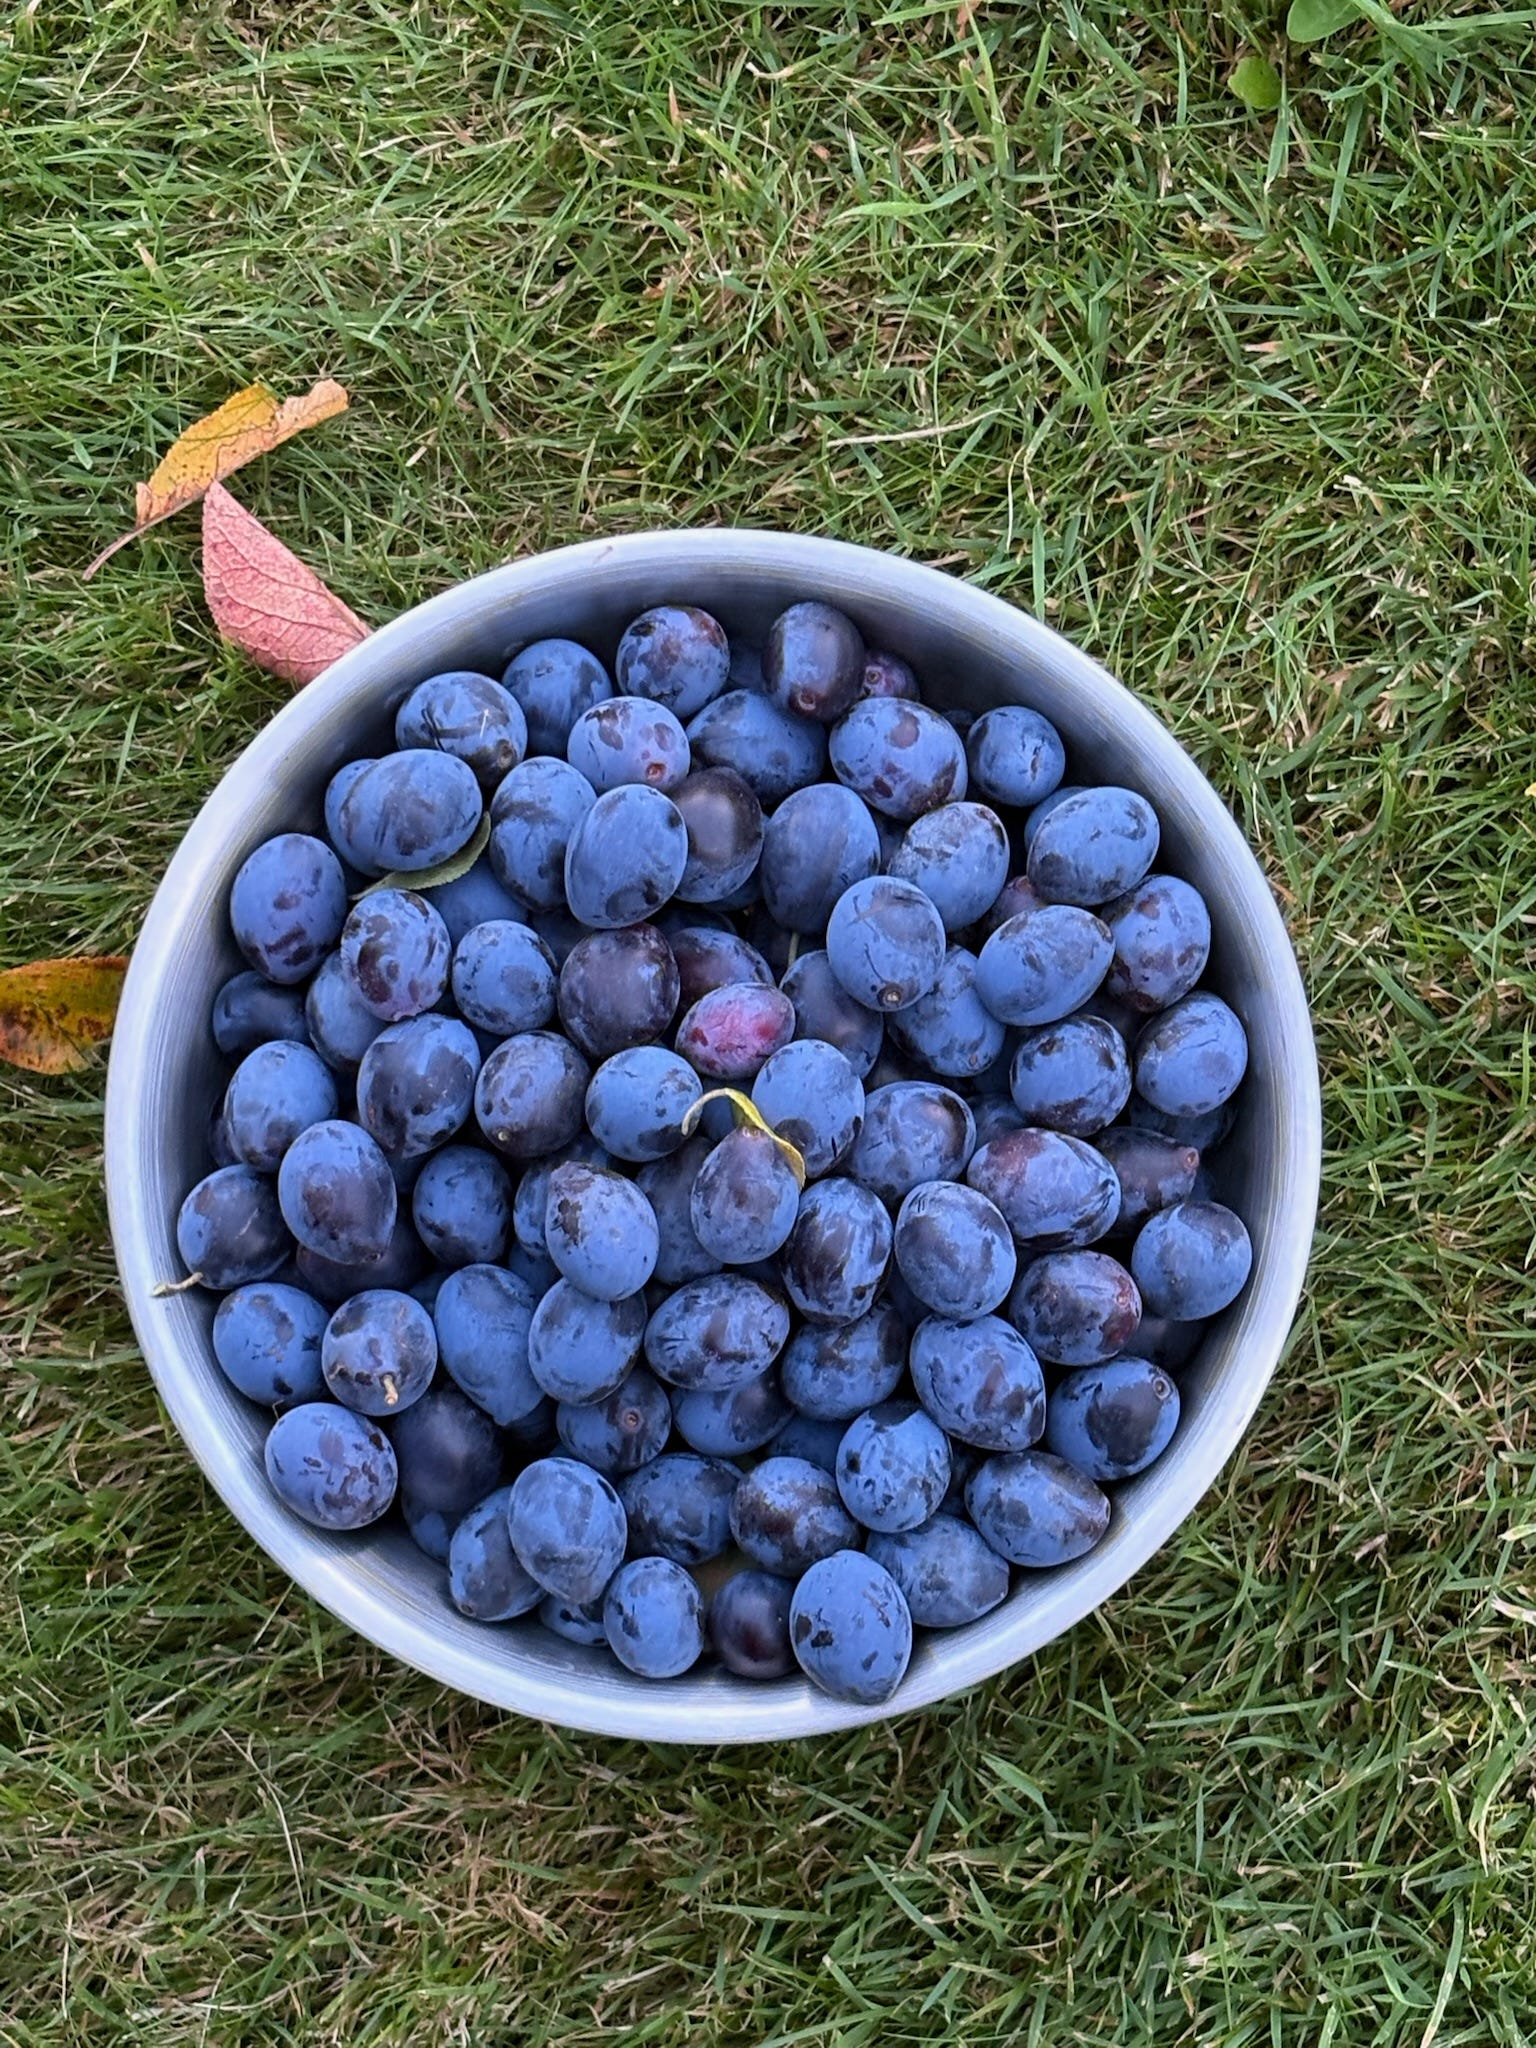
A few weeks ago I was in Rye celebrating my mum’s 70th birthday. We stayed in a beautiful cottage with a tumbling garden filled with very happy plants. One such happy plant was a damson tree, growing quietly in a corner of hedgerows. It was heaving with opaque purple fruit, orbs with the inherent quality of a Dutch Masters still life.
I am not against stealing from fruit trees that are at risk of falling into rotten disrepair come autumn. But, as luck would have it, a quick text to the owner gave me full permission to take as many Damsons as I wanted. We didn’t hold back, filling mixing bowls to the rim. There’s nothing better than a perfectly aligned exchange like that - the owner of the tree felt I was doing her a favour by taking all the fruit, while I felt like I had won the damson lottery.
If you aren’t familiar with damsons, they are a variety of plum. Small and bright, too acidic to enjoy raw (though these ones weren’t quite as sour as others), they make incredible jam. Though the grand-dame of food writing, Jane Grigson, has not much to say about them (In Fruit, she explains that she finds their power “difficult to enjoy” and that it needs “plenty of something else … to make it tolerably pleasant,”), I think they are a magical fruit that makes perfect jam. The high ratio of skin to flesh means it is full of pectin and the sparkling purple colour improves pretty much any bake you introduce it to. And even if Jane doesn’t like it, I can tell you that according to his memoir Toast, it is Nigel Slater’s favourite - a whole chapter named after it, in fact. That is a big win for damsons everywhere.


For the classic tart, I’ve added a layer of jam, baked into the case til sticky to prevent it floating up during the low and slow section of the bake. But over on KP+, it’s a level-up.
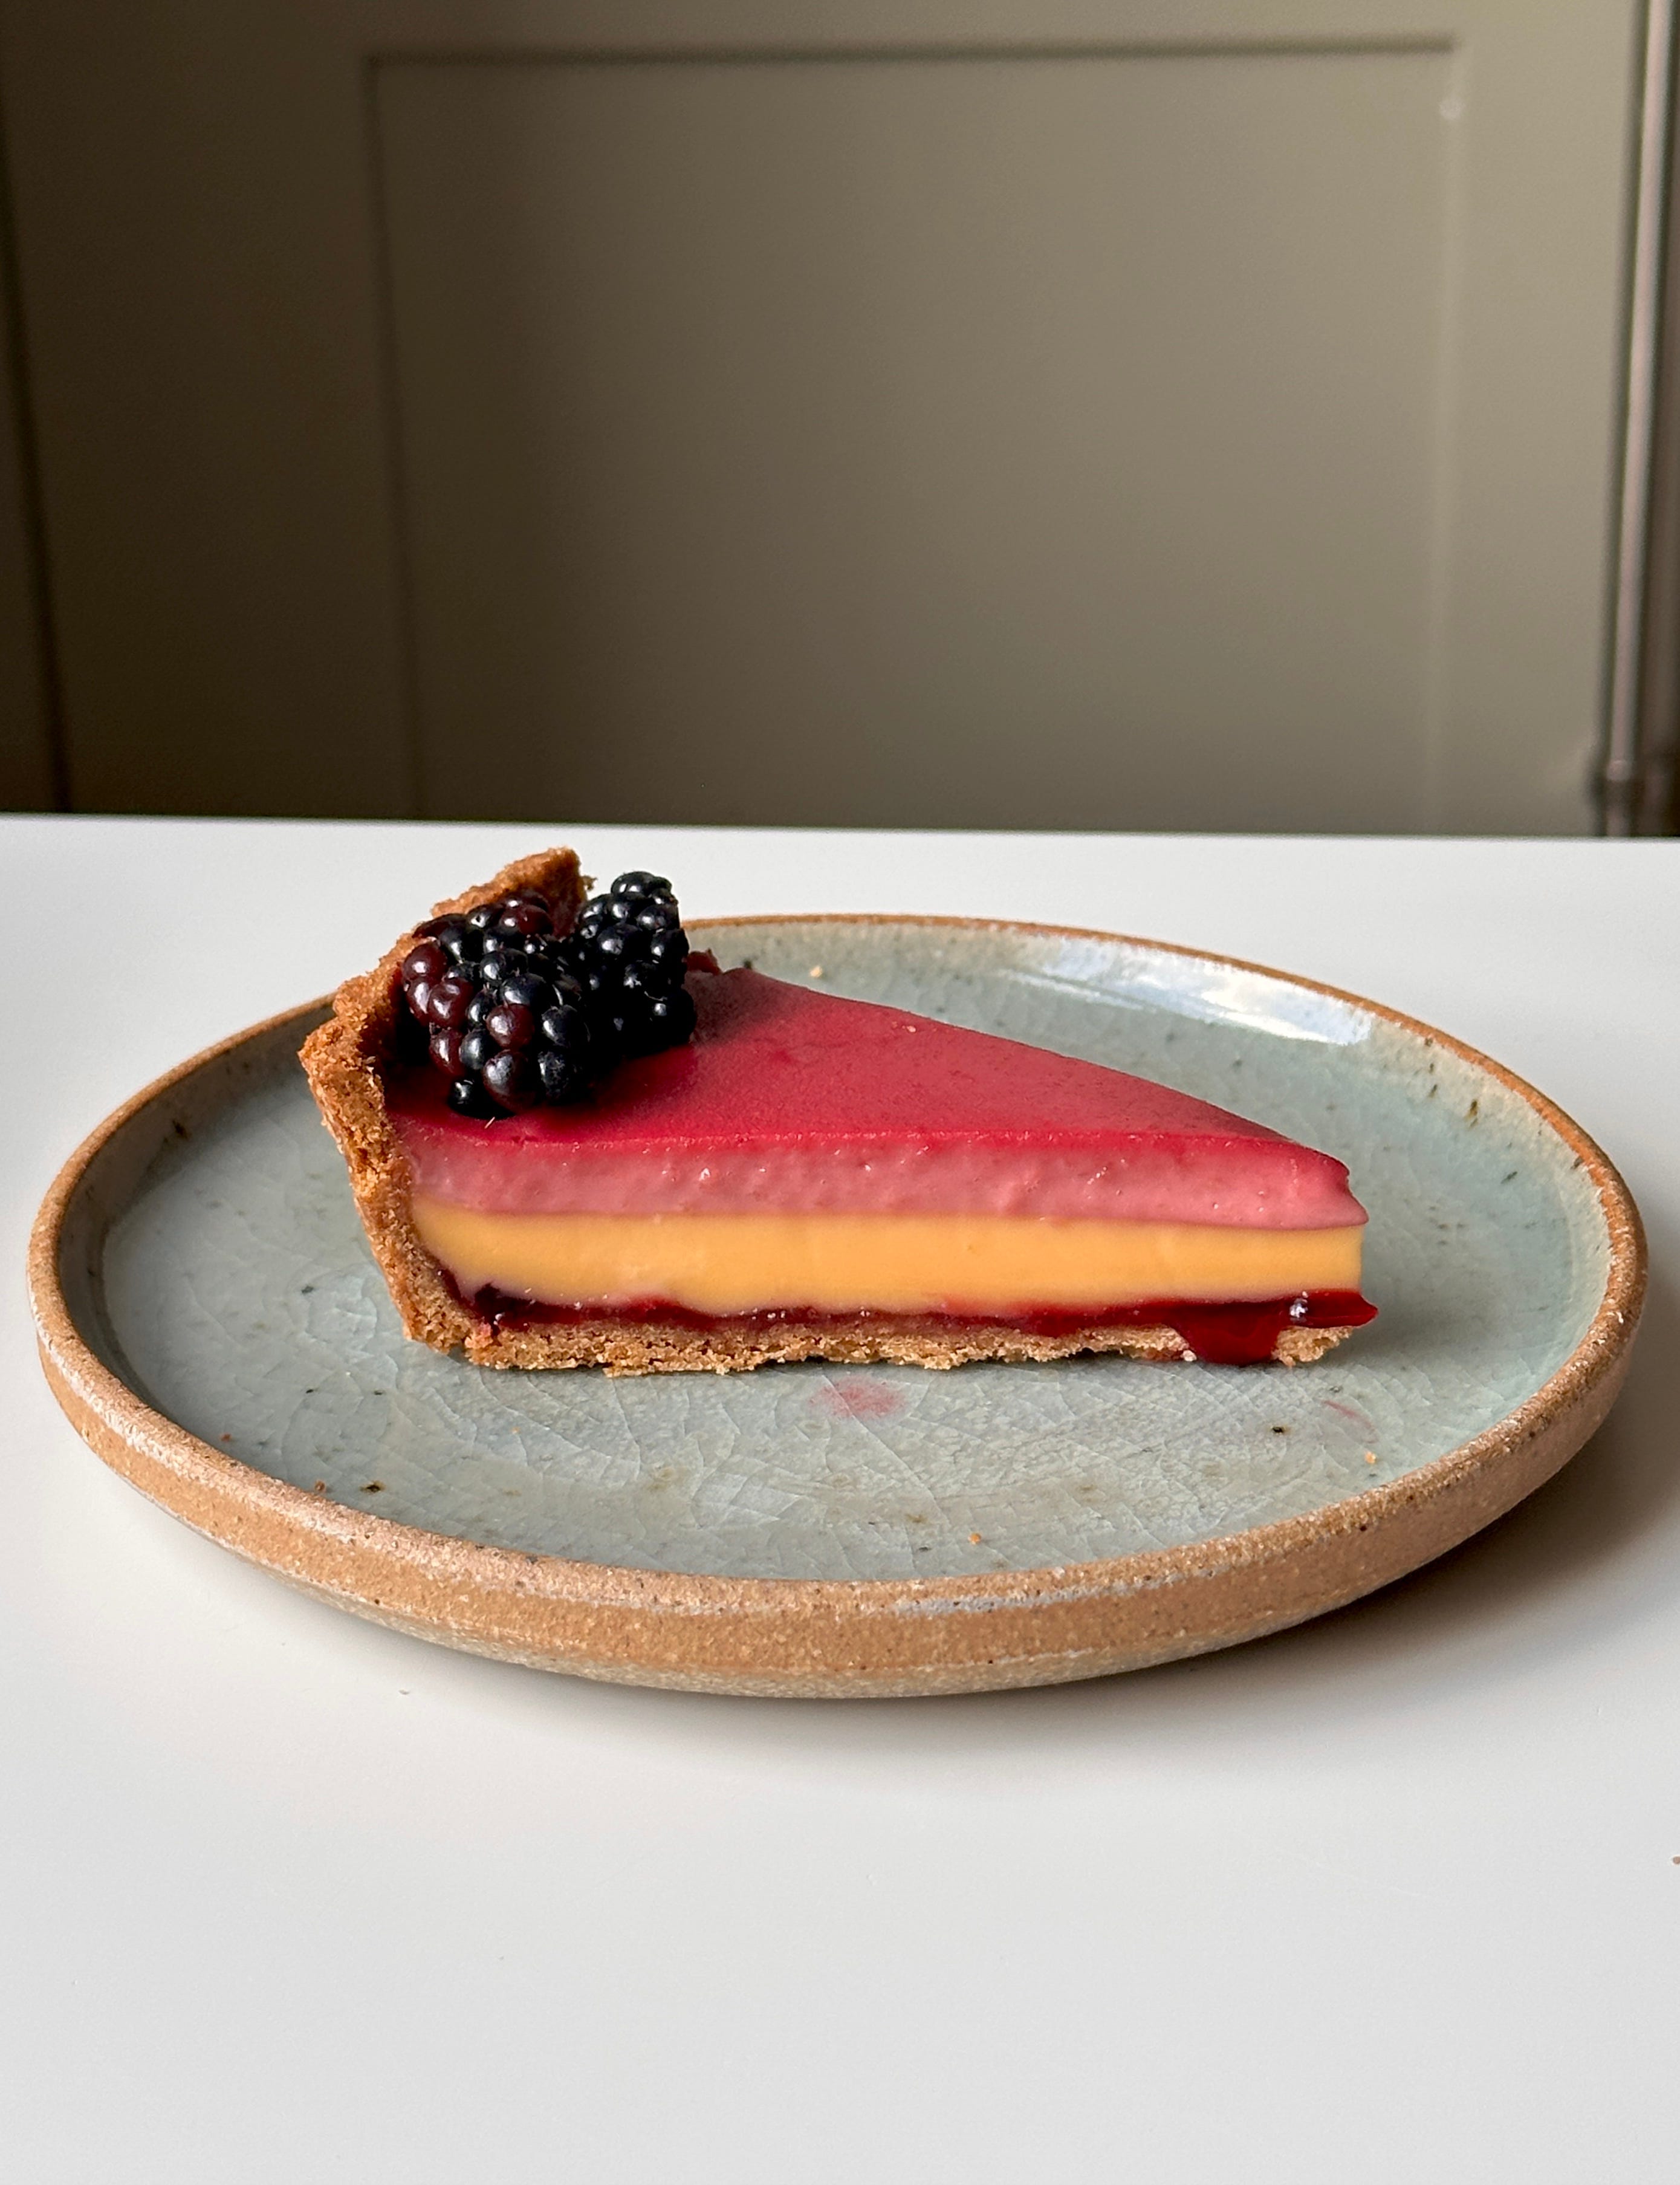
Over on KP+, I’ve developed a triple layered custard tart with the most beautiful purple custard. It was fascinating figuring out how to make the damson layer and adhere the layers together. Read it here now.
The Pastry
For something that forms the bedrock of so many bakes, pastry is also the bane of many bakers’ existence. Underbaked, shrinking, floppy, raw, burnt, and everything in between. With such simple ingredients - flour, fat and liquid, it shouldn’t cause so much frustration. It’s a paradox really - pastry can be both ordinary and terrifying.
There’s also a whole world out there - on this newsletter alone, we’ve traversed sweet tart pastry, speculoos pastry, flaky pastry, rough puff, pistachio pastry and puff pastry to name just a few. But a really good, crumbed in, straight forward, home economics vibe shortcrust? We’ve yet to cover it. And since Tarts Anon use an unsweetened pate brisee (the french name for shortcrust), I was emboldened to give it a shot.
In its simplest form, shortcrust pastry is just flour, butter and water. You can use egg or yolks in place of water, and add salt or sugar to season. It’s been a while since I reviewed my shortcrust recipes so I mixed up a few batches to see the lay of the land. From altering the mixing method (crumbing butter in vs creaming), the butter ratio, the sugar (icing vs. caster) and hydrating with yolk or egg vs water:
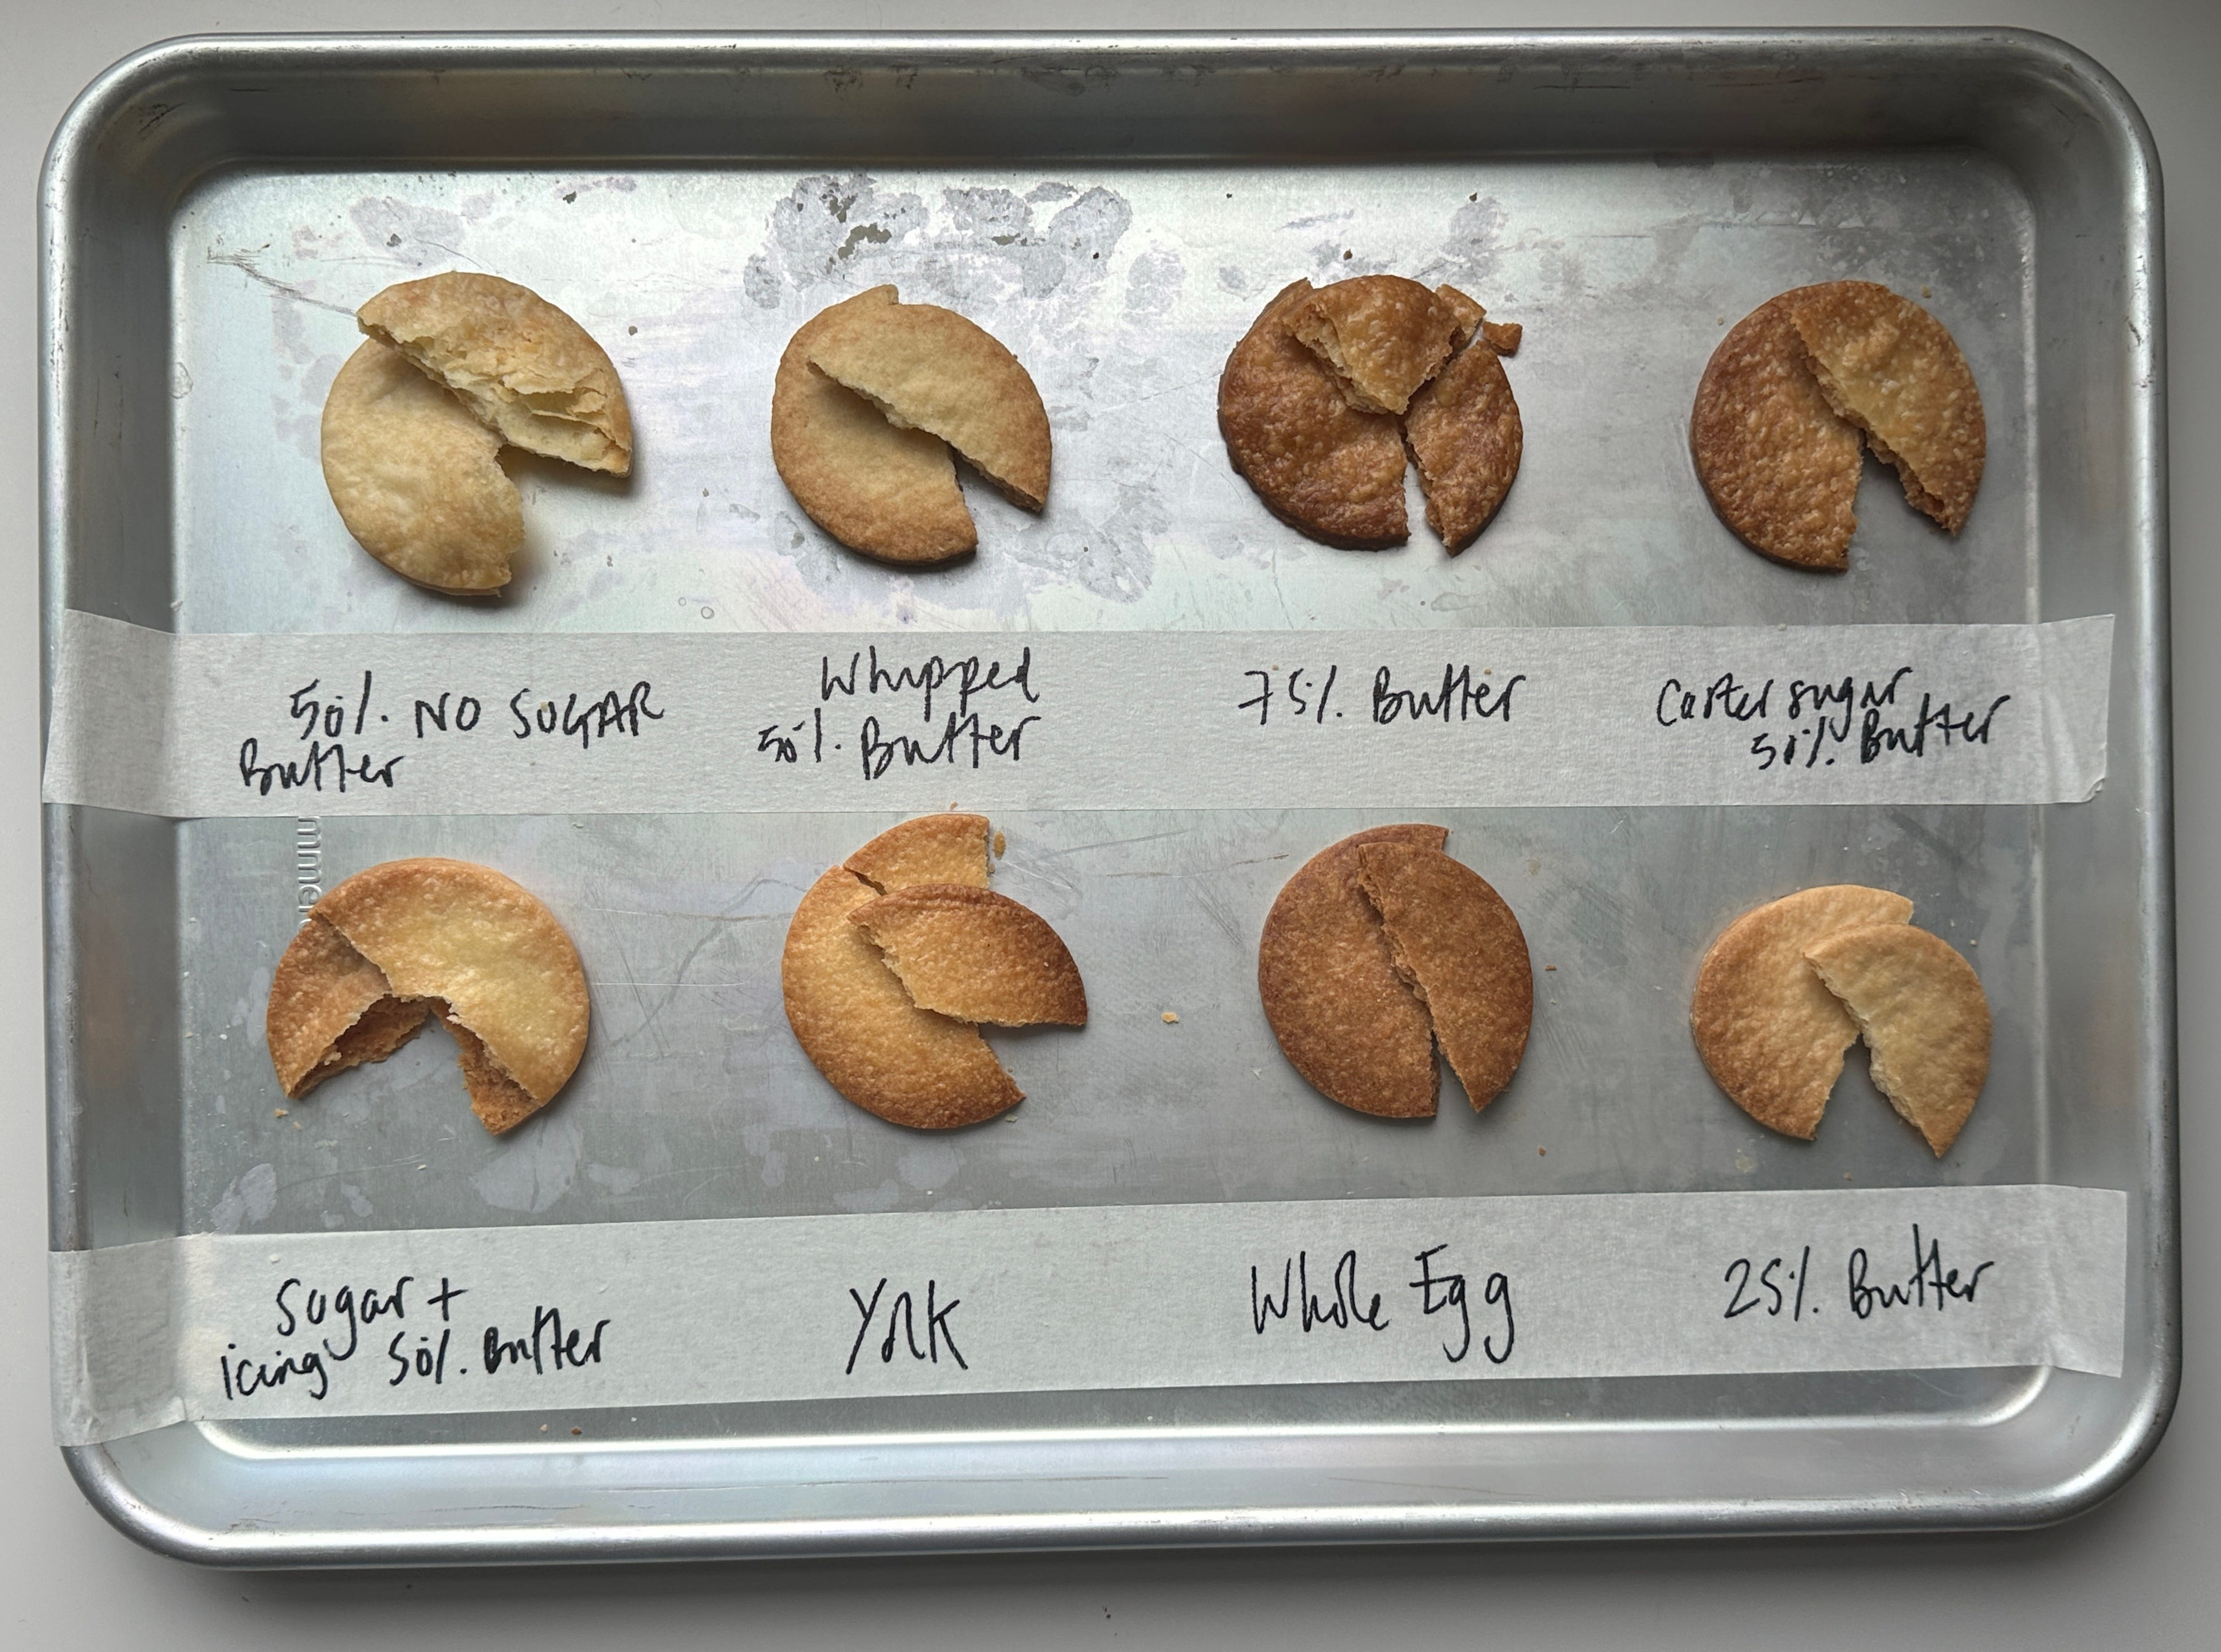
The most standard mix, 50% butter to flour, a little salt, and just enough water to bring it together, was a little charmless, though not bad at all. At the other end, 75% butter made for an intensely rich and buttery dough, but one that was frustratingly fragile. 25%, as you can imagine, felt a bit mean. Creaming the butter created a dough that was more even but less airy; it lacked the crumbly mouthfeel I wanted. Adding eggs took things in another direction entirely: yolk and whole egg gave a rich flavour, with the yolk-only dough so short it dissolved instantly in the mouth — lovely as a standalone biscuit, but over the top for the classic shortcrust I was aiming for.
In the end, I landed on a formula of 60% butter to flour, seasoned with just enough sugar and salt to feel balanced (not sweet, not plain), and hydrated with water. Doughs that use water rather than egg are more susceptible to shrinking, since there is more water available for gluten to form, but with proper mixing and resting, those problems can be minimised. I have utmost confidence in my sweet pastry recipe - it doesn’t shrink, it can’t be moved. BUT, for shortcrust, I prefer an insurance policy. I line the case then leave a 1cm overhang which I trim later after the bake. For me, that extra step helps mitigate any stress or anxiety I might feel.
A note on blind baking before we move on: Perhaps it is my oven, but I always think blind baking shortcrust pastry takes FOREVER. Usually way longer than a recipe method tells you. Especially if you have it at a decent thickness (say 3-4mm so it has some crunch) - you have to trust your eyes and nose over a number written in a method. Over this week, the blind baking time has been anywhere from 40 - 60+ minutes for me to get it really biscuitty and baked through.
The Custard
A DISCLAIMER for any US readers, please note that custard is really just a catch all term for any kind of liquid or dairy set with eggs. Consider then that cheesecake is a custard! As are most of your cream pies (what you call ‘filling’, we call ‘custard’, I’ve noticed…), too. Don’t be discouraged. A rose by any other name would smell as sweet, etc.etc.
Of all the tarts, a classic British custard tart is the one that pastry chefs return to for major impact. The barest ingredient list of all - yolks, cream, sugar - perhaps vanilla, often nutmeg, it is masterful in its simplicity. The most popular custard tart formulation is almost certainly that of Marcus Wareing recipe - 9 egg yolks, lots of cream and a touch of sugar. It is unbelievably rich. Compared to its worldly counterparts, the pasteis de nata, the Macau Egg Custard Tart, the burnished Parisian Flan, it is perhaps – as expected for the British – the most austere looking. But what it lacks in visual pizzaz, it makes up for in intense, creamy texture and depth of flavour. If anything, it is a way to show off our access to extraordinary dairy.
But within a custard formula is a ripe opportunity for adjustment. You have two main levers to pull - the dairy itself and whether you use whole or separated eggs. The final third lever is the ratio and relationship between the dairy and eggs.
Lever 1: The Dairy / Liquid
Typically custard tart is made with the richest, thickest cream possible - British double cream sits at a plump 50% fat (it is interesting to note that Parisien Flan tends to use no cream, and instead gets its unctuousness from starch-thickened milk, and as well as eggs). The lessons here are similar to that of the panna cotta we discussed a few weeks back; When eggs coagulate, they provide a protein network - a framework of sorts - to trap and hold the liquid. The richer and fattier the base (like cream), the less water there is for that network to bind, which leads to a firmer set overall. Acidity and sugar shift this balance too: acid speeds up coagulation, so custards set faster, while sugar slows the process, delaying the set.
I mixed up tests to see which I liked best, as well as a test featuring damson puree:

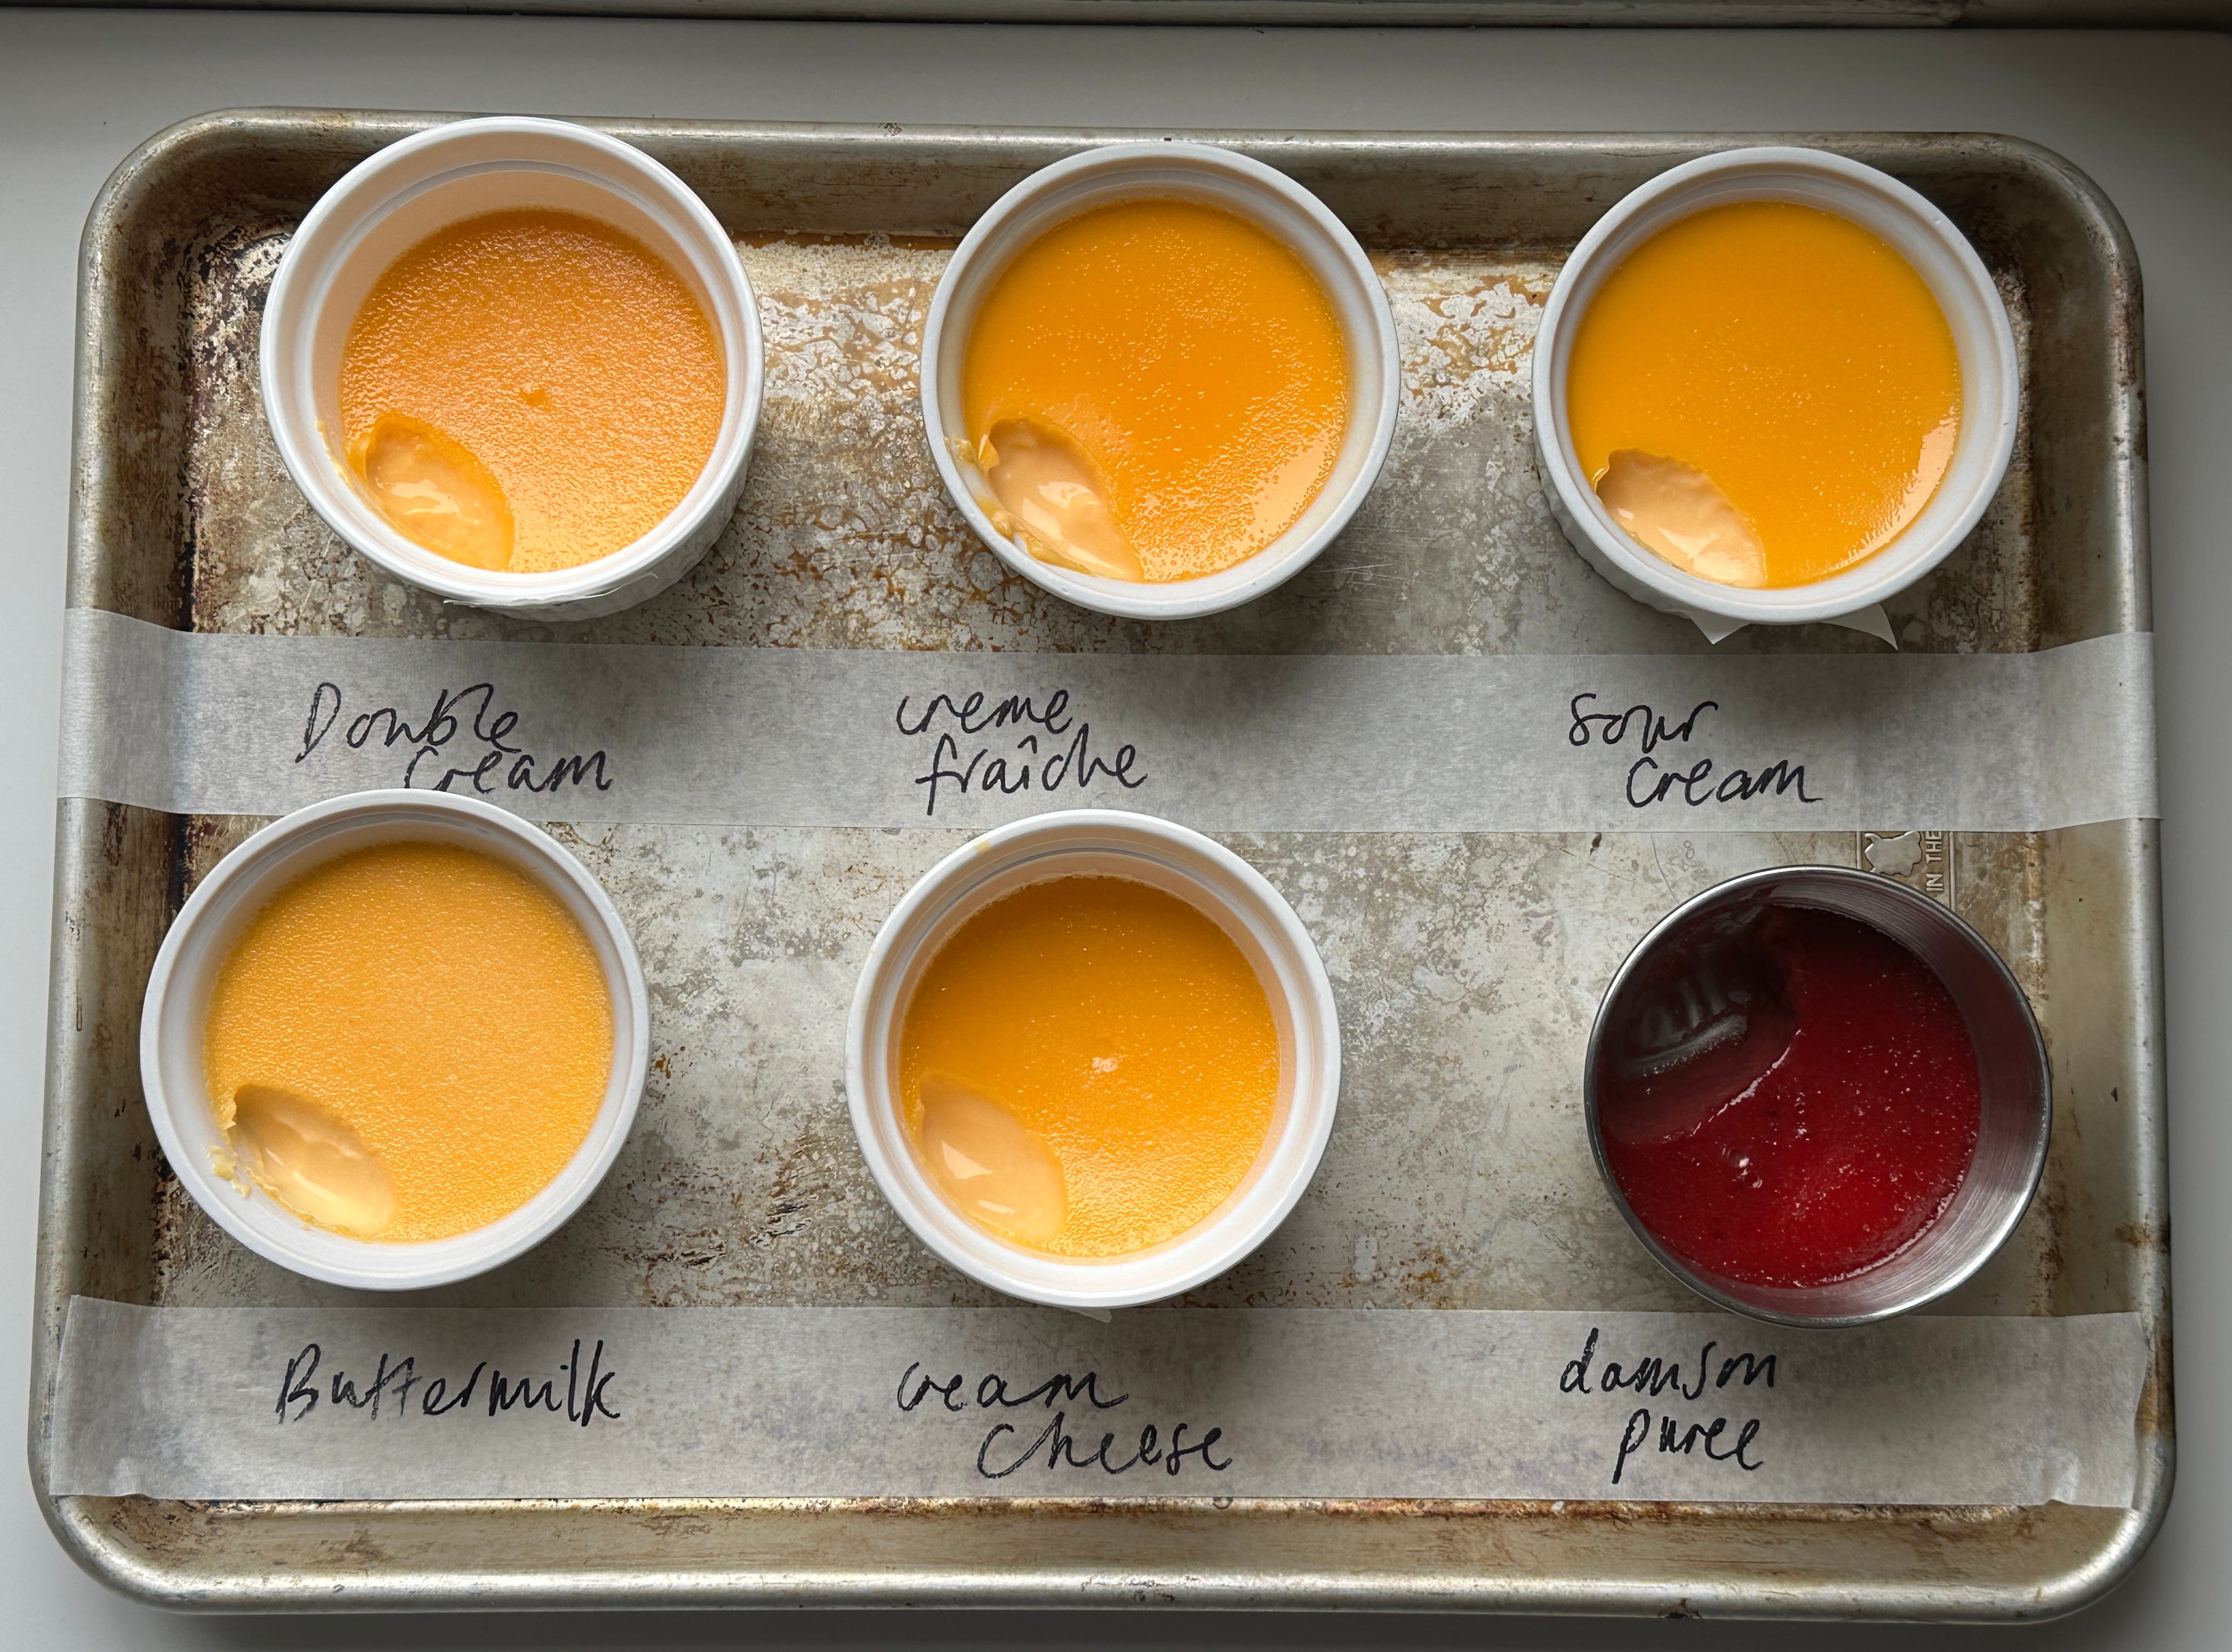
Unsurprisingly, the fattier the dairy, the richer the custard. However, I was still impressed at the performance of the other combinations. Creme fraiche, both acidic and fatty, was just tangy enough to have a ‘je ne sais quois’ special feeling to it, while sour cream and buttermilk were both bright and confident. Whole eggs had a slightly bouncier texture. Cream cheese was indeed thicker but unmistakably cheesecakey - that stuff is surprisingly potent. Though acid has the effect of making something taste more like itself, I found it to be more overpowering than supportive in the ratio I tried. Who knows, perhaps a spoonful would add character, and I suppose the emulsifiers and thickeners used in the cream cheese making process might have stabilising power. That said, I didn’t see a home for it in my classic tart.
The truth is, they were all good. And as long as you trust your base ratio (you can trust mine), this is a perfect canvas to make your dairy dreams come true.
The damson was a huge success, bigger than I’d expected! A brilliant tang and texture and the colour… the colour! I’ve worked this into the level-up version of the tart which you can find on KP+ now.
Lever 2: Yolks vs. Whole Eggs
Whether you use whole eggs, whites or yolks is an impactful choice. Both yolks and whites contain proteins that coagulate (ie. harden), which act as a net to capture the dairy. The proteins in whites have a firm set that contributes a smooth, bouncy set that is easily sliceable (read here about egg white only custards, yes they are a thing!). The proteins in yolks, where fats are also present, provide a creamier gel. It is always useful to consider a hard boiled egg - the whites are sliceable while the yolks stay creamy.
Think of the whites as hard scaffolding and the yolks as a cushioning buffer. The flavour of a whole egg custard is cleaner - whites lack inherent flavour - so the aroma of the dairy is stronger. Yolks are delicious, but have their own, rich profile. Obviously the colour is affected, too.
I mixed up a few tests to show you the differences as well as toggling with whipping/double cream to check the effect of fat. I also made a batch with damson puree to see how the eggs behaved with even less fat:
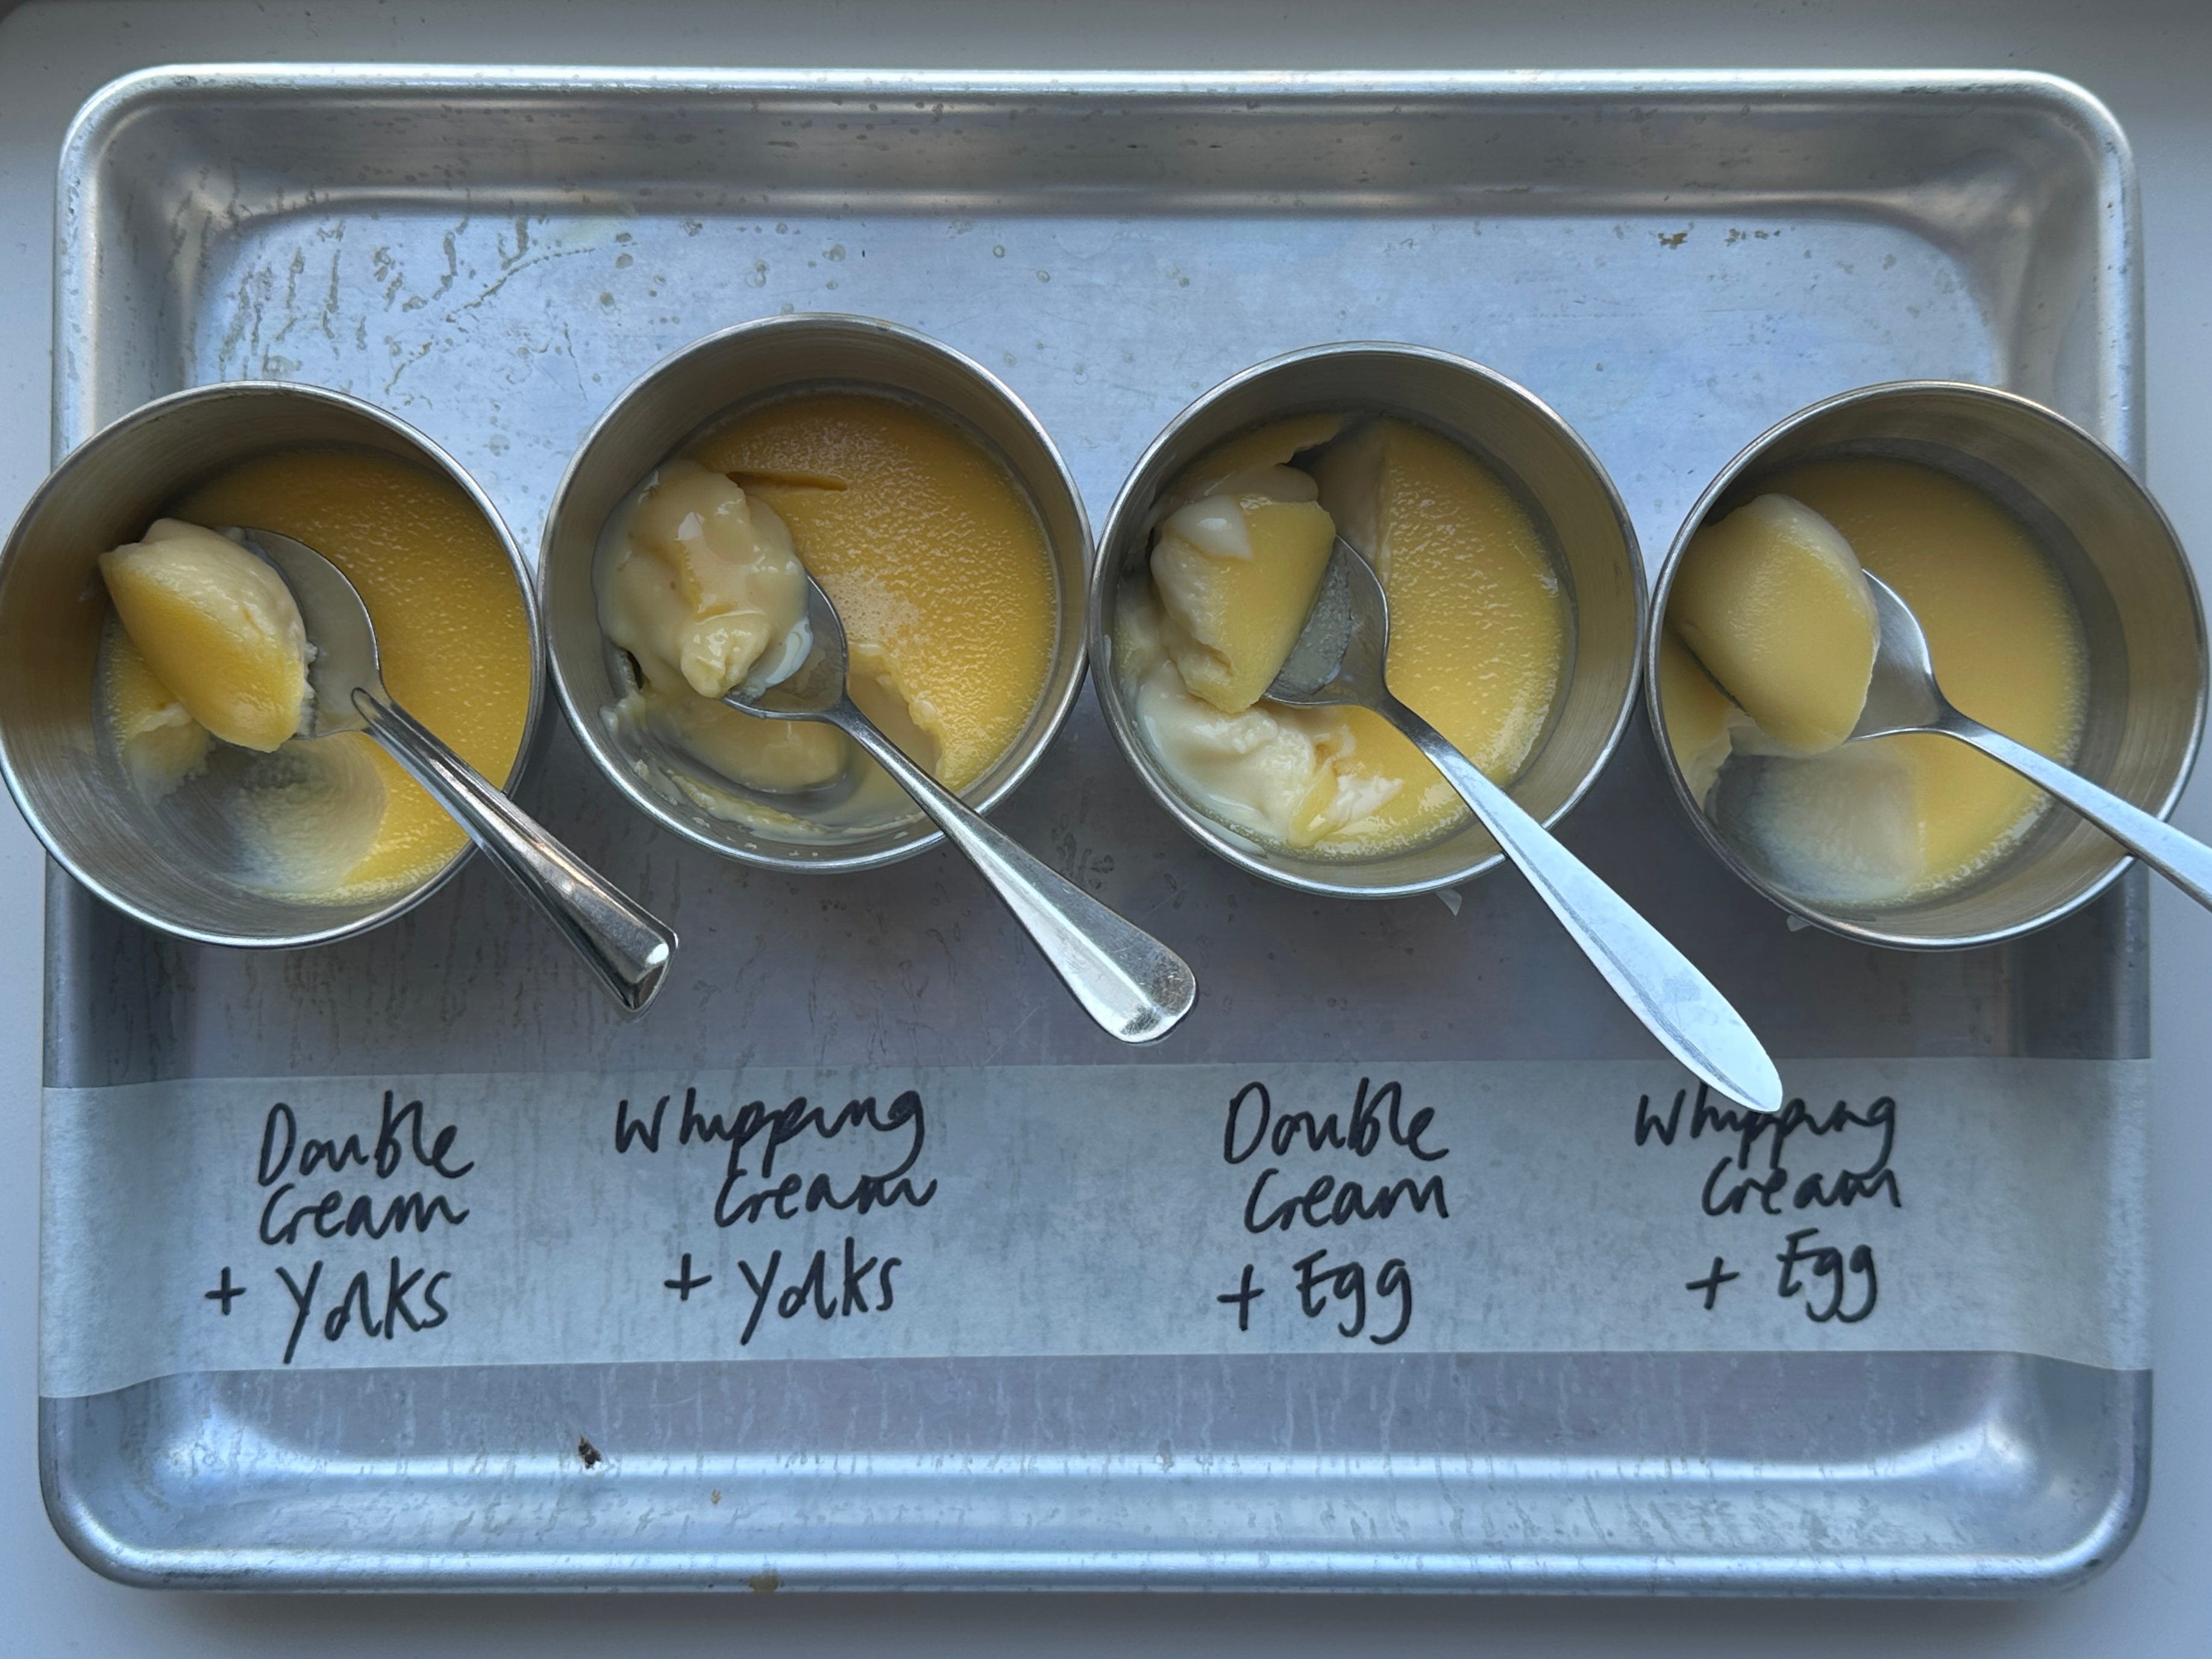
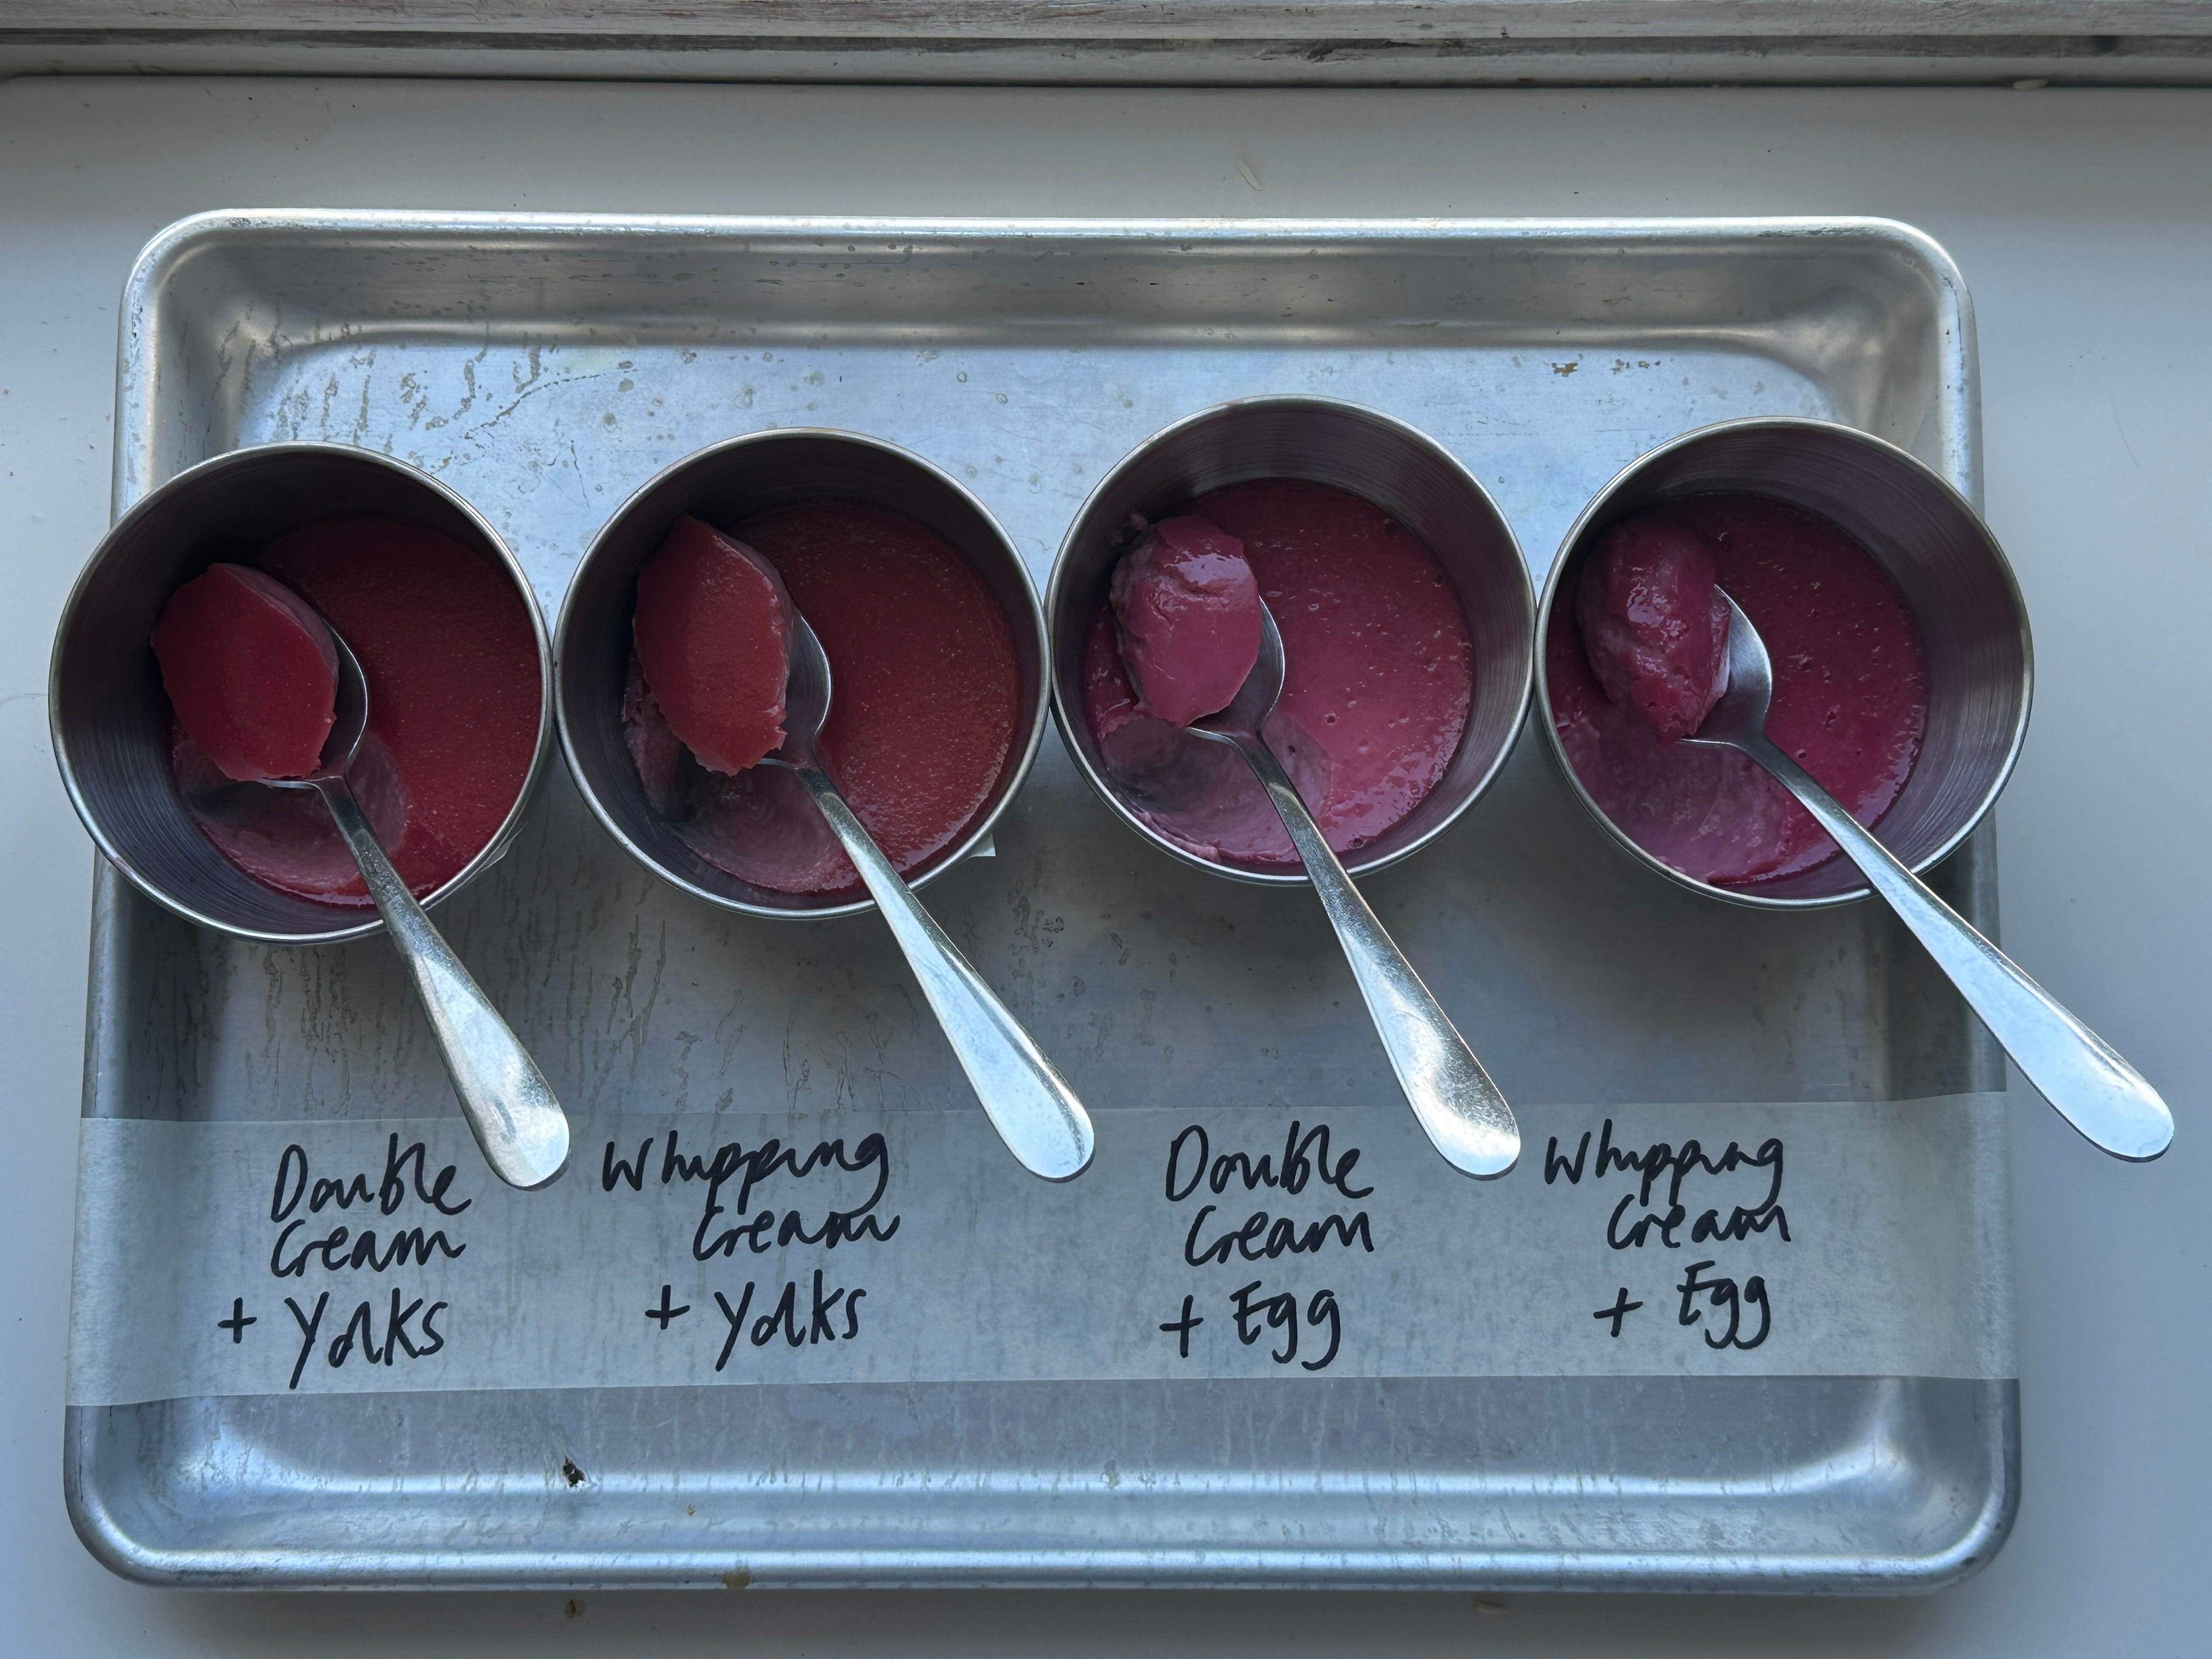
In some ways, you need less whole eggs to set the same amount of liquid as a yolk. However, as egg whites are 90% water, the balance is actually quite similar. It’s a bit of a paradox! Think of it like this - your whites have baggage.
This means really, in any recipe, you can swap yolks for whole eggs gram for gram. The results will be different, but your custard WILL set. It ultimately ends up being about your preference. In all cases, the change from whipping (similar to heavy cream in US) to double cream wasn’t too dramatic - yes, the fattier cream gives you a richer, thicker mouthfeel, but the whipping cream still felt special and decadant.
Side Bar: Counting Egg Yolks
When writing and researching this newsletter, I often ask myself: “Is this reasonable?”
Every time I ask you to separate an egg, or use a yolk only, or white only, there’s got to be a good reason. I can make a pretty good guess about where the line is, but I took to Instagram earlier this week to take a poll. How many eggs, I asked, would you reasonably consider separating for one recipe?
Over 1,400 people replied. The clear favourite was six eggs, with nearly 70% of answers clustering between four and twelve, the comfort zone for most home bakers. A handful of outliers admitted to separating 30, 50, even 200 eggs (hello, fellow pastry chefs!), but for the majority, anything spanning more than two cartons started to feel unreasonable. And since an average yolk (I bought three boxes of six from different brands) is around 17g, you’re really only getting 100g yolk - if you’re lucky - per box. So, that’s my absolute MAX per recipe - 100g.
Unfortunately, with the ratio that I need to set the cream and to fill a tart case, that barely makes 500ml. An 8inch tart case, depending on the depth, can take anywhere from 650ml - 900ml. Not even close!
So, for today’s recipe, we’re using a combination of whole eggs and yolks - two whole and three yolks, to make about 150g of egg total.
Psst: If you’re looking for a good way to use extra egg whites, please note that my brownie recipe is egg whites only AND my tiramisu uses more egg whites than yolks.
Lever 3: The Ratio
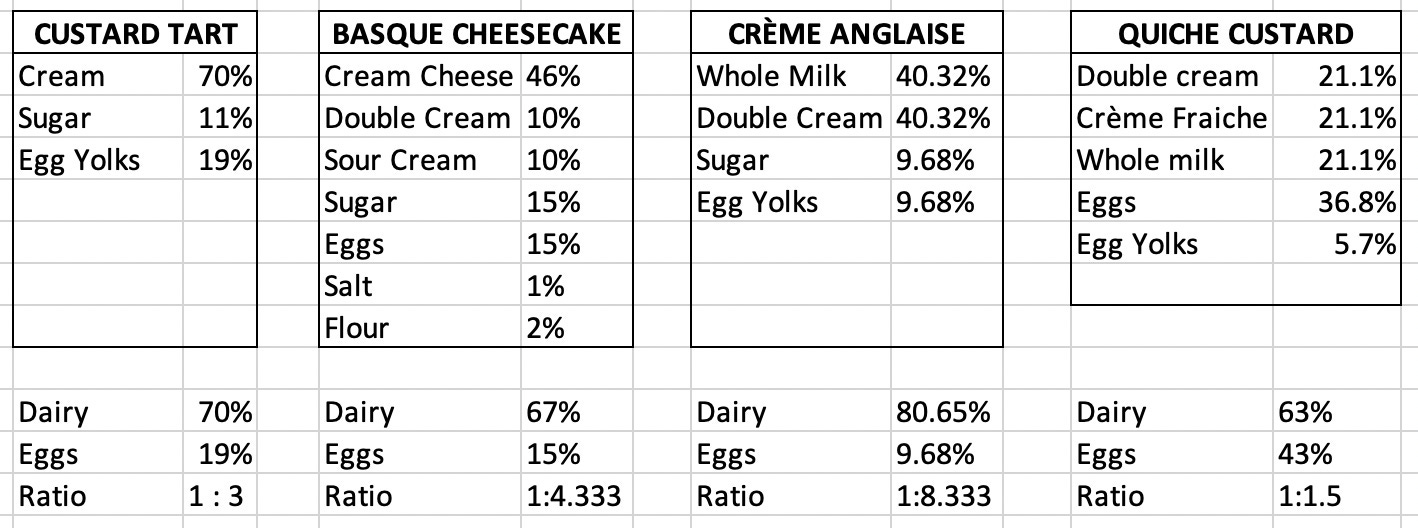
Custards set as the proteins in the eggs harden (coagulate). The more eggs you have, the firmer the set. Considering the ratio between eggs and dairy is crucial to achieve the desired set. For crème anglaise, aka pouring custard, the egg to dairy is about 1:8. In the case of custard tart, a much firmer, denser and richer wobble of a custard, it is 1:3. In Basque cheesecake (yes, cheesecake is a custard!), it is approximately a 1:4 ratio. My quiche custard is closer to 1:1.5.
When I developed a baked custard recipe for SIFT (see pg. 163), I deviated from this slightly, adding milk for a slightly lighter finish on the palette. The Marcus Wareing recipe has 35% Egg Yolks to Cream, while mine is 25% Yolks to Cream+Milk. Again, the effect is a somewhat lighter cream with a more fragile set.
Today, we’re going more traditional - this is a rich custard that you can mix and match about 25% of the dairy. Keep it all double or whipping cream for a traditional creamy flavour, or adjust with sour cream, buttermilk, creme fraiche with various effects. My pick? Sour cream or creme fraiche. Both, when heated or combined in the first instance, can get a little grainy, so be sure to pass the custard through a fine mesh sieve (several times if needed).
Tart rules
BEFORE we launch into the recipe, let it be known that there are several things that prevent tarts from looking professional and some of these things are out of your control/beyond your desire to control. Of course, good lining of the pastry (trimming post bake, for example, if you want that insurance policy for shrinking by leaving overhand), well judged wobbles in the bake will come in time with practice.
Case size: The most elegant slices of tarts are baked in 11 or 12 inch tart cases, meaning you get these extraordinary, awe inspiring slices. Even baking in a 10inch tart case means a lot more filling, and a lot more pastry, for the average home baker and hundreds of grams of yolks.
This goes on nicely to the next point: The tart slice should be a long, isosceles triangle not a squat, equilateral one. You want to go for elegance, not dairy lea triangles. In a smaller tart, this means cutting into smaller slices - serving 10+ slices from an 8inch tart rather than 6-8. People can always have seconds! Again, this is limited by option 1. For neatest slices, please warm your knife with boiling water or a blow torch and wipe between slices. A gentle carving through the pastry then a confident singular downward motion should do the trick!

Underfilled case or thin case. This issue sits somewhere between points 1 and 3. Unfortunately the most epic looking custard tarts are baked in very deep dish tart cases. A standard depth is about 3cm, but you can get 5.5cm cases, too. In that case, you’ll be wanting to double your filling at least and say goodbye to a demure amount of eggs. As well as this, an overly protruding upper crust makes the whole thing feel ungenerous - so if your custard doesn’t meet the absolute top of your case or filling then it is advisable to trim it VERY CAREFULLY once cool.
Finishing
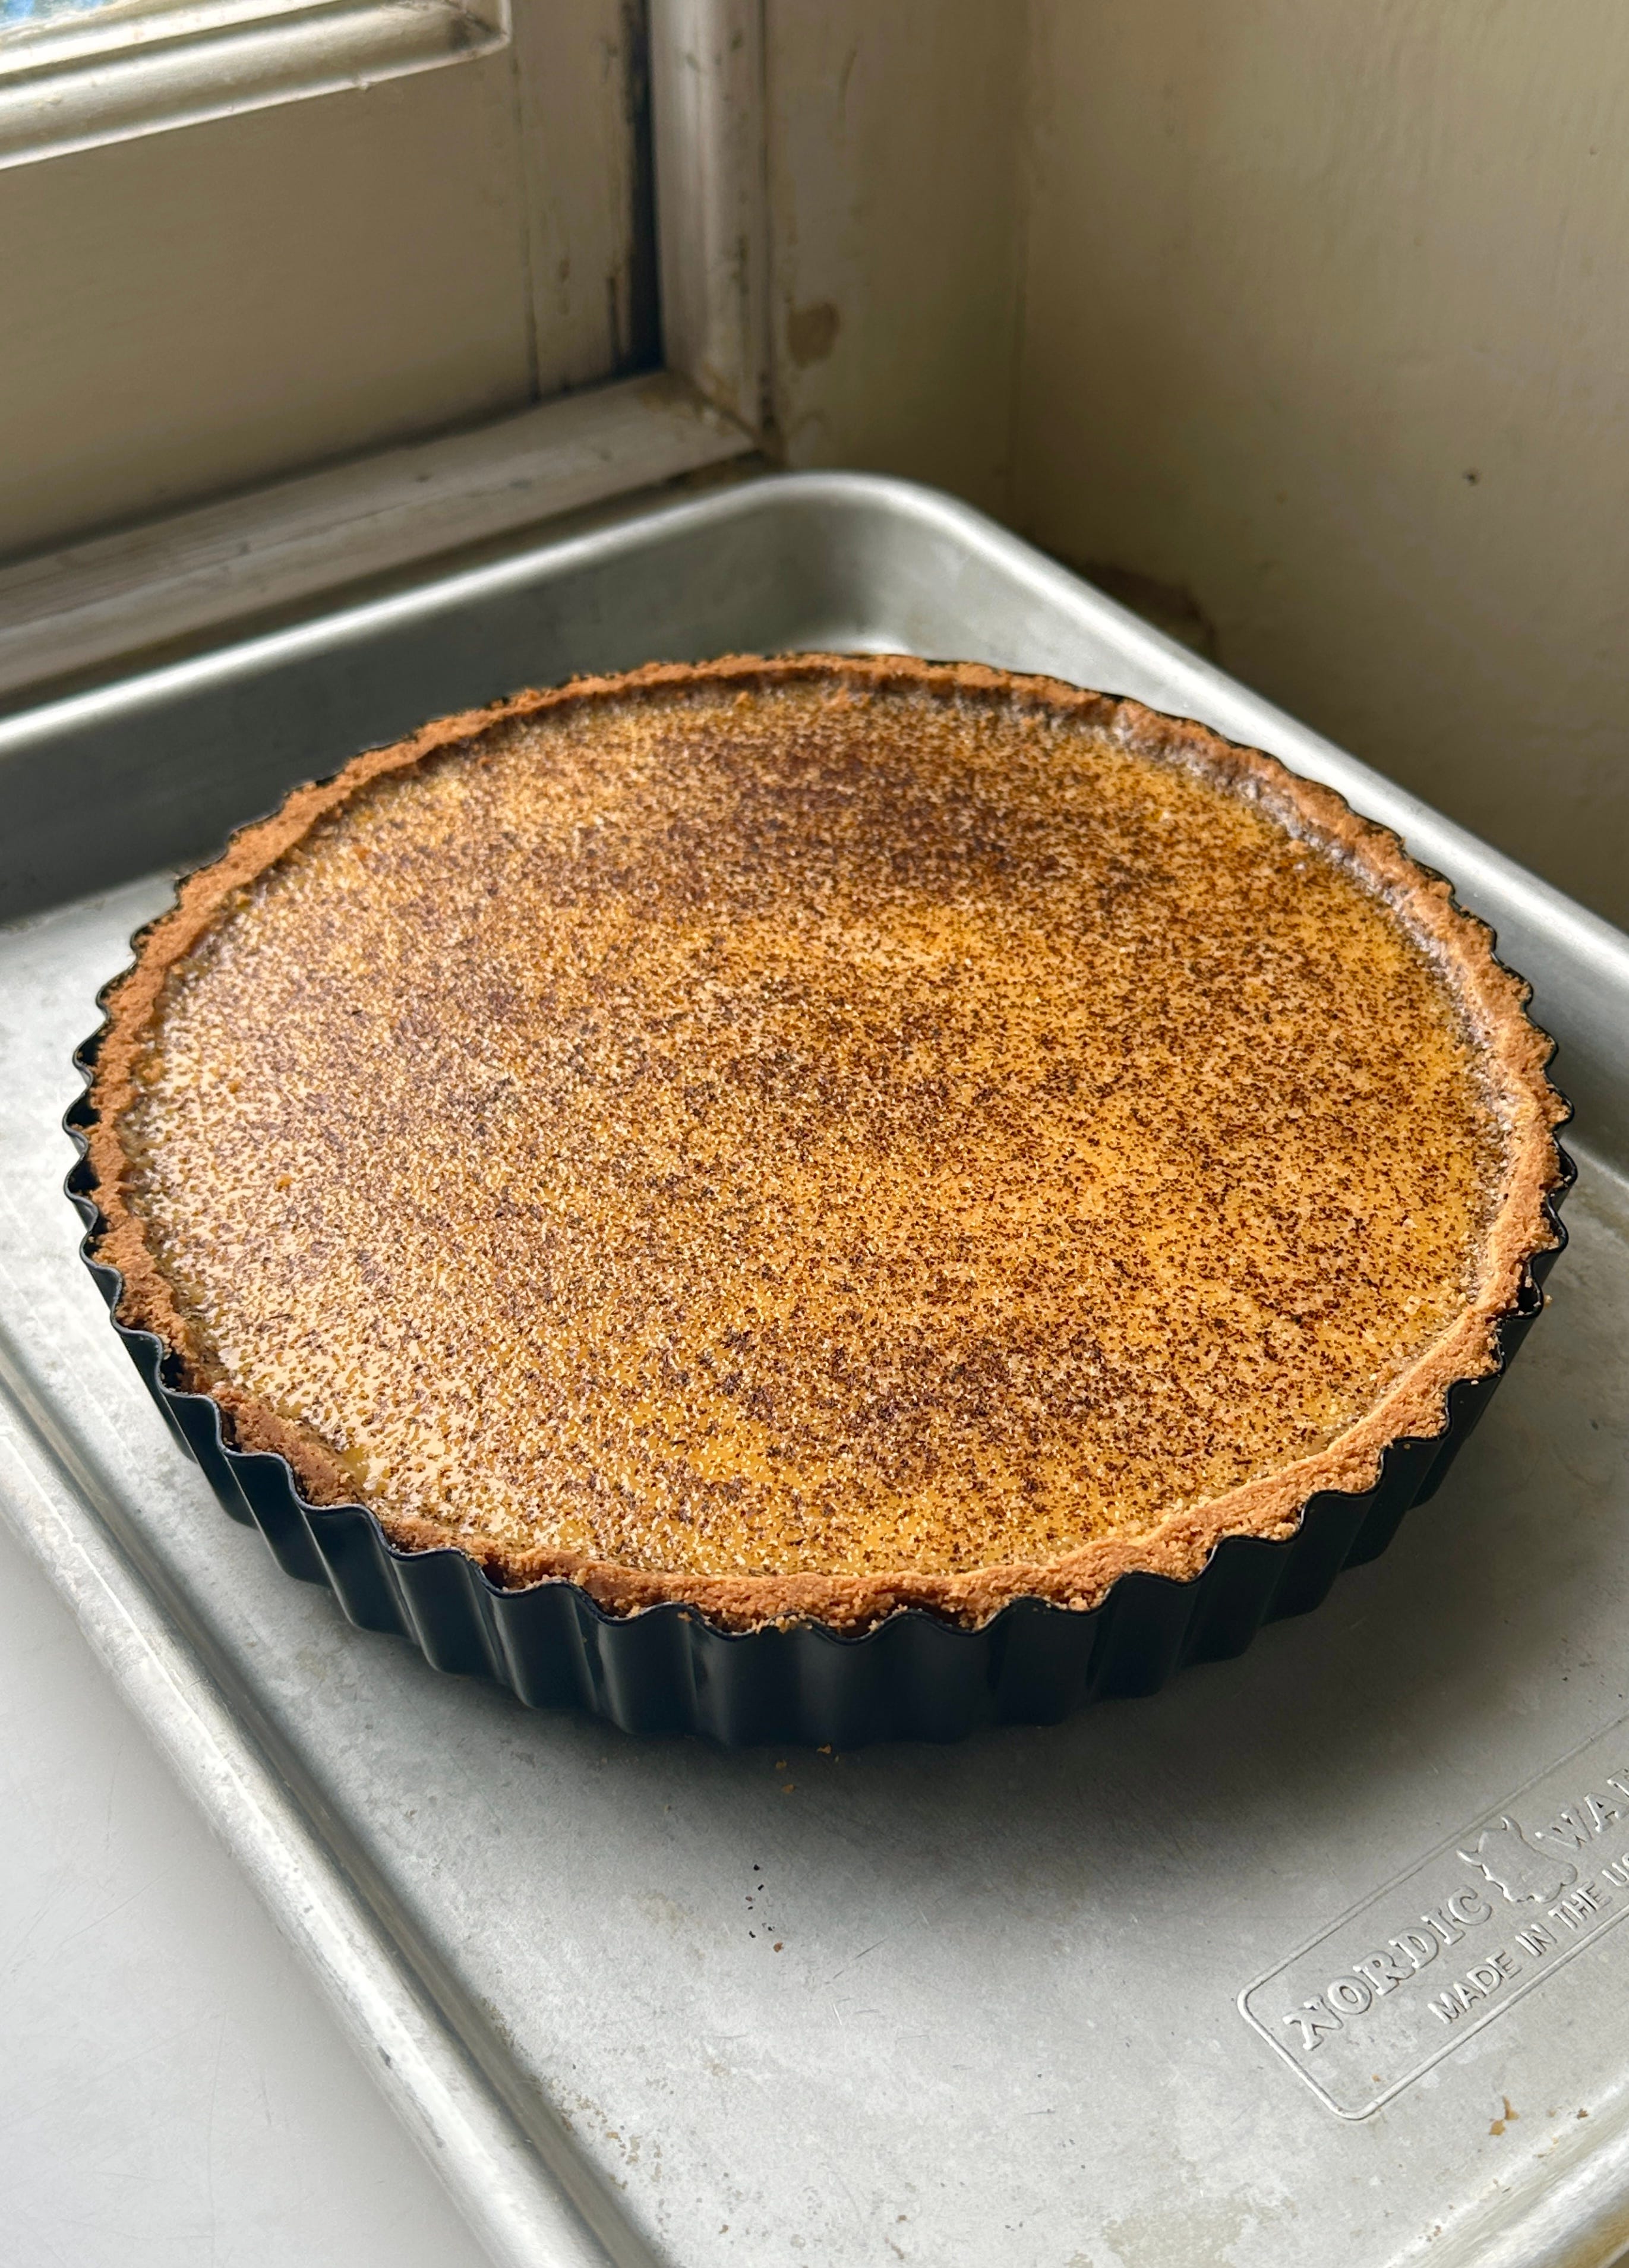
Custard Tart is usually finished with grated nutmeg. I do like that, but I have wondered for some time…. why use nutmeg when you can dust the tart with vanilla?! Vanilla powder is easy to make - just dehydrate the pods (overnight with the oven light on) or roast in the oven. Once brittle, blitz then use a very fine sieve to dust it on.
Ok, lets bake!
RECIPE: Vanilla Custard Tart
with Damson Jam
Makes 1 x 8inch tart
Slightly Sweet Shortcrust Pastry
Makes enough for 1 x 8inch or 9inch tart
175g Plain Flour
30g Caster sugar (optional)
¼ tsp Fine sea salt
100g Butter, cold 2cm cubes, unsalted
35ml Water
Damson Jam
500g Damsons (if you can’t find damsons, you can use my plum jam recipe here.)
300g Sugar
1 lemon, juice only
Vanilla Creme Fraiche Custard Custard
350g Double Cream
75g Creme Fraiche (optional - just use more cream if desired, or sub for full fat sour cream if you want that tang but can’t access creme fraiche!)
100g Caster sugar
2g Fine Sea salt
100g-110g Whole Egg (about 2)
50g Egg Yolks (about 3)
Vanilla Dust
1-2 vanilla beans (as many as you like, really, but you can keep it minimal in this economy!)
Method
For the vanilla bean dust, cut the tough ends off the vanilla pod (or as many as you want to make, two is probably worthwhile doing at once), cut in half and leave overnight in the oven with the light on, or bake at 170c fan for about 15-20 minutes. It will have a different flavour if roasted. Leave to cool completely - either method should give you snappable, totally dehydrated pods. Blitz in a food processor until fine, then pass through a sieve, discarding any hard bits, and reserve in an airtight container.
For the damson jam, destone damsons (either squeeze the stones out, or cut with a knife. This is time consuming, you are warned) and mix with sugar and lemon juice in a saucepan. Leave to macerate for an hour, or overnight in the fridge. Place a small plate or two in the freezer. Bring the mixture to the boil, stirring frequently, then stir occasionally until setting point is reached, 10-15 minutes. To check the set, place a teaspoon of jam on the frozen plate then freeze for another 2 minutes. If the jam wrinkles or you can drag a finger through it and it doesn’t fill back in, it’s ready! Pour into a heatproof container (or sterilised jars for long term storage), leave to cool and store in fridge for a month (or more! Check for mould!)
To infuse the cream, split a vanilla pod, scrape the seeds and put into a saucepan with the cream and the pod. Bring to a simmer then cover and leave for minimum and hour, but better two or more. You can even leave it overnight in the fridge, if you have time or the desire.
For the pastry, mix the dries together in a large bowl. Toss the butter cubes in the dries then rub in between your fingers until it is the texture of breadcrumbs. (You can also do this part in the food processor then pour into a clean bowl for the next step). Drizzle in the water then toss and shake the contents of the bowl gently to help it distribute, before going in with your hands to form the dough. Bring it together, kneading just 1-2 times to help it form a smooth ball. Press into a large 8inch disc, wrap well and chill for at least an hour before using, or proceed to the next step, working with the pastry whilst it is soft (good option if you have fridge space for rolled out dough sheets!).
Working between two sheets of baking paper, roll the dough evenly with firm, confident strokes, to an 11-inch /27cm circle and about 3mm thick. Hold the dough up to a light source, like a big window, to see if it is even. Chill until firm, at least 1-2 hours. (If you are working with the cold disc of dough, you can rest for less time, 1 hour.)
Let the chilled dough rest on the counter for about 1-2 minutes, or until you can bend it in the paper without it cracking. Remove the baking paper then place into your tart tin, lifting and pressing into the shape of the tin, paying close attention to the edges and corners. Trim the pastry so it has a 1cm overhang (OR, by all means, trim it to the exact edge, with sharp confident cuts, of your tart case. This means you won’t have to trim it later, but should there be any pesky shrinking or moving during the bake, you won’t have an insurance policy.) and pop into the freezer whilst your oven pre-heats. Reserve any off cuts for pastry surgery later, if necessary.
Heat oven to 180c fan. Scrunch up baking paper, or use foil if you like, and place into your chilled lined case. Fill up to the rim with rice then bake for 30-35 minutes. Remove tin from the oven and remove the paper and rice. The pastry should be blonde but relatively cooked or set in place. If not, put the paper and rice back in and cook for a further 10 minutes. Bake for a further 10-15 minutes (or longer) until the whole case is pale golden and cooked through, not at all doughy.
Allow to cool on a baking rack for ten minutes, then trim the overhang of the pastry with a very sharp knife, trimming / sawing in confident strokes along the edge of the tin. Move onto a clean tray (or move the offcuts off) and brush any crumbs out.
Turn the oven down to 160c fan, then spread 80g of jam in the base of the cooked tart case. Cook for 10 minutes, then leave the tart case to cool whilst you prepare the custard - the jam should be a bit tacky and sticky
Reduce oven to 120c fan. For the custard base, add the sugar and salt to the infused cream and heat until simmering. In a heatproof bowl, whisk the eggs, yolks and creme fraiche if using together. Whisking all the time, slowly pour 1/3rd of hot cream mixture into the eggs, then pour in the rest and mix until combined, avoiding the spent pods. Pass mixture through a sieve into a jug, then pour into your tart case gently. Remove any air bubbles with a spoon. Dust with vanilla powder through a fine sieve. If you have any extra custard, bake in a ramekin.
Bake for 30-45 minutes (large range as all our ovens differ…), or until it has a 3 inch wobble in the centre. Leave to cool completely before slicing. You can also make the day before and store in the fridge, though the best or creamiest texture is on the first day. If stored in the fridge, bring to room temp before slicing (Though I admit I really like a cold custard, so by all means, don’t delay!)
![IMG_9037.mov [optimize output image]](https://substackcdn.com/image/fetch/$s_!OiMK!,w_1456,c_limit,f_auto,q_auto:good,fl_lossy/https%3A%2F%2Fsubstack-post-media.s3.amazonaws.com%2Fpublic%2Fimages%2Ff978d547-55cc-4039-81cc-5298891aecfc_800x1230.gif "IMG_9037.mov [optimize output image]")
![IMG_9037.mov [optimize output image]](https://substackcdn.com/image/fetch/$s_!OiMK!,f_auto,q_auto:good,fl_progressive:steep/https%3A%2F%2Fsubstack-post-media.s3.amazonaws.com%2Fpublic%2Fimages%2Ff978d547-55cc-4039-81cc-5298891aecfc_800x1230.gif "IMG_9037.mov [optimize output image]")
Want to take this tart to the next level? Try the damson custard version on KP+ now
Hi Nicola! I wanted to try make this with a rhubarb filling instead of damson because ‘‘tis the season! Will your rhubarb compote work here or will it be too wet? Should I make a jam instead?
The tart looks beautiful! Living outside of the UK, sourcing double cream is not easy. In Italy, there is a tart called torta della nonna which is basically a baked custard tart as well, but to set it they use starch (usually rice or corn) and has only milk not cream. I was wondering if that might work here. And I would love to see your version of torta della nonna, if you are up for a challenge!! It's one of my favorites but quite tricky to master.