Kitchen Project #30: Buttery onion tart
All about your new fave rough puff pastry + a dive into the science of eggs!
Hello,
Welcome to another edition of Kitchen Projects! It’s lovely to have you here.
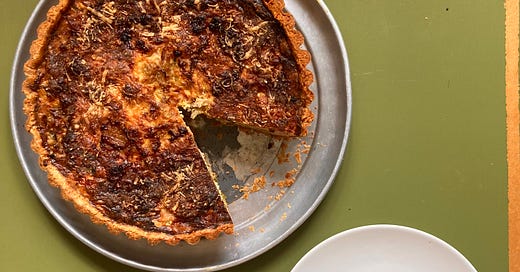
This week it’s all about savoury tarts aka quiche. BUT I think the q-word doesn’t have the cutest associations as of late so needs a re-brand! SO, we’ll be calling it the buttery onion tart (it really deserves this title, too). I served this at my pop-up lark! a few weeks ago and couldn’t be happier with the recipe. Plus I get to share my ultimate rough puff recipe and technique with you.
Over on KP+, I’ll be sending out a rough puff themed dessert you can make with this VERY SAME pastry: Individual apple tart tatins. Trust me, these are beauties. I will also be sharing how to make this rough puff totally by hand for the gang!
Subscribing is easy and is only £5 a month, so if you fancy supporting the writing, getting some extra content AND being entered into random giveaways + access to community chat threads, then click below:
I’ll also be announcing the winners of last weeks Wildfarmed grain and London Honey Company giveaway early next week, too. So, if you want to be in with a chance of winning, you can subscribe to enter.
Anyway, let’s do this
Love,
Nicola
The Q word
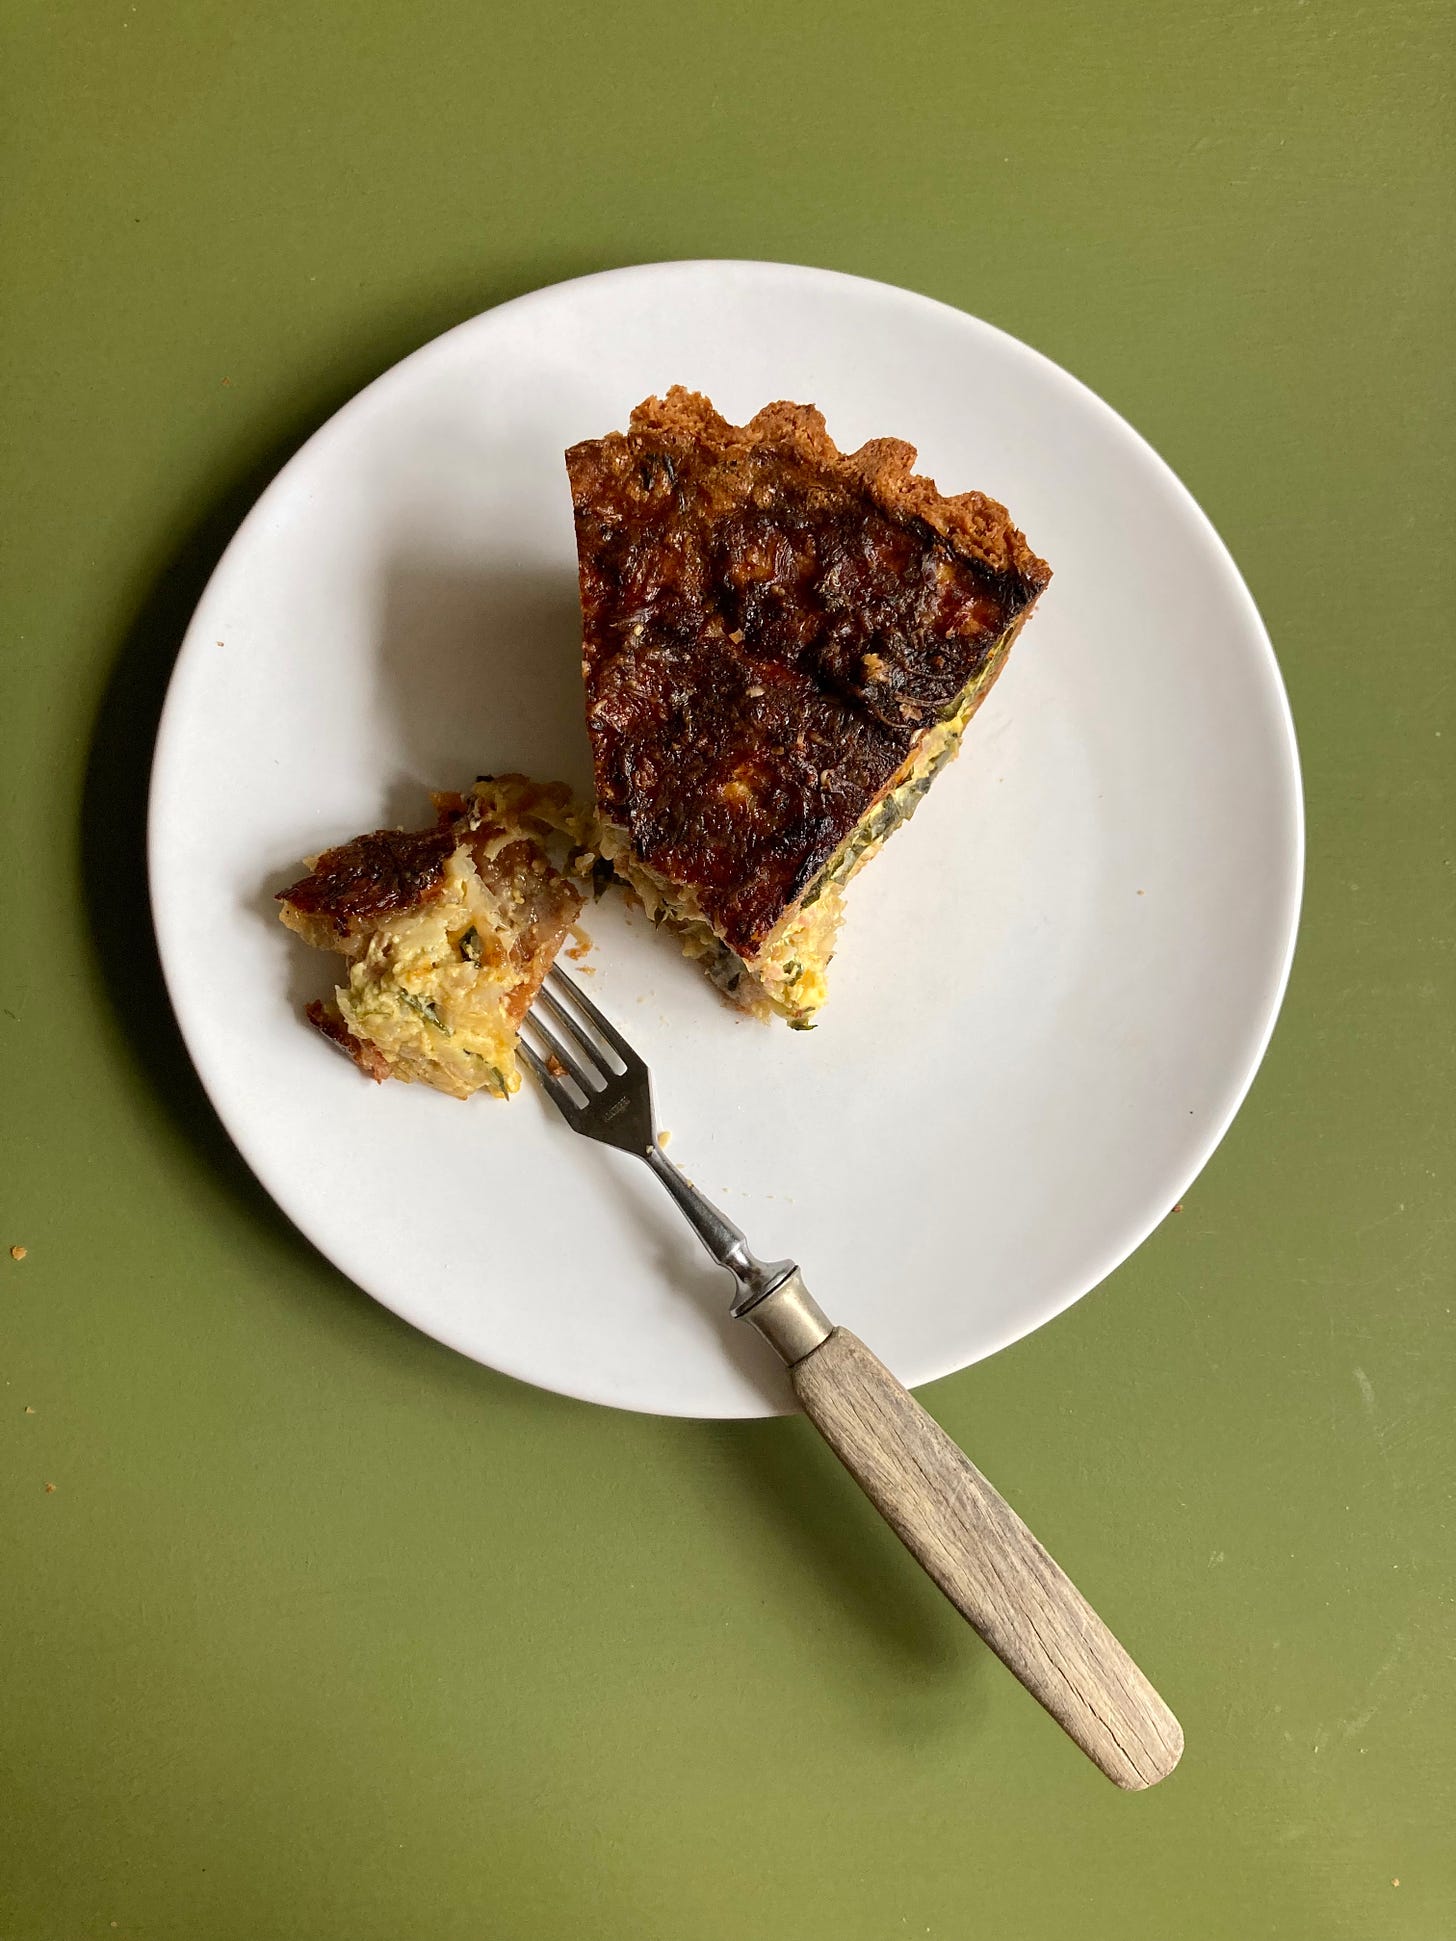
Does quiche set your heart alight? If it doesn’t, it should. I’ve begun to avoid the ‘q’ word as I feel it conjures up retro images that don’t exactly get the appetite going. SO, instead, I’ve rebranded this q****: Buttery onion tart.
Anyway, the ‘q word’ gets a bit of a bad rep - done correctly, it is marvellous. We’ve taken it for granted for too long I think. To me, there’s no better summer lunch than a buttery crisp pastry filled with creamy, just-set filling, served with a sharp salad and glass of wine, hopefully.
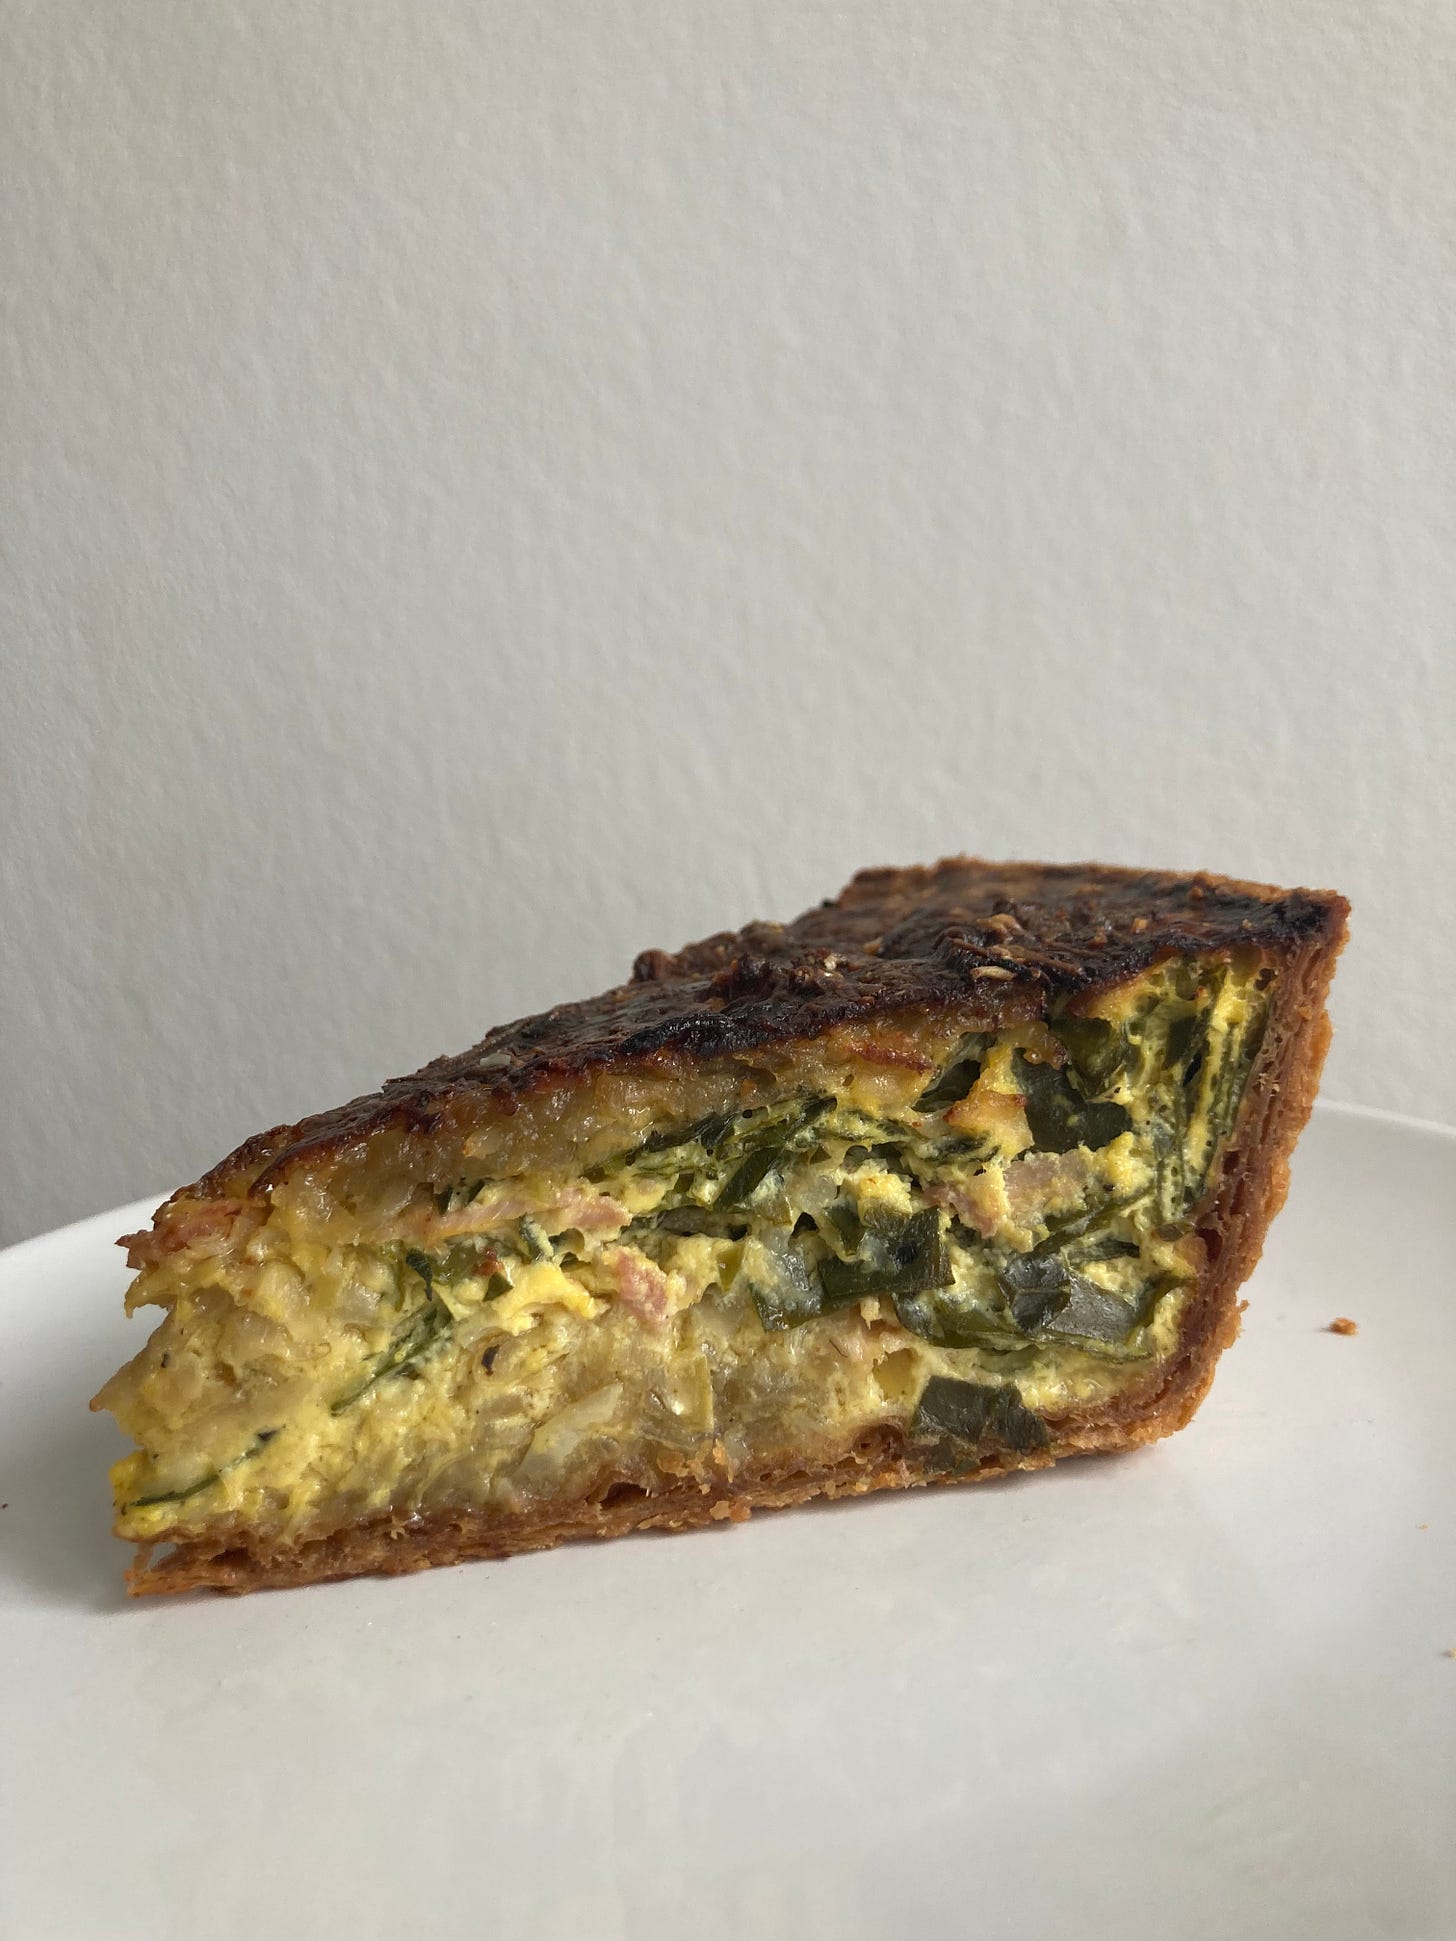
My ideal savoury tart must be baked in a deep dish tin - it’s about 4.5cm deep. The reason I love this deep dish is because you get the crisp top but still achieve a perfectly set middle. Sometimes there are things you simply can’t do without the right kit. That’s not to say that a quiche you make will not be good unless you have a deep tin, it’s just harder (or indeed impossible) to achieve a dark crisp top during baking without overcooking the middle.
Yes, I do use a thermometer to temp my quiche but you don’t need to. I know we’ve talked about egg coagulation quite a lot before but let’s run it down again before we get started.
The science of eggs
Eggs are about 75% water. That sounds crazy to me (though I guess humans are 60% water which makes the fact relatively less crazy) but it’s thanks to this property that we can do so much with them.
Eggs have two parts - the white and the yolk. The white is 90% water, with the rest being made up of proteins that float around doing their thing. The yolk is 50% water - the other 50% is a mixture of fat and protein. In their raw state, egg whites stay watery thanks to the bonds between proteins and water repelling each other. Thanks to the fat, which coats the proteins and helps prevent the repelling behaviour of the protein and water, egg yolks are a bit more together, even in the raw state.
Due to these molecular properties, whites and yolks reach a setting point at different temperatures, albeit through the same action: When heat is applied to proteins, the molecules all start to dance around quite quickly. As a result, the proteins unfurl and connect directly with each other, forming strong bonds that begin to edge out the water. Eventually, all the water is squeezed out (you know those weepy hotel eggs? Yep. Those proteins are as tight as Thelma and Louise resulting in the eggs literally crying asking ‘why did you do this to me’?) and you get a rubbery egg.
Anyway, the white, which is predominantly protein and water, sets or ‘coagulates’ at 60c - 65c. Yolks, however, are set at 65c-70c. If you heat a whole whisked egg, the coagulation temperature is in between, approx 62c - 70c.
These temps do change if you combine eggs with other ingredients like milk, cream, sugar or any dairy. Once you do this, this setting threshold is raised to 80c - 85c due to the interfering actions of casein (milk proteins, which can’t coagulate alone) and sugar, our fave interferer.
So, when it comes to cooking quiche, we will be combining our eggs with a significant quantity of dairy for that creaminess, but that does mean we have to be aware of setting temperatures to get that perfectly, slightly wobbly set. Let’s discuss.
Setting temps
The ideal setting temp for your dairy is going to be contingent on the relative proportion of eggs to dairy. Let’s consider creme anglaise (which can be cooked to 85c) vs. our quiche custard, which we want to be softly set.
To figure out the perfect setting temp for my quiche custard, I took to my favourite tool - the spreadsheet - to figure it out:
I know, from experience, that this creme anglaise will begin setting at around 80c, with the ideal at 82c-84c for a thick, spoon coating quality.
With only 10% concentration of yolks (that have heat-based coagulation properties) in the creme anglaise compared to the 37% of whole egg in the quiche, I can work backwards, based on these temps.
So, if 100% whole eggs begin setting at 65c and a custard containing just 10% of eggs is setting at 82c, and assuming that the behaviour is linear, there is setting difference of about 1.5c-2c per additional 10% of egg used:
Therefore, the ideal temp for my quiche begins at 74c but - like most egg temps - has a 5c upper limit. Due to carryover cooking, I’ll aim to remove my eggs as they reach that 74c threshold and then let the rest of the setting happen as it cools.
Of course, you can’t *just* rely on spreadsheets. So don’t you worry, I promise I have actually tested this on IRL quiches and taking it out at 73c has worked beautifully. I’m always excited when the spreadsheet and the real life tests line up - the BEST.
One last thing - the relative ‘set’ of your dessert or dish will be contingent on the proportion of eggs to dairy - dairy cannot set on its own, remember, so no matter how hard you cook a custard, for example, it will never become a full solid due to the lack of coagulable proteins.
A note on Stirring vs. baking
A stirred custard - like creme anglaise - will always be less firm than a baked custard. It will be more fluid since you are continuously agitating the mixture, keeping it fluid - you’re basically reorganising the structure! A baked custard, which is cooked undisturbed, will form a more solid network. Even if it is the same proportion of ingredients as a stove-top custard, it will still be firmer.
Silkiest custard ever
For the tart custard, I am a huge fan of using creme fraiche. It adds the fat and mouthful needed to make the whole thing feel ultra luxurious, but with additional tang. Let’s be real for a moment - q***** is good for the soul and should be treated as such so we are going to be generous with the fat %. Sure you can make a q***** with milk and eggs, but I’m not about that. I want this dish to get back to the status it deserves - as a stunning standalone flavour and texture sensation.
To get your eggs ultra silky, it’s essential to hand blend your eggs and pass through a sieve. This way, you get it totally smooth. Passing eggs through a sieve is something we used to do at Dominique Ansel for the ‘perfect egg sandwich’ (truly perfect) and now I don’t look back. If I’m feeling fancy/don’t mind the extra washing up, I ALWAYS hand blend my eggs for breakfast if I’m doing scrambles - trust me, it’s superior!
OK, time to talk rough puff
If you’ve made my XXL cheese scones before, you’ll know that I developed that recipe from my secret weapon rough puff pastry recipe. Today, I’m introducing you to the OG! This rough puff pastry recipe is going to carry you through good times and bad. It’ll support your pastry endeavours, sweet or savoury. It’ll be your go-to and I’m excited that you guys will finally be friends.
Rough puff is also known as flaky pastry or blitz pastry. It’s a quick, semi-slap dash version of puff pastry, the labour intensive pastry that requires you to fold butter carefully into a dough, turning and folding it until many distinct layers have formed.
Instead of labouring over very symmetrical layers of butter and dough, rough puff approximates this by ensuring chunks of butter are suspended throughout which, when baked, turn to steam and leave little buttery pockets behind in the baked pastry which easily flake apart. Although you don’t get as even or significant a lift, the layers are fantastic and it makes a brilliant base for tarts, tatins and even mille-feuilles (more on that in a few weeks!)
When rough puff is baked whilst compressed, it really comes into its own: It is dense yet flaky and super rich oweing to its high butter percentage. You can either bake it between sheets or blind bake it with weights - we’re doing that today. More on that soon.
Cold + the effect of acid
When making the rough puff, it’s important for everything to be cold. PROPERLY cold. From the water, to the flour, to the butter, you’ll make the process so much easier if everything is already cold. Butter will melt and soften from the temperature of your hands, so having everything cold to begin with is a bit of an insurance policy.
You’ll see in the recipe below the inclusion of white wine vinegar - this will help prevent oxidation of the dough (it won’t go grey in the fridge) and helps the pastry stay flaky as acid will get in the way of gluten development (water creates gluten bonds, acid doesn’t have the molecular properties to do so).
How many turns is the right number of turns?
When it comes to rough puff, you still need to do some folding and turns, like puff pastry, but it’s a lot quicker and you don’t need to rest it in between. Whilst puff pastry requires you to exude zen and patience, rough puff needs you to be ready for action and turned up to 11.
But how many turns should it be? For classic puff pastry, it’s widely accepted that 6 turns (any combination of single and double) is optimal. But for rough puff, the jury is out. This might be down to the size or proportion of the butter chunks for each recipe (if you start with smaller butter chunks - say 1cm - it may make sense for you to do less turns since the butter is already more distributed than a recipe that only asks you to take the butter to 2cm etc.) so if you’re following a non-KP recipe, I’d try and trust in the process and accept whatever the author suggests for their specific formulation.
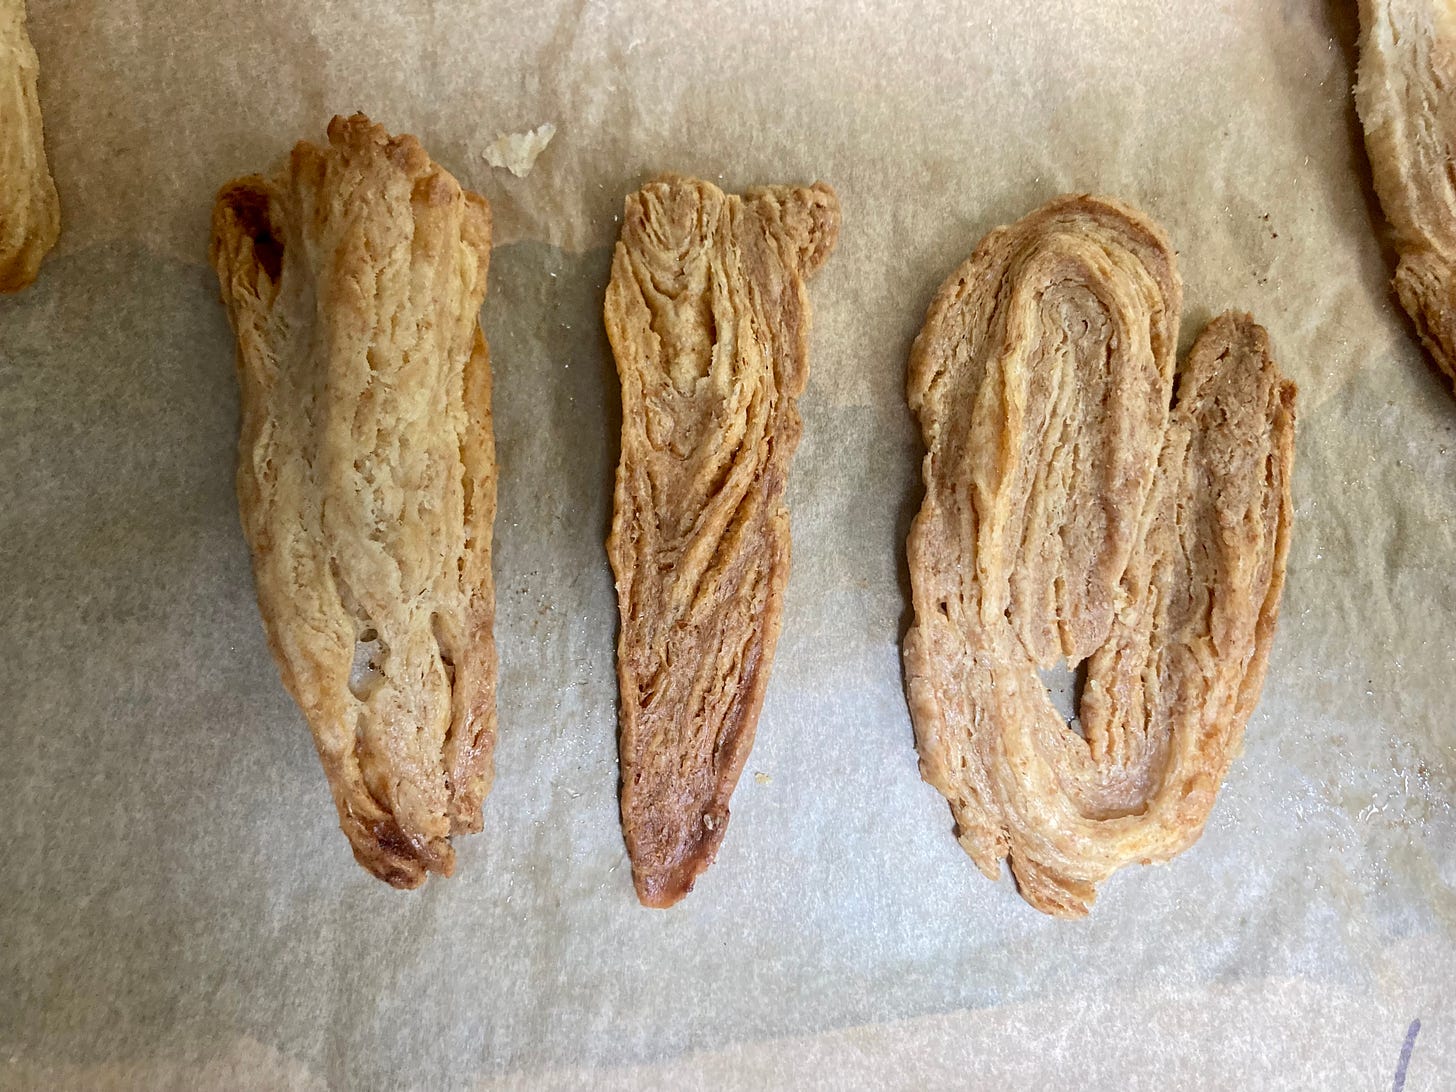
HOWEVER, I did want to show you the difference between a rough puff with 4 folds (two double), 5 folds (two double, one single) and 6 folds (two double, two single). I simply made a large batch and portioned off the dough as I went. I rested the pastry and then baked the results:
Although the 4 fold rough puff was still very flaky, the 6 was definitely optimal for this tart. The 4-fold has overall more volume as larger pockets of butter create steam that forced the layers apart. The 6-fold has a more dense, highly layered structure which eats beautifully. For my compressed tart, I’m definitely gunning for the 6-fold as it’ll flake most dramatically when eaten.
All this to say, you can definitely play with the number of turns when you’re making pastry like this. Anything less than four, I think, might leave too large chunks of butter which interfere with the baking and lining process, so avoid that. Otherwise it’s totally up to you.
Grated butter rough puff
I’ve seen a few methods out there that encourage you to grate frozen butter and then laminate this in - I prefer not to do this, mainly because I don’t like grating frozen butter (I feel the same about frozen pastry). This method totally checks out, but I wont be covering it. Izy Hossack has a great tutorial on her site, here.
Blind baking
So, you know how I went deep into encouraging you against baking beans (or at least for you to think twice about using them) in the All About Tarts edition?
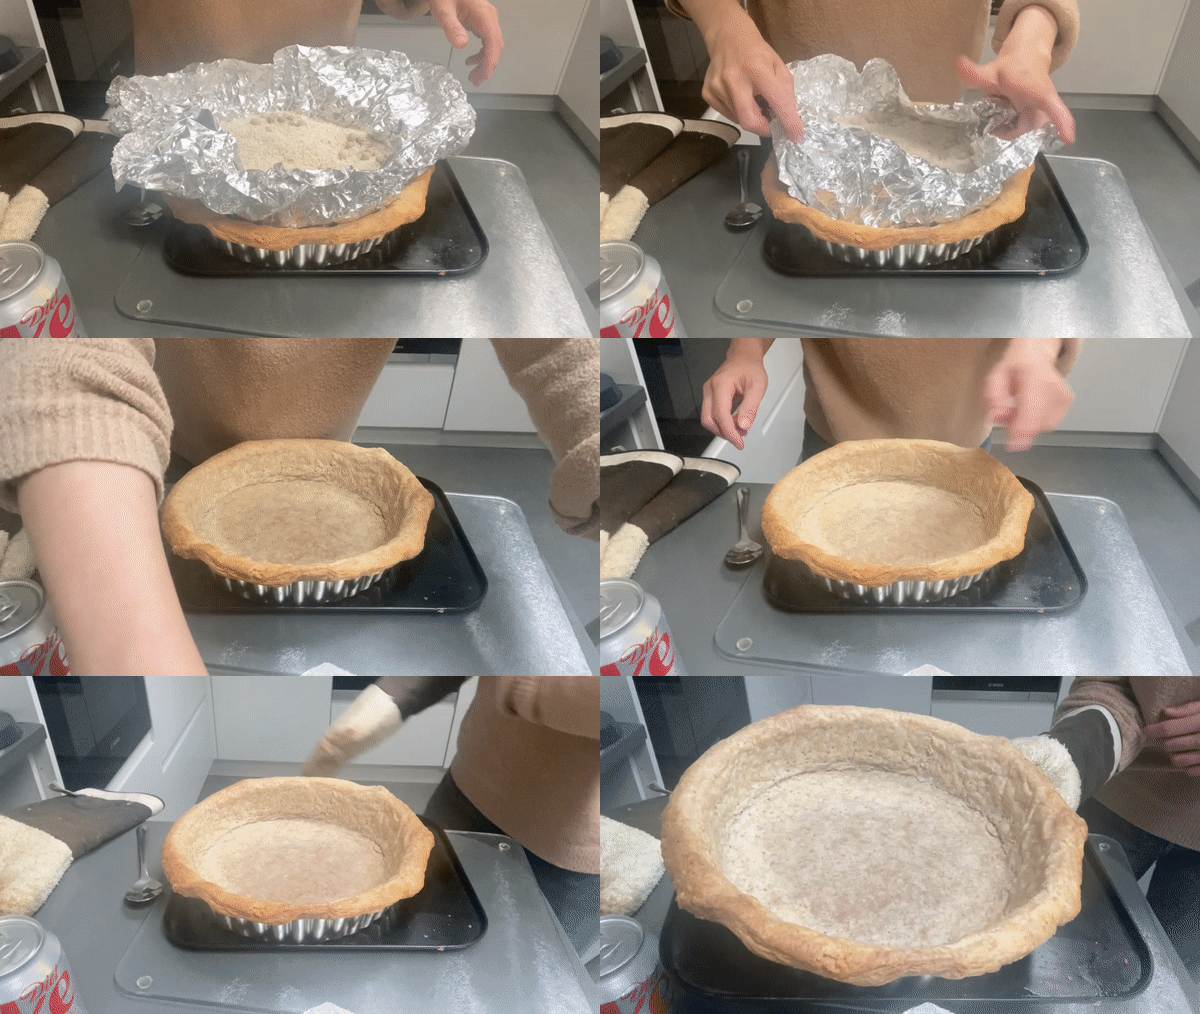
Well, it’s the opposite for blind baking rough puff. As we’re dealing with chunks of butter that melt, enrich then steam, this pastry wants to MOVE. Like, unless it is held down and fully shackled, it’s going to try and run away from you.
I can’t lie to you - rough puff takes a long time to blind bake. The butter in the pastry is melting and then evaporating which creates steam. Since the steam has nowhere to go (held down by baking beans!) the moisture is retained in the pastry for much longer, making the whole process quite long.
As well as this, you do need to make sure your pastry is cold before baking. I prefer to do it from frozen - much more convenient - but at least an hour in the fridge to firm up to ensure those flaky layers keep their integrity.
Due to this, I’ve also realised you really need to blind bake the pastry hotter than you would normally - 180c! Yes, I know it’s hot! But trust me, you need the extra power. Even with the extra heat, this pastry needs about twice as long to blind bake than a regular case - I start with around 30 mins with the beans, then another 20-30 minutes without the beans until it is fully dry.
This pastry also requires something I don’t normally advocate: Docking. Docking is the action of putting small holes in your pastry to ‘allow steam to escape’ - as we are dealing with a semi laminated dough that is filled with large chunks of butter, this is genuinely necessary and it does help the pastry from billowing up. I dock before it goes into the oven but sometimes re-dock once the baking beans have been removed. Trust me, you’ll see - it really needs it.
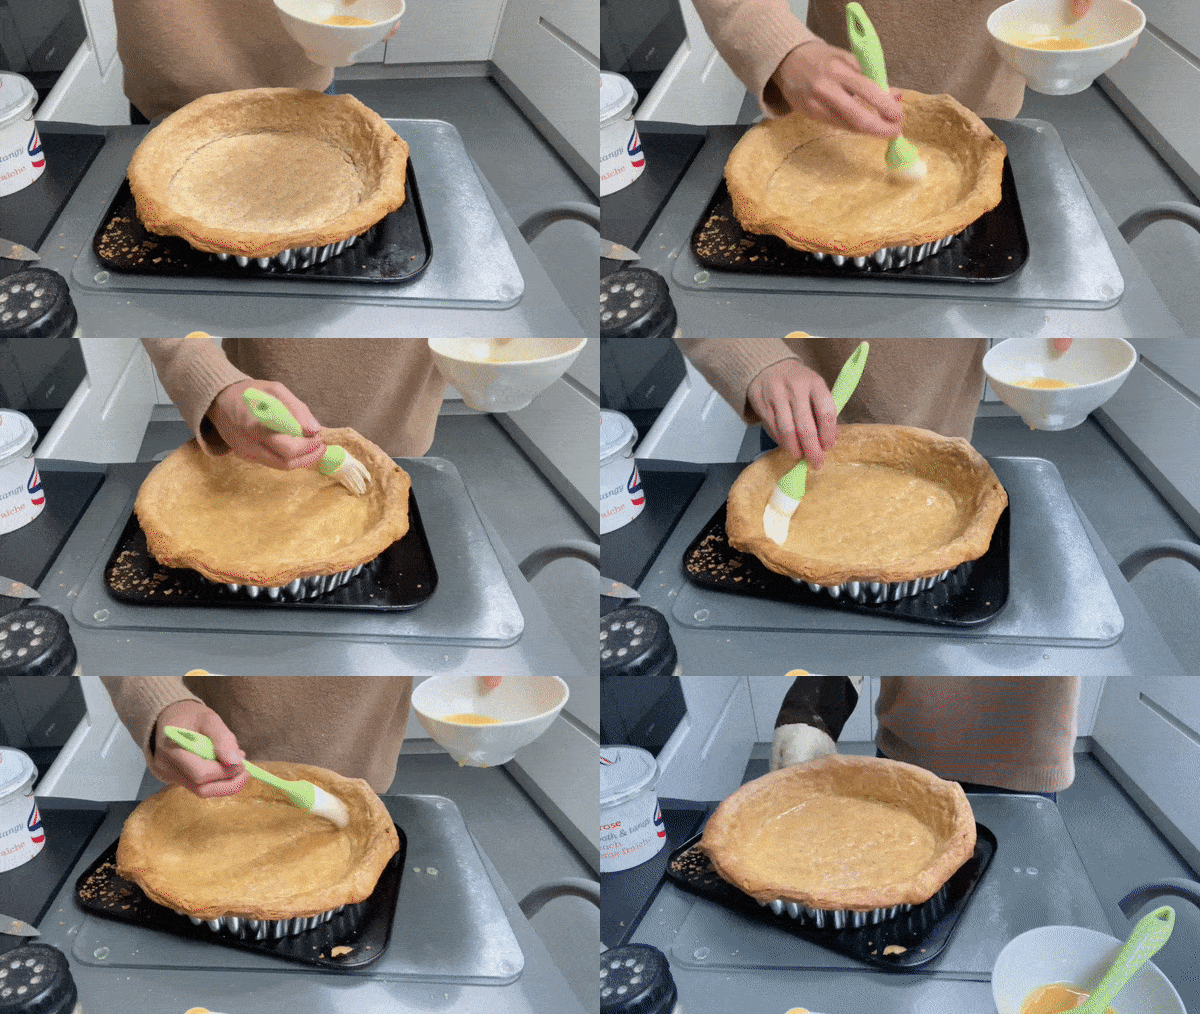
On top of all this, this pastry also gets 10 minutes with an egg wash to seal up any pesky little holes and to keep it crisp as it defends itself against the quiche custard. You’ll thank me later.
The importance of thickness (or thin-ness, more accurately)
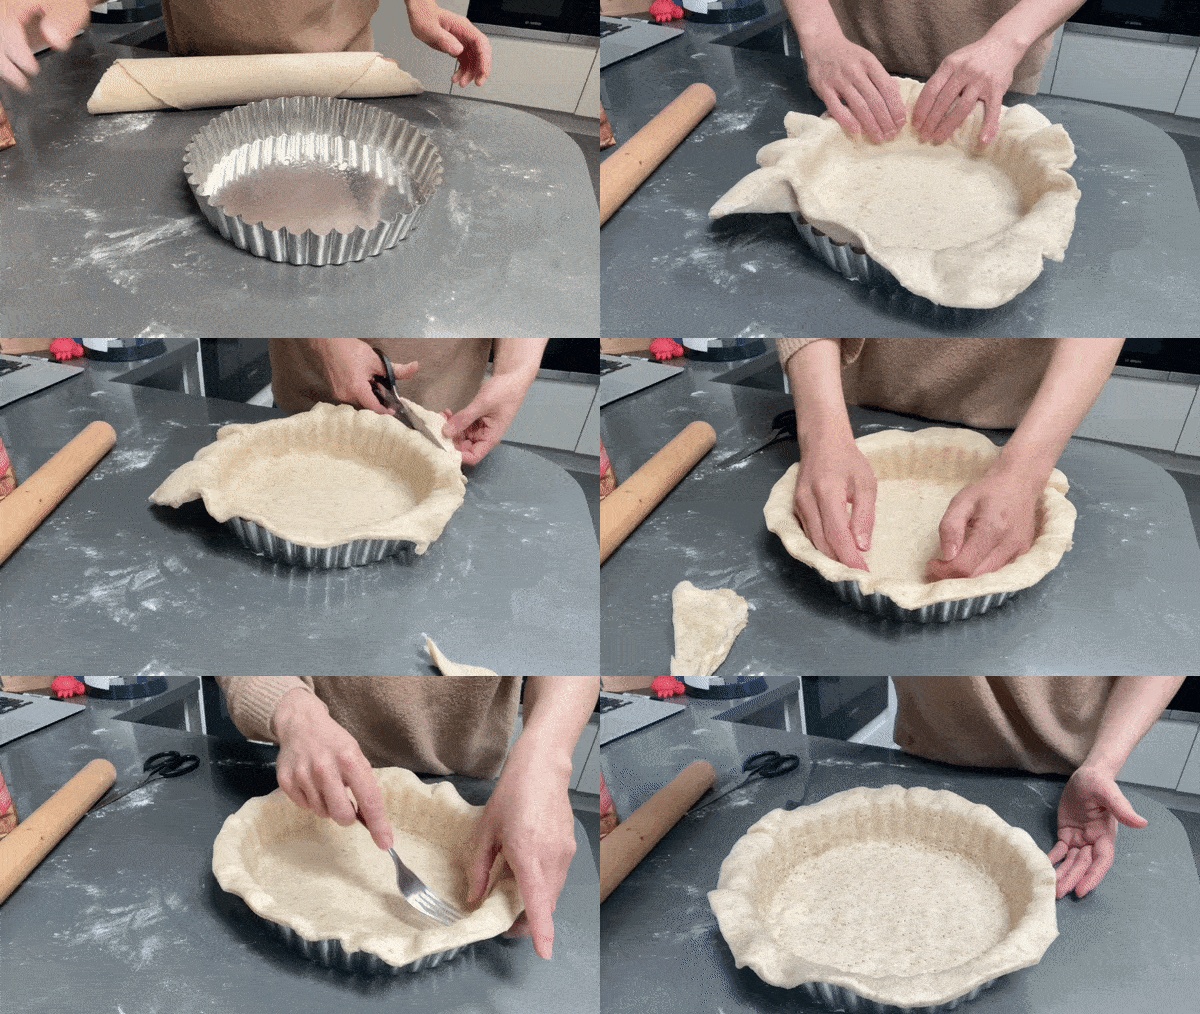
For blind baking rough puff, you really need to roll your pastry out thin. Since the pastry is filled with layers, it does expand aggressively so you need to initially take it thinner than you might think. When lining the case, it’s key to get it thin and well pressed into the corners - the most difficult part to bake is the inner corner/edges of the pastry case. As the case bakes and the butter starts going wild, the pastry sinks a little into the inner corner, creating a thicker-than-you-want inner border. Although we can’t control the shrinking in this pastry due to the laminated pastry, we can try and roll the pastry thin initially to minimise this issue.
As well as this, we need to leave an overhang of the tart case during baking which can be snipped or cut off later. If you don’t leave this overhang, it the random structure of buttery pockets will definitely cause the pastry to shrink and leave you with a bit of a headache.
When to egg wash
A few weeks ago I made a batch of these rough puff lined cases. I removed the baking beans to dry the cases out before adding egg wash. I checked them over - yep, they looked dry! I was in a rush, too, so I quickly brushed them with egg and put them back into the oven to seal the pastry.
10 minutes later I came back and realised what I had done - the pastry was NOT cooked, especially not around the inner edge (see previous paragraph) but the top was now golden. The layer of egg wash had now sealed the undercooked pastry which was still trying to rise up and bust out. The result was a strange mix of underbaked edges and overbaked middle and edges which had gone ultra golden from the egg wash. Unfortunately, there was nothing I could do and I just had to start again.
It was tragic - but I learned from my mistake. Now I will never ever egg wash a case until I’m 100% sure the pastry is fully cooked. The only way to check is to rather unglamorously prod your case, using a knife tip to peek into the case if you can. If it’s doughy - put it back in the oven! If it’s looking good, biscuitty and dry, you can totally proceed to the next level
Adapting rough puff
This pastry recipe is pretty easy going - I use a combination of wholemeal flour and plain flour. You do need gluten to be involved since it’s quite structural, so I wouldn’t recommend swapping in too much rye or spelt (for example), but I think this rough puff is so delicious when using a local flour or something a bit more exciting than plain flour.
If you have any farm shops near you or any shops that source locally, go and grab a bag! To ensure this recipe works widely, I’m using predominantly plain white flour, but you could totally add something more flavourful in there. Much like the cheese scones, you can also add things like paprika or mustard powder, depending on what the filling is, too.
Seasoning quiche
My rule for quiche is - do not put anything inside your quiche that you wouldn’t eat or enjoy on its own. Like, if you’re putting potatoes in there, make sure they are seasoned to the GODS and would be a perfectly good snack on their own. If you’re using peppers, don’t just chuck them in and hope they’ll come out delicious - slow roast them and then use them.
Ensuring there is a good level of seasoning in every element will ensure your quiche is well flavoured throughout and a proper celebration of the ingredients.
Quiche also offers you a good opportunity to use pre-made things - from smoked fish or meat to jars of roasted peppers or sundried tomatoes - as well as being a bit of a fridge clearer. Got a bit of soft cheese that is slightly past its prime? Stick it in! Got some asparagus that you forgot about and are now a bit bendy? Grill them and throw those in, too! Basically, quiche is the perfect vessel for all those extra bits - you can make it as complex or as simple as you like.
Alright, let’s make it!
Buttery onion tart
This recipe is for a DEEP 8inch tart tin. You can definitely use a less deep tin - just halve your ingredients (or make two!)
If you’re veggie, then simply omit the smoked ham. I added some additional herbs into the veggie version at lark! - thyme worked beautifully here. You could also add some roasted shiitake or something super savoury - that would be delicious
Rough puff pastry
This makes enough pastry for a deep 8inch tart tin however I recommend doubling this and keeping a batch in the freezer
160g plain flour
75g wholemeal flour
165g butter
5g salt - i use flaky, like maldo
10g white wine vinegar
95g ICE COLD water
Savoury custard
95g double cream
95g creme fraiche
95g whole milk
165g eggs
Seasoning to taste
Fillings
Confit onion - this will reduce to approximately 60% of the original weight and is enough for 1 deep 8 inch tart. I recommend to make this the day before or start early in the day
900g onions (around 6-7, peeled and sliced)
90g butter
2 bay leaves (fresh if poss)
Salt and pepper to taste
Greens
150g-200g greens of choice, blanched in salted boiling water for 1 minute then drained chopped/diced into small chunks. I use spring cabbage
Optional:
150g Smoked ham
100g grated cheese - I use gruyere
Rough puff - method
Weigh out water and vinegar. Put into the freezer for 20 mins or fridge for 1 hour at least
Weigh out flours and put into the fridge or freezer before using
Cube butter into 2cm cubes and put into the fridge for 1 hour or freezer for 20 mins
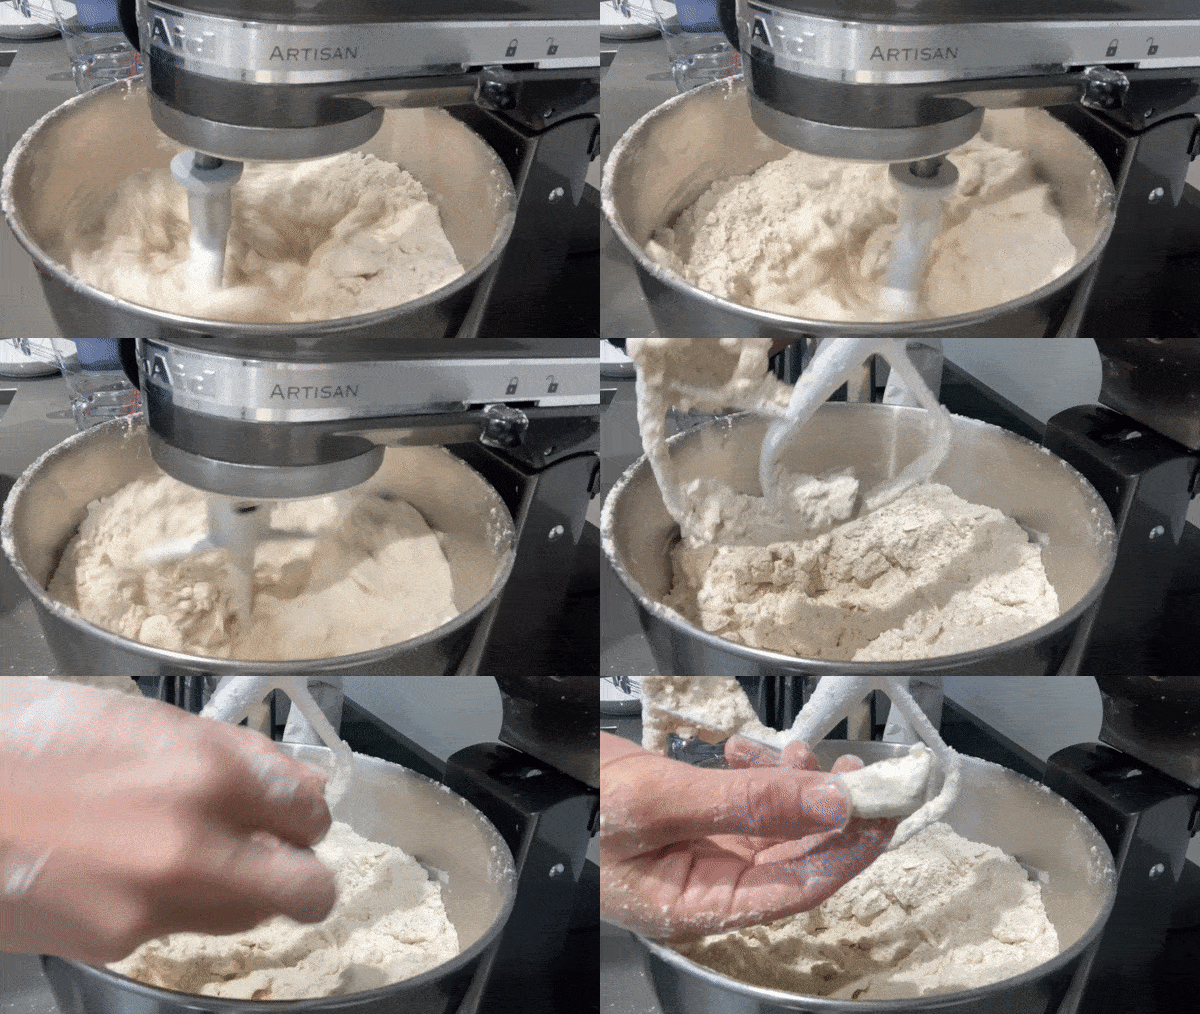
Put flour into KitchenAid bowl and mix with paddle until all is combined
Add in cubed butter and mix on a low speed until the butter is in irregular sized pieces - you want some to be breadcrumb style and some to still be large - around 1.5cm
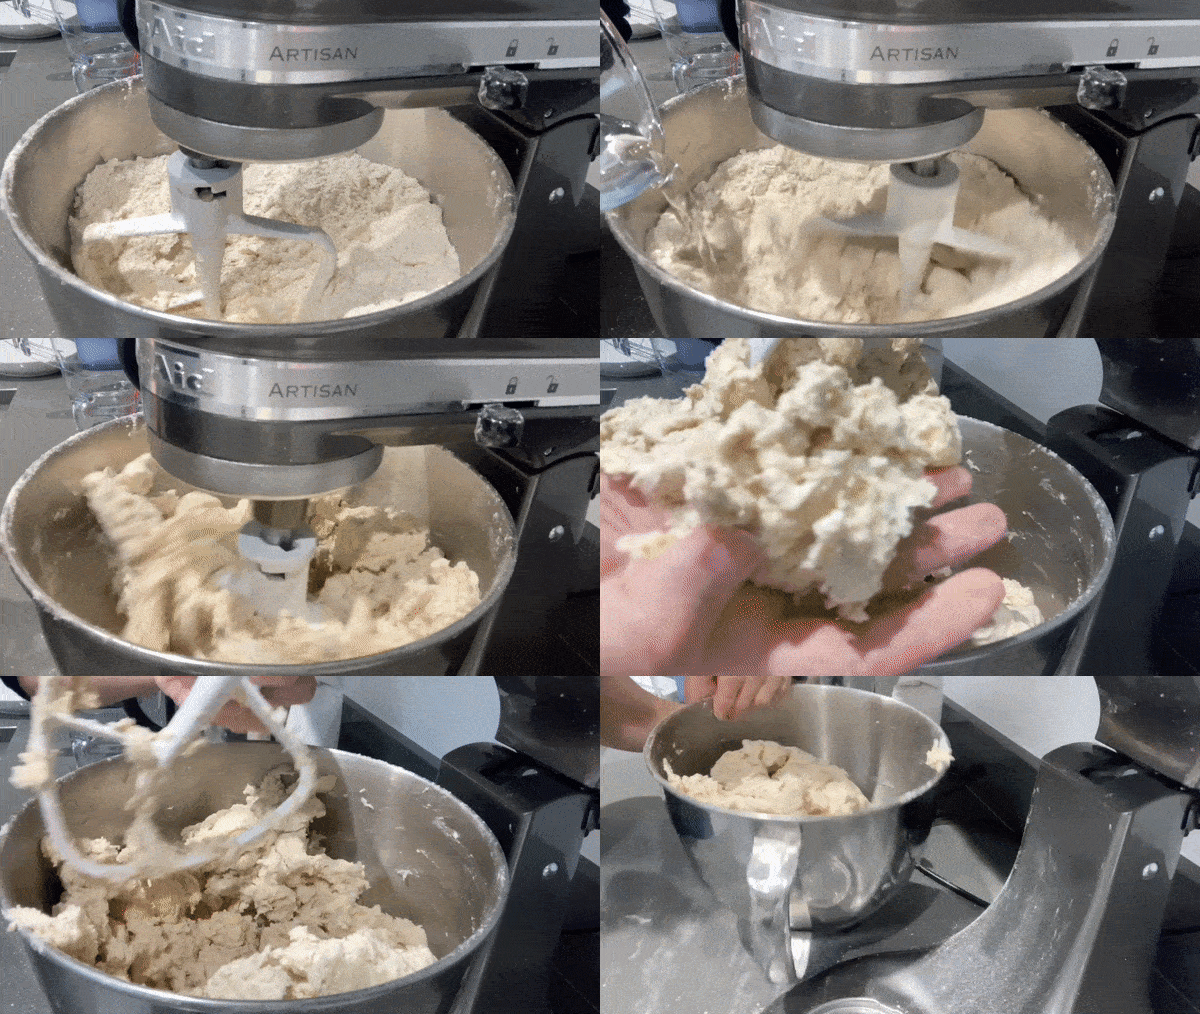
Immediately add in your cold water/vinegar and mix until it looks hydrated - about 20 seconds. You will still have dry bits at the bottom of the bowl
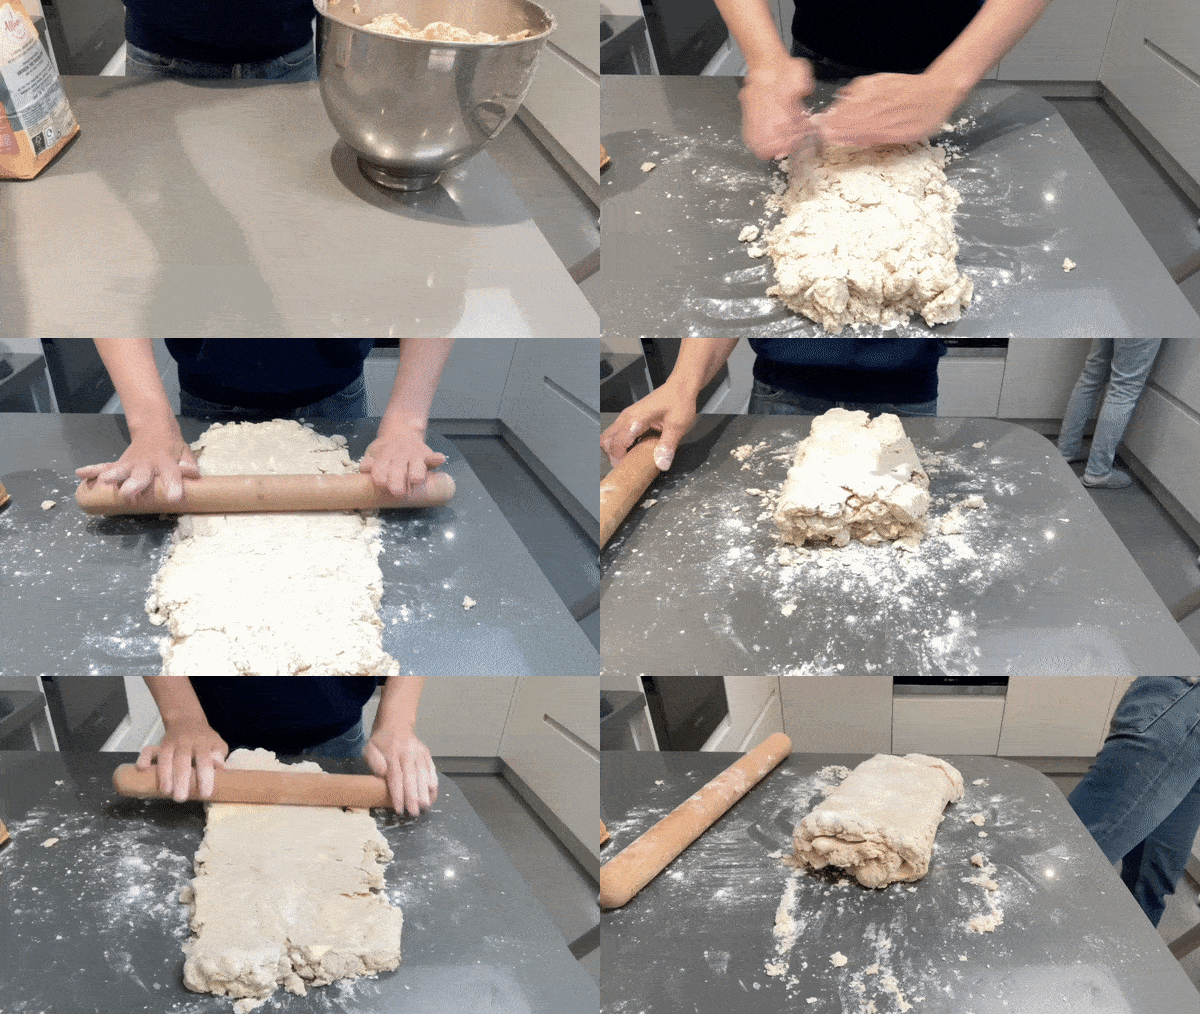
Move onto a clean surface and add flour if you need to underneath
Roll the pastry out to be 40cm long and perform a double fold - this is when you fold both edges into the middle and then fold it over itself again
Perform two more double folds, immediately, adding flour when you need
Chill in the fridge for 1 hour before using
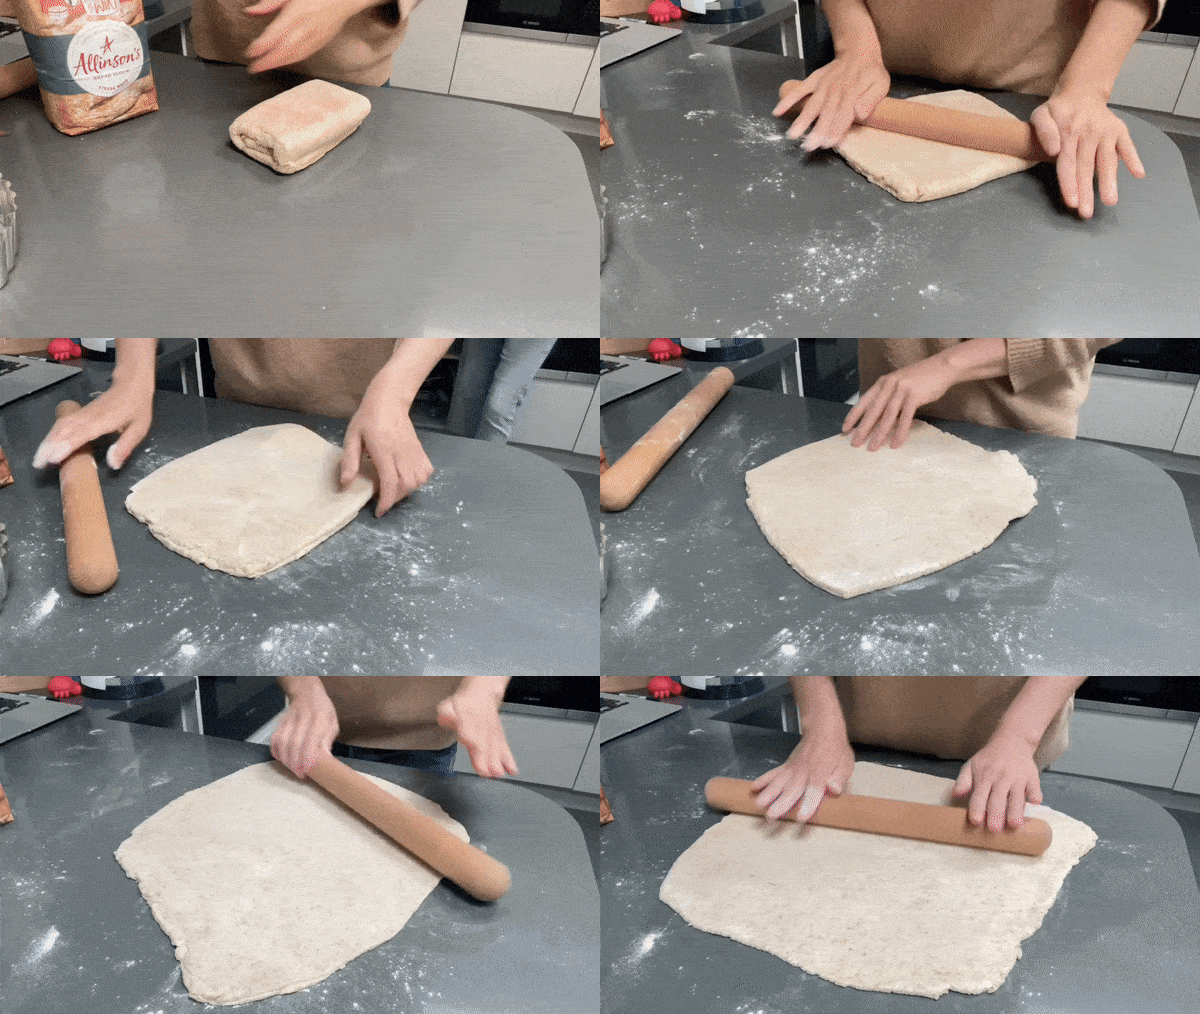
Roll out the pastry using firm strokes of the rolling pin, turning it a quarter turn between each roll to keep it in an even shape. Roll it to about 3mm. I know this seems thin but it has lots of layers in and won’t cook otherwise! You want it to be rolled out enough for there to be decent overhang. And remember what I said earlier about it needing to be THIN - don’t be scared, you won’t crush the layers!
Line your pastry case. Roll the pastry up onto the rolling pin and drape over the case. Tuck carefully into the corners and press into the sides. Go over it several times with floured fingers if you need - it’s got to be super tight to the tin. You can trim the overhang with scissors so it only has 2cm or so
Dock with a fork all over - sides and all
Chill in the fridge for 1hr or the freezer for 30 mins
Pre-heat oven to 180c fan
Press foil (as it gets into the edges best) into the tart, ensuring it is tight to the edges. Fill with rice, or your chosen baking bean
Bake case for 30 mins until it looks very dry when you peak inside
Bake for another 20-30 mins until golden brown and fully baked
Brush baked case with egg wash and return to the oven until magnificent looking - about 10 minutes. You need to fill in all the docked holes!
The case is now ready to use
Confit onions - method
This is going to hurt. I am sorry. Peel and slice the onions thinly, about 2mm
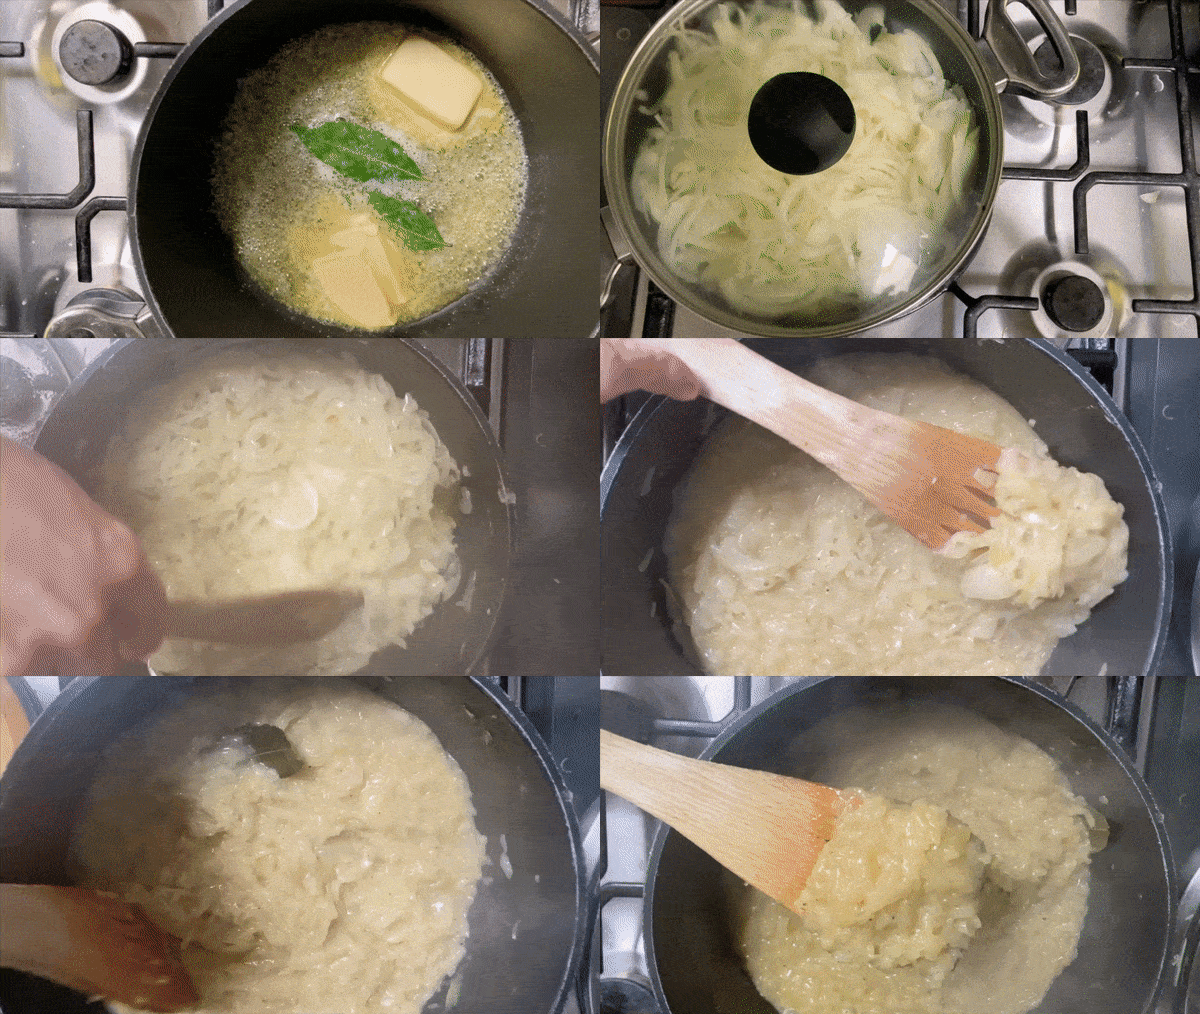
Heat butter in a large saucepan and add the bay leaves on medium heat. When it is melted and sizzling slightly, add in the onions with a big pinch of salt
If the onions are going over the top of the saucepan, stir until they have softened enough for you to be able to cover with a lid
Turn the heat down to low and cook the onions until completely soft and beginning to change colour. It will take a few hours. Stir every 20 mins or so to check it isn’t catching
Once the onions look silky and have released all the water - the pan should look juicy - you can remove the lid and turn the heat up and evaporate some of the water off
Continue to cook, checking it doesn’t burn, until the onions have reached a light caramelised brown
Check the seasoning - add salt and pepper
The onions are complete! These will last for 5-7 days in the fridge or you can freeze them
Savoury custard - method
Blitz all the ingredients together and pass through a sieve
Season to taste - lots of black pepper, please!
Store 3 days in the fridge for freeze for 1 month
Buttery Onion Tart - assembly
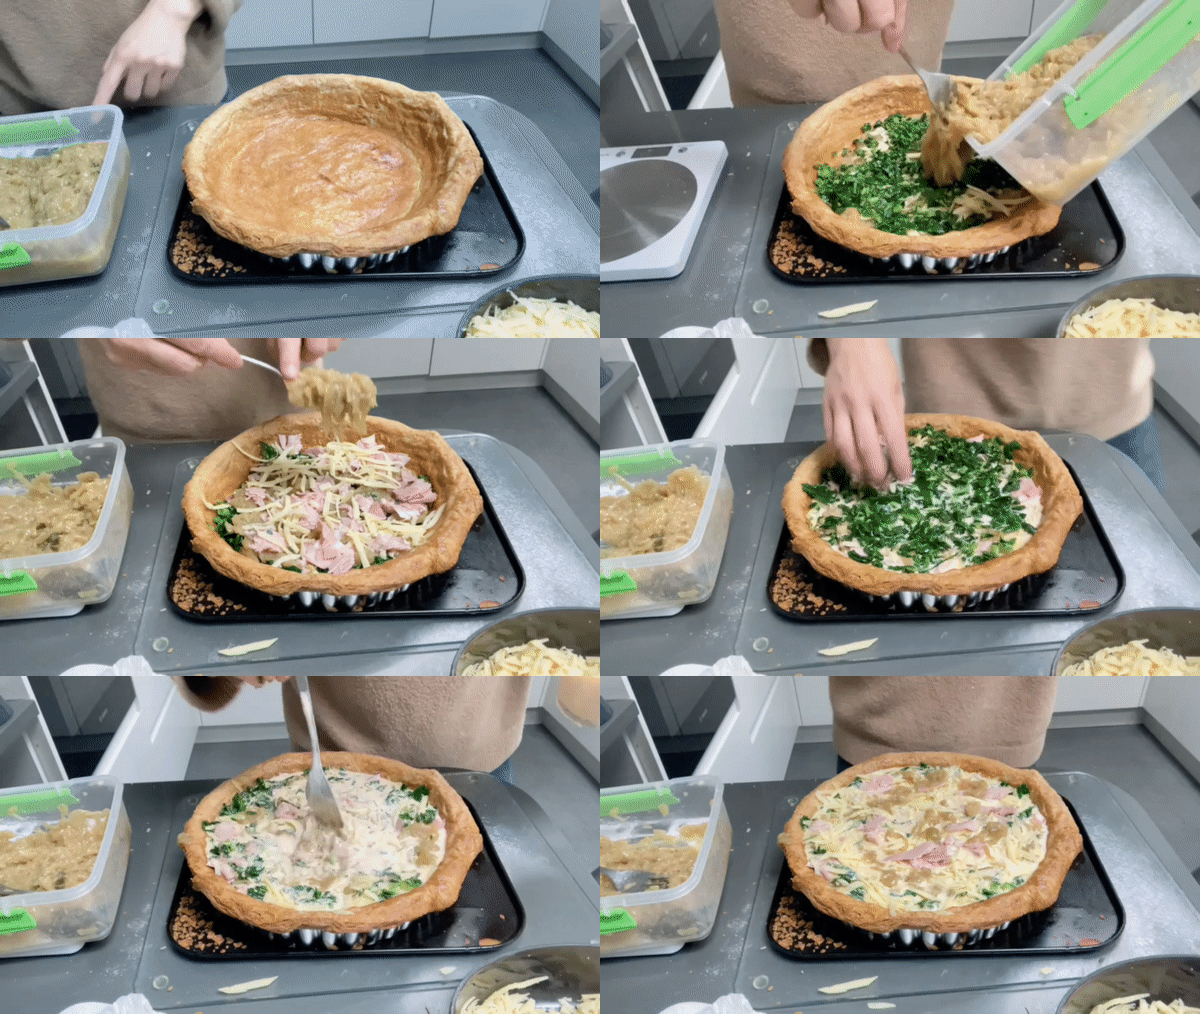
Build up the layers for your quiche, keeping most of the cheese at the top for serious browning action. If you’re doing a deep quiche, you may need to move the fillings around to get the custard into all the grooves - just wiggle it about with a fork or knife. Finish with onions and cheese on top - a little bit of ham is nice too as you then get crispy bits
Bake 170c fan until the internal temperature reaches 73c. Check in a few spots - it’s okay if the middle is still a bit gooey or not quite up to temp as carry over cooking will take care of that, trust me
Once cooled slightly, you can trim the crust with a sharp knife to tidy it up
Wait for 1 hour before cutting or chill overnight then reheat the slices before serving - 10 mins in a hot oven should do it
You can also enjoy it cold, if you like, but the buttery pastry really comes into its own when warm. Serve with a super sharp salad - I love shaved fennel with an acidic shallot-y dressing. YUM.






I have just made this tart and fallen completely in love. Thank you so much for the recipe Nicola!
So looking forward to KP+ this week as I'm dying to make individual tarte tatin ❤️ and that crème brulee cookie from honey pie looks to die for ❤️