Hello,
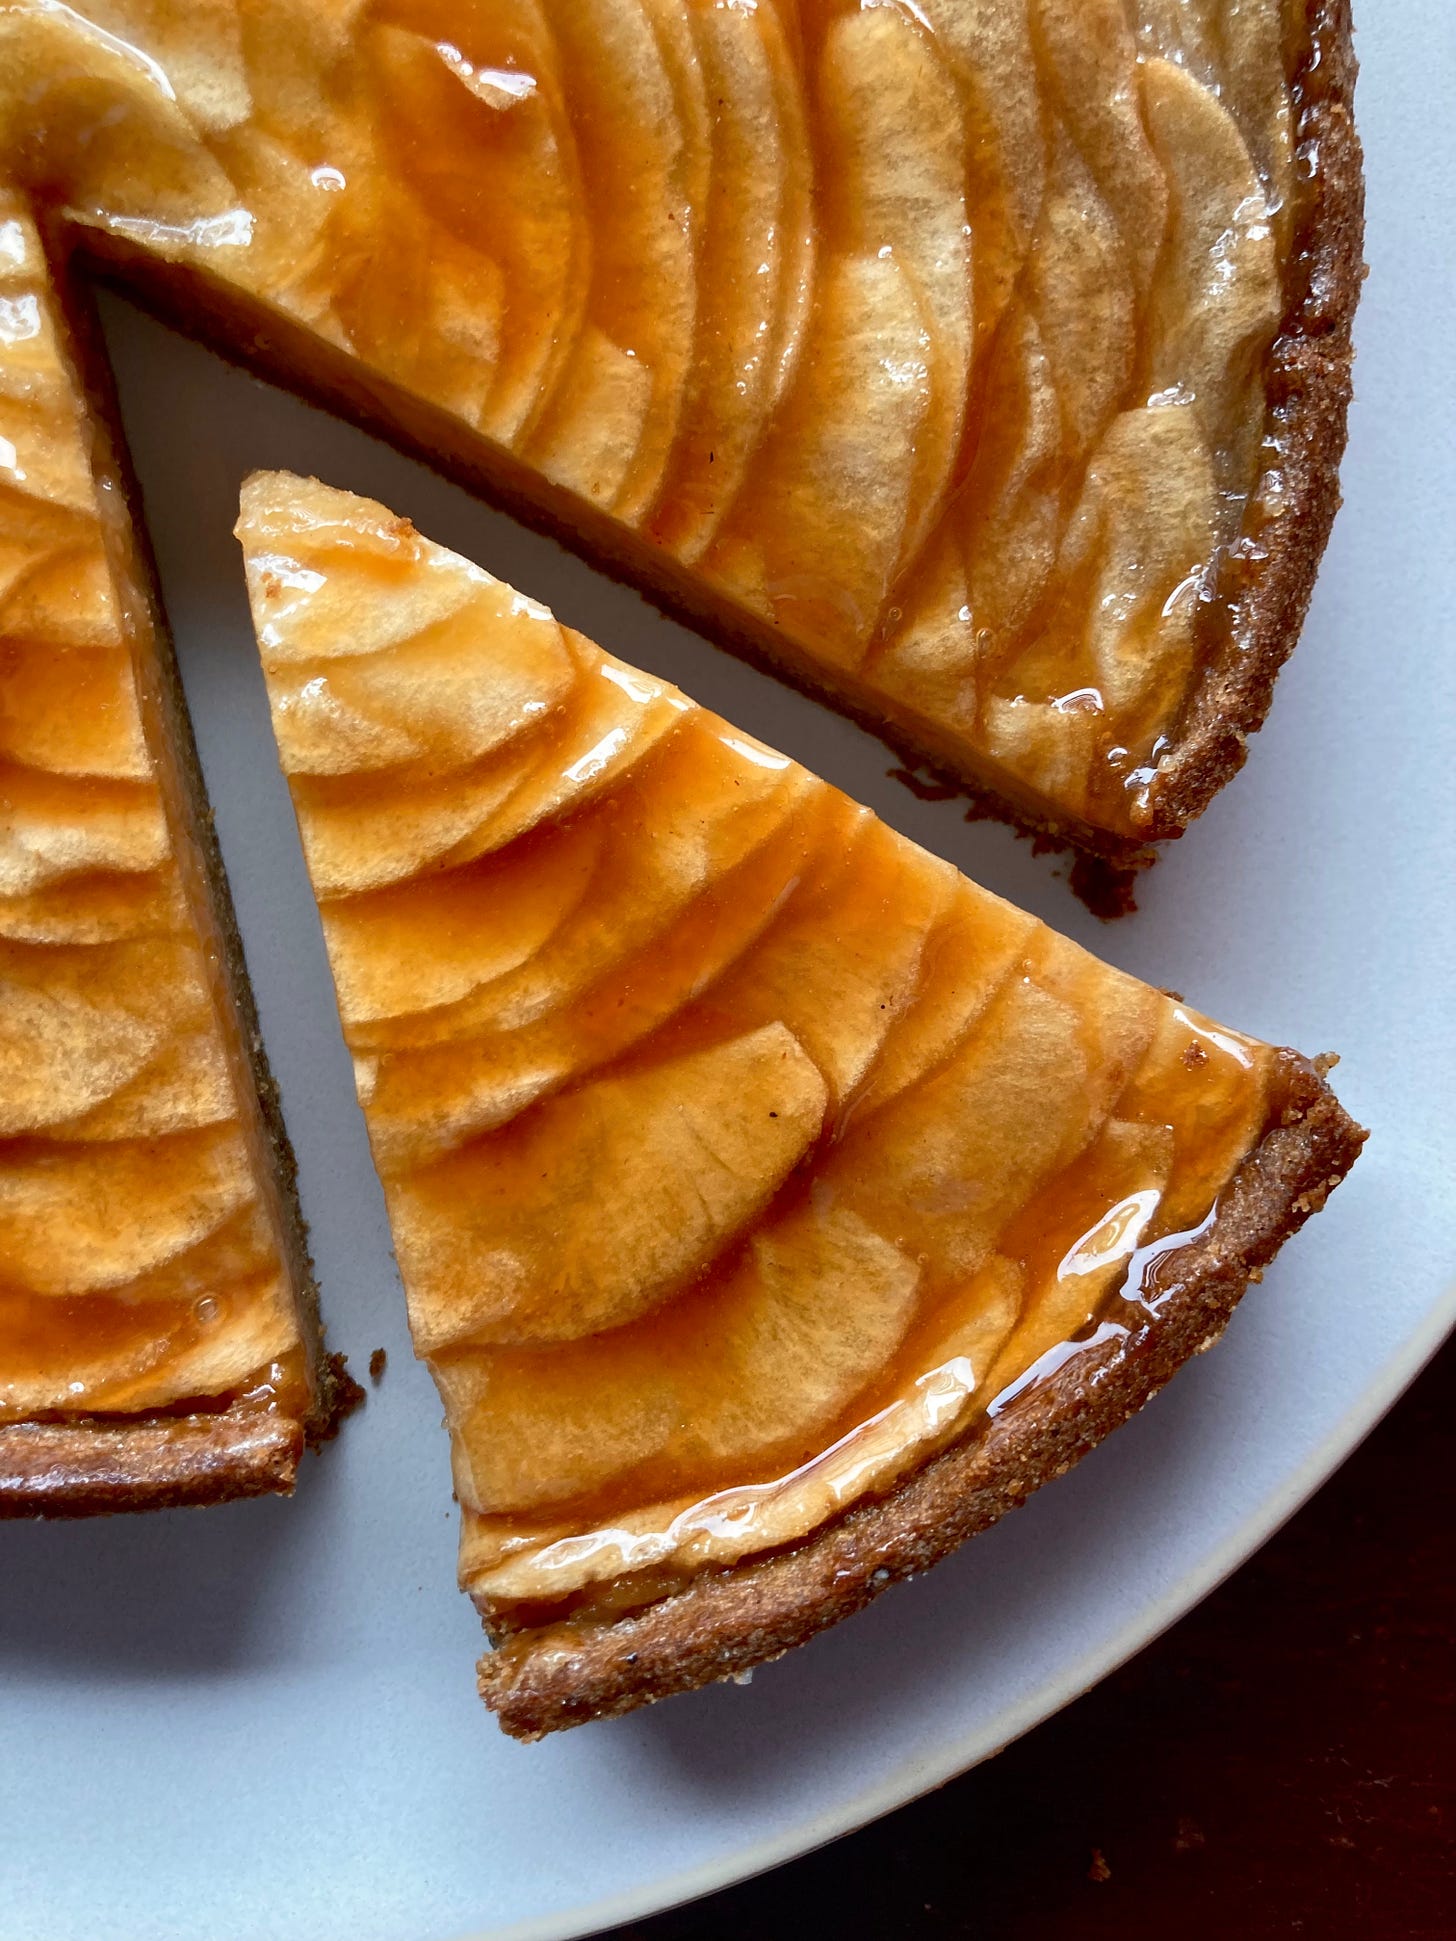
Welcome to today’s edition of Kitchen Projects. I am SO happy to have you here. Today we are leaning hard into the world of apples and this tart is possibly the purest expression of apple flavour I’ve ever made… I think you’ll love it.
A few months ago I launched KP+. Subscribing only costs £5 per month and with that, you’ll be supporting the writing and will get access to extra recipes, win fun prizes content + community chat threads. Once you sign up, you’ll get access to the whole archive (including things like flaky apple turnovers, your go to brownies, caramelised white choc and cherry cookies, chocolate basque cheesecake, tart tatins and sooo much more) and ofc, direct access to all future KP+ content, too:
OKAY, let’s do this.
Love
Nicola
Apples on apples on apples
So, we haven’t really discussed entremets before, have we? An entremet, in essence, is a multilayered dessert. One of the wonderful things about entremets is the balance of flavours - you take a bite of the entremet and all the layers work together to produce a perfectly balanced flavour.
Although entremet is usually a term reserved for fantastical looking mousse cakes that (often) use gelatine, wacky colours, special moulds and lots of in-and-out-the-freezer-ing, today’s tart is a take on an entremet of sorts - although it doesn’t have a mousse (usually a pre-requisite), it’s got multiple layers and textures within one tart and each element brings a different flavour or texture, meaning we can dip our toe in the entremet pool without too much pressure. This apple tart is an absolute team player of a tart.
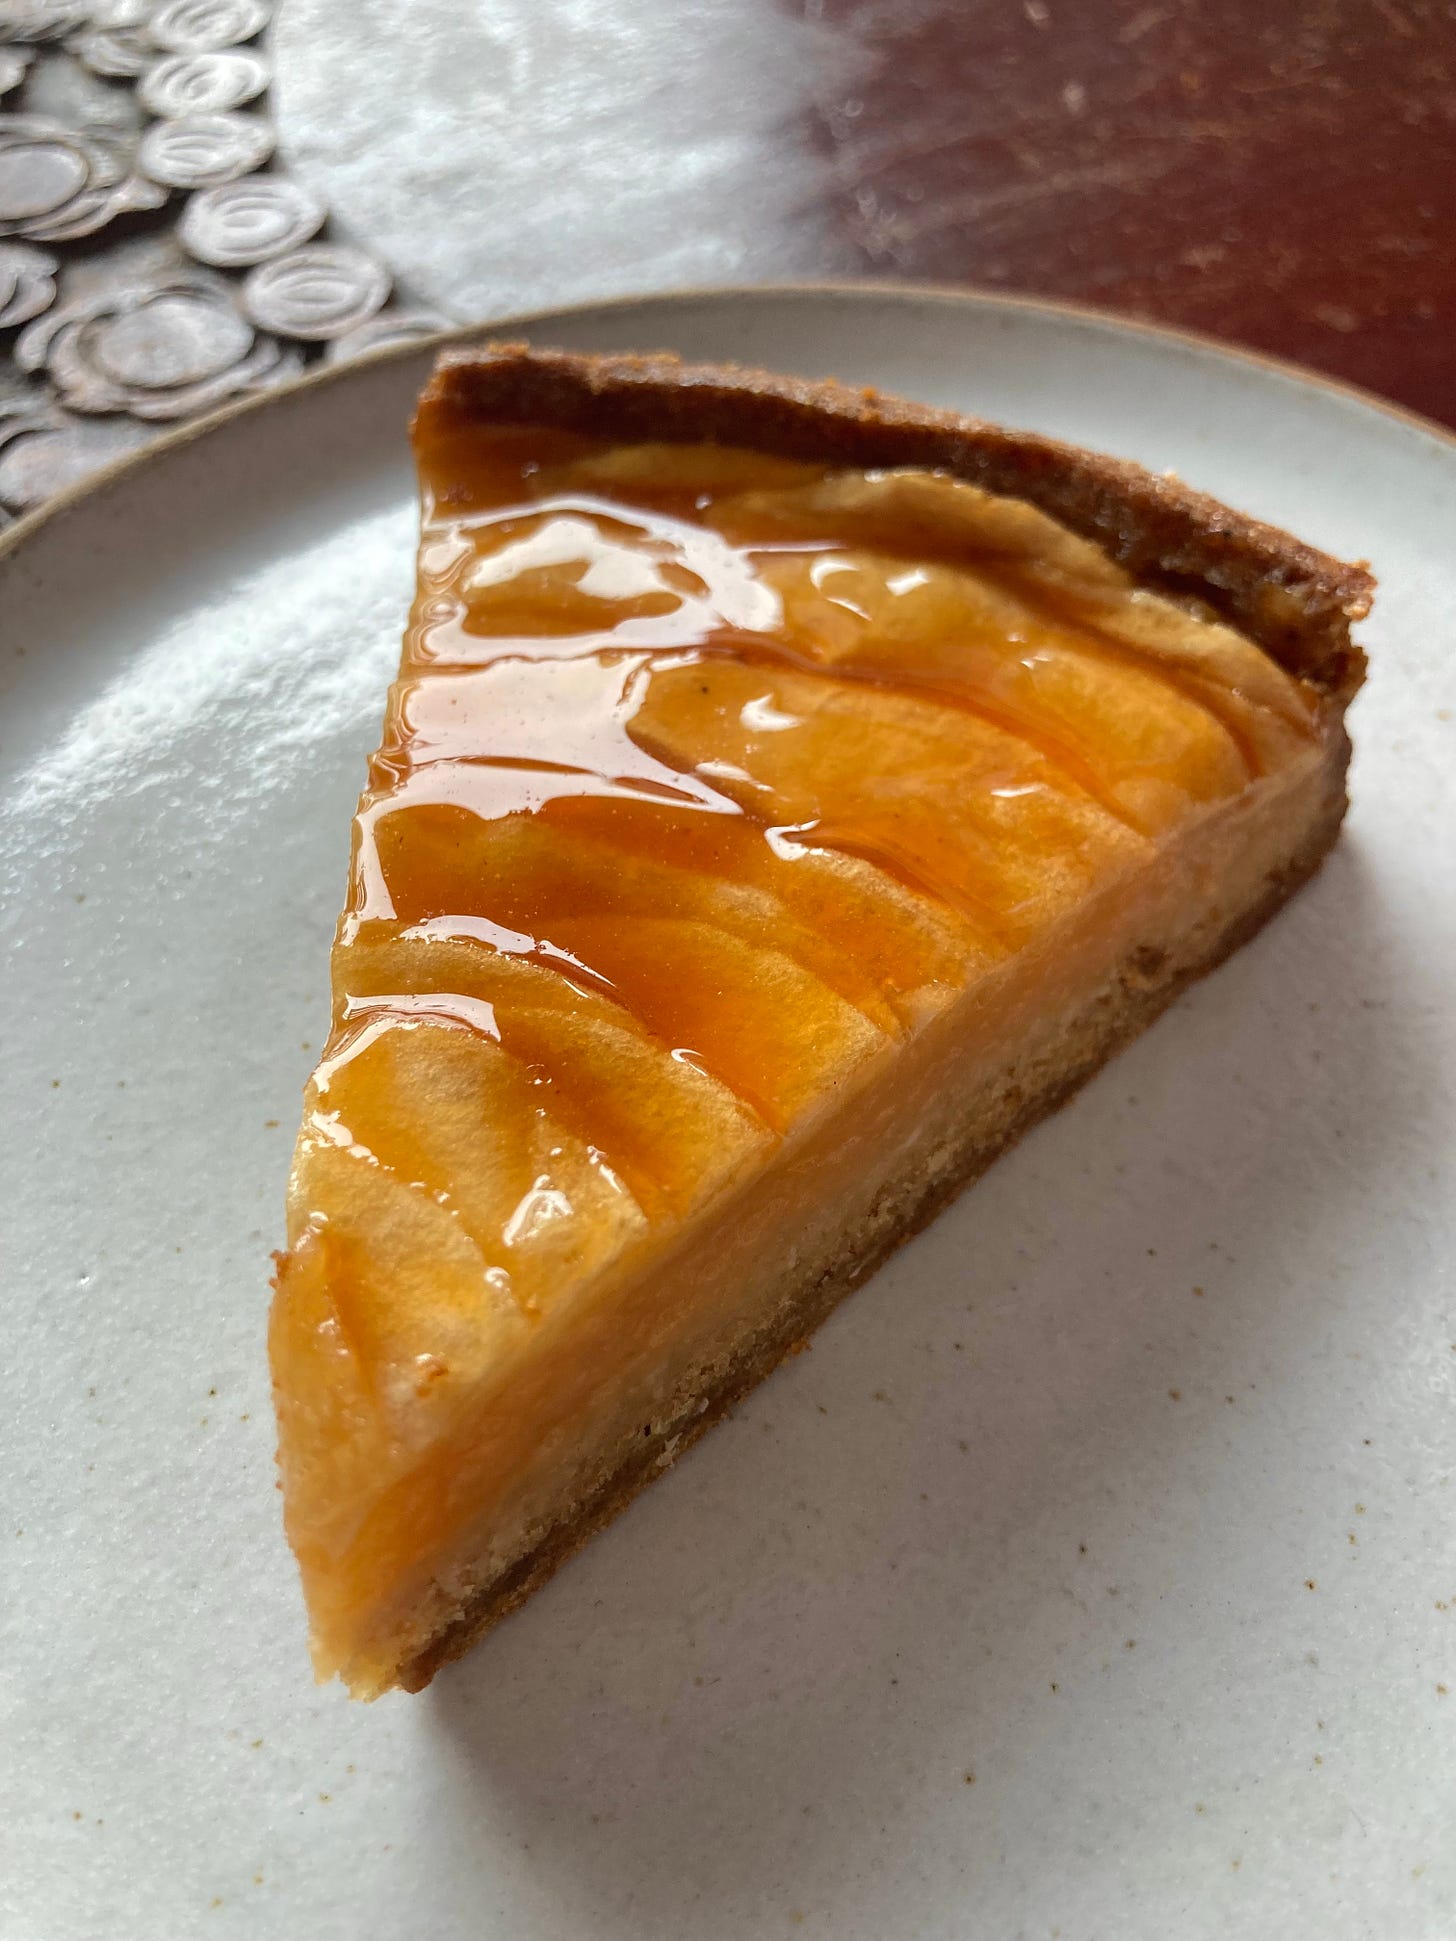
My goal for this dessert was to create a tart that absolutely celebrated the flavour of apples, inspired by the classic french apple tart. I also wanted it to be harmonious - that means, when you eat it, you’re not quite sure where each flavour is coming from. This means having apples in three ways - a compote, in delicate slices and the juice reduced on top. A little frangipane and the speculoos spiced dough just ties it together.
Alright, let’s do this.
The glorious world of apples
I couldn’t resist making an apple recipe earlier this year (those brown butter buckwheat apple bars), we are officially now in peak apple season and I hope you’re ready! Especially if you’re reading this in the UK, pretty much the home of apples. Although you can permanently purchase the most popular varieties all year round (jazz, gala, granny smiths, pink ladys), between September and November, a whole host of apples come into play. I really hope you take this opportunity to see what varieties you can find.
But, as you probably know, Apples are not created equal. From floury to crunchy, creamy to sharp, red skinned to green skinned, tart to sweet, apples don’t just look different, they behave differently in the oven.
Apple characteristics are defined by several things but there’s one fact about apples that always blows my mind: Your average apple has a large % of air - around 15%-18% for an average apple. This is why apples float! And it’s always why apples are so wonderful to eat: The more air in your apple, trapped between fibrous cell walls, the juicer it is. An apple with lots of air will have a fantastic crunch - the cell walls break open and the juice is released. Different varieties will have different % of air, different sugars and different acidity, giving apples all of their wonderful expansive varieties.
All of these factors, as well as how recently the apple was picked (apples continue to ripen after picking) determine how apples behave when baking. Let’s put them to the test
Putting apples to the test
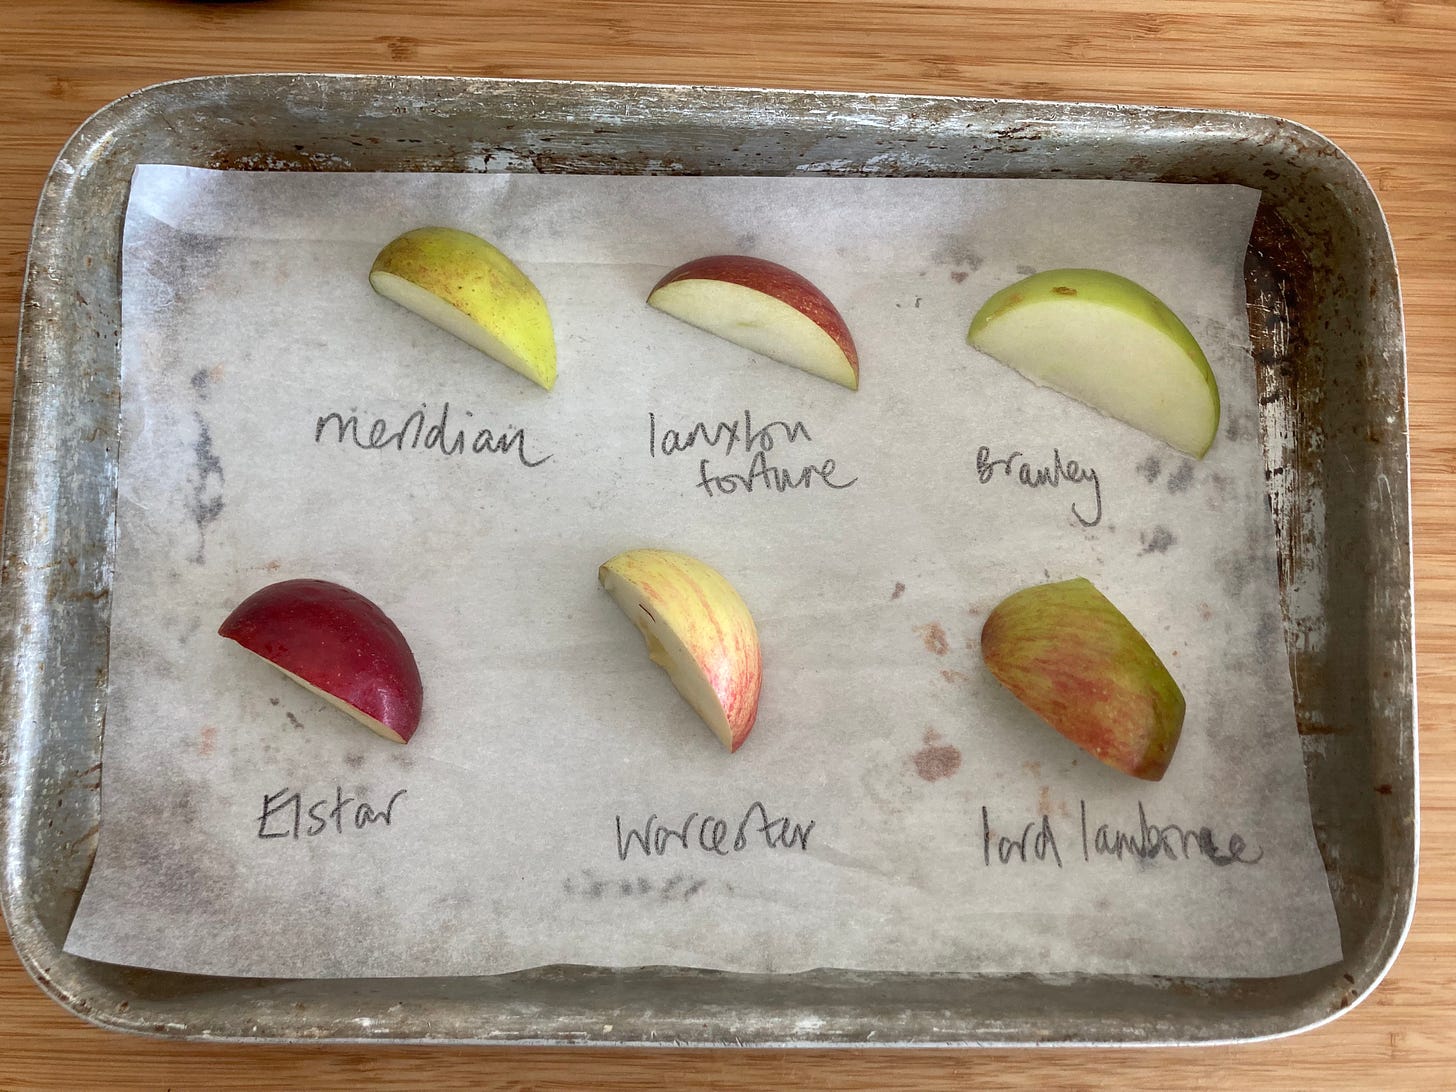
For today’s tests, I got lots of different varieties of apples and put them against each other and baked at 160c (fan) - covered - for 20-30 minutes.
The varieties - and their flavour profiles - that I tested are as follows:
Bramley - Sour and tangy
Pink Lady - Tart, sweet and creamy. Very crunchy
Granny Smith - Acidic, tart, very sharp and crunchy
Laxtons Fortune - Sweet, creamy, floral (perhaps THE PERFECT APPLE imho, and fyi have seen them in m&s this week!)
Worcester - Juicy, rounded flavour, sweet
Meridian - Tart, sharp, creamy flesh, juicy
Lord Lambourne - Sweet, subtle flavour, floral
Elstar - Crisp, medium tart, juicy
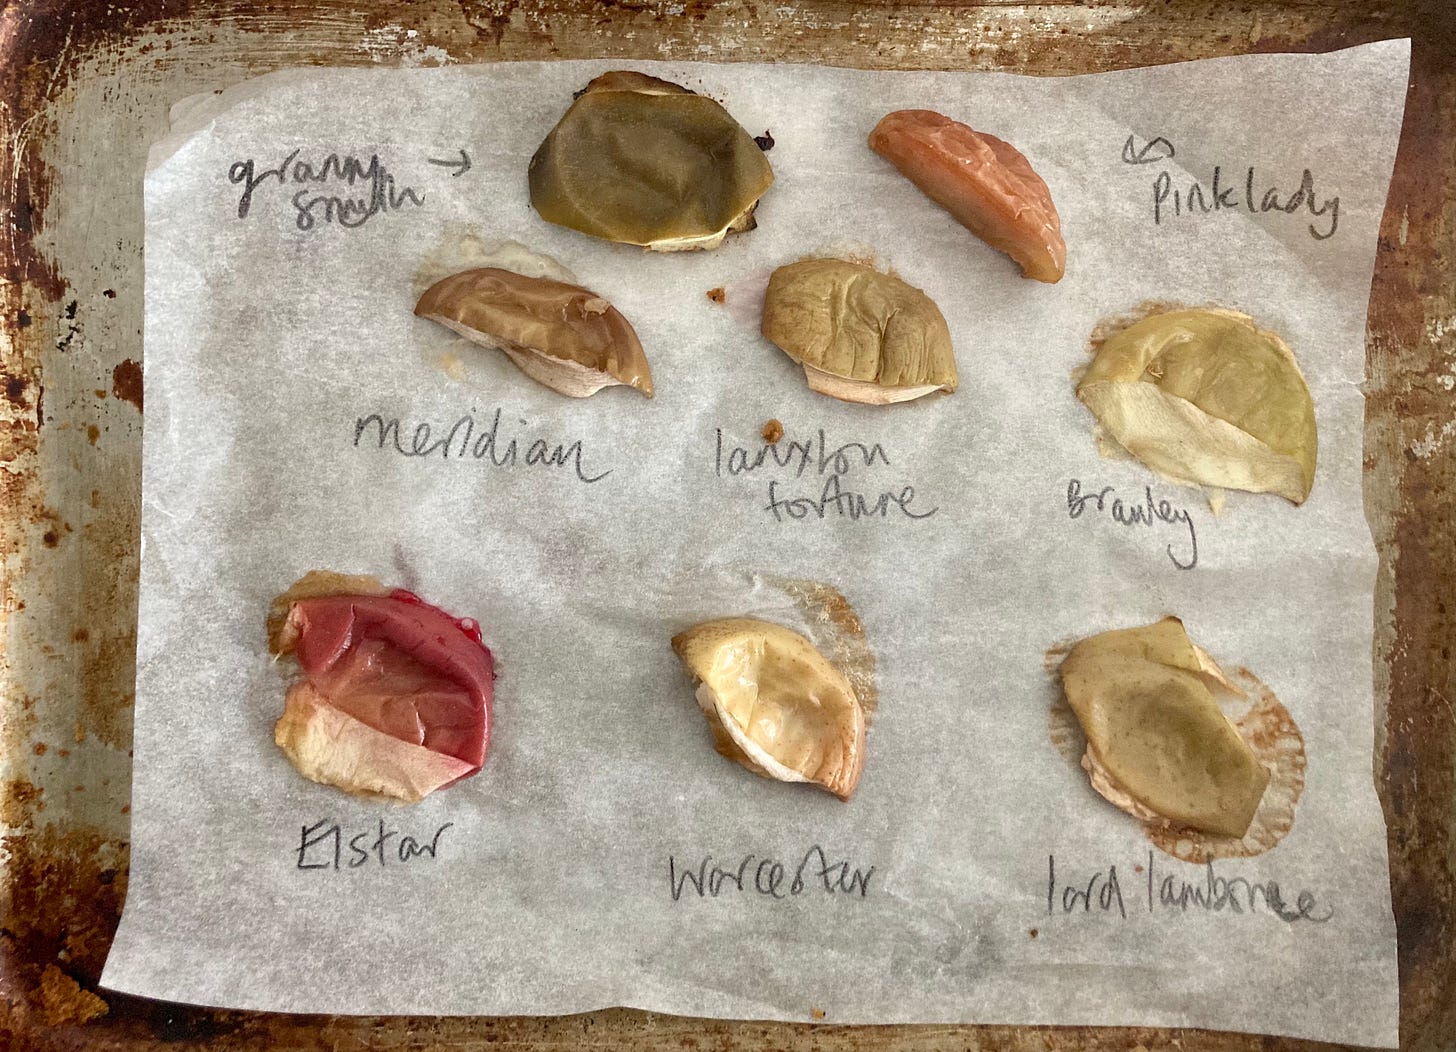
Once out the oven, I did the most *scientific* thing I could think of - I squished them. Here are the results. *Scientifically* I have rated them out of 10 for their mush factor, 10/10 meaning they are absolute mush, and rated on their colour retention too:
Bramley - 10/10 - Pale, creamy colour. No longer green
Pink Lady - 2/10 - The whole slice has gone a pleasant pink!
Granny Smith - 3/10, colour totally lost, skin is a grey green
Laxtons Fortune - 3/10 - Totally lost all of its red colour
Worcester - 3/10 - Pale, green and devoid of colour
Meridian - 6/10 - Skin has gone a light grey, green
Lord Lambourne - 8/10 - Really lost its colour, desaturated
Elstar - 7/10 - Retained colour suprisngly well, bright pink skins!
There is no one size fits all test for apples. Although pink ladys are a safe bet for keeping their shape, the best thing to do if you come across an apple variety you’re not sure about is to test it yourself - just take a quarter and bake it. Another way to handle unknown varieties is to mix with a ‘reliable’ type, like a pink lady, so then you can bake sans anxiety of mush and get all the benefits of the flavours.
Developing the profile of today’s recipe
Part of the reason I write this newsletter is because I want to provide you with the tools and confidence to develop your own recipes. And at the heart of all recipe development? Flavour.
Whenever I start a recipe, I like to make a quick list of all the ingredients that I think go well with the ‘star’ ingredient; Of all of the autumnal fruits, I do think Apples may have the most flavour friends. Here’s the list I scribbled down in my notebook when creating the recipe this week. I’ve added a little asterisk by all the ingredients I’ve ended up using:
Rye*
Buckwheat
Rum
Vanilla
Almonds*
Cinnamon*
Ginger*
Lemon
Oats
Honey
Molasses*
Malt
Pecans
Cardamom*
Bay leaves
Brown butter
Caramel
Hazelnuts
Walnuts
Lemon
Mint
I’m always excited to expand this list and I’m sure there are some *glaring gaps* so please leave a comment and let me know your favourites!
Today’s tart dough
I’m sorry but I have some bad news for you - this speculoos tart dough, whilst glorious, is kind of annoying. It’s not hard to make, it’s not hard to work with… but it does like to misbehave a bit. Why?
Baking powder
You might think - Nicola, why do I need to use baking powder in my tart dough when we don’t *want* my cases to ‘rise’? I thought having a nice flat tart case is the goal? Well, it IS… but baking powder provides such a glorious texture that I couldn’t omit it. And therein lies the trickiness - this dough wants to move and groove and we need to keep it in place.
But before we get to this, here’s a little reminder about baking powder and raising agents: Basically, raising agents effectively do one thing: chemically react to create gas (CO2).
As the CO2 is released, it is trapped by molecules like gluten and fat. This trapped air leaves a light and fluffy structure behind. Baking powder is a combination of an alkaline (like bicarbonate of soda) and an acid (like cream of tartar) but these two don’t react until heated AND hydrated. It is known as a ‘double action’ raising agent because it reacts twice: the initial reaction is when you add an acidic liquid (just like baking soda) and the second reaction comes when it is heated and the acid and alkaline present in the powder itself get together. This means that you don’t really have to add anything acidic to your mix to get the reaction as long as it's hydrated – the baking powder does it all itself.
So, with baking powder, we get to fake the flakiness. As the chemical reaction happens during the bake, our tart dough basically gets aerated which gives it a premium snap and eating quality. It improves tenderness, too.
Struggles of baking with baking powder
I made several versions of the dough this week - one with baking powder and one without and the former was definitely superior. Once I’d decided on the baking powder dough, I tested to see the best way to bake it: Do I need baking beans? The answer is: kind of.
Although I got a decent bake without baking beans, it’s a bit high maintenance. The thicker areas of dough struggled to bake and expanded more aggressively, meaning I had to press down the tart during the bake. Although this is alright for one tart, I could never put this dough into production. So, baking beans it is. Get your rice ready, y’all!
The world of speculoos
Although the Speculoos flavour has come to be synonymous with the biscoff spread (and ice creams, and millions of other spin off products), the OG speculoos is a thin, crunchy spiced cookie that dates back to the 17th century and originates from Belguim.
Whilst recipes vary, speculoos tend to have a mixture of cinnamon, cloves, nutmeg, cardamom, white pepper and ginger - a pretty festive mix. Which makes sense, since these biscuits were traditionally baked for the St Nicholas Day Feast on the 5th/6th December. As well as the spices, the speculoos biscuit is known and loved for its caramelised flavour. This comes from the sugar - brown sugar, molasses and honey can all be used. It’s a pretty standard mix - butter, sugar and spices beaten together before the flour and raising agents are stirred through.
For today’s tart dough, I’m using a mixture of cinnamon, cardamom, nutmeg and ginger as well as molasses. If you don’t have molasses, you could swap 1:1 for honey or malt syrup. You can always play around with the spicing, too!
Fresh spices
When developing recipes for the lark! Pop-up, I told Verena I was going to buy some ground cardamom for the plum tart. She stopped immediately in her tracks and said ‘wait!’. Duly, I watched her go to her cupboard and produce a little tupperware pot. ‘Smell this!’ she said… and I did. And that fresh ground cardamom blew my mind (and cleared my sinuses).
I admit, freshly ground spices are a luxury and I usually just reach for the handy pre-ground stuff. BUT, over time, spices lose their potency and aroma. Although they’ll never go off, or go ‘bad’, once past their prime, they can be quite disappointing. Also, the thing about ground cardamom? The stuff you buy is both the husks and the seeds blitzed together - hence its light colour - rather than just the gloriously zesty pods, meaning the flavour and aroma is massively watered down.
So, even though it’s a bit annoying, separating the pods from the husks and then blitzing in my spice grinder (aka my nutribullet) is worth it. Just blitz some yourself and breathe in… you’ll see! A few months ago, I also wrote a round-up on blenders, if you’re interested!
BTW.. on the subject of spices, if you want to learn more about cinnamon, SOURCED - a project by the wonderful writer and baker Chloe Rose Crabtree and Anna Sulan - has gone hard on the topic. Have a read here or sign up to their newsletter.
Today’s apple compote
A few years ago, I was shown an apple compote technique whilst working at Happy Endings when developing a special Christmas ice cream bombe - apples are grated, cooked with sugar and then a little flour is added to thicken and absorb the juices. Then finally, egg yolks and butter are stirred in. The result is an ultra rich, buttery and custard-like compote.
Unfortunately, I never wrote down the recipe and have spent the last few years thinking about it. But I DO remember the technique - this week, I tested eight different combinations until I landed on something I think is in the ballpark of what I tasted years ago: Sharp, creamy and pure apple flavour. As you cook the apples down, the liquid is released and then thickened with the flour, meaning you retain all of the mass of the apple rather than being reduced resulting in a rounded but firm compote. The yolk and butter, of course, add richness and improve the mouthfeel.
The deal with oxidation
When you make this recipe, the oxidation might be a bit alarming at first.
Oxidised/brown apples are a disappointing sight. But different apples brown at different rates, why? Enzymatic activity. When an apple is cut, the flesh is exposed to oxygen meaning that the enzymes present in apples begin rapidly oxidising, resulting in a brown colour. As we know, acid helps prevent oxidation. This means that the more acidic (sour) the apple is, the slower oxidation will occur. Also, the amount of damage (ie cuts) to the apple will define how much it oxidises - for this compote layer, we’ll be grating apples. This aggressive bruising action will ensure an onslaught of enzymatic activity, so don’t be worried when it goes brown.
Putting it all together
Remember in our plum tart that we could just bake it all in one go, no blind baking, or anything? I couldn’t resist trying out that technique for this week's tart, too.
Unfortunately… no dice. The moisture from the apple custard compote was too much for the pastry to handle, resulting in a tart that had soft, weak edges. Although the flavour was great, the biscuit lost all of its crunchy speculoos glory. So, although I hate having to blind bake, I don’t have much of a choice.
As a little nod to earthy tones, we’ll include rye flour in our frangipane. It’s a subtle addition but helps marry the flavours altogether.
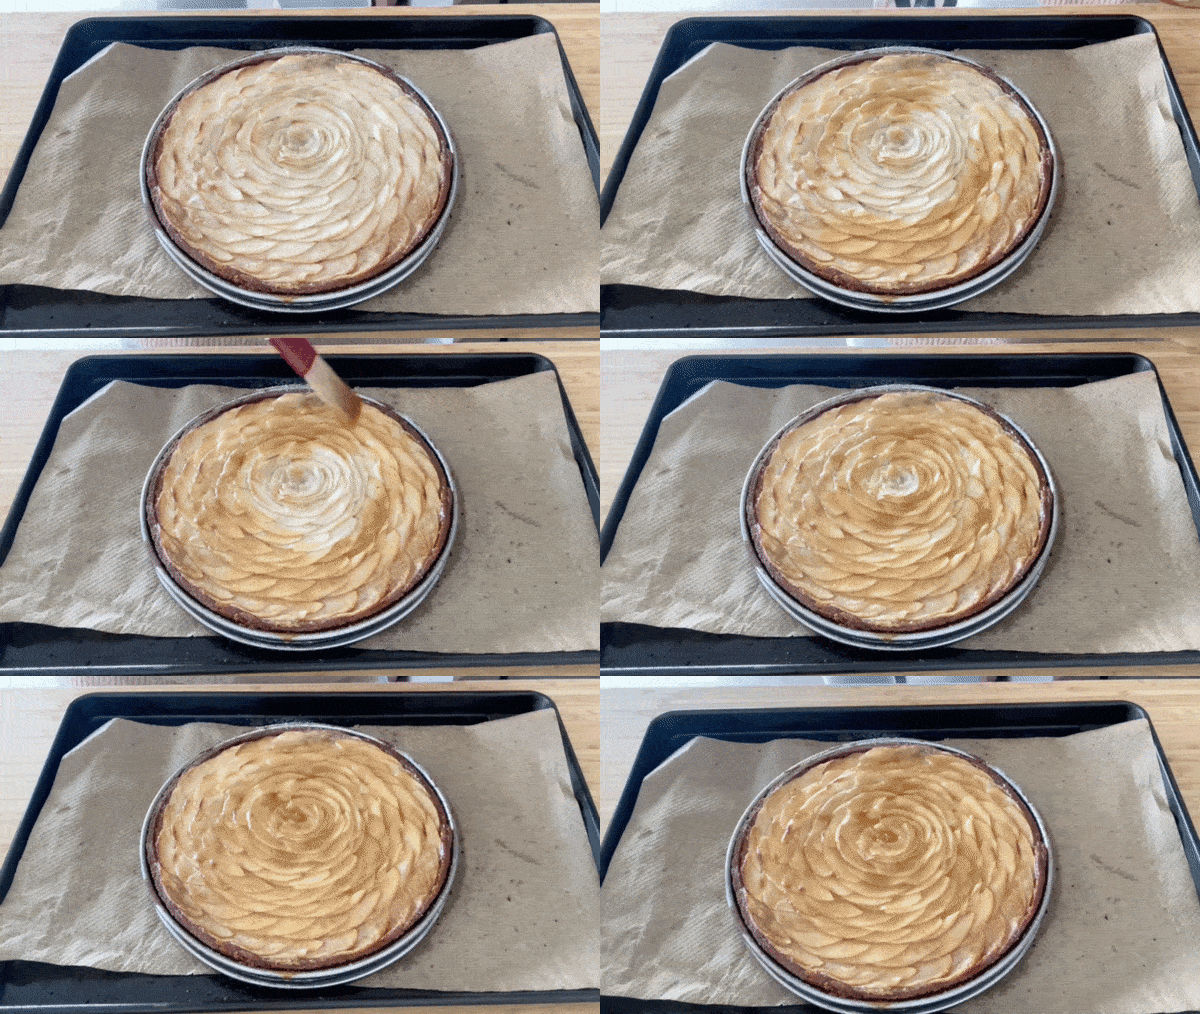
To finish, we’ll reduce apple juice by 90%(!!!) until we get a gloriously thick glaze and brush on top for both colour and flavour:
You know I feel passionately about matching the glaze to your fruit (I love apricot jam but making your own glaze is a joy!) so I’m excited to add this to your arsenal. If you want to learn to make your own plum glaze, click here for the KP+ about it.
A note on tart rings
I recently bought some new 8inch tart rings and they are - heartbreakingly - quite clingy. As in, my tart dough got stuck several times whilst baking. Now, I’ve never had to do this before but I’m going to recommend an insurance swipe of butter or grease spray before going ahead with this recipe!
Okay let’s do this!
Triple Apple Tart
Makes 1 x 8inch tart
For this tart, I’m using a combination of bramleys and any sweet eating apple
Speculoos tart dough - this makes more than you need, but you can bake the rest off as biscuits.
65g butter
65g light brown sugar
130g plain flour
1 egg yolk (15g)
2g baking powder
20g molasses (or malt syrup, or honey in a pinch)
1g (¼ tsp) ginger
1g (¼ tsp) cardamom
1g (¼ tsp) cinnamon
1g (¼ tsp) nutmeg
1g (¼ tsp) salt
5g (1 tsp) milk
Rye Frangipane
55g butter
55g egg (1 large)
55g caster sugar
55g ground almonds
25g rye flour
2g salt
Reduced apple juice
300ml apple juice of choice
Apple custard compote
1 large bramley apple (we need 125g grated apple once prepped so use as many as you need to get this!)
10g lemon juice
35g caster sugar
3g (1 tsp) flour dissolved in a teaspoon of water
1 egg yolk
20g butter
Sliced apples
3-4 apples for the top
25g butter, melted
Plus caster sugar for sprinkling (around 4-6 teaspoons should do it)
Method - Speculoos tart dough
Cream butter with sugar, molasses, spices and salt. You don’t need to aerate it, just until its really smooth
Next emulsify in the egg yolk
Meanwhile, whisk the flour and baking powder in a bowl
Finally stir through the flour and baking powder. Add a teaspoon of milk to combine
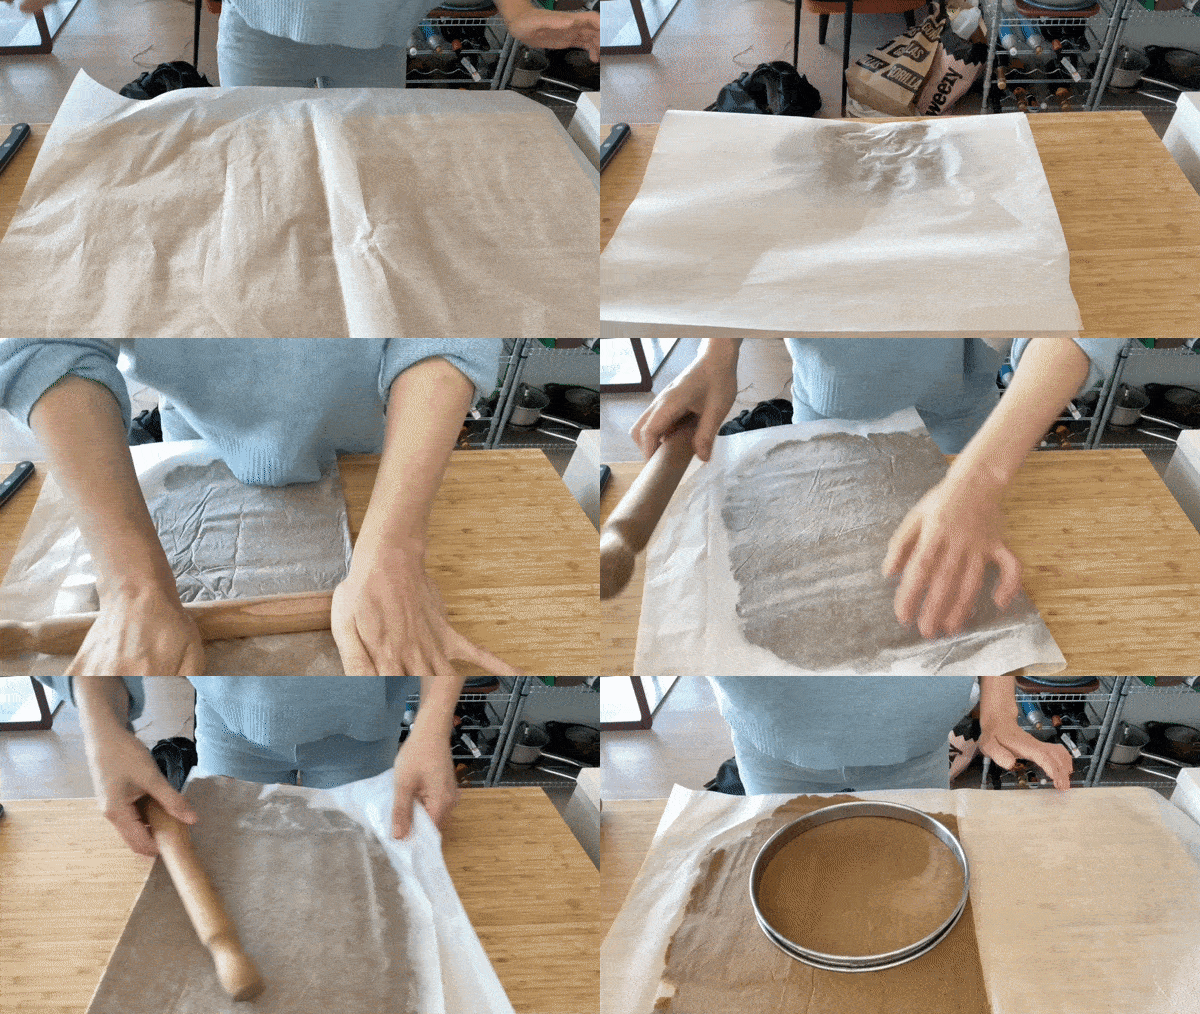
Roll the dough out to 2mm thickness between two sheets of paper. Check the thickness by making an indentation with your finger
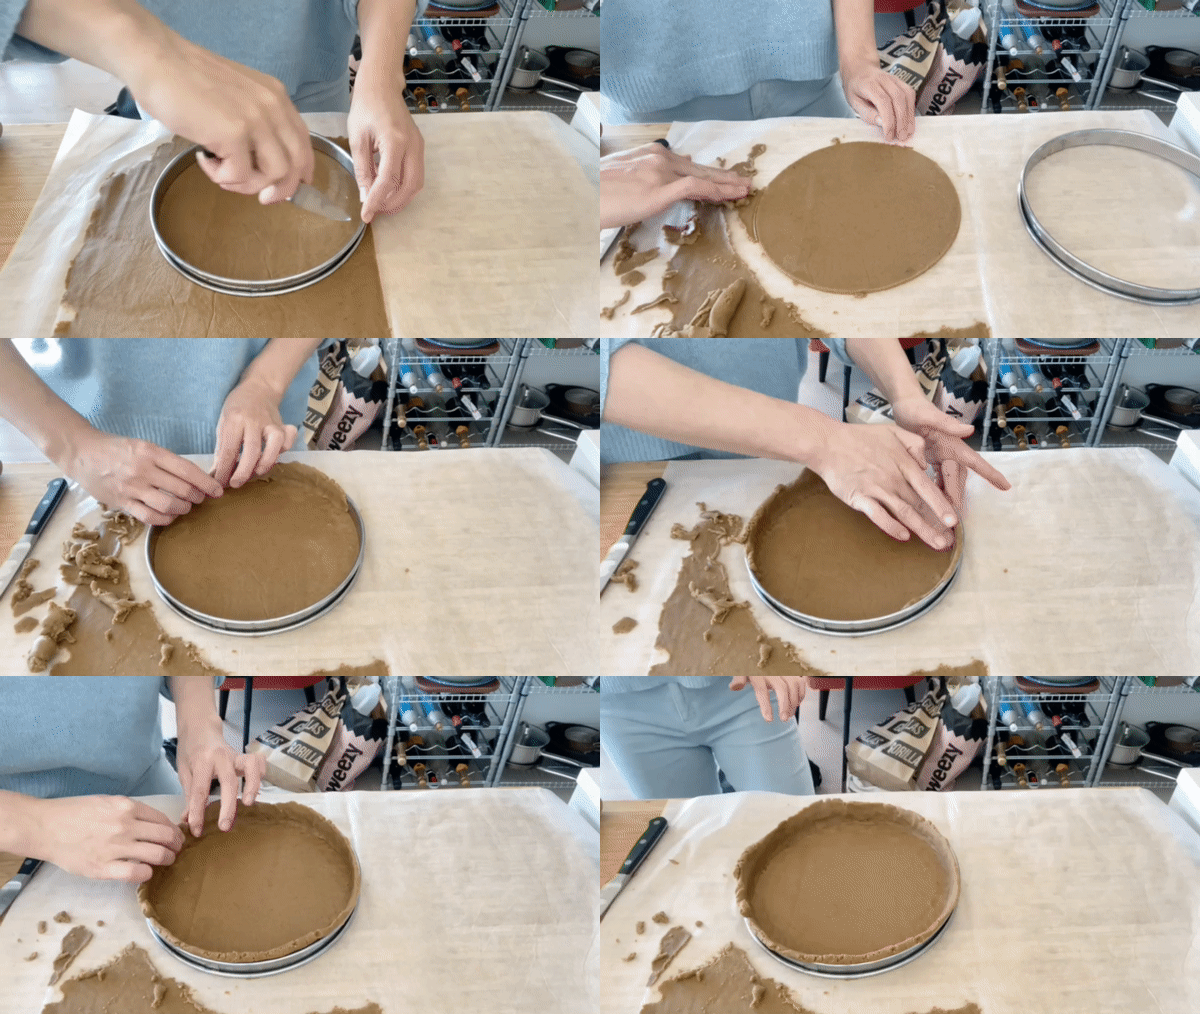
Cut the base of the tart shell
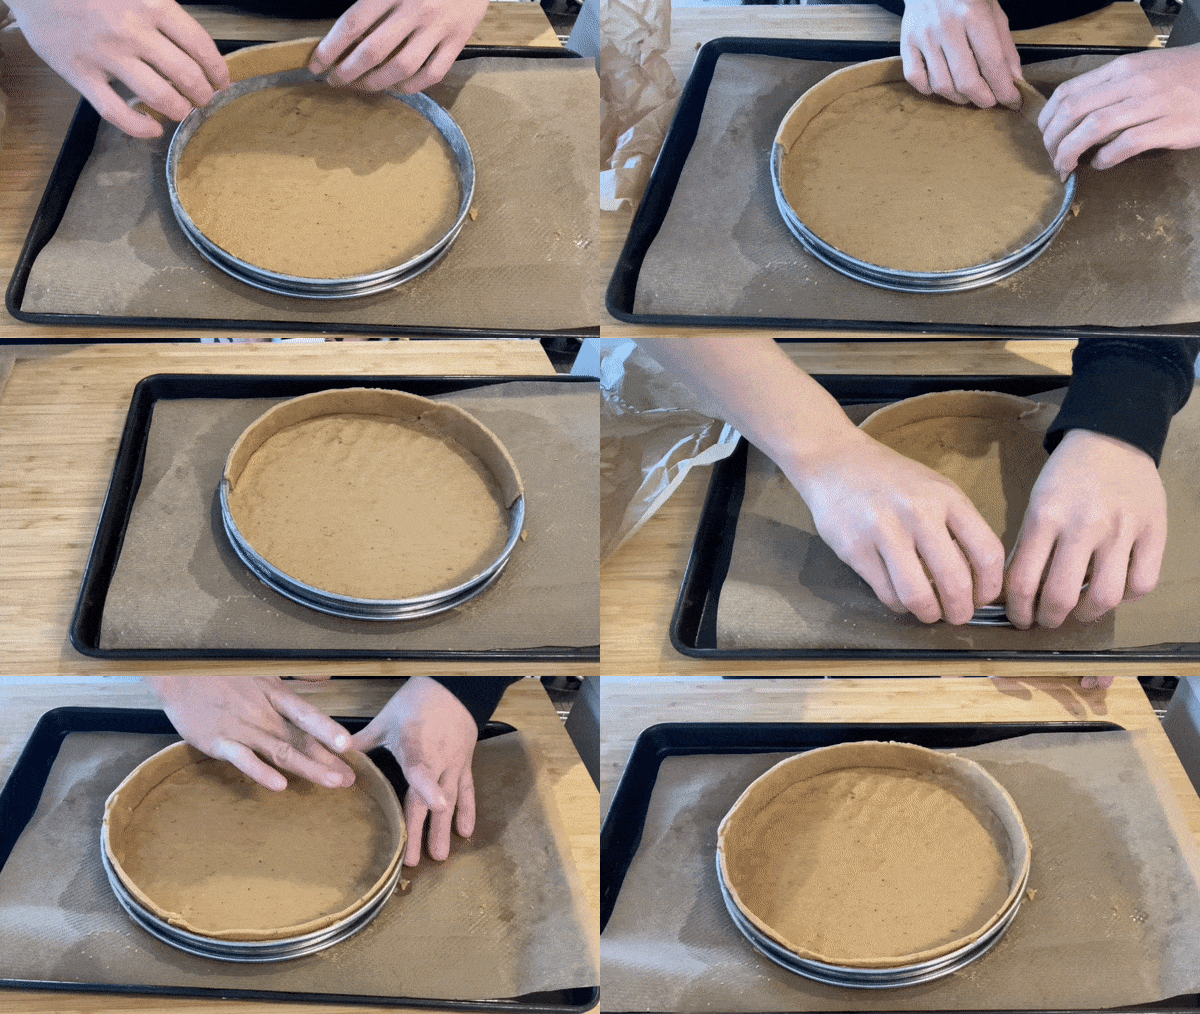
Line the edges, either by chilling down the dough in the freezer and cutting strips OR by the pressing method. Check this KP for more details on how to line a tart
Place into the freezer for 15 minutes before baking
When ready to bake, pre-heat oven to 170c fan
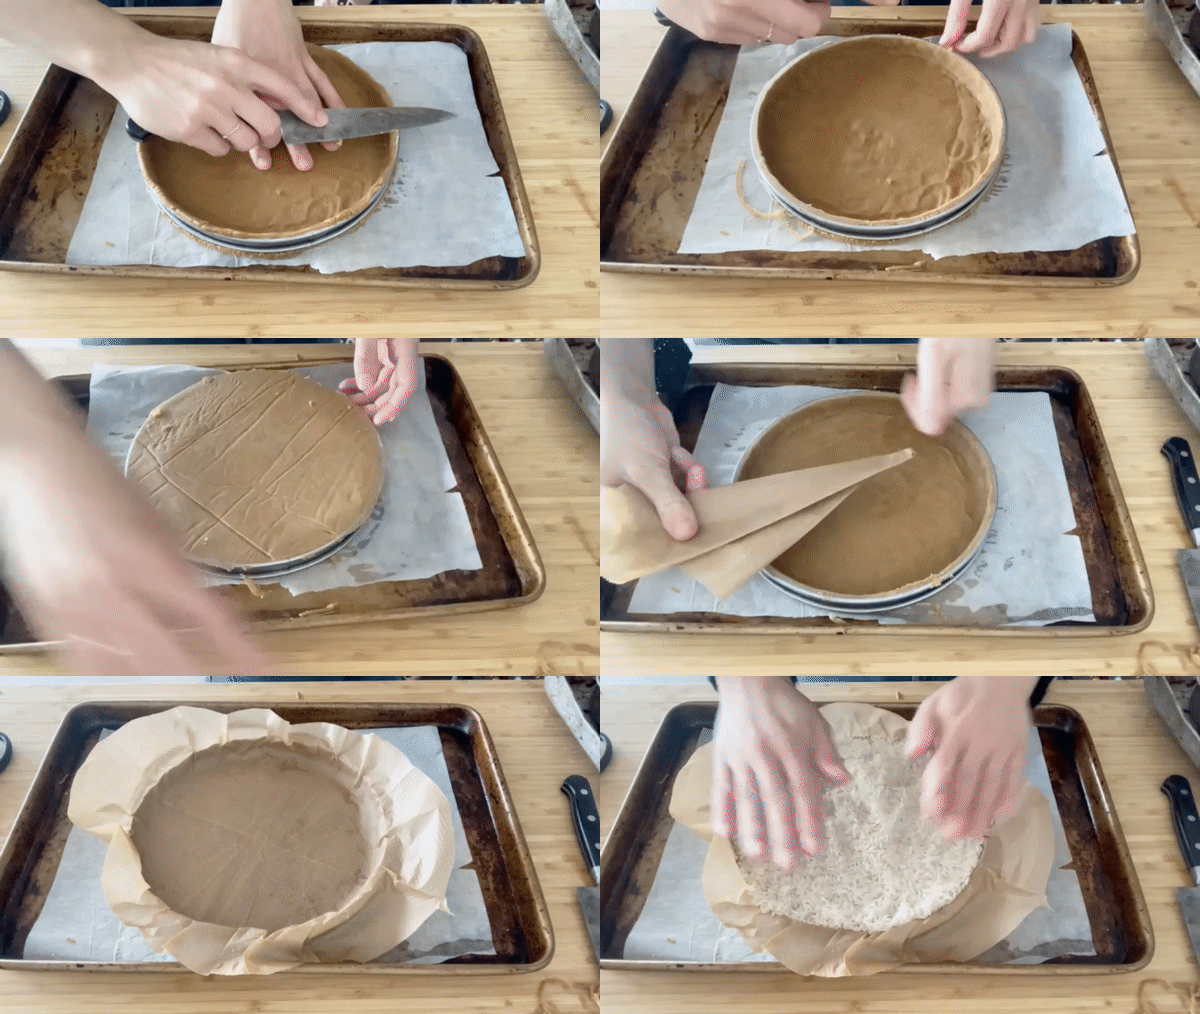
To ensure the pastry behaves, trim the edges (top and bottom if using a tart ring) once chilled and use a circle of greaseproof paper and add rice or baking beans
Blind bake for approx 15-20 mins and then remove the paper and bake for 5-10 minutes more until dry. Your oven might take longer (or shorter!) so keep an eye. We are baking these cases again with frangipane in so don’t go too dark
Allow to cool
Method - frangipane
Beat together butter and sugar until combined. You don’t need to aerate but make sure there are no lumps of butter
Add in your egg and mix until it is all together. Don’t worry if it looks a bit split as it’ll come back together and bake beautifully
Stir through your dries
Frangipane is now ready to use immediately or it can be stored in the fridge for 5 days
Method - apple custard compote
Peel and grate the apple - mix with lemon juice
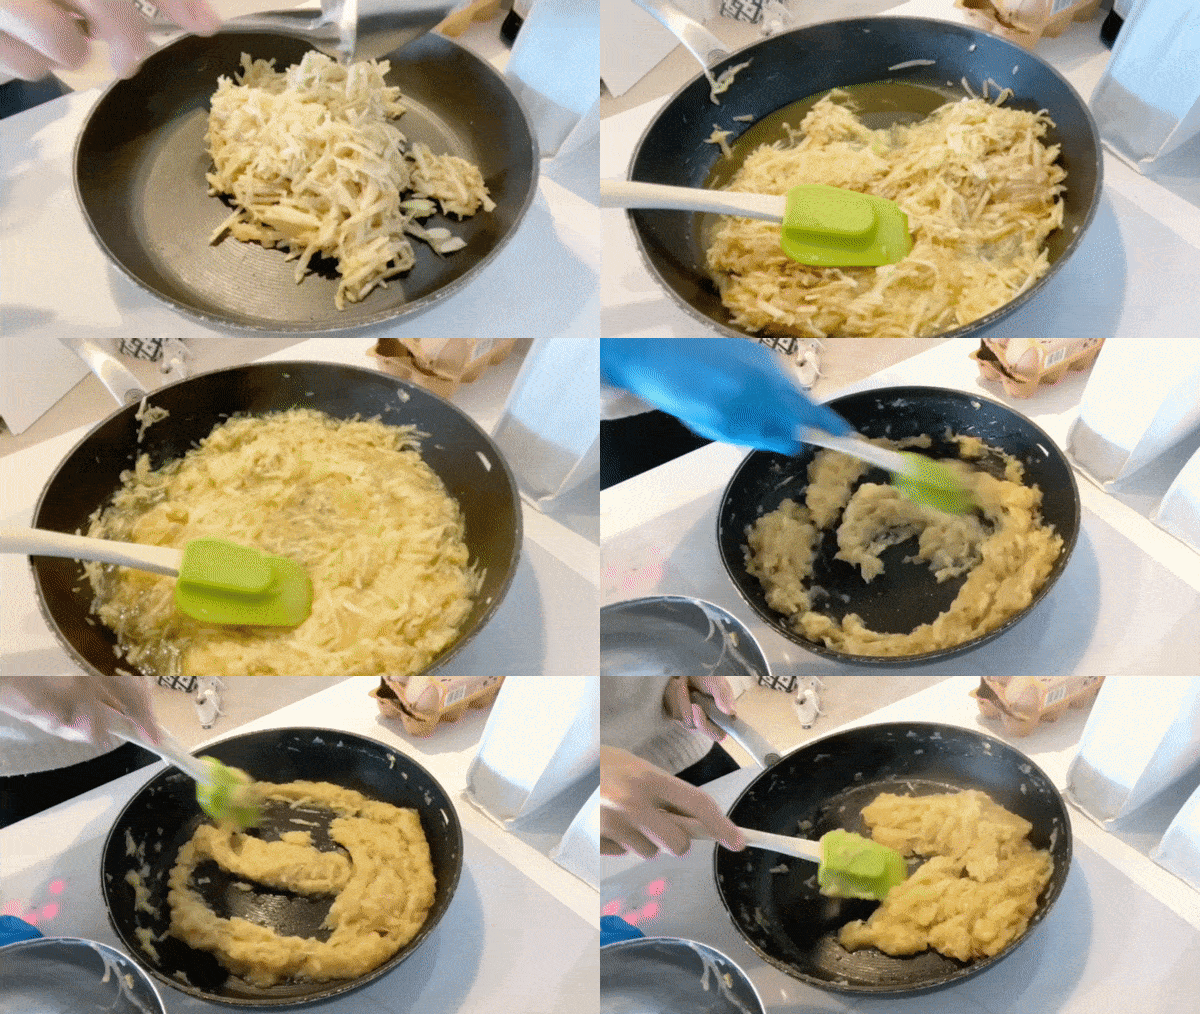
Add to a pan with the sugar and cook over a low heat until the apple is squishy and soft and the juices have released
Mix the water and flour together in a separate bowl and then add a bit of the soft apples to it to combine. Return to the stove and make sure the floury apple mix is distributed throughout - cook for 3-4 minutes until the juice has all thickened.
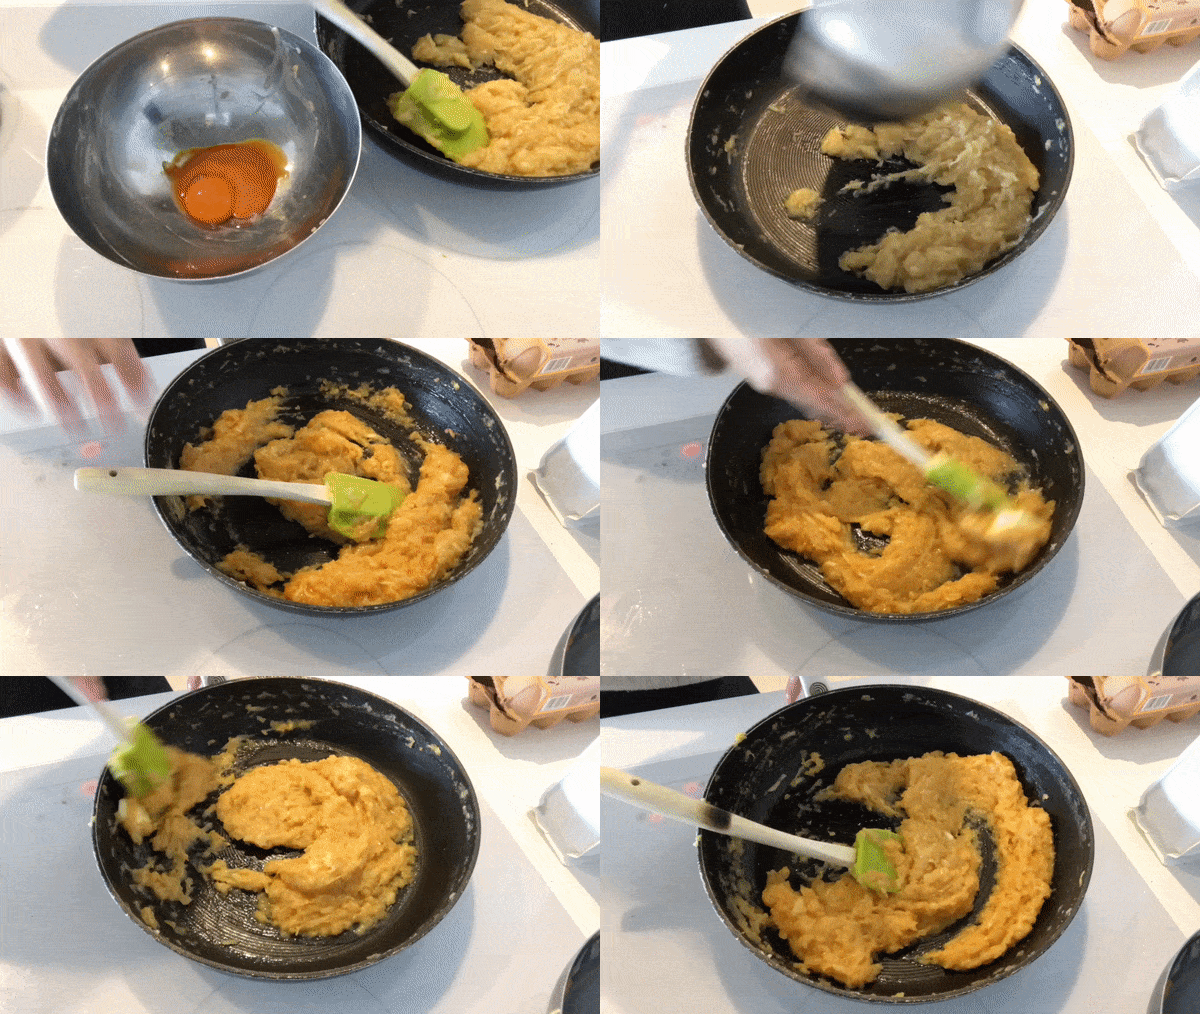
Turn off the heat - residual heat from the pan is all you need for the next step! In a bowl, add a bit of your hot apple mixture into the yolks - this is like tempering! Then add the rest in. Finally, stir through the butter
Your apple custard compote will last in the fridge for 7 days
Method - reduced apple juice
Add apple juice to a high sided pan
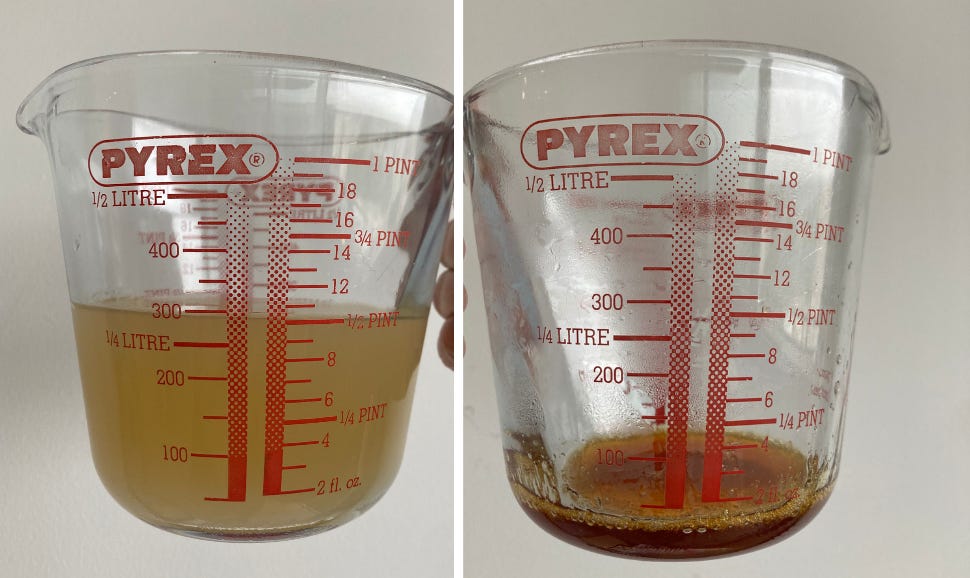
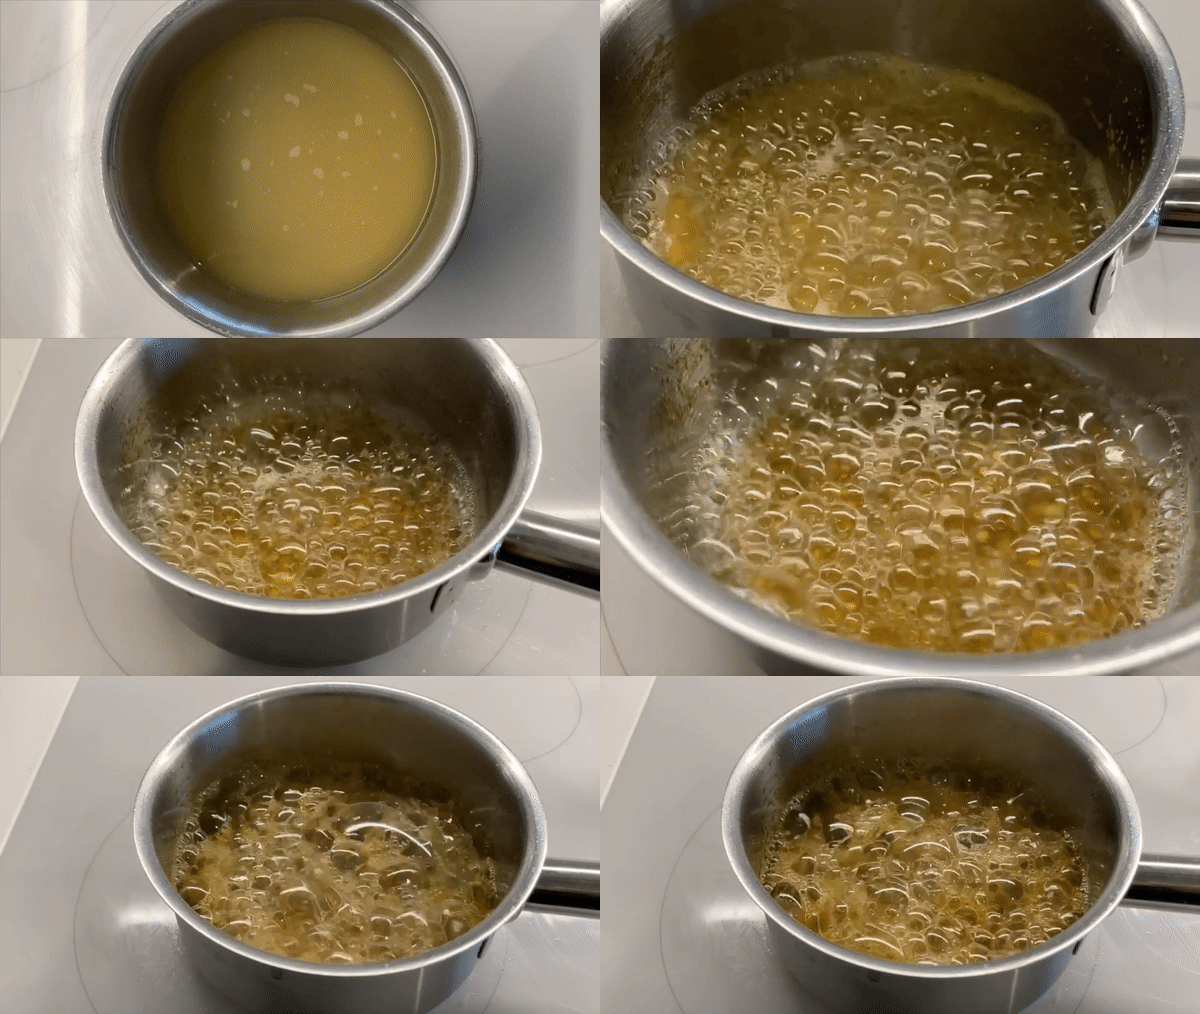
Reduce on a medium heat until very thick and syrupy - around 15 minutes on a medium-high heat. The final weight should be 30g. I keep a glass measuring jug nearby and pour the mixture in and out of it to scale it as I think it starts to get close. As you get closer, the mix will become dark in colour and the bubbles will get big
BE CAREFUL - if you take your eyes off it then it can easily scorch and you will be cleaning your pan for like, 2 hours which is very boring indeed
Method - Assembling the tart
Pre-heat oven to 175c fan
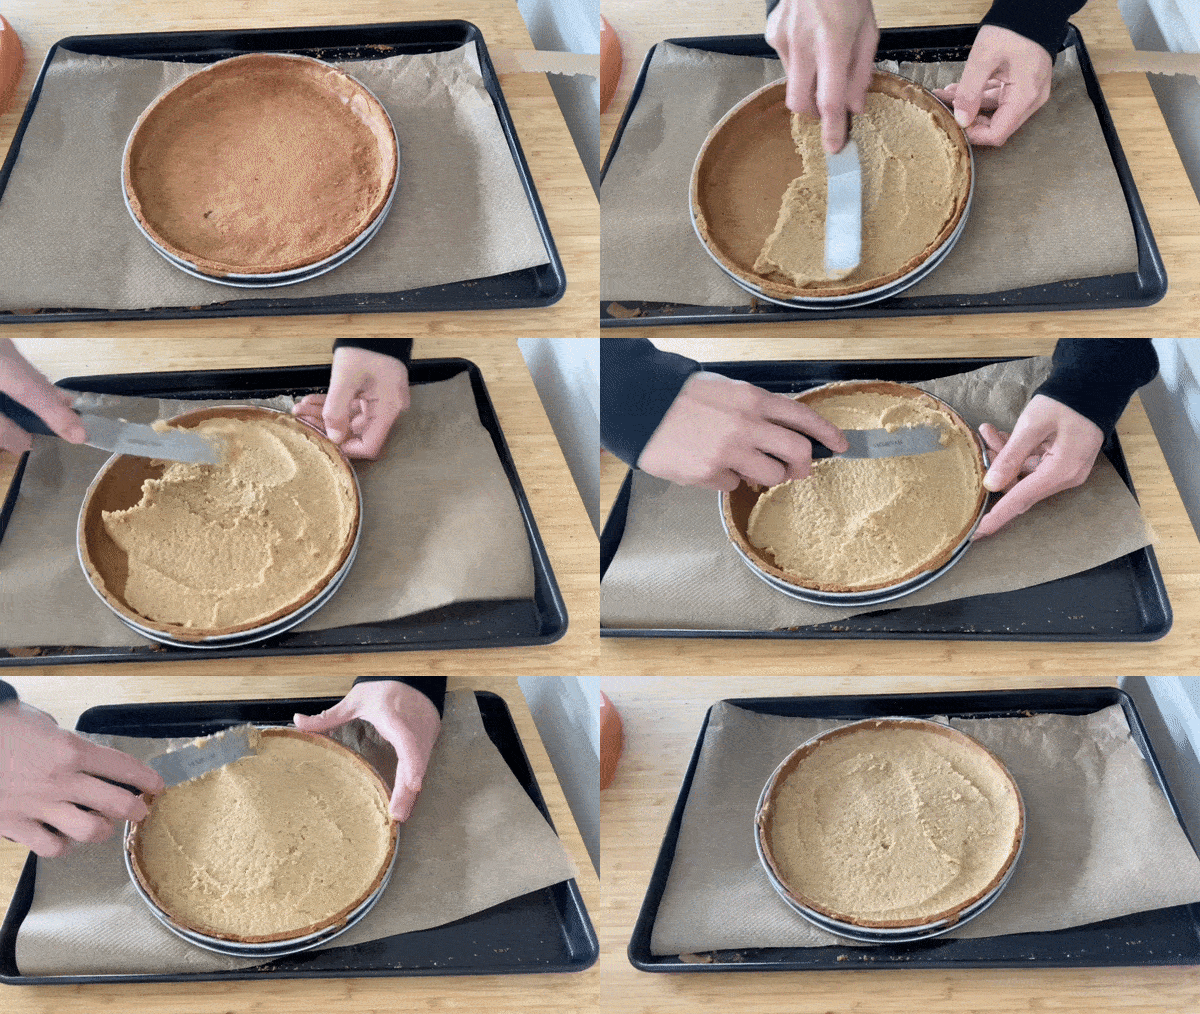
Spread the frangipane evenly in your blind baked tart case
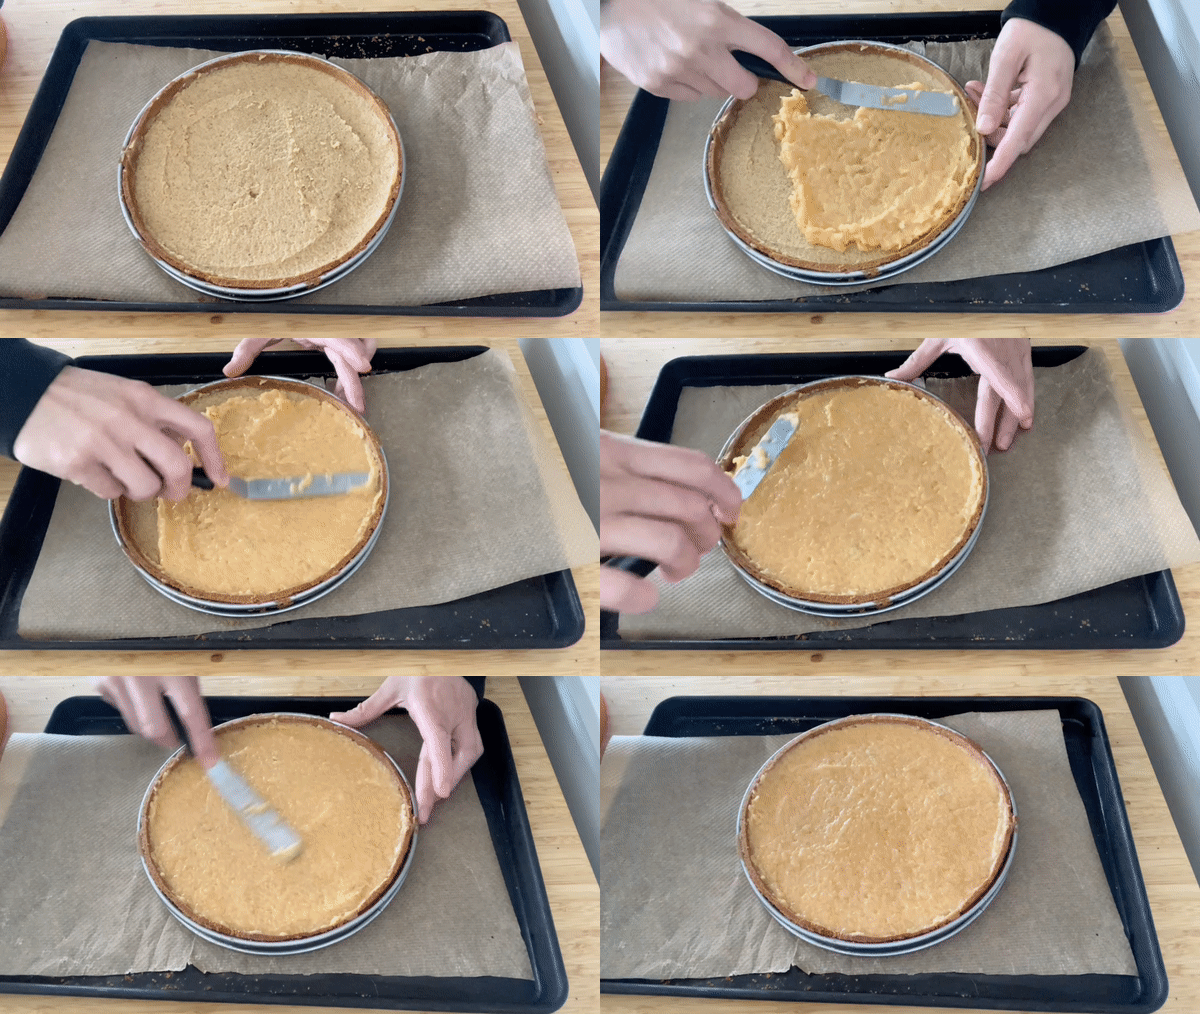
If your frangipane is quite soft then put it into the freezer for 10 minutes so you can spread the apple custard compote on it neatly
Spread 150g of the apple custard compote on top
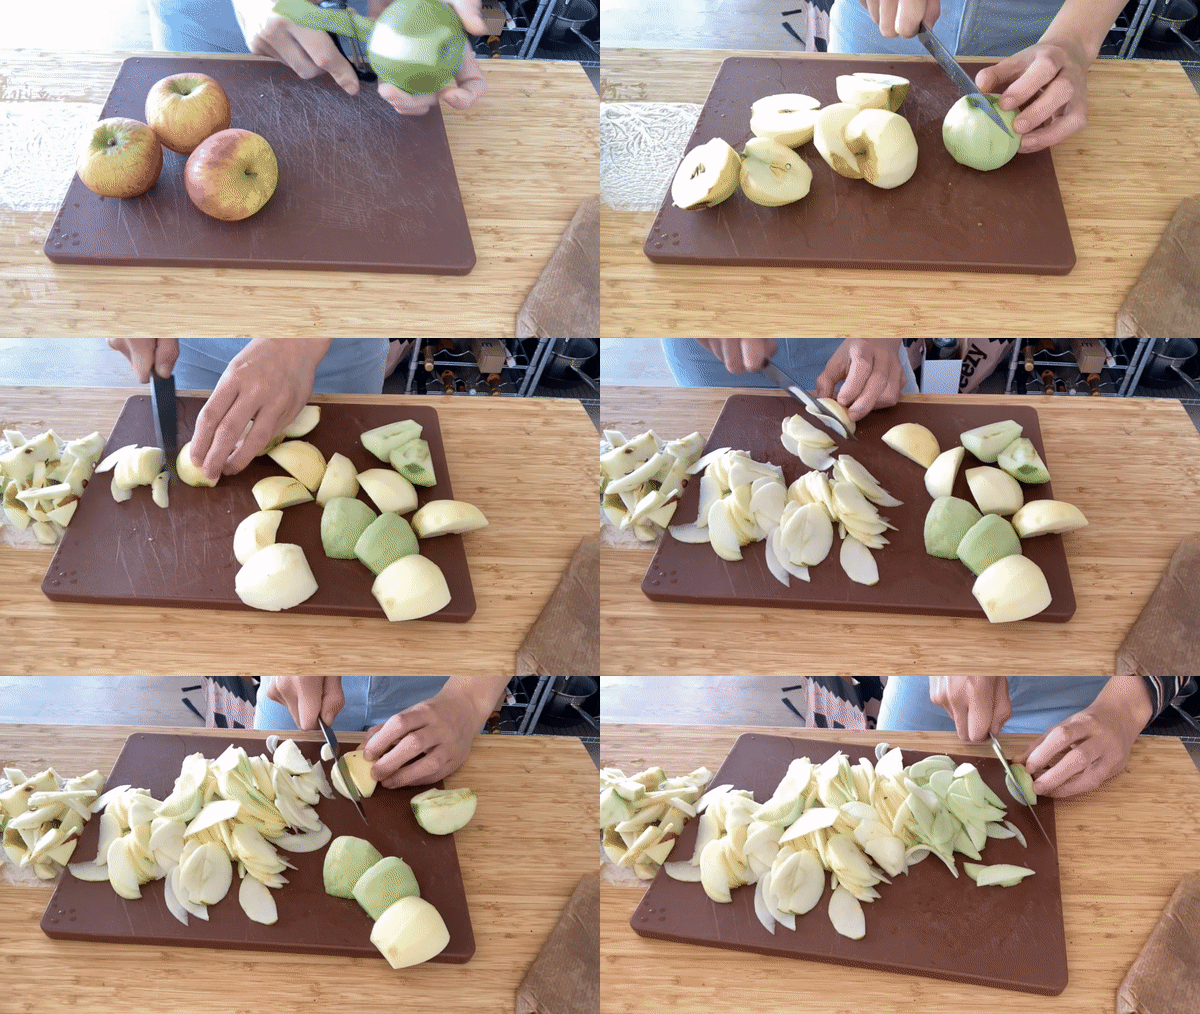
Slice your apples THINLY - 1-3mm is perfect - I peel mine first and use a sharp chef’s knife
Arrange on top. I like to do mine in concentric circles, joining up the apples for each ring for the pattern, rather than working my way into the middle like a flower. You can do it however you like - this is my preferred way
Brush carefully with melted butter then sprinkle caster sugar all over the top, around 3-5 teaspoons. You want to be able to see the sugar
Bake for 40 minutes until the apples are slightly browned. If after 40 minutes it is all looking a bit anemic, turn the oven up to 200c fan and cook for 5 minutes to brown the apples slightly
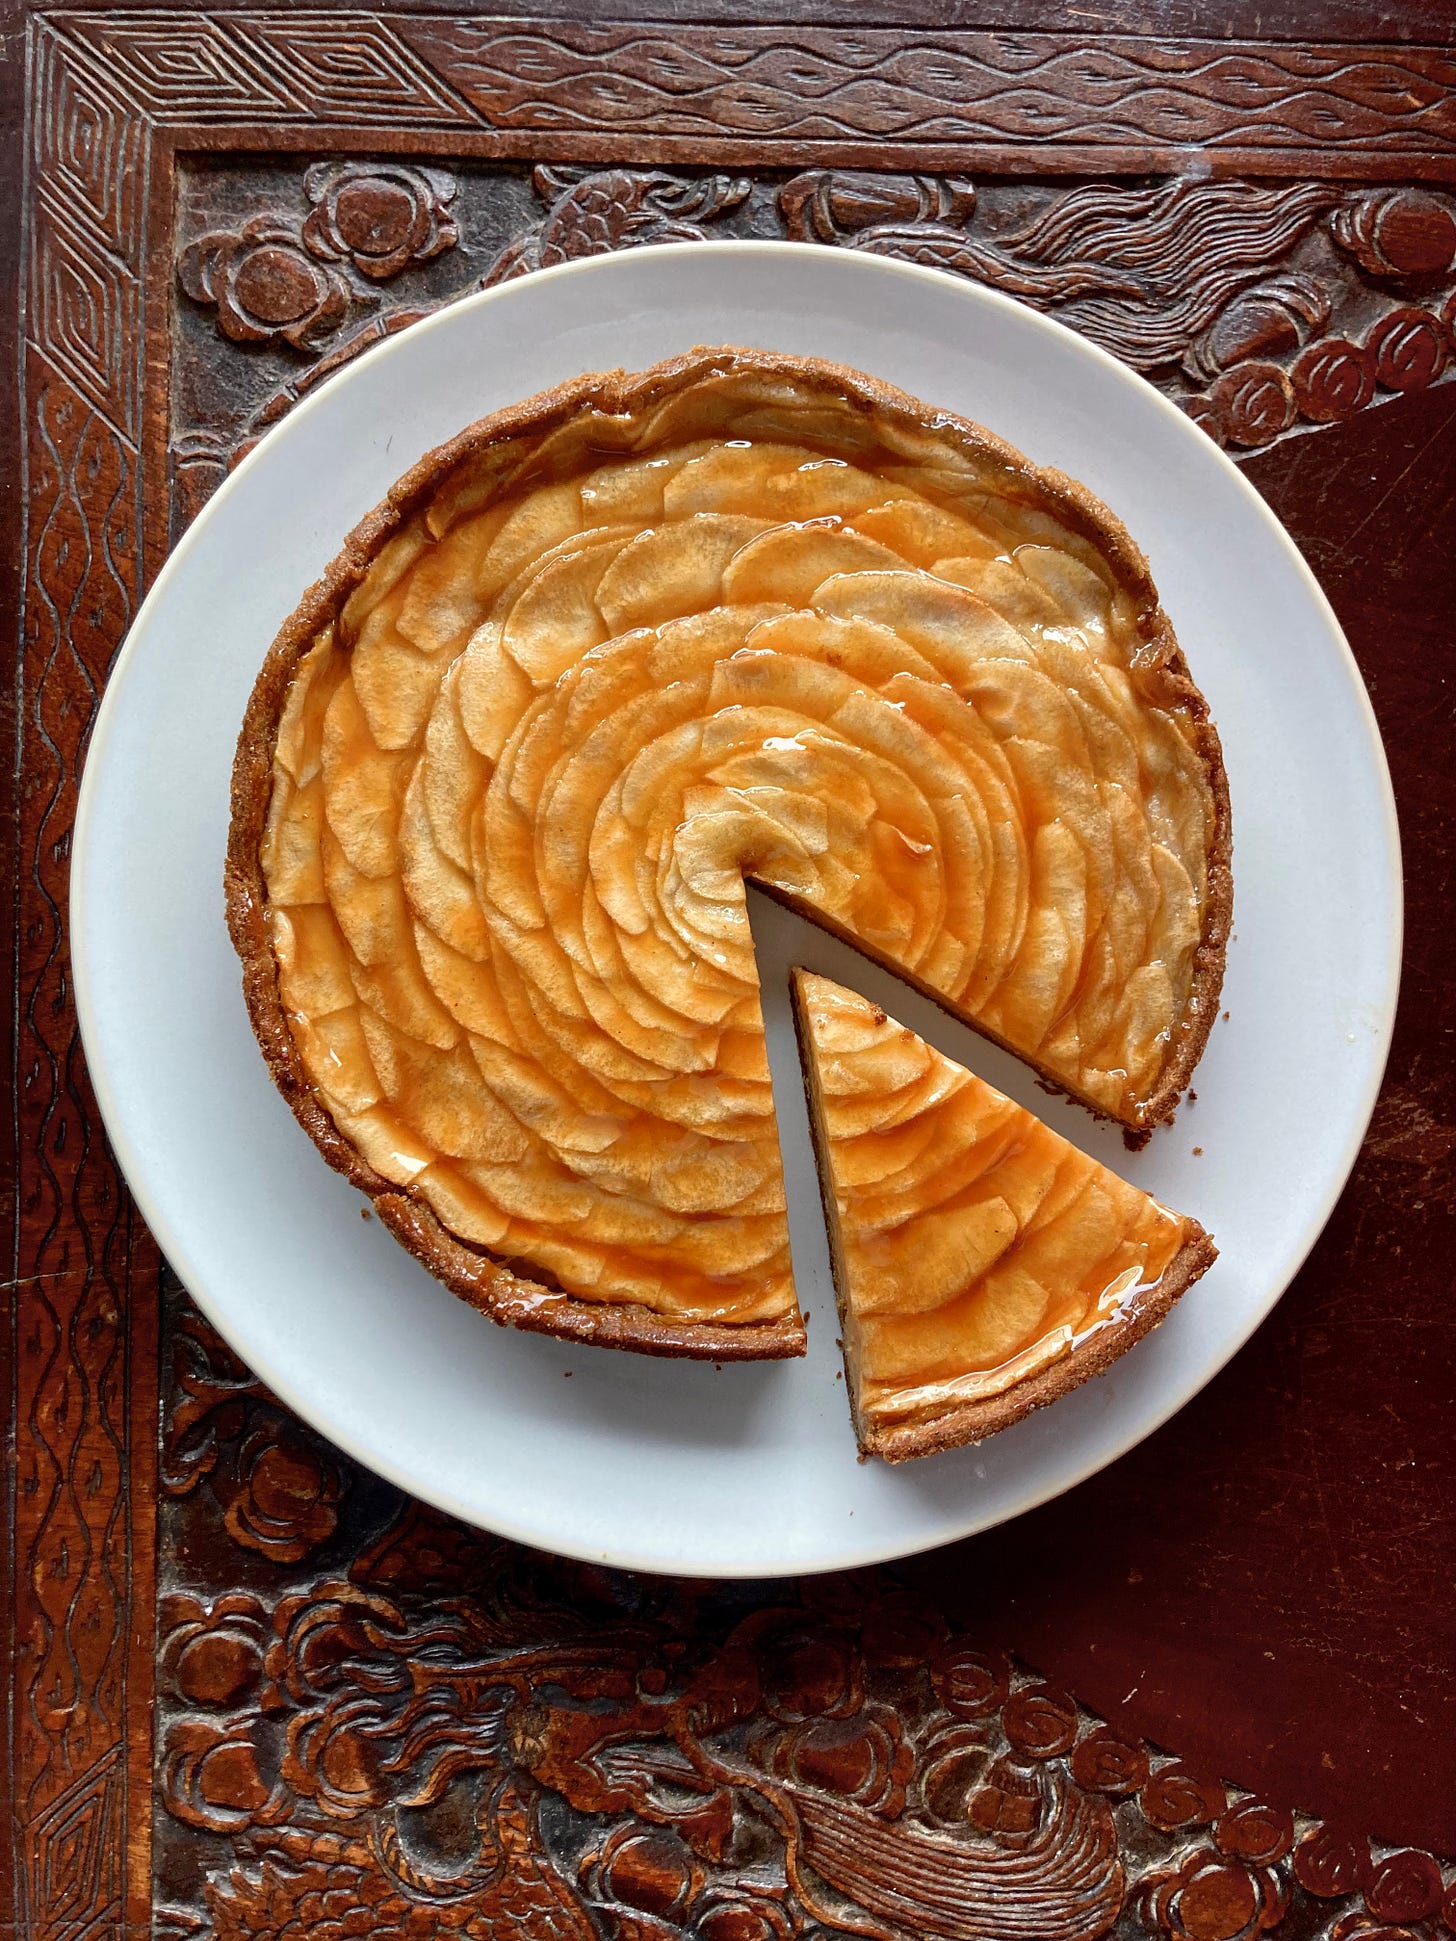
Leave to cool then brush the top with the reduced apple juice
Serve! A little dollop of whipped cream or creme fraiche would be lovely, too. Tart will keep for 5 days in the fridge




A friend of mine who is obsessed with cardamom bulk buys bags of the seeds and then keeps them in a pepper grinder and she swears by it as the best way of using cardamom.
Fab-looking recipe and eager to try it, but quick question: for the apple compote, the ingredients list calls for 1 egg yolk, but the method says "yolks" and the GIF appears to show at least two. What's the correct number?