Kitchen Project #33: Stone fruit tart
Let's make jam + infuse our butter + celebrate peak fruit season!
Hello,
Welcome to another edition of Kitchen Projects. Thank you so much for being here.
This week we’re covering a true classic that’ll have your back through every fruit season and beyond, and we’ll be stripping it *right* back this week to the basics so you can build your own dream fruit-frangipane tarts every single season.
Over on KP+, I’m sharing my guide to making your own nappage fruit glaze PLUS the low-down on commercial pectins. Subscribing is easy and only costs £5 per month. So, if you’d like to support the writing, get access to extra content + community chat threads, click below:
Love,
Nicola
Peak seasons
When we get to peak fruit season like we are in now, I encourage you to use the full range of the fruits, especially the glorious ones with stones. Even though I am low-key allergic to them I cannot resist them - so much so that I have to eat them in a clandestine way, hidden from my family and friends who try to keep me away from them knowing that one bite of a peach will doom me to an itchy throat for a few hours. It’s ALWAYS worth it.
So, this tart is an ode to my unrequited love of stone fruit with a focus on plums (though this would work well with others - apricot and peaches for suuure): We’ll make a pickle-y jam, we’ll include chopped plum in the tart itself, which roasts and tenderises as we bake, and finish with thin freshly sliced plum. Over on KP+, we’ll cover making your own plum glaze, too. Check it out here.
We are a little bit early for British plum season which doesn’t come into its own til mid-August. And though I am a fan of the British plum, I’ve been really enjoying the European varieties available at the moment. From these sensational black-skinned Spanish plums to the yellow fleshed mirabelles, plums are having a big impact on my daily happiness and I can only hope you go forth and seek it out, too.
I find that fruit isn’t always particularly well labeled in shops, so if there are several varieties on offer then - if you can - grab one of each and taste and see. I went to two different shops and found that the yellow plums from one shop were not very sweet, but the yellow plums from the other were absolutely beautiful. Same for the red - from the first shop, they were tangy but sweet but the other they were pretty weak in flavour, other than being quite juicy and herbaceous (still pretty pleasant though!).
Adapting and infusing frangipane
When you’re working with something high in butter there are a few ways to go about it. Browning the butter is something we’ve covered in detail before but clarifying the butter is one of my favourite applications when it comes to frangipane. There’s something so clean and pure about a clarified butter frangipane and I’m looking forward to introducing you to it.
Clarified butter is pure butterfat. To make it, simply melt the butter and skim off the top and avoid the bits at the bottom! When you melt butter, it separates into three layers - the top is excess water, the middle is fat and the bottom is milk solids. You don’t want to agitate it too much during the process or interrupt these handy layers otherwise it becomes difficult to separate, so it must be done on a low heat.
Re: Ghee. You may have heard of ghee - ghee is a bit different to clarified butter in that ghee is slightly browned. You don’t take it as far as brown butter, but it is a bit more toasty than just clarified butter.
The wonderful thing about clarified butter is that it infuses beautifully. Once you get out of the nuts and bolts of pastry, one of the best things you can do to achieve new dimensions and flavours is via infusions and clarified butter is ripe for this kind of action! We’ve covered infusions before, but I’m always excited to share with you new stages that you can introduce flavours.
Ingredient spotlight: Bay leaves!
Bay leaves are one of those ingredients I didn’t “get” for a good while. I think we’re so used to being a bit of a BTS ingredient. Thrown into *almost everything*, bay is such a team player, not necessarily noticeable but doing a lot of flavour lifting. Fresh bay leaves have a herbaceous, nutmeg-like scent with hints of thyme to me - warming yet fresh. The leaves contain eucalyptus oil giving a brightness which mellows once simmered in a soup or stew. I’m a huge proponent of letting the bay leaf flavour shine on its own. I first experimented with bay leaf frangipane whilst developing an apple danish recipe but I think it works beautifully with stone fruit.
Ingredient spotlight: Umeboshi
Umeboshi is… INTENSE. But that’s fun sometimes, right? If you haven’t heard of it before, let me tell you: Umeboshi is a salted, pickled and fermented plum. Well, actually, it’s a pickled ‘ume’, which is a Japanese fruit that is half-way between an apricot and plum. Once the ume is harvested, they are packed into barrels or jars with about 20% of their weight in salt, along with red shiso leaf. Though the shiso flavour isn’t that significant, it’s what gives the paste its beautiful pink colour, along with the plums of course. The ume are dried and then put back into the pickling liquid before being packed up or processed into paste.
If you’ve never tried it, I urge you to do so! It’s intensely salty, sweet and fruity. It’s quite an astringent flavour but works beautifully in sweet dishes. I think it’s the perfect foil for jam and brings something a bit special to the jam for our tart.
Umeboshi paste is available in most supermarkets now alongside ingredients like rice vinegar and pickled ginger but is certainly available at more specialist asian grocery shops.
Let’s talk jam
Jam isn’t exactly… my jam. I’ve made it at previous jobs, but in fancy patisserie style environments, fruit is rarely left to its own devices and commercial pectin is often used. Making jam from frozen fruit and purees, like I was shown in some pastry kitchens, is great because they work without fail. Do you get the most fabulous flavours? No. But you get consistency. That’s the thing about jam that has previously stopped me from getting deeper into it is just that: lack of consistency. However, I think it’s time that changes.
I won’t be going too deep into jam because there are a lot more knowledgable and well-informed resources out there. Most recently I’ve loved Jam Bake by Camilla Wynne so this not-that-deep-but-still-sort-of-deep-deep-dive is inspired by the things I’ve learnt from her book!
So… let’s get into it. Jam is set with the help of pectin. But what actually is pectin?
Pectin is a starch found in fruit, mainly in the cell walls and core. Before it’s useful applications in jam and jelly making, pectin is responsible for holding the cell walls of the fruits together. As we heat fruit, the pectin is extracted (with the help and activation of acid) and begins to create a network that is capable of holding liquid and thus creating a gel. Sugar, which loooooves water, assists in this process by attracting water AWAY from pectin, allowing the network to form without water getting in the way. This makes a more stable network.
Acid plays a key role here - the presence of acidity allows pectin molecules to interact with eachother and create bonds. So, without acidity (like the addition of lemon, citric acid, or something naturally occurring in the fruit), pectin is unable to form the gel network.
During the final cooking process, excess water is also evaporated which contributes to the flavour and texture. This rapid water evaporation results in the final texture of the jam/gel - the colour and flavour is significantly impacted by the concentration of sugar. If you’ve ever made a sugar syrup before, you’ll know that it is thicker and more viscous than water - well, it’s the same here with jam. One way to reduce the sweetness is to use a commercial pectin like I mentioned before, as this acts as a helping hand for the natural pectins will in creating a strong gel without the need for so much sugar.
To put it in perspective, the jams I used to make with commercial pectin used between 20%-25% sugar compared to the 50%-65% you would use in traditional jam making *sans* pectin. Commercial pectin comes in several types but the ones used in most kitchens are thermo reversible and non-thermoreversible. I’ve gone into further depth about this in this weeks KP+ - click here to read.
The deal with maceration
Over on KP+, Zey asked me about the maceration method for jam and shared a link to the wonderful Alexina’s apricot jam recipe (here). I’m quite new to the jam making thing so decided to ask a real expert. In her book ‘Jam Bake’, Camilla always opts for maceration (from 15 mins up to 1 week!) so I *know* its legit. But I decided to ask her exactly why she does it and here’s her answer:
“I almost always opt for an overnight maceration. Sugar, being so attractive, draws the water out the fruit. This helps to dissolve the sugar, meaning it is less likely to stick or burn at first. As well, the longer the fruit is macerated, the better it will hold its shape in a jam. Sugar draws the water out of the fruit much more gently than heat, which can burst cells and break it down. I love chunks and distinct shapes in jam so that’s part of why I do it as well. It also helps break down the tasks into manageable chunks which I think is so great for people who think jammaking is time consuming or intimidating”
PREACH! Thank you massively to Camilla whose book ‘Jam Bake’ is out now - can’t recommend it enough!
Breaking down the jam making process
For the recipe, I’ve used Camilla’s basic jam formulation which is basically 0.5 : 1 ratio sugar to fruit with approx 4% lemon juice to fruit weight. tI’m not going to lie - I always feel much happier and safer when there’s a potential spreadsheet involved. Breaking it down like I do below is interesting because you get to follow the process, giving me a deeper understanding of what is actually happening when making jam. This has definitely made me feel less wary of it in the future and I hope it helps demystify jam a bit, too.
Stage 1: Maceration
Fruit - 500g
Sugar - 250g
Lemon juice - 20g
Net weight: 770g
I let my fruit macerate overnight. Like we discussed before, during this time, the sugar draws the water out of the fruit and the fruit itself becomes translucent and shiny - the liquid is filled with flavour and colour compounds from the fruit. During the maceration phase, the fruit begins to break down and soften. This is due to the hygroscopic nature of sugar - it is water loving. The benefit of maceration is to achieve the most vibrant colours and flavours.
Stage 2: Time to cook!
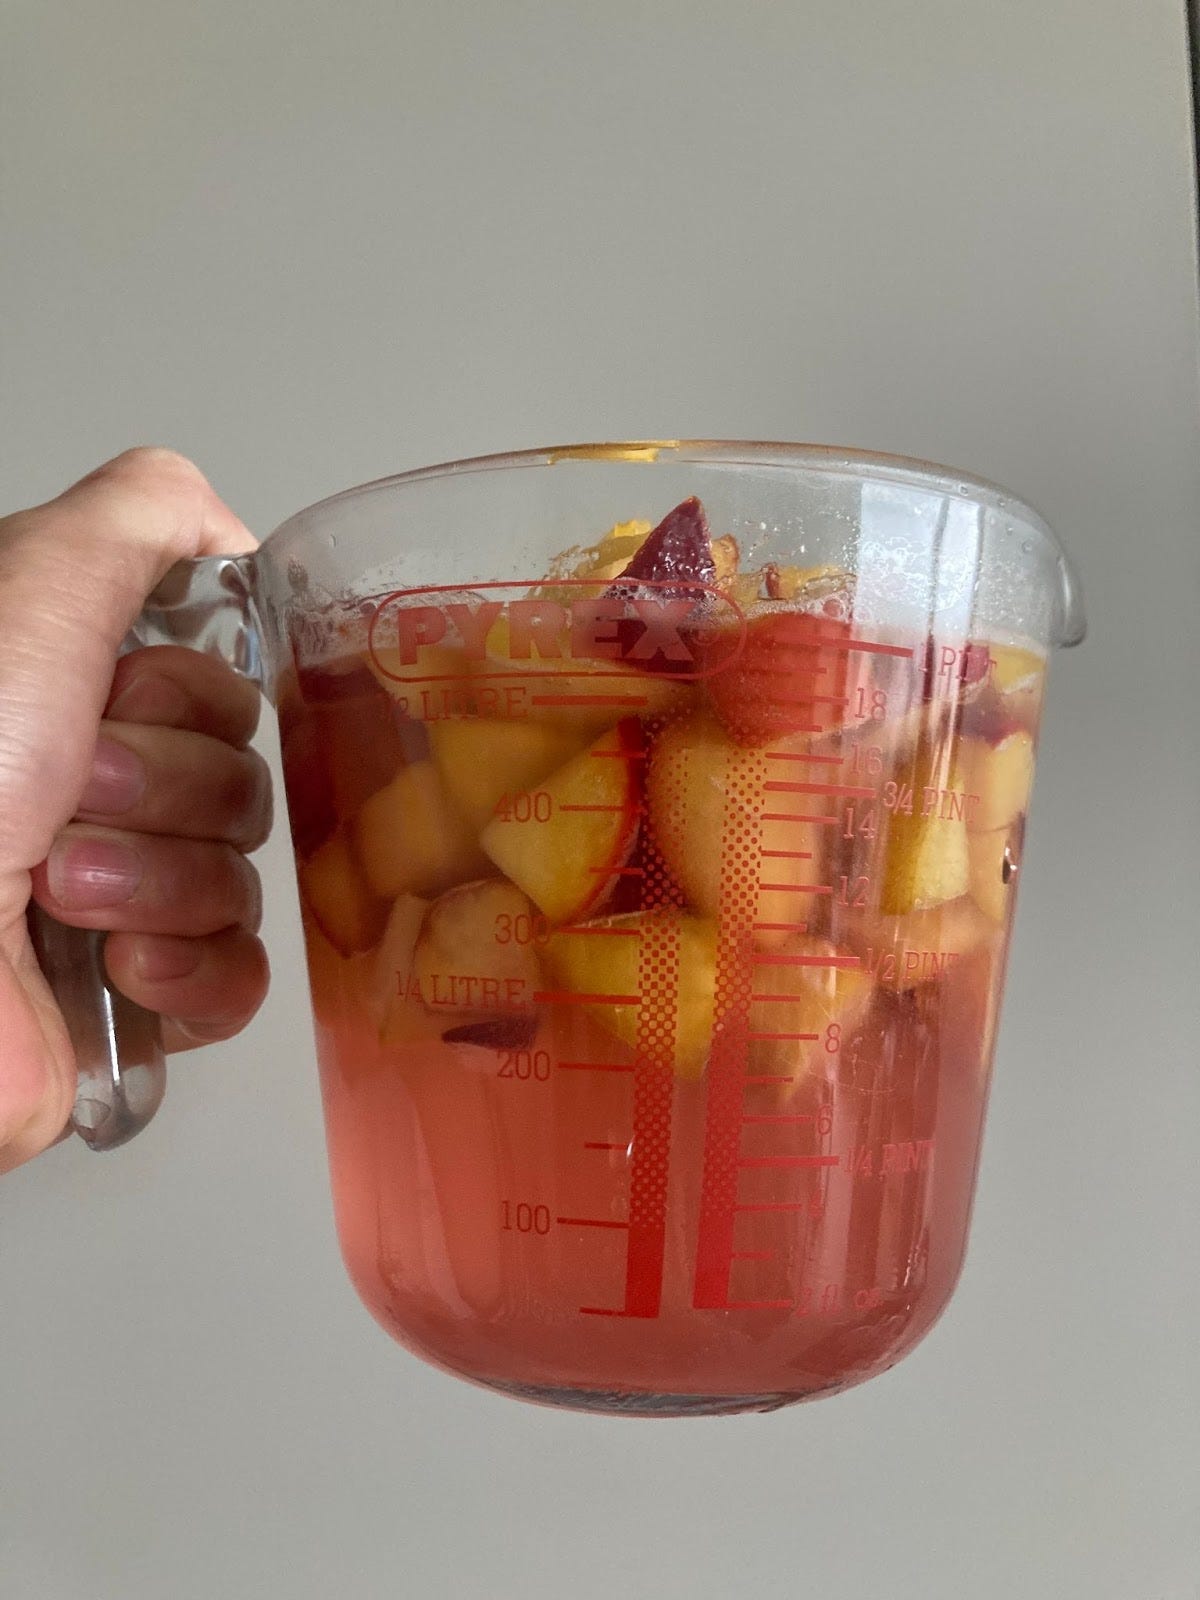
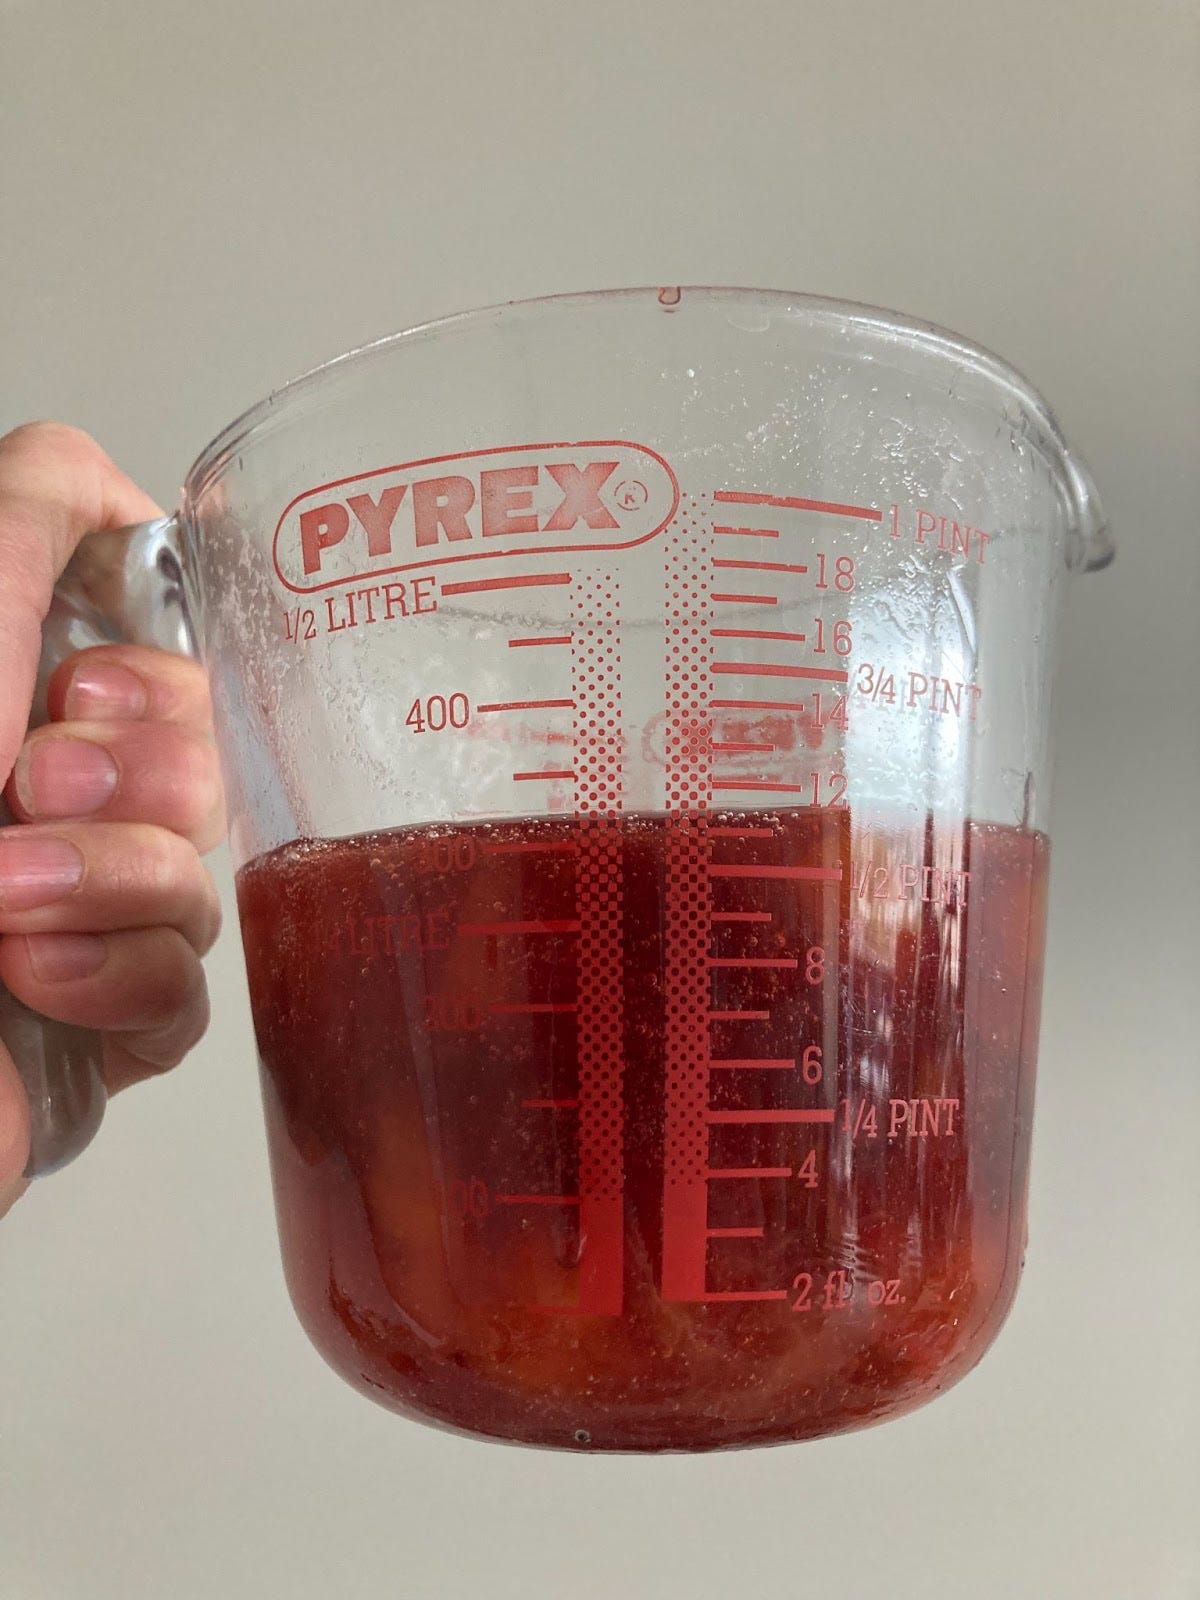
After maceration, the fruit, sugar & lemon situation has visibly changed. Liquid from the fruit has been drawn out as you can see here:
Fruit - now weighs 300g (decreased 40% mass)
Liquid - 350ml of liquid has been released
Altogether, volume of fruit + liquid = 550ml
Weight: 770g (unchanged)
Stage 3: Post cooking
Volume: 300ml
Final weight 400g
For this back of a crisp packet maths, we are reducing around 50% of the initial mass to reach the setting point for the plum jam. This is the point where the ideal sugar concentration/water evaporation has been reached along with the formation of a pectin network.
If you consider the molecular structure of the plum pre-jam which is 87% water, consider that around half of this is being evaporated whilst the rest is bonded with sugar and held by pectin.
Alright, let’s get onto the pastry!
Blind baking
One of the best things about making frangipane tarts is that you don’t have to blind bake your tarts. As the frangipane isn’t very wet, it doesn’t absorb into the pastry as it bakes, leaving it super crisp. Although it doesn’t leach into the pastry, the butter from the frangipane does slightly fuse into the pastry making it even more buttery, which is a feat to behold.
Other than halving the prep time of your tart, the other benefit of this is you’ll certainly bake your frangipane properly. Properly baking it takes time - if you take it out too early then the frangipane will likely fall. With this method, the chances your pastry AND frangipane will come out utterly perfect is much more likely.
Lining the tart
To line the tart today, I’m doing a mixture of two techniques we’ve covered before: For the base, we’ll roll out the pastry between two sheets of paper and use the pastry ring to “cut” the right shape. We’ll then roll the rest of the pastry into slim sausage shapes then use it to line the edges with the squish method. You’ll see!
Alright, let’s make it
Stone fruit frangipane tart
Plum jam - formulation & tips from Camilla Wynne’s Jam Bake
Makes 400g
500g plums, assorted colours (weight once pits removed. Approx 6!)
250g sugar
20g lemon juice
For the umeboshi jam
200g plum jam
20g umeboshi paste
Tart pastry
This makes enough for 2 x 8inch tarts
90g icing sugar, sifted (actually do this!!! It is essential there are no lumps. Don’t try and skip this, even though it’s tempting I know)
90g butter
1 egg (50g)
30g almond meal
230g plain flour
1g salt (nice pinch!)
Clarified bay butter
150g butter
3 fresh bay leaves
Frangipane
100g clarified bay-infused butter, chilled
100g caster sugar
100g ground almond
40g plain flour
100g eggs (2 medium, remove white if needs be)
2 x plums
Glaze
Either apricot jam or make your own plum nappage which I share on KP+
Method - Jam
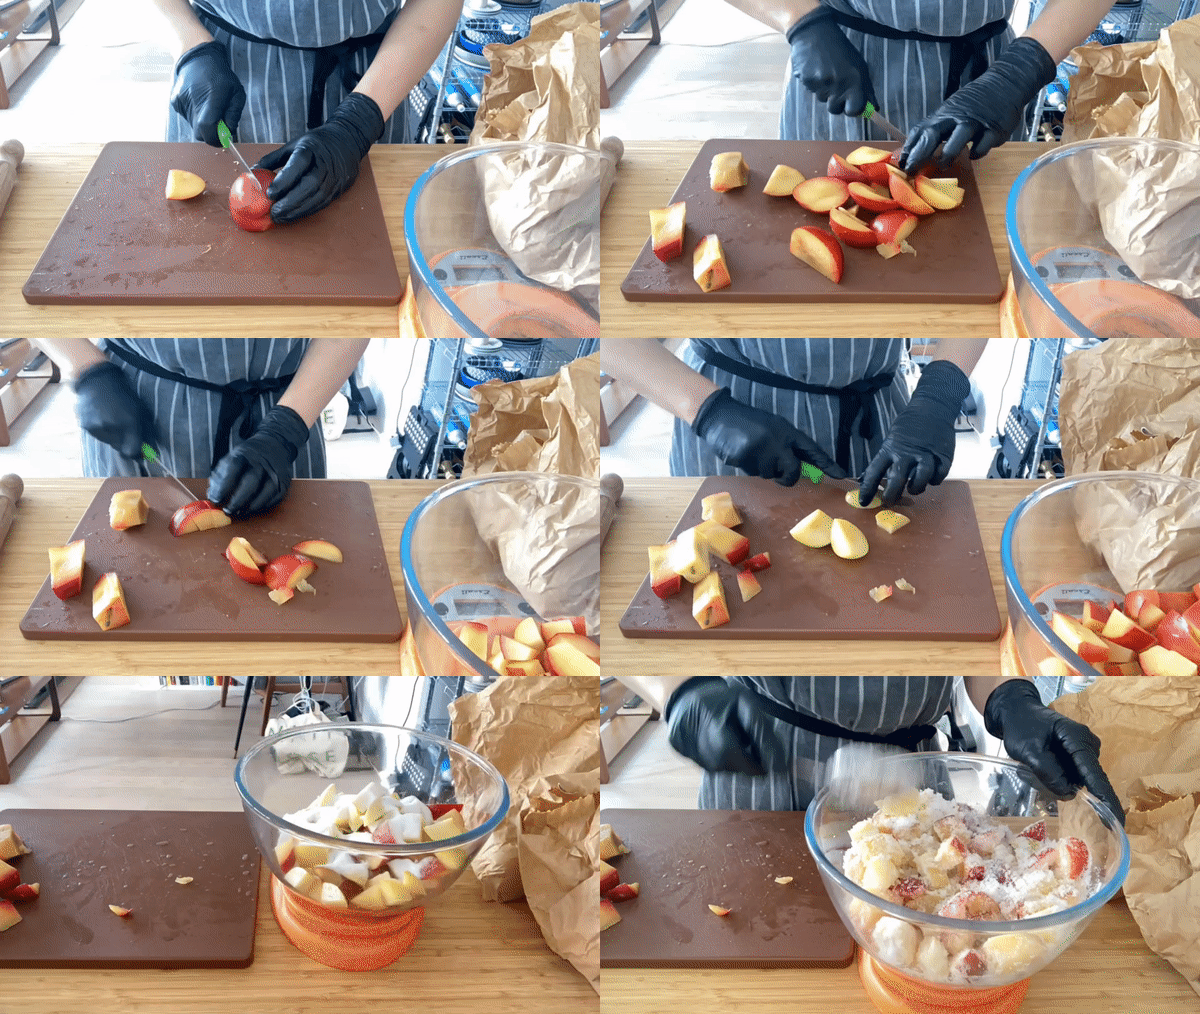
Cut plums into 1-2cm chunks
Mix with caster sugar and lemon juice and leave overnight in the fridge. You can reduce this if you’re short on time - have a look at the pics so you can compare how much liquid you should be expecting
Place two small plates in the freezer ready for the jam set test! Trust me you’ll be happy you remembered to do it early
After this maceration period, heat everything together on a medium heat and bring to a boil stirring all the time with a spatula
In this batch size, it took me about 10-15 mins of boiling until it was ready. The signs of readiness include - the bubbles slow down and it looks visibly thicker and glossier. When you lift your spatula out of the jam, it will cling to it. Once it starts to thicken, I suggest lowering the temp so you can get the set just right. As Camilla says in her book - you can’t uncook jam, so take it easy as it begins to thicken and the water has evaporated off. This is the jam after 15 mins of boiling - it’s not quite ready:
The best thing to do is to continuously test the set by putting a teaspoon of jam onto one of your cold plates. Set it back into the freezer for 2 minutes and then check to see if it sets or wrinkles when you press it with your finger. You can also swipe your finger through the middle of the jam and if it’s ready, the line won’t fill in and the jam will remain firm
Pour into a container and leave to set. If you’re planning to keep it for a while then I recommend following a tutorial on how to sterilise jars for long-term storage
For the umeboshi jam, I like to use 10% paste to jam weight. So, for an 8 inch tart, I use 200g plum jam to 20g paste. Just stir it together and set aside
Method - Sweet pastry
Cube your butter (cold is fine, using soft butter can lead to over mixing or accidental whipping so best to start with cold!) and mix with sifted icing sugar using the paddle attachment until well combined on a low speed. It does NOT have to be creamed! You just want to check there’s no lumps of butter or sugar and it is homogenous
Scrape down the sides of the bowl and add the egg. It will break up and look gross and split but don’t worry!!! Just scrape down the sides of the bowl and mix it in as best you can. Again, just use a low speed
Mix the dries together - flour, almonds and salt - then pour into the mixer and mix on a low speed until it comes together. That’s it!
To line the tart, roll out the soft pastry inbetween two sheets of paper until its around 3mm thick. Place your pastry ring over the top and cut the base shape
To line the edges, gather the soft pastry and roll into thin strips and press into the sides of the tart ring. Do your best to keep it really delicate. Press into the corners to join up the base
Remove the rest of pastry and use for re-roll
Place into the freezer until the pastry is firm, around 30 mins
Trim before filling by cutting the edge with a sharp knife
Method - clarified bay butter
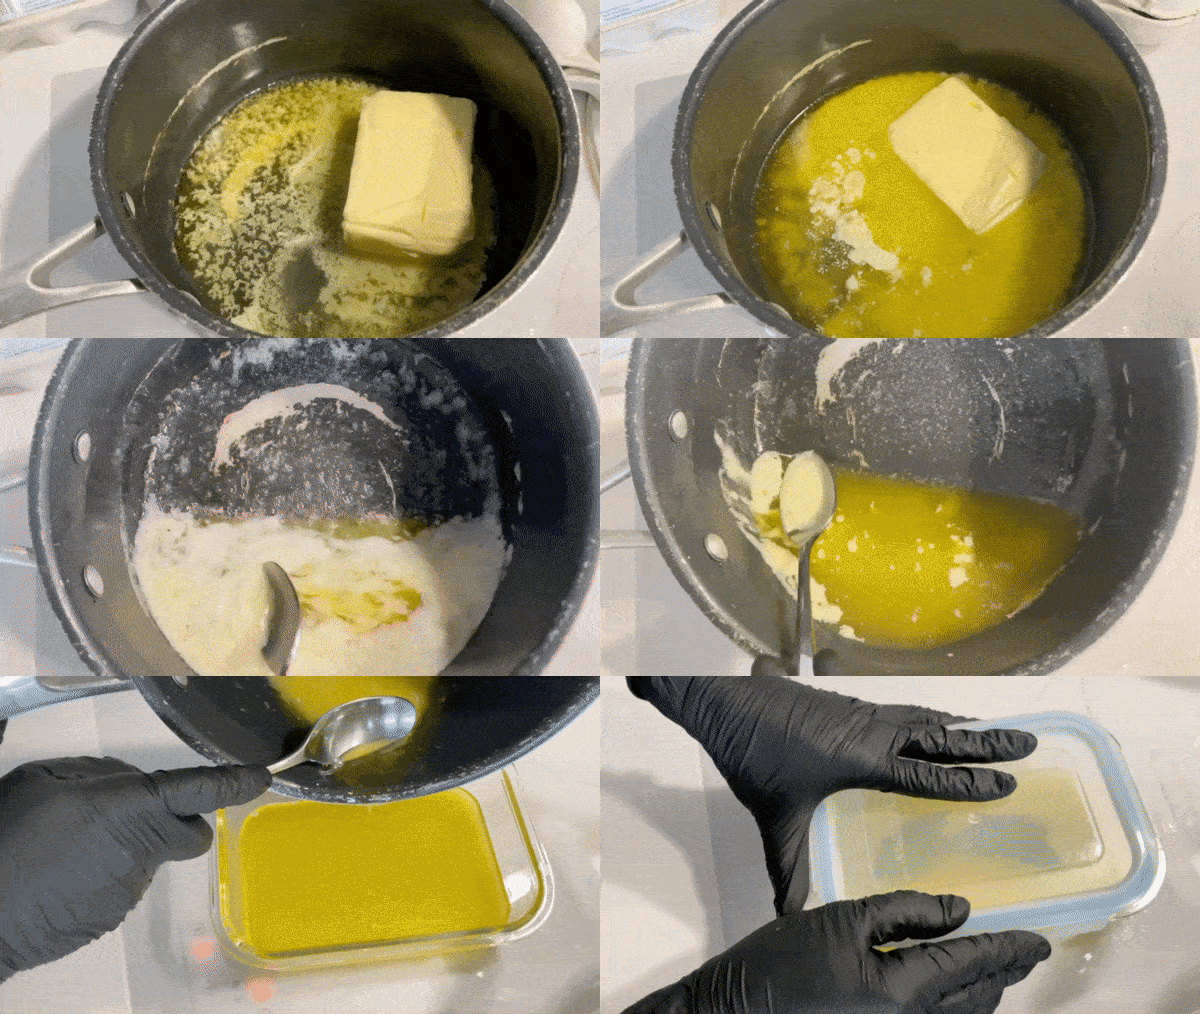
For the clarified butter, heat up the butter in a saucepan on a low heat. The butter will separate into three years: The top layer is foam aka water, the middle is butterfat and the bottom is milk solids. You need to do this on a low heat so as not to interrupt the layers with bubbles or to accidentally brown it. We want pure clarified butter!
Once these layers have been achieved, you need to turn off the heat and gently skim the foam off the top. Once all the foam has been skimmed, carefully pour it into a clean container, avoiding pouring the milk solids in. These should remain in the base of the tin
Add three fresh bay leaves. Leave to chill and infuse completely in the fridge
Method - frangipane
Remove bay leaves from the butter. Mix with caster sugar using paddle attachment - you want to get quite a lot of air into it
Next add the eggs and salt
Finally paddle through the flour and almonds. Fin!
Tart - assembly and baking
Pre-heat oven to 160c fan
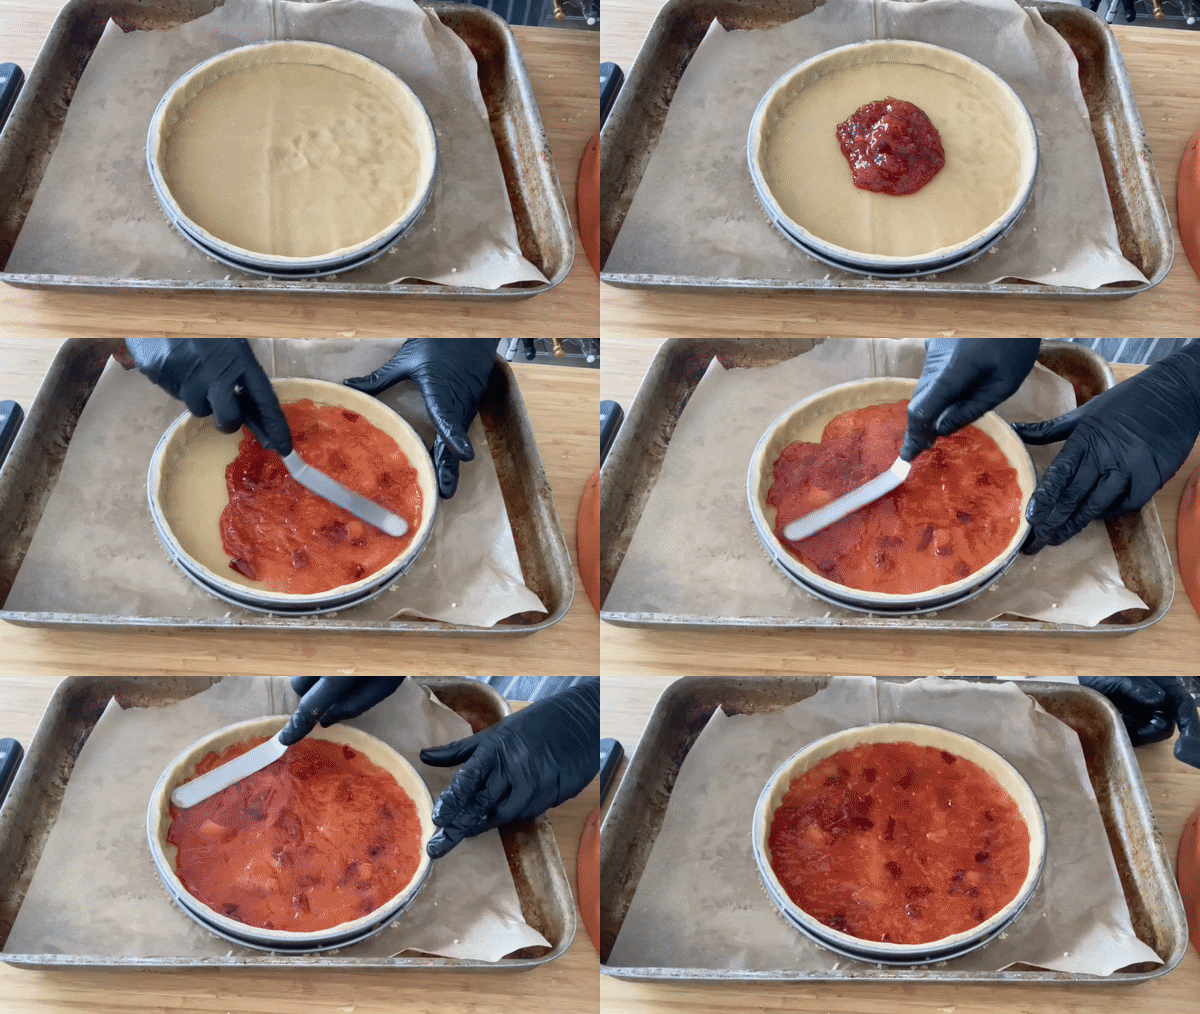
Spread 200g jam into the base of your cold tart case. Set in the freezer for 10 minutes until it has firmed up otherwise it might splurge over the edge once you add the frangipane
Once the jam is a bit set, spread 275g-300g frangipane on top. Use an offset spatula to smooth it out
Chop up 2 plums into 1-2 cm chunks and press into the frangipane
Bake for 40-50 mins until golden
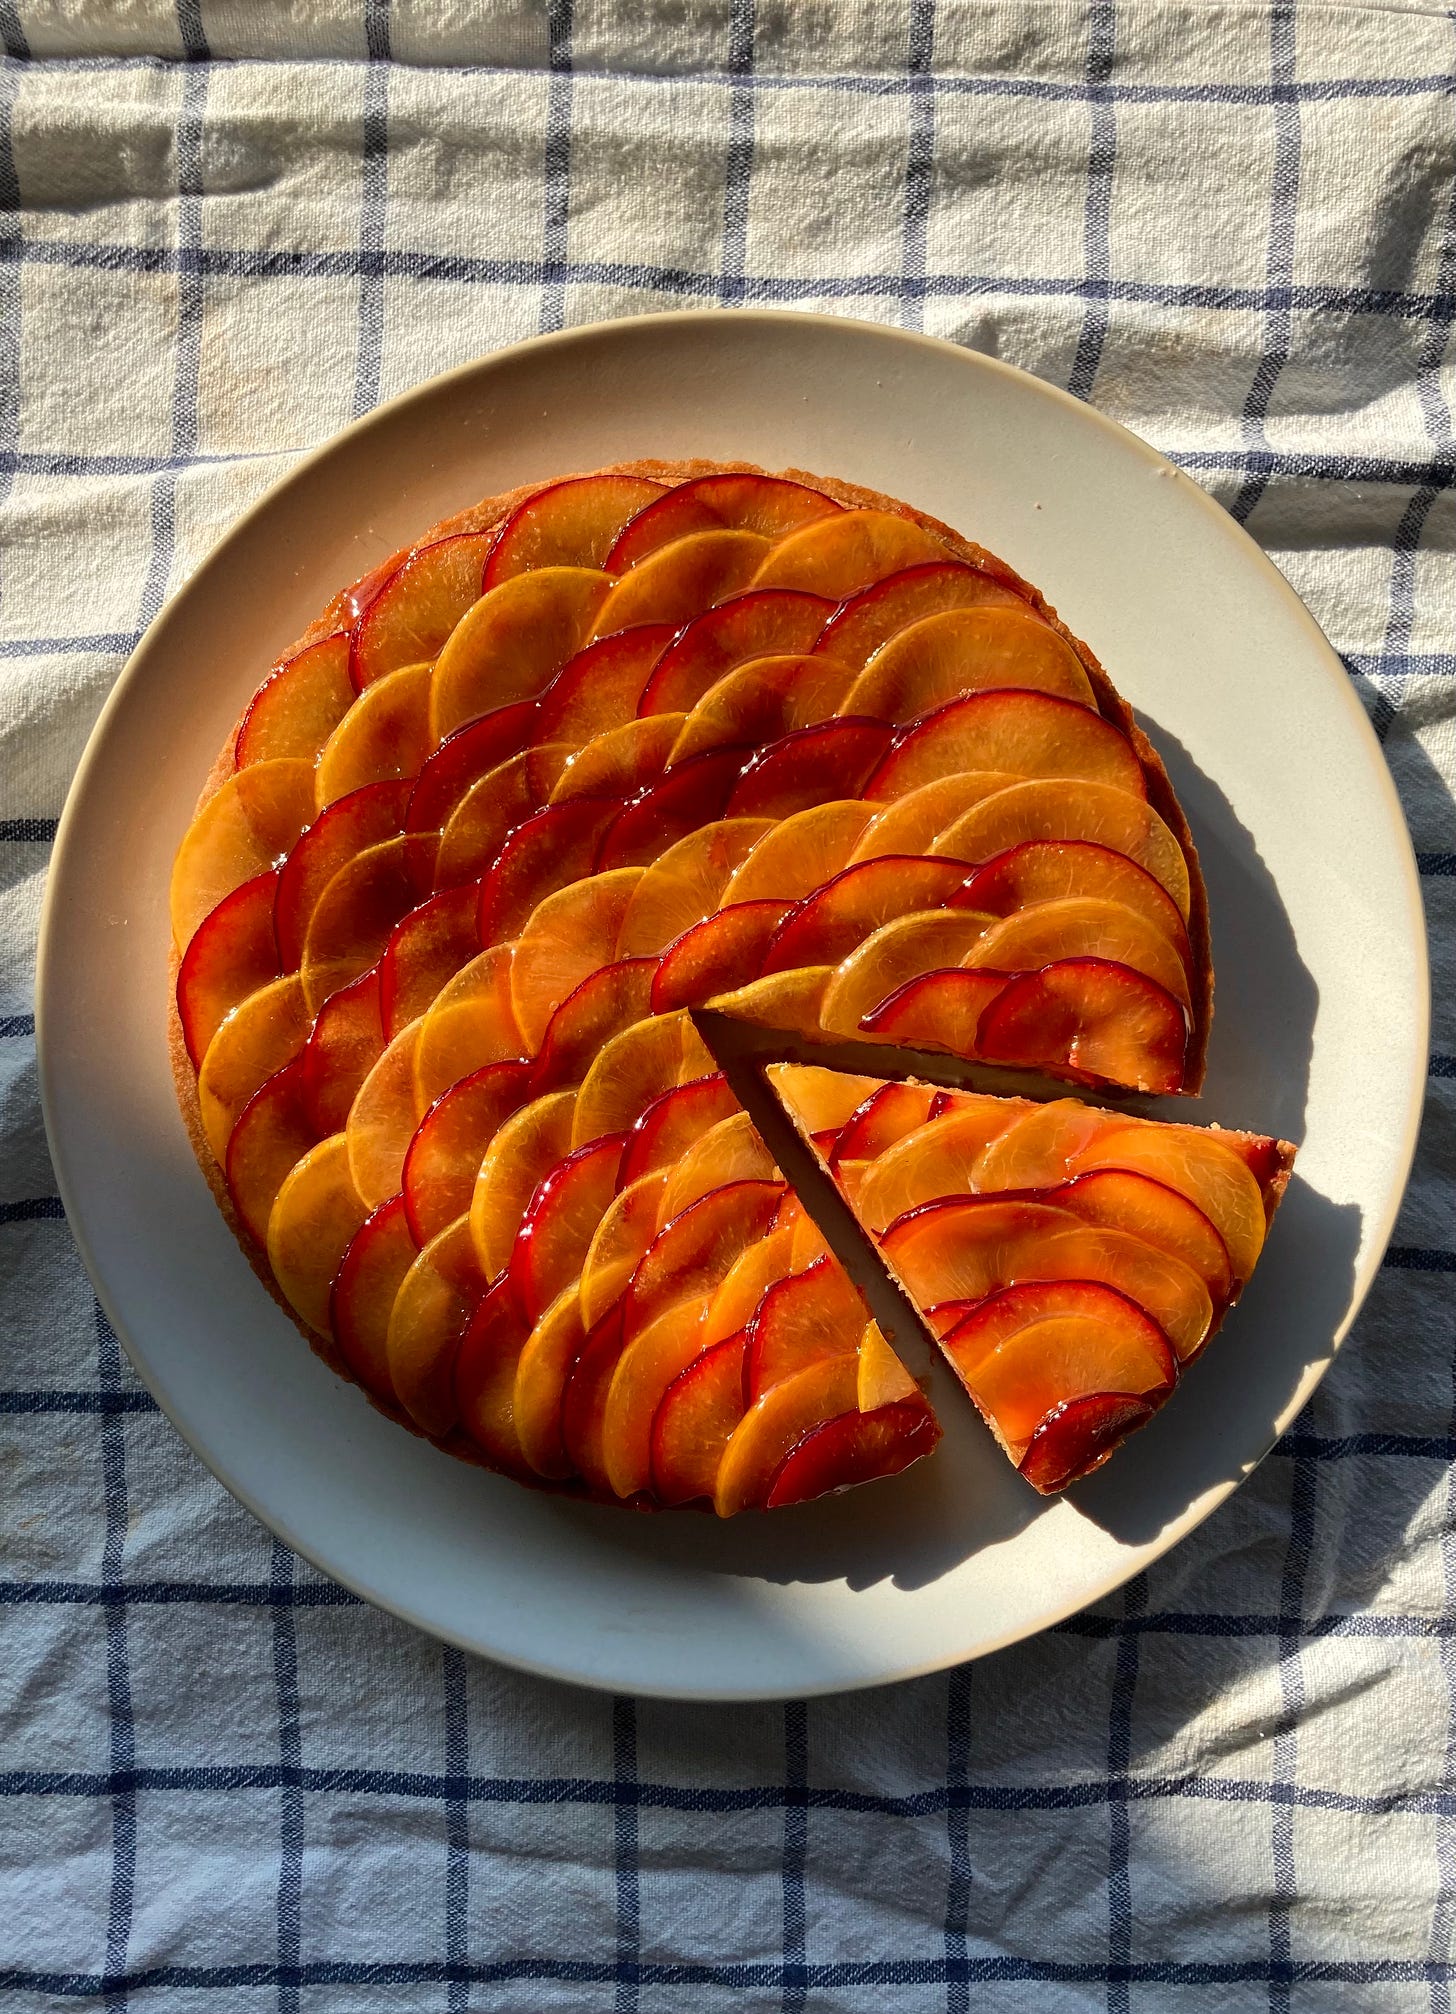
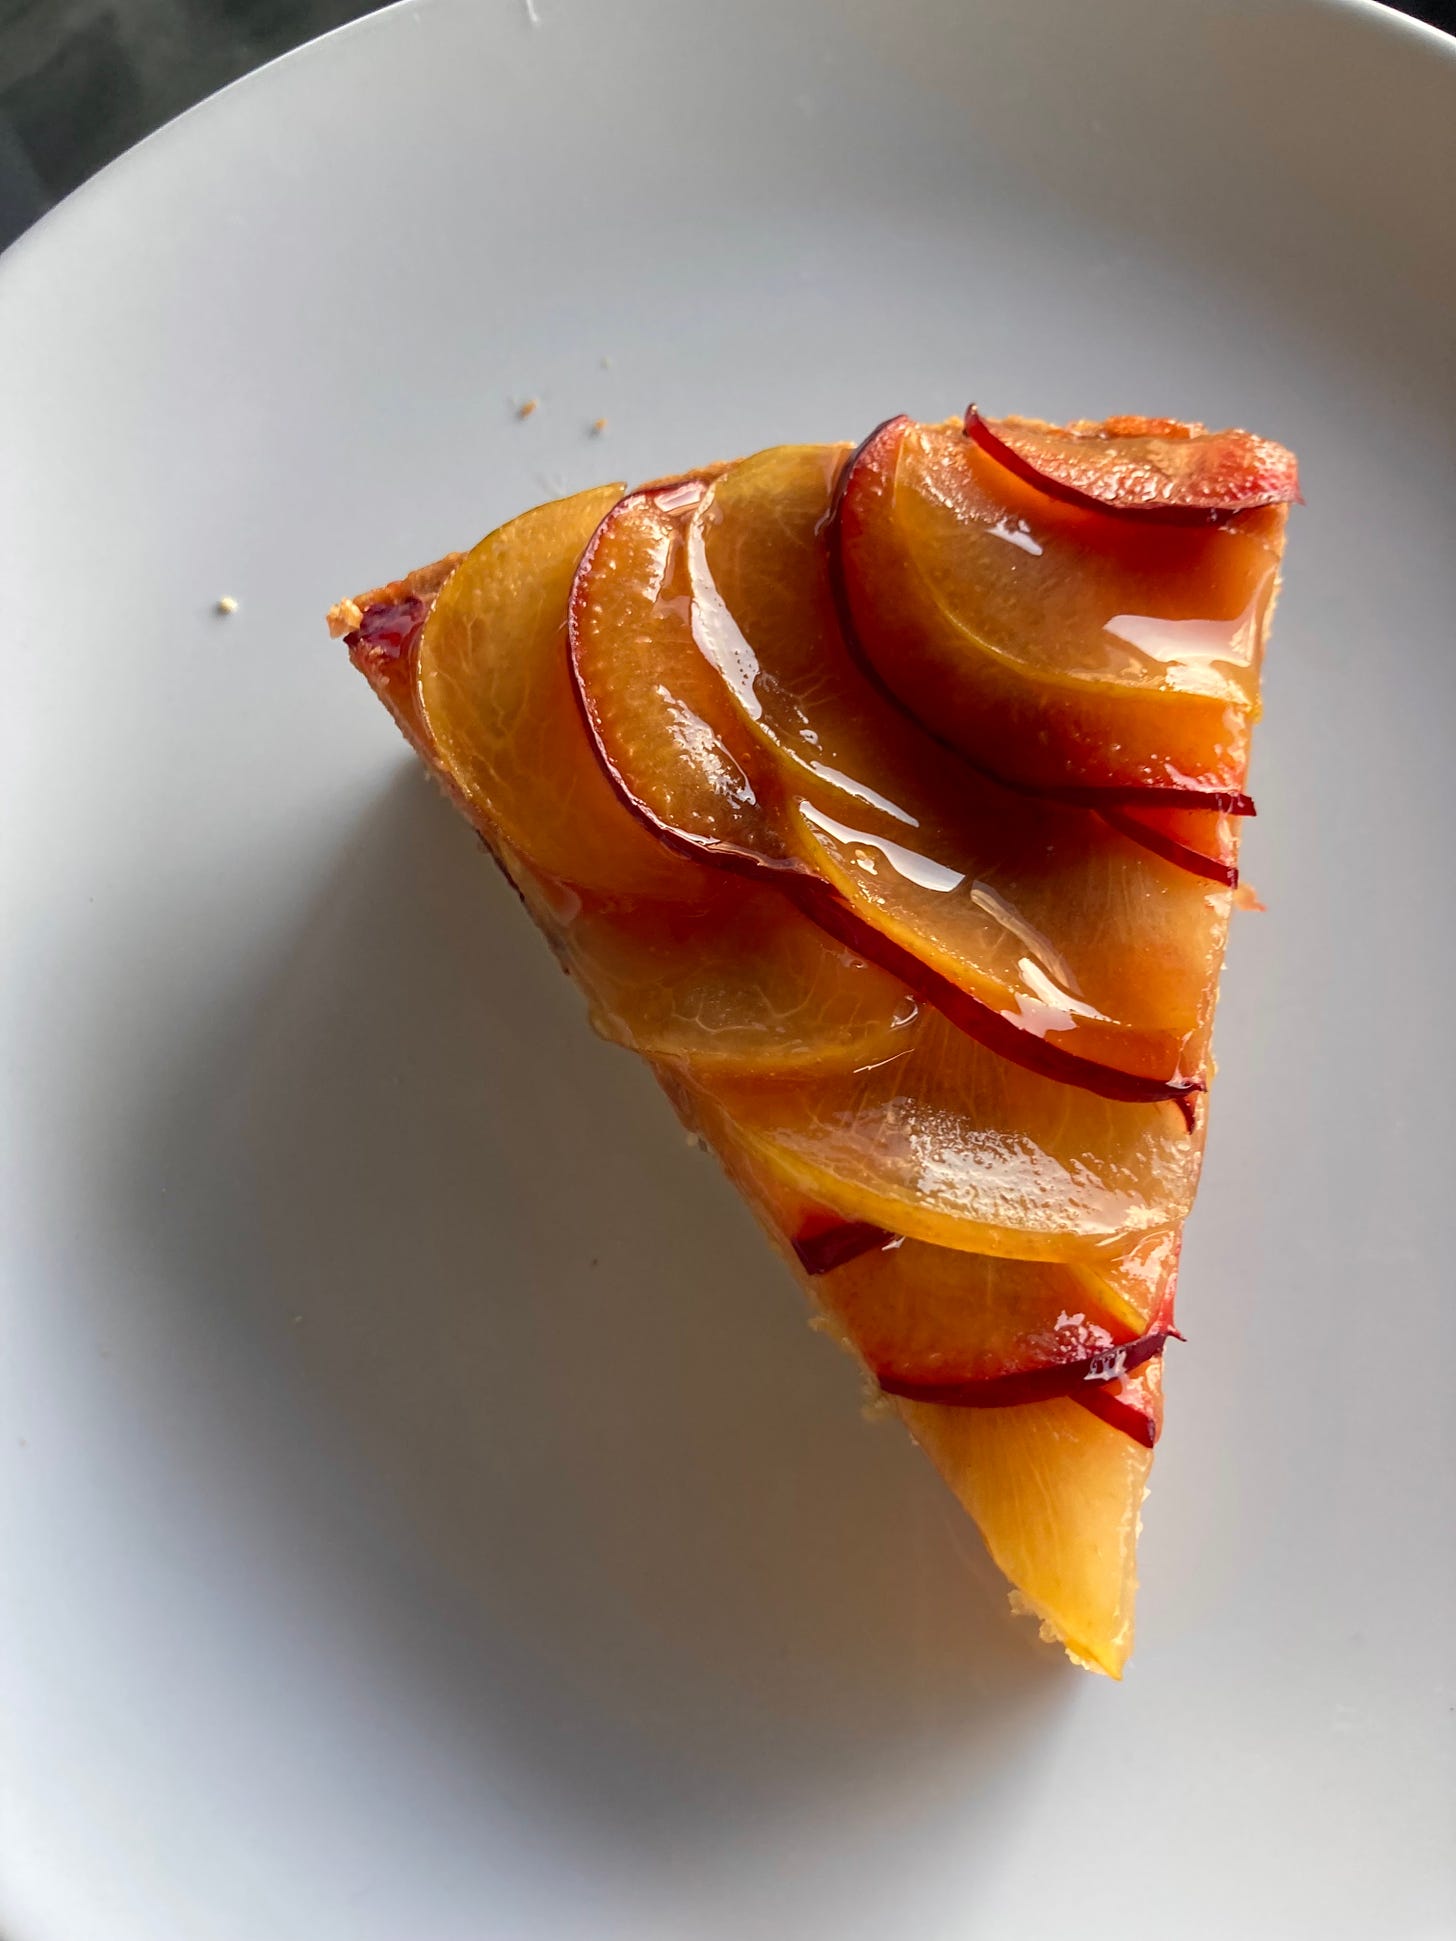
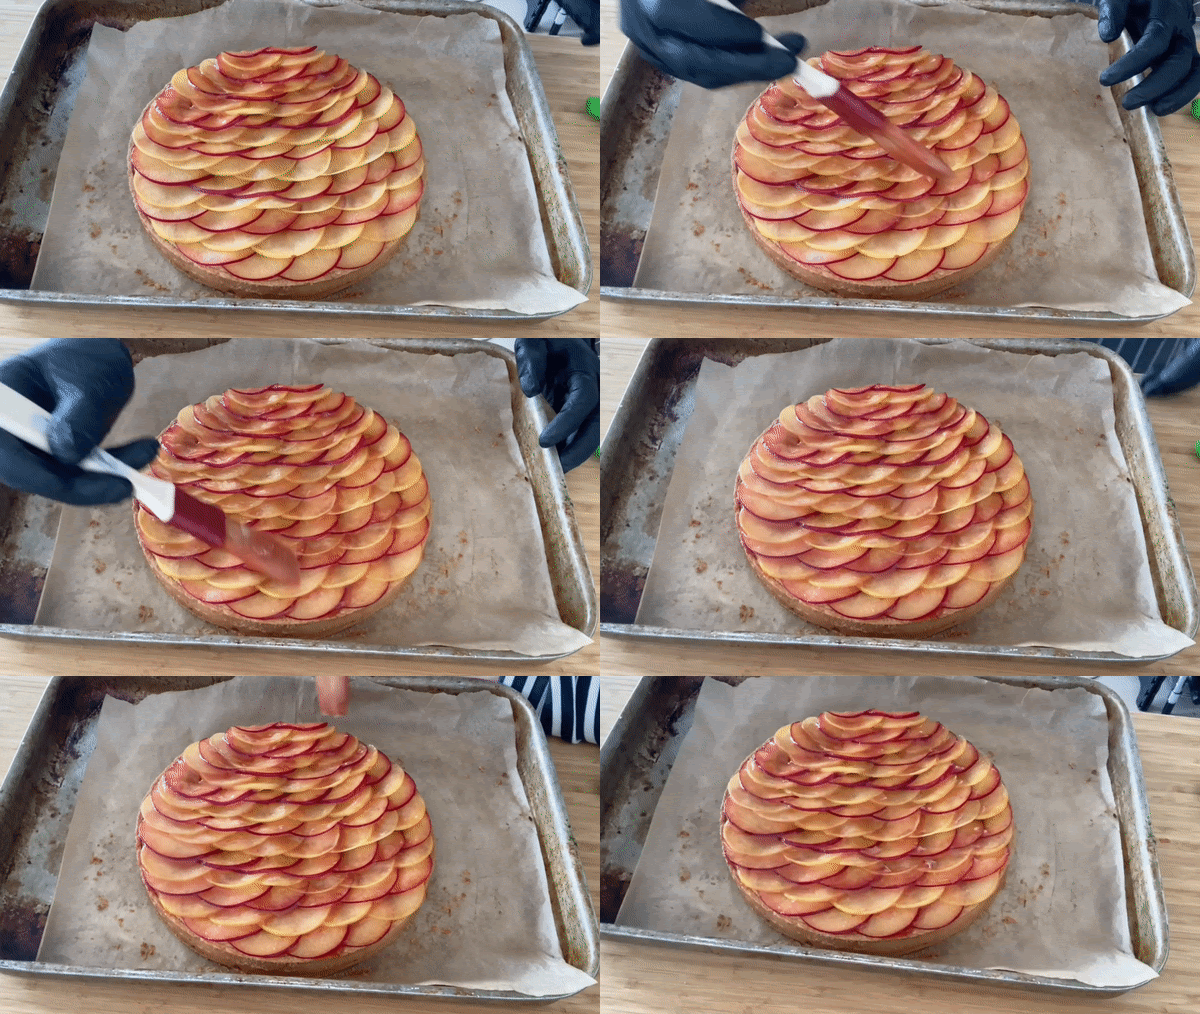
To finish, slice a mixture of yellow and red plums thinly, around 1-2mm
Layer plums on the tart, alternating colours
Glaze and serve










I have a question about frangipane... My clarified butter is already infused, but cold (from a fridge). Should it be soft, or melted to do cream? Sorry, couldn't notice in a video above...
So pretty! And such interesting flavor elements. Your tart in the video looks lidded prior to adding the sliced fresh plums. Was this step in the directions? Thanks.