Kitchen Project #45: Maple pumpkin tart
Plus a guide to quenelles for when you're feeling fancy
Hello,
Welcome to today’s edition of Kitchen Projects. It’s so wonderful to have you here.
Although I do live in London, I am partial to a thanksgiving festivity so today we are diving into an adorable maple pumpkin tart.
Over on KP+, I’m sharing the recipe for a miso-honey pecan tart with a chocolate tart shell which I serve with a honeyed espresso cream. Rather pleasingly, this tart completes my thanksgiving tart trifecta (apple, maple, pecan, done!).
I launched KP+ earlier this year - subscribing is easy and only costs £5 a month. Over there I share lots of extra content, and when you subscribe, you help support the writing and research that goes into the newsletter. I really hope to see you there:
Alright, let’s do it.
Love,
Nicola
Pumpkin on pumpkin
I am partial to a thanksgiving celebration. I’ve been lucky to have attended some truly magical thanksgivings in the last few years. From the wine-drenched meal that didn’t end til 4am and ended with my iPhone falling into a toilet (RIP - this was prior to waterproofing), to the potluck in London that was so abundantly irresistible that I cried on the way home from being too full, to 2020’s quietly abridged edition, I’ve got the most wonderful memories to reflect on and yes… be thankful for.
As well as memories of friends and family, I’ve also got a lot of memories of pies. Some I’ve made, some I’ve just eaten. And I’ve been sitting on today’s recipe for an entire year, just waiting for the perfect moment to share it with you. Finally, the time has come.
I developed this in 2020 when I had a serious glut of pumpkin puree after testing the pumpkin basque cheesecake. Pumpkin puree is useful - it is sweet and starchy and can be used to enrich pretty much anything. From custards (like we are doing today), to bread doughs to cakes, you can use it in the same way you’d use something like bananas - it moistens, sweetens and bulks all at the same time.
Let’s talk about this whole pumpkin thing
Pumpkin pie feels firmly American and still feels extremely novelty to me and I’m not a natural lover of it. I definitely prefer eating it as elegant thin slice of the stuff rather than a deep dish situation, which I personally find overwhelming.
I covered the whole ‘pumpkin spice’ and more details on pumpkin puree itself in the aforementioned basque edition of the newsletter, but here’s a little reminder:
When it comes to pumpkin, the biggest question I get asked is do I really need to make my own puree or not. I’ve used the tinned stuff before and it is good, reliable and consistent. But the truth is, if you want to level up the flavour I think it’s really worth making your own puree.
But we can’t forget that pumpkins are not created equal - you definitely do want to use one of those fancy looking ones. They’re called Delica pumpkins but they look and behave similar to the Japanese pumpkin called a kabocha. These pumpkins have densely packed and intensely flavoured flesh so it’s worth seeking one out if you’re going to make your own puree. They have dark green skin and are quite flat.
I wouldn’t recommend using a run-of-the-mill pumpkin or butternut squash – you can, but you’ll need to leave the puree to drain overnight to get as much water out of it as possible after baking. You’ll be amazed at how much is in there! You still get some liquid from the others, but much, much less
So what exactly is it?
Pumpkin pie is a type of custard tart, meaning dairy set with eggs and sugar for flavour. The addition of pumpkin in this tart gives it a firmer, rather than wobbly, set. Although I do love the pumpkin flavour, there is something that personally makes me feel a bit queasy about wobbly pumpkin custard, so this tart is definitely more on the firm side.
To put this recipe together, I looked to the classic of all classics - THE baked custard tart.
The most famous recipe for custard tart is Marcus Wareings - it is extremely simple, just a combination of caster sugar, double cream and yolks:
To make your own takes on custard tart, there are some simple things you can do - infusing the cream or caramelising the sugar will totally change the dimension of the tart without having to worry about whether the ratio and formulation is right. This classic tart calls for 24% yolks compared to 66% cream (ie. liquid) to make sure it sets up just right. Once you start changing things beyond this ratio, you have to pay more attention to the details.
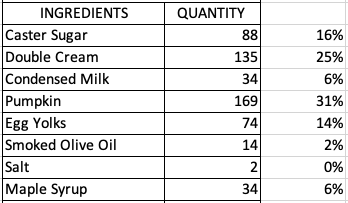
The ratio of eggs needed to set ie. ‘coagulate’ the liquid is essential when it comes to custards. We discussed this in the KP quiche edition (where we use 37% eggs to 64% liquid, the eggs increased pretty much proportionally in place of the sugar in the OG custard tart) and we need to have a closer look at the pumpkin breakdown to see whats going on there:
Today’s pumpkin tart has a relatively lower egg yolk to the standard custard tart. This is because we’re using pumpkin puree - it is dense and starchy and already close to the setting texture we’re after. This tart also has a relatively lower fat content. Our original custard tart is around 40% fat, including the double cream and yolks, whilst this tart comes in around 20%, with the rest of the bulk coming from the sugars and the aforementioned puree. The use of the puree also means you don’t get a ‘wobbly’ tart here, but more of a perfectly dense and smooth set, almost like a stretchy caramel sauce.
As well as this, the sugar is around double. You know how seasoning has the magical power of making ingredients taste more like themselves? Well, though our pumpkin is sweet, we will add some additional dimensions with the maple syrup as well as caramelising our sugar (a tip I picked up from Nicole Rucker THE queen).
A note on condensed milk
I’ve waxed lyrical about condensed milk in previous newsletters and today it’s BACK! We use a little bit in the custard itself for mouthfeel and flavour. I ummed and ahh’d about whether to include a relatively small quantity of this in the tart because I know opening a whole tin of the stuff can be annoying. To make sure the tin isn’t wasted, I also whip up a batch of one of my favourite ever compound creams - condensed milk whipped cream. The rest can be cooked into dulce de leche (recipe here) or why not make my HK Milk Tea tres leches?
If you don’t feel like opening up a tin then I understand - you can omit the condensed milk from the tart and replace with more double cream, and your whipped cream can be plain or if you prefer tangy, replace the condensed milk for creme fraiche.
A little bit about maple syrup
Maple syrup really comes into its own at this time of year. I don’t know about you, but there’s something about the dark evenings that makes those sweet/savoury flavour combinations come into play. From a glazed ham to roasted veggies, I pour with reckless abandon come November.
Maple syrup itself is a marvel. Every spring, orchards full of maple trees are ‘tapped’ - this means a hole is drilled into the trunk of a tree and a spigot is placed inside, allowing the sap to drain. Sap is the liquid used to transport nutrients, water and sugar to the tree. It has to be collected in the Springtime as the warm days/cold nights offer the right conditions to access the sap - the pressure change as a result of the temperature forces sap out of any holes in the trees throughout the day. Once the environmental temperature levels out, sap no longer flows and it can’t be collected.
The sap is a clear liquid and its then boiled down to create the amber syrup that we know and love. It actually takes almost 50 litres of sap to make just a single litre of maple syrup. Maple trees aren’t the only tree that can be tapped - the lesser known Birch syrup is extracted from Birch trees. Its similarly sweet but has a richer, more molasses-like flavour. I’ve never seen it outside of the US. Palm, walnut and sycamore trees can also produce syrups.
The deal with swapping in sugars
We’ve discussed this before but sugar = sugar and sugar = glucose + fructose bonded together.
For the most part, liquid sugars like maple syrup, honey, golden syrup etc are predominantly just sucrose dissolved in water. Of course, there are other things like the ratio of glucose, fructose and other flavour compounds, too, but in essence, sugar is sugar is sugar.
So, once you start using honey, maple or anything, beyond the flavour implications, you need to account for the additional liquid. This usually means reducing it from elsewhere in your ingredients. So far, so simple. But you also need to consider the different balance of sugar molecules, too.
Because as well as tenderising and adding sweetness, sugar in baking is also partly responsible for browning and colour via Maillard reactions or caramelisation. I know we’ve covered this a bit before, but let’s go deeper:
So, when it comes to caramelisation, sucrose and glucose caramelise at around 160c, but fructose happens way lower at 110c. This is why bakes that use honey are often darker in colour and can burn more easily. Remembering this when you are putting a recipe together will help inform your technique and help achieve whatever flavour profile you want.
On the other hand, the browning maillard reaction occurs when glucose and fructose react and reduce with amino acids. Sucrose (glucose and fructose before its broken apart!) takes no part in the maillard reaction. Sucrose only gets involved in caramelisation.
But WHY do I need to know this stuff to develop recipes?!
Well, one of the biggest decisions you have to make when you create your own recipes is WHEN to put flavours into your bakes. You have two options - either put your ingredients through these processes prior to the final cooking OR ensure your final cooking method will result in the development of flavours.
Today’s custard tart is baked at a low temp - 120c fan - and since Maple syrup is predominantly sucrose we won’t be achieving any caramelisation without a bit of help. So for today’s recipe we will be caramelising a portion of the sugar in the recipe, meaning we’ve banked a bunch of flavour before the baking portion has even begun.
Baking time for custard tarts
As is standard for baked custards - we’ll be going low and slow, but it isn’t as slow as you’d think. Because we make a caramel sauce as the base of our custard, it’s incorporated into the rest of our ingredients whilst still warm, it reaches setting temp much more quickly. Unlike a classic custard tart, there is less risk of overbaking and curdling - the sugar content and starchy pumpkin take care of that. But the longer you bake it, the firmer your final tart will be. I prefer not to stab my tart with a thermometer, but if you did you’d be looking for around 80c - I prefer to take it out when there’s still a 5cm wobble in the middle. Trust me, it’ll set up!
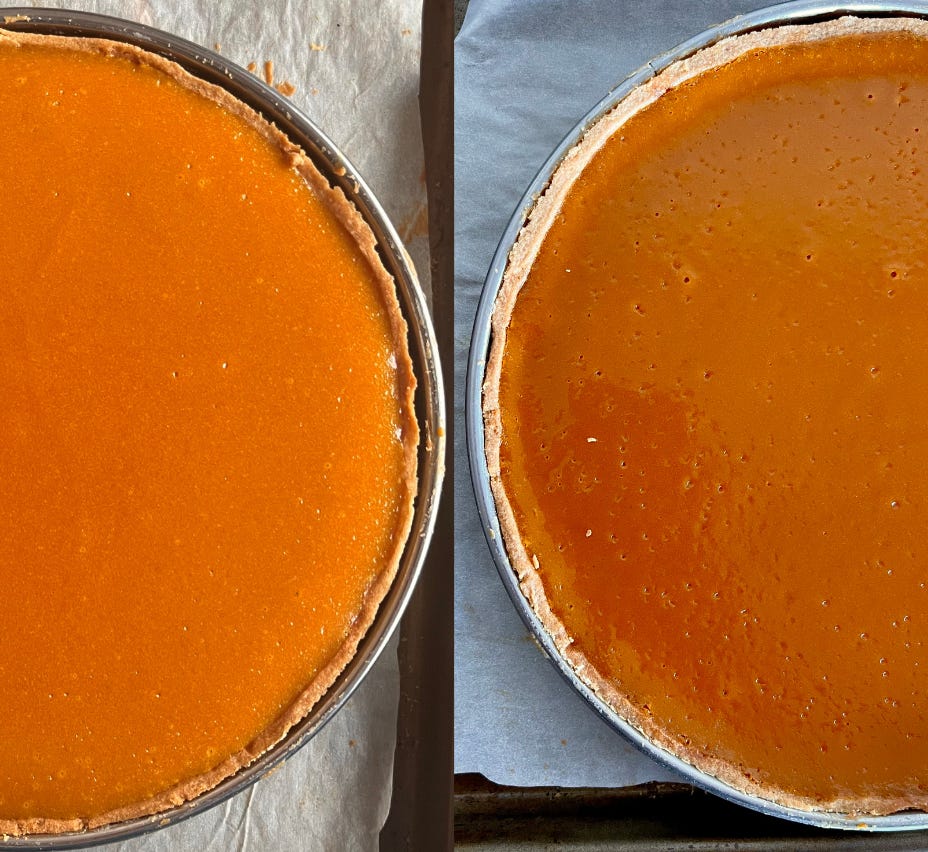
The other wonderful thing about this custard tart is how SHINY and glossy it gets after its chilled - you can literally see your reflection:
Smoked oil
The first time I made this tart in 2020, I’d just been given a sample of smoked rapeseed oil from Duchess Farms. It was delicious and the smokiness of the oil added another dimension to the tart, bringing everything together. That rapeseed oil is long gone, unfortunately, so I picked up a bottle of smoked olive oil from Sous Chef, which has a much lighter smoke.
If you don’t have smoked oil to hand, this tart is still really successful without it and it is still worth including the olive oil in for mouthfeel and flavour. Depending on the strength of the smoke in your oil, the flavour may be more/less pronounced.
How to quenelle
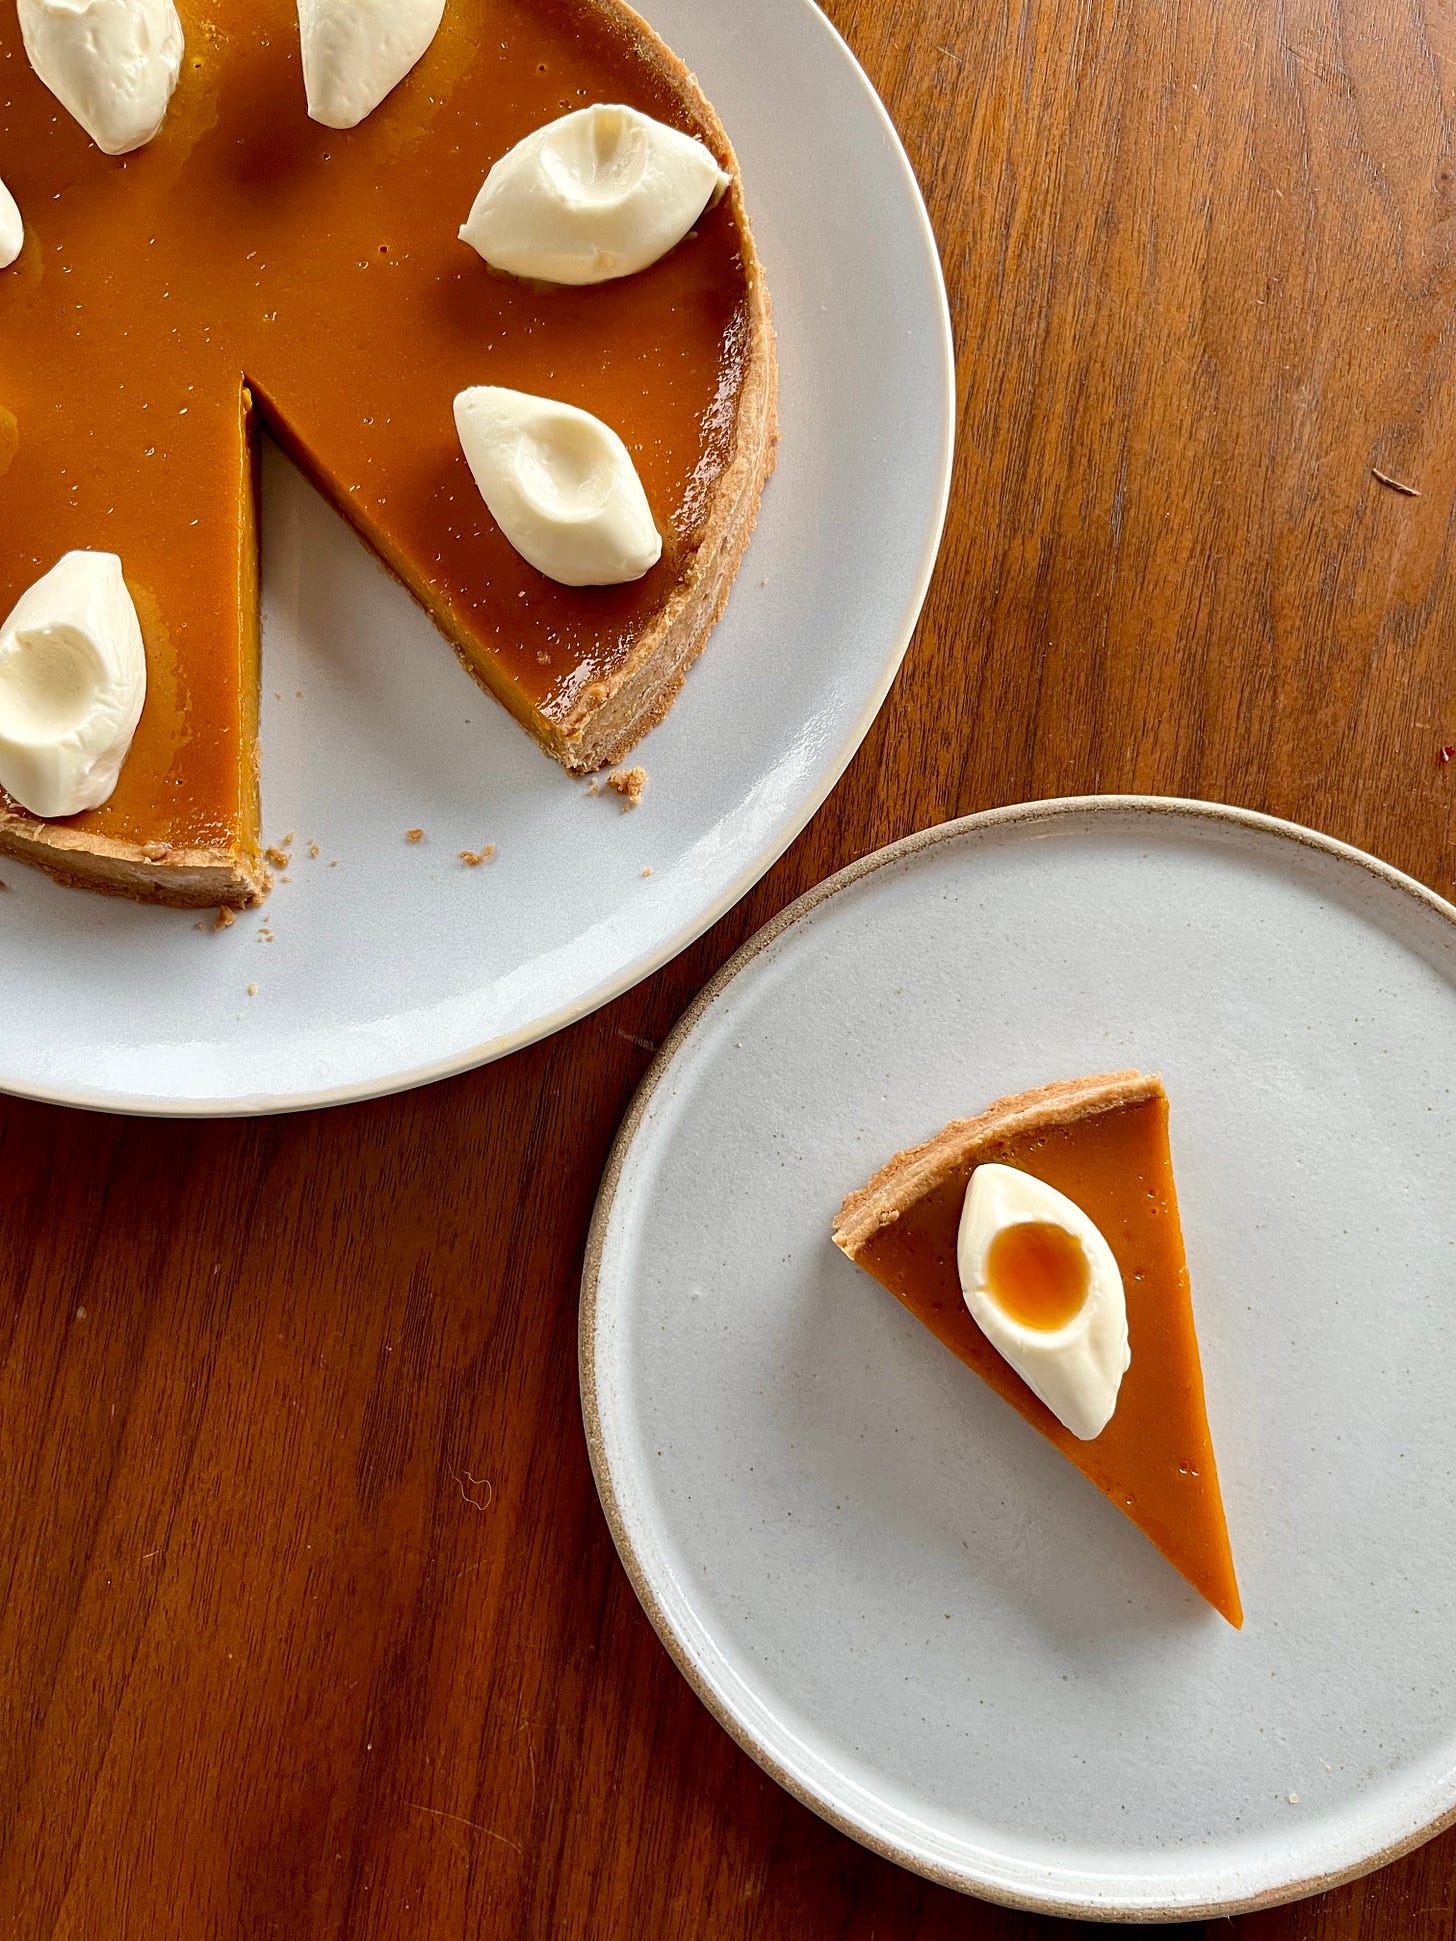
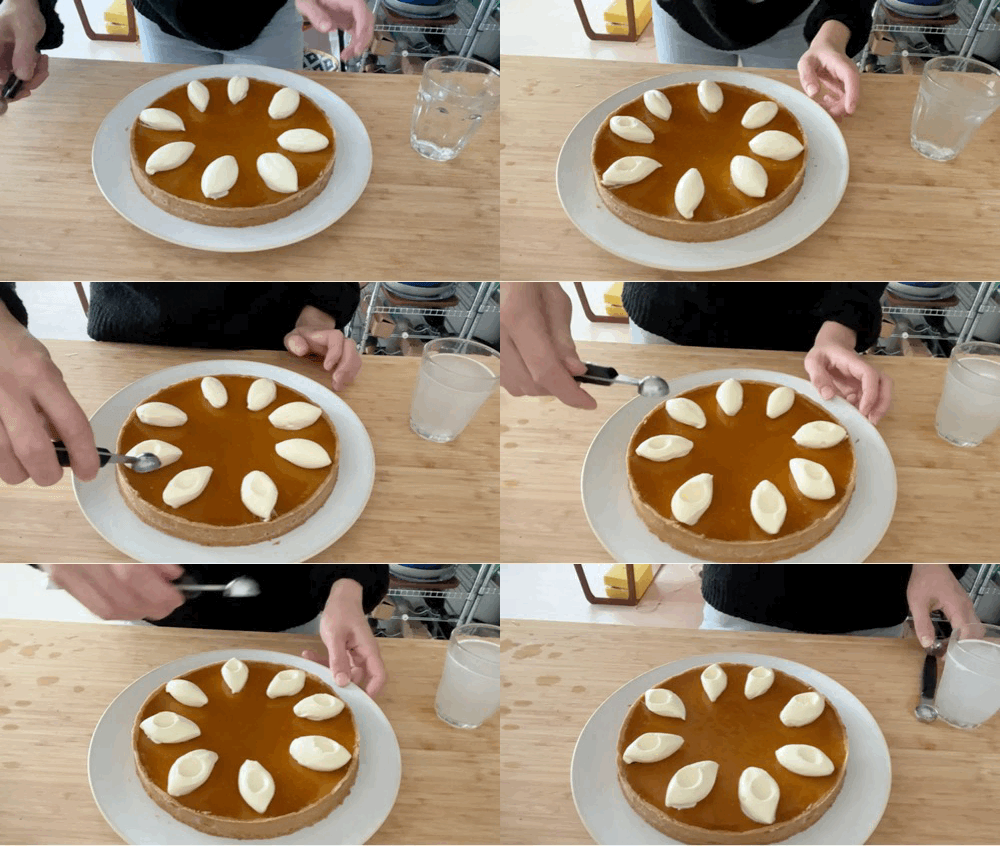
One of my favourite things about this tart is the adorable finishing - a quenelle of cream then a little bowl carved out that will be filled with a little dash of maple syrup (or olive oil, depending on what you prefer!). Quenelles are a classic finish for desserts - yep, I know the weird alien egg shape is a bit odd, but they are strangely beautiful, aren’t they?
Learning how to quenelle is a right of passage for a pastry chef. It’s one of those things where repetition really helps. My training was at Ottolenghi where we quenelled mascarpone on baked tarts and financiers day in, day out. I remember finding it such a frustrating process and I’m the lucky owner of muscle memory these days. Here’s a list of tips:
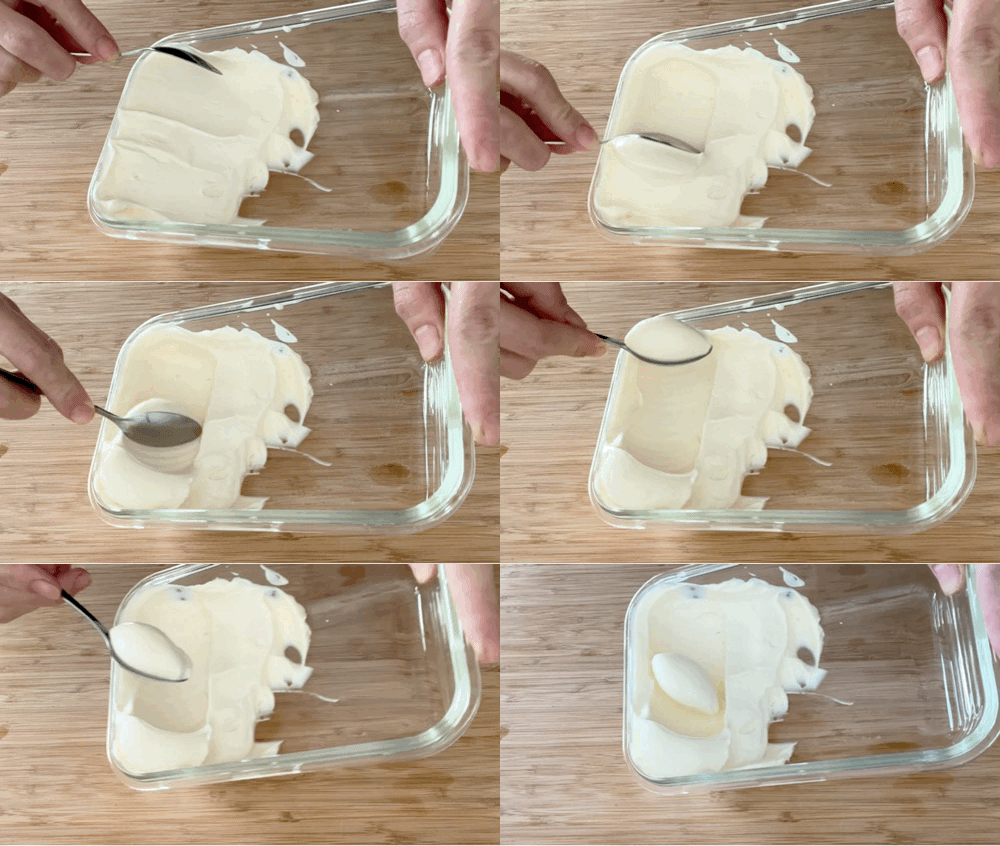
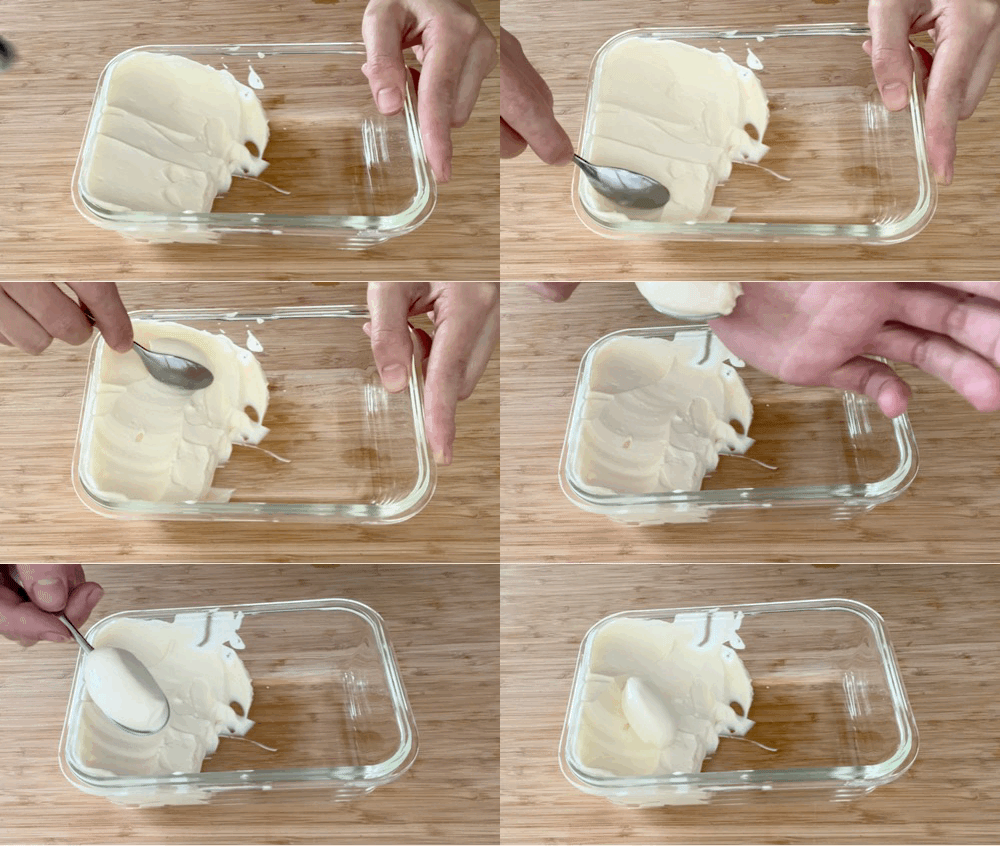
Annoying but true - practice, practice, practice! Cream cheese is a great texture to practice on - just take scoops and quenelle them directly
You can define the size of the quenelle by altering how much cream you take with your first scoop - if you take a full spoonful, the quenelle will be the size of the entire spoon, but you can also make mini quenelles by taking half as much to begin with
Spoon shape is important and chefs often have their favourite spoons, but as you practice your quenelles you’ll be able to alter the shape by angling your spoon in a certain direction
Have plenty of warm spoons ready - the heat of the water depends on what you are scooping. Ice cream benefits from spoons dipped in >80c water, a dense cream cheese/mascarpone at least 70c, but a freshly whipped cream (like today’s recipe) should really only need hot tap water around 50c-60c. Too hot and your cream will simply melt and deflate
If your quenelle isn’t releasing, you can warm the back of your spoon on your hand to help it release neatly
Don’t be afraid to neaten up the edges of your quenelle with your hand before final placement, or even better - don’t be afraid to just do it again!
You can quenelle in advance - this is quite normal for ice cream service in a large banquet style dinner. Just quenelle onto a tray then freeze and simply place before serving!
Here’s a few ways to quenelle:
Classic - drag your spoon through the cream, turn it around then drag it back. You can clean up the edge with your hand if needs be
Classic one direction - this is better for ice cream or for something with a deep container, but simply drag your spoon through the cream at a 45 degree angle and a quenelle *should* form
Two spoons - simply take a scoop then use an identical spoon to shape it, packing it between the two angles of the spoons. This is better for firmer things (whipped cream does NOT like this) but I’ve seen it used most regularly for non homogenous but tightly packed things, like a salmon tartare or ratatouille for a veggie canape.
Okay let’s make it!
Pumpkin maple tart
Ingredients
Makes approx 2 x 8 inch tarts (or more with re-roll). You can halve this
90g icing sugar, sifted (actually do this!!! It is essential there are no lumps. Don’t try and skip this, even though it’s tempting I know)
90g butter
1 egg (50g)
30g almond meal
230g plain flour
1g salt (nice pinch!)
Egg wash to line
Maple pumpkin tart
75g egg yolks
170g pumpkin puree
35g condensed milk (or use same quantity double cream)
15g smoked olive oil (or normal olive oil!)
35g maple syrup
3g maldon salt
135g double cream
90g caster sugar
Whipped cream
115g double cream
40g condensed milk (or creme fraiche)
Method - Sweet pastry
Cube your butter (cold is fine, using soft butter can lead to over mixing or accidental whipping so best to start with cold!) and mix with sifted icing sugar using the paddle attachment until well combined on a low speed. It does NOT have to be creamed! You just want to check there’s no lumps of butter or sugar and it is homogenous
Scrape down the sides of the bowl and add the egg. It will break up and look gross and split but don’t worry!!! Just scrape down the sides of the bowl and mix it in as best you can. Again, just use a low speed
Mix the dries together - flour, almonds and salt - then pour into the mixer and mix on a low speed until it comes together. That’s it!
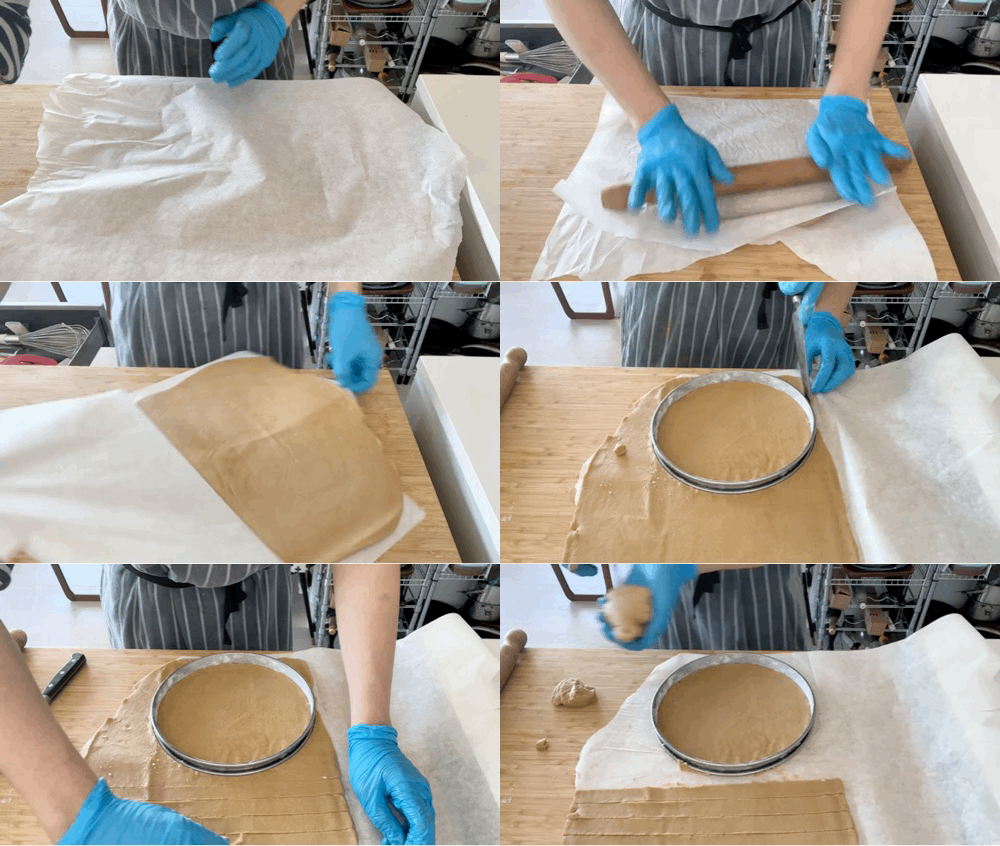
To line the tart, roll out the soft pastry in between two sheets of paper until it’s around 3mm thick. Place your pastry ring over the top and cut the base shape
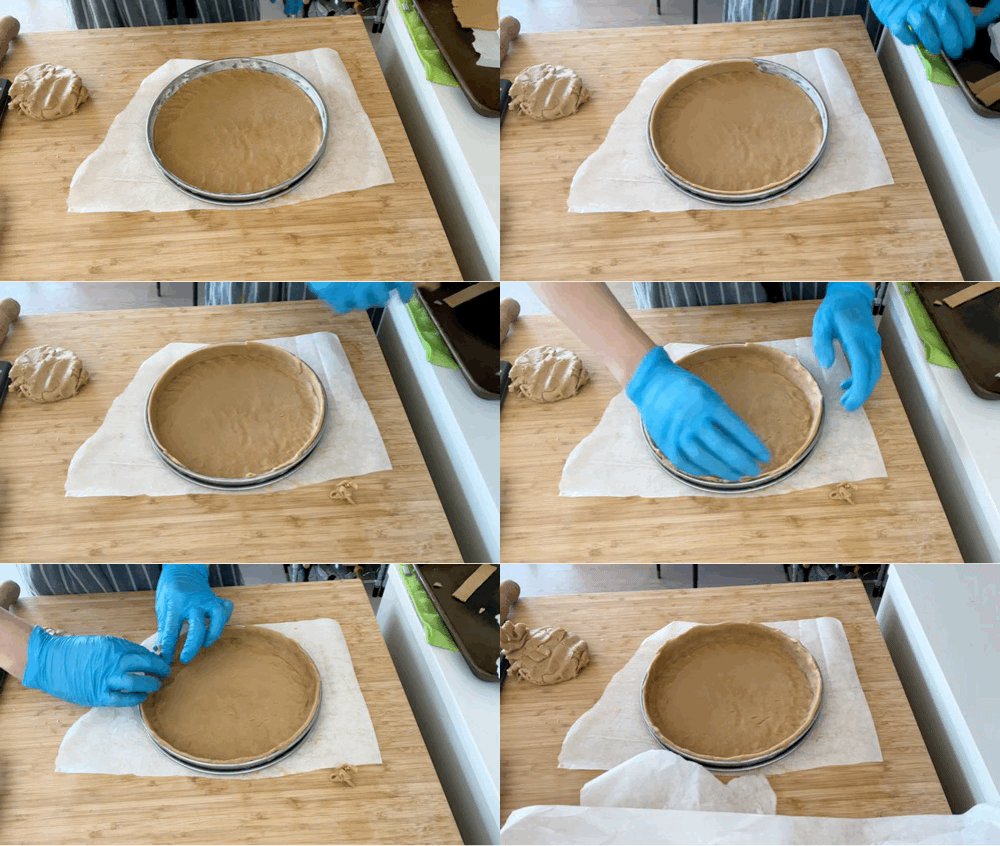
Now cut strips the width of your tart ring and chill in the freezer for 5-10 minutes. Then take these strips and line the edge of the ring. Press into the corners to join up the base
Remove the rest of pastry and use for re-roll
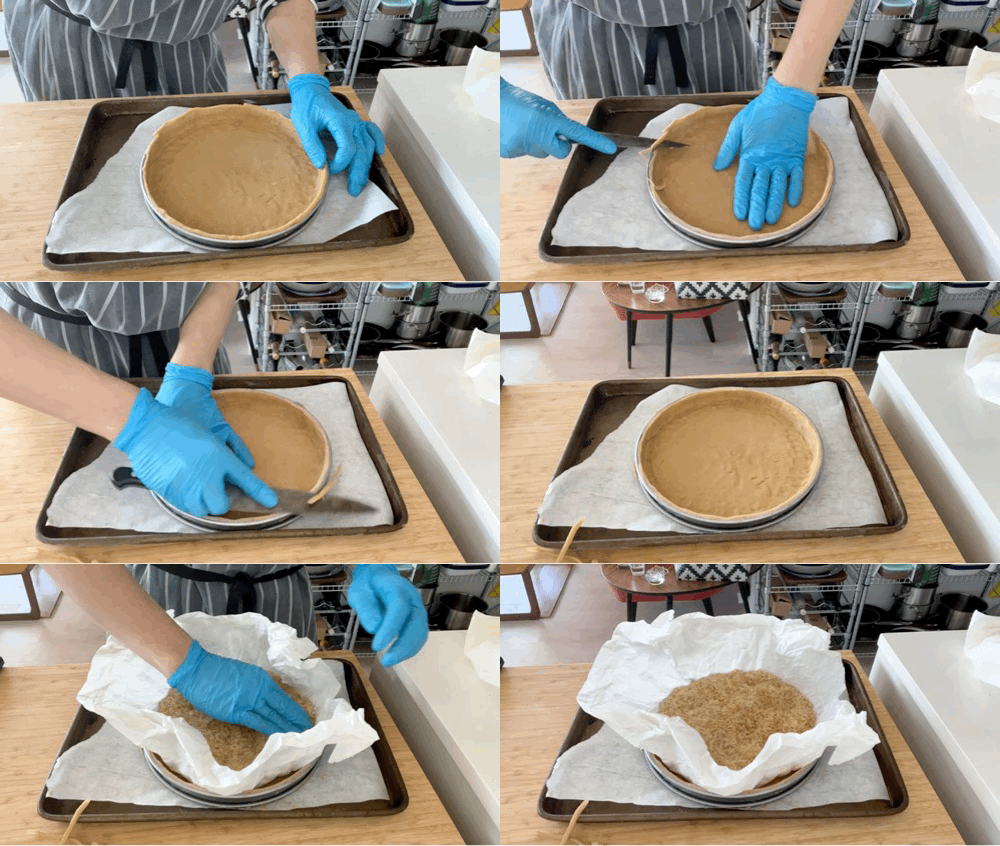
Place into the freezer until the pastry is firm, around 30 mins and trim before filling by cutting the edge with a sharp knife
To blind bake, pre-heat oven to 160c fan and fill tart with paper/rice. I don’t normally use baking beans, but for large tarts its really helpful as the base can sometimes billow
Bake for 20 minutes with the paper on, then remove the paper and bake for about 10 more minutes until it is fully baked. We are going for golden biscuitty brown!
To preserve the crispness even further, brush with egg wash and return to the oven for 5 minutes. Repeat.
Method - Pumpkin Puree
Making your own puree? Hurrah!
Cut your delica or kabocha style pumpkin in half, remove the seeds then and place cut face down on a baking tray with parchment
Bake for 40 mins at 170c fan until very soft. A knife should easily pierce the flesh
Allow to cool completely
Remove the flesh and puree in a food processor until completely smooth
Pass through a sieve, twice, if you can be bothered
Pumpkin puree will be good in the fridge for 5 days. Stir anything leftover through pasta or throw into a sandwich, or invite people over and have pumpkin crostini canapes
Method - the tart custard
Pre-heat oven to 120c fan
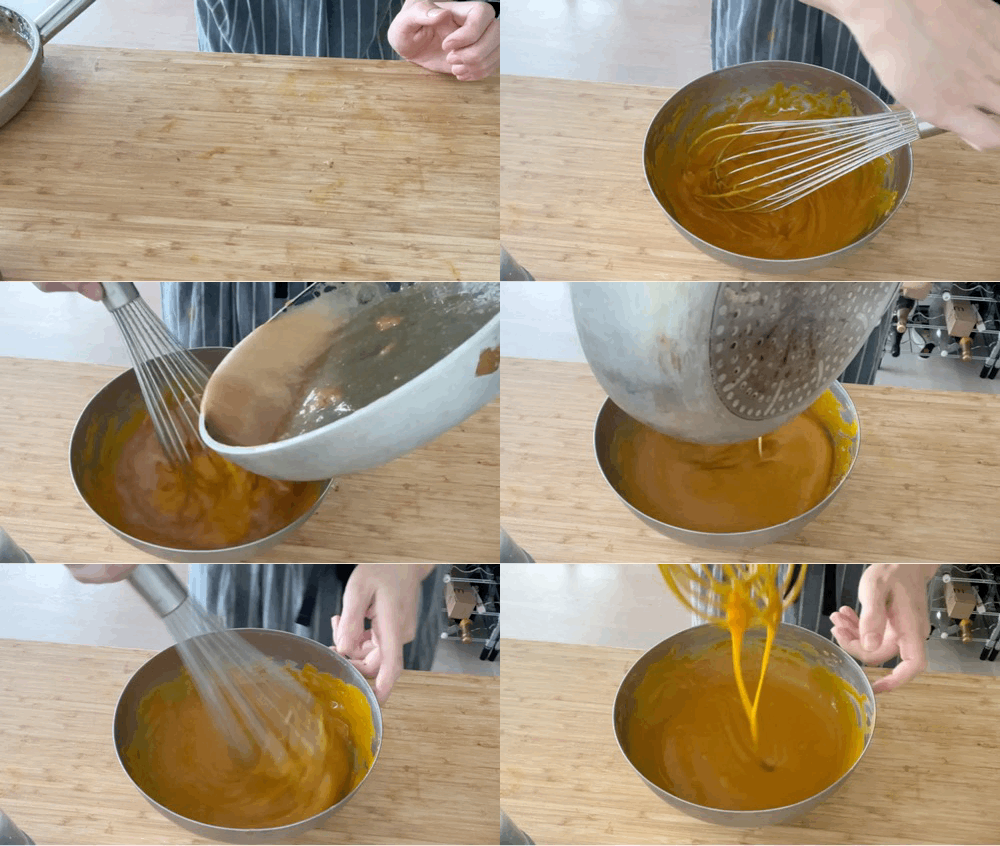
First mix together your pumpkin puree, condensed milk, egg yolks, salt olive oil and maple syrup and set aside
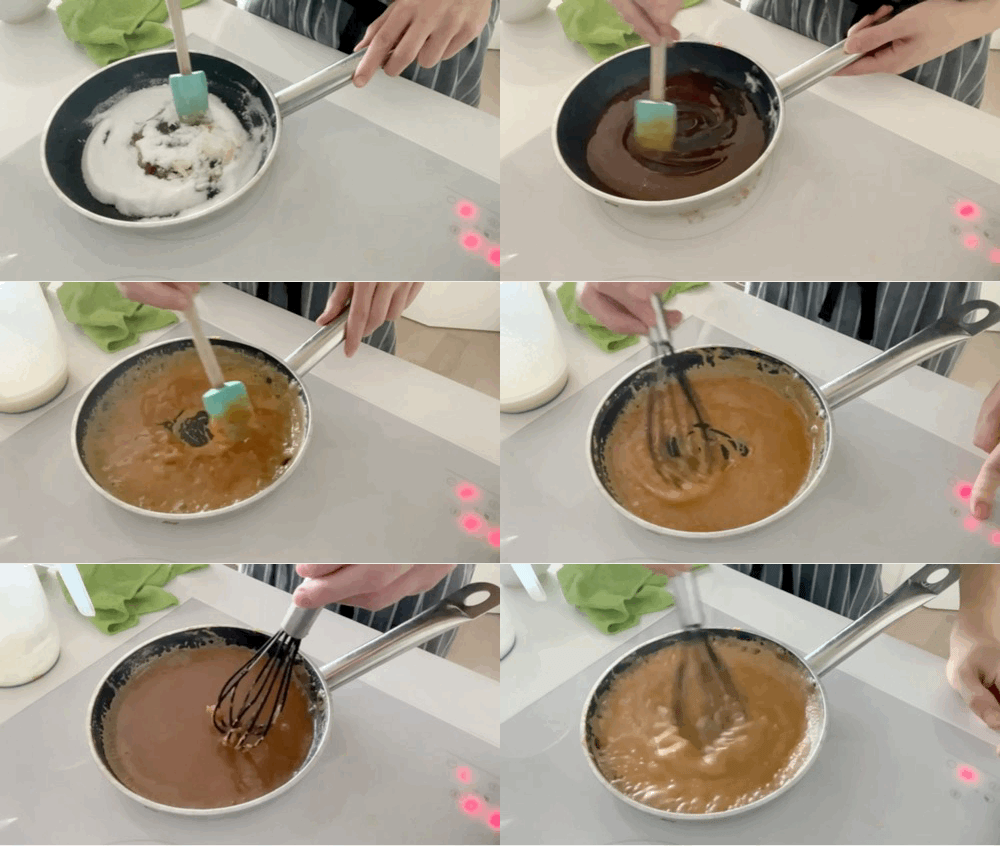
Now make a caramel - melt the caster sugar in a pan. You can either leave it to melt and stir occasionally or stir constantly until it reaches an amber. It’s up to you how dark to take it - I like it fairly dark to take an edge off the sweetness. Add your cream and let it bubble then whisk/stir over a low heat until you get a caramel sauce and any lumps of sugar have dissolved
Leave to cool for a minute or two (so it doesn’t cook the egg yolks immediately on impact!) then whisk into your pumpkin mixture
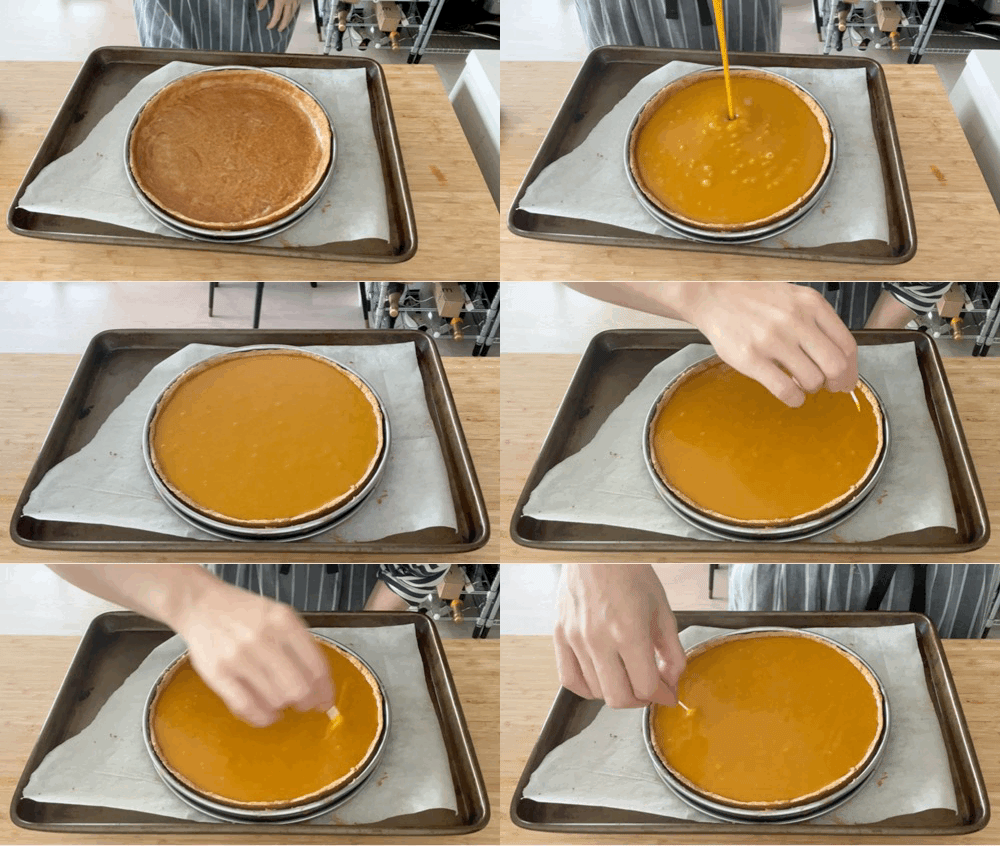
Pour into your tart shell and use a toothpick to pop any major bubbles. Then bake for around 20-25 minutes until a 4-5cm wobble remains in the middle. Depending on how hot your custard is when you put it in, the time might change. Start checking after 15 minutes then in 5 minute increments just to be safe
Leave to cool. I like to set mine in the fridge - the tart will become glossy once it has chilled in the fridge
Method - cream and finishing
Whip your cream and chosen addition (condensed milk/creme fraiche) until firm peaks
You can either cut the tart into slices then quenelle before serving OR you can cover the tart with quenelles. I like how the latter looks. If you are doing this, mark the slices on the greaseproof paper then put your quenelles inbetween these marks. Scroll up to check the technique!
If you want to make the little divots for the maple/olive oil, put the tart in the fridge for 10 minutes for the cream to slightly firm up, then dip the small side of a melon baller into warm water then gently press down onto the quenelles. You can also use the tip of a narrow teaspoon to do this. I like to quenelle some cream onto a plate then practice a few times - It’s a lot of pressure doing it directly onto the final product sometimes, so practicing is super helpful
Your tart is now ready to serve! I think the final pour of maple or olive oil is best done tableside. Don’t worry if it runs out on the plate a bit!








Lovely recipe! Quick q about the condensed milk: the method doesn’t seem to indicate when to add condensed milk to the tart filling?
Looks lovely! Something to note: Thanksgiving the holiday is always capitalized, like Easter or Halloween or Independence Day.