Hello,
It’s so wonderful to see you here! Welcome to today’s edition of Kitchen Projects. I missed you guys.
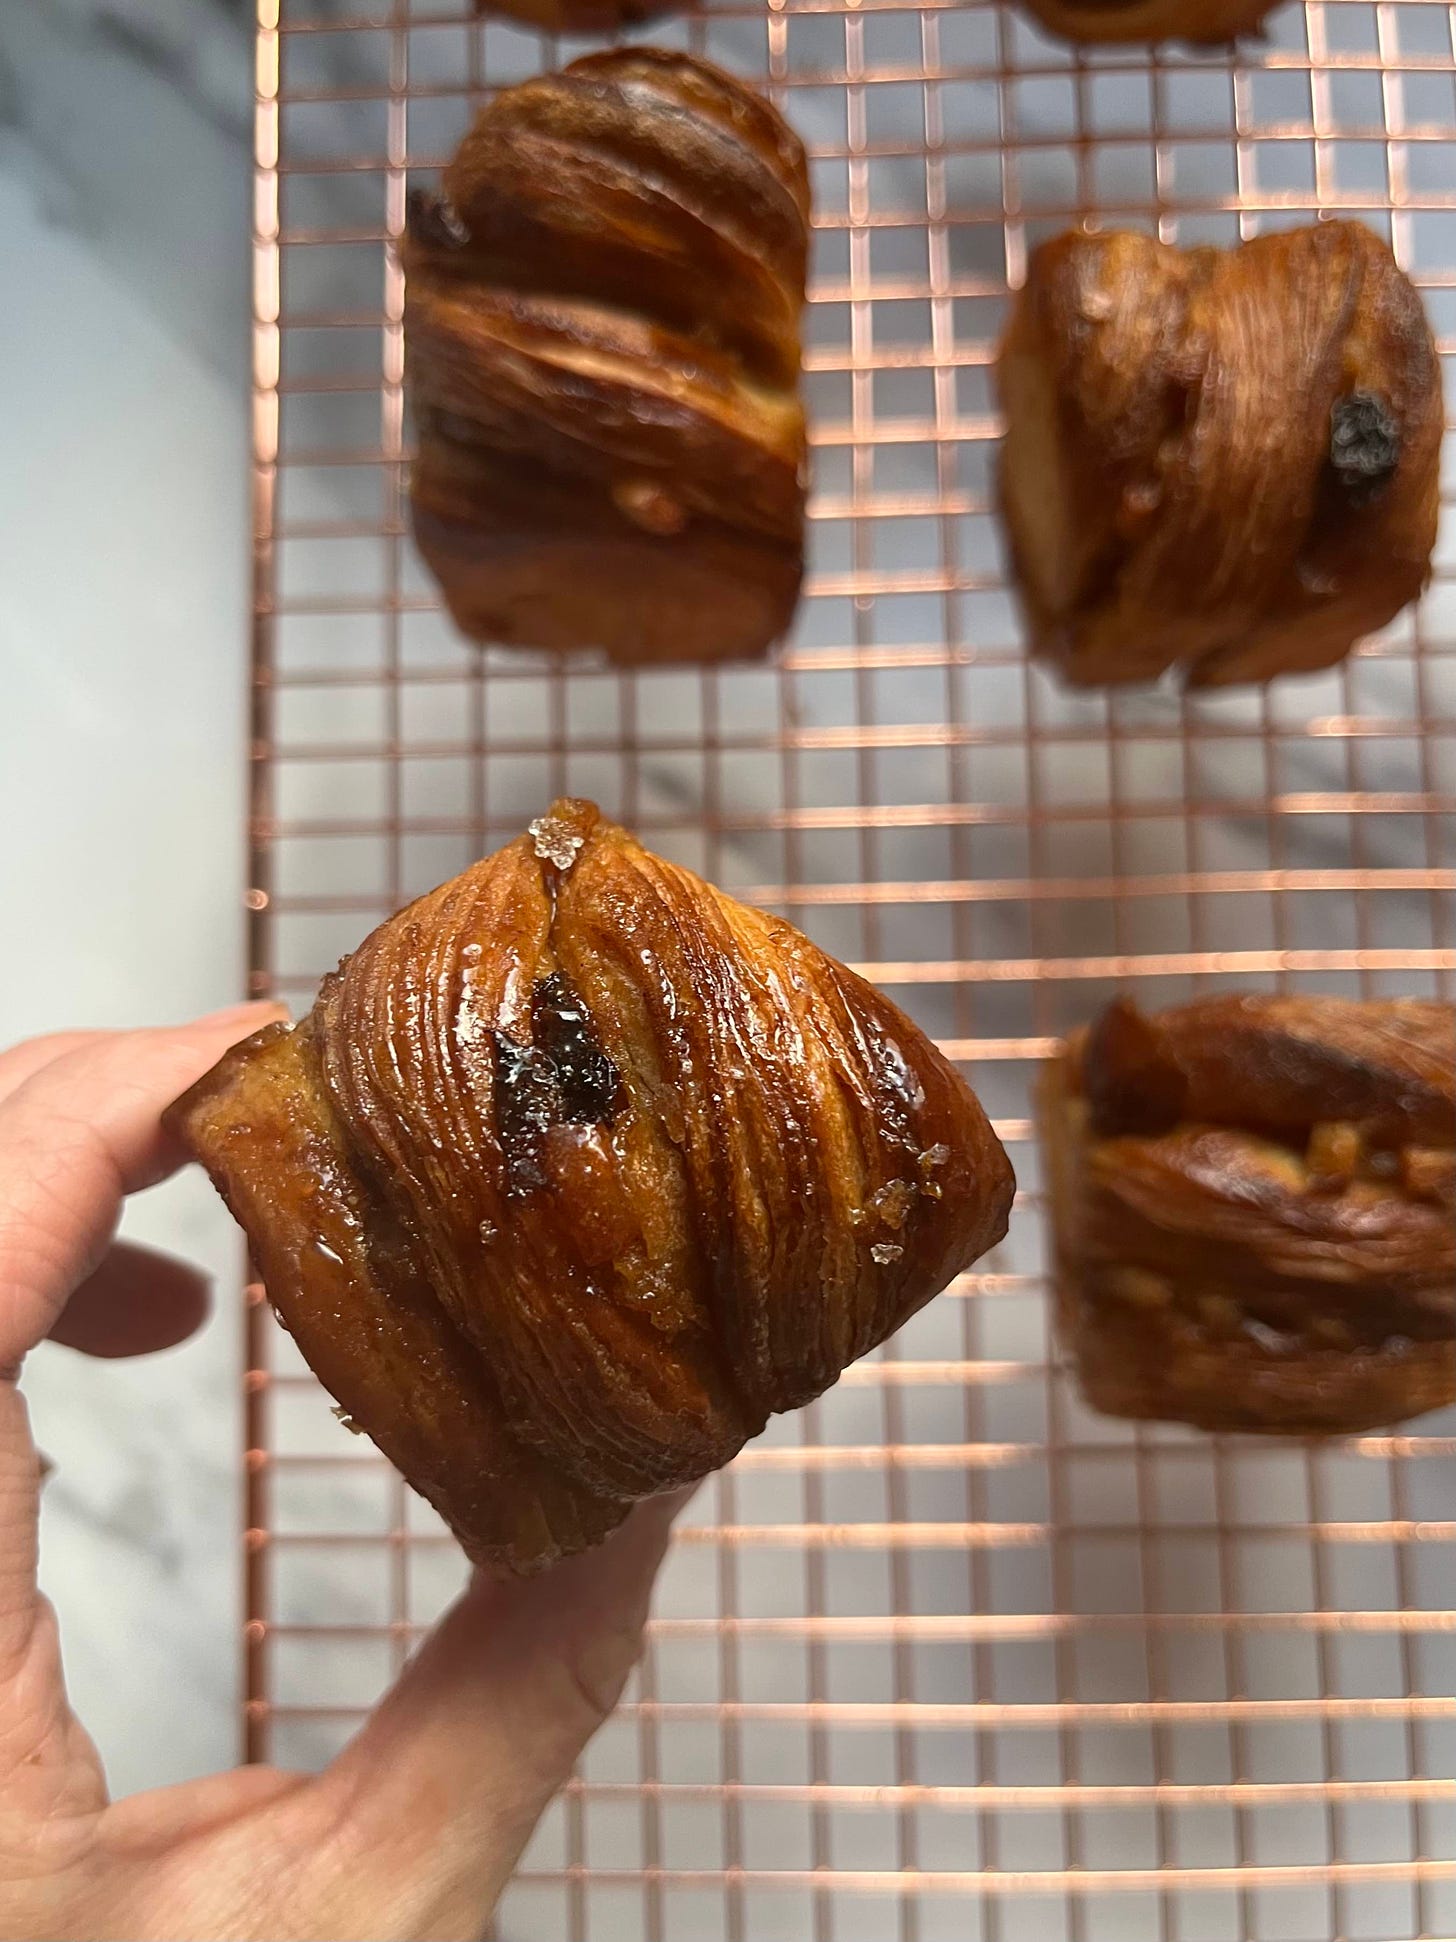
Today, my friends, we are finally taking a step into the world of viennoiserie together with the hot croissant bun, and it’s going to be a fun journey to take together.
Over on KP+, I’ve got such a joyful one-bowl recipe for you that I know you’re going to love - chewy, oaty, easter-y cookies of joy. Kitchen Projects+ aka KP+, is the level-up version of this newsletter. It only costs £5 per month and your support makes this newsletter possible! By becoming a member of KP+, you directly support the writing and research that goes into the weekly newsletter as well as get access to lots of extra content, recipes and giveaways, including access to the entire archive. I really hope to see you there:
Love,
Nicola
Before we get started… the Hot Cross Bacon Bun is back!
I’m so excited that my collaboration with bacon sandwich legends Le Swine is back in action for 2022! We’ve teamed up to create the ultimate Easter kit to create truly incredible hot cross bun sandwiches - it’s so fun when it arrives at your door with everything you need! Trust me, this is a combo you never knew you needed - each box for 2 (£16) comes with 2 x of my best ever hot cross buns, date & fennel ketchup, bacon butter and four incredible slices of middle bacon and delivers nationwide. Click here to order yours from Le Swine before Tuesday to get it in time for Easter! For KP+ subscribers, I’ll be sharing a code that’ll throw in a Bloody Mary with every kit for 2 - check out today’s KP+ newsletter for the details!
The search for all things hot & crossed
Every April I start sniffing around for a HXB adjacent bake. I will always love the classic and though I’m still very fond of the custard swirl buns of 2021, I’m here to present you some other festive bakes to get you in the spirit. As well as this, we’ll also be taking our first real foray (but it is baby steps, promise!) into the world of viennoiserie. It’s a good skill to practice in Spring weather - not to cold (good for fermentation) and not too hot (good for butter!). I’ve been waiting for this day and I can’t believe it took us over sixty Kitchen Project newsletters to get here…!
Over on KP+ I’m sharing a recipe for an incredibly satisfying and simple bake with plenty of HXB thrills to be had - HXB x Oatmeal cookies. Although I swore off making oatmeal cookies after almost choking a friend with a truly terrible one I made almost a decade ago (story cont. In other newsletter), I dusted myself off and tried again, just like Aaliyah. I’m very pleased with these gooey, sticky, chewy delightful cookies and I think you’ll have fun with them too:
The biggest skill I’ve improved on since recipe developing full time? Note taking. Two years back I spent a few weeks working on a Hot Cross Bun x Croissant child. I was so happy with the results at the time; So happy that I guess I thought I’d have a photography memory and therefore write down *actually zero* notes? So, for today’s recipe I had to start right from the beginning. Though it took a few tries (four!!!), I finally feel I’ve landed on the right recipe. OK, let’s dive in.
Laminating dough pep talk
Laminating yeasted dough is by far one of the most challenging bakes to master at home. It can be frustrating especially when we are surrounded by images of perfect viennoiserie on Insta and beyond. This is a great segway bake - we want flakiness but there’s no pressure for a perfect cut through or to shape perfectly. Plus we stuff it into a mould so any potential lamination blunders will be obscured. Although we will cover more traditional viennoiseries in more detail one of these days, I’ll run through some of the most important concepts today to whet your buttery-flaky whistles.
Before we get started, I really want to let you know how important it is not to get disheartened whilst working on your skills in the kitchen and to always be kind to yourself. One of the most important things needed to build a skillset is practice, practice and more practice! And hours of repetition is, unfortunately, hard to replace - sensory cues and intuition can take time to sink in - it did for me. Much of working with doughs, especially with viennoiserie, is getting used to handling the dough with confidence. It took me at least 20 tries before I got a passable hand laminated croissant at home during lockdown and there are still times when I’m disappointed at my results.
But just remember… you are learning! Stop expecting perfection and remember that errors are gifts of knowledge that you can Sherlock out later (I’ll help, send me pics) and I’ll bet it’s still delicious. And if it’s so ugly that you don’t want to serve it (though you should!!!!), you can always tear it up, soak it in custard and make it into a bread pudding. Problem solved. Custard for president.
Let’s discuss lamination
Viennoiserie refers to the category of flaky breakfast pastries that you already know and love. From croissants to pain au choc, pain aux raisin to kouign amann, it’s a fun family to get to know.
Lamination is the process of creating layers of butter between dough. This is achieved by making two separate blocks - one is a simple dough (we call this the ‘detrempe’) and the second is made of butter. You then enclose butter into the dough. After this, bit by bit, roll by roll, fold by fold, the butter and dough are spread into fine, distinct layers. The result? When the pastry goes into the oven the butter melts which has two purposes:
The melted butter enriches the dough as it melts
The steam created by water evaporation forces the layers apart. The dough physically lifts and puffs up and you’re left with an ultra flaky crisp multi-layered pastry
If you’ve made puff pastry or anything that requires folding then you already have a good head start on viennoiserie. Whilst the moves are the same and the end result of getting distinct layers of butter and dough, there is one major difference: Your dough is alive!
Aka your dough is made with yeast. Adding yeast to your dough and then laminating results in soft, fluffy tender layers, rather than layers that shatter. What does yeast do, exactly? Well let’s recap; Yeast is a diverse microorganism that digests sugar and, as a by-product, produces CO2, ethanol and ‘flavour compounds’. WTF are flavour compounds? Well, specifically, it’s a bunch of organic compounds like esters, aldehydes and alcohols. Non-specifically, it’s the things that make your bread taste like… well, bread. These compounds are aromatic and give bread the tangy and fruity notes we know and love. For today’s recipe, and all the recipes I’ve shared with you, we use commercial yeast aka the fresh yeast and dry yeast you can buy in the shop is a single strain of yeast. It was isolated, laboratory grown and tailored over the years to be extremely efficient in raising bread.
Adding yeast to a laminated dough adds a new dimension of management: Fermentation. And that means you need to balance fermentation with the other important factor for making layers: butter temperature! It’s this balance of microbial fermentation and butter temperature that causes headaches, since the two are annoyingly at odds with each other. Let’s go deeper.
The deal with fermentation
Fermentation is about keeping your yeast happy but unfortunately, the temperature that keeps both your butter AND yeast happy is not the same. This is where most complications arise in lamination - the butter gets too warm and smears during the laminating process which causes issues in the final product. Getting the temperature right for proofing too can cause problems - butter starts melting at 27c. And guess what temperature yeast is happiest? Yes. 27c. How bloody annoying.
As well as this, butter is really happiest at around 12c - this is when its warm enough to be plastic (ie. can spread out easily) but cold enough not to smear or melt into the dough. Although you might be thinking too much heat is the most concerning issue, if your butter is too cold, it will splinter when you roll it, destroying all your hard work! So, when it comes to making viennoiserie you do need to be more careful and considerate of your resting and rolling schedule. Fortunately there’s fewer turns than puff pastry so only have to be disciplined for a few hours. I’ll include a detailed timeline within the recipe.
Taking your turn(s)
The key technique for viennoiserie is performing folds with your butter and dough to create layers. There are a number of ways to go about this and there’s no limit to the passionate arguments that can be had between bakers about what is ‘best’! I’ve run through this in detail in puff pastry 101, but let me remind you of the pros and cons of the single vs. double fold:
A single turn (a letter fold) is the simplest way to fold the dough. You don’t have to roll the dough out as long as you would for a double turn, meaning you can generally perform them quicker, especially if you are a beginner. Issues with lamination often come from accidental mistreatment of the dough - pressing too hard resulting in the butter breaking up or smearing, leading to uneven laminations, so single turns are often recommended. However, you need to do a lot of single turns to get the number of layers up, which means you end up working with the dough more than you would if you were using double turns
A double turn (a book fold) requires you to roll the dough out a bit longer than for a single, then to fold the edges into the middle, then over on itself again (like a book). This is a great way to build layers, although these can result in clunkier layers. It also requires you to roll the dough out longer, which can result in the butter getting too warm if you aren’t careful, which can negatively impact your layers
Traditionally croissant dough has three single turns but many people (myself included) prefer a 1 x single and 1 x double turn as an alternative if I’m making plain croissants - this results in slightly less but slightly thicker layers which look more dramatic. For today’s recipe, since we are adding a thick layer of hot cross bun butter for flavour, we will perform 3 x single folds, enclosing our spiced butter in the last one. I also tested with a single, double method, but the 3x single gave a more tender bun - tender ALWAYS wins.
The deal with gluten development
As we know, flour has the ability to form gluten which is the backbone to our viennoiserie. Gluten is formed when flour - containing the proteins gliadin and glutenin - meets water.
Gluten is developed as it’s rolled so you need to try and get a happy medium between a strong dough and a dough that literally-hurts-your-hands to roll it out. It’s really important not to let the dough get too strong because that will likely lead to you pressing down harder on it / fight as you roll it out, which as a result smears and warms up the butter layers, damaging the lamination! When you are rolling out laminated dough, there is a fine line between being firm and purposeful and being too aggressive with your rolling strokes.
As well as this, yeast also ‘kneads’ the dough (no knead dough details here) and strengthens gluten as it ferments the dough. This means the dough is quite strong by the time we start laminating. So, to mitigate this as much as possible, we will mix the dough until it just comes together and not develop any gluten in the initial mixing stage.
The importance of resting in the fridge
Resting during the lamination process is important for microbial activity, gluten development and butter temp management. Firstly, the gluten relaxes so we are able to roll out the dough easily, but it also allows the butter to firm back up. Secondly, the dough temperature is able to stabilise so the yeast activity is kept minimal. Finally, the butter - which can smear if things get too warm - is able to firm back up so the layers stay distinct and flaky.
I think it’s sensible to avoid the freezer when making small batches of dough - butter tends to split when too cold so it’s just too risky. Although it can be tempting to speed things up, I can’t recommend it for today’s recipe!
Translating HXB
Although I could have used the base of my classic spiced hot cross bun dough, I love finding new ways to impart HXB energy into bakes. Last year when I was on my HXB adjacent bake adventure I flirted with a spiced compound butter which has come back with a bang for this year. Instead of laminating with the compound butter, I have taken inspiration from the cinnamon bun, opting to fold in a thick layer just before shaping along with mixed peel and raisins. As the hot croissant buns bake, the spiced butter melts and infuses the buns and pools at the bottom creating amazingly juicy, spiced sugary bases.
Shaping technique
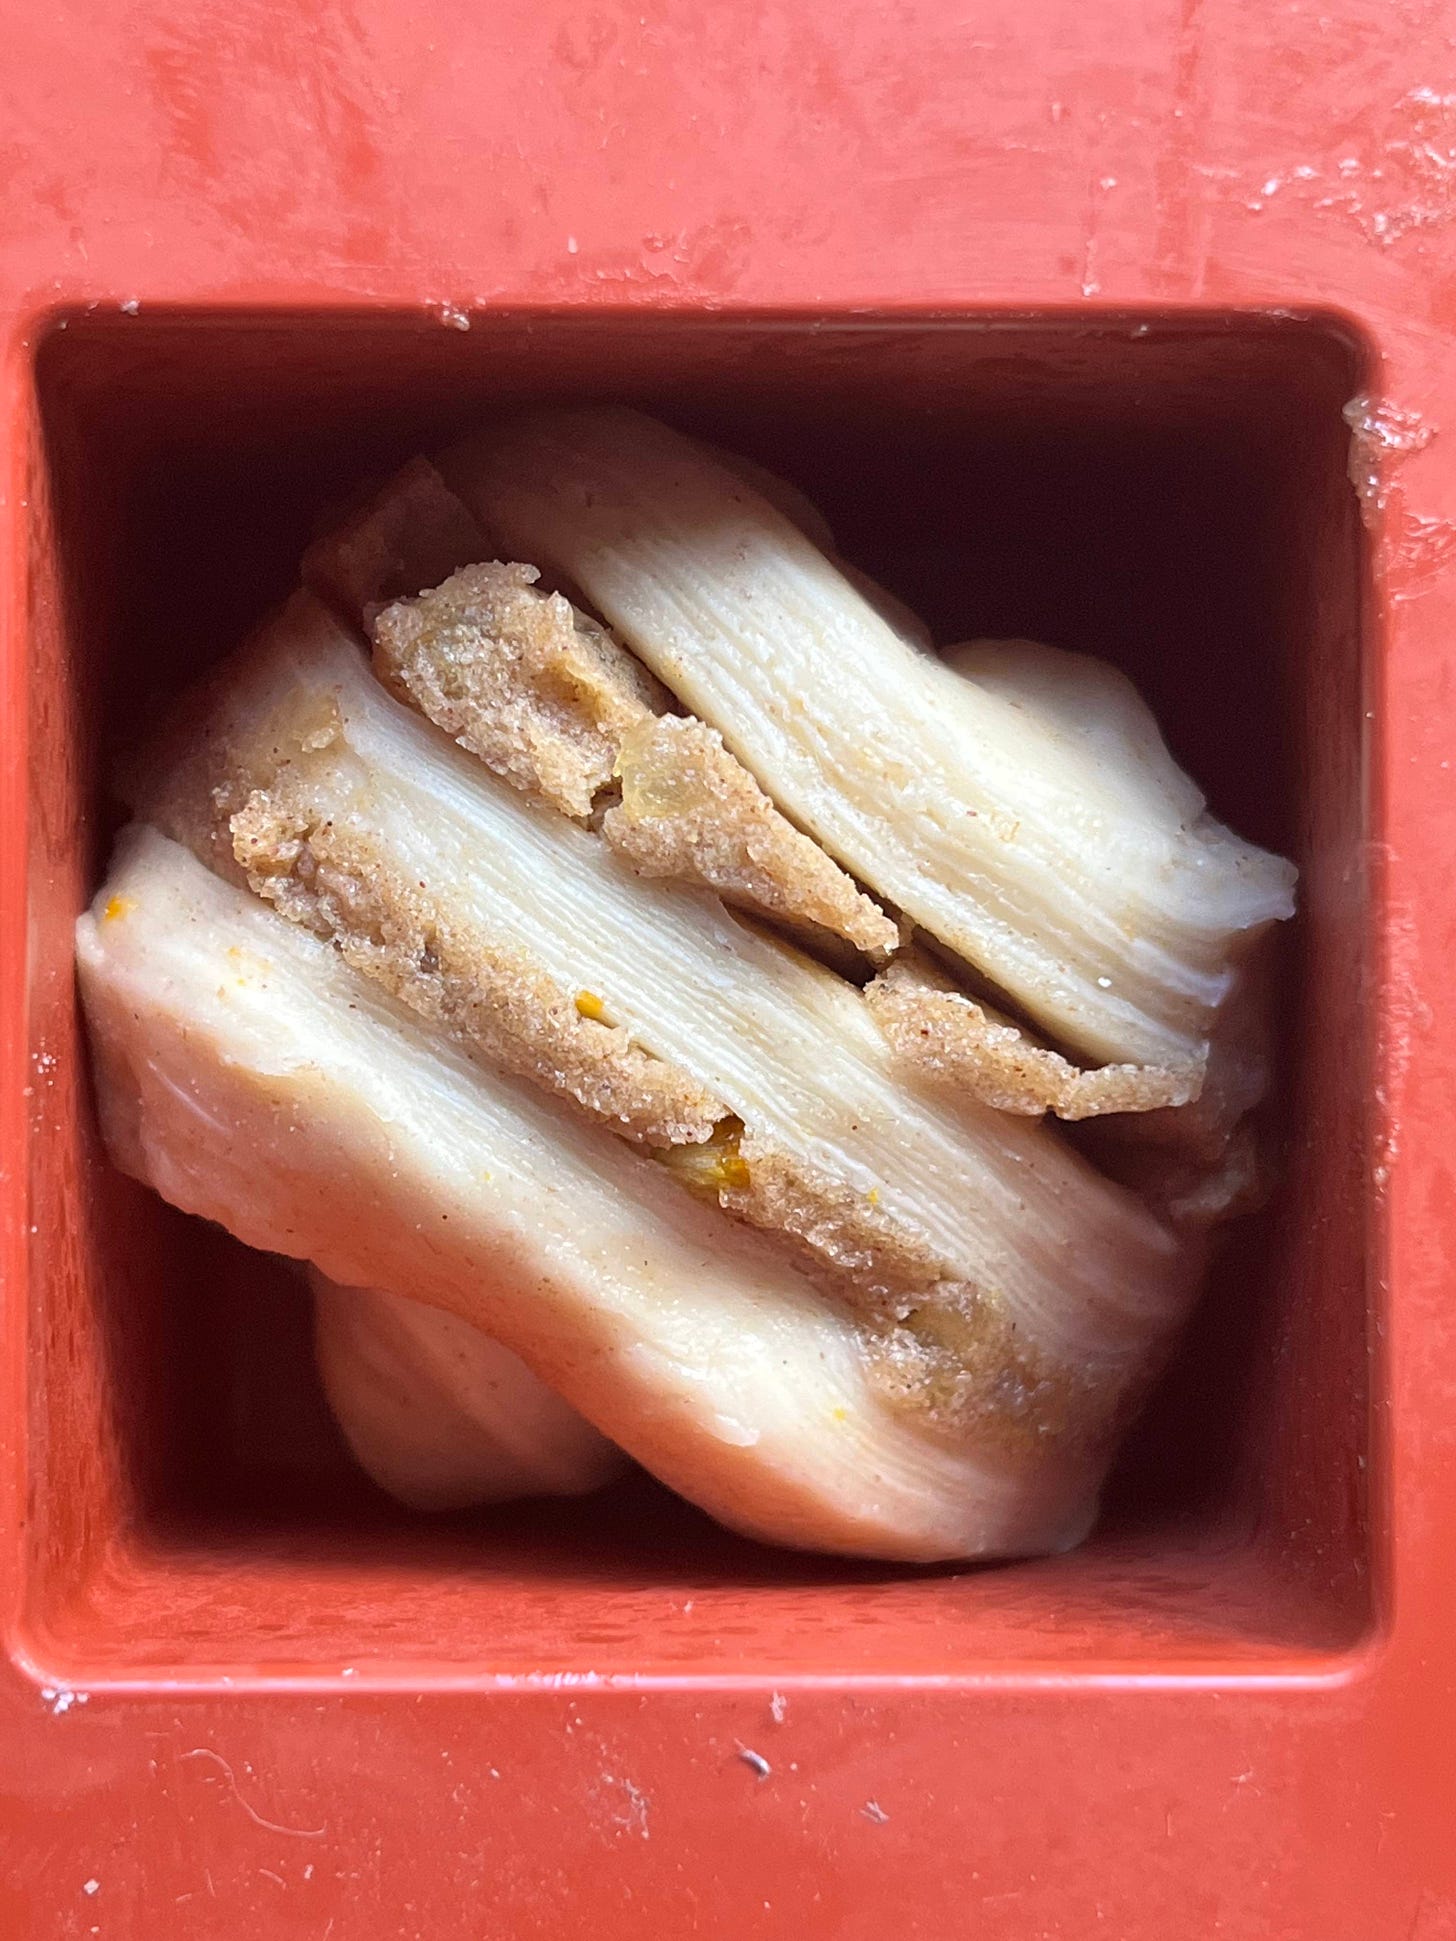
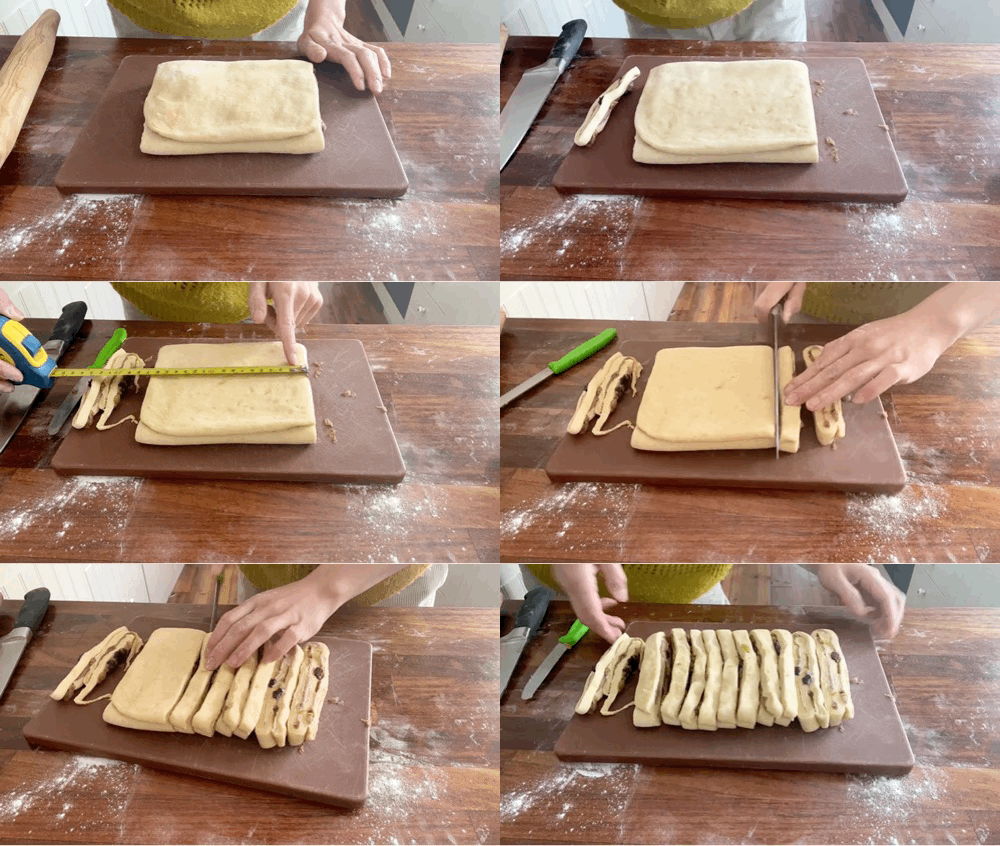
I’m excited to share a shaping technique with you today - it’s a simple way to cut your dough (and can be applied to other pastries) to make the most of your lamination. Instead of rolling out the dough and then cutting shapes, we are simply going to cut the dough ‘as is’ once the spiced butter layer is in. The result is a shape where the lamination is fully exposed and on show and long strips of dough that are a joy to eat and unfold in one long thread.
You can use this technique - sans the spiced butter - to create dramatic looking pastries with the lamination on show by slicing thin strips and wrapping around pastries like pain au chocolat.
I tested this shape in several moulds - although it’s nice to use the square one as it gives a dramatic sharp edge, cupcake tins make super cute alternatives.
Timeline
The key to nailing this recipe is *respecting the timeline*. Although I’m not usually too prescriptive on schedules, when you’re managing the trinity of gluten development, butter temperature and fermentation, time management is important.
Stage 1: 10 minutes
First we’ll be mixing the detrempe. This is a quick mix so the gluten isn’t developed too much. The dough is fairly stiff so it should come together easily.Stage 2: 1 hour
We then need to leave the dough to bulk ferment - if you don’t allow your yeast time to activate and establish, you may have trouble proofing your buns later on. We will make sure our liquid is warm so the dough temperature is warm enough to encourage dough activity. The goal temperature is known as ‘DDT’ - desired dough temperatureStage 3: Overnight or at least 4-6 hours
Now we want to STOP fermentation! The best way to do this is to put your dough into the freezer for an hour then moving to the fridge to completely chill. Yeast activity is very minimal at 4c, fridge temperature. If your fridge tends to be warm and you open and close it a lot, you may want to put in the freezer for 2-3 hours so it is totally frozen before letting it thaw at fridge temperature. Your dough will rise slightly as it ferments which is a good sign that your yeast is alive and active. Before you use the dough but after you have de-gassed it, you may want to put it into the freezer for 30-45 mins to get really nice and solid. This will be dependent on your fridge temperature
Stage 4: 5 minutes
Now it’s time to laminate! We will make our butter block and lock it into the dough, rolling out to perform a single fold
Stage 5: 45 mins - 1 hour in fridge
Remember… this resting period is important on two levels:
TOO WARM: Butter tends to smears and melt slightly into dough giving you a heavier end productTOO COLD: Butter can split and shatter as it is rolled, giving you uneven lamination and indistinct layers. As your butter layers get thinner (as in more turns that you do), the less likely it is to shatter/split as you are rolling
Stage 6: 10 minutes
Time to perform your single fold
Stage 7: Rest 45 mins - 1 hour in the fridge
Stage 8: 5 minutes
Roll out and spread the spiced butter over ⅔ of the dough and perform a single fold. You can also freeze the dough at this stage and keep it in the freezer for 1 week and thoroughly defrost when you are ready to shape.Stage 9: 5 minutes
Cut strips and shapeStage 10: 1.5 - 2 hours
Proof buns coveredStage 11: 20 minutes
Bake!
Alright, let’s give it a go. I’m with you every step of the way!
Hot croissant buns
Makes around 10 buns
Due to length restrictions GIFs (which I think you should use to complete this recipe!) are available on the web version.
Ingredients
285g bread flour
6g dry yeast
25g light brown sugar
4g salt
25g butter, soft
85g milk
50g hot water (80c)
1 x egg yolk (15g)
1 x Orange, zested
For lamination
85g butter, very cold
Spiced HXB butter spread
60g butter
60g light brown sugar
25g golden syrup
3/4 tsp ginger
1/2 tsp cinnamon
3/4 tsp cardamom
2g flaky salt
60g raisins
40g mixed peel
Plus Egg wash
Method
Firstly, if your yeast needs proofing, do so by following the manufacturers instructions
Mix dries together (including yeast if its ‘instant’) in the bowl of a KitchenAid. Mix milk with hot water, it should be about 40c, then whisk in the egg yolk. Add the proofed yeast into this mixture if you need to. Add the liquid to the dries and paddle together until a dough forms
Tip onto your work surface and knead slightly. Move into a reusable plastic bag and leave to proof for 1 hour. It should puff slightly as the yeast establishes
Move into the freezer for an hour to stop fermentation then move into the fridge and leave for at least 5 hours / overnight (best)
It should have puffed up quite a bit - press down on it to de-gas and then, if its a bit floppy (like mine was) put into the freezer for 45 mins so its nice and firm to work with
Butter block method
Do not make your butter block until you are ready to laminate. The most important thing about your butter is that it is pliable but not greasy or smeary. It is most plastic and pliable (and the ideal temp) as soon as you’ve bashed it into shape!
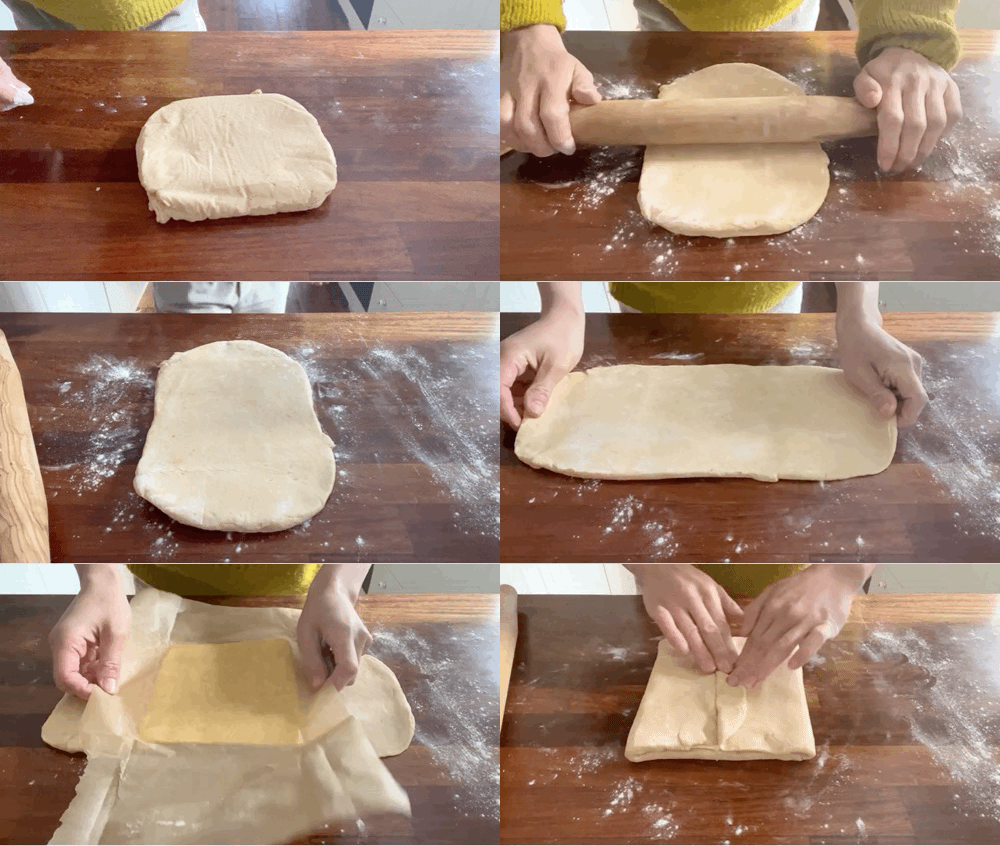
Make your butter block by cutting fridge cold butter into strips. Then put the strips into approximate shape on a piece of greaseproof paper. Fold the paper around the butter, leaving some room on each side
Using a rolling pin, bash the butter into shape. Once it is pliable, use a rolling motion to spread it into an even block, about 18cm x 16cm:
It will be pliable and bendy but still cold when you’re done! It is now ready to use. If it feels soft or greasy, pop it in the freezer for 3 minutes and then check again. If it is too cold and is cracking when you bend it, leave it out for a minute and check again
Locking in your butter
Roll your detrempe so it is double the width of your butter block. Use your butterblock to measure the size. You want the edges to be able to fold back over and cover the block completely
When you are satisfied it is the right size, unwrap the butter and stick it into the middle of your dough. Bring the edges in and pinch it together in the middle. Your butter is now in!
Now turn your dough 90 degrees and roll your dough out long. You need to be purposeful and firm and try to roll with even pressure. Uneven or aggressive rolling of the dough will lead to uneven laminations so try to be as zen as possible! After final roll out, mine is approx 42cm x 18cm.
Adding turns aka lamination
We are going to perform 1 x single fold - imagine the dough is divided into three equal sections. Bring one third across the centre of the dough, then bring the opposite third on top, like you’re folding a letter. Wrap the dough well and put into the fridge for 45 mins - 1 hour until firm
Now roll out your dough 45cm x 20cm and repeat the above; I always begin my rolls by pressing down on the dough several times with the pin to make the butter pliable - it’ll look like little dents! Wrap the dough and put into the fridge for 45 mins - 1 hour. You have now performed 2x single folds
Spiced butter
First soak your fruit! Pour boiling water over your raisins and leave for 10 minutes and drain well
Mix soft butter, sugar and spices all together until well combined. Then mix through the soaked fruit and mixed peel - it’s now ready to use
Final assembly and shaping
Roll out your dough to 45cm x 18cm one last time and spread all of the spiced butter across 2/3rd of the dough. Bring the un-buttered third across the centre and then bring the other third on top in a letter fold
Slice 1.5cm width pieces - you should get about 10 pieces, weighing around 65g-70g each
Stretch each piece slightly then loosely roll into spirals
Place into moulds. I use this 8-piece mould, but cupcake tins also work!
Leave to proof for 1.5 hours until puffy - its imperative that you proof these enough otherwise the butter will leak even more. The buns should be visibly larger, about 1.5x size at least and the layers should be forcing themselves apart. If your house is cold, make a proofing chamber in your oven by adding a pan of boiling water to the bottom of the oven, leaving for 5 minutes to get steamy then putting your buns in a rack above!
Egg wash gently - you don’t want to stick the layers together but you do want it to get a bit of colour!
Pre-heat oven to 180c fan
Bake for 16-18 minutes until well puffed. It might look like a lot of butter is leaking during the bake but I promise it’ll all come together and re-absorb!
Enjoy. These are good for a few days, just heat up for 7 minutes at 150c to re-crisp


Thanks for this recipe--I'm excited for my first hot cross buns-related bake, haha. Is is ok to do these over three days (like putting them in the fridge overnight after they are in the muffin tin)?
I’m from the US, what do you mean by mixed peel?