Kitchen Projects Easter special: The religieuse
Meet the double stack choux bun aka Little Lamb
Hello,
Welcome to today’s edition of Kitchen Projects, my recipe development newsletter.
I’m away for the next ten days so there will be no newsletter next week, so I wanted to leave a super fun and joyful recipe for you today with my very special Little Lamb religieuse. Today, my friends, is when pastry art meets pastry crafts!
Over on KP+, just to keep you guys busy, I am sharing my recipe for my ultimate citrus layer cake ft. zesty olive oil genoise, orange syrup, blood orange jam, whipped cream cheese mousse and salted vanilla buttercream. This is a truly gorgeous layer cake that I’ve had up my sleeve for a few weeks and is great candidate for any birthdays etc. you’ve got coming up this Spring:

Kitchen Projects+ aka KP+, is the level-up version of this newsletter. It only costs £5 per month and your support makes this newsletter possible! By becoming a member of KP+, you directly support the writing and research that goes into the weekly newsletter as well as get access to lots of extra content, chat threads (like this community travel recommendation post here) recipes and giveaways. I really hope to see you there:
Lots of love
Nicola
P.S. Looking for more Easter recipes? You can find my best-ever classic hot cross bun recipe here and, for something a bit leftfield these hot cross custard bun swirls are pretty great, too. I also have a recipe for double choc cross in Olive Magazine this month, which is out in the UK now.
A religieuse experience
Pastry is all about making you happy – its existence relies on it! Physically, we could all survive without it (if forced)… but mentally? No way! Pastry, eating and making it, is fully in the self-care category, and how powerful is that? I love thinking about the impact that something sweet can have, the way it can make someone’s day.
In recent years I have become so focused on creating ‘natural’ pastries with a strong focus on provenance and sourcing that I forget you can make whimsical desserts with the same great ingredients. And although I tend to go for simpler desserts these days, I would be lying if I said it was the simplicity of a cake crumb or the rustic un-done-ness of a galette that convinced me to become a pastry chef. My first love in the world of pastry was definitely on the fancier spectrum – I was totally obsessed with those identical lines of pastries in refrigerated cases that had each been finished with so much care and love that perfectly summed up pastry as art to me.
I’ve always had a particular soft spot for pastries that make you smile – whether it’s a bright pop of colour, wacky vintage mould or something in miniature, there’s nothing better than a pastry that has already made you happy before you’ve even tasted it. That’s impressive. And that is why I simply adore the religieuse.
The religieuse is a double stacked choux that was originally decorated as a nun (which is where it’s name comes from) and first made in the 19th century, but the world of the religieuse has expanded since then.
When I worked on the opening of Dominique Ansel Bakery in London, we were each given a pastry to take care of. The recipes had already been developed and sent over from the New York HQ, but we had to adapt them and test they worked with UK ingredients which was much-less straight forward than you’d imagine. It was a dream come true when I was given Hooty, an owl religieuse. Of all the memorable and wonderful items at the Dominique Ansel pastry counter, I was always enamoured with their creative and often very cute religieuse: A duo of choux buns, stuffed with various cream and jam, finished to reflect the seasons. From a cupid on Valentines Day, to a sailor for Bastille day, to a scarf-wearing penguin to see in winter, it was these sorts of joy-bringing pastries that made me want to learn from Dominique’s team. I loved the way that they were always able to effortlessly combine serious technique with whimsical presentation.
Hooty was a gorgeous creature with a caramelised milk chocolate whipped ganache in the rotund base. We managed to get the fillings just right and the buns just-so… but when it came to the decoration, we really let Hooty down first time around. On the day of our tasting, I brought the buns, fillings in piping bags and tempered chocolate décor to my head chef and we assembled it. Our first attempt? Hooty looked like he had seen things he couldn’t unsee. A few hours and new batch of ganache and orange beaks later, hooty had recovered (thanks to some top tips from Chef Karys about how to make a cute religieuse, which I’ll share later) and was back to his gorgeous self. Every time I see the ‘before’ picture of Hooty, it always makes me laugh:
Today I am getting back in touch with the part of myself that is obsessed with adorable, finessed pastries. Even though I wanted to have lots of fun with the design this week, it was also a perfect opportunity to be seasonally sensitive – enter my Little Lamb religieuse! I – of course – have a predilection for Lambs, oweing to my last name. This means I don’t actually eat a lot of Lamb (the animal) so this is probably the closest I’ll get this year:
For today’s KP I’ll talk you through the creative thought process:
Flavours – First and foremost, the flavours must reflect the springtime aesthetic. Although part of me wanted to take inspiration from the Polish Lamb Easter cake (which often has a bright red filling to represent well… you know…) I wanted to stick to light flavours with pretty pastel colours, classic of Easter
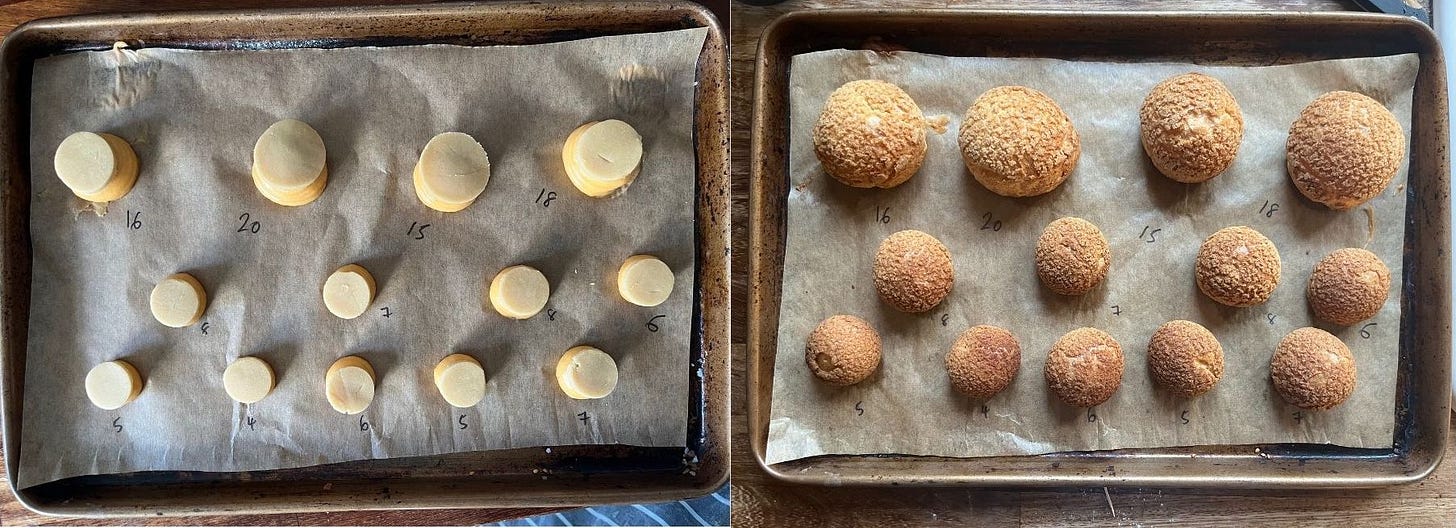
Proportions: One of the most important things to achieve with the religieuse is proper proportions – you want to make sure you get good and consistent size differential between the body and head
Design: As we have seen with the ‘I see dead people’ Hooty v1.0 from above, the design of your religieuse is important for the final assembly – this impacts the visual effectiveness of the pastry. My goal was to make this religieuse so cute that people kind of don’t want to eat it, but so delicious that it was irresistible
Let’s do it!
Flavours and where to find them
We are officially in inter-seasonal land in the UK right now. Around this time, especially when British weather is behaving weirdly well (I don’t trust it), I start getting itchy for the bounty of summer fruits. I know that good things come to those who wait, so instead I am relying on a Springtime pastry trifecta of power to bring the joy: Citrus, jars and tins. Last week we covered citrus (and we do use a little bit again this week) with the baked jelly cheesecake but this week the key players are the jars and tinned items: Pistachio paste and tinned pineapple (with a little help from coconut flakes).
The pistachio
Pistachio paste comes in a few forms – you can get Crema di Pistacchio, a Nutella like spread that has blended the nuts with sugar and additional fat – or the plain pistachio paste. Although these are *in theory* interchangeable for what we are making today, the plain nut paste is a lot more fluid and totally unsweetened. As well as this, nut pastes are not homogenised and will split into the oils and nut solids. This does mean you need to incorporate it more carefully as it may distribute unevenly throughout your mixtures.
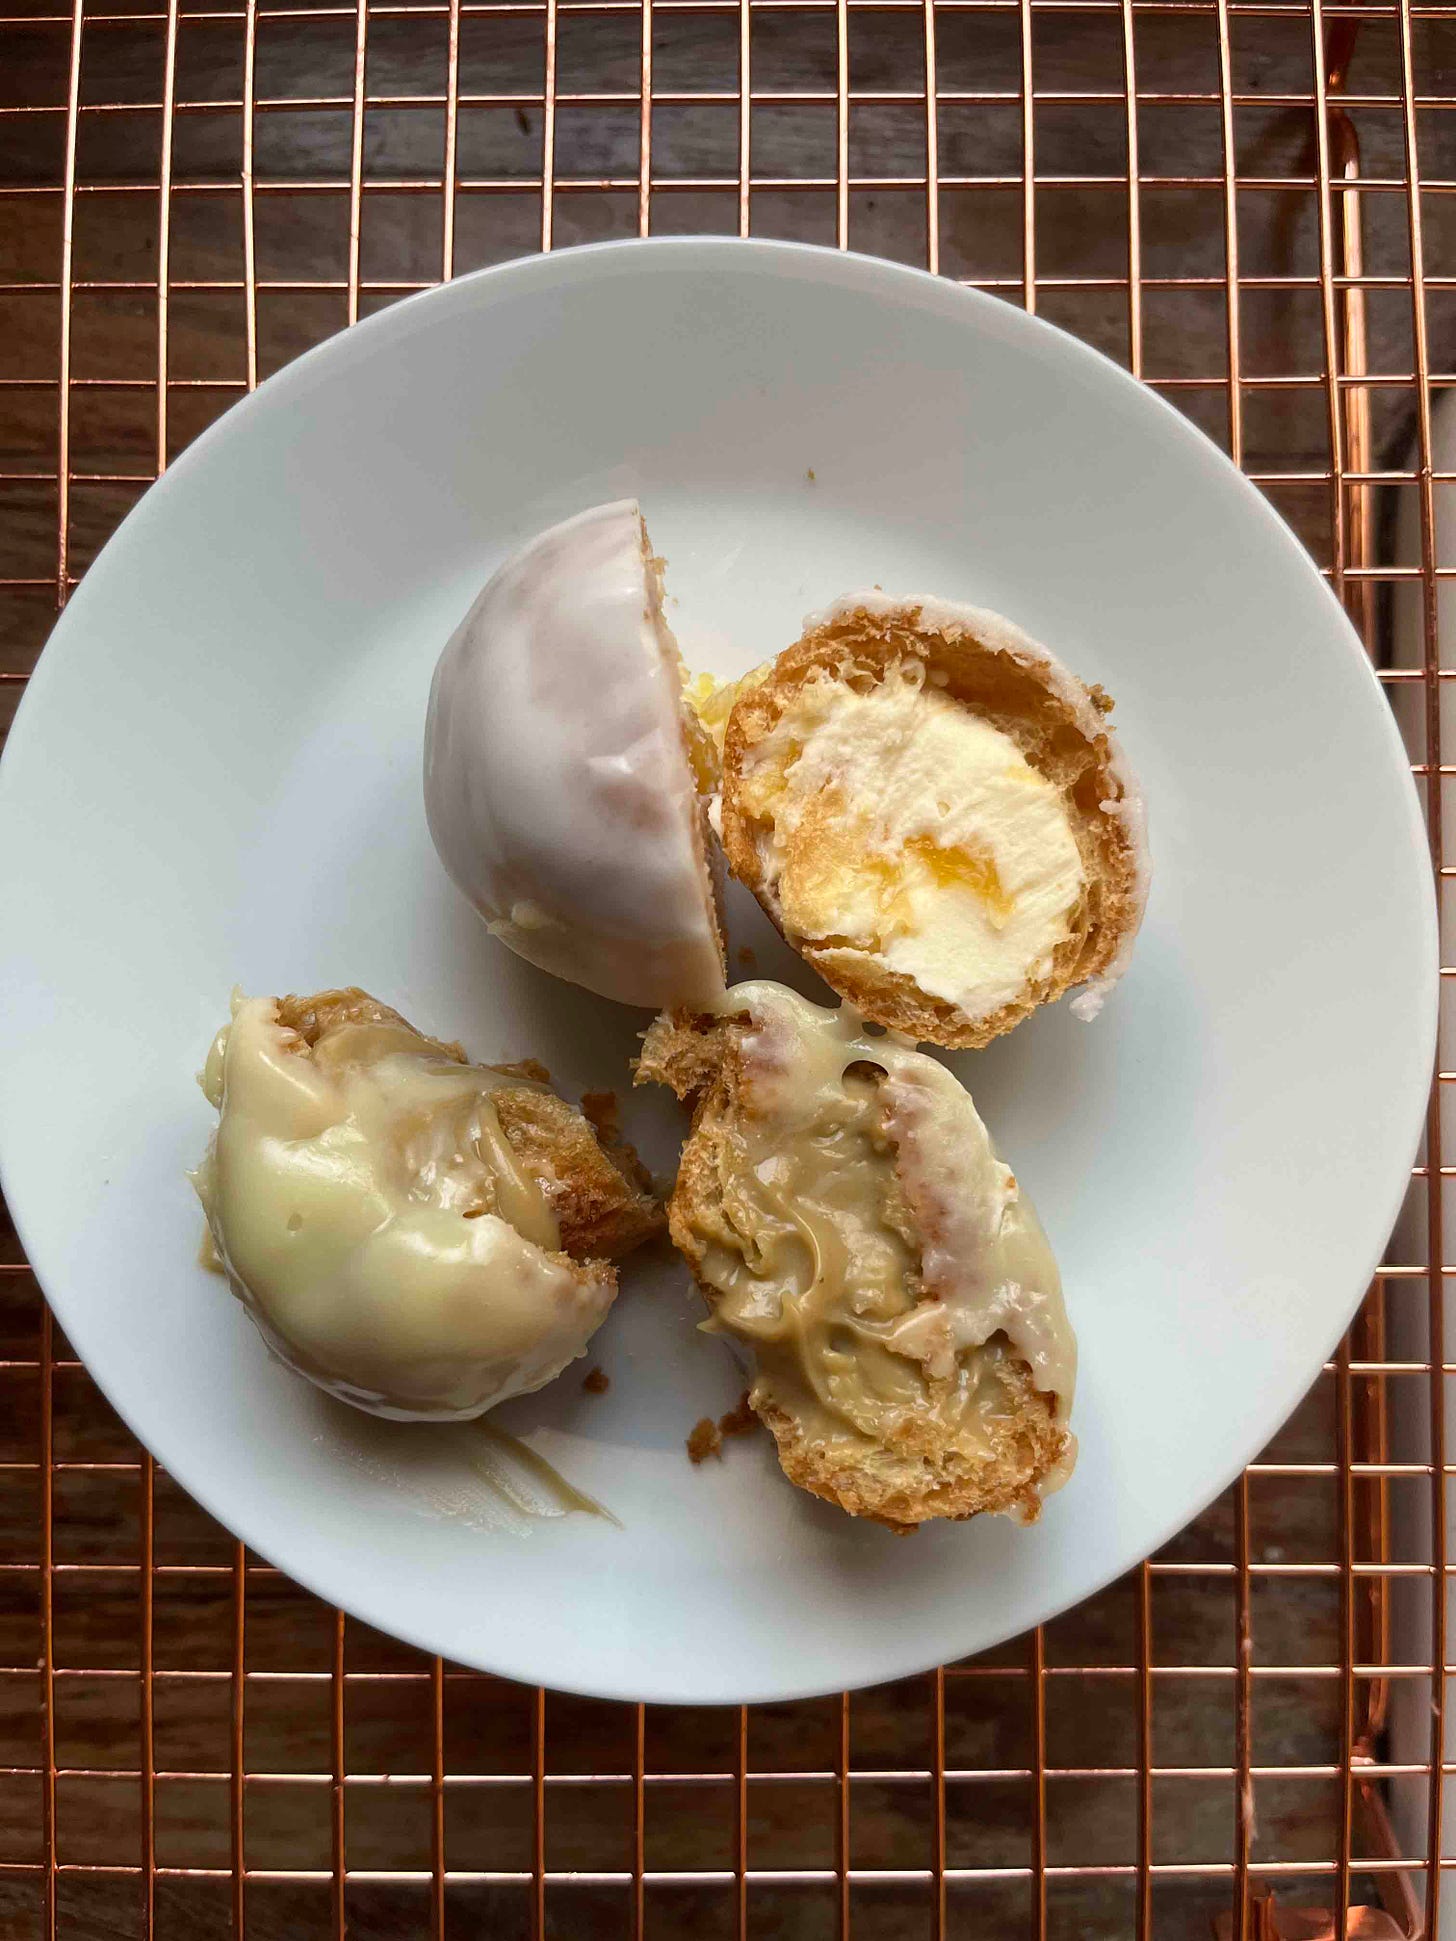
The addition of nut paste makes a very soft pastry cream – it is slightly dangerous and can’t be fully trusted not to slide its way out (You could not put it in a cannoli) but it behaves well enough in choux buns. We have covered how to flavour pastry creams in the past but for nut pastes I have tested a few methods:
Method 1 – Make pastry cream as usual then whisk in pistachio paste right at the end .
Result – Way too soft – the nut paste adds a lot of fluidity so we need to make sure to incorporate it before the mixture is cooked so it can benefit from the thickening powers of the starch / heatMethod 2 – Heat milk with pistachio paste and then make pastry cream as usual
Result – Good but the pistachio paste splits quite a lot when being heated with just the milk leading to a slightly grainy texture that needed to be passed several times to become smoothMethod 3 – Whisk pistachio paste with yolks and starch then temper
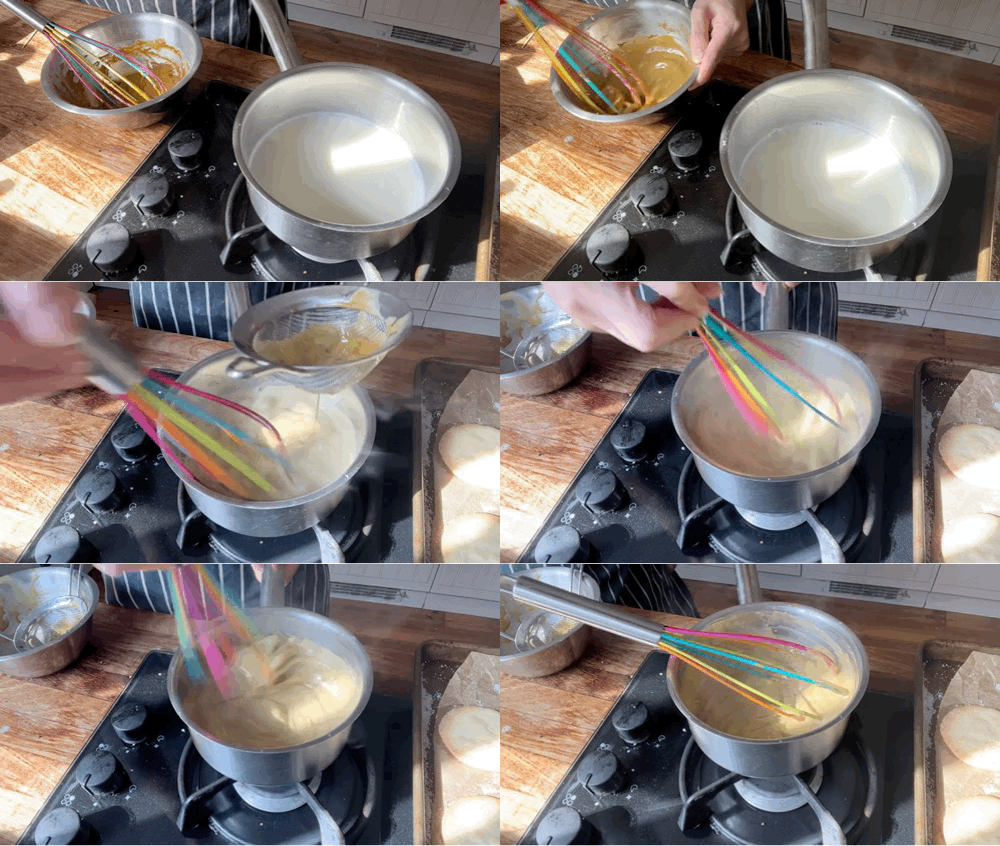
Result – This is a goldilocks situation – just right! We avoid the splitting of Method 2 whilst benefitting from the starch thickening that made Method 1 untenable
The rest
This time of year, jars really come into their own. From jams, those jewels of seasons past, to pastes, you’re only a lid twist away from something wonderful. And when I’ve got a fruit itch that just can’t be scratched, I love reaching for tinned fruits; Peaches are obviously brilliant but Pineapple comes in a close second.
For the pineapple jam I was inspired by the Taiwanese pineapple butter shortbreads; You could go through the rigmarole of preparing a fresh pineapple, you can make a brilliant and sticky jam with the tinned fruit. Although I am a huge fan of this sticky pineapple jam, I don’t feel like pistachio and pineapple pair naturally together and there needs to be something a bit more neutral to marry the flavours harmoniously: MORE coconut. But this time, it’s toasted.
When you toast coconut flakes it takes on a completely different flavour – it can’t be achieved with using coconut milks, creams or the desiccated/sweetened stuff – it is earthy, buttery and, I think, otherworldly. But toasted coconut doesn’t really work with my easter colour palette. So what to do? Infusion! Paired with mascarpone and a hefty sprinkle of salt, the toasted coconut infused cream provides the ideal go-between for my fillings. My initial worry was that it might be coconut overload with two types of coconut, but the two are actually distinctly different and offers a well-rounded flavour profile that plays beautifully with the rest of the team.
Size and proportions
A poorly proportioned religieuse can make all the difference– you want a lovely plump base and nice round head. To control the expansion, I used the very stable choux base that I used for eclairs. The expansion is slightly less than if we used a mixture with higher hydration but it is more even which is ideal for this pastry. Also, craquelin is essential.
I know that choux can be a bit unpredictable in its expansion, so I tested out several sizes and mixed and matched as best I could. For the heads, I piped rounds ranging from 4g – 8g and for the bodies I piped rounds ranging from 15g – 20g. My favourite combination was the 5g tops with the 15g bases, though any of the heads matched with a 3x size base looked pretty good. However the 5g+15g produces religieuse that felt like a manageable size to eat. Also, despite the buns being different sizes, I found no issue baking them in the same oven.
The intersection of design x flavour
There were two key areas where design and flavour came head to head and I knew there would have to be some compromise: The coating and the coconut itself. I made test batches of all the options and mocked up the heads / bases with the options:
First, the dip. I had two contenders: A white chocolate ganache and a simple lemon icing. As well as flavour, the two different cream tones were important here since they made the base of Little Lamb’s face. If you’ve ever made white chocolate ganache you’ll know it is slightly tricky to work with – it needs drastically less cream to make a ganache owing to the lack of cocoa solids in the chocolate itself. This meant that the white chocolate ganache was a little bit difficult to work with once it began to cool down – as well as this, it really did not like being reheated whatsoever. I also made my trusty éclair glaze, swapping the dark chocolate for white chocolate and that did not work at all – it was grainy, fatty and horrible.
Flavour wise, I thought it– it was spectacular and rich with the pistachio; I know I am in the minority of people that actually really love white chocolate, so I was rooting for this one.. but sadly not. The lemon icing is a simple mix of lemon juice and icing sugar, around 0.2:1 ratio – although I was gunning for the white chocolate, the lemon icing won quite easily in both flavour and ease. Getting the ‘right’ consistency for the icing can be a bit hit and miss and you may need to tweak and adapt my ratio depending on what brand of icing sugar you are using – you want the icing to be thick enough to adhere to the choux bun whilst not being chunky, but not so thin it runs off in a stream.
The second was the coconut fluff. Let’s go deeper.
Types of coconut
I am a reformed coconut hater. I’m not sure why I found it to be such an offensive flavour when I was growing up – was it *all the* malibu? Was because bounties were always leftover in the celebration selection? – but I would always avoid coconut, especially in desserts, like the plague. Over time I’ve come to love it! I still hate surprise coconut a la vegan desserts (more on that here!) but when its used intentionally, it is so delicious and a proper team player. Coconut plays nice with lots of ingredients – it’s an easy friend for anything fatty or creamy, it loves salt, it is BFFs with citrus, it can blend with white chocolate and it will happily dance in the rain with pineapple.
The three main types of coconut on the market for baking are as follows:
Desiccated coconut – It is coconut that has been shredded finely and dried. Desiccated coconut is definitely the weakest wheel on the tricycle for me, but is great in frangipane and for decorating
Sweetened bakers coconut – This is the type of coconut you’re going to want to use for making macaroons. It has already been moistened (around 2% moisture) and sweetened, giving it a fluffy texture. I first came across this at Ottolenghi – we used to make a chiffon cake with a mound of cream cheese icing on top then we would dip it in this hairy, fluffy coconut – adorable!
Coconut flakes – One of the reasons that I think fruit and fibre is the platonic ideal cereal (sorry but it just is) is its coconut flakes, the long thinly shaved coconut pieces. I always have these in stock now – they add interest and texture to pretty much any bake and they look beautiful. Also, they have the best flavour once toasted
To make the most of that amazing toasted coconut flake flavour flavour we will make an infusion with darkly toasted coconut flakes and combine with mascarpone and salt for a wonderful thick cream. But for the deco, the sweetened bakers coconut is definitely the way to go. Desiccated doesn’t look bad but you don’t get quite as much volume which I think is essential for these – the coconut flakes look okay but they aren’t that easy to eat when raw so not really a practical choice for the finishing.
How to be cute
One of the most valuable lessons I learnt at Dominique Ansel – and one that I don’t think I use enough – is how to make cute faces on choux buns:
First and foremost you need to make sure that you have the proportions right – a too big head can throw everything off. Scale your choux buns and don’t skip making the craquelin
Make sure you dip your buns enough, especially important for the head. The ‘face’ needs to come far enough down that you 1) have room to add features and 2) can add features onto the front of the bun so it doesn’t have a weird perspective when you look at it straight on
Giving it face: Ok, so the golden rule is – big googly eyes should be close together and small eyes (like today) look way better when far apart! To make it as easy as possible, I mix up a simple cocoa powder icing and snip the smallest possible hole in the piping bag. Make sure you test it because sometimes icing comes out in a wacky direction when its through a small tip
Logistics and adapting
One issue I have with making religieuse is that you need to use quite a few piping bags – in the end I decided to reduce this number simply by cleaning and re-using. By all means you can adapt the fillings of this recipe endlessly, though coconut can be a tricky flavour and you do need its fluffiness for the décor; that being said, I think lemon curd or lemon cream (here) would work so well, as would a classic pastry cream; Please do let your creativity shine through.
Okay let’s make it
Easter special: Little Lamb religieuse
This makes 6x Lamb religieuse
Choux – this is a small batch but all you need!
20g milk
40g water
30g butter
1g salt
2g sugar
45g flour
60g egg (about one large)
Craquelin
30g light brown sugar
30g soft butter
30g flour
Pistachio pastry cream
150g whole milk
50g caster sugar
35g egg yolks
16g cornflour
40g pistachio paste
30g butter
Pineapple jam – this makes more than you need but I love having extra bits in the fridge
300g tin of pineapple
100g caster sugar
40g lime/lemon juice
20g butter
Toasted coconut mascarpone
150g double cream
30g coconut flakes
150g mascarpone
20g caster sugar
¼ - ½ tsp maldon salt depending on your tolerance
Lemon glaze
150g icing sugar
20-35g lemon juice
Face icing
50g icing sugar
10g cocoa powder
10-15g water
Sweetened shredded coconut to decorate
Method – choux and craquelin
Pre-heat oven to 200c fan
For the craquelin, mix butter and sugar until homogenous then stir through the flour to make a dough. Roll inbetween two sheets of greaseproof paper until about 0.2cm-0.3cm thick then put into the fridge/freezer
For the choux, heat milk, water, butter, salt and sugar together. Once simmering, add the flour all at once then stir to form a thick dough ball that will leave a film on the pan. Dry out the paste for 1-2 minutes or until you see the film
Move to a bowl and leave to cool slightly before adding the beaten egg bit by bit – a smooth shiny paste should form
Transfer into a piping bag and cut a 1.5-2cm hole in the bottom. Pipe 6 x 15g choux buns (you can scale the piping bag each time) and 6 x 5g choux buns (these are soooo tiny!!!) – pipe a few extra if you have leftover mix
Cut craquelin to cover the buns – the small I use 1.5cm cutter and for the large it’s the 3cm cutters. If you have kept your craquelin in the freezer, let it come to temp slightly, or warm with your hands, otherwise it will just crack
Put into the oven and reduce heat to 190c (fan) and bake for 15 minutes. After 15 minutes, reduce to 160c fan and bake for a further 10 minutes
Pistachio pastry cream
Heat milk and half the sugar to simmering
Whisk yolks with pistachio paste, other half of sugar and cornflour
Pour the hot milk over the yolks and whisk then pour it back into the saucepan – keep stirring until it thickens and bubbles
Remove from the heat and then stir through the butter
Leave to cool completely
Pineapple jam
Drain pineapple then dice into very small pieces
Add into a saucepan and heat until the liquid has evaporated, then add the sugar, citrus juice and butter
Cook until reduced and jammy, around 15-20 minutes – it will reduce radically
Toasted coconut cream
Toast coconut flakes at 160c for 15 minutes until very golden and dark
Add to double cream then bring whole mixture up to a simmer for 1-2 minutes
Cover and leave for 2-3 hours or overnight
Strain and cool completely before whipping. Reweigh - you need 125g - you will may well have lost more in the infusion process
Mix mascarpone with sugar until blended then add all of the toasted coconut cream and salt. Whip until thick
Lemon & face Icing – this dries out easily so don’t make it until you’re ready to dip
Mix icing sugar – sift it please – with lemon juice until a thick icing forms
Mix cocoa powder, icing sugar – SIFTED! – with water until a VERY THICK (thicker than the above) forms
Assembly
Have everything ready – coconut in a shallow bowl etc etc.
Make a hole in the bottom of all your choux buns then pipe 50g pistachio pastry cream into the large buns and set aside
Pipe 20g of mascarpone cream into the small buns, followed by 10g of the pineapple jam and set aside
Dip the base in the icing and cover with coconut flakes all over
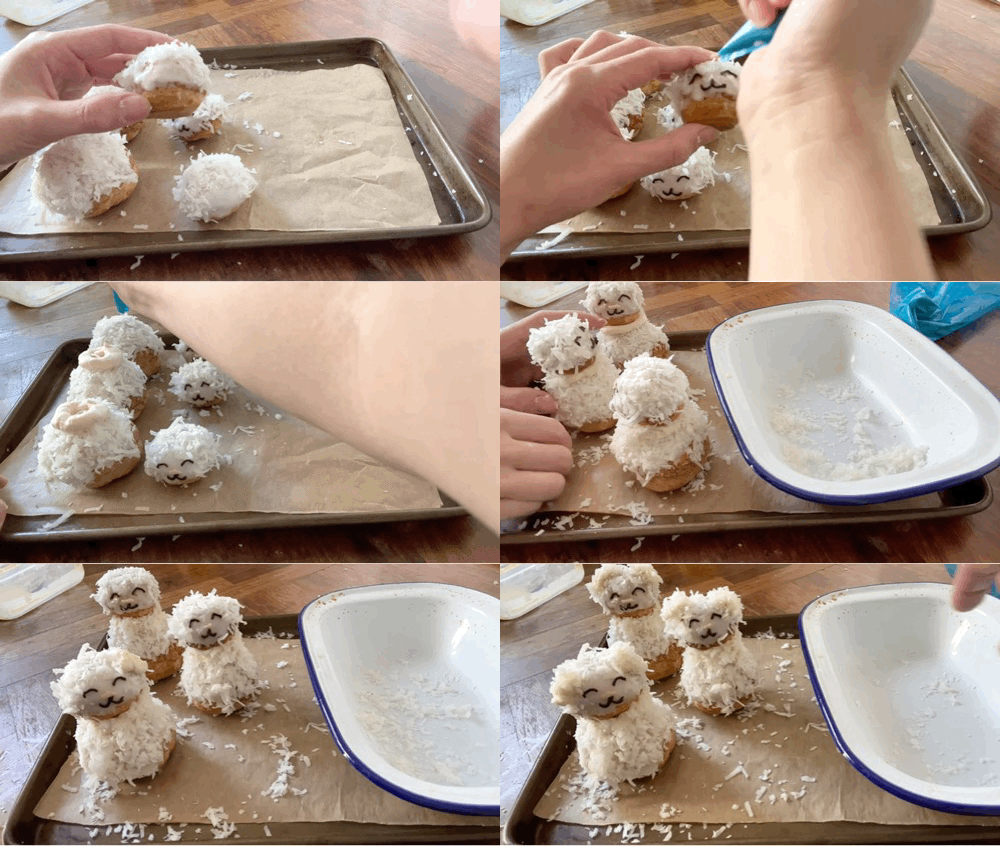
For the head, dip 2/3 into the icing and shake off any excess then leave upside down for 10-20 seconds to dry to make sure you get a nice clean line for the base of the face. Then dip 80% of it in the fluffy coconut, making sure to leave yourself space for the face! I would test one first to check you are happy with it
When it’s dry, pipe on the cute face. For the nose, I mix up a tiny amount of the lemon icing with a bit of raspberry juice/anything pink from the cupboard and just dab it on with a toothpick
To build, pipe some mascarpone cream on top on the base then stick the head on then add fluff
Pipe two ears with the mascarpone cream and add more coconut fluff
Enjoy! You can make this a day in advance


These are too cute and I’m excited to try this recipe. I have to agree that toasted coconut is a game-changer. My partner is from the island of Mauritius and while I was living there we had a friend who worked with us, a woman from a small village on the east coast who would gather coconuts from the trees, crack them open and scrape them then toast the flakes over the fire which imparted the most heavenly smoky caramel flavour. The whole process was very hard work for scant result but it was unbelievably delicious and I would love to have some of her toasted coconut to try for this recipe. Thanks for sharing, I always look forward to getting your newsletter recipes in my inbox!
Do you think American heavy cream would be a permissible substitute for milk in the pistachio pastry cream recipe?