Kitchen Project #70: Elderflower buns
The perfect cordial ratio & how to use cordial in your bread
Hello,
Welcome to today’s edition of Kitchen Projects. Thank you so much for being here!
Just in time for your early summer foraging needs (like, get out to the park and find some now!), I’m here to share the intel on making *actually delicious* elderflower cordial, which we’ll use in some beautifully soft elderflower iced finger buns. Tea parties, here we come.
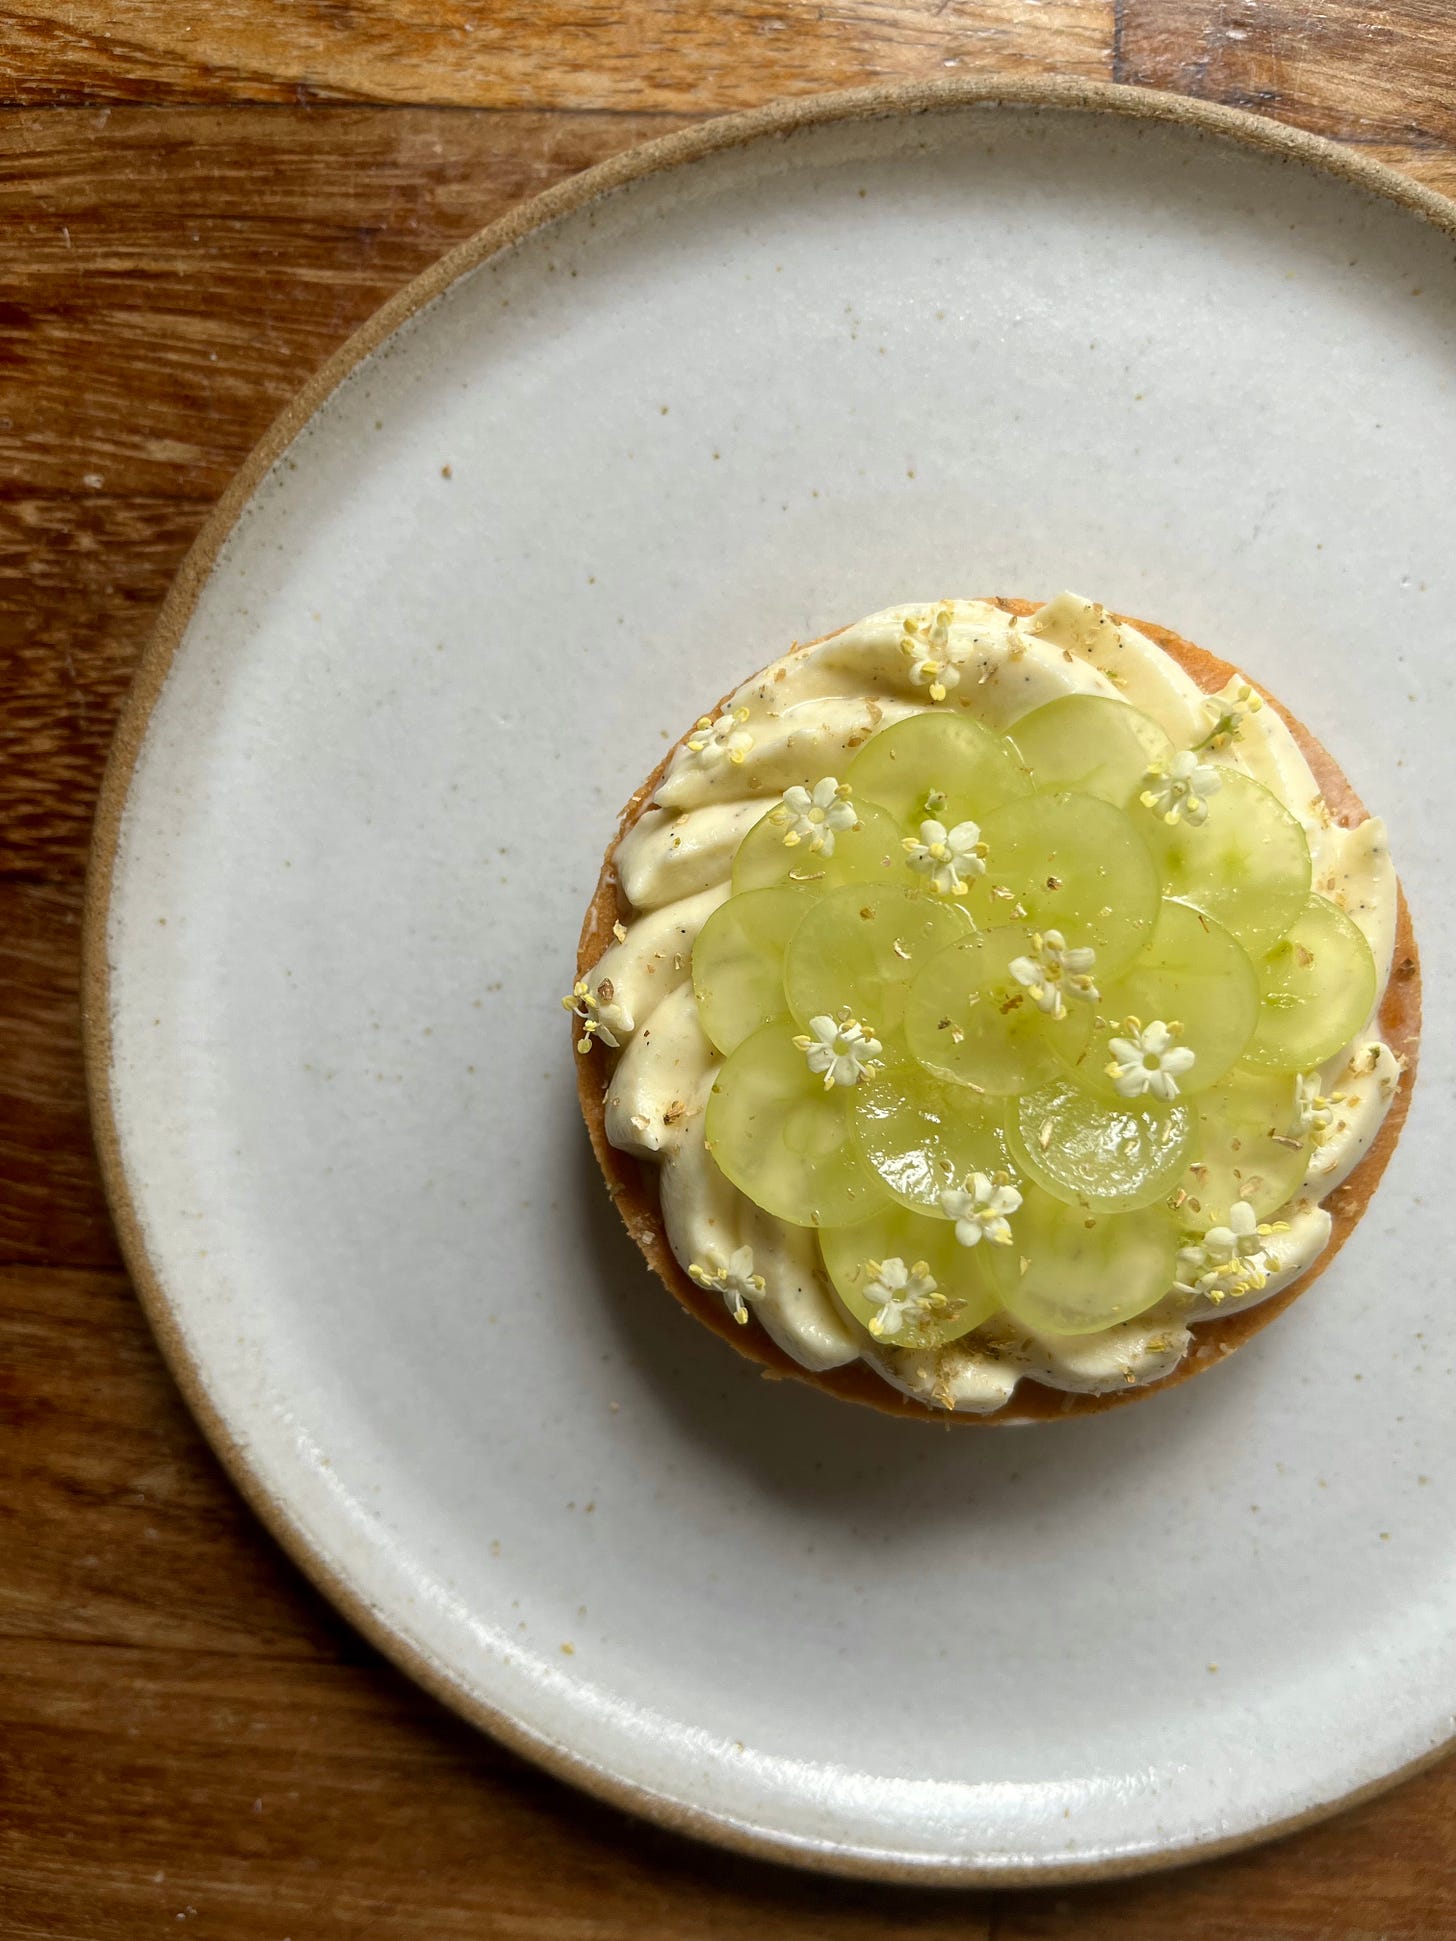
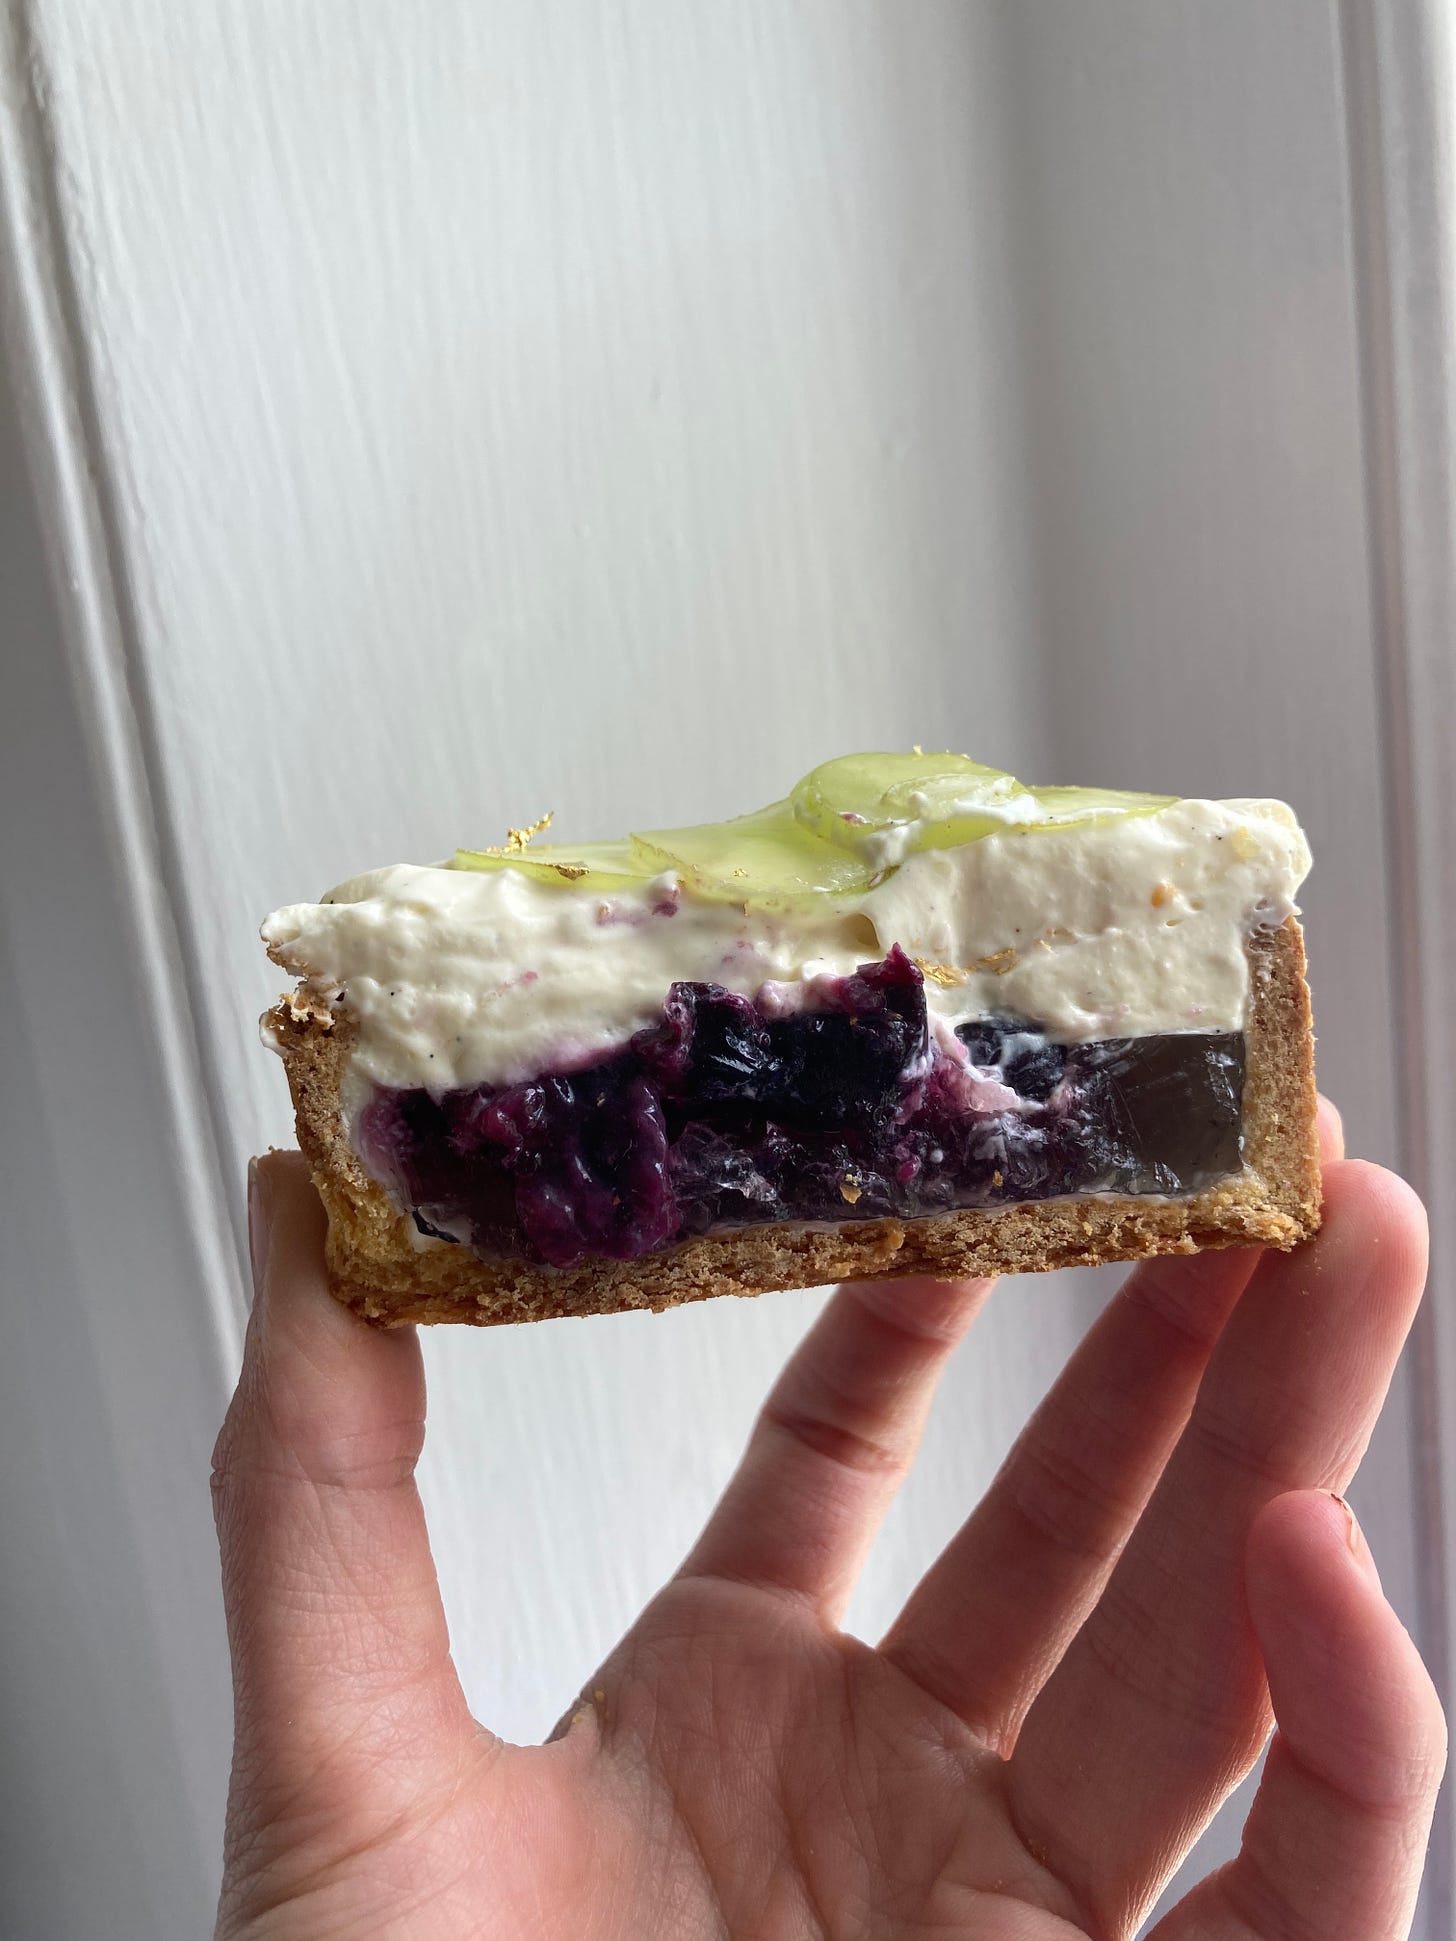
Over on KP+, I’m sharing another wonderful way to use your elderflower cordial with a grape, elderflower and vanilla tart - they’re almost too beautiful to eat.
What’s KP+? Well, Kitchen Projects+ aka KP+, is the level-up version of this newsletter. It only costs £5 per month and your support makes this newsletter possible. By becoming a member of KP+, you directly support the writing and research that goes into the weekly newsletter as well as get access to lots of extra content, recipes and giveaways, including access to the entire archive. I really hope to see you there:
Love,
Nicola
Adventures in elderflower
I am the first person to admit I’m no expert forager, but elderflowers are so ubiquitous this time of year, I can’t help but arm myself with a bag and a pair of scissors when I’m off on a walk.
Elder trees grows across the country, popping up in parks and fields - it’s a tree with dark green leaves and abundantly bushy flowering heads. These creamy white flowering heads are the elderflowers, which carry a perfumed scent and flavour. Later in the summer, the trees sprout elderberries, a dark purple fruit. The elderflowers can be made into fritters, or processed into cordial, syrups or wine, and the elderberries can be processed similarly.
On your travels, you may also come across pink elderflowers. Despite conflicting reports, I’m happy to let you know that the pink elderflower IS safe to eat… well, safe enough. As Sarah Johnson, head of pastry development for Spring and Heckfield Place tells me, “all elderflower and elderberries have chemical compounds that can cause mild toxicity if eaten raw and in excess. Cooking usually takes care of this problem.” Sarah also shared the difference between the pink and white, “In my experience, white elderflower is more aromatic and therefore better for cooking. Save the black for pretty decorations!”
If you’re still interested in getting in on the elderflower action, make haste! The best are gone by the end of June and the once fragrant heads are past their prime. Not sure where to start? Been there - there are quite a few white flowers, from cow parsley to hawthorn to rowan, that bloom at the same time as elderflowers and can cause a bit of confusion, but you should always try to trust your nose. Because, even if you have successfully identified elderflowers, but they don’t have a good scent, you probably want to keep on looking anyway.
The scent of elderflowers range from the good - a perfect summery perfume - to the neutral, to the bad. Over time, elderflowers may give off an unpleasant, ammonia tinged scent so it’s also a good idea to process your flowers pretty soon after picking. I kept mine wrapped in a plastic bag in the fridge for several days and they were still great, but you’ll have to use your nose to make a call. That being said, the scent of elderflower is mercurial - it comes and goes through the day, impacted by the sun and surrounding areas. Elderflowers by busy roads, for example, will be much hampered by the passing traffic, whilst low hanging elderflowers won’t have been supercharged by sunlight, which helps heighten its aroma. Also low hanging elderflower have probably been marked by foxes and dogs, so AVOID. Sorry to lower the tone, but it’s true.
When it comes to washing, I err on the side of ‘insects are protein’ - I don’t like dunking my elderflowers in water, as many recipes may suggest, since you loose so much of the fragrant pollen. Of course, it’s sensible to remove any big creepy crawlies but a quick inspection should be sufficient.
So now you’ve successfully foraged your elderflower… now what? Let’s get on to the processing. We’ll cover how to make a wonderful cordial and iced buns in this edition, but if you’re looking for more elderflower inspo, I’m sharing my recipe for vanilla, grape & elderflower tarts on KP+:
Its a perfect combination of whipped creme fraiche vanilla ganache, elderflower & roast grape jelly then a dusting of coriander seed powder with thinly sliced grapes, finished with a few fresh elderflowers:
The cordial
The last time I made an elderflower cordial at home was almost five years ago. And it was RUBBISH! Armed only with the support of Google, I dove headfirst into the world of sugar, campden tablets and citric acid - and I was very unhappy with the results. I figured it must have been a problem with me.
I was surprised at just how many people have also had disappointing experiences with cordial. From unpleasant flavours to overly acidic to overly sweet, there seems to be a plethora of things going wrong in cordials across the land. And with all that effort to pick, carry and process it, is it really worth it?
I think so. In a world where we are often so disconnected from what we consume, I love taking the (easy) preserving moments. Although there’s several prominent elderflower trees near my house in London, I picked all of mine from a field near a friend’s house over the jubilee weekend and those wonderful memories are now preserved in bottles in my fridge and freezer.
To banish those less than perfect elderflower cordials of the past, I drew up a testing plan for the factors below:
Whole elderflower heads vs. flowers only
Let me start by saying I am disturbed at the way elderflowers are measured. For a country that loves to drag the US for using volumetric cup measurements, we are seemingly satisfied with counting elderflower per head. In my experience, each elderflower head is quite different so I will be providing you with a weight measurement today.
Whilst most recipes will ask for the heads - thick stems removed - I also wanted to test whether using the flowers only would provide a significantly better infusion. It should be mentioned now that using just the flowers is much more time consuming and you need a lot more elderflower heads to yield the weight proportional to a whole-head cordial.
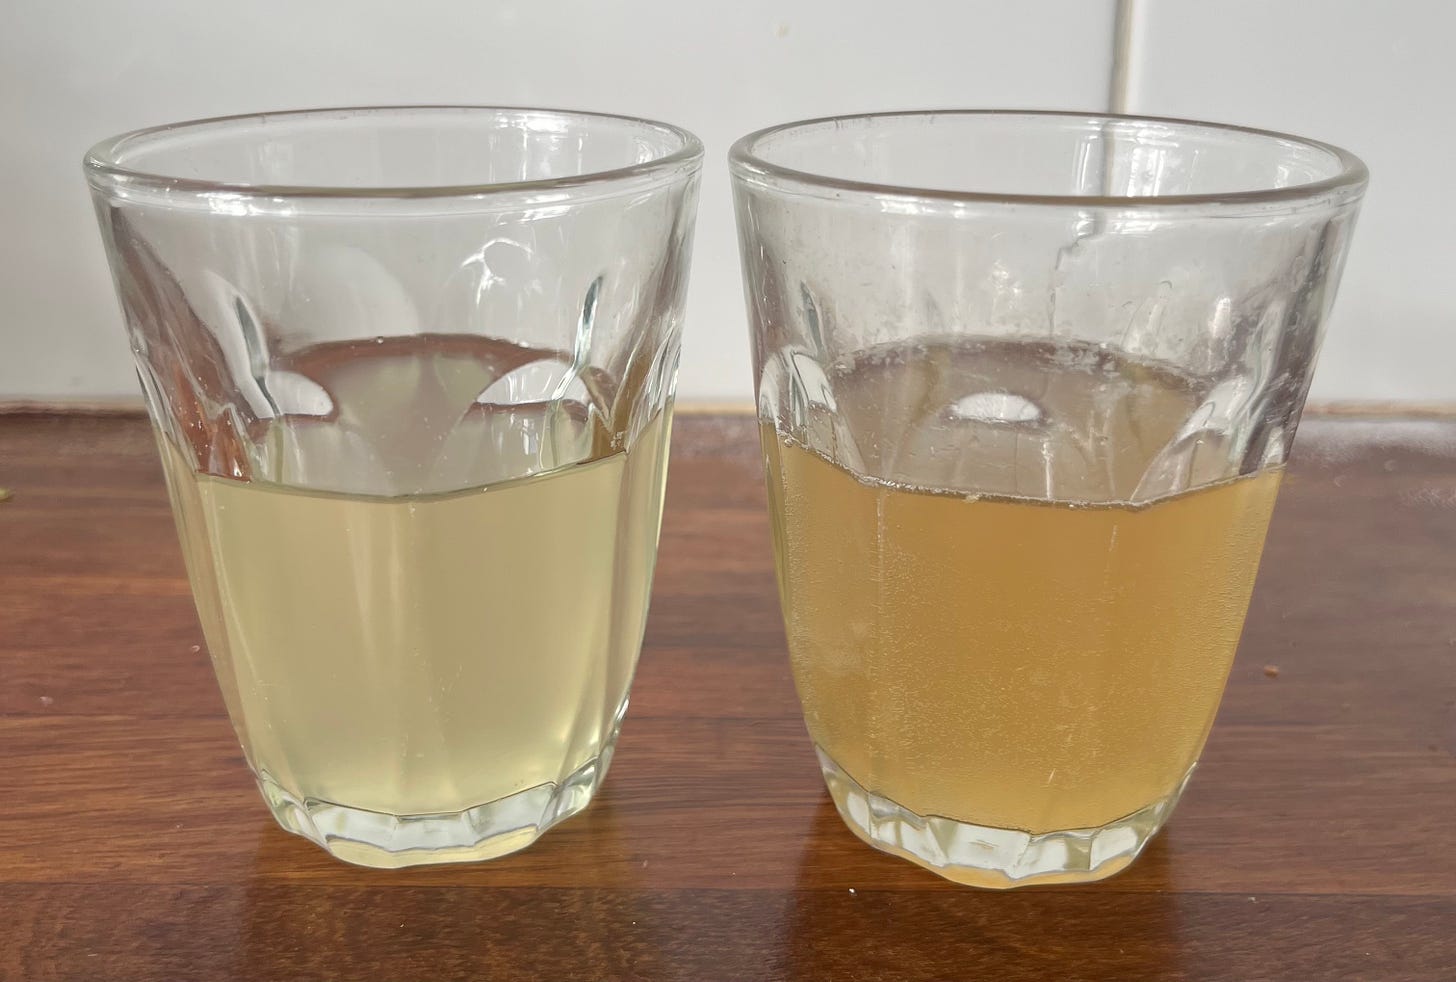
You’ll be happy to know that I didn’t find a significant difference. Admittedly the cordial made with flowerheads only is slightly sweeter and more fragrant, but not noticeably. In fact, I found the cordial made with the whole heads had a more herbaceous flavour, which is welcome. The one with the flowers is also darker in colour - I’m not sure why. Also, the one made with flowers was much quicker to ferment - I ended up with a fizzy batch that I left out in a glass for a few hours. An accidental win.
Winner - whole elderflower heads
Hot vs. Cold infusion
One of the biggest decisions you get to make when making an infusion is whether it’ll be hot or cold. A hot infusion means heating up your liquid and adding your flavourings, then leaving to cool, whilst a cold infusion will mean introducing your liquid and flavouring without any heat. Temperature has a huge impact on flavour for infusions - ever tried to make a cup of tea and impatiently poured the kettle before it was ready? Then you’ll know that heat is the key to a fast, highly flavoured infusion. But it isn’t that simple - a hot infusion may also result in the release of astringent, bitter flavour compounds and your mixture is often highly pigmented as a result. A cold infusion, though much more time consuming, can often result in a cleaner flavour and is much more appropriate for sensitive infusions with flavour compounds that may be damaged by boiling water - some flavour carrying oils may be dulled or modified by heat, so leaving them unchanged will let us enjoy the flavours.
But which is better? Both the hot and cold infusion have benefits - I was not put off by the darker colour of the hot infused cordial, but I did not find that it was significantly more flavourful than the cold infusion.
Winner: cold infusion
Sugar syrup infusion vs. Introducing sugar later
Most recipes online will have you make a sugar syrup then introduce the elderflower straight into it - although I DIG this approach, it does mean you have to be pretty confident in your ratio from the outset. As I was investigating sugar levels, I decided to flip this and made water/elderflower/lemon infusion, then heated and added sugar to taste, allowing me to create my own ideal ratio - which happens to be 30% sugar to water! As for flavour, there was no impact on cordial and having a greater degree of control for the testing phase was great. That being said, it’s much easier just to go right in with the sugar syrup… but you’ll have to trust me!
Winner: Sugar syrup infusion if you trust me, but introducing sugar later if you want to play with ratio
Whole lemons vs. Zest and juice
Some recipes will ask for a separate quantity of zest and juice, whilst others will suggest cutting up whole lemons and infusing them. In theory this should give us similar results, but I found I preferred the control I had by separating the zest and juice. The cordial made with whole lemons did not have the same amount of zing.
Winner: Zest and juice
Sugar %
Whilst we often associate sugar with its role in sweetening, it’s important to consider the essential part it plays in preserving, and balancing this double-agent role is key to unlocking your ideal cordial. Spoiler alert: you can’t have it both ways. To understand sugar, we actually need to understand water, or more accurately, water movement. We covered this before when discussing water ganache, but the same rules apply here.
Water movement is the culprit of all spoilage. Why? Well, bacteria needs water to grow. However lots of things contain water and *don’t* mould quickly because water is kept chemically *otherwise engaged*. Sugar is one of the main occupiers of water - this is why jams, which have lots of water, don’t go off - the water is busy being entertained by sugar so mould and bacteria don’t have the environment to grow. It’s the ‘free water’ that causes issues. Free water will act as a personal petri dish to any bacteria that comes along. This is why dried things, like pasta, will last indefinitely, whilst fresh pasta has a short shelf life. And it all comes down to water activity, which is defined by how much of the water is ‘free’, meaning ‘free to take part in bacteria parties’.
So, the more ‘free water’ there is, the more likely and more quickly your cordial is going to go off. This means you need to make a choice between longevity and flavour. A cordial made with a 1:1 sugar to water ratio (aka 100%) will last much longer than my suggested 0.3:1 ratio, but will be intensely sweet. All is not lost though - never forget, the freezer is your friend! And as we know, at negative temperatures, there is very little-to-none water activity so you can keep your cordial tasting just as you want it and defrost as needed.
The important thing to consider here is what you are using it for - I prefer to have a less intensely sweet cordial that can almost be sipped on its own. However, if you are making a simple syrup for hundreds of cocktails, you may want to increase the sugar.
Winner: 30% sugar to water ratio, but use it within 2 weeks or freeze, as opposed to 4 months with a 100% ratio
The deal with citric acid
Is citric acid just one more thing to collect dust in your cupboard or is it worth it? I personally love citric acid which comes in a fine white granulated powder - add it to any fruit recipe and it will brighten the flavour (and colour!). Citric acid is the acid present in lemons and limes - it’s responsible for the sour flavour of the fruit. Commercial citric acid was originally derived from lemon juice, but is now industrially produced from mould, though it has the same properties - it enhances acidity without the addition of any citrus flavour. As well as this, it is a fine granule that can be added in small amounts that won’t impact a recipe, whilst lemon juice will always add a level of hydration as well as lemon-y flavour compounds. Although I love lemon flavour, it can be quite dominating. Camilla Wynne uses it in her strawberry jam recipe to “give the fruit back its fresh fruit flavour that gets dampened by cooking.”
I think a lot of recipes out there have far too much citric acid - Mary Berry suggests 50g per 1.5l water, whereas I was satisfied with a paltry amount in comparison, just 5g per 1.5l, though this radically reduced figure may also be due to the radically lower sugar in my cordial. As well as this, if you do use citric acid I think it’s sensible to start low then add to taste. I would not go higher than 8g per batch - elderflowers have a gentle flavour and you can overpower it with acidic and sour notes in attempt to balance out the sweetness, and the elderflower is suddenly… gone! If you don’t have citric, don’t worry too much - the cordial will still be very satisfying.
So now you’ve got your elderflower cordial… what next?
Enter: the iced bun
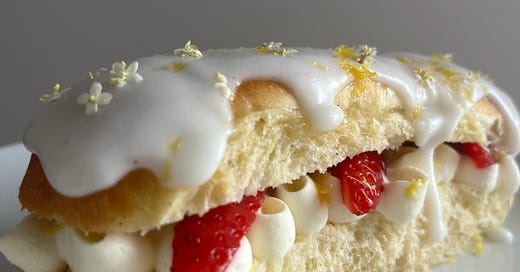
For this week, I wanted to finally nail down a recipe for an English classic, the iced bun. Iced buns, or fingers, are a staple of market town bakeries and their charm has been much overlooked in favour of flaky, layered things. But no more! Today this simple and satisfying bake of soft sweet bread and generous thick icing will be celebrated. You can soup it up a bit by slicing in half and adding cream, jam and fruit, but it’s just as good unadorned.
This week’s recipe has been adapted from my favourite ever soft bun - the maritozzo aka rhubarb cream bun, a satisfyingly squishy bun with flavours of vanilla and citrus that uses a preferment to improve the texture. For my first test, I made the recipe as normal but replaced the orange zest for additional lemon, and replaced the honey for elderflower cordial. The result? Lovely.
But then I wondered, provided I balanced the sugar right, could I utilise more cordial and thus have more aroma in my buns?
Substituting ingredients is fairly simple as long as you know the breakdown of the ingredient. Cordial is liquid and has both sugar and acidity, so we need to consider it both as a hydrator and for its sugar content. To the spreadsheets!
As I made my own elderflower cordial, I know that it has the following:
20% sugar
7% lemon juice
<1% citric acid
As the ingredients above are dissolved in the water, we will consider it to be 100% hydrating
The acidity will not impact the gluten negatively since the dough will not pass the pH threshold of 3 - it is after this point that the dough breaks down.
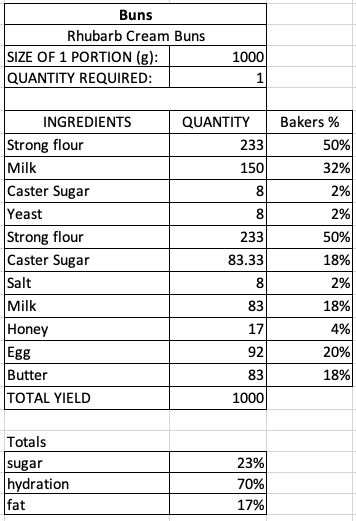
First let’s consider the original recipe - the original recipe is hydrated with a mixture of milk and eggs and is sweetened with honey and caster sugar. The fat comes from the egg yolk, butter and milk:
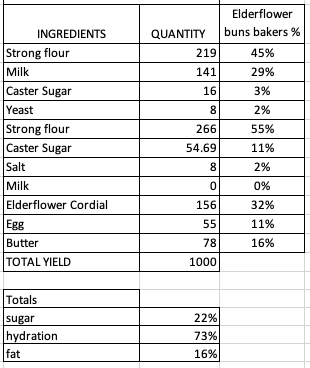
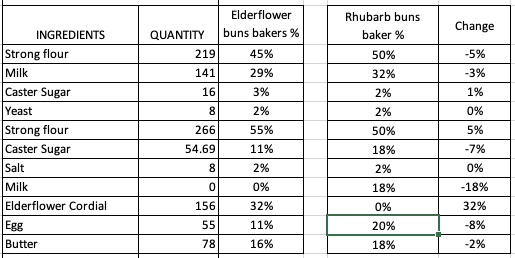
Knowing that my elderflower cordial is both hydrating AND bringing sugar, I had to rebalance the recipe. This resulted in a 100% replacement of the milk and a slight reduction of the egg, as well as a reduction in the caster sugar. To replace the fat lost from the egg, I’ve also increased the butter and the flour slightly to keep the hydration in check. These tweaks have allowed me to incorporate the cordial without radically changing the proportions of the buns. Btw, this does mean using less than one egg in a recipe, I think it’s okay because we will use the rest for egg wash (don’t hate me!).
Here’s the final side by side:
It must be noted that if you haven’t made your own cordial and therefore don’t know the % breakdown of ingredients, I wouldn’t recommend making this swap! Either have a go at rebalancing the recipe or simply switch back to milk.
A reminder of Preferments
We covered this in depth in the rhubarb cream buns edition, but let me refresh your memory…
A pre-ferment is simply a mixture of flour/liquid/yeast from your recipe that you mix ahead of time. There are lots of names for pre-ferments - bigas, poolish, sponge, pate fermentee. It goes on. The reality is, they are all sort of… the same. All the variations achieve the same goal: an improved flavour and texture.
When you make dough, time is an ingredient. As the dough ferments, the yeast converts sugar into carbon dioxide and alcohol (which burns off when you bake!). Flavour compounds are also produced here. So, spending a bit more dedicated time on the ferment stage is a great way to improve the overall aroma of your dough.
Maybe you’re thinking – why not just proof the WHOLE thing for longer, instead of just a small portion? Well that’s a good question. It’s possible that the whole dough may over ferment, producing overly yeasty aromas and ‘running out of juice’ by the time it hits the oven. You see, making a pre-ferment is like giving your dough a kickstart and allows you to build layers of flavour and complexity.
While you ‘lose’ time by pre-fermenting the flour, you can actually gain some of that back during the mixing process and rise. First let’s talk gluten: As the dough is fermenting and the flavour is building, gluten – the result of the proteins gliadin and glutenin lining up into long strong chains – is also developing. Flour – once hydrated – will immediately begin to form gluten bonds and, in a process known as ‘autolyse’, the enzymes present in flour will begin to break down the proteins which makes the dough really stretchy and developed. As the yeast processes the sugars, the CO2 expands which has the effect of very gently ‘kneading’ and stretching the dough. Cool, right?
When you make a pre-ferment, you’re benefiting from all of these processes. You get to add in an already flavourful dough that has a good amount of gluten development which makes your actual mixing process shorter since you already have the beginnings of a strong structure which really improves your texture and fluffiness later on. Enriched doughs, like brioche or anything with sugar, eggs or fat, can be very slow to rise. This is because it takes longer for the yeast to actually reach the flour to begin fermenting it. Plus, sugar is a real water hog and so hydration can be slow which, in turns, slows down fermentation.
By pre-fermenting some of your dough, you have circumvented this issue. You have been able to ferment some of your flour without the pesky butter or egg yolks getting in the way. You have also been able to ferment your dough without all of the sugar around which gives it a real head start.
All of that PLUS your yeast is already active and ready to take charge so your next rise – even with an enriched dough – will be shorter!
As well as this, I realised this week that, thanks to the preferment, I could forgo the second rise. This means that as soon as the dough is mixed you can rest it briefly (about 10 mins, just so it relaxes) then immediately shape into buns.
Ok let’s make it!
Elderflower Cordial
Time required: 24 hours
Makes about 1.5L
1500ml water
160g elderflower heads, no thick stems
30g zest in strips
50g lemon juice
440g caster sugar
4g citric acid (you can also add to taste, though I wouldnt go more than 8g!!!)- if you don’t have, just omit
Method
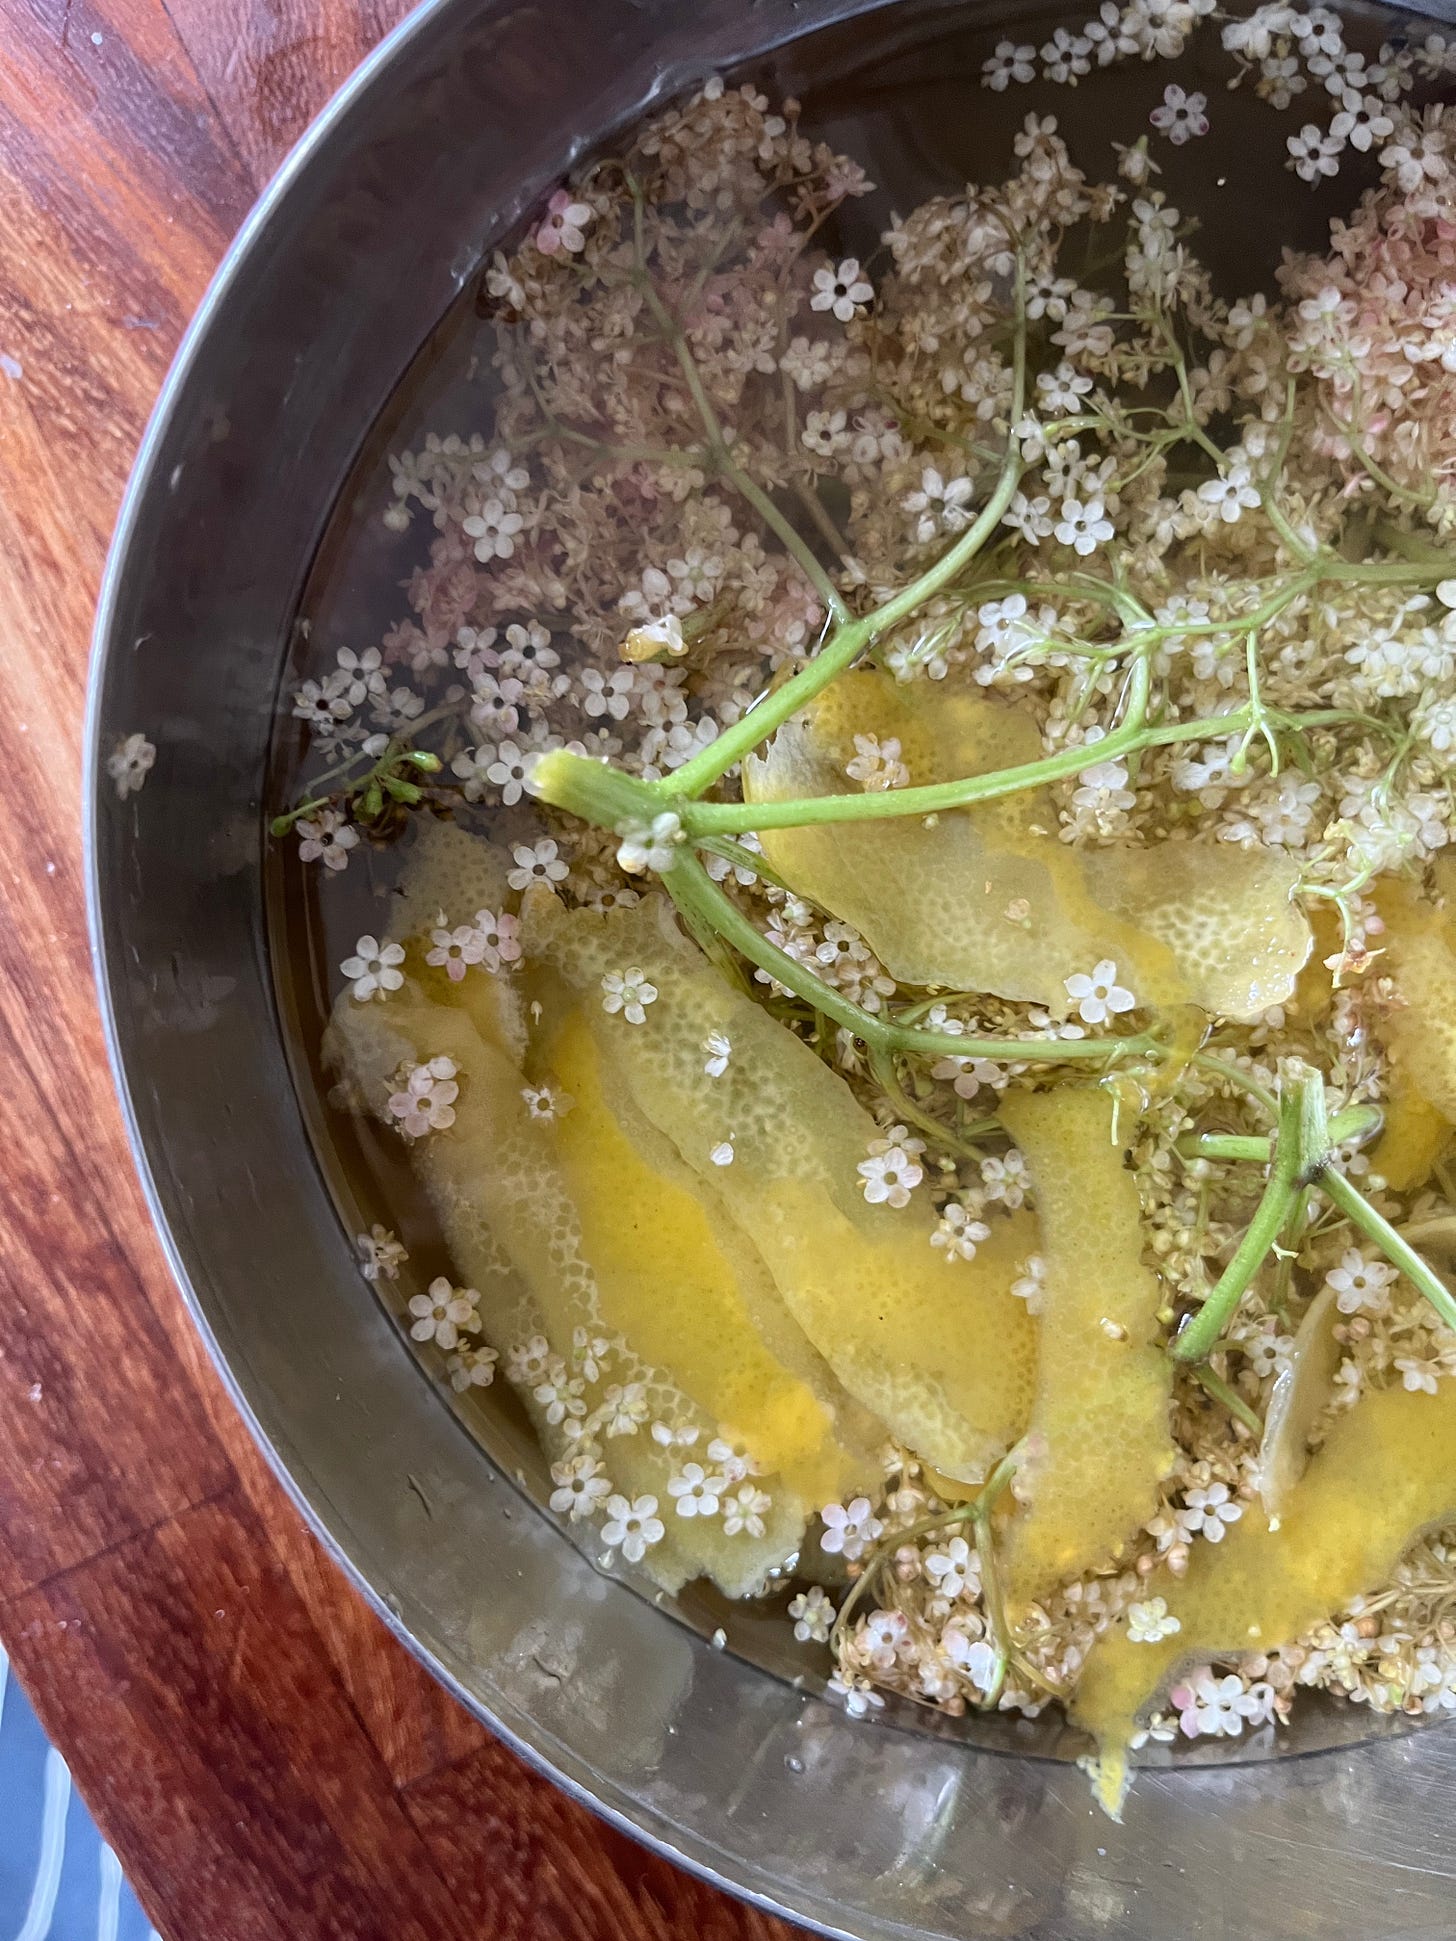
Pick any obvious bugs off your elderflower then place in a bowl with the strips of lemon zest and set aside
Boil the kettle then pour 450ml boiling water over the sugar and stir to dissolve.
When fully dissolved, top up to 1500ml (so add 1050ml) cold water plus the lemon juice and citric acid, then pour over your elderflower heads and lemon zest strips
Cover and leave for 12-24 hours
Strain through a fine mesh strainer, or muslin if you have it, then taste
Funnel into clean bottles and store in the fridge for two weeks
Elderflower iced fingers
Time required: These can be made in an afternoon, around 4 hours
Due to length restrictions, the GIFs will be available in the web version of this newsletter.
Makes 10 buns
Dough Ingredients
Preferment
130g strong bread flour
85g whole milk
10g caster sugar
5g dry yeast
3 x lemons zested
1 x vanilla pod, optional
Dough
All of preferment from above
160g strong bread flour
30g caster sugar
5g salt
100g elderflower cordial from above (if you are using shop bought, just use milk here instead please)
30g egg (save the rest for egg wash)
50g soft butter
Icing ingredients
160g icing sugar
Approx 30g-35g elderflower cordial
Pinch of citric acid if you have it (tiny amount!!!) to help offset sweetness
Plus
Elderflower cordial to brush on buns and elderflowers to decorate
For the filled buns, elderflower whipped cream:
150g double cream
20g whole milk
35g elderflower cordial
Tiny pinch of salt
Plus
Strawberries and elderflowers to decorate
Method - preferment
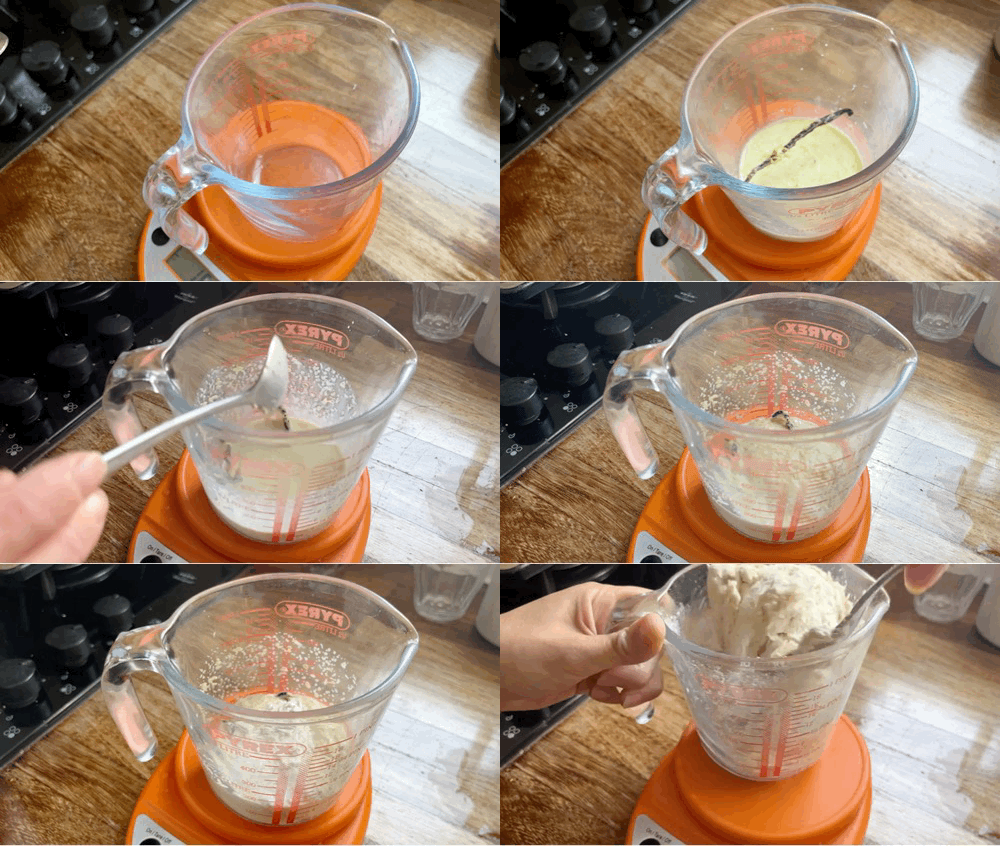
For the preferment, heat milk with vanilla and lemon zest until fragrant. Pour into a container and leave to cool to 40c then stir in sugar and yeast. Leave to go bubbly for 10 minutes then stir in the flour - it will be stiff and ugly and dry looking.
Leave for 2 hours to ferment - it will probably have doubled in size and you can clearly see the stretchy gluten developed
Method - dough
To mix the dough, add all of the preferment (remove vanilla pod if using) into the bowl of a mixer along with the flour, salt, sugar, cordial and egg. Mix on a medium speed until the dough forms around the hook and reaches medium gluten development
Add the butter in chunks and mix on a medium speed until full gluten development has been reached - the dough should be stretchy and shiny
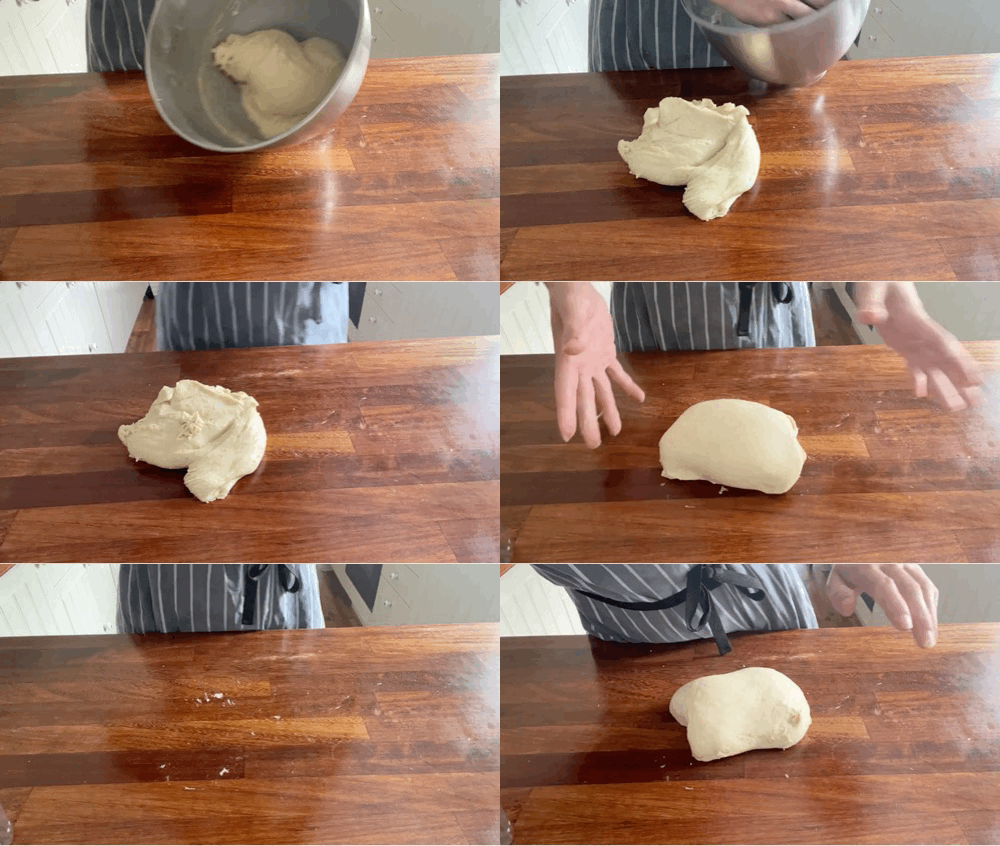
Remove dough from the bowl and perform a few slap and folds on the counter. Leave to rest for 5 minutes, covered (put the bowl upside down on it)
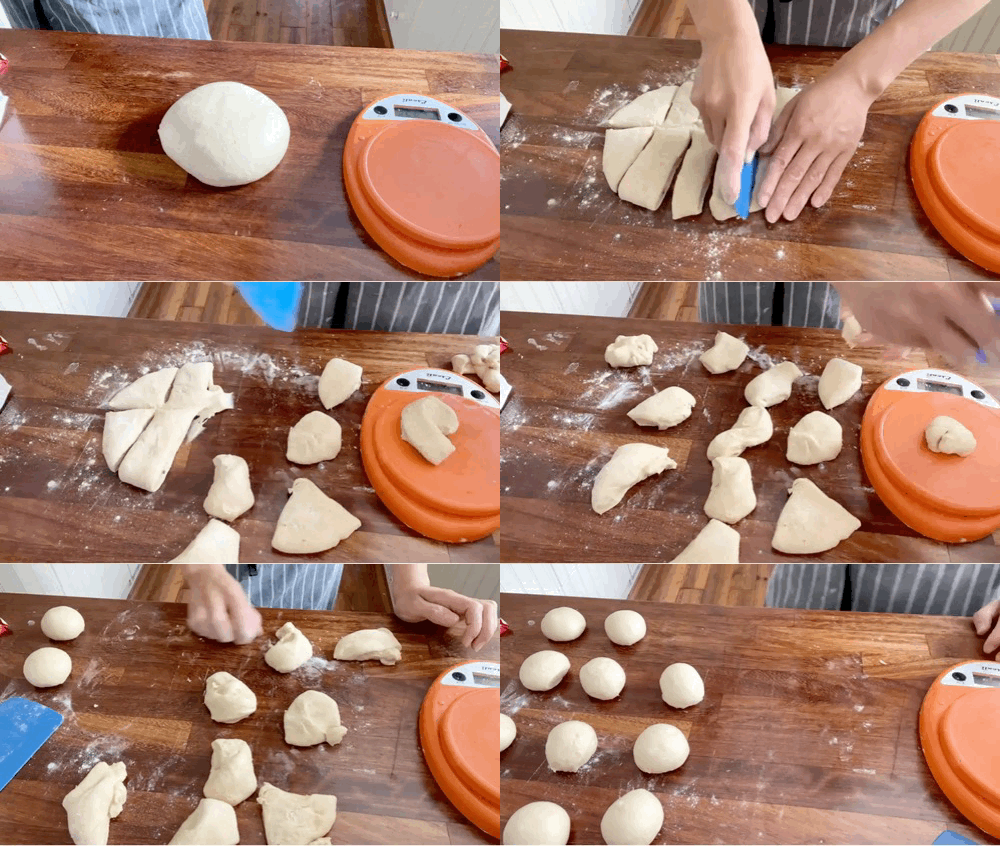
Divide dough into 55g buns and shape into 5inch sausage/log shapes - see GIFs - you want to make sure they have tension and are quite taut
You can shape using either of the techniques below - either rolling into a sausage or patting out into a flat, even rectangle then rolling up tightly. I find the latter gives you longer more elegant buns
Technique 1:
Technique 2:
Place on a tray lined with greaseproof paper with a 1inch gap in between. I do two rows of five
Cover and leave to proof for 1 - 1.25 hours - the dough logs will be puffed and touching eachother
Pre-heat oven to 175c fan
Egg wash the proofed buns
Bake for 12 minutes - as soon as they are out of the oven, douse with elderflower cordial. Be generous!
Leave to cool
Method - finishing
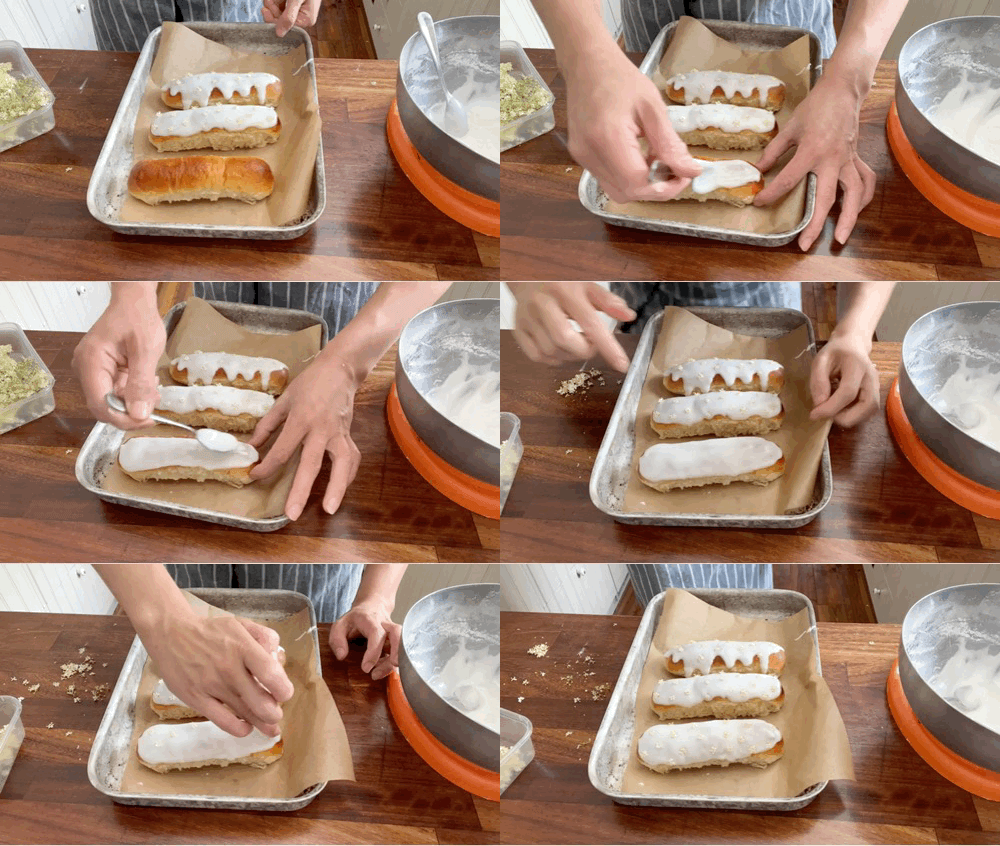
As they are cooling, mix the ingredients for the icing - it should be thick enough so it won’t run down the edges of the buns, it’s best to spoon it on
Spread icing over the top of the buns, you can either go for a drippy look or keep it neat. Press elderflowers into the top of the buns as you go - the icing will dry otherwise
Store in an airtight container and enjoy within two days
For the filled buns, split in half then douse each side with elderflower cordial
Whip the cream, cordial and milk together til soft peaks then transfer into a piping bag - cut at an angle then pipe a zigzaggy flourish on the bun
Cut strawberries and place at angles down the bun then place the top back on then finish with the elderflower icing and flowers as before
Keep in an airtight container in fridge for 2 days, but to be honest you should just eat them now!
Thanks for reading! This newsletter is a reader-supported publication. The best way to support my work is to become a paid subscriber and help keep Sunday’s free for everyone.














One thing, can I make the preferment the night before? if so, would I let it ferment for the whole time in the fridge, or would I let it ferment at room temp a while and then fridge it? Thanks Nicola
This sounds amazing, I'm definitely going to give these a go. I'm not seeing any gifs on the web version though, just a heads up!