Kitchen Project #71: Fluffy Steamed Pork buns
The first KP teacher series with Lillian Luk aka Shanghai Supper Club!
Hello,
Welcome to today’s edition of Kitchen Projects, my recipe development journal. Thank you so much for being here!
I’m so excited for today’s newsletter featuring the brilliant Lillian Luk of Shanghai Supper Club (@shanghaisupper). In the first-ever ‘teacher’ series for KP (More on that below), Lillian will guide us through the heavenly world of steamed buns and two delicious fillings.
Over on KP+, I’m sharing two more fillings - black sesame and runny egg yolk custard - so all your bun dreams can come true.
What’s KP+? Well, Kitchen Projects+ aka KP+, is the level-up version of this newsletter. It only costs £5 per month and your support makes this newsletter possible. By becoming a member of KP+, you directly support the writing and research that goes into the weekly newsletter as well as get access to lots of extra content, recipes and giveaways, including access to the entire archive. I really hope to see you there:
Love,
Nicola
Introducing the teacher series
A huge part of what drives this newsletter is a curiosity about food. Getting to explore the ‘hows’ and ‘whys’ of the food world, and passing on the tips and tricks I’ve learnt over the years is a total joy. After dropping out of pastry school all those years ago, I created my own curriculum to learn the trade - from patisserie to cakes, to ice cream, to sourdough, to viennoiserie - and I’ve been lucky to have incredible teachers and mentors throughout my career so far.
I’m the first to admit that my expertise has limits, and I love nothing more than learning and listening. That’s why I’ve decided to start a new series for the newsletter. Welcome to the Kitchen Projects teacher series.
Every now and then, I’ll be heading into the kitchen or workspace of an expert and becoming a student all over again! I’ll spend the day learning from them, asking ALL the questions, passing that knowledge onto you, and sharing their food story. I’ll also be sharing one of their tried & tested recipes for you to try at home. I cannot WAIT!
I firmly believe that knowledge is power, and I’m so excited to explore new techniques and skills with you. I can’t wait to learn all the commonalities and differences, pick up some new skills and delve into the unknown. I am so thrilled for today’s first-ever KP Teacher series, where I head into the kitchen with the brilliant Lillian Luk, the founder of Shanghai Supper Club. Last week, after kindly agreeing to be my first ever subject, I headed over to her home kitchen in Marylebone to learn all about the world of steamed buns.
Let’s get into it.
The wonderful world of buns
Lillian Luk founded Shanghai Supper Club (@Shanghaisupper) in 2014, inspired by the time spent eating her Grandmother’s cooking. Whether it is hosting in-person events or pre-order takeaways, Lillian’s food celebrates the regional cuisine of her childhood, offering ‘home cooking away from home’.
Since leaving Shanghai with her parents as a teenager, Lillian has lived all over the world from Hong Kong, San Francisco, Tokyo and London. Her love for eating (she is a self-proclaimed “skilled eater”, which I love!) and cooking good food knows no bounds, but her expertise is in creating Shanghainese homestyle comfort and street food. Feeding people delicious and nourishing food drives her - and she’s incredibly good at it. When I arrived at Lillian’s home last week, I was greeted with a bowl of perfectly slippery wontons in hot chicken soup, which I rapidly slurped down in between questions about how she started her business.
Before launching the Shanghai Supper Club, Lillian pursued a successful career in the city, but in 2014 it was time for a change. London had begun to embrace regional cuisine, but the more mellow and delicate Shanghainese cooking was still not well represented - Lillian would try to change that. Through “lots of trial and error” Lillian had taught herself how to recreate the food that brought her the most joy and would focus on bringing attention to the typical Shanghainese cooking styles in pursuit of “creating food that evokes memory”.
Lillian is known for producing distinctive Shanghainese dishes. From her signature juicy, soup-filled fried Sheng Jian Bao to ‘Nong You Chi Jiang 浓油赤酱’, which means ‘heavy oil and sauce’, with dishes like slow-braised pork belly in invitingly deep-hued and rich sauces, to more subtle, seasonal ingredient-lead cooking with delicate knife work like Suo Yi cucumber 蓑衣黄瓜 or silky pork wontons.
“The comments that move me,” she says, are when people tell her “, it’s the memory of being at home, like eating home cooking again. The ability that food has to emotionally connect you to a faraway time and place is so rewarding.” I’ve seen that evocation occur in real-time - a few years ago, I took home some of Lillian’s Zongzi for my Dad. As he opened up the meticulously wrapped parcel and tasted the sticky-soft, pork belly enriched glutinous rice, he was so happy - it genuinely made his day.
Alongside cooking for her supper clubs, private events and takeaways, Lillian is always busy keeping the fridge and freezer stocked for her family. Her frozen dumpling drawer is an envy-inducing delight, as is the perpetual chicken soup she keeps bubbling away on the stove.
It’s through food that she keeps her memories alive - the wontons Lillian prepared for me are the type that her Grandmother prepared for her at home as a child. “By feeding these to my kids, it becomes part of their memory, and when they grow up, they will always remember, and food will transport them back.”
Although there are a million and one things I could learn from Lillian, for today’s newsletter, we will be exploring a universally loved subject: Steamed buns, aka baozi. Baozi is the fluffy yeasted bun dough wrapped around all manners of juicy fillings, savoury and sweet.
There are many wonderful Shanghainese customs, like ‘Xiao Chi’ aka ‘Little Eats’ or snacks, but today’s subject is in the category of ‘Zhu Shi’ 主食 which, according to Lillian “, literally means staple food.” She explained that “at the end of your meal, usually when you are serving your guests, you may worry they are still hungry so you bring out “Zhu Shi’ - noodles, rice, wontons and buns are all considered in that category.”
Steamed buns are eaten throughout the day but are typically enjoyed at breakfast in Shanghai - think of it as the equivalent of the British bacon roll. According to Lillian, the buns are easily found and purchased from local Street Vendors who steam fresh batches from dawn. You can also get plain steamed buns, which are known as ‘mantou’ (‘mantou’ is also sometimes used interchangeably with ‘bao’ or ‘baozi’), but we’ll be focusing on the wide range of stuffed buns, and there’s no limit to the fillings! You’ll often find minced pork, tofu or vegetables for savoury steamed buns, while the sweet steamed buns will likely have sesame or red bean fillings. Lillian remembers visiting relatives as a young child and recalls “this unusual bun - it was rose flavour. Fusion has been happening for a long time.”

Spending time with Lillian, you become immersed in the interwoven space that connects food culture, history, geography and time with her lived experiences. “China had an agricultural divide from a long time ago - north of the Yangtze River, they grow wheat, and south of the Yangtze River, they will grow rice. And that shaped people’s diet.” She explained that “Shanghai is at the mouth of the Yangtze River, so we would eat rice as our main staple, our bread equivalent, but the snack food is made of wheat. But if you go north of Shanghai, wheat is the main carb, so dumplings or baozi will be the main meal for people in Beijing. In Shanghai, we have both.”
So, with the wontons all slurped, it was time to get down to business. You know me, I love all things yeasted; I’ve long been a fan of fluffy white steamed buns, but I’ve had very little hands-on experience steaming bread. I couldn’t wait to get stuck in!
Before we get into it, over on KP+, I’m sharing two sweet bun fillings you can wrap Lillian’s dough around: First, up is an outrageously delicious black sesame filling, followed by a divine runny egg yolk custard:
The runny egg yolk custard is much more typical of Cantonese tradition, a cuisine I associate closely with my Dad’s side - although he was born in Shanghai, he spent much of his childhood and teenage years in Hong Kong before moving to the UK. This works out perfectly as a homage to him, especially since this is coming out on Father’s Day in the UK. Happy Father’s Day, Dad! I wish I was there to give you an egg yolk bun!
Right, let’s do it.
All about the dough
Going into my day with Lillian, I had a series of questions about the science and technical aspects. There are many commonalities to be found in yeasted doughs, but the unique differences and treatments of the variables particular to each cuisine are so exciting. I’ll break down each step of the baozi with Lillian’s guidance and expertise.
The baozi dough is a simple lean dough - Lillian’s tried and tested recipe combines plain white flour, water, yeast, baking powder and sugar. When making the dough, you should only start it when you’re ready to go because the process can go quite fast. Lillian doesn’t recommend making the dough in advance, which we’ll go into next. Let’s go deeper!
The flour
Lillian chooses to use plain white flour with a protein content of around 10%-11%, but she encourages you to adapt the dough to suit your tastes. Like all recipes, it's important to understand where you can tweak the ingredients to get your desired results.
Like your buns super fluffy? Use cake flour or a very low gluten flour. Want something extra soft? Add a little oil. Prefer a chewier bun? Try using a portion of or 100% bread flour for your dough. Many of these attributes can be traced back to different parts of China.
To achieve the bright white fluffier buns you might see in Cantonese cuisine, you’ll have to seek out very low protein, bleached flour. Lillian explained that the bleached flour “has low protein, no nutrition, no taste, but a beautiful colour.” These differ from the buns that Lillian is teaching us today. The buns she grew up with “were a little bit yellow and had a chew, but a balance between softness and chew.”
She continued, “if you go even further north, it’s different. I recently ate at a friend’s house, and her nanny was from Northern China, which borders Korea, and they use bread flour to make buns - it has more texture, it’s a lot more chewy. So it all depends on preference and where the buns originated from - so much depends on what people had near them in terms of the grains they were growing.”
The water
After experimenting with a variety of hydration %, Lillian settled on 54%. This creates a supple, tender dough that is firm enough to be shaped into intricate pleats.
However, It’s worth remembering that a higher protein flour will absorb more water and vice versa, so you may need to slightly adapt the hydration. Lillian has figured out what works for her flour over the years: “One of the very early cookbooks I bought on how to make bread is a Chinese book and they say, I think, 60% water. And I thought, oh my God, that’s so much water! But you don’t know what the flour they were using. I think Northern Chinese tend to use harder wheat varieties, so they would’ve been able to absorb a lot more. So you just have to go with what feels comfortable.”
Salt
There is no salt in the baozi buns. Salt strengthens gluten and slows fermentation; we aren’t looking for either of these qualities in a steamed bun. As well as this, the bun dough is favoured for its texture rather than the flavour, so we instead focus on ensuring that the filling is really well seasoned. The ratio of filling to dough is very high, so a lack of salt in the dough itself isn’t an issue from a flavour perspective.
Raising agents
The baozi dough has a relatively low % of yeast - just 1% as we are not seeking a sky-high loaf - we are simply looking for a puffy, fluffy textured bread. When it comes to bread, some favour highly fermented or yeasty flavours, but I learnt that this is not a flavour profile that we are seeking for the baozi. This is why it’s best to make the buns as soon as the dough is ready. As we know, cold or long periods of fermentation results in additional flavour compounds that don’t meld with the baozi - the ideal dough will have a slightly sweet but fairly neutral flavour, focusing on the texture.
Lillian explains to me that the addition of baking powder, in her experience, “doesn’t add extra fluffiness, but I noticed it neutralises the taste of the yeast. Yeast has a sour taste that you never taste when you eat in China, so the baking powder helps.” Lillian acknowledges that baking powder “might help things be a bit fluffy because it generates CO2, but I don’t think it’s good for ‘rising’ rising!”
Lillian’s original recipe uses fresh yeast - she lives near a Swedish shop that sells it - but you can use dry. Although it works, she has tested this variable and found that ‘compared with dry, the fresh yeast buns come up fluffier! And we thought it was a bit sweeter - a little bit more puffed, a little bit more fluffy.”
To limit yeast activity, Lillian doesn’t recommend making this dough in advance ‘or it’ll definitely be over. You can do it, but then you need to add more flour and water the next day and treat it like a pre-ferment, and the dough is already fermented.” So, although it can be done, it isn’t highly recommended.
Fat
Some baozi recipes will include a portion of vegetable oil, but Lillian doesn’t utilise this in her dough. “It does enrich, maybe the dough is a bit softer, but for the shanghai style bun, we don’t want that texture. For a lot of Cantonese buns, the dough is much fluffier or softer, so many of the ingredients choices will come down to the regional differences in China.” As we know, fat inhibits gluten development, resulting in a more tender bite.
Gluten development
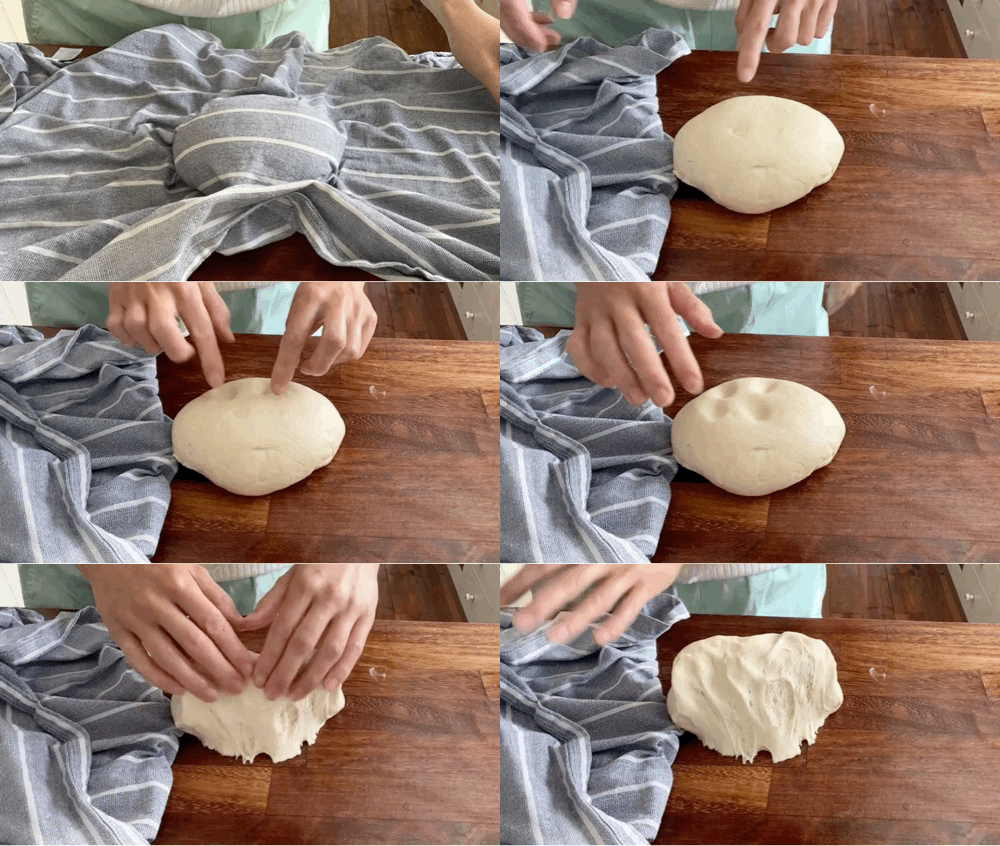
It is important to develop the dough to get really smooth-skinned steamed buns. Lillian starts her dough in the mixer to get it homogenous before kneading it briefly on the counter - she pays close attention to how strong the dough is feeling. If it “looks very tight, it needs to rest” - Lillian rests her dough in a neat shape under a damp tea towel. “We just need a medium level of development - only keep kneading it until it is cohesive and it’s not going to go any further” - good news for those of us that can’t stand being told to knead until very smooth and elastic. Rather than focusing on gluten development, Lillian is more concerned with fermentation, which we’ll cover next.
For low hydration doughs, judging gluten development is hard - it doesn’t have the same gluten development stretch you can easily track with a higher hydration dough. Lillian subscribes to the same camp as me and agrees that resting is one of the most important parts of gluten development! Gluten develops without mechanical kneading, and the dough may just need time to relax before it shows the actual level of development. If you work the dough too hard, “you see all these tear marks - you can see it’s really tight. It needs to rest.”
As Lillian tells me, “with bread, everything matters. Like, if you throw it down and just leave it, it won’t expand in an even way. So putting your dough in a nice shape is important for it to expand properly.”
The deal with proofing (first and second)
One of the biggest questions I had about baozi for Lillian was how she dealt with the traditional first & second proofing system. Much like the Japanese curry bread, we don’t actually want there to be a huge, puffy dough around our filling - we are not solving for maximum expansion.
Regarding the first proof, Lillian tells me, “over time, I’ve ditched the common wisdom of letting it prove. I want the air to build, but I’m not looking for doubling then beating it down. When I’m making a lot of buns, I have the risk of over-proofing.” But what about smaller batches? “Maybe if you are doing smaller amounts, there is no difference, but when we make 200 buns for a takeaway, managing the fermentation activity gets harder and harder.”
Ampha, who helps produce Shanghai Supper Club with Lillian, made up a large batch of dough. The dough was mixed for 5-10 minutes in the Kitchen Aid until homogenous. As it was a warm day, and since the dough was already hot from the mixing, it was proofing quickly on the bench, and there were already air pockets visibly forming.
“My first proof is very quick. Then you have more control once it’s wrapped, and you can choose how much you want to prove the second time. I find that the consistency of the bun is better.”
Managing the proofing is all about thinking forward to the final texture. “If you push the buns too far, you end up with big air pockets, and then you lose all the juice!” says Lillian, as she kneads the dough to break down any big bubbles that have formed - the dough squeaks slightly as the air pockets are broken down.
I tested small versions of Lillian’s recipe on a warm day and will share my approximate proofing time guides, but you may be happy to hear that there’s no waiting around for things to double. With such a low yeast % of 1%, we would be waiting a long time for that, resulting in an unfavourable formation of flavours. We are so used to being told to proof until double (probably as an insurance policy against mass under proofing!), but as Lillian tells me, “I never do that because all of my buns are going to be over-proofed by the time I steam!”
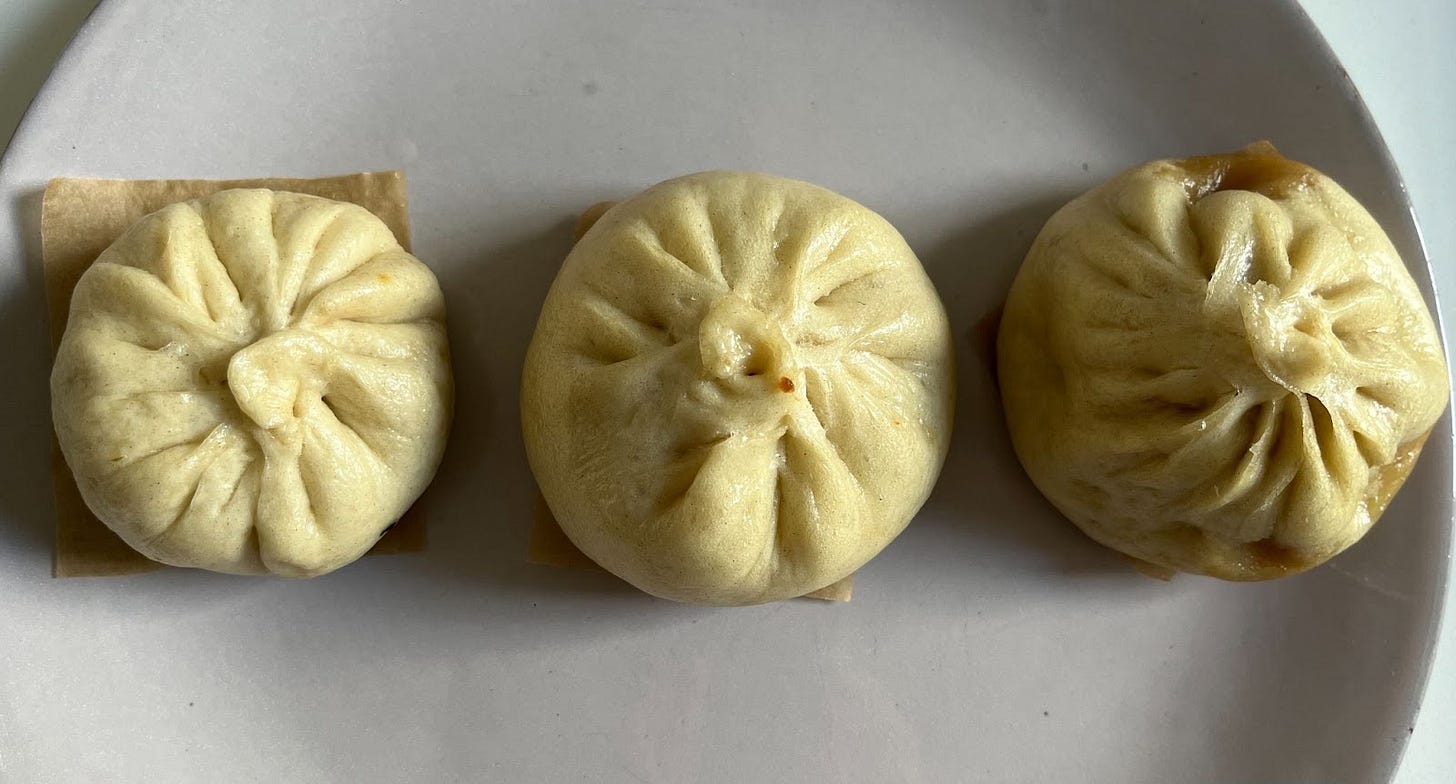
For the second proof, when the baozi are in shape, we want the buns to be slightly puffed but not doubled and there should be, “a scent of sweet rice wine which indicates the right level of fermentation.” On a warm day, 15 minutes is enough. On a cooler day, 30 minutes might be more appropriate. We also found that the over-proofed buns tended to leak a lot more:
For the plain steamed folded bao buns, you do benefit from a longer second proof - since the bread is plain and we aren’t thinking about the fillings, you want to aim for fluffiness. I do wait until the buns are very visibly puffed - about 45 mins - 1 hour, before cooking. You can do it right away but they will be a bit flatter:
Ratio
One of the keys to success is ensuring a proper ratio between filling and dough. After years of experimenting, Lillian uses 30g filling per 40g dough for steamed buns. “It’s not too big, not too small. I’m trying to recreate what you see in Shanghai, and this came out to be the right size.” For the filling, Lillian likes to be generous “you want to have just as much meat as dough! My mum tells me I put way too much meat in there and says, ‘if you do business like this, you’ll never make any money!’ But it’s how I want to eat, and that’s the right ratio for me.”
One of the most interesting considerations for the filling is the way they behave during the steaming. “One thing I always tell people to think about is when you’re making dumplings or buns, is that you have two ingredients going opposite directions as you cook - the dough is getting bigger, and meat, whatever stuffing you put in there, is shrinking.” This is a great point - when meat cooks, it contracts and shrinks as the meat fibres tighten and juices are released, but the bun is rising away from it. “This means you need to get the balance right; you need to think about how much shrinking you’re going to get relative to how much expansion is happening.”
Keeping a modest size can help with this. “I don’t like big dumplings because I think you get a poor outside to inside ratio. You don’t want a huge fluffy bun - the dough is a wrapper for the stuffing, so it needs to be fluffy, but at the end of the day, it’s a wrapper and fulfilling a purpose.”
Shaping
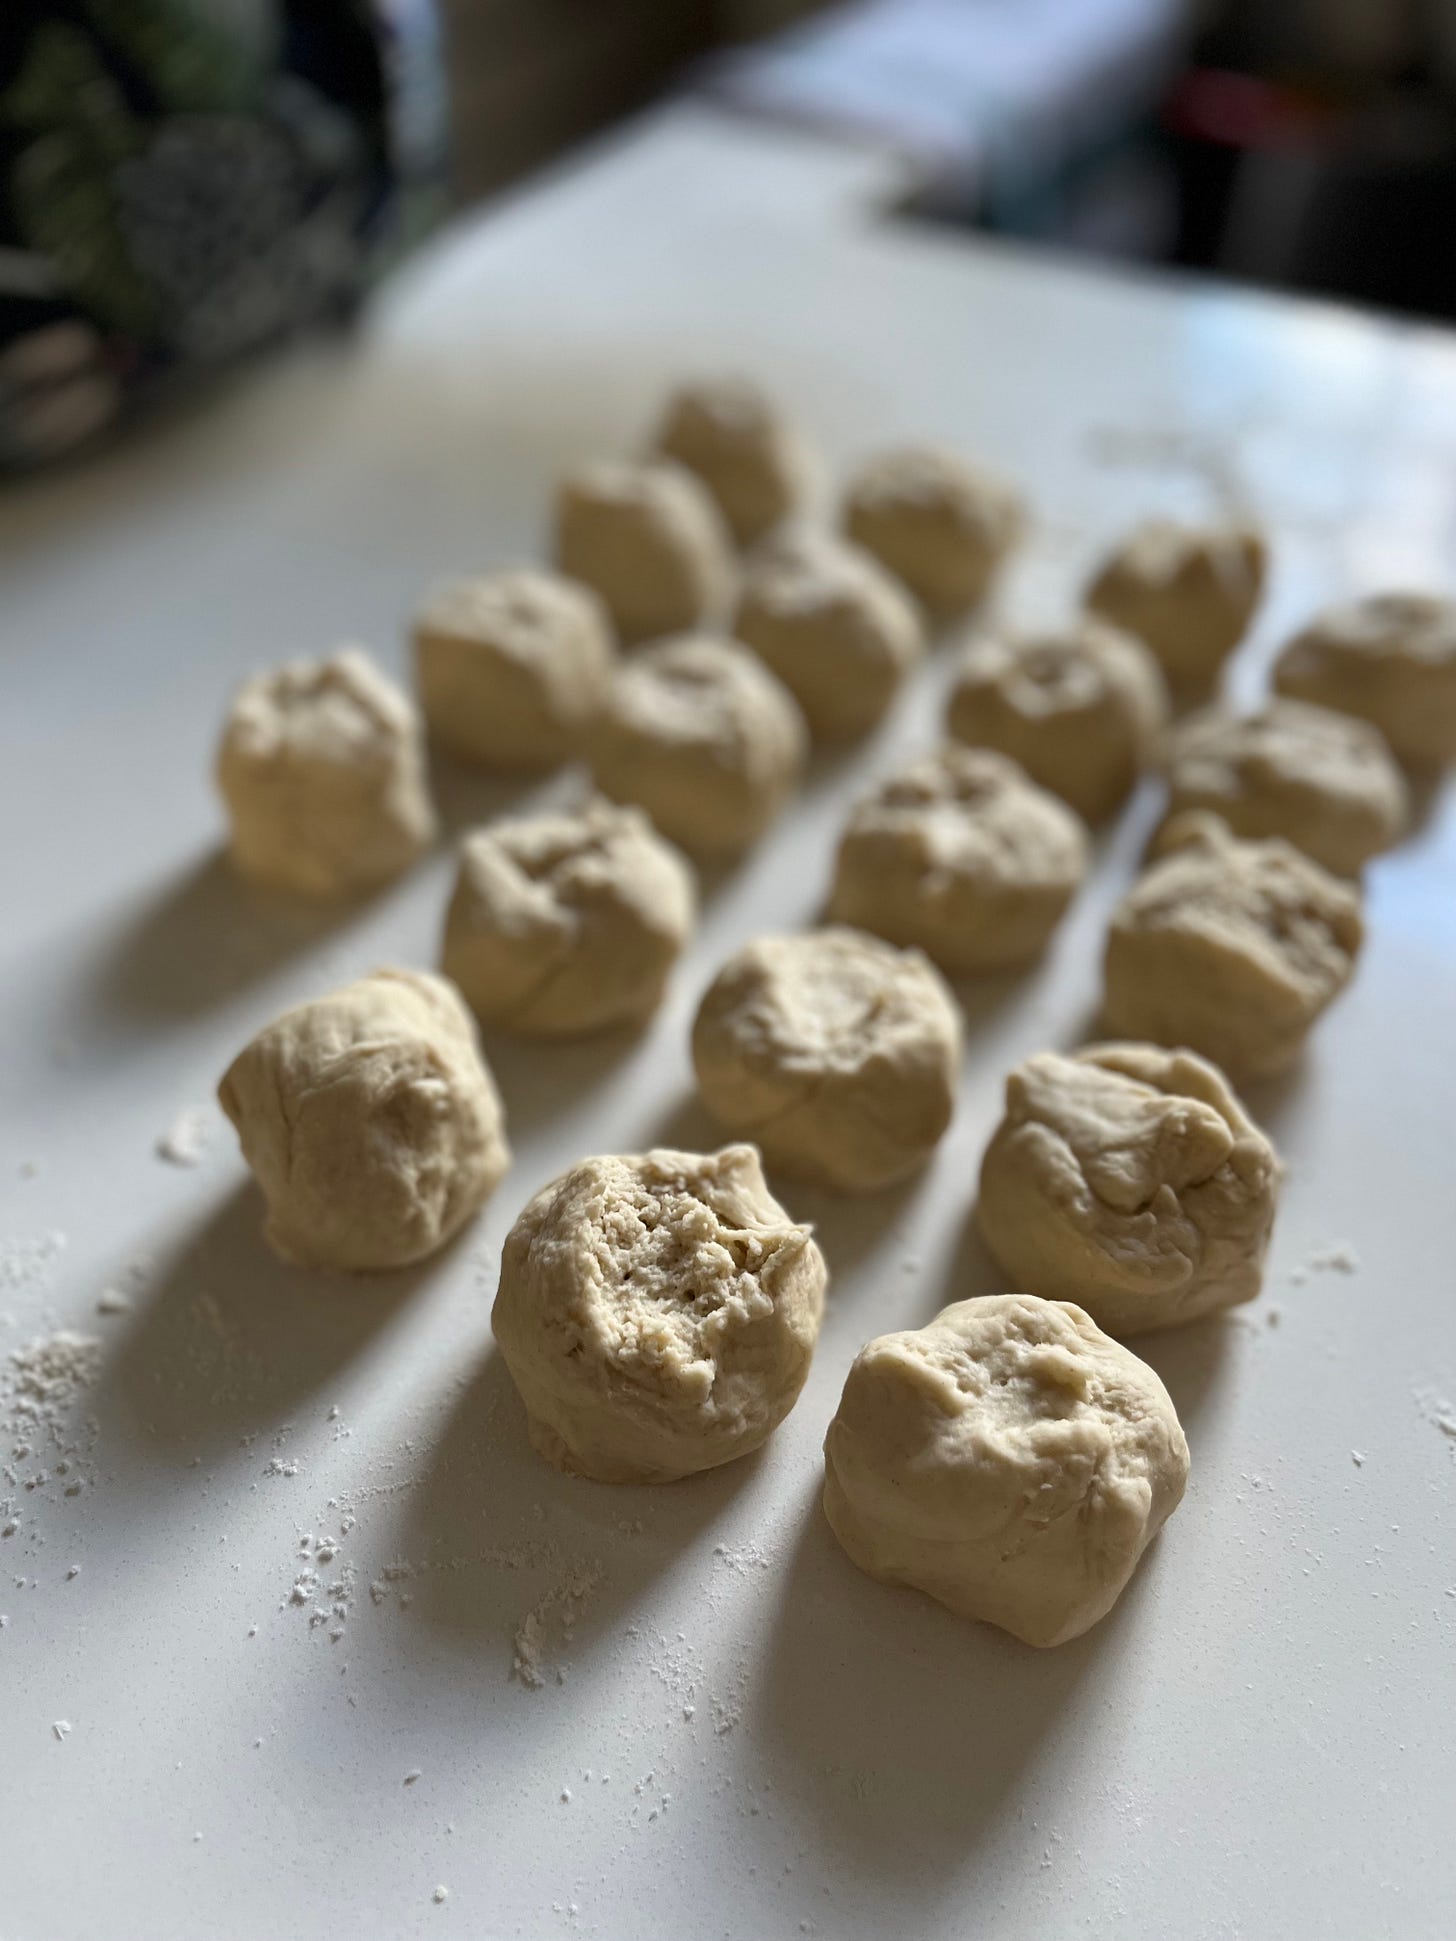
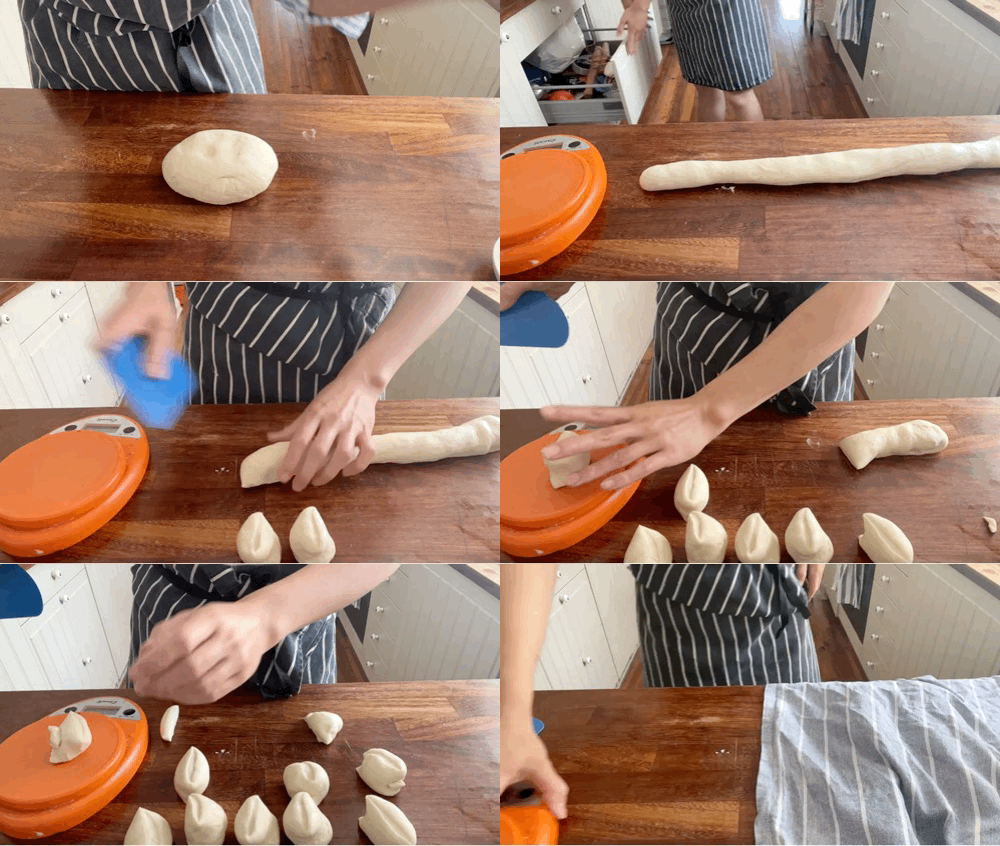
The key to great-looking baozi en masse? Team work! When it comes to making large batches, there’s a production line system - Lillian usually rolls out the dough whilst Ampha stuffs them. But beyond practice and teamwork, Lillian shared useful tips on how to keep things neat; Once the dough has rested, roll it into a rope and cut your 40g pieces, then flatten the pieces - cut side up - with the palm of your hand. “Always have the cut side up,” says Lillian “it has to be this way because that’s the way the gluten stretches”, and it helps keep the dough stay in shape. When rolling the dough, focus on making the edges thinner - it should look like a fried egg and be about 12cm in diameter.
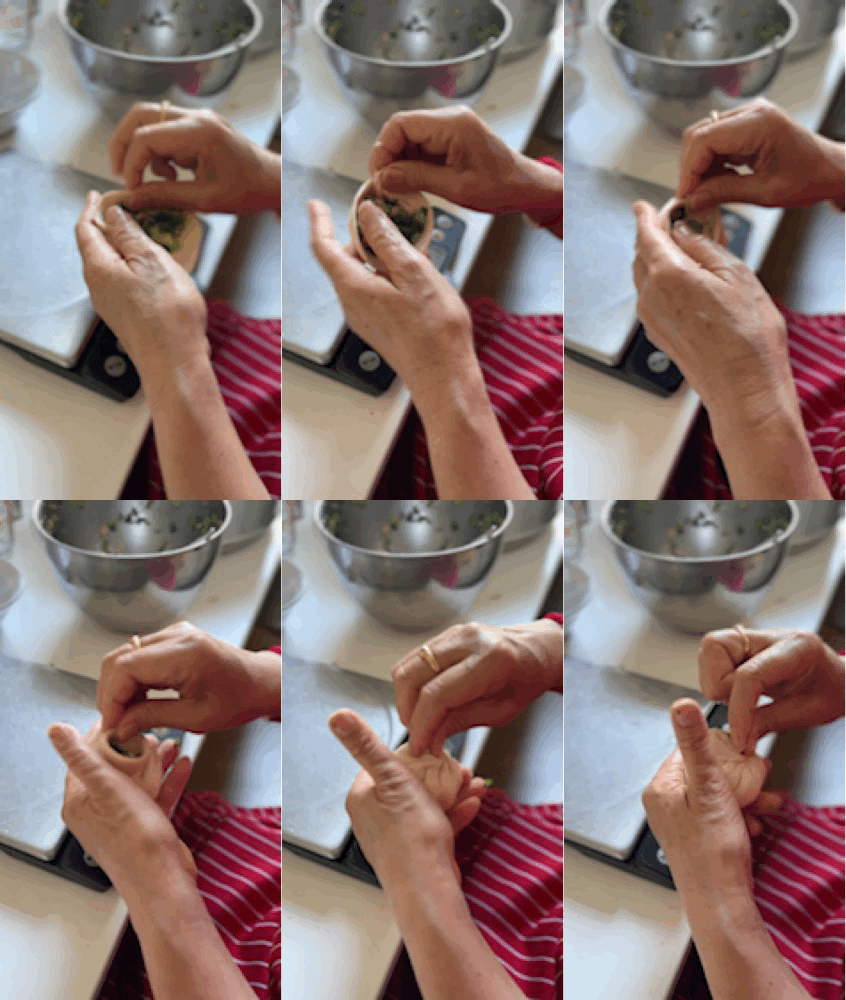
When it comes to filling - practice makes perfect! If you are right-handed, like me, I find it easiest to hold the bun in my right hand and pinch together the pleats with my thumb and forefinger, constantly turning it using my left. “In theory,” says Lillian “, you shouldn’t be moving the right hand. But by the end, it can sometimes feel like your hand is in a knot.”
Does the number of pleats matter? “No, I just do it until it’s closed.” Phew. Although it might be tempting to reduce the proportion of filling, so it is easier to pleat, Lillian doesn’t recommend this. “You want the filling to be snug; otherwise, you bite into it, and there’s a lot of empty space.” Don’t worry too much, though - as the buns puff up in the steamer, you may not notice any pleating crimes either - some of the buns I made at home actually came out looking half respectable! But if you’re really displeased with your work, rest assured you can always just gather the dough together and close completely, then cook pleated side down.
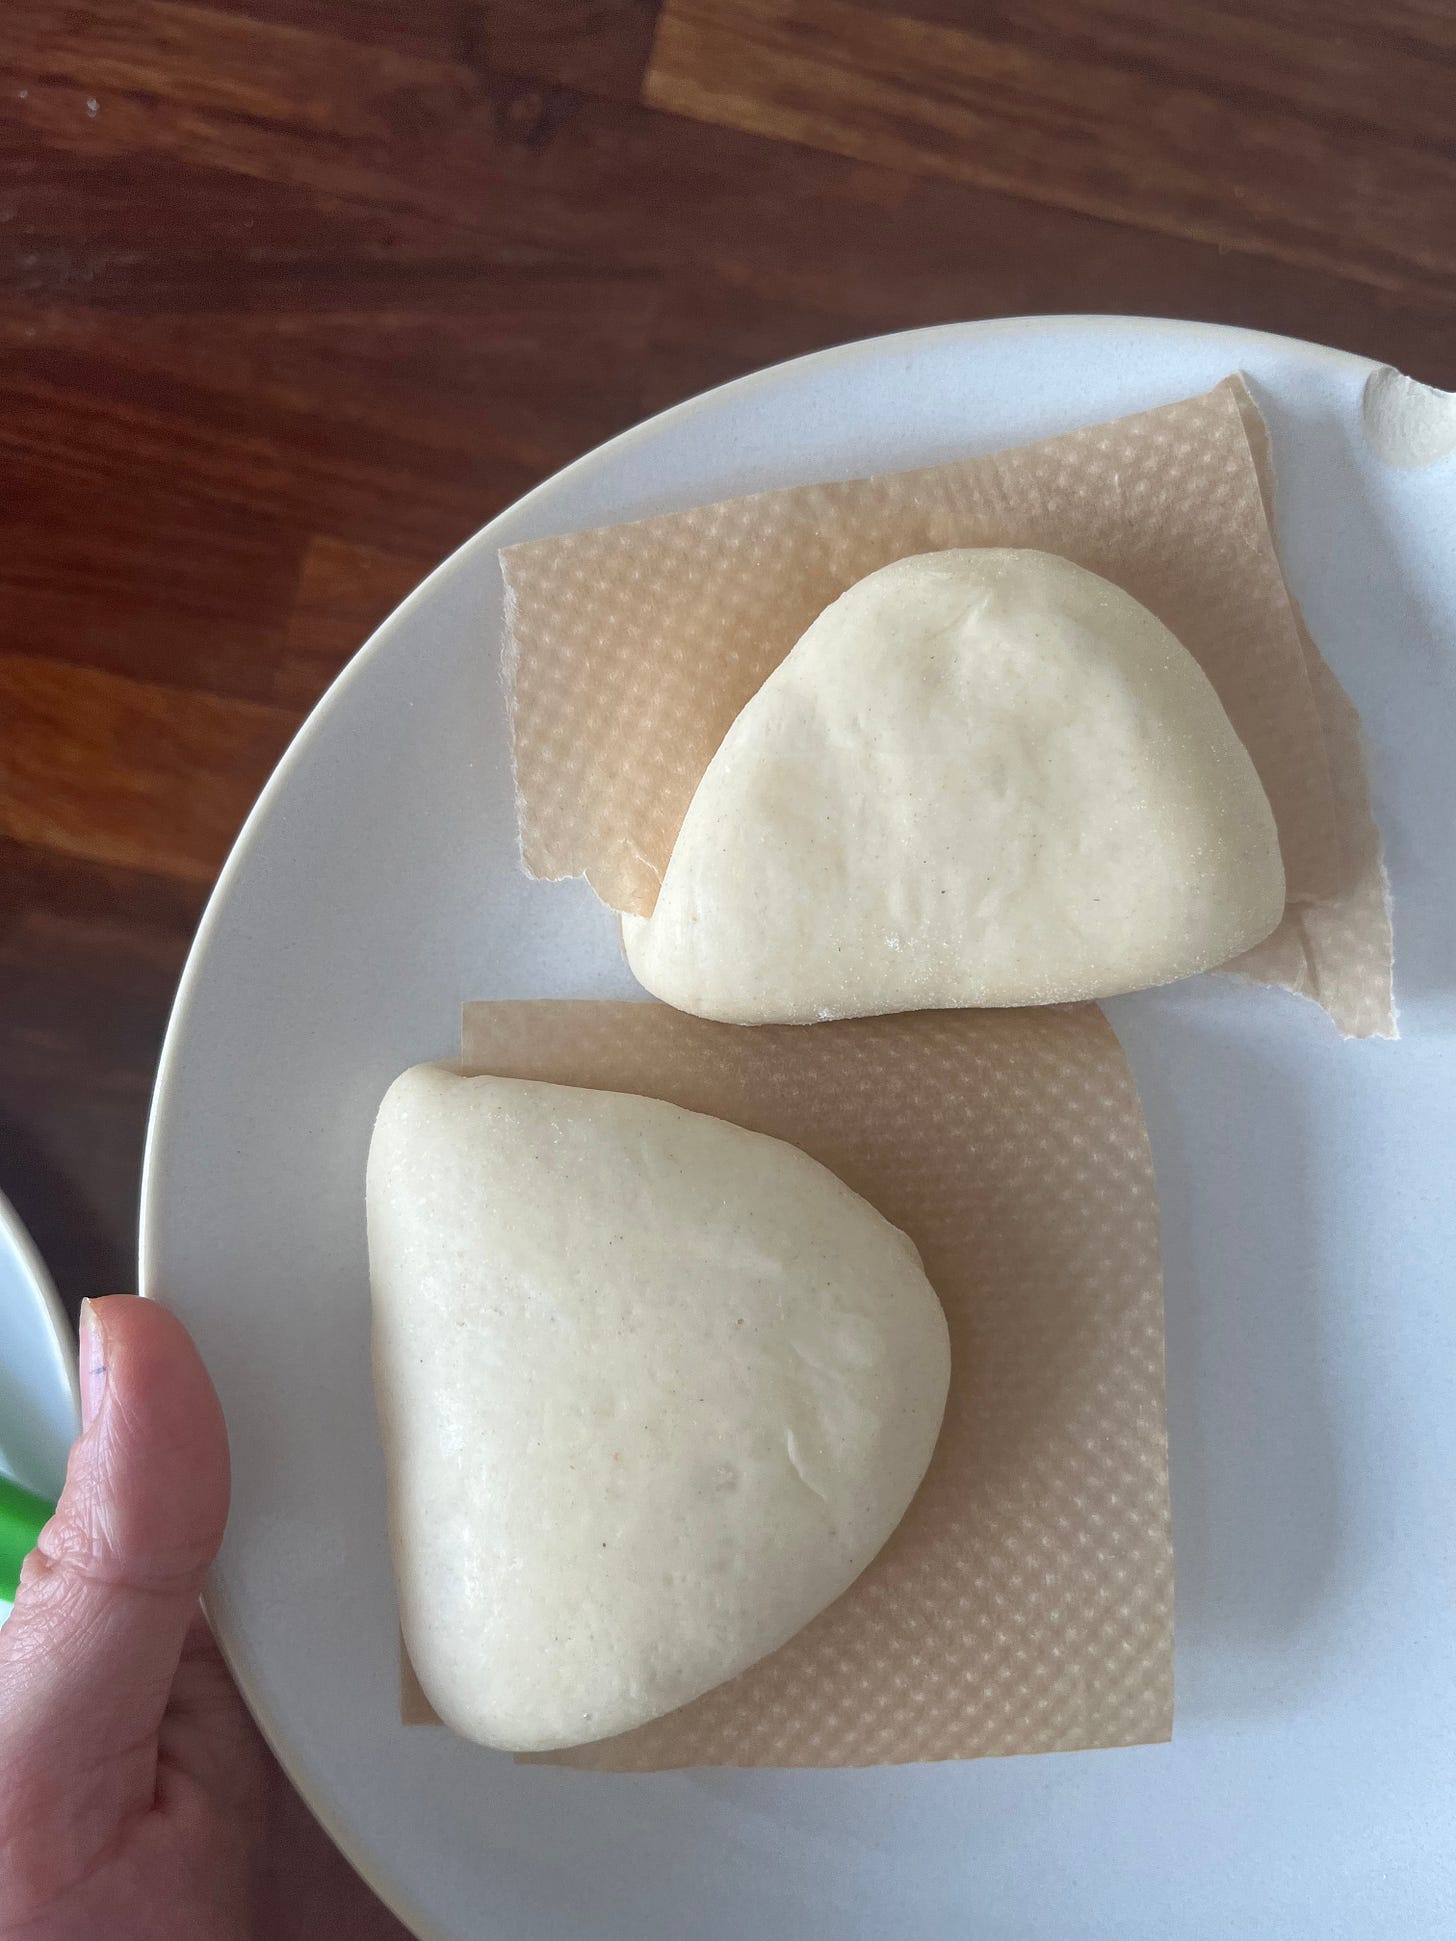
If you want to make plain bao buns that you can stuff later, make the dough slightly larger - 50g ish - then roll it into an oval and fold over a piece of paper so it can be easily removed later. I think the plain bao buns benefit from a longer second proof in shape - you want these to be quite puffy.
The filling
Lillian has shared two wonderful savoury filling recipes for today’s bun dough. Different techniques are used to build and balance flavour - Lillian explains that in the Shanghai region, “the cooking philosophy is not so much additive - it’s almost reductive. Ingredients come from many places, from the rivers, the sea, and rice paddies, and they all have distinct tastes.”
Lillian uses ingredients like ginger, soy sauce and Shaoxing wine not to make her food taste of ginger, soy sauce or Shaoxing wine but to balance flavours, “like the muddy taste of a river fish, or like the overly briney-ness of an ocean fish. A lot of my seasoning comes from that philosophy - rice wine, ginger and green onion are the trinity!” She explains that the point is “not to taste anything distinctly later… it will just taste good!”
For the pork filling, Lillian mixes fatty pork mince, salt, sugar, soy sauce, Shaoxing wine, ginger and water. It’s important to remember that “it doesn’t matter if you use soy sauce - you still need salt! Salt is a different type of savouriness from soy sauce, and they are not mutually exclusive. If you need more salt, add salt, not soy sauce!”
Sugar is essential to balance the saltiness and yeastiness from the soy and wine, but I’m warned, “Sugar is not there to make it sweet! It’s all about balance.”
When it comes to the pork mince, you definitely need fat, ideally 20%. As a rule of thumb, the more fat there is, the juicier your bun filling will be. BUT, if it’s too fatty, I found that it doesn’t combine with the other ingredients since the fat won’t absorb them properly. I picked up pork mince ranging from from 5% (very lean) to 30% (very fatty) from my local butcher. By mixing different quantities of the two cuts, I explored a variety of combinations. The 30% fat buns were incredibly juicy - too juicy, if such a thing exists - and, as Lillian warned me, the very lean buns had an underwhelming, dry texture.
The other thing to look out for is how finely ground the pork is - “You don’t want it not to be super fine as you get a very dry texture”, says Lillian, “It all just squishes together. It’s actually counterintuitive - you might think you need really fine ground meat to make really soft meatballs, but if it’s a chunky size, almost like a corn kernel, you get them really soft!”
To help with juiciness, Lillian adds water, adding moisture without any fattiness and creating “a lovely juice when you steam them”. I asked her whether this amount of water changes depending on the mince. “I’ve gotten to a point where I just have a set amount that works for me - I like about 20%. You can push it further, but I don’t think you need to for the steamed bun.”
When adding the water, it’s sensible to add it bit by bit, otherwise, “it will just slide around too much and get water all over you! It gives you control when you’re first starting, and you want to get comfortable with the process of beating water into it.”
Although it isn’t usual practice in Western minced meat dishes, like burgers and meatballs, it should be - it just makes so much sense and improves the softness and juiciness of the final dish. As Lillian explains, “the meat relaxes after the water has been beaten into it, and when you steam it, it’s nice and loose, and the water comes out evenly. There’s nothing worse than if you were to steam it and end up with a tight ball of meat clumping together in the middle!”
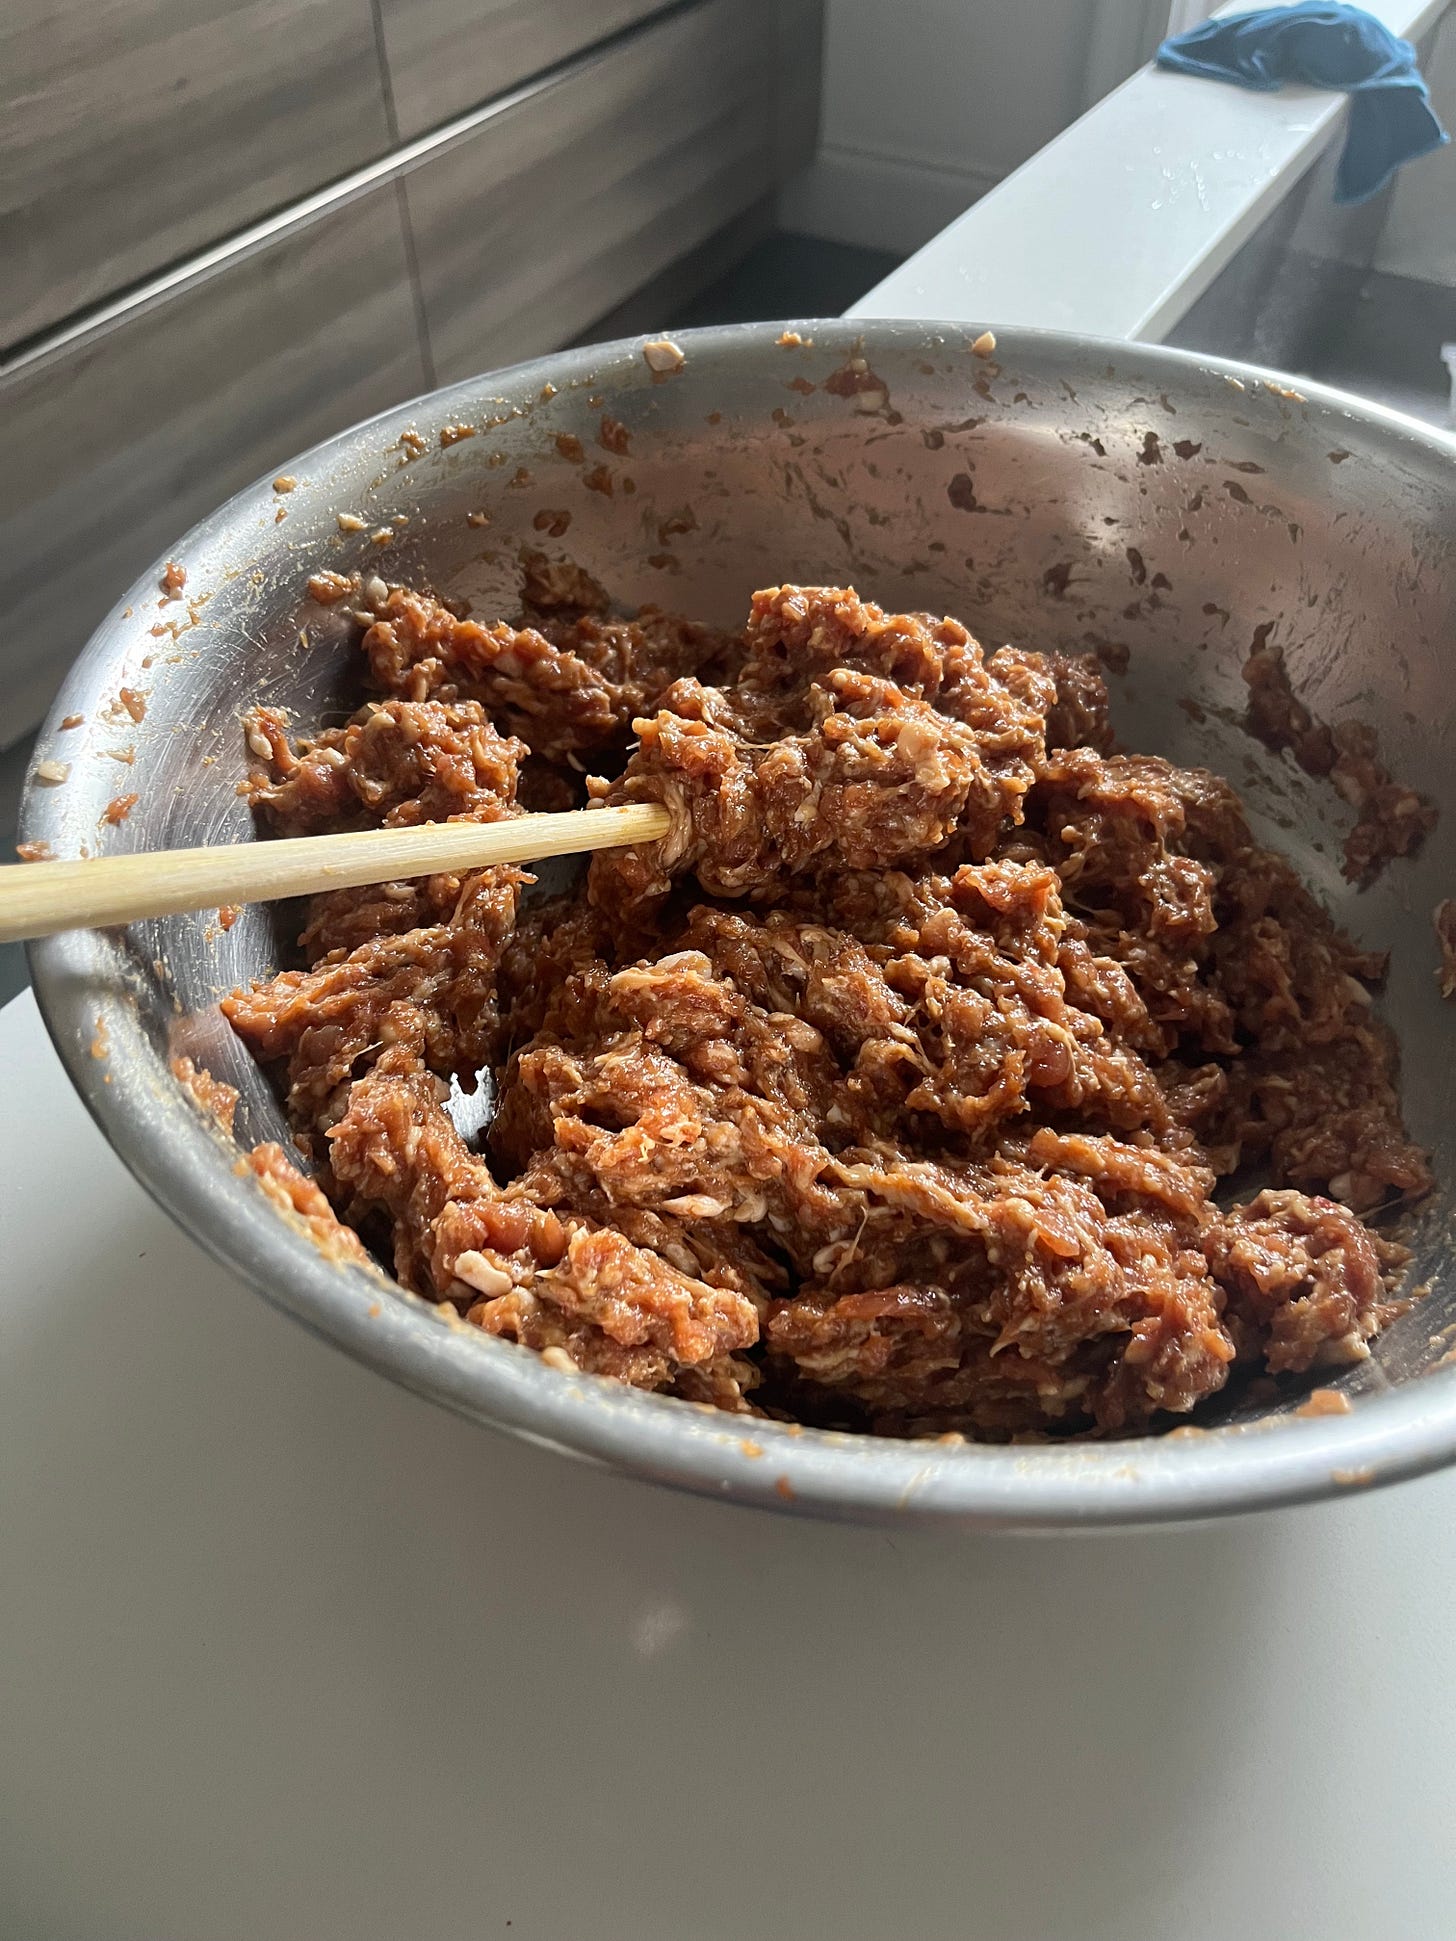
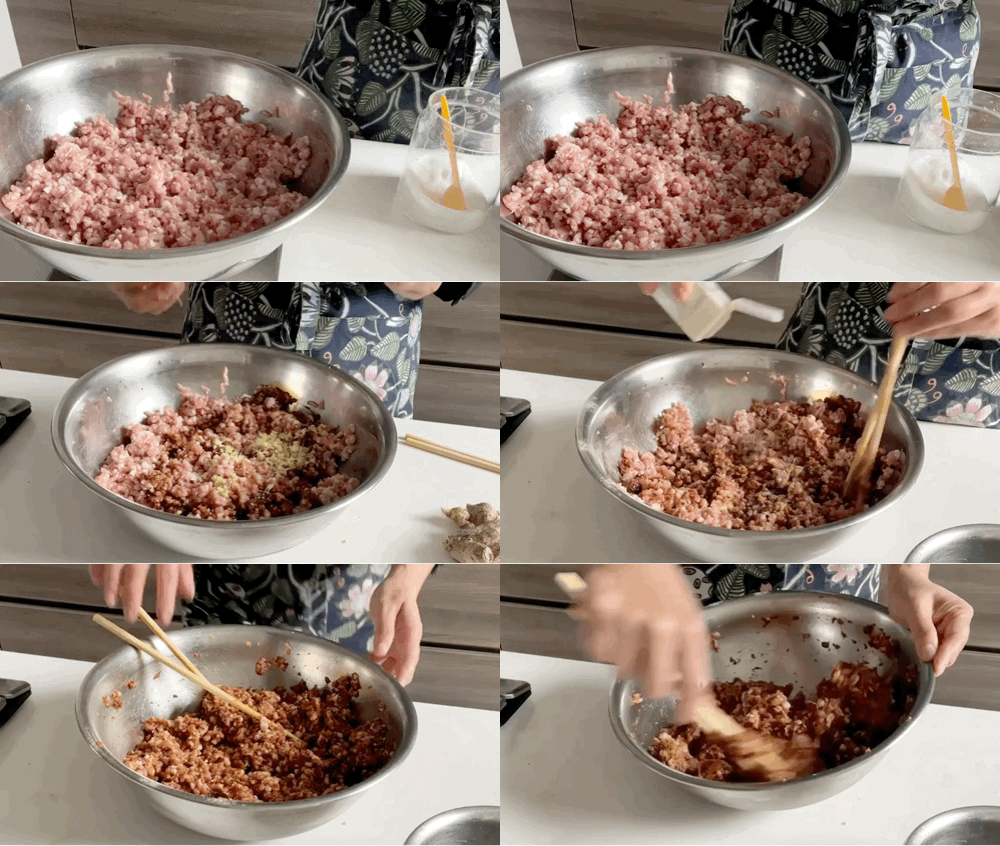
Chopsticks are Lillian’s tool of choice to mix the filling. “I like it because it doesn’t mash the meat together too much. It just kind of mixes everything but doesn’t clump it. I cook everything with chopsticks - it’s the most versatile tool!” Once mixed, it is left in the fridge to firm up so it is easier to handle, though it can be used immediately.
For the vegetable filling, it’s all about managing textures. Lillian uses a combination of green veg - Shanghainese pak choy (also known as Qing Cai) - rehydrated shiitake mushroom, winter bamboo and sesame oil, and “large quantities!” of salt and sugar because the vegetables are “quite mild.”
To help control the moisture content and texture, the pak choy must be blanched, diced and then squeezed to release water, or it will be “very, very crunchy. It’s a very high water content vegetable, like 95%, and we’ll squeeze out more water before combining it. If you start with 1.2kg, then I normally end up with less than a kilo after I’ve prepared it.”
The dry shiitake is ideally soaked overnight in cold water - since Lillian isn’t using the soaking liquid in this recipe, “too much of the flavour is lost” if you use hot water, though it is faster. After the excess water is squeezed from the mushrooms, they are briefly fried. “Mushrooms need heat! The earthy flavour is so much better - otherwise, it can just be spongy. Stir-frying helps release the fragrance.” And when you fry them, don’t scrimp on the oil. “For this vegetarian stuffing, you need to have fat, and you’re not getting it from anywhere else.”
You can use fresh shiitakes if you can get them, and it will be “a different taste,” says Lillian, “but probably still delicious. And you still need to saute first.”
As we know, salt and sugar will draw the water out of our fillings, so Lillian doesn’t season until the last moment - everything else can be prepared in advance. When it’s time to fill the buns, the rest of the ingredients are added. “Green veggies and sesame oil have a slightly bitter taste, so you add sugar to balance it out. The salt helps improve the mild flavour - no soy sauce! Soy sauce is not so much a green veggie thing.”
To adapt the filling to what you may already have at home, Lillian suggests, “you can add tofu. But the challenge for the vegetarian stuffing is always the water content, so add dry tofu; otherwise, it’s even more water!”
Steaming times
The recommended steaming times for the buns will depend on the filling. Lillian suggests that 8-9 minutes on medium-high heat is enough for the vegetarian buns. “If you cook for too long, the problem is immediately visible when you bite into it - it’s no longer green.” She explains, “I want you to bite into it and see green! And the vegetables will become yellow. That’s not attractive.” As the filling is already cooked for the vegetarian buns, we don’t need to worry about cooking through.
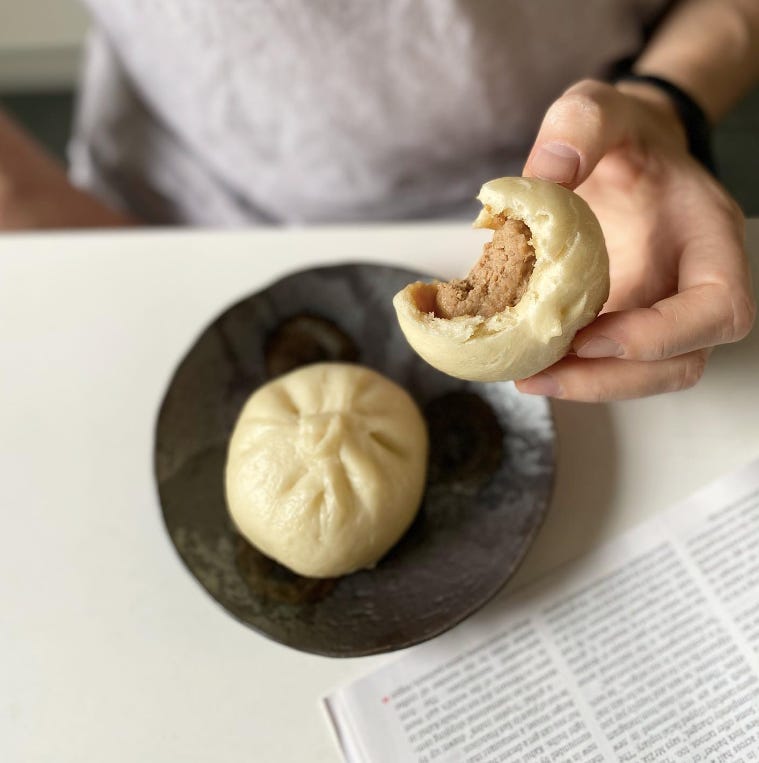
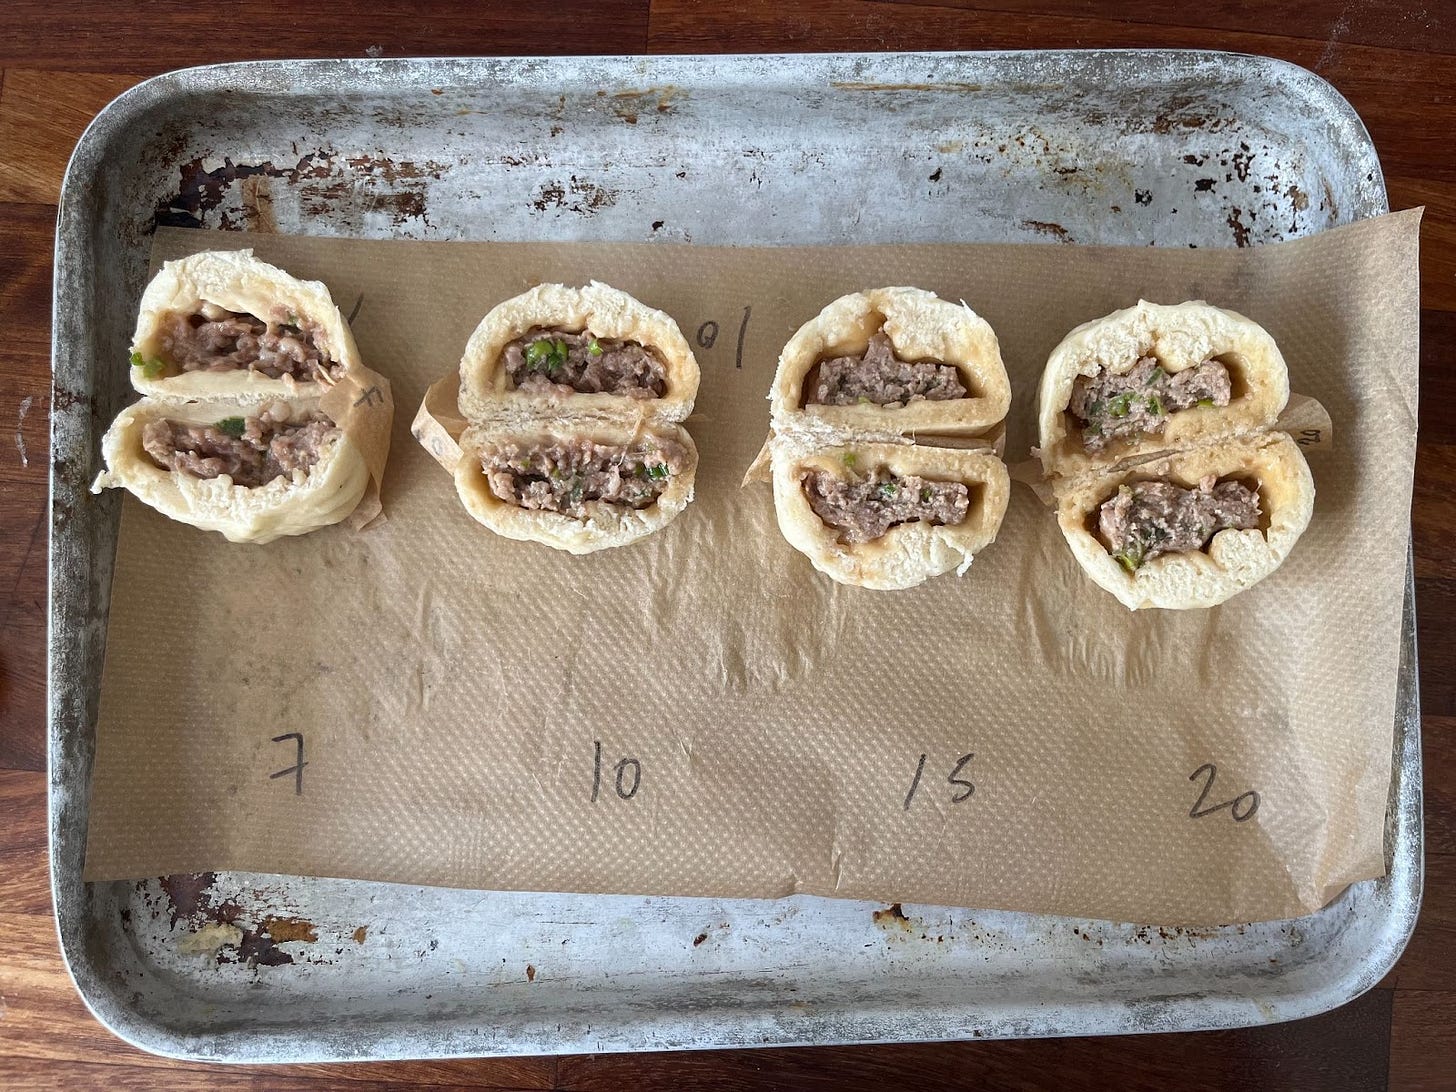
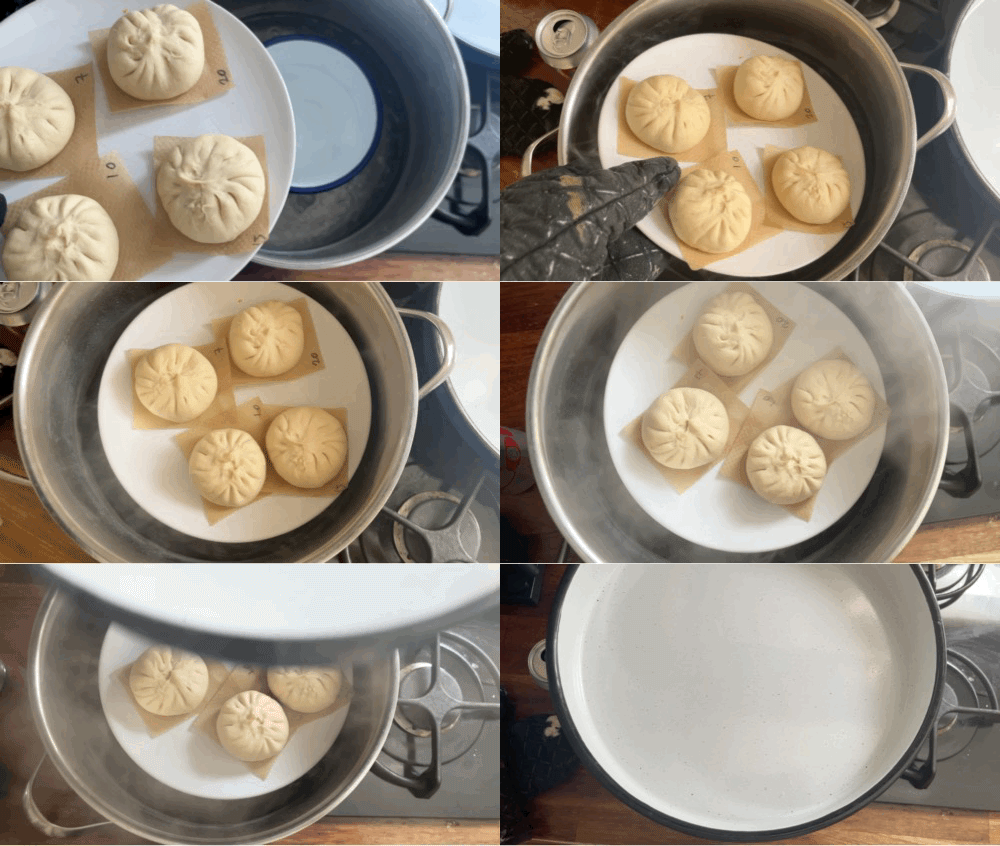
For the pork buns, the steaming time is increased to 11-12 minutes on medium-high heat. I put the pork buns to the test:
At 7 minutes, the dough is a little raw and the pork is not fully cooked. At 10 minutes, it is *just* cooked, though definitely on the cusp, so 11 minutes is perfect. At 15 minutes, it is well cooked through and the filling has begun to shrink. At 20 minutes, it is quite similar to the 15 - the dough is quite thick compared to the filling and the juice has begun to leak out into the dough.
Don’t have a steamer? No problem! Just fill up a wide saucepan with a little water, then add a heatproof bowl with a little water in so it doesn’t float. Put your buns on a plate, then balance on the bowl and add a lid… there you have it, a DIY steamer!
A note on perfection
If your buns burst a bit whilst steaming, or if they’re a bit over-proofed, or if they’re not neat and tidy… don’t worry too much. As Lillian told me, “Consistently making perfect buns is a real challenge - it’s really difficult because your kitchen conditions change all the time. Even in a professional kitchen, you have to make it again and again, and you’ll always have issues! Temperature change, it gets too hot, it gets too cold, over proofing, under proofing.”
She continues, “Even in bun shops.. they will have ones that leak! There will always be ones that are not just perfect like Instagram… so I just relax about it”. Wise words for us all to live by!
Freezing and storage
Buns are best enjoyed fresh, but Lillian recommends that ‘If you eat on the same day then leave at room temp and cover in a container or with a towel. Because we always eat them hot, so steamed up again, so the skin is not an issue.’
For longer-term storage, the baozi should be frozen AFTER cooking and then refreshed from the freezer. “In principle, they should still fluff up’ says Lillian, “as we do our Shen Jiang Bao from frozen, but we tried [baozi] at the beginning of my journey, and it just didn’t fluff up; it was like a dead dough. I don’t know if it was a problem with the dry yeast or how long we froze it for.” - either way, Lillian prefers to “freeze after steaming, then just warm it up when you need it!”
Shanghai Supper Club Steamed buns
Recipe by Lillian Luk @shanghaisupper
Makes 10 steamed buns
Baozi dough - Makes 10 buns, 40g per bun
250g plain flour
2.5g dry yeast (just over ½ tsp) or 5g fresh
3g baking powder (approx ½ tsp)
3g caster sugar (approx ½ tsp)
135g water
Pork filling - Makes 10 buns, 30g per bun
250g fatty pork mince, 20% fat
¼ tsp salt
1 tbsp caster sugar
1 tbsp shaoxing wine
2.5 tbsp light soy sauce
8g grated fresh ginger
50g water
Optional: 20g thinly sliced spring onion (green bits)
Vegetarian filling
350g Shanghainese pak choy / Qing Cai (will yield 270g after blanching/squeezing)
60g rehydrated shiitake mushroom
60g winter bamboo*
2 tsp sesame oil
½ tbsp salt
2 tsp caster sugar
2 tbsp vegetable oil for frying
*can be subbed for gluten balls, found in Chinese supermarkets, or omitted
Equipment
Steamer / DIY Steamer
10 x 8-9cm squares of greaseproof paper
Method - vegetarian filling
Wash pak choy and blanch for 20 seconds in salted water. Refresh under cold water then squeeze out water, chop then squeeze out more water. Set aside
Squeeze out water from shiitake mushrooms then chop finely
Heat veg oil then sautee mushrooms until fragrant and slightly golden
Transfer, with all the oil, into a bowl with the chopped pak choy and chopped bamboo if using
When you are ready to fill the buns, add salt sugar and sesame oil - mix well
Method - Pork filling
Add pork mince to bowl and add soy sauce, sugar, salt, shaoxing wine and ginger. Mix well
Add water bit by bit until completely absorbed. Set aside in the fridge to firm up/chill. Can be made in advance
Method - Bun dough and finishing
In the bowl of a Kitchen Aid, combine flour, yeast, baking powder and sugar and mix on a low speed. Add the water slowly then increase to a medium-high speed and mix for 5 minutes until a homogenous dough forms. You can also use the paddle attachment as the hook sometimes has trouble picking up the dough
If using fresh yeast, mix well into the water with a little sugar to ensure its totally dissolve2
Move dough onto the bench and knead for 2-3 minutes. Form into a ball then rest covered for 5-10 minutes. Check to see if it is smooth after relaxing - if not, knead for another 1-2 minutes
Depending on how warm your kitchen is, rest dough for 30 mins (summer) - 1 hour (winter) covered, either with a damp towel or under a bowl so a skin doesn’t form. The dough needs to feel light and aerated but it won’t have doubled in size - if you lift the dough up you should be able to see bubbles and fermentation - when you squeeze it you can hear air squeaking as it escapes
Roll dough into a long thin rope and press out air bubbles, then divide into 40g pieces. Once divided, keep the pieces of dough covered so they don’t dry out
**I like to shape and fill my buns ONE AT A TIME so you don’t have to worry about it drying out**
Press 40g pieces into circles then, using a rolling pin, roll into 12cm diameter circles with a thinner edge - they should look like fried eggs
Measure 30g of your chosen filling and place on the middle/hump of the dough circle. Use one hand to pinch the edges together in pleats whilst using the other hand to turn it - keep moving and pleating until the bun is closed. If you have excess dough, you can pinch it off
Place on greaseproof paper then into your steamer basket/plate
Leave for around 15 (summer) - 40 (winter) minutes, depending on the activity of the dough (it won’t expand a lot, but may be slightly puffed). Lilllian says you can also do a smell test to see if the dough now smells like sweet rice wine which indicates the right level of fermentation
Steam on medium high heat for 11-12 minutes (pork) and 8 minutes (vegetable)
Remember, if you don’t have a steamer, heat a wide saucepan with water and place a heatproof bowl inside (also fill with water so it doesn’t move around), then place a plate on top with your buns. Cover with a lid.
For plain steamed folded baozi, scale buns to 40g-55g depending on final size and roll into an oval, 0.5cm thickness. Either grease buns lightly and fold over, or place a piece of greaseproof inbetween
Move onto greaseproof paper and leave to proof until quite puffy - 45 mins (summer) - 1.5 hour (winter). Steam over medium high heat for 10-12 minutes
Want more bun fillings? Check out KP+ for runny egg yolk custard and black sesame fillings.













This was a great read. Thank you Lilian and Nicola!
This is very exciting!! I’m making Jaozi (dumplings) today with my family. It’s three years ago this week since we came back to the UK after living in China for 6 years: I love how food plays such an important part of remembering🥟🥟