Hello,
Welcome to today’s edition of Kitchen Projects. Thank you for being here!
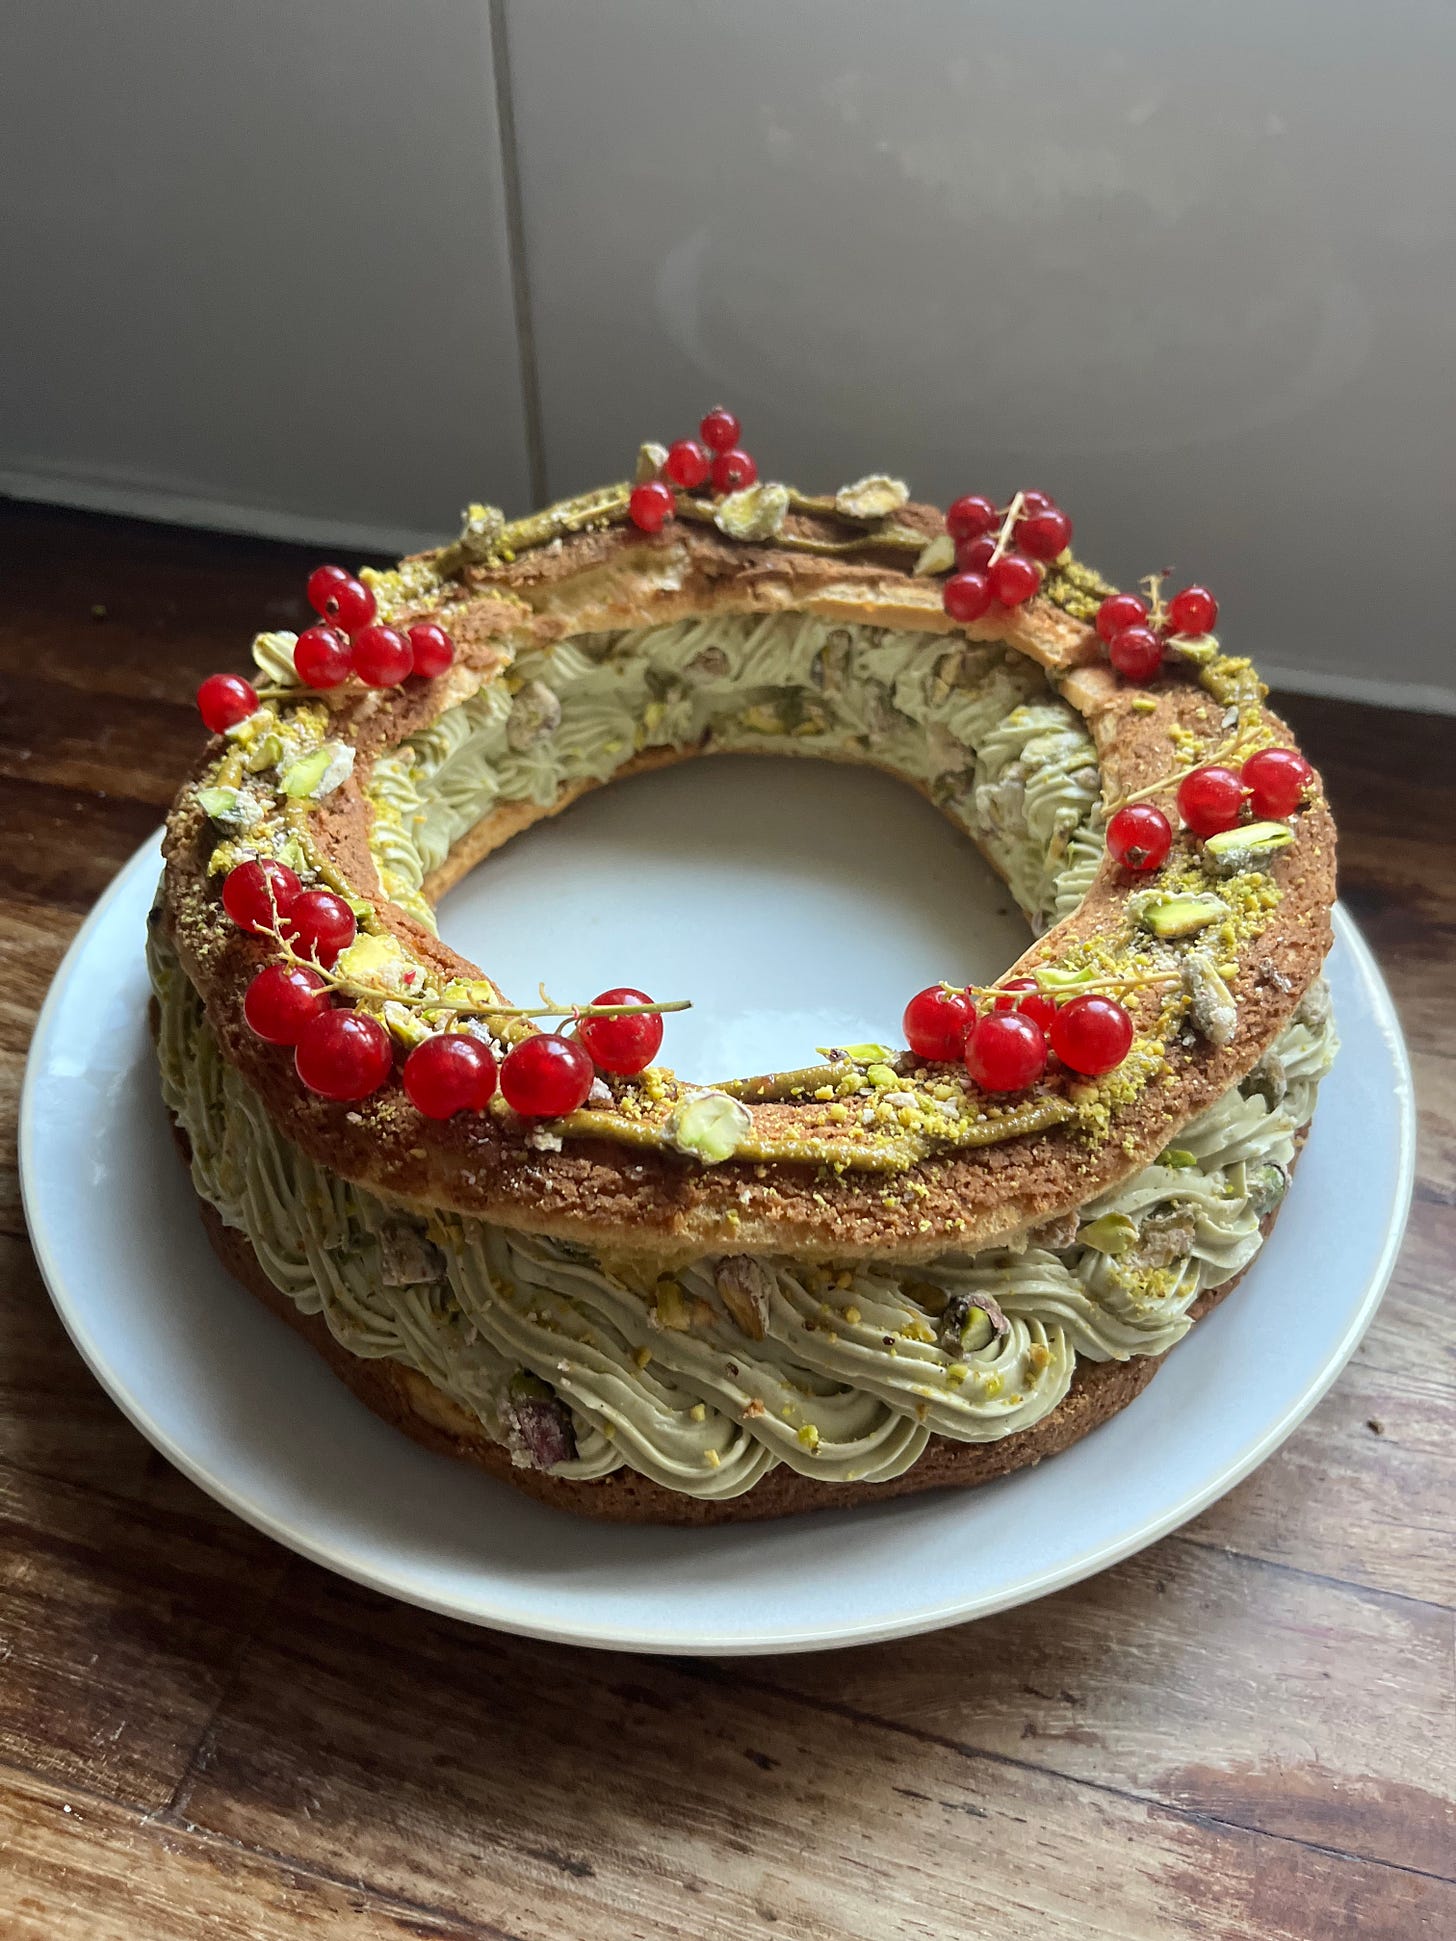
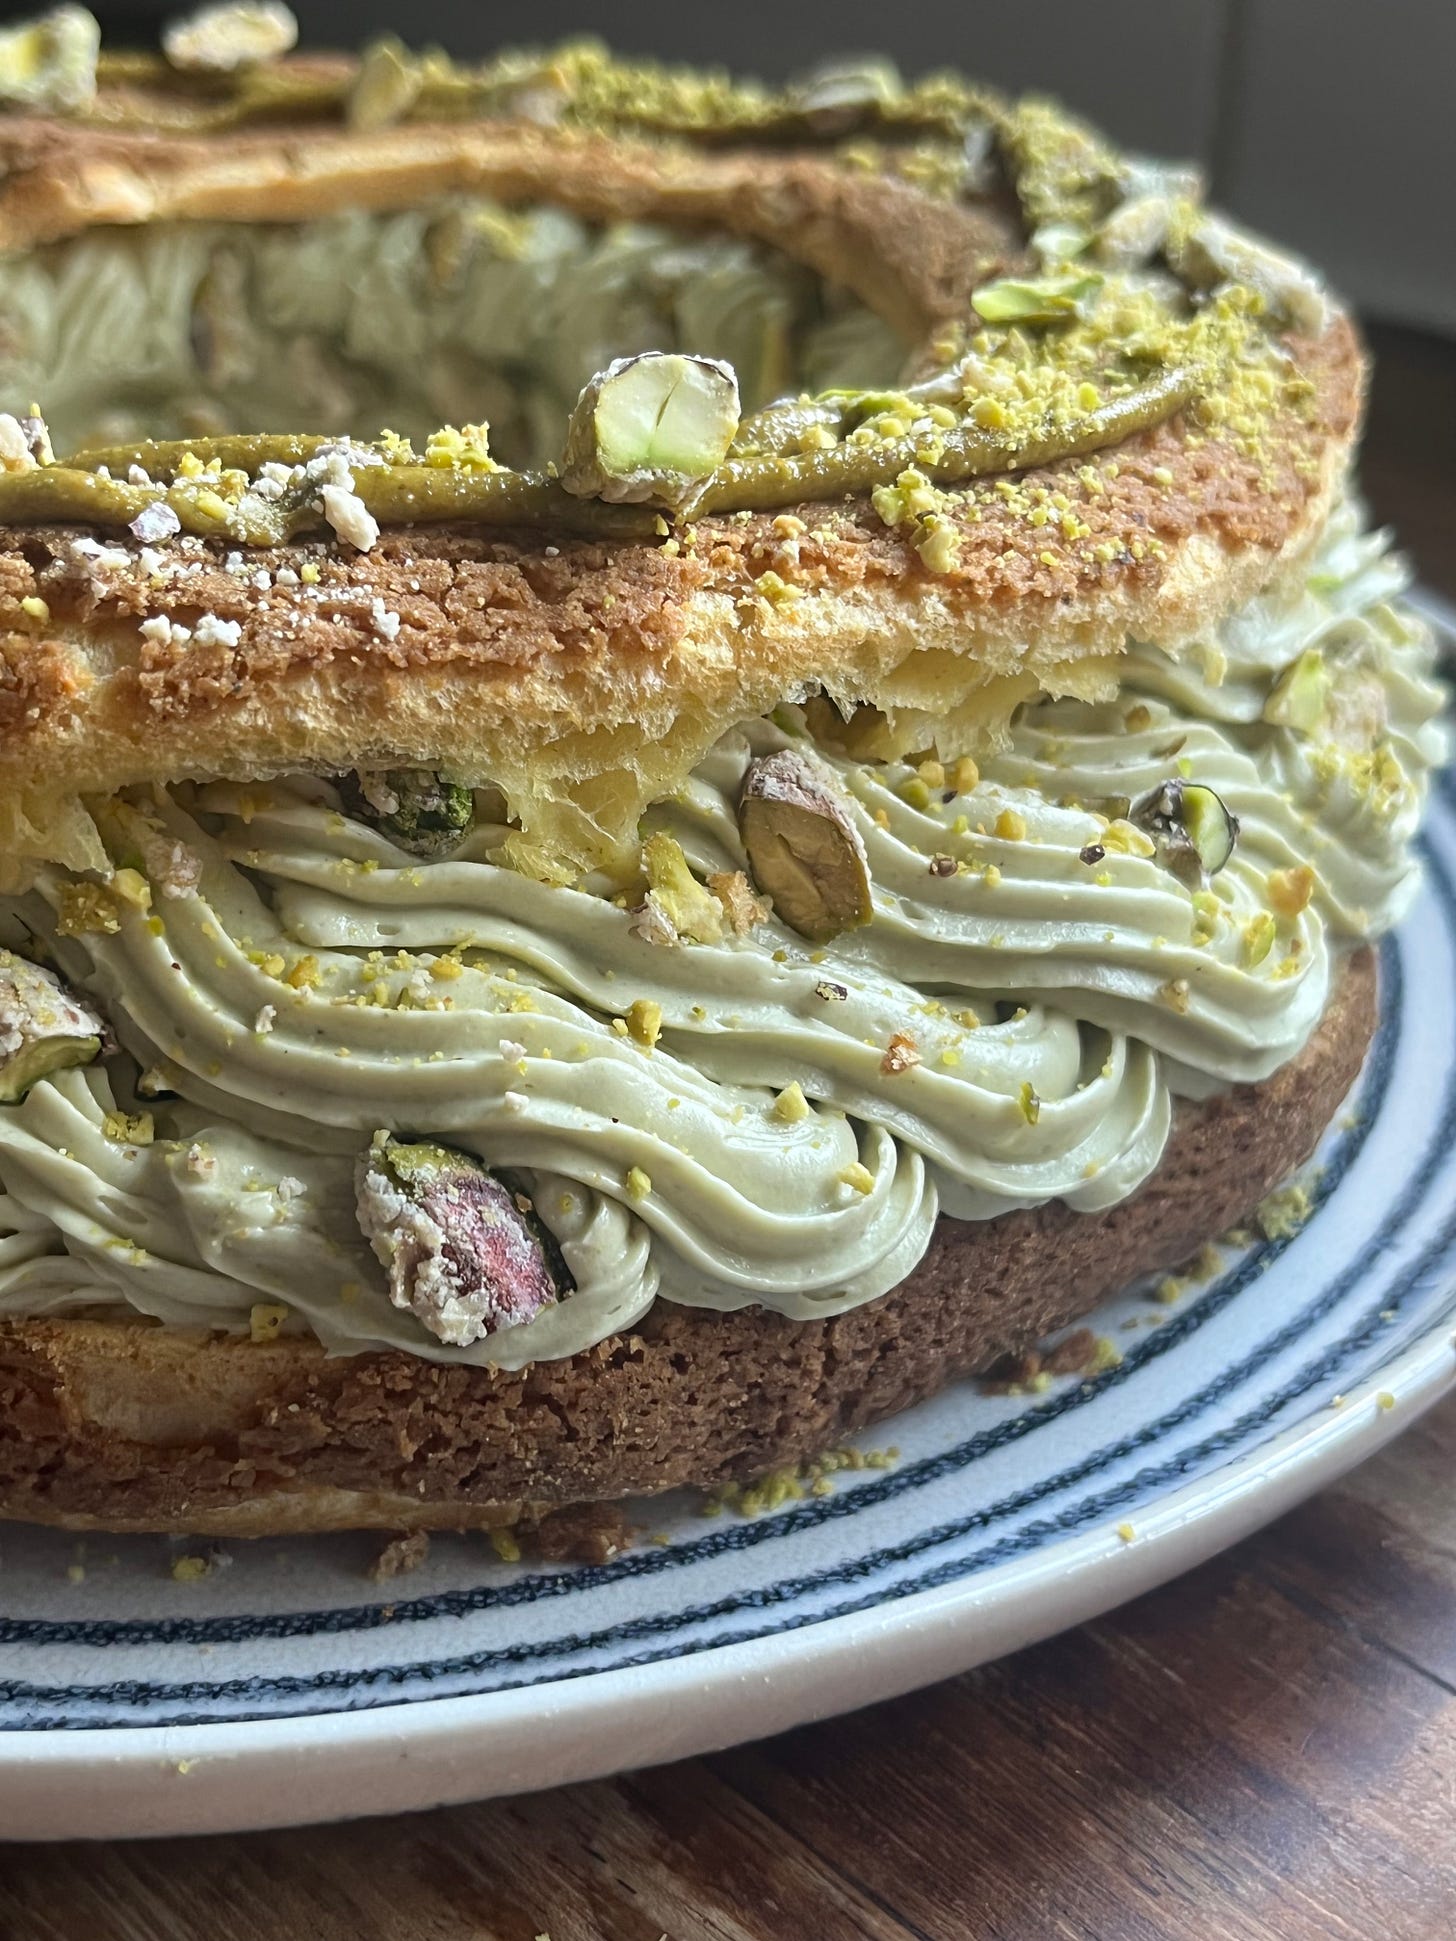
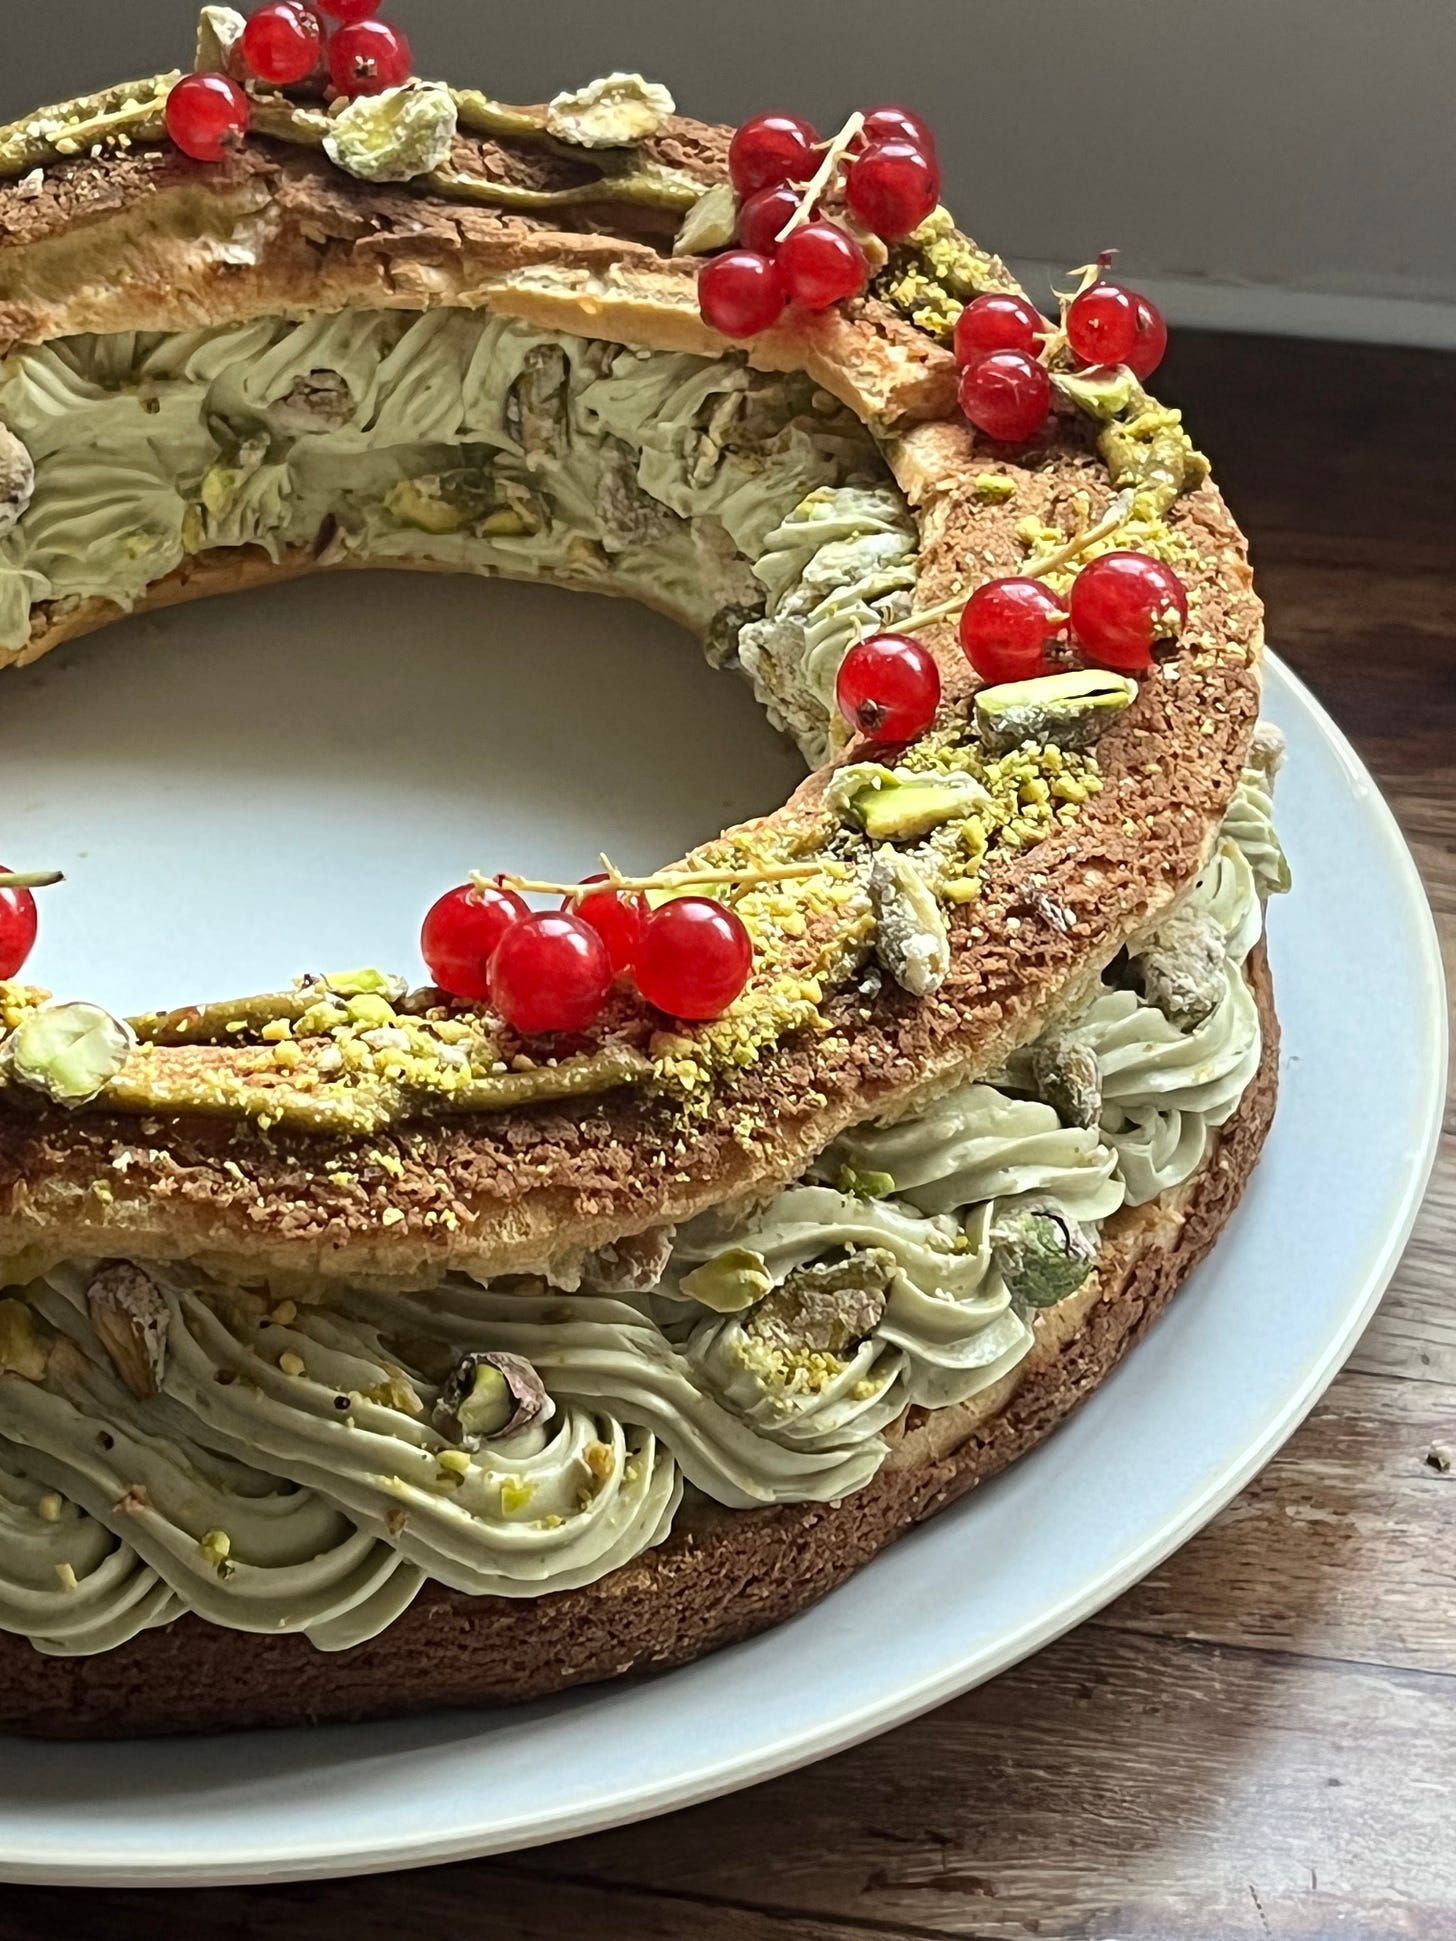
Today I get to share with you my actual dream centerpiece for the festive period: A stunning pistachio Paris-Brest, aka a wreath you can eat, studded with crystallised pistachios and a secret layer of cranberries and cherries inside. Over on KP+, the pistachio party continues with a recipe for make ahead morning buns - click here to read.
What’s KP+? Well, it’s the level up version of this newsletter.By joining KP+, you will support the writing and research that goes into the newsletter and get access to extra content, community chat threads, and more. Subscribing is easy and only costs £5 per month:
Merry Christmas.
Lots of love,
Nicola
Green? For Christmas? Groundbreaking
When it comes to Christmas dessert, I think you going ‘all in’ is a must. Whether you’re setting a full-blown fire on your Christmas pudding, or leaning hard into the season with a cake meticulously disguised as a log (reminder to google the history of yule log, what a bizarre creation), I think ‘more’ is definitely ‘more’…
… Which is why I’m very excited to talk to you about today’s recipe: A very demure (jk) edible wreath that would make a stunning centrepiece on any table. In keeping with the season's colours, we have reds and greens, plus little decorative flourishes in the form of crystallised pistachios.
One of the best things about this dessert is how scaleable it is: You can make a demure wreath for smaller groups or go all the way with something unashamedly hefty. It also has real make-ahead magic: The choux wreath itself can be made well in advance, whilst the cream can be prepped in stages, and then whipped up when you’re ready. Once assembled, it is happy at room temperature for a good few hours, ready to be sliced and devoured.
Coming up on KP+ / Upcoming newsletter schedule
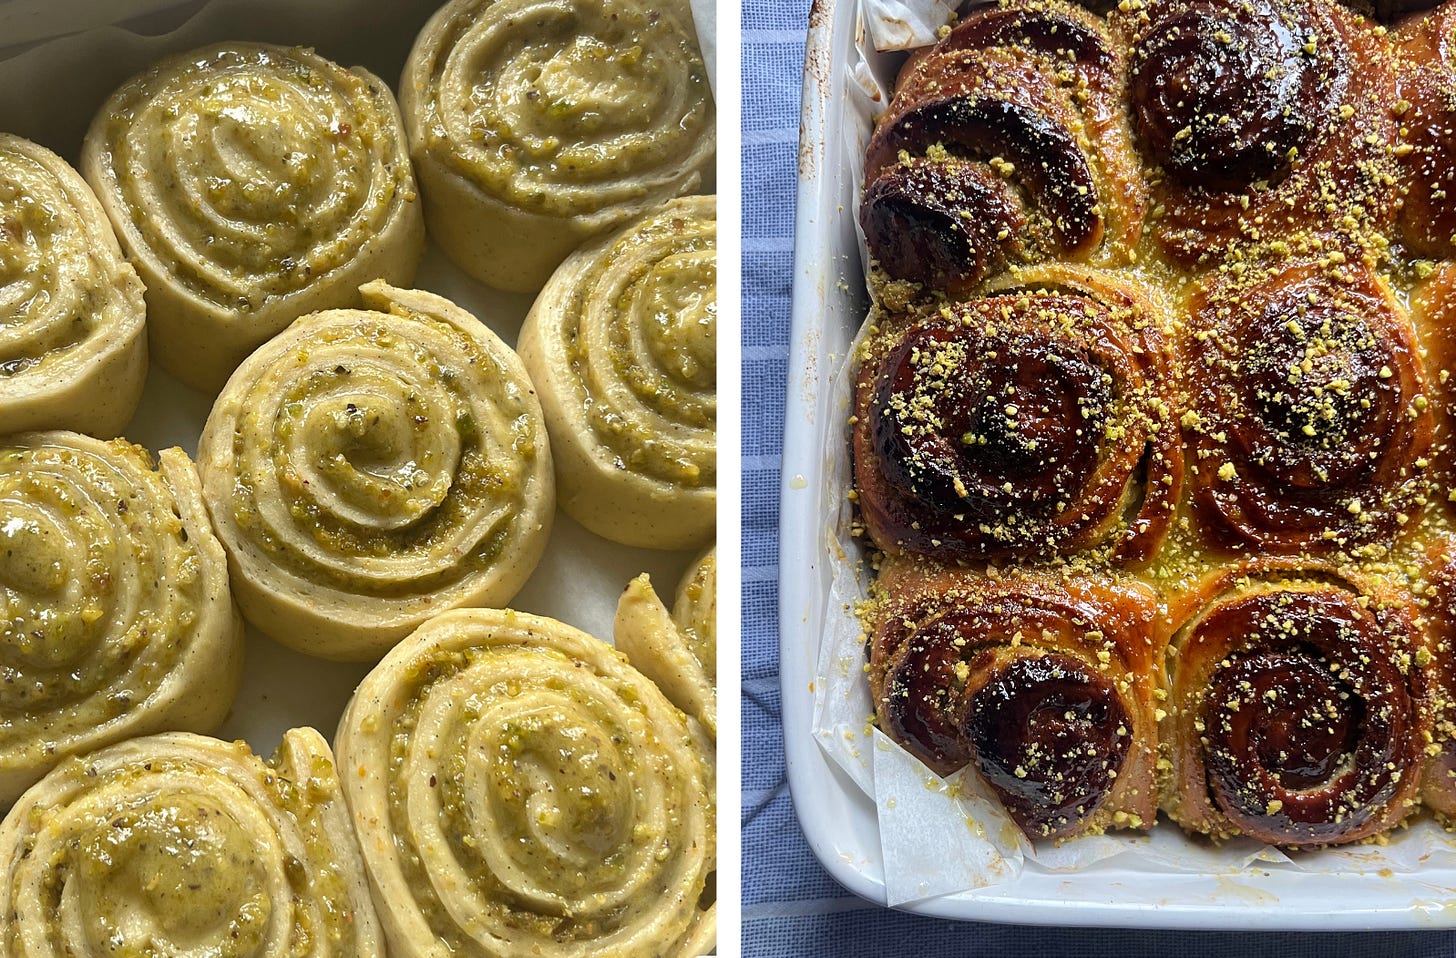
Over on KP+, my love affair with pistachios continues with absolutely stunning orange blossom and pistachio morning buns. You can make these ahead of time and simply proof and bake in the morning to be enjoyed with coffee.
BUT THAT’S NOT ALL: In the final run-up to Christmas, I’m sharing a few more posts I’m really excited about:
First up, a special on how to batch the dreamiest Negronis (perfect for gifting / taking as dinner party pressies!) by two of my actual expert friends
This will be followed by the December KP+ Community Recipe: A Brown Bread Amaretto Ice Cream (no churn!) by Rory Clarke.
Finally, I will also be sending out a very special recipe: Sticky Toffee Soufflé, just in time for Christmas.
I also want to let you know that I’m taking a break over Christmas and the beginning of next year - there will be no new newsletters. Rather excitingly, I have a massive project I need to do some proper focus on (which I cannot wait to tell you allll about!) but I’m also planning to take a break to recharge mentally.
I will still be sharing recipes and inspiration on KP+, with a series of superb guest posts, so now would be a great time to join the community and keep up to date:
See you on the other side!
Firstly, the wreath
For this recipe, I have borrowed heavily from the school of Paris-Brest the circular choux ring that is traditionally filled with hazelnuts. Paris-Brest is one of my favourite expressions of choux - it’s such an appealing shape and very adaptable. With its inherent similarities to a wreath, the most festive of things, I knew it was something I wanted to cover in winter.
If you’re nervous about making choux, I get it! I know it seems freaky, or cheffy, but it’s actually one of the most simple applications of ingredients you can make, plus one of the most scientifically satisfying.
It works like this: As we make the choux, we trap lots of tiny water bubbles in the paste. When the choux goes into the oven, the water bubbles evaporate rapidly into steam and create one big bubble, which also makes the pastry rise. The crust, made of starch and egg proteins, begins to form and creates a crisp, thin crust which traps this big air bubble, leaving the inside completely hollow.
Each ingredient is in perfect harmony with the others. Here’s a breakdown:
Milk / Water - A mixture of milk and water provides moisture and makes the important gelatinisation of starch possible. The moisture provides tenderness / flavour (in the case of milk)
Butter - Butter adds a little moisture and flavour.
Salt and sugar - Salt and sugar are for flavour. Choux can be made without it
Flour - The heart of our choux. Flour is essential for structure, even though the gluten forming ability is reduced once gelatinised, as choux is when we cook it.
Eggs - You know how with most egg preparations (souffle, meringue-based things, genoise), the item will rise due to expanding air trapped inside the network of proteins? Well, it’s kind of the same here! But instead of putting air into the eggs before baking, we rely on those proteins to capture the evaporating water/steam whilst the choux bakes. Once expanded, the eggs will help provide a well-set, rich crust. The yolks, as ever, are doing some the heavy lifting when it comes to flavour.
Help, my is my choux flat?!
Every now and again, I have a choux that fails. But this is almost always because I have undercooked the paste on the stove and failed to hydrate and gelatinise the flour properly. This stage is sometimes known as ‘drying out’, though it must be known that there is actually no ‘drying out’ happening - we are simply trying to make sure that our flour is properly gelatinised. In fact, we are not losing any water at this stage - we are doing the opposite! We are actually trying to hold onto it by binding it with our flour. The ‘drying out’ is true in a sense since the choux will leave a dry/crusty film on the pan as we gelatinise it, but it ends there.
So, instead of trying to guess if your choux is ready, you can remove the guesswork by using a thermometer. Wheat starch gelatinises at 65c, but you can bring your paste up to about 70c-75c to make sure the starch has properly hydrated. If you don’t have a thermometer, then ‘cooking’ the paste for 1-2 minutes on a medium-low heat until the paste is homogenous and there are crusty bits left on the pan is a good signal your paste is ready.
Piping the choux
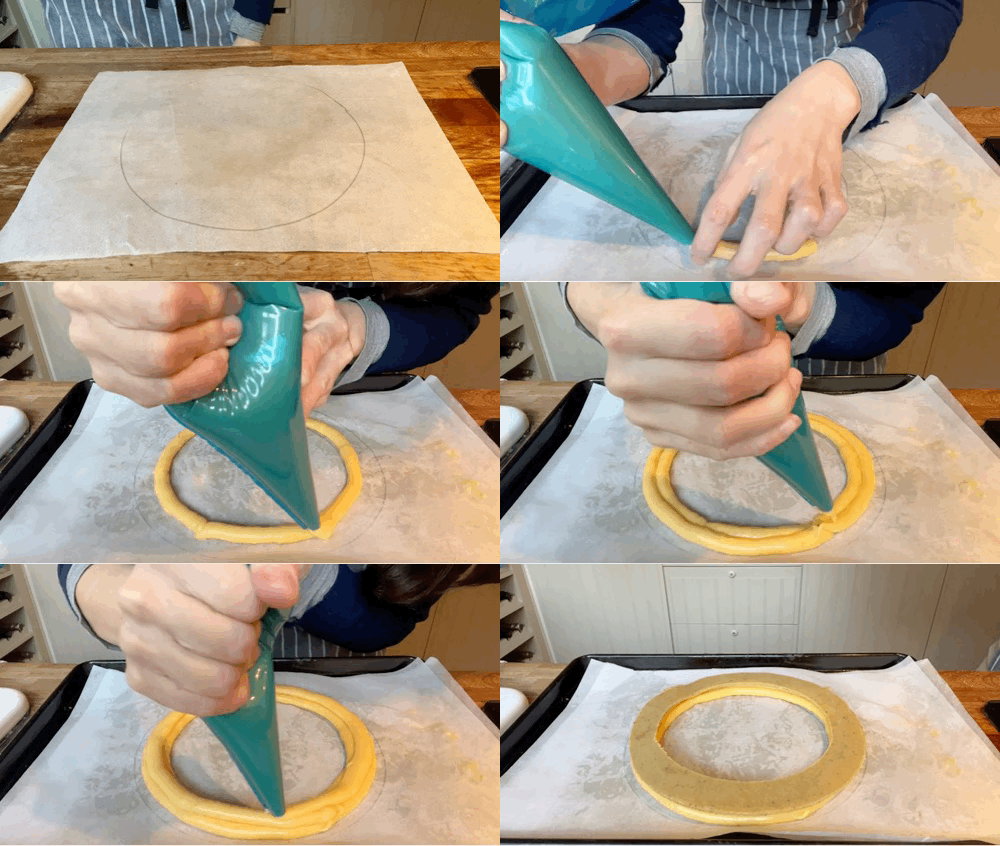
One of the most important and underrated factors in the performance of your choux in the oven is air bubbles. Not the good kind of air bubbles, like the ones we seek when we cream butter and sugar, for example, but interfering air bubbles that we accidentally introduce when transferring the choux into a piping bag. When you put the choux into the piping bag, you should do your best to squish it and squash it to remove as many air bubbles as possible. When you are piping, and there is a gap in the flow of the choux, this will come back to bite you later as this gap/bubble is imprinted into the choux. Choux can be endlessly piped and repiped, so if you are unhappy with the ring you’ve made, simply scoop it back up with a dough scraper and start again.
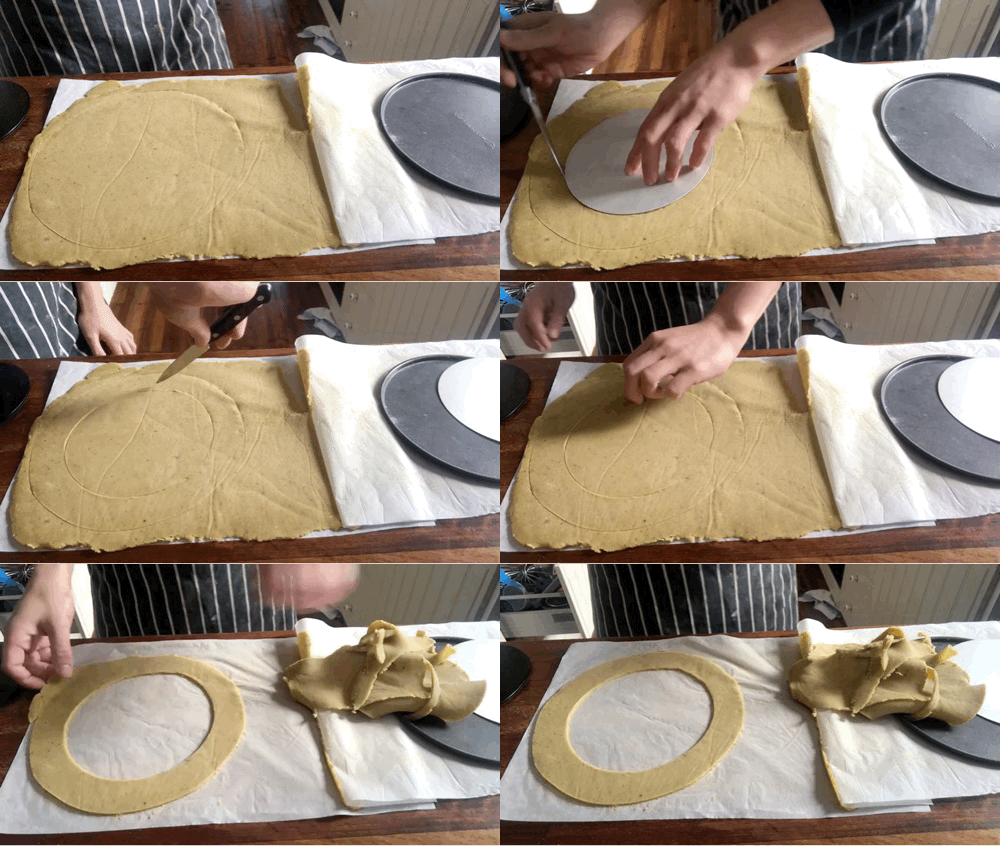
Some sins will be hidden with the craquelin (the special ‘cookie’ type topping, which spreads as the choux rises to create a crisp sugary crust as it bakes), which I have bolstered with pistachios, but you can definitely notice gaps. This can be an issue for paris-brest, which needs to be cut in half to be decorated and finished. If the choux is uneven, it might be hard to cut the wreath neatly.
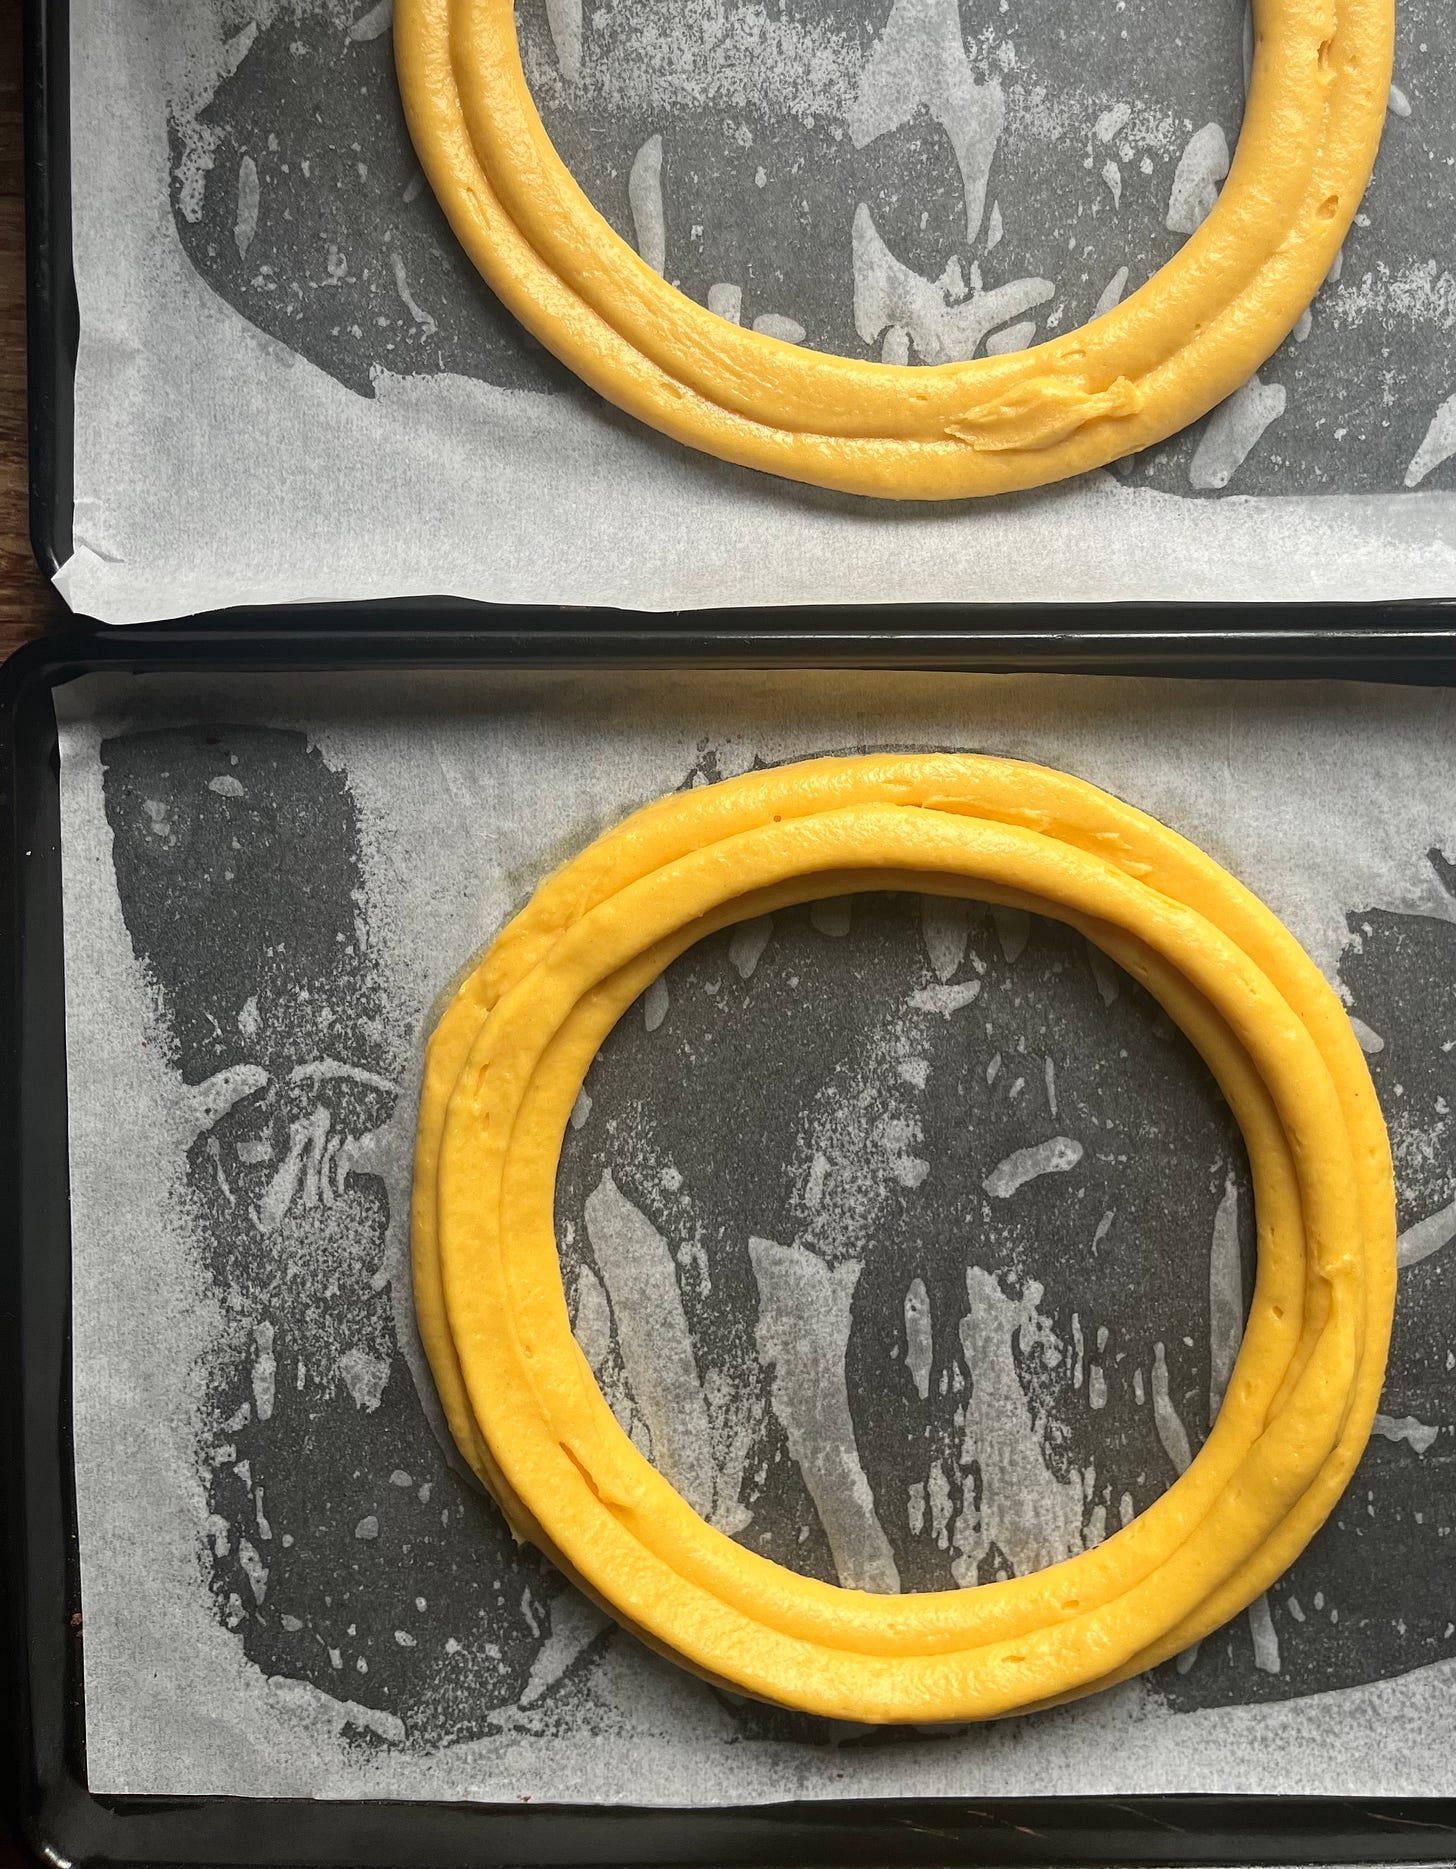
To get the size right, I tried a few different techniques. Although choux spreads upwards, it also spreads outwards, so I was finding some of my first tests quite messy and unruly and - frankly - gigantic. In pursuit of an 20cm (8inch-ish) ring, I found that by piping on the 8inch line, I ended up with a choux that was more like 25cm (9.5-10inch). So, after much experimentation and a graveyard of choux hoops, I found the best thing to do was to trace an 8 inch circle, followed by a 15cm(6inch) circle inside on some baking paper. Then, with the piping bag tip cut to be 1cm, I first follow the 6inch line then pipe another slim line following the border, then with one on top, bridging the two lines. The resultant choux is around 17.5cm (7inch) but spreads to 8inch when baking. This is only about 175g choux total.
The recipe I’m sharing today makes more like 300g choux - what to do with the rest? Mix in some grated cheese (about 10%-20% of the weight) and blob onto a baking tray, with more cheese on top. Bake and voila - GOUGERES aka cheesy choux. You’re welcome.
Let’s talk pistachios
I adore pistachios. As well as being delicious, that buoyant green, especially paired with a pop of red, is enough to melt any stubborn grinchyness. But as I’ve warned you in the past, there is always a caveat when it comes to these green gems: Deploy them carefully because… they are PRICEY! It is advisable only to use a pistachio recipe from a trusted source. I’ve been burnt before by a dodgy recipe and I’m still not quite over it.
So why are pistachios so expensive? Pistachios take a long time to grow and are very labour-intensive to farm. The trees only grow in certain climates - cold winters (but not freezing) and non-humid hot summers - and they take 20 years to mature and reach peak production. After all this, each tree only produces around 20kg of nuts and on top of this, the trees tend to do a ‘one year on, one year off’ for bountiful harvests. Such divas! The most expensive pistachios in the world are grown in Sicily, which fetch double the price of Iranian and US pistachios. This article about pistachios needing police protection is quite amusing.
The colour of pistachios range from yellow to bright green with hues of purple from naturally occurring anthocyanins, an antixoxident. The green colour comes from chlorophyll according to the wonderful Harold McGee, but all of the pistachios on the market don’t seem to be born colour-equal. Presumably nuts with particularly green hues are favoured and separated for our eating and visual pleasure.
Here’s my best tip for you: At Ottolenghi, where we often used the super green pistachios as decor, we used to keep our ultra-green pistachios in the freezer for ultimate freshness. It also helped them retain the colour.
Expanding your pistachio paste
When it comes to pistachios, you have a few routes you can go in: Pistachio paste comes in a few forms – you can get Crema di Pistacchio, a Nutella-like spread that has blended the nuts with sugar and additional fat – or the plain pistachio paste or pistachio praline paste, which is simply blended up nuts, or with caramelised sugar in the case of praline. I did check, and these are interchangeable for what we are making today, though the plain nut paste is a lot more fluid and totally unsweetened, so you need to add sugar during the cooking stage.
Whatever paste you decide to use (I went for the cream), the jars are pretty small. Definitely not enough to fill an entire Christmas wreath and certainly not a pipeable consistency. SO what to do?! Well, my goal for today’s filling was to figure out a way to effectively expand a 200g jar of pistachio cream by 300%-400% without losing the flavour.
To do this, I make a custard with a jar of pistachio paste, milk and egg yolks, cooking this, much like a creme anglaise, until thick. Once cooled, I whip this pistachio-y custard into softened butter to create a fluffy and rich cream that pipes like a dream and has real staying power. It’s my take on a mousseline (usually made with pastry cream + butter). To take it to the next level, you can also experiment with folding pastry cream through it to make the texture even lusher, but I figured this was a step of faff too far, even for this newsletter (write to me if you want to hear more about this!).
So you want to make your own nut paste?
Despite pistachio cream being fairly easy to source from Italian delis IRL, I found pistachio paste - aka the pure stuff - next to impossible to find in person. I guess it’s just a bit cheffier than what the average shopper is after. That paired with the postal strikes, I really only had one option: BLENDER; I choose you.
Although it takes a very long time (around 40 minutes, including breaks to ensure your machine doesn’t completely overheat), I made decent pastes in both my magimix and nutribullet. I used these intense pastes to add an extra pistachio kick to the wreath, as well as using it to decorate the top - it acts as an adhesive for more nuts and the decor. I also tested how pure nut paste worked in the final cream - it’s successful, but you just need to add a portion of sugar. I’ll add direction on that below.
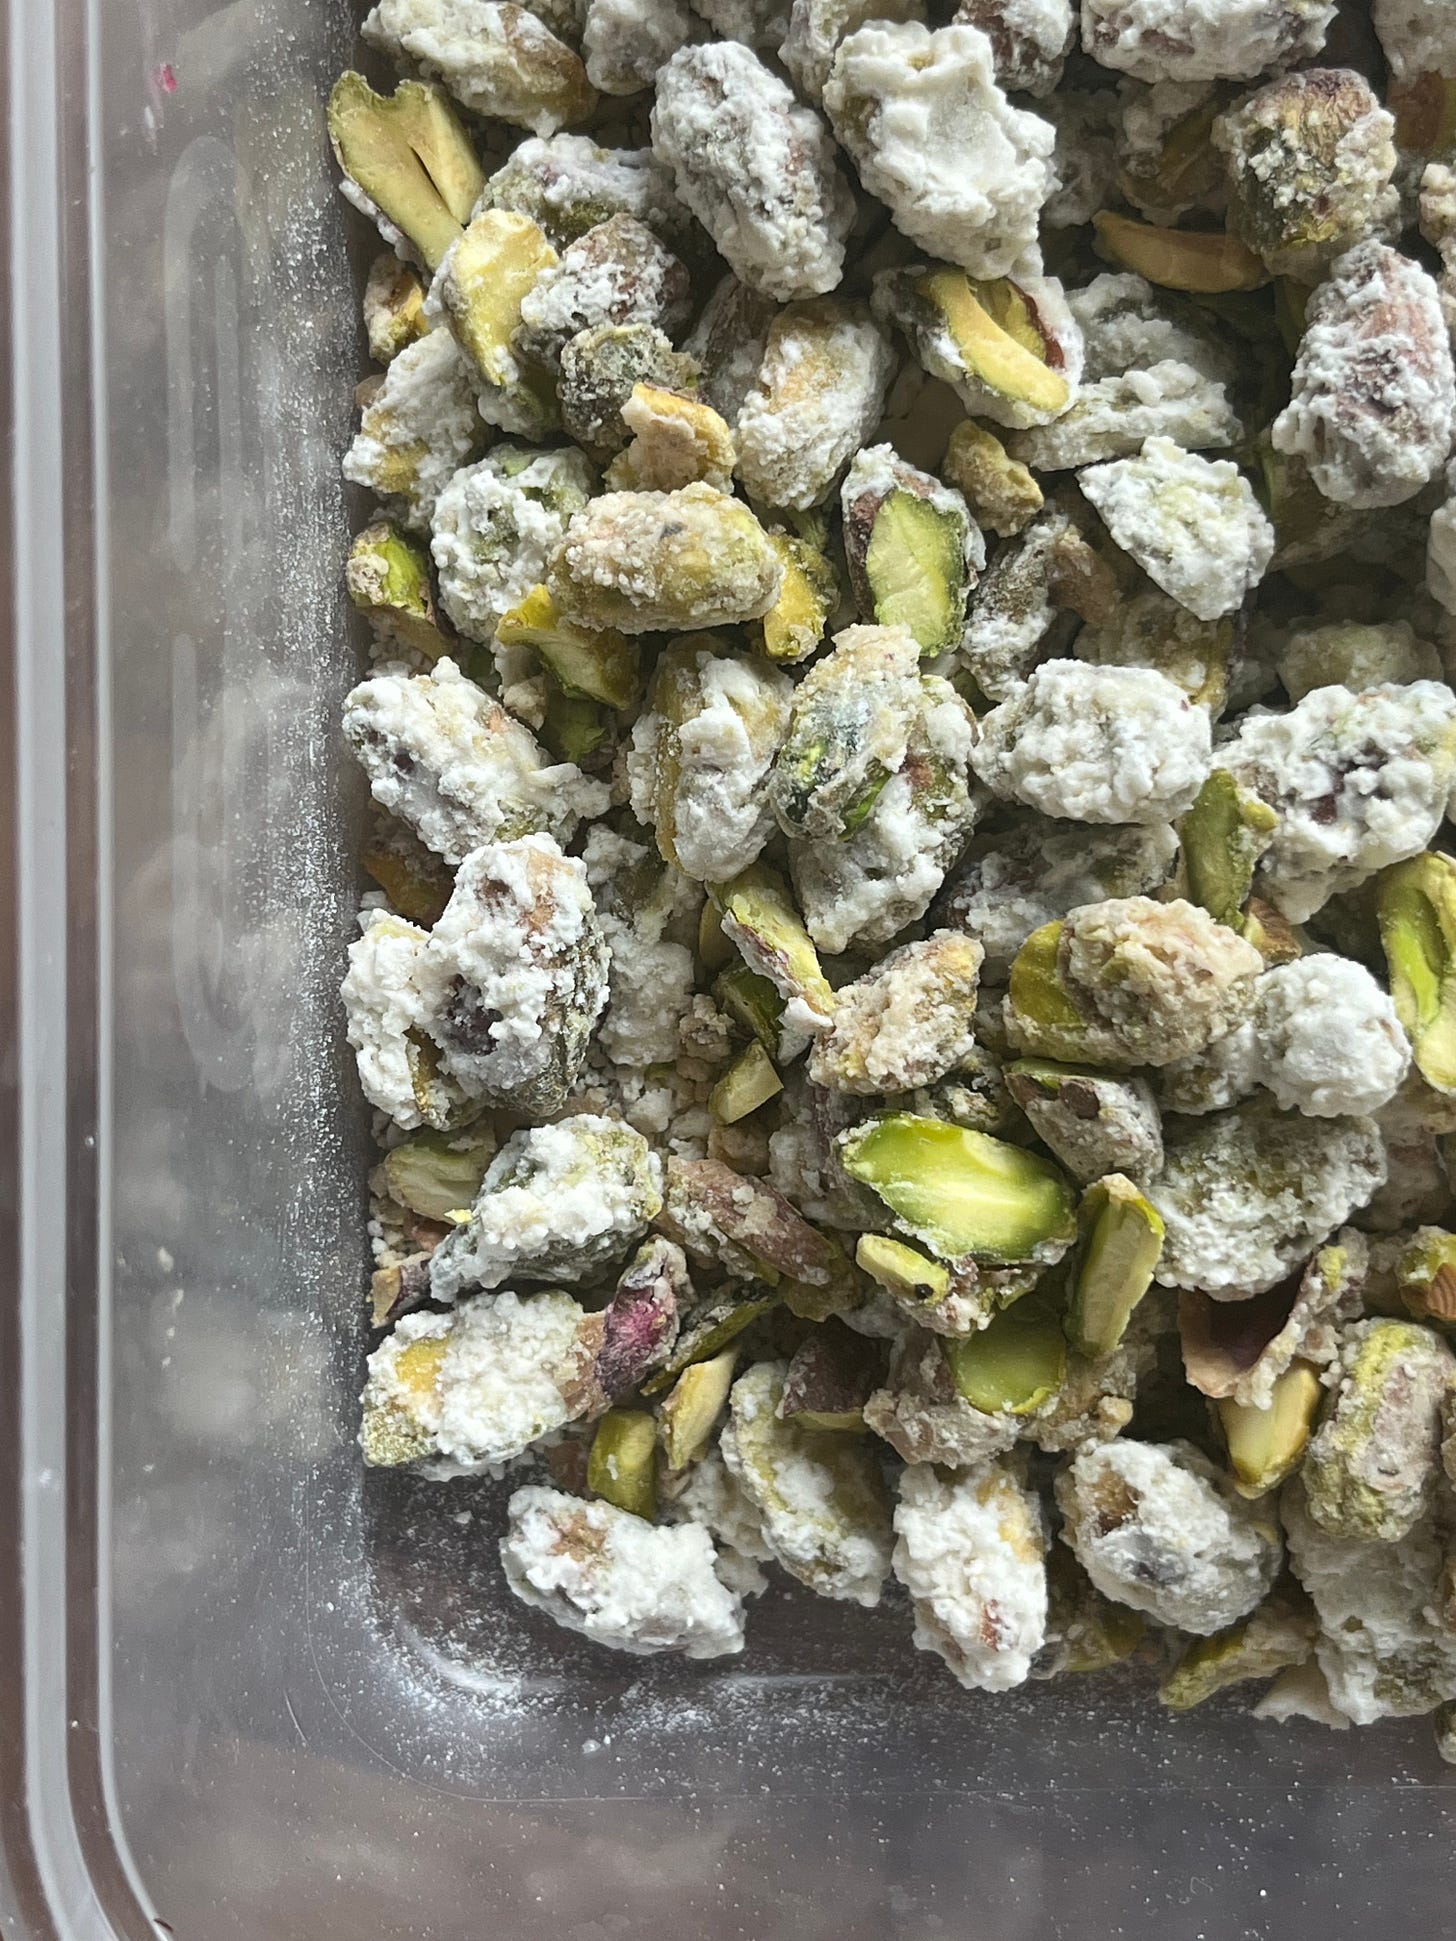
Crystallising Nuts
You know when we are working with sugar, we try to AVOID crystallisation? Well it’s always good to have something that bucks the trend: Welcome to crystallised nuts, a technique where we fully encourage the crystallisation of sugar syrup into snowy clumps.
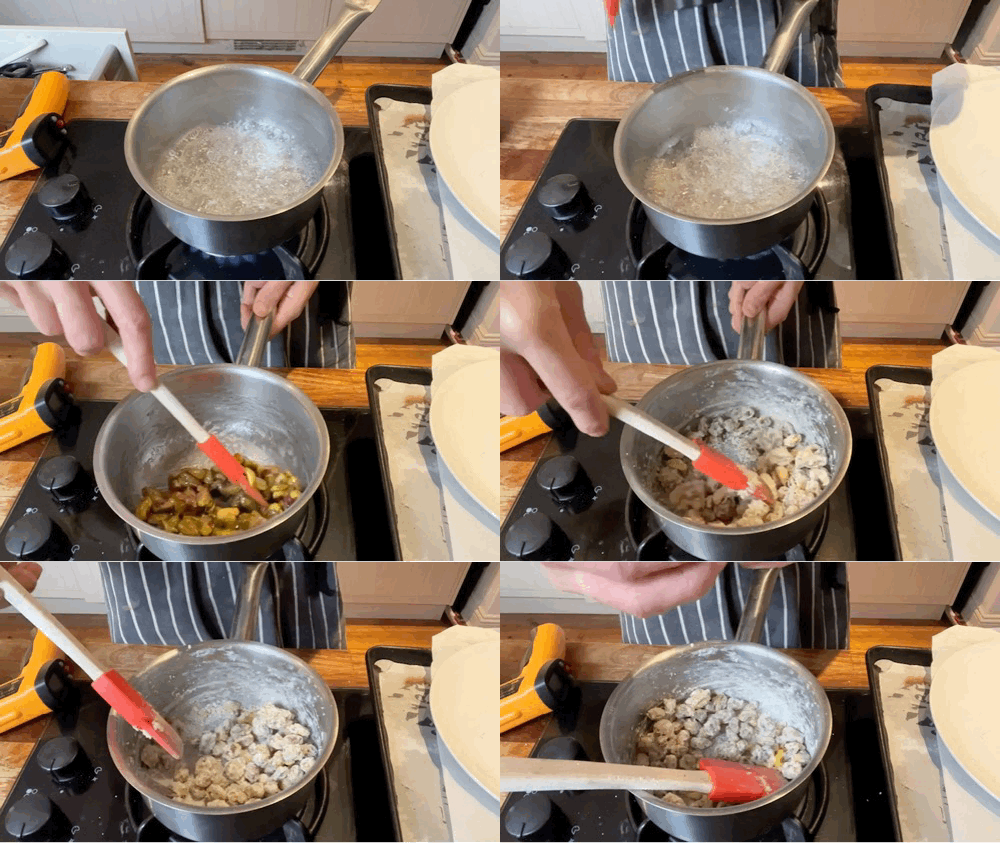
It’s a fairly simple technique: Make a sugar syrup and take it up to just before caramelisation, about 140c, then add in the nuts, turn off the heat and stir like crazy. The action of stirring forces the sugar crystals to bump into each other. Because sugar has a strong tendency to exist in a crystalline state, the sugar syrup will first appear sticky and wet before transforming into snow-capped gems right before your eyes.
One thing I wasn’t quite sure of was the ratio of nuts to sugar. I found a 1:1 ratio resulted in nuts that were overly covered in sugar - none of those lovely shades of green or purple were peaking through. I reduced this to a ratio of 1 nuts to 0.5 sugar, and found the results much better, though my final ratio is 1 nuts to 0.75 sugar, for balance. Rather than being entirely snowed in through a freak blizzard, the nuts looked more like they had been covered with a soft blanket of snowfall.
Choose your festive fruit fighter
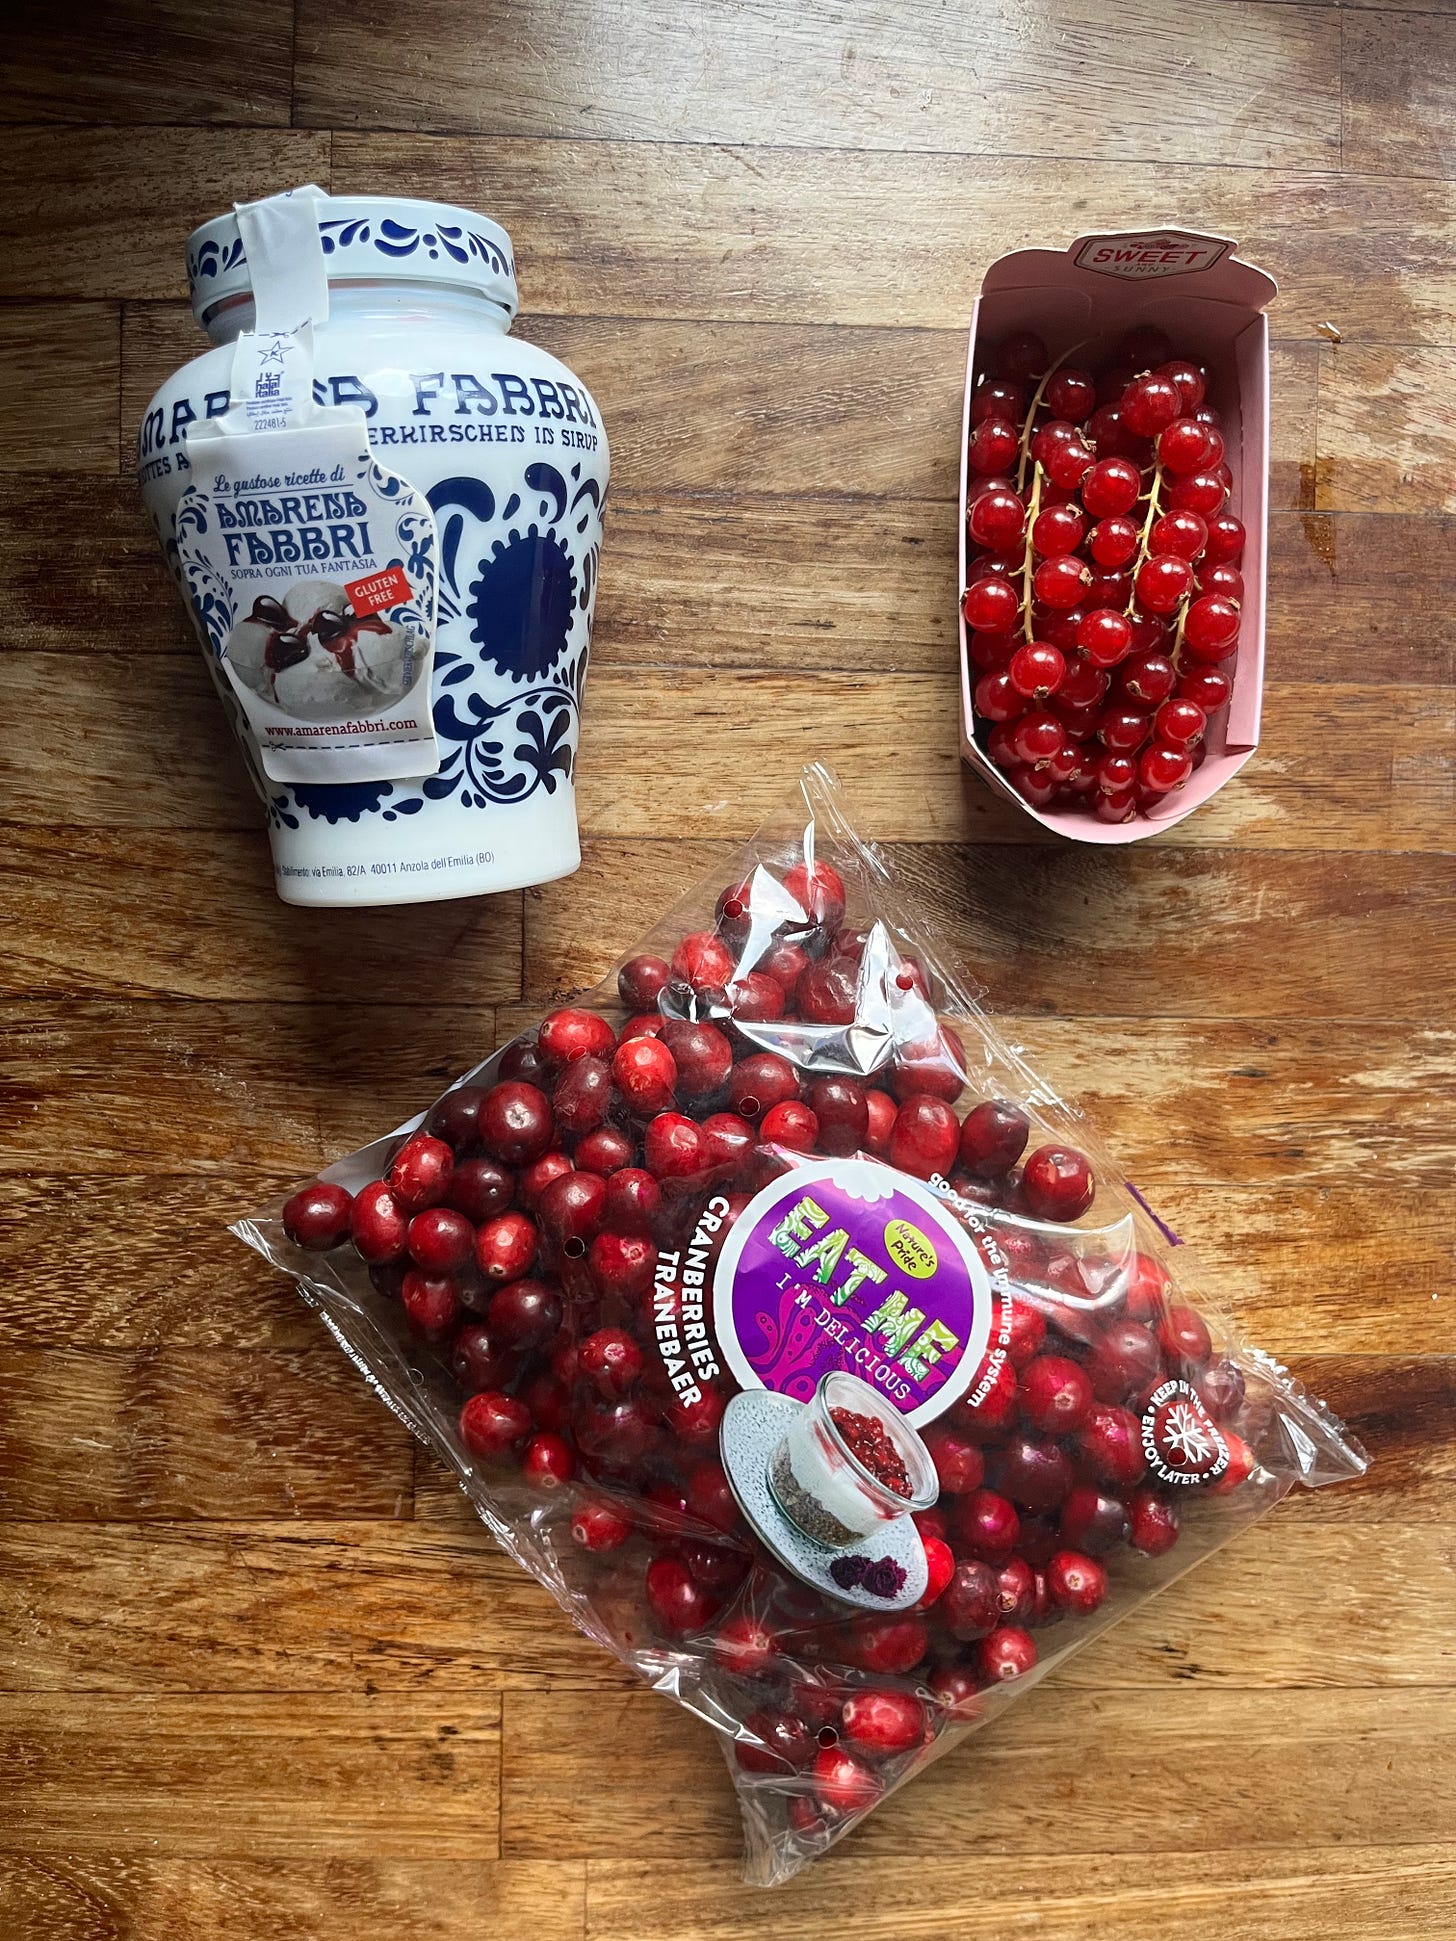
As much as I could chomp through pistachio cream endlessly, having something to contrast the richness is always a good idea. Although you could go in any direction, I’m not ashamed to be entirely enamoured with the festive pairing of red and green. And lucky for us, we have plenty of options. My top picks are:
Preserved cherries (A great brand is the Fabbri Amarena ones, though you can get decent ones in tins from most coerns hops) are always my go-to, tried and tested combination with pistachio. They are always a good idea, plus I found you can pour a little syrup on top of the final slice of choux-wreath.
Cranberries / Redcurrants - Both incredibly tart and high in pectin, these red berries make excellent quick jams that thicken and set very easily. Simply add half the weight of sugar to the berries, then half of that weight in water or orange/lemon juice and cook until thickened, or reading 103c on a thermometer. With a small batch, this can happen in less than 10 minutes and sets up like a dream. I picked cranberries in the end, then blended it until smooth before using.
Jam - You can use any jam here, a black cherry or grape preserve would be delicious, or a good quality raspberry or strawberry jam.
Alright, let’s make it.
Pistachio Paris-Brest aka a festive wreath
Serves 8-10 (it’s rich!)
Ingredients
Choux paste -Makes around 300g, enough for a wreath + a few leftover gougeres (See main body of newsletter for details)
50g butter
60g water
35g milk
2g salt
4g sugar
70g flour
100g eggs
Pistachio Craquelin
25g butter
25g light brown sugar
25g flour
10g ground pistachio
Pistachio mousseline
200g pistachio cream* (like this, for example but any brand will do!)
180g whole milk
80g egg yolks
280g butter
2-4g flaky salt
Crystallised pistachios
100g pistachio
75g caster sugar
20g water
Cranberry jam (makes more than you need)
200g cranberries
100g caster sugar
50g orange juice
Pistachio praline paste (optional)
100g pistachio
50g caster sugar
Plus: Ground pistachios, preserved cherries, redcurrants, or red fruit to decorate
*If using pure pistachio paste, add 20% caster sugar to this mixture
Choux Method - Click here for GIFs from the eclair newsletter
Heat the milk, water, butter, salt and sugar together. Bring to a rolling boil and stir to make sure the sugar/salt is dissolved
Sift the flour several times and add into your boiling liquid. Turn the heat down and stir rapidly until a smooth paste forms and a dry film is formed. If you have a thermometer probe, check that it is above 70c
Move paste into a bowl and either spread it out to cool down or paddle on a low speed if using a KitchenAid. Meanwhile, whisk the eggs - this makes them easier to combine
When you can touch the paste comfortably for 10 seconds, start to add the eggs. I do this in 3-4 additions, mixing well between each. When the paste is smooth and shiny, move it into a piping bag and smoosh the paste to try and reduce pesky air bubbles as much as possible
Trace an 8inch circle onto greaseproof paper, followed by a 6inch circle in the middle. Flip the paper over onto your baking tray. Cut the piping bag at 1cm then pipe a ring of choux around the 6inch guide, followed by another circle directly around it. It should not quite touch the 8inch guide line. Finally pipe a circle of choux on top of these two lines, bridging the two. It should weigh around 175g.
Pre-heat oven to 200c fan. When ready to bake, place the craquelin (directions below) circle on top of the choux rings then place in oven. Immediately turn down to 170c then bake for 30 minutes. Turn off the oven and crack the door and leave the choux to cool for another 10 minutes in the oven, before removing and allowing to cool completely on a wire rack. You can use the choux once cool, or wrap airtight then refresh at 170c for 5 minutes. You can also freeze and defrost using the same reheating instructions, adding on 5 minutes.
Craquelin method
Mix together (not cream - you don’t need any air in this) soft butter and brown sugar. Then stir in the flour and pistachio nuts
Roll out to 3mm thickness and to just larger than an 8inch width circle. Mark the craquelin with an 8inch circle, followed by a 6inch circle. Cover with greaseproof and chill in the freezer for 10-15 minutes until solid
When ready to use, remove the extra bits from the outside and middle, leaving a perfect hoop of craquelin to adorn your choux. Craquelin can be reused indefinitely and can be stored in the freezer for 6 months.
Quick Cranberry Jam
Mix together cranberries, sugar and orange juice into a sauce pan. Heat on a medium low heat, stirring until the cranberries break down a little. Turn up the heat and cook for 5-8 minutes longer or until the jam is thick with large bursting bubbles, or reads 102c on a thermometer
Pour into a container and leave to cool. If its really chunky, you can blend it before using. Jam will last in the fridge for two weeks, or you can seal it into jars properly and it will last for years!
Pistachio mousseline
Heat together pistachio cream and milk on medium heat until simmering - whisk it well until homogenous. Whisk egg yolks together then add a little of the hot milk/pistachio mixture, whisking well to temper and combine. Return it all to the stove and cook on low heat, whisking all the time until it thickens and reaches 82c. Be careful not to let it go over this, or it will curdle.
Pass the mixture through a sieve and leave to cool completely, with some cling film touching the surface of the custard. This can be done up to 3 days in advance.
When you are ready to mix the mousseline, paddle or whisk soft butter on medium speed until aerated and no lumps. Add the cooled pistachio custard in thirds, bearing in mind that if your pistachio custard is cold, it may ‘shock’ the butter. If this happens, either warm the side of your bowl with a blowtorch or whisk briefly over a bain-marie (5-10 seconds). Temperature control is the most essential part of making mousseline - if the butter drops in temp, it will harden. Worry not; there’s nothing that a little bit of heat and some whisking can’t fix. Once all the pistachio custard is in, check for seasoning and add salt. Keep paddling/whisking until fluffy and homogenous, another 1 minute or so. If it seems too stiff, either whisk briefly over a bain-marie or take two tablespoons out, melt in a saucepan, and then whisk back in to encourage the mixture to loosen.
The cream is ready to use - transfer into a piping bag fitted with a fluted tip - the one I use is 12mm. Because of the temperature control of the cream, it will firm up if it cools down, so it’s best to make the mousseline and pipe right away, ideally within 3-4 hours of serving it, and just leave it at room temp
Crystallised pistachios
Mix together water and sugar in a small saucepan. Cover with a lid and heat until boiling (this helps prevent early crystallisation), then remove the lid and cook until 145c - the syrup will be very thick and viscous. Turn off the heat and add in your pistachios. Stir vigorously. At first, it will just look sticky but eventually, as you keep stirring, the sugar crystals will form on the nuts. Keep stirring until all the sugar has crystallised, then pour the nuts into a clean container. Store in an airtight container for 3 months.
Pistachio paste *optional*
Melt sugar in a saucepan, constantly stirring, until an amber caramel forms. Turn off the heat and add in your nuts and stir to coat. Pour onto a greased piece of paper and leave to cool completely. Once cool, add into a blender and blend with a 5 minutes on, 5 minutes off, until smooth (will take about 40-50 minutes with breaks). Move into a container. Keep for 3 months in an airtight container at room temp.
Assembly
Divide your choux ring. I like to cut more like a 60/40 split (top/bottom), or even ⅓ / ⅔ (top / bottom) as I think this looks better in the final assembly. Set the top aside.
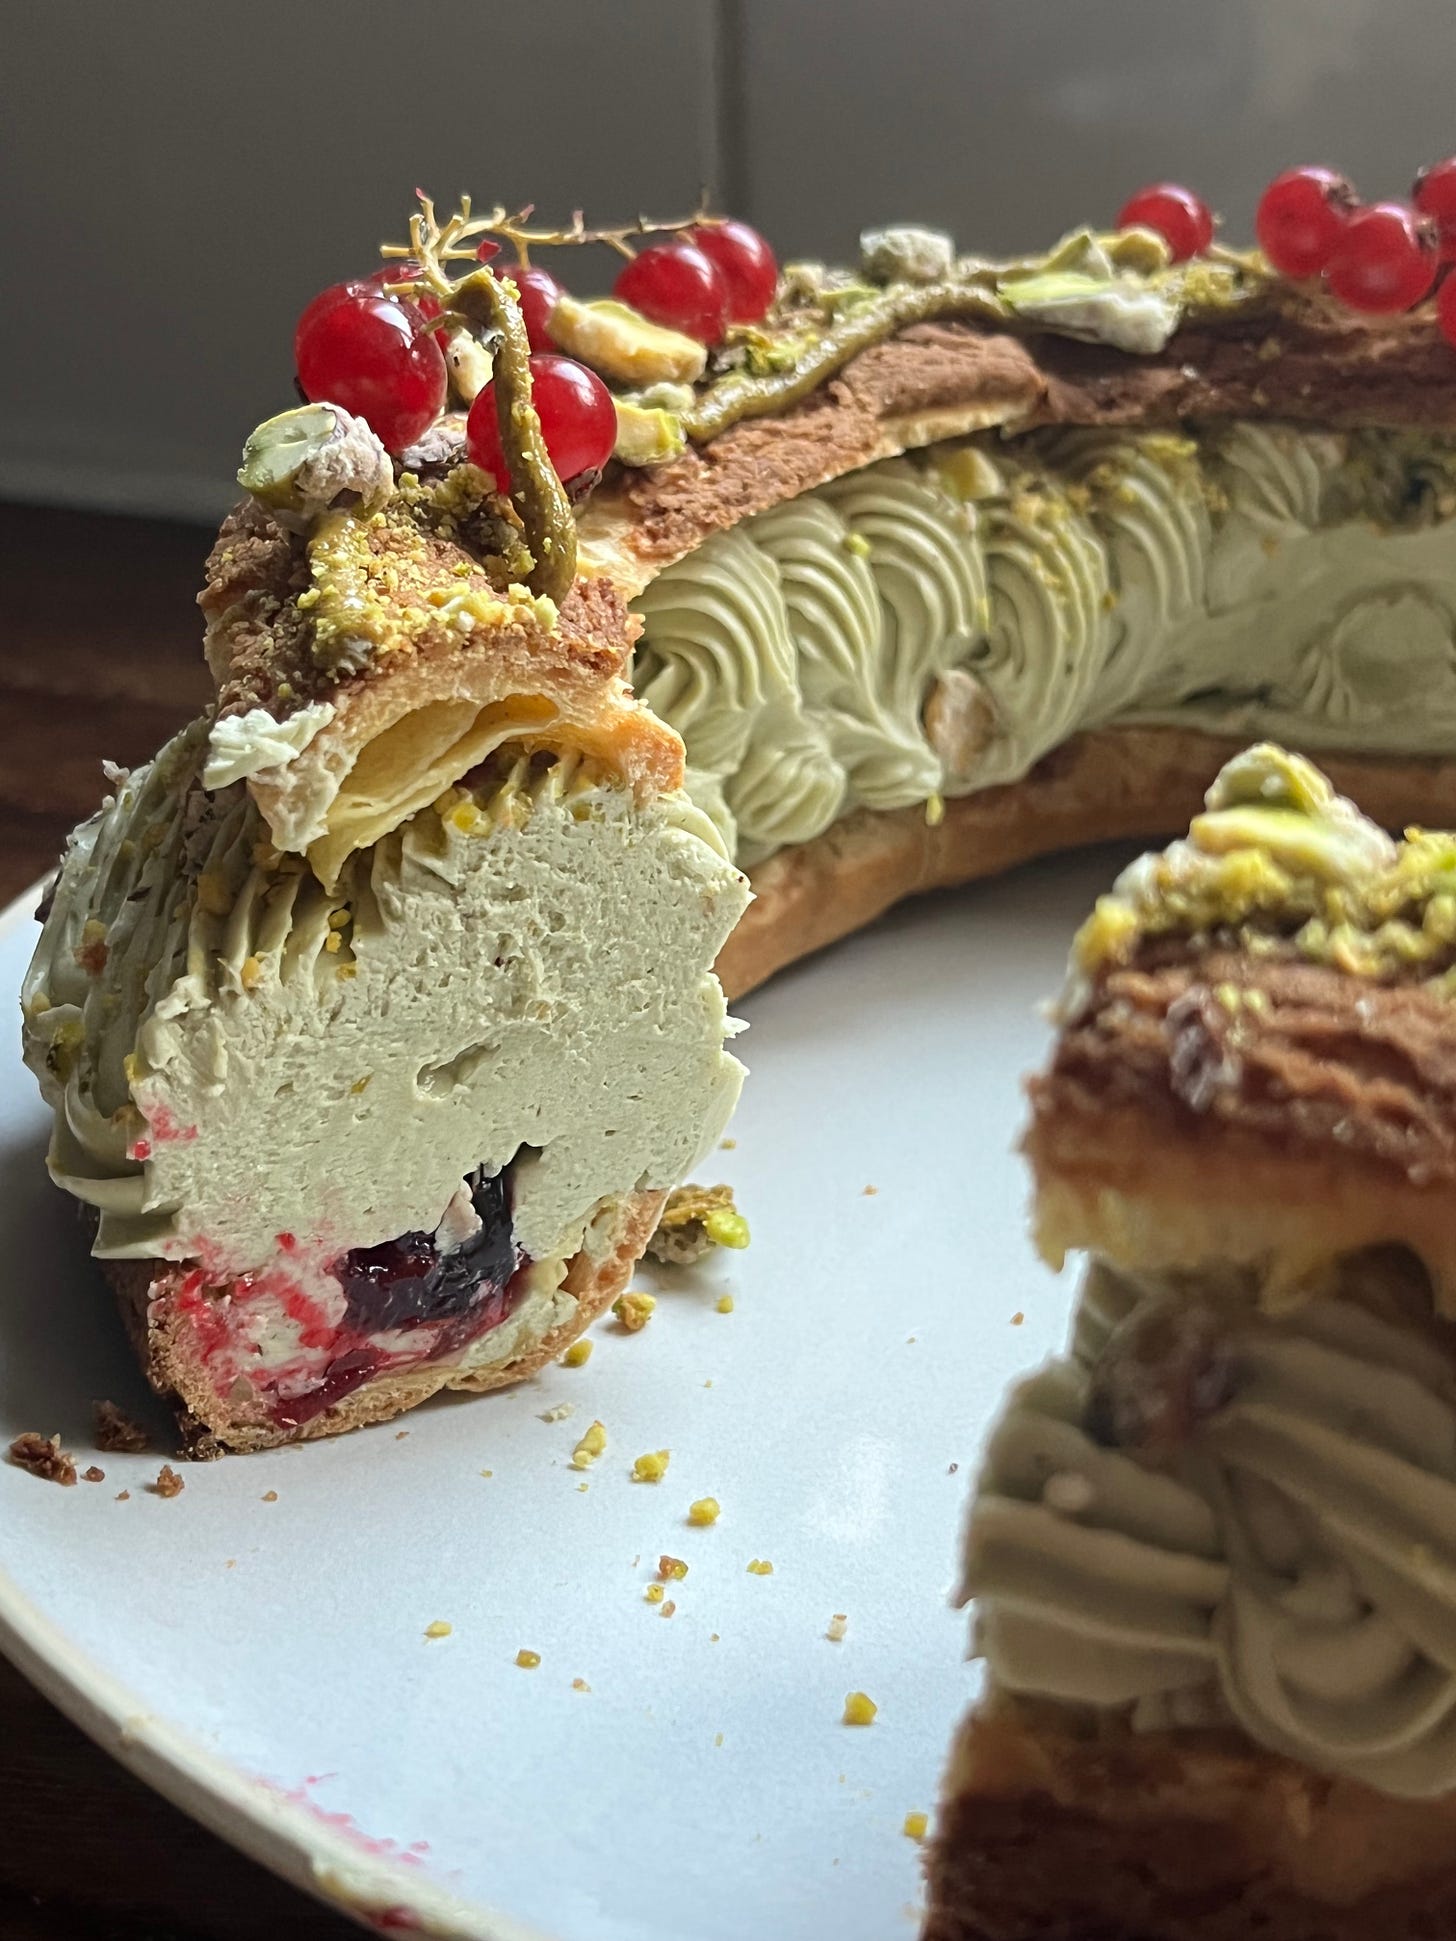
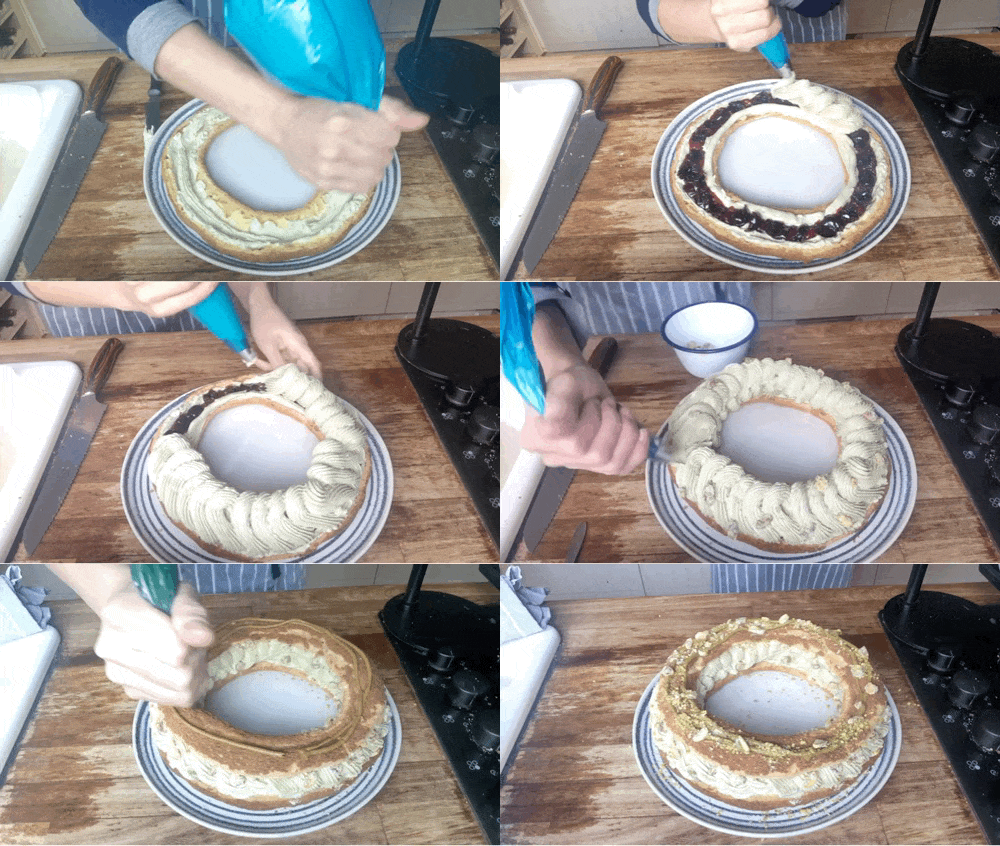
Pipe a thick line of mousseline cream in the base. Use the back of a spoon or a small offset spatula to drag through this to create a ‘channel’ to pipe your jam. If it isn’t deep enough, pipe rings of cream around the inner and outer border. Pipe your jam and, if using, place preserved cherries on top of the jam.
Pipe overlapping circles of pistachio cream. You want the cream to really add some height, so pay attention to the technique in the GIF - you can also practice this before piping onto the real thing.
Break up the crystallised pistachios slightly then place all over the pistachio cream, followed by some more chopped pistachios for colour
Top with the choux lid. Pipe a few fine circles of pistachio paste (you could also use pistachio cream let down with a little milk, or classic lemon icing!) on the top, finishing with crystallised pistachios and chopped pistachios. Keep at room temp for 3-4 hours before serving, otherwise store in the fridge - the choux will loose crispness and you will need to leave to come to room temp for 2-3 hours before serving. Serve slices with amarena cherry syrup, if you have it!




This looks gorgeous Nicola! Any chance you could add the close-up video of piping the mousseline please? It’s tricky to see the technique in the GIF here. I think you posted it to your stories on Instagram the other day. Thank you!!
This looks delicious! I wanted to know if I could freeze leftover pistachio mousseline. Thoughts?