Kitchen Project #55: All about éclairs
ft. triple chocolate éclairs + deep dive into choux science
Hello,
Welcome to today’s edition of Kitchen Projects. It’s so wonderful to have you here.
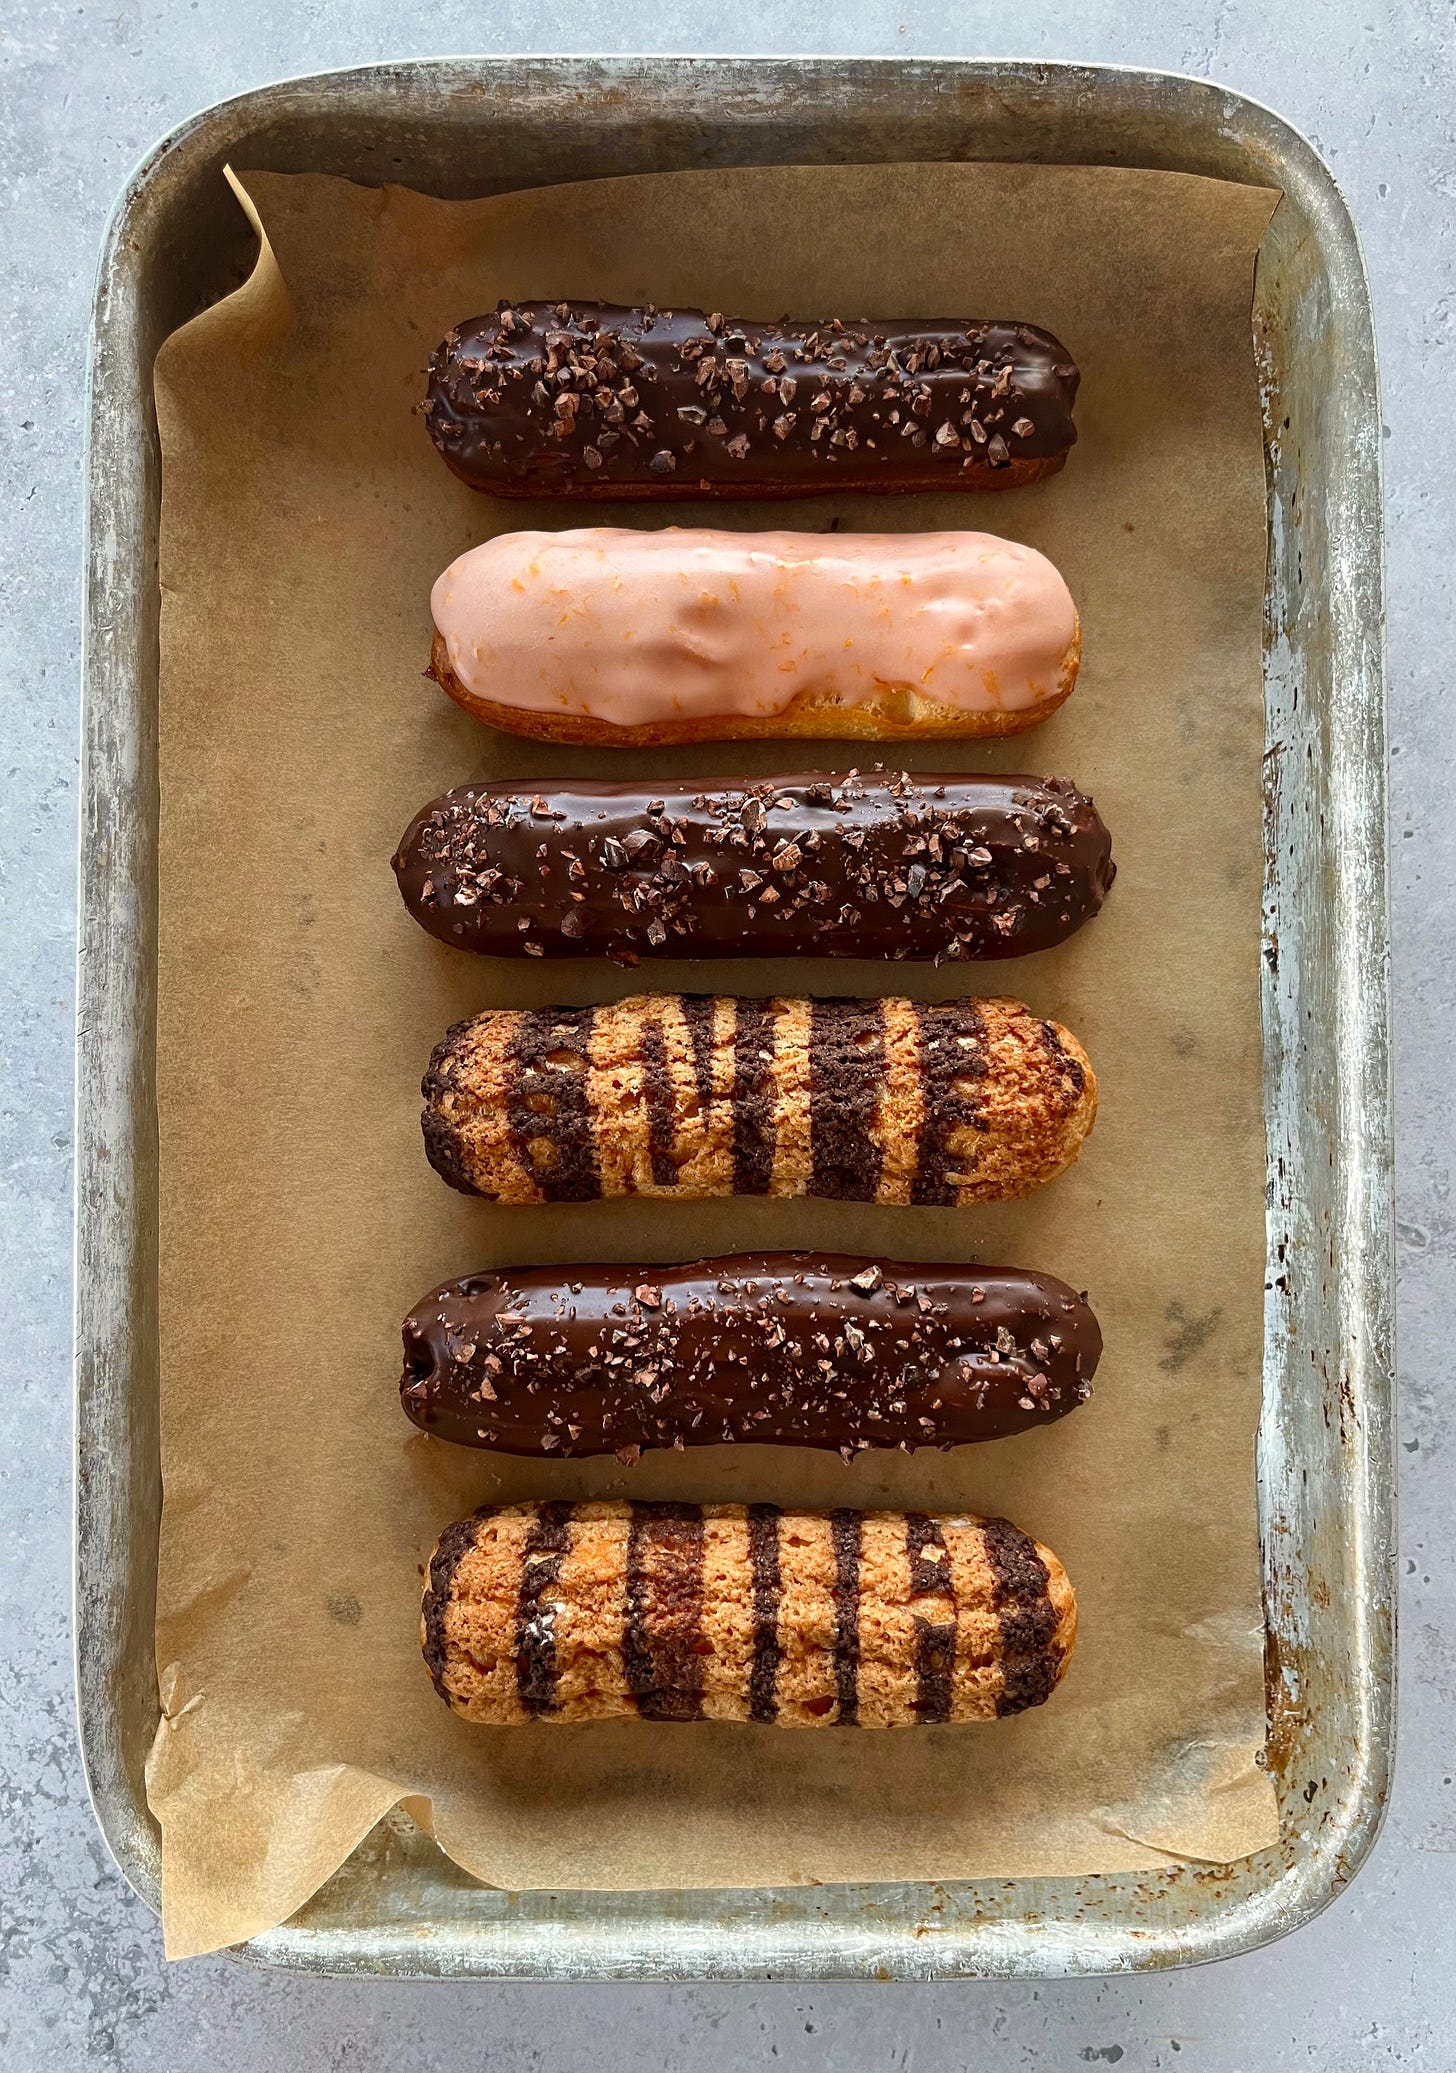
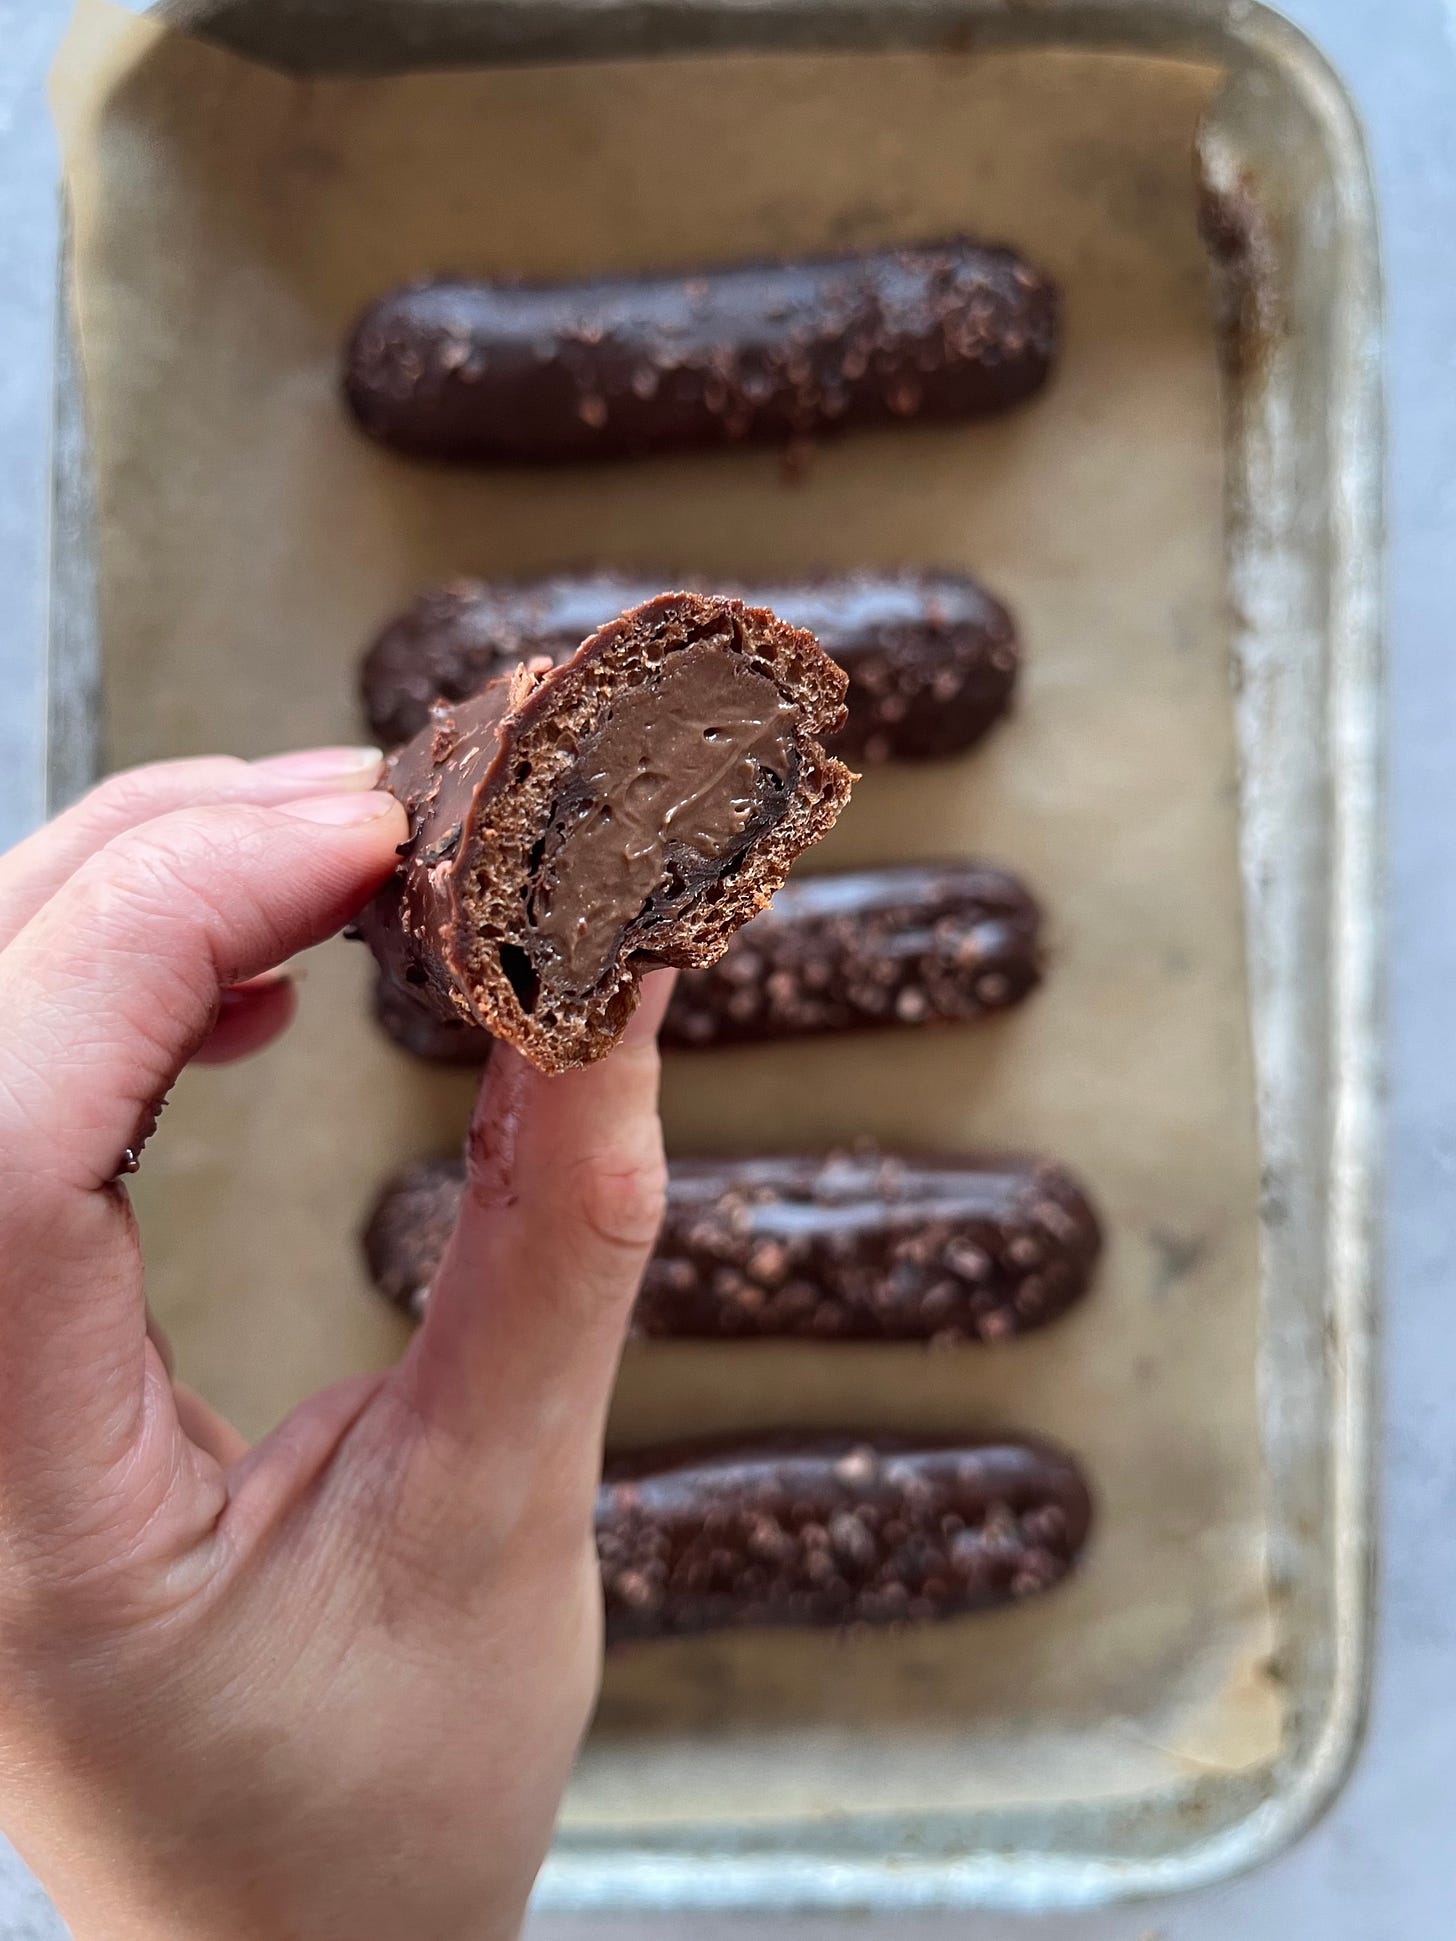
Today we’re going deep into choux in the form of éclairs. These are a dessert I’ve always struggled with and I’m so happy to have finally nailed them this week in the form of triple (or maybe quadruple) chocolate eclairs.
Over on KP+, I’ll show you how to level-up your éclairs design with tiger-striped craquelin, a super fun technique I discovered this week. Subscribing to KP+ costs just £5 and you get access to lots of extra content, inc the full archive, whilst supporting the writing of this newsletter, so please click here to check it out:
Lots of love
Nicola
Overcoming éclair scares
Éclairs freak me out. Or at least they used to.
I know we’ve made some beautiful choux creations together before (tiramichoux, choux buns), but éclairs have always been a challenging / scary area for me. If I were to rate the choux-spawn from easiest to hardest, I would put éclairs waaaaaay beyond a towering croquembouche. My success rate for éclairs has always been pretty low.
I reckon it’s because it’s so much harder to hide with éclairs. Whilst profiteroles benefit from a rustic charm, éclairs do benefit from being elegant. As well as this, aren’t choux recipes often such a minefield of ‘finger in the air’ sensory guesses?! Drying out the paste “just right”, getting the dropping consistency “perfect”?! Well, I’ll try and delve into some of those inaccuracies today.
So, in an attempt to get my batting average up for good, I’ll show you how I’ve changed my original formulation to make a choux that gives you beautiful éclairs and we’ll go deeper into the factors that affect the rise, run through the different piping tactics and finish off with a recipe for triple (or quadruple?) chocolate éclairs.
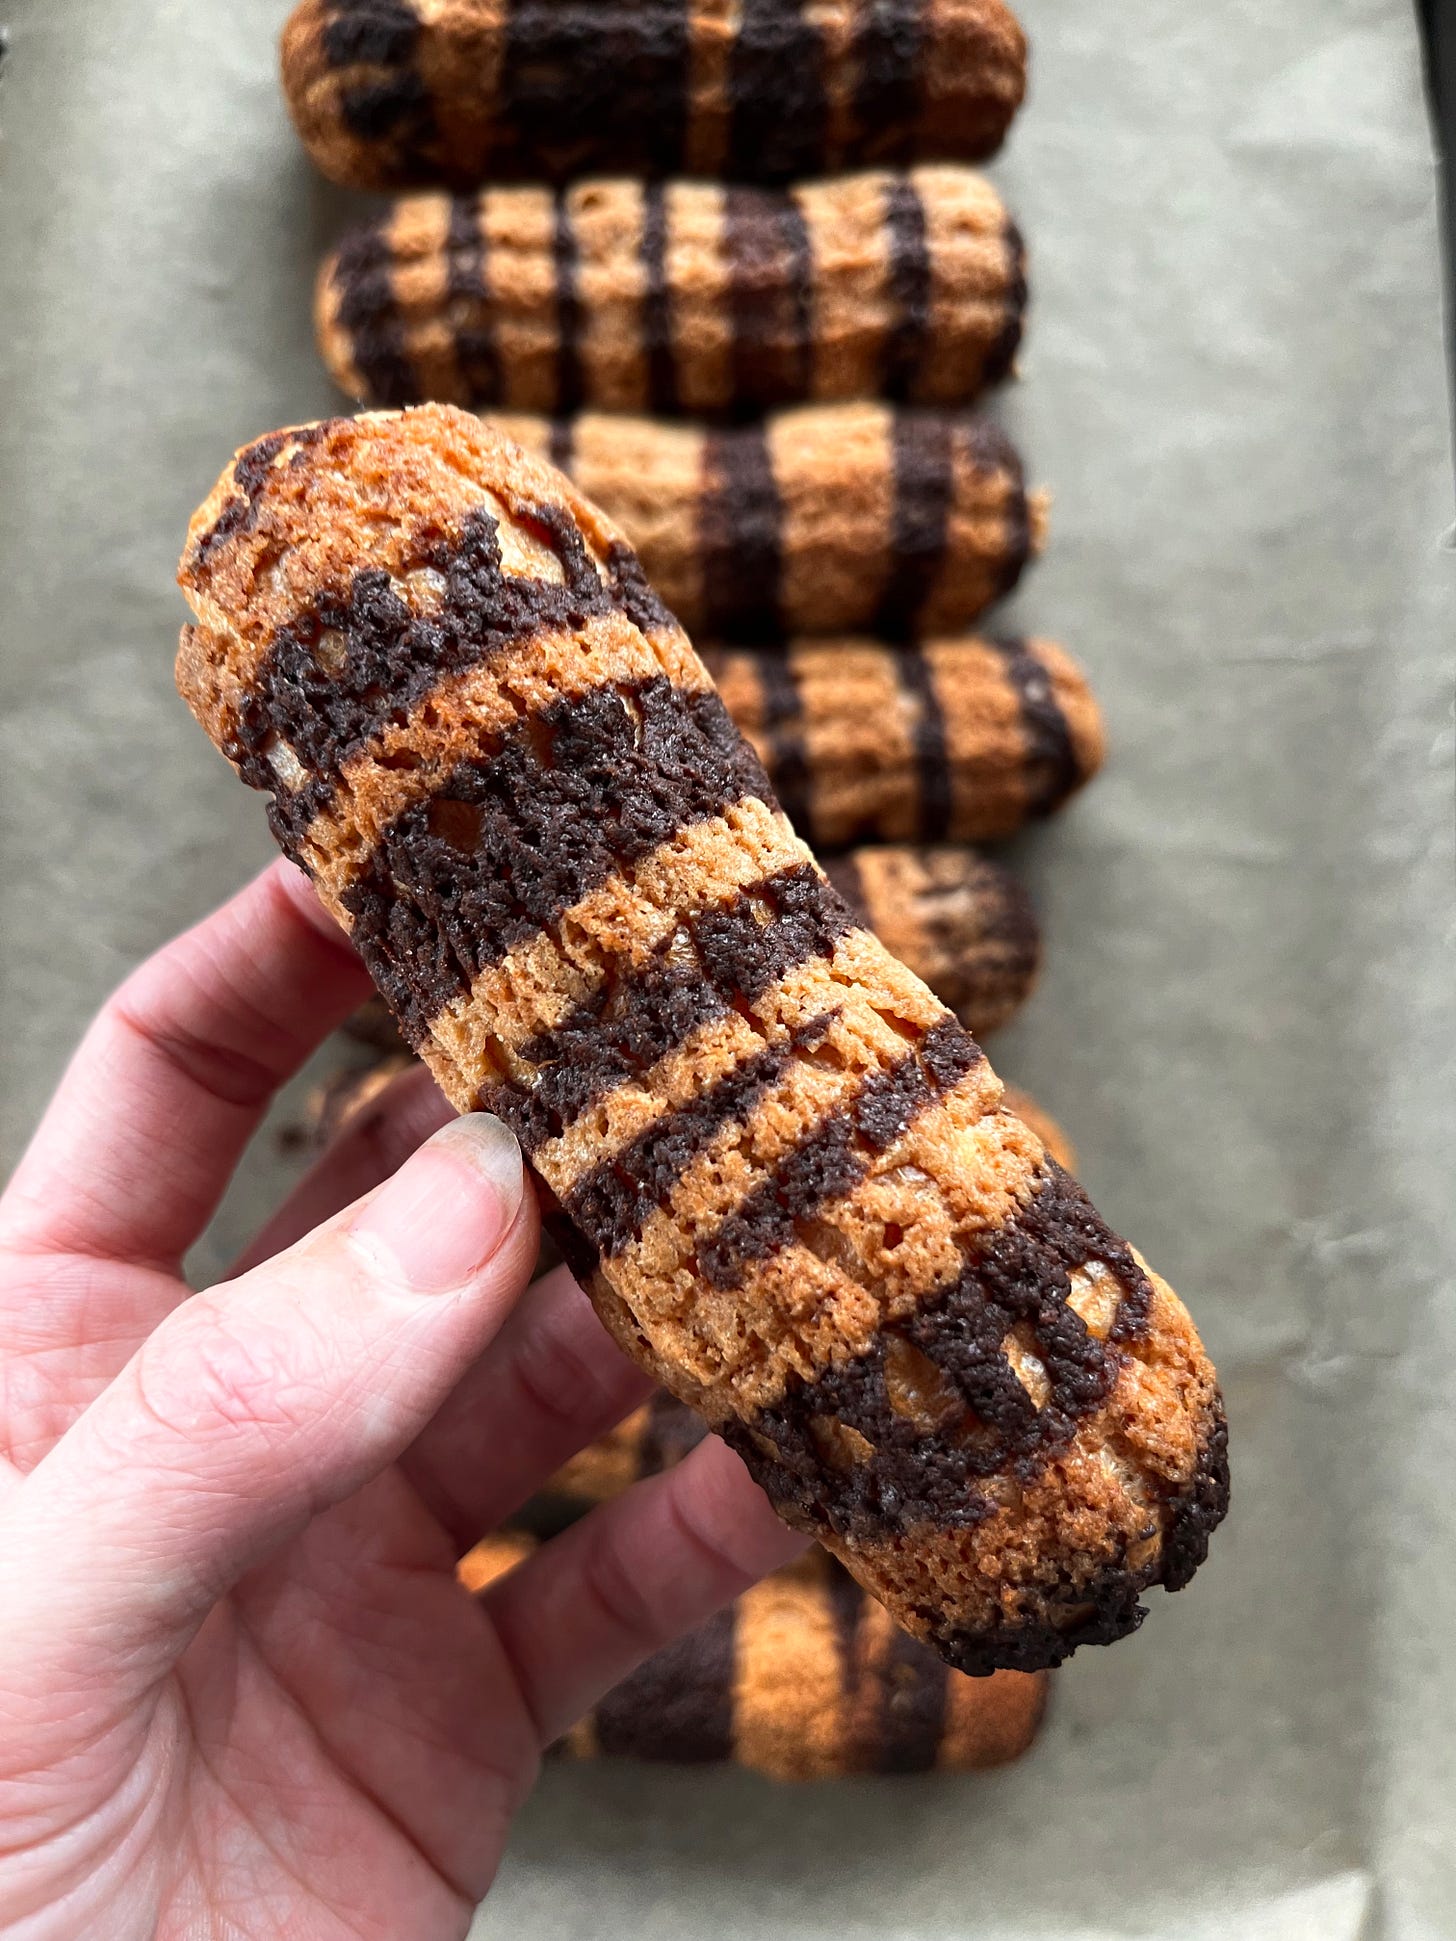
Over on KP+, I’ll show you a technique that I discovered this week! I was minding my own business, thinking about the lunar new year (Kung Hei Fat Choi btw) and how this year will the year of the Tiger when I thought… could I make a tiger striped éclair?! And so, the concept was born:
I’m so excited to show you how to make these - they are filled with tangerine jam and chantilly cream. Click here to read it.
Dissecting choux
I know that choux is an area of stress for a lot of people. I’ve had a lot of DMs on Instagram and questions about it in the past - for some reason, choux just doesn’t like to behave. I’ve always felt that the best way to get a handle on a bake is to really understand what is going on at each stage.
The most important thing to remember is that Choux is steam powered. As we make the choux, we are trapping lots of tiny water bubbles in the paste. When the choux goes into the oven, the water bubbles evaporate rapidly into steam and create one big bubble. This also makes the pastry rise. The crust, made of starch and egg proteins, sets creating a crisp, thin crust, and trapping the big air bubble, leaving the inside completely hollow.
But there has to be a perfect ratio and blending of ingredients to even get to the baking stage, so let’s start there:
Milk / Water - A mixture of milk and water is generally used to provide moisture and make the important gelatinisation of starch possible. The moisture provides tenderness / flavour (in the case of milk) and recipes generally tend to split it 50/50 down the middle. We’ll look into the difference between choux made with a majority water vs milk soon
Butter - Butter adds a little moisture and flavour. We’ll test out alternative fat choux today, too, to see the impact of butter
Salt and sugar - Salt and sugar are for flavour. Choux can be made without it
Flour - The heart of our choux. Flour is essential for structure. We’ll go deeper into the role of gluten in choux and the whole plain vs strong flour debate plus what happens when you add in something gluten free - like cocoa powder
Eggs - You know how with most egg preparations (souffle, meringue based things, genoise), the item will rise due to expanding air trapped inside the network of proteins? Well, it’s kind of the same here! But instead of putting air into the eggs before baking, we’re relying on those proteins to capture the evaporating water/steam whilst the choux bakes. Once expanded, the eggs will help provide a well-set, rich crust. The yolks, as ever, are doing some the heavy lifting when it comes to flavour.
Tweaking the recipe for éclairs
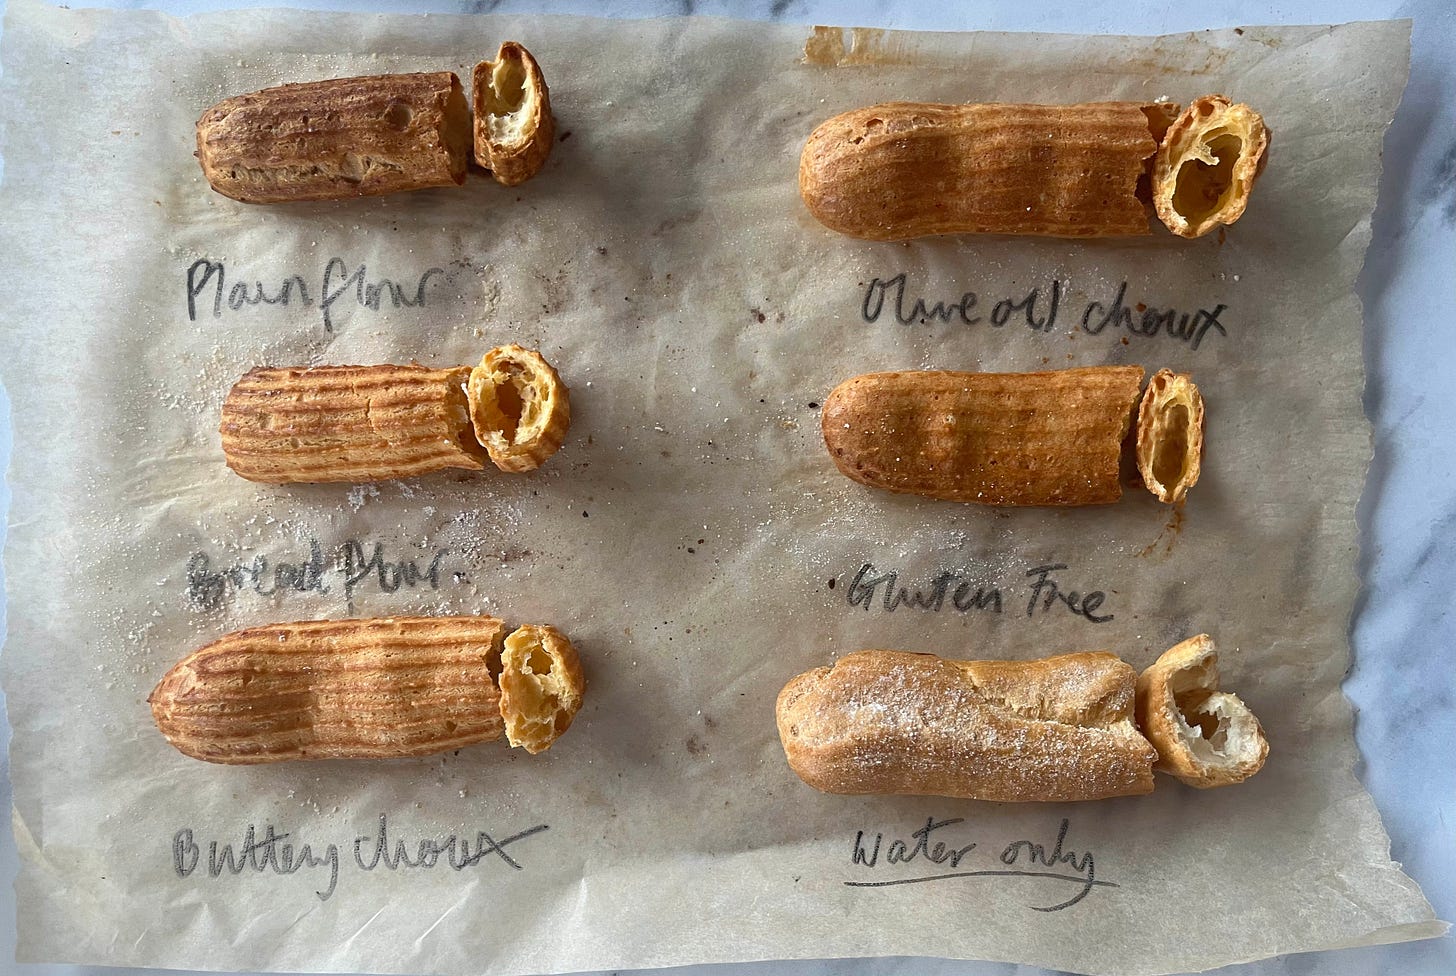
To get beautiful éclairs, I had to tweak my recipe to get the best results. I put it to the test. I made several batches as below:
Plain flour with reduced butter and increased flour
Strong bread flour with reduced butter and increased flour
Original recipe “buttery choux”
Olive oil in place of butter
Gluten-free flour
Water only as the liquid
Here’s what I found out:
Buttery choux vs. new formulation
The original formulation, which has equal butter, flour, milk and water spread out quite a lot. It was very delicious, but wasn’t quite beautiful enough for éclairs. The new formulation - which you can compare side by side in bakers percentages - is quite different. You will see that the butter and hydration is drastically reduced which results in a much more defined, thicker paste that results in lovely éclairs:
Strong vs. Plain flour vs. Gluten Free flour
In the past, I have theorised that the cooking of the flour, which leads to gelatinsation, makes the gluten negligible and therefore using plain flour vs high gluten flour shouldnt make much of a difference. This week I tested it out! To test it I made three batches of flour - for the first I used strong flour, the second I used plain flour and the third I used gluten free flour:
So, as we can see, we do need *some* gluten. The choux made with gluten-free flour expanded well in the oven but then flattened half way through baking. The choux made with plain flour and bread flour were visually similar, though the bread flour produced a slightly neater and more defined choux, which is good for éclairs. Bread flour can also absorb more liquid which means our choux paste will be stiffer and easier to work with. That being said, if you don’t have bread flour, I wouldn’t bother running out to get it for this!
Olive oil choux
I replaced 100% of the butter with olive oil and I got great results - the choux expanded extremely well, better than the butter, which (especially due to the next point about water v milk) must be due to the milk proteins providing softness and flavour but not doing a whole lot for the rise of the choux. The olive oil flavour was actually quite subtle, but I think this technique would be really good for savoury choux preparations
Water
Éclairs made with 100% water expand significantly more than éclairs made only with milk. I’ve increased the proportion to be just over 60/40 to maximise éclairs expansion.
The role of gluten and starch gelatinisation in choux
The gelatinisation of the starch is a key moment in the life of our choux pastry and one that we have used before in other recipes; We use starch gelatinisation as a hydration holding tactic when we make milk bread via a tangzhong. By pre-cooking the flour, we are both ‘trapping’ hydration by keeping the moisture busy with starch, effectively binding the water which will come into play later.
At the same time, you denature some of the gluten bonds, massively reducing the flour’s gluten making abilities, though not removing them completely. The gluten chains will form but they are impeded - the gluten is stretchy but not elastic, ie. it won’t ‘spring back’ - this works in our favour when it comes to baking: The denatured gluten expands as the steam evaporates and this shape gets locked in by the starch and egg proteins setting.
The deal with drying out
This week I realised I have been perpetuating one of those kitchen myths - drying out choux. Although the technique is correct, there is actually no ‘drying out’ happening - we are simply trying to make sure that our flour is properly gelatinised. In fact we are not losing any water at this stage - we are doing the opposite! We are actually trying to hold onto it by binding it with our flour. The ‘drying out’ is true in a sense, since the choux will leave a dry/crusty film on the pan as we gelatinise it, but it ends there. So, instead of trying to guess if your choux is ready, you can remove the guess-work by using a thermometer.
Wheat starch gelatinises at 65c, but you can bring your paste up to about 70c-75c to make sure the starch has properly hydrated. For small batches, like we make at home, this will likely happen immediately; I temped my small batch recipe and as soon as it had made a homogenous ball, it was well over 70c.
Once you’ve reached this temp, there’s no more drying out needed. Simple!
The issue with dropping consistency
If you’ve made choux before you’ll know the vague feeling of anxiety that arises when it comes to adding the eggs, which is often described with some mysticism and needs to be judged every single time you make it.
But judging your choux paste on so-called dropping consistency is actually really difficult since it varies so much due to outside factors beyond the volume of eggs. Both the temperature of your eggs and the temperature of your paste when you add the aforementioned eggs makes a huge difference: Cold eggs added to a cooler paste will more rapidly cool your paste, solidifying the butter and firming the starch-gel network, resulting in a paste that appears more firm. On the other hand, room temperature eggs added to a warm paste will appear runnier, even if the same amount of eggs have been added.
As a result, I do quite like using fridge cold eggs now - I like the way they cool down the paste and can help give you a proper indication of the consistency. Although a too-runny paste is hard to come back from, the ‘right’ amount of eggs is less variable than some recipes would have you believe. Unless your flour is radically different from mine, simply following the weight of the eggs as stated in the recipe below should yield some brilliant choux. I prefer to err on the side of firm paste, especially for éclairs, where the visual shape is important. If you are worried you’ve added too many eggs, simply rest your paste in the fridge to see if it firms up before chucking it! You may be surprised.
Cooling your paste
If you have a Kitchen Aid, you can definitely cool your paste by paddling it in the mixer on a slow speed before adding the eggs. I tried cooling it on a high speed, but it made my paste super lumpy, so be gentle. If you are mixing it by hand, simply put the paste into a bowl and press it around the edges of the bowl to increase the surface area. I like to test if the paste is cool enough by putting a finger in it - if you can hold it in there comfortably, it’s time to add the eggs.
The role of equipment and importance of piping
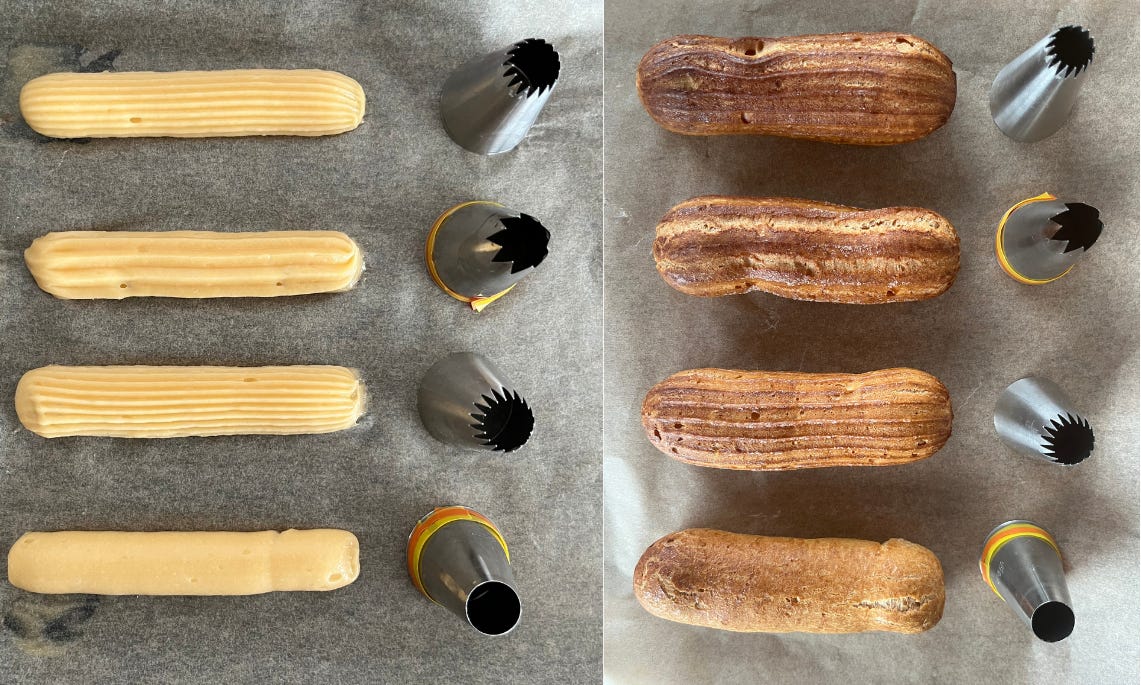
Although I tend not to like to ask anyone to use special equipment, or shell out for fancy stuff, a good piping tip does make a difference, though not as much as I’d thought:
The éclairs piped with the fluted tips (do help cover all manner of sins - it expands much more easily and neatly as the shape encourages the correct direction of expansion. Though you can still make good looking éclairs without it.
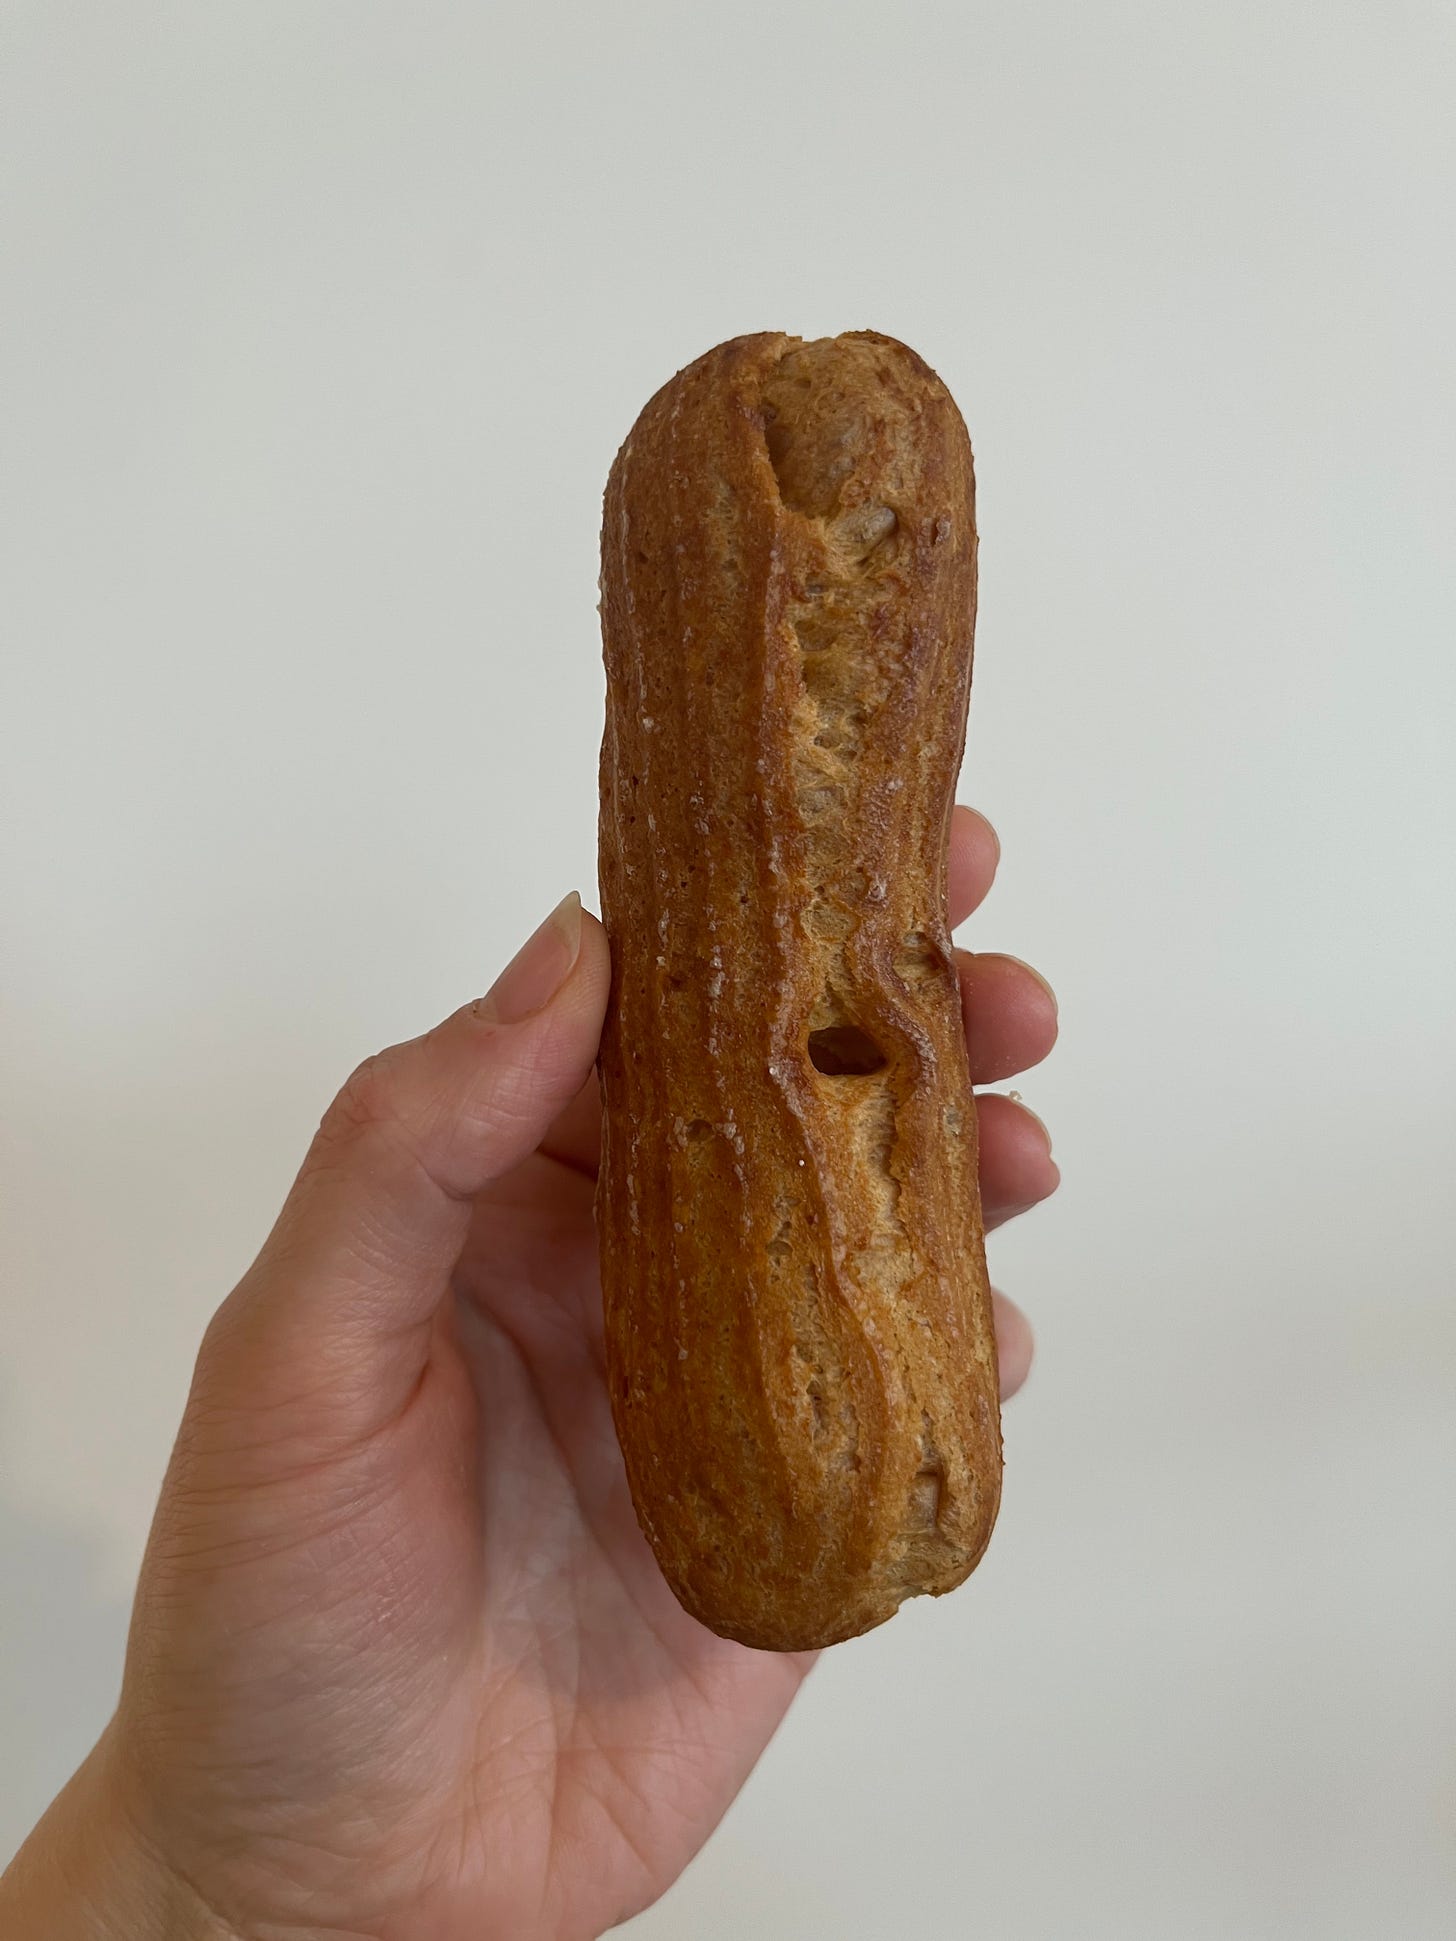
The much more important factor is even piping pressure and air bubbles: When you put the choux into the piping bag, you should do your best to squish it and squash it to remove as many air bubbles as possible. When you are piping and there is a gap in the flow of choux, this will come back to bite you later as this gap/bubble is imprinted into the choux. As well as this, if the choux is piped unevenly, this will also bake into the final shape, so it’s important to try and be as even as possible.
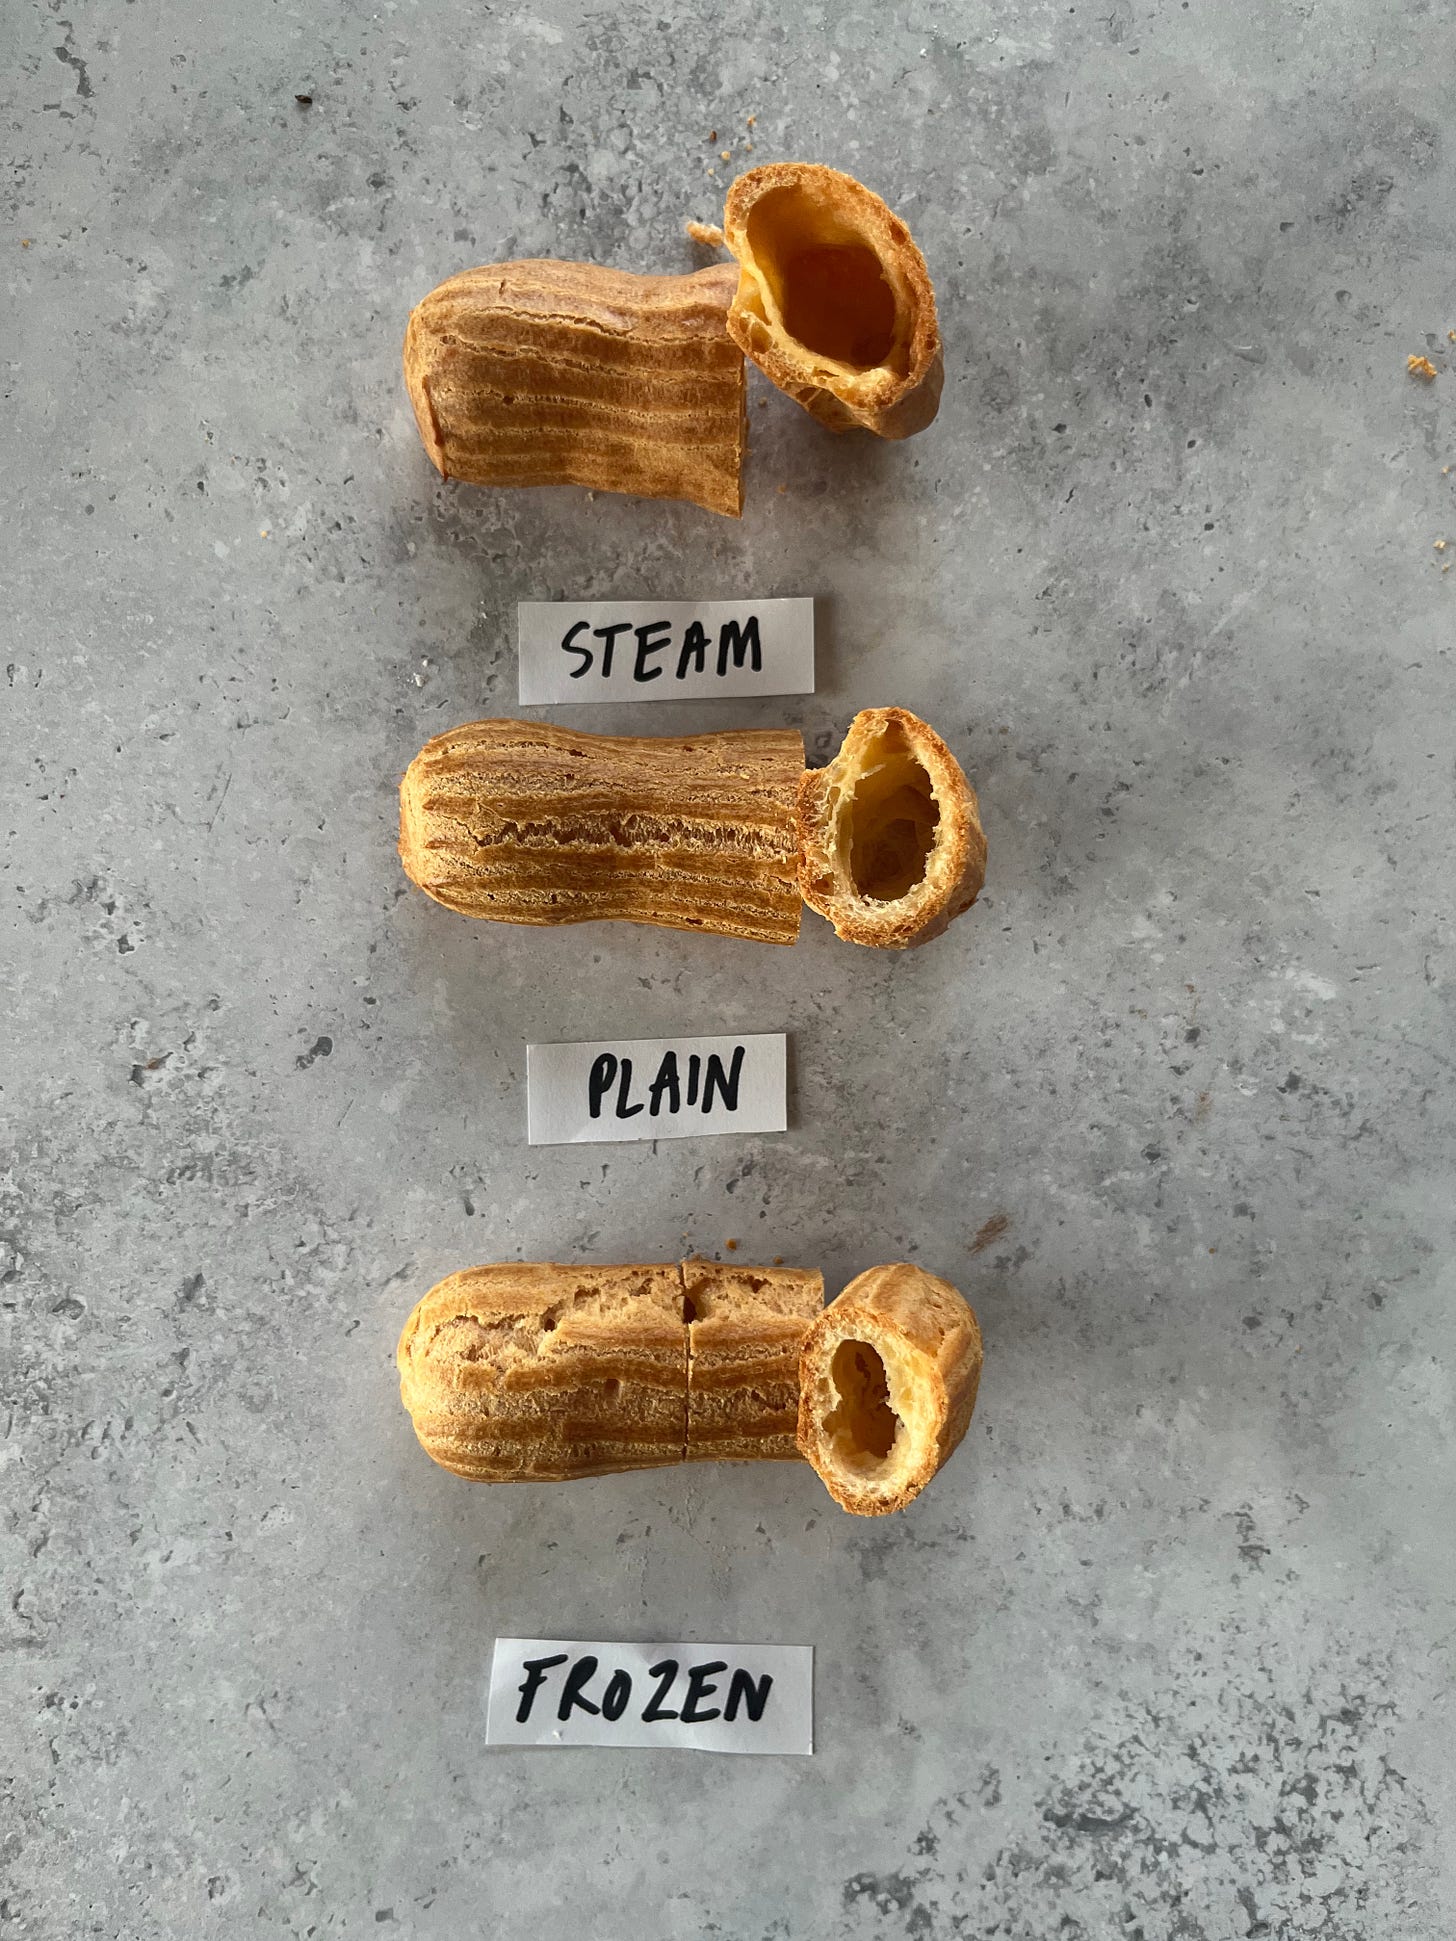
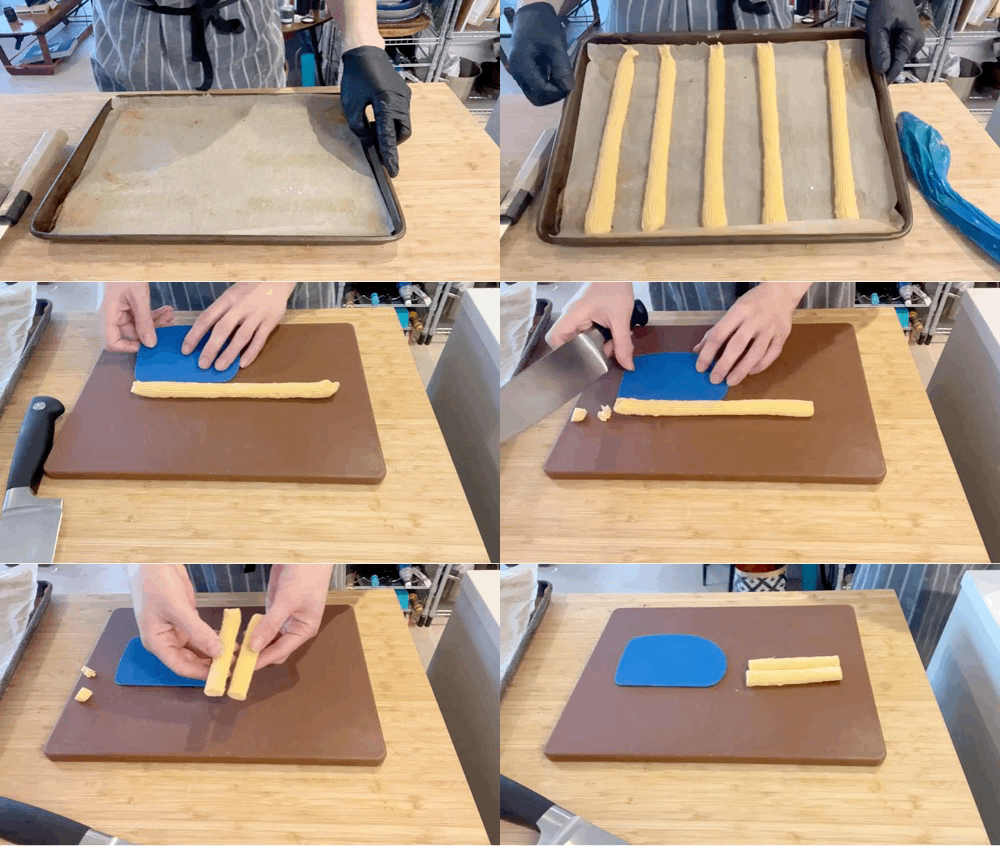
Not good at piping? Don’t worry! You can pipe choux as many times as you like. If one is a bit wonky, simply use an offset spatula and put it back into your piping bag. Another way to get neat éclairs is to pipe long lines of choux paste and then freeze before cutting to size. I’ll show you how below.
Of course, you can hide all manner of sins with craquelin - I’ll show you on KP+ how to create a design with your craquelin. Click here to read it.
Resting your choux
At one of my first jobs, we would always rest our choux pastry overnight. I tested this at home and found no discernible difference between choux that was piped as soon as it was ready vs. choux that rested overnight. So, feel free to make your choux ahead of time. Due to potential oxidation, I wouldn’t hold it for longer than 24 hours. This technique is definitely one of convenience, rather than one that will give you any particular flavour or visual benefit, in my opinion.
The deal with the freezer
When it comes to choux, the freezer is your friend. You can either bake your choux off then freeze the baked shells then refresh at 170c for 5 minutes when you want to fill, or you can pipe your choux and bake from frozen. Choux baked from frozen will not expand quite as much.
Expansion maximisation techniques / How to bake
Although the formulation is important, the real choux magic happens when it goes into the oven:
Firstly, temperature - a high temperature encourages rapid evaporation and steam production. However, if the temperature is too high the flour and egg will coaguate into a thick crust and set too quickly, inhibiting expansion. There are a few ways to try and mitigate this - firstly: Steam. I’ve read opposing reports on whether we should be baking our éclairs with steam. I put this to the test. Baking with steam, btw, doesn’t mean you have to buy a fancy steam oven; When I need to bake with steam, I usually throw a few ice cubes in the bottom of the oven then close the door quickly. Just as good. The éclairs baked with steam had a shiny, more supple crust, and DID have a big hole… but they rose in a more unorganised manner and I much preferred the éclairs baked without steam.
I also read that you can coat the éclairs in a light spray of cooking oil before baking in attempt to keep the choux supple. I did test this and didn’t find a very significant difference. I do rate dusting with icing sugar, though - you get nice caramelisation and a good colour.
My favourite way to mitigate this is to bake the éclairs quite differently than I do for other choux - I pre-heat the oven to max (250c fan) and then decrease to 160c (fan) as soon as the éclairs go in and bake for 45 minutes without disturbing. This way you get the burst of hot air at the beginning and then a more gentle bake, akin to more gently drying out the choux. After this, I leave the choux to cool in the oven with the door open for at least 30 minutes, ideally til oven is cool. This results in a crisp yet tender choux.
Of course, all ovens are different, so I really hope what works for me works for you!
Adapting choux with cocoa
For this week, I’ll also share a recipe for cocoa choux. Due to the lack of gluten in cocoa powder, these choux dont rise quite as much as their plain counterparts, but they do look beautiful and dramatic - they have a much more tender inside, too. We’ll introduce the cocoa when we make the choux paste and increase the sugar to counteract the bitter flavour. Since cocoa absorbs more water than wheat flour, I’ve also increased the water slightly. These choux are more tender, due to the lack of gluten, than their plain counterparts.
Glazing éclairs
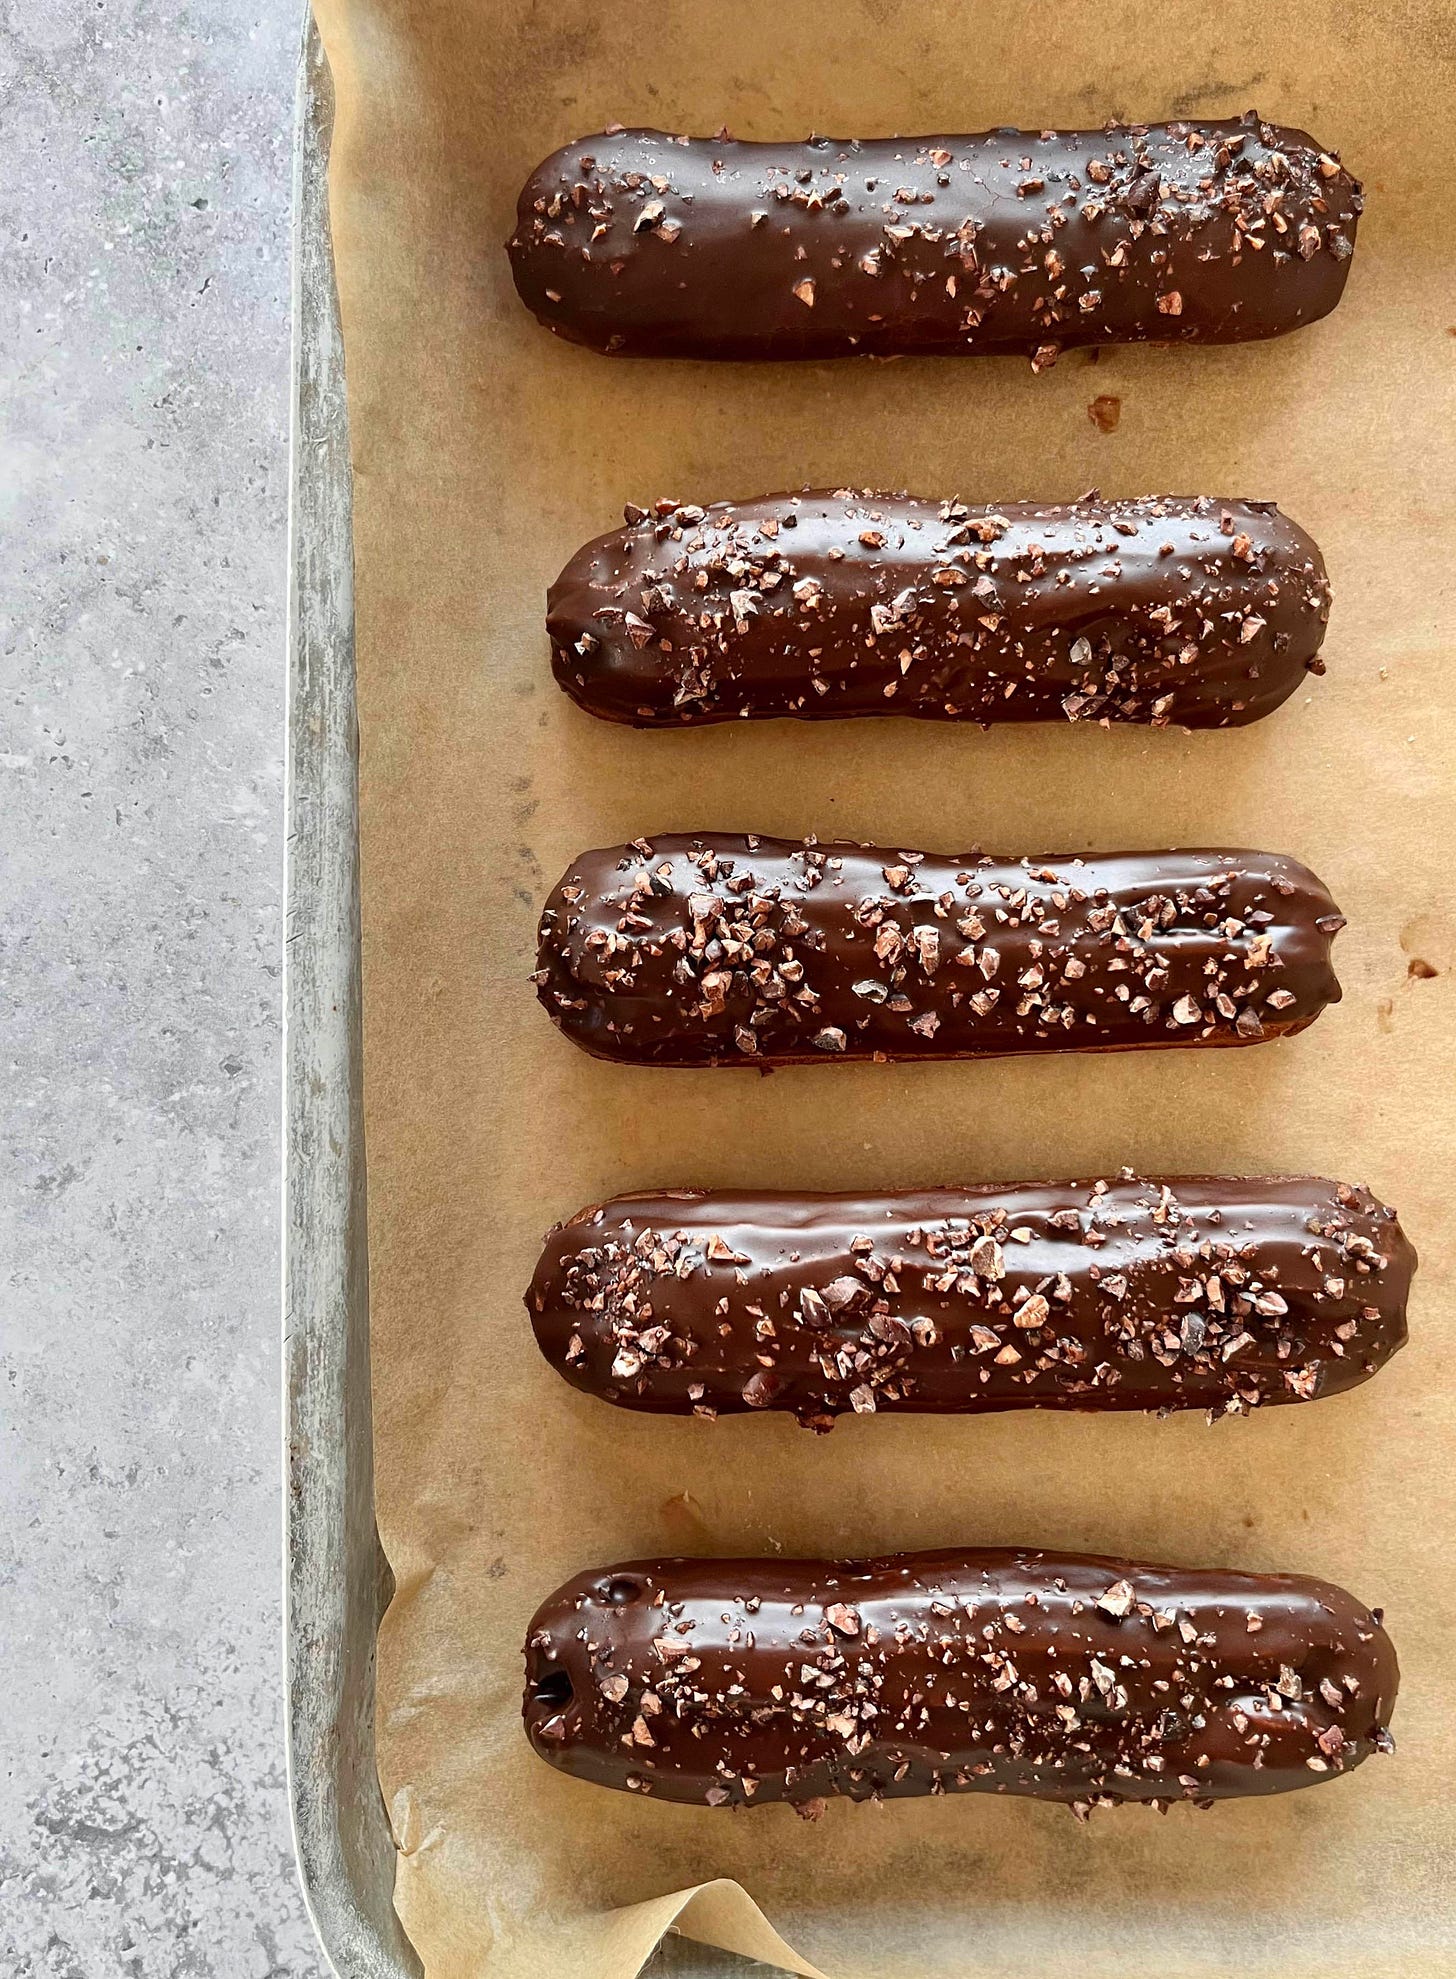
A lot of recipes online or in pastry books ask you to use Pate A Glacer for éclair glaze - pate a glacer is a ‘dark compound’ - basically a cheaper chocolate alternative made with sugar and palm oils rather than cocoa butter. As a result, it doesn’t need tempering and it is very shiny. Unfortunately, it’s quite hard to get for home bakers and it really isn’t very delicious - I don’t know about you, but I’m not a fan of eating more palm oil than needed, either, no matter how shiny it is! Today we’ll be using a simple mixture of butter, chocolate and a bit of golden syrup (for *natural* extra shine!) to dip our eclairs.
You can also use craquelin to decorate your éclairs, or use a simple fruit juice + icing sugar mixture, which works well too. Blood orange juice yields a lovely pink colour at the moment!
Filling éclairs
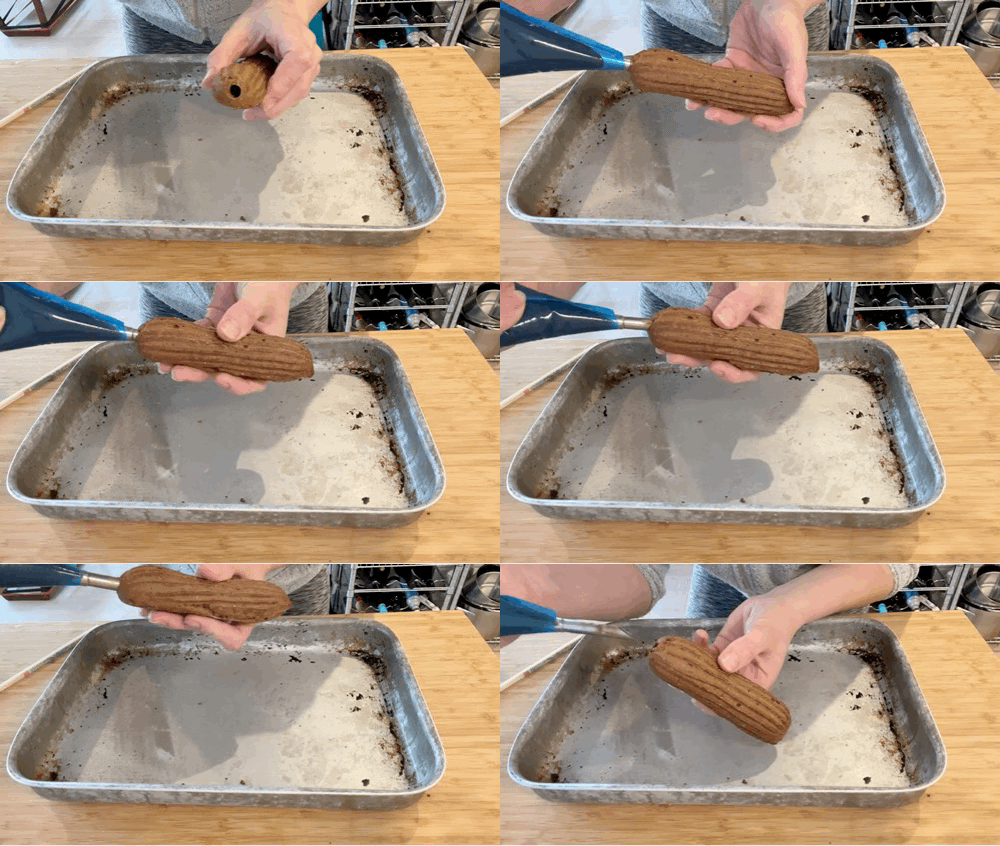
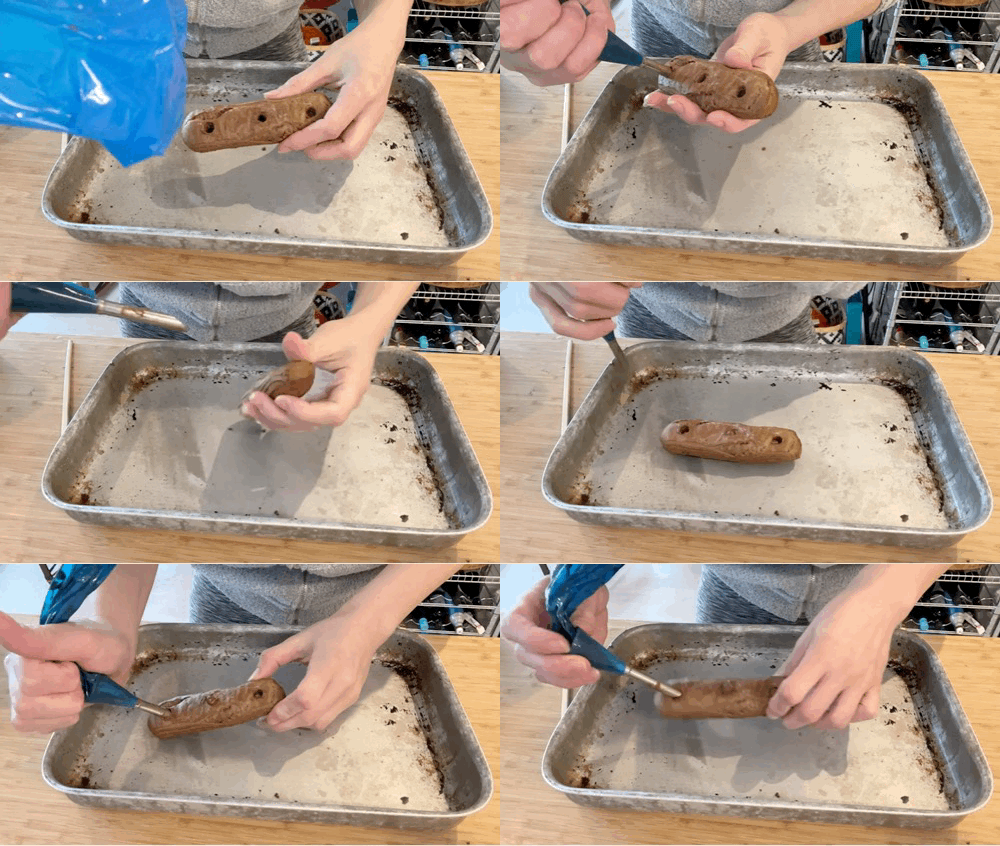
You can either fill éclairs from one side or via several holes in the bottom. The former is easier if you have a Bismarck tip which is like a long thin tube that you can stab into the pastry, however a tip with a 4mm spiked/star tip works well too.
Chocolate Éclairs recipe
This recipe works well with either the cocoa or plain choux, choose your own adventure!
Plain choux
Makes around 300g, enough for 10 éclairs
50g butter
60g water
35g milk
2g salt
4g sugar
70g flour
100g fridge cold eggs
Cocoa choux
Makes enough for 10 éclairs
50g butter
65g water
35g milk
2g salt
15g sugar
60g flour
10g cocoa powder
100g fridge cold eggs
1 x recipe Chocolate custard from Kitchen Projects
Chocolate glaze
140g dark chocolate
100g butter
20g golden syrup
Pinch of salt
Cacao nibs, finely chopped, to decorate
Method - the method is the same for cocoa and plain choux, simply mix the cocoa with the flour for the cocoa version
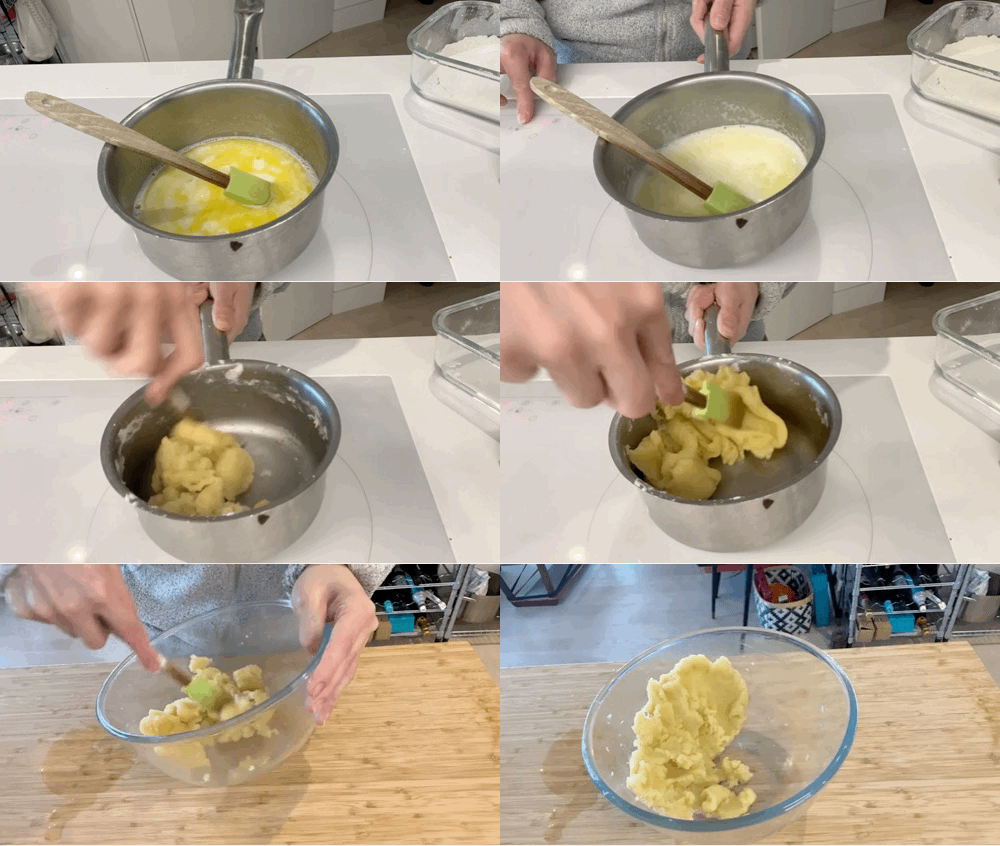
Heat the milk, water, butter, salt and sugar together. Bring to a rolling boil and stir to make sure the sugar/salt is dissolved
Sift the flour (and cocoa, if using) several times and add into your boiling liquid
Turn the heat down and stir rapidly until a smooth paste forms and a dry film is formed. If you have a thermometer probe, check that it is above 70c
Move paste into a bowl and either spread it out to cool down or paddle on a low speed if using a KitchenAid
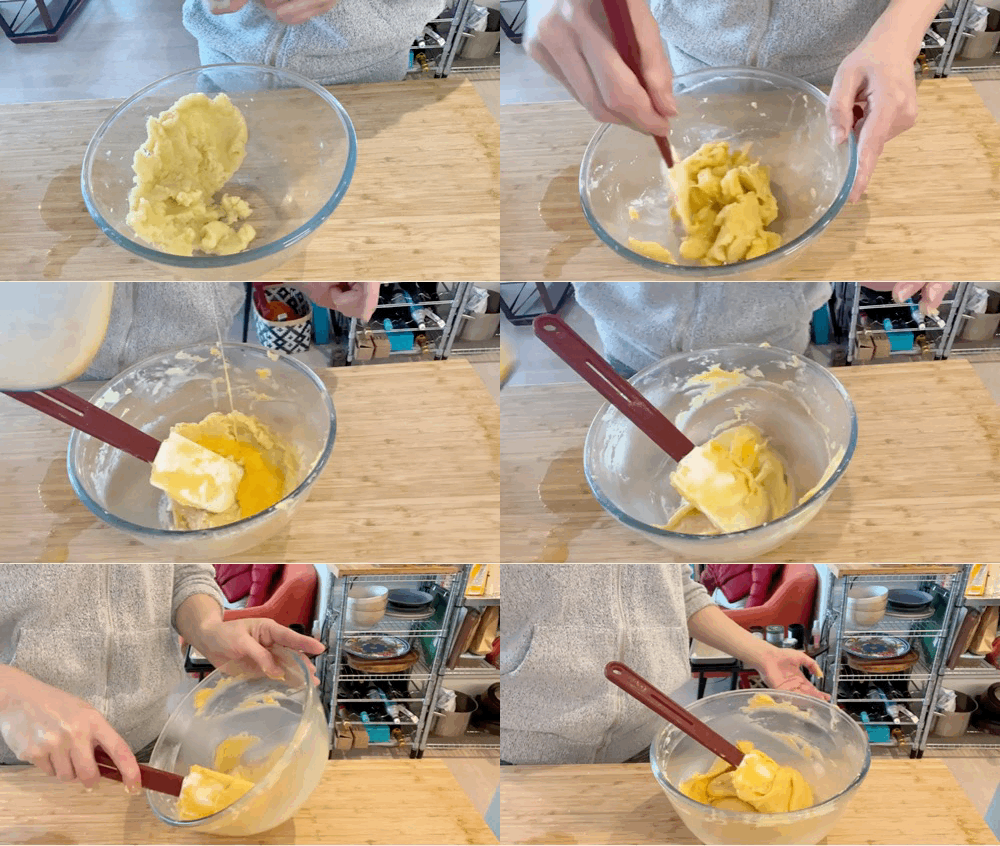
Meanwhile, whisk the eggs - this makes them easier to combine
When you can touch the paste comfortably for 10 seconds, start to add the eggs. I do this in 3-4 additions, mixing well between each
When the paste is smooth and shiny, move into a piping bag with a fluted tip (if using) and smoosh the paste to try and reduce pesky air bubbles
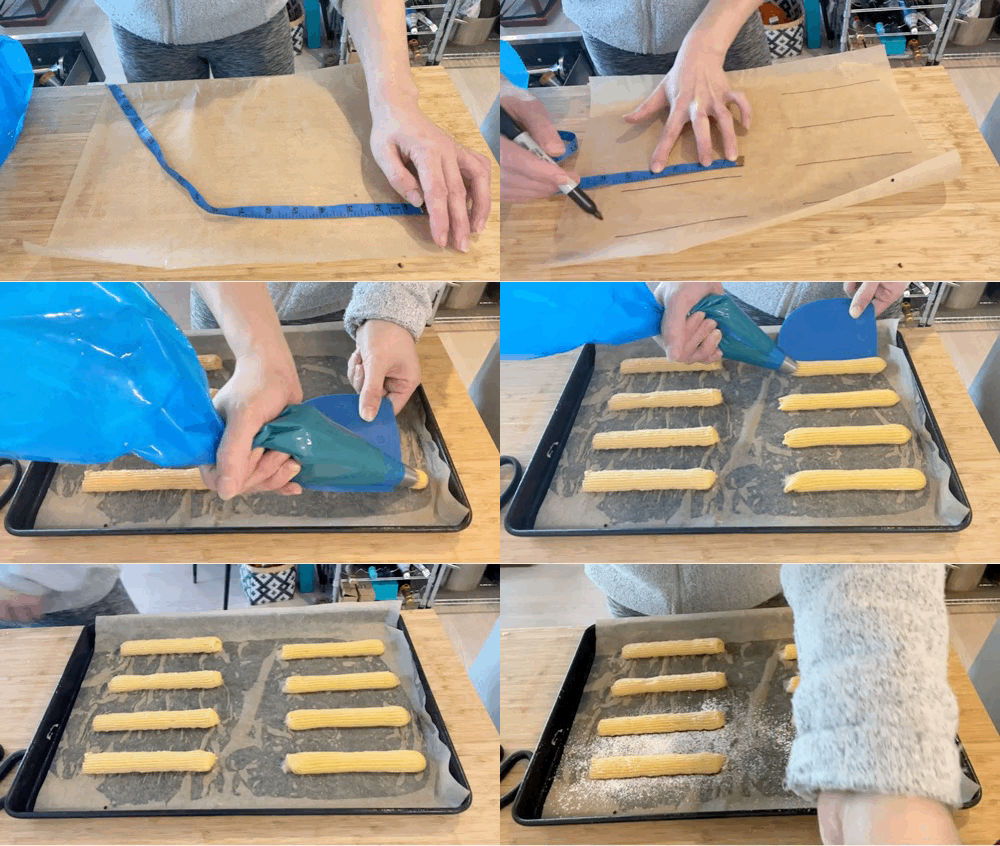
Pipe 5 inch lines as evenly as possible. You can either use a scraper, or something similar, as your guide, or draw lines (then flip the paper over) before piping. Alternatively, use a bench scraper or something similar as your guide. To pipe neatly, I pipe the full length and then drag down and then dip my finger in water to tidy it up if needed. They should weigh around 20-25g
Dust heavily with icing sugar
Alternatively, pipe long lines and then freeze and cut to size and bake at your convenience
To bake, pre-heat oven to 250c fan (max) for about 20-30 mins to make sure its really hot
Put the éclairs in the oven and reduce temp to 160c immediately
Bake for 45 minutes without disturbing then turn off the oven and leave door ajar and leave for at least 30 minutes **If you prefer a very crisp choux, bake at 170c for 35 minutes instead - I find these can snap/break when filling though!**
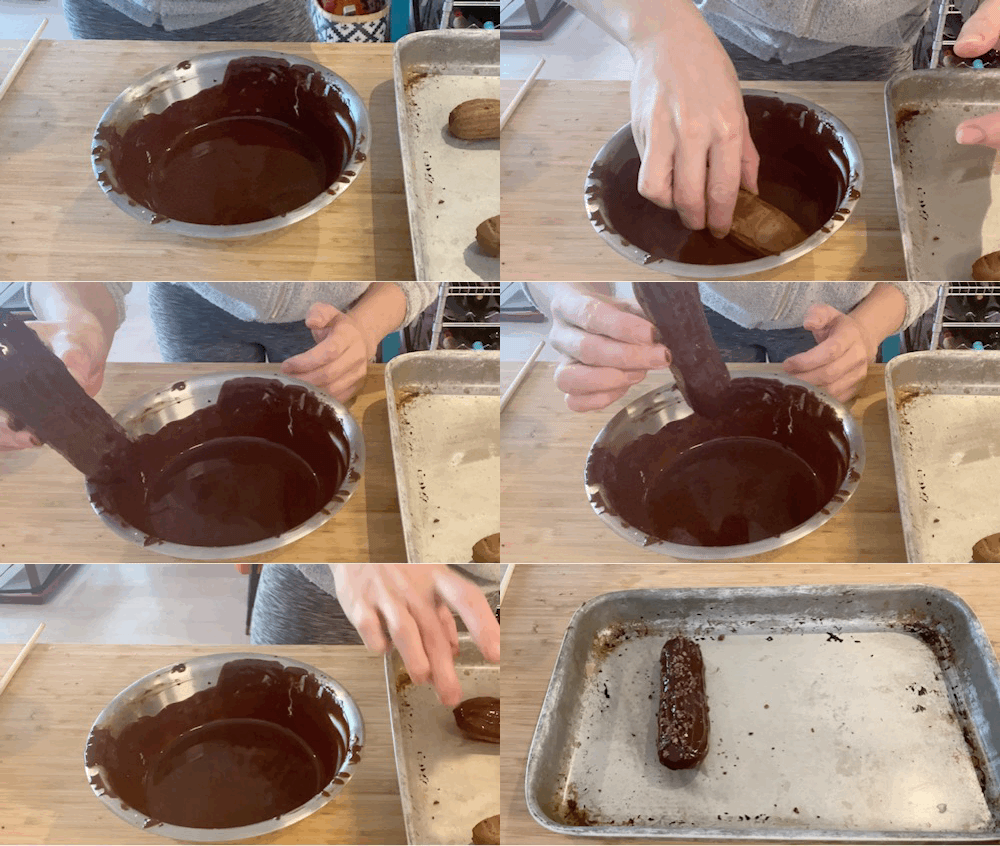
To make the glaze, heat everything together in a bain-marie and stir until combined. Leave to cool til about 35c so it thickens slightly making it easier to dip
Once cool, stab some holes in your éclairs using the piping tip you will use to fill. If you have a long piping nozzle, I like to do it from one end. If you have a shorter piping nozzle only, fill from the base - make three holes
Pipe the chocolate custard into éclair, feeling it expand slightly and get heavy in your hand. If using the three holes version, you know its getting full when cream pops out the middle
Leave to chill for 5-10 minutes
Finally it’s time to dip - dip the top half of the éclair in the glaze and then shake off the excess
Sprinkle with cacao nibs
Éclairs really are best within a few hours of filling, so best to enjoy them sooner rather than later, though 12 hours in the fridge would be okay. I think piping “to order” is the pro move!



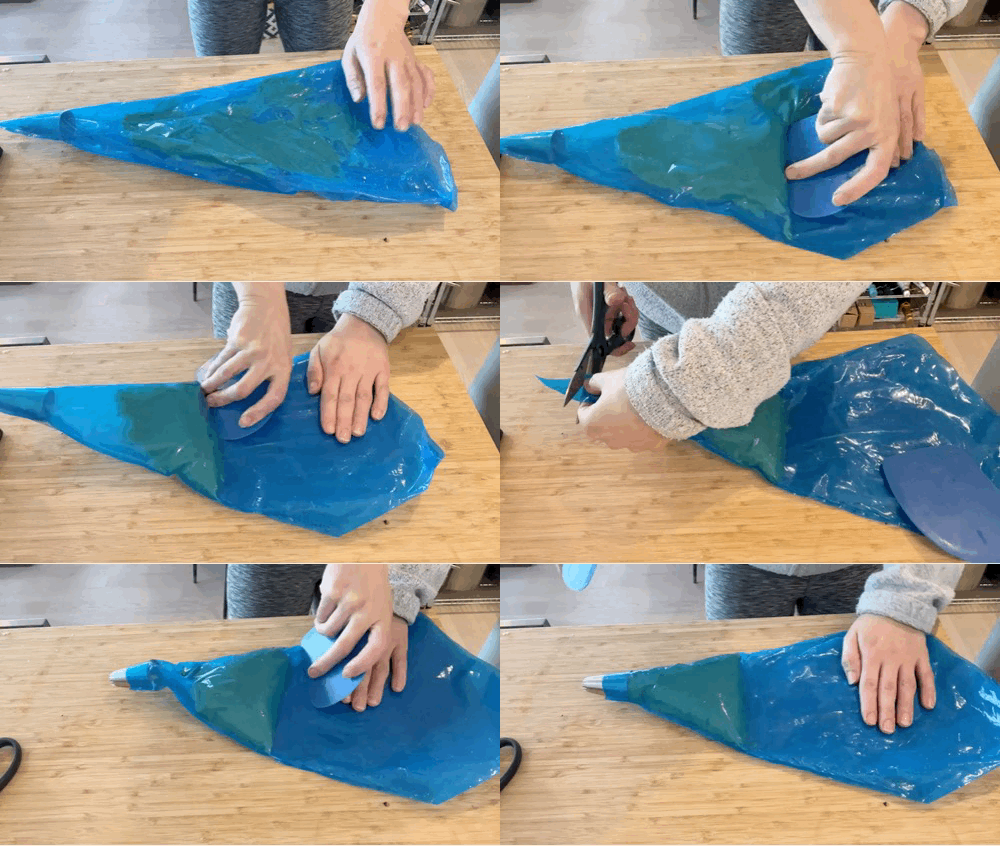
A trick I picked up for eliminating those pesky trapped air bubbles…
Fill a piping bag with the choux and smoosh the paste as shown above, then pipe directly into another bag keeping the tip submerged in the paste. Any air pockets fill themselves in. Voilà!
It does mean using two bags, but then again I’m the skinflint who washes out and re-uses disposable bags, so no big deal. 😏
Could you freeze the final filled eclairs?