Hello,
Welcome to today’s very festive edition of Kitchen Projects. It is so wonderful to have you here.
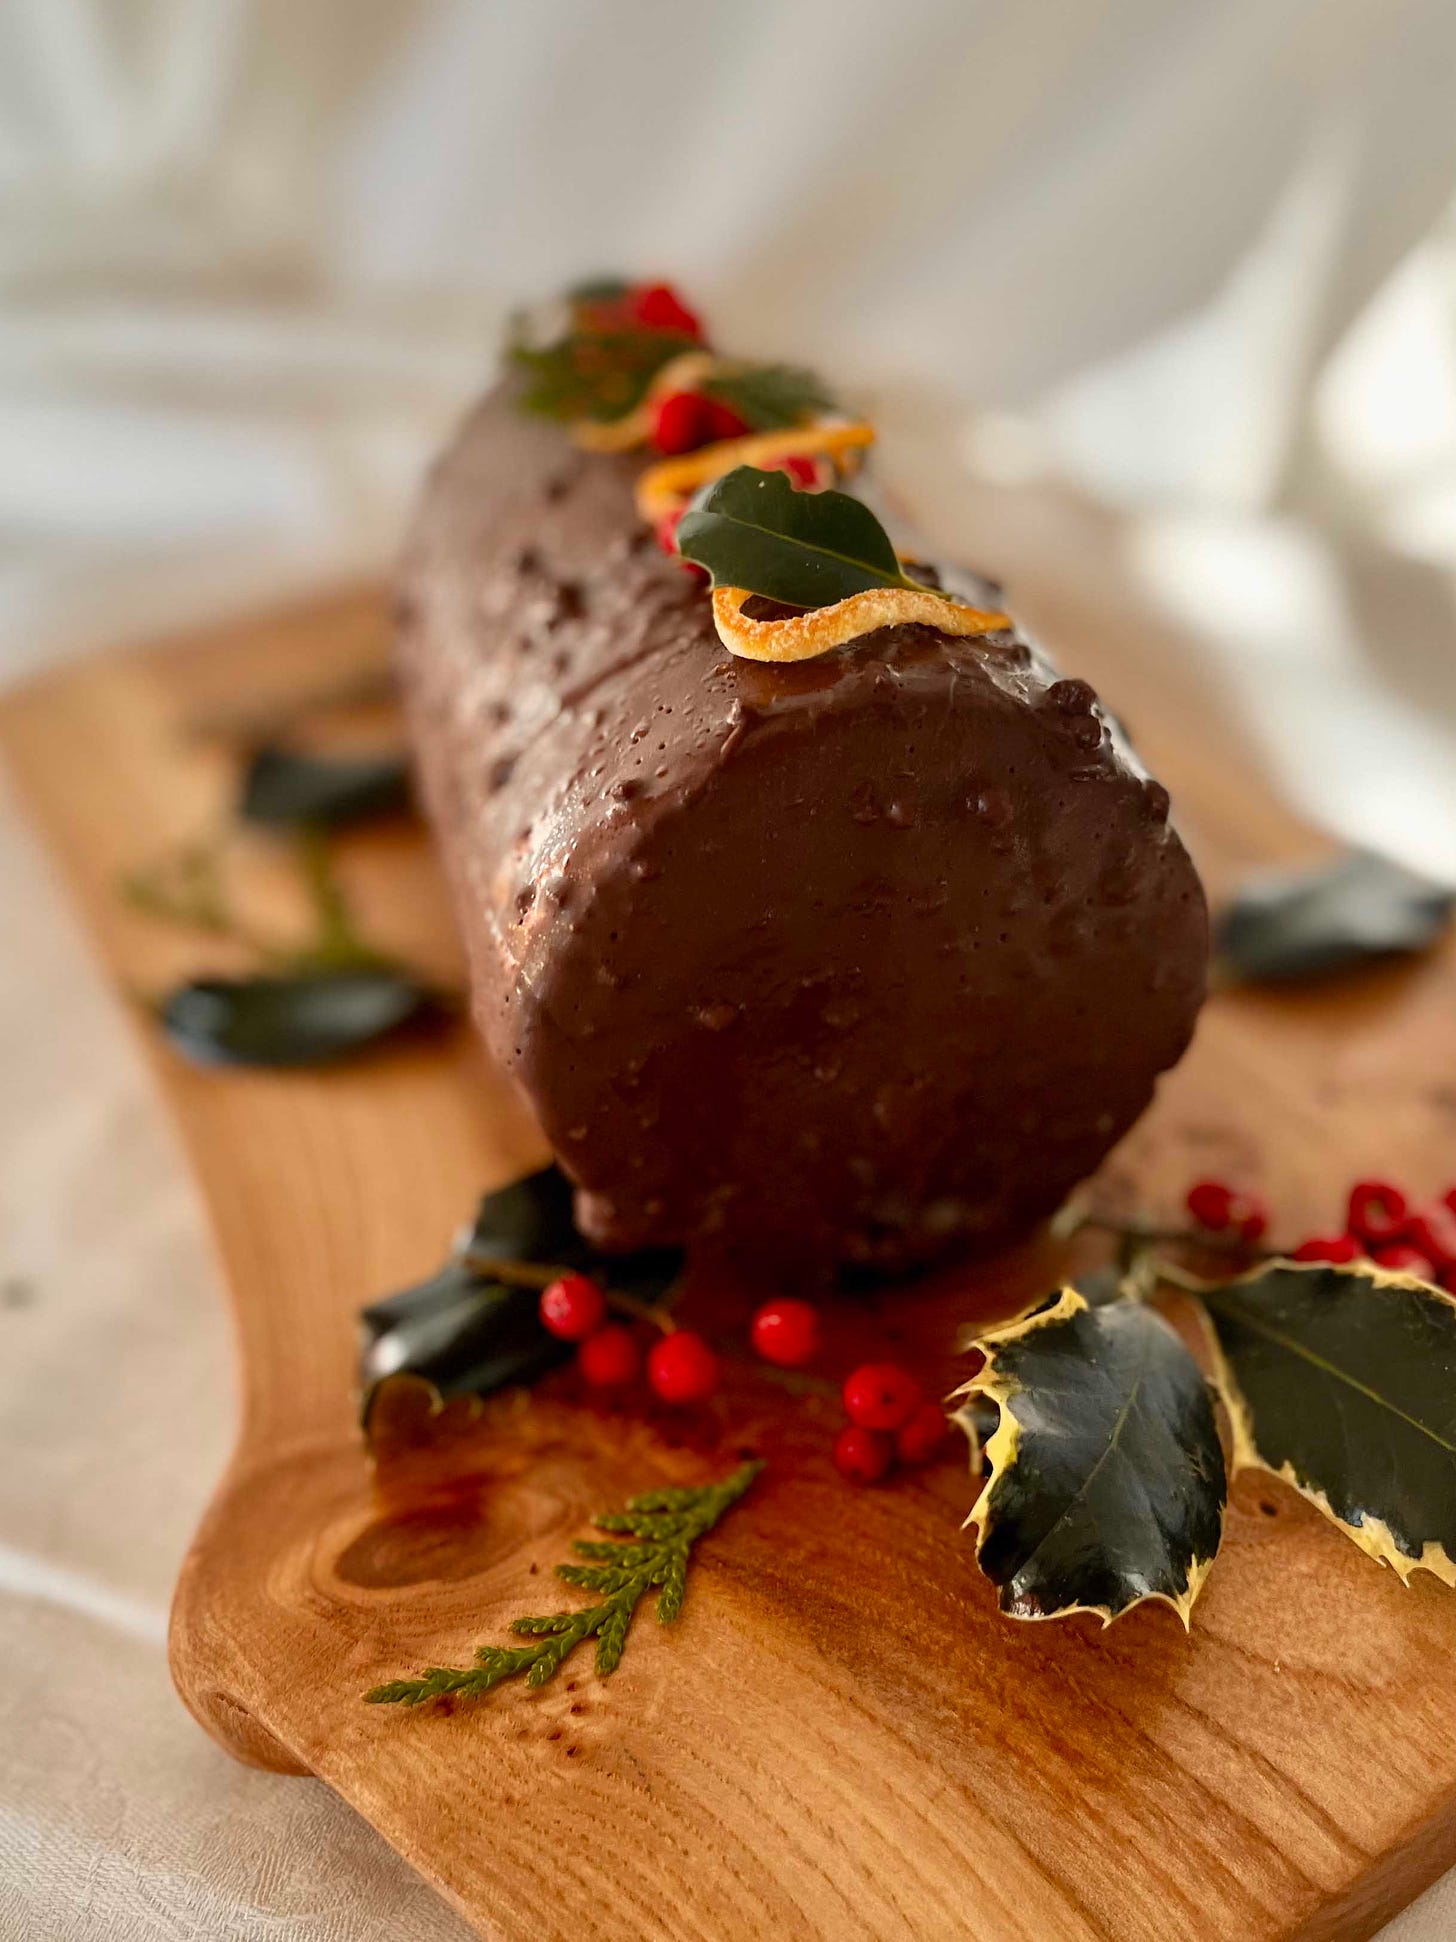
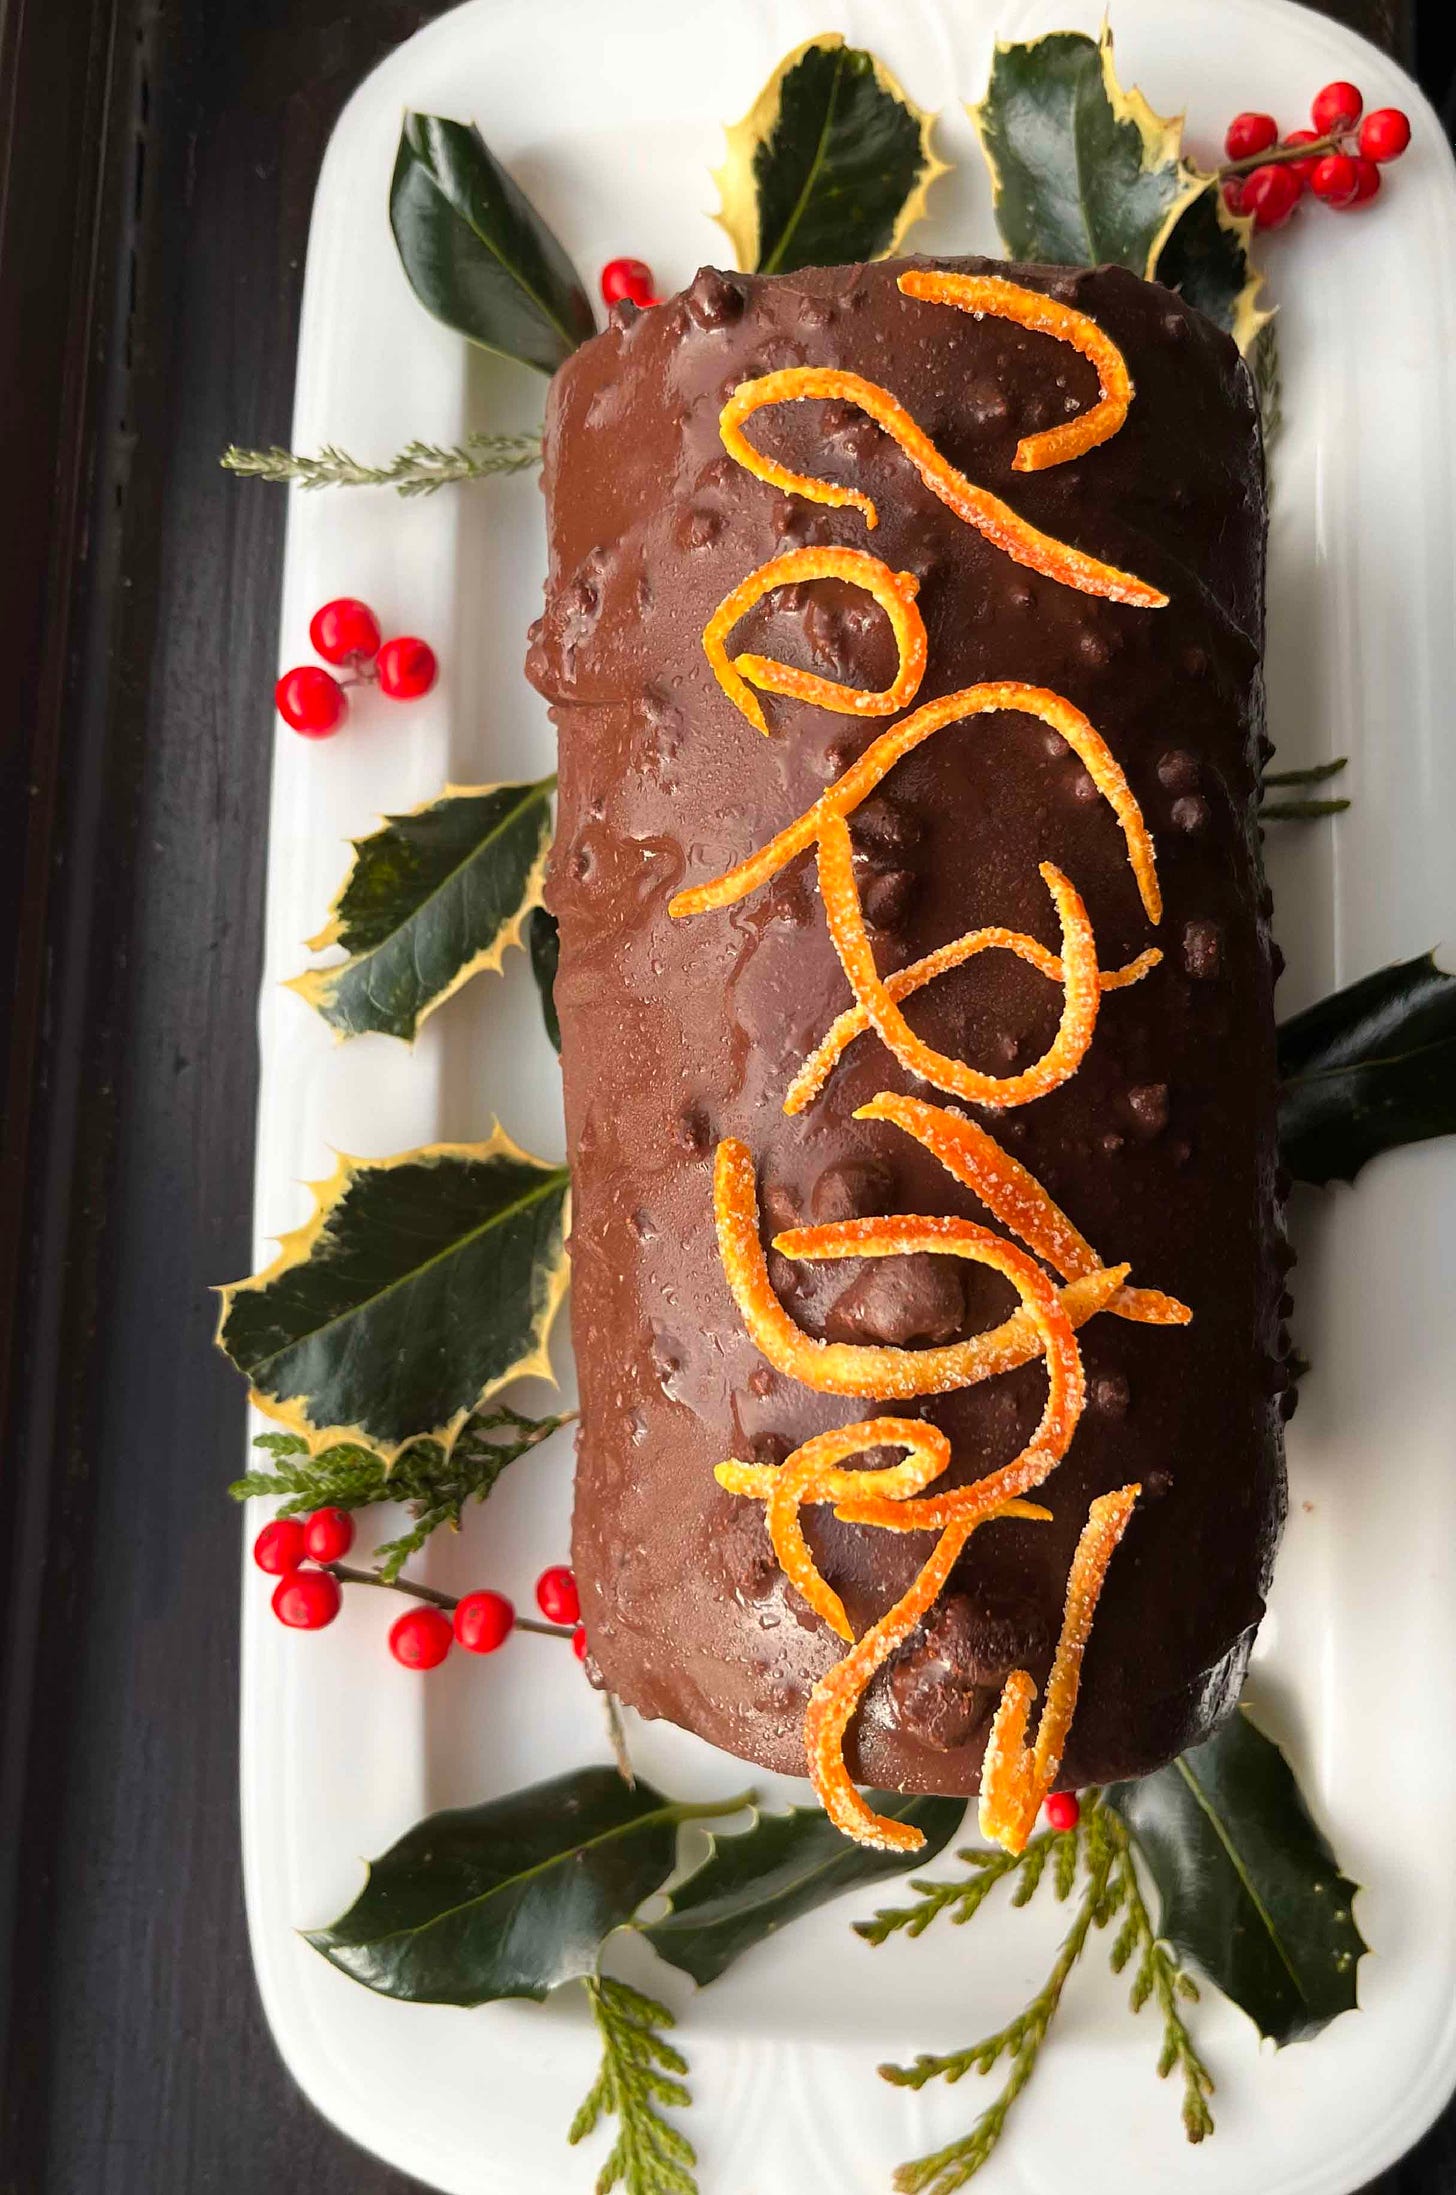
I’m so excited to introduce you to a perfect Christmas dessert which can be made well ahead of time: A very jolly Arctic Roll x Yule Log, a stunning ice cream cake with no ice cream machine required.
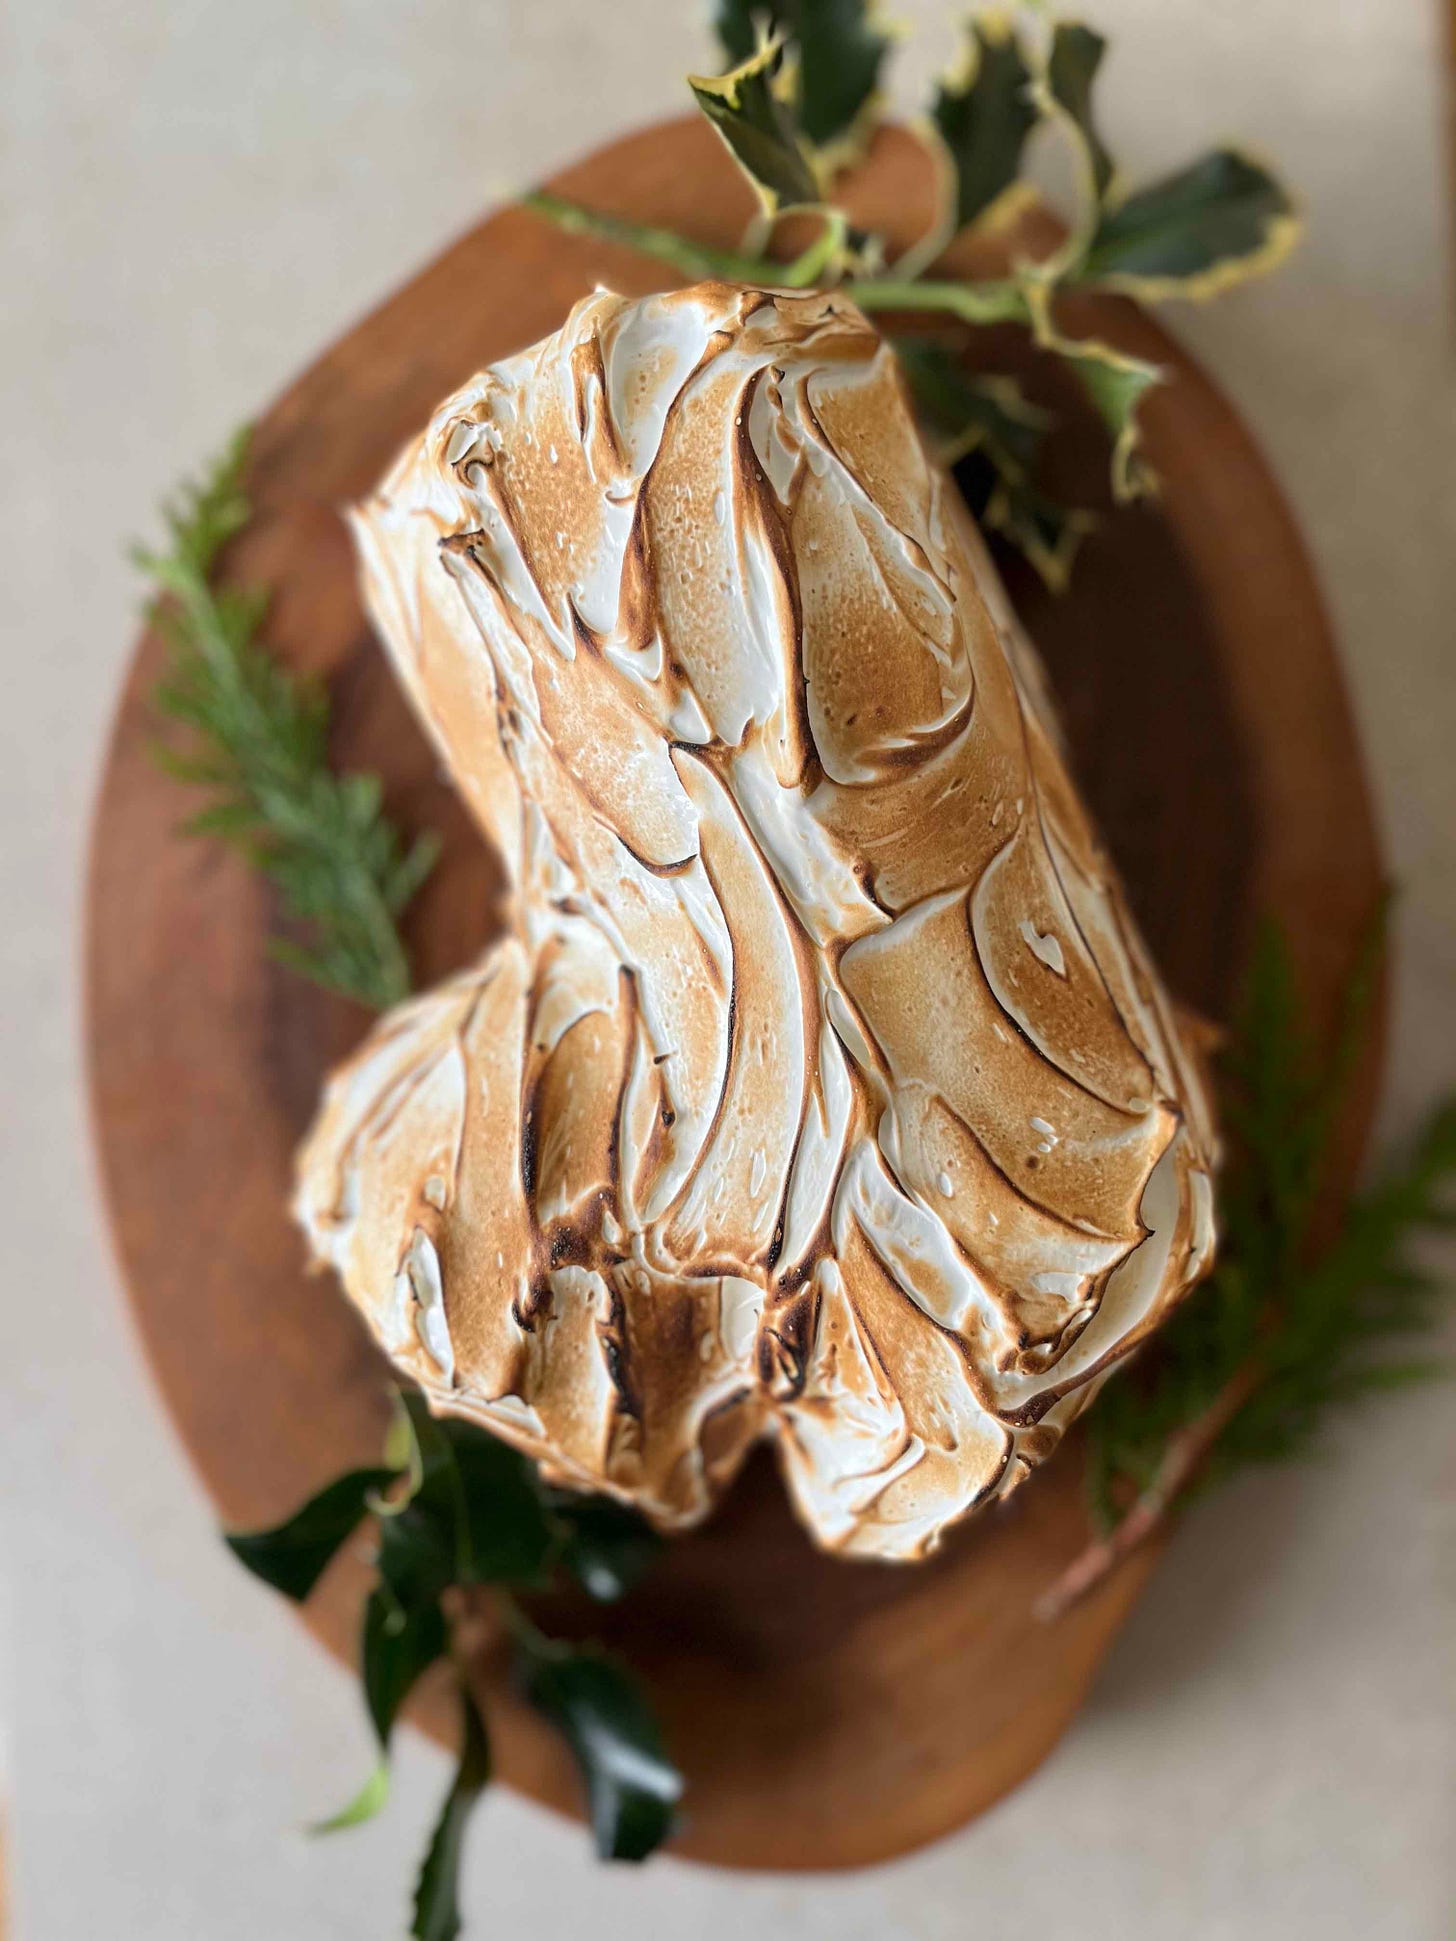
Over on KP+, we’ll be levelling this recipe up to create a heavenly Yule Log x Baked Alaska mash up that would also be a dramatic and stunning centre piece for any Christmas table.
I launched KP+, the paid version of the newsletter earlier this year. Subscribing to KP+ costs just £5 and you get loads of extra content + get to support the newsletter so click here to check it out:
I’ll be taking a break from Kitchen Projects over Christmas. I will be sending out a couple extra KP+’s but the main Sunday newsletter will be back early in the New Year. See you then and have the best Christmas and a Happy New Year.
Love,
Nicola
PS. Made it to Kitchen Project #50! Thank you so much for helping me get here, couldn’t do it without ya!
P.P.S. Like Christmas music? Like jazzy vibes? Here’s an album you might like!
Let’s roll with it
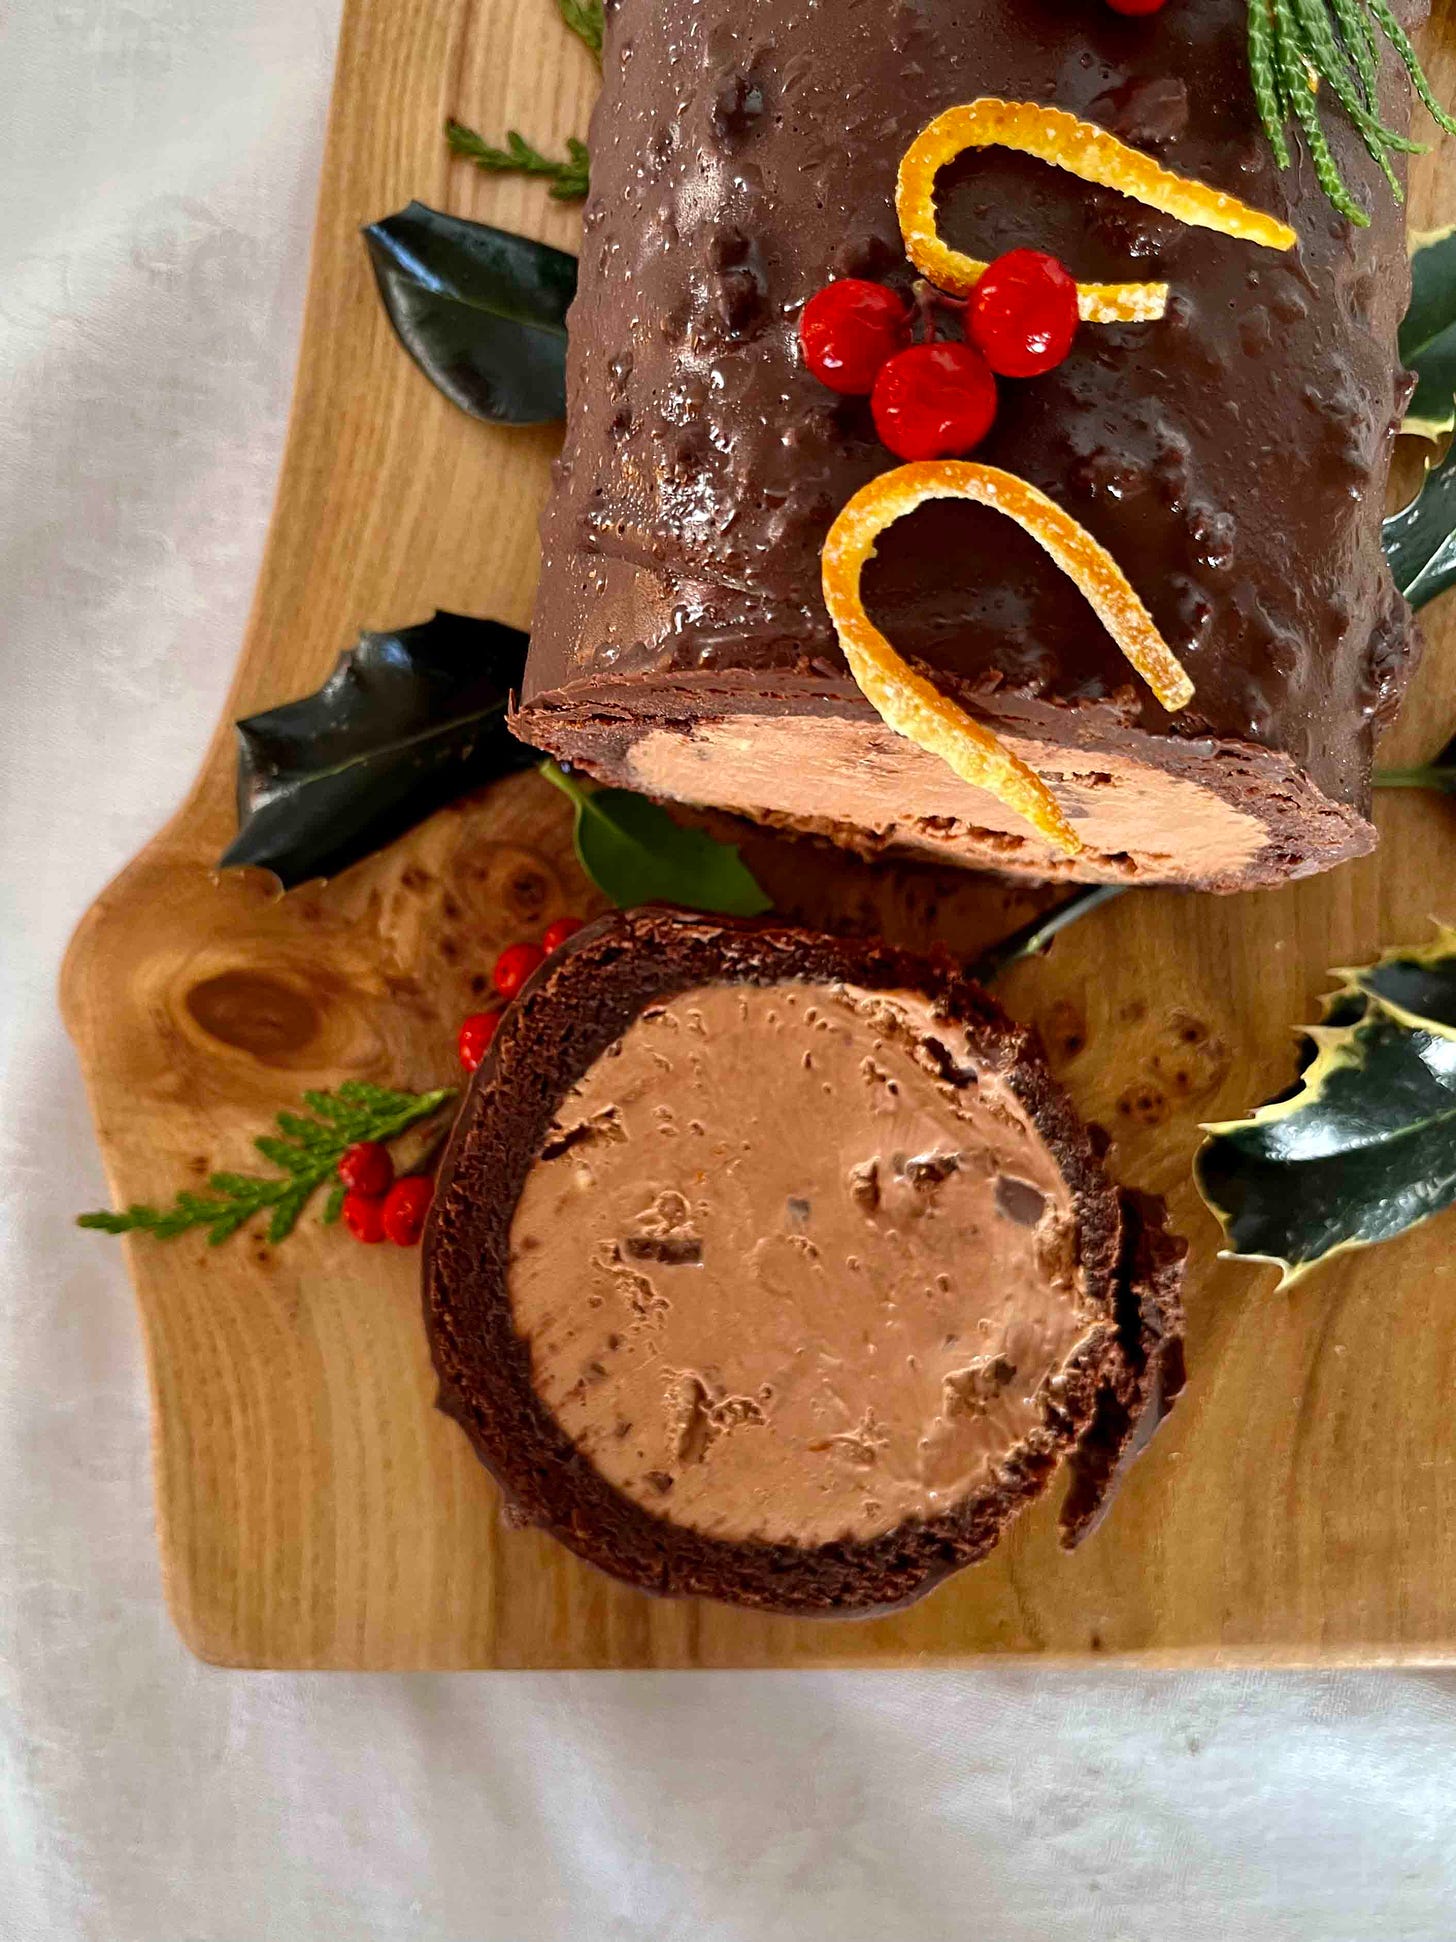
There are some desserts that shouldn’t be resigned to the sad section of freezer aisle and Arctic Roll is one of them. Just think of the arctic roll as a giant, sliceable ice cream sandwich that is a make ahead dream and a huge crowd pleaser. If you’re not from the UK, Arctic Roll is a classic British dessert - a log of ice cream wrapped in sponge!
This week’s KP is part recipe and part craft project. I’ve had this recipe in mind for months now and finally now it’s Christmas time it’s finally time to make this showstopper happen.
Today we’ll be constructing our arctic roll x yule log baby with four elements: The smoothest orange and chocolate parfait with chunks of Terry’s chocolate orange (as a homage to my Christmas brekkie every year), a layer of maple fudge sauce, a perfect chocolate chiffon sponge then finished with a chocolate crunch dip.
To make this, it means you need to join me in having a ridiculously chaotic shopping list too: Double cream, eggs, pringles and a terry’s choc orange. Definitely worth getting side eyes in the supermarket.
This is a wonderful hands-on project that you can split up and make at your leisure. Each element can be made in advance and you just need to assemble. The assembled product, if wrapped properly, will freeze for ages, too.
Oh, and I should really mention that this makes the perfect base to the dreamiest baked alaska aka frozen yule log. I’m sharing the details on that over on KP+ - this one is filled with a fabulous mint choc chip parfait (though it could also be a vanilla straccitella! Click here to read it!
Taking a concept from imagination to reality
Recipe development is about dreaming things up entirely in your mind then finding a way to make it happen IRL. Sometimes it’s impossible to achieve some of the desserts you see in fancy bakeries and patisseries because you simply don’t have the desire/means to get the fancy moulds.
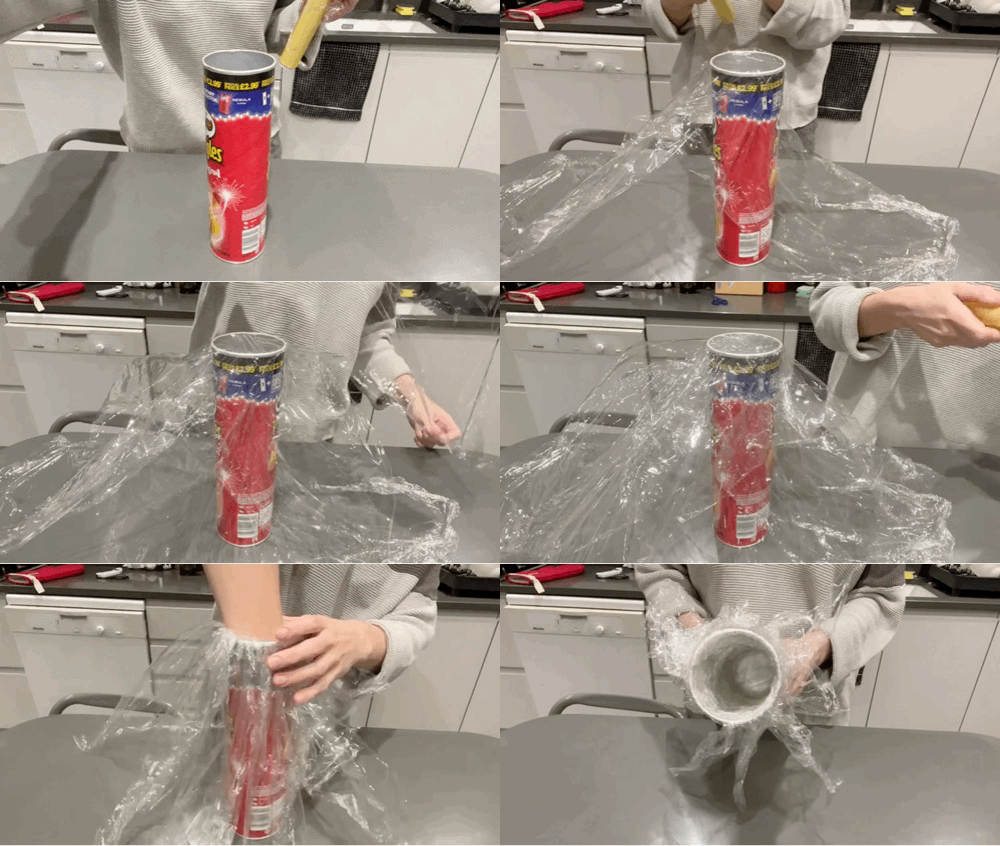
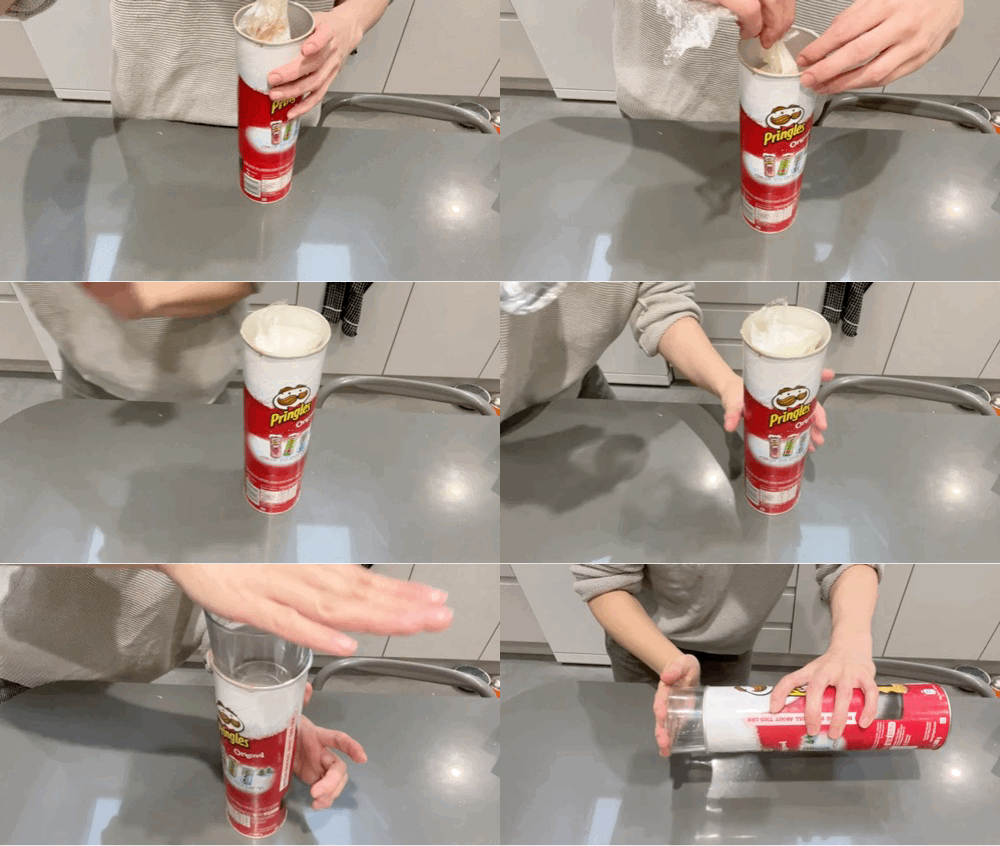
When I first thought about how to approach this dessert, I originally thought I’d pipe my parfait into a lined loaf tin and leave to semi-freeze. When it was in a plastic but cold state, I was thinking I’d roll it into a log shape then leave to freeze. As I was just about to pour my parfait into the tin, I realised I’d run out of cling film. I popped to the shop and when I walked in I saw a solution right in front of me: PRINGLES!
The pringles tube is an economically sound investment and perfect shape for the arctic roll. Kept clean, you can use it again and again and BIG PLUS: you get to eat the pringles within.
Lining the tube is important and you have a few options. If you have food safe acetate, this is your best option - simply cut a circle for the base then curl the acetate around the sides of the tins. I didn’t. So, either a freezer bag or cling film will have to do. The freezerbag is probably the worst option because there is too much plastic for too small a tube - you will get loads of weird indents. You do need to use a slightly ouchies amount of clingfilm, but it’s worth it!
Cake yoga
Although the ice cream is the heart of this recipe, the cake is really important to get right. Frozen cake not sound too appealing? Don’t worry, I get you. To enjoy frozen/cold cake, a few things need to go right - firstly, the cake can’t be too thick. Secondly, it needs an aerated formulation which will help it not freeze like a solid ice block. If the cake has air - which can’t freeze, of course - it will retain a soft(er) texture.
Enter: Chiffon cake.
I know we’ve covered the chiffon cake before but not like this - this is my ultimate flexible roll cake.
I’ve made swiss rolls before and the recipes ask you to prevent cracks by rolling up your cake as soon as it leaves the oven. This results in a (stressful) mad dash which usually ends up in cracks/the cake sticking to the paper anyway.
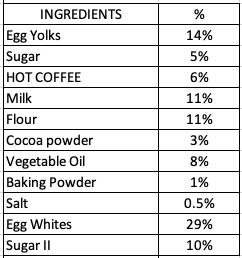
Chiffon cake is extremely flexible when baked in a sheet - the combination of oil (which keeps things moist without trying to return to its solid state like butter) and meringue makes a strong and stable but flexible network that prevents the cake from breaking as you roll it. As well as this, a low proportion of flour is key. Flour, which is a starch, as you know forms a gluten network once hydrated. It also gels at 60c and fully sets or hardens during the bake. So, if you want a flexible structure, you need to reduce the overall flour - today’s recipe only has 10%!
The only issue with chiffon cakes is they can be a bit flavourless - we’ll bolster todays with coffee (inspired by a devil’s food cake) and rich Valhrona cocoa powder.
Parfait refresher course
We covered parfait over the summer. If you want to read up on the subject in detail, check it out here. But here’s an overview of all the important stuff you’ll need to nail today’s recipe.
Parfait is a member of the frozen desserts community. It’s rich, light and means you can make ice cream WITHOUT a spenny ice cream machine. You probably already know that Ice Cream is a custard base that is churned as its frozen - this agitation means small and delicate ice crystals can form as it freezes, as well as trapping air, which gives ice cream it’s wonderful texture.
The major difference between parfait and ice cream is that; ice cream has air whipped into it as it freezes; parfait has air whipped into it and is frozen after. This is why its known as a frozen mousse.
Here’s a basic formulation for parfait:
Sugar syrup at 118c-121c + Egg Yolks = Pate a Bombe
Pate a Bombe + whipped cream + flavours = Parfait
Another reason to really vouch for parfait is that it is liquid at room temperature. This means it can be piped or shaped into moulds or frames and this is why it’s the perfect recipe for today’s Arctic Roll / Yule log.
Ice cream, once churned, begins to rapidly melt, meaning it’s not as shape friendly. Also, if you let ice cream melt and then refreeze without agitation, it results in crunchy (in a bad way) ice crystally texture. The absolute pits. SO, parfait is our friend. And Christmas is all about hanging out with our friends.
WHY pate a bombe is essential (and why its not in some mousses)
Pate a Bombe is basically an Italian meringue except it’s made with hot syrup (118c) poured over egg yolks instead of egg whites. Unlike whites, which can increase 8-10x in volume, yolks aren’t quite as capable of the drama and can only increase around 4x in volume. Egg yolks whipped up alone with sugar won’t achieve stiff peaks.
Egg yolks are also impossible to over-whip owing to the large amount of proteins and lecithin, the emulsifier. Despite the high number of protein building blocks, yolks need water to help untangle the proteins and reach a high volume - egg whites are 90% water so already have the water required to help untangle and reach the high volume.
Pate a bombe is the key to parfait (and most fancy mousses). If you’ve made chocolate mousse - or read my KP deep dive - you’ll know that chocolate mousse can be made without egg yolks. So why do we bother with the whole pate a bombe thing?
Whipped cream can be frozen and thawed and it will still be whipped cream. But there is a risk it can weep without stabilisation. And when it’s frozen, it doesn’t have a scoopable texture. Unlike parfait, which can be scooped much like ice cream, whipped cream breaks apart in icy chunks - not so dreamy.
The egg yolks also bring flavour and more fat. But most importantly, they bring lecithin, which has amazing emulsifying properties. This combination of air trapped within a network of fat globules (from the cream), proteins (egg yolks) and then the emulsifying qualities of the egg yolks allow parfait to be voluminous, scoopable, stable and smooth.
About those sugar syrup temps
Earlier I mentioned we need to use 118c syrup for our parfait. Although you guys may already know all this, here’s a little reminder of the science.
When you make a sugar syrup all you are doing is mixing sugar and water, heating it and then using a thermometer to judge how much water has been evaporated off.
Pure water, as we know, cannot pass 100c as this is its boiling point. Once you mix in sugar, the boiling point changes and the temperature can climb way past this. The amount of water present will define how the sugar will behave in whatever recipe you’re using. This is why you can achieve different results by taking the sugar syrup to different temps. The more water you evaporate off, the thicker the syrup will become. You continue heating it and evaporating off the water until the concentration of water is so small (less than 1%) it becomes caramel. So, if you accidentally overshoot the temperature during this recipe, just add more water and rewarm it. This sadly won’t work if you’ve got to caramel stage, as at this point the sucrose molecule has irreversibly changed.
Freezing parfait
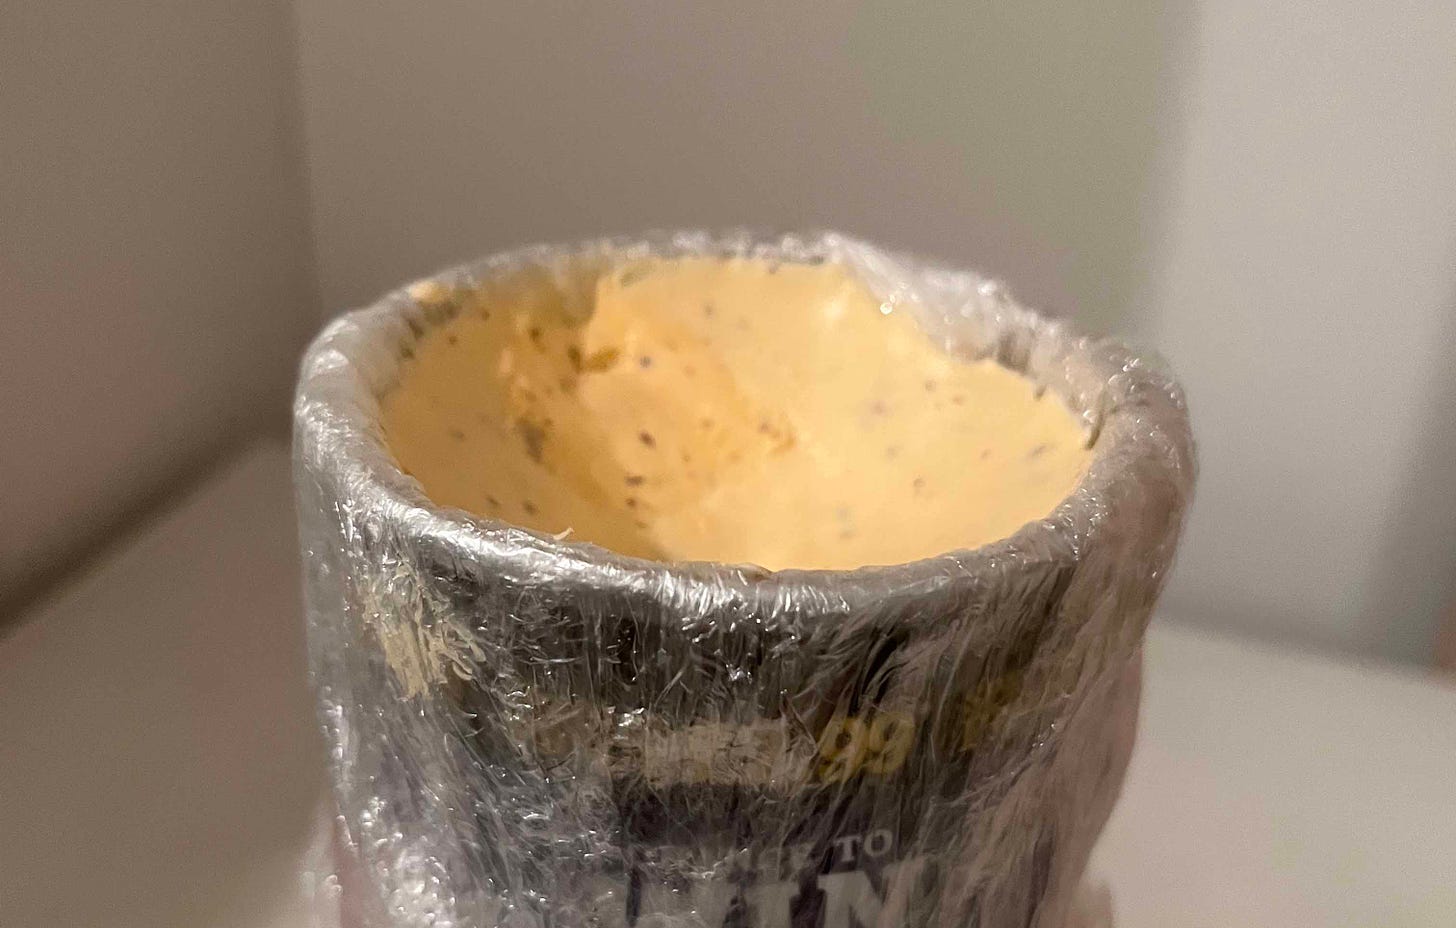
One of the issues that has trialled ice cream makers over the years is shrinkage. And I experienced this first hand whilst working on this recipe - I checked my ice cream and it had a little dip in the top:
This means once you’ve made your ice cream, it shrinks as it cools. There are a few reasons this happens - the first is too much air. Overrun is a term used in the industry that means the amount of air whipped into ice cream. Expensive ice cream has a low overrun and cheap ice cream, because air is free, will have a high overrun. Air is an essential ingredient of ice cream, you definitely need to incorporate enough to give ice cream the texture we know and love, but after a point it becomes a cost saving opportunity. Over the years, manufacturers have been trying to work out the maximum overrun you can put into an ice cream to beat that bottom line.
So, if there is too much air in the ice cream / parfait (ie. a formulation that favours whipped cream too much above pate a bombe/other ingredients), the air can evaporate during the freezing process, resulting in shrinkage.
The other culprit is poor insulation. When I experienced parfait shrinkage, I forgot to wrap the top of my pringles can. Therefore, the outside of the parfait was freezing quicker than the inside which might have resulted in the shrinking. So, in the future, don’t forget to wrap your ice cream before you freeze it! This will also prevent freezer burn and stop your ice cream from ever tasting (get ready to heave) freezer-y. Yuck.
Incorporating chocolate
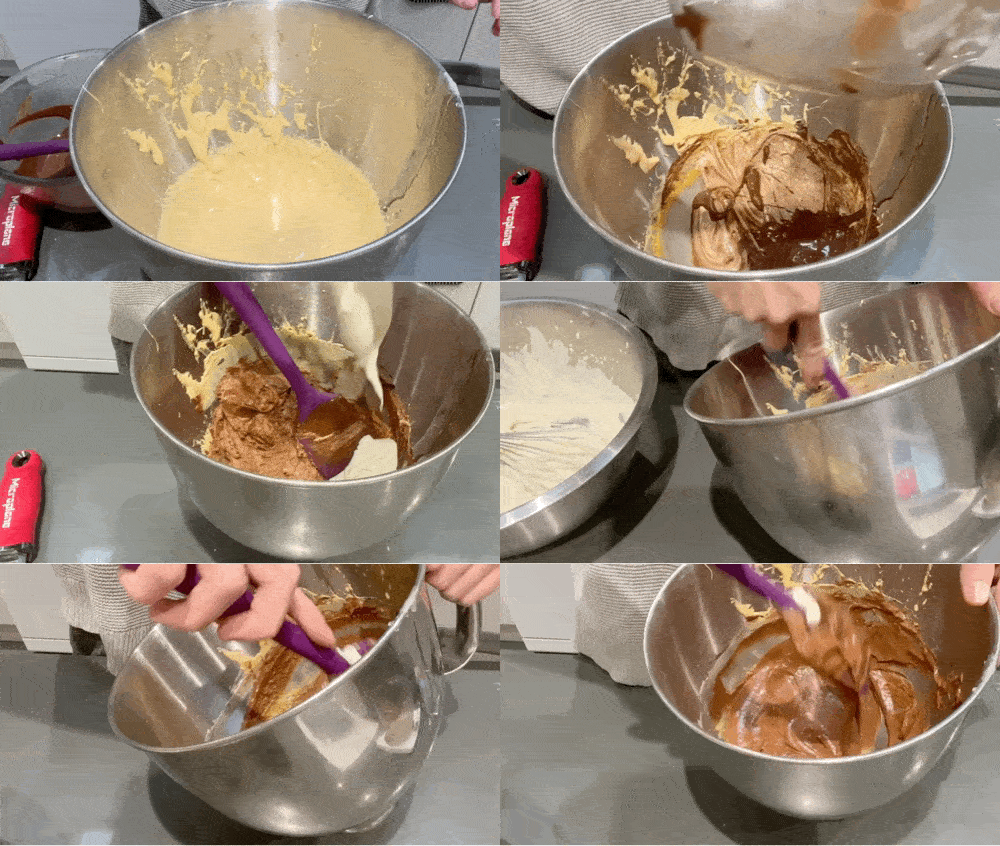
I love chocolate but it can be a bit tricky to work with. Too hot, it seizes. Too cold, it seizes. So bloody annoying. So, when you make chocolate parfait, or fancy mousse, you face the same issues except this time, there’s a foam at stake. For this recipe, we’re incorporating the chocolate directly into the pate a bombe and it needs to be around 35c (give or take a few degrees, but ideally warmer than colder). Any warmer than this, you risk melting your foam (cream) and any colder, it will seize when combined with the heavy cream. Although you can’t recreate a melted foam, if your chocolate is a bit too cool - it CAN be fixed.
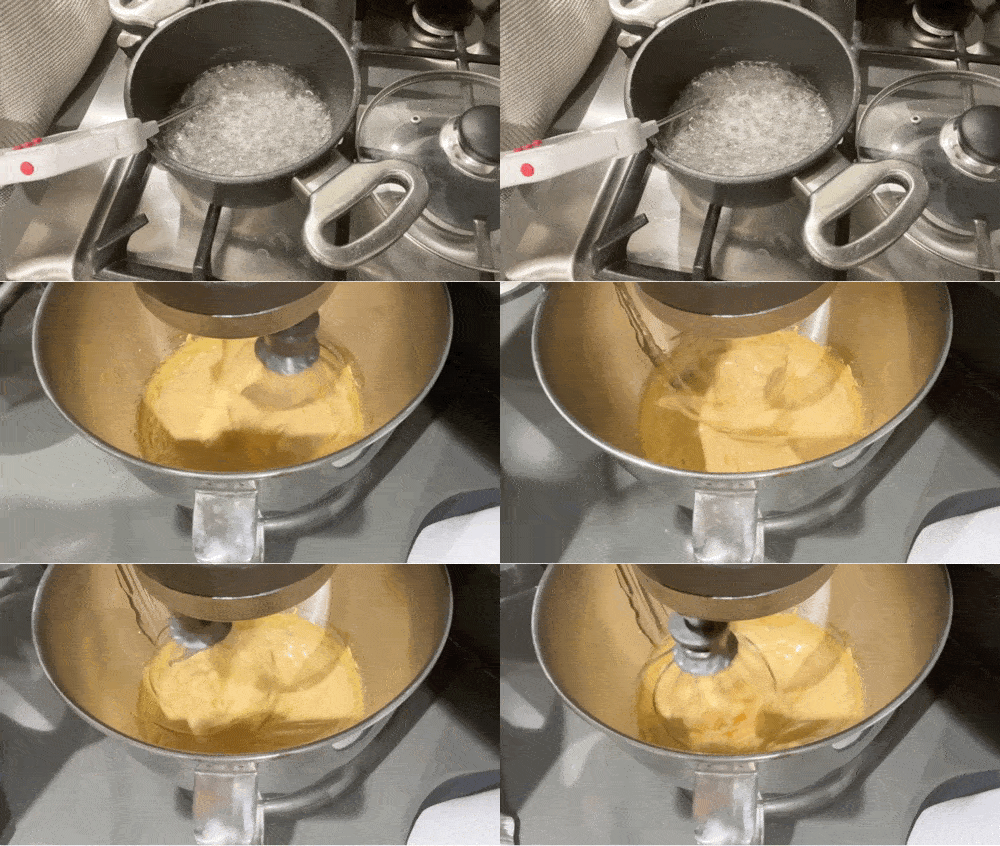
When I was making the recipe (as you’ll see in the GIFs), my chocolate was a bit too cold and it seized after mixing with the pate a bombe, when I had a little cream. It went lumpy. But instead of freaking out, I added a little more cream and continued smooshing and smoothing the mixture methodically until it came back together. Although I lost a bit of volume from overmixing, the result was still smooth. So, it CAN be fixed - but better not to put yourself in a position where you have to fix it.
Scaling it / making in advance
A good thing about this recipe is you can scale it up/down depending on how many people you are catering for. I’m including a recipe that should serve 6-8 (about ¾ of a pringles can) but you can scale it up and down.
You can make this whole recipe well in advance as it will keep, assembled, in the freezer for a month! Make sure its well wrapped so it doesn’t get freezer burn or - even worse - tastes of the freezer. Just thaw for 10-15 mins before slicing.
Alright. Let’s make it!
Double chocolate orange Arctic Roll
**Due to length restrictions, please check the web version of this recipe for ALL the GIFs**
This fills up a Pringle tin to about 75% and serves 6/8
Equipment needed: Pringle tin
Chocolate orange parfait ingredients
**By all means, forgo the orange! Just don’t add orange zest/use Terry’s for the chunks. Use whatever you like!**
60g egg yolks
95g caster sugar
65g water
40g maple syrup
1 orange, zested
270g double cream
145g milk or dark chocolate, melted
80g terry’s chocolate orange (about half of one)
Chocolate chiffon roll sponge
3 eggs, separated (45g-50g yolks, 90-95g whites)
15g sugar (i)
20g strong coffee
35g milk
25g vegetable oil
35g plain flour (can also be GF flour)
10g cocoa powder
4g baking powder
1g salt
30g sugar (ii)
Chocolate crumb for glaze and garnish *(this makes more than you need but crumb is so useful! You could also use any bashed up biscuit if you can’t be bothered to make your own crumb)*
90g light brown sugar
2g maldon salt
30g cocoa powder
110g plain flour
65g butter
Chocolate glaze
225g dark chocolate
60g neutral oil like veg oil
80-100g cocoa crumbs
Maple fudge sauce
100g double cream
20g butter
170g maple syrup
30g light brown sugar
50g chocolate
30g cocoa powder
2-3g salt
Plus, to decorate:
Candied orange strips (my recipe here)
Holly leaves and festive foliage
Parfait method ((or detailed GIFs on parfait making, check the All about parfait KP here)
First, line your pringles tin! (remove pringles first) - For clingfim, you need to layer up 4 pieces (in a cross ‘+’ then an ‘x’) then press in. If you only do two pieces, the parfait may come out the edges and then freeze, then it’ll get stuck
Next chop up your terry’s chocolate orange and setting to one side
Now get your egg yolks whisking. You want your egg yolks to be super fluffy by the time your sugar syrup is ready. Don’t worry - you can’t overmix them
Now melt your chocolate, either over a bain-marie or in the microwave. This should give it enough time to cool
Add sugar and water to a saucepan. Stir it to make sure all the sugar is dissolved
Heat the sugar syrup until it reaches 118c. To avoid crystallisation, for the first 1-2 mins as it’s heating up I like to add a lid. This means any random sugar crystals will be dissolved during condensation
Change the mixer speed to low. In a steady thin stream, pour the sugar syrup down the edge of the bowl, avoiding the whisk so it doesn’t splash. Also, be careful the vanilla pods don’t fall in. You need to do this step quite slowly as not to accidentally pool the syrup at the bottom of the bowl
Turn the mixer back to high speed and whisk until cool - the mixture should be thick and fluffy. Around 10 mins should be plenty
Meanwhile, whip the cream with maple syrup and orange zest until soft peaks
When the pate a bombe is ready, pour the melted chocolate (35c please) into the pate a bombe and fold together. If it seizes… don’t worry, just keep working it!
Now fold together the two mixtures - you should start by adding a 1/3rd of the choc pate a bombe into the cream and ensure its homogenised before adding the rest in
Finally fold through the chopped chocolate
Pour into your pringles tin and tap to remove any big air bubbles / gaps and cover the top (you can use the lid, or just twist the cling)
Leave to freeze for at least 6 hours, or until completely frozen. If you can’t freeze it up right, twist the clingfilm top closed then press a glass/something cylindrical into it to keep it place, then freeze horizontally
Chiffon cake method
Pre-heat oven to 170c fan
Separate your eggs
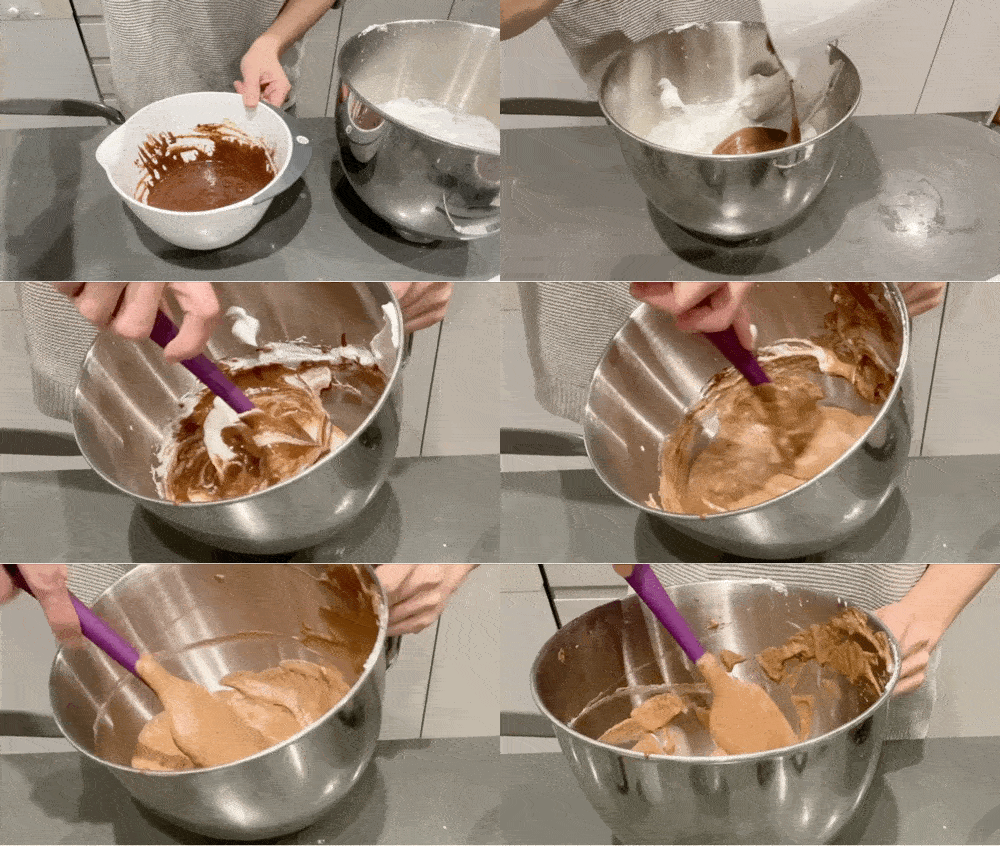
Mix yolks, sugar (i), coffee, milk and vegetable oil together, followed by the flour, baking powder, salt, cocoa powder
Whip whites and sugar (ii) until a meringue is reached. Don’t let it go clumpy or overwhisked. There isn’t a lot of sugar so it isn’t going to be glossy, but make sure it is holding strong peaks
Fold the meringue and yolk/flour mixture together carefully. Don’t let it deflate too much
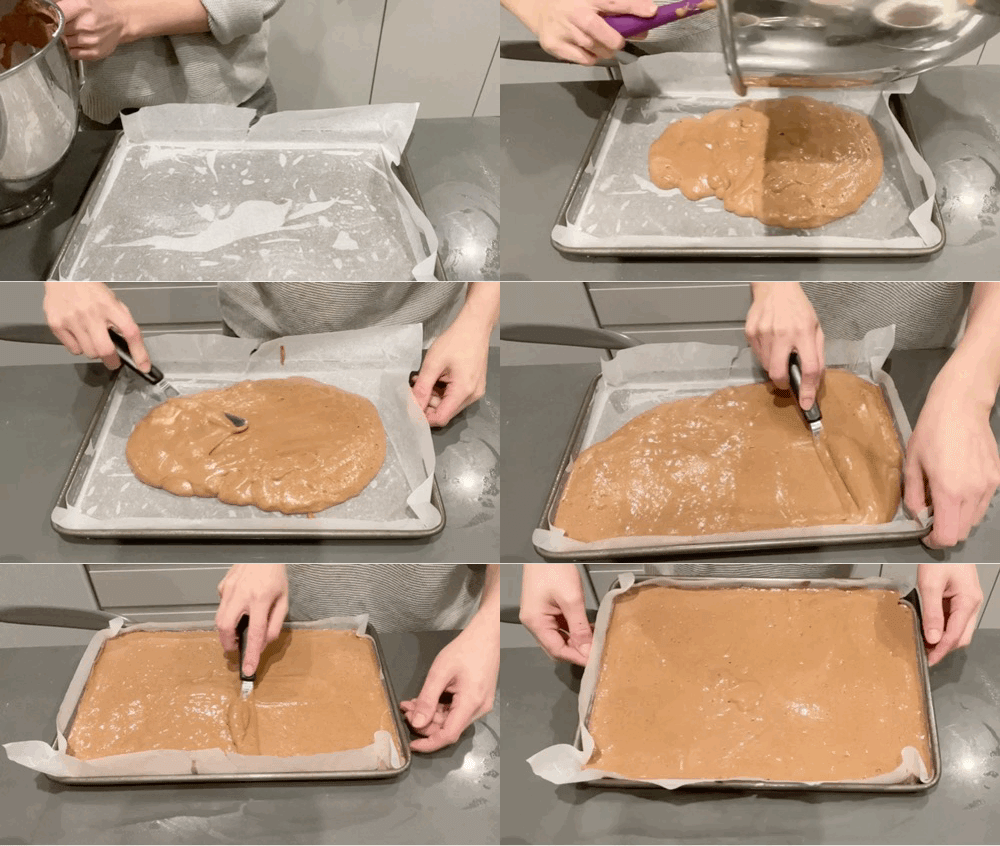
Spread on a lined 30cm x 40cm baking tray
Bake for 14-15 minutes until dry but springy
If not using within a few hours, wrap well. It will keep for 2-3 days wrapped or you can keep in the freezer
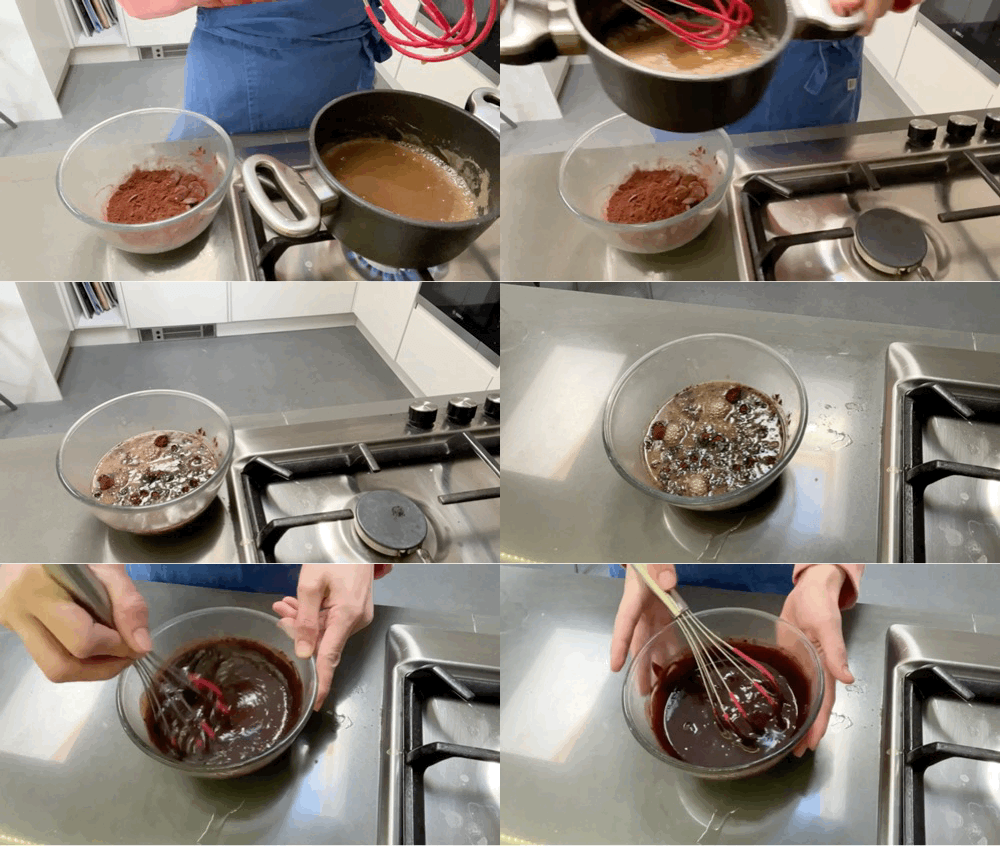
Fudge sauce method
Heat cream, butter, maple syrup and sugar until boiling
Pour over chopped chocolate and cocoa powder
Leave for 1 min (like a ganache)
Whisk until smooth
Add salt to taste
Leave to cool so its spreadable for arctic roll
You can re-heat and pour over desserts
Keeps for 1 week in the fridge
Roll up / Assembly method
Remove the parfait from the Pringles tube - you might need to ask for help (I had to ask my mum to help - I held the tube, she pulled). If it wont come out, you can always just peel the pringles cardboard off. and CAREFULLY remove cling film. This is a bit messy - triple check it for small plastic bits! Set aside in the freezer whilst you fix up the sponge
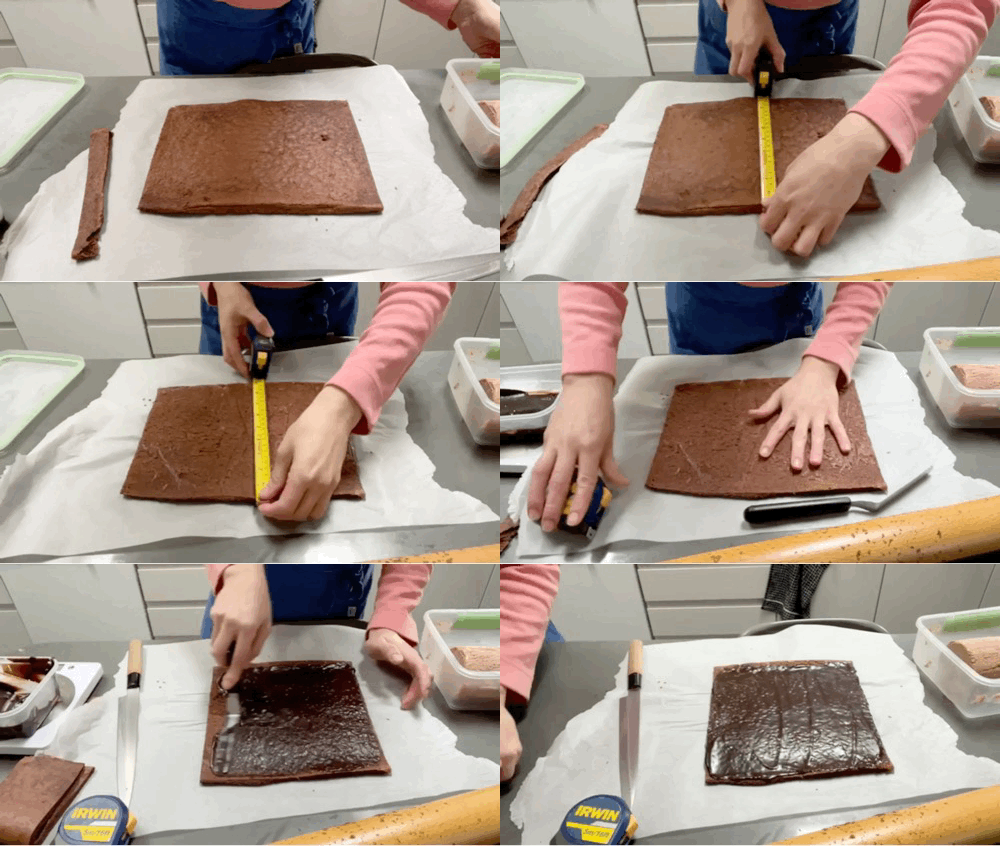
Use a measuring tape to check how long and wide you need your cake wrap to be. If you are using a Pringles can, you need the width to be 23.5cm - 24cm but your length might be slightly diff from mine
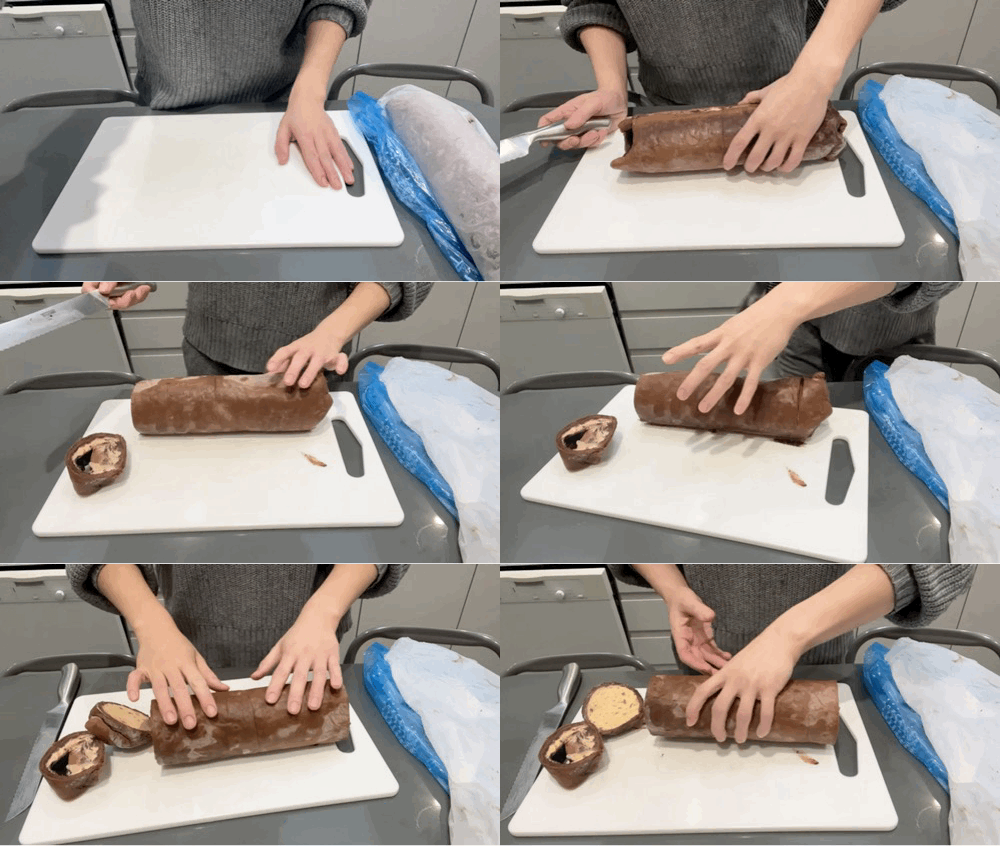
Unwrap cake and roll back and forth until it is 23.5cm wide, using a rolling pin. Trim any major excess. Eat it with fudge sauce. It tastes really good.
Spread around 100g of the cooled fudge sauce on the sponge
Place the parfait on bottom edge of the sponge then roll it up and secure with the paper
Wrap well and put into the freezer for a few hours / up to a month! You want it to be properly cold for the next step
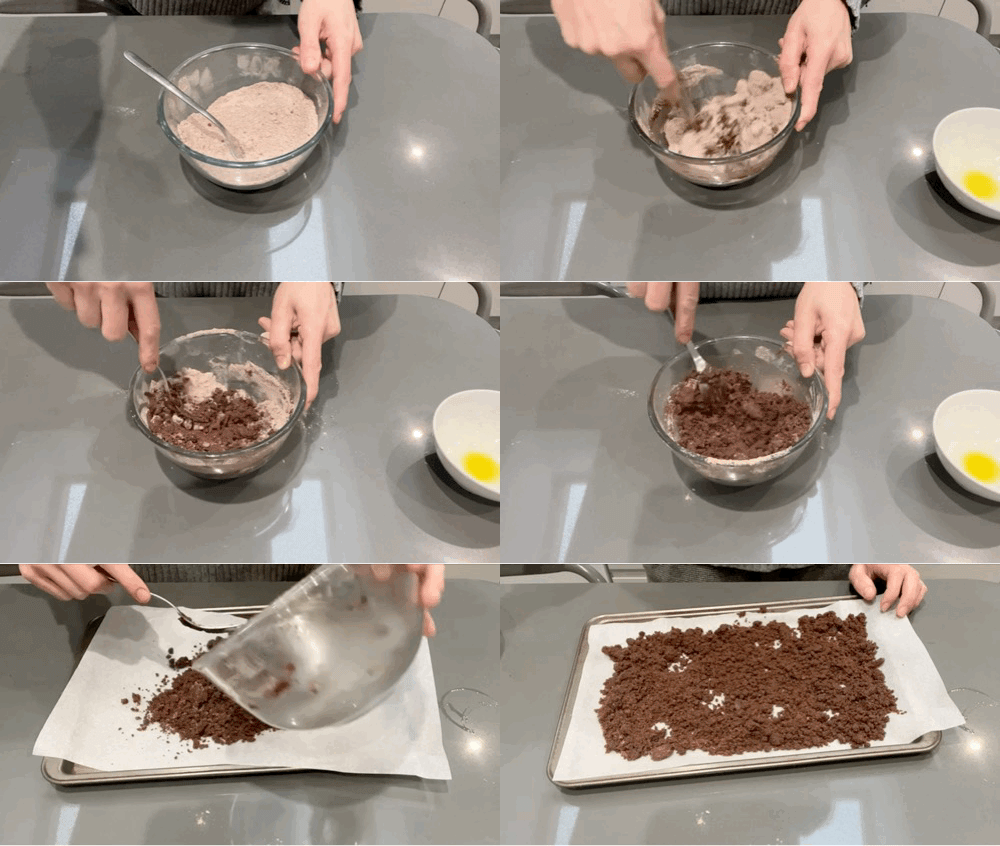
Chocolate crumb method
Pre-heat oven to 170c fan
Mix flour, sugar, salt and cocoa powder in a bowl
Melt butter then stir through the dries with a fork until a fine crumb forms
Spread out on a baking tray
Bake for 20 mins. Leave to cool
This crumb will last 3 months in an airtight container
Final Assembly / chocolate glaze method
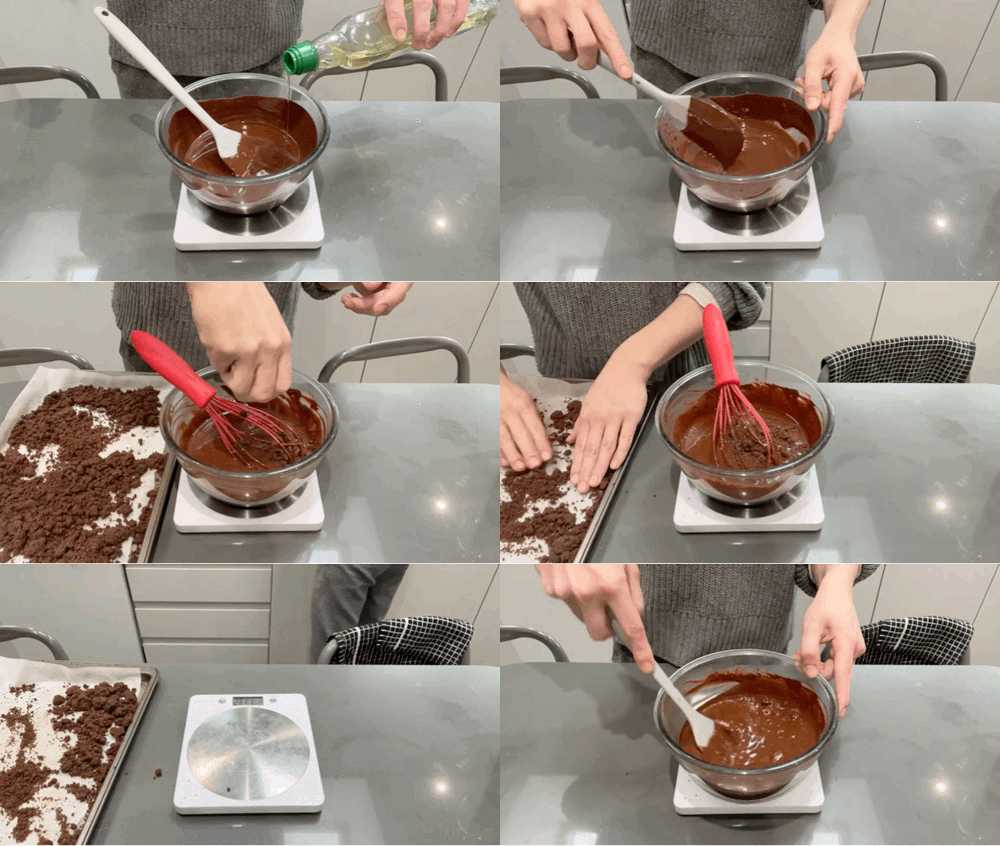
Melt chocolate in the microwave/over a bain marie
Whisk in the oil - this makes it thinner and easier to pour so helps give an even coating
Mix through 100g of the chocolate crumb - try to use fine-ish bits
Remove your arctic roll from the freezer and trim the ends if there is any cake over hang
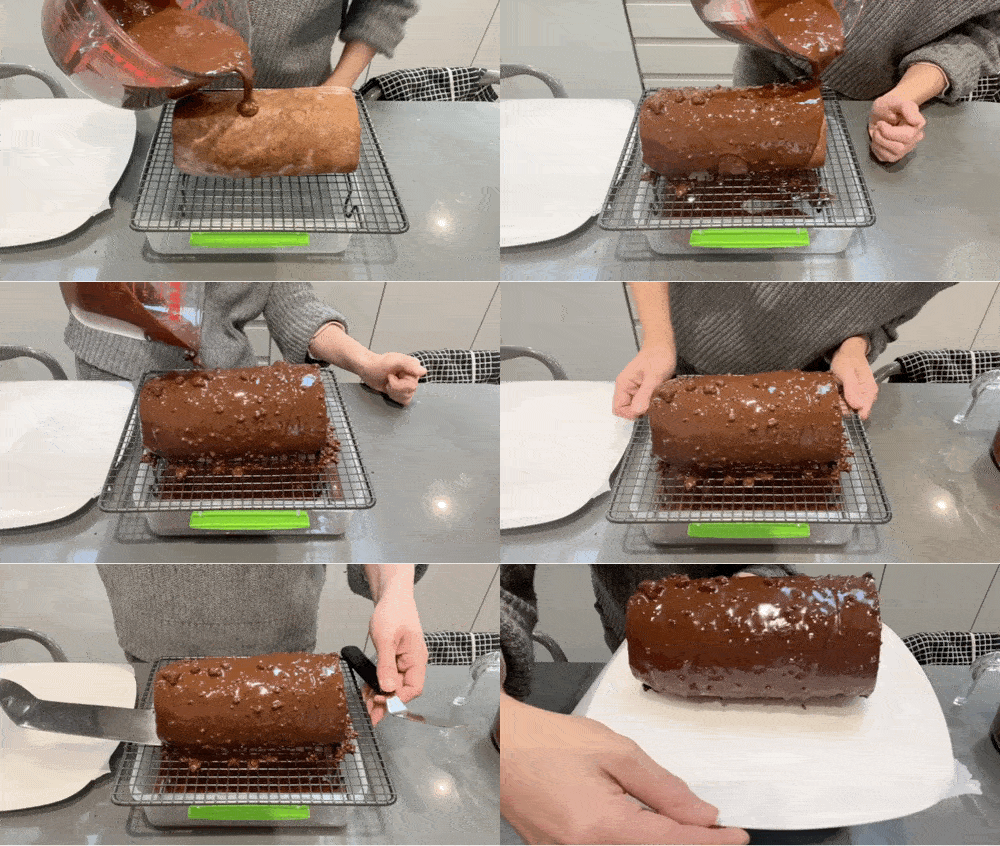
Set your well frozen arctic roll on a cooling rack over a tub/container that will be easy for you to use to dip the arctic roll in so we can cover the base after
Pour over your chocolate evenly. Remove and put onto baking paper.
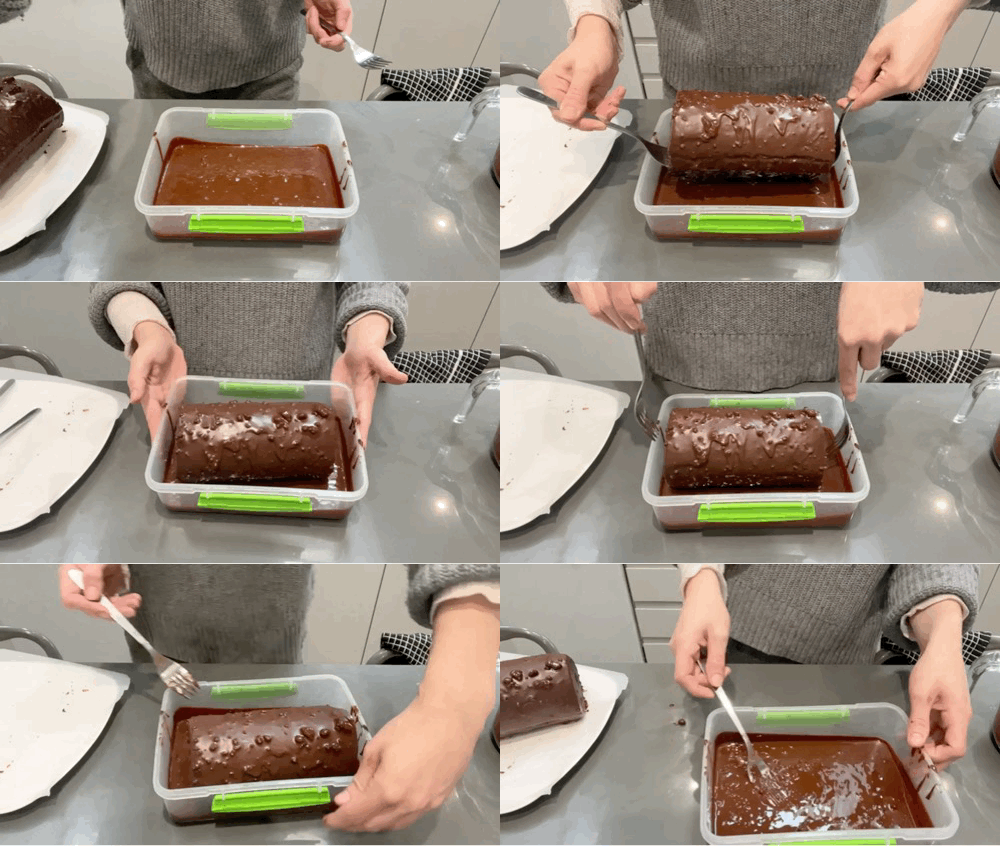
Move baking rack then place the arctic roll in the run-off glaze. Lift it out using forks and put on your greaseproof paper
Pop back into the freezer for at least 10 mins before serving, but up to 30 days, well wrapped
When you are ready to serve, let thaw for 10-15 mins before slicing (depending on how good your freezer is!)
Slice and cover with extra fudge sauce and chocolate crumb
PS. if you leave it out for too long, it will get condensation-y. That’s just how it goes! Don’t worry!
Wanna make this into a baked alaska? Check out KP+ now!




I cannot tell you how delighted I am that this is where the emergency chocolate orange ended up 😁