Kitchen Project #41: Chocolate + pear dacquoise
Deep dive into chocolate mousse tests with a helping of good old school pastry glamour
Hello
Welcome to today’s edition of Kitchen Projects! It’s so lovely to have you here.
I’m thrilled today to be demystifying a subject that has long been taking up space in my mind: The what, hows and whys of chocolate mousse. And with that we’ll be exploring one of my favourite combos - pear and chocolate - as well as an adventure into the world of the marjolaine / dacquoise.
For this newsletter, I put five different chocolate mousse methods to the test. This newsletter includes one of the recipes, but over on KP+, I’ve shared two more of those dreamy formulations so all your mousse dreams can come true! Subscribing to KP+ is easy! It only costs £5 per month and with that, you’ll be supporting the writing and will get access to extra recipes, win fun prizes content + community chat threads:
Lots of love
Nicola
Old school patisserie glamour
Today we are going to be delving into a bit of an old school fancy dessert. Although at times whilst developing this I questioned whether you guys would be into it’s retro patisserie energy, but I ended up loving the freezer-aisle-gateau glamour of it all so much that I had to share it. Anyway, part of the reason I develop specific recipes for Kitchen Projects is to be able to pick different lessons to run you through. And this one is FILLED with techniques and adaptations: The glorious marjolaine / dacquoise.
If you google marjolaine, you’ll actually get a bunch of results about negligee which definitely confirms my theory that the marjolaine cake has definitely slipped out of fashion from menus and bakeries. The latter ‘dacquoise’ is a slightly confusing term as dacquoise can refer to both one specific element of the cake - the nutty meringue layer - as well as the dessert as a whole. Basically, a dacquoise/marjolaine is a multi-layered dessert. Although traditionally it includes both buttercream and ganache layers, this is one of those desserts that can be adapted to loads of different flavours and creamy fillings (more on that later.)
Today, we’ll run through the layers one by one as well as deep diving into the world of chocolate mousse, a subject that has often bamboozled my brain a bit due to the sheer quantity of options you’ve got. We’ll keep the flavours super classic - chocolate and hazelnut, but we’ll also stud the layers with beautiful strips of poached pear. Pears and chocolate? Definitely BFFs. PLUS I get to cover the technique of poaching pears with you which, now we are fully in the season, is going to come in handy in the months (and years) to come.
Let’s talk dacquoise
A dacquoise is definitely one of those up your sleeve / classic french patisserie techniques to master. It’s a baked disc (or some sort of shape) of meringue folded with nuts. It’s baked until dry and then layered into cakes.
Look, I love a meringue. I do. But I HATE waiting. I am deeply impatient and unless *essential* (like in the case of pavlova), I avoid making meringues like the plague. I can’t handle the oven being out of action for hours and hours as you wait for them to dry. The benefit of a slow bake is the total and controlled drying out of the meringue as well as the way it allows you to retain the colour/avoid any caramelisation. But is that always the best way for every single application? No way!
Although your dacquoise is going to be crispy when it goes into the cake, One of the things that confuses me about dacquoise recipes, generally, is that they spend HOURS on the baking of the dacquoise. Literally why? Although the discs will be crunchy at first, we are going to be getting them very up close and personal with a bunch of mousse and the discs will turn into soft, light and nutty cake like layers. As well as this, we get additional caramelised flavour compounds when we bake on a higher temp.
So, for today’s dacquoise I will definitely be baking on a higher temp - rather than baking for an hour+ on a 110c fan, we’ll have the oven at 160c fan and simply bake for 20-25 minutes until the meringue is fully dry to the touch. This is waayyyy much more time efficient (20-25 min bake!) and schedule friendly, and the result is delicious.
How to adapt the dacquoise
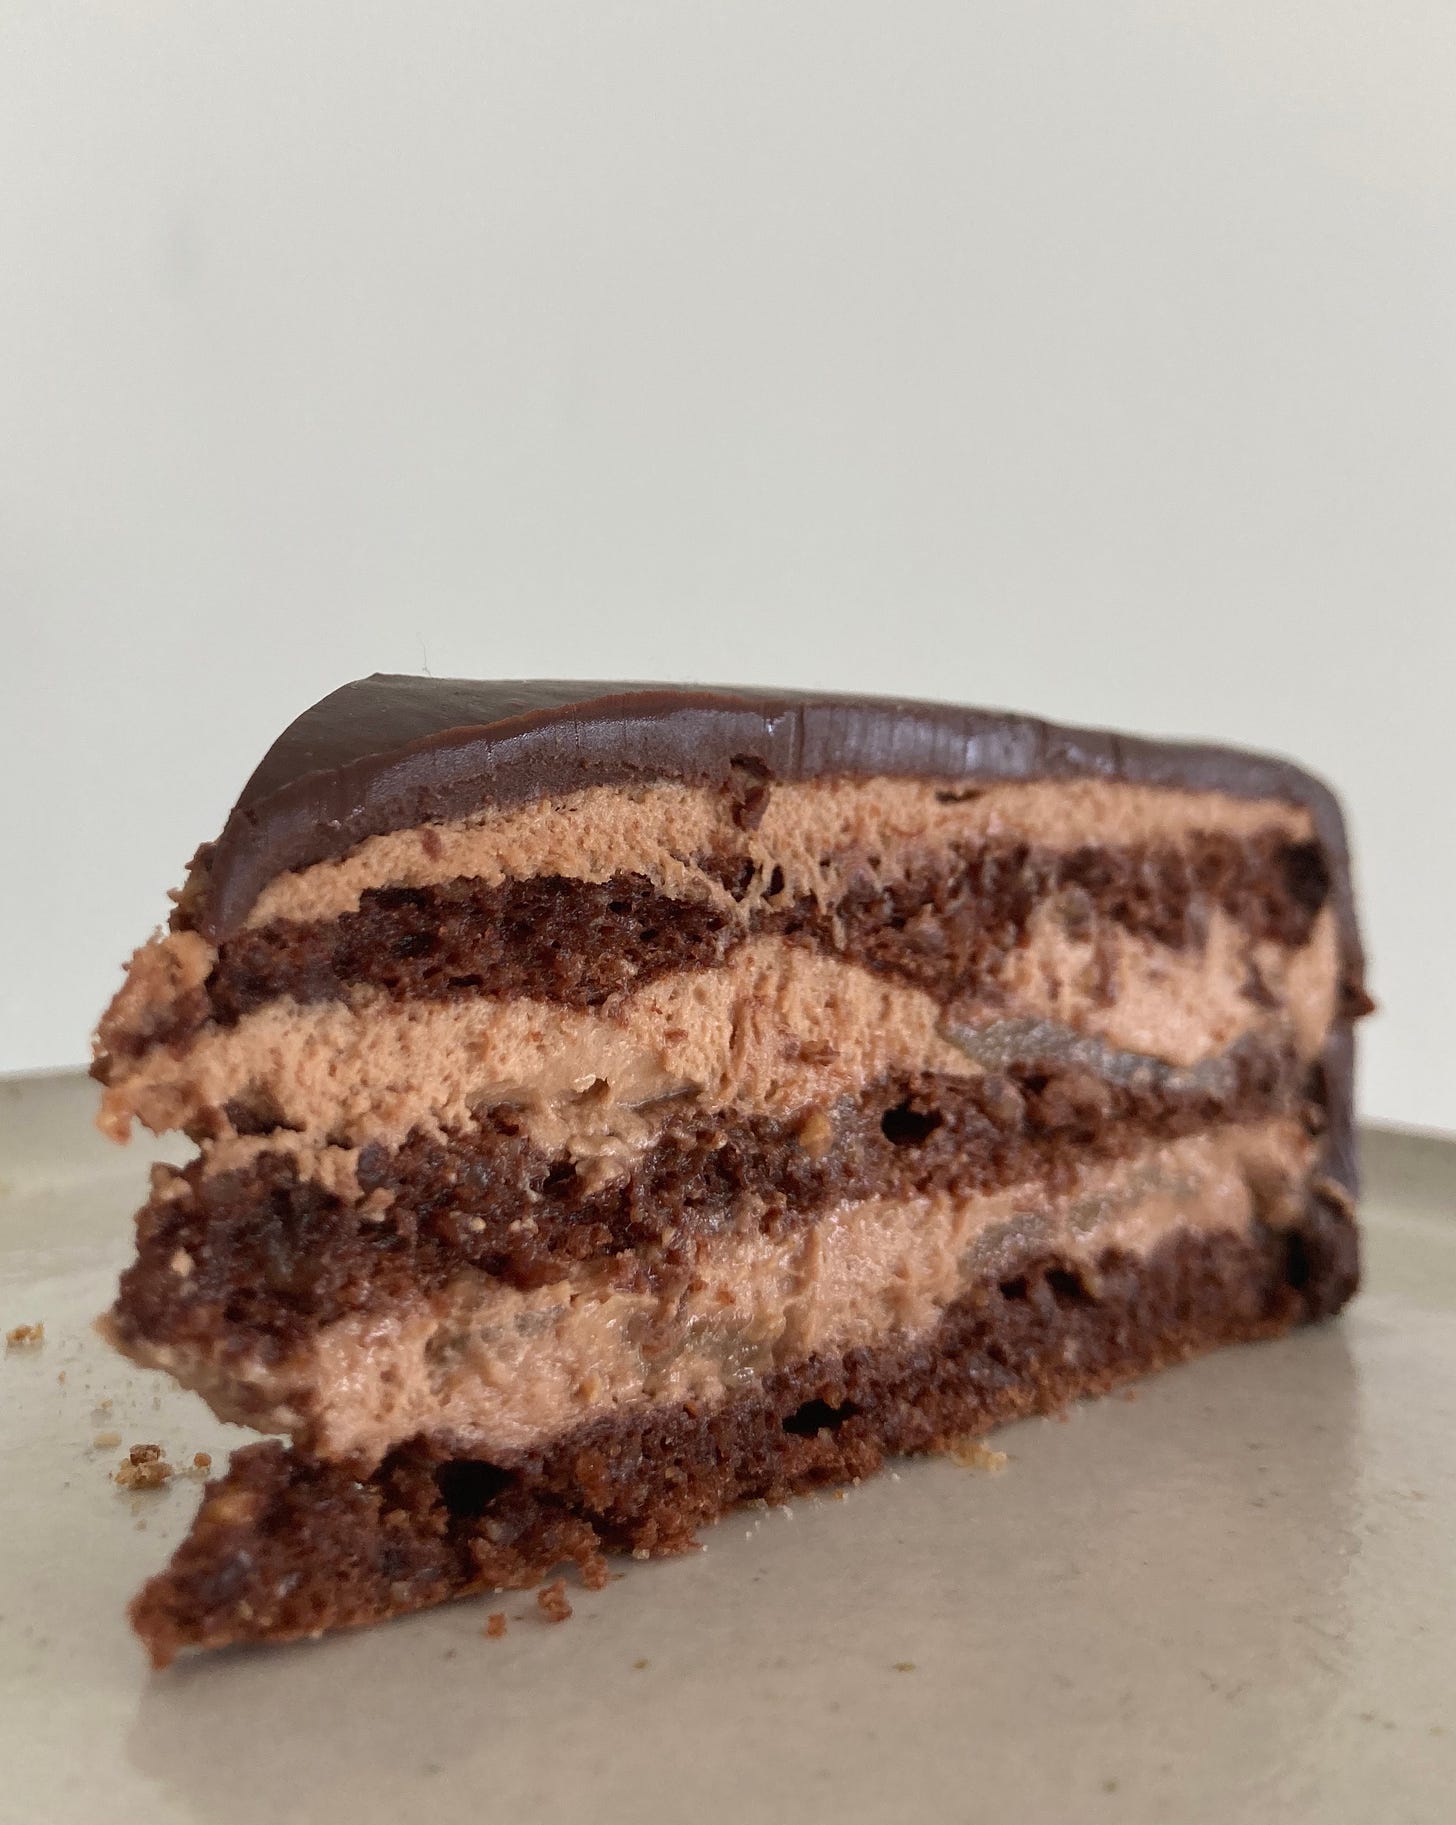
One of the major benefits of dacquoise layers is that they are gluten free - this is a great way to incorporate cake layers into your recipes if you’re trying to avoid gluten yourself or you’re making a cake for someone with an intolerance. And you get a lot of options with this technique; When it comes to the nuts, you have to consider a few things things: The nut itself, level of toastyness and the texture that you introduce it into the meringue.
For the former, you can switch up your nut selection depending on the final result. Hazelnuts and almonds are the classic option but you could definitely do something cute with pecans or pistachios. For the latter, you need to consider how you want it to eat later on. For this, I want a bit of texture, so I grind the hazelnuts myself and leave it a bit chunky so the cake has more texture later on. If you use a fine ground nut flour, the dacquoise layers soften into much more traditional cake. I also choose to roast my nuts dark to get the most impactful flavour.
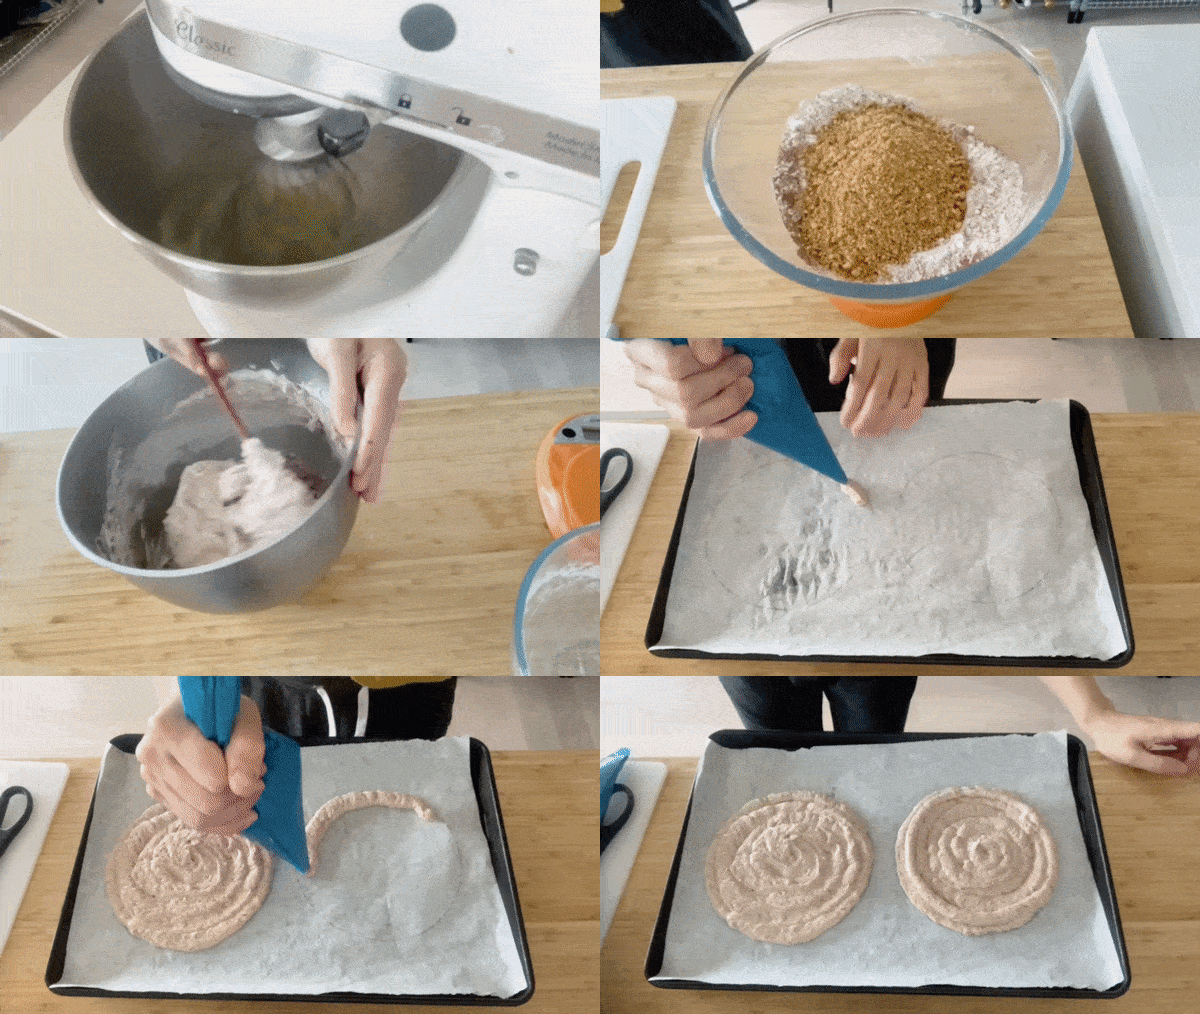
Once you’ve made the mix, it’s time to get it into shape. To get it to the right size, we’ll draw an outline on baking paper and then pipe the meringue in an even layer, though you could also just spread it on, too. As with all meringues, especially since we are baking at a higher temp, the dacquoise layers will expand slightly so we will trim to size before using.
The world of chocolate mousse
One of my favourite things about writing this newsletter is being able to answer questions that have been taking up space in my mind for years: I have long been baffled by chocolate mousse and the sheer number of ways to make it.
Before we get into the deep dive tests and results, it’s important to understand what a mousse actually is and why certain ingredients and techniques will impact the final product. Mousses, after all, are not built equal - the type that could hold up a cake may not be appropriate for spooning out of a bowl at the end of a meal, and vice versa. But let’s start at the beginning:
Simply put, mousse is an aerated dessert / a foam. To make it, a base, like melted chocolate or fruit puree, is combined with *something* airy. This could be a meringue, whipped cream or pate a bombe (the egg yolk version of a meringue), basically anything that can hold air within a network of either proteins (meringue, pate a bombe) or fat (whipped cream). The foam is stabilised by the addition of chocolate, which will solidify as it chills, holding the airy network in place, thanks to cocoa butter firming up.
Mousses made without chocolate are generally stabilised by the addition of gelatine, though gelatine is also added to chocolate mousse sometimes. I decided not to include gelatine mousses in my tests today. Firstly, I couldn’t find leaf gelatine anywhere near me! But also gelatine isn’t my favourite for chocolate mousse - you can make a lovely mousse without gelatine and I’m not looking for a super shelf stable result/something that can hold for hours and hours and hours.
When it comes to chocolate mousse, we have to make sure there’s a significant amount of chocolate (or other firm things, which is why gelatine is so often used) to ‘hold’ the network of air bubbles, otherwise there won’t be enough solids to stabilise and hold the air in place.
Another thing to consider is the raw vs. cooked eggs thing: In our most simple mousse technique, the eggs remain raw. To cook or pasteurise the eggs for the mousse, you have to make all of your processes more complex - a french meringue becomes an Italian meringue, yolks stirred into chocolate turns into a pate a bombe etc. - so although I am personally fine with eating raw eggs in a mousse, it’s definitely worth considering your own comfort level and assessing the risk for yourself.
The tests
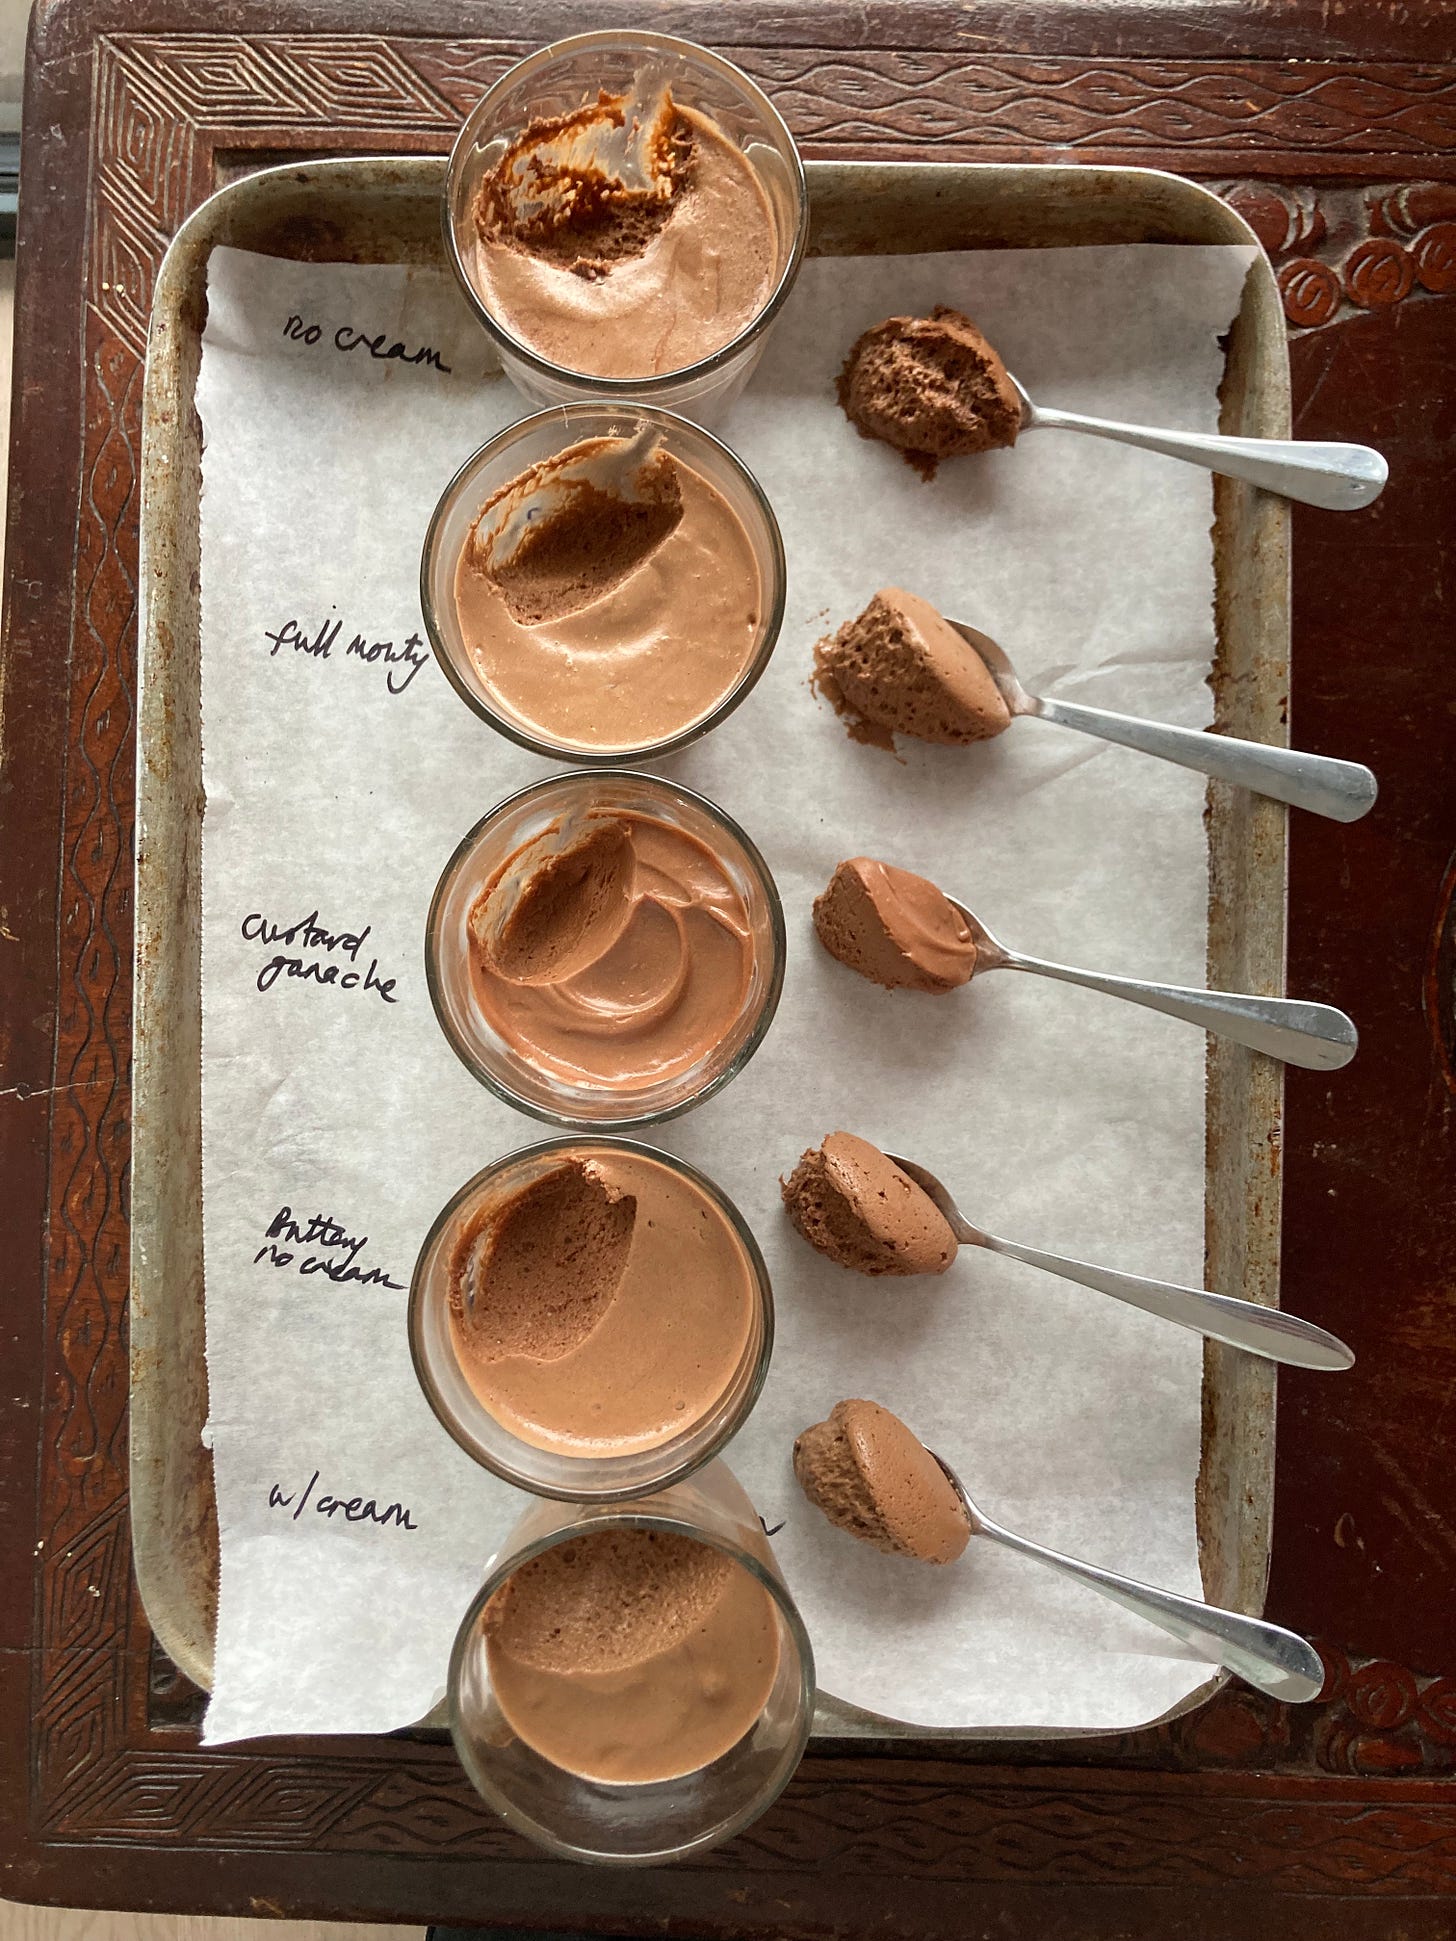
OK guys, there are SO many ways to make chocolate mousse. And at every kitchen I’ve worked at, I’ve encountered each type. But, I’ve never actually compared them side by side. From ganache based to french meringue, to pate a bombe, here’s what I tested:
Classic - Melted chocolate + yolks + french meringue
Classic with butter - Melted chocolate and butter + yolks + french meringue (to get this recipe, click here!)
Classic with cream - Melted chocolate + yolks + french meringue + whipped cream (to get this recipe, click here!)
Custard ganache - Extra thick crème anglaise custard ganache + whipped cream (you could also make this with a classic ganache, rather than a creme anglaise)
The full monty - Melted chocolate and butter + pate a bombe + italian meringue + whipped cream
Each mousse was made with a 50/50 split of milk and dark chocolate (55% and 75%). I also finished each mix with a ‘flourish’ on top to indicate how firm/soft the mousse was after mixing. Although the sugar content of the chocolate may affect the flavour and texture, I didn’t consider this to be a big enough impact to test different % specifically,
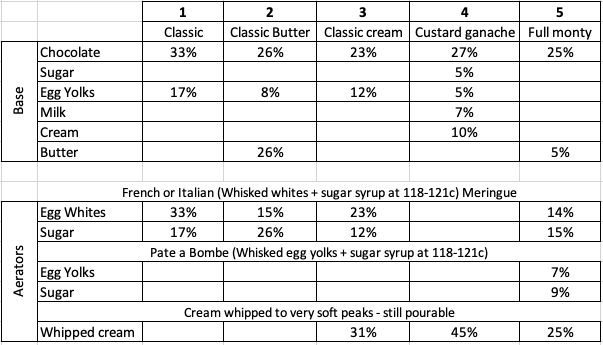
Here’s a spreadsheet (my fave) with the ingredients displayed in % based on the overall mass. All of the recipes have been adapted from mousses I have made at previous jobs or developed for pop-ups:
The recipes all have a similar percentage of chocolate - the lowest being at 25% (the full monty, being so complex!) and the highest at 33% (the classic, which has the least ingredients). What is interesting about the different mousses is how the different aerators behave.
The full monty, which boasts both pate a bombe and italian meringue as well as whipped cream, has the light and almost spongy yet airy texture - it is light but remains on the palette for longer than mousse 3, which is the classic style with whipped cream. Mousse 3 is extraordinarily light and is aerated with both whipped cream and a french meringue.
The classic has the most pure chocolate flavour and definitely feels very authentic in a french bistro set menu kind of way, but I think the mousses with additional fat - either butter (2) or whipped cream (3), are miles above it in terms of texture and flavour. The buttery mousse brings an unrivalled unctuos-ness.
My favourite, a bit of an outlier, has got to be the custard/ganache mousse. Although you could definitely additionally lighten this formulation with egg whites, the current result is a bubbly yet dense and smooth mousse. It’s heaven. Although it has 45% double cream, a much higher percentage than the other mousses, it is still distinctly chocolate-y, though the texture is more lush than airy. It is prone to overmixing so a light touch is definitely required for best results.
If you want to learn a bit more about each recipe plus directions on how to make some of the other formulas, check out today’s KP+: Chocolate Mousse, extra helpings!
The deal with the custard ganache and technique
Making a ganache with creme anglaise results in an ultra decadent emulsion which is often called a ‘cremeux’. As you can only heat up your creme anglaise to 82-84c max (you know, the whole not curdling egg thing) rather than boiling it rapidly, it can be a bit tricky to get the chocolate to totally melt. So you must do your best to cut the chocolate into super fine pieces so that it melts more easily. If you are making this recipe and your chocolate doesn’t melt completely, just pop the bowl over a pan of simmering water and whisk. No sweat.
The thing about British cream…
Don’t get me wrong, we are so lucky to have such beautiful dairy. But one of the best and worst things about British cream is how fat it is. Double cream available in supermarkets is a massive 50% fat. This makes it delicious but also a lot harder to work with. It is prone to over whipping and can definitely make our mousses on the denser side and make ganaches and creams prone to splitting. Boo! I definitely wouldn’t swap it for the world, but I have had to create some coping techniques.
One way to negate this is by using whipping cream - whipping cream has a lower fat content, closer to 35% - 40%. You can also experiment with adding milk to double cream (as I did in the Strawberry Shortcake recipe) to lower the fat content. I’ll explore fat cream % in more detail in a future KP!
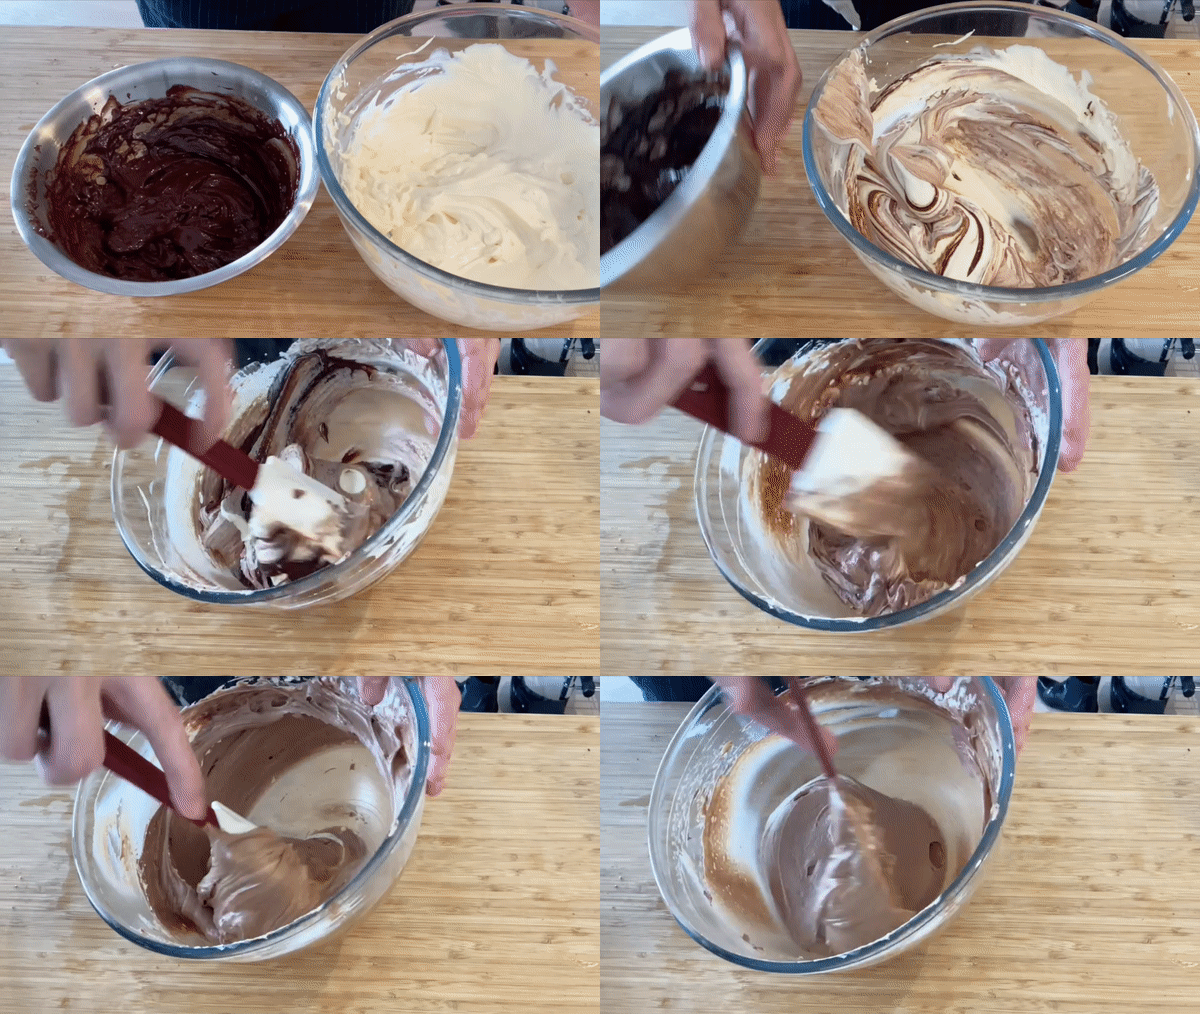
Whatever cream you use, it’s important to whip your cream to only just soft peaks - you want it to be thickened but pourable. When you fold the mixes together, the cream will continue to whip/thicken. Also, if cream is left on its own after whipping it will stiffen, making it harder to combine with your ganache base, so keep it moving.
Poaching pears
We are well and truly in pear season. And I know the moment that I start poaching pears, we are well on our way to winter (sorry!) - today is the first recipe we’ll be using poached pears.
Pears can be a bit tricky to get right - they seem to take forever to get ripe. Fortunately, you can forgo the waiting and poach exactly to your liking, plus you can add in flavourings - like spices, tea, wine, different sugars - during the poaching process too. Although I’ve suggested using vanilla, pink peppercorns and lemon peels for this recipe, you can use the base poaching liquid recipe and add your own flourishes.
By the way, I always poach more pears than needed - although you can just do one or two, poached pears are so handy for quick desserts, throwing into cakes, eating for breakfast etc. that it’s better to make a big batch! They’ll last in the fridge for at least a week, perhaps more (as long as it’s sealed and properly cold!)
The importance of mise en place and ganache tips
For a multilayered and dimensional cake like this, MISE EN PLACE is key. Mise en place means ‘everything in place’ and refers to having everything you need to complete the dish ready so you don’t have to scramble around at the last minute. This cake definitely gets easier with proper mise en place.
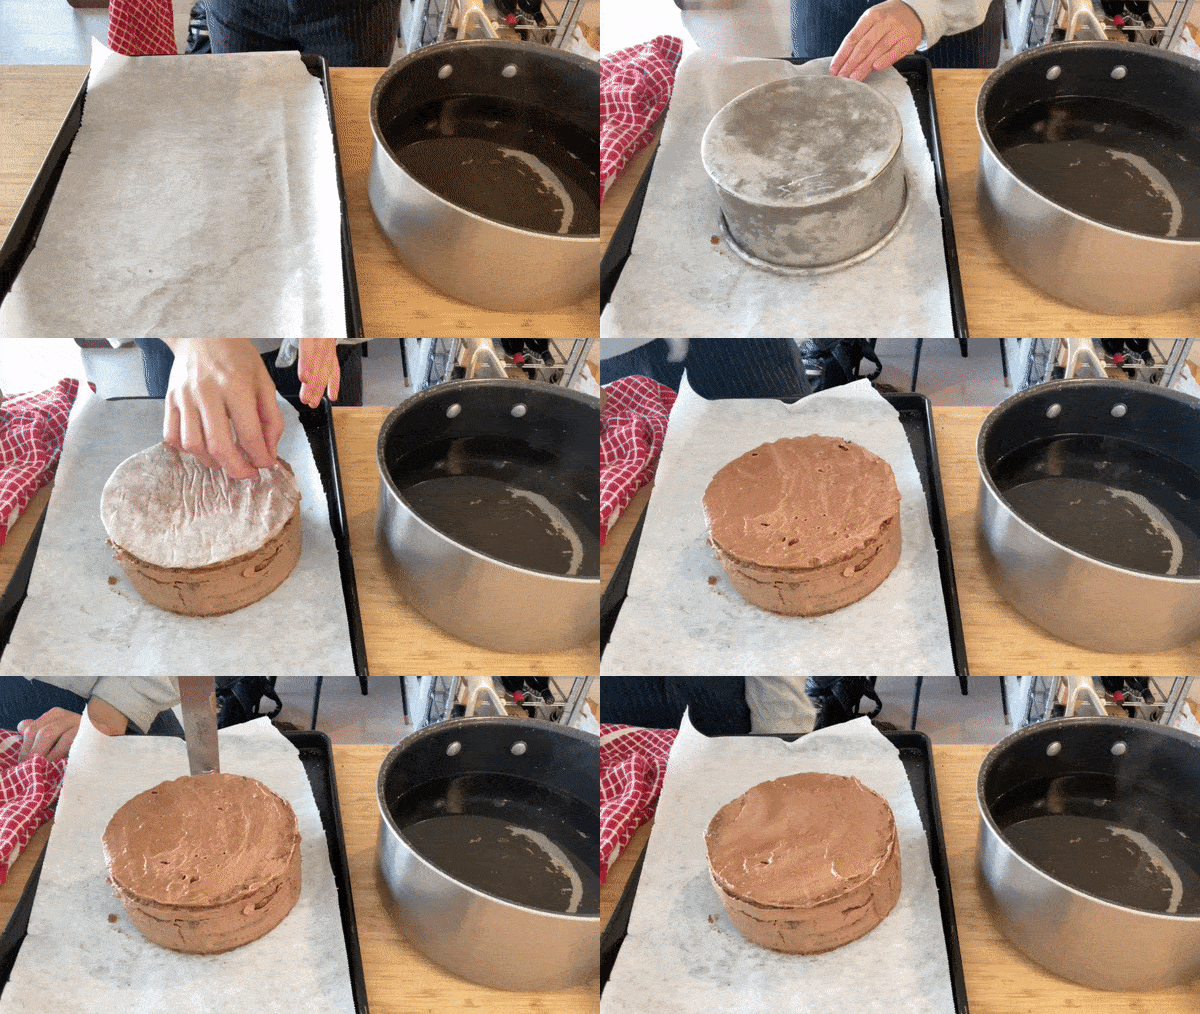
Assembling the dacquoise is definitely a fun bit as long as you are prepared. First up is demoulding - my blow torch *just* ran out of gas so I ended up dipping my dacquoise cake into freshly boiled water for a few seconds (much like you would do a panna cotta) then turning upside down onto some fresh paper and slapping the tin like an insane person. Whatever works! At this point, you might need to put it into the freezer to firm back up whilst you prep the ganache.
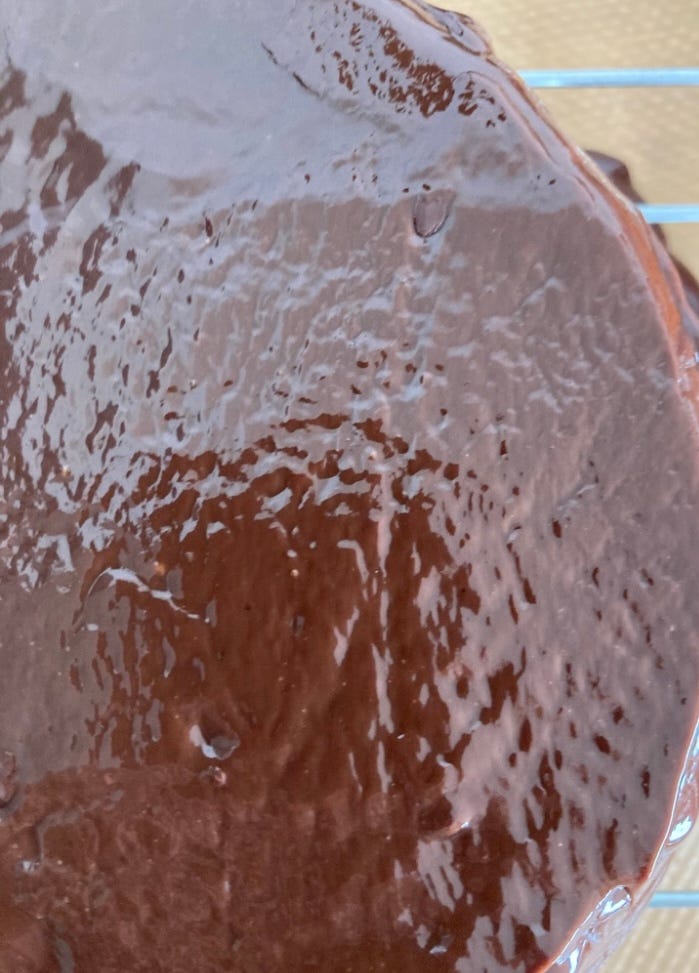
Today’s ganache is a simple 1:1.3 ganache. The reason we aren’t doing a 1:1 ganache is for the aforementioned fatness of British cream. Ganache made from super fat cream will also have a much thicker consistency so don’t be alarmed. For my first run at this cake, I made a 1:1 ganache and it was definitely split - my cake def had a bit of cellulite. If your ganache is on the edge, it will be even worse once you pour it / try and move it around on the cake. Although it looks like jelly and there was nothing I could do to save it, it still tasted fantastic:
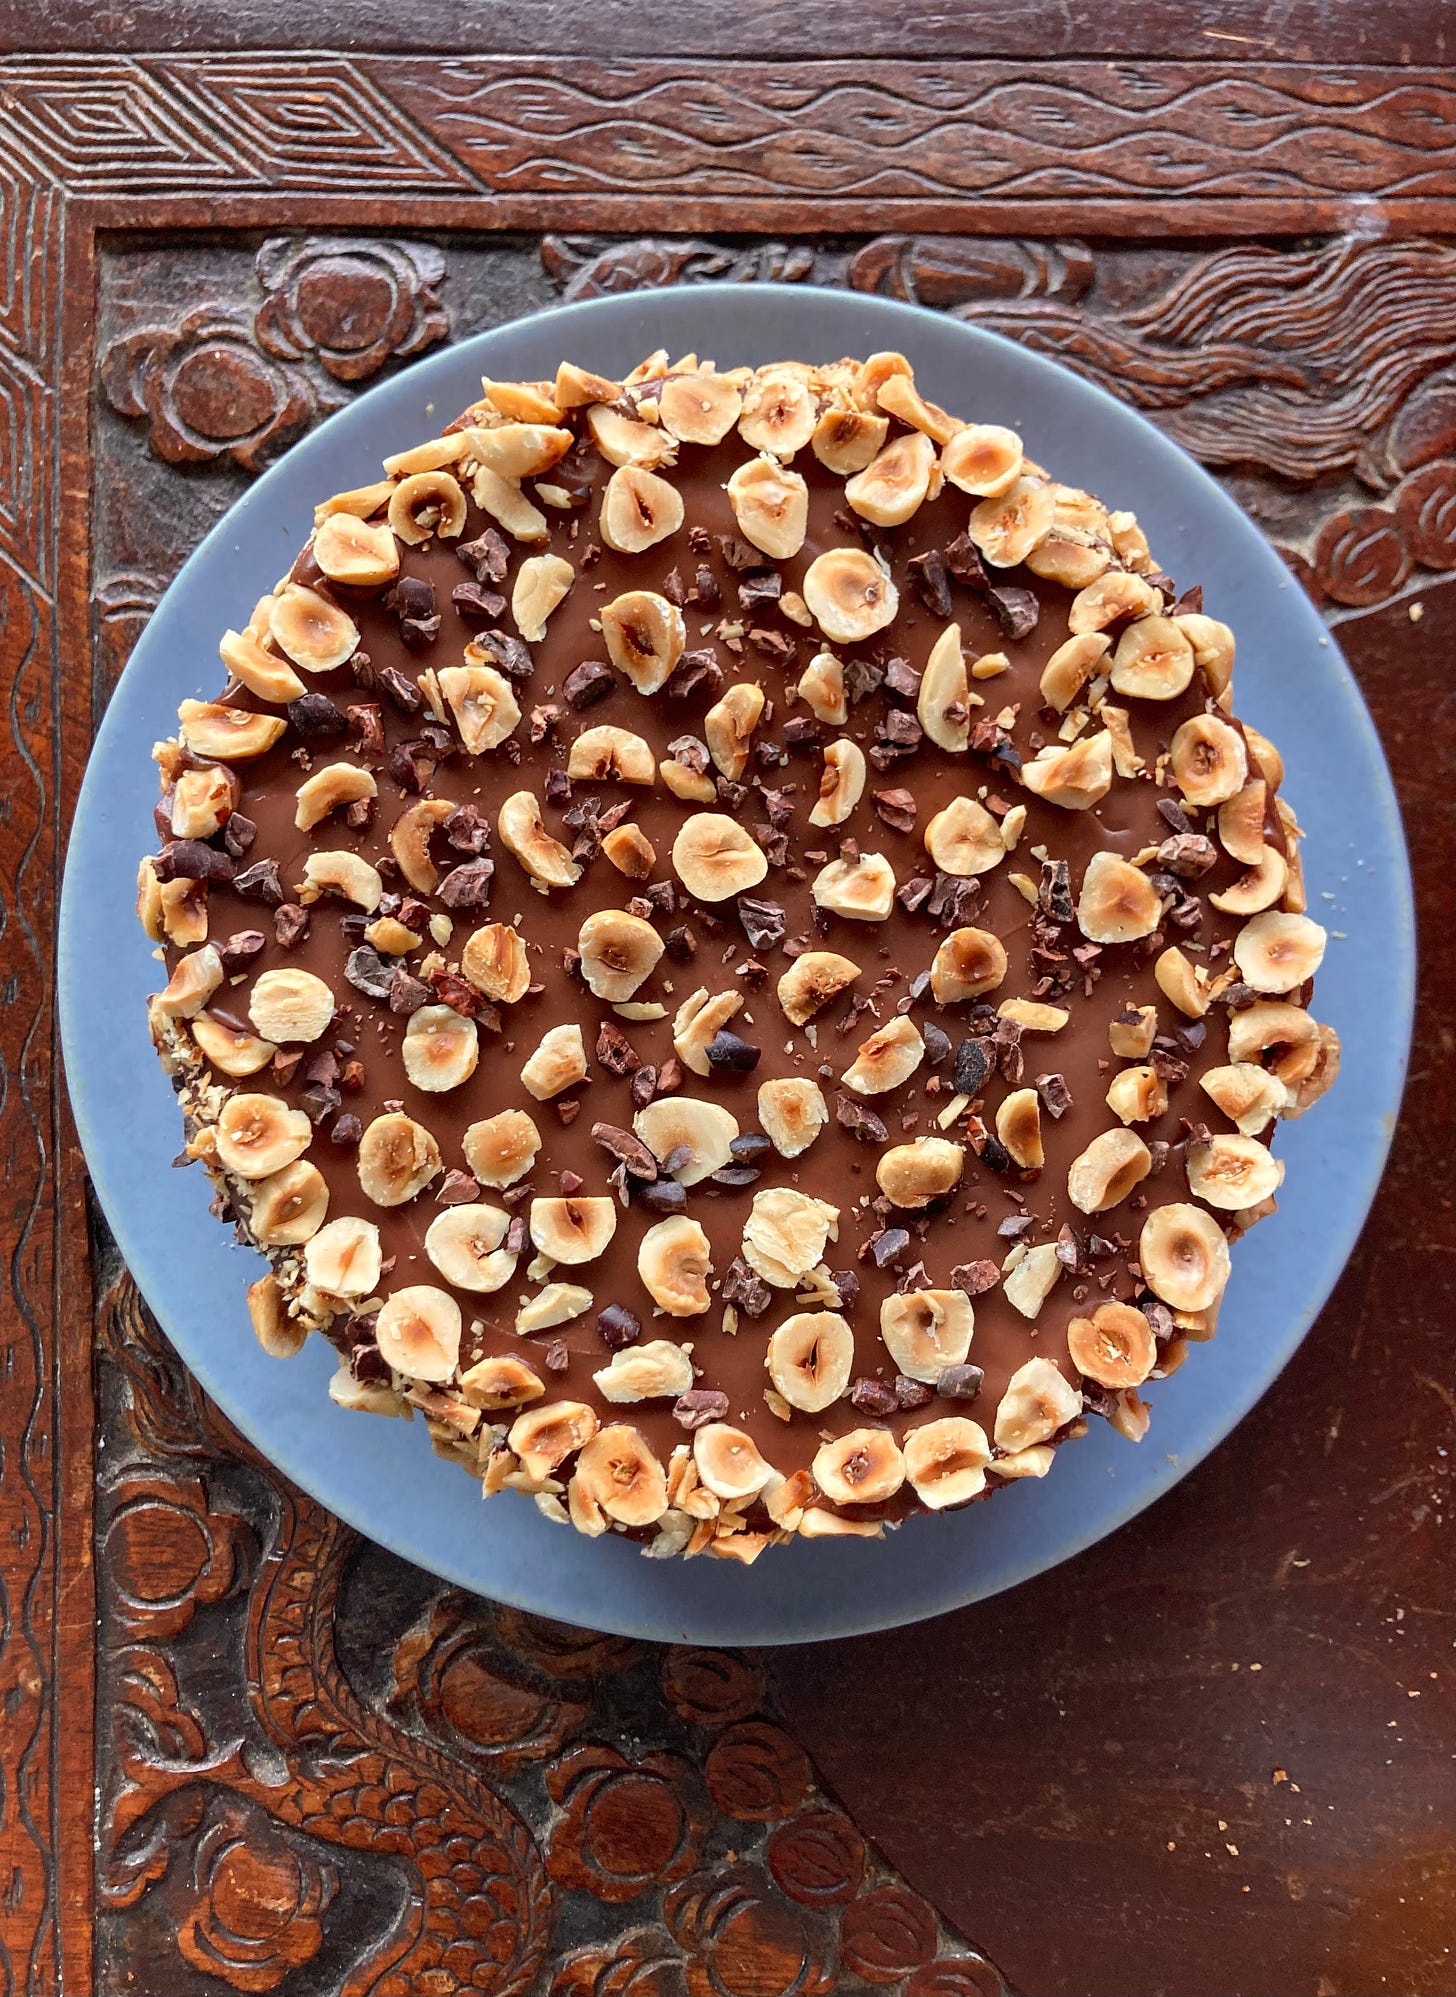
My second attempt, with higher proportion of cream to chocolate - was much more successful. Although it doesn’t matter too much as we are going to be covering the entire cake with hazelnuts and cacao nibs. Speaking of those hazelnuts, I am going to ask you to cut these by hand. I mean, you don’t have to of course, but you’re going to get the best look - slicing the hazelnuts thinly with a knife as though you are ‘flaking’ them (think of flaked almonds!) will result in beautiful and fine nut flakes that retain a lovely shape.
Timing
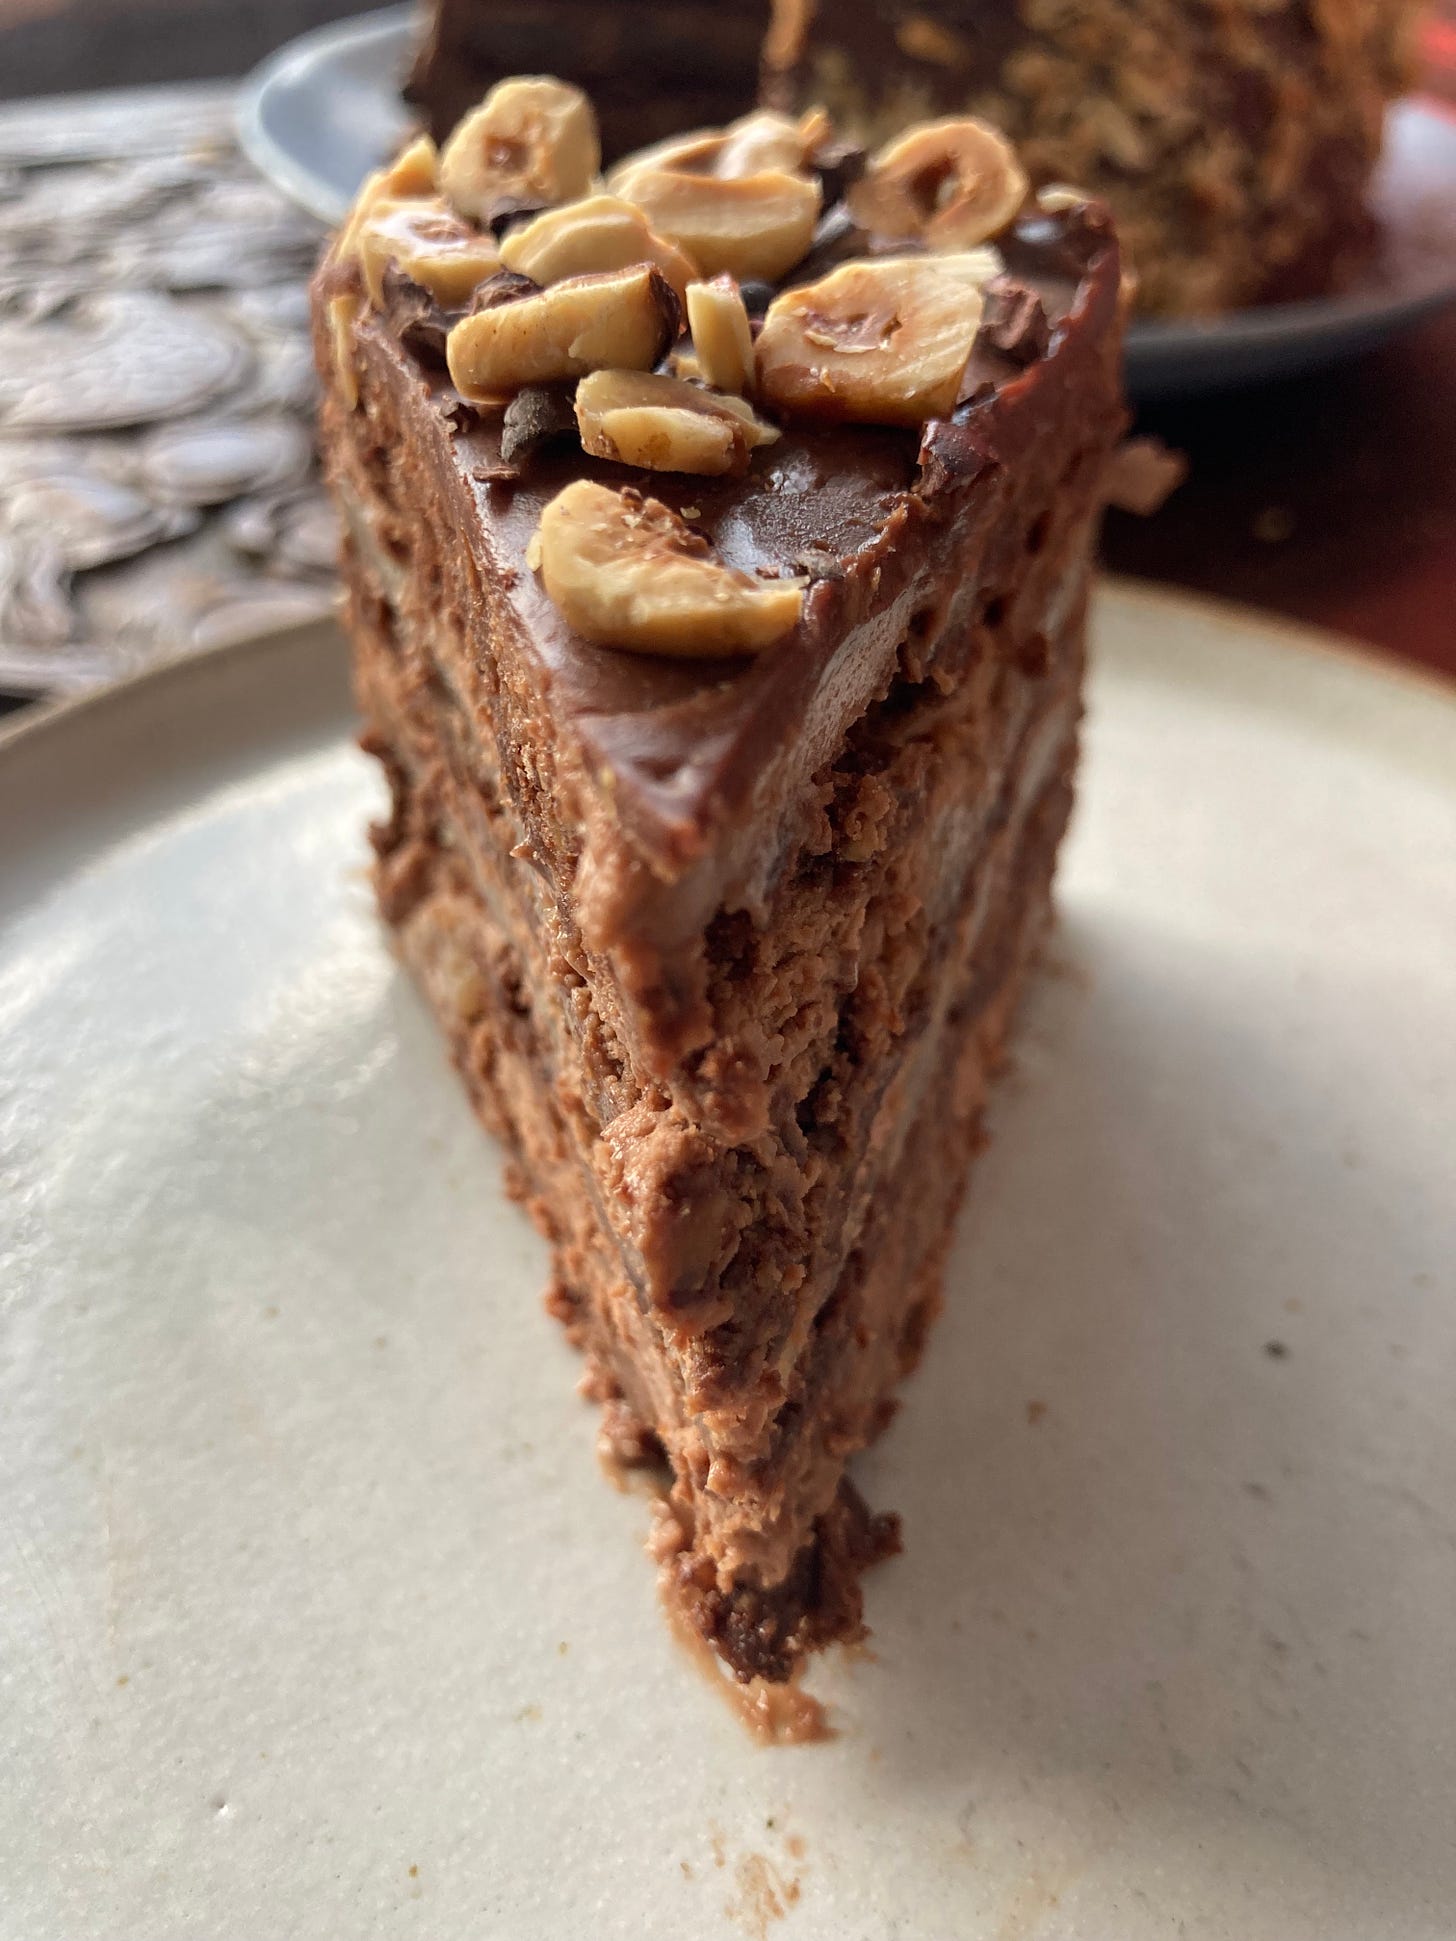
This cake tastes different over time, depending on when you make it. The first time I made it, I set the mousse and dacquoise layers overnight in the fridge and the dacquoise had softened by morning. On the other hand, the second time I made it, I was in a bit of a rush and I set it in the freezer and demoulded and cut within 3 hours of assembling. The result was a much crunchier/chewier dacquoise layer. Both work well - I actually prefer the soft cake, so I’d be inclined to leave the cake for at least 4 hours in the fridge OR overnight for everything to meld and mellow.
Adapting the flavour
Although I am fully committed to pear/chocolate LYF right now, this dessert would be adorable with SO many diff combinations, which you could introduce at each layer. For example, the meringue could be plain, without chocolate, or flavoured with coffee. The mousse could be streaked with peanut butter, or you could add layers of caramel as you build it. A zingy version with a white chocolate cream cheese mousse and lemon curd would also be heaven with a plain meringue. The easiest place to switch it up, if you don’t feel like changing the basic DNA of the recipes, is the fruit. You could totally go full black forest gateaux energy, with layers of amareno cherries, but I also think a caramelised banana could also take the place of the pears and be brilliant.
Alright, let’s get on with the recipe
Pear chocolate and hazelnut dacquoise
This makes 1 x 6inch four-layer cake. You could also make a 3 layer, 7 inch cake, if preferred
Chocolate hazelnut dacquoise discs
100g egg whites
60g caster sugar
20g cocoa powder (something dark!)
90g ground hazelnuts
70g icing sugar
2g salt
Custard ganache chocolate mousse
This makes a bit more than you need as it’s impossible to make an even smaller batch of creme anglaise - plus this custard is thicker than your average!
2 yolks (30g)
25g caster sugar
30g milk
40g double cream
110g chocolate (I use 50/50 dark and milk, Islands, but I think a full milk choc mousse would be good here too)
220g cream, whipped
Poached pears
3 x Comice pears (or any type you like)
600ml water
250g sugar
20g lemon juice - this is to help discolouration
Lemon peels, pink peppercorns, cardamom pods, vanilla pods - whatever you like!
Ganache
115g double cream
85g dark chocolate (I use 75% islands)
To finish
Cacao nibs
75g hazelnuts, slivered (slice thinly by hand!)
Method - Poached pears
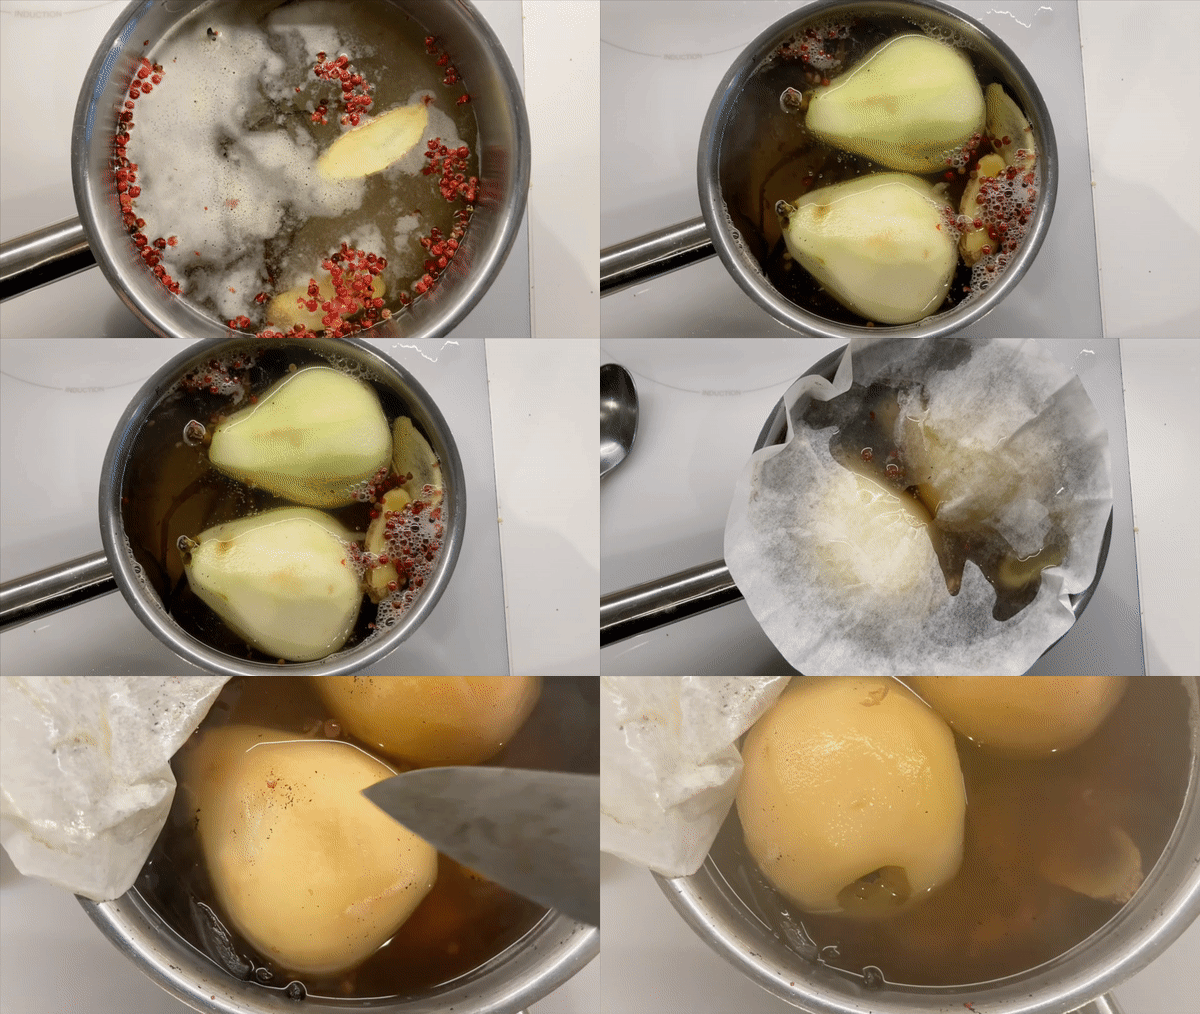
Prepare your poaching liquid - heat sugar, water and your flavourings of choice in a pan large enough to immerse the pears fully. Bring to a simmer
Peel your pears. I like to poach my pears whole and then cut to size later, but you can also cut in half and remove the seeds and poach in halves
Add pears to poaching liquid and ensure the liquid is at a very gentle simmer - if the pears are bobbing around, you can put some paper on top (a cartouche) to keep them immersed fully
Poach for around 45 mins - check after this point and see if you can easily pierce the pear with the tip of a knife. If not, keep poaching. Try not to let the pears get mushy.
Take off the heat and leave to cool in the syrup. If you are poaching and the pears accidentally get a bit too soft, remove from syrup to cool separately
Store poached pears for a week in the fridge
Method - dacquoise
If making your own ground hazelnuts, bake at 180c fan for 15-20 mins until the hazelnuts are nice and dark. Leave to cool slightly then blitz until still chunky but quite fine. You can grind the nuts whilst warm but just be careful that you don’t accidentally over process
First, trace four 6 inch circles / whatever shape you have decided to make
For the dacquoise, pre-heat oven to 160c (fan)
Whisk egg whites until foamy then add the sugar slowly and whisk on a high speed until a glossy, stiff meringue forms
Meanwhile, sift the icing sugar and cocoa powder then whisk in the ground hazelnuts and salt
Now fold the two mixes together. The mixture will deflate somewhat
Transfer into a piping bag
Pipe 75g-80g meringue in concentric circles. You can smooth the top if you like though the rings are often part of the dacquoise design
Bake for 25 - 30 mins until dry and crisp
Leave to cool. Once cool, trim to size - use a sharp knife and cut around the mould that you are using
You can make these 2-3 days in advance and keep in an airtight container
Method - chocolate mousse - don’t make the mousse until you have everything else ready as you want to use it quite quickly once made
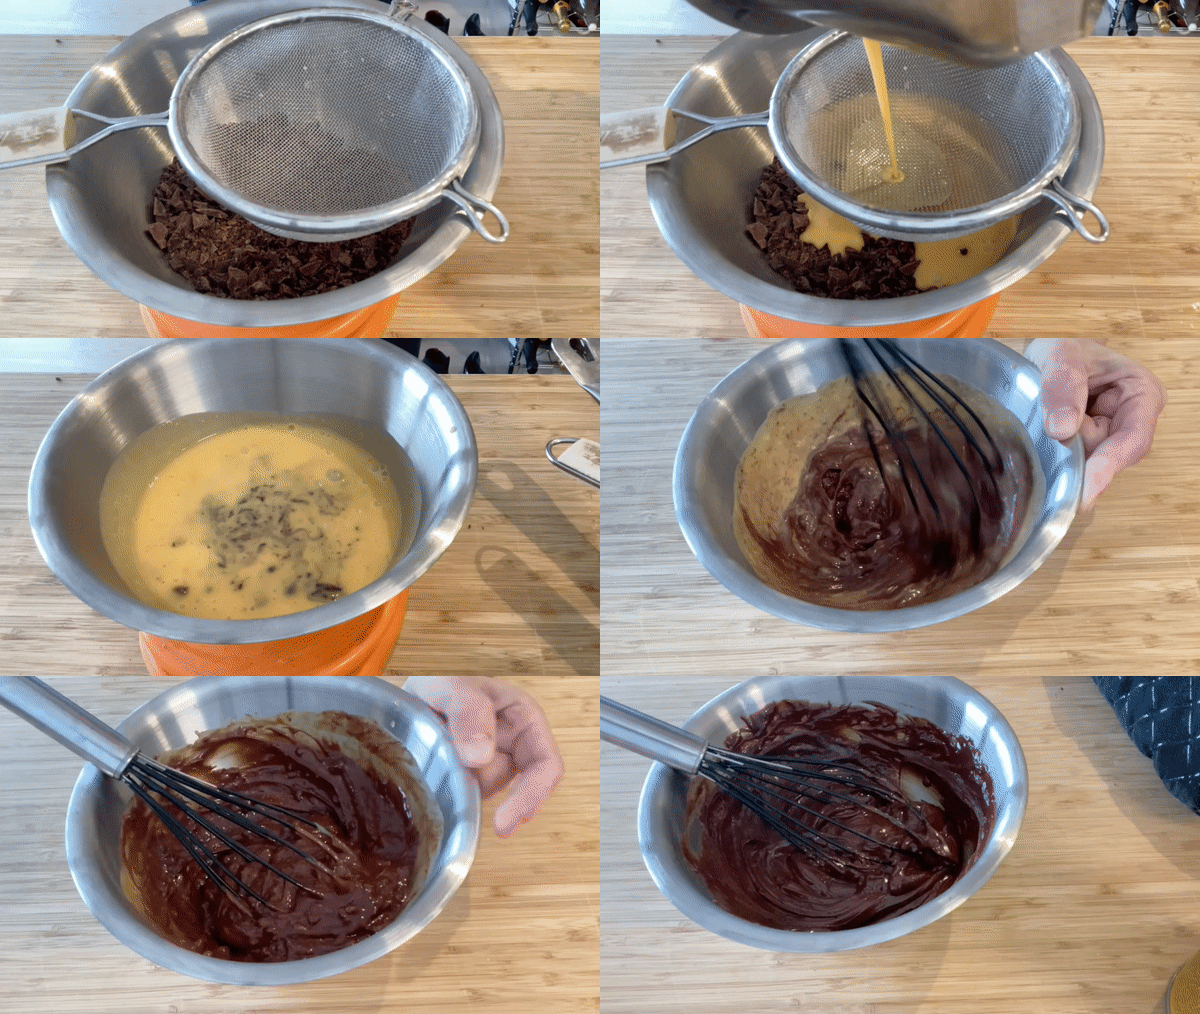
Chop chocolate up as finely as you can
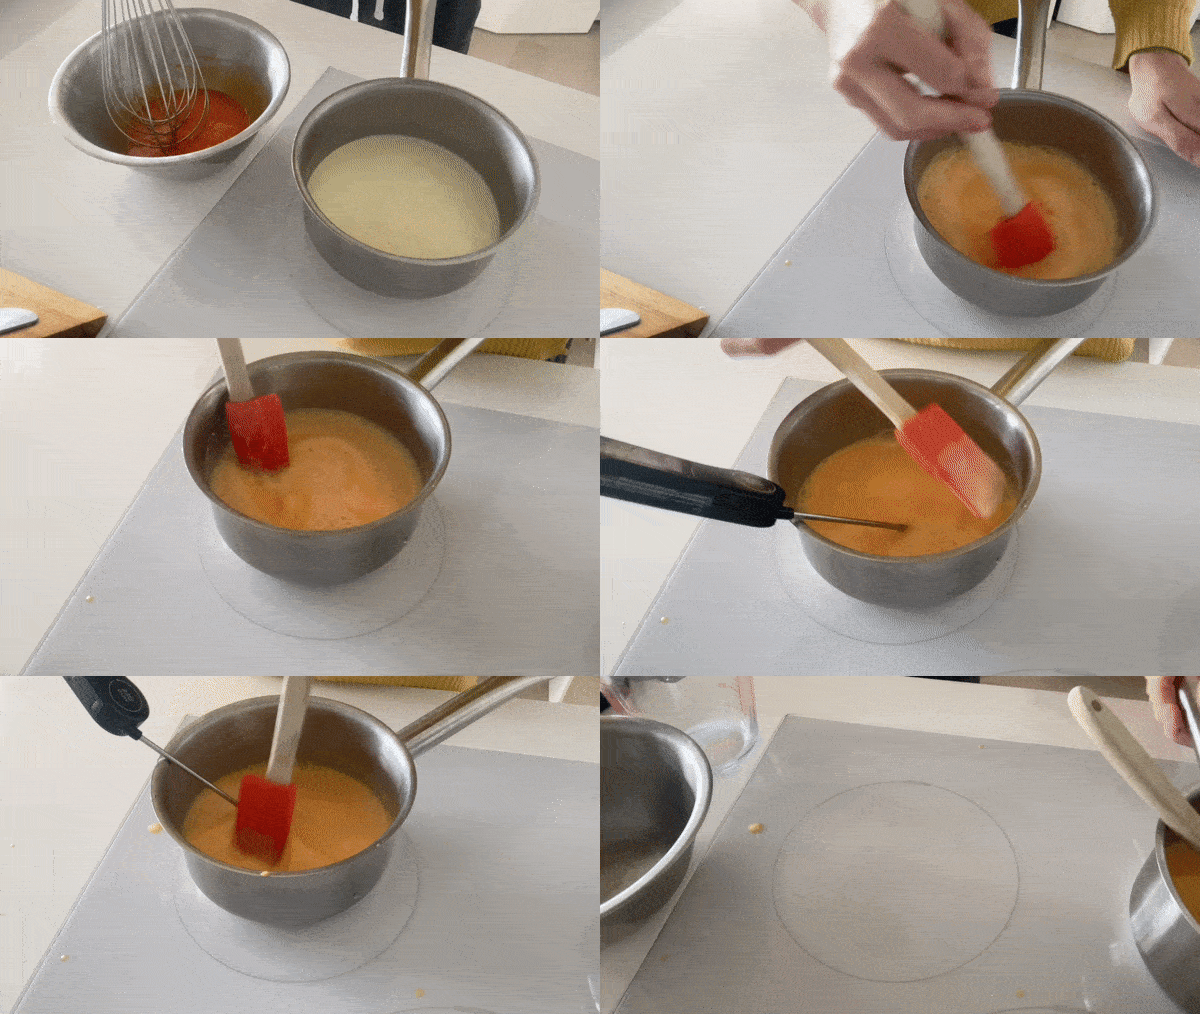
Heat milk, cream and half the sugar together
Whisk egg yolks with other half of the sugar
When the milk is steaming, pour a little on the egg yolks and whisk to temper
Return the mixture to the stove on a low heat and stir constantly until the custard thickens. If you want to temp it, you need to take it to 82c as this is when the eggs coagulate and thicken to their max potential. If you take it off earlier, don’t worry. It wont have much of a negative impact on the final mousse
Once it has reached temp, pour the custard through a sieve onto the finely chopped chocolate
Shake the bowl a little bit to distribute the liquid properly and then leave for 1-2 mins before whisking to a smooth ganache. If there are any lumps, you can whisk the ganache over a bain marie until its smooth
Now whip your cream until *just* soft peaks - it should still be pourable but be visibly thicker. Err on the side of underwhipped - it’s amazing how much it thickens as you fold it
Fold the two mixes together to create a light mousse. Be gentle when you fold but make sure there are no streaks of cream left and the mix is homogenous
The mousse is now ready to use
Assembly - have everything ready to make this bit as easy as poss
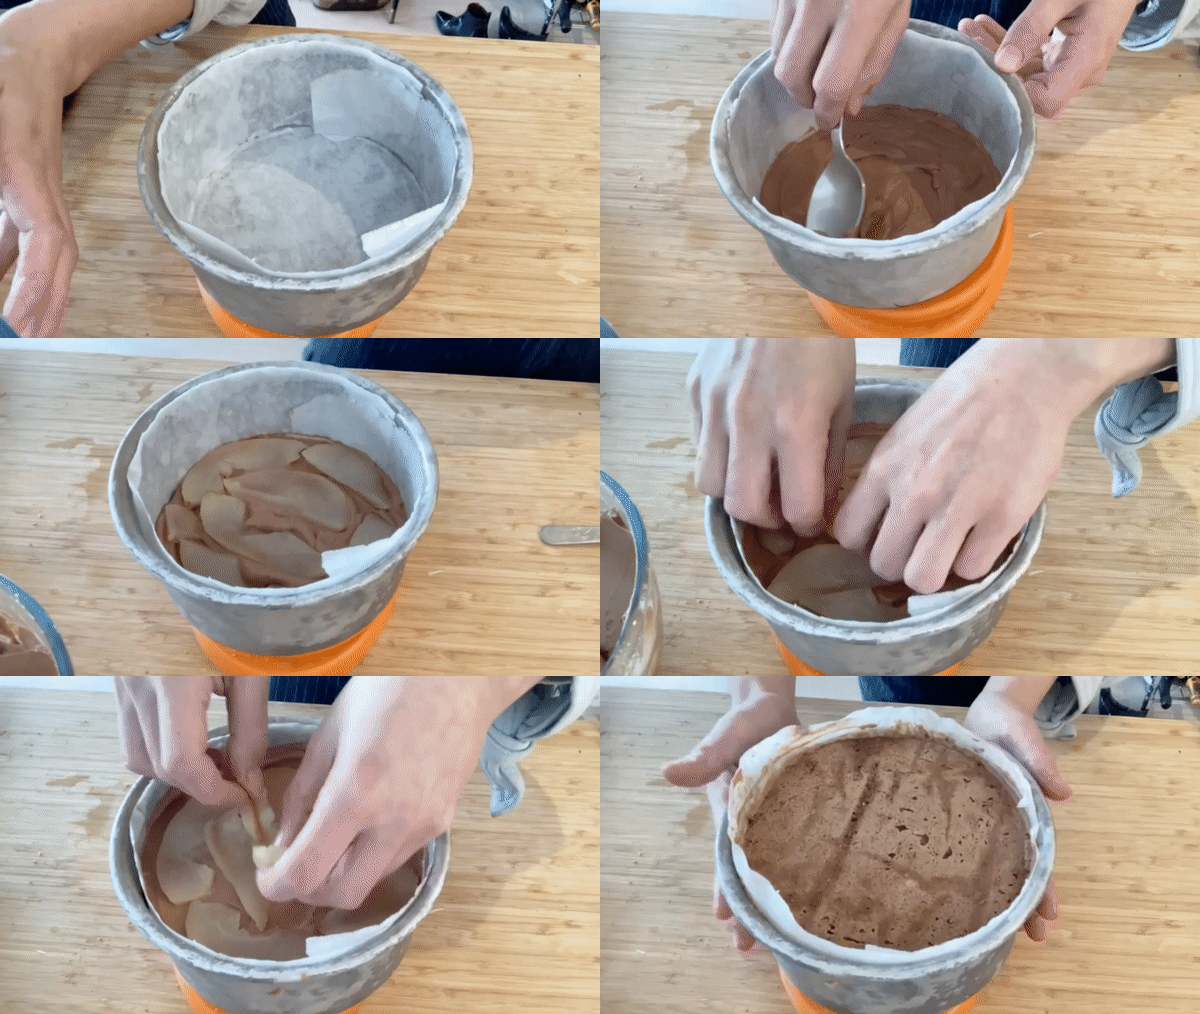
Prepare your tin - I use a deep 6inch tin - with paper. You could also use clingfilm
Dry pears slightly and remove cores then slice into 0.5cm strips. If you havent already trimmed your dacquoise, nows the time to do it:
Start with a layer of mousse, around 60g
Place a disc of dacquoise directly on top, flat side down
Now spread 75g mousse, followed by a full layer of pear slices
Continue layering up, finishing with a dacquoise disc, flat side UP - this will be your base
Chill in the fridge for at least 4 hours or overnight OR in the freezer for 2 hours
Assembly - ganache / finishing
Prepare your hazelnuts - I slice mine with a sharp knife to ‘flake’ them so you get beautiful hazelnut disc shapes
Demould your dacquoise - upturn your mould and use a blowtorch until it releases. OR dip your tin briefly in boiling water, 5 seconds at a time, until it releases onto clear paper. Pop in the freezer whilst you make your ganache
Make the ganache - heat cream until boiling then pour over chopped chocolate. Leave for 1-2 minutes and then whisk to a smooth ganache. Leave to cool slightly - around 5 minutes should be fine
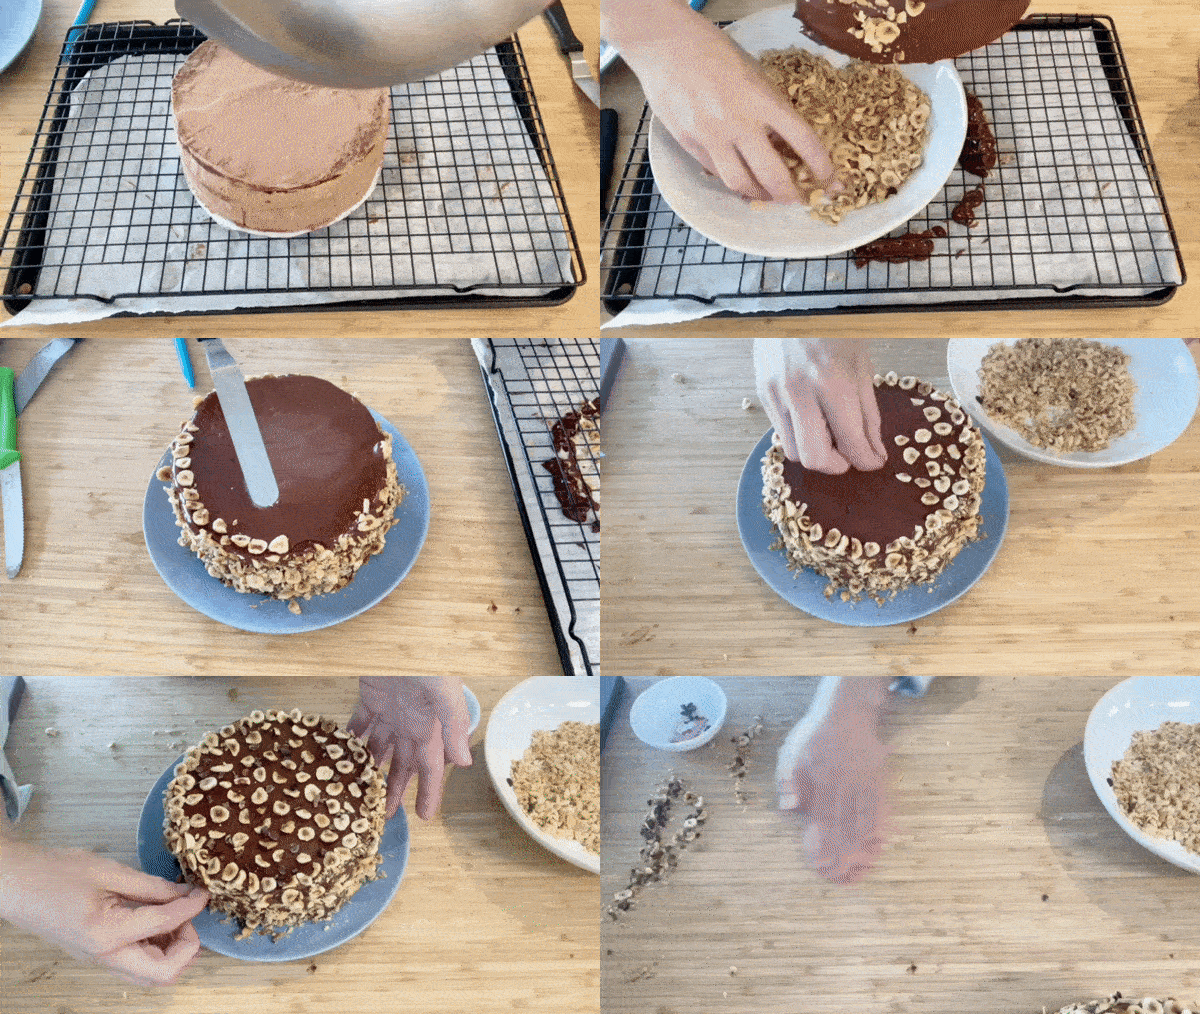
Place the dacquoise on a cooling rack over a clean tray
Pour ganache over the edges and top of the cake and use a palette knife to smooth it
Press slivered hazelnuts and cacao nibs onto the side and edge of the cake
Decorate the top of the cake with hazelnuts and cacao nibs in a slight pattern, or however you think looks nice!
Reserve in fridge until ready to serve
When ready to serve, I usually like the mousse a bit more room temp so will let it come to temperature for around 30 mins. Don’t forget, if you have used the freezer method, your cake may still be extremely cold/frozen inside! SO if you did use the freezer chilling method, I would leave the cake in the fridge to defrost for 2-3 hours and then serve after a 30 min room temp hang



ALWAYS into “retro patisserie energy”
This was great! It was terrific getting the mousse breakdown and a fun working through a classically layered patisserie. I love novelty/the new/innovation, but simultaneously, I also love these intricate and richly delicious classics.