Kitchen Project #48: Quick Kouign Amann
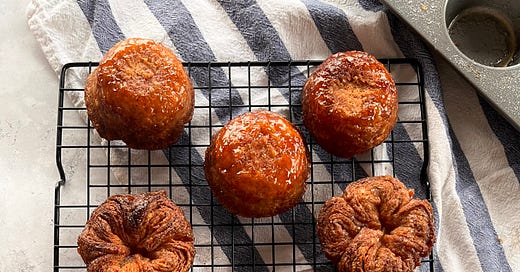
Try saying that 10 times in a row + LOW effort HIGH return magic!
Hello,
Welcome to today’s edition of Kitchen Projects. Thank you for being here!
Guys, I am PUMPED about today’s recipe: Is there anything more joyful than freshly baked viennoiserie in the morning? I’ve been trying to figure out a way to shortcut this, especially with Christmas coming up.
When it comes to any shortcut recipe, there is always a bit of a trade off situation but I think I’ve managed to walk the line today. In today’s recipe for gloriously quick Kouign Amann, we are cutting the active time to less than 20 minutes all-in!
Speaking of Christmas, over on KP+ I’m starting a weekly series in the run up to Christmas all about home made gifts. Today’s recipe is an outrageous Salted Miso Toffee Crunch aka slabs of joy aka boujie daim bars:
Subscribing to KP+ costs just £5 and you get loads of extra content + get to support the newsletter so click here to check it out:
OKAY, let’s do it.
Lots of love,
Nicola
For the love of pastries
About five years (and two months) ago, I stepped into my first bakery job. I wasn’t sure if the lifestyle would suit me and I was terrified of the night shifts. But there was something compelling me to set my alarm to wake up at 9pm every night. It wasn’t easy, but years later I’m so thankful for all those night shifts and the skills I learned.
When it comes to making pastries at home, however, viennoiserie is a bit of a heartbreaker. Notoriously hard to perfect, you can spend hours working meticulously on a dough only to be disappointed by the final results. Trust me, I’ve been there. I’ve been trying to work out the best way for us to deep dive into viennoiserie together. And even though I love a deep dive, for this I’ve decided it might be best for us to wade into the shallows to start with.
To be honest, I’m seriously suspicious about any recipe that promises a shortcut. They can often be a real let down. But then I had a thought: Over the years, I’ve tended to re-roll my croissant scraps to use for Kouign Amann, the caramelised croissant/saviour of breakfasts everywhere.
So, if I was happy with my KA made from offcuts, I figured that this means the Kouign Amann is pretty much the ultimate candidate for a ‘short cut’. I just had to figure out how.
Lets get into it.
The curious KA
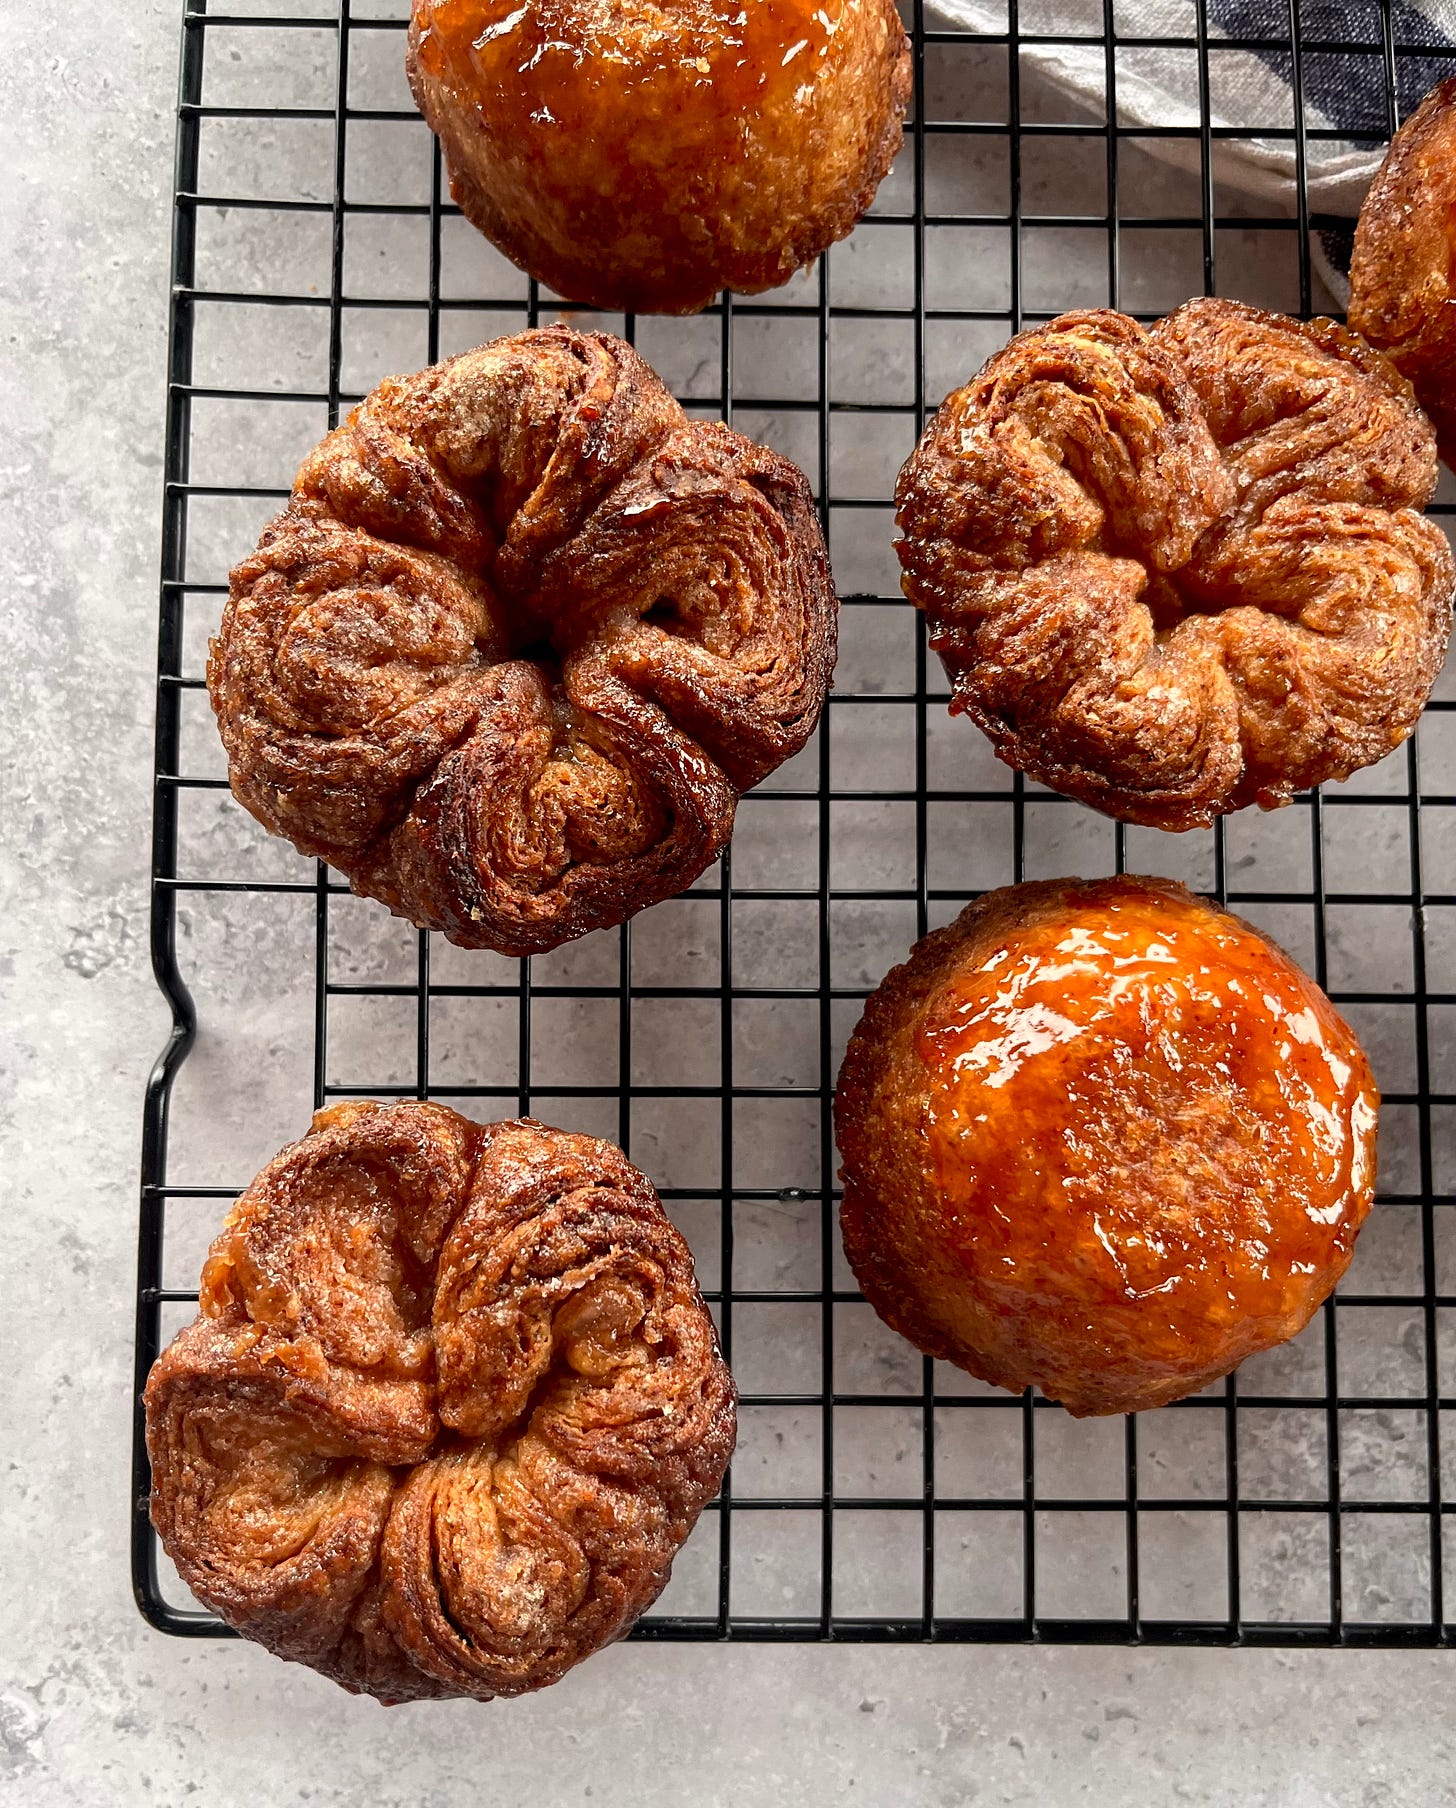
I’ve spent quite a lot of time looking at pictures of Kouign Amann, my own included, and these pastries are fluffy yet dense, intensely caramelised and seriously tender. However, the method is usually long. Most recipes have you laminate the dough in a traditional way - making a dough, resting it, beating out a butter block, folding it into the dough etc. with lots of resting periods, but there is another way! We still get gorgeous layers and a serious dose of caramelised croissant energy, but a lot less work.
Kouign Amann is a curious pastry - due to the huge quantity of sugar in the dough, which wreaks havoc with the yeasts - these pastries don’t tend to behave like other doughs. Unlike croissants, kouign amann will not rise dramatically during the proof. In fact, most recipes will either have you bake the kouign amann right away or only proof very briefly before baking, relying on the intense activity of the yeasts as they go into the oven.
KA’s are a bit challenging because, to get the absolute best taste, you need to laminate sugar into the dough. For flavour, this is great, but for stability? It’s among the worst things you can do to a dough. As you know, sugar is highly hygroscopic which means it is water loving/a total water hog. This means if you laminate sugar into your dough and let it sit for a long period of time, your dough will leak. The first time I made this dough, I laminated sugar in my folds then - as the recipe suggested - I let it rest for several hours, wrapped up in cling film. The result? LEAKY AF.
Due to its hygroscopic nature, the sugar leaches all of the moisture from your dough and it will pool in sugary puddles. Not so cute. We’ll discuss how this works for making in advance later.
About the KA + role of salt
Before we go any further, I should tell you how to pronounce this - ‘Queen Ah-man’ is the way I say it. KA come from Brittany and dates back to 1860. Brittany is famous for its salted butter, and I’m pretty sure the KA’s are laminated with it over there, so having a good balance of salt and sugar is key to creating the perfect KA.
To recreate that intense saltness/sweetness, when we perform our folds on the dough today we’ll sprinkle that ultra important combination of sugar and salt - I like to use 10% salt to sugar - to give our pastries an addictive, moreish combination of salty sweet that makes you come back for more. Please note, you may prefer a 5% salt to sugar level of saltiness. Mix it up and taste it! The salt you use will also massively impact this.
Creating layers
If you’ve made pie dough (here’s my recipe!) or my cheese scones recipe, or any kind of flaky pastry really, you’ll know it’s definitely possible to make layers without the laborious lamination process. Are they as defined as a croissant or puff pastry? No, but should that really bother us? Absolutely not.
For today’s recipe I am once again taking inspiration from my favourite recipe ever: Rough puff.
Rough puff, which we’ve covered before, is a simple combination of flour, water, salt and butter. Instead of creating distinct layers of butter and dough, chunks of butter are suspended throughout the dough. Several folds are performed and then, when baked, those little chunks of butter melt, steam evaporates and little buttery pockets are formed. You don’t get the symmetrical lift you would from standard lamination but we don’t need that for KA.
So, we’ll use all the techniques involved but change the ingredients (for tenderness) to get the absolute best of both worlds. Plus, those folds are essential for the aforementioned salt/sugar incorporation.
The complications of traditional viennoiserie (and how we solve them here!)
One of the reasons that viennoiserie is so difficult compared to making something like puff pastry (which also isn’t a walk in the park!) is the management of temperature - fermentation and butter.
Fermentation is about keeping your yeast happy but unfortunately, the temperature that keeps both your butter AND yeast happy is not the same. This is where most complications arise in lamination - the butter gets too warm and smears during the laminating process which causes issues in the final product. Getting the temperature right for proofing too can cause problems - butter starts melting at 27c. And guess what temperature yeast is happiest? Yes. 27c. How bloody annoying.
As well as this, butter is really happiest at around 12c - this is when its warm enough to be plastic (ie. can spread out easily) but cold enough not to smear or melt into the dough. Although you might be thinking too much heat is the most concerning issue, if your butter is too cold, it will splinter when you roll it, destroying all your hard work! Once you’ve performed several folds in the traditional way, the butter layer is thin enough that there isn’t much risk of it splitting, but it can be a real problem at the beginning of a croissant journey.
For this quick method, we don’t have to worry about any of that (as much!): We do need to manage the temperature with a few tactical freezer rests. Our main focus is to keep the butter cold to maintain the flakiness and since it is already split up into chunks, we don’t have to worry about it fissuring or being damaged during the folds! Hurray! And, as we are not encouraging any yeast activity until the final pre proofing push/oven spring moment, we don’t have to worry about things being too cold, either. Let’s discuss that next.
The role of yeast
One of the questions I get asked a lot is ‘can I just use puff pastry to make viennoiserie’ and the short answer is no. Puff pastry, whilst delicious, is crisp and flaky but it isn’t tender. Introducing yeast will allow us to make a fluffy, tender dough.
Due to the method of this recipe, you need to use “instant” yeast. This means it doesn’t need to be activated before using. The issue with yeast that needs to be activated is that it requires warm water. Due to the fast mixing process and the importance of not warming up the butter to promote maximum flakiness, the warm liquid + yeast combination is not going to work.
Although you guys are pretty much yeast experts by now, let me remind you: Yeast ferments the dough by eating available sugars and burping out CO2, which is trapped in a mesh of gluten, giving the effect of the dough rising. When we make recipes with yeast, the dough is risen several times but it has its most dramatic rise when it goes into the oven. This is known as oven spring. Although yeast has been multiplying, when it goes into the oven, yeast activity will go into a frenzy which is why your bread/buns will shoot up. Once the internal temperature gets to around 55c, the yeast will die.
The different yeasts on the market can cause a bit of confusion - why do some yeasts need to be proofed in warm liquids whilst others should be mixed straight into the dries? It’s all to do with size. Yeast that needs to be reactivated in warm water is larger than instant yeast, which is why it needs to be rehydrated before use, otherwise it won’t dissolve. Instant yeast granules are significantly smaller which means they are absorbed readily into the dough and can be reactivated via the moisture introduced in the mixing process.
The deal with tins + caramelisation
Much like the salt and sweetness, getting the tin right for Kouign Amann is a balancing act. Silicone moulds are great and the fear of sticking is pretty much negated, but the finish isn’t quite as good.
You see, metal conducts heat and holds it which means you get really even baking and fantastic caramelisation but there is a higher risk of sticking. But YOU ONLY LIVE ONCE!
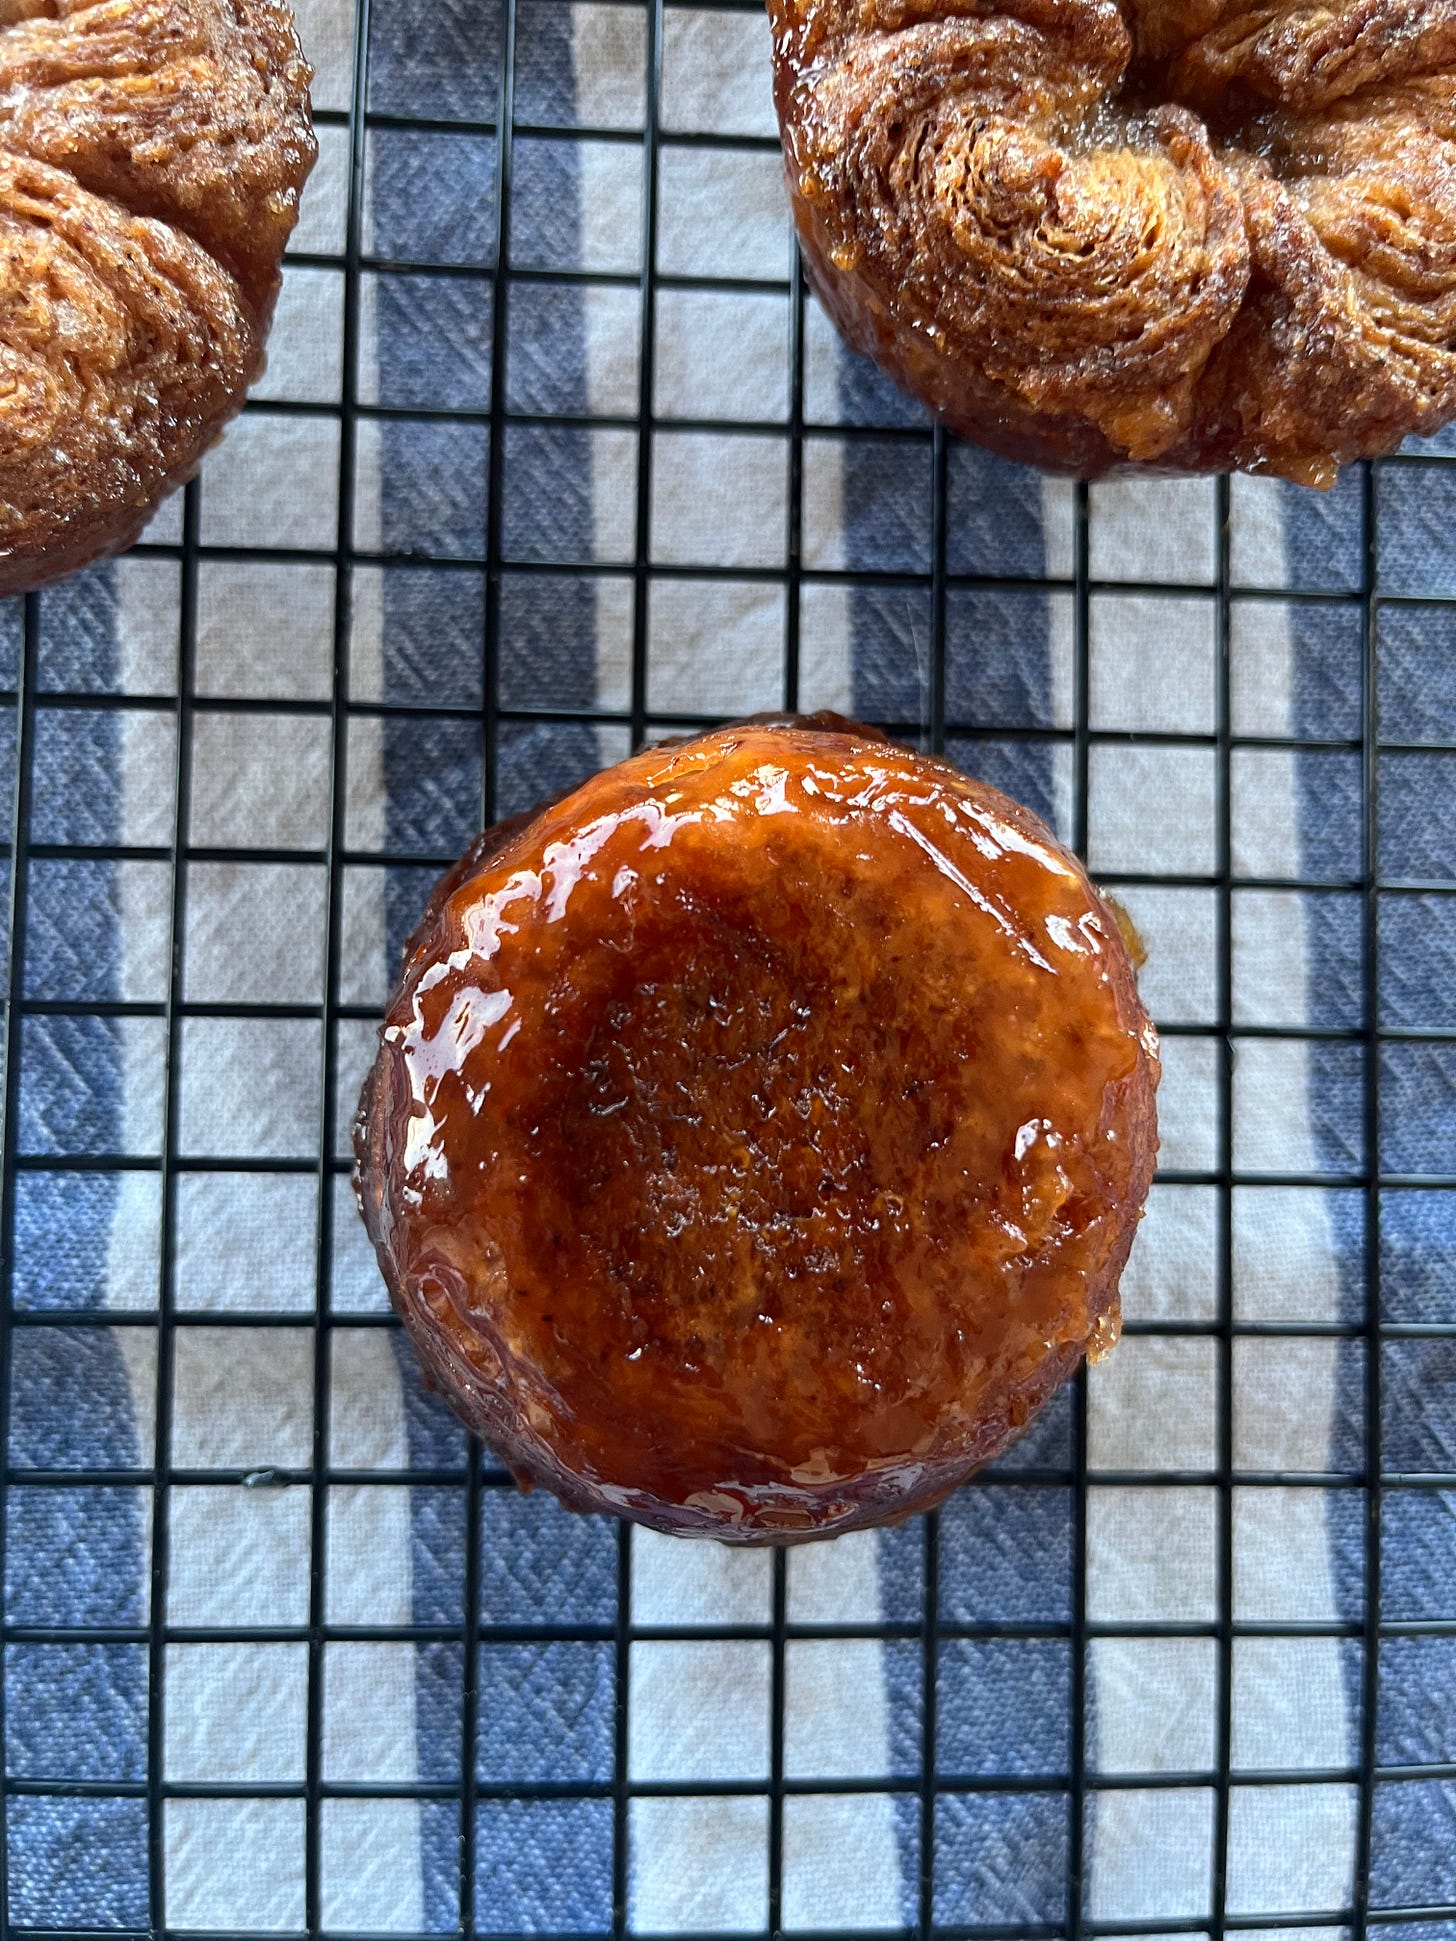
Kouign Amann are covered in sugar, and we’ll be putting more sugar in the tins. As they bake, the sugar will turn to caramel. Caramel, when hot, is a liquid and only hardens as it cools. So, by their very nature, Kouign Amann are only hard to remove from the tin once they have cooled down. This means you need to remove the Kouign Amann from the tins as soon as they come out the oven (flip the tray over or use a palette knife) if using a metal tin. If you forget to do this, you can always rewarm them for 5 minutes to melt the hardened caramel, and then remove. Problem solved
Another option for Kouign Amann is to use pastry rings on a flat tray - this is a great solution, but having a load of 3inch rings isn’t very practical. You can use whatever rings you have, but you may not get the adorably hefty buns I’ve come to love.
Leaving KA overnight
I really want this recipe to be something you can prep in advance then bake fresh for your loved ones (you count as one of your loved ones, btw) so you’ll be happy to know that you can make and shape this recipe and leave it overnight in the fridge. I tested this out and they bake up well, though admittedly they take a bit longer (about 5 mins-8mins)
The only difference is they are less caramelised looking on top - this is because the sugar will have drawn liquid out from the dough and then reabsorbed some of it, meaning some of the sugar has been absorbed.
So, if you are making these for resting overnight, I recommend shaping them in the tins for overnight storage and finishing by sprinkling some fresh sugar into the bottom of the tins and more on top of the KA just before baking. Best of both worlds.
Ok, let’s make it.
Quick Kouign Amann
The recipe
200g strong bread flour
100g water
4g salt
25g sugar
10g instant yeast (this means yeast you don’t need to proof in liquid before using)
140g butter, cold and cubed
---
200g caster sugar
20g salt (please note I used fine sea salt. Once you’ve mixed your sugar and salt together, give it a taste! If it’s too salt for your taste; add more sugar! I would go for minimum 5% salt to sugar but it’s really up to you!)
50g butter, melted
Method
Scale flour, salt, sugar, instant yeast into a bowl and combine with the paddle attachment
Add the cold cubed butter and process for 10-20 seconds - the butter should be squished and coated in flour but still in very large pieces
With the mixer running, slowly drizzle in the water to hydrate. Paddle for about 15-20 seconds until a dough forms
You can also complete this process by hand following the instructions for the pie dough
Wrap dough in clingfilm/put into a reusable plastic bag and seal well. Put into the freezer for 10 minutes to firm everything up
Meanwhile mix the sugar and salt together and set aside
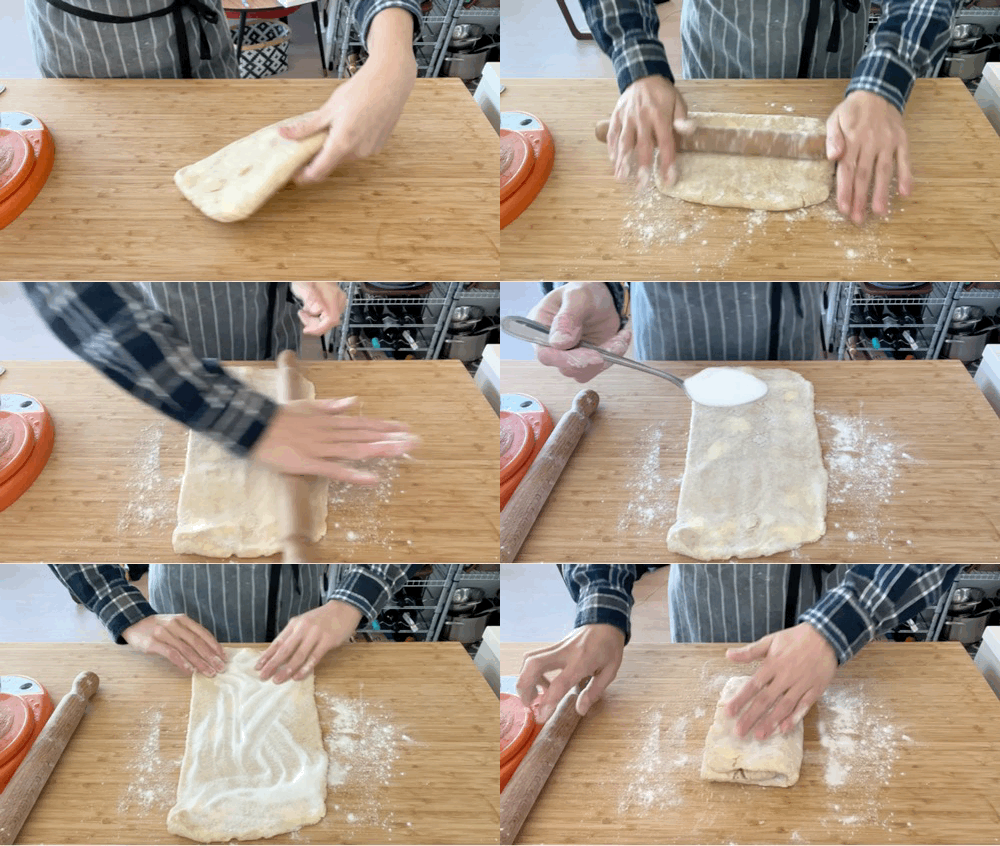
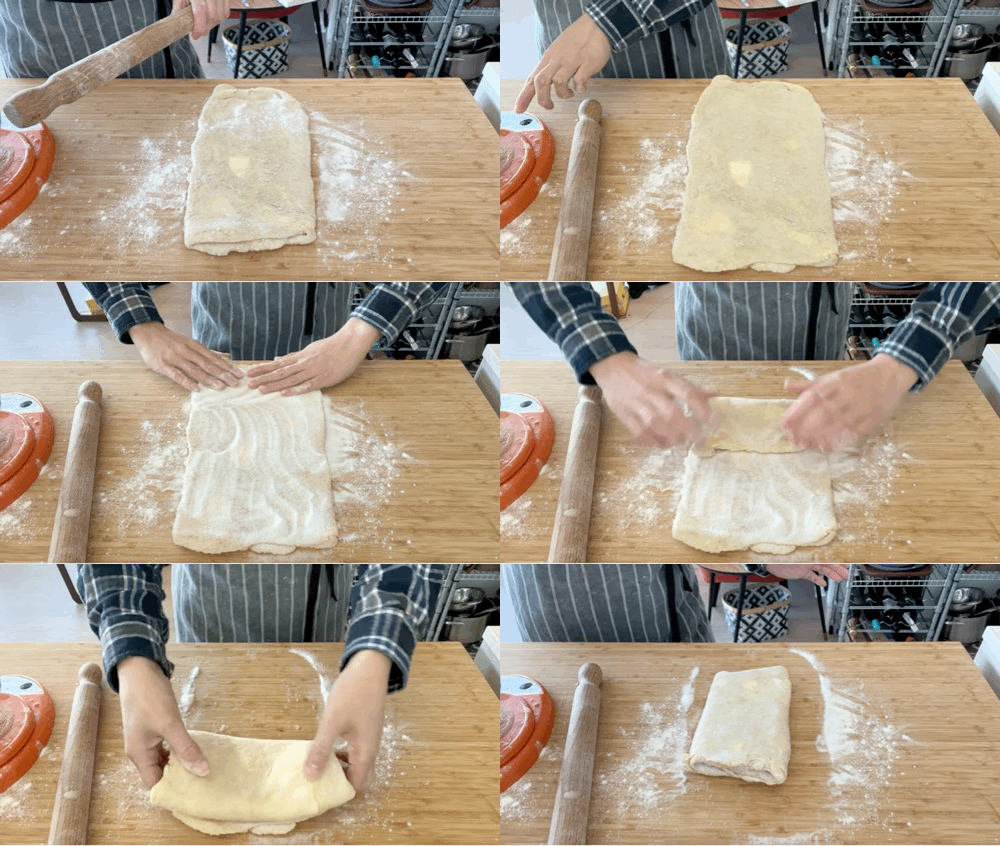
Time to “laminate’ y’all. Take your chilled pastry and flour both sides. Roll out to 0.5cm thick, approx 30cm x 20cm. Sprinkle with 1-2 tablespoons of your salt/sugar mix. Fold into thirds, like a letter. Sprinkle with more sugar/salt and turn 90 degrees
Repeat this, twice! Add flour if you need or, if you’re feeling spicy, use the salt/sugar mix to prevent sticking
Before the final roll out, re-wrap your pastry and put into the freezer for 5-10 minutes
Whilst its chilling, melt the butter and leave to cool slightly
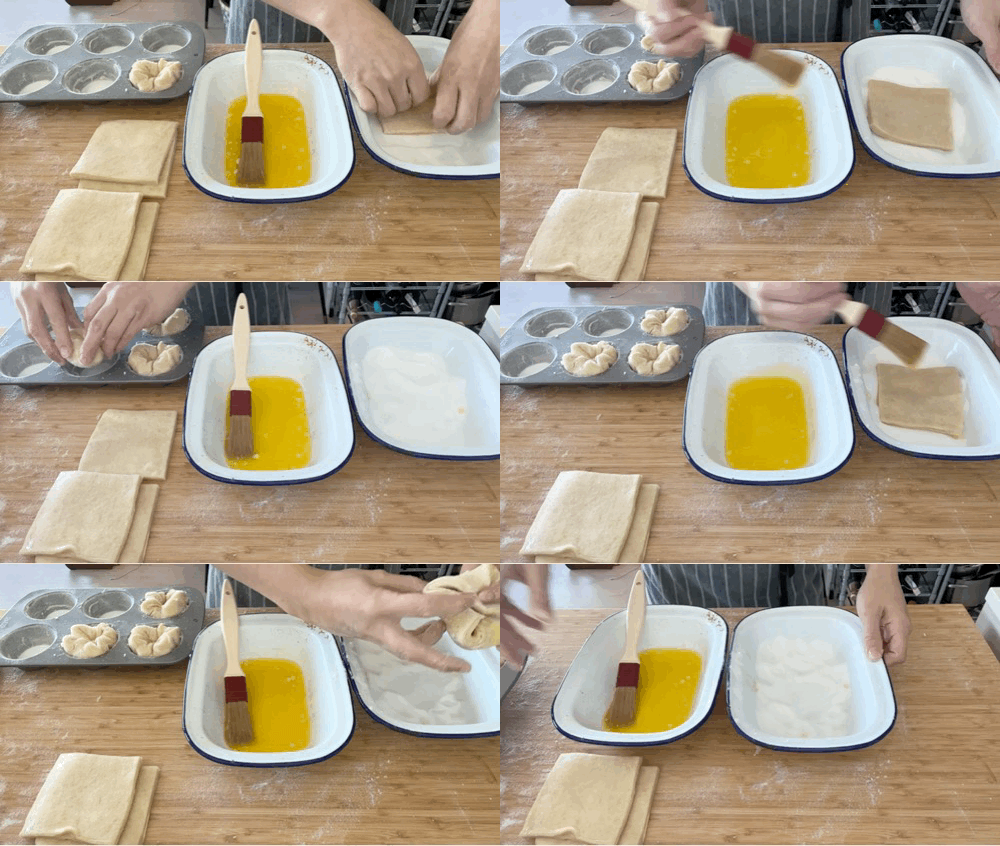
Prepare your tins - Add a teaspoon of sugar to the bottom of each tin - this will make the super caramelised base
For the final roll out, sprinkle your table with salt/sugar and roll out your dough for the last time to a rectangle approx 32cm x 22cm
Trim the edges cut into 6 x 10cm squares. You should be able to see all the lamination!
Ensure your sugar is in an appropriate vessel - something low and wide is good
Brush one side of your pastry square with a very thin layer melted butter and place butter side down into the sugar/salt mixture. Brush the other side then flip the pastry over so it gets well coated.
To shape the kouign amann, bring the edges of the square into the centre and press together then squish into the baking tin
Repeat!
Place tin onto a tray and cover loosely with clingfilm and proof somewhere warm for 1 hour. They won’t look very puffy - don’t worry!
You can also leave these in the fridge overnight at this stage but please read the section ‘Leaving KA overnight’ on info on how to prep the traysPre-heat oven to 180c fan
Bake KA for 30 minutes, turning after 15 mins. They should be golden, bubbling and gorgeous. If they don’t look caramelised enough, bake for a further 5 minutes
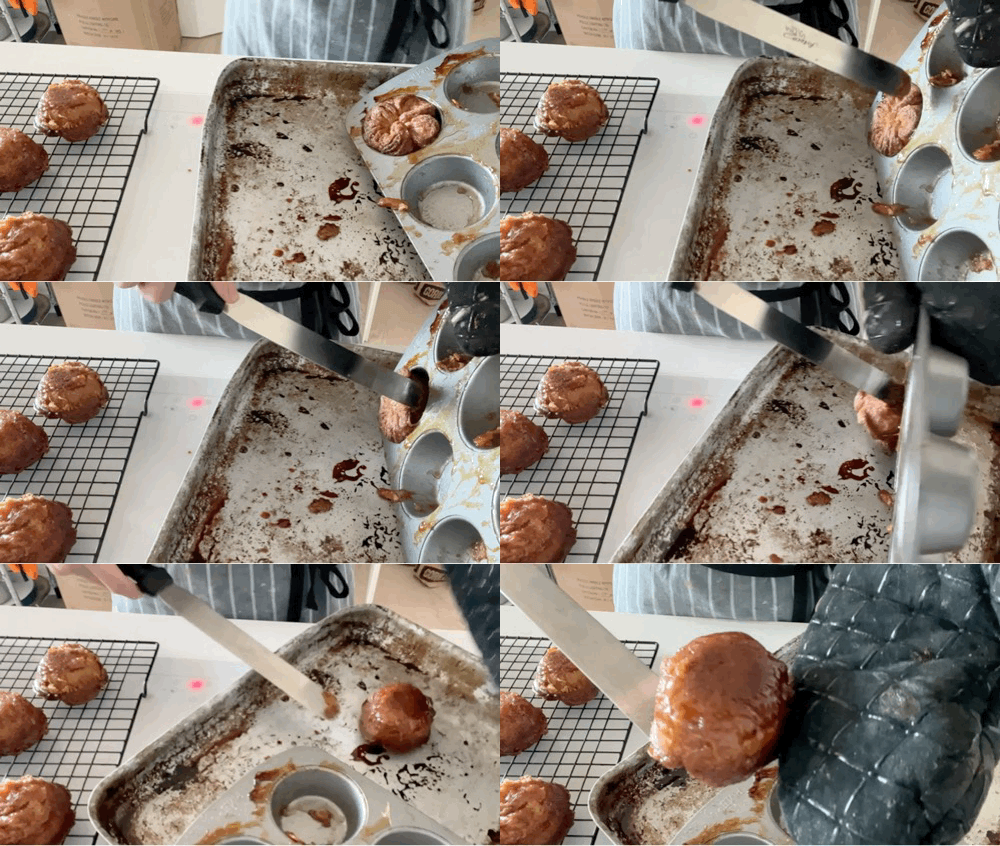
Whilst they are still warm, remove pastries from the tin, otherwise the caramel will harden. Either flip the whole thing upside down as soon as they come out the oven OR use the palette knife if they are being annoying (like mine were). If you forget to do this, put the pastries back in the oven for 5 minutes to melt the caramel.
Cool upside down on a cooling rack
Enjoy! These will last for 3 days in a sealed container but really are their best on the first day. Rewarm slightly before eating if they aren’t freshies








Having a bit of an issue with these when baking them and not too sure why..
So the bottoms are starting to burn even before the dough is baked all the way through. Not sure if it's the oven temp (pretty sure 180 fan is 350f) or an issue with the type of tin I'm using?
I did put a baking sheet underneath to help, but unfortunately it didn't.
I'm glad Chloe asked about the salt, because mine were pretty salty as well.
I guess Canadian salt just hits different? Haha.
Hi Nicola!
Thanks for the recipe, we just tried these and they turned out really well, except that they were a bit too salty, which led me to wonder: what type of salt do you use?
Thanks a lot!
C