Kitchen Project #40: Caramel pear pie
Plus interview with pie genius Nicole Rucker + deep dive into pie crust tests!
Hello,
Welcome to today’s edition of Kitchen Projects. I am SO happy to have you here.
Today I am excited to share a mega edition of the newsletter, all about pie. We begin with an interview with my pie hero & legit pie champion Nicole Rucker, followed by a huge pie crust test off (yes I made 14 different doughs and yes it was worth it!) and finally we’ll finish with a little love letter to pears and the recipe for the caramel pear pie from my lark! pop-up last week. PHEW, it’s a big’un.
Over on KP+ (the subscriber version of this newsletter that is full of fun extra recipes and content, and yes you can access all the past editions!) I’m sharing the recipe for my double apple turnovers, which are basically a hug in pastry form! For those dreamy treats, we’ll use two different method to cook this seasons apples. Subscribing is easy and costs just £5 a month and that helps support the writing and research that goes into the newsletter:
OKAY, let’s do this.
Love
Nicola
Reach for the pie
Perhaps this is a weird way to begin this newsletter but I’ve got to put my hands up and tell you I am NOT an *expert* in pie. I mean, I’m pie proficient and can make a gorgeous pie and I’m a huge pie fan, cheering from the sidelines, I’m stan, I’m here for all conversations, but I am definitely not a professional pie maker per se.
Although I can make a good pie and can sling slices with all the enthusiasm in the world, it definitely pushes me out of my comfort zone. Pastry skills are earnt through repetition, dedication and years of focus, study and perfecting; Pie making is an art.
So, this KP is not going to be ‘everything you need to know about pie’ simply because I don’t know everything you need to know about pie, and I probably never will. Which is why I am thrilled to start off this newsletter by interviewing someone who truly does know all there is to know about pies: Nicole Rucker.
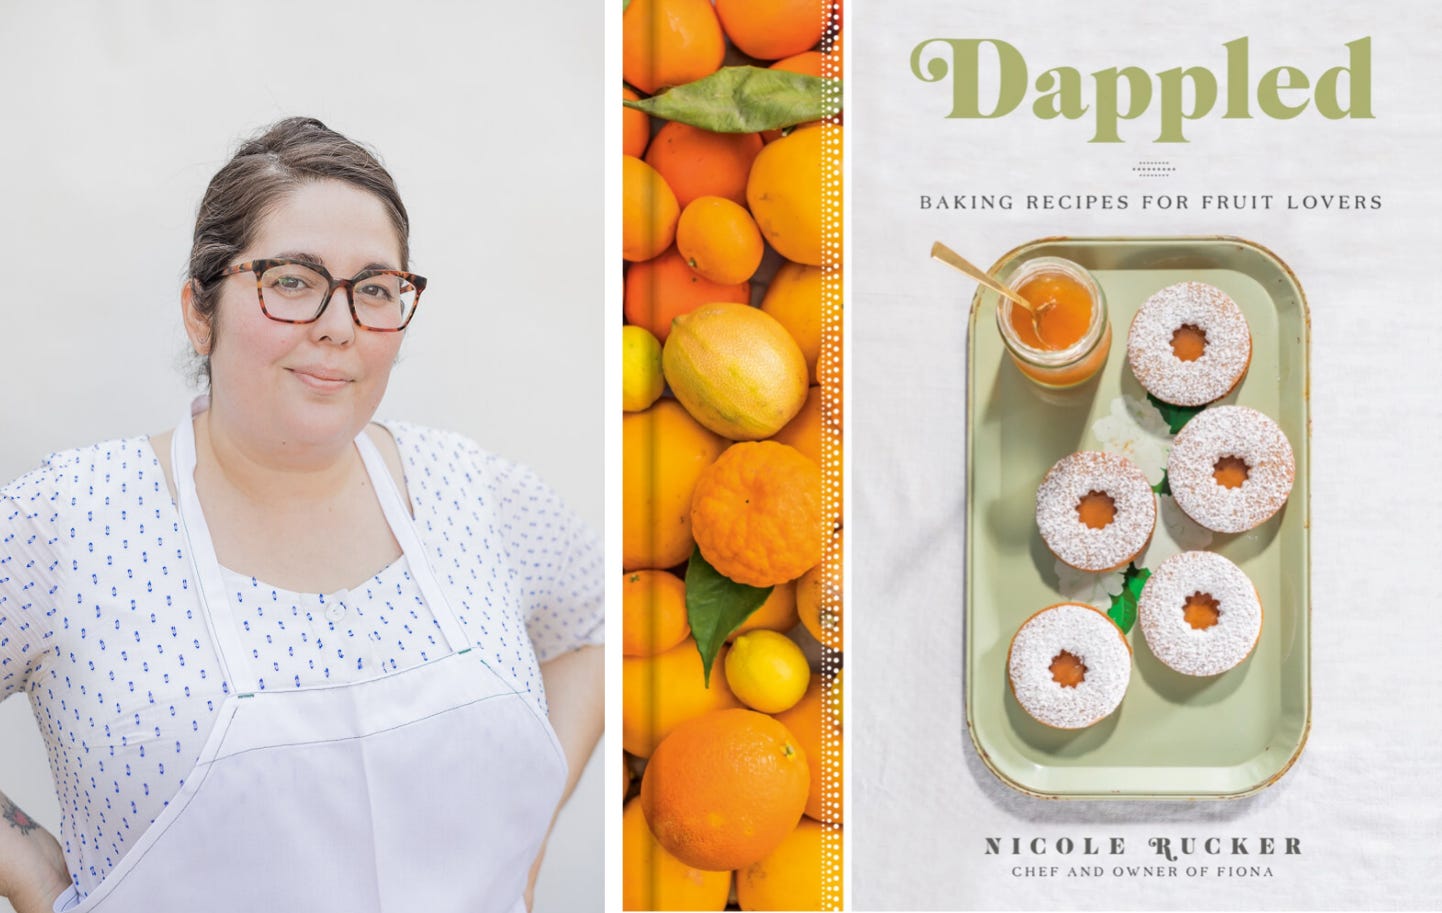
Nicole Rucker is definitely a baking hero of mine. Her debut cookbook ‘Dappled’ is a love letter to fruit and every recipe in it (all fruit-forward) is a 10/10 and includes a generous section on pies. Day to day, Nicole runs her pie shop ‘Fat and Flour’ in Downtown LA:
Her effortless layering of flavours and masterful handling of literally-every-fruit-there-ever-was combined with her expert technique & technical knowledge really does earn her the pie queen title she is so often given. So, enough of that intro and let’s go straight into the chat:
When did you first get the pie bug? Do you remember the one that made you go 'okay, this is my thing. I can do this for a lifetime'?
I won the 2012 KCRW Good food pie contest, four out of 7 awards, best in show. I took it as a sign that I had figured something out.
How would you define a pie? Are there any rules? In your opinion, what makes a great pie?
A pie is a filling encased in dough, usually in a vessel with angled sides, the dough is made combining fat, flour, and liquid until gluten has formed. Pie has many forms, and has many sisters - galettes, hand pies, pot pies. But structurally to be a pie I hold fast to the rule that there must be a BOTTOM CRUST of some sort. otherwise it is a casserole / crumble / cobbler.
What do you think people get THE MOST WRONG about pies? Is there such a thing as a pie crime?
They refuse to bake them long enough, they avoid following a ratio or recipe for filling, and they overcomplicate the process on the first go which leads to failure inevitably.
Is there a pie unicorn in your life? Like, is there one pie that you've dreamed about but haven't quite managed to nail down?
Hmm not that I can think of but I also have a very boring simple taste. It’s most likely a rare fruit I can’t get my hands on and want to work with - a rare apple variety, a bulk amount of a precious berry.
In the UK, fruit pies are not really a thing. In fact, they are rarely seen besides in the freezer aisle. What is the one pie you think would change a pie skeptic into a pie obsessive?
Having a good one - it truly seems odd that y’all don’t have fruit pie culture since you both have good fruit and pie culture origins. I would say it could be that over that way the wrong dough is used 99% of the time - your shortcrust pastry is not the same as our pie dough. Most crusts I have seen abroad are pate sucree or hot water pastry or puff pastry and pie dough is none of those things. Australia seems to get it though, they have great pie dough but they also are not into fruit pies as much as they should be!
You are based in LA aka the land of perma-seasonal abundance. I'm very jealous. Are there any favourite European fruits / specific seasonal things that you wish you could get in LA?
Well we might be burning out way out of that era, we have no water to support our farmers growing precious fruit. I want better apples, and more varieties of bramble berries. We seem to have citrus on lock, and stone fruit. Even the east coast has more varieties of apples and pears than us and I am jealous.
Where do you stand on frozen fruit? How should we deal with it?
I love frozen fruit. Why are ppl such haters. It’s useful and affordable. thaw and drain leaky water first, or cook with sugar and thickener before baking. I like to cook half the frozen fruit with thickener and seasoning and then cool it with 50% frozen fruit before baking - then you have some intact juicy fruit and it’s not all one brick of thick starchy jam. I would never touch a frozen strawberry though. ew.
It’s currently apple season in the UK. What is your favourite apple to bake with? Do you have Bramley/cooking apples in LA?
We get a few fun apples, but not as many as I'd like. I stick to green varieties like mutsu and granny, and add pink lady, gravenstein, anything fun I can get my hands on. I dont believe in sticking to only those apples that are for cooking, rather I create a blend with texture and flavor.
Alright, let’s talk about pie crusts. What flour do you use for your pie crusts? Do you use local grains?
We use King Arthur AP flour. reliable, affordable. Sometimes I like to get into other grains but I run a pie shop and it’s honestly just not the demographic I serve. Maybe some day!
What do you think about strong flour vs. all purpose flour in pie dough?
Strong flour is not necessary in my opinion
Alright, let’s discuss thickeners. In your book, Dappled, you favour flour over cornflour/tapioca starch as a thickening agent. What makes you use flour above those other 'popular' thickeners?
I use both actually, and it depends on the fruit. for berries and red fruits I prefer cornstarch for clarity and strength. for apples and such flour is fine. its just preference and availability.
Is there a magic ratio of thickener / fruit?
Always, but it’s not one size fits all ratio. There is always a starting point.
How do you make such juicy pies without getting the dreaded soggy base? Do you bake on a pre-heated stone or anything like that?
I have yet to have a soggy pie, and the fascination with this troubles me. First of all, if you have a wet filling (literally all fillings have moisture or else what the fuck are we eating) then you need to be mindful of the fact that the area where the filling meets the dough will be cooked with steam and moisture - it will never be crispy. It will cook sort of like how a dumpling cooks. This is good. This is delicious. The bottom of the pie crust needs to be baked fully - the part that meets the pan will be baked and browned and yes, I suppose crisp on that side.
I do not bake on a stone, we bake on sheet trays and we use metal pie plates. If you don’t bake a pie long enough, the bottom will not be baked through, and yes it will be raw. If you don’t bake a pie long enough, the moisture from the filling will not come to a boil and do two things: evaporate, activate with the thickener.Some ppl like to line a fruit pie with a barrier, we have done this mainly for flavour - cream cheese, almond cream, a layer of chocolate. In my opinion none of it is necessary but it is delicious.
What do you think of pie gaps? Like, when the crust doesn't touch the fruit?
It’s inevitable if you have steam escaping. You can minimise it with vents, crumble tops and cooking fruit beforehand.
Do you bake your pies fresh every morning or is there a benefit to baking before and refreshing for eating?
No, most stuff gets baked the day before. No refreshing is necessary but it doesn’t hurt.
Okay and finally, how the heck do you get the first slice out the pie?!
It’s always the hardest but making sure you have cut it all the way is key, also resting the pie helps with that a lot which is why we bake it the day before.
Thank you so much to Nicole for answering my pie questions. I can highly recommend Nicole’s book ‘Dappled’ as a resource on pie recipes as well as inspiration for baking with fruit - her book has been on my shelf for the last year and I thumb through it a lot. You can purchase her book on Amazon / Blackwells etc. or from good booksellers (not sure how easy in the UK, but def in the U.S) and its a total must have for your shelf!
Alright, get into it.
Let’s talk pie (crust)
The reason to love fruit pies is because they are (or should be) a perfect expression of the fruit held within. This does mean, however, there isn’t an exact formula for each one.
Actually, when you think about all the things you can do to a pie filling, it can be a bit overwhelming. From pre-cooking the fruit, to different thickeners, to using frozen, you do have a bit of a blank canvas. This in all honesty is kind of a nightmare for me - I LIKE formulas, I LIKE a spreadsheet telling me exactly how much of this and how much of that should go in - with pies, it’s going to change from fruit to fruit, variety to variety, season to season.
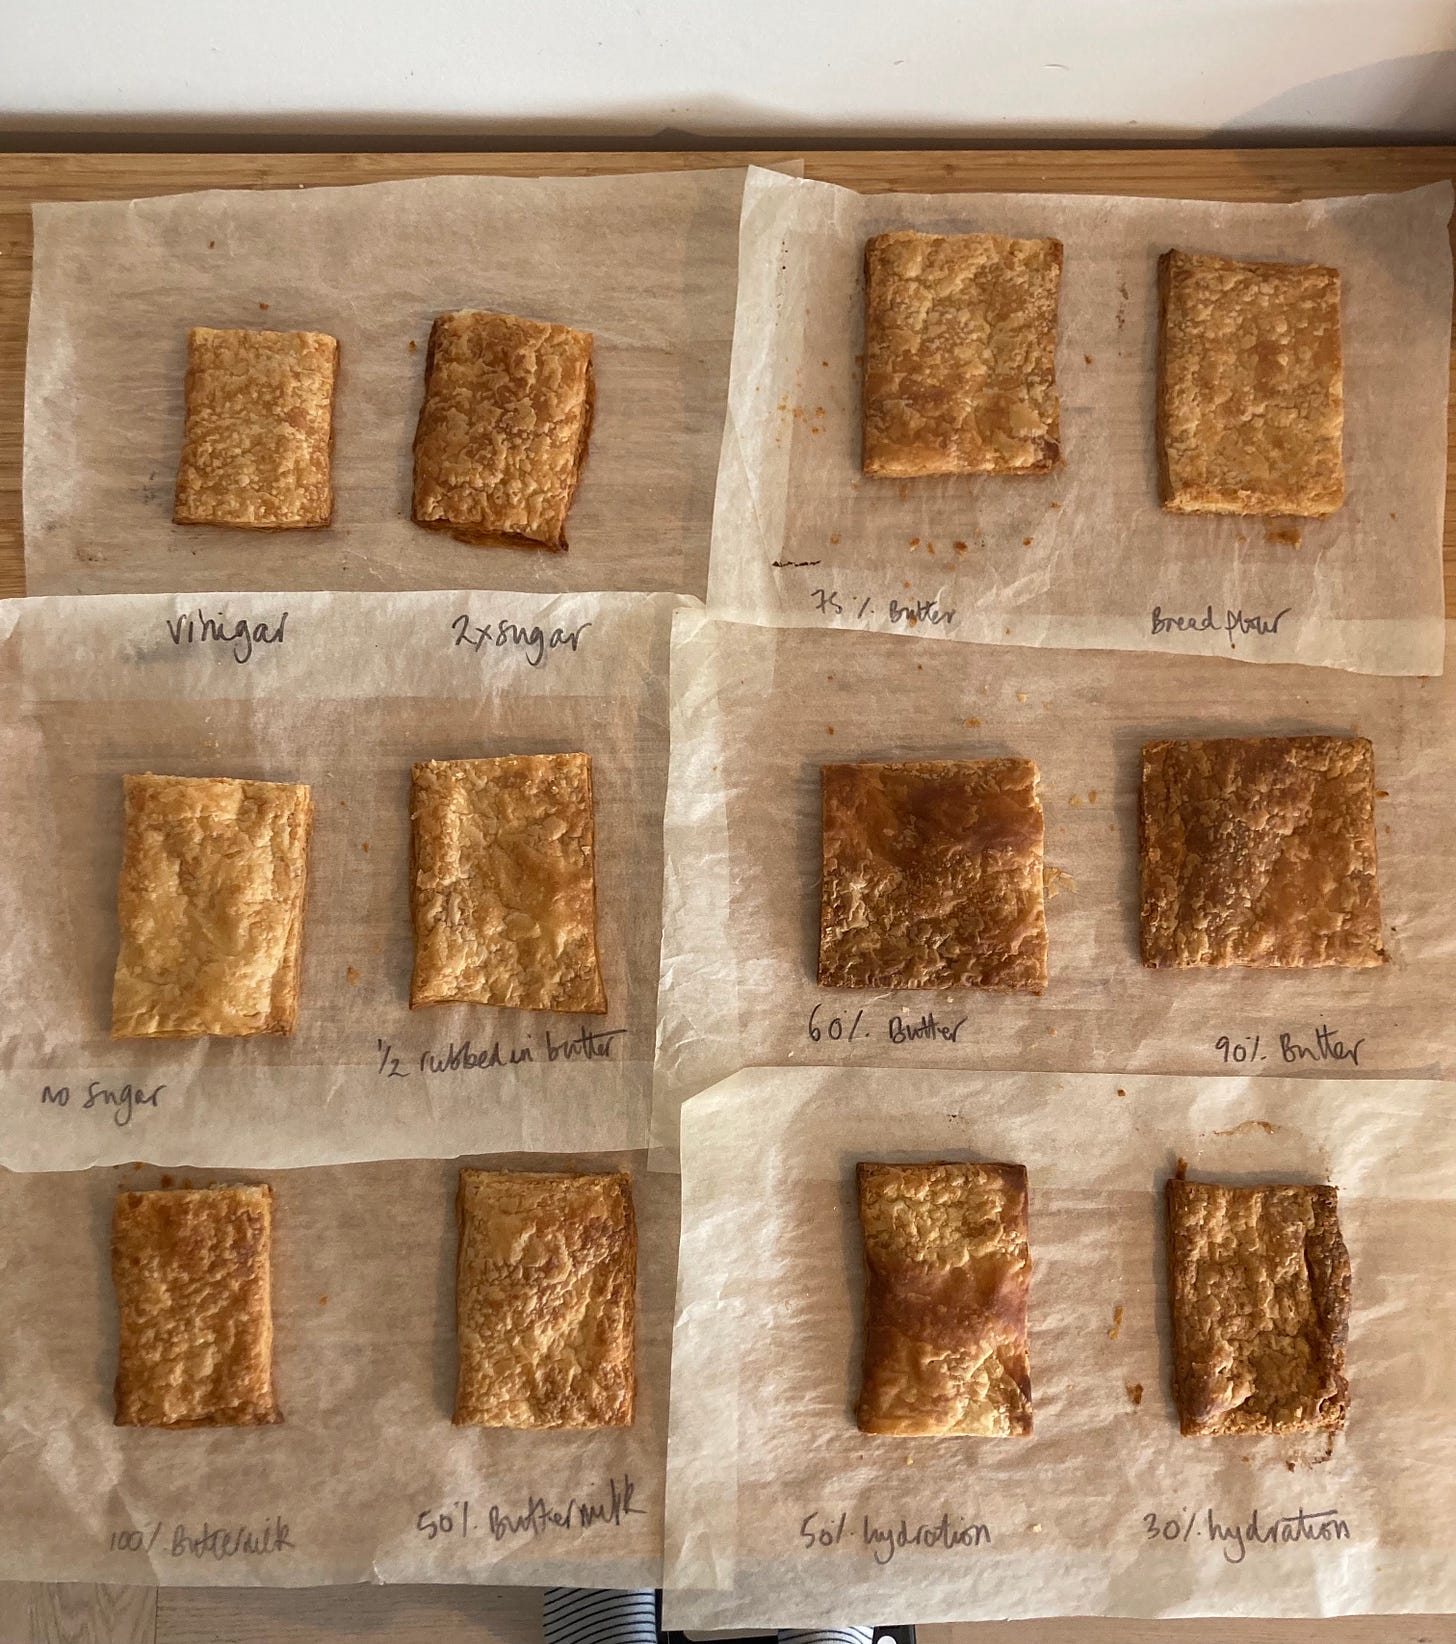
So, for today’s KP I’ll be covering an area that can be quantified - the pie dough itself. There are a lot of brilliant resources on pie dough but the more resources there are, the more of a minefield it can become. To try and get to the bottom of the issue, I made 14 tests (12 of them pictured below) so you can see the impacts for yourself:
We’ll be covering:
Mixing method
Butter %
Type of flour
Hydration %
Hydrating agents
Role of sugar
Acidity
The deal with oxidation
The deal with re-rolling
For these tests, my base dough was formulated to have 75% butter, 40% liquid, 2% salt and 8% sugar. This recipe is a mixture between the pate brisee recipe from my French Culinary Institute cookbook and the Nicole’s pie dough recipe in Dappled.
I can also highly recommend The Book On Pie by Erin McDowell - it’s a really well put together book which will answer pretty much every question you’ve got about how to fill, design and decorate your pies.
Mixing method
To get started, all of my pie doughs were mixed by hand. My favourite technique goes like this: Weigh dries into a bowl, add 1 inch pieces of butter, squish into flat blobs, add liquid, scrunch together and then put a few simple folds into it until it comes together. Now, you don’t have to mix the dough by hand but it really is a great way to get in tune with your dough. It gives you overall more control which is good if you are still dialling in your pastry making skills.
The mixing method is extremely important as it will ascertain how much hydration is required. Basically, the more you rub in the butter, the less liquid you’ll need to bring it together as a dough because the butter itself is hydrating the flour. This is why shortcrust pastry doughs seem to have relatively low hydration (this recipe for shortcrust on the Great British Chefs website has just 15ml water to 250g flour, but all the butter is rubbed in) compared to today’s pie dough.
Depending on what recipe you are following, you will be instructed to rub the butter into the flour to varying degrees. We’ve discussed this before in the XXL Cheese scones and quiche recipe, but when it comes to flaky doughs, (butter) size matters. A lot.
For a flaky pie dough, chunks of butter are suspended throughout which, when baked, turn to steam and leave little buttery pockets behind in the baked pastry which easily flake apart and have an amazing flavour and texture. Depending on the recipe and technique, you’ll be asked to take the butter to various sizes which will ascertain the size of the butter holes ie. flakes later on.
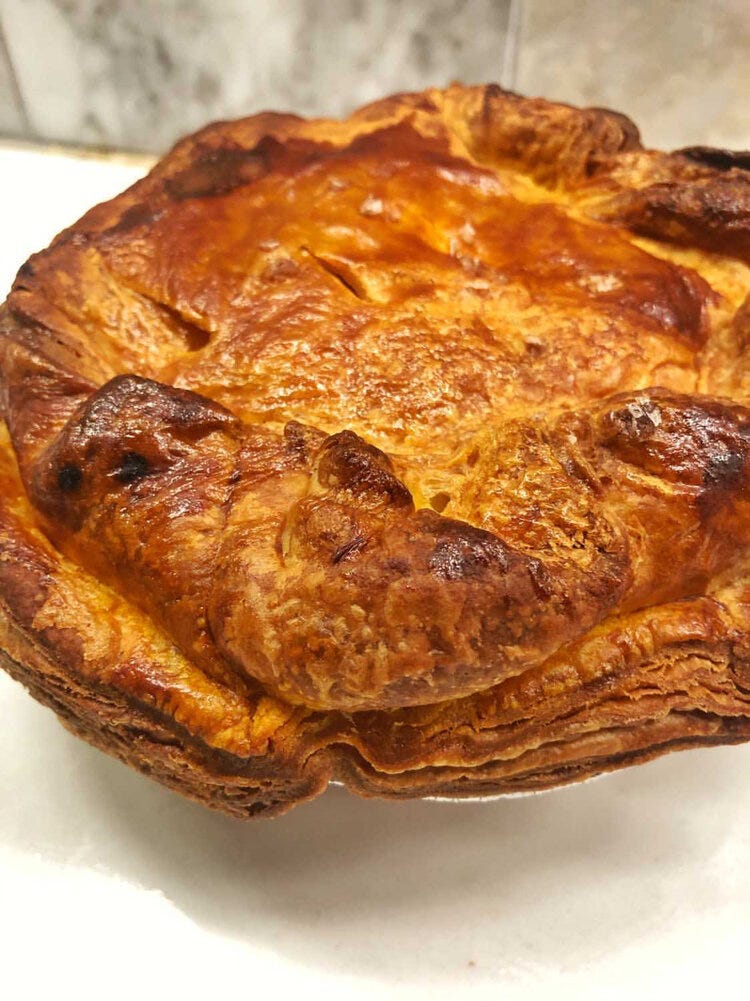
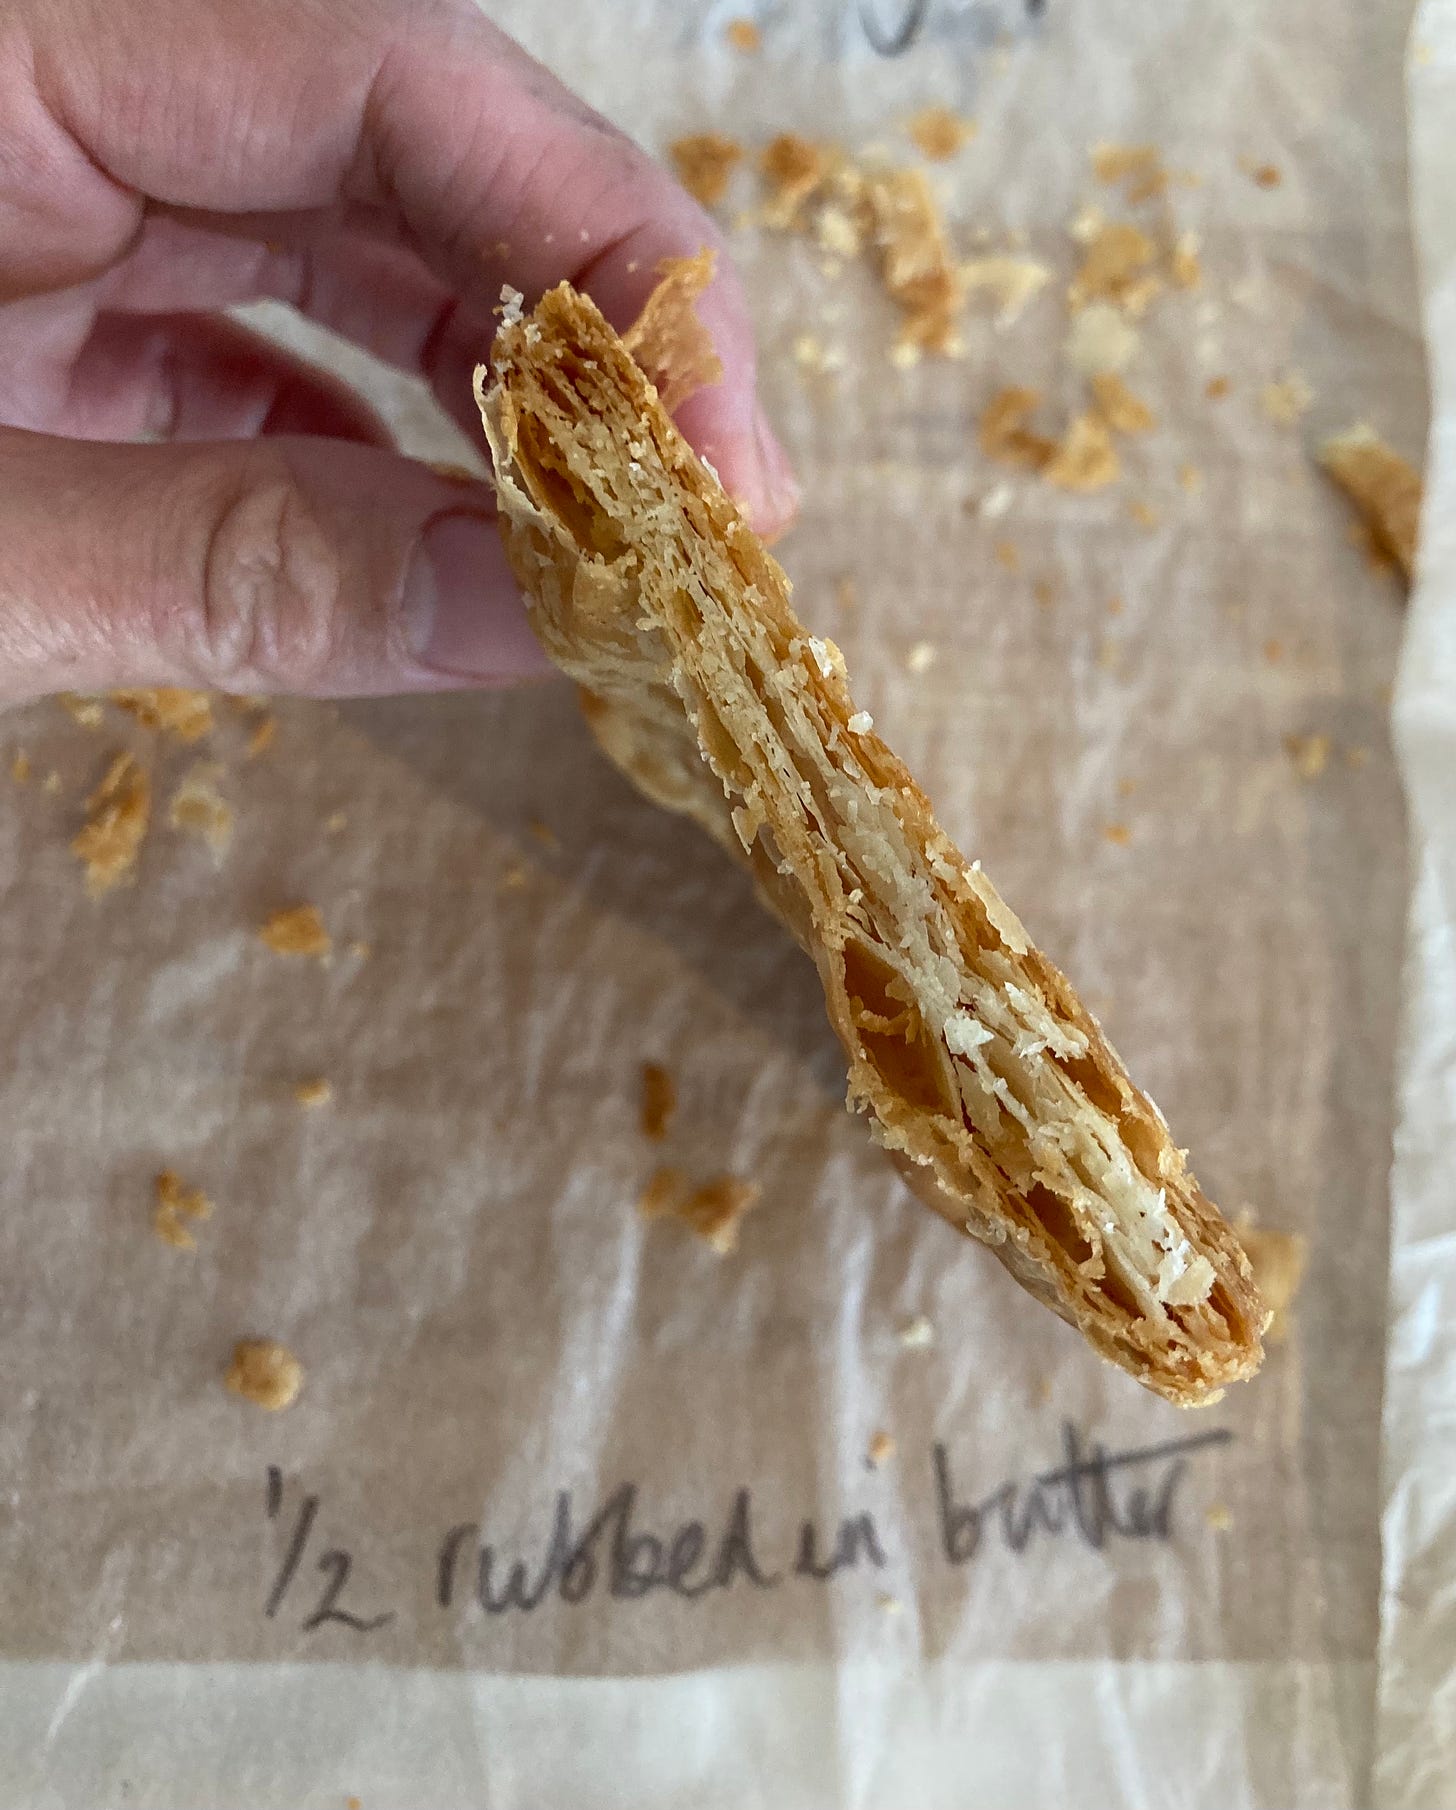
There are also hybrid doughs - Nicole Rucker’s technique is to rub half the butter into the flour for a sandy texture and before introducing the other half in large pieces. This results in an extremely rich and buttery dough that has less extreme butter marbling but still is wonderfully layered. It has an absolutely amazing mouthfeel, actually, since the whole thing is enriched with butter, rather than having more dramatic dough / butter sections:
We will mimic this by adding several folds into the dough, distributing the butter more evenly throughout in a marbled effect, rather than doing half rub-in, half big chunks. So, to sum it up: The more you rub in the butter, the less liquid you need and therefore the less water that comes in contact with the flour resulting in gluten (potential for toughness). You can turn any pastry recipe from shortcrust style into a flaky dough style by changing up the butter size and liquid proportionally.
If you aren’t confident about pie dough then I GET IT - I’ve been there. And the only way to move
Butter %
Butter plays major roles in pie crust, like creating flaky layers and providing flavour. But it is also majorly responsible for browning. Remember we talked about the Maillard reaction? Well, at high temperatures and during baking, the butter will brown and which gives the pie it’s beautiful colour AND a more complex flavour. (Of course, the proteins in the egg wash also aid with their own Maillard reactions)
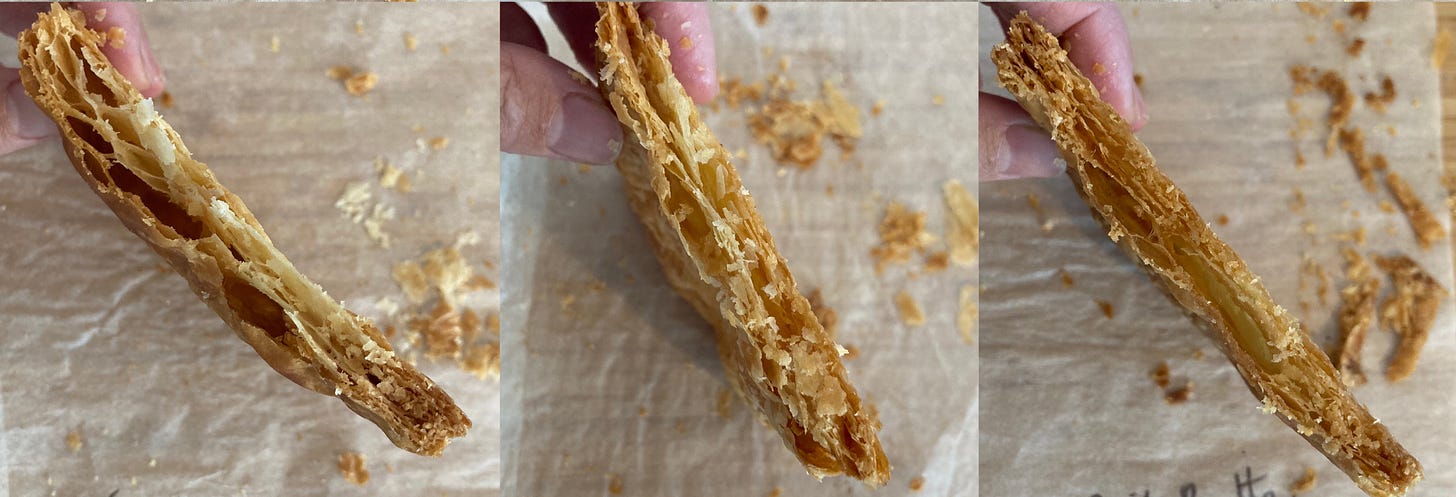
For the tests, I compared butter %s in a standard dough recipe, ranging from 60% on the lower end to 90% on the higher end:
It always surprises me that less butter can actually result in a more dramatic looking rise. This is because the large pieces of butter are distributed more randomly throughout the dough meaning the visual comparison of a butter less area vs. a random butter pocket looks more extreme. On eating, the dough shatters dramatically but has long shards of crispy pastry.
On the high butter % end, the pie dough is richer and denser. There is overall more butter meaning there is a more intricate dough structure and when you eat it, it shatters really dramatically in your mouth. Unsurprisingly, the 75% is somewhere in the middle - you get the richness and intricate structure from the additional butter but has a slightly more erratic structure.
For flavour, I’m going to put my ‘ideal’ pie dough on the higher side coming in at 80%. If you are looking at that and think OH MY GOD, that’s too much butter - just re-read this section and know you can reduce it down without any ill-flake-effects.
Type of flour
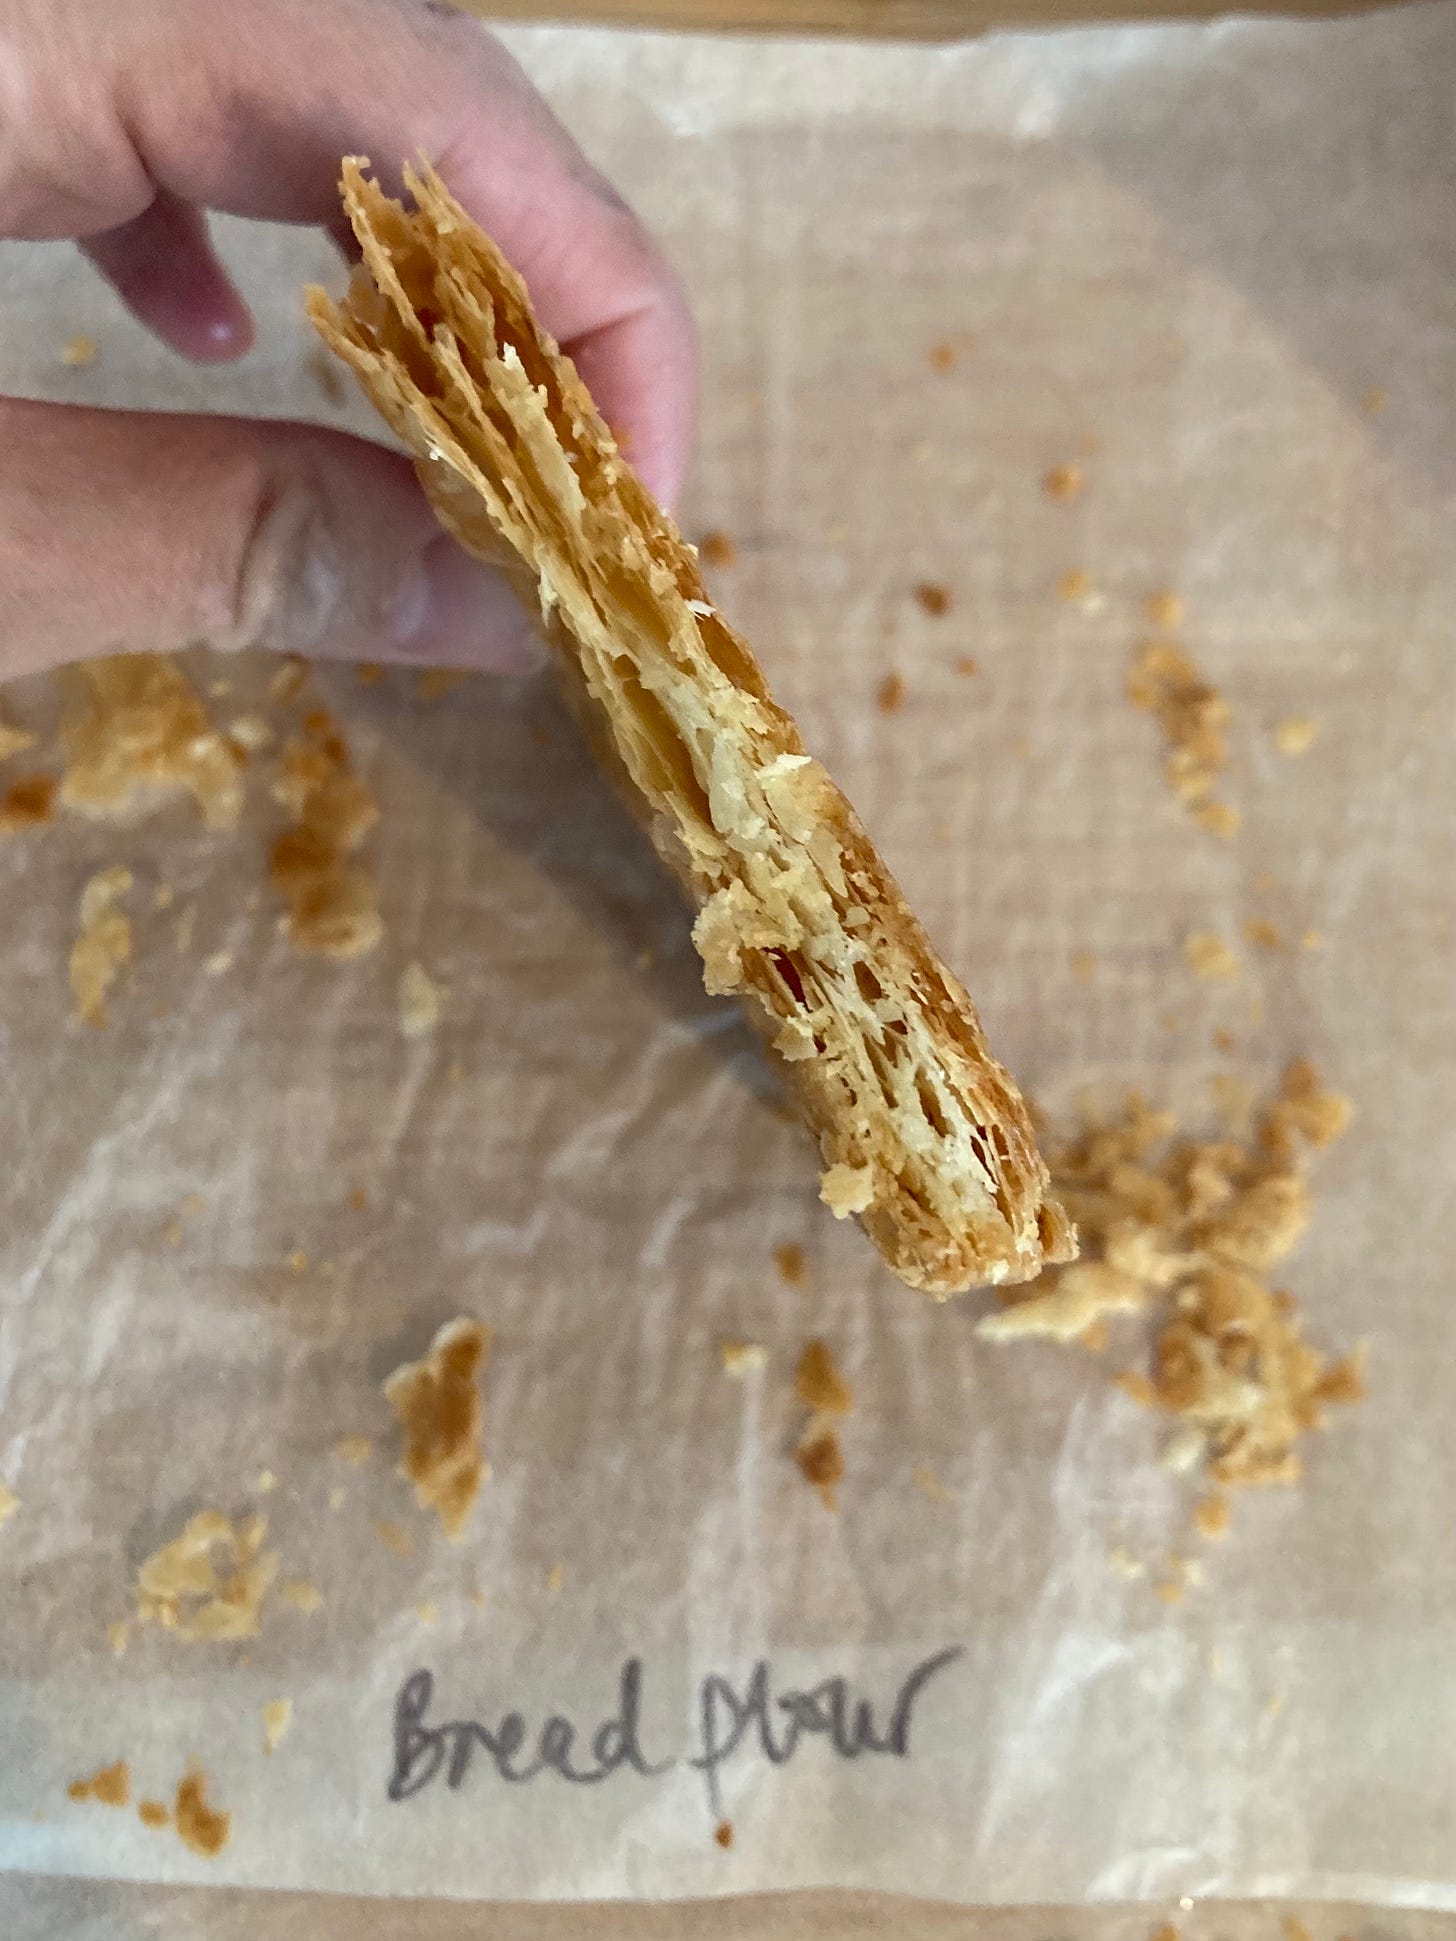
I made two identical batches of pie dough using plain flour in one and bread flour in another.
The results? Basically imperceptible, just like Nicole said it would be in the Q&A. The one with the plain flour might be *slightly* ‘lighter’ and visually the layers are slightly better. But since we are not developing the gluten in the recipe, the flour isn’t making a significant difference. So, if you’re in a snip at home and you only have bread flour? Use it! Though I still prefer using a low protein flour, simply because it’s all you need.
That being said, if you are new to making dough and are worried you might overwork it, leave the bread flour to one side. The higher protein content could lead you into chewy gluten territory during the rolling out process, especially since the method I’m sharing includes turns.
Hydration %
For the high hydration dough, I increased the water to 50%: Adding hydration to the flaky dough increases the proportion of lean dough to butter chunks. So, even though it was very easy to roll out, the dough itself is unpleasantly crispy and tough - quite hard to eat with large sections of un-buttered pastry. The additional water also gets busy making gluten bonds with the protein which results in a far too tough dough. It’s a no from me.
The low “30%” hydration, on the other hand, is ultra unstable but very flaky. It’s also really ugly. The dough cracked as it baked and although its quite crunchy, it was very hard to use and to be honest, the flavour results were not worth how frustrating it was to work with.
Acidity / Vinegar
The number one reason to add vinegar into your pie dough is to prevent oxidation (we’ll cover that in a sec) ie. when your pastry goes grey in the fridge. But it does have another role: Seasoning! The best thing about a pie is that it’s such a complete bite, and to ensure this the dough needs to be appropriately seasoned throughout. Vinegar makes sure this happens.
You might read that vinegar has a tenderising effect on the dough - and this is true… to an extent. Acids do get in the way of gluten development (water creates gluten bonds, acid doesn’t have the molecular properties to do so) but the amount included in pie dough (around 4%-5%) generally isn’t going to be that significant. There are recipes that recommend using an alternative liquid like vodka (again, water creates gluten bonds but alcohol doesn’t, so you can hydrate your dough without making gluten!) to hydrate the dough without actually making gluten, but proportionally you would have to be quite extreme for it to make a significant difference.
Compared with the control dough, the dough including vinegar is slightly more tender and definitely more flavourful. We’ll be achieving this by using an acidic liquid instead of using vinegar directly.
Hydrating agents
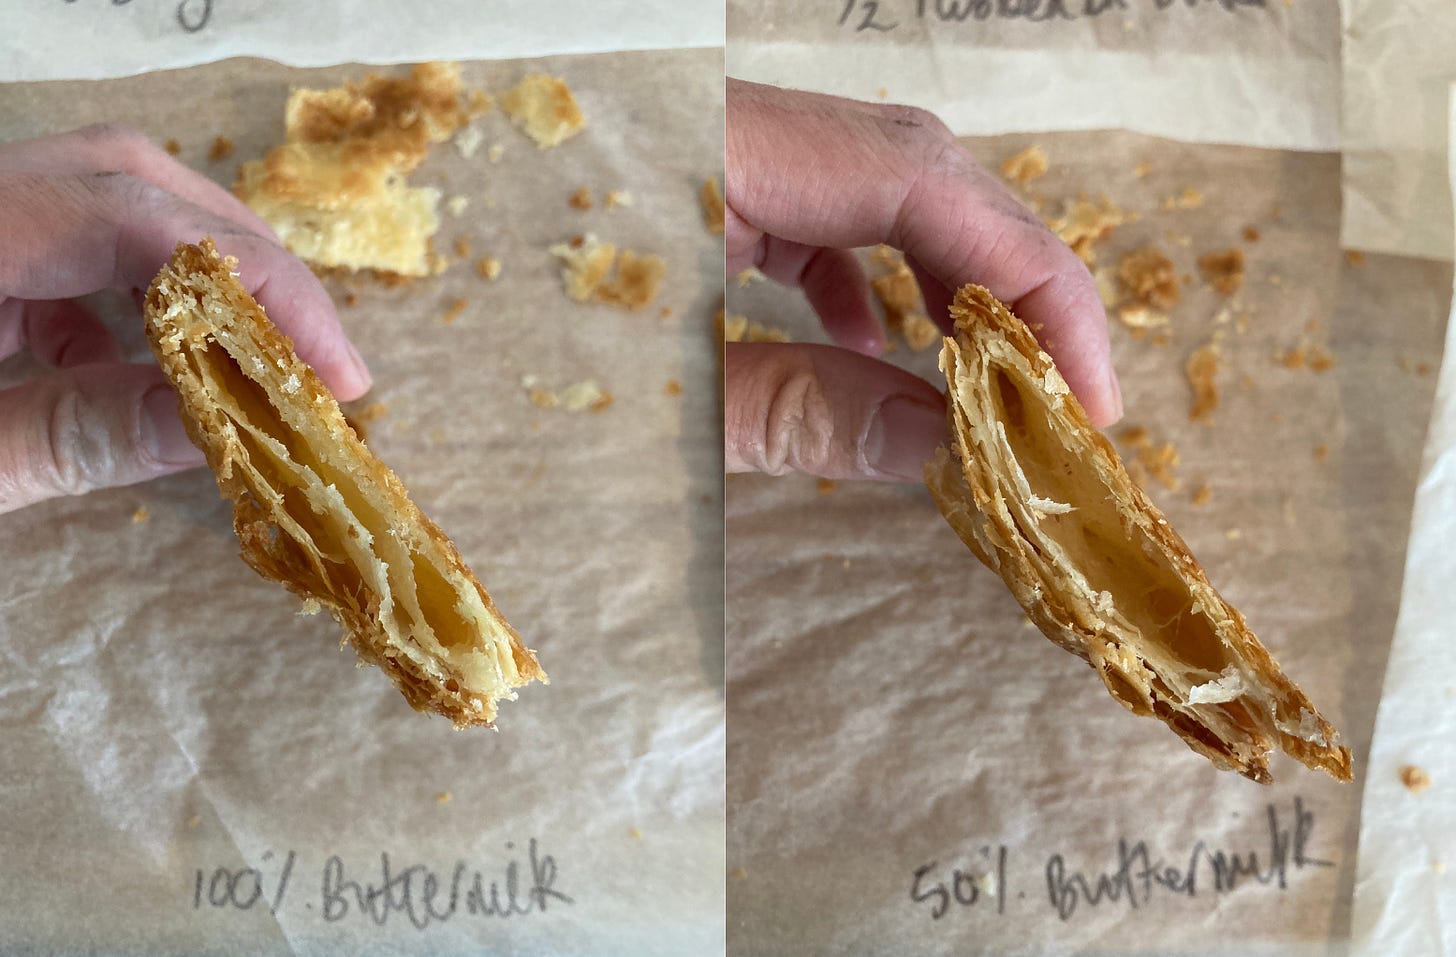
Until last week, I hadn’t considered hydrating my pie dough with anything other than water. It just didn’t really come to mind. And then, during the lark! prep pop-up, Verena told me that she makes her pie dough with creme fraiche. And then I bumped into the brilliant Shelley Barbera who mentioned using buttermilk... and my whole world was blown open! I have to say, I think using an alternative liquid really takes your pie dough to the next level, flavour and texturewise:
Adding additional flavour / fat in the form of a liquid like creme fraiche, sour cream or buttermilk adds a depth of flavour and impressive tenderness that can’t be achieved with water alone.
Plus, you get the added benefit of the acid preventing the oxidation of the dough.
Comparing the three, there is little difference in the texture. The flavour changes proportionally to the richness/fattiness of the liquid, ie. the buttermilk has a great tang but doesn’t improve mouthfeel, whilst the sour cream and creme fraiche improve the mouthfeel too.
From these tests, I think it is definitely worthwhile including at least a portion of alternative liquid in your dough! Comparing the one made with 50/50 water/buttermilk-creme fraiche-sour cream vs. 100% buttermilk-cremefraiche-sour cream, the latter was slightly more difficult to work with so I have a slight preference on using a mixture, but its definitely something you can scale up/down for flavour preference.
Sugar situation
As we know, sugar doesn’t just make things sweet. Sugar plays a significant role in both colour and texture of baked goods. When it comes to cake, sugar tenderises the crumb and helps give a really soft texture to things like cakes and cookies, but in pastry - in small amounts - it doesn’t have this effect.
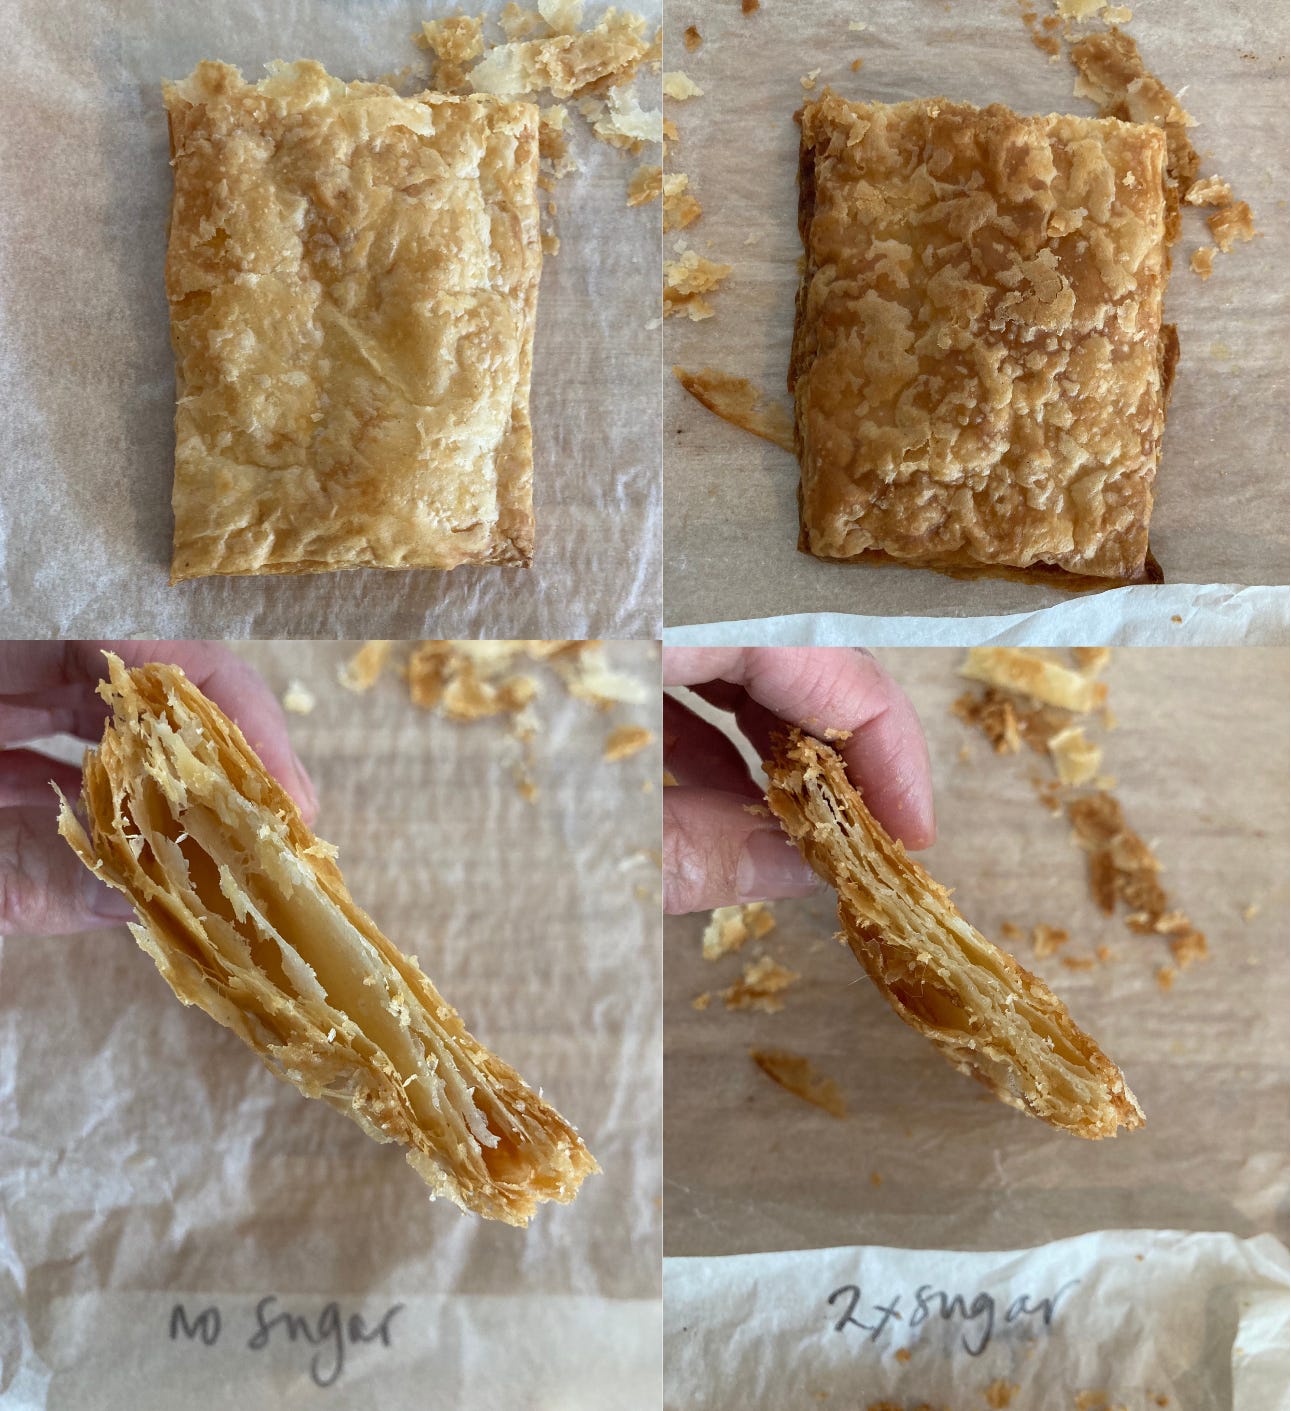
In fact, the pastry made with double sugar (16% compared to 8% of my control dough) is extremely crispy, tough and on the chewy side, but it is darker in colour. Oh, and it’s quite sweet, obvs. I would, therefore, only be prepared to increase the sugar up to 10% (for seasoning purposes) without being worried about affecting the texture. Another thing about ‘too much sugar’? The dough was LEAKY. As we know, sugar is hygroscopic (water loving) which means it draws the liquid out of your dough. Although at first you might not notice, after a few days in the fridge, this dough was damp and tricky to work with.
The dough with no sugar has very little textural difference to the control dough. I thought the control dough would taste really sweet compared to the no sugar dough, but actually it just tastes seasoned. So, don’t worry about changing up your recipe too much.
The deal with oxidation
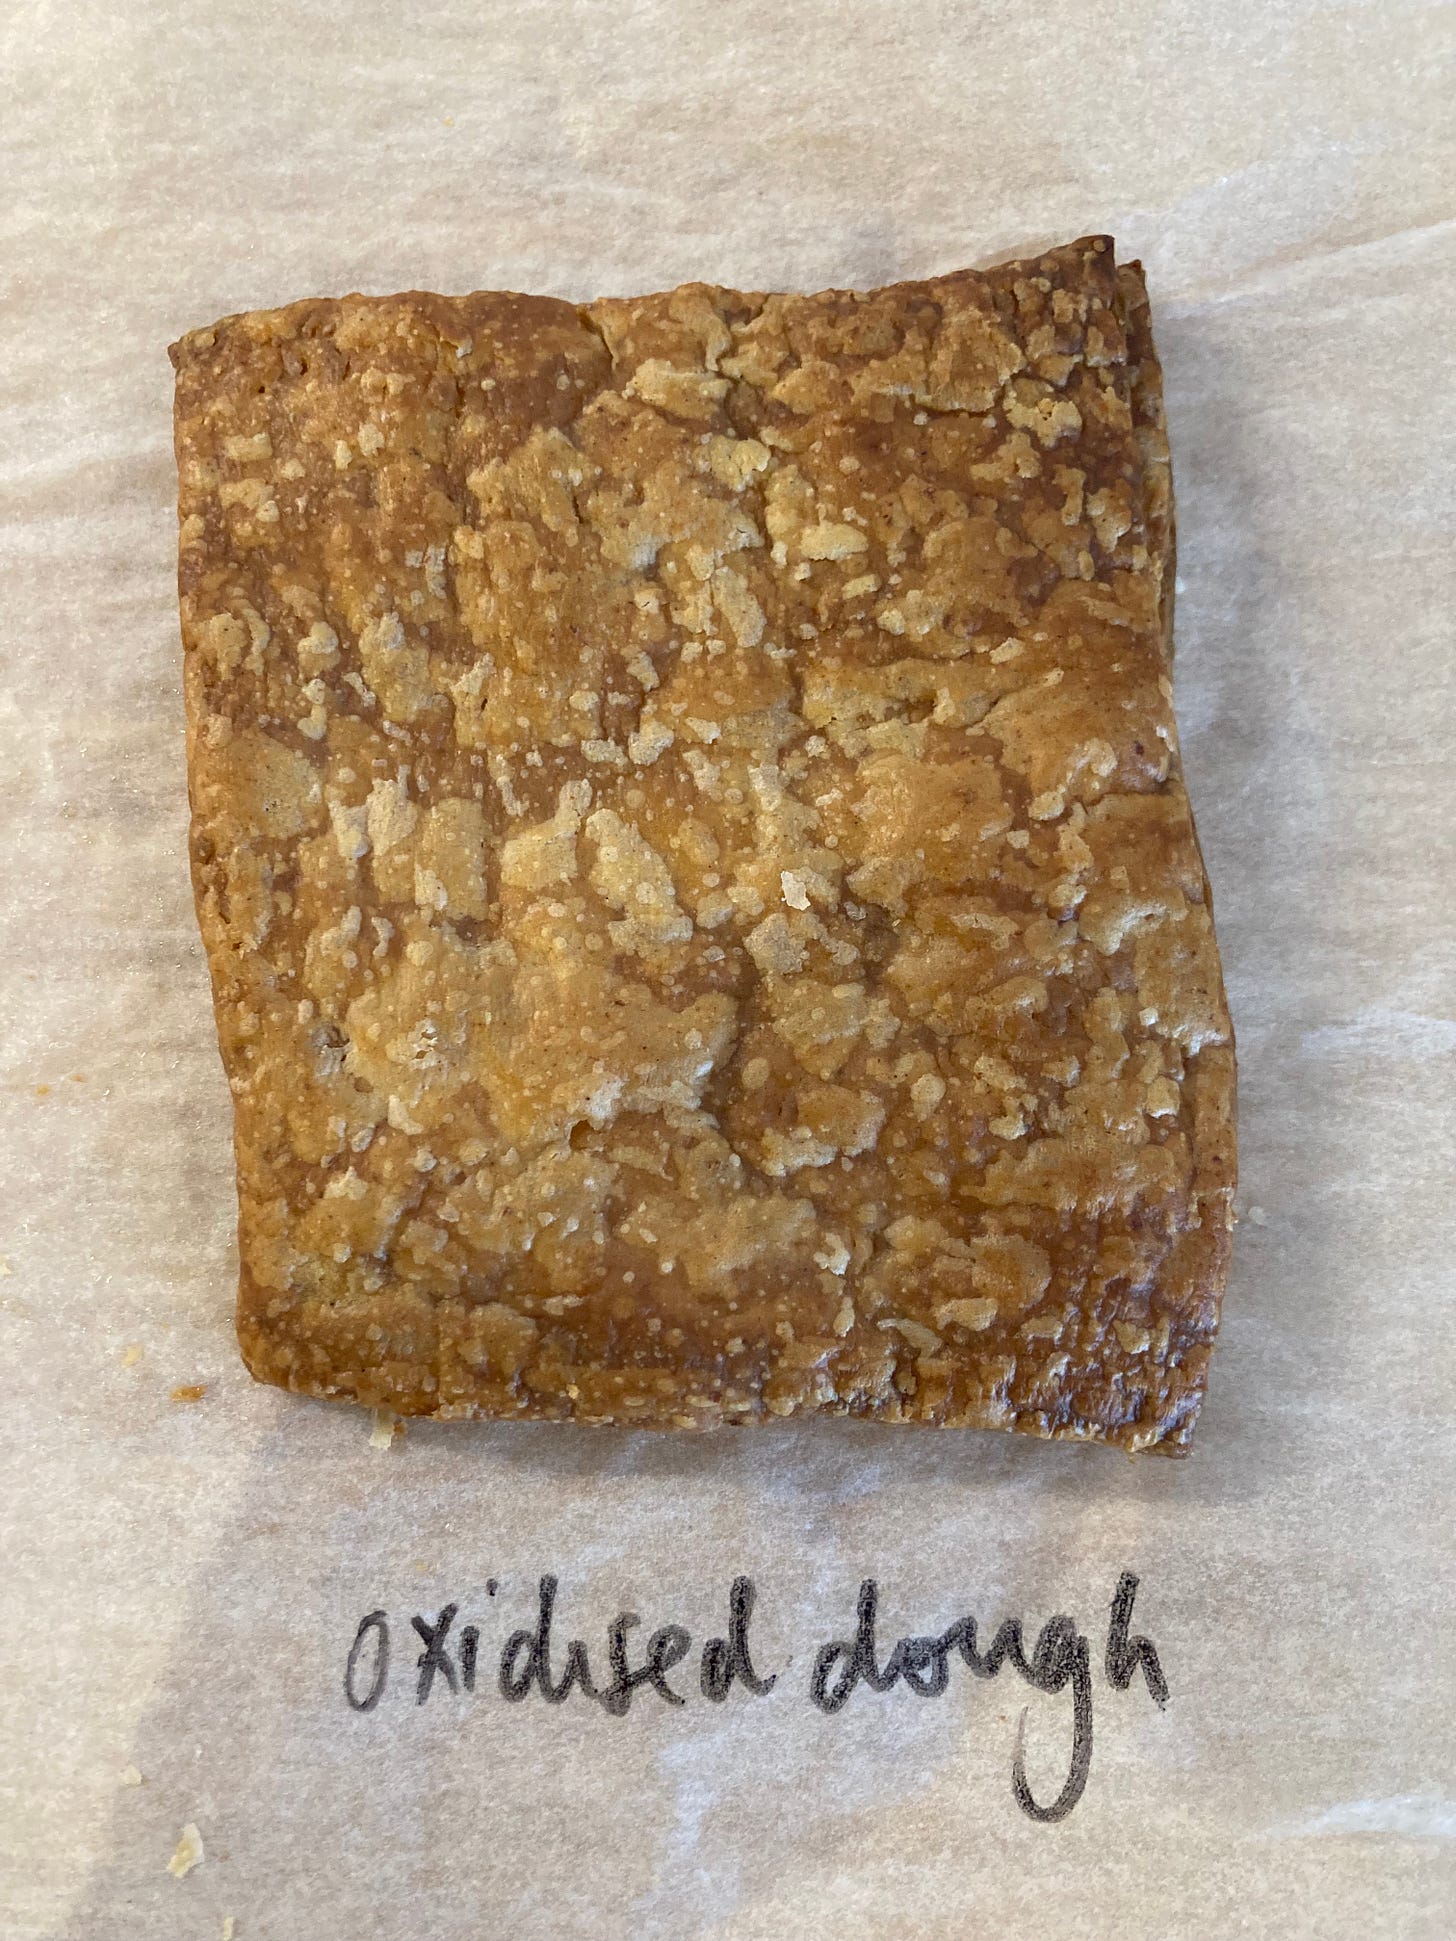
Oxidised dough looks unpleasant but we’ve all been there. Even though it hurt my heart, I mixed up some dough without any acids and left it to go grey - and I mean grey - over a few days. Once it was looking well and truly unwell, I gave it a sniff test. It didn’t smell *fresh* but it was also still in the realms of *safe to eat* so I went ahead and rolled it out and baked it.
The result? The dough baked up beautifully and there was no sign of the oxidation after baking. It also ate very well. So, although I can’t recommend it, if life gets in the way and your dough goes a bit grey - don’t worry! You can use it without any issues.
The deal with re-rolling
You can absolutely re-roll pie dough. Actually, the re-rolled dough is sometimes even flakier than the first round.
What about re-rolled, re-roll? I re-rolled dough three times during the pop-up (made palmiers etc) and still had great results. The caveat of this, however, is that I was using a pastry break ie. a gigantic electronic rolling pin that doesn’t put a lot of stress on the dough. With equipment like that, you are processing/pressing on the dough much less meaning the integrity of the dough is maintained more easily.
The only thing you need to be aware of when you re-roll is how much you’re developing the gluten. Rolling is an extremely effective way to strengthen and build gluten bonds, especially if you are doing it by hand. So make sure you leave the pastry for plenty of time before rolling it out again and be aware that the dough is more prone to springing back.
I’ll be sharing a recipe for pie crust off-cut palmiers on KP+ next week and sharing the techniques on how to best re-roll it! Subscribe to get it straight to ya inbox.
Conclusions
To conclude, your pie dough formulation does matter but the biggest impact, I think, is your technique. Yes, the formulation can really help get a good and flavourful result, but it is possible to make a decent flaky dough, less butter, higher hydration, different hydrators etc. no matter what your formula (to an extent).
That being said, we should see a really good pie crust formulation as a series of insurance policies: A generous butter proportion will improve flavour and offer a bigger margin of error for the rubbing in process, using a hydrator with a bit of acidity will reduce oxidation of your dough, improving the shelf-life, as well as seasoning it, whilst sugar will improve both flavour and aesthetics. Like all recipes, the ingredients all play a role.
For my ‘personal fave’ pie dough, I’ll use a 75% butter (though would feel confident about reducing or increasing depending on how rich I want it to be), a mixture of water and sour cream/buttermilk/creme fraiche for flavour and texture, a low percentage of sugar for seasoning and a relatively ‘high’ hydration (42%)
In praise of pears
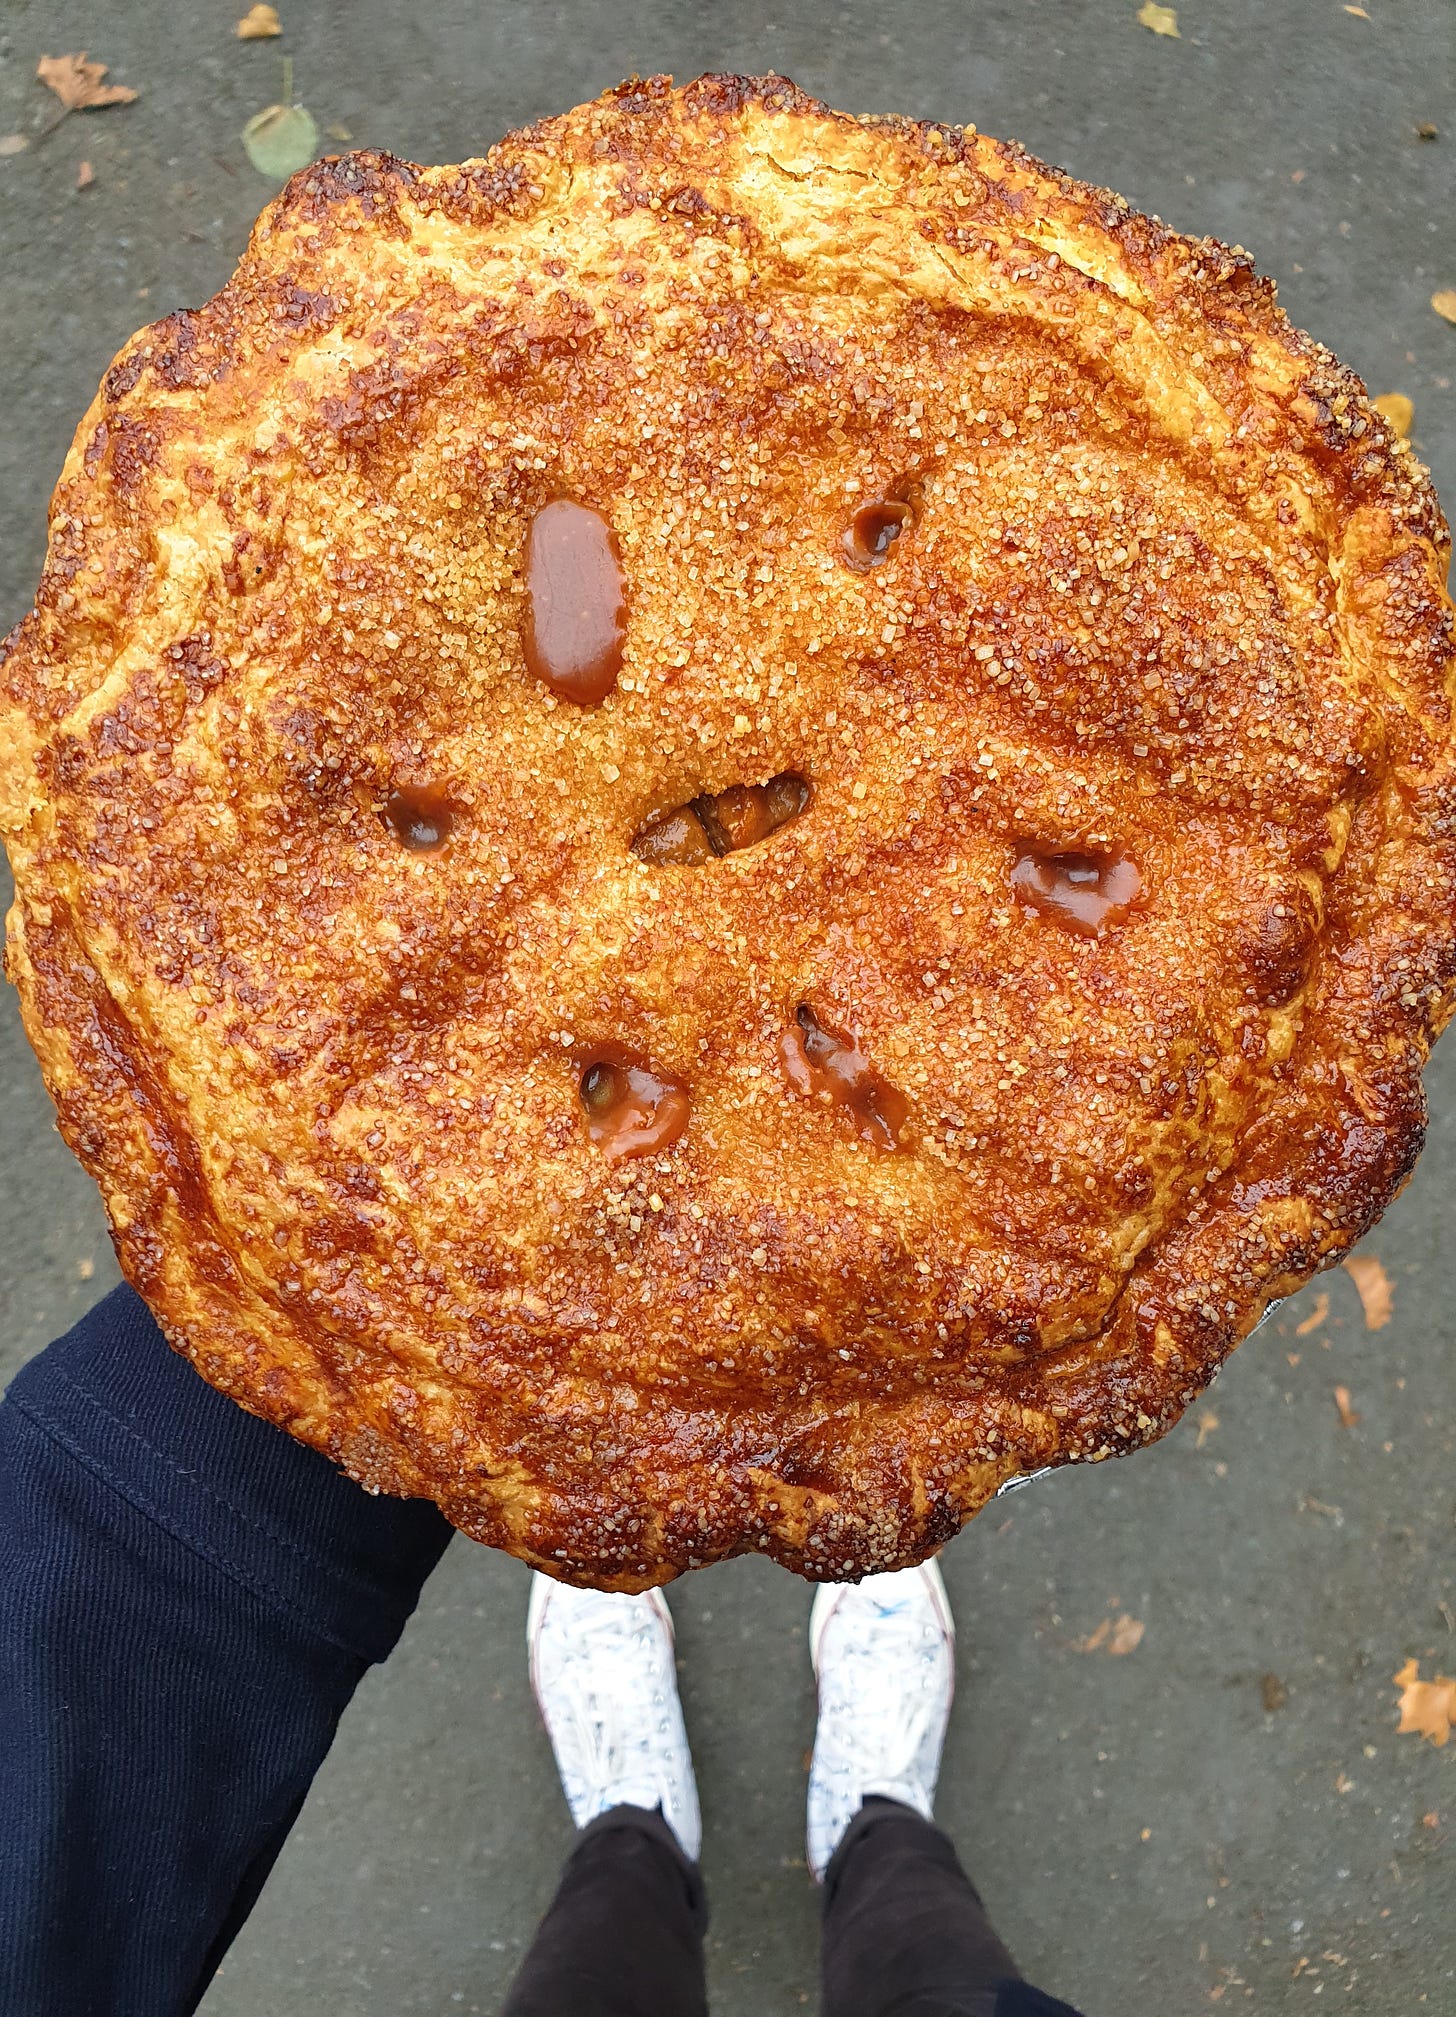
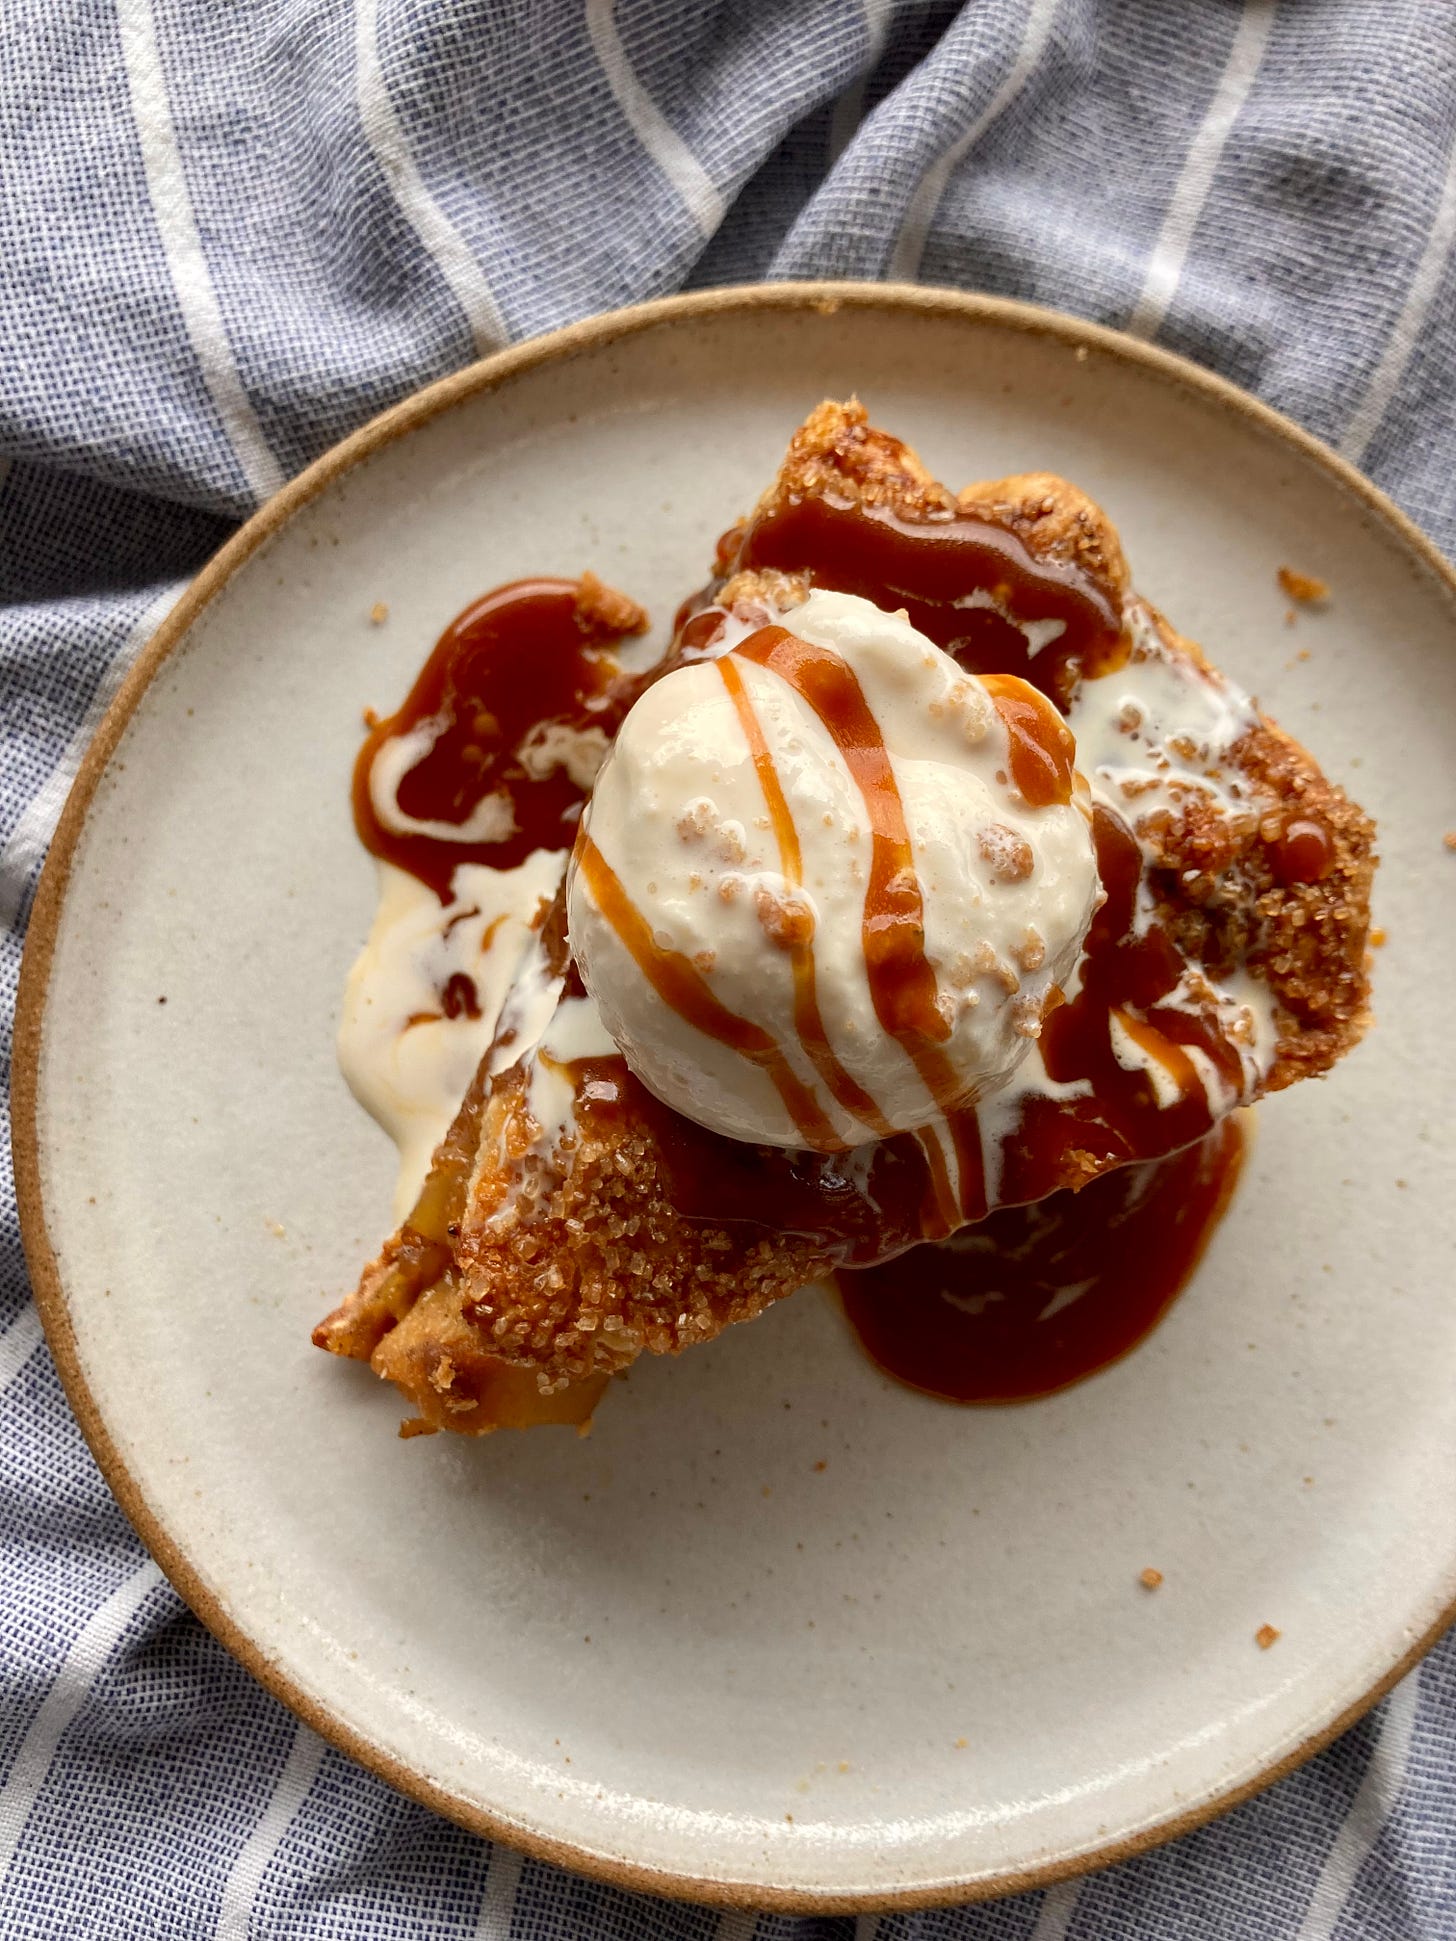
GUYS….. Welcome to pear season, everybody! It’s going to be fun here. I have so many beautiful pear recipes in mind but we’ll start with one of my favourite pies from last week’s lark! Pop-up - the caramel pear pie.
When it comes to pears, I actually prefer a slightly under-ripe or hard pear when it comes to baking. This is because I usually poach, roast or cook the pear before using anyway, and the harder pear retains its shape better. If I’m just enjoying the pear on its own then I love waiting until it is juicy, tender and creamy, but for today’s recipe, underripe pears are much easier to handle.
Today I’m using a mixture of conference and beurre hardy pears. Beurre Hardy’s are beautiful picture book looking pears with very sweet, juicy and floral flesh. Conference pears are the ones most widely available in supermarkets - they are thinner and taller than the beurre hardy pears and have a slightly grittier texture. But, isn’t that gritty pear texture the best? I absolutely love it!
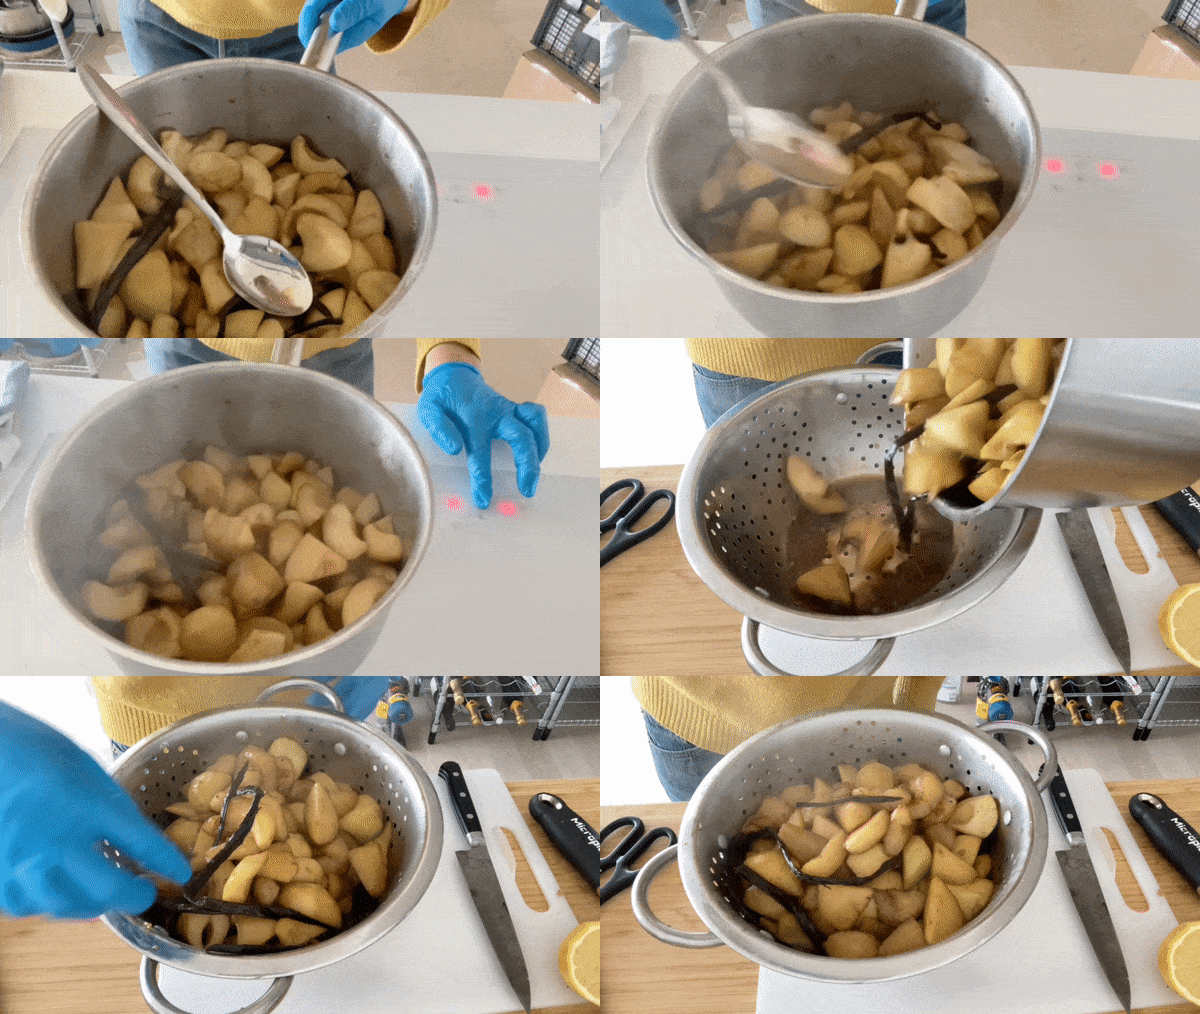
For the caramel pear pie, we’ll be gently cooking chunks of pear in brown sugar, lemon juice and vanilla. The thing about cooking with pears and apples at this time of the year… you need to get past (mentally) that they’re almost certainly going to look like potatoes in gravy at some point. Or undercooked potato wedges. Fortunately, the smell is so glorious and comforting even though the visuals are a bit off putting at first.
Once the pears are *just* cooked, we’ll drain off the liquid and reduce it then whisk it into caramel sauce with flour. This is a tip I picked up from Erin McDowell’s book on pie! Thanks Erin. After that, all of the filling is piled inbetween two pie crusts then baked to perfection. To top it off, the we’ll pipe in some caramel sauce in through the pie vents for good measure.
My ideal pie dough + Caramel Pear Pie
Makes enough for a double crusted 1 x 9inch pie dough base (or 8 inch deep tin) pie
280g plain flour (this has been corrected/updated)
225g butter, cubed
6g salt
24g sugar
60g creme fraiche, sour cream or buttermilk
60g water, cold
For the caramel pear pie
This makes a ‘shallow’ (1.5-1.5 inch dept pie tin) 9 inch pie or a ‘deep’ (2inch depth pie tin) 8inch pie
Around 1.3kg (!!!) pears (that’s the weight before you prep it)
100g dark brown sugar
20g lemon juice
At least 1 vanilla pod or a TBSP of vanilla extract. You can also add spent pods to this mixture as we are slowly cooking it on the stove and vanilla will be released
Plus
110g caramel sauce
150g pear cooking juices (see method)
40g plain flour
Caramel sauce
100g caster sugar
45g butter
60g double cream
1-2g salt, to taste
For finishing
Egg wash
Demerara sugar
50g caramel sauce in a piping bag (ideally with a doughnut bismarck tip)
Method - pie dough
Before we begin… For this recipe, you just need to BRING the confidence. The faster you work, the better your dough will be as the butter won’t have a chance to melt, so just bloody go for it. Leave the butter in bigger chunks than you think, because we’ll be doing a folding method to keep it flaky. And remember, you’ve got this!
Whisk water and creme fraiche/sour cream/buttermilk together and set aside in the fridge or freezer to chill
Mix together the plain flour, salt, sugar and whisk to distribute everything evenly
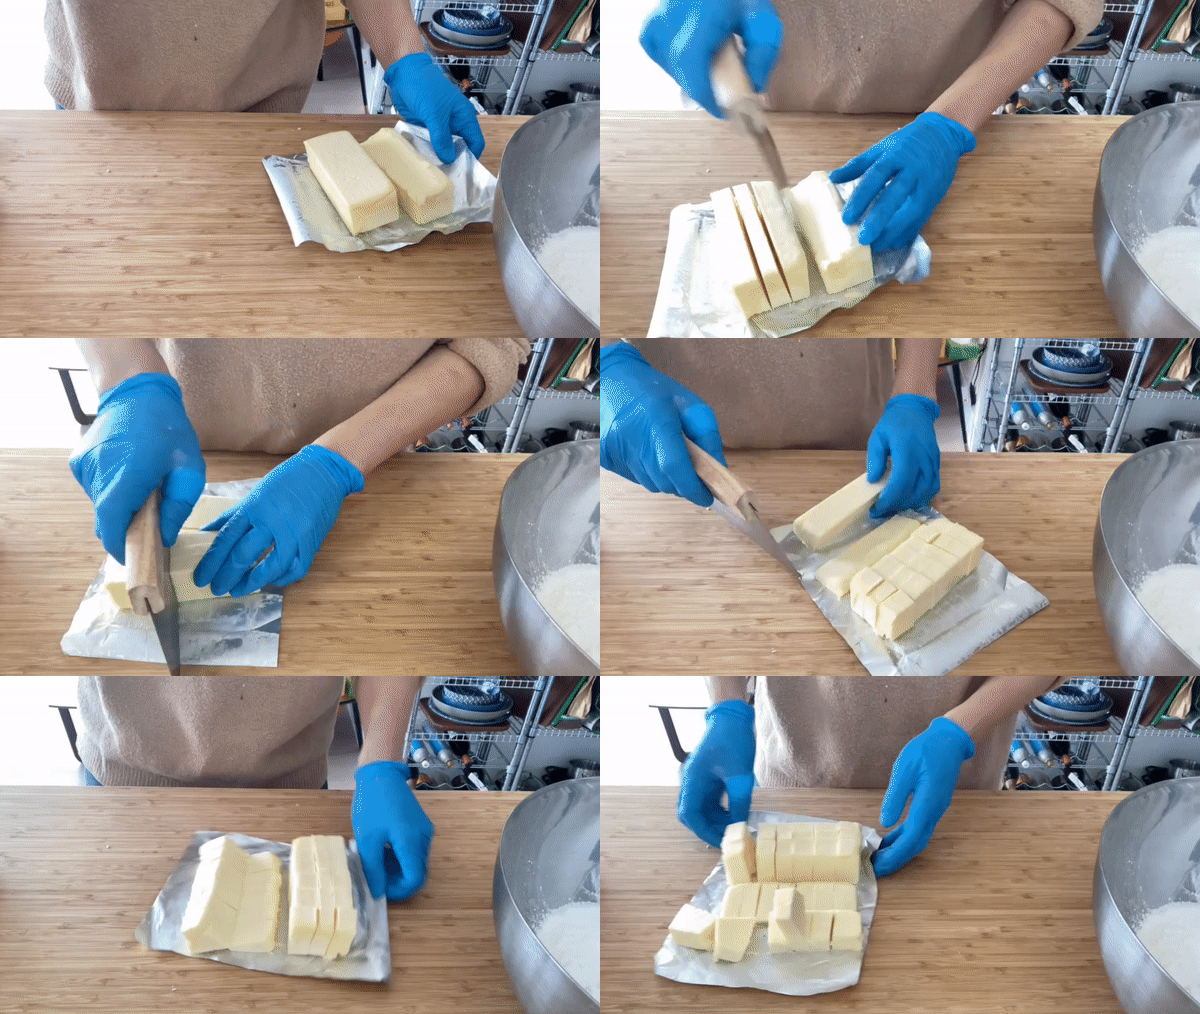
Cut butter into small cubes / rectangles
Add butter into the flour and toss to coat. Coating the flour will help protect it from the warmth of your hands/it getting melty and thus negatively impacting the flake-factor of your pie dough
Squish the butter into flat pieces, one by one
Now it’s time to add the liquid - pour in half and toss the dries around the bowl until you can’t see it anymore. Now add the rest and squish together. As soon as it doesn’t feel like total desolation, tip the dough onto your bench top
Squash everything together as best you can and then, adding flour if you need, roll out the dough and perform a single turn. You’ll see chunks of butter turn into long thin pieces - its quite satisfying!
Press the dough back together - adding more flour if you need - then perform 2 more single turns until the dough is homogenous but you can see big lovely marble-y streaks of butter
Wrap the dough (also divide it into chunks at this stage - squares are fine, we’ll roll it out later) and put into the fridge for 1.5 hours (minimum) for it to firm back up
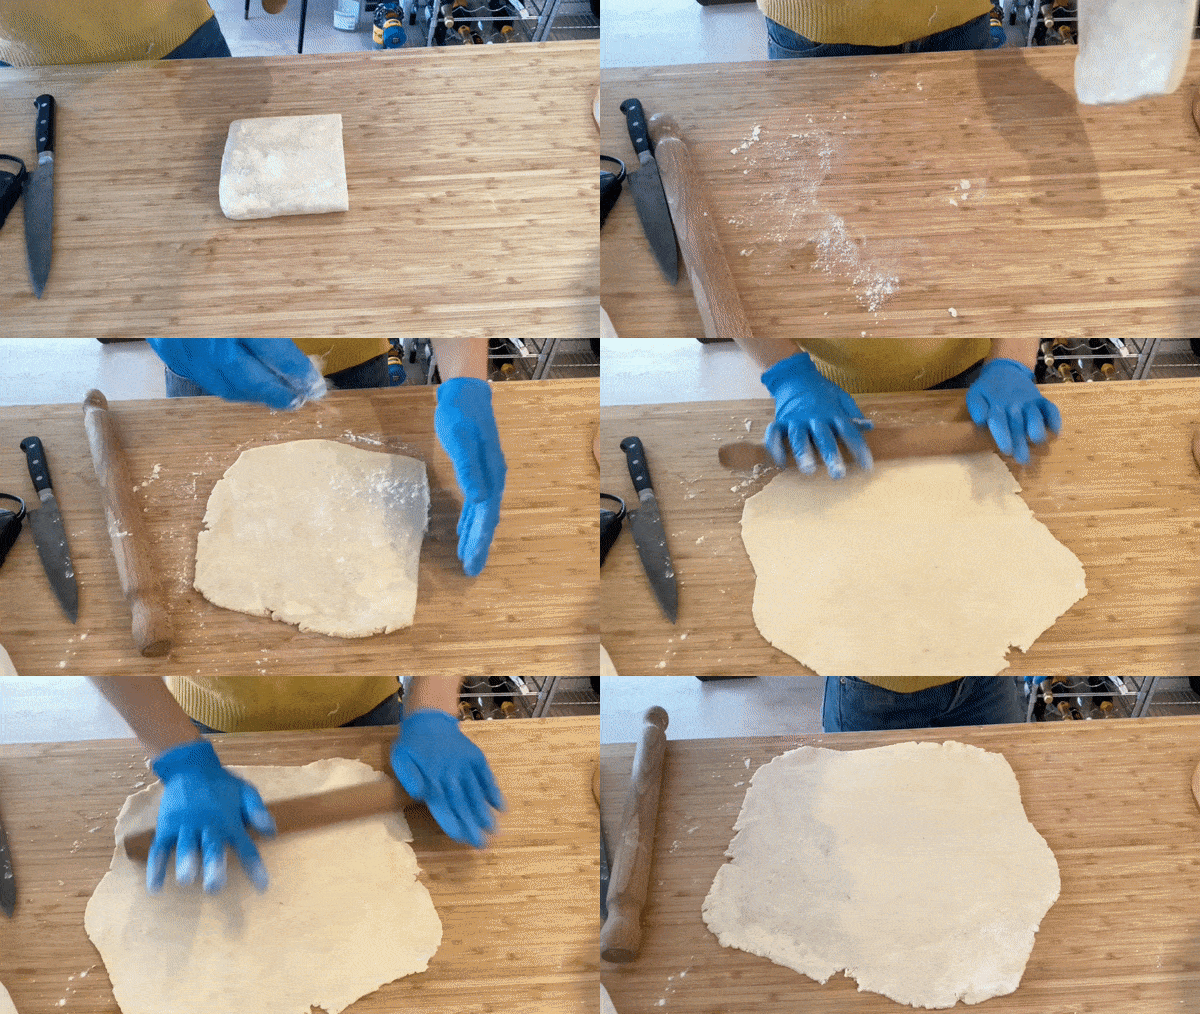
To roll it out, flour your surface enough to stop any sticking then roll the pie dough out to 3mm. This is way thinner than you think is going to work. Trust me. I’ve made a lot of pie doughs that are TOO THICK because I simply haven’t *trusted the process* but you do want to go quite thin here. You’ll still get a fantastic chubby edge as you fold the dough on itself anyway during lining so don’t worry about losing any drama.
If the dough is warming up too much and it doesn’t feel cute… just put it in the fridge and return to it in 10 minutes
For the caramel pear pie, you’ll need to roll out both the top and bottom crust. You can do this in advance and put into the fridge, as long as you wrap it really well, okay!
Method - pears
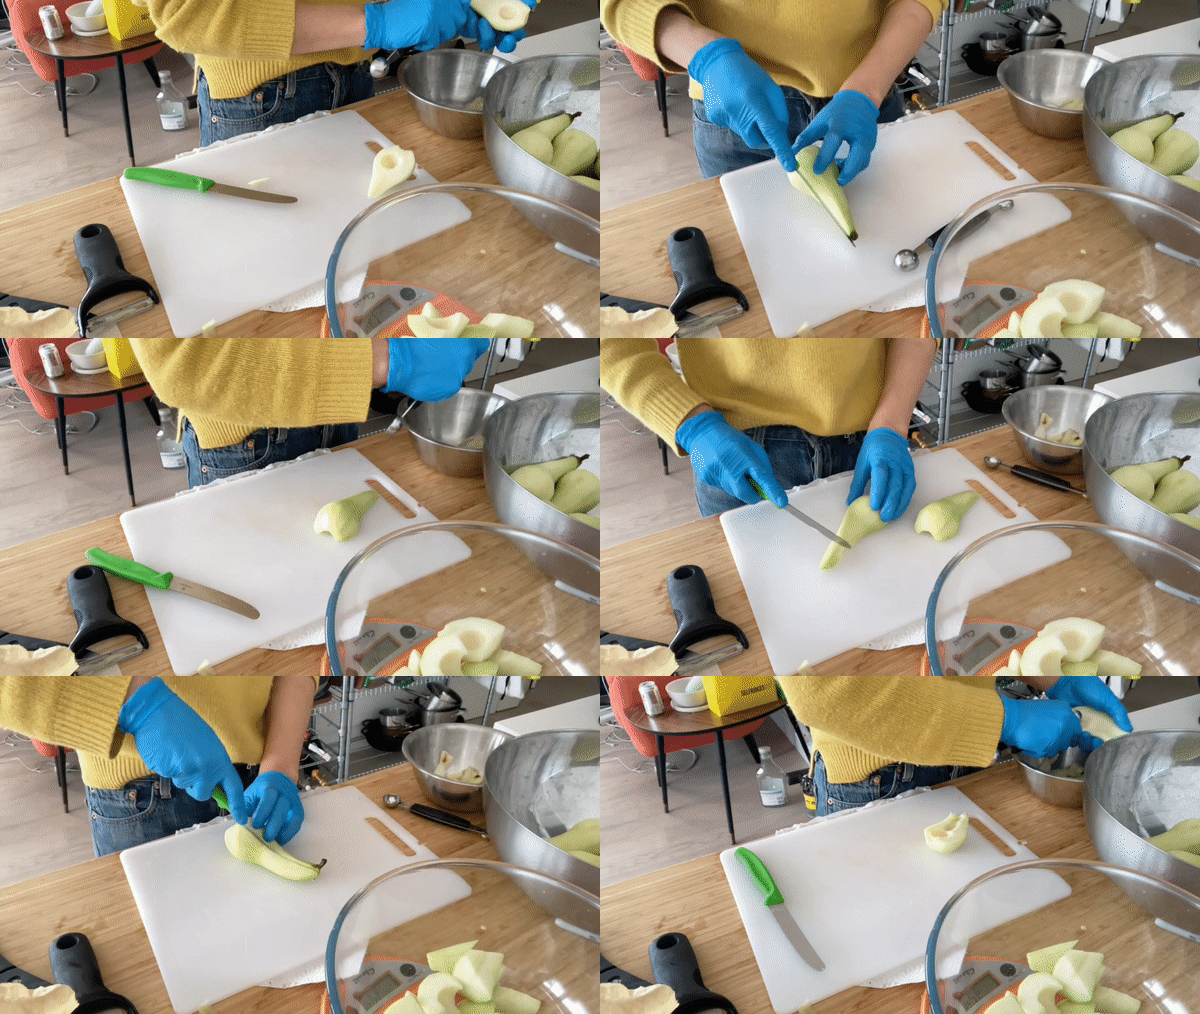
Peel the pears and remove the insides. I have a melon baller tool that is super useful for this job
Cut into irregular size chunks and toss in the lemon juice. I like doing this because it is more interesting to eat. You should have about 1000g pear chunks
Add to a saucepan with the sugar and vanilla pods
Cook on a low/medium heat until the pears have taken on a caramel colour (looks like potatoes in gravy ok) and are slightly soft. Dont go too far, just until they are gently cooked and not falling apart
Drain the pears from the liquid
You should have around 800g pears and 200g liquid
Reduce the 200g liquid in a small pan on the stove until you have about 150g liquid. If you can’t be bothered to do this, you can just use 150g of the un-reduced liquid and discard/eat/use elsewhere the other 50g
Allow both the pears and liquid to cool
You can do this step in advance! Up to three days in advance, in fact
Method - caramel sauce
Heat sugar on a medium heat until totally melted. You can move it around with a silicone spatula if you like, but we aren’t making a large batch so you shouldn’t need to. Once it’s melted watch it - you want it to be dark. Be brave!
Whisk in cream, which will bubble aggressively, followed by the butter and salt
Leave to cool. It will firm up so you might need to rewarm it for this recipe to make it usable
Method - assembling the pie
Pre-heat oven to 200c fan
Whisk 150g of the pear liquid into 110g caramel sauce. Into this, whisk your sifted flour until its totally dissolved
Finally mix this liquid up with all the pears in a big bowl
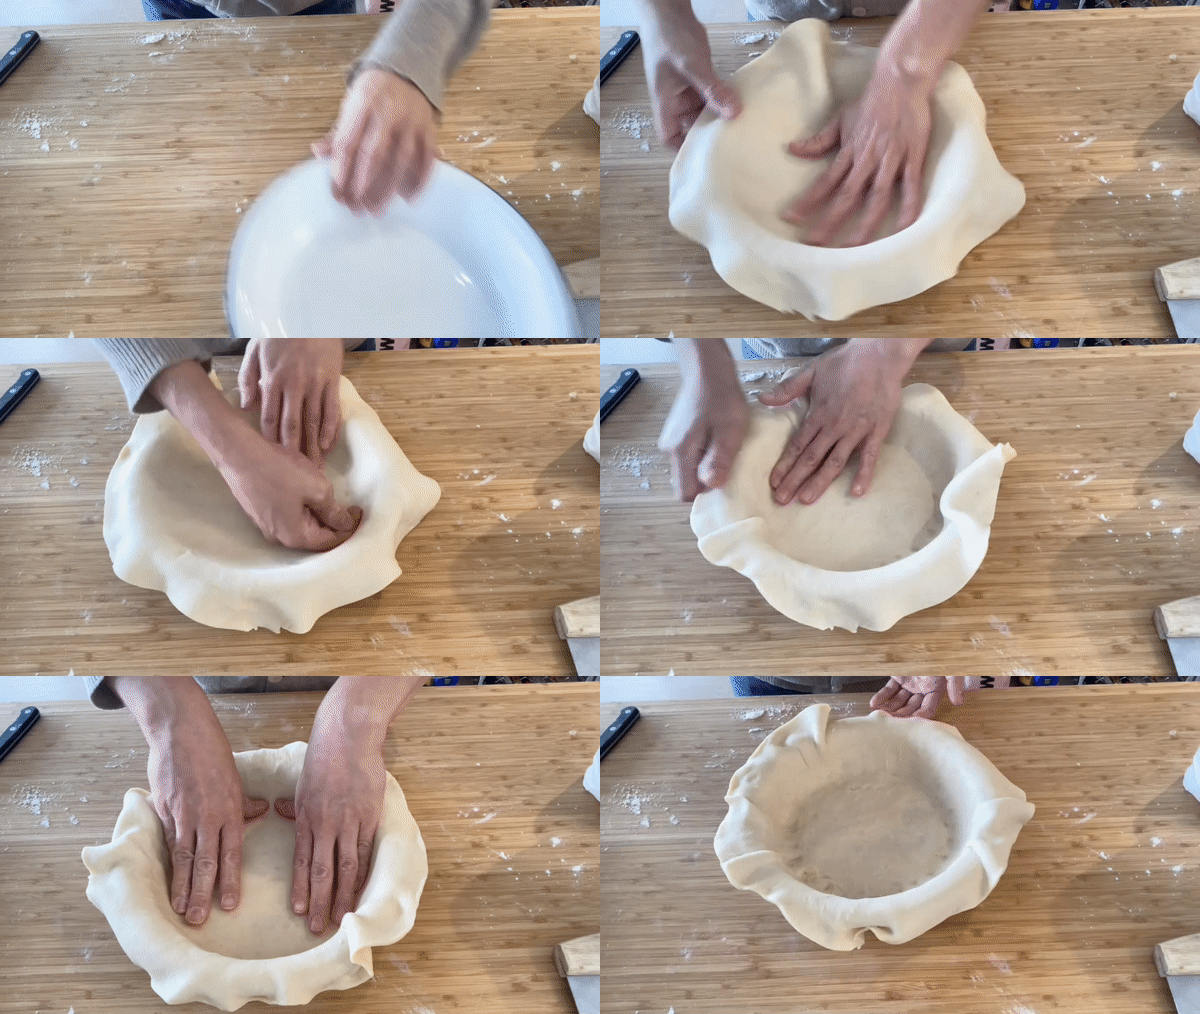
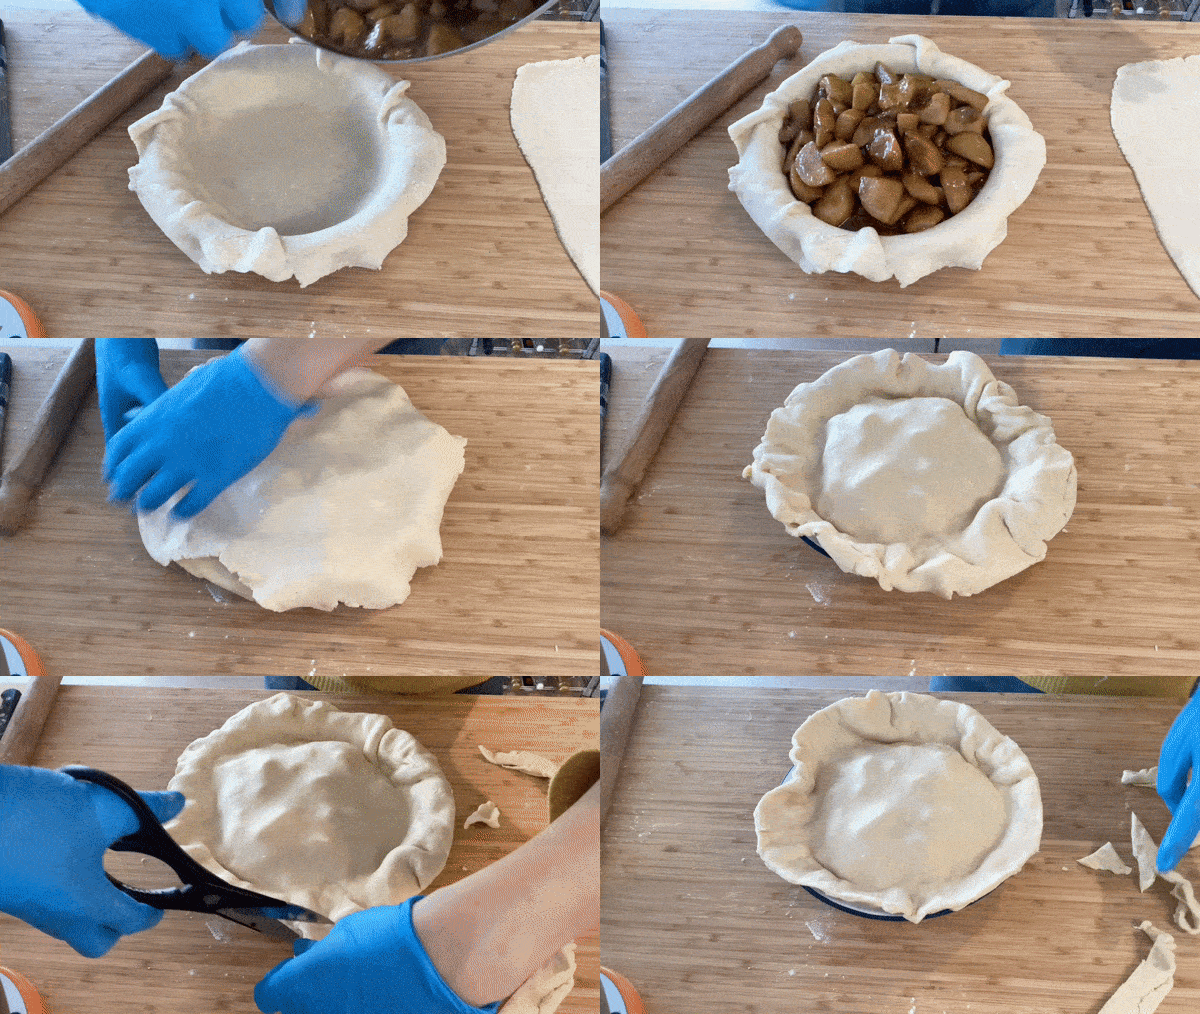
Line your pie dish with your 3mm thick pie dough. Make sure its nicely nestled into the edges and leave 2-3cm overhang
Pile in ALL the filling. I know, it looks dangerously full. Just go for it. Be brave
Place the top crust on top and press the two bits of overhang together. Squish them a bit if you need to - just try and get a decent seal
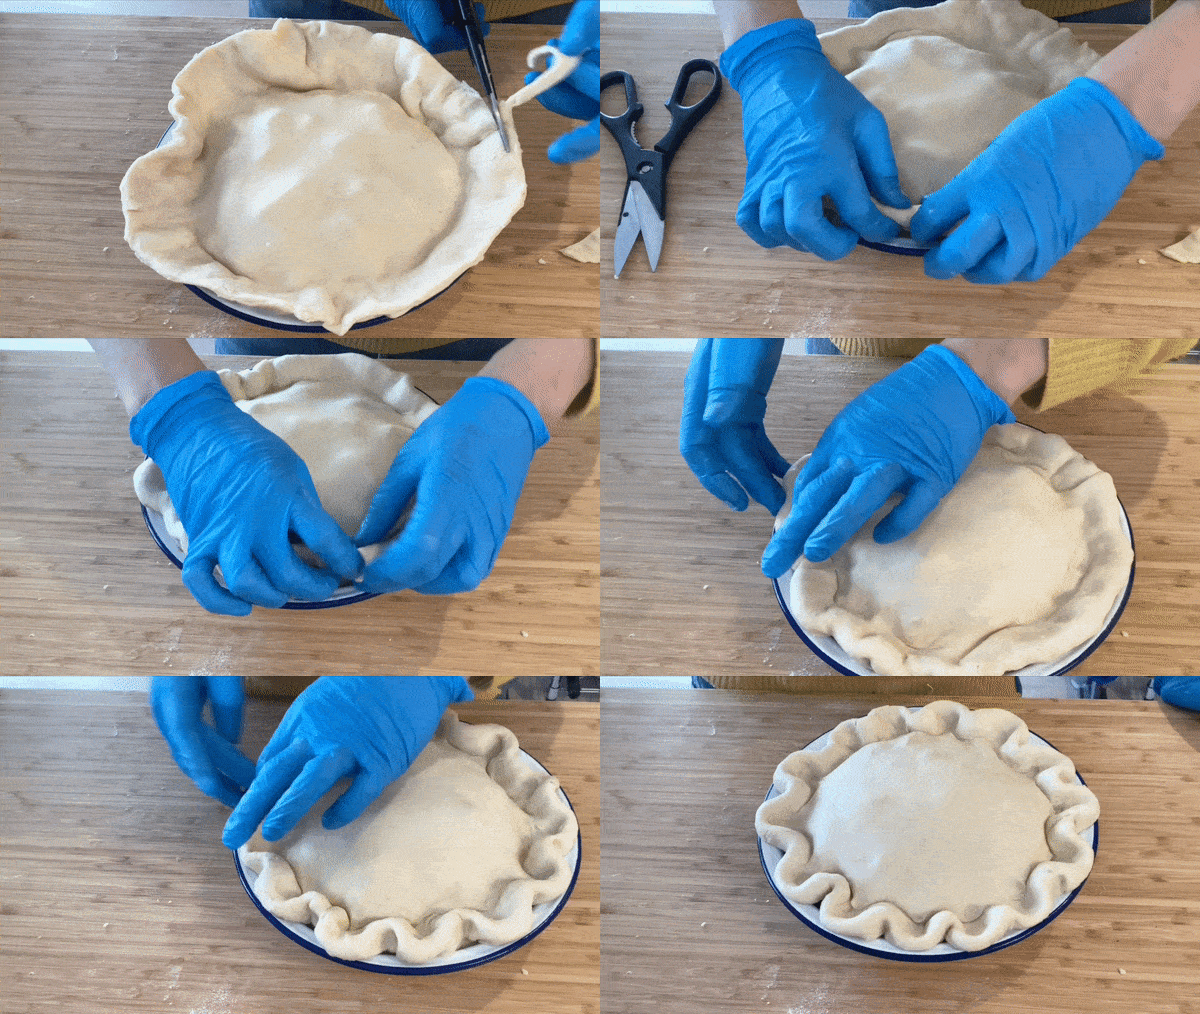
Move the pastry up-and-in on itself to create a crust and lock in the fruit (see the GIF) then when you’re satisfied, trim the edges of the pressed-dough so you have about 2cm overhang
Tuck the dough under itself to create a crust then crimp it using two fingers. The GIF will demo this better than I can describe it
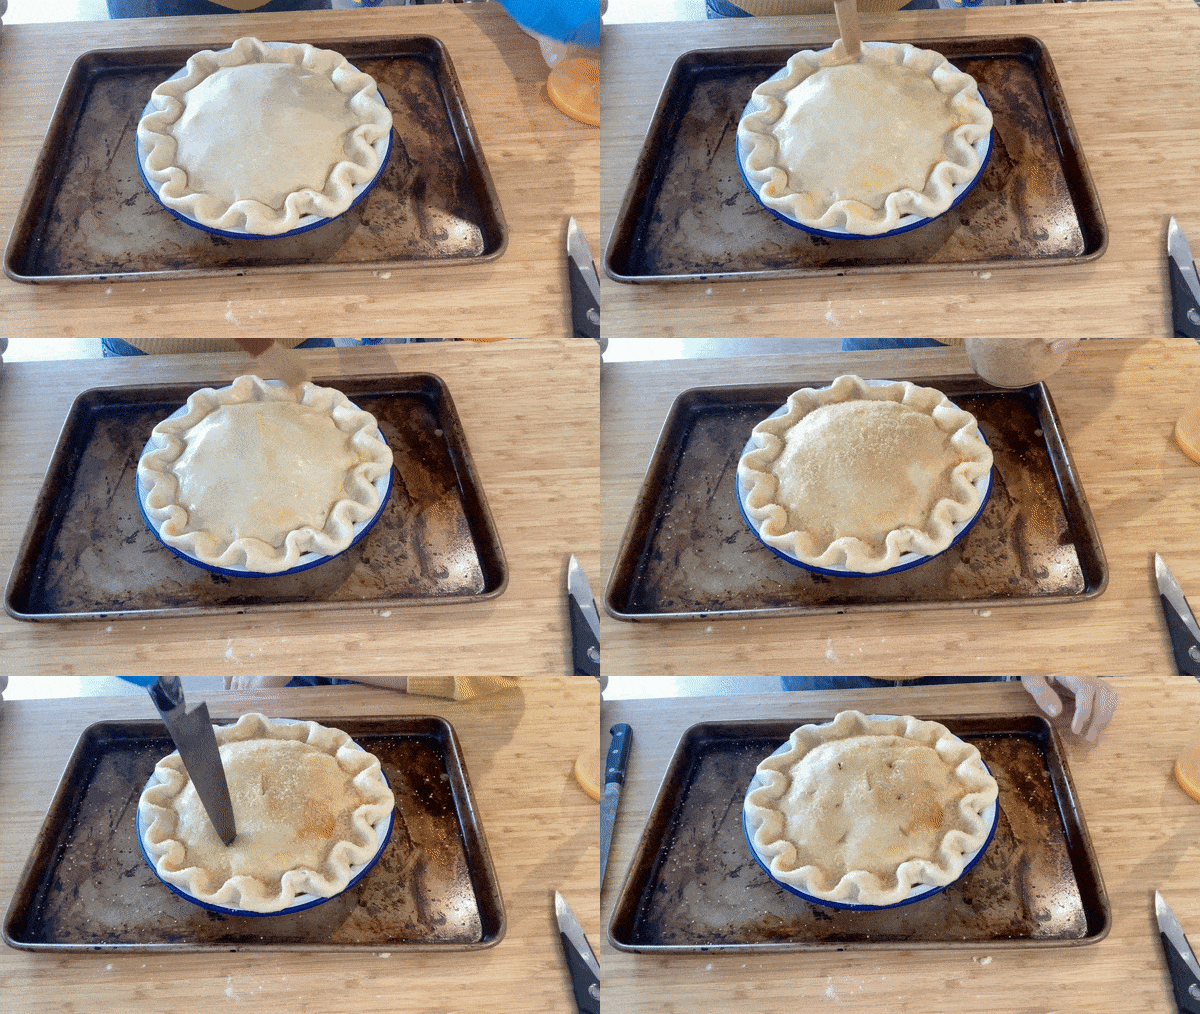
Chill the pie in the freezer for 15 minutes
When the pie is chilled, egg wash (go hard on the top, less hard on the edges as these bits tend to stick out and brown easily anyway), add demerara sugar generously then stab some vent marks in
Turn the oven down to 185c fan and then put the pie on a tray (it will get buttery!) and then place into the oven
Bake for 1 hour, turning after 40 minutes. At the 40 min turning mark, if its getting too dark then reduce the temperature to 170c for the rest of the baking time
After an hour, it should be golden and well baked. If yours is looking like it *could* take longer, then leave it in for 15-20 minutes further. I think is quite hard to overbake this pie because it’s so juicy and caramelly inside, so don’t worry
Allow to cool for at least two hours
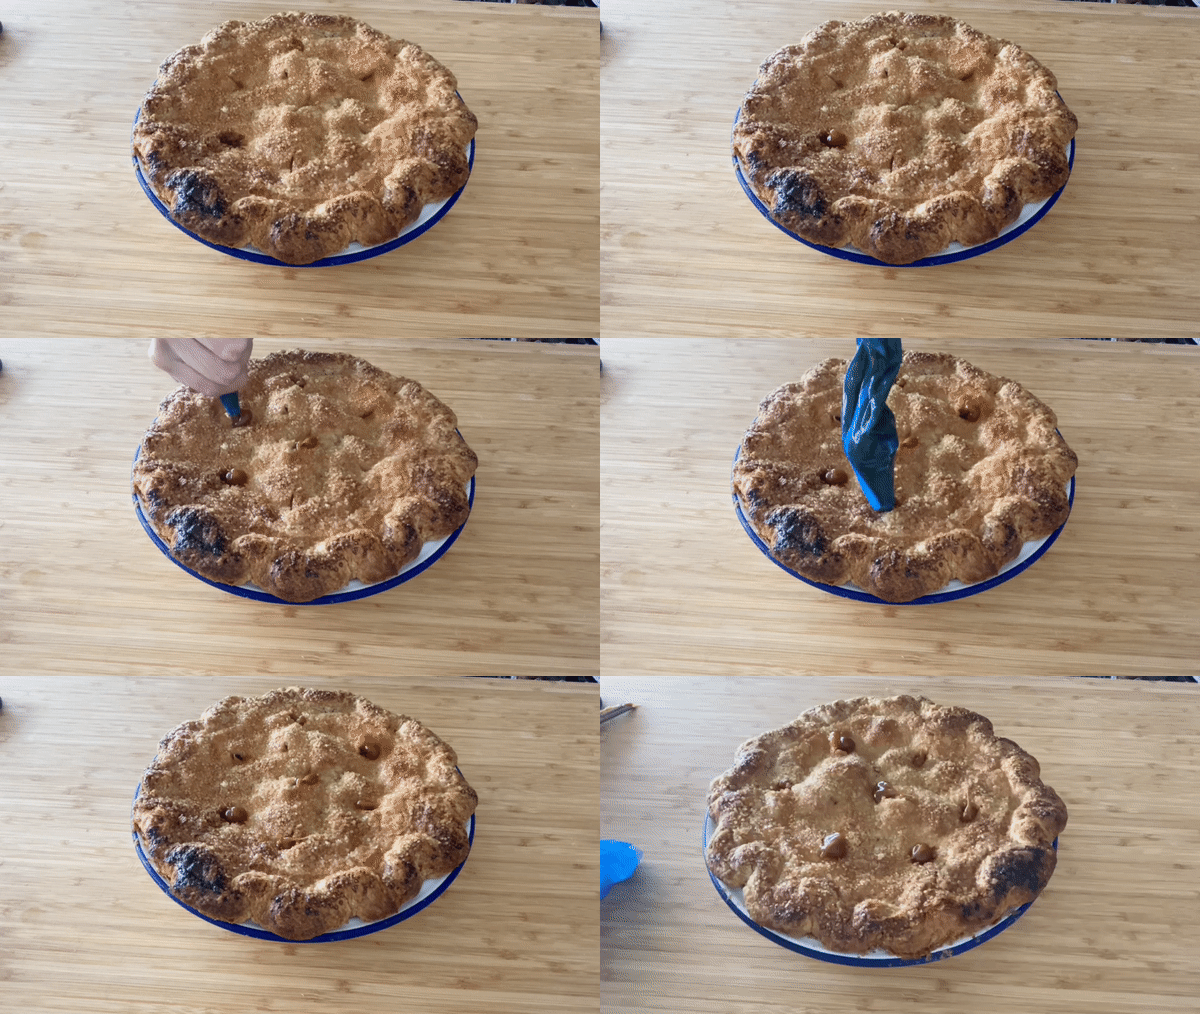
Once cool, you can pipe in your caramel sauce! This is best done just before serving. Get about 50g of caramel sauce in a piping bag then STAB YOUR PIE (the vents come in handy) and squeeze in caramel sauce for extra joy.
To rewarm, heat for about 15-20 minutes in a hot oven OR do it slice by slice









Could I freeze this entire pie before baking so I can make it in ahead?
I’ve been making the same pie dough for the last decade…but you had me at creme fraiche. I took a leap of faith and it blew my mind. The crust had fabulous flavor and incredible flakiness. Total home run. The family wanted an apple pie at Thanksgiving, so I’ll need to try the pear recipe at some point. But OMG, the dough. Thank you!