Kitchen Project #46: Potato buns
Welcome to your new fave bread dough + a present from papier!
Hello,
Welcome to today’s edition of Kitchen Projects. It’s so great to have you here.
Today, it’s all about potatoes and bread, two of my favourite subjects. These two combine to make the fluffiest, softest little rolls. We’re going deep into the world of the humble potato.
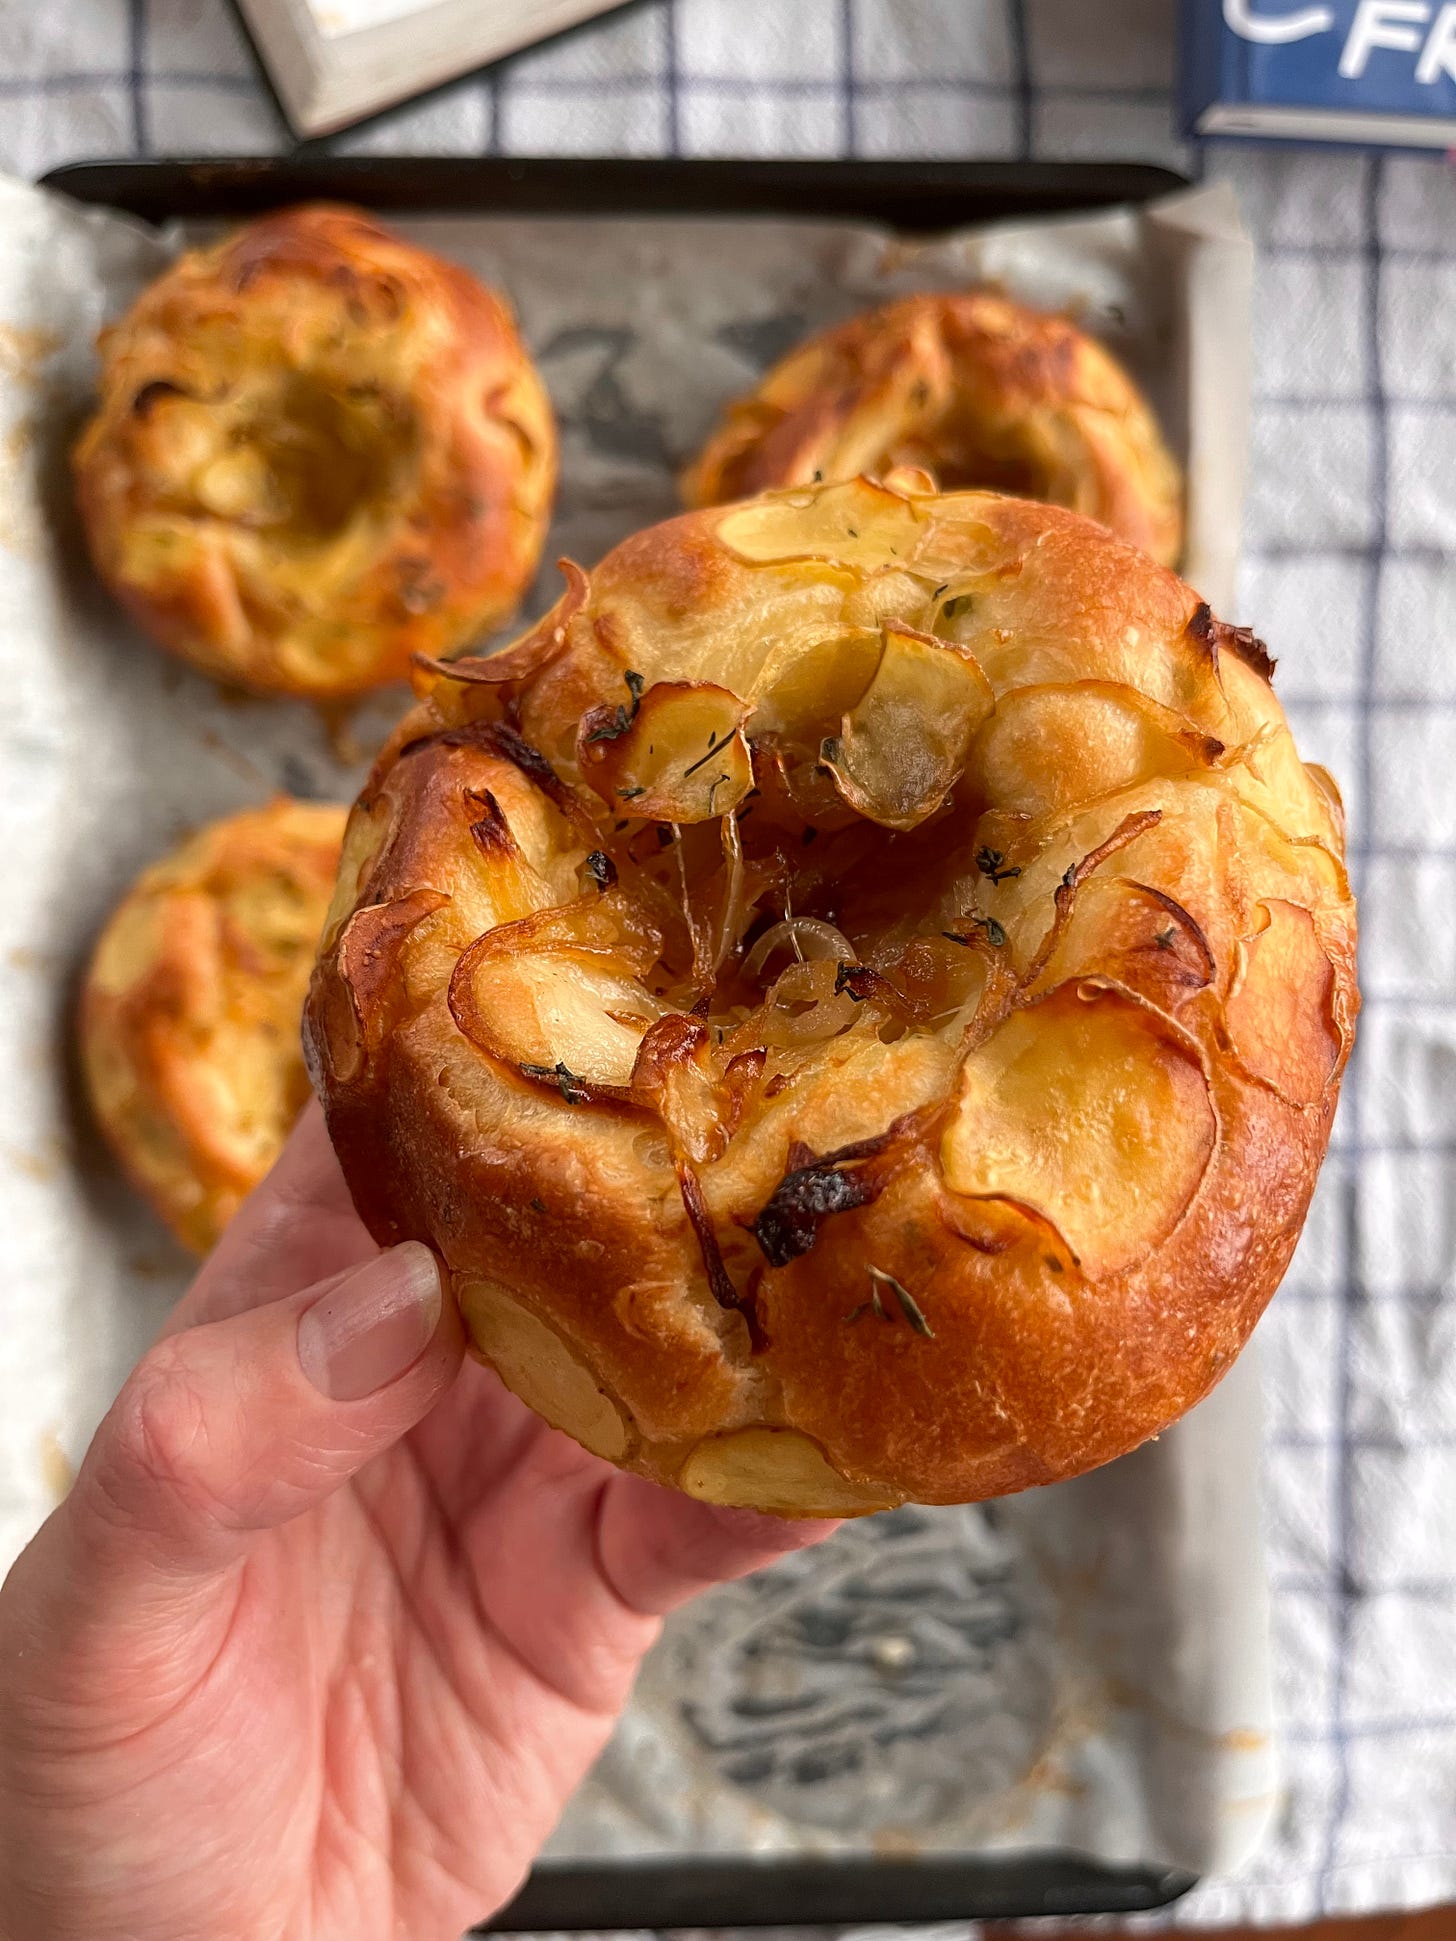
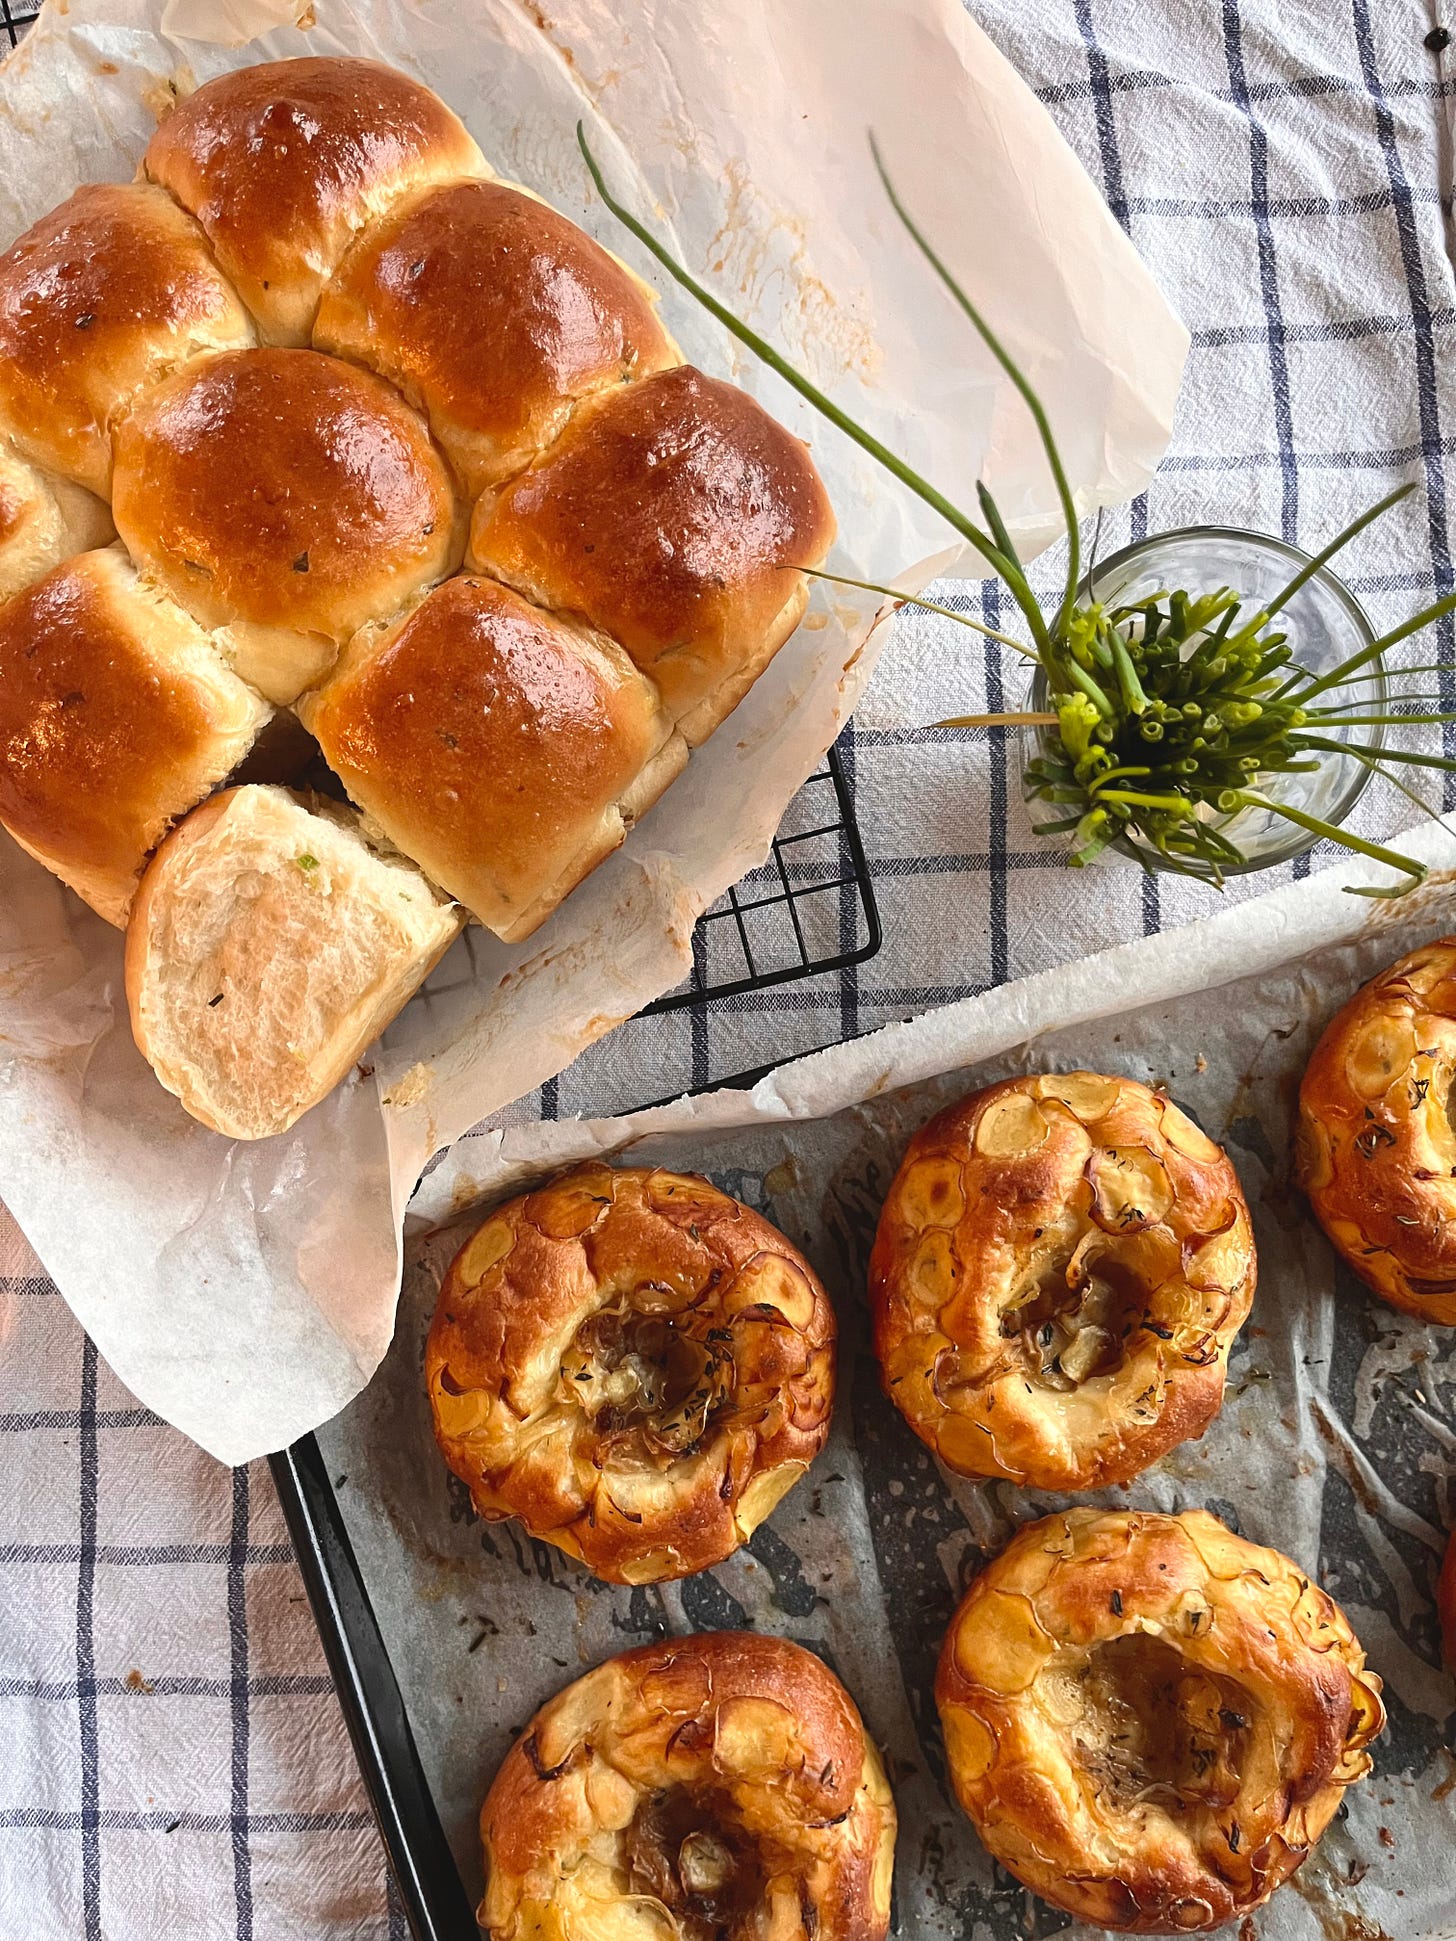
Over on KP+, I’m sharing my level-up recipe of today’s newsletter: The double potato bun. It’s stuffed with bechamel, slowly cooked onions and covered in crispy potatoes, natch.
I launched KP+, the paid version of this newsletter, a few months ago. Over there, you’ll get extra content and recipes, be entered into fun giveaways and have access to community chat threads, the entire archive of recipes and lots more. Subscribing is easy and only costs £5 a month and your support helps make this newsletter happen! So I hope to see you there:
Love,
Nicola
Before we get started…
Today’s edition of Kitchen Projects is sponsored by one of my faves: Papier. If you’re not familiar, Papier makes the most divine stationary sets and notebooks like, ever.
As you guys know, scribbling notes is one of the most important parts of recipe development so a great notebook is essential. I use their green leather / gold croissant embossed notebook to make notes every day - it's always just an arm’s reach away at any given time. I can attest that these notebooks hold up wonderfully and still look great, even after they've been attacked with flour and dough whilst baking.
As well as plain notebooks, they also have a brilliant range of recipe journals. These have been designed specifically for you to jot down all of your fave recipes and ideas, as well as lots of room for things like shopping lists and restaurant hit lists. Plus they have about a bajillion diff gorgeous designs.
So, I’m very excited to team up with Papier to offer you guys a 10% discount with the code ‘KITCHENPROJECTS10’ that can be used site wide until the end of this year across all of their products (hi Christmas!) so click here and have a browse! My KP+ gang will get a 15% discount and we're also doing a special giveaway for 5x journals. All you need to do is subscribe to be in with a chance of winning. See ya there!
An ode to potatoes aka my potat-ode (pls forgive me)
As if you needed another reason to love potatoes, I’m here to open your heart even further to the starchy Gods that they are.
I first remember learning about the science of potatoes whilst listening to the Revisionist History podcast by Malcolm Gladwell. If you’re in need of a podcast recommendation or some audio company for a walk, the episode in question is “McDonald’s broke my heart” and it’s all about the rise (and fall) of McDonald’s fries. Very important stuff.
Anyway, it’s not a spoiler to tell you that this podcast taught me exactly why fries are so good: Water.
Potatoes are 79% water which is extremely useful in whatever application you are using them for. As you know, water turns to steam at 100c. So, when you deep fry a potato, the water on the surface of the potato will evaporate quickly and a crust around the outside is immediately formed as it makes contact with hot oil. This locks in all the water. With no way to escape, the inside of the potato essentially steams which results in a super fluffy inside and that beautiful crisp outside.
But we’re not making fries today. We’re making BREAD. And all that water? Extremely useful.
Effective hydrating techniques
You know how the tangzhong method (see Milk Bread Babka here) allows you to add additional moisture and softness into your bread dough by pre-cooking a portion of flour with water? Well, with potatoes it’s the same thing.
By adding potatoes into your bread, you are able to increase the overall moisture of your bread dough. This brings the effective hydration of today’s recipe up near 85%! This results in a ridiculously soft and squishy dough, but it’s much more manageable to work with. This is because, just like the tangzhong, all of the water in the potato is ‘spoken for’ which allows the rest of the recipe to function.
Although I love the tangzhong dough, the potato is actually even more effective at retaining moisture. This is because potato starch is better than wheat at holding and retaining moisture. Potato starch molecules are bigger and absorb and hold liquid more easily, though for bread baking it does need to come in the form of actual potatoes. Yes you can buy potato starch, but it’s pretty bland, whereas you get the subtle flavour benefits from the potatoes.
Since potatoes do not contain gluten, the mashed potatoes just add bulk to the dough. This bulk also helps keep the bread fresher for longer. When bread goes stale, we tend to think of it ‘drying out’ but moisture loss isn’t the only culprit for stale bread. The staling is actually due to the recrystallisation of starch molecules. Bread begins its life as individual granules of flour. Once we add water, it transforms into the bread dough we know and love. When the bread bakes, these swollen starch molecules burst. As the bread cools, the starch, with its lost water, tries to return to its crystallised state. The hydration rich potato starch molecules interrupt the network of wheat molecules which helps prevent the effects of staling:
I should say now, this bread doesn’t taste like potatoes. That’s where the whole double potato buns come in - thinly sliced potatoes will crisp up as it bakes giving us both the flavour and texture benefits.
How to cook the potatoes
This newsletter is in support of roasting your potatoes to make mash. If this isn’t part of your standard cooking practice then I implore you to make it so. I, too, used to be the victim of faffing around peeling potatoes, cubing and boiling them before mashing. But now I am free! And I hope you will be too. It is EASY.
When you incorporate potatoes into your bread and bakes and given how much hydration they already contribute, I’m careful to cook the potatoes in a way that allows me to fully control the water. This means that boiling potatoes is out of the window. In recipes that ask you to boil potatoes, there is often an additional ‘drying out’ stage required because of all the additional, flavourless, un-starchbound water that has been absorbed by the potatoes.
Although additional moisture isn’t problematic for your everyday side dishes, when you are building and considering bread formulations, every drop of water counts. Although we could make a potato loaf with boiled potatoes, the amount of water that would then be in our dough is unpredictable. And unpredictability is the last thing you want when you are baking. Let’s discuss how to avoid that
When you roast your potatoes for baking, or just for mashing, you are steaming the inside of your potato, resulting in a perfectly fluffy middle which makes outstanding mash. As well as this, you aren’t adding or watering down the flavour, which means you get the most potatoey base possible and haven’t diluted the potatoey goodness in any way.
Even more reasons to love your oven roasted pots
Another benefit to this process is the skins. When you peel and boil potatoes, the skins more often than not end up in the compost heap. When you bake your potatoes to make mash or puree, you are left with perfect skins which can be filled and returned to the oven for a no effort second side dish OR, as is my favourite, returned to the oven on their own and roasted to a crisp then made into roast potato powder, which is the seasoning you didn’t know you needed. I’ll cover that on KP+ next week!
If you weren’t already convinced, this method is also the absolute easiest and faff-free option for potato cooking - get your oven hot (200c fan) and potatoes directly onto the rack then bake for an hour. Leave to cool slightly then scoop out the flesh. Done.
This is also the best way to prepare your potatoes for something like gnocchi which, again, needs a careful eye on the hydration in order to achieve the right final texture. Welcome to the roast potato club.
So.. how much potato?
I based this potato recipe on my tried and tested milk bread dough which has 20% tangzhong vs overall weight. Although I was tempted to try this equal swap, I wanted to make sure the bread would retain a lightness. Although the potato is a magical ingredient and does provide moisture, I would also be adding a lot of starch and potential heftiness. So, I reduced the overall potato to 15% - this resulted in a light, airy and soft bread. If I was using another starch puree that I wanted to impart flavour as well as texture (pumpkin/sweet potato?) I’d likely increase this to 20%.
Knowing that eggs are significant in creating airy rises in dough (check out my brioche experiments here) I didn’t want to scrimp on the egg, so I found that the formulation I’m sharing with you today is the perfect bridge between egg/potato/milk in terms of flavour and texture.
For this bread, I would use any floury potato and avoid waxy potatoes. I just used bog standard baking potatoes and they worked great.
Managing fermentation and overnight fridging
As we discussed in the apple butter buns recipe, fermentation is much harder in the winter because the significantly lower ambient temperatures in our homes are just not as yeast friendly.
To help mitigate this, I’ve found that using the potato mash whilst it’s still hot and fresh from the oven is a great way to increase the dough temperature and encourage fermentation making this a fairly quick rise both times. If you’re working with cold potatoes , I’d recommend heating the milk to 60c then mixing in your mashed potatoes. So, depending on your schedule either do hot potatoes + cold milk OR cold potatoes + hot milk. Simple!
As with all doughs, dough can be mixed and stored overnight in the fridge. It is easier to work with when its cold and it does also improve the flavour, but I’ve had lots of success just making these straight through and forgoing the fridge rest.
Extra flavours
For these buns I’m adding chopped chives to my dough as a little reminder that mashed potatoes are within, but you could leave them plain. I’ve included a range of weight for the chive as its really up to you how herby you like it. Herbs, added to bread, really need to be added with the heart so I prefer not to be too prescriptive.
Wanna know how to level up these buns and make my double potato buns, stuffed with bechamel, slow cooked onions and covered in crispy pots? Check out the KP+ post here!
Mixing by hand and altering the hydration
To get the softest dough possible with the longest shelf life ie. stays soft for longer, I have maximised hydration here. But I’ve also done that knowing I will be mixing this with a machine.
This means it is a bit hard to work with. If you are mixing it by hand, I’d recommend reducing the milk by 20g-30g. I know this doesn’t sound like a lot, but it will make a huge difference in how it mixes. Sure, your buns will be slightly less soft, but they’ll still be brilliant.
In fact, if high hydration makes you anxious or if you are less experienced in dough handling, reduce milk by 20g the first time you make them. I have a feeling you’ll be making these more than once.
Okay, let’s make them!
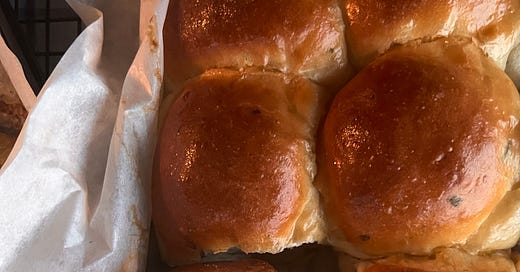
Potato buns
I use a 8 x 8 inch dish to bake these
Makes 9 x 65g-70g buns
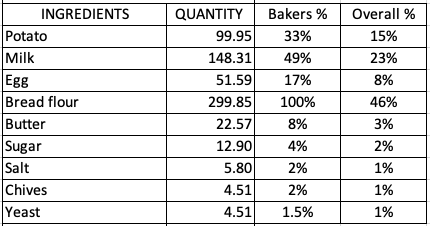
100g mashed potato (directions below, prep about 150g-200g worth of potato to be safe)
150g whole milk (or 120g milk if you are less confident with shaping wet doughs! If you are less experienced in making bread, go for less milk the first time you make it)
50g egg
12g sugar
6g salt
5g-10g chives (depending on how chivey you like it!)
5g yeast
300g strong white bread flour
25g butter (soft)
Cooked potatoes method
Preheat oven to 200c fan
Place potatoes directly onto oven rack
Bake for 1 hour
Use a sharp knife to check they are completely soft all the way through. Cook for another 15-20 minutes if not
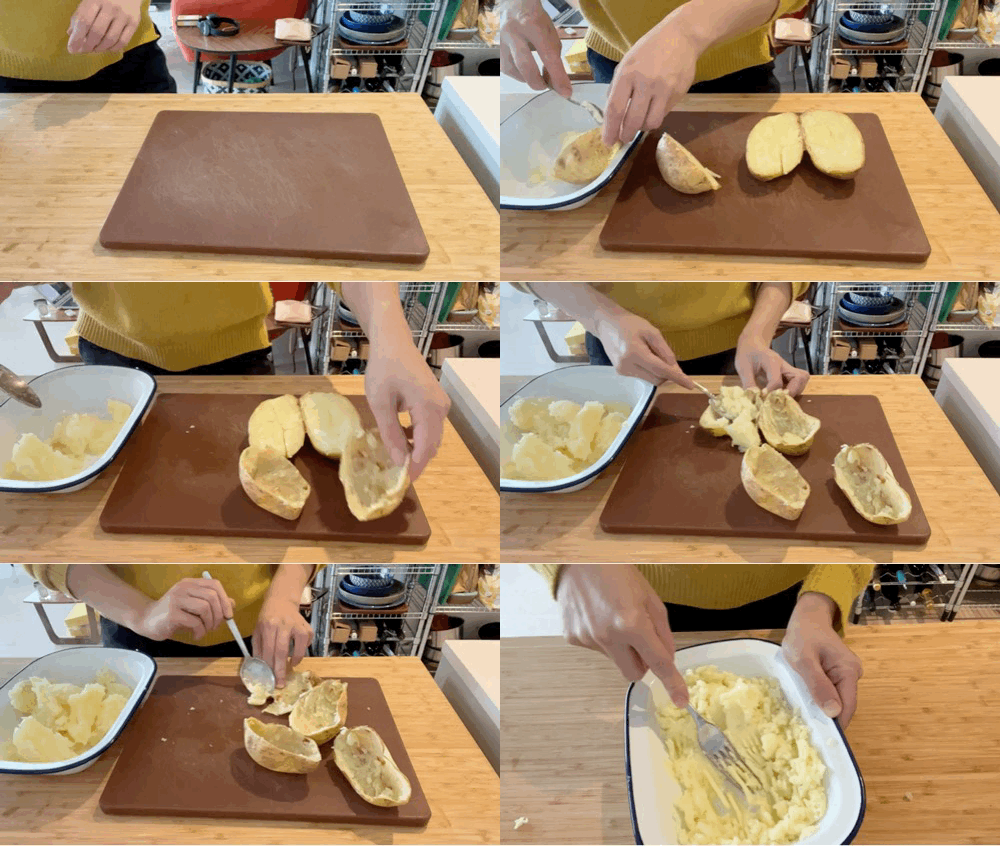
Remove and allow to cool slightly before halving and scooping out the flesh and mashing with a fork
Either eat the skins or turn into loaded potato skins. Directions on how to make roast potato skin powder coming next week
Potato dough method
AS ALWAYS - proof your yeast according to the manufacturer's instructions. Please check the instructions on the back of your packet!
If you are using your potato whilst hot, add cold milk then egg in the bowl of your KitchenAid. If your mashed potatoes are cold, warm milk to 60c then add to the potatoes, followed by egg
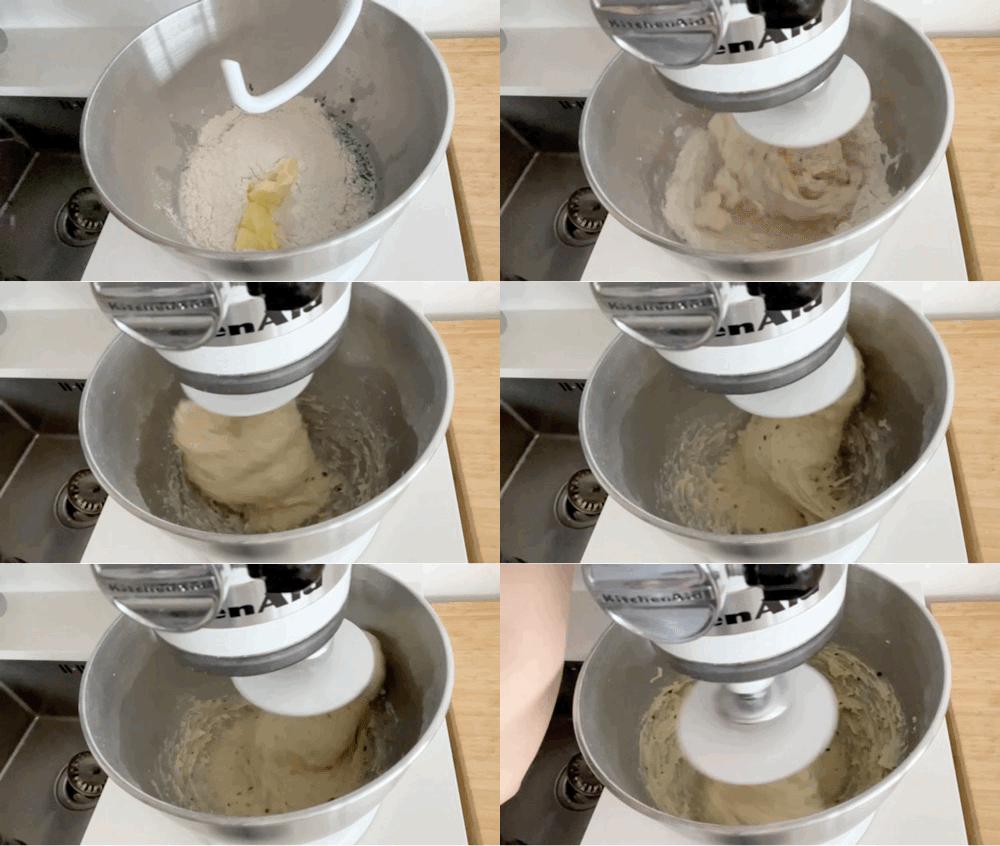
Next add in the sugar, salt and yeast (keep yeast a little bit further away from salt and sugar), followed by the flour, butter and chives
Mix on medium high speed on the KitchenAid for 8-10 minutes. Rest for 5 minutes
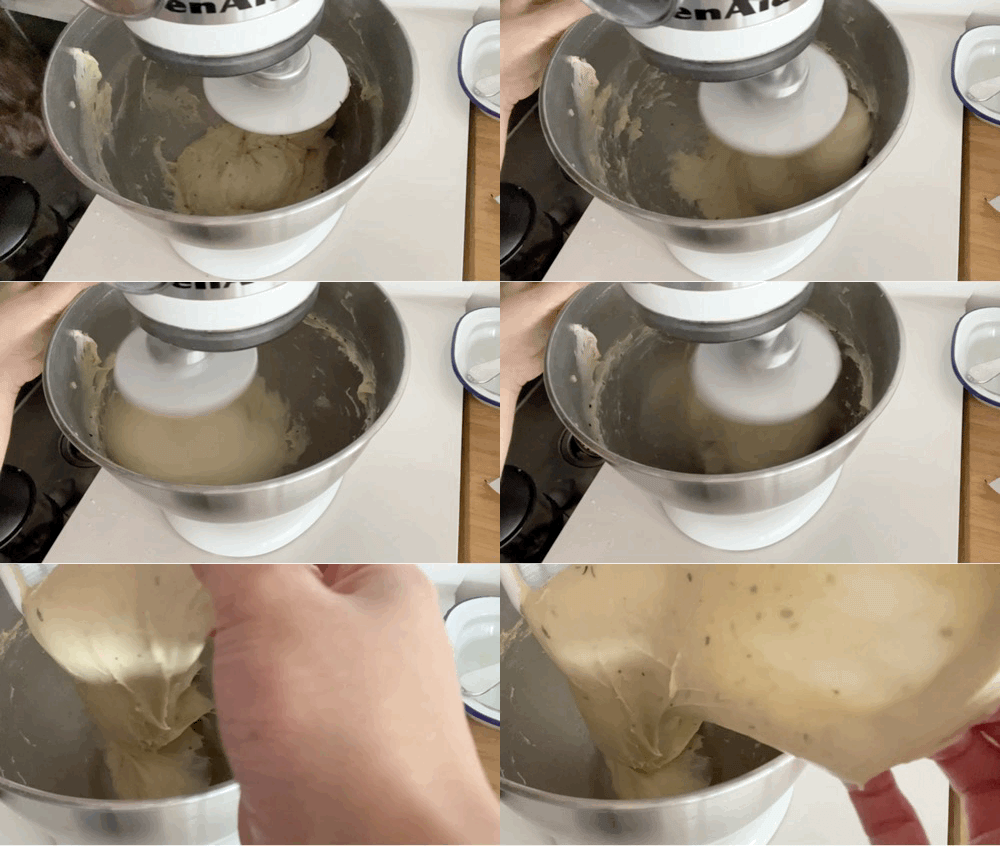
Continue mixing for another 8-10 minutes until it pulls away from the sides of the bowl and full gluten development is reached. Scrape down as needed
Move into an oiled bowl and cover so it doesn’t dry out! Leave to rise for 45mins - 1 hour til it doubles. This dough is quite active so you shouldn’t have to wait too long
Finishing for buns (or you can also just shape into a loaf!)
Pre-heat oven to 180c fan
Line your baking dish with greaseproof paper. Grease the paper lightly, too. I don’t normally do this but for some reason my buns have been sticking lately - prob to do with the brand I’m using
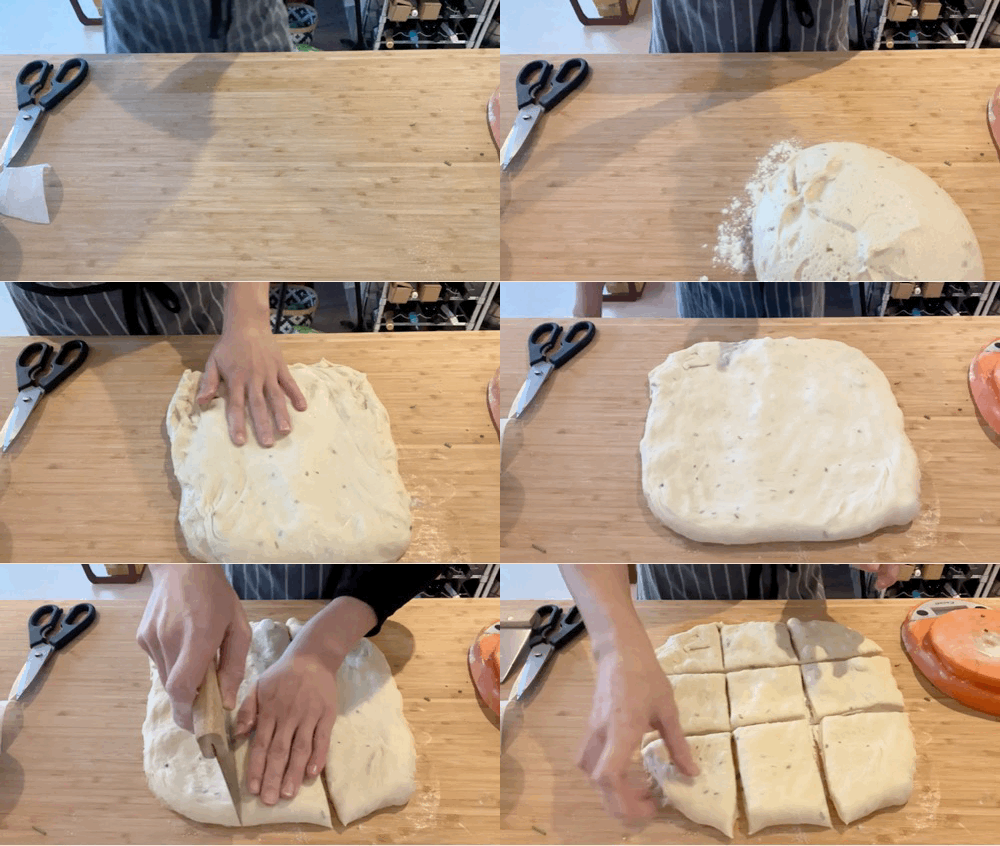
Tip proofed dough onto a well floured surface. Don’t worry about adding too much - you can be fairly generous here.
Press down into a flat square then divide into equal sized pieces. Scale each to 65-70g
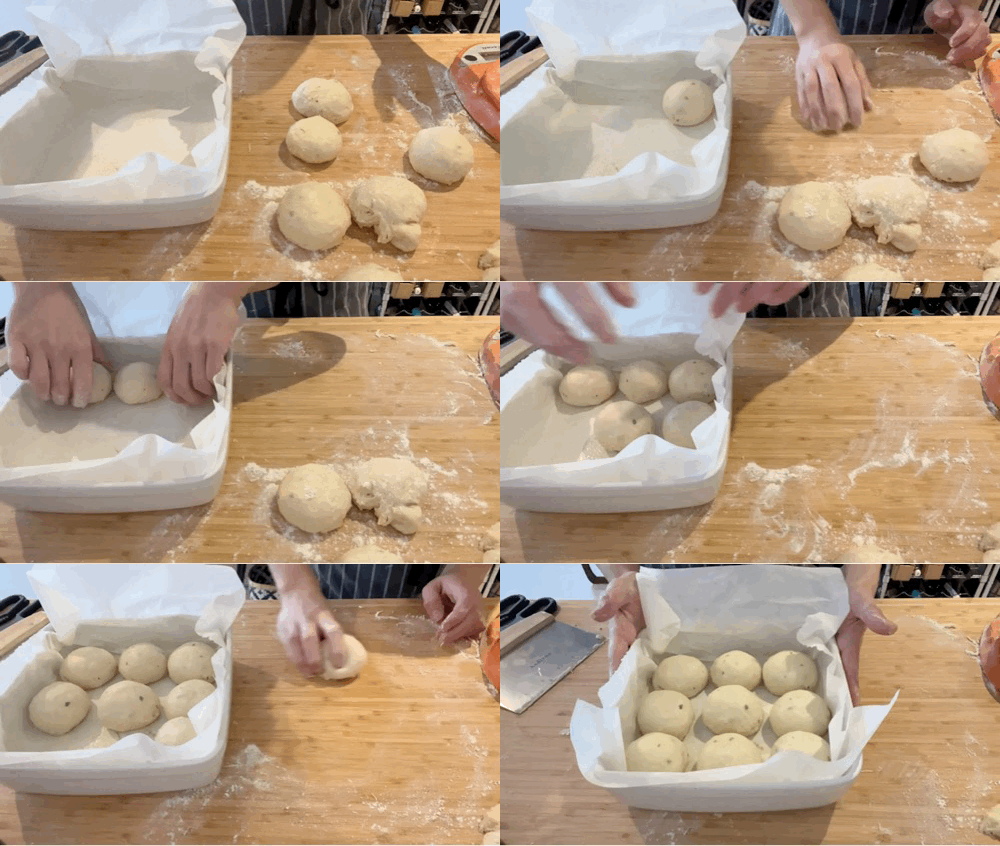
Shape into balls - you can preshape by gathering the edges and pinching into a rough ball, then finish off by rolling against the worktop with a cupped hand to help shape it using the curve of your palm, like this:
I find it's best to have your hand or the top of the bun floured but the surface of the table sticky - this allows you to create tension. Sometimes I find its best to shape them once then set aside then shape again to make it really tight!
If you want to make a loaf, roll the flattened dough square up tightly into a sausage then squish the ends close and pop into a loaf pan!
Place balls of dough into your baking dish, in a 3 x 3 format
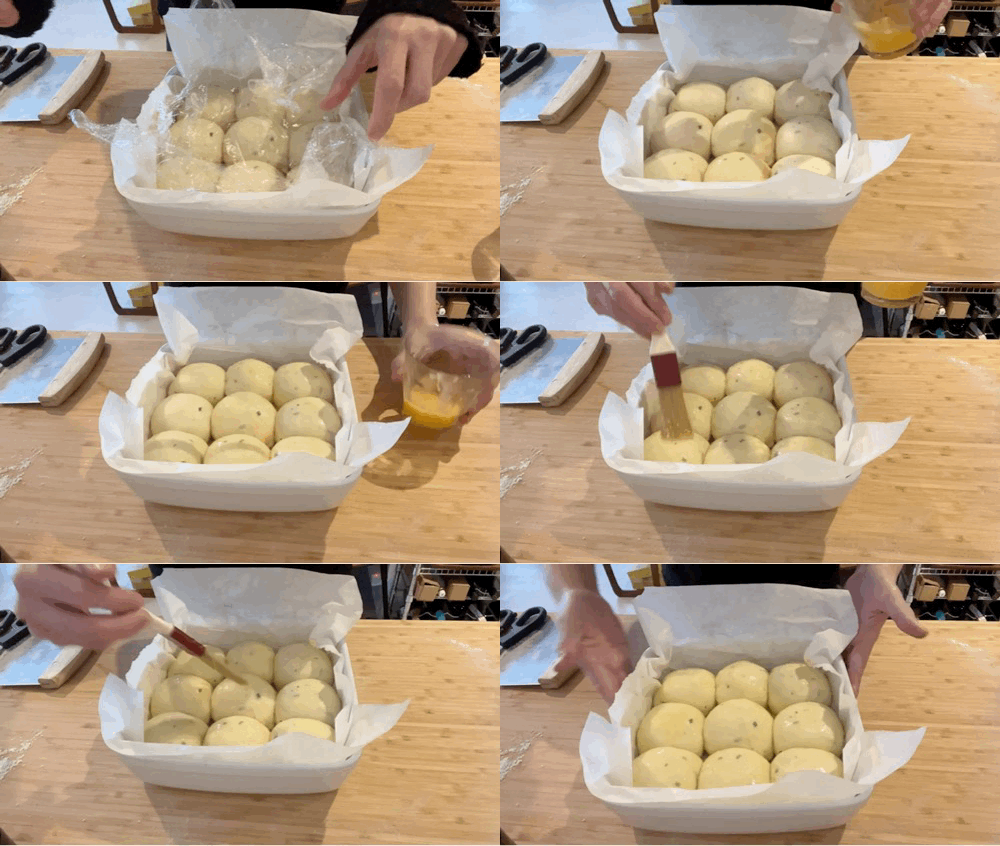
Leave to proof for 45 mins - 1 hour. The buns should be kissing eachother by now
Egg wash generously. Try and get it into the little divots between the buns
Bake for 20-25 mins until golden. If you’re worried they’re not done, just temp with a probe and check they are above 93c degrees
Leave to cool for at least 5 minutes in the pan and then move onto a cooling rack. Wait at least 15 mins (if you can!) before enjoying
These buns will stay fresh for 2-3 days if you wrap them once cool
Fancy levelling this recipe up? Check the KP+ double potato bun edition here!




Hello me again :) so to do an overnight fridge fermentation, you mix the dough, let it do a full first rise, then put it into the fridge in a bowl? Then the next day you take it out, shape into rolls and let them warm/rise (presumably for a little longer than 45min?)
Hi! The buns, they bake at the same temp as the potatoes? 200+fan?