Kitchen Project #38: Tart Tropezienne
Why brioche = cake plus a deep dive into brioche + learning to speak wholemeal
Hello,
Welcome to this weeks edition of Kitchen Projects. It’s so lovely to have you here.
This is one of those desserts I’ve been thinking about for years but for some reason have never made myself: The Tart Tropezienne. Never heard of it? Get ready to fall in love!
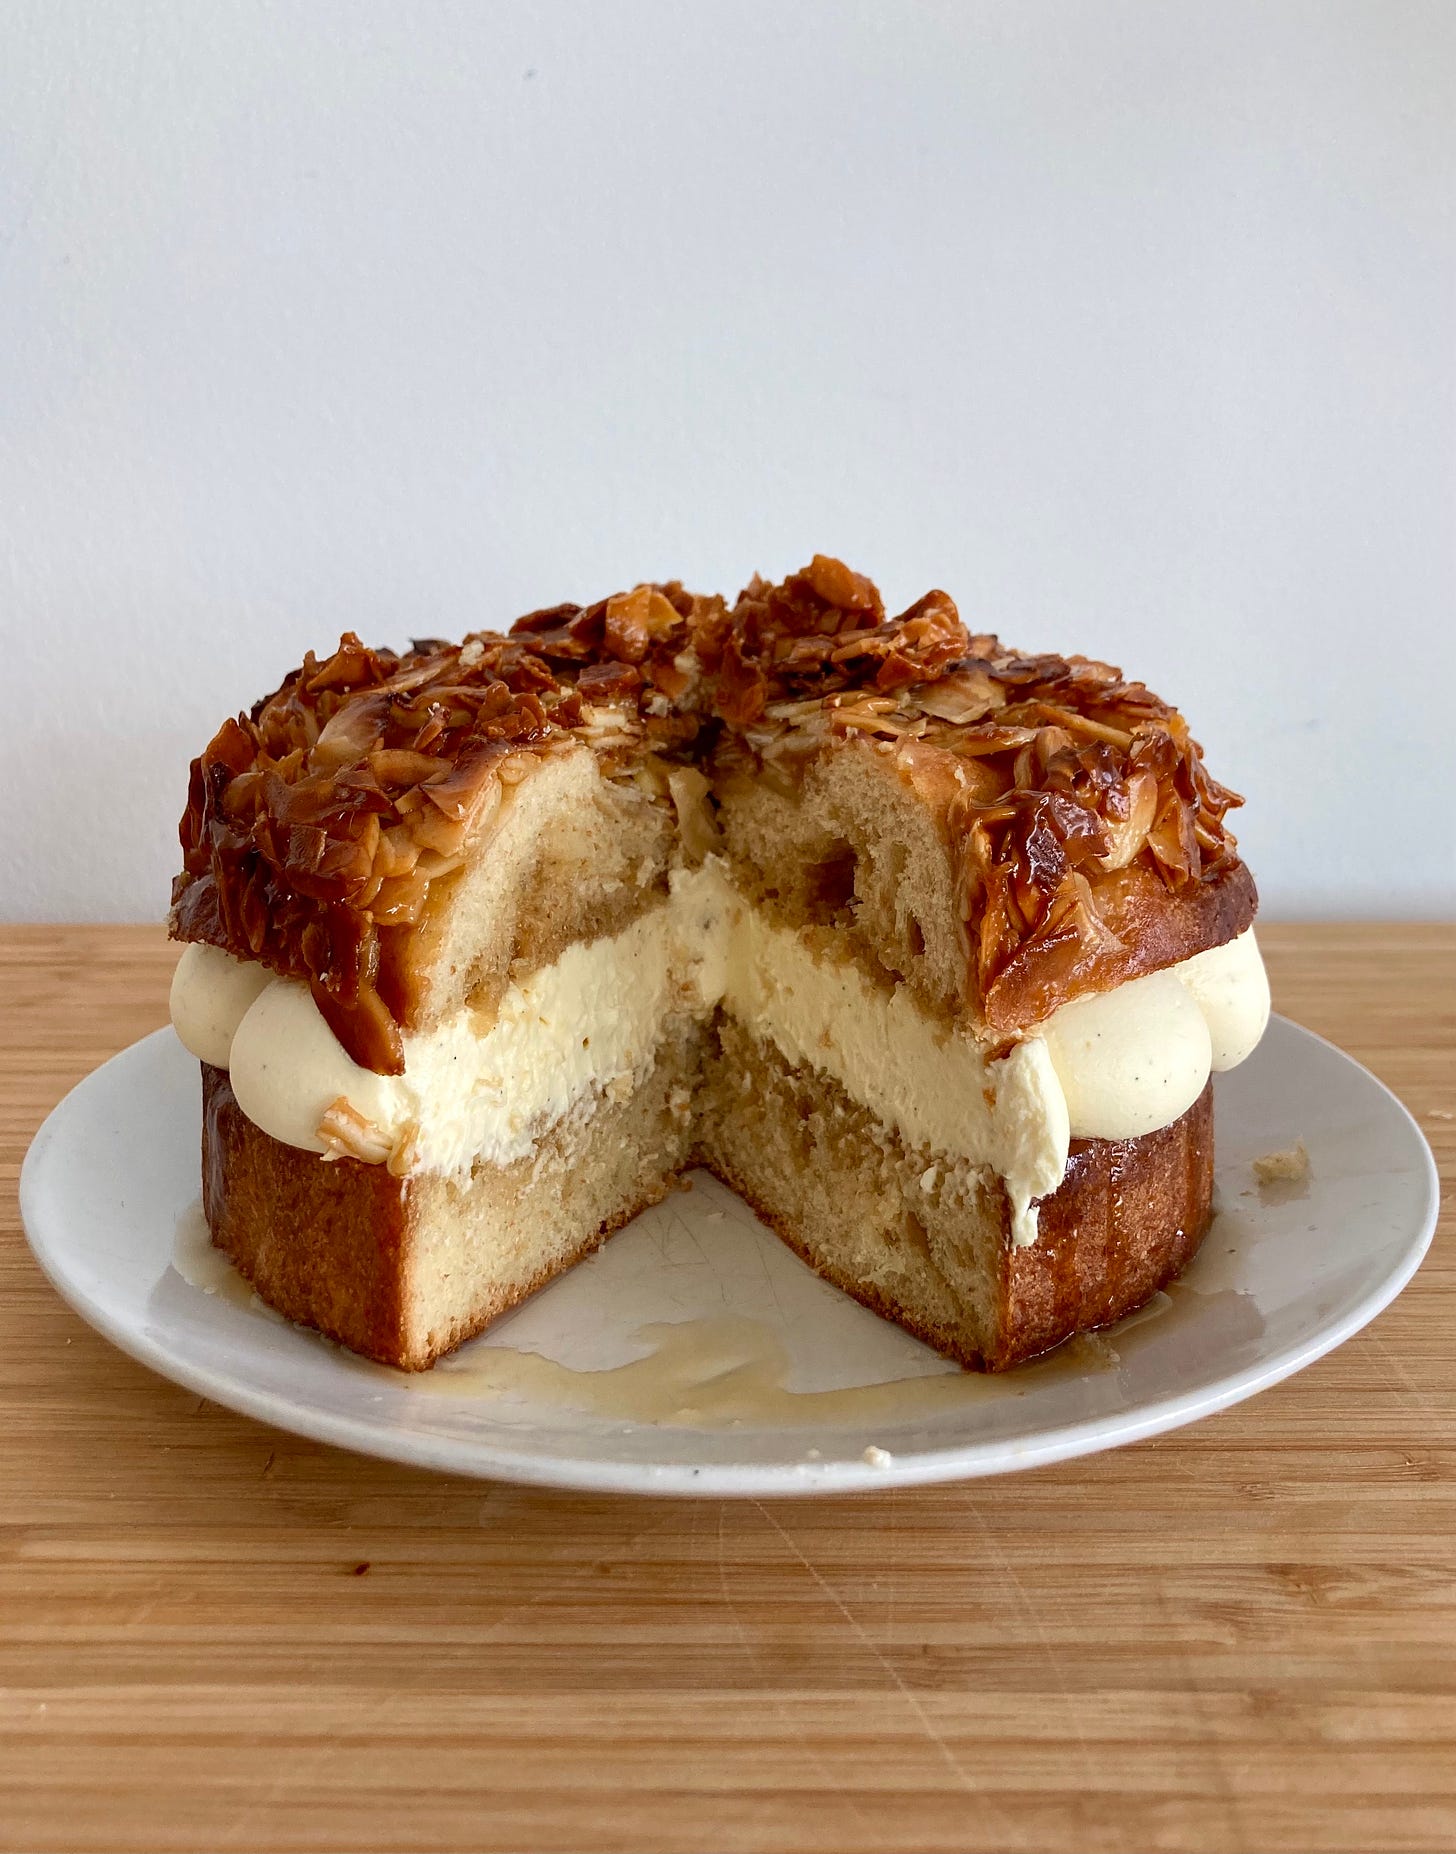
Over on KP+, I’ll be sharing the method for another brioche delight: The bee sting cake aka the baby of a florentine and a brioche. It’s adorable and ridiculously delicious:
Speaking of KP+, I launched it a few months ago to create a way for you to support the writing and get access to extra recipes, content + community chat threads for just £5 per month. Just click below to get access to future content plus all of the archive (there’s a lotta good things in there):
Love,
Nicola
P.S. SUMMER HOLS FINALLY ARE HERE - I’ll be taking a break from the newsletter for a week to (hopefully) go on holiday. So the regular Sunday newsletter will be back on Sunday 19th September
Escape to St Tropez(ienne)
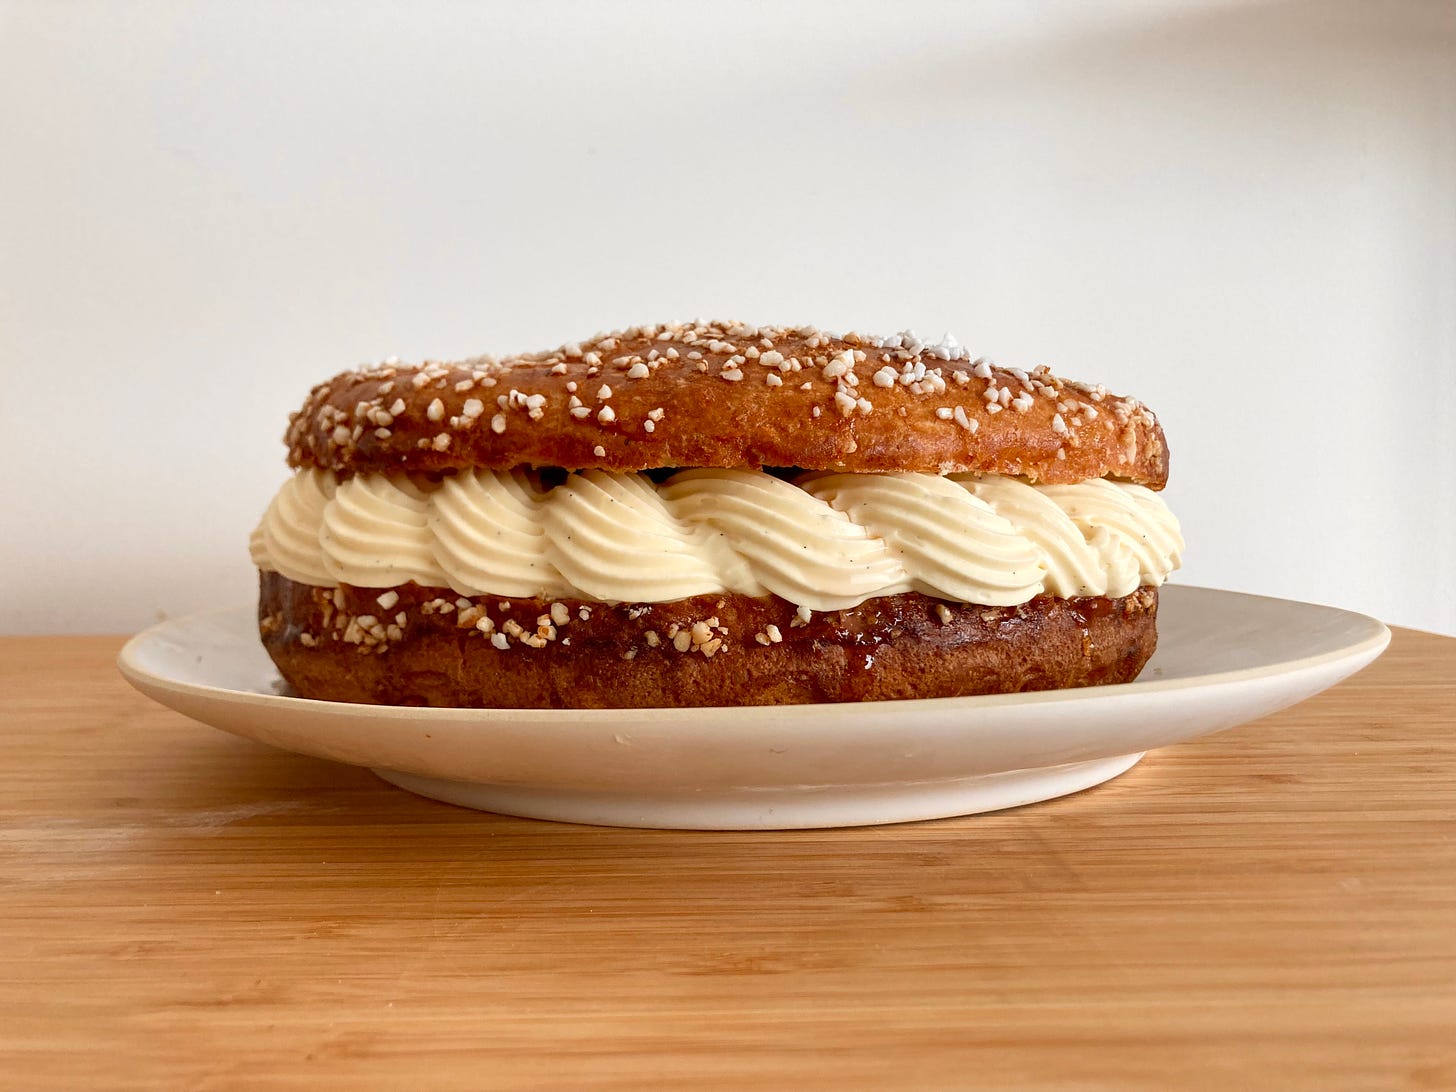
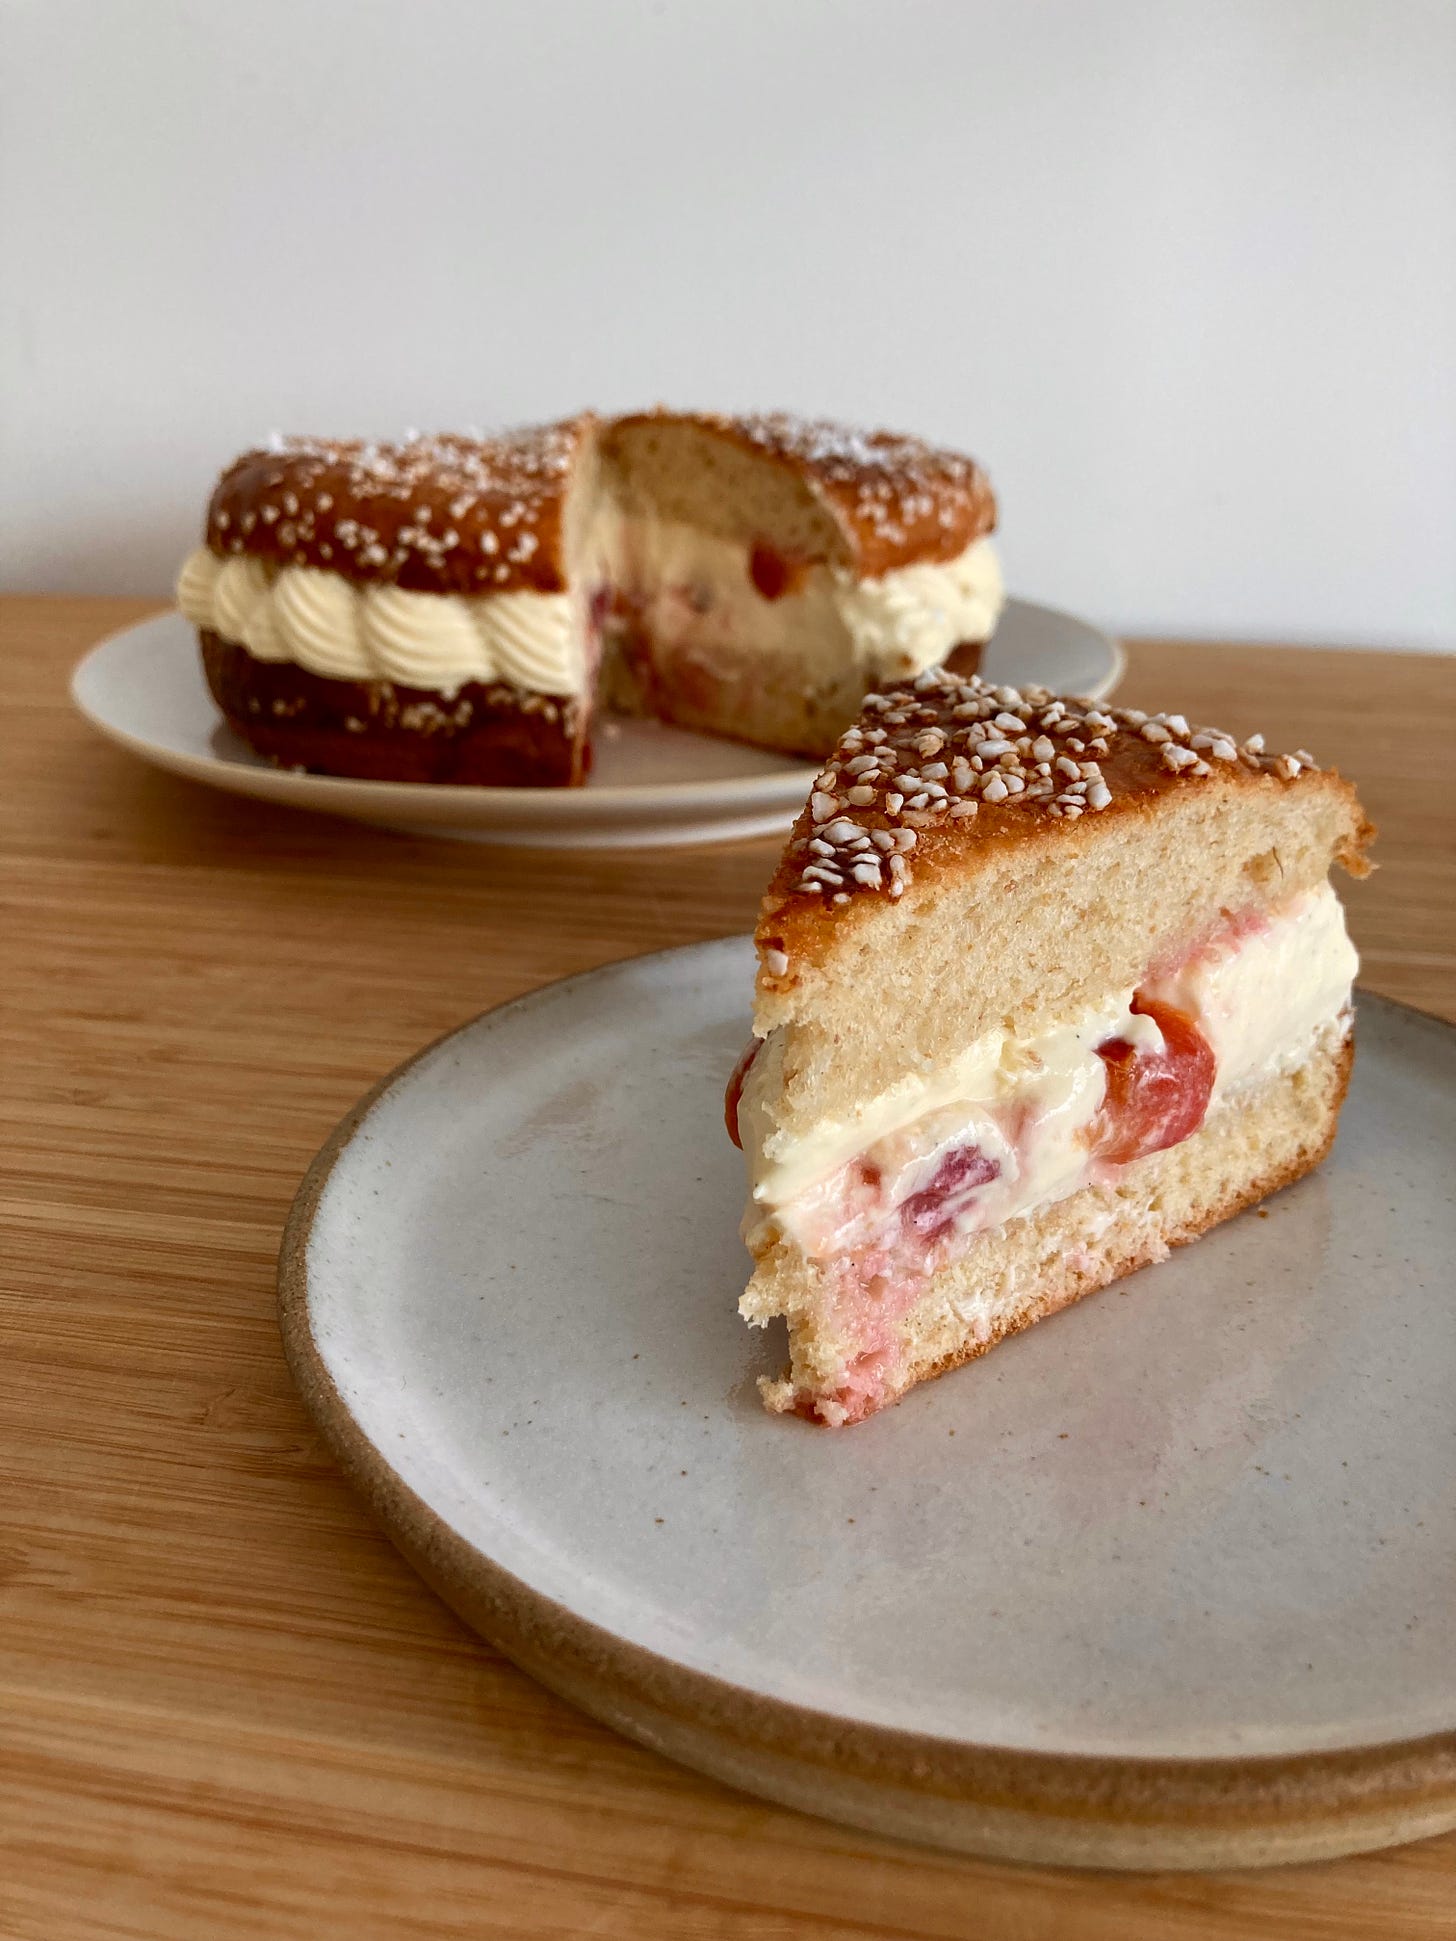
This week I finally took the plunge into the dreamy world of the Tart Tropezienne. Tart Tropezienne is a beautiful golden disc of brioche, stuffed with creme madame (cannot wait to tell you about THIS one!) and finished with crunchy pearled sugar. It’s such a treat to eat and look at, too. Plus, we’ll be adding roasted plums to ours.
Why brioche = cake
Let’s be real for a moment: Brioche is basically cake.
You know how eating a muffin for breakfast is actually just eating breakfast cake? Well, Brioche is the original breakfast cake. Considered part of the viennoiserie (ie. morning goods) canon, let’s size up a couple of formulations.
We’ve become so used to cake to mean a batter with raising agents / egg foam that it seems strange that a cake could be raised with yeast. But, brioche stands firmly in the centre of pastry, cake and bread, holding it all together. It’s the ultimate fusion bake!
Understanding where recipes are similar - and where they are different - will help us get a deeper understanding of building your own recipes. Let’s compare three pastry champions - The Victoria Sponge, the Genoise and Brioche:
Although comparing these three might seem like a strange activity, we get to delve into the WHY of baking, which is probably the most exciting place to be.
One of the major differences in these three recipes is the way each one is leavened ie. the way that that air is incorporated into the dough. With the Victoria Sponge, the dough is aerated via creaming of butter and sugar which creates a network to trap air bubbles, provided by additional chemical raising agents. With the genoise, air is trapped into the eggs during a long foaming mixing process, which sets when baked. With the brioche, air is incorporated via fermentation of yeast and trapped in a strong gluten network. Each of these recipes rise but all for different reasons!
As well as this, the sweetness is derived from significantly different places. Brioche, of course, is the least sweet overall but it does get a significant portion of its sweetness from milk in the form of lactose sugar. Yeast does not have the enzymes to digest lactose sugars, so we includes sucrose (15%), which plays a major role in getting the yeast fermentation going.
Both genoise and victoria sponge get their sweetness from the sugar itself, but the sugar in these two cakes also plays a major role separate from the sweetness. The genoise utilises sugar to build a strong foam during the mixing process. The victoria sponge, similarly, also uses sugar to build a network with the fat to capture airbubbles, creating a light sponge.
The rules of brioche
Most sweet or enriched doughs are just variations on brioche. Whenever I go to build a recipe for KP, it always begins with a variation on a classic dough. There must be sugar, there must be salt, there must be eggs and of course there must be butter. How much of each, however, can vary, as well as mix-ins.
Part of the reason I write KP is so I can hopefully give you the confidence to build your own recipes. I really want you to be able to adapt and change recipes to suit you. I want you to be able to look through your pastry books and know what you can (and what you can’t) tweak ‘safely’ to create flavour profiles of your own.
There are a few rules when it comes to brioche. And when I say rules, it’s not to be scary! In fact, I see rules more as guidelines of where I can move and change recipes without much trouble.
**The percentages below (except the flour protein) refer to bakers percentages. To refresh your memory, bakers percentages is the % of an ingredient in proportion to the flour. In a recipe displayed in bakers percentages, flour will always be 100%**
Brioche needs a strong flour, around 12% protein, to survive the mixing process and house all of the butter. Brioche is actually a highly structured dough, with its fine crumb that can also be torn in soft, cotton-candy like strips
The dry yeast quantity is standard and should be around 2-3%. This does not need to be changed.
The salt is also around 2-3%. This does not need to be changed as it is the correct quantity to both add flavour and control yeast fermentation
The sugar ranges from 10% - 20%. You need sugar to activate the fermentation process but also for flavour and tenderness. Too much sugar in bread will lead to problems - we’ve talked about this before, but the water-loving sugar will happily take hydration from everyone and play havoc with the dough. Too much sugar will also overwhelm the yeast and prevent proper fermentation
The hydration of brioche can be anywhere from 50% to 80% (producing a very light, soft crumb) but generally I keep mine in the 60%-70% range to keep the mixing time reasonable. The higher hydratio brioches are quite hard to work with
Traditionally, brioche is hydrated with a mixture of milk and eggs (or most traditionally, it should be only eggs). We’ll cover that in detail in the next section
We know that brioche needs fat, but how much? Well, this can be a fun thing to play around with. I think anything in the range of 20%-30% would put bread into the ‘demi brioche’ category, 30%-60% is the standard brioche range of recipes I’ve seen, yielding a . Anything about 50% CAN BE DONE but i think has diminishing returns
Other ways you can impact the brioche itself is by changing the fat itself - from brie, to olive oil, to chicken schmaltz to chocolate spread, you can emulsify in lots of different fats. But we’ll cover that other time, promise! But go WILD in the meantime - it’s a lot of fun.
The mixing process of the brioche is always the same: Mix flour and liquids until medium gluten development is reached before adding the butter before mixing to full gluten development.
Fat inhibits gluten development (think rubbing in butter to make pastry) so we don’t want to let the fat into the party too early. So the fat is added bit by bit and emulsified at the end. Don’t forget, brioche is actually an emulsion that can actually break under stress so if the dough gets too hot or overworked, the dough will become greasy and fat will leak out. If this happens, you can chill the dough down and re-knead it.
Brioche, like all doughs, benefits from a good bulk fermentation as well as a proper rest in the fridge. Brioche with a high fat content can be almost liquid after mixing but it will firm up well in the fridge as the butter resolidifies. Brioche dough is happy in the fridge for 24 hours but can also be frozen to be baked at a later date.
The impact of hydrating agents
In brioche, I tend to use a mixture of milk and eggs to hydrate my dough. The milk adds lots of sweetness and the milk proteins (lactose) brown easily, giving it a golden crust. The eggs provide fat, flavour and structure, owing to the presence of the ovalbumin, the protein that sets firm when heated.
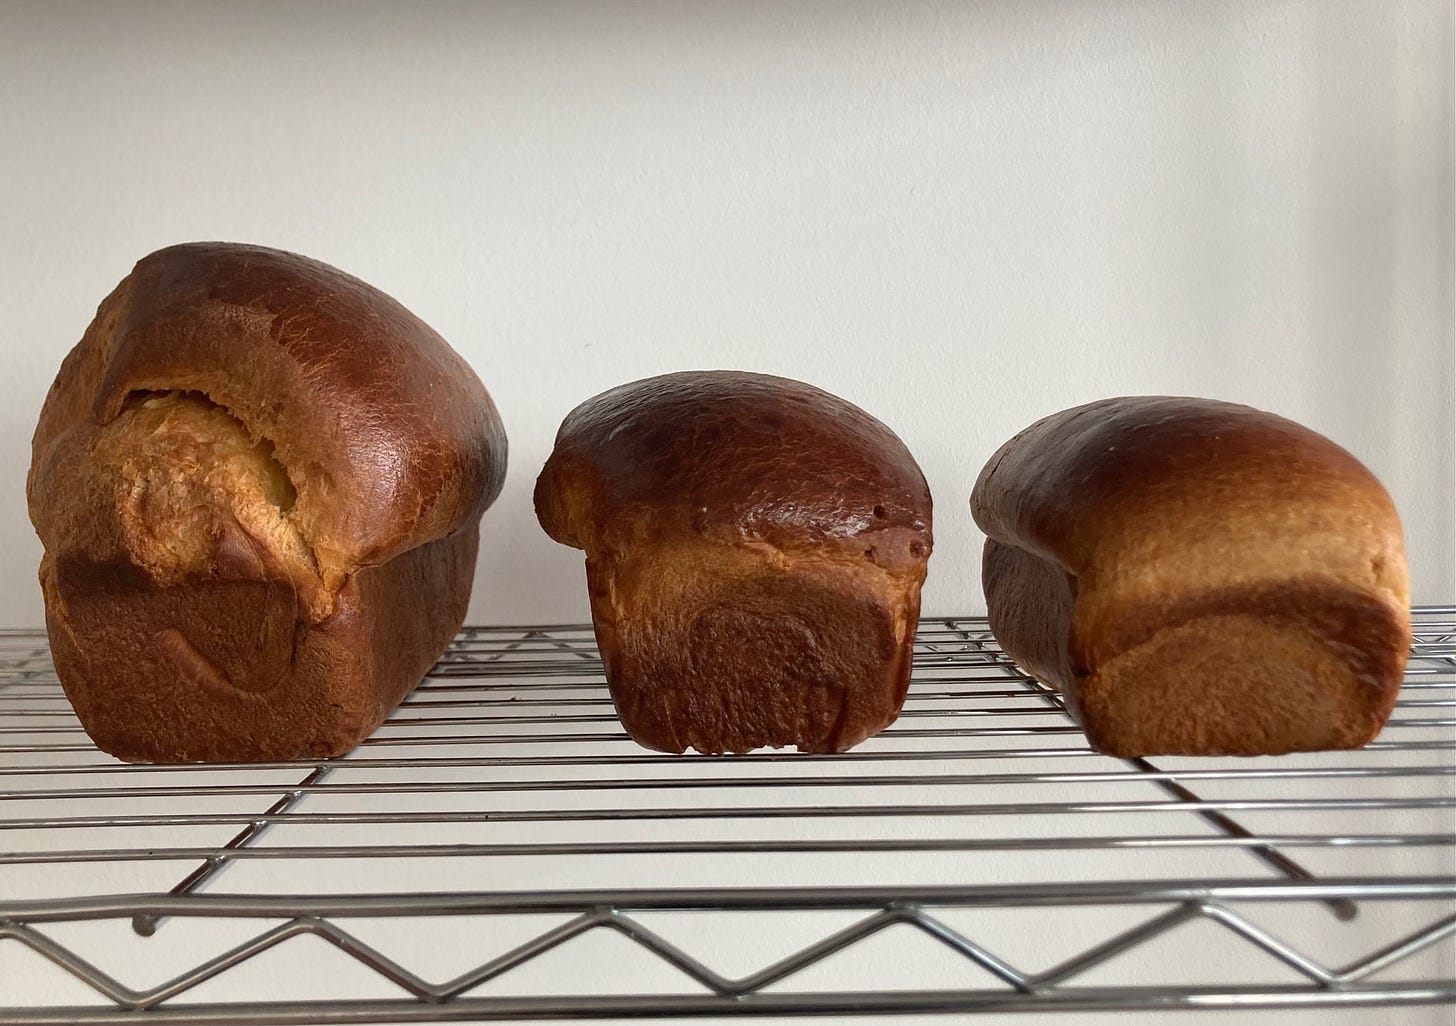
But doing this mixture of milk and eggs is something I’ve always just *done*. So today, I’ll be testing the impact of these hydrating agents:
Brioche 1: 100% Eggs
Brioche 2: 50% Eggs, 50% Milk
Brioche 3: 100% Milk (not really a brioche, this should really be called a ‘pain au lait’
Mixing
When it came to mixing, I found the 100% egg only dough came together much more easily. This is probably due to the effective lower hydration. I know we’ve covered this before, but not all liquids hydrate equally. And when we say hydrate, we’re actually talking about the water content, because when it comes to dough, gluten can only be formed in the presence of water (h20). So, eggs are actually only 74% water so if you hydrate a dough with eggs only, you’re effectively lowering the hydration, even if you use the same (g) weight.
Proofing and baking the dough
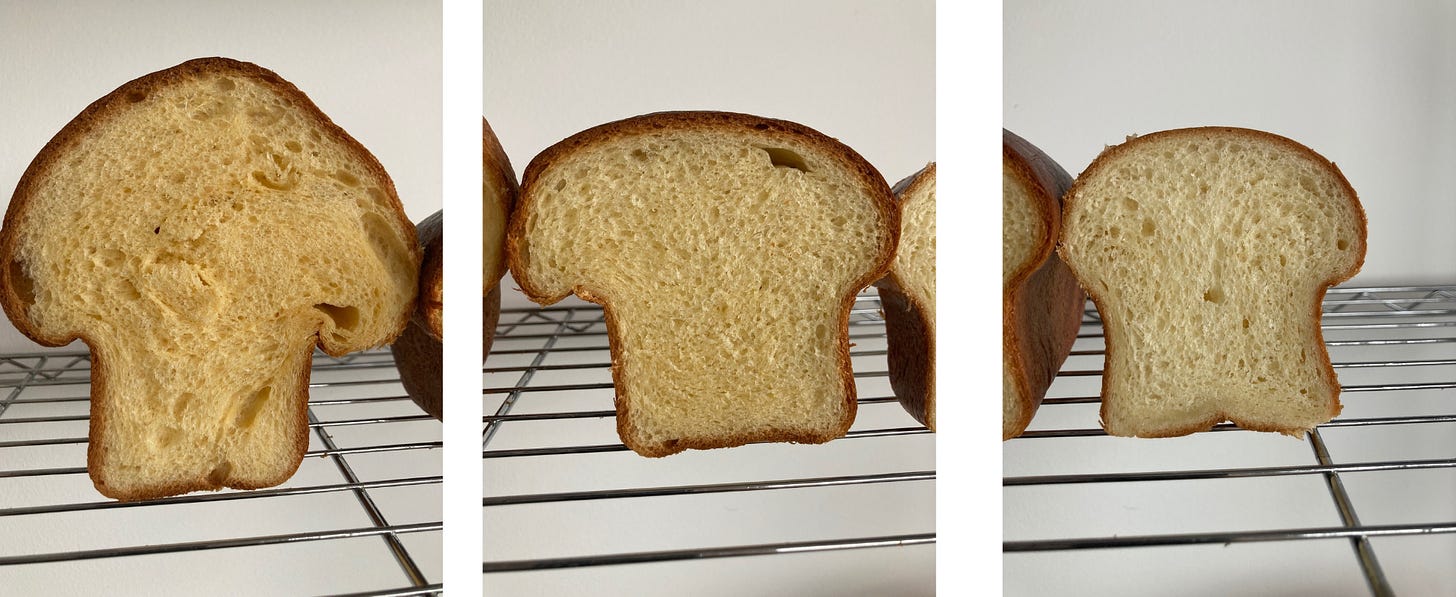
The egg dough was slower to rise (4 hours until it had doubled and risen above the loaf pan) but expanded rapidly in the oven. It looks almost double the size of the milk dough! The milk/egg dough was in the middle of the two, but closer to the 100% milk brioche height. The 100% egg and 50% egg brioche also rose quite explosively. The loaf was more prone to tearing or bursting. The 100% milk loaf rose very evenly and didn’t bust out the sides. The eggs also gave the brioche a thicker shinier = crust with a deeper colour.
Eggs are known for their leavening capabilities but I didn’t realise they’d still be so strong even after being mixed into a dough. The egg proteins in the dough must provide additional structure and support for the CO2 released by the yeast during fermentation, allowing the structure to lift and rise during the bake.
In terms of the crumb, my loaves definitely suffered from a few shaping errors on my part (air bubbles / large holes probably from too much flour) but those aside, the 50/50 brioche was very tender and flavourful with a very even crumb with small holes - 2mm ish.
The 100% egg crumb was a bit wilder - the crumb had very fine small holes (<1mm) and was brightly coloured. It’s very flavourful but it was a little bit dry though I have to say I love how airy and ethereal it is.
The 100% milk crumb had fine even holes (1mm - 2mm) and was very soft and light. It didn’t have quite as much flavour though. The 50% is somewhere in the middle, of course.
Final thoughts
Overall, I was really surprised by the extreme impact of the eggs. So, if you want a super tall brioche or want to promote oven spring and an uneven, airier crumb, then increasing the eggs is key. I think I would definitely use a larger portion of eggs for any loaf shape and for today’s recipe.
I’d also like to shout out Fanny Zanotti, a pastry chef and author of Paris Pastry Club, who messaged me to share her brioche experiment findings from a few years back. I love the way she writes and here’s a link to her brioche study here.
Today’s brioche and a note on cracking
For todays brioche, I’m using a majority eggs to milk brioche dough. With this, you get a much springier and holier crumb which is perfect for a cake. I’ve also added a portion of wholemeal flour (which we’ll add next) which adds a nuttiness that works wonderfully with the cream and fruit.
Due to the additional eggs in the dough, this dough may crack, especially if its under proofed before baking. And, as its quite hard to judge the proof since its a flat disc, your dough *might* crack. I tested this dough about 6 times and it cracked 2 times out of that, despite my best efforts to get the proof right.
If it does, DO NOT WORRY! You can hide this sin by getting your brioche cake out the oven, brushing the crack with a little egg wash and then filling in the gap with pearled sugar. No one has to know. It’s our secret.
The deal with adding wholemeal to brioche
For today’s recipe I wanted to add some flavour into the brioche by using some wholemeal flour. Although it’s optional, I love the nuttiness it adds to the whole affair. If you’ve worked with wholemeal flour before, you know that the bran and germ are more absorbent meaning you need to increase the hydration in the recipe.
But how much?! I decided to run this by my baking / bread hero Adam Sellar. If you’ve been reading KP for a while, you’ll probably know about Adam as I’ve mentioned him before a few times. During my time at LBP, Adam was running the bread section. He’s now a master baker / bakery consultant and has set up plenty of spaces - he’s extremely knowledgable and thoughtful about all things baking and bread.
According to Adam, it all depends on the proportion. To introduce wholemeal without too much fuss, you can use about 30% of your flour weight. This will impart the lovely nutty flavours without causing any dramatic changes in the structure. A rule of thumb is: up to 40%, add around 1% extra liquid for each 10% wholemeal added. So, if you’re adding 10% wholemeal, increase your liquid by 1% and so on and so forth. For today’s recipe, I’ll cap my wholemeal at 30% to keep it simple.
A little bakers technique for ya
So for today, we’ll be adding that 30% threshold of wholemeal to the brioche. But I’ll also show you a technique that Adam showed me back in the day (but also kindly reminded me of during our whole grain chat!) : Separating the bran.
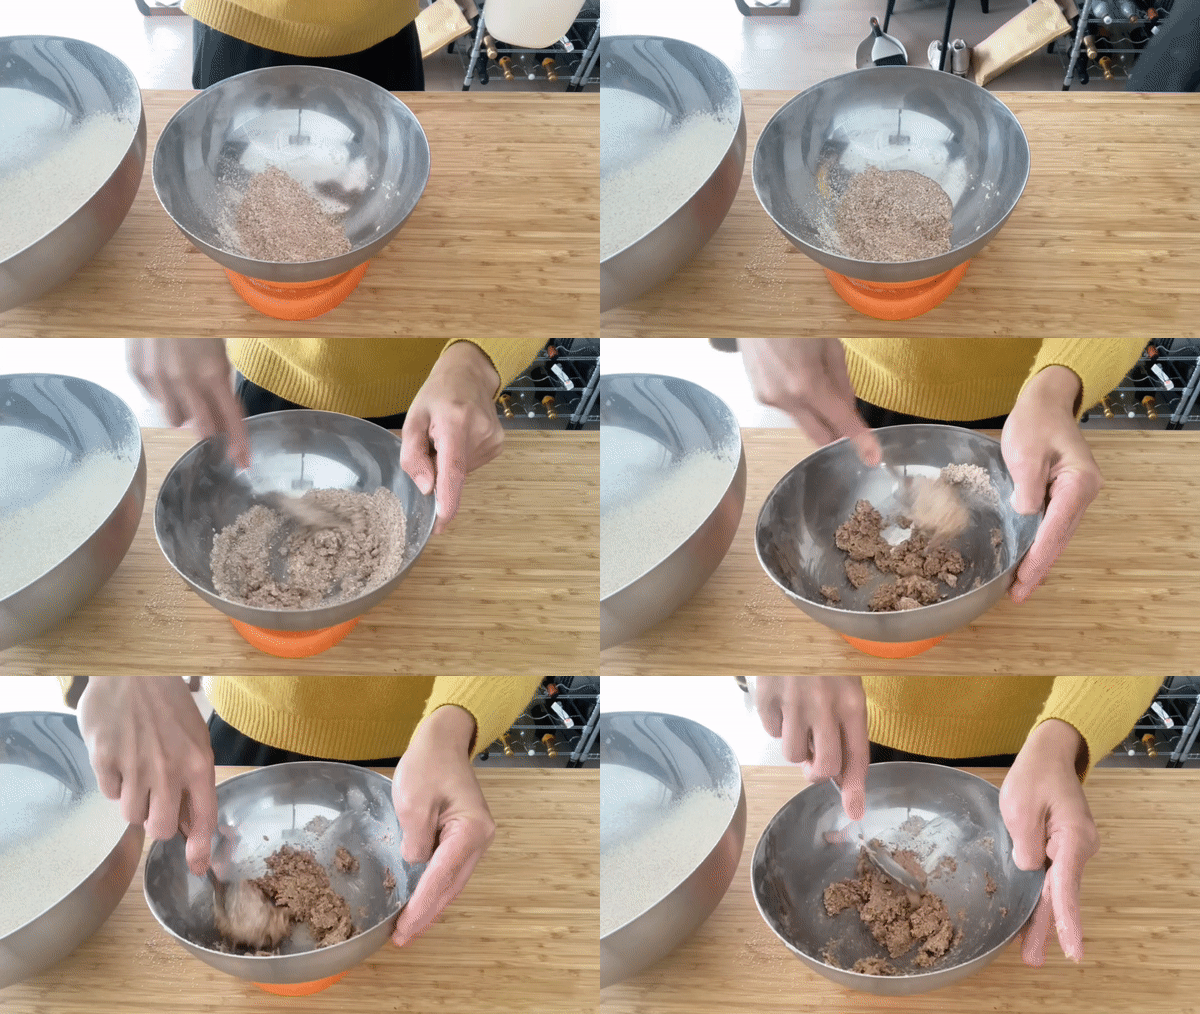
The reason wholemeal flour can be difficult to work with is because all those pesky / stabby bits of brain and germ interfere with the gluten development. These bits of wholegrain act like little knives, cutting through the dough. So, a way around this is separating out the bran, soaking it in a little bit of your liquid. As this soaks, you can adequately develop the dough then reintroduce the bran later. This way you get all the benefits of flavour and nutrition from the bran without any of the headaches of concerns about proper development.
Another custard story
Today we are also going to be a variation on creme pat. Yes, I know, we make a lot of custard here. But why wouldn’t we? Also, I did promise you back on the banana pudding KP that I’d take you through every variation.
Well today, I’m adding one to the list AND hitting two birds with one stone. Score. Enter: The creme madame.
Here’s an updated cheat sheet for all those names. I’ve ranked them from least extreme to most extreme in terms of energy (personal opinion):
Creme patisserie - Classic pastry cream
Creme legere - Pastry cream + whipped cream
Creme diplomat - Pastry cream + whipped cream + gelatine
Creme chiboust - Pastry cream + italian meringue
Creme mousseline - Pastry cream + butter
Creme madame - Pastry cream + butter + whipped cream
I’ll be making the creme pat with whole eggs because we will be adding so much fat later on. For combination creams like this, I generally do away with the whole yolk separating thing. After years of being a bit anti egg whites, I’ve really come around to it. Since we are going to be adding butter AND cream, the whole egg will also help keep this cream a beautiful light colour.
The thing to really be aware of when making mousseline or madame is to make sure your butter is properly soft. If you don’t do this, the butter won’t combine properly and you’ll end up with lumps in your mousseline.
Yes, this can be solved by warming it over a double boiler and whisking fervently but it’s best to just avoid this situation if you can as melting the butter too much isn’t ideal, either. Although melted butter does reharden, it will never be quite the same as the emulsion will have broken.
The syrup
Much like the genoise sponge, the tart Tropezienne benefits from a good soaking of syrup. The traditional flavour is orange blossom water, but you could do anything you like. Cinnamon, cardamom, herbs, citrus - go wild!
Roasting plums
I know I’ve already shared my deep love for plums via the frangipane tart recipe, but now we are in September we’ve gotta get those plums roasted. Having roasted plums on hand is highly advisable - add to sweet and savoury dishes and bask in the glory of autumn!
When I’m roasting fruit, I usually do it with around 10% of the fruit, but for the plums I’ve been getting lately I’ve been upping it to 20% - 25%. Taste your fruit and see!
Mixing quantities
Today I’m sharing a recipe which I think is the minimum you can make in a KitchenAid - 400g brioche. However it is a pretty small quantity and you may need to start off using the paddle, instead of the hook, to get it going.
Brioche freezes extremely well in its raw dough state and after baking, so if you want to make extra, shape it into buns and reap the benefits in the future. Here’s a guide to the sizes:
400-450g - 8 inch brioche
300-350g - 7 inch brioche
250g - 6 inch brioche
50g - Small brioches
10-15g - Mini brioches
Baking brioche and storing
When you bake the brioche, you don’t want to overbake it. If you’re not sure if the brioche is ready, you can temp it with a probe! You’re looking for 90c.
Once baked - if using a tin - let the brioche cool in the tin for a few minutes then remove and leave to cool completely. If you aren’t using the same day, wrap the brioche in cling film.
The assembled Tart Tropezienne will last for a few days - if you use enough syrup, the brioche will stay plump. As ever, it’s best to eat it within 24 hours!
Splitting up the recipe
The tart tropezienne has quite a few steps but they can be broken up over a few days!
The brioche dough can be stored, baked, for 2-3 days well wrapped or pre-baking in the freezer for 30 days or the fridge for 24 hours
The creme pat / creme mousseline will last in the fridge for 3 days and can be rewhipped/warmed ready to add whipped cream (do not add this until you are ready)
The roast plums will last for 5 days + in the fridge
The syrup will last for 30 days, minimum, in the fridge.
Alright let’s do this
Tart Tropezienne
Makes 1 x 8inch cake
Brioche dough
135g white bread flour
55g wholemeal flour (or omit and use 185g white flour)
30g caster sugar
4g salt
4g dry yeast
45g milk + 10g milk
90g eggs (This is *almost* two eggs. Annoying, sorry, but you can keep the leftover aside for your egg wash later, so it’s actually *less* wasteful!)
75g soft butter
Pearl sugar
Egg wash
Creme Madame
250g whole milk
65g caster sugar
1 x egg (50g)
30g cornflour
55g butter
55g butter
75g whipped cream
Syrup
100g sugar
100g water
5g orange blossom water (1 tsp)
Roasted plums
400g plums
80g sugar
Method
First sift your wholemeal flour to separate the bran
Stir milk into the bran to hydrate and set aside
Now weigh the rest of your dry ingredients into the mixing bowl and all of your wet ingredients separately
Mix the dries on a low speed with the dough hook until everything is distributed
Pour in the wet ingredients and mix on a medium speed for 10-12 mins until medium gluten development has been achieved. This is when you can stretch the dough a little way but it is still fragile
If your KitchenAid is having trouble picking up the small dough, start by using the paddle attachment and mixing until it comes together then swapping to the hook
As we are making a small batch, you’ll have to scrape down the side of the bowl more often
If it hasn't achieved this development by then, rest for 5 mins (we don’t want it to get too hot) and then continue mixing until medium gluten development is achieved
Scrape down the sides of the bowl and then put the mixer on a low-medium speed
Add in your soft butter and bran, alternating the two making sure each addition of butter is completely mixed in before adding more
Keep mixing until the dough pulls away from the sides of the bowl and it is extremely shiny, soft and stretchy
Remove from the bowl and let the dough bulk ferment at room temp for around 2 hours. You can put it in a clean bowl, or onto a tray and cover with cling film. It isn’t as dramatic as a rise but it’s great for storing it later. You could also put it into a large tub with a lid - just make sure it is covered so it doesn’t dry out. We aren’t looking for a very dramatic rise, we just want a bit of flavour development
Now chill your dough - this makes it much easier to work with. You’re basically re-solidifying the butter. It takes about 2 hours to chill in the fridge but you could leave it overnight and continue this the next day
Once your dough is chilled, ball it gently and then begin rolling it out to an 8inch disc
Press the disc into your lined 8 inch tin
Proof again! This will probably take around 2 hours - 3 hours. The rise wont look that dramatic but it’ll be puffy look soft to the eye
Egg wash and sprinkle with pearl sugar generously
Bake at 180c fan for 25 minutes until golden
Let cool completely
Method - Roast plums
Pre-heat oven to 170c fan
Cut plums in half
Put into a roasting tray with the sugar
Roast for 15 mins until the plums are slightly softened and a syrup has pooled in the bottom of the tin
Method - Creme Madame part 1: The pastry cream
First make the pastry cream
Heat milk until simmering with the vanilla pods
Meanwhile, whisk the egg with cornflour and sugar
Temper the egg yolks with by pouring a little hot milk on the mixture and whisking well - then return the whole mixture to the stove
Heat on medium until thickened
Off the heat, remove the vanilla pods then use a hand blender or a whisk to blitz in the first half of your butter
Leave to cool completely
Method - Creme Madame part 2: The mousseline-ing
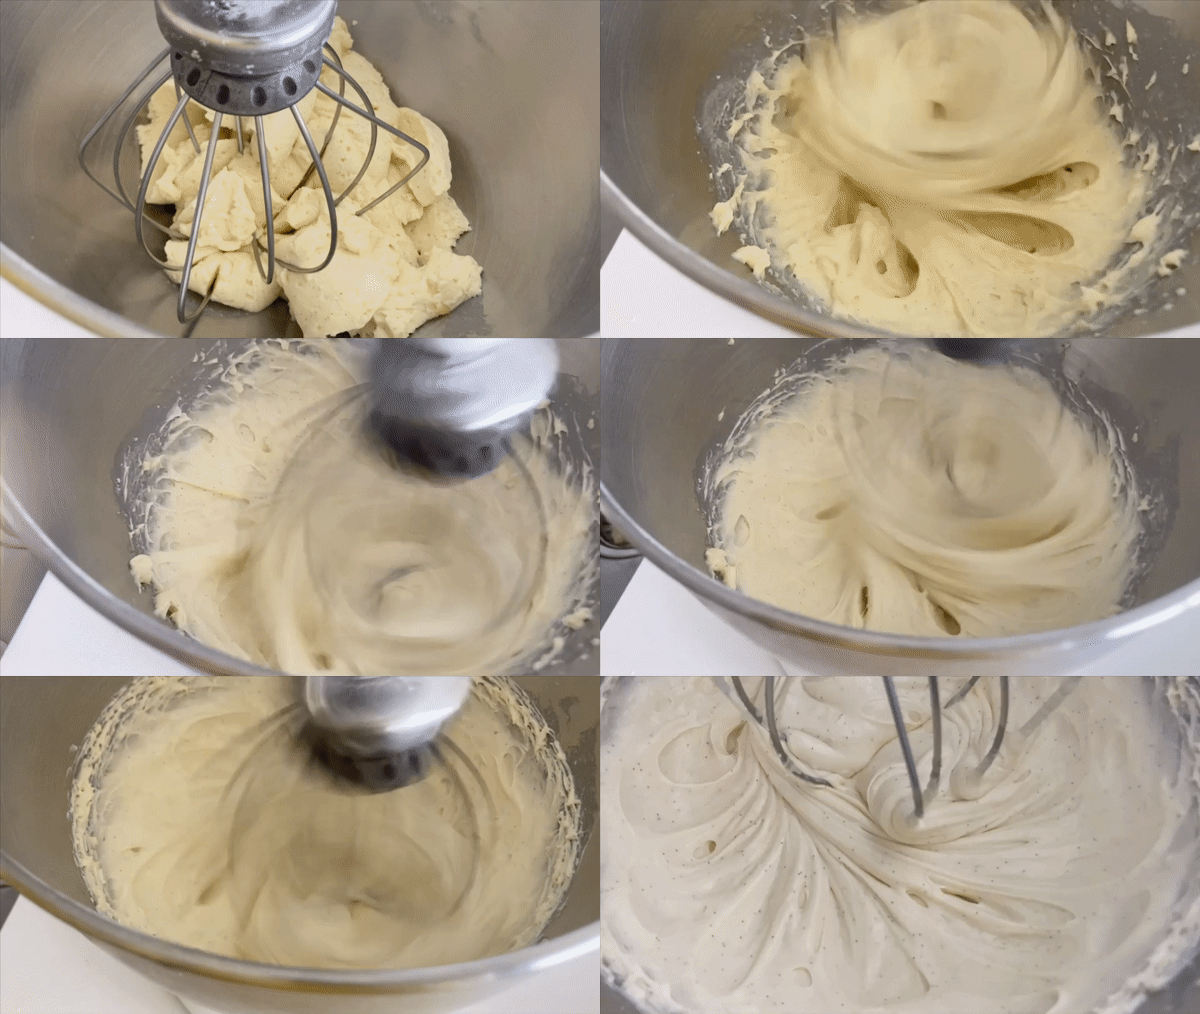
Whip the pastry cream with a whisk until very fluffy and smooth - you want to be aerating it and getting rid of any jelliness
Now start adding in the soft butter - it better be soft! Piece by piece until you get a thick fluffy mixture
Set aside
Method - Creme Madame part 3: The madame-ing
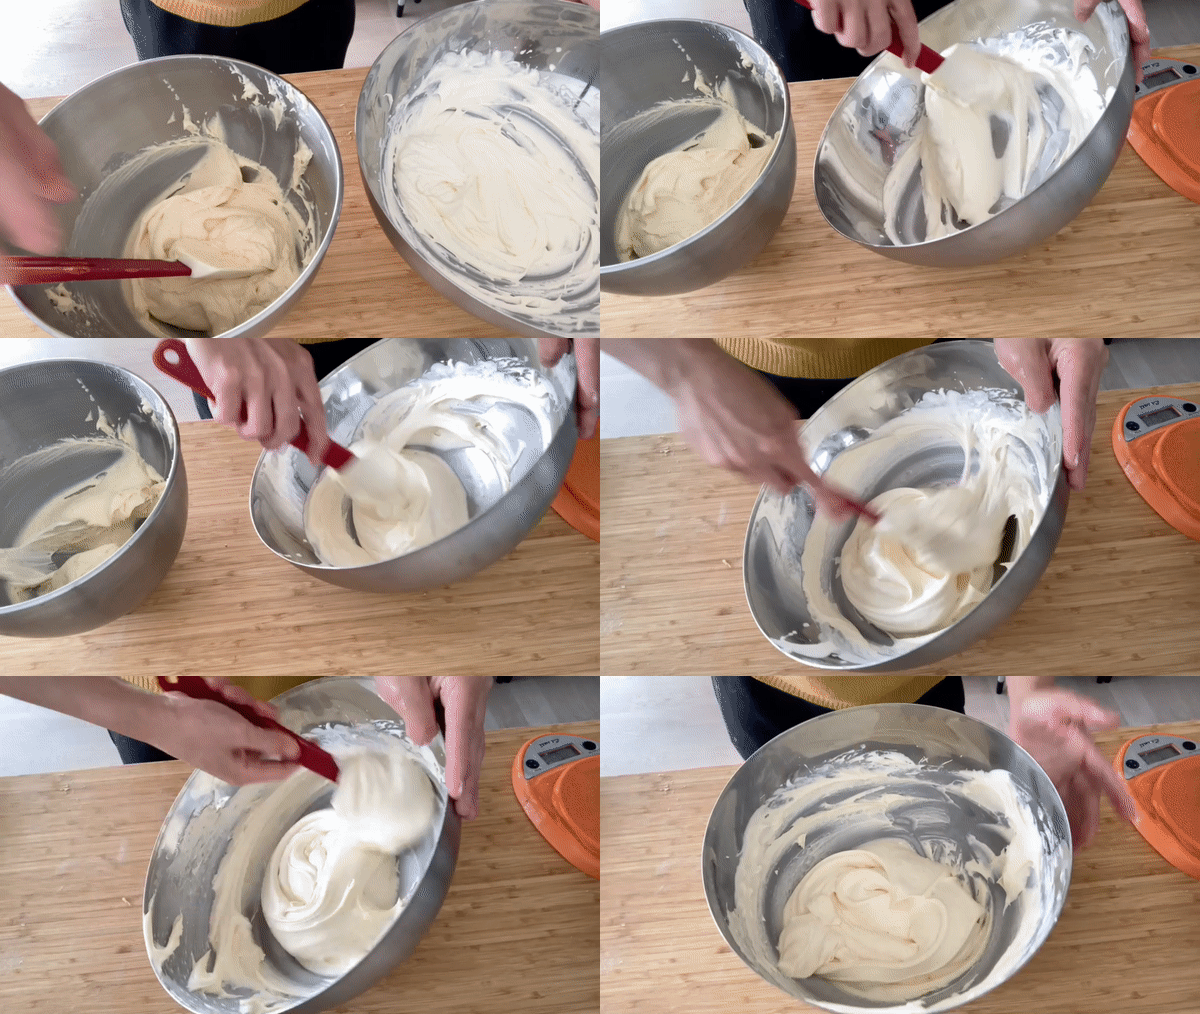
Whip the cream until soft peaks
Add a little of the whipped cream into your mousseline to lighten
Then fold the rest in until you have a super light and creamy mixture
The cream is now ready to use. If you put it in the fridge, it will set up and can be hard to bring back, so its best to only add the cream once you’re ready to make it
Method - Syrup
Heat sugar and water together until boiling
Take off the heat and stir in the orange blossom water
Set aside until ready to use
Method - Assembly
Cut the brioche in into ⅔ and ⅓ (the top) - making the top smaller will make sure the cream doesn’t squish out
Soak with the syrup
Pipe the madame cream around the edge then spread cream in the middle followed by plums, a bit of syrup and some more cream
Now, put it in the fridge for 15 mins to firm the cream up otherwise this cake tends to SPLURGE
Once the cream is slightly firm, put the other half of brioche on top
Chill in the fridge for a few hours for the everything to firm up and the brioche to get all soaked, but you can serve it right away













I’m normally on board with your tweaks and adaptations but am utterly bewildered why you would want to use wholemeal flour in the brioche for a Tropézienne. 😵💫 For me, the golden crust and creamy yellow crumb are the very colours of Riviera sunshine on a plate. Too brown and I’m thinking less Tropez and more Tromsø. think I might have to go and lie down. 😉
Nicola, I love Tropezienne. So glad you’ve posted this recipe - thank you!