Kitchen Project #80: Plum crumble pie
aka the PLUMBLE!
Hello,
Welcome to today’s edition of Kitchen Projects. I’m thrilled to be back in the kitchen. I’ve missed you guys.
Today I’m bringing you right into the heart of an American x UK fusion situation: Plum Crumble Pie aka Plumble pie. We’ll talk all about how to manage all those juices and welcome in September with open arms.
Over on KP+, I have a beautiful late summer dessert for you: Basil infused almond cake with roasted plums; Made with a vibrant basil oil, the colour palette is something else. Click here for the recipe.
What’s KP+? Well, Kitchen Projects+ aka KP+, is the level-up version of this newsletter. Kitchen Projects is an entirely reader-supported publication. It only costs £5 per month, and your support makes this newsletter possible! By becoming a member of KP+, you directly support everything that goes into the weekly newsletter and get access to lots of extra content, recipes and giveaways, including access to the entire archive. I really hope to see you there:
Lots of love,
Nicola
PS. I’m excited to share the newly designed Kitchen Projects logo and look with you, see above! It was designed by the brilliant Nueker (thank you Josh & Chris!) I truly couldn’t be happier with it, hope you guys love it too!
Eating your holidays
Last week I got back from my travels in Minnesota, USA. I had a lot of food experiences that I’m excited to share and recreate for you - things will be fried and maybe even on sticks - but for today, I’m starting with something a little more classic: Pie.
On the second half of the trip, we drove up to Duluth, which hugs the southwest edge of Lake Superior. It’s a body of water that stretches so far into the distance that it’s hard to believe it isn’t the open sea. Having grown up by the ocean, it’s genuinely bizarre being somewhere that feels so coastal, yet there is no salt in the air or discernable tide, though the lake does lap a little bit. Instead of seagulls and crabs, there are eagles (which means less harassment for your chips), deer, frogs, dragonflies and prairie dogs. Which, by the way, aren’t dogs at all - they’re incredibly industrious ‘ground squirrels’.
We spent one afternoon exploring a national park, and on the way back down the North Shore Highway, we stopped at Betty’s, the famous roadside diner serving food since 1956, though it wasn’t until 1958 that pies became the real star. When I stop at a roadside diner like Bettys, I wonder whether this is how it feels when a new visitor to London sits down for a fry-up in an old school caf; Places like these are timeless. Not old-fashioned, but true classics, connecting time, space, food, people, life. As much as I enjoyed looking at the aerial ferry bridge and the ghostly grand mansions dotted around the town, sitting down for a slice of pie at Betty’s, the city finally clicked into place.
Betty’s crust is more tender and less flaky - though still very rich - than the crust I’m used to. They still use lard and have egg in their dough and, I think, a little more sugar. I loved this - it was a much more shortbread-like texture. We got four slices - two to eat, two to go - including their signature Great Lakes crunch, which features five fruits representing the five great lakes of the US and a double-crusted bumbleberry, which is just a cute name for mixed berry. Both were outstanding, the filling set ‘just right’ and not at all bouncy or overly sweet, with a freshness that spoke to Betty’s decade-long commitment to pie.
Today, we’ll be diving into the world of US inspired crumble topped pies, or crunch pies as Betty’s would call them, featuring a very British fruit: The plum, the jewel we get at the end of summer to let us know that autumn is officially here.
Hope chess and lessons learnt on pies
A while back on this newsletter, I told you about Hope Chess. If you weren’t a regular reader back then, let me catch you up. A few years back, probably around the time, The Queen’s Gambit was airing, I read an article about something called “hope chess”, a term coined by US national master Dan Heisman. It refers to when a player simply ‘hopes’ things will work out during a game rather than making sufficient plans or effort to ensure it is a good course of action. This notion has stuck with me, and I’ve realised it’s a concept that extends way beyond any actual playing of chess and is my favourite catch-all term for when I’m getting cavalier at work. There are many times in my career when I’ve played too much ‘hope chess’ in the kitchen, usually as a last resort tactic in the heat of production or service or the 11th hour of pop-up prep…
Whilst I hate on ‘hope chess’, it can be necessary when it comes to fruit. Eating seasonally and varying your selection to whatever is available locally - or perhaps what has fallen off your neighbour's tree - does introduce a degree of chance or risk. Last year, when Verena (Lochmuller of OTK) and I were prepping for the lark! Pie pop-up, the varieties of fruit in their peak were constantly changing; Our supplier would send us apples and plums to test but warned us that they wouldn’t be available for the pop-up, which meant making hundreds of slices blindly with mysterious fruit. Although I’m proud of how the slightly chaotic damson & plum crumble pie turned out last year, but it was risky, and I lost so much sleep over it.
Now, a year later - and wiser - I’m going to figure out all the best tactics for making a plumble pie checkmate and try and leave very little to chance, no matter what plums you’ve got!
KP+ this week
Over on KP+ this week, I’m sharing a recipe that marries a peak summer ingredient with the transitional plum: Basil! Inspired by a delicious dessert I had at Spring, it’s a study in colours with a vibrant green cake and lush purple plums, plus the technique for punchy herb oils you can use again and again:
The building blocks of pie filling
A fruit pie filling needs three things: Fruit, sugar and starch. Acid can be added to aid flavour but isn’t necessary. I’ll get to the bottom of the starch situation for today's newsletter and put some fruit prep techniques head to head to see what works best. Let’s start with the fruit.
For the fruit itself, you need to consider three key factors: Water, sugar and pectin.
Most fresh fruits have a water content of 85% - 93%, though some are better at holding onto it than others. As fruit is heated, the cell breaks down, and the water is released. This process begins at 60c. The longer and more strongly the fruit is heated, the more liquid it becomes. So, having a plan of how to entertain all that water is essential - will we evaporate it? Or reduce it? Or will we bind it?
Sugar is also essential: The amount of sugar in a fruit dictates the flavour and how it will eat. As Harold McGee explains in On Food & Cooking, “A ripe fruit’s vacuole full of sugar solution will give a melting, succulent impression, while a potato’s solid starch grains contribute firm chalkiness.” I tend to go 20% of the fruit weight as standard for added sugar in pie fillings, though I may reduce this for peak berries.
Pectin is a starch found in fruit, mainly in the cell walls and core. It is responsible for holding the cell walls of the fruit together. We know it primarily from its role in gelling jams: As fruit is heated, pectin is extracted and begins to create a network capable of holding liquid and thus creating a gel, recapturing all that lost water - albeit in a different, more free-form way. Sugar, which loooooves water, assists in this process by attracting water AWAY from pectin, allowing the network to form without water getting in the way. This makes a more stable network.
However, if pectin is extracted successfully, that means the cell walls have begun to break down; We know this because underripe fruit (hard!) has more pectin than ripe (soft!) or overripe fruit (very soft!). This means there is a balancing act needed between the amount of pectin extracted vs the amount of mushiness we are prepared to deal with inside our pie. Sure, all of that pectin is useful for our final set… but at what cost for the texture?
Adding plum into the equation
If seasons had a canary, the sudden influx of British plums lets me know that summer is drawing to a close. So, how do these arbiters of Autumn fit into the above, and how do we deal with these properties?
Tragically, there is not a lot of research on what is happening at a cellular level between varieties of fruit - we understand that varying fruit textures result from stronger or weaker cell structures. Still, no food scientists (yet!) have charted the firmness, tartness, sweetness and behaviour when cooking between specific varieties, so we have to rely on a) typical assumptions and b) experience.
Firstly, typical assumptions, I would like to offer you this: Plums, though they do vary, may have a water content of up to 90%, making them incredibly juicy. Generally, the sugar content is around 10%, and most varieties have a naturally high pectin content.
As for experience: This week, I found that smaller, oval-shaped plums, like victoria plums, held their shape slightly better overall than fat, round plums, more common in Europe. Greengages were surprisingly outstanding; the ones I had were somewhat underripe and held their shape extraordinarily well. Though I don’t often use underripe fruit in my recipes, when it comes to plum pie, you can afford to go slightly on the harder side, though make sure the flavour isn’t too tart. The higher level of pectin plus the ability to withstand cooking results in a pie filling with much more integrity.
The deal with maceration
The best thing about learning different areas of pastry is borrowing techniques from other places. Today, we can use a classic jam-making tactic to improve the texture of our fruit pie: maceration. This is the process of introducing sugar and fruit before cooking or eating. The moisture is drawn out and forms a syrup with the sugar. I first learnt about the importance of this technique in jam making from Camilla Wynne, who always opts for maceration. I’ll let her tell you why:
“Sugar, being so attractive, draws the water out the fruit. This helps to dissolve the sugar, meaning it is less likely to stick or burn at first. Also, the longer the fruit is macerated, the better it will hold its shape in a jam. Sugar draws the water out of the fruit much more gently than heat, which can burst cells and break it down. I love chunks and distinct shapes in jam so that’s part of why I do it as well. It also helps break down the tasks into manageable chunks, which is great for people who think jam-making is time-consuming or intimidating.”
So, we can apply the same theory to our pie filling. By macerating fruit for our filling ahead of time, the fruit will hold shape better and reduce rapid and aggressive water loss (that our starch can’t keep up with) during the cooking process. For how long, though? I got good results after an hour, but the longer, the better, up to several days in the fridge.
Pie thickeners
When it comes to fruit pies, no starch fits all. The water content of fruit is essential when making pies because that water, when heated, will happily escape. Although this results in more concentrated and intensified flavours, the released juices can be problematic. This is where starch comes in.
Starch is a naturally occurring carbohydrate in plants - it’s usually tasteless and pure starch, more often than not, is white, or white-ish. Of its properties, it’s the ability to thicken that makes starch our friend in the kitchen. Different starches have varying strengths - literally - and weaknesses. But they are all linked with one necessary process: gelatinisation. When starch is mixed with water and heated, the granules absorb the water and swell, creating a mesh network and a thickened consistency.
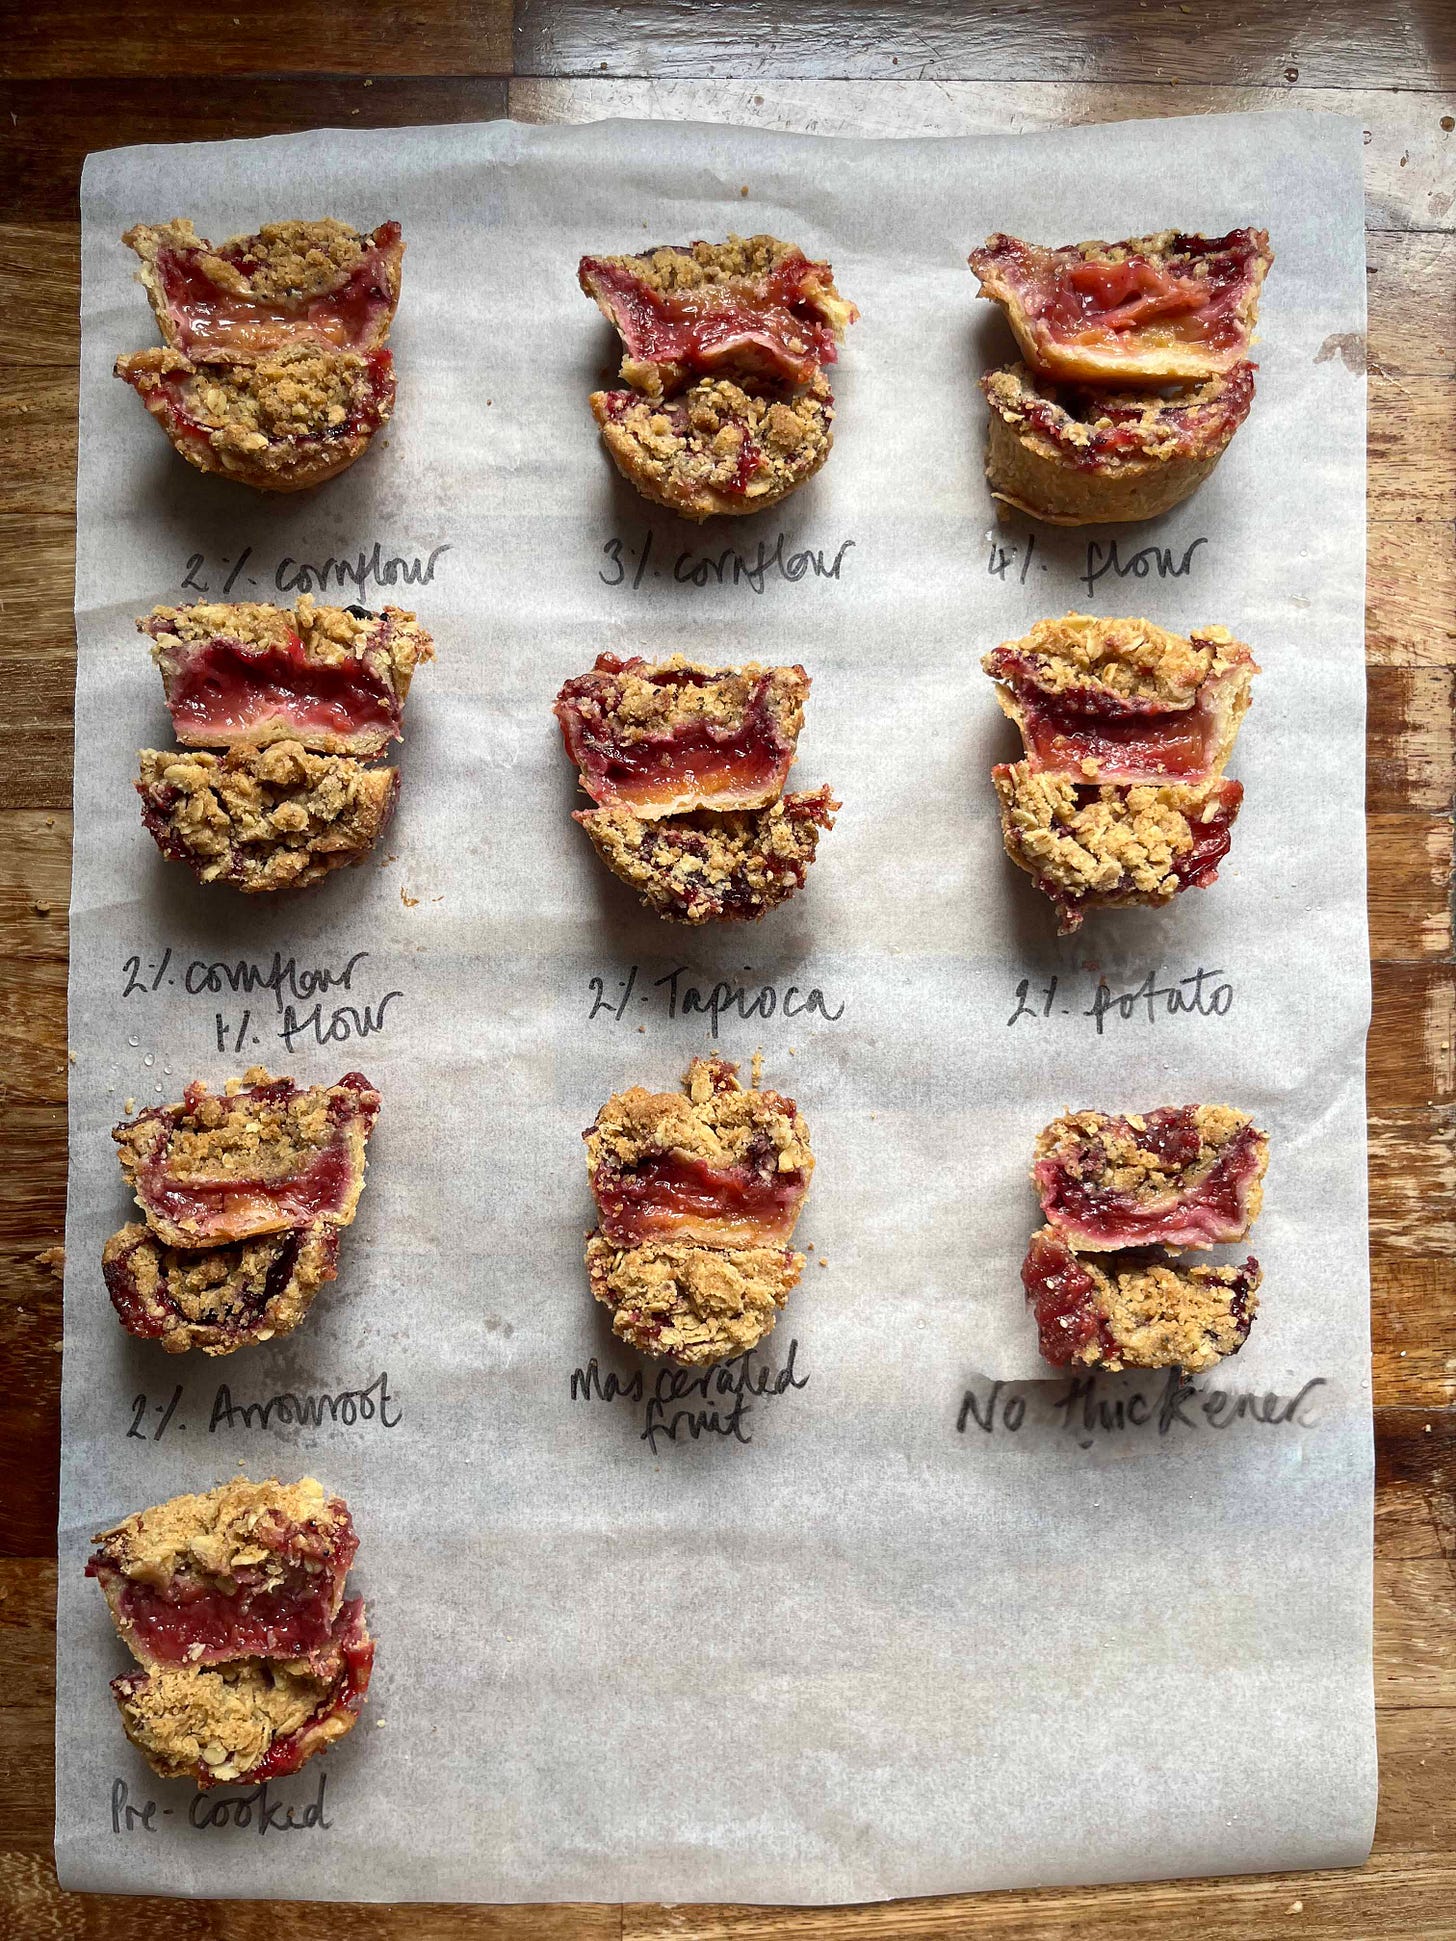
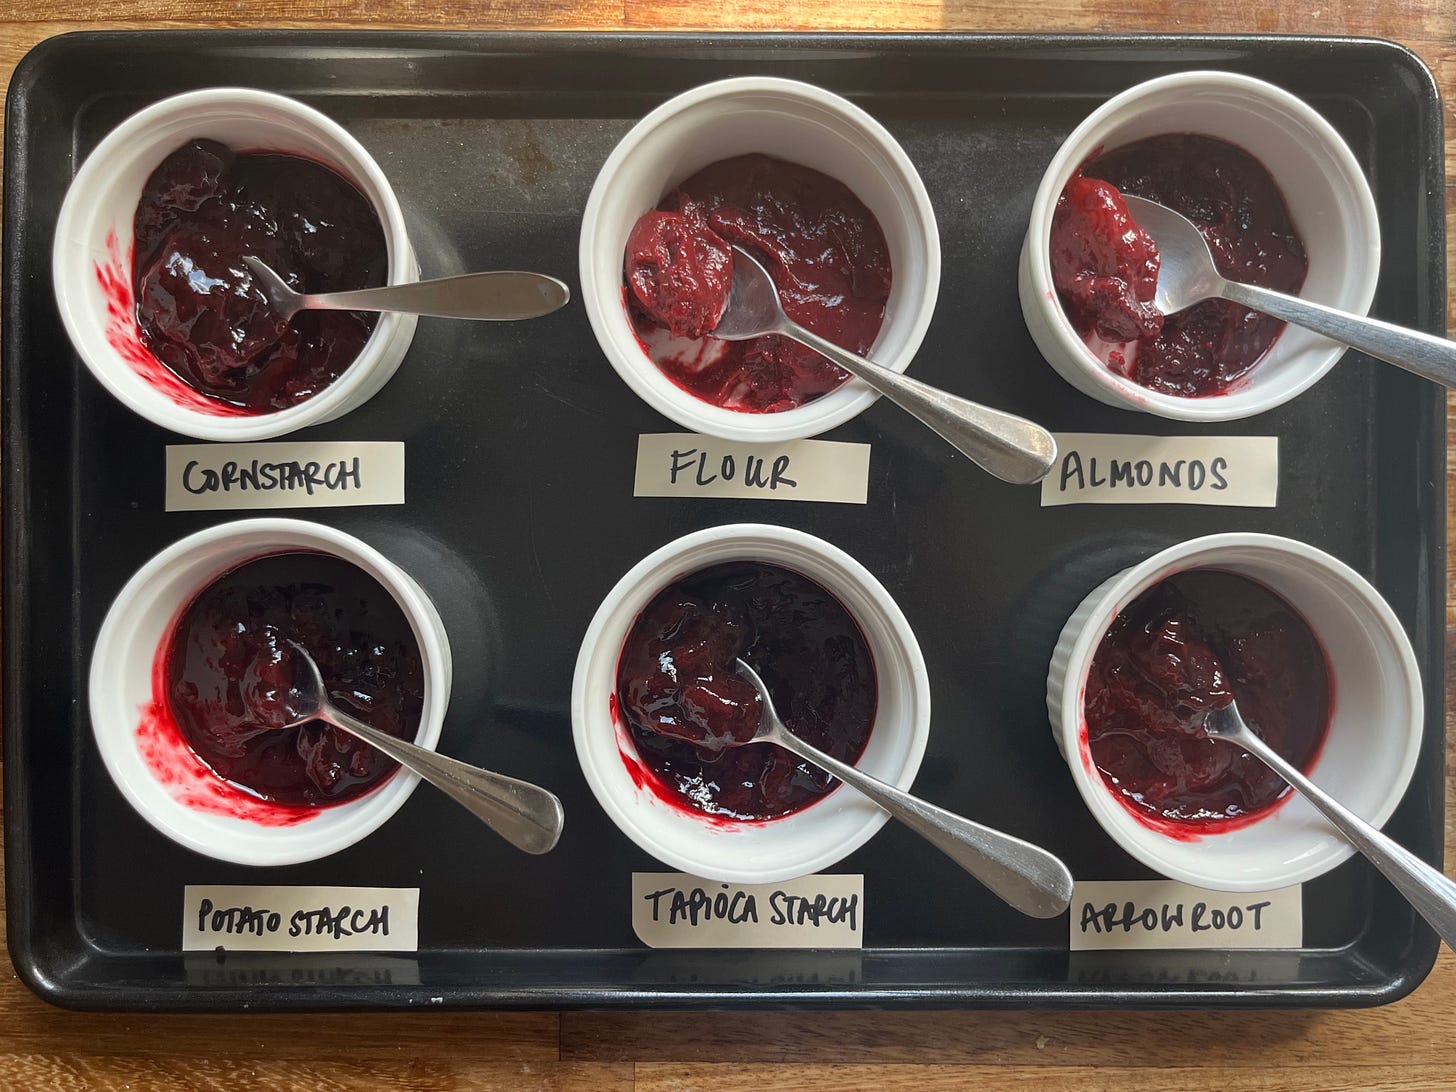
So, what are our options? I tested the key players with plums: Wheat flour, Cornstarch, Tapioca, Potato and Arrowroot. Oh, and ground almond - which isn’t a starch at all - just to see how it compares. I tested both the stove cooking method (see below) and cooking in the oven (above).
Gelling temperature
It’s important to note that wheat flour is only 75% starch compared to corn, tapioca, potato and arrowroot, which are almost 100% starch. This results in different setting temperatures - flour thickens nicely at around 65c, but the other starches won’t thicken fully until above 85c and up to 95c, reaching their full thickening potential.
When cooking on the stove, it’s pretty easy to see when you have reached full thickening potential - for pies, it’s less straightforward. The best thing to do is make sure you can see the filling bubbling.
Ratio & set
Since flour is only 75% starch, it is not as effective at gelling liquids; you need 1.5x - 2x more to set the same amount of liquid as pure starch. I used 2% starch vs 4% flour to plum weight. I needed around 10% ground almonds to the plum weight for them to appear thickened.
The firmest set was the flour (perhaps I would reduce it to 3.5% or 3% next time?!). The next most effective was the almonds, though it was very textured. After that, the tapioca starch performed best, followed by the cornstarch, potato starch, and finally, the arrowroot. Tapioca starch really impressed me here, though all of the starches needed to be increased to be sliceable. For juicy fruits like berries and plums, I would say anywhere between 3.5%-8% starch is appropriate, but apples and pears would likely need more like 2%-3%.
Appearance
Visually, the pure starches appeared clear, and the colour of the plums was not affected. For flour, it’s a different story - this is because the gluten proteins appear opaque.
Flavour
The most noticeable flavour was the flour and the almonds; the former was a bit unpleasant, and raw tasting, whilst the latter was quite delicious, though the grainy texture would have to be a confident choice. The starches all had less apparent flavours, though I found the tapioca and arrowroot most effective.
Final result
Using a combination of flour, which gelatinises at 65c and another starch, like cornstarch or tapioca starch, which gelatinises at a higher temp provides a two-pronged approach to capturing the juices. Using flour only results in a sludgy, slippery - though well set - fruit filling, which needs quite a lot of acid to hide the strong flavour. A pure starch leaves less of a trace, flavour-wise. If you’re making a lot of pies, I would go out of my way to get tapioca starch for regular use, but for a one-in-a-while recipe, go for the readily available cornstarch.
I’ll give you two options for the starch % for today's recipe, since we all have different fruits. If you use underripe greengages or just like a juicer pie and don’t mind a slightly messy slice, go for the lower quantity. Worried your plums are going to go explosive in the oven? Go for the higher quantity! Ultimately, it’s all down to your personal preference.
When starch meets juice
We’re almost at the finish line: Your fruit is macerated, your starch has been scaled… so now what? Well, we have a few options before it goes into the oven:
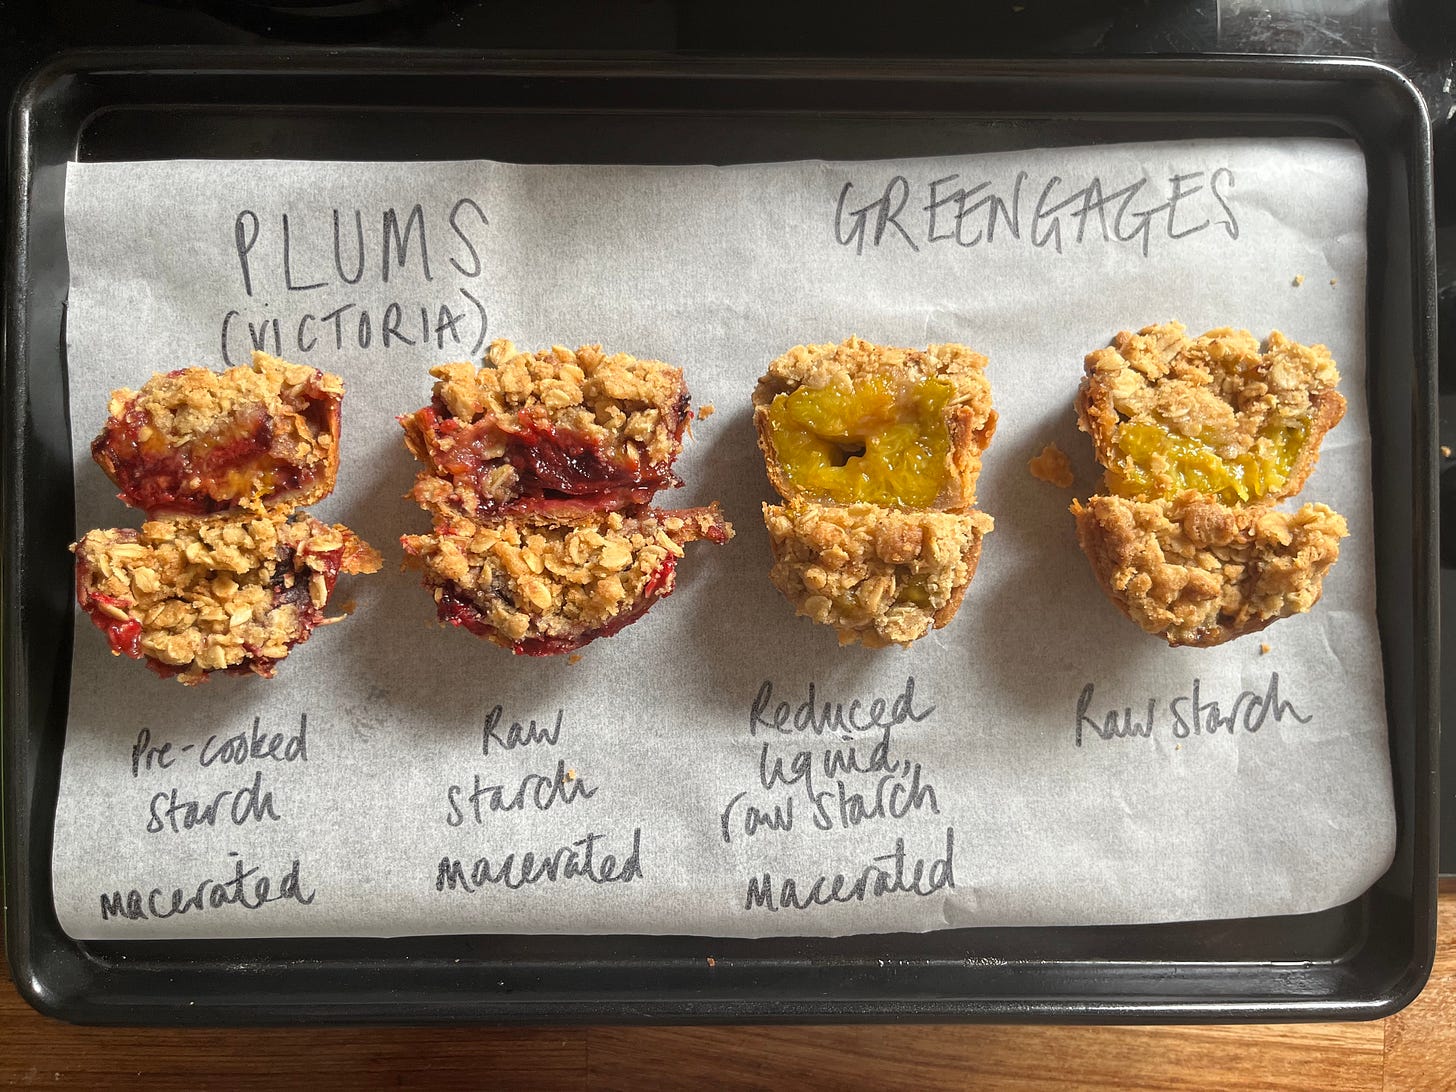
Mix raw starch with macerated fruit
Pre-cook the maceration syrup with starch, then mix with fruit
Reduce the maceration syrup by 50%, then mix with fruit and raw starch
I put them to the test. Much to my surprise - pre-cooking the starch wasn’t a total failure; It looked slimy and thick before baking but set well - I’m not sure this would work well for a large pie, though. Mixing in the raw starch mixed directly worked, but the filling was much sloppier than the other tests and sunk a lot more overall. Most effective was reducing the syrup by half then introducing the starches - might seem faffy, but will save you sloppiness in the long run.
The crumb
The FINAL hurdle is our crumb. I tested two options for today: A classic fine crumb and a clumpier version with more butter. In a decision that will surprise no one, the thiccccc crumb came out on top, even though it is a bit harder to cut! Though you don’t have to brown the butter, I think it adds a beautiful dimension to the whole affair. The crumb is also the perfect place to add spices or experiment with different flours - buckwheat would be great here.
Blind baking a crumb-topped pie
Whilst you can throw the filling into an uncooked pastry case and bake it all together, using a par-baked pie shell means we can reduce the fruit cooking time. Not needing to worry about whether the crust is adequately baked, we can focus entirely on the status of the fruit itself. The overall cooking time is similar, but this is split between blind baking and the actual baking of the pie itself. Win-win!
I have also updated my pie dough recipe to be more like Betty’s, using a mixture of flour and egg to hydrate and working the butter in more. It’s still really flaky but much more tender.
Ok, let’s make it!
Plumble pie
Makes 1 x 7 or 8inch pie. Feel free to ditch the pie crust, halve the starch, and go right ahead and just enjoy this as a crumble. Crumble pies also make excellent miniature pies in cupcake tins - around 85g filling per tin worked well for me, and around 20 minute baking at 180c.
Tender pie crust - you can also use my extra flaky crust!
200g plain flour
30g wholegrain flour (optional, can also use all plain flour)
175g butter
15g caster sugar
6g Maldon salt
50g egg
20g milk
Pie filling - since we all have different plums, I’ll give you two options for the starch quantities; you decide! Or go somewhere in between.
1200g plums. I used half/half victoria and greengages. (Approx 1050-1100g after prep!)
220g caster sugar
15-30g lemon juice, to taste
Firmer, jammier set, sliceable when cold:
38g cornstarch (3.5% based on fruit weight after prep)
16g plain flour (1.5% based on fruit weight after prep)
Juicier pie, a bit wet n wild (but in a FUN way!) when cold, or use for underripe or less juicy plums:
27g cornflour (2.5% based on fruit weight after prep)
14g plain flour (1.25% based on fruit weight after prep)
Crumble:
80g butter to make 60g brown butter
55g plain flour
45g jumbo oats
35g light brown sugar
2g salt
Method - Fruit maceration
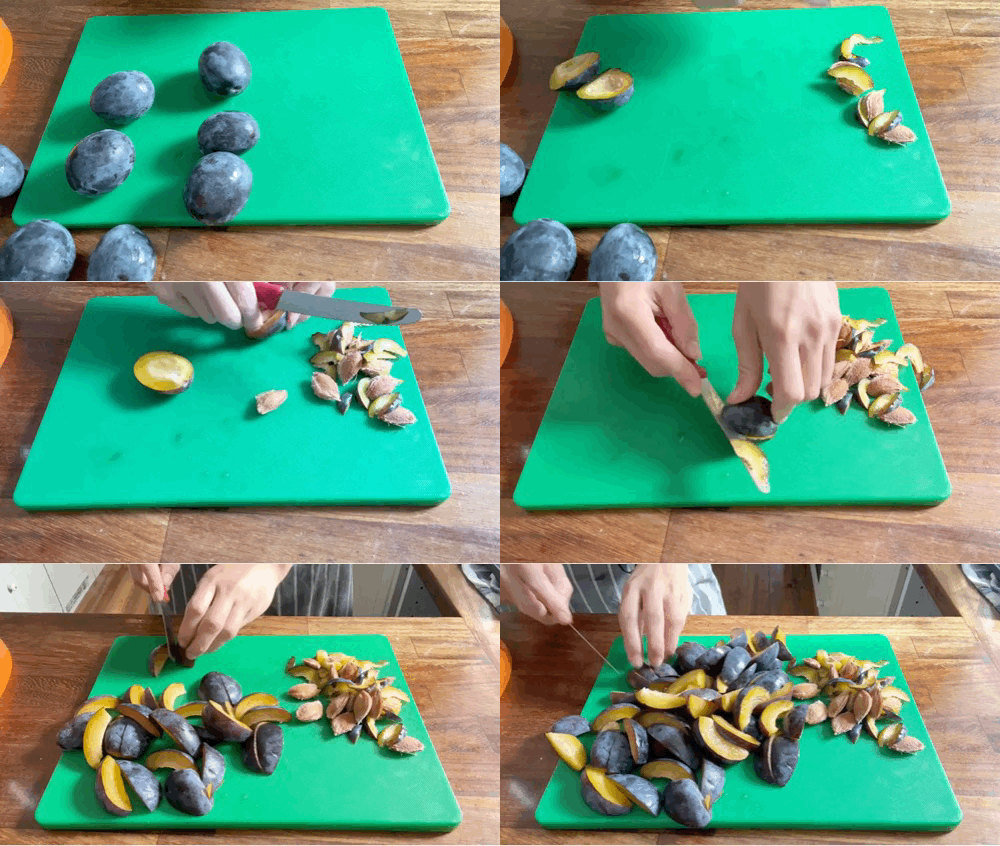
Destone plums and cut any hard bits off the inside. Cut into quarters and move into a container you can keep in the fridge. Toss with the sugar. Leave for at least 30 mins - 1 hour but up to 3 days, occasionally stirring to make sure the sugar is dissolved.
Method - Pie dough
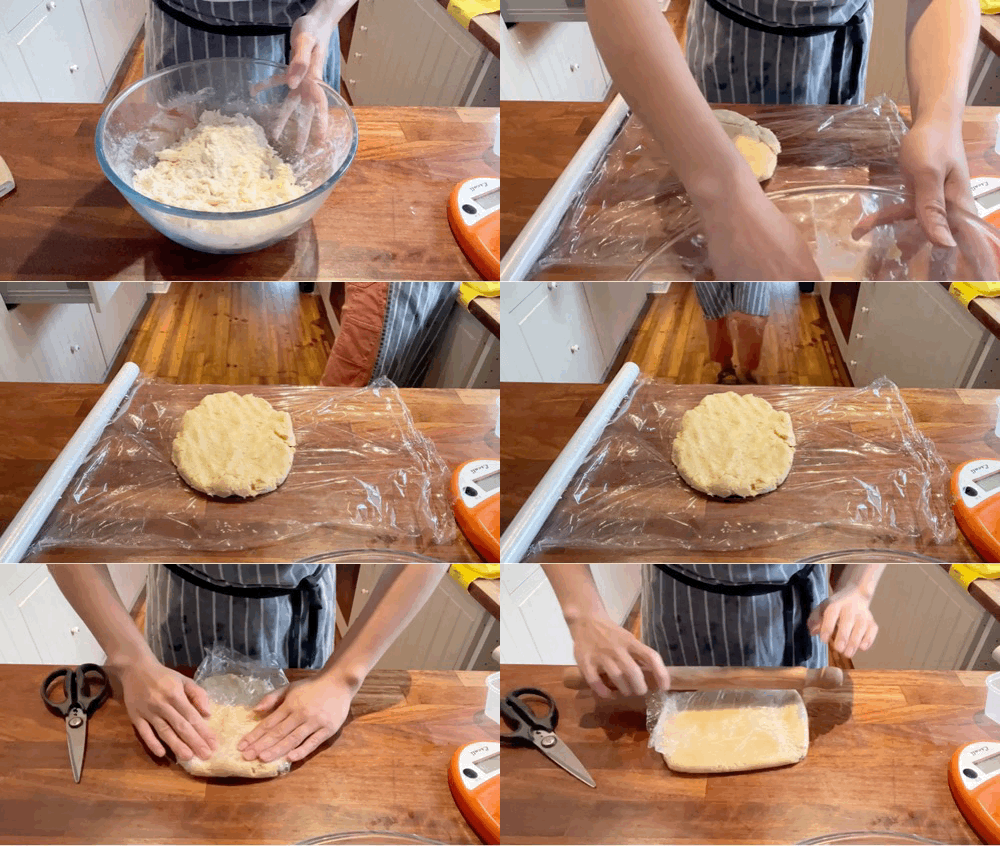
Mix the plain flour, salt, and sugar and whisk to distribute everything evenly. Cut butter into small 1-2cm rectangles. Whisk egg and milk.
Add butter into the flour and toss to coat. Coating the flour will help protect it from the warmth of your hands/it getting melty.
Squish the butter into flat pieces, then continue working the butter into the dough until the pieces of butter are irregular in size, the largest being blueberry size.
Add the egg/milk in three parts, using a fork to toss it each time. Bring it together in a ball. It will be pretty moist. Wrap it and put it into the fridge for at least 1-2 hours but it can last wrapped for three days.
To roll it out, flour your surface enough to stop any sticking, then roll the pie dough out to 3mm. If the dough is warming up too much and it doesn’t feel cute… just put it in the fridge and return to it in 10 minutes.
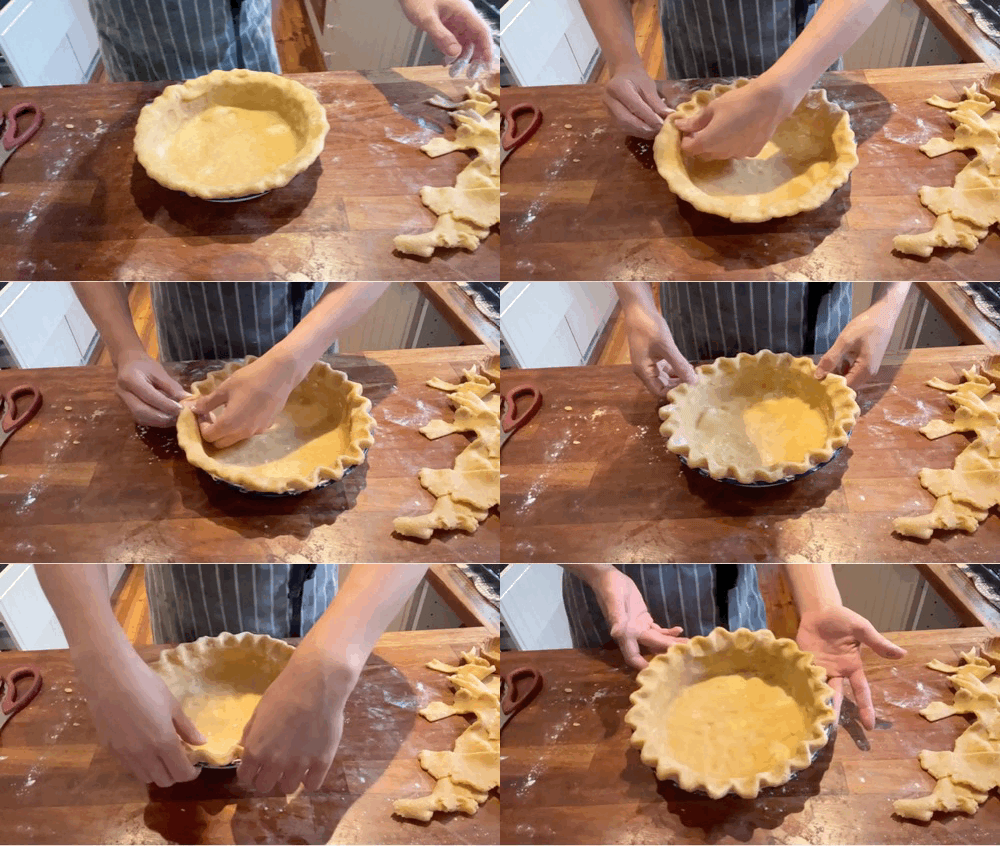
Line your pastry case. Roll the pastry up onto the rolling pin and drape over the case. Tuck carefully into the corners and press into the sides. Go over it several times with floured fingers if you need it - it’s got to be super tight to the tin. You can trim the overhang with scissors so it only has 3cm
Tuck the pastry under itself, then crimp. There are lots of ways to do this but my favourite is simply using a finger and fore thumb - make a V with your left hand then using a finger on your right hand, press inwards whilst holding your fingers in place.
Chill in the freezer whilst the oven pre-heats to 180c fan
Press foil (as it gets into the edges best) or paper into the tart, ensuring it is tight to the edges. Fill with rice, or your chosen baking bean.
Bake case for 25-30 mins until it is golden on the edge.
Remove the beans, then bake for another 10 mins until it looks dry and pale golden. Patch up any holes if you need o!
The case is now ready to use.
Method - crumble
Heat butter in a saucepan until foaming, then start stirring often, continuing to heat as the milk solids brown. Either pass through a sieve or move into a container to cool slightly.
Scale oats, flour, salt and sugar into a bowl. Toss with the cooled but still liquid brown butter until clumps form. Set aside in the fridge until ready to use. If it’s really thick, then you may need to use a fork to form clumps once it is cooler and the butter has hardened.
Method - filling and baking
Drain the plums, pressing to get as much as juice as possible out, then set aside. Add lemon juice to taste.
Measure the syrup (I had around 300ml), then put into a saucepan.
Heat syrup, simmering until you have around 80-100ml left. You do need to boil here, but since it’s so concentrated with sugar, watch out it doesn’t burn! Pour into the measuring jug to check the reduction volume and leave to cool slightly. Sift the starches together and add 1.5 tbsp of water to make a smooth slurry. Mix slurry into your reduced syrup, then mix into your fruit and mix.
Because we have par-baked our case, you can use the filling right away. Pour into your prepared pie case and cover with crumb (you may need to crumble it up a bit more as you go!)
Bake at 180c for 40 minutes, or until the filling is bubbling and the crumble is golden.
Cool completely before slicing - a night in the fridge is always welcome! Just slice then warm up the slices before eating. With vanilla ice cream, obviously.









Your newsletter is such a generous teacher. Hats off.
I love how you included all the tests and what you've learned from them. I've never seen such a comprehensive post for just one recipe. I'm so happy I've found your newsletter, guess I'll be binging all your posts in my free time now!