


Kitchen Project #32: Tiramichoux
Let's talk choux (pt 2) + reverse engineering desserts for the love of puns!

Hello,
Welcome to another edition of Kitchen Projects. It’s so lovely to have you here.
I think today’s title speaks for itself so I won’t go on about it up here but all I can say is - I am extremely proud of this one. And I know it has loads of steps but it’s such a satisfying end result plus you’ll learn LOTS on the way.
A few months ago I launched KP+. Subscribing is easy and only costs £5 per month and with that, you’ll be supporting writing and will get access to extra content + community chat threads (more launching this week and also plans for an IRL pastry potluck hang out!). Just click below to get access to future content plus all of the archive:
Alright, let’s do this!
Love,
Nicola
What’s in a name?
One of the worst things about me is that I cannot resist a pun.
Truly, if there is a chance to pun a name, I will do it. During my time at Happy Endings, we named the mint choc chip ice cream sandwich the ‘Monu-mint-al’. I served a BUN-ana at lark! (recipe here y’all) and I can’t stop going on about having so much ‘hot cross fun’ at Easter. I know, it is awful. Take me to a restaurant or cocktail bar and show me a drink with a pun and I will buy it before even knowing what’s in it. Judging a book by its cover, if it has a pun on the front, is 100% acceptable in my eyes.
This week, I’m excited but also slightly ashamed to say that in this what-comes-first-chicken-egg-pastry-naming situation, the name 100% came first.
Enter: The tiramichoux.
Firstly, how fun is that to say? Irresistibly! But once you get past that, so much joy awaits. I was pitching desserts for an event (as mentioned in this chat thread) where the client was after an Italian dessert table. After noodling for a little while, the tiramichoux concept was born.
Flavour first
When I come up with a recipe for Kitchen Projects, it’s usually flavour first. I’ll see an ingredient and match it up with something seasonal and then I work out the best possible way to showcase it. Today, it’s different. Which is fun! Because sometimes recipe development is about reverse engineering.
In consultancy jobs I’ve done in the past, a client will write to me often with an idea in mind already and it’s my job to either *gently guide them away* from it or to lean into it. Now, I firmly believe that there are no bad ideas. But it’s also super important to keep in mind that you may end up with something different at the end to what you intended.
I love the flavour profile of tiramisu - coffee! Mascarpone! Booze! Omg! - but let’s be real - it’s so much more than that. Taking the flavours and just plopping them into something else doesn’t just work immediately because part of the enduring charm of tiramisu is its fluffy creaminess, it’s raw eggy-ness, it’s voluptuousness. So, how can we replicate that?
To all the tiramichouxs that came before
Before we go further, I want to shout to some of the wonderful renditions of tiramichoux circulating out there already! Firstly Taylor, the pastry chef at at Tavolino, is adding one to the menu soon (can’t wait to go and try it and thank you to Femke, a KP+ subscriber for letting me know this exists). I also LOVE the look of this version by Elena aka @pinchofsalt_cooking - who has also written a blog post and method on hers here - and also adore Sonali’s lovely buns aka @suppersbysonali - LOOK AT THESE BEAUTIES!
Putting the choux in tiramisu
I was pretty confident where to begin: The choux paste itself had to be flavoured with coffee. It’s not something I’ve tried before but I thought about the structural make-up of choux and was pretty sure that espresso powder wasn’t going to make much of a difference.
I tested it out and absolutely loved the results - a deep yet mellow bitterness which would maximise the tiramisu energy even more.
I know we talked about adapting choux before but let’s discuss again: I’m pretty sure you could use any flavoured liquid or powder - matcha would be great - and add it to the choux without damaging it’s structural integrity.
Quick recap: Choux is steam powered. That means when it gets into the hot oven, it is rising due to the evaporation of water. As the water evaporates in the hot oven, it creates steam, expanding the paste rapidly. After about 10 minutes of rapid evaporation, the crust of the choux paste begins to set creating a crisp, thin crust, leaving the inside completely hollow. The rest of the cooking time is on a lower heat in order to dry the choux completely.
Since choux is steam powered, it has a very high water content. Let’s look a bit deeper into that:

So, choux has a signifcant water content, potentially higher if you add more eggs. So, let’s say it’s in the 52%-62% range.
The first role of the water in the choux making process is to facilitate gluten development (more on that in a sec). The second is to provide lift via steam during evaporation. So, by the time the choux has finished baking, it will have reduced approximately 40-50% in weight but doubled (at least) in volume which is a lovely thing to see.
In my coffee choux recipe, the choux was scaled to 45g and final weight at 25g, meaning a reduction of 45%.
OKAY, so the structure of choux. As you know, flour can’t produce those gluten bonds until hydrated - however, since this is cooked over heat, the starch is actually gelatinzed and cooked, preventing it from producing the dramatic stretchy gluten we know and love. This means we’re really relying on those eggs - added slowly one by one - to provide our final structure, backed up by the gelatinsed starch.
You know how with most egg preparations (souffle, meringue based things, genoise), the item will rise due to expanding air trapped inside the network of proteins? Well, it’s kind of the same here but a bit different but instead of putting air into the eggs before baking, we’re relying on those proteins to capture the evaporating water/steam. Once expanded, the eggs will help provide a well-set, rich crust. The yolks, as ever, are doing some the heavy lifting when it comes to flavour.
I’ve worked in kitchens where the chefs choose to use milk powder rather than water + milk. Presumably this is to maximise the water content of the choux to promote maximal lift during the bake. Although I haven’t tried it myself as I rarely have milk powder hanging around - I’d love to know your results if you try it!
A note on my choux recipe
Recently, I've been finding that my original and trusty formulation for choux has been a bit… er… weird. After making the flour butter roux mixture, I’ve been leaving it to cool and it looks almost.. Split? The butter seems to be leaking out. Now I’ve never had this problem before and I’m not sure whether it’s to do with the weather changing or what, but I’ve fixed this issue by adapting the formulation to use a bit more flour and now the choux paste is back to its best fighting fit state! hurrah.
How much coffee?
So, I’m not going to lie to you here. There was not an exact science for this. When it comes to recipe development, sometimes it is literally about lobbing in a teaspoon here, a teaspoon there, and *essentially* remembering to write it down as you go. For this recipe, I made a 500g batch of choux paste and started with 2g - a heaping teaspoon of espresso powder. The result? Fabulous! Though it is rare, sometimes you hit a home run the first time. Call it pastry chef intuition or call it luck, either works.
If you have a coffee machine, you could also replace part of the water with a shot of espresso. I think that would work really well. Since coffee is essentially an infusion, we aren’t changing the molecular structure of water so you could use it with no ill-effect in your choux.
And once you know that… How wide have we just blown choux open? Anything you can infuse water you can therefore use in your base for choux. The only consideration you should make is that choux is baked at a hot temperature so be careful of incorporating delicate flavours that may be destroyed by the 200c+ oven.
Before we get onto the rest of the KP and before you embark on the choux, I really recommend you re-read my CHOUX-MANDMENTS (originally posted here along with a fairly in depth first-looksummary of choux so pls read it if you haven’t yet!)
That Paris-Brest shape
As I continued thinking about the tiramichoux, I decided that this would be the perfect flavour combo to present in the lovely Paris-Brest shape. If youre not familiar, it’s a sort of wreath / doughnut looking thing. It was originally created in the early 20th century to commemorate the annual cycling race between Paris and… Brest, obviously. Usually flavoured with praline cream, it is a delightful thing to both look at and eat.
I mean, how hard could it be to get this shape right?
Honestly.. It was hard. It took me three/four goes to get it right. I started by drawing 8cm circles to use as a guide as ya girl cannot draw a perfect circle and we want our fancy Tiramichoux x Paris-Brest to look CUTE.
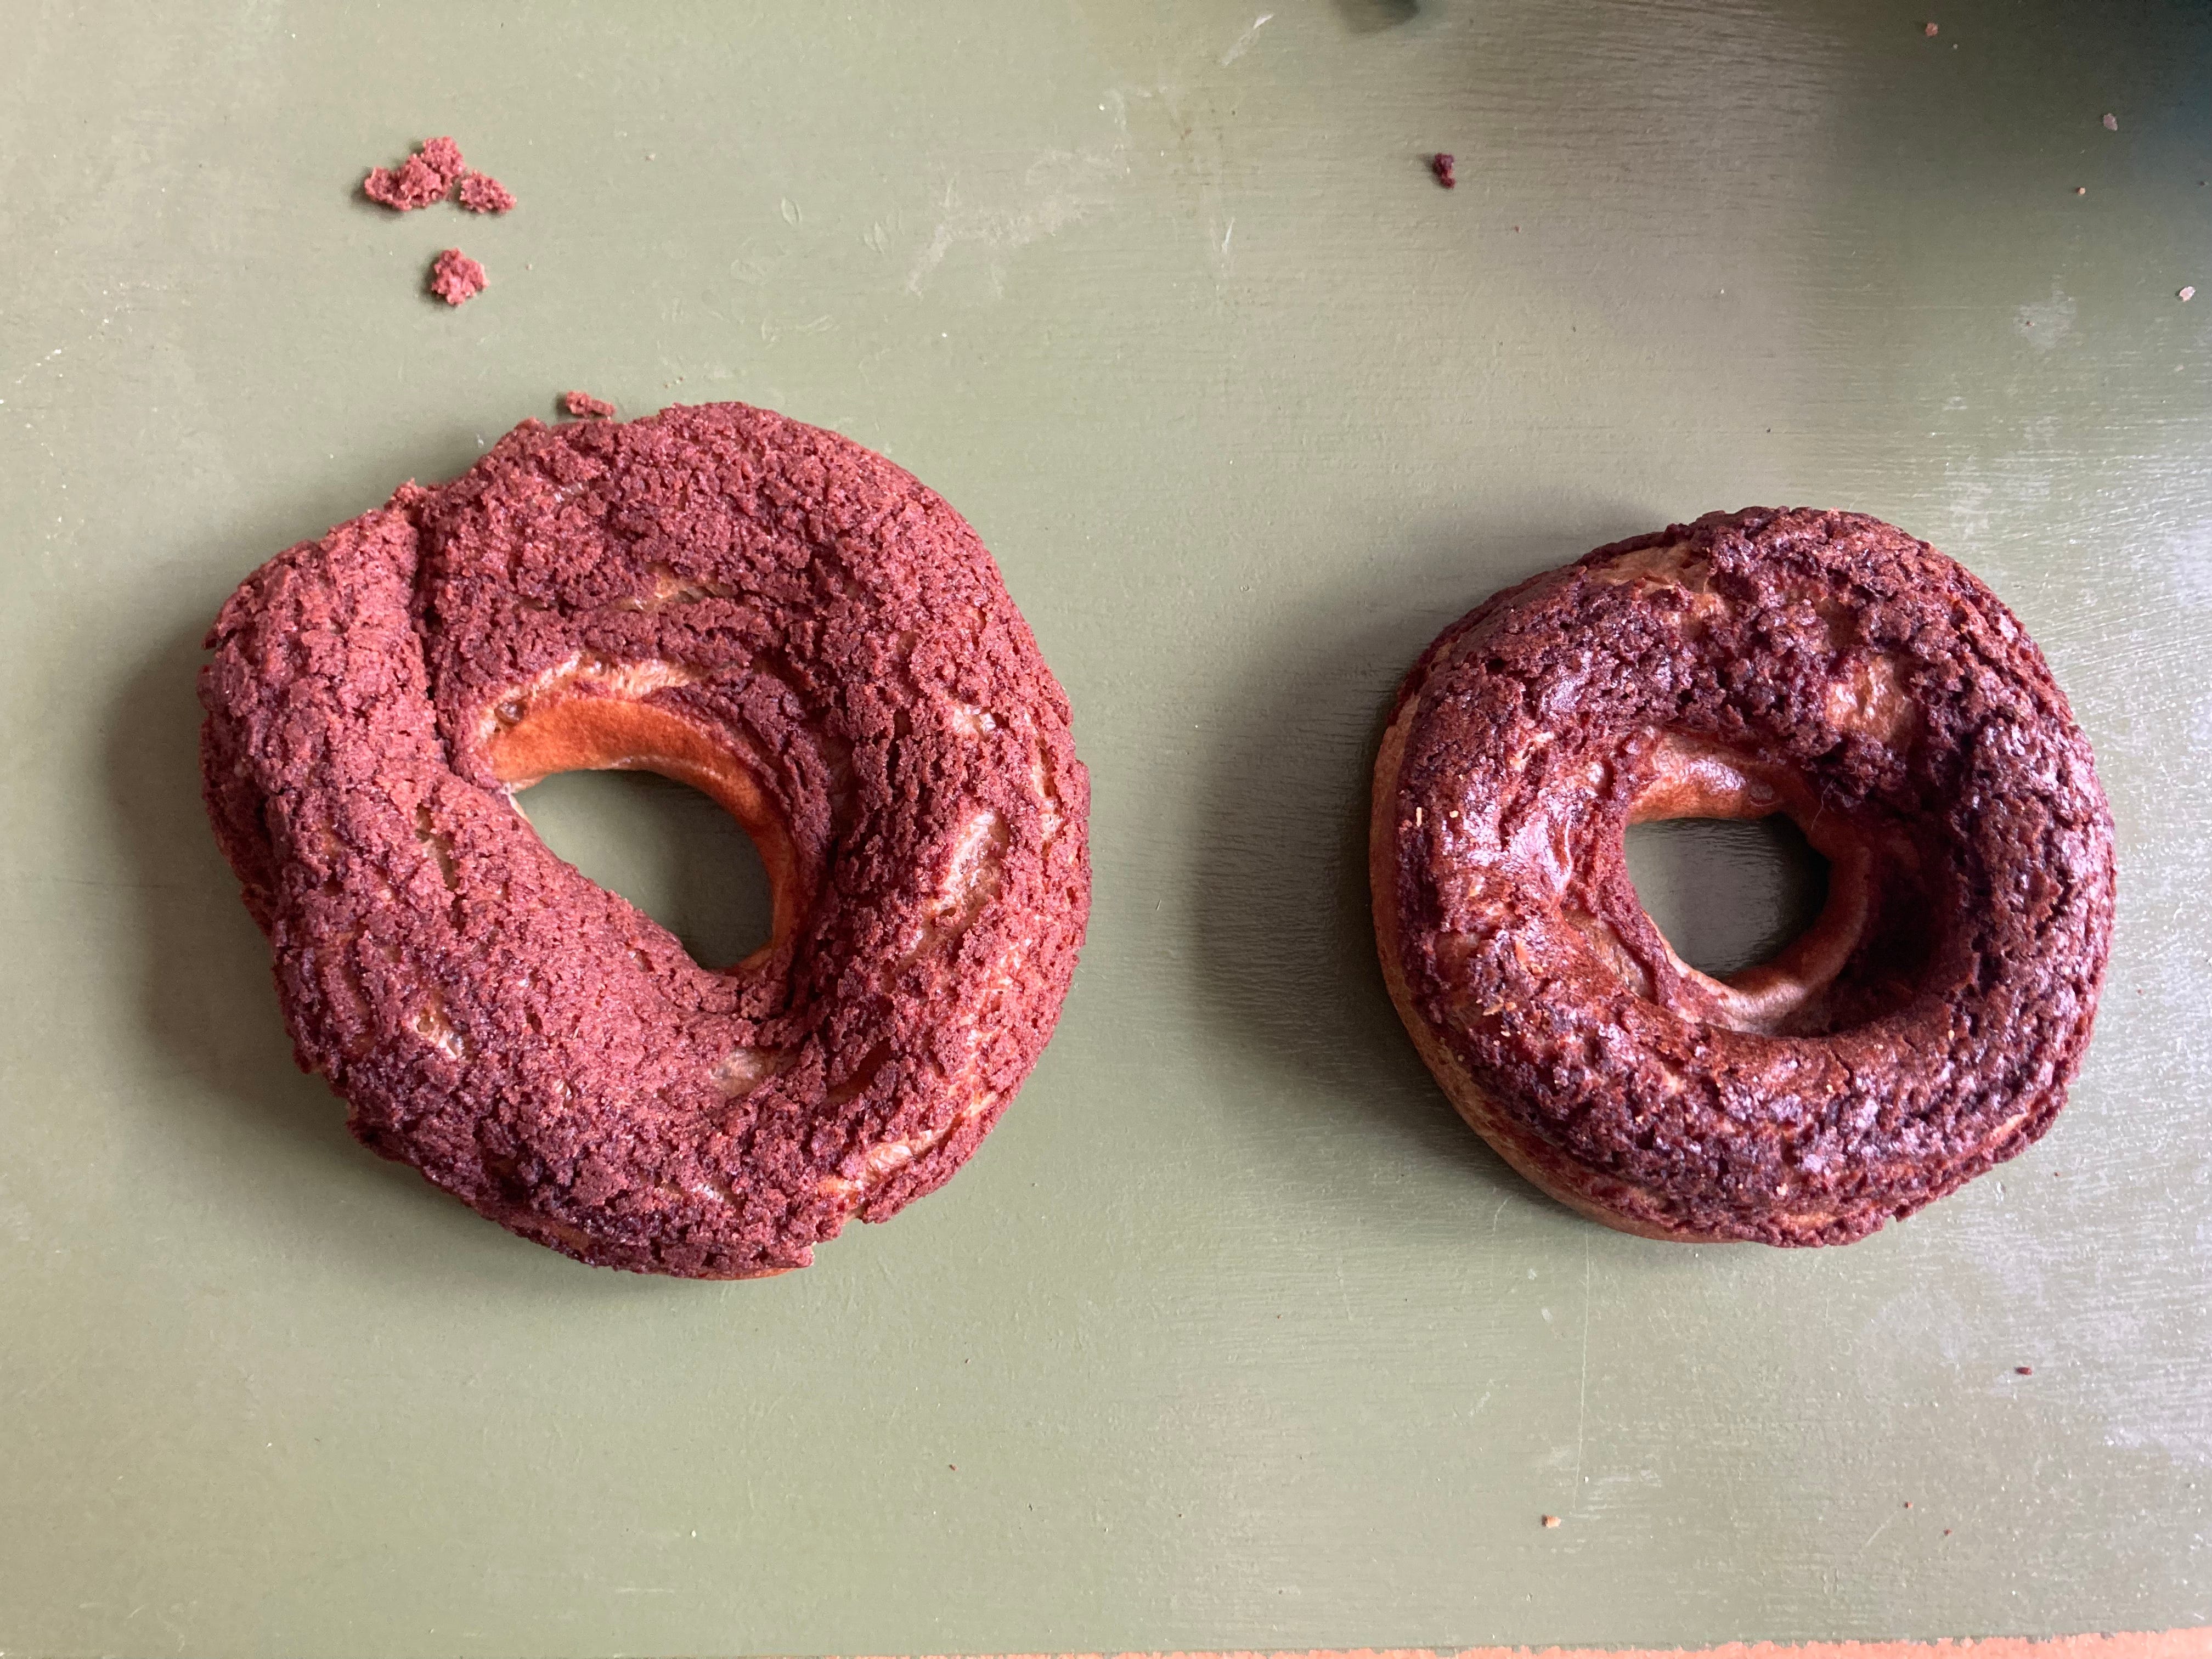
So, the first time I piped it using a 1.5cm piping tip. Pre-oven, it looked like a dream. But post bake, it had spread out far too much in the oven for my liking. Although it looked decent, I wanted it to lift UP and give me some upward volume rather than outward volume:
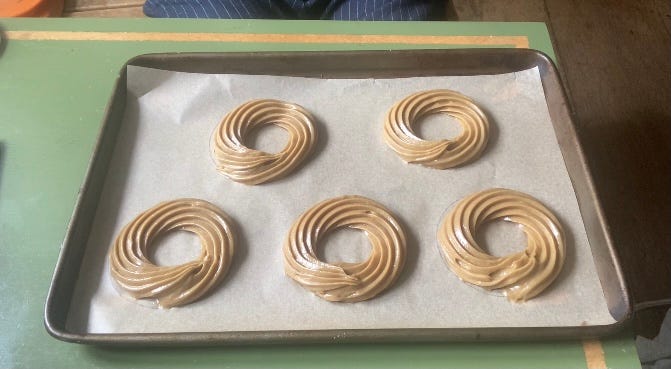
I tried by piping two fat lines on top of eachother which was a bit better… but still pretty much the same. Sure that this would work, I tried the same thing twice more using slightly different piping tips before realising it was not the way to go for the dreamy tall doughnut I was envisioning.
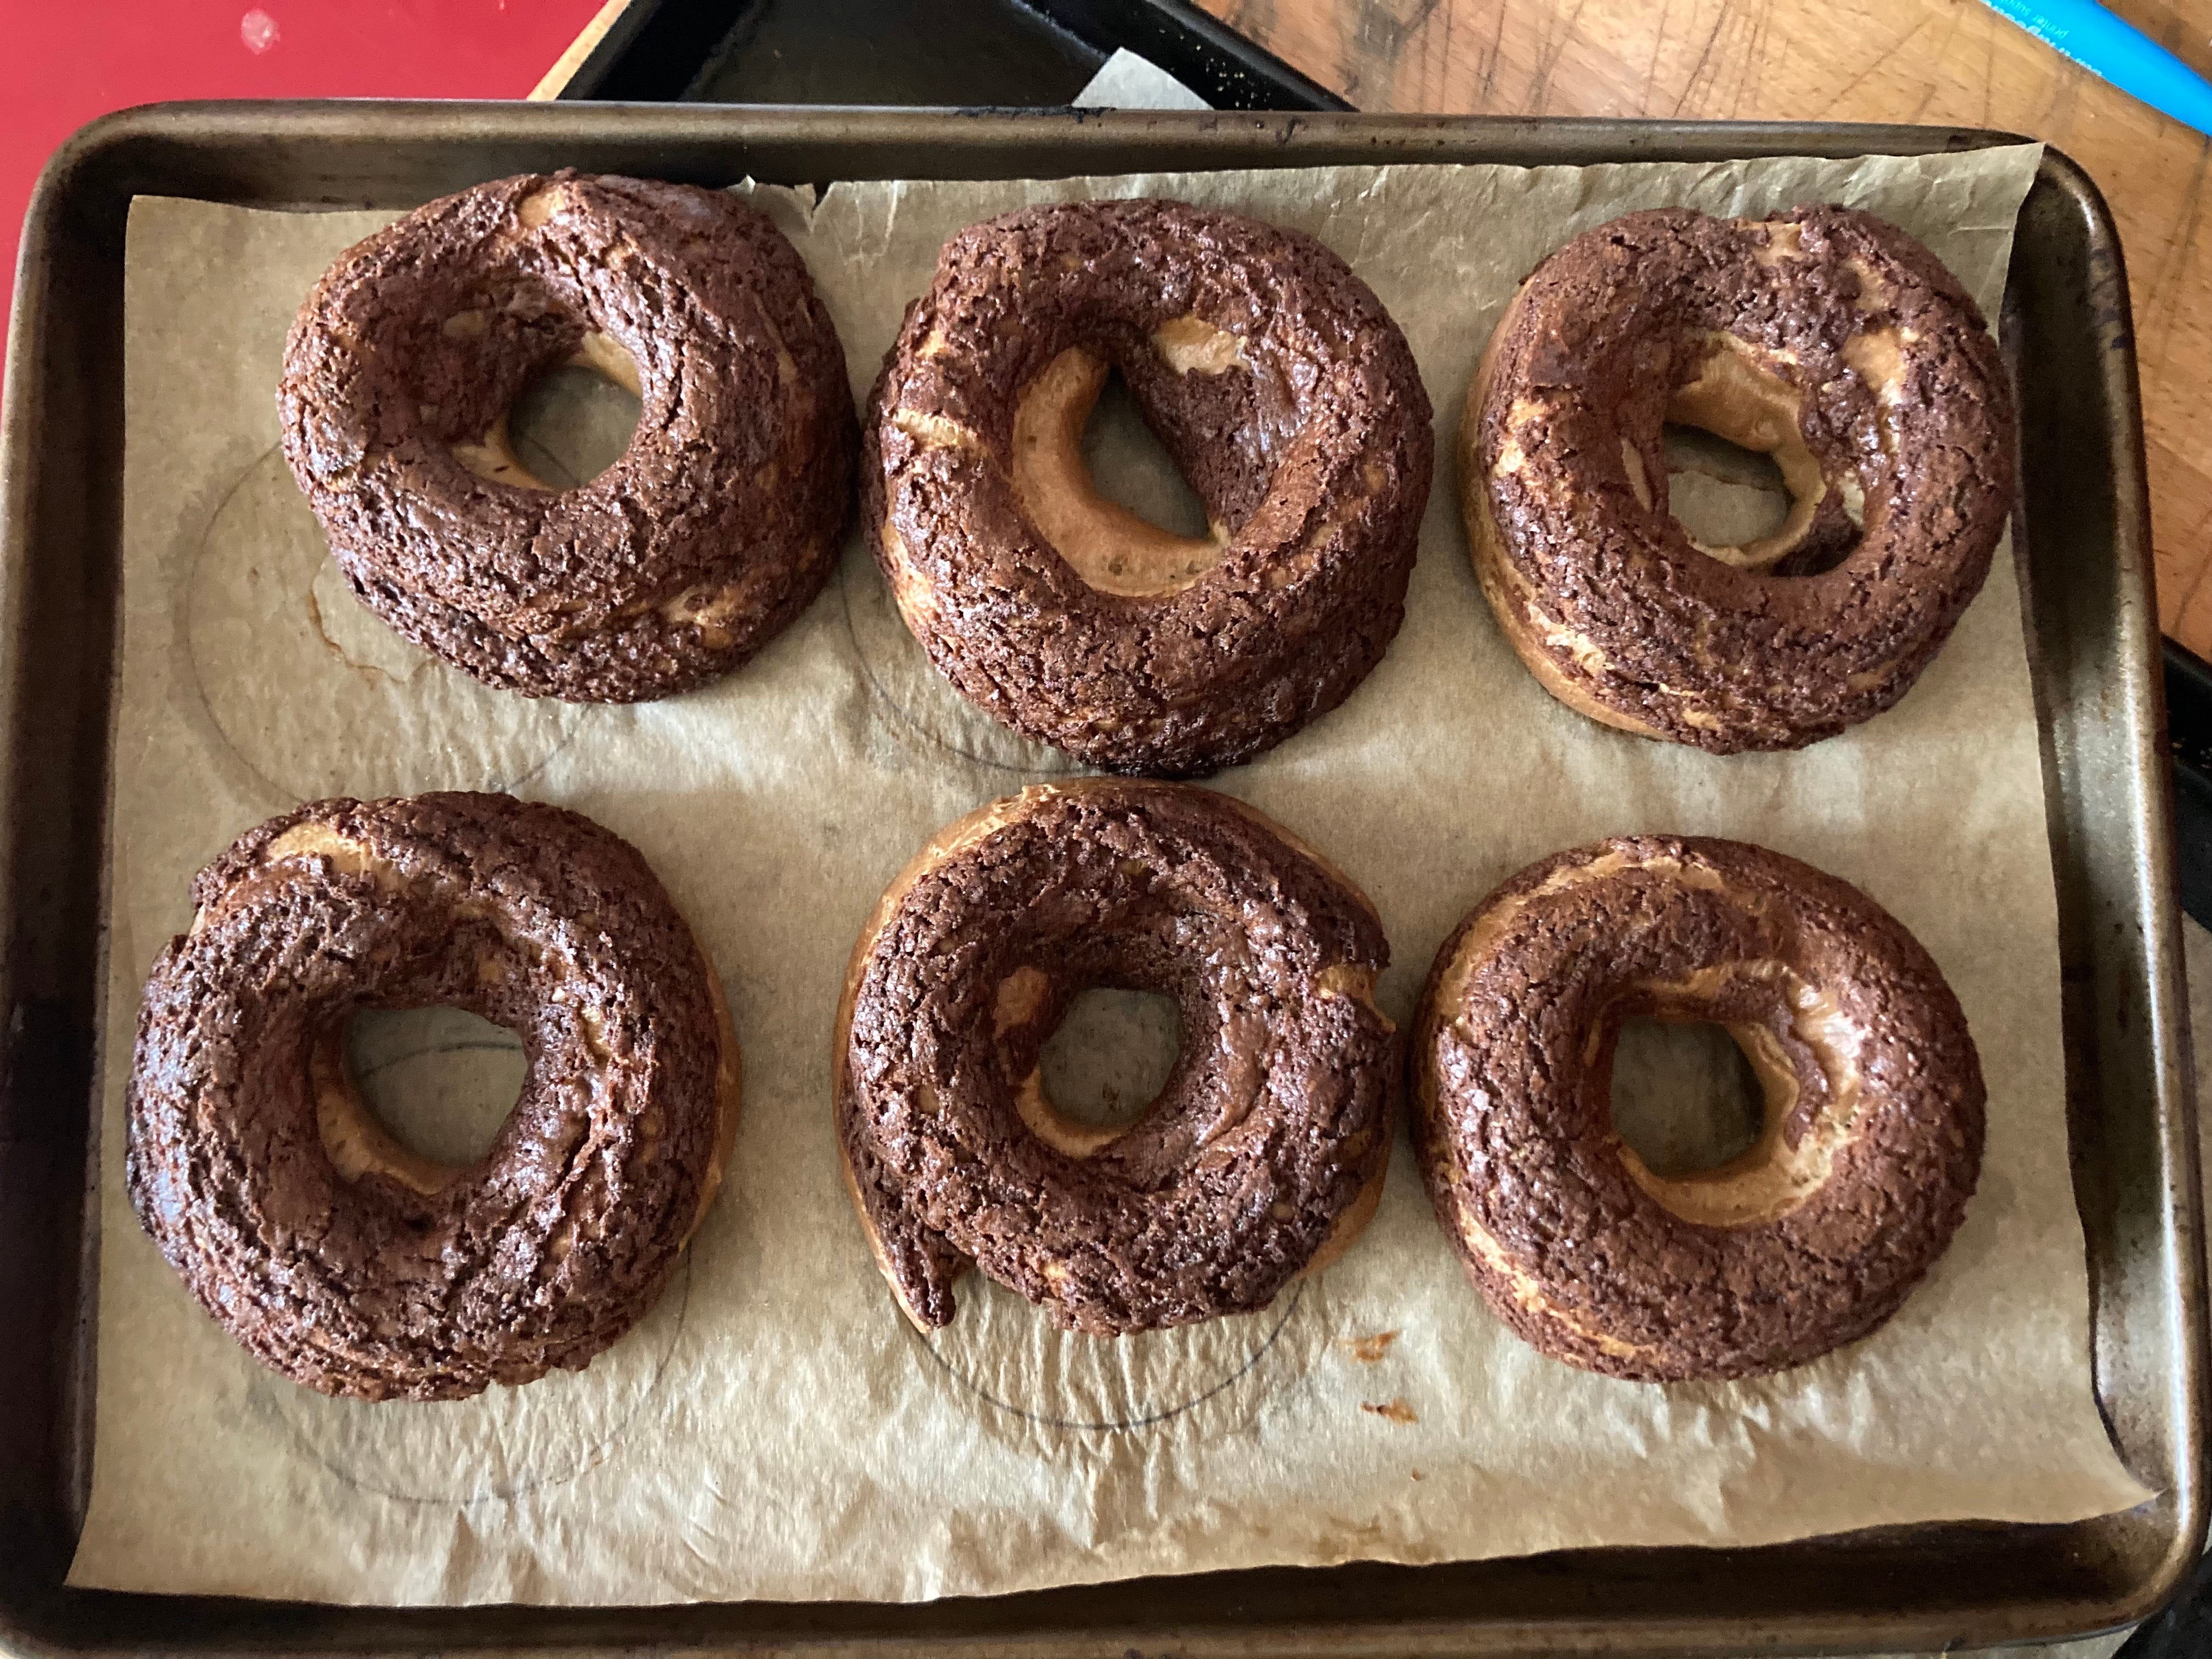
Finally, I took a new tactic. I took a small piping tip (just under 1cm) and piped a circle, followed by another one in the middle. I finished off by piping another circle on top of those - kind of like a medal podium at the olympics (TOPICAL!):
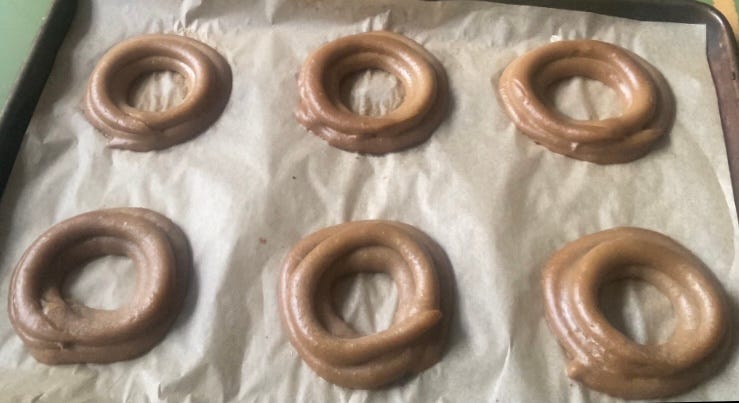
The result? Perfect. Look at the comparison here:
The cream
Alright, I have to admit to you that sometimes writing Kitchen Projects does come right up to the line. This week, I was running out at 3pm on a Friday for more mascarpone after really struggling to get the cream right. I am firmly part of the camp that believes whipped cream does not belong in tiramisu! I love it light and eggy. But translating that into a choux is a bit challenging.
Tiramisu cream is a beautiful medley of mascarpone folded with gently cooked yolks and lightened with meringue. Wonderful! But not at all pipeable. There’s a reason you need to let classic tiramisu sit in the fridge for a couple of hours and that’s to let the mousse form, set and layers meld. So, how could I engineer this? It needed to be stable enough to be piped for the Paris-Brest shape but I didn’t want to use any gelatin or whipped cream.
My first thought was MOUSSELINE. I know we’ve talked about some of the adaptations of creme pat before but we’ve never talked about this. Basically, mousseline = pastry cream + butter. It is fabulously pipeable and not too wet.
My second thought was CREME AU BEURRE e.g. french buttercream. French buttercream is basically a pate a bombe (hot syrup poured over whisking egg yolks) whipped with butter. Lovely, but replacing the butter with mascarpone..
My third thought was a mix-up of the two: Creme anglaise whisked with mascarpone and butter OR Italian meringue
Ugh - the cons of overthinking.
Not wanting to use up too many egg yolks on tests (aside: for a decent pate a bombe, you need a lot of yolks otherwise the mix doesn’t work too well) I decided to forgo the creme au beurre for the time being and tried out the creme anglaise idea. I poured hot creme anglaise over mascarpone. STUPID MOVE - it melted immediately. Obviously. I have no idea why I thought this wouldn’t happen. Anyway, although it was super runny, it tasted great. I folded part of it with Italian meringue which was a big fail - it was just lumpy and overly sweet. I then tried folding it with butter which at first looked… gross:

I warmed it up on a bain-marie and re-whisked it and it came back together - it was glorious and smooth and shiny, as well as being super stable. BUT way too buttery. The flavour was just too much. I think I’d use this as part of a gateau opera but not quite right for what we’re after today.
So, it was back to my original thought: Mousseline. Which was, I’m happy to tell you, a HUGE success. Although I have to say this recipe does live or die on the quality of the mascarpone you use. The own-brand supermarket stuff I tested tended to get lumps I couldn’t later get rid of. Fortunately I live quite near Eataly at the moment so I’ve been using this ‘Fior Di Maso’ mascarpone and its magic:
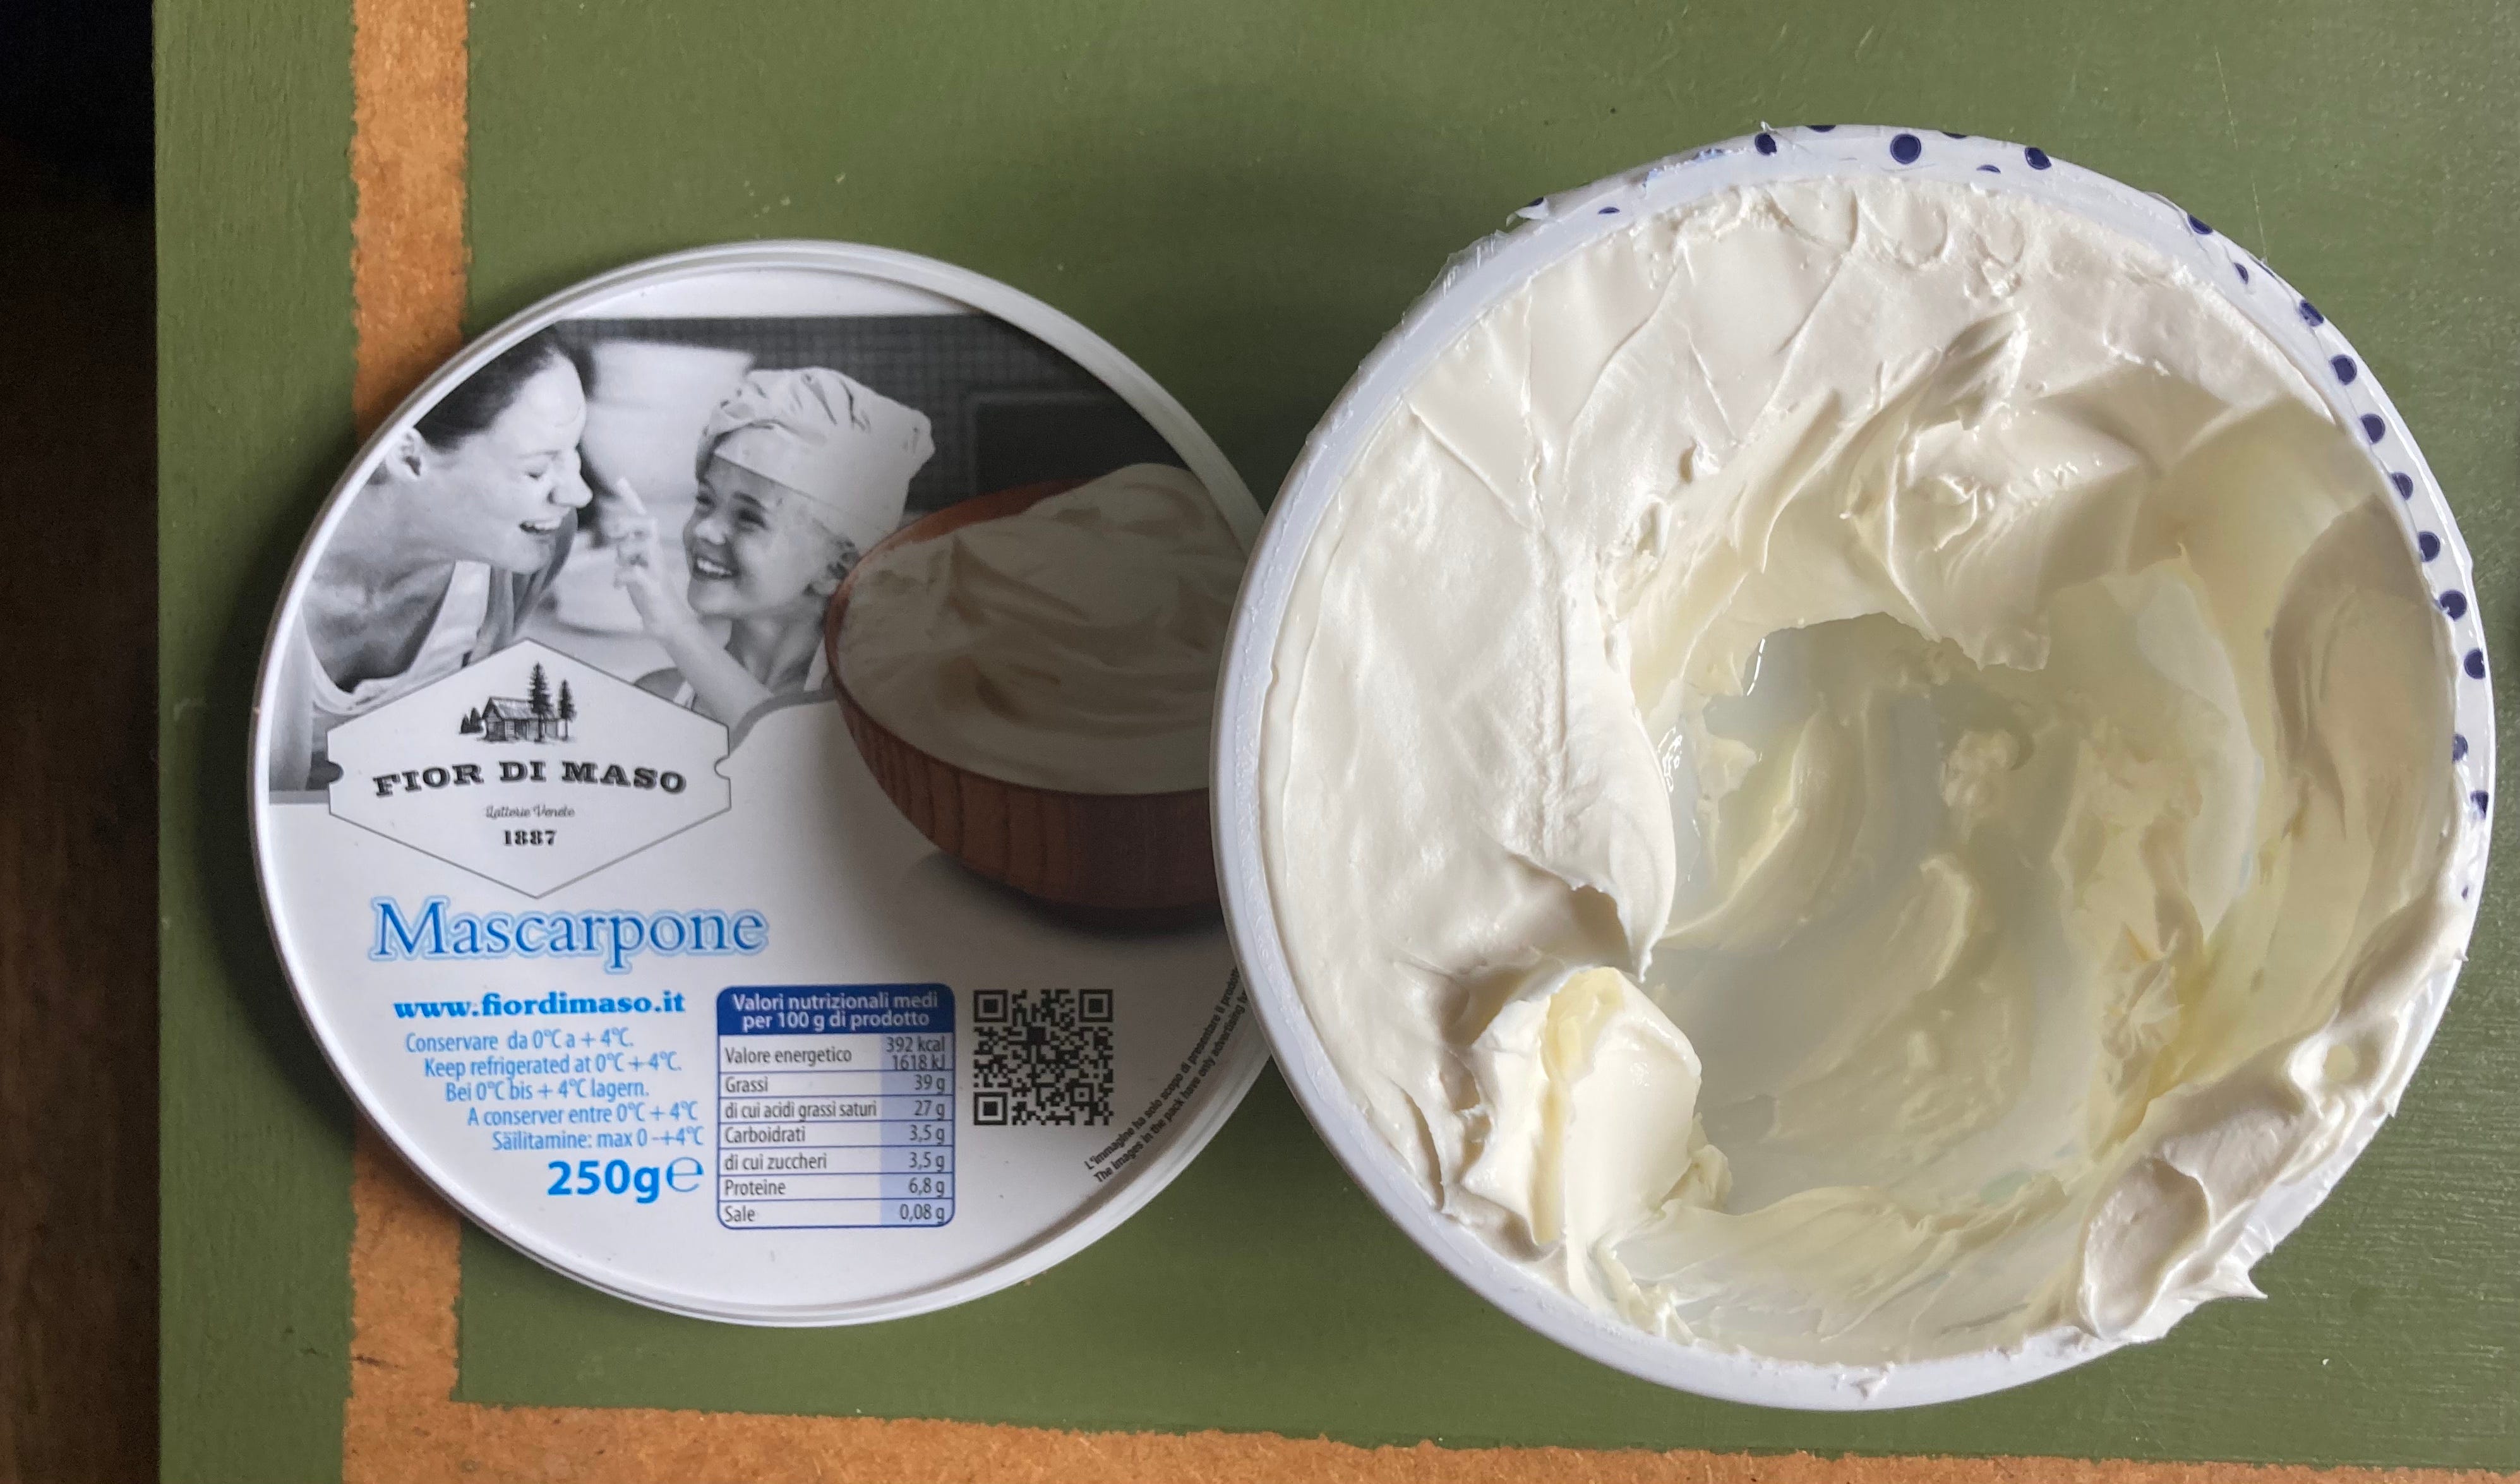
The supermarket mascarpone was more…. Solid? Whilst this italian brand was more like clotted cream in texture. It combined so much more easily.
Pastry cream
For today’s pastry cream, I adapted it slightly to be more tiramisu friendly. Firstly, I reduced the sugar ever so slightly. I also decided to use whole eggs, instead of just egg yolks! I mean, if whole eggs are good enough for tiramisu in general, then they’re more than good enough for me.
Although this feels a bit weird at first, you can totally use whole eggs for pastry cream. Can you see the difference?
Not really eh! Since whole eggs have more water than yolk, I increased the cornflour very slightly to ensure we got a nice solid set. But, since whites set harder than yolks anyway, that’s just my insurance policy. If you want to read more about the set of egg whites, this KP is perfect for you: Peach creme caramel
To booze or not to booze
I admit it. I’m a child. I don’t really like booze in my tiramisu! But I know that I’m in the minority. So, here’s a list of all the booze options recommended by my wonderful followers on Insta, who clearly have better taste than I do:
Marsala (sweet wine)
White Port
Kahlua or any coffee liquer
Cognac
Amaretto
Dark rum
Tia Maria
Frangelico
Whisky
Baileys
Brandy
Madeira
Sherry
Cointreau
Grand Marnier
Pedro Ximinez (ok I’M SUPER INTO THIS!)
I have adapted the mascarpone mousseline cream to include the booze but you can also stir it into your coffee soaking syrup instead. Up to you!
The savioardi
Look, making your own ladyfingers is actually super easy and fun! I know it seems like a pain, but isn’t it so adorable to have the savioardis in a little circle shape that matches up perfectly?
If you don’t want to make your own, you can simply cut the shop bought ones into little chunks and arrange them in a circle. No judgement!
Alright, let’s make it.
Tiramichoux
Ingredients
Makes 6-8 tiramichoux buns
Coffee choux paste (slightly more than you need but you can freeze it or pipe buns)
60g butter
60g water
60g milk
¾ tsp espresso powder. I use azzura americano
2g salt
2g sugar
80g plain flour
140g - 160g eggs (annoying amount I know!)
Cocoa craquelin - this makes more than you need but its handy to have around!
90g light brown sugar
70g plain flour
20g cocoa
90g soft butter
Savioardi biscuits
2 egg whites
30g sugar
2 egg yolks
20g sugar
45g plain flour
Pastry cream
400g milk
80g sugar
2 x medium egg (50g)
40g cornflour
40-50g liquor of choice - you also have the option to add this to your coffee syrup soak
350g mascarpone - if you can, get nice proper Italian stuff. I tried this recipe using the one from sainsburys and it went really lumpy and was hard to work with. Here’s a pic of the one I used - it should almost have a clotted cream consistency rather than being one big chunk:
Coffee syrup
1 x shot of espresso (35g) - optional
100g water
8g espresso powder
30g sugar
If you don’t have access to an espresso machine or have a local coffee shop nearby, you can just brew up some strong coffee yourself or double the espresso powder quantity. You might need to make a slightly bigger batch though. This should be so intense that it is *almost* undrinkable, I think! Needs to stand out against all the cream
Method - Mascarpone pastry cream / Mousseline-ish!
Heat milk until simmering
Meanwhile, whisk together the whole egg, sugar and cornflour (I know it feels weird but just go with it)
Pour hot milk over the egg mixture and return to the stove
Cook for 3-4 mins over medium heat until boiling, whisking the whole time
Once thick, take off the heat and whisk in the alcohol if using
Now, set aside to cool and gelatinise - make sure you put some cling film on the surface so it doesn’t form a skin. You want it totally cold and firm before continuing on with this recipe
When you’re ready to make the cream, try to make sure your mascarpone is room temp as it will combine more easily. It does have a tendency to be a bit lumpy so you just have to be prepared to work it!
Once that’s ready, beat the creme pat until smooth and no longer jelly like - try and get the little lumps out but if a few remain, don’t worry! We have made this creme pat extra thick and pipeable so if there are minor lil pastry cream lumps I promise you won’t taste them. The easiest way to do this is in a Kitchen Aid bowl if you have one
Now fold / mix the two together - it should make a very thick cream. You can also do this in your KitchenAid with the paddle attachments. This is how it should look once combined:
Leave in the fridge until ready to use
Method - Savioardi biscuits
Pre-heat oven to 200c fan
Whisk egg whites and 30g sugar to a french meringue
Whisk egg yolks with 20g sugar and set aside
Fold the two mixes together
Sift the flour on top and fold in
Draw 8cm circles and use as a guide - pipe two slim circles
Bake for 10-12 minutes until golden
Method - coffee syrup
Heat all together. Set aside. Don’t use until it's cold otherwise you’ll dissolve your lady fingers by mistake!
Method - craquelin
Mix together all the ingredients
Smoosh inbetween two pieces of paper and roll to about 3-4mm thickness
For the Paris-Brest, cut 8cm circles with a 3cm circle in the middle
Chill until needed
Method - the choux
Heat water, milk, espresso powder, sugar, salt and butter together on a medium heat
Add all of the flour at once and stir
Turn heat down to low and cook for 3 or so minutes until a film covers the pan

Remove from the heat and put the paste into your KitchenAid bowl or similar
Let it cool down until it’s hot but doesn’t burn your fingers when you touch it. Now you can start adding the eggs. Add the eggs until you reach dropping consistency as shown here:

To bake the choux, pre-heat the oven to 230c fan
Draw 8cm circles on greaseproof paper to use as a guide. Turn the paper over so you’re not piping choux onto sharpie
Put the choux in a bag fitted with a 1cm plain tip OR just snip a 1cm hole. Pipe a circle the diameter of the guide, then another inside, followed - finally - by one on top
Place craquelin on top
Put into the oven and turn the oven down to 200c fan. Bake for 15 mins
Reduce oven temp to 160c fan and bake for a further 15 mins. The shells should be well baked and crisp
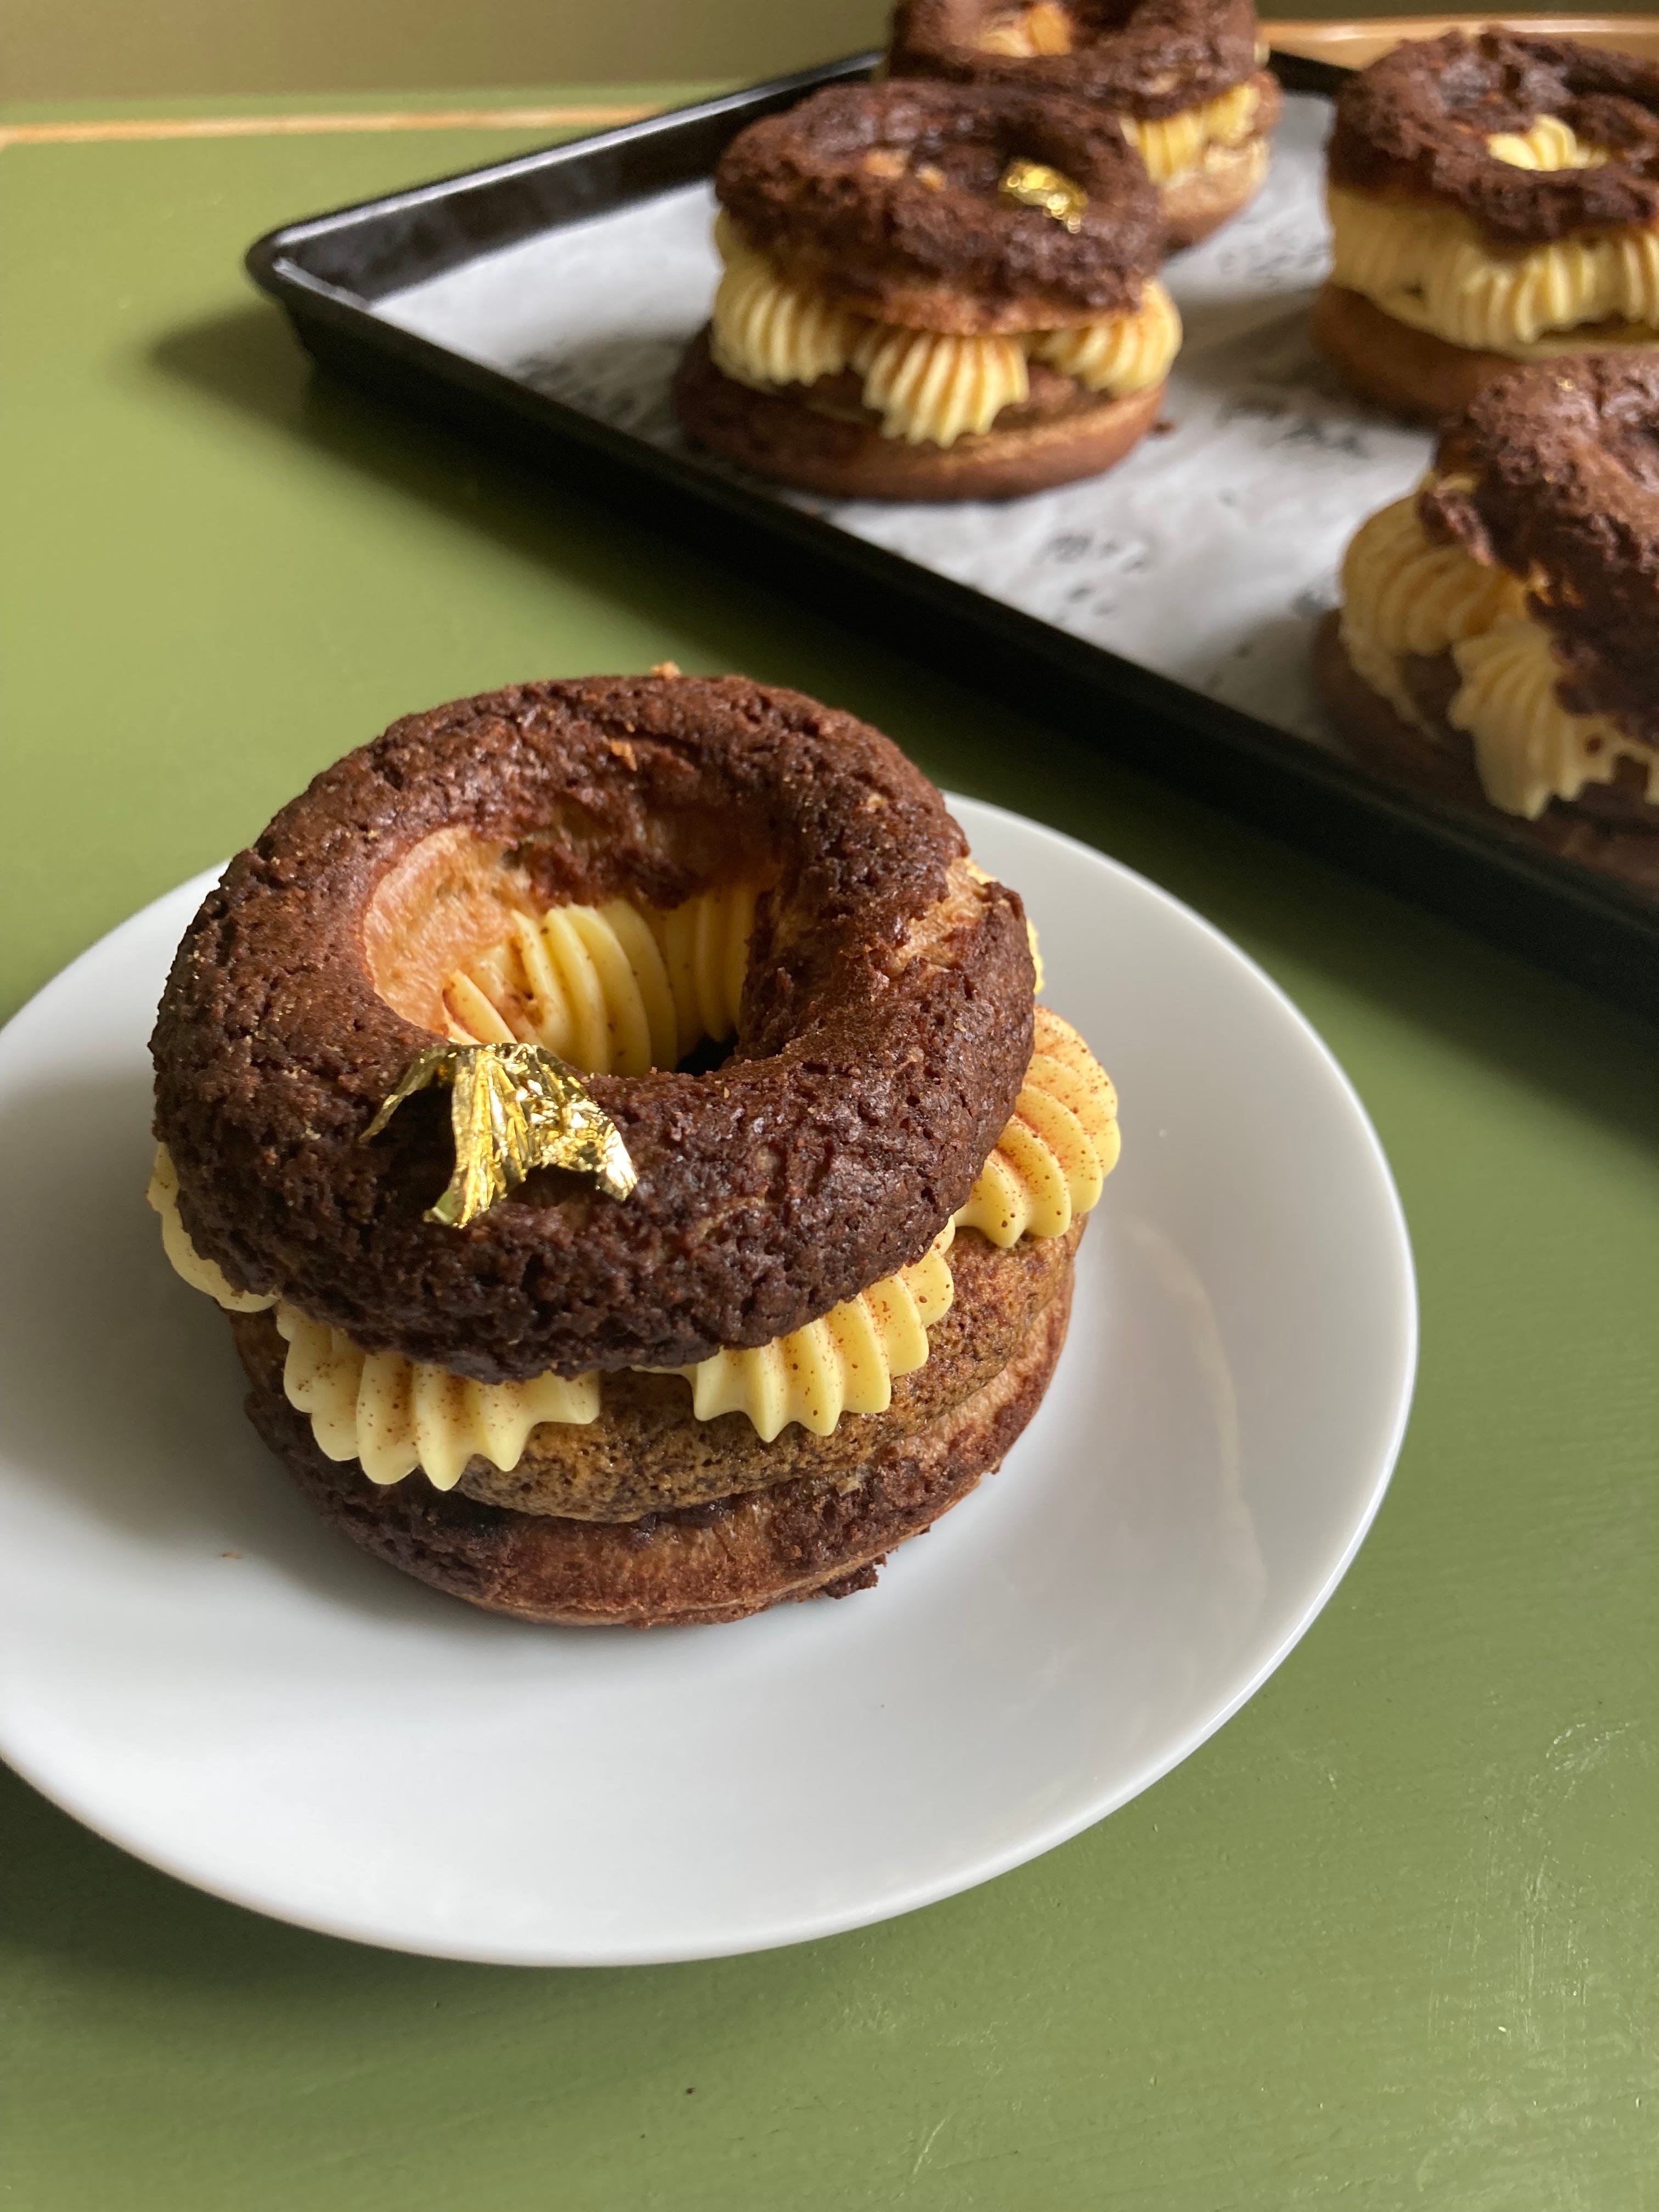
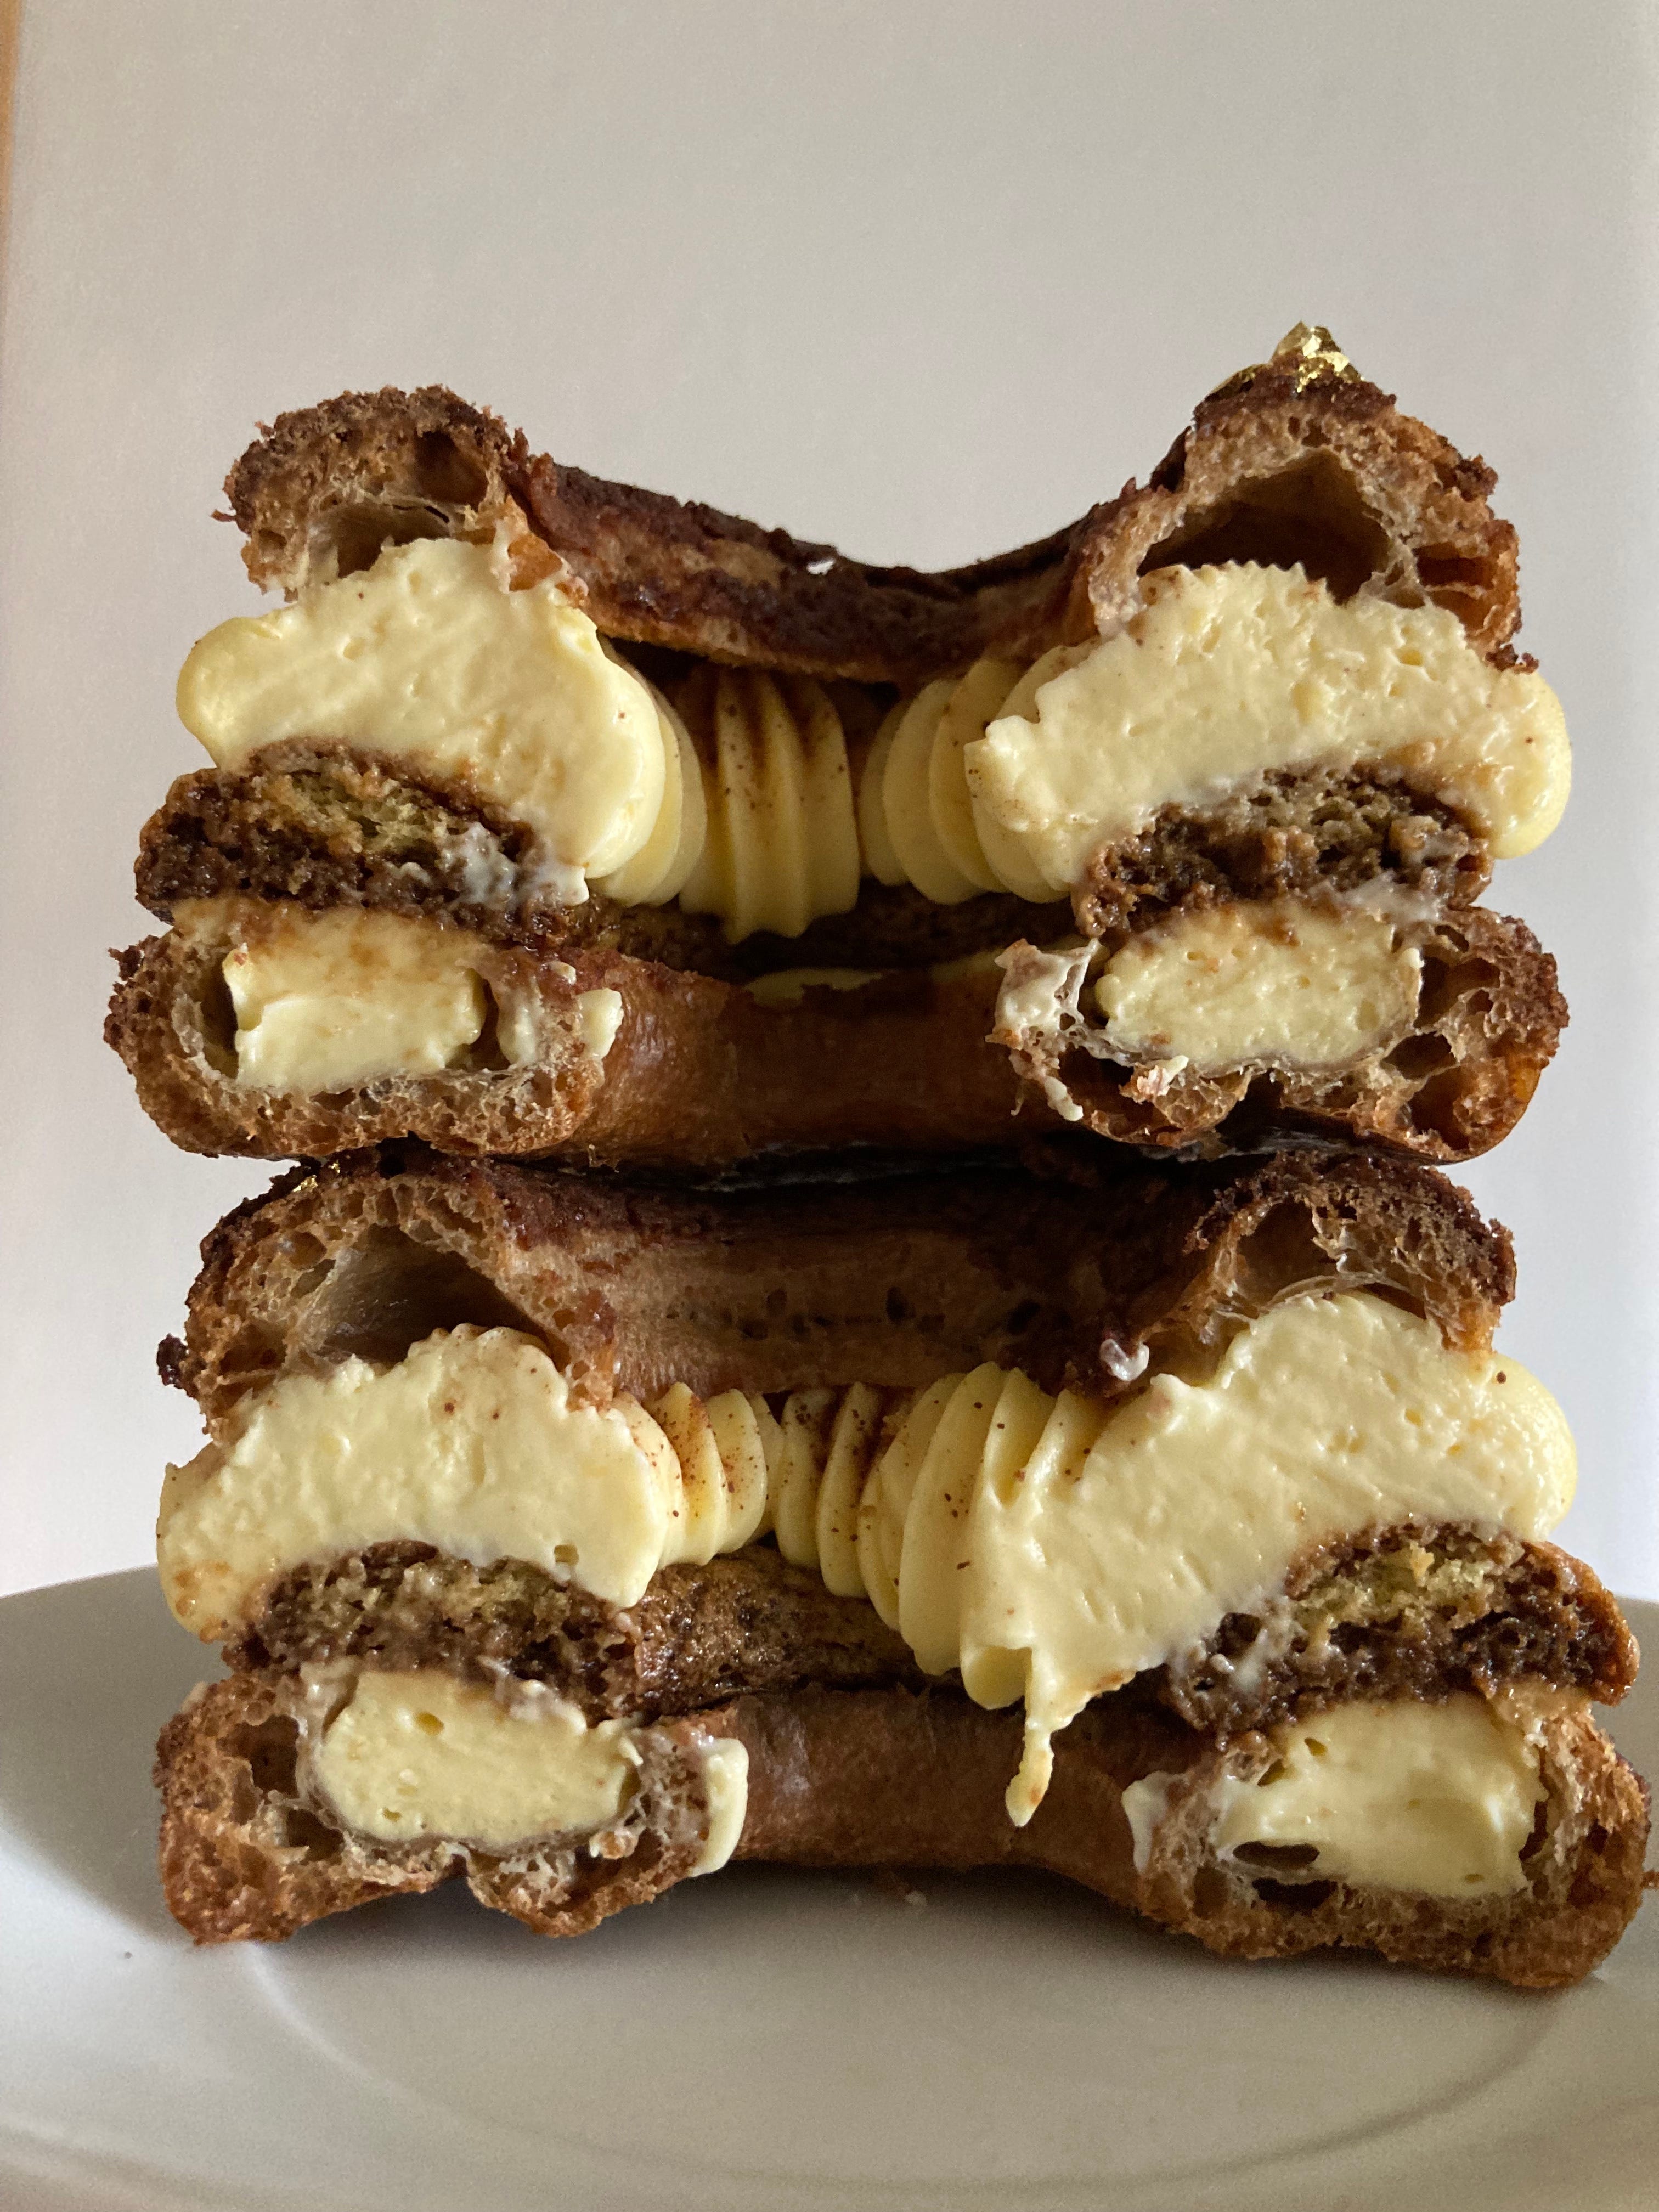
To assemble
Cut the choux in half
Get your mascarpone cream into a piping bag. I use a 1.25cm star tip nozzle
Pipe a small amount of cream in the base
Soak the circular savioardi in the coffee syrup and place on top
Pipe blobs of mascarpone cream on top
Dust with a little more cocoa
Place the hat on top
I added gold leaf because I can’t help myself but it’s totally optional
Done! You can keep these in the fridge for a couple of hours and they’ll be great
So far Ive just tested just the cocoa craquelin coffee choux - seriously so yummy. Honestly just the plain choux with craquelin is so scrummy as a little snack fresh out of the oven. One issue though - this happens sometimes when I make choux, they dont stay crisp at all after cooling down. I poke a hole in the bottom to let steam out, but I still find that they never stay crisp, and soften after just a few hours out of the oven. They have colour, so I dont want to cook them too long and burn them, could this have something to do with not cooking the moisture out long enough on the hob?
Hi! Is it two eggs weighing 50gms or one egg weighs 50 gms ? For the mascarpone pastry cream! Thank you!