Kitchen Project #29: Honey and blackberry cake
Ft. toasted flour + deep dive into sugars and an interview with the London Honey Company
Hello,
Welcome to another edition of Kitchen Projects! It’s lovely to have you here.
This week we’re talking TWEAKS - little adaptations you can make to your pantry when you’re baking. From browning butter to caramelising honey (should it be done?) or toasting your flour, I’ll help guide you through these little adaptations and put them all together in a beautiful layered cake inspired by Medovik - Russian honey cake.
We’ll also be talking about all things sugar, because the more you know, the more you know, you know? As part of this, we’ll be deep diving into the world of honey with the help of an interview with George Shelton, a bee keeper for the London Honey Company
Over on KP+, I’ve just released a recipe for cherry, ginger & caramelised white chocolate cookies and the latest KP+ chats thread is popping. Subscribing is easy and is only £5 a month, so if you fancy supporting the writing as well as getting some extra content then click below:
As an extra thank-you for my subscribers, I’ll be doing random giveaways of some of my fave producers whenever I can - last week, it was Wildfarmed Grain and this week it’s the London Honey Company. All you need to do is be a subscriber and I’ll pick from there.
Love,
Nicola
The power of tweaking
A few weeks ago, we went deep into the world of genoise. But surely there’s so much more we can do with all those well-earned techniques? I wanted to find out! So, to develop this week’s recipe, I broke down each element of the genoise to see what could be played with:
Eggs + Sugar - although the eggs can’t be played around with much, we can adapt the sugar we use for the egg foam. This week, light brown sugar is stepping up to the plate to provide a new dimension to the base flavour. I also wanted to know if brown sugar - which contains more moisture - would affect the foam structure compared to white sugar (Short answer: it doesn’t. Yay!)
Flour - Since genoise does not particularly need gluten to be successful, we can play around with the flour. Making the most of the fact we don’t need gluten, we’re going to be toasting the flour to unlock some flavour dimensions in the cake base. Basically, everything is going to be toasty. Huge thanks to Anais for bringing this technique to my attention
Butter - Of all the things that can be done with butter, browning has to be the most simple and gratifying. These toasted notes will go very well with the toasted flour. For details on it, read here
When I thought about all these tweaked flavours together, I knew there was one perfect ingredient to tie it all together: HONEY. And how would I incorporate it? Whipped into cream cheese, ofc. Yeowza. So, today I’m sharing a recipe for a multilayered genoise, inspired by Medovik aka Russian Honey Cake.
Alright! Let’s start with the golden stuff.
Honey honey, how you thrill me...
As I approached this week’s KP, I realised that I was actually pretty under-informed on honey. Like, I know honey comes from bees, OBVS, but I often forget to think about the journey it has taken to get into the jar. I’ve totally been taking it for granted.
Honey is an amazing ingredient because it is a direct reflection of the environment it was made in - you’re essentially benefitting from foraging … via bees!
Honey from Zanzibar will taste significantly different to honey made on a rooftop in Peckham. All the nectar that the bees collect in their surrounding area, from different places, different environments and different plants, is what you are tasting. So, although the idea of eating South London might not be that appealing, isn’t there something magical about interacting so directly with your environment?
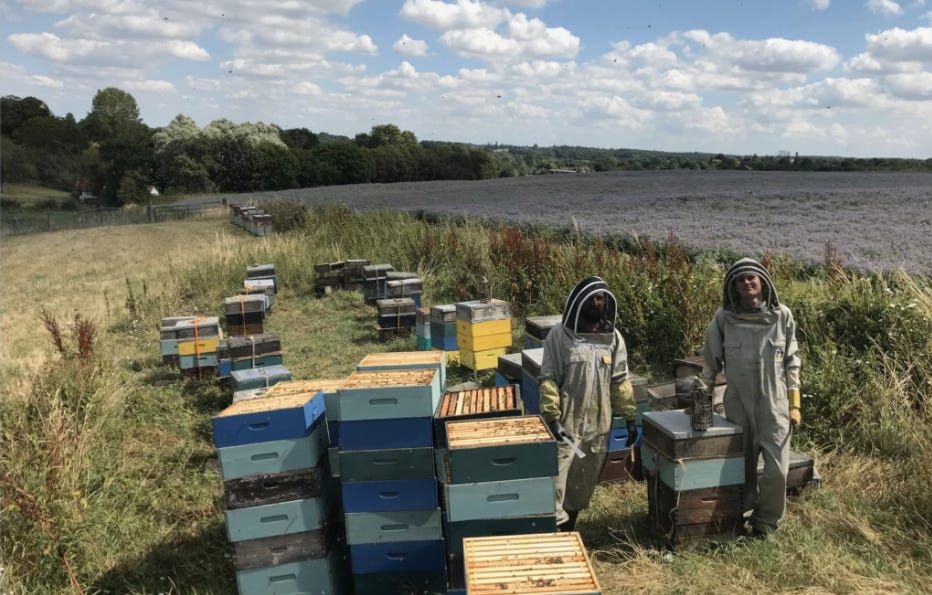
Instead of muddling through the topic myself, I reached out to the London Honey Company, who used to be my neighbours during my time at Little Bread Pedlar, to find out more.
Below, I’ve written up some excerpts of my conversation with George Chelton, a beekeeper, who has been around honey and bees for his entire life. In this chat, I hope to shed some light on the magical nectar that is honey as well as share the lowdown on crystallisation and what to look out for AND avoid.
Ok, let’s start at the very beginning. What IS honey?
Simply put, honey is a product of animal origin. But honey is really about the full storyline and chain of the product. It starts with bees extracting nectar from surrounding flowers, which is then processed and ripened in the hive and then it becomes honey. The bees also collect pollen which is used to feed young bees and that also ends up in the honey, too.
How do you control the flavour of your honey?
We try to get it as pure as possible! We’ll put our bees right on the corners of fields but no honey is 100% from one flower - it’s really hard to do in the British Isles as it’s such a small nation. The farms are all so close together so you cant 100% control where the bees forage, but that is what makes it amazing.
What are some really unique honeys?
London honey is the most polyfloral - think of all the different people, cultures and all the different flowers they are growing on their balconies, or on rooftops or in parks, it just creates the most complex honey because there’s so many types of nectar in the jar.
When we’re picking honey to work with in baking, where should we start?
It’s good to think about the colour. The stronger the honey, the darker it is. The strongest honey you can get in the UK is Ling Heather - it is rich, dark. It’s the queen of UK honey - it’s the British Manuka (Manuka Honey can only be sourced in NZ - it has lots of anti-septic qualities and is used in hospitals), it’s powerful, bittersweet, sometimes it can even be like toffee - such an unusual flavour. Then you get something like borage honey which is almost transparent, it’s so thin - so floral, it’s almost medicinal. You can usually match honeys from their colour to their taste. Zambian honey is almost black, it’s so good in coffee.
So, I’ve seen and heard about the concept of ‘burnt honey’ quite a lot, seeing it on menus across London. So, what do you think about caramelised honey?
I’m not about that! I can’t recommend doing that a monofloral honey. You’d lose all the goodness in the honey - it would just taste flat. You’d lose all the complexities. It ruins it for me.
Finally, what exactly is honeycomb and how can it be eaten?
Honeycomb is honey in its raw state. The bees build around these beeswax cells and keep the honey inside. Depending on the honey, the honeycomb can be gooey and aromatic, or it can be really strong and almost crunchy.
So, can you just eat it? How should we eat honeycomb?
Yes, you can eat it - it’s almost like chewing gum! So you can swallow it or spit it out! I love it with cheese. It’s so good with cheese - a big chunk of honeycomb on the side of a cheese board is really nice. I’ve also seen it in ice creams, or decorating tarts and cakes!
At LHC, you’re very clear about the provenance of your honey. So, where does all this supermarket honey actually come from?
If you look on the label, quite often, it says something along the lines of ‘a blend of EU and non-EU honey’ and they don’t even specify the origin, but a lot of honey comes from China and… it’s not really honey. In some mass producing countries, bee keepers are taking the boxes off so rapidly - after 1 or 2 days - there is no real time for the bees to process the nectar and turn it into honey that a sugar syrup solution is added to the nectar to make up for that process. That’s often what you’re getting from these companies.
So, what are the big differences between your small batch honey and mass produced honey?
When you look at one of our honeys in a shop, you might see that it looks crystallised on the shelf and think ‘oh, that’s not good’ but what that means is you’re seeing a 100% raw product. If honey stays completely clear for 12, 18 months there’s something really wrong there, as the only way stabilise honey is to heat to extreme temps which burns all the crystals down. By doing this, you’re killing all the goodness, all the complexities and losing all the flavour. We’re so against this!
So, is crystallisation good?
Yes! All nectar from UK flowers that the bees collect has quite a fast crystallisation rate. So, with British honey - there’s nothing you can do. If your honey crystallises - fantastic! It means you’ve got great honey. If you want, you can reverse crystallisation by gently warming your jar under the tap, but type of crystallisation really depends on the nectar - some can go solid white, almost cream, which is amazing and they taste even better and even smoother once crystallised but others will crystallise like shards of glass.
Thank you so much to George Shelton and the London Honey Company - you can read more about their mission and the full story of flower to jar on the website here. Everyone subscribed to KP+ will be automatically entered into a giveaway for a British honey duo set so you can try some of their beautiful products.
So, should we burn honey?
Caramelised, or burnt, honey is something I’ve seen in pastry books and restaurant menus over the years but my chat with George has me questioning it… should it be done?
I think honey should be treated a bit like olive oil. In kitchens, there are two sorts of olive oil - olive oil for cooking and olive oil for finishing. The olive oil you use for cooking doesn’t have to be extra virgin or the best you’ll ever buy - in fact, it 100% shouldn’t be. Cooking olive oil needs to be affordable and also a team player. You don’t want something extremely perfumed just to soften onions in.
Honey is similar. In your pantry, you should really have two types: One for general use (that will likely be heated, used in cake batters or syrups etc. and thus ‘burn’ in the oven), and one that is for a final flourish. The final flourish honey should stand out and should not be heated. EVER.
So, burnt honey is absolutely a thing. But it should never be done to a small-batch honey that has been carefully preserved and purposefully never heated above 50c, an action which destroys all the nutritious and delicious bits!
What happens when you heat honey?
By heating honey, sure you are creating new flavour compounds… but to create those caramel notes, you are burning away all of the complex layers and flavour profiles built by thousands of bees and their local flora and fauna.
When we turn plain white sugar into caramel, we do it to make it more complex and to give it additional flavours and bitter notes. But by heating certain honeys, we are actually doing the opposite - making it much more one note.
To sum it up, if you only have access to fairly one-note or the polyfloral mass produced honey, you can absolutely heat it on the stove until it turns a few shades darker before using it! It definitely deepens the flavour and makes it less plainly sweet. But if you’ve splashed out for something fancy, don’t touch it!
If you do heat your honey, please note that you will be reducing the water and the final product may be stiff, sticky and non-pourable, so must be incorporated whilst warm into a custard, buttercream or any such thing, and the lost liquid must be accounted for elsewhere in your recipe.
An overview of sugar - what, where and how
To understand recipe development more deeply and improve our approach, we need to understand the history, make-up and background of the key ingredients we’re using.
As you go down the baking rabbit hole, you’ll often see a lot of sugars being used, in all it’s different forms. But what actually *is* sugar? When we’re baking, we spend most of our time hanging out with sucrose - your classic white sugar - or sucrose + molasses (light brown or dark brown sugar), so it seems a good place to start.
You so (re)fine(d)
Sugar comes in many forms but the two key forms are refined and unrefined.
Refined sugar is sucrose that has been extracted from one of two sources: sugar beet or sugar cane. Sugar beet is grown in cooler climates, like the UK, whilst sugar cane is grown in tropical climates, like Brazil. Whilst there are some differences in the processing of the cane vs. the beet, it’s around about the same - the cane and beet are crushed or sliced and then the juice is boiled and processed to separate the molasses (more on that in a sec) from the pure sucrose - well, 99.95%! Pretty close.
These two sugars are fully interchangeable since pure sucrose is extracted. I’ve read a few articles online that suggest one burns quicker, or that there are some differences between the beet and cane sucrose, but I can’t find any real info on that so consider it a rumour that can be ignored.
Once the sucrose has been extracted, it is either used as pure white sugar OR it goes through another process to become other products - molasses is added back in to make light and dark brown sugar.
The molasses is where the cane and beet vary - beet molasses is not very sweet and is used for animal feed, whilst cane molasses is the sweet syrupy stuff we’re used to enjoying.
Unrefined sugar, however, is rarely derived from beets (the molasses isn’t quite as sweet) and mainly comes from sugar cane. Muscovado, for example, is a product of cane sugar. It is considered unrefined, as the molasses and sucrose are extracted together, rather than the molasses being added in later like most light brown/dark brown sugar products.
Demerara is also an unrefined sugar derived from cane sugar - as the sucrose syrup boils down and reduces, small crystals are left which give us those crunchy crystals.
It’s impossible to talk about sugar without taking a moment to consider it’s dark history. Demerara, for example, takes its name from the American colony of Demerara, where the crystallised sugar was originally produced by enslaved people. I can recommend this NY Times article that specifically looks at America. This article paints a picture of sugar trade in the UK.
A little bit about liquid sugars
So that’s it for the classic baking sugars in granular forms… but what about the rest?
To get started, we need to understand what sugar actually is. Like I mentioned earlier, white sugar is pure sucrose (50% fructose and 50% glucose).
Honey, however, has an uneven mixture of fructose (40%) and glucose (30%), with the rest being made of up water, pollen and other impurities. It’s this variable 30% that gives honey its unique, environmentally influenced flavour - white sugar, no matter where it comes from in the world, is always going to taste like white sugar.
Honey happens to be an inverted sugar. Inverted sugar is one of those things you don’t *HAVE* to know about it, but the fancier pastry books you buy, the more often you’ll see it mentioned. It can be made by adding sucrose to liquid and ‘breaking’ the bond with an acid - basically, inverted sugar just means that the glucose and the fructose molecules have been ‘separated’ and so are both available to create bonds. This has some benefits - from delaying water movement to improved sweetness - but we’ll talk about this more when we get onto a subject like ice cream… one of these days.
So, if you do come across a recipe that asks for invert sugar, you can swap in honey but beware that honey comes with some strings - herbaceous, flavourful and spiced strings as well as impurities that may bubble or react unexpectedly - whilst invert sugars are purely sweet.
Other liquid sugars, like molasses, golden syrup and treacle, are derived from the cane and beet sugar process, whilst some are derived from palm (jaggery syrup) corn (corn syrup), barley (malt syrup) or tree sap (maple and birch syrup). We’ll talk about those another time.
So, are granular and liquid sugars interchangeable?
In a word - yes. But prepare yourself for some slightly different results inc. baking time, colour, texture (softer! moister!) and of course, flavour (deeper, weirder, more dimensional!). Changing the sugar in your recipe is one of the fastest ways to yield new interesting flavour results with a pretty effortless tweak!
For something wet - like a muffin, dough or cake recipe, you will yield similar results by swapping a granular sugar for a liquid sugar. That being said, liquid sugars - especially honey - can be a lot sweeter than granular sugars owing to its fructose content, so you can reduce the (g) weight. You may also want to reduce the other liquids - if any - in the recipe, though
It’s also worth considering that granular sugar and butter make the base of most cakes because of the formation of air pockets during the creaming process. Liquid sugar, thanks to its water content, does get in the way of these air pockets forming. So, when it comes to swapping granular for liquids, expect a less airy cake but know you’re getting flavour in return.
The deal with toasting flour
So, now we’ve talked all about sugar, let’s move onto flour.
Toasting flour wasn’t really a concept I knew much about until Anais mentioned it in a KP+ chat thread. I know that many recipes for not-actually-raw ‘raw cookie dough’ suggest that toasting the flour makes the dough safe to eat, but I’ve rarely seen it as a device for adding flavour. How have I been missing out on this so much?
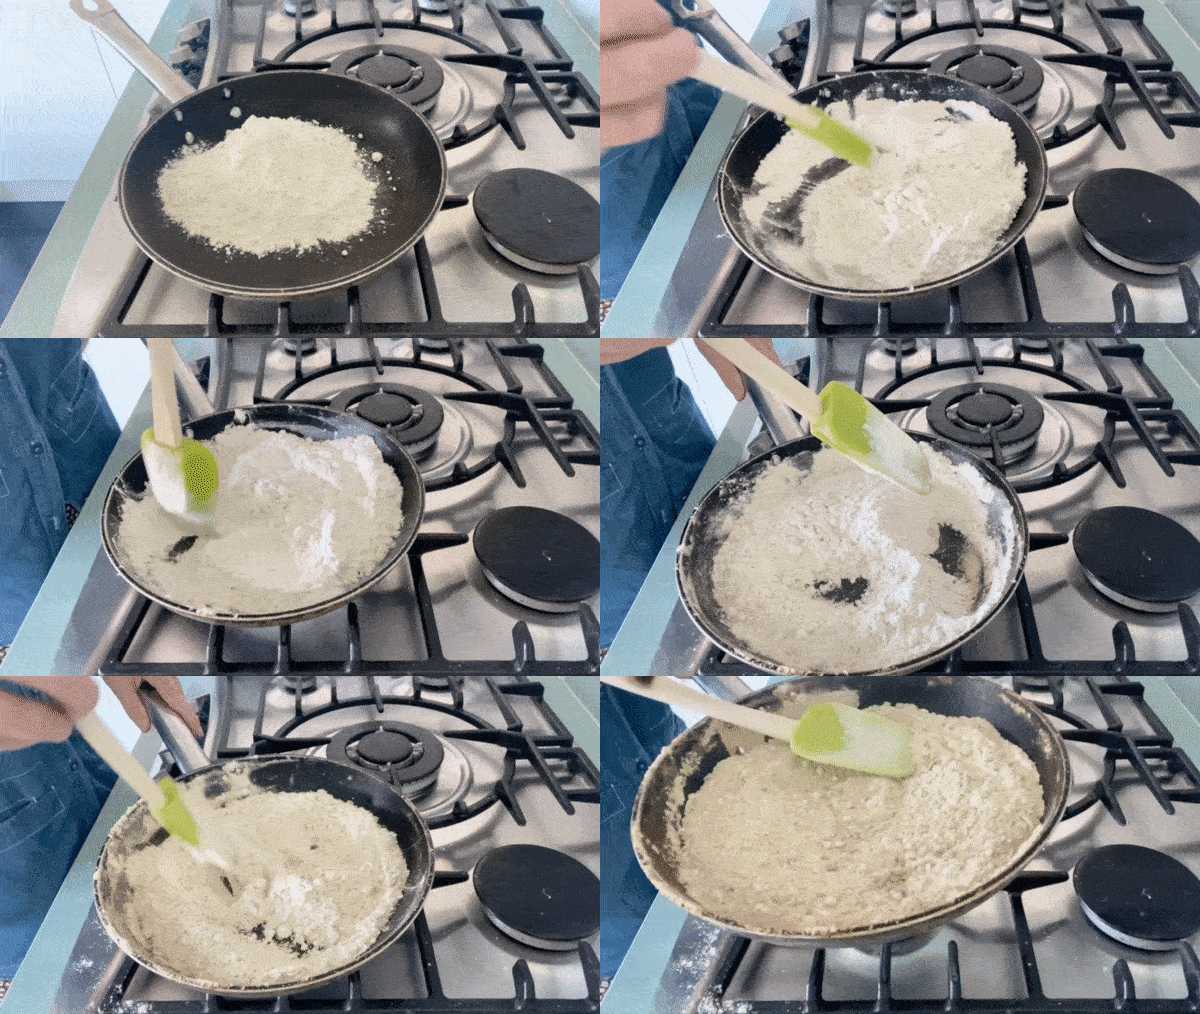
When you toast flour - as advocated here by the Bon Appetit team - you are bringing out new flavour notes. In the same way that you would roast a hazelnut or almond before using it, flour can benefit from the same process: Simply heat the flour in a pan until it darkens and has a nutty flavour. This takes about 10 minutes. I can’t recommend doing it in the oven and prefer to do it on the stove top!
But at what cost? When you toast flour you are scorching each grain making it impossible for gluten to form - the proteins are denatured and thus unable to form bonds.
So, you should really consider toasted flour as having total gluten-free properties. This doesn’t mean it is safe for coeliacs! But it does mean that you can use it without stress for things like biscuits that don’t rely on gluten so much. Please do remember to use it conjunction with gluten-forming wheat flour if you’re planning to use it in cakes, pastry or bread.
I noticed that toasted flour also absorbs moisture in a totally different way, probably due to its scorched edge being unable to interact with water in the same way as usual - it is literally blocked from creating bonds/ a dough as expected. Although I’m not sure what is happening on a chemical level to the flour, there is only a little bit of mass lost - about 10% once toasted.
I mixed the plain flour with 60% water to form a dough. I added as much water as I needed to to get the toasted flour hydrated - it took 100%+ (so equal water and flour) to even begin to stick together:

Thanks to this slightly challenging quality, we need to make some adaptations for the cake…. let’s discuss.
Toasted flour behaviour in genoise
Genoise structure is pretty much down to its egg foam, so using toasted flour that is incapable of forming gluten bonds is the perfect match.
Owing to toasted flour’s rather difficult relationship with moisture, it can be hard to fold this mixture. I definitely recommend folding this flour in with a large bowl and a VERY light touch - go gently otherwise the foam totally falls apart.
So, to achieve the right crumb - and to have leftovers for the crumb decoration - we need to make a 5 egg genoise and split this between two tins. I originally made this recipe with 4 egg sponge and although it was enough to make the 6 layers I desired, there wasn’t quite enough crumb to go around.
You will NOT get as much volume as the strawberry shortcake recipe thanks to the use of toasted flour but you will be rewarded with flavour.
Genoise + moisture = joy
Genoise alone is delicious but admittedly, it has the potential to be dry. With such a small amount of fat, genoise makes a lean sponge that definitely needs support from other layers and ingredients, usually in the form of a soak.
For the strawberry shortcake, this assistance came from a citrus soaking syrup. This week, it’s the blackberries, honey and cream cheese frosting. Left overnight, the sponge soaks up a bit of the moisture making a beautifully cohesive flavour profile.
Cream cheese frosting
I think cream cheese icing gets done wrong - a LOT. I’ve looked at recipes on the internet to understand why people aren’t achieving the silky smoothness that they deserve here in the UK and I’ve figured it out: Beating the butter and cream cheese together, like most US recipes suggest, is a big NO.
Cream cheese, at least here in the UK, just ain’t made like they do the US. I’m not sure why, since it’s the same brand, but the Philadelphia here seems to break down more quickly, leak and give much less lush results so needs to be used more carefully.
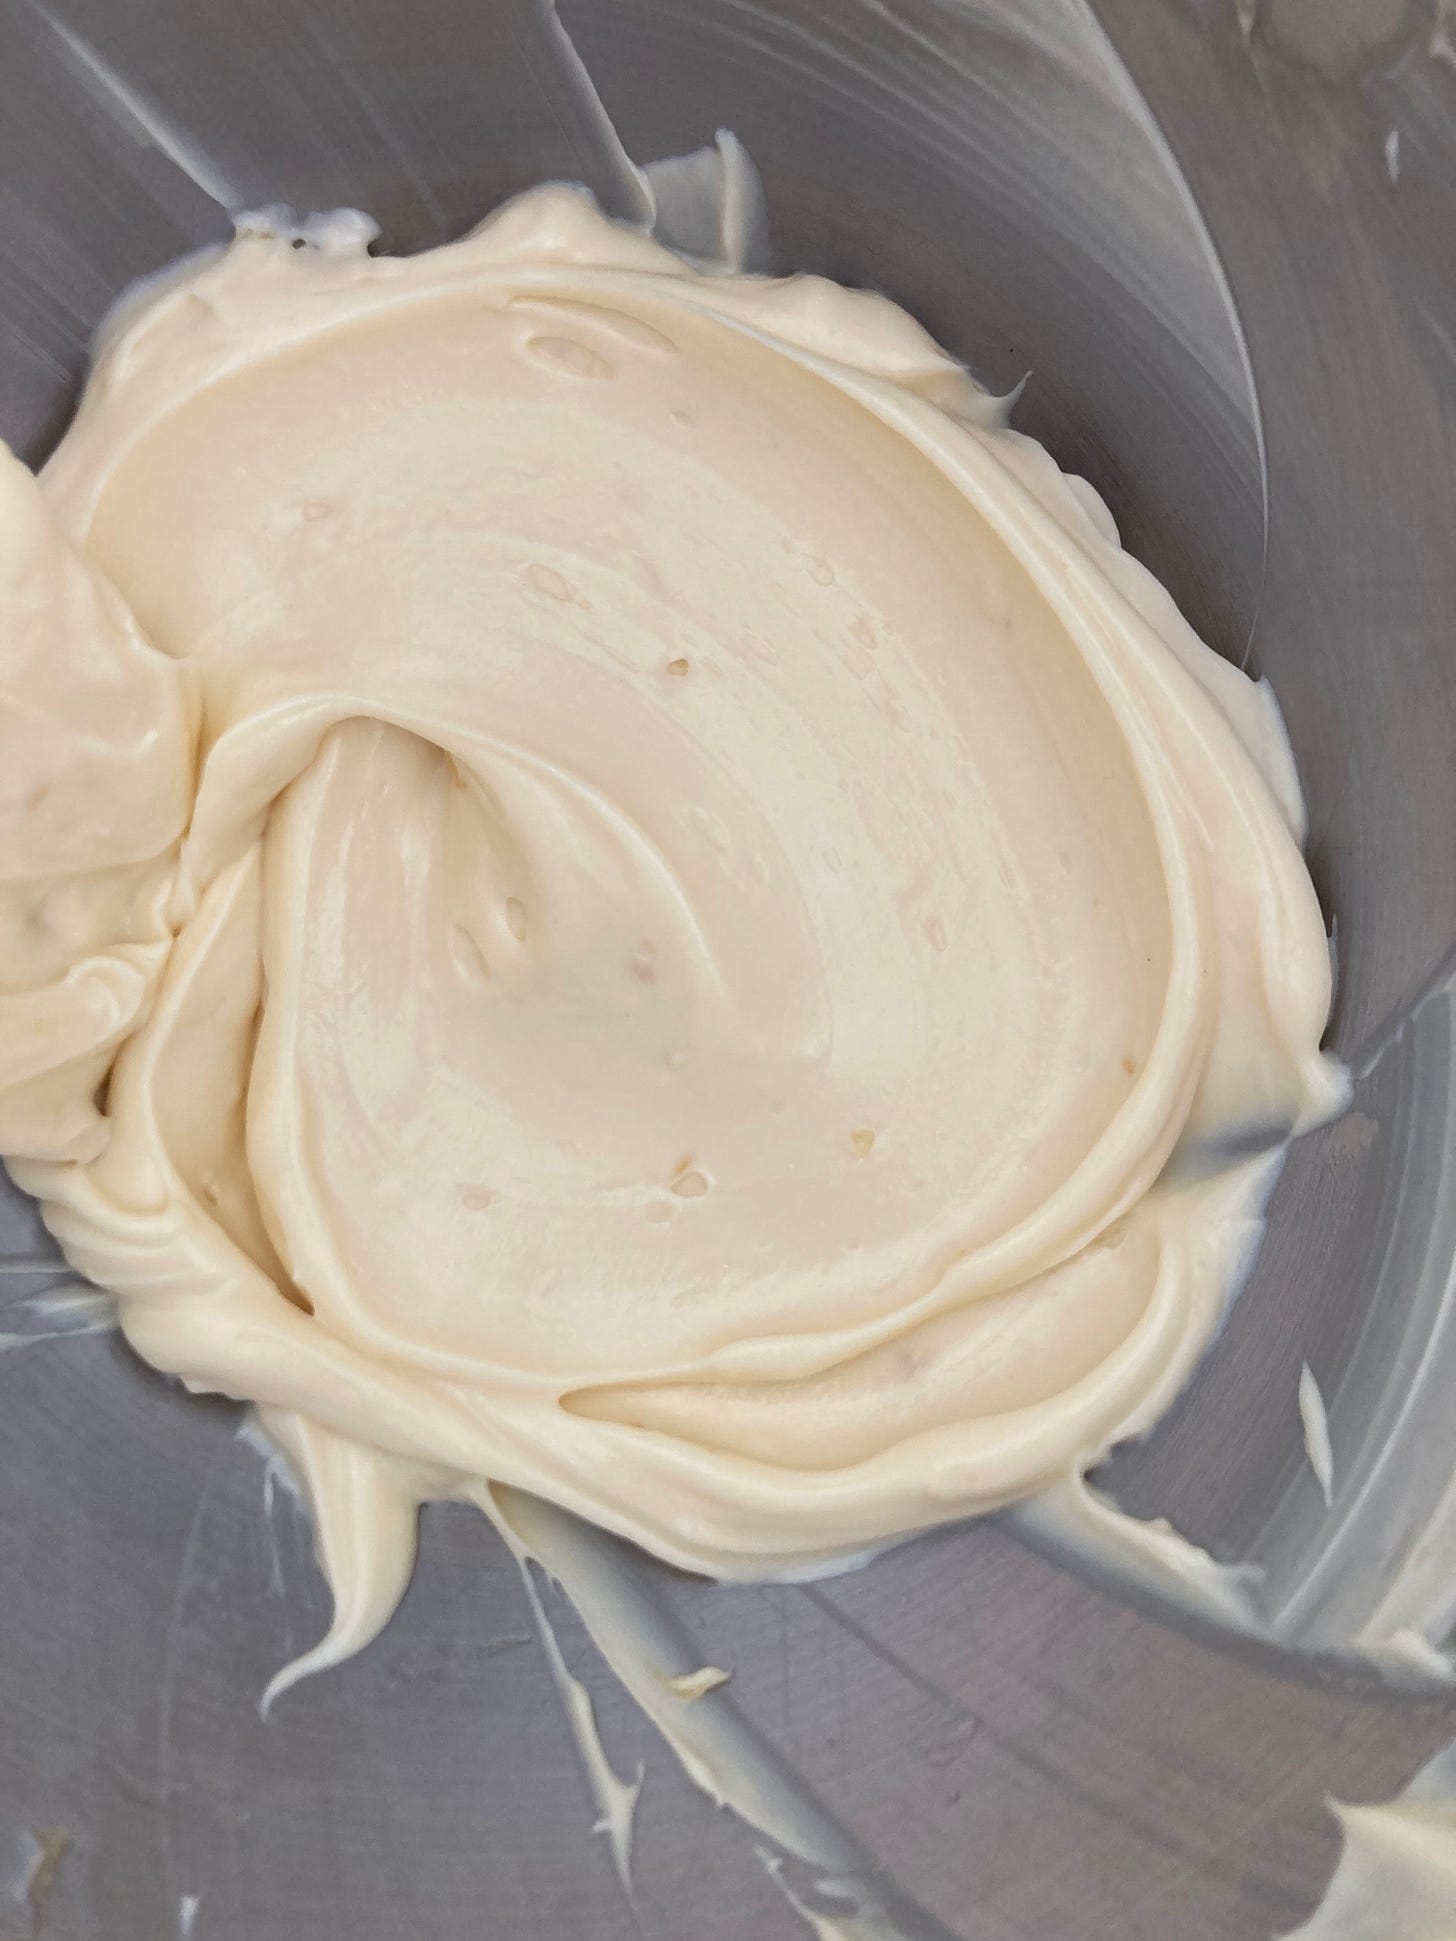
Perhaps US cream cheese can take a beating, but here it’s sensible to split the frosting steps up to achieve the right texture without the fear of leaking, splitting or oozing. Because when you beat your butter and sugar (in the form of icing sugar or honey) you need it to be SUPER smooth and aerated. I’m talking 10 minutes of beating until it is shiny and white. Then and only then can you stir through the cream cheese which does not need to be on a high speed whatsoever - just stir it through until blended, scraping down the sides to ensure it’s all folded together.
To get the flavour right on the cream cheese/honey, you need to add a LOT of honey and then balance it out with salt, otherwise the flavour just isn’t strong enough. Depending on your honey, you may want to check this - if you have a super dark honey like manuka, you may want to use a bit less.
A note on blackberries
GUYS - Blackberries are filled with seeds. That’s just their thing. I played around with making a blackberry coulis but its so wasteful - it’s really difficult to get a decent quantity of juice from the fresh blackberries.
SO, if pips aren’t your jam, I recommend using blueberries for this flavour profile OR you could use a blackberry conserve that has taken the pips out for you instead.
Alright, let’s do this!
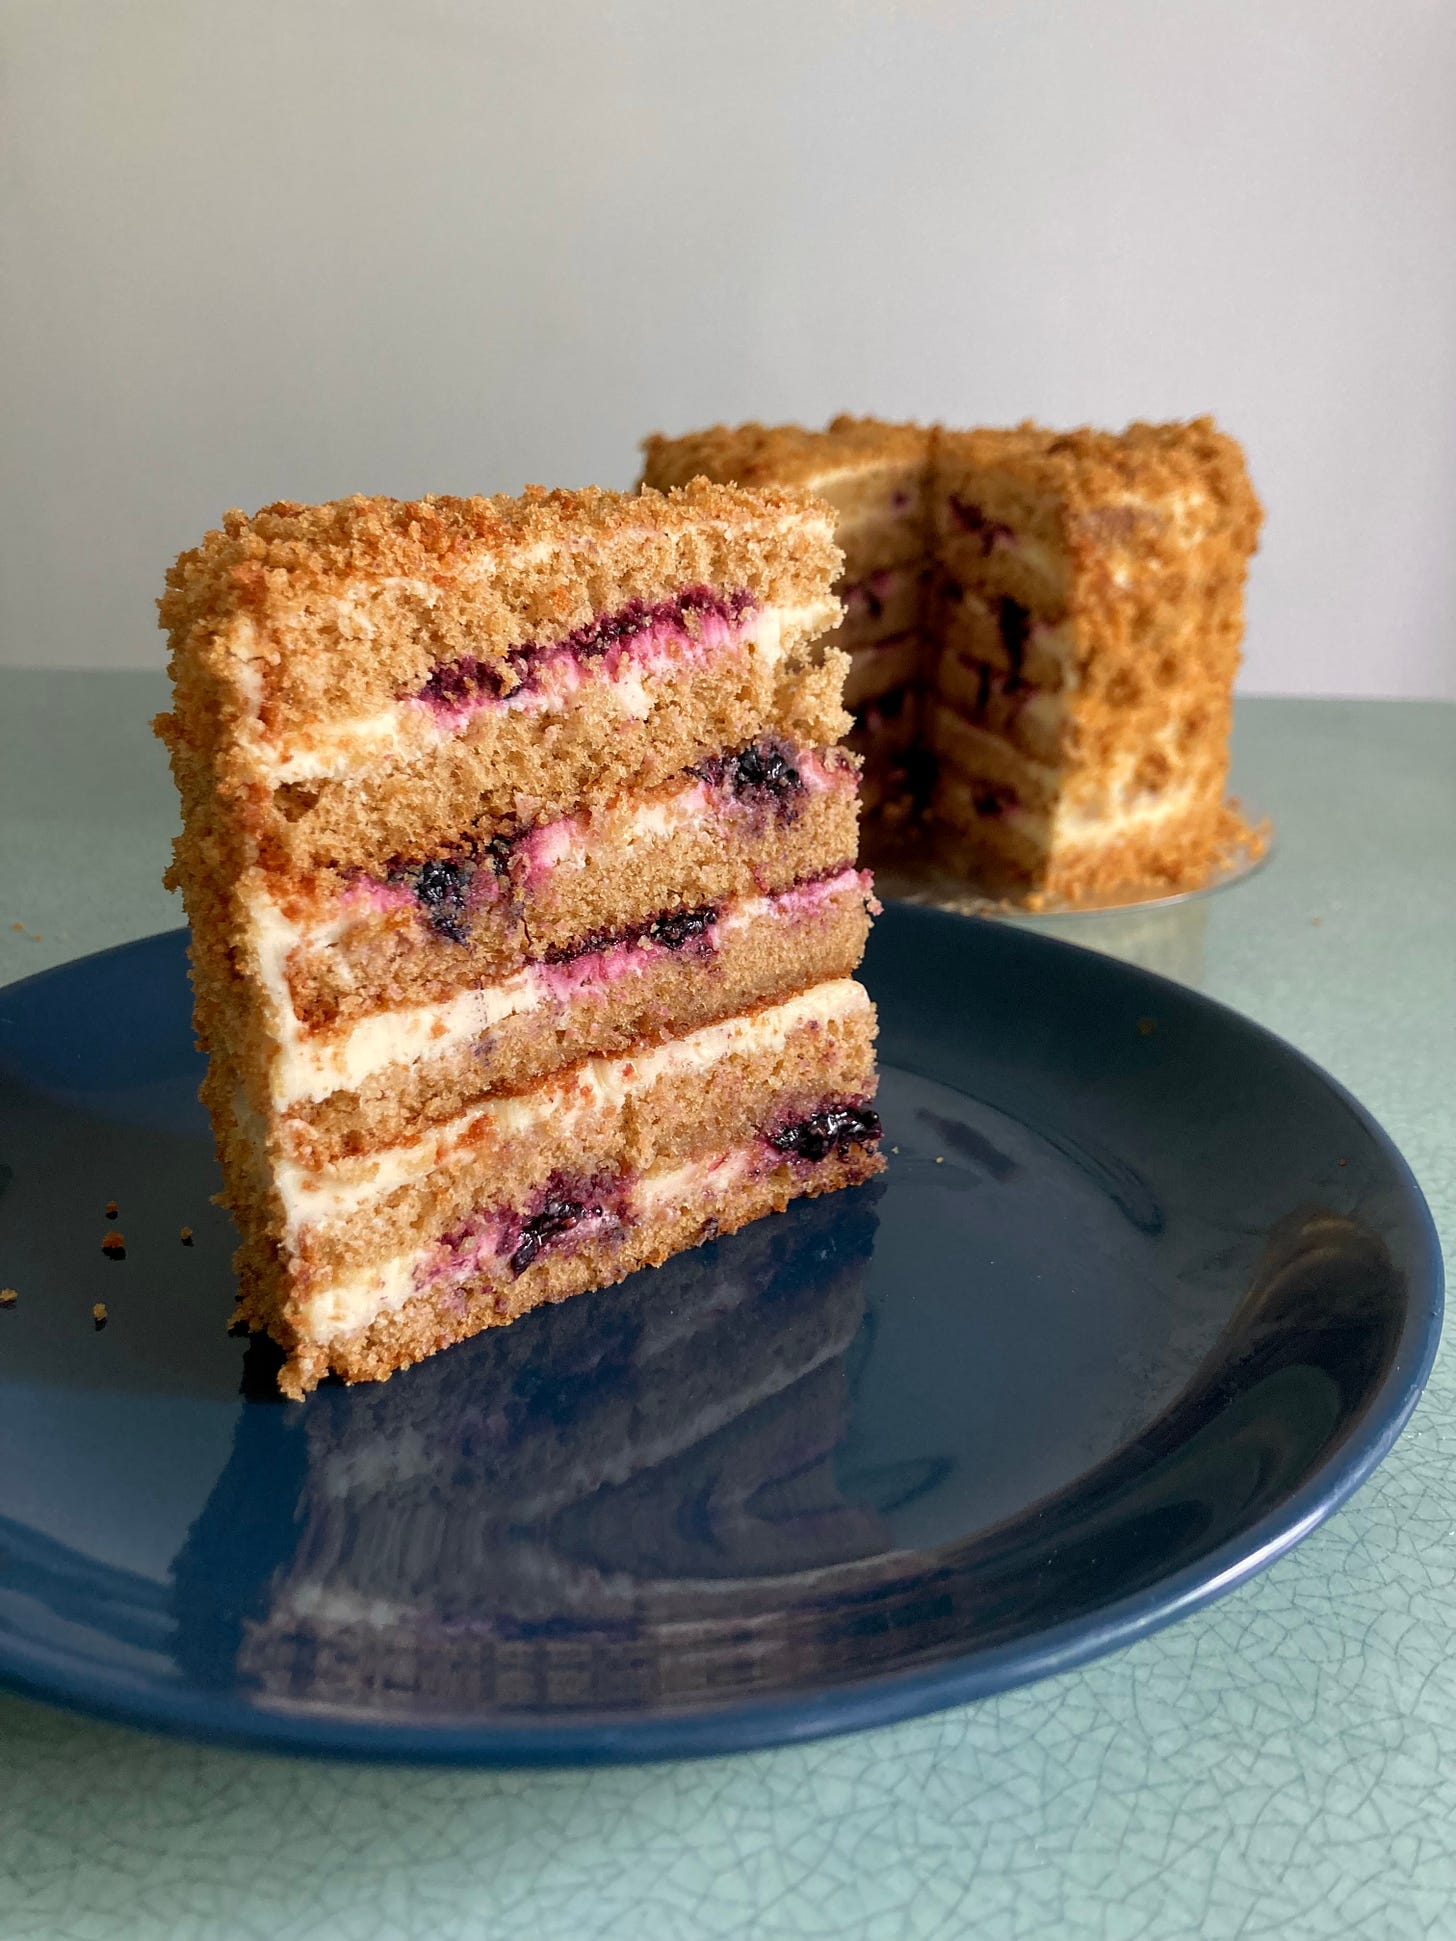
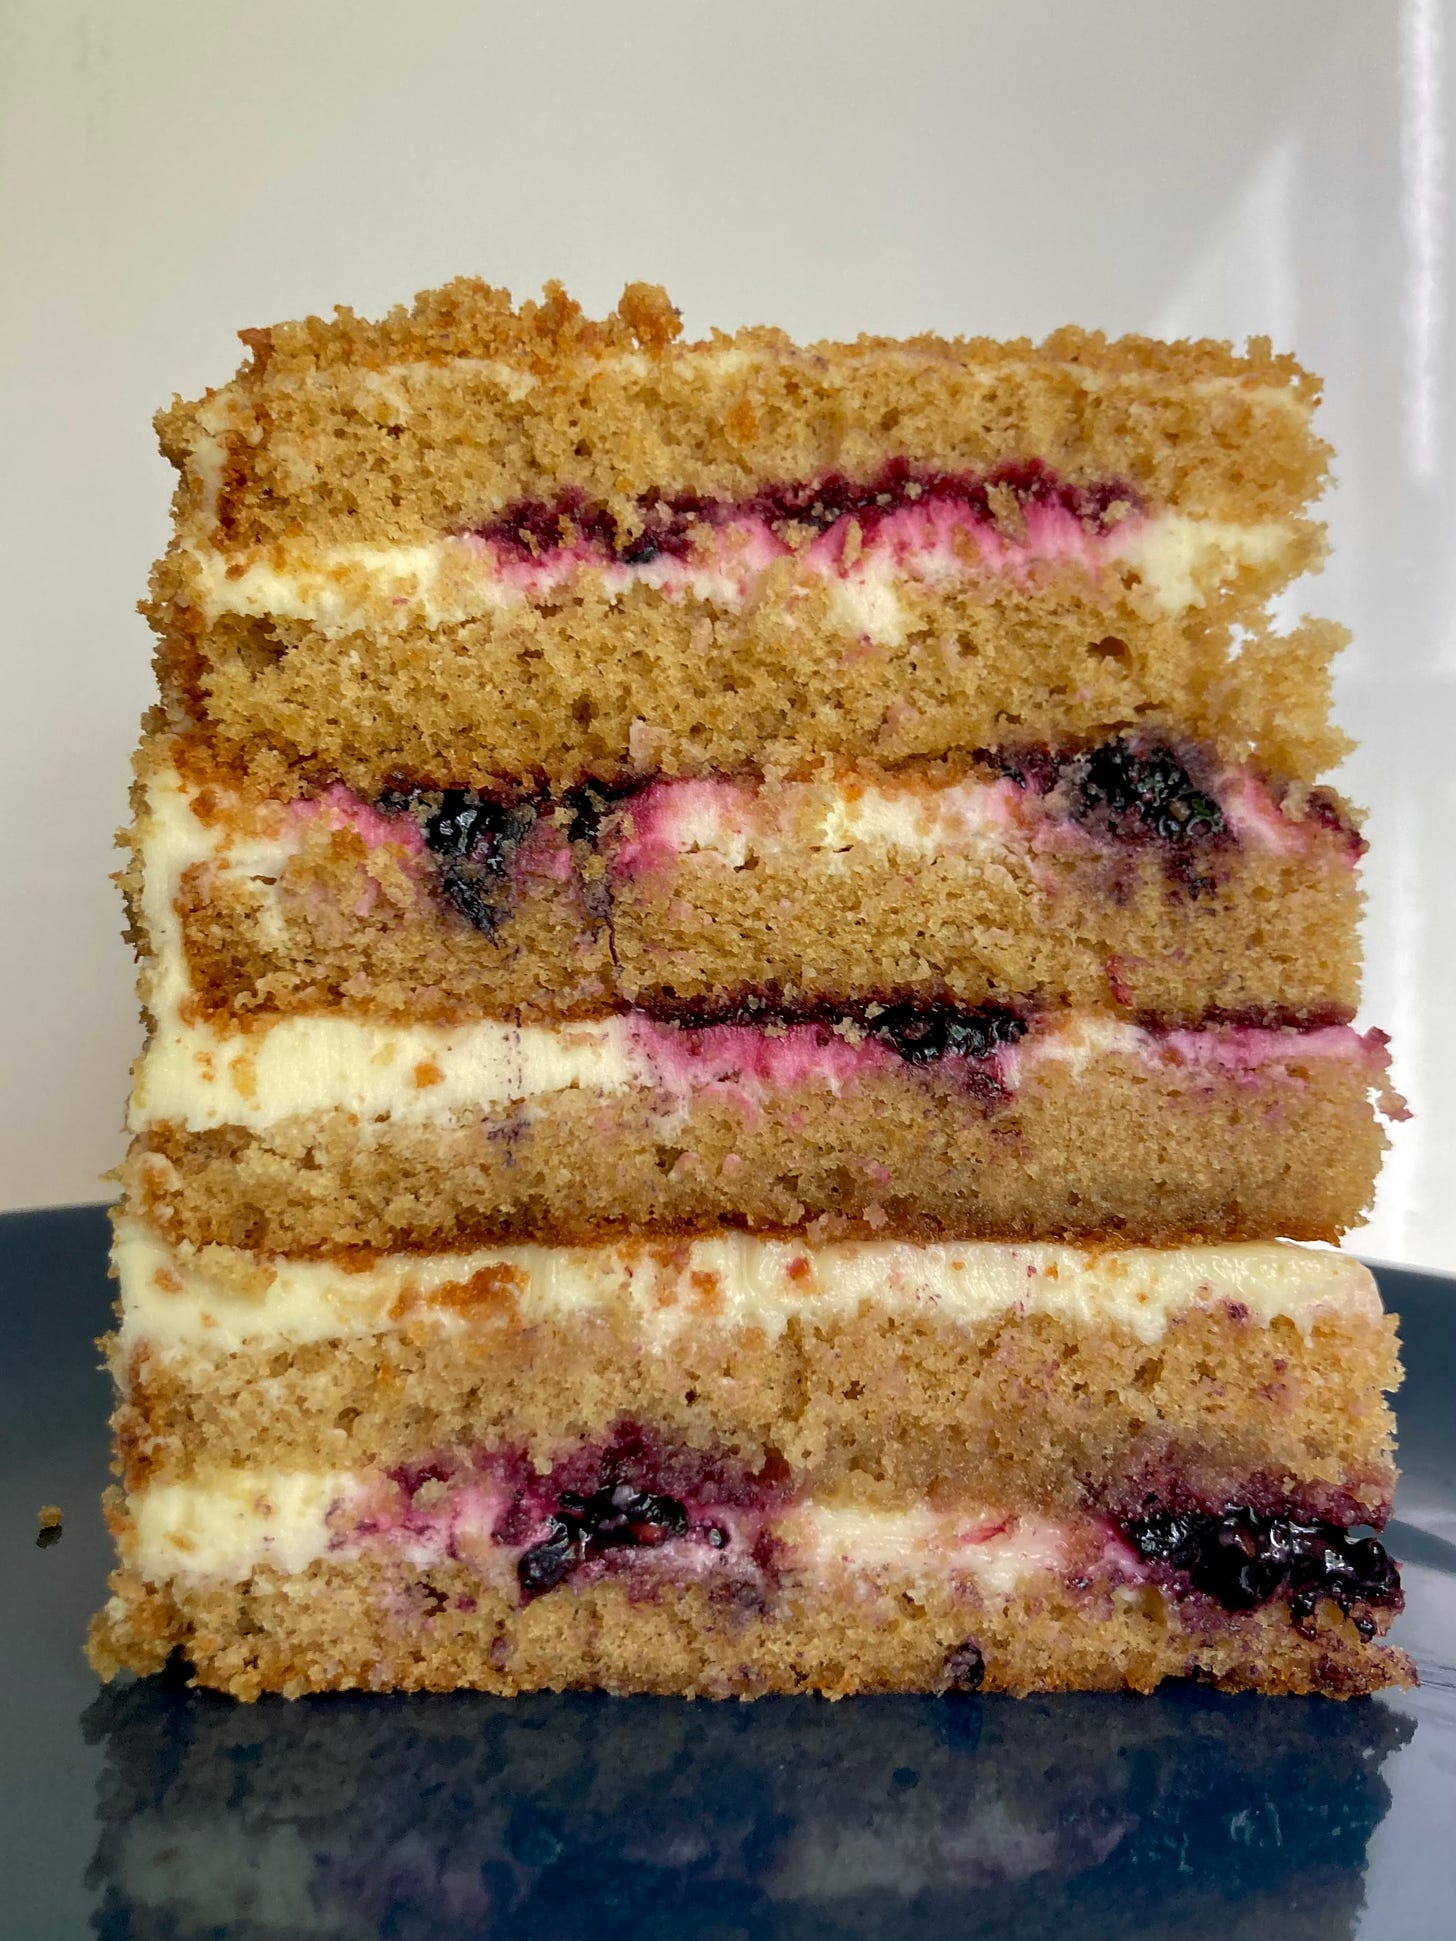
Toasted flour, honey and blackberry layer cake
This recipe makes a fancy looking six layer cake w/ crumbs around the outside. BUT, this sponge cake is also so fantastic with a dollop of the cream cheese frosting on top - layering not essential if you CBA (fair enough). If you want to go down this route I would recommend scaling down the recipe 20% to use four eggs only and baking the cake in 1 x 6 inch tin only, not splitting the mix. You will also only need half the quantity of cream cheese frosting:
Equipment: 2 x 6 inch tins
Toasted flour genoise recipe for layer cake (see note above for non-layer cake size!)
5 eggs (about 265g)
135g light brown sugar
135g toasted flour
60g brown butter, melted still warm - details here
3g salt
Cream cheese frosting
130g unsalted butter
150g honey ← either caramelise your regular honey (a brand like hilltop or rowse) or use a more complex honey - I use the London Company’s London Honey. You may want to start off with 125g then add more honey slowly at the end, depending on the strength and unique taste of the one you’re using
3g maldon salt
400g full fat cream cheese
To build:
1 punnet of blackberries (if you dont mind seeds) or blackberry preserve
Honey to drizzle
Method - for deep details on genoise, read this here
First, toast your flour. Put your flour in a large frying pan and heat on medium heat, stirring well for about 10-12 minutes until it has darkened - I like to go quite dark!
You will need to sift the flour several times. It gets quite clumpy once toasted - make sure you sift it 2-3 times!
First, brown your butter and set aside to cool until ready to use. Check this KP for details
Pre-heat oven to 170c fan. Line 2 6inch tins with greaseproof paper
Whisk room temp eggs and sugar on highest speed for 5 minutes (eggs should be almost white and the mix will look shiny. If it doesn’t, don’t stop high speed til you get to white shiny territory), reduce to medium speed and whisk for 3 minutes and finally reduce to slow speed and whisk for 10 minutes until you can see no visible bubbles
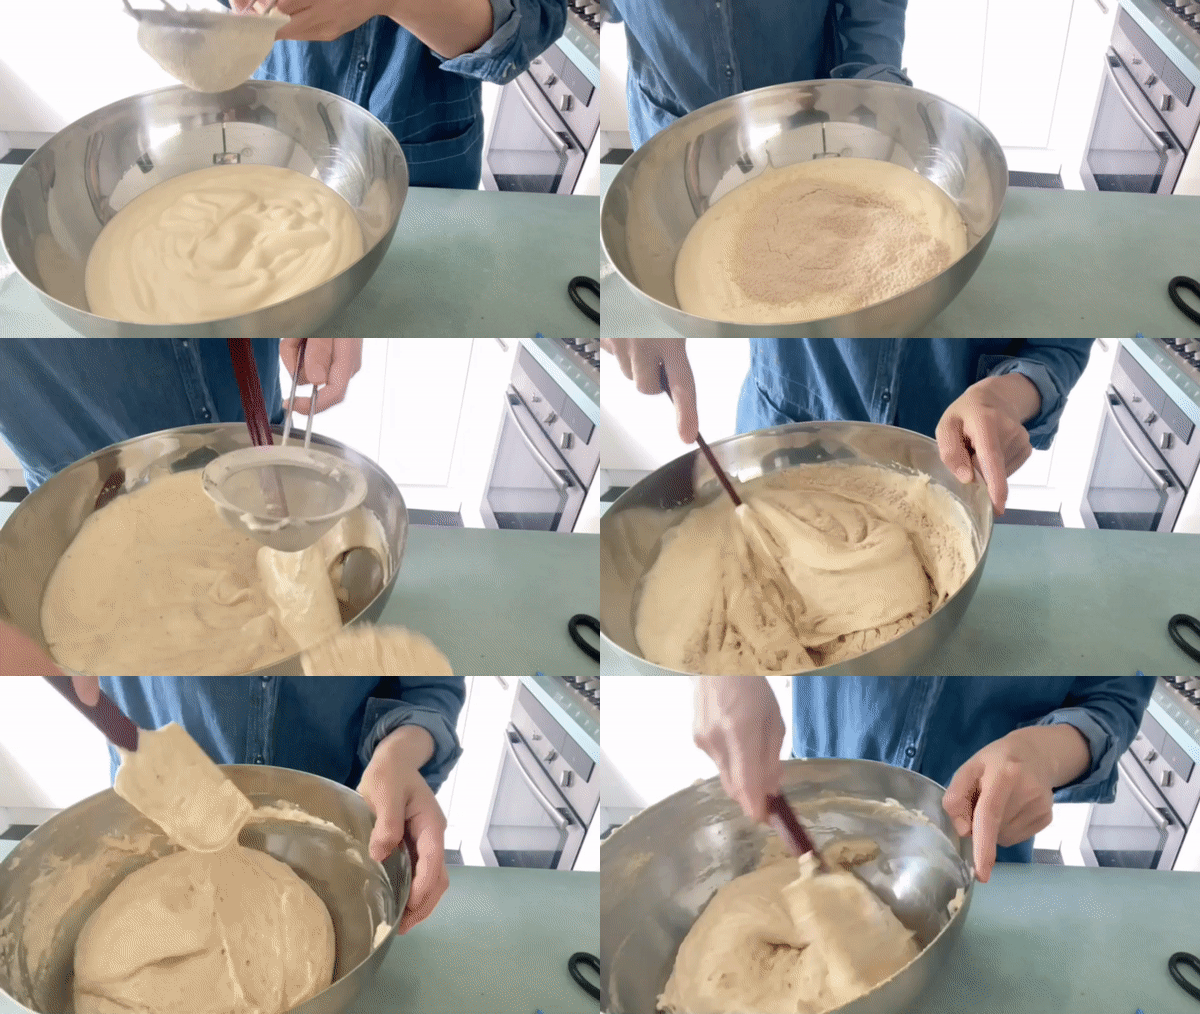
Pour your ribbon stage eggs into a large bowl - it is easier to fold more gently if the bowl is large
Sift the dries over the egg mixture, folding very gently with a slicing motion (I like to do a capital D shape - slice through the middle or edge then go around and under!). You can do this in 2-3 stages. Try not to deflate the mixture - it can be hard!
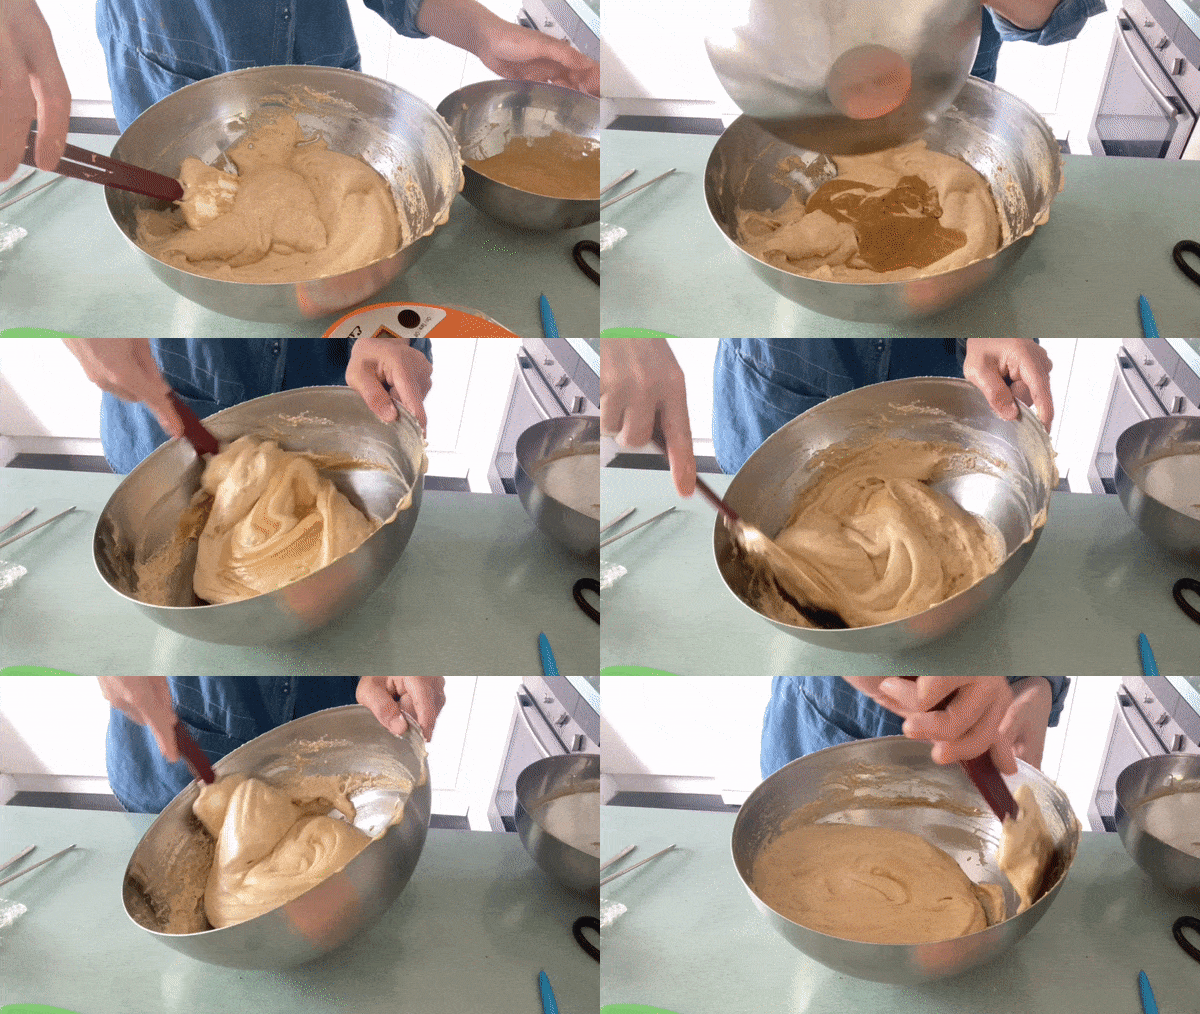
Make a liaison batter - whisk 2-3 tablespoons of the flour/egg mixture into your melted brown butter
Fold the liason batter back in - do your best not to overwork it. For this batter, it’s best for things to be *just* combined as it may begin to deflate thanks to the toasted flour
Divide equally between tins and drop from 20cm height to burst the large air bubbles
Bake for 20 mins until risen and golden
Drop from a height once then leave on a cooling rack to cool completely
To make the cake easier to cut, wrap the cakes and put into the freezer for 1 hour to chill and be easier to cut
Method: The cream cheese honey frosting
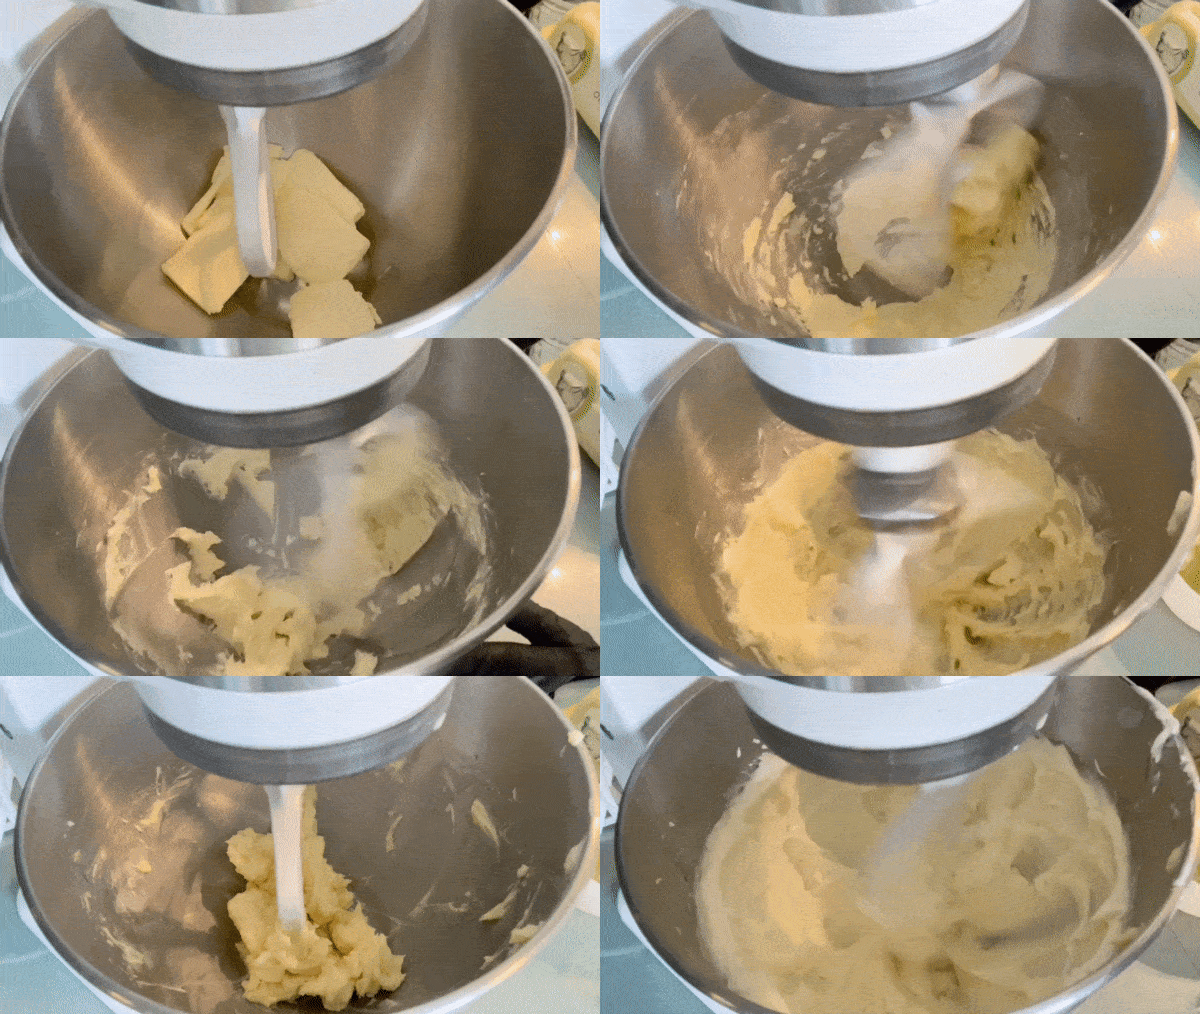
Whip the butter until smooth and airy using the paddle attachment - high speed about 3 minutes
Scrape down the butter from the sides of the bowl. Then add the honey and salt
Whip for another 3-4 minutes on high speed until very airy, scraping down the bowl as necessary
Pour any liquid from the cream cheese container and discard
Stir through the cream cheese on the paddle attachment on medium speed until well combined and smooth - you can finish off with a fast whip to ensure its all combined
Putting it together
Trim the tops of the cakes off - this will be your crumb to cover the cake
Break the cake up into crumbs then toast on 160c oven for 10 minutes until crisp - let cool completely before using
Now cut the remaining cake into thirds carefully - it should be about 0.75cm-1cm thick. I have lost my large bread knife so using a little one but serrated is KEY.
Set the cakes to one side
Cut the blackberries up - I like uneven but small pieces. Make sure you capture all the juice and use this too!
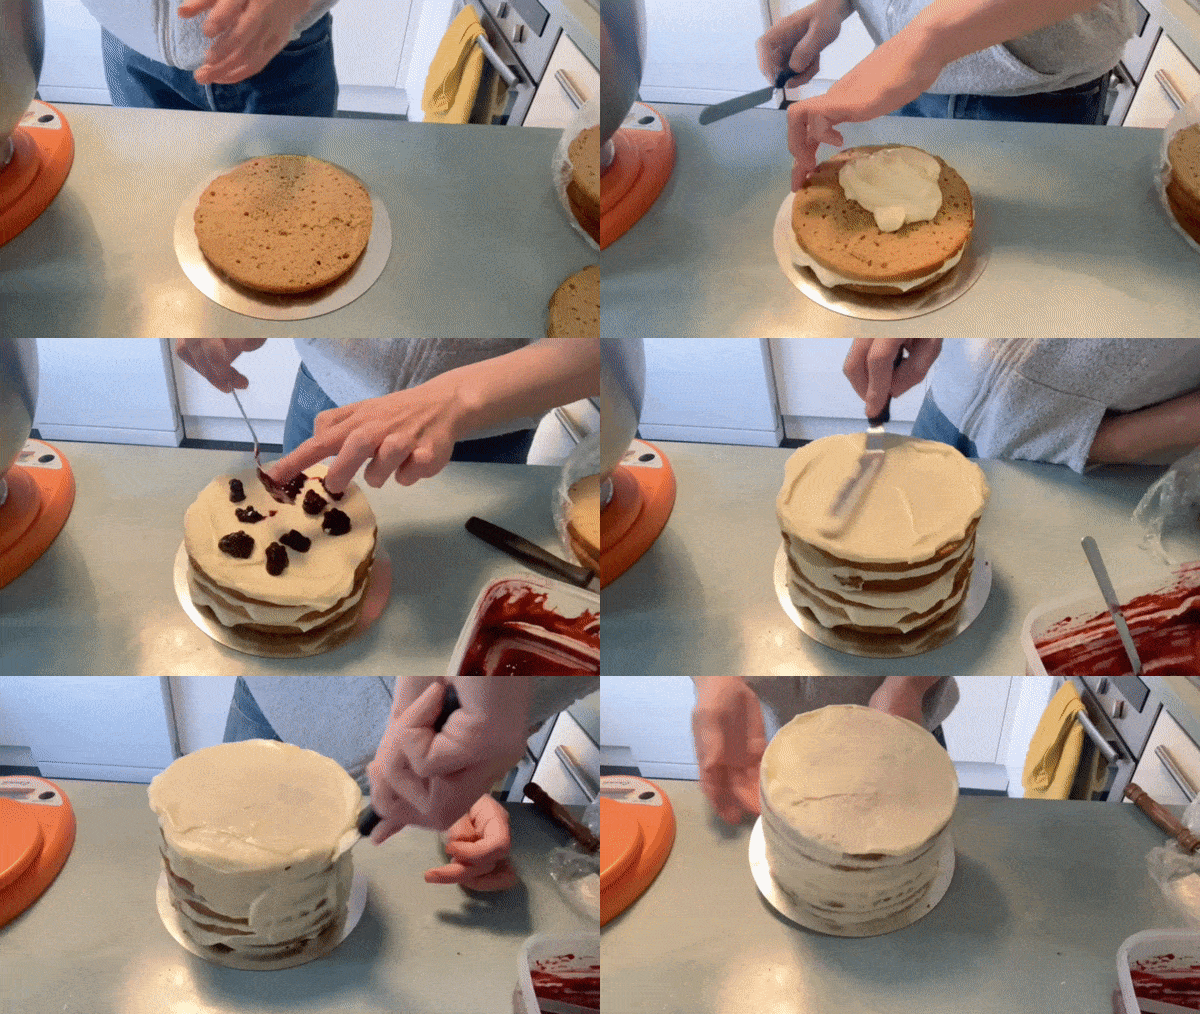
Spread around 100g of cream cheese frosting evenly, followed by blackberries and then a little squiggle of honey
Continue layering up the cake until complete
Use the remaining icing to cover the whole cake
Put into the fridge for 10 minutes until a little firm
Cover the edges of the cake with the crumbs
Leave in the fridge overnight to absorb the moisture from the honey, cream cheese and berries. You can also leave it 4 hours or so, that should be fine for some soaking action! This cake lasts for at least 3 days in the fridge. You can leave it to come to room temp to eat it






Do you think cherries would be a good flavour combination with the honey?
This combination of flavors sounds so delicious! I like everything deep and toasty :) Do you believe I could swap the flour for 100% coconut flour since genoise does not need gluten? Or is it a step too far?