Kitchen Project #26: Strawberry Shortcake
It's the bumper Japanese baking edition: Interview with Chef Ayako Watanabe + genoise deep dive lets GO!
Hello,
Welcome to another edition of Kitchen Projects, my recipe development newsletter. Thank you for being here.
*Cue celebratory music*: It’s the bumper Japanese baking edition! ft. a deep dive into the world of strawberry shortcake and genoise sponge plus an interview with the formidable Chef Ayako, a pastry chef (and mentor of mine) based in Tokyo.
On KP+ this Wednesday, I’ll be sharing TWO miso muffin recipes developed by Chef Ayako to showcase the flavours of both white and red miso pastes: Shinshu miso muffins with yuzu crumble and Hatcho miso muffins with cream cheese frosting. Boom.
As well as this, everyone subscribed to KP+ will be entered into a random giveaway prize draw to receive a superb goodie bag by the gang at Miso Tasty, purveyor of the most delicious organic miso: You’ll get to try their whole range of products and get a copy of their cookbook. The winners will be announced on Wednesday’s KP+ newsletter.
Subscribing is easy and is just £5 a month and you’ll get access to all the KP+ archive, too! Join the KP+ gang by clicking here:
Alright, let’s do this.
Love
Nicola
PS. To celebrate today’s edition, the folks at Miso Tasty have also shared a 20% discount code for their whole product range on their web store inc. my personal fave:
- just enter MISOMUFFINS at checkout for that 20% off (expiry 17 June). Check out their insta here and their product range here!
The world of Japanese bakes
When you guys asked me about Japanese baking on the KP+ chat threads, I was more than happy to admit I’m no expert in the field.
Fortunately, I do know a brilliant Japanese pastry chef: Ayako Watanabe!
I first met Chef Ayako when she was the pastry chef for Dominique Ansel Tokyo. Our paths crossed during the opening for Dominique Ansel London. Since then, Ayako has founded her own business in Tokyo - Tough Cookie, which showcases and celebrates Japanese flavours in the convenient form of a perfectly formed and insanely delicious giant cookie:
We’ll kick off today’s Kitchen Projects with an interview with Chef Ayako to get the lowdown on Japanese baking.
Ayako, thank you so much for speaking to me. I had a request on KP+ for more details on Japanese Baking and immediately knew I had to interview you! So, let’s do it. Could you please give me an overview of the most famous Japanese baked goods and - in your professional opinion - what sets typical Japanese bakes apart from European style bakes?
First, Japanese sweets will be sorted into two catagories: “Wagashi” and “Yo-gashi”.
“Wagashi” is old traditional Japanese pastry (deeply related to tea - matcha - ceremony history), and “Yo-gashi” is influenced by western culture. The first country to bring Western style sweets into Japan was Portugal. So “Casutera” (ie. Castella cake) came from Bolo de Castella and “Boulo” came from Bolo. Those are categorised in Wagashi. Wagashi uses method of cooking, steaming and cooling - Rice, barley and beans are the main ingredients.
What we call “Yo-gashi” is influenced by France, British, American and German etc cuisine, which is mostly baked and contains milk, cream and butter (dairy products) after Meiji era. At the beginning, we purely copied what they made. Eventually, Japanese pastry (include baked goods) were structured which combined Japanese flavour and western ingredients. The very first and popular combination was red bean curd jam and butter on toast.
Yo-gashi requires a baking process and needs to have an oven: Egg, butter, milk, cream are the main ingredients.
There are two textures that make Japanese sweets so unique: “Fuwa Fuwa” and “Mochi Mochi”. Fuwa Fuwa means fluffy like eating clouds. It has structure to keep them together but shouldn’t feel gluten-ish texture, making it as light as possible. Egg and the finest flour (the lowest gluten content) makes it possible but the texture is mainly attributable to egg foam and mixing. Mochi mochi expresses texture which is at the opposite poles of Fuwa Fuwa. Mochi mochi is the texture we want to have in “Wagashi”, to bring out the gummy, chewy, sticky texture as much as possible, but keeping the soft texture by kneading and steaming.
Could you share some of the go-to baking ingredients and flavours favoured in Japan and your faves?
There are so many classic Japanese flavours. Well known are red bean curd, Matcha(green tea), Hoji-tea, Miso, Soy sauce, etc. For bakery beginners, I would recommend using tea and spices which contain no moisture. Curds and Miso are nice to use, but when you bake with it you need adjustments to bring out the flavour as they are high in moisture.
Here are some of my favourite Japanese ingredients:
Sanshyo
It is slightly different than Chinese Szechuan pepper. Japanese one has beautiful green colour and is more citrusy. It gives a very fresh flavour to baked goods. You can chop them and mix in dough, you can infuse in liquid, but it requires prep to take off the bitterness
Shiso.
Maybe most people know this herb from Sushi experience, but it is nice and easy to use in baking. It gives a really nice kick to berries too
I want to introduce those flavours to the world as Japanese, so what we introduce through Tough Cookie is exactly this - taking the shape of American size cookie and using Japanese ingredients and flavour to it. I use different Japanese ingredients for each type so people get to know more about them!
Another area of confusion and excitement is miso. Miso has become really popular in baking here. Can you explain the difference between the types available and what should we be wary of when baking with it?
Ok. I actually didn't know that Miso featured so much in the UK! Japan is a country which is long from north to South. Each region has different kinds of Miso. Lighter one to darker one. North tends to have lighter colour and saltier and south has deeper colour and sweeter. The lighter one has a more delicate flavour and the dark one has a strong character, so depending on how we want to empathise and the other ingredients to go with it , we change the type of Miso.
For caramels, I think about % of water and flavour; Miso texture makes liquid thicker. So depending on how much softness you want, you’d need to adjust the liquid ingredients.
For cake and cookies, moisture also needs to be adjusted but also to be aware of Amino acid and sugar, as Miso gives extra Maillard reaction to baked goods. So baking time and temperature need to be adjusted to control colours and texture of the baked goods.
Moving on to dairy, what are Hokkaido cheese tarts? Could you tell us a bit more about Hokkaido milk? Here in the UK we are lucky to have access to incredible dairy… but none seem to have the same mystery/magic as the famous Hokkaido milk?!
This... I have to shrink people’s expectations! We use the “Hokkaido” brand for marketing reasons - Lol.
Japan is famous for expensive dairy products as the government has to protect farms from importers. One of my joys is to try daily products when I travel. To be honest, the UK is one of my favourite and dream countries when it comes to dairy products. Much tastier than one in Japan. However, the government put a high tariff rate on dairy products from other countries, so it is very hard for us to get them.
For example, one of my favourites is clotted cream from the UK. But extremely expensive in Japan. Honestly, I think nothing special about Hokkaido milk but when we use “Hokkaido” in our products, it sells...
I understand there is an old connection between Portugese and Japanese cuisines - tempura, for example. One of my favourite cakes ever is called Pao De Lo which is a very simple egg foam cake. It is usually under-baked and sold with a gooey centre in Portugal. Do you think this cake is similar to the Castela style cakes famous in Japan? It contains olive oil as the main flavour, rather than honey..
This was also introduced in Japan from 2015 or so and became a trend, but classic Japanese bakeries didn’t do it. It was named “Raw castela”. We categorise classic spongy castella as Wagashi and this raw castle is in Yo-gashi. Both have roots in Portugal but I think we had distinguished it from classic Japanese castella!
You can follow Chef Ayako here, and support and follow her brilliant cookie business Tough Cookie here. Chef Ayako hopes to ship her tough cookies worldwide sometime in the future so I’ll keep you all posted on that.
Let’s talk CAKE
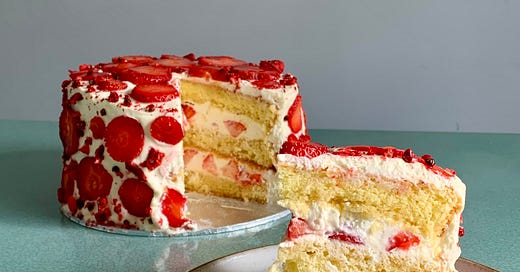
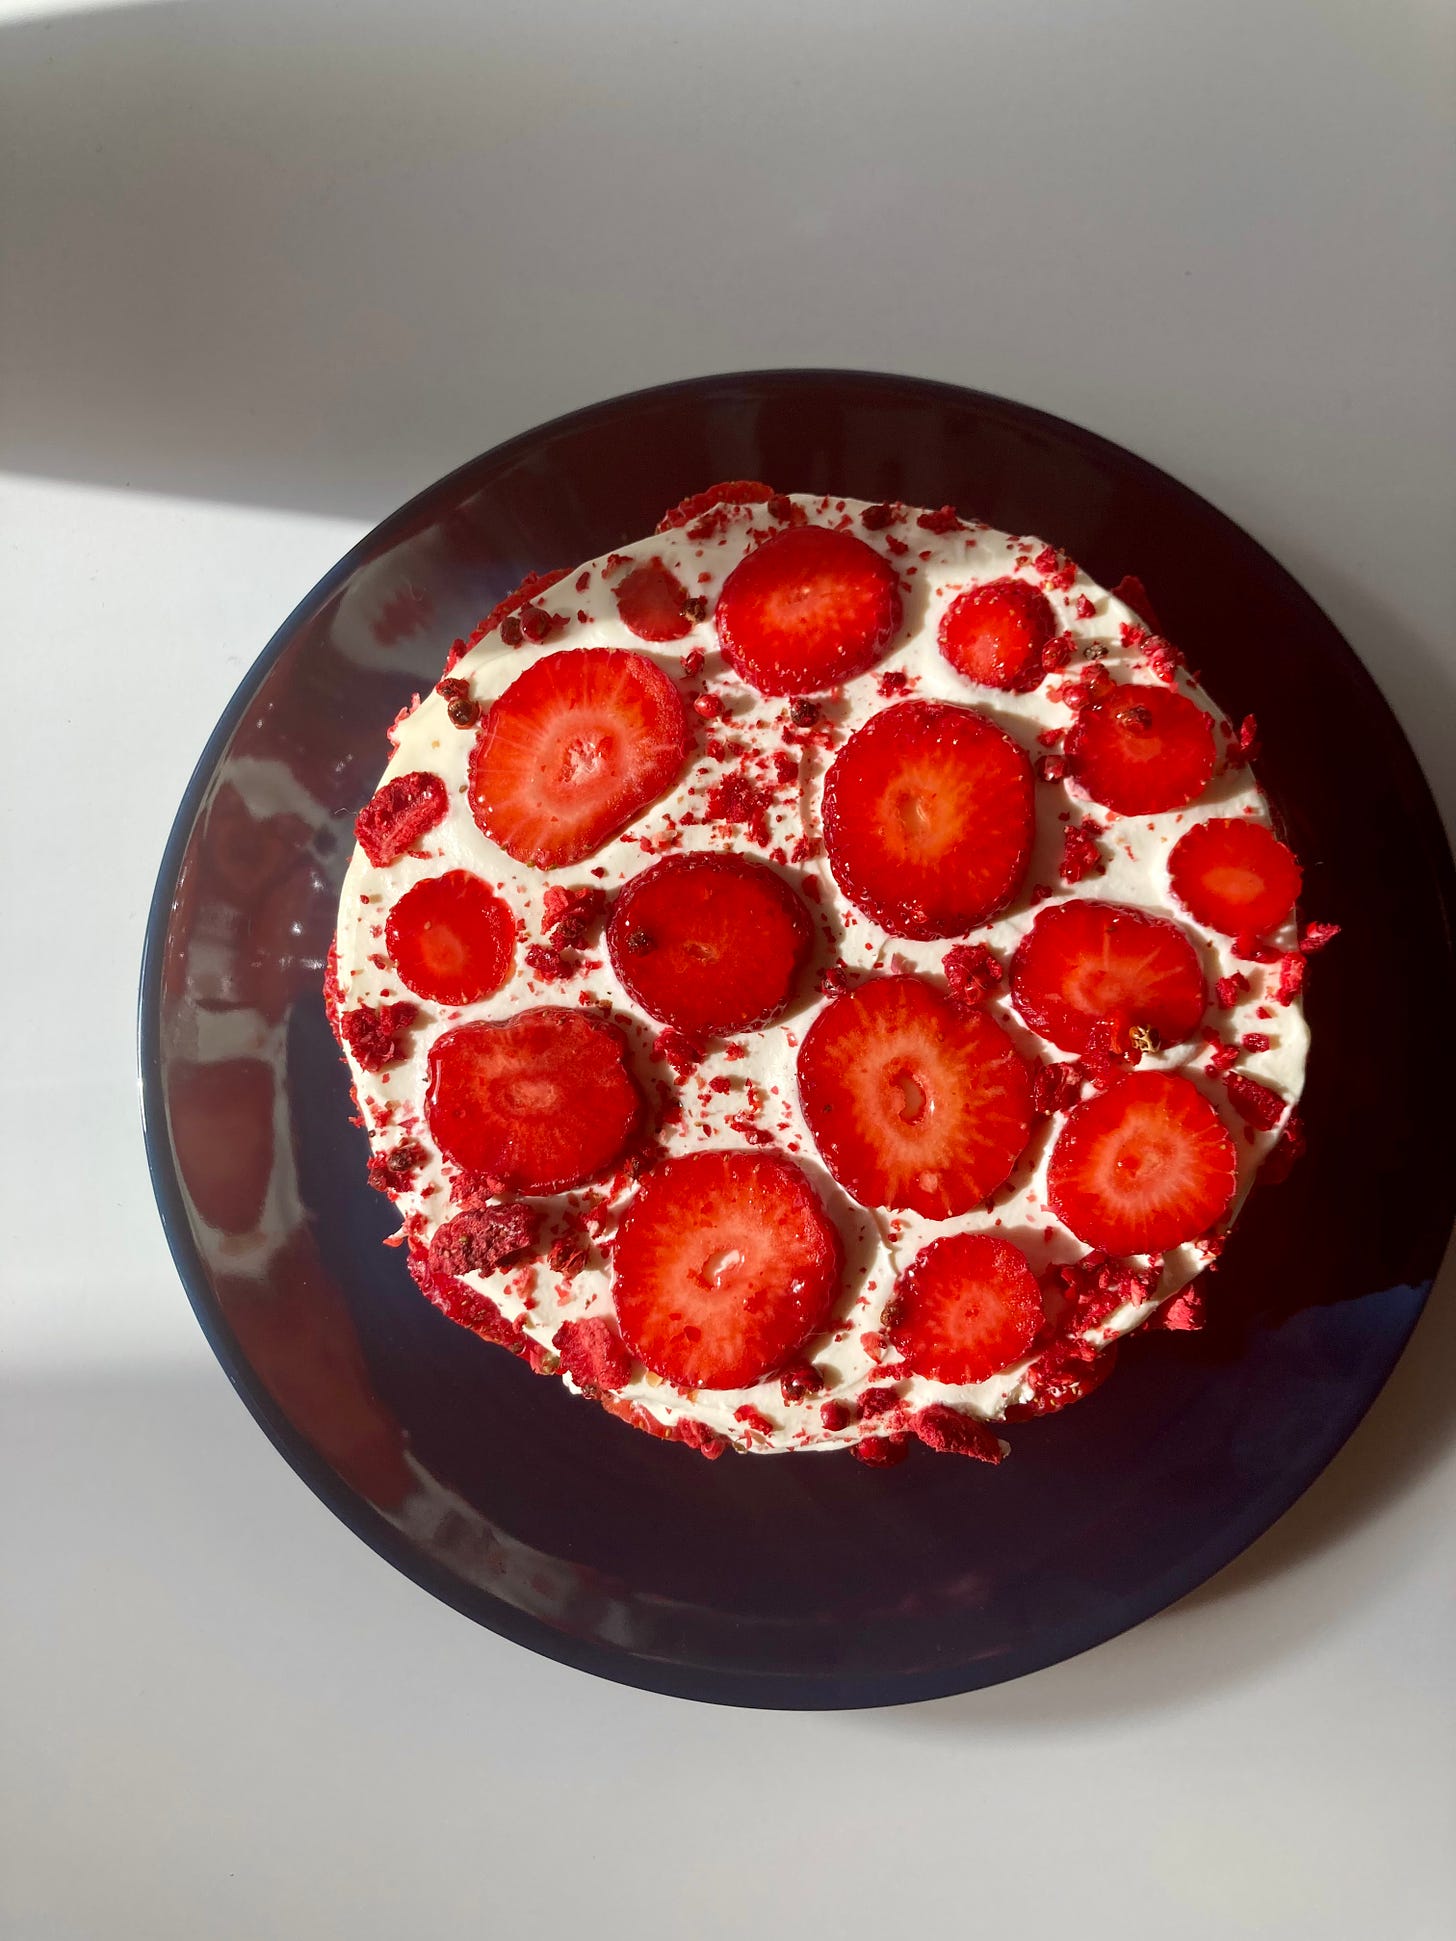
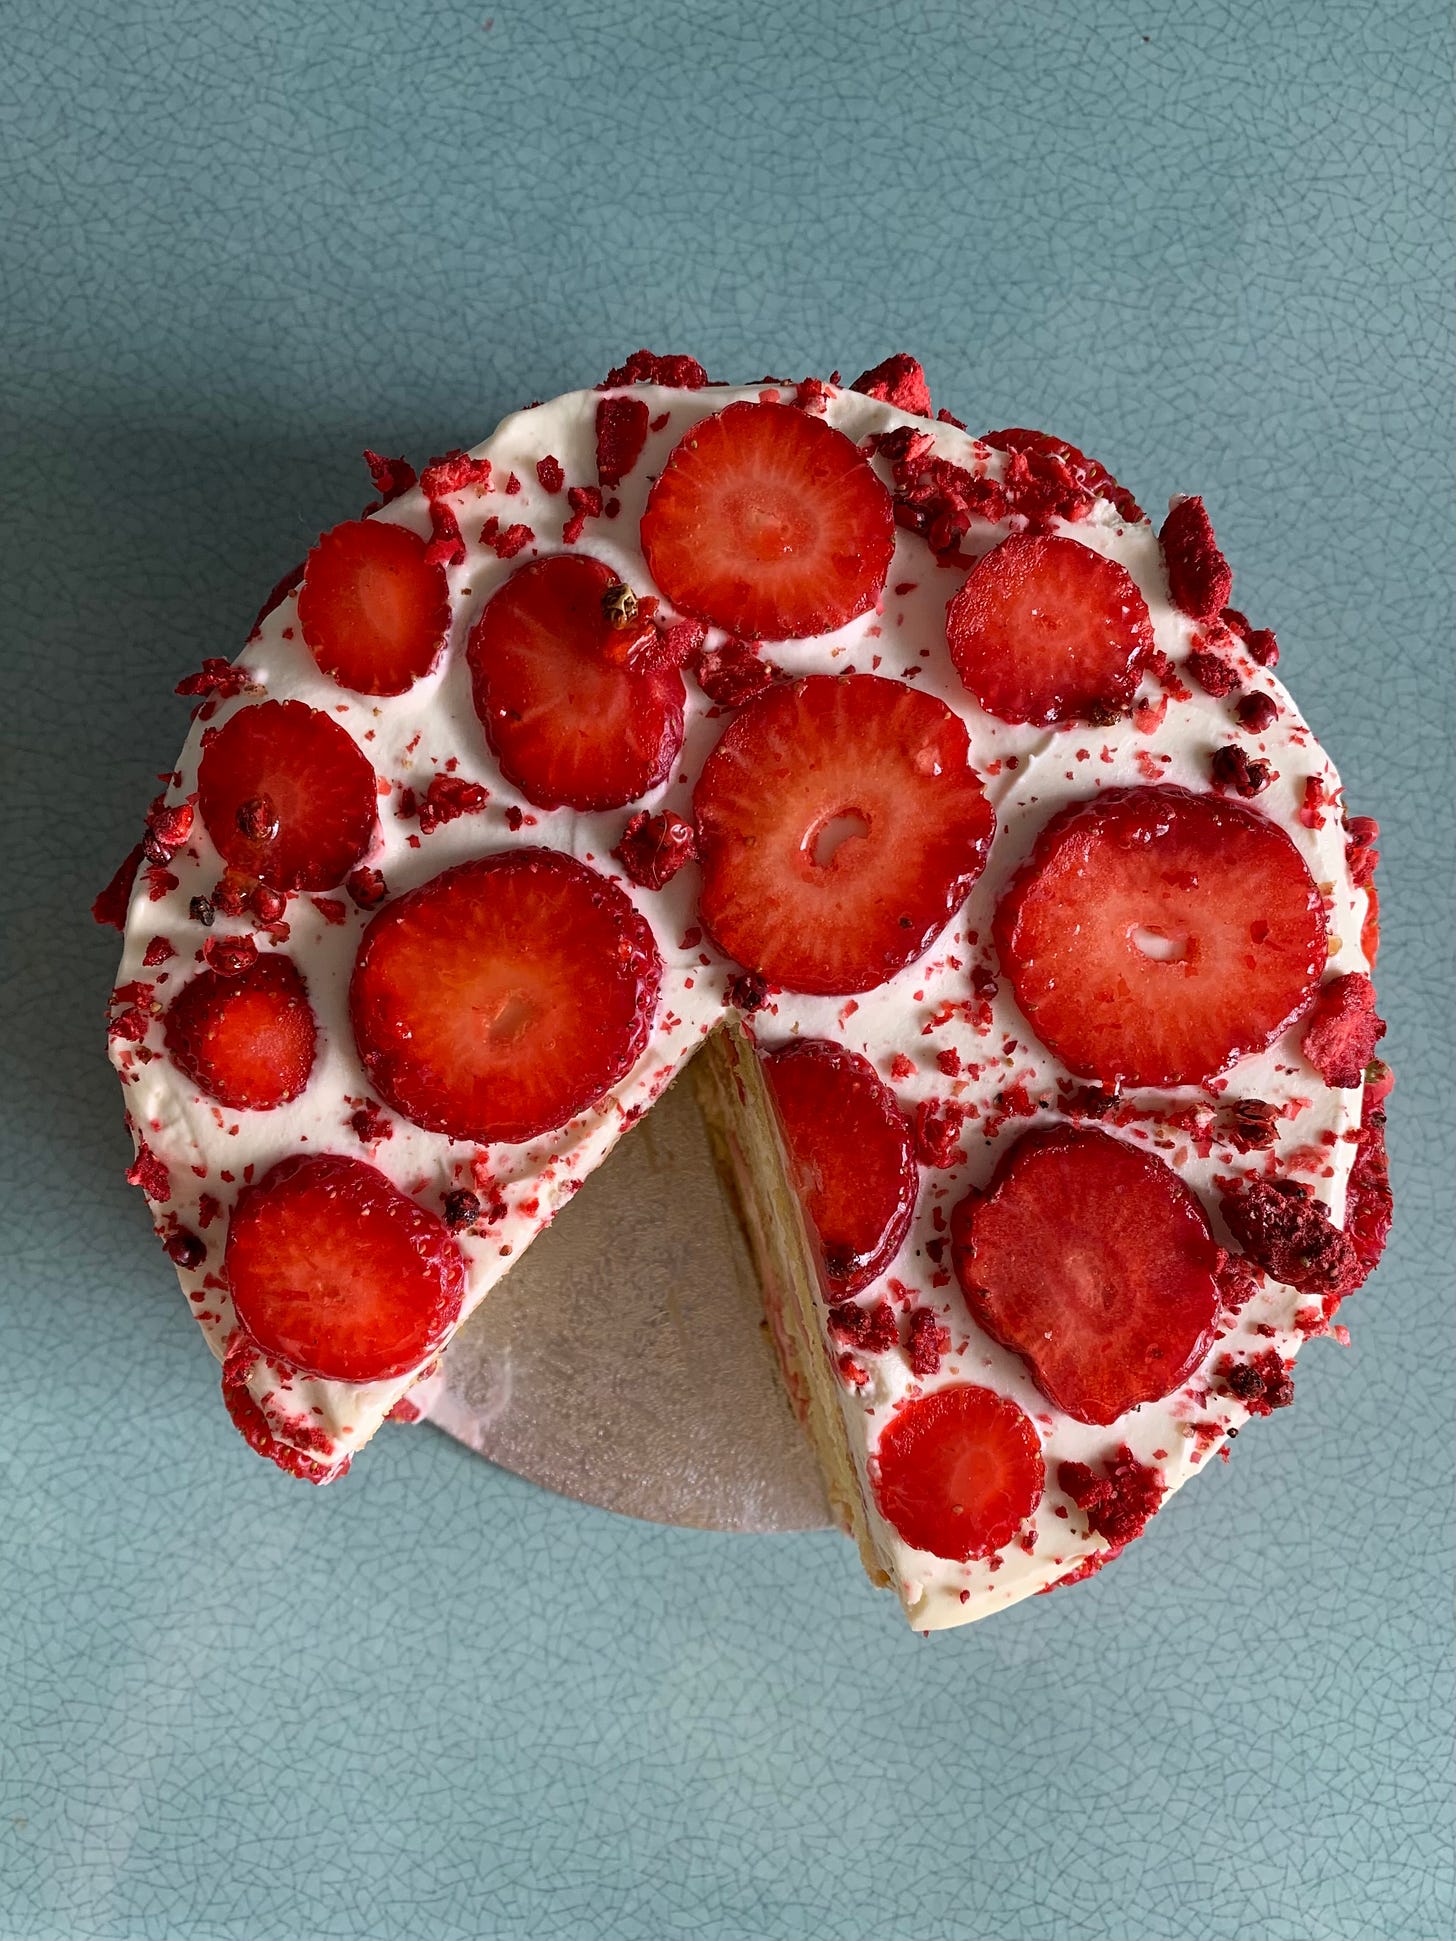
Today is not about developing a whole new recipe, today is about getting DEEP on a technique: The infamous light-as-air genoise sponge to go inside a Yayoi Kusama inspired strawberry cake.
Even though there are slight variations within standard genoise formulations, all recipes are *reasonably* similar: This sponge is all about technique and how to handle all of the pinch points. By god, there are pinch points.
I am the first person to admit that I’m not an expert in all fields of pastry and I’m not about to pretend to re-invent the genoise sponge. So, this week’s recipe will be guided and based on a killer genoise sponge recipe and technique by Chef Ayako.
Strawberry Shortcake is one of the most popular desserts in Japan - it is fluffy (fuwa fuwa!) and not too sweet. The perfect dessert for summer here in the UK now that strawberries have crept in. Although genoise is used in lots of European cakes (Swiss roll, trifle, summer-y layer cakes ala Mary Berry), the super fine texture of the Japanese version is truly exemplary.
The making of a great sponge
I like to think of cake families like mafia families: You’ve got the pound cake gang (ie. equal butter, sugar, eggs etc.), the chiffon clan (cakes aerated by whipped egg whites and usually containing oil) and OG Genoise (today’s subject).
When it comes to cake, there are a fair few ways to get it to rise. There are two factors at play 1) air and 2) chemical leavening.
For pound cakes, air is incorporated through the action of creaming of butter and sugar. Although this is essential for texture, the air incorporated at this stage isn’t enough to lift a cake, so creamed butter/sugar mixes are backed up with a chemical leavening agent like baking powder or baking soda.
The genoise (and chiffon) is all about AIR. You’ve probably heard about genoise sponges and you may have even made one. Genoise sponges are leavened entirely by air. The air is captured by whisking the eggs into a ‘foam’, a word we’ll be using a lot today.
The Genoise/Genoese has the simplest ingredients of all: Eggs, sugar and flour. It is often - as it will be today - enriched with melted butter. In general, a genoise recipe has a pretty standard ratio: 1:2:2:4 (butter : sugar : flour : eggs)
Where chiffon cakes and genoise differ is the treatment of the eggs. Although there are always recipes that defy the rules, generally chiffon cakes use whipped egg whites whereas a genoise sponge uses whipped whole eggs. And on that note, let’s talk technique
Serious testing energy
So, now we’ve got our cakes in a line, let’s get down to technique. I broke down as many factors as possible for the genoise recipe method and put it to the test - the two biggest variables were temperature of eggs and speed of whisking:
All of the cake in the test above were baked in a 6-inch pan and used the same quantity of eggs, sugar and fat. They were all dropped before and after baking and baked for the same amount of time in the same oven.
BTW… Trying to isolate the stages of the genoise for testing was hard since the final stage - the folding - was always down to my technique and could screw it all up. My cakes got continuously better throughout the week (jumping from 5cm - 8cm in height without changing the recipe!) which does make me wonder whether the differences in crumb for the first few batches were due to poor handling rather than the egg foam, etc. Fortunately, this KP is all about best practice and pinch points and how to perfect the techniques for skyscraper genoise!
The deal with egg foams
When it comes to making egg foams ie. whipping up your eggs - probably the least delicious combination of words ever - the two key factors are temperature and speed.
I’ve read a lot of genoise recipes this week and it’s all rather confusing isn’t it? Some recipes insist you have to whisk the eggs over a bain-marie until reaching 45c, others suggest you need to whisk it over the bain-marie the entire time. Some do away with the bain-marie altogether. So what IS GOING ON?
Well, apparently heating the eggs helps the proteins ‘denature’ aka unfurl, which means they are able to trap more air and gain more volume faster. But is this actually true?
Throughout my tests, I found that yes, a warmed egg can seemingly trap air faster, and will expand much more quickly in the bowl but it will not make a significantly better cake. It does not significantly impact height or texture.
If you don’t have a KitchenAid and are using an electric handwhisk or - GOD FORBID - you are making a genoise fully by hand, heating the egg/sugar mixture will help get things moving in the right direction more quickly so I’d advise warming the eggs if you’re doing it by hand.
Fear the cold and do it anyway?
A fair few recipes say you must avoid fridge cold eggs at all costs, but I found this to be untrue and unfair. Although it does take more time for the eggs to whip up, I found that the final results were more than fine, the only real difference being that there were more irregular holes in the final foam - though, as you’ll find out, this could have been down to folding technique or other factors. The moral of the story here is: If you keep your eggs in the fridge, don’t sweat it if you forget to remove them ahead of time before whipping them up. The difference is pretty tiny as long as you follow the rest of the techniques well.
This got me to thinking: Why is it that you’re often asked to freeze your bowl before whipping cream to get the best volume and yet cold eggs are demonised? Well, cream gets its volume from air being trapped between fat molecules, whilst eggs get volume from air trapped within a mesh of proteins and water (the whites). The yolks get in the way of this network becoming truly stiff. But more on that later.
So, cold egg whites take longer to break down (ie. unfurl those proteins to the network can be built back up with air inbetween ie. volumize it!) but will still make a great structure. An errant article suggests that the cold ‘stabilises the protein network’ but I’m not sure about the science on that and I can’t find much info on the subject. I’m also quite doubtful that the egg temperature will be that different by the time it has been whisked to peaks, since the whipping process - at room temperature - will likely warm the eggs up anyway.
The scale of stiff and speed
When you’re whisking egg whites, there are a few significant stages to play with. From soft peaks to stiff peaks, a recipe will ask for something specific with an end goal in mind.
You know how pastry chefs will freak out if there’s even a tiny bit of yolk or fat in a mixing bowl if they’re about to make a meringue? Well, that’s because yolk - with its lecithin (emulsifying) and fatty qualities - will totally mess with the whites ability to form a meringue so stiff it can be held above your head.
With a genoise, you’re INVITING those yolks to the party and it’s thanks to the fat - and those emulsifiers - that you can really push the structure and formation of the foam. The yolks are basically the MVP.
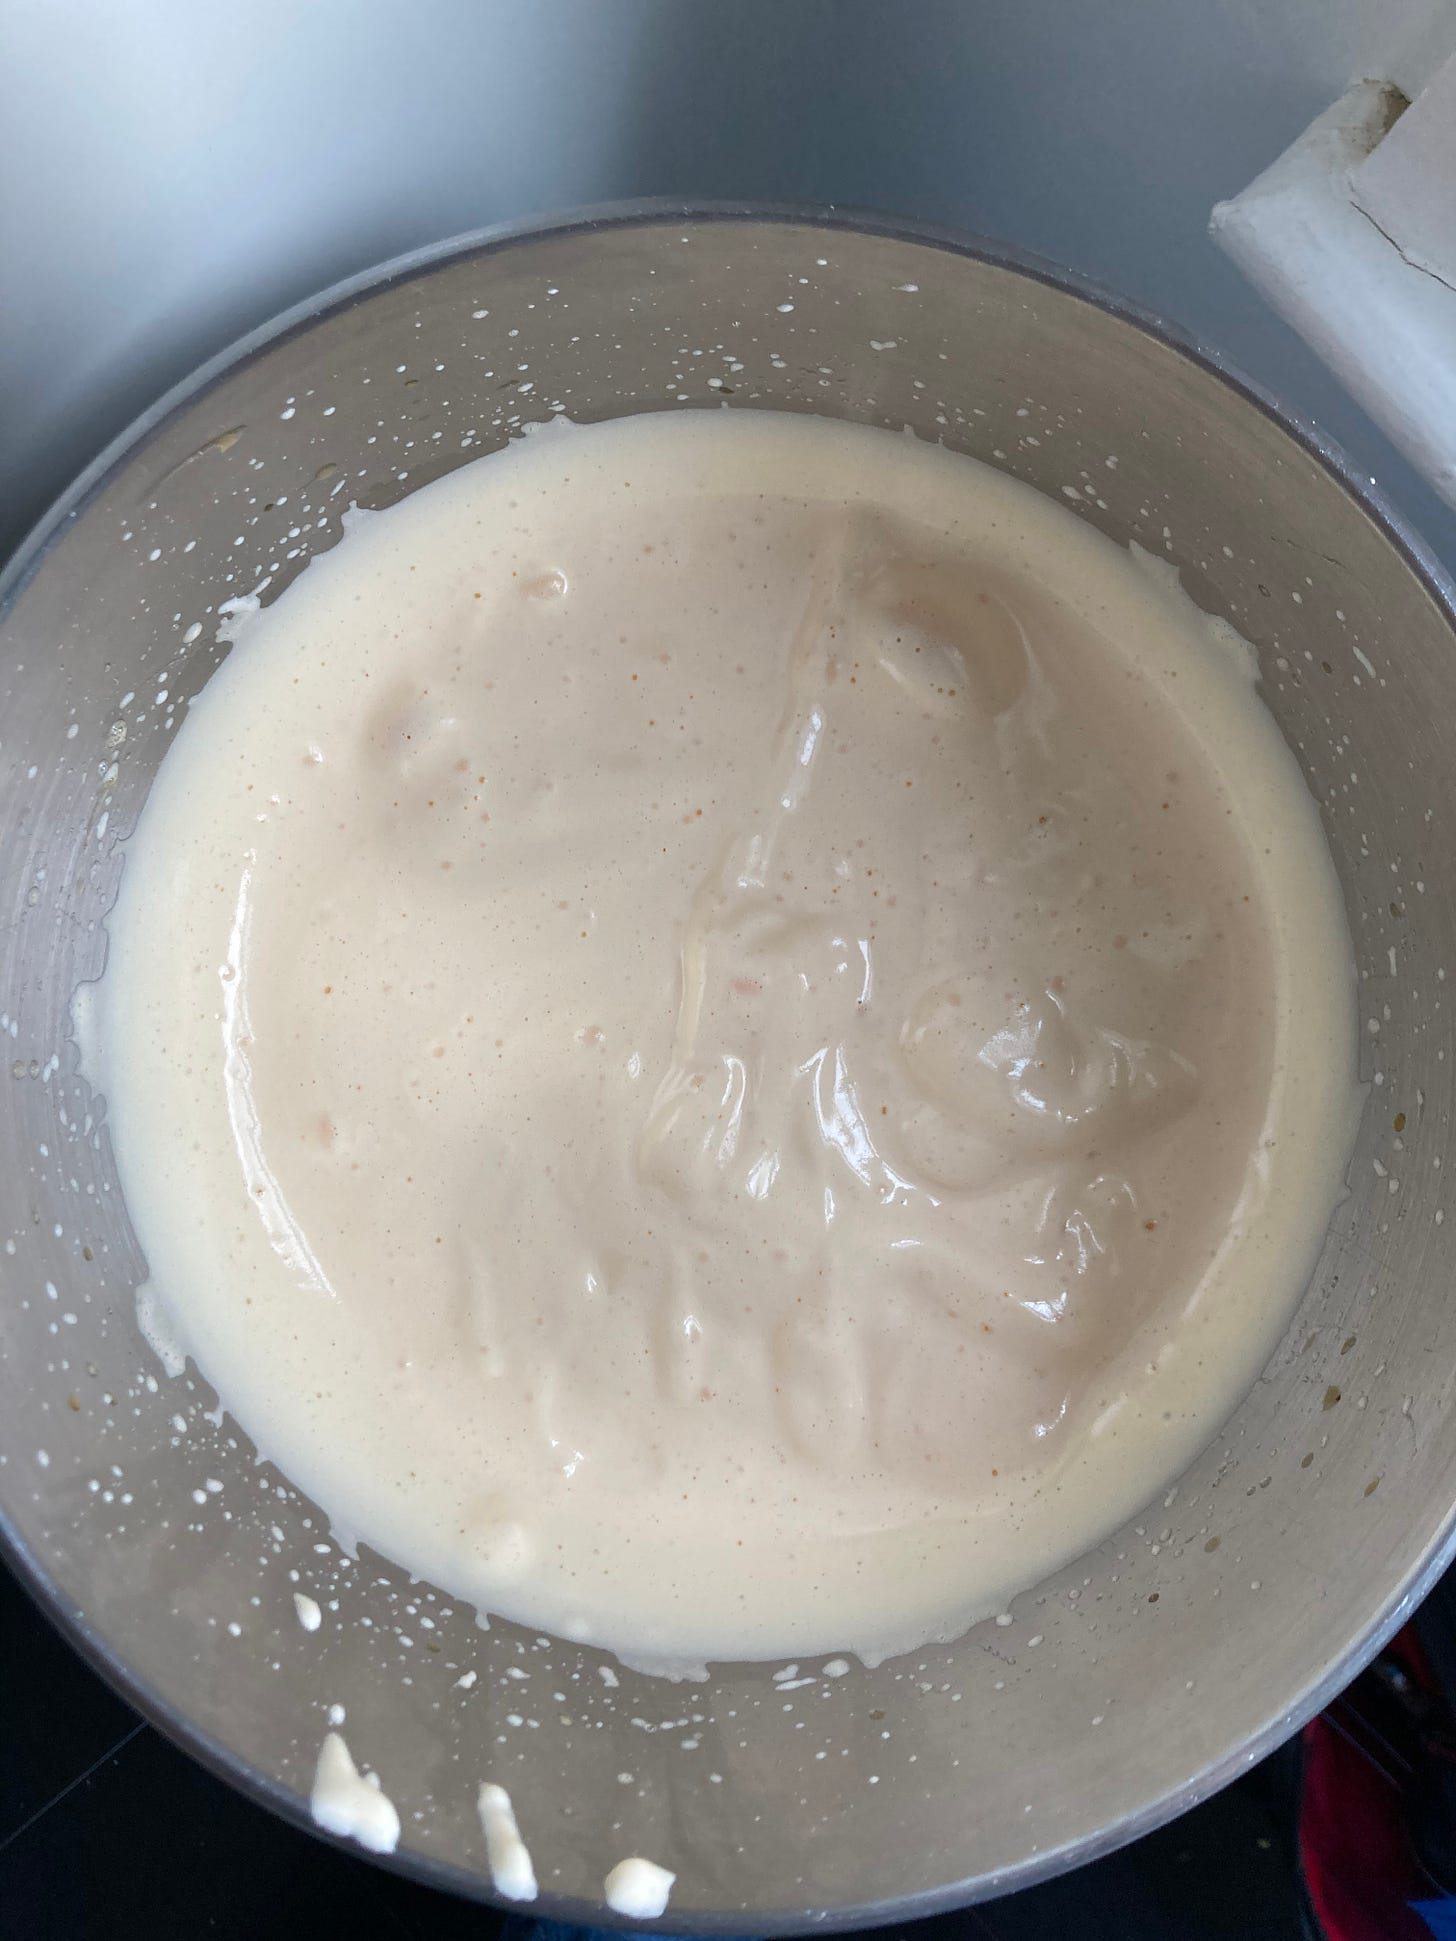
When it comes to whisking whole eggs, there is really only one goal: Ribbon stage. Ribbon stage is often defined in terms of the trail a lifted whisk will leave on top of the mixture - usually performed in a figure of 8, the egg has enough body to sit on top of itself.
The eggs will be white and shiny, at least tripled in volume and thick, with fat air bubbles and an almost chunky or fat texture when the whisk is lifted from the mix. This is a very good indication that you have fully aerated your eggs and they are ready to go…
…However, this can be finessed.
Ribbon stage is perfectly depicted by this picture here sent to me by Chef Ayako:
Of course, using your whisk to leave a trail of eggs on the surface is one way to check it, but your goal is to transform your eggs into ribbon shiny enough that you could tie Elizabeth Bennet’s bonnet with it. It is marvellous.
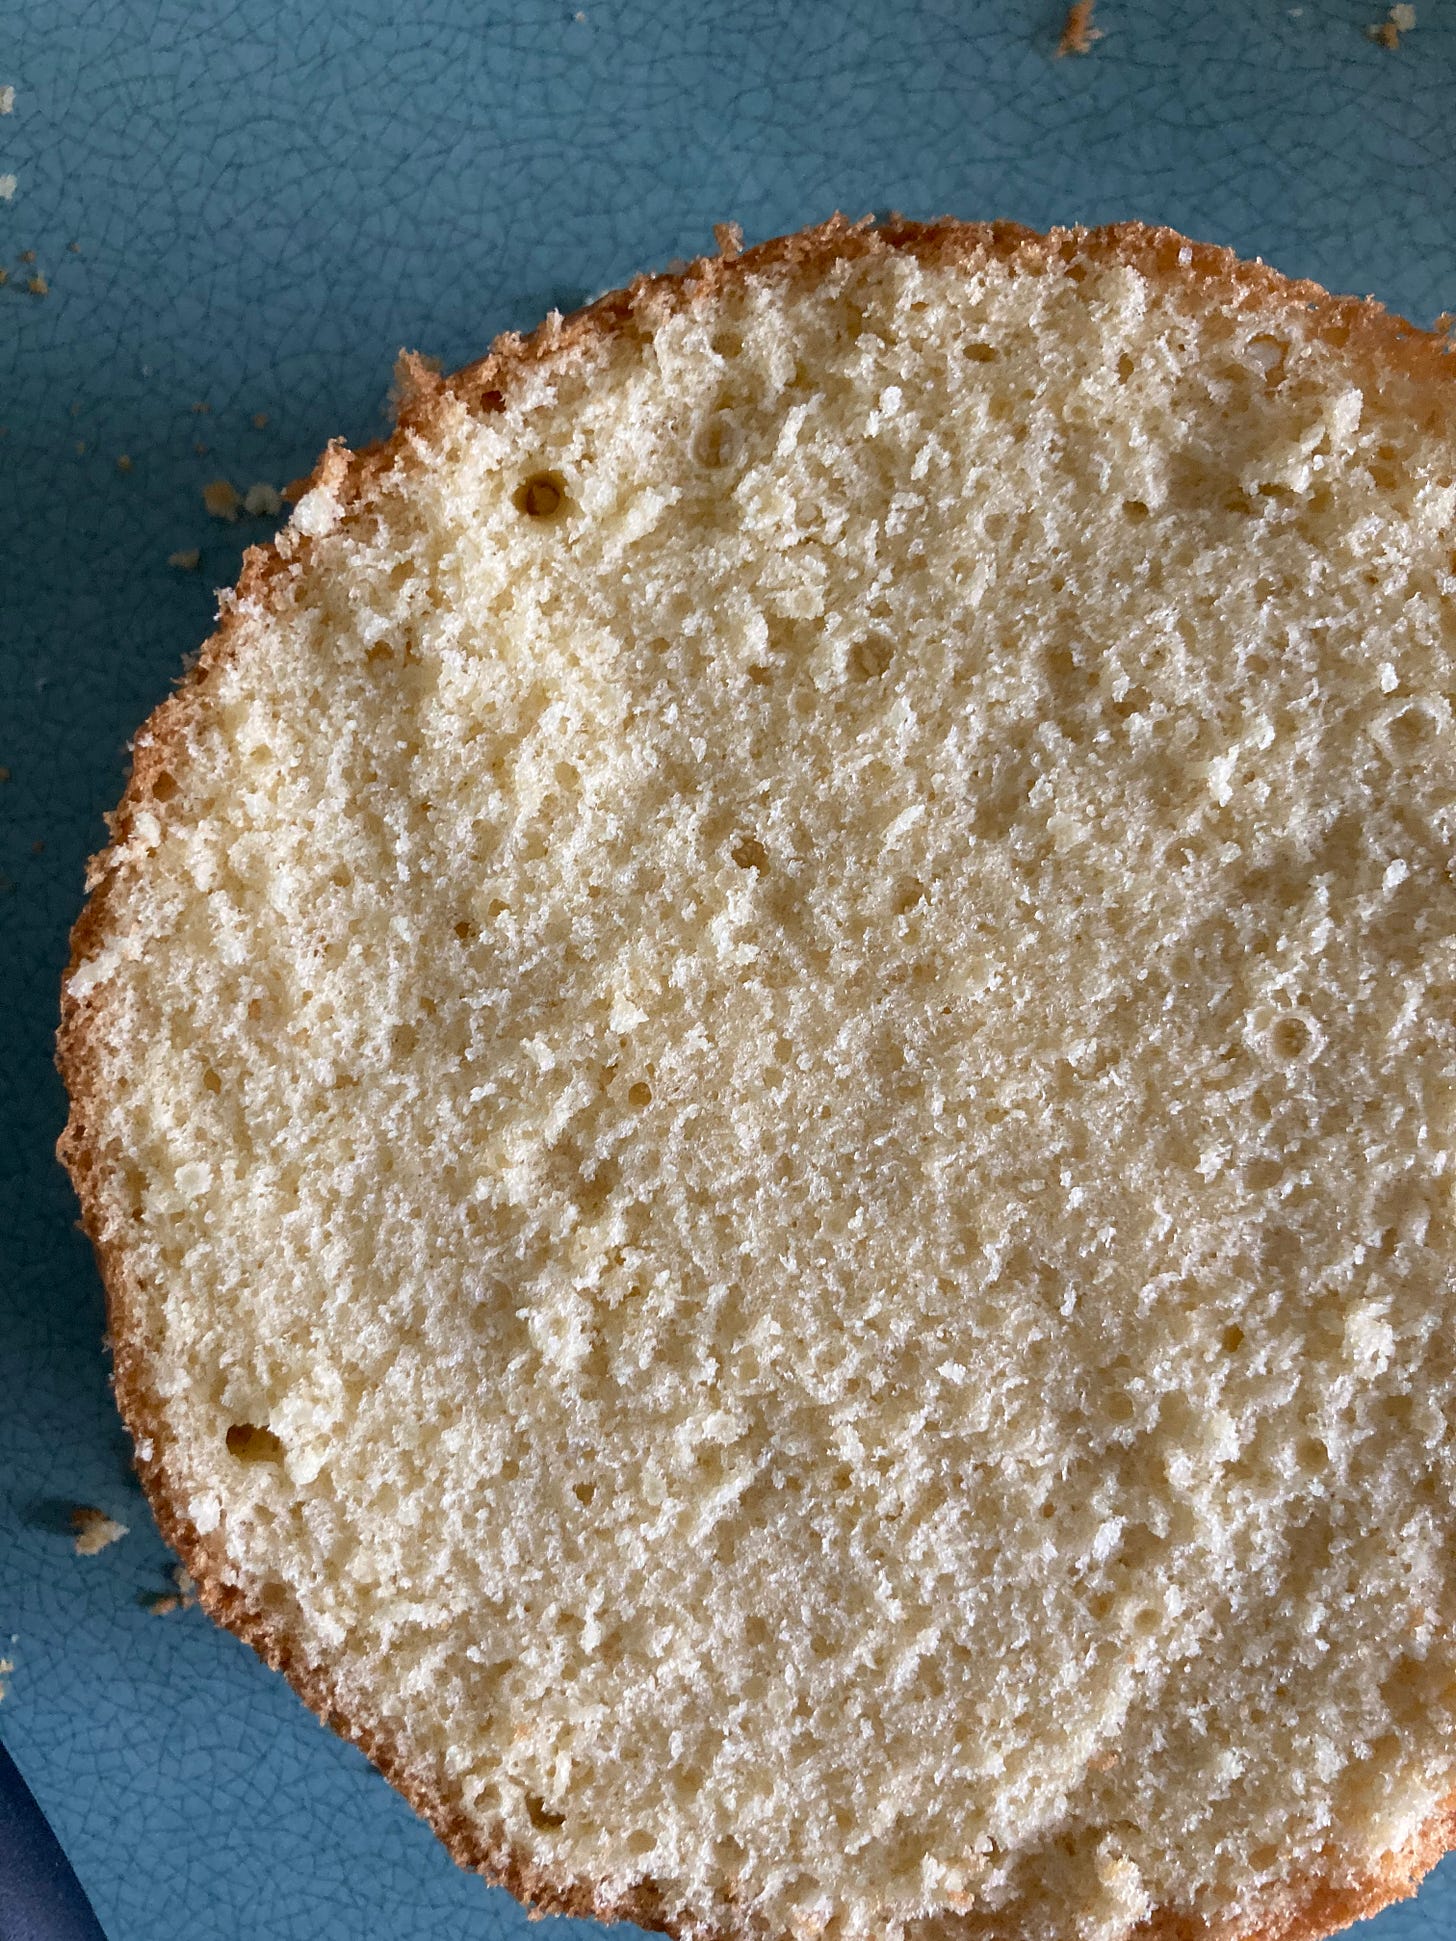
For the ultimate genoise, we’re not just thinking about height. We are thinking about the final texture of the cake. Although you can whip the eggs on max then get on with the folding bit, we are actually seeking a stable, fine egg foam that will ultimately translate into a super fine texture for the baked cake. And this is where that silky ribbon comes into play.
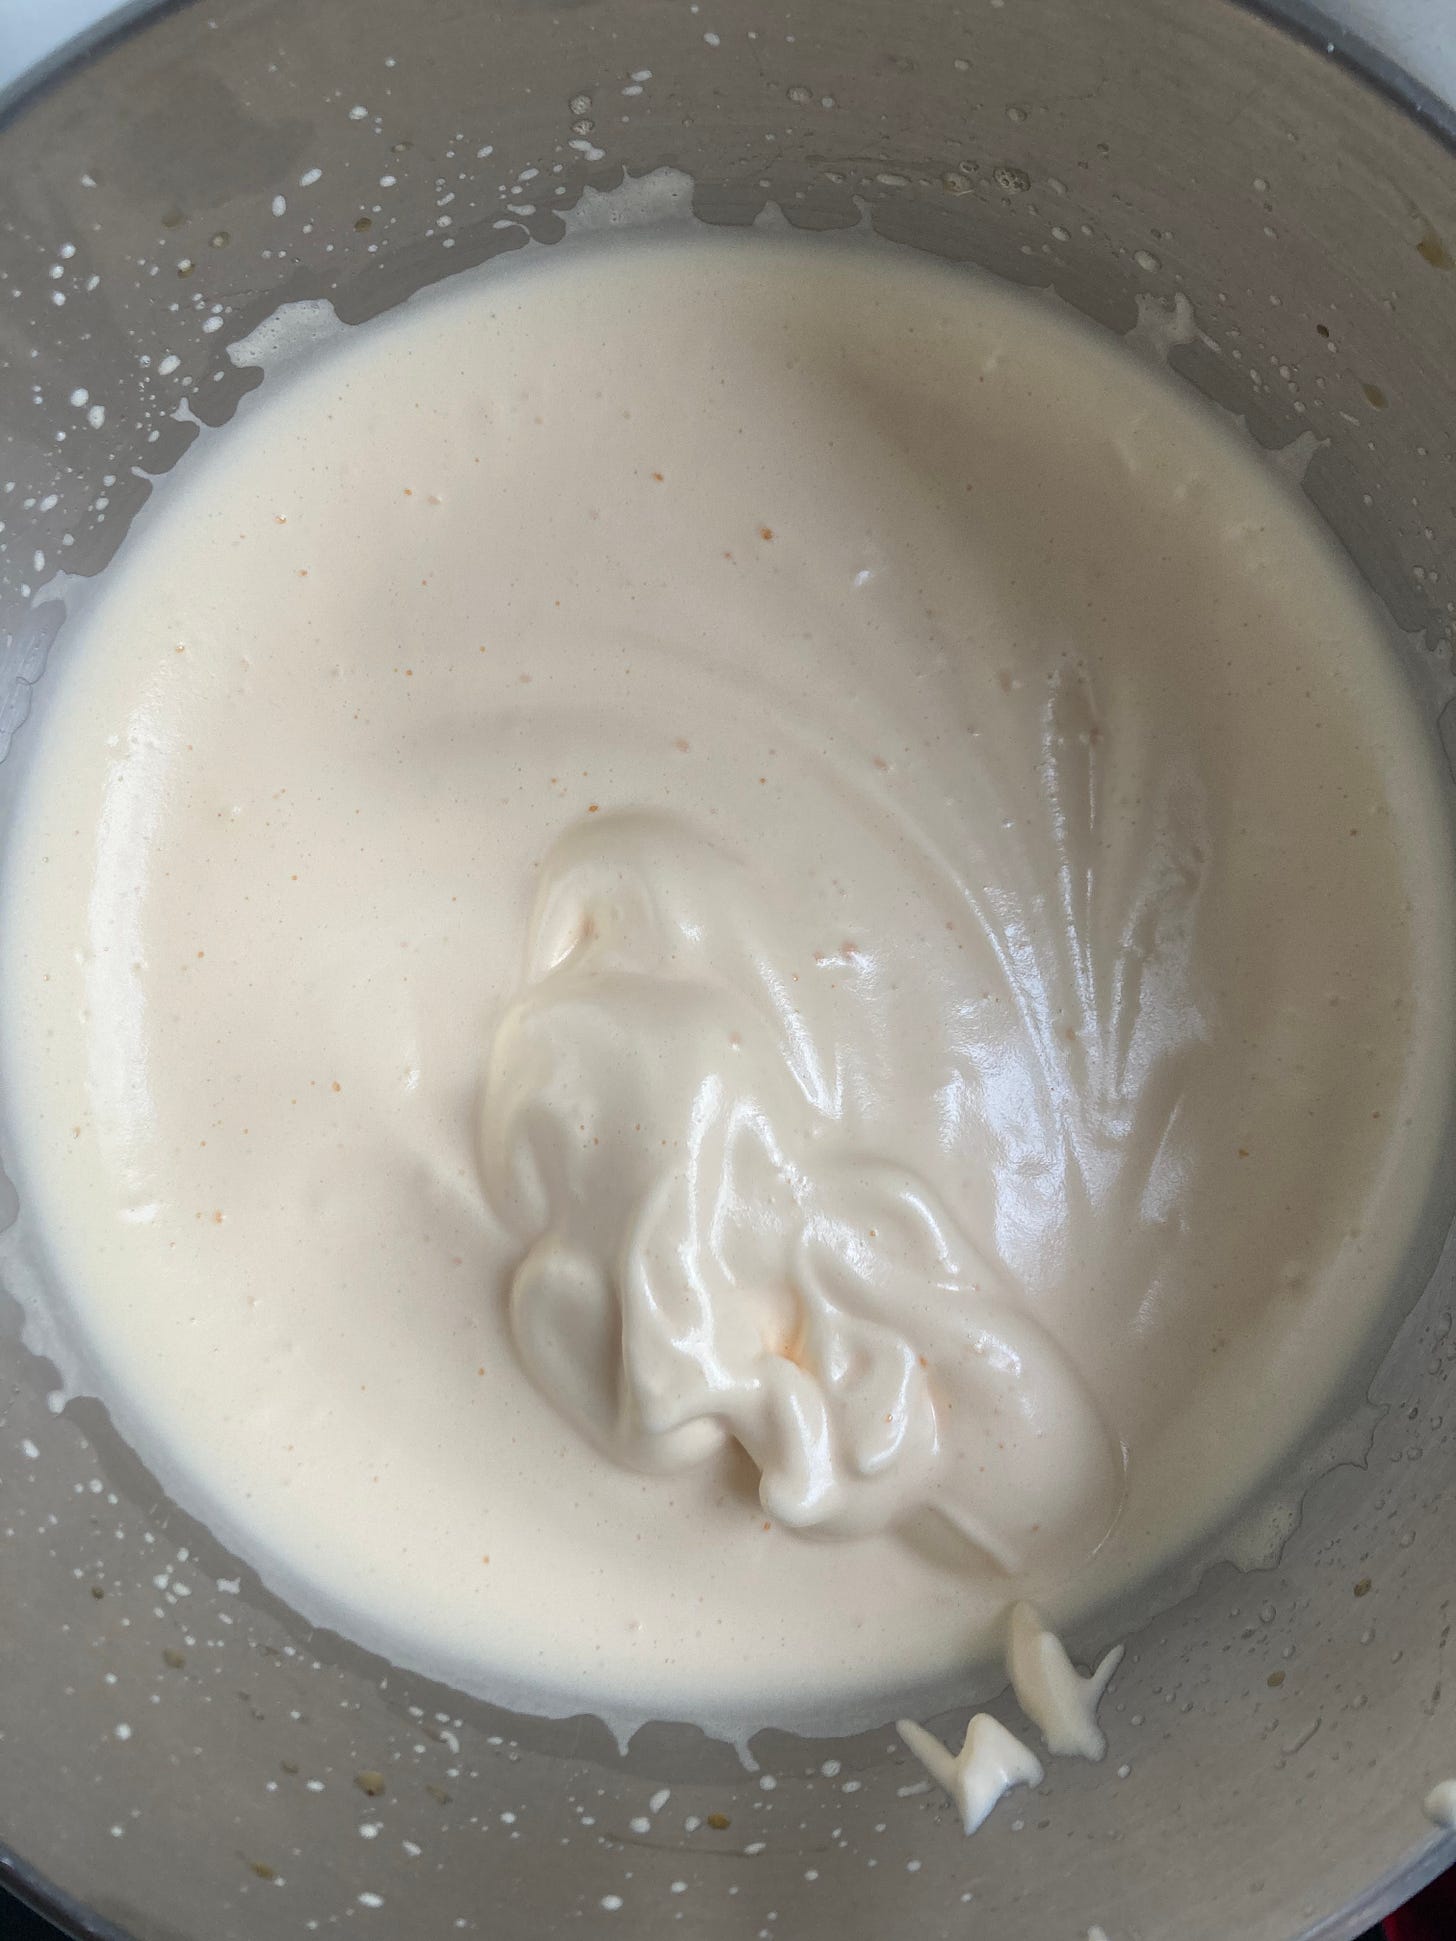
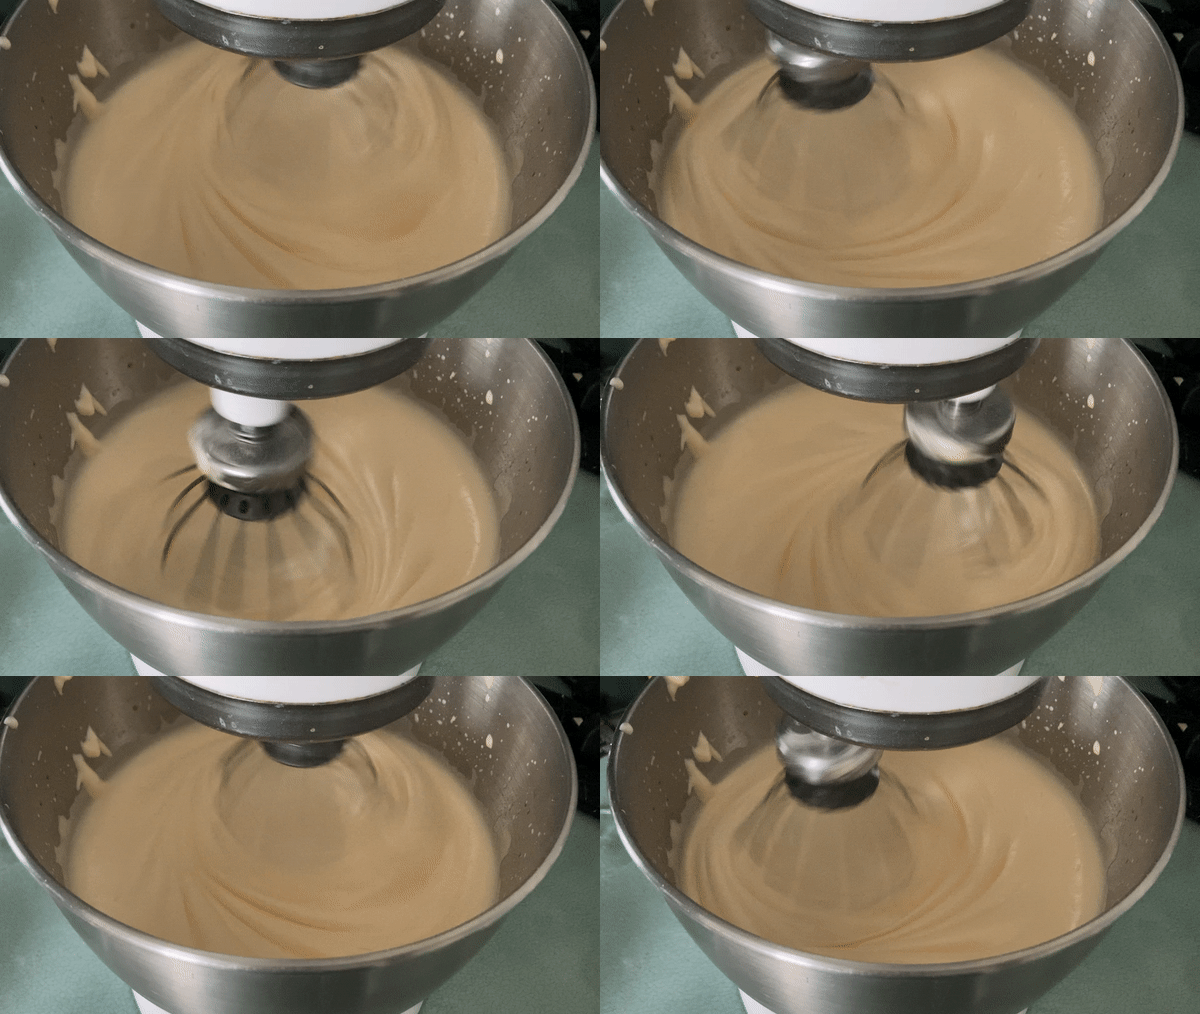
Chef Ayako’s technique is all about refining the bubbles and the foam. By whipping the eggs on super high speed to begin with, you are trapping as much air as possible into the mix. But that’s only the first stage. Once the eggs have reached a shaving foam sort of volume they look very impressive but if you look deeper, the mixture is full of irregular sized bubbles even though it leaves a trail:
Although it is fully aerated, it is unstable. I’ve had good results - height wise - using the egg foam at this full height - but erratically structured - stage, but you have to be extremely careful when you’re folding in the flour and fat otherwise this temperamental foam will deflate.
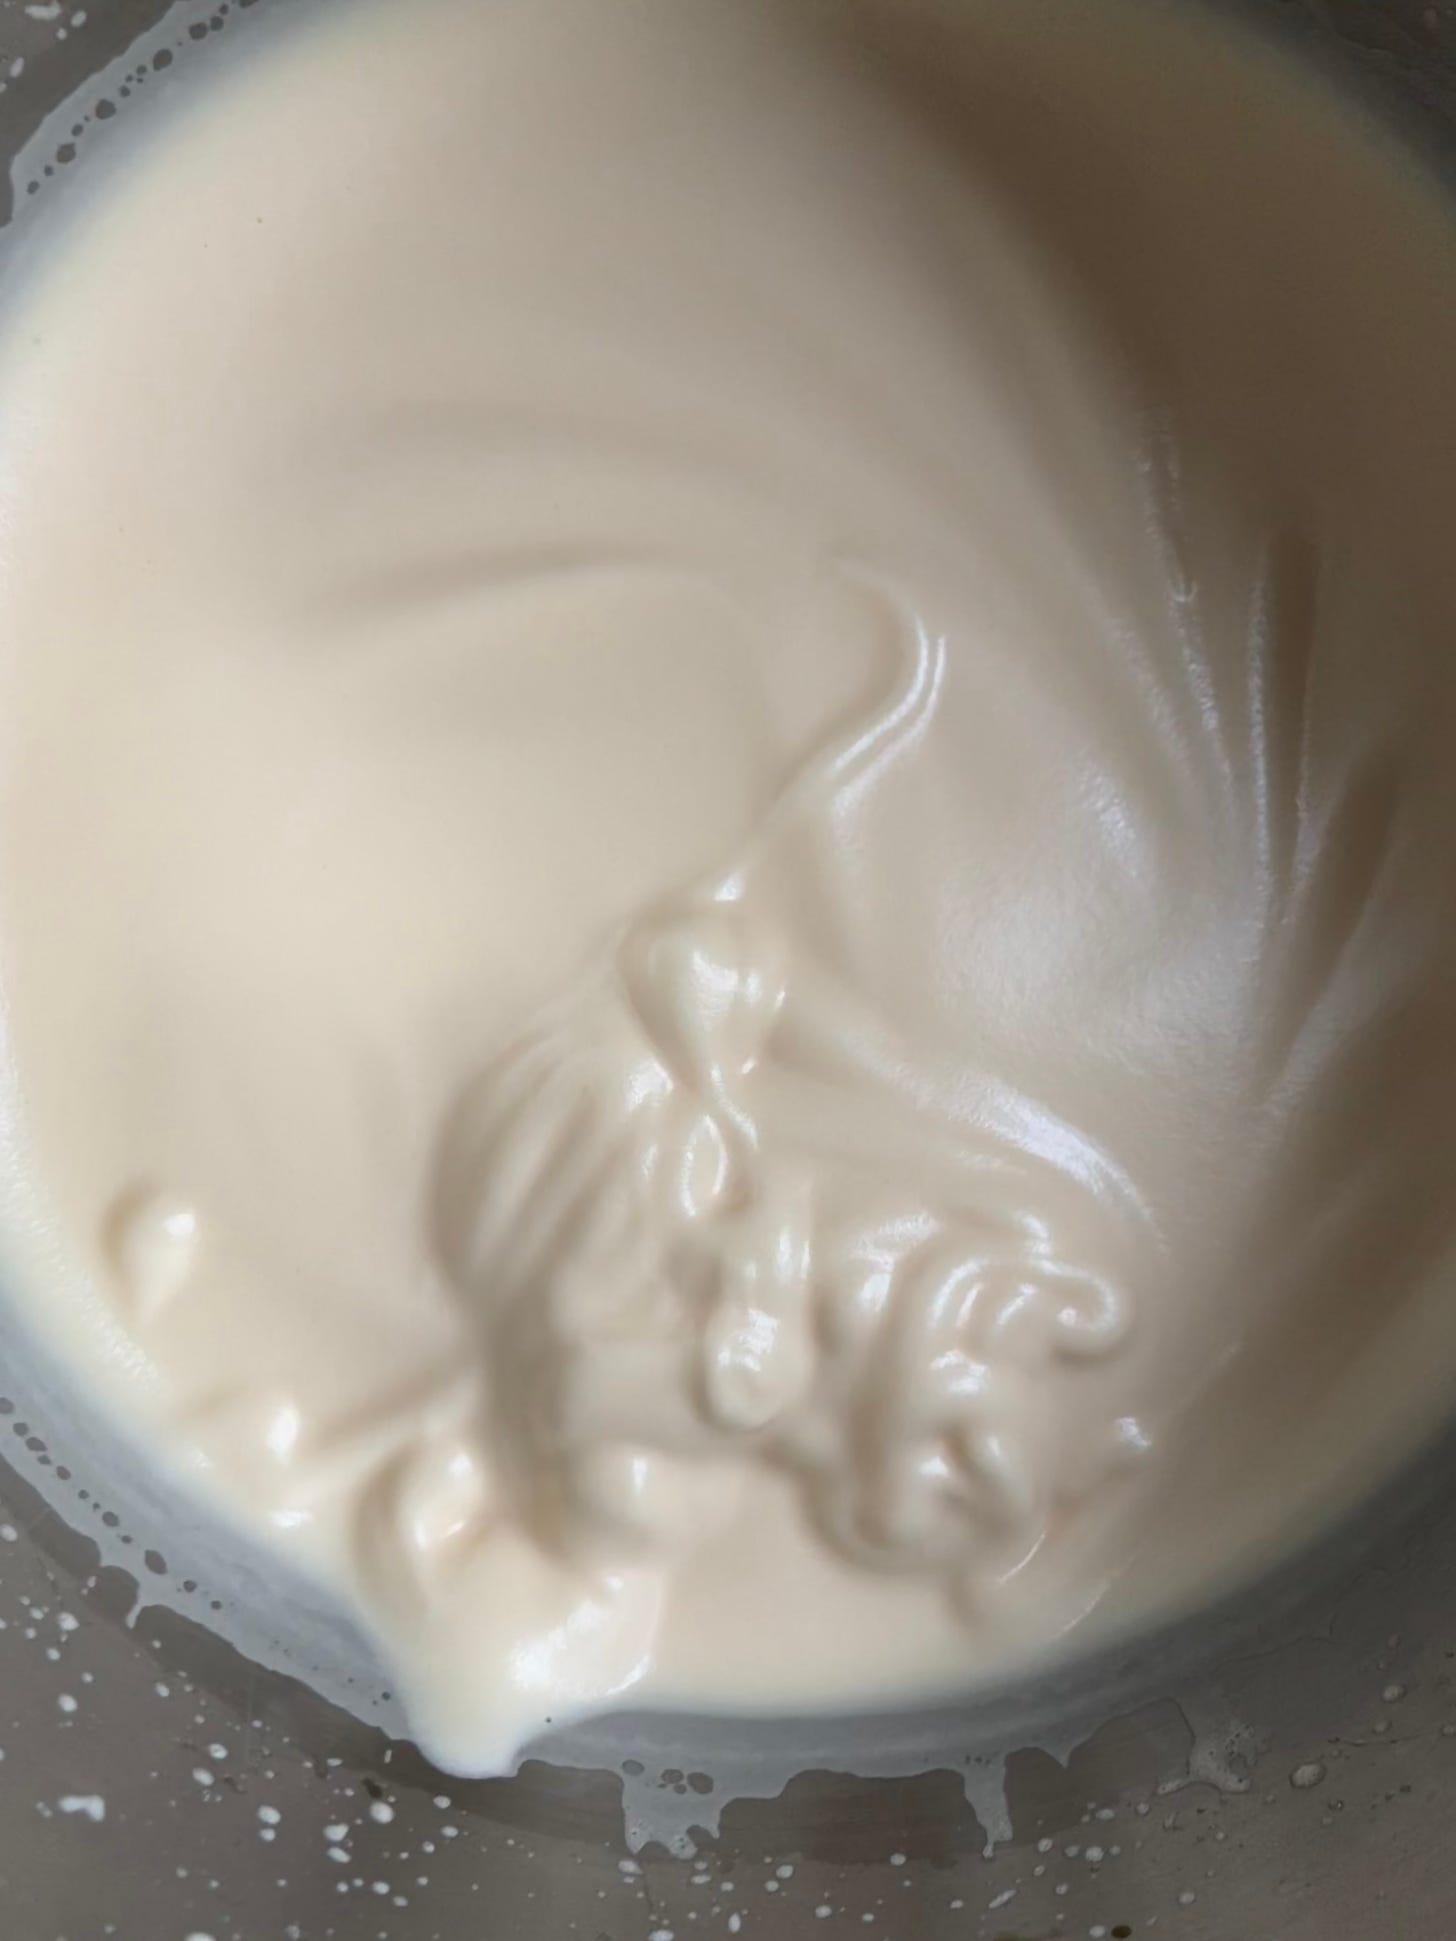
So, to stabilise the foam and to get the finest possible texture (and to make it far less scary at the folding stage that things aren’t just going to fall apart), we slowly lower the speed of the whisk in stages until there are no visible bubbles. During this action, no air is lost - instead the large unstable bubbles are split into small, very stable and strong bubbles. No volume is lost.
Here’s that egg mixture again after 3 minutes of medium speed mixing
Here’s the egg mixture again after 10 minutes of low speed mixing:
The result is a very stable egg foam that can withstand folding much better, will have more stable air expansion in the oven and will give you a better cake texture overall.
Putting eggs through their paces
Eggs are amazing. I will be testing out some of the egg replacers on the market (aquafaba, flaxseed, potato protein) to see how they behave in something like a genoise. this week I decided to push the egg to its limit.
I started off by whipping the whole eggs with sugar for 50 minutes(!). The result? It was absolutely fine. Totally stable. No higher than it had been at the 10 minute mark, but it was stable nonetheless. We can thank the egg yolk and it’s emulsifying qualities for that.
Once I was satisfied I’d whipped the absolute heck out of these eggs, I left the foam for an hour. Just walked away and let it sit. It became dry and ‘set’.
To push these eggs further, I whipped them on a high speed and - amazingly - they became glossy, as though nothing had happened. Although they weren’t at their absolute best, they looked pretty good, so I proceeded to use them in a genoise.
The result? Absolutely great. Like nothing had happened. The cake turned out perfectly fine. So, although you may hear horror stories of not overwhipping or eggs or ‘knocking out the air’ by going too fast! So, you can rest easy knowing that your eggs are tough and not going down without a bloody good fight.
The key to folding
As I mentioned earlier, it was quite hard to isolate all of the genoise techniques since the final hurdle is perhaps the highest one: Folding in the dries. This stage is by far the most important part and where a lot of things can go wrong.
Folding is something you need to practice. Throughout this week (where I made 12-15 genoise sponges in total) my technique got better and better and the sponges became airier and airier, almost regardless of all the other variables (temp of eggs, speed of whisking etc.)
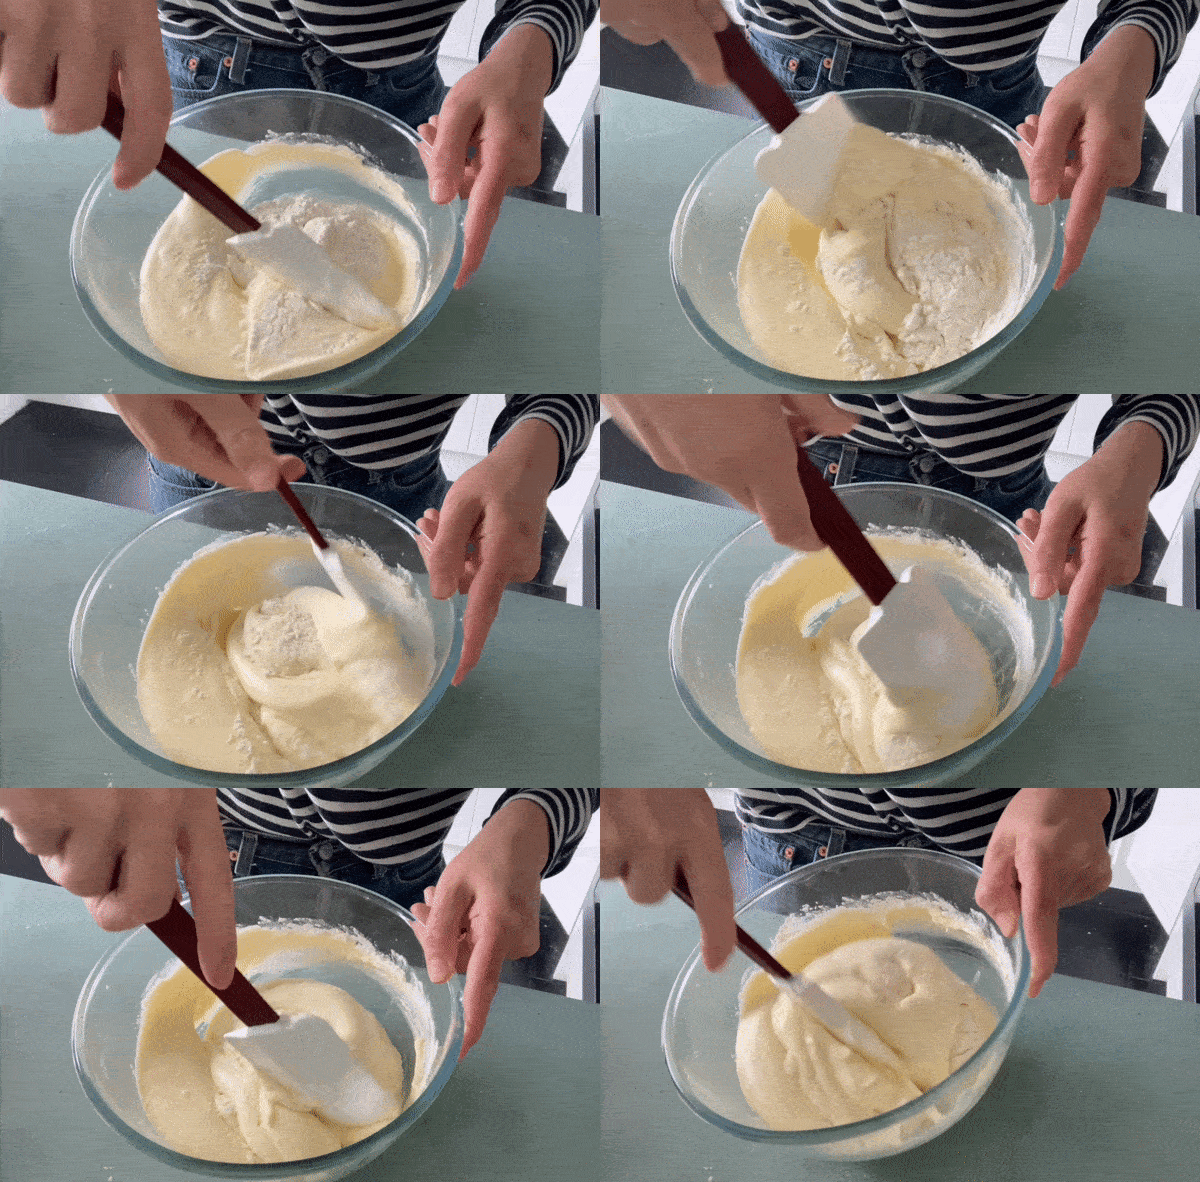
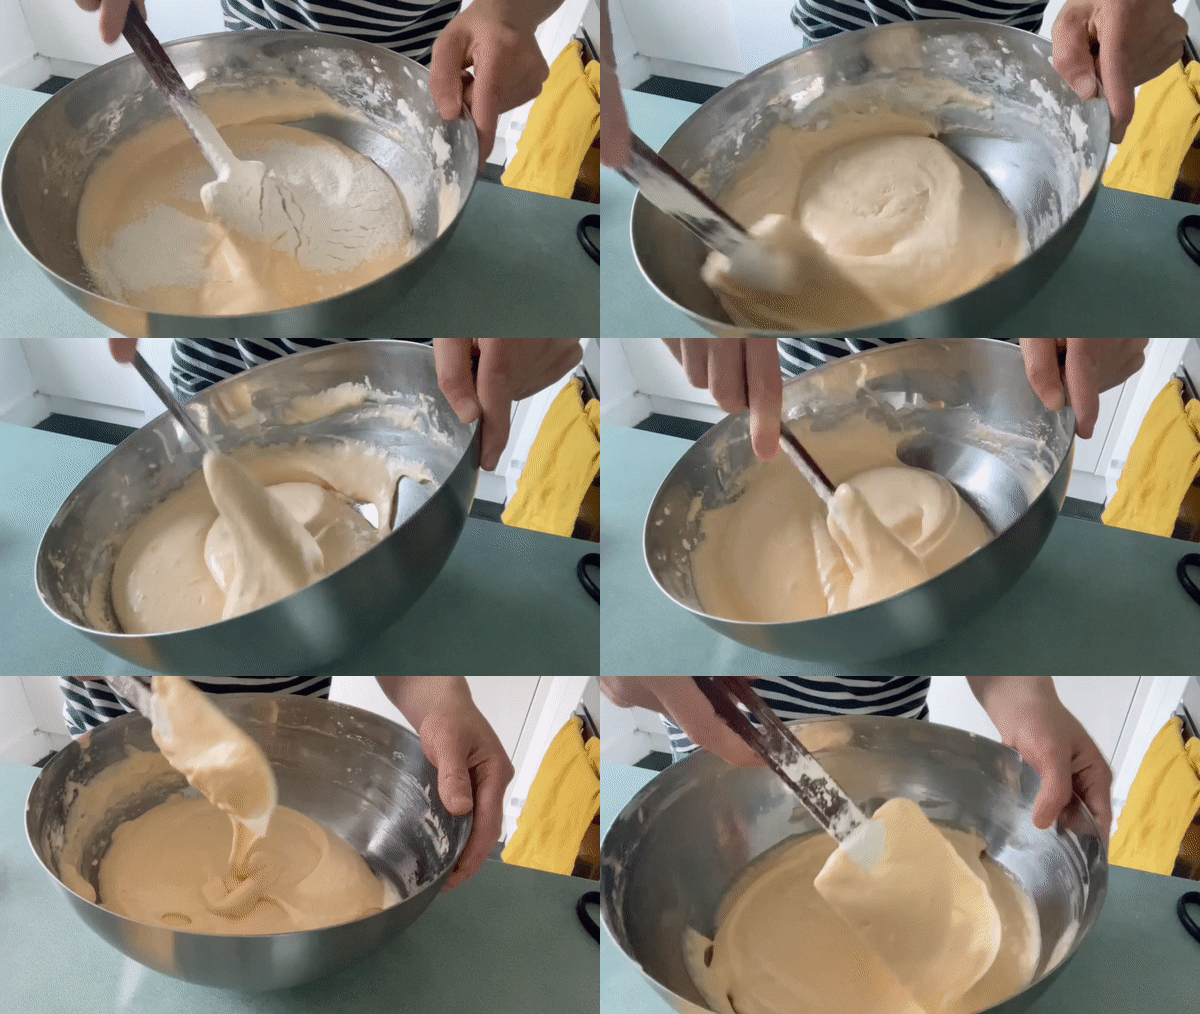
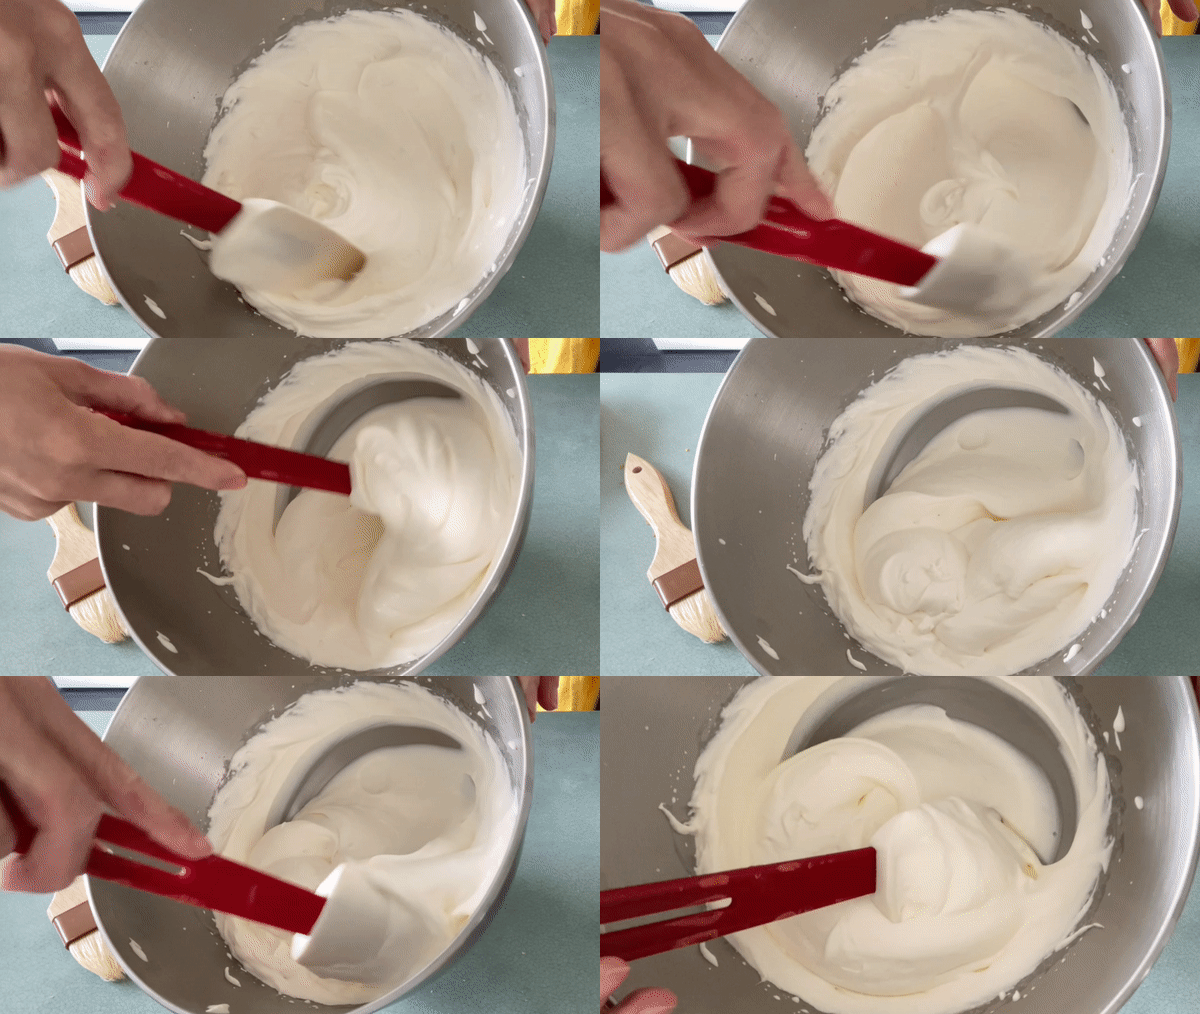
My fave technique is based on a slicing action: I try to fold in my dries with a capital D - I slice through the centre with a spatula then round the edge, trying my best not to deflate the mix:
In a KP in the near future, we’ll discuss other folding methods (using the mixer, using a whisk etc) but for now, a big flat spatula is your BFF.
It’s worth noting that a good, super stable egg foam will withstand poor folding technique better than a wobbly unstable egg foam so best to get those bubbles finessed for best chance of genoise success.
What if you don’t have a kitchen aid?
If you don’t have a KitchenAid, it will be much harder to get a fine, stable foam, since a handmixer has much less speed control overall. The key to the silky ribbon is a longer mix on a lower speed, a task pretty much impossible when using anything other than a KitchenAid.
But all is not lost. As I said earlier, the second stage of foam mixing is more about finessing. You can make a lovely sponge - though it may not be quite as fine textured - without the slow whisking stage to , though you may be able to recreate the slow, repetitive action of a slow KitchenAid whisk using a handwhisk on the lowest setting, it may be a challenge to maintain the integrity of the foam without mechanical intervention.
If using a handwhisk, I’d recommend warming the eggs and sugar over a bain-marie until it reaches 40-50c. This will help aerate the eggs more quickly and get the process moving a bit faster since you don’t have quite as much power as a KitchenAid. Despite the lack of speed controls, you can try and emulate the shiny, bubble-less ribbon-stage eggs by checking the visuals and being patient as you go.
The big drop before and after
The enemy of a perfectly refined sponge is big fat air bubbles. Although this advice may seem counterintuitive considering how much I’ve stressed the folding process as the *most* essential step, it does make sense for the final texture.
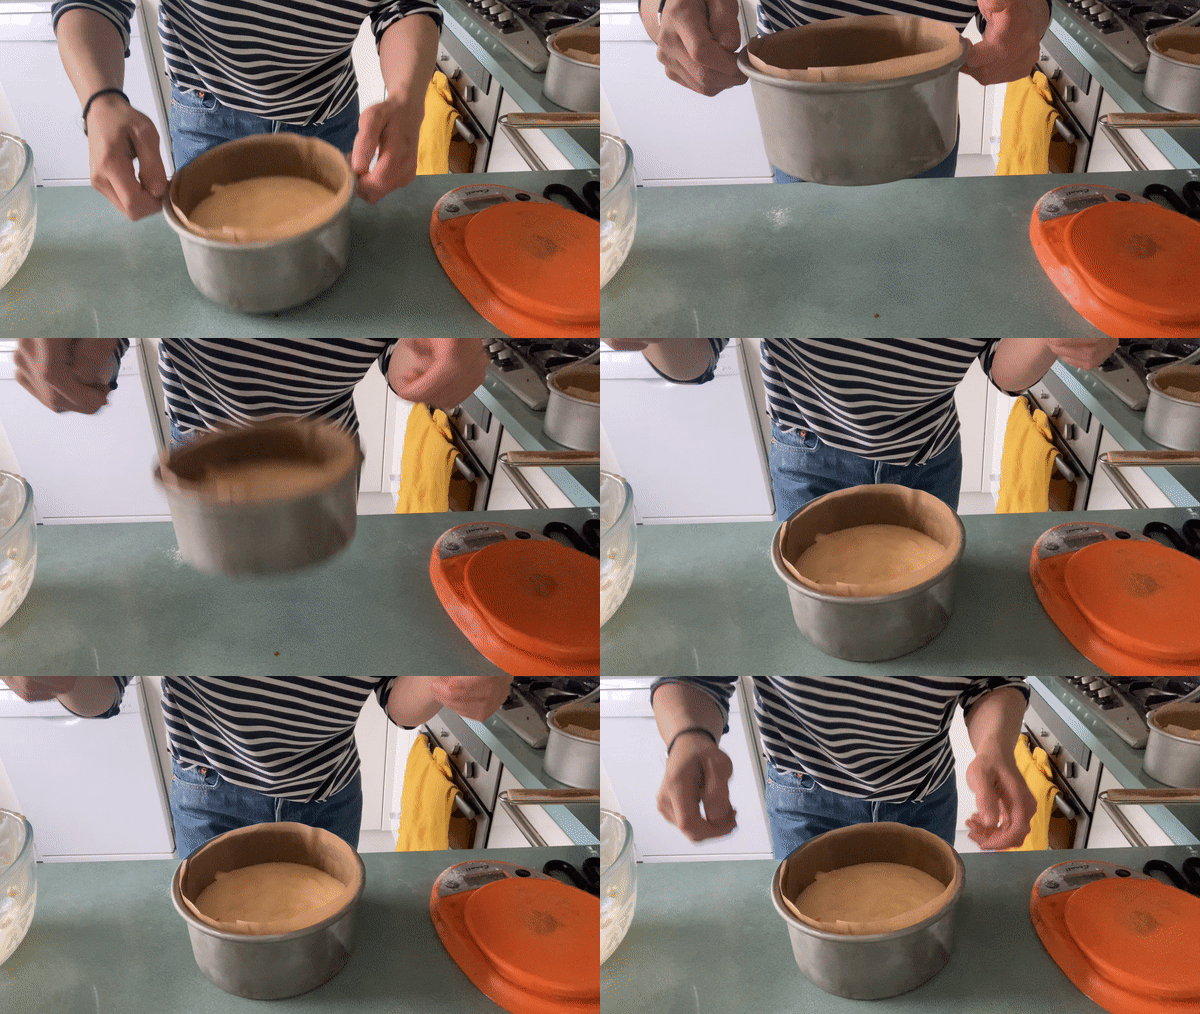
You’re going to drop your cake. From a height. Ugh, ok it feels very odd the first few times, but when you drop the cake you will see large bubbles popping on the surface. This is a good thing - these are bubbles that are actively trying to get in the way of your perfect fine sponge. They are uninvited.
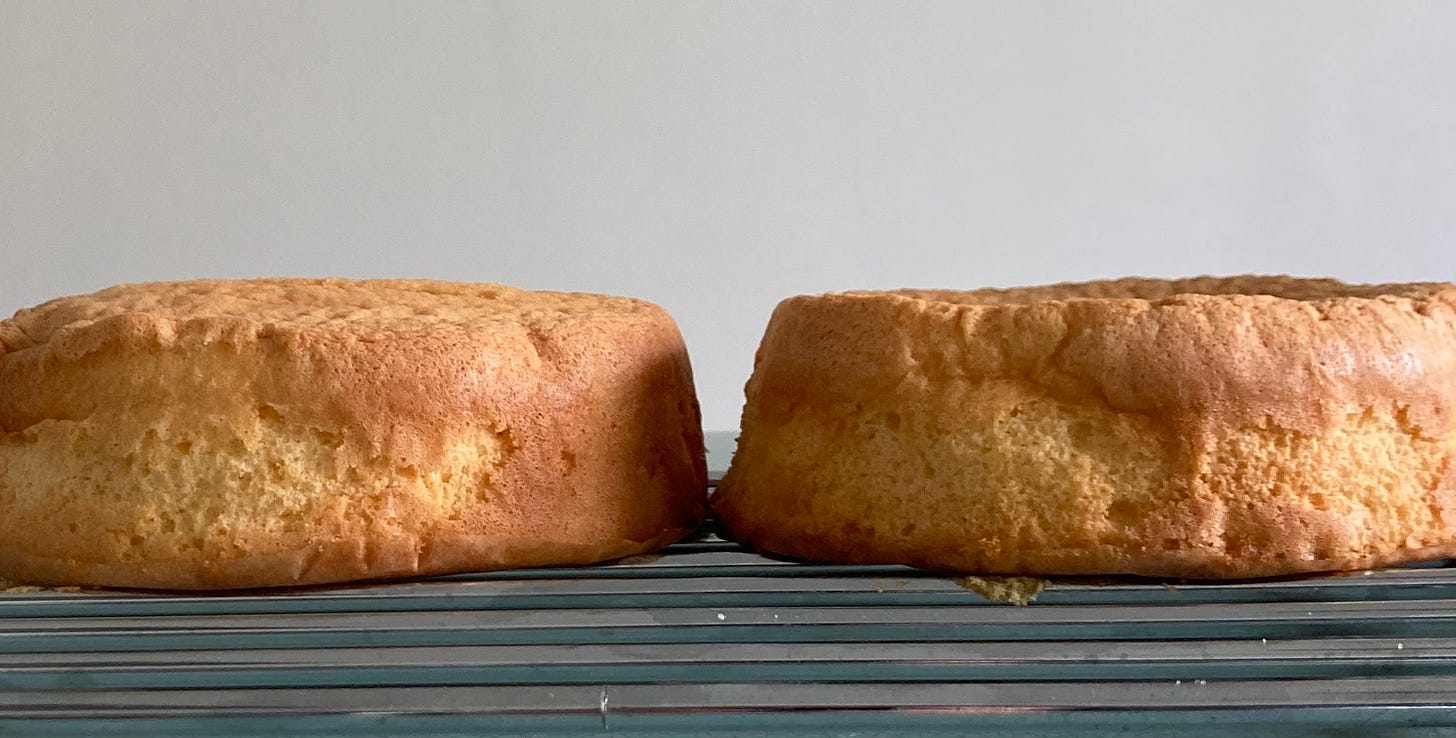
Once the cake is baked and as soon as it comes out the oven, you repeat the same thing. The idea here is that you are pre-empting the potential for shrinking by ‘shocking’ the cake and releasing the pressure between the cell walls.
In ‘The Science of Cooking’ by Peter Barham, there is a section all about this: Cakes collapse because steam condenses and there is no way for more air to get INSIDE the cake to replace it, and so it shrinks. According to Barham - and Chef Ayako - the key to stopping the shrinkage is dropping the cake from a height. This sends a shock through the cell walls of the cake and allows some of the bubbles to break, which allows air to pass back and forth through the cake and prevents shrinking.
I put it to the test - and IT WORKS. The one that wasn’t dropped after baking shrinks toward the centre compared to the one that was dropped, which remains straight (ignore my damaged edge from crap lining if you can and just look at the angle comparison!):
PLUS, it’s very fun. Do it.
The flour
To achieve the ‘fuwa fuwa’ texture Chef Ayako mentioned, it’s essential to use a low protein flour. Gluten plays no role in this cake, with the fluffyness and structure all coming from that hard earned egg foam. Some recipes call for ‘cake flour’ which - in the US - is a very fine milled flour with low protein but in the UK ‘cake flour’ is actually flour with a raising agent mixed in.
To achieve a low protein flour and the correct fluffy texture for the strawberry shortcake, a combination of cornflour and plain flour is used. Rose Levy Berenbaum uses a 1:1 ratio of cornflour/flour whilst Chef Ayako suggests 1:3 cornflour/flour. I tried out a few combinations and found that somewhere in the middle worked best with British flour so I’ll be sharing a recipe for 1:2 cornflour/flour, though you’re welcome to experiment with this.
I’ve seen self raising flour being used in genoise sponge recipes, though I’m not sure you can really call it a genoise anymore if you’re adding raising agents. Personally, I don’t really see the point - just make a different cake! I totally appreciate it might earn you an extra cm and you may see it as an insurance policy so you’re welcome to do it, as long as you’re upfront about it! I know a couple of pastry chefs that use raising agents in their so-called genoise but keep it a secret, something which I think is unforgivable.
Adapting the recipe
Although the castella cake does look visually similar to the strawberry shortcake, it is actually in the mochi mochi (Wagashi) category and should be ‘bouncy’ or ‘chewy’ rather than fluffy. To achieve this, strong bread flour or plain flour is used in place of the ‘cake’ flour. We’ll go into this territory together soon.
Cake tin size
I’m the proud owner of some very deep PME 6 inch cake tins - they’re almost 3 inches (8cm) deep. I know most cake tins are about 1.5 - 2 inches deep (4-5.5cm). Here’s a rough guide of what cakes you can make:
Scaling up
Due to the size and shape of a KitchenAid bowl and whisk, you’ll get best results by making a larger batch (4 eggs fits very well in a KitchenAid bowl). You can eyeball the cakes or weigh them to keep them accurate but with a genoise, that relies on its air content, you might get better results by filling your tin to 2/3rd full (5cm deep tin) or ½ full (8cm deep tin)
The deal with double cream
Like Ayako said in the interview, we are very lucky in the UK to have such incredible dairy. But sometimes our incredible dairy is just a bit too fat! When I was putting this cake together, I initially struggled to get the double cream (whipping cream is has fat but harder to find) to a stay silky consistency that wasn’t splitting or looking grainy toward the end.
To counteract this, I add some whole milk to the cream before whipping - you get a much cleaner and silkier result and I highly recommend this step if you’re using British double cream that is prone to splitting!
Ok, let’s make it!
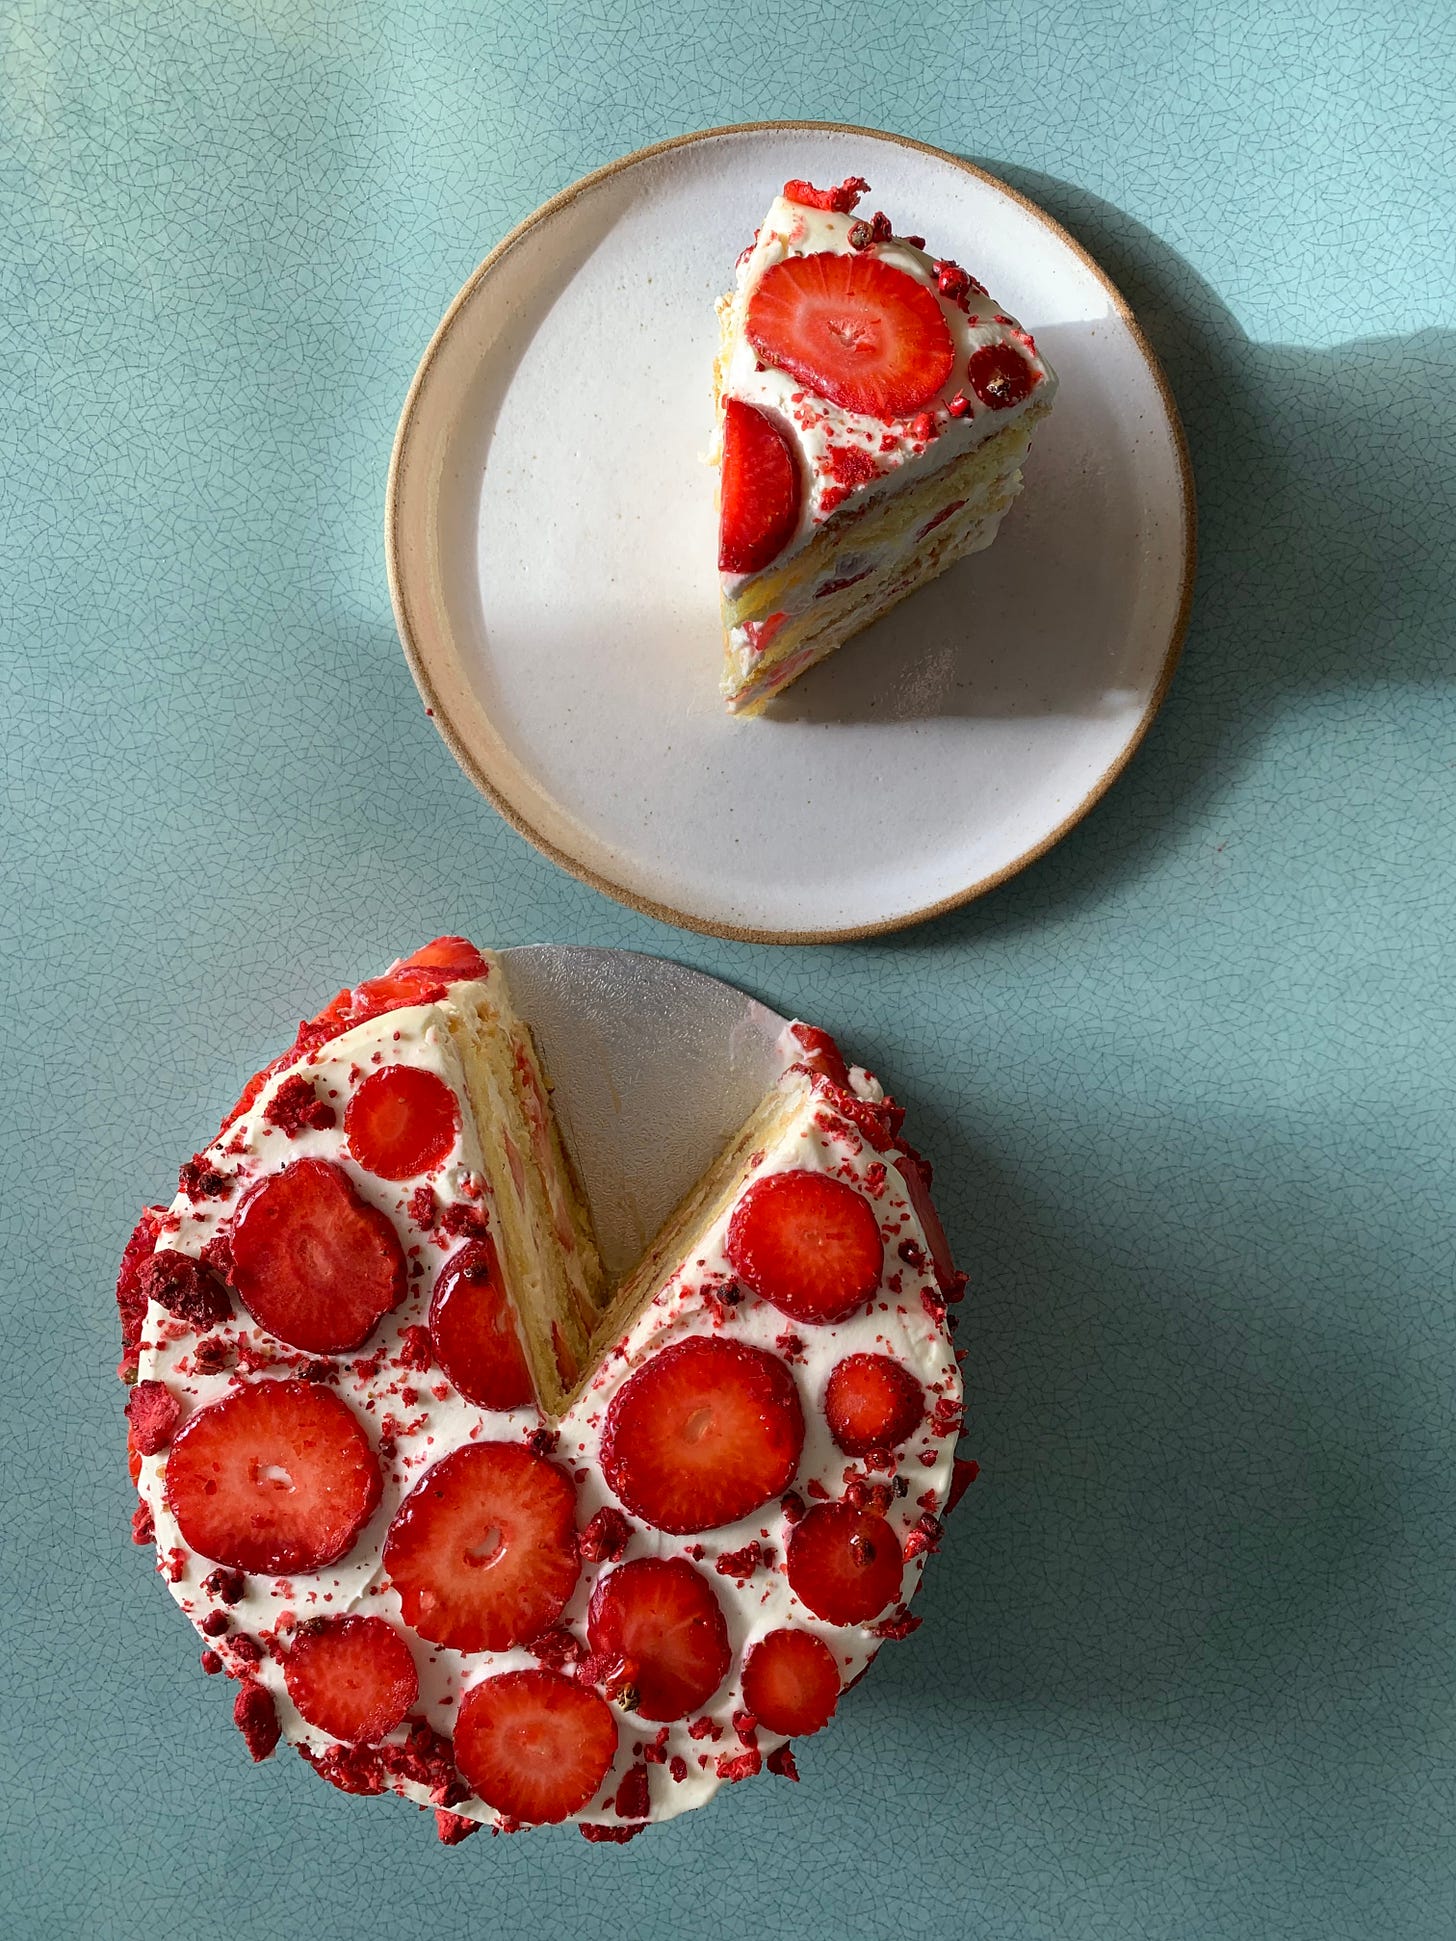
Strawberry and pink peppercorn shortcake
Adapted from Chef Ayako’s genoise recipe
This recipe will make 2 x 6inch cakes, which you can divide in half and make two 2-layer cakes or 1 3-layer cake (my fave) and use the leftover for trifle or just snack on it.
Cake:
4 large eggs at room temp
100g sugar
70g plain flour
35g cornflour
45g butter, melted
Syrup:
200g sugar
200g water
1 x lemon, peeled (optional)
2 tsp pink peppercorns (optional) <— I’ve always loved the flavour of pepper with strawberries. Try it, you might love it!
Whipped cream for a 1 x 6 inch, 3 layer cake
370g double cream
35g whole milk
35g caster sugar
(FYI you need approx 300ml pot per 1 x 2 layer 6inch cake so use this as a reference for scaling up the recipe as you need!)
To finish
1-2 punnets of strawberries depending on your design
Freeze dried strawberries and pink peppercorns to finish
Apricot jam for glazing
Cake method
Pre-heat oven to 170c fan. Line tin(s) with greaseproof paper
Whisk room temp eggs and sugar on highest speed for 5 minutes (eggs should be almost white and the mix will look shiny. If it doesn’t, don’t stop high speed til you get to white shiny territory), reduce to medium speed and whisk for 3 minutes and finally reduce to slow speed and whisk for 10 minutes until you can see no visible bubbles
Sift plain flour and cornflour together 3-4 times
Melt butter - ideally you want it at around 50c. To achieve this, I melt it in a pan and then once it is half melted I take it off the heat. The residual heat should be enough to melt the rest and it will be at a good temp. Set aside
Pour your ribbon stage eggs into a large bowl - it is easier to fold more gently if the bowl is large
Sift the dries once again onto the egg mixture, folding very gently with a slicing motion (I like to do a capital D shape - slice through the middle or edge then go around and under!). You can do this in 2-3 stages. Try not to deflate the mixture
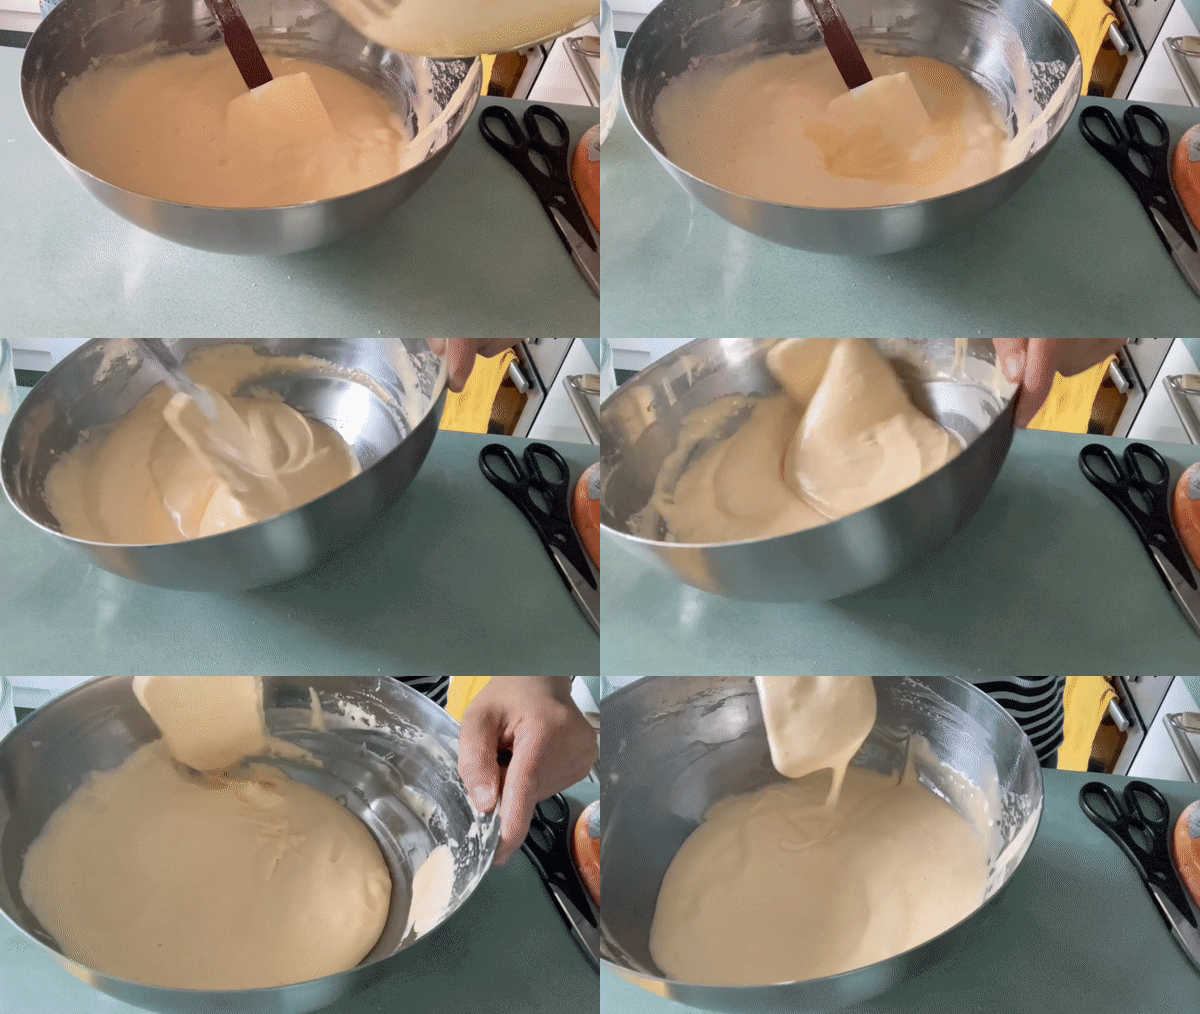
Make a liaison batter - whisk 2-3 tablespoons of the flour/egg mixture into your melted butter
Fold the liason batter back in
Divide between tins
Drop tin from 20-30cm height to break any large bubbles
Bake for 25-30 mins until risen and golden. You can stab with a knife to check it comes out clean
Drop the cake from a 20-30cm height when it comes out of the oven
Cool upside down in the tin on a cooling rack
Once cool, wrap and freeze for 30 days or use within 2 days
For the syrup
Heat all together. Leave to infuse for at least 30 mins - 1 hour
Strain (or leave in for little crunchy peppercorn bits in your cake) and keep in the fridge for 2 weeks
For the whipped cream
Whip cream, milk and sugar until soft peaks are reached. You want it to be spreadable and not at all close to splitting or overwhipping. It should look ultra smooth (the milk helps avoid overwhipping since the UK cream is so fat!!!)
To assemble
Cut strawberries for filling into quarters. For the decor, slice strawberries into 3-4mm slices (the weirder shape the better I think!) and put on kitchen paper or j cloths. Do not skip this step! You need to absorb all the excess liquid otherwise the strawberries will leak into the cream
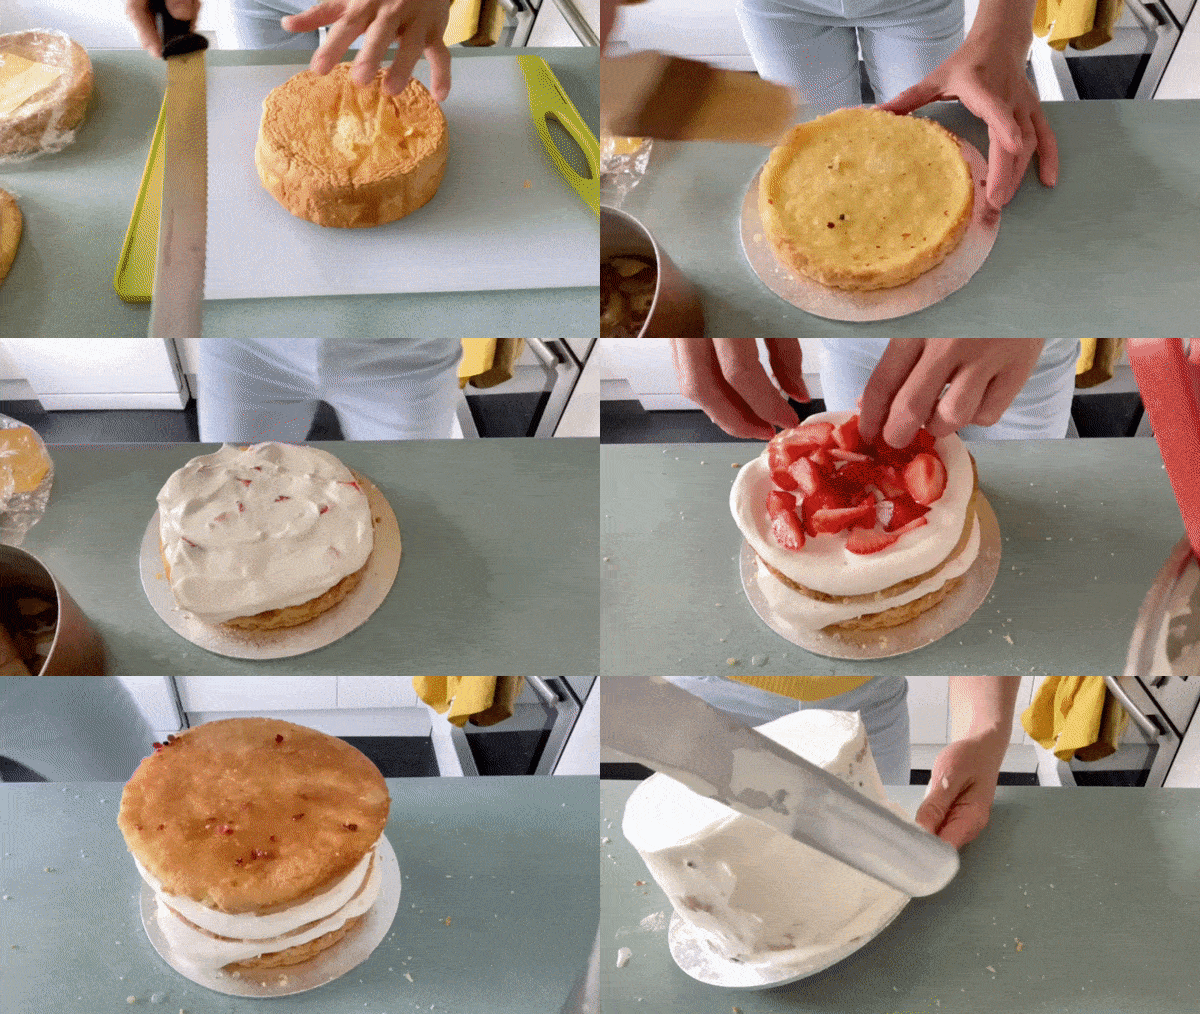
Divide cakes equally. For today’s finish, I have divided the 6 inch sponges in half and will use three to build a triple layer cake. I will save the leftover sponge for trifle.
Brush with syrup and spread a thin layer of whipped cream, followed by strawberries, then some more cream on top
Repeat with all the sponges
Cover the cake roughly but elegantly with the cream. You may need to do a crumb coat depending on your cake
Place strawberries artfully around the cake
For best results, leave in the fridge for at least 4 hours or overnight for the sponge to soak up the syrup and cream. You can also glaze the strawberries with warmed apricot jam at this point, too
Crumble up freezedried strawberries and pink peppercorns - flick at the cake to finish the decorating just before serving










Hi Nicola! I'm not sure if this has been discussed in the newsletter at some point...is there anything one should know about baking genoise in a sheet pan instead of a cake pan? I expect the baking time to be vastly different, but other than that–any pointers? I've never baked cake in a sheet pan and I really want to try it!
Hi, lovely post! however, my cake wasn't a success. Tired it twice and both times it had a rubbery bottom layer :(. How do I get it right? please help.