
Kitchen Project #194: Fruit Galette Masterclass
Louis Thompson explains it ALL!

Hello,
Welcome to today’s edition of Kitchen Projects. Thank you so much for being here.
Today, I am thrilled to be moving on to a different type of galette altogether: The Ultimate Fruit Galette Masterclass by pastry chef Louis Thompson. I don’t know anyone who makes more beautiful galettes than Louis (also: I highly recommend reading his previous pieces for Kitchen Projects - Finding the perfect peach and an Introduction to Tropical Fruit). This is truly an indispensable guide and ode to the art of mastery. I genuinely feel very lucky to get to publish this piece.
Over on KP+, I’ve taken on Louis’s lessons from the piece below and have developed a recipe for blood orange and black sesame galette. Click here to make it.
What’s KP+? Well, it’s the level-up version of this newsletter. By joining KP+, you will support the writing and research that goes into the newsletter (including the commissioning - and fair payment - of all the writers), join a growing community, access extra content (inc. the entire archive) and more. Subscribing is easy and costs only £6 per month or £50 per year. Why not give it a go? Come and join the gang!
Love,
Nicola
The Fruit Galette Masterclass
When I tell people I’m a chef, the most common response is “Is it like The Bear?” (yes and no).
Between the screaming and the shouting, the swearing and the seriousness, TV and films like The Bear or Ratatouille have cemented a collective idea of what it means to be a good chef and how kitchens operate. Specifically, they reveal how the kitchen brigade system (and the mentality that underpins it) has become something of a cultural edifice.
The brigade system is an organisational hierarchy introduced by Auguste Escoffier in 19th-century France. Borrowing from his military background, Escoffier applied the same sort of stern rigour to kitchens, and in doing so elevated the status of cooking from lowly labour to a respectable art. We now see the downstream effect of this in legendary chefs, from Pierre Hermé to Marco Pierre White, who are lauded for their exacting nature and god-like skills. Unfortunately, the pendulum swung with such force and gusto that cooking, especially baking, remains an unapproachable, intimidating practice for many, weighed down by the tyranny of starched-white perfection.
As a professional chef, I do take joy in the obsession of my craft, but it’s silly to think that’s what cooking is limited to. In the words of Tamar Adler, “we need not cook like chefs in restaurants; we only need to cook as we are: people who are hungry.” Kitchen Projects has been so successful because it’s a masterclass in pedagogy; Nicola and her brigade of writers have a knack for explaining concepts and techniques in simple terms and making baking accessible. In the same spirit of pedagogy, I would like to focus on the other key element of learning: practice, and the value of simply trying and doing.
Excellent food is completely in reach with just some care and basic technique - it is not a matter of some magic touch. I’m going to let you in on a little secret; in most restaurants you go to, there is a really good chance a junior chef has cooked the food you are eating with not that much experience. The difference between you and them is that they have someone looking over their shoulder to ensure due process. The point is that anyone can make exceptional food, not necessarily with difficulty, but with care! While you may not perfect something on the first try, a lack of inhibition to try and try again, continually refining your skills and picking up tips is what makes the difference between good and exceptional.
To demonstrate the accessibility of mastery, I’m going to look at an apple galette today. A galette is a free-form fruit tart, often considered a rustic, forgiving, and accessible entry point to pastry. It is my favourite thing in the world to make, to eat, to look at, to daydream about. As with many simple things, the devil is in the details and care and sensitivity to your ingredients and process will be rewarded. I couldn’t count how many galettes I’ve made in my life, but every time I make one, I learn something new, and they get a little better.
Nicola has a fantastic introduction to fruit tarts here to get you started. Today, I’m going to share the tips and tricks I’ve picked up along the way to elevate a galette to the very best it can be with nothing but simple, sound technique. By sharing the tips I’ve learned in professional kitchens and through my own experimentation, I hope to demonstrate the value of simply giving it a go and demystify what sets a good dessert apart from an exceptional one.
Q&A with Sarah Johnson
Sarah Johnson, the founding pastry chef at Spring (formerly head pastry chef at Chez Panisse and author of Fruitful), has set the benchmark for what a restaurant-worthy galette should be. I met her in my time working at Spring, and it is her wisdom that has guided me most on the path to galette enlightenment. I spoke to her to get the picture straight on what excellence looks like in tart form:
LT: How would you describe your style of cooking, and how does that manifest in a galette?
SJ: My cooking style is often described as ingredient-led. For me, that means starting with what’s in season and at its peak. In other words, fruit that is ripe, full of flavour, and ready to shine. Once I choose the fruit, I think about how best to honour it by preparing a dish that lets its natural flavour take centre stage. Galettes are perfect for this.
LT: How many galettes do you think you’ve made in your life?
SJ: I tried to do the math! 3,000 is a conservative number.
LT: Can you describe your ideal galette?
SJ: My ideal galette has a flaky yet tender base, a crisp, golden bottom crust, and a thin layer of frangipane. The fruit filling should be flavourful but not overly sweet, which means using perfectly ripe fruit at the height of its season.
LJ: What is/are your top tip(s) for making a restaurant-worthy galette?
ST: Always make your own pastry and keep it cold throughout the process. A glaze made with fruit offcuts adds a beautiful finish, making the galette look polished and professional.
LJ: What do you think a common mistake is when making a galette?
SJ: A common mistake is adding sugar to the fruit before baking. I like to put the galette in the oven without sugar, then gradually add it as it cooks. This helps preserve the fruit’s shape and prevents excess liquid from escaping, which can lead to leaks.
Sarah Johnson is an American-born pastry chef who trained under Alice Waters at Chez Panisse in Berkeley, California. She later oversaw the Pastry Development for Spring restaurant, London, and Heckfield Place, Hampshire. Her debut cookbook, Fruitful: Sweet and Savoury Fruit Recipes Inspired by Farms, Orchards and Gardens is out now. You can follow her here.
While I have done my fair share of experimentation, it is from Sarah Johnson more than anyone else that I have learned about galettes. To elaborate on her wisdom and supplement it with my own, I will examine the three primary components of a galette: the pastry, the filling, and the baking.
On KP+ today: Blood Orange & Black Sesame Galette


Using the rules of this newsletter to develop a distinctly mid-winter and slightly gothic Galette ft. blood orange and black sesame!
The Pastry
Use a richer pastry
I use a rough puff with a 1:1 flour-to-butter ratio. Because you are eating such a small amount of pastry per portion in a galette, it can afford to be richer. Plus, the lamination involved creates beneficial gluten that supports your tart.
Richness also comes from more than butter. I am more aggressive with my seasoning with sugar, salt, and vinegar and use high-quality locally-milled flour. Flour is an often-overlooked ingredient. treated as an invisible canvas made from commodity wheat. Just like your fruit, your vanilla, and your dairy, flour is the product of plants and the earth, and careful sourcing will yield valuable flavour payoffs. I like to use a portion of spelt flour (around ⅓ spelt flour to ⅔ plain flour is a good balance of flavour and texture), whose flavour is a natural complement to most fruit. If you enjoy the wholegrain taste, I would go up to 50% alternative flour, like wholewheat or rye. Beyond this, I find the flavour overwhelming and begin to experience unwanted textural changes due to the reduced gluten-forming capabilities.
Don’t be afraid of gluten!
The most revolutionary, helpful advice I ever read when learning to make pastry was Stella Park’s case for gluten. Not only is it liberating in that the process is less delicate, but a healthily glutenous pastry will have the structure necessary to hold up your fruit - no soggy, floppy tarts for me! Normally, when making rough puff, I would divide my butter in half, dispersing half evenly through the dough in a breadcrumb texture for tenderness, and leaving the rest in larger chunks to create sheeted layers. When making pastry for galettes, I increase the proportion of sheeted butter and reduce the bread-crumbed butter to create larger sheets of butter and subsequent layers, thereby increasing overall structural integrity.
Keep your pastry cold.
This is the least exciting, but perhaps most important tip I have for you. While cold pastry is essential for preserving the flaky texture of your pastry, it will also make your life a lot easier when rolling out and pleating the galette. Patience and care in these steps will result in a beautiful tart. Soft pastry will be overly sensitive to your touch and, as such, is more prone to uneven thickness and shape.
Firm, pliable pastry will be easy to manage, giving you more time fuss over the shape, both when rolling and pleating. When building the galette, I roll a large round of pastry, chill, trim and pleat, then chill again before applying frangipane and fruit.
If you are particularly speedy and deft you can consider condensing this process, but generosity with chilling time is one of the easiest ways to exercise care and patience for a better galette.
The Filling
Standard galette composition will often put something between the fruit and the pastry for structural reasons. My ideal filling is a layer of frangipane. It is low moisture, which adds a guard between your pastry and juicy fruit, while simultaneously enriching your tart with nuts and butter. Frangipane really packs a punch, so only a small amount is needed for it to do its job while remaining a complementary background note to the star of the show, the fruit.
Maximise flavour with fresh ingredients and seasoning.
Frangipane is one of the most potent examples of the value of good ingredients and a well-seasoned dessert. Using freshly toasted and ground nuts and a healthy pinch of salt has a remarkable payoff. I always taste my frangipane for salt and seasoning before it goes on (depending on the fruit, perhaps it wants lift from a whisper of lemon zest, or rounding out with a fragrant drop of vanilla); friends have commented that they didn’t know something could be so flavourful! The difference between using prepackaged ground almonds and using whole almonds is staggering. If you’re unable to grind your own nuts, at least give pre-ground nuts a brief toast in a pan, keeping them moving the entire time to prevent burning, or smash your nuts in a plastic bag with a rolling pin as fine as you have the patience for, adding 1tsp flour (for the batch size given below) to make up for the decreased absorbency of a coarser grind.
Make your frangipane fresh and spread it thin.
This is a significant point of differentiation to finesse a galette; while frangipane is completely delicious, it can easily steal the limelight from your fruit. Plus, it will puff up and grow in the oven, further asserting its presence. For this reason, it is essential to apply just a bare layer. For a 30cm tart, I use no more than two tbsp, scraping off more if I can. You want a layer no more than 1mm thick - almost transparent.
It can be difficult to spread it thin enough without damaging your pastry. With that in mind, you want to apply creamy, room-temperature frangipane to cold, firm pastry. I like to have my pastry almost frozen so that it can withstand aggressive spreading to achieve a thin result. Once again, taking time and care is only in the interest of making things easier. For this reason, I make my frangipane fresh when I am preparing a galette. This will also best capture the aromatic oils of the nuts. If this isn’t an option, make sure it is fully tempered, even giving it a quick flash in the microwave to soften it without melting (or cooking!).
Use a moisture-absorbing powder.
Having some sort of starch scattered on your frangipane will relieve it of the sole responsibility of moisture management. At Chez Panisse, they scatter ‘moon dust’, a mixture of ground almonds and sugar. At Spring, we use dehydrated and blitzed genoise. While these are fabulous options, at home I simply use flour, cornstarch, and sugar, mixed in a ratio of 1 tbsp flour to 1/2tbsp cornstarch to 1 tbsp sugar. This will help catch juices and slow them down as soon as they leech out of your fruit. Flour provides immediate absorbency, while cornstarch provides more potent thickening. Sugar ensures you don’t just have a gummy, unseasoned layer of fruit goo.
The Fruit
It’s currently pome fruit season in the northern hemisphere; Here in England, we have exceptional apples growing, and it’s a fantastic opportunity to celebrate excellent home-grown produce. Perhaps more importantly, apples (and other pome fruit, pears and quinces) are well behaved in a galette. Not too juicy, they won’t get in the way of crisp, delicious pastry, and their flavours take well to heat: apple crumble and apple pie are some of the world’s most loved desserts. With this in mind, you can be sure to be rewarded with a delicious dessert, no matter how refined, giving you a safe space to focus on technique and hone your skills. If you’re elsewhere in the world or just have a more experimental streak, by all means, you can apply this recipe to other fruits, but be warned, there will be more variation in seasoning and juiciness which will require you to use your sense - juicy, sour fruit will need both more sugar and perhaps a little more starch to ‘capture’ the juices.
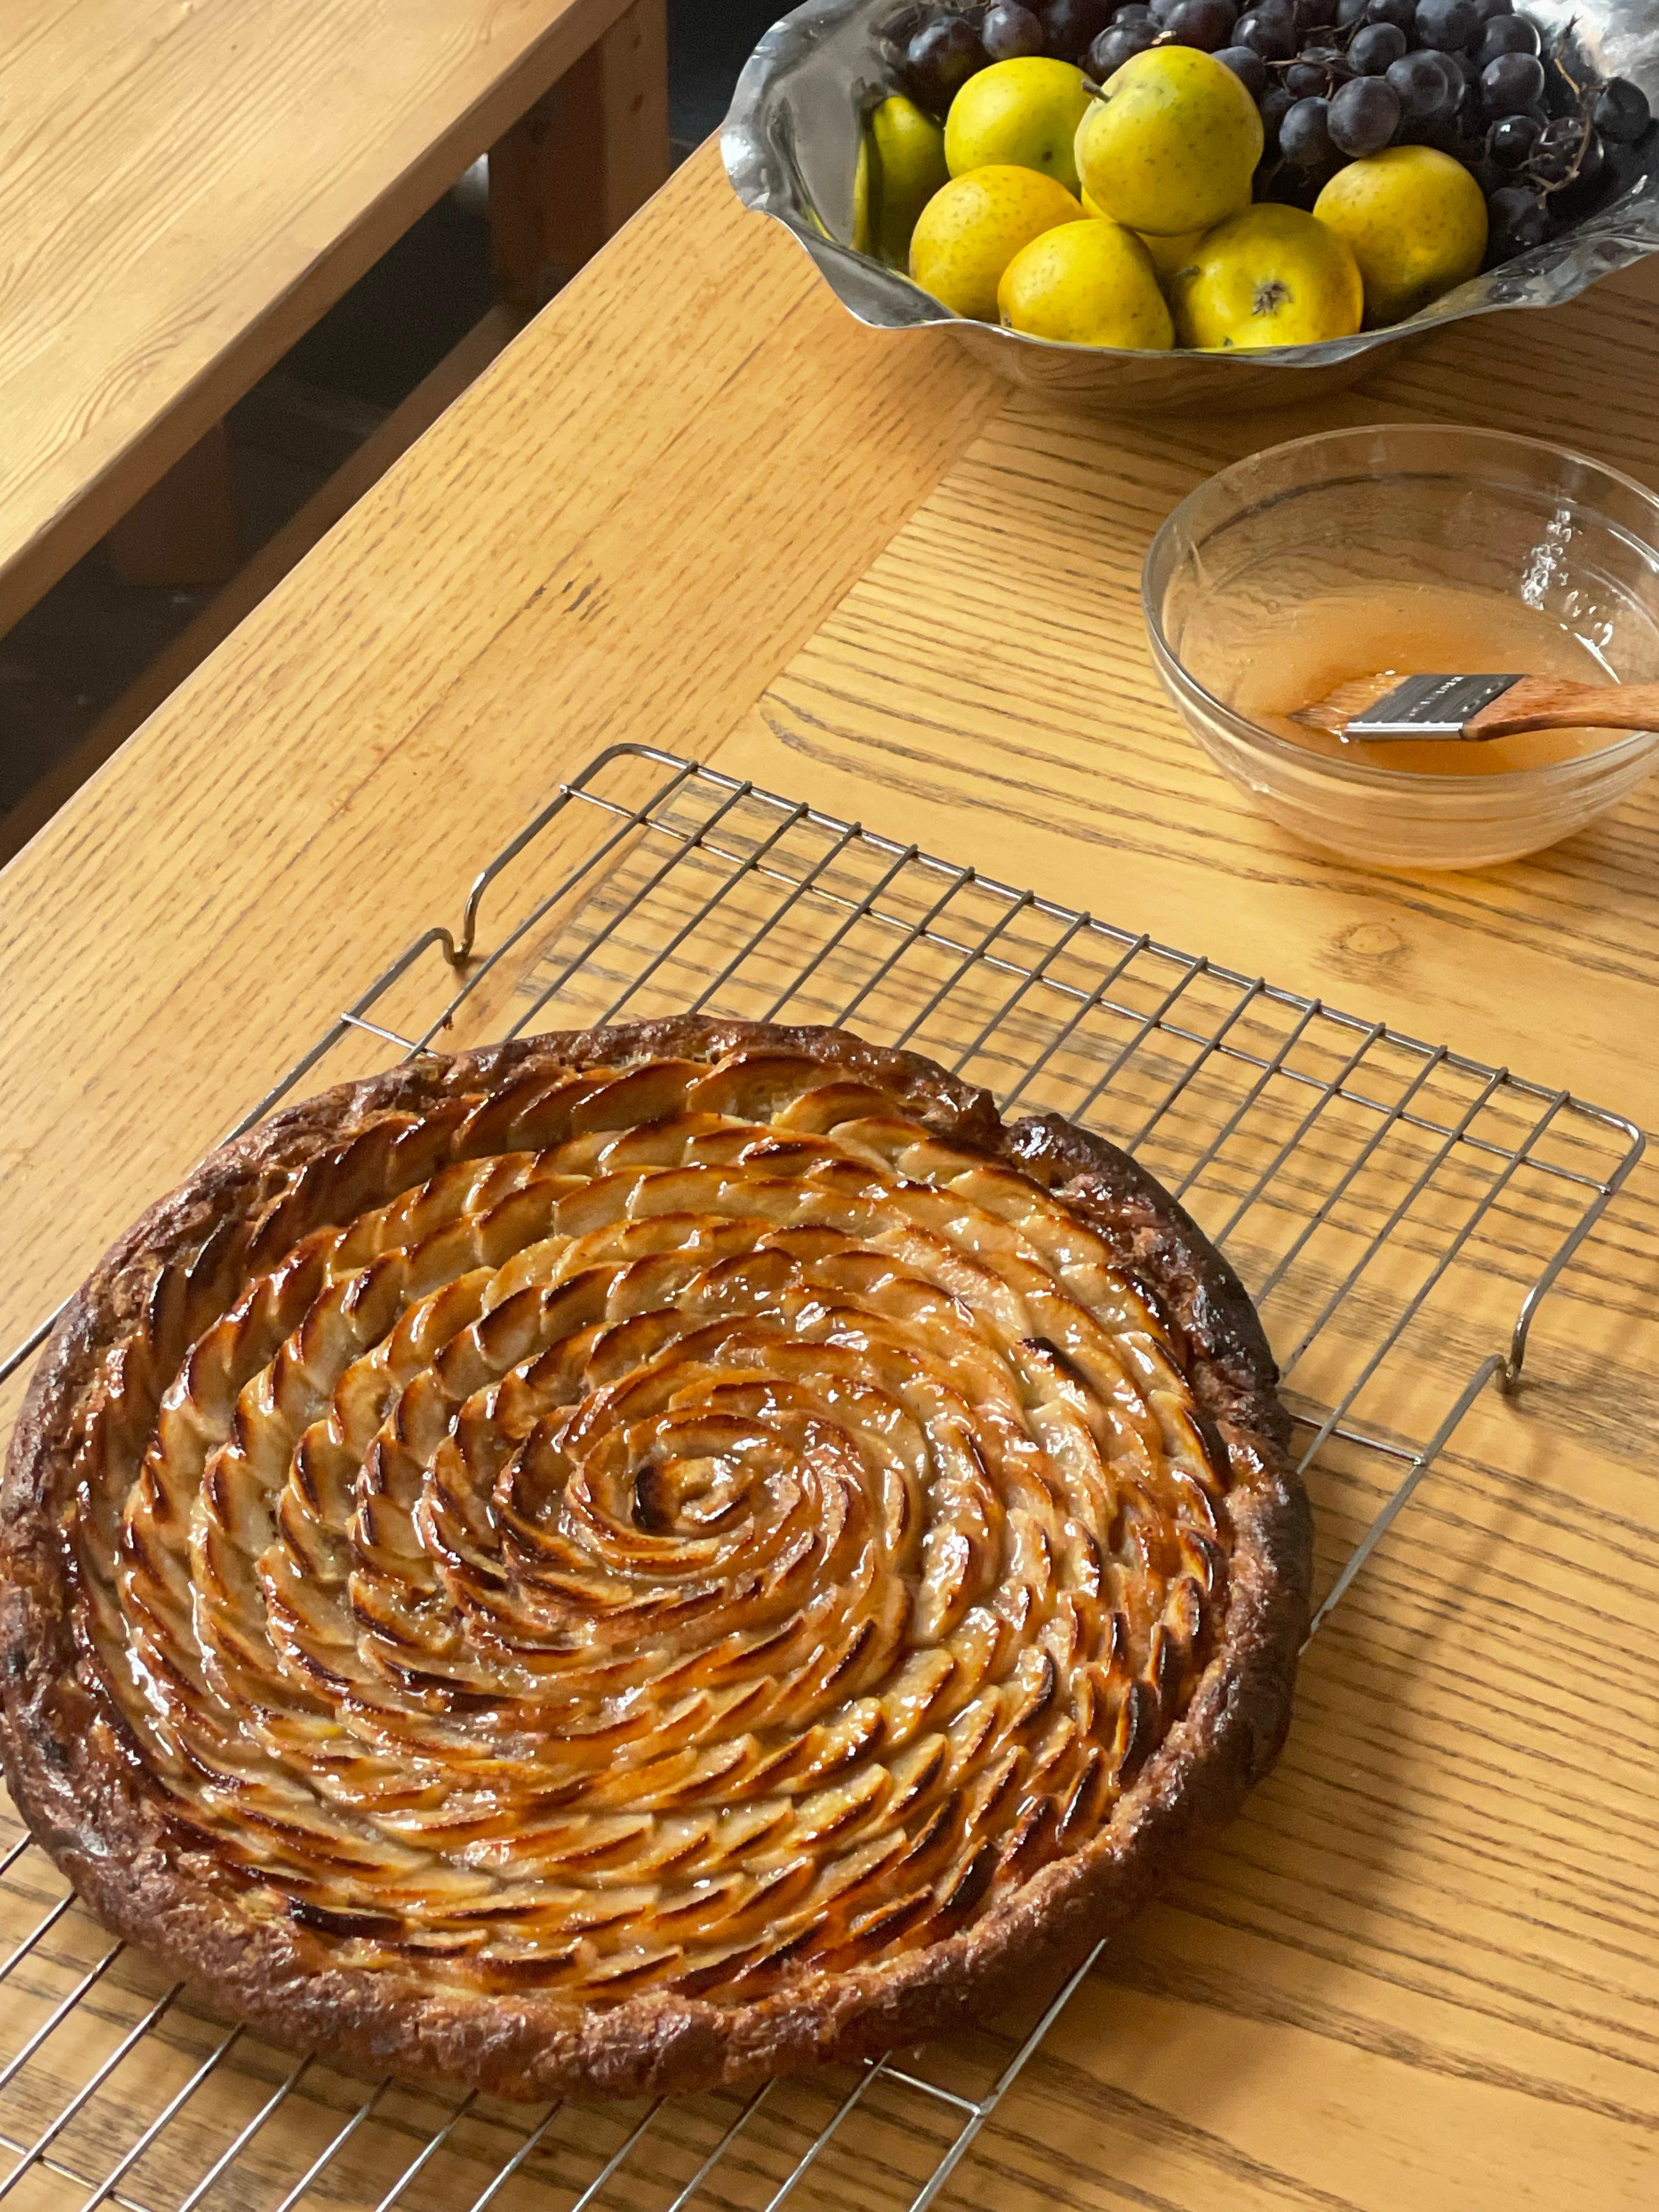
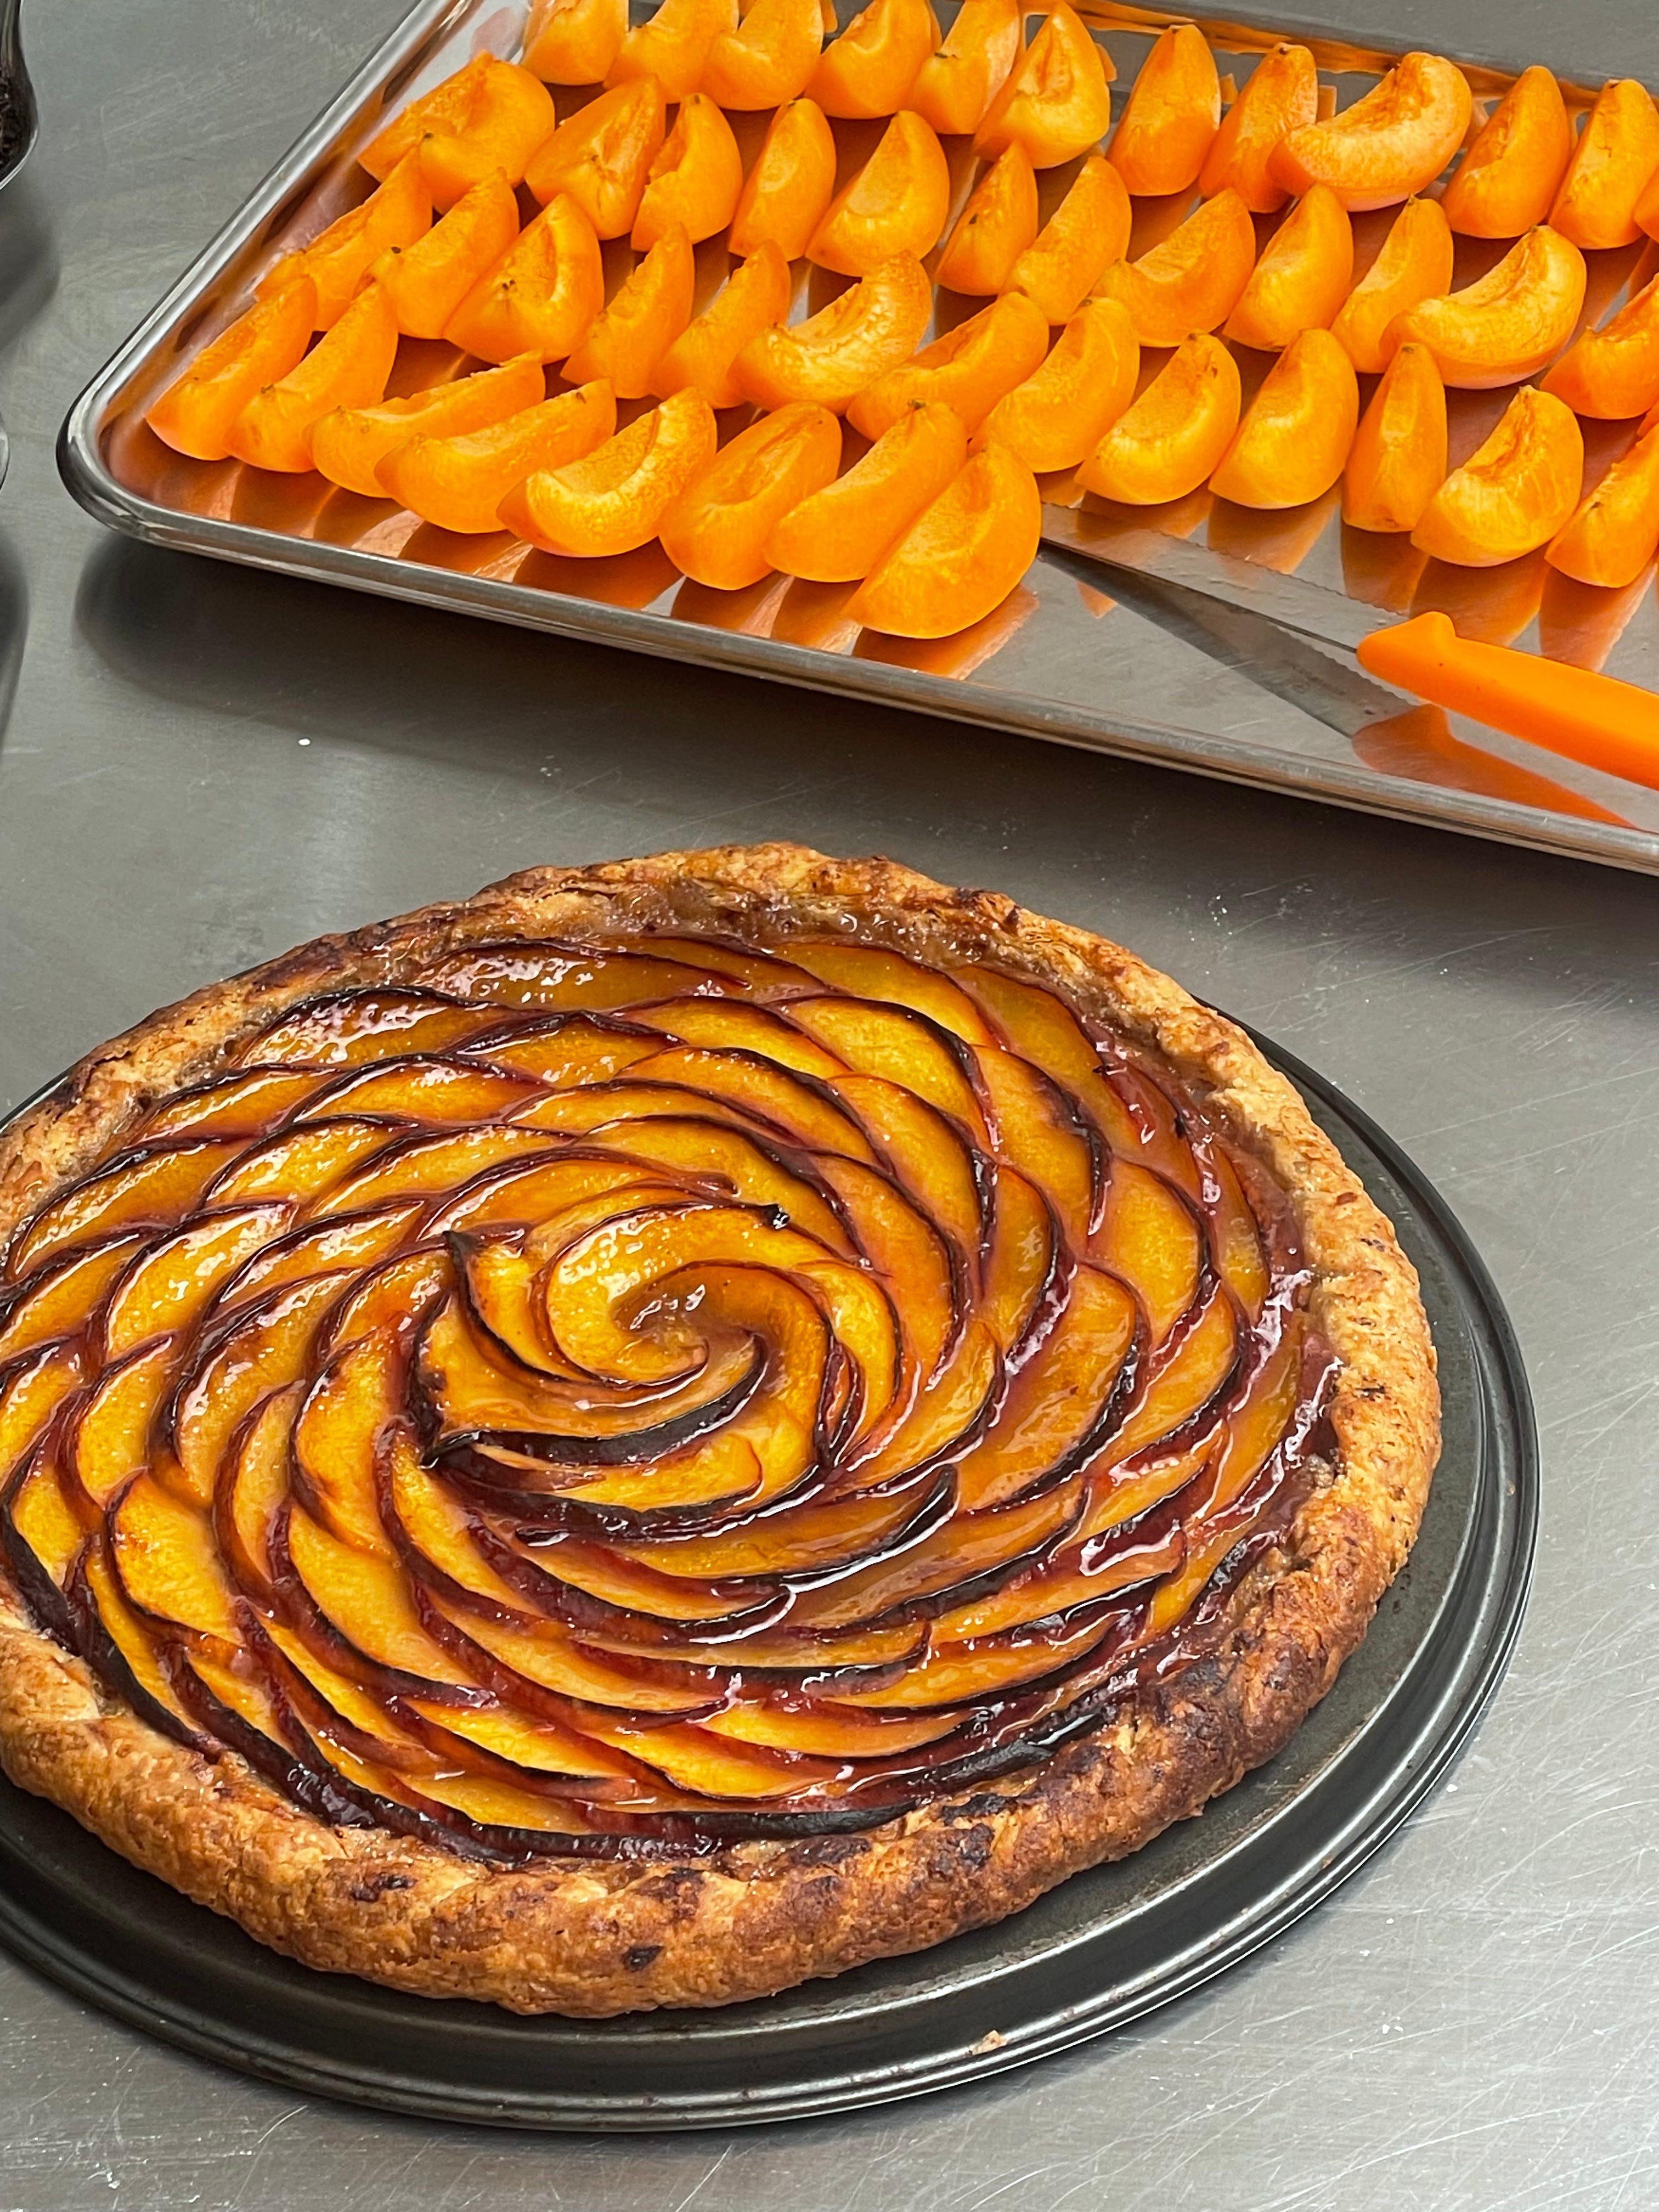
Arrange your fruit
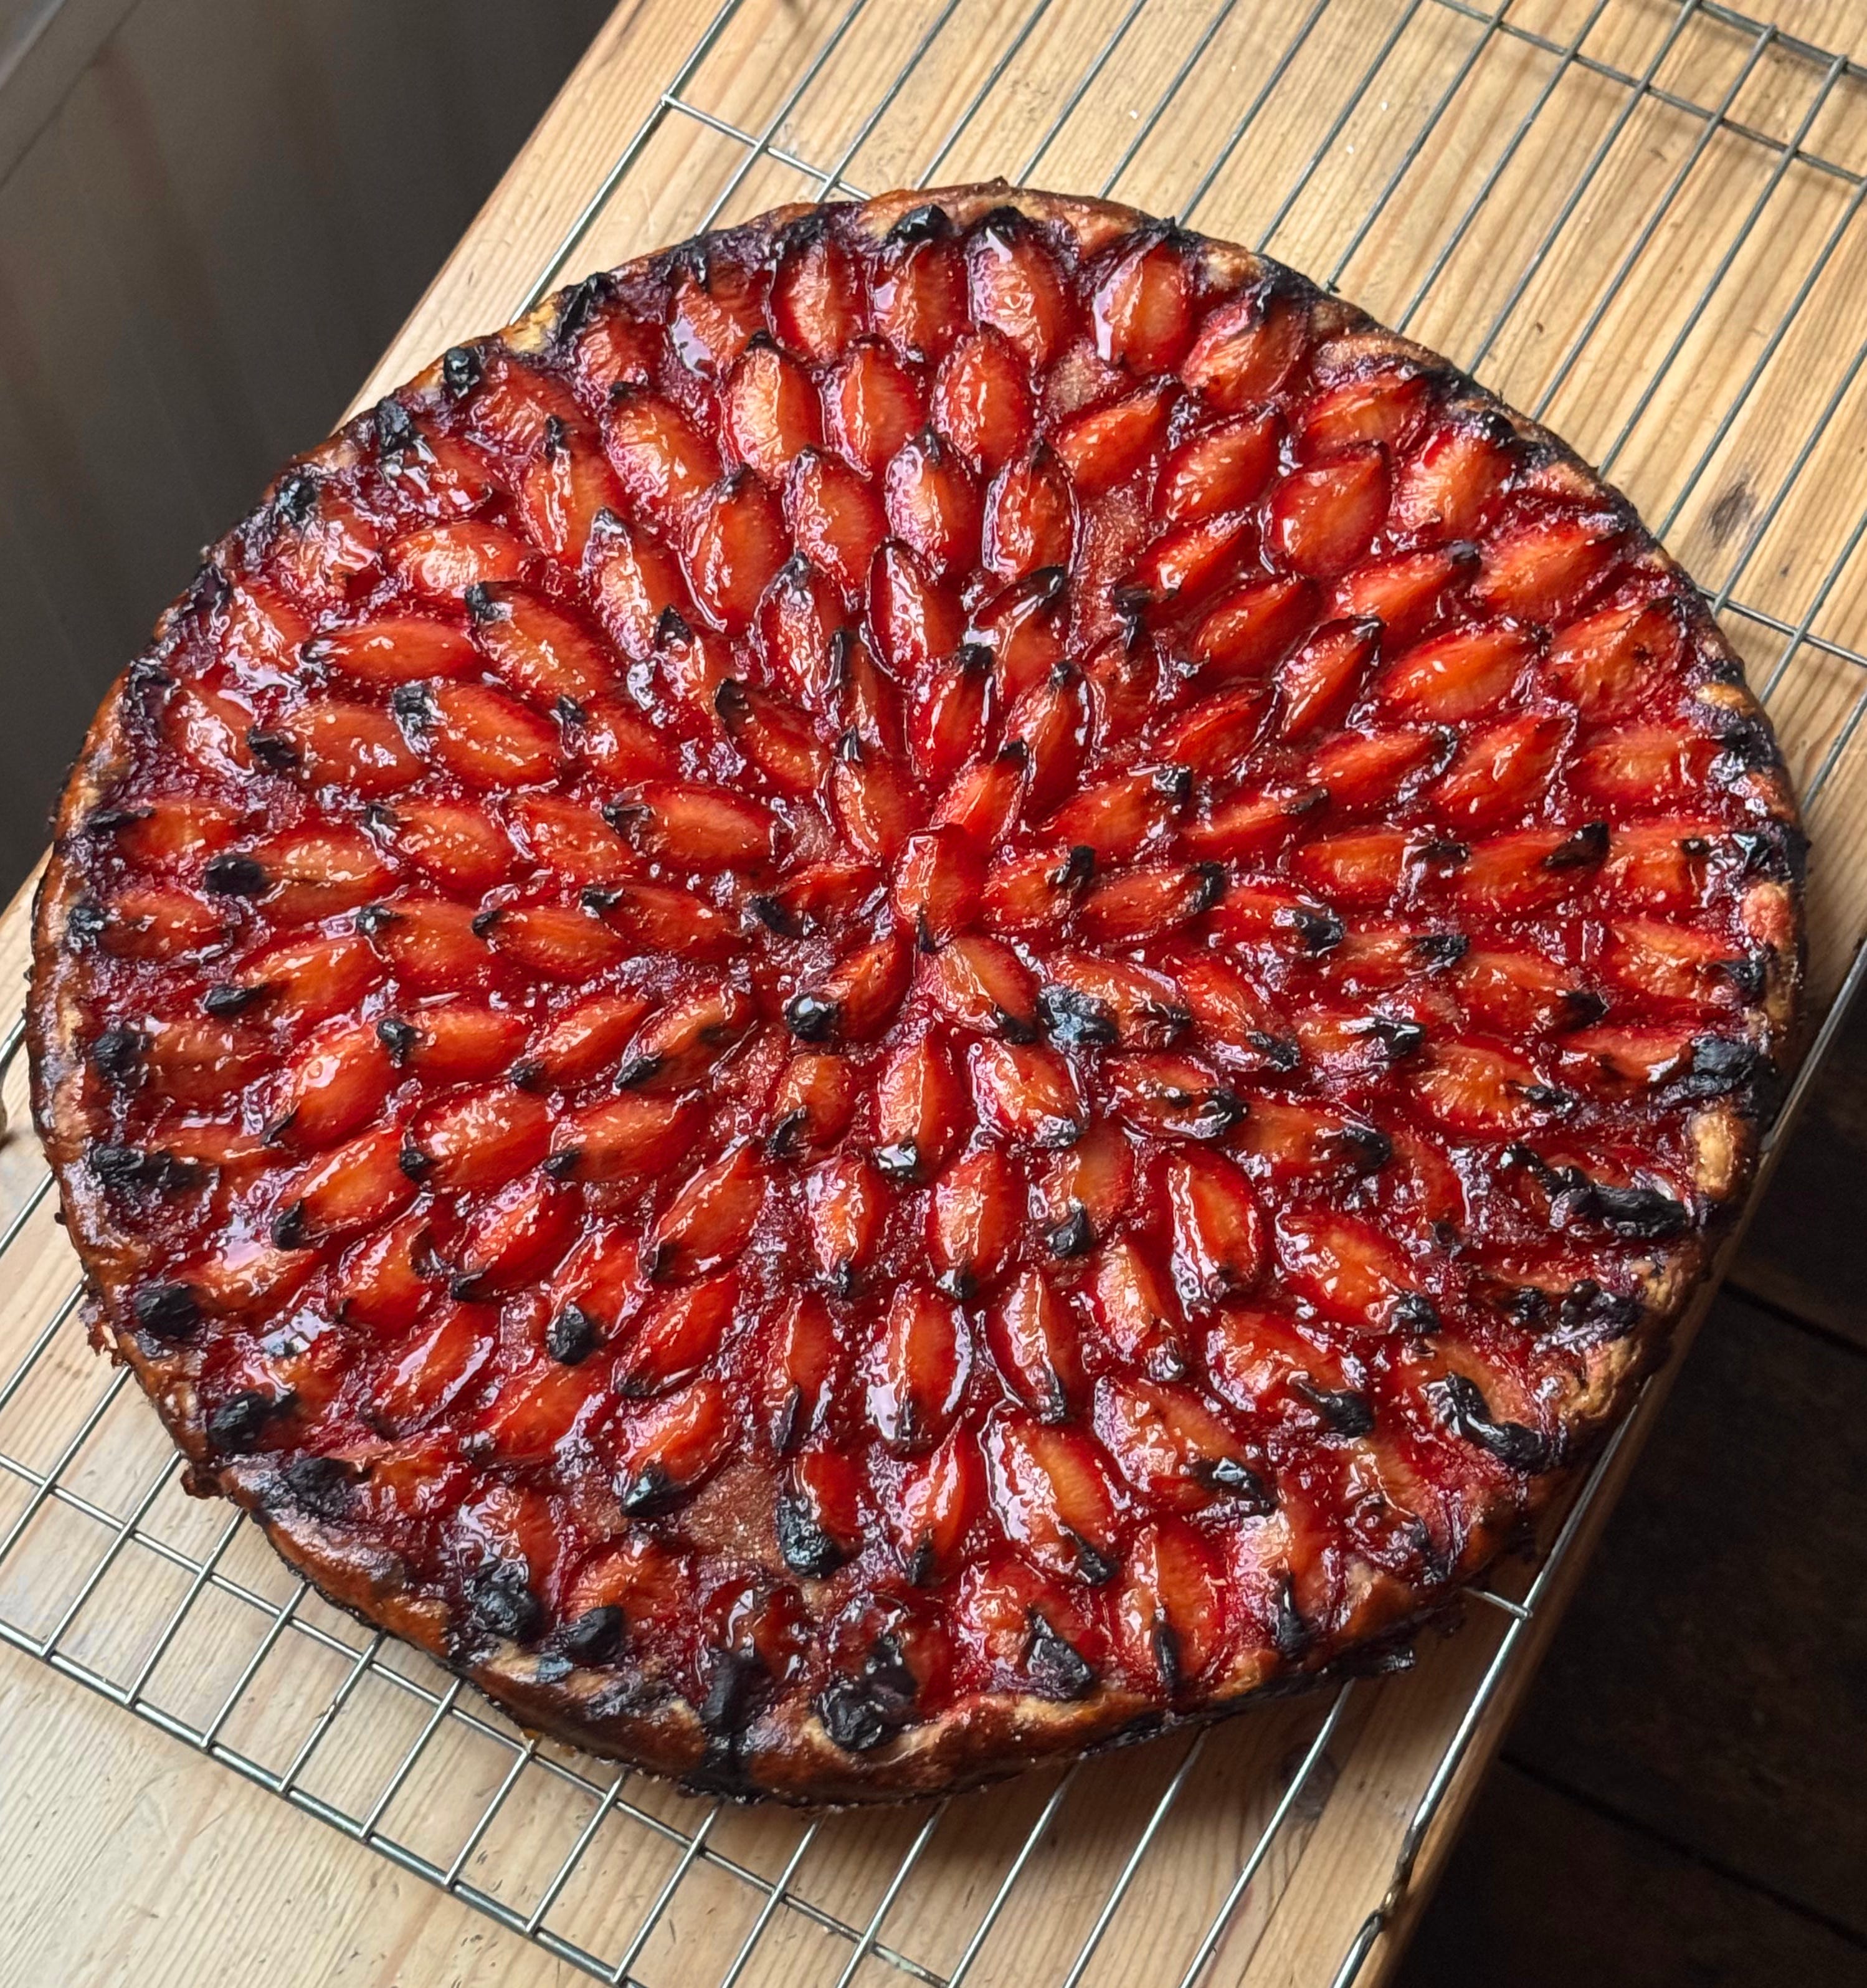
Placing the fruit on a galette and creating a pleasing pattern are significant sources of joy for me, in both the process and the outcome. While it is by no means strictly necessary to fuss over a precise pattern, placing your fruit in a single even layer is crucial for an even bake and moisture management, allowing for efficient evaporation and browning.
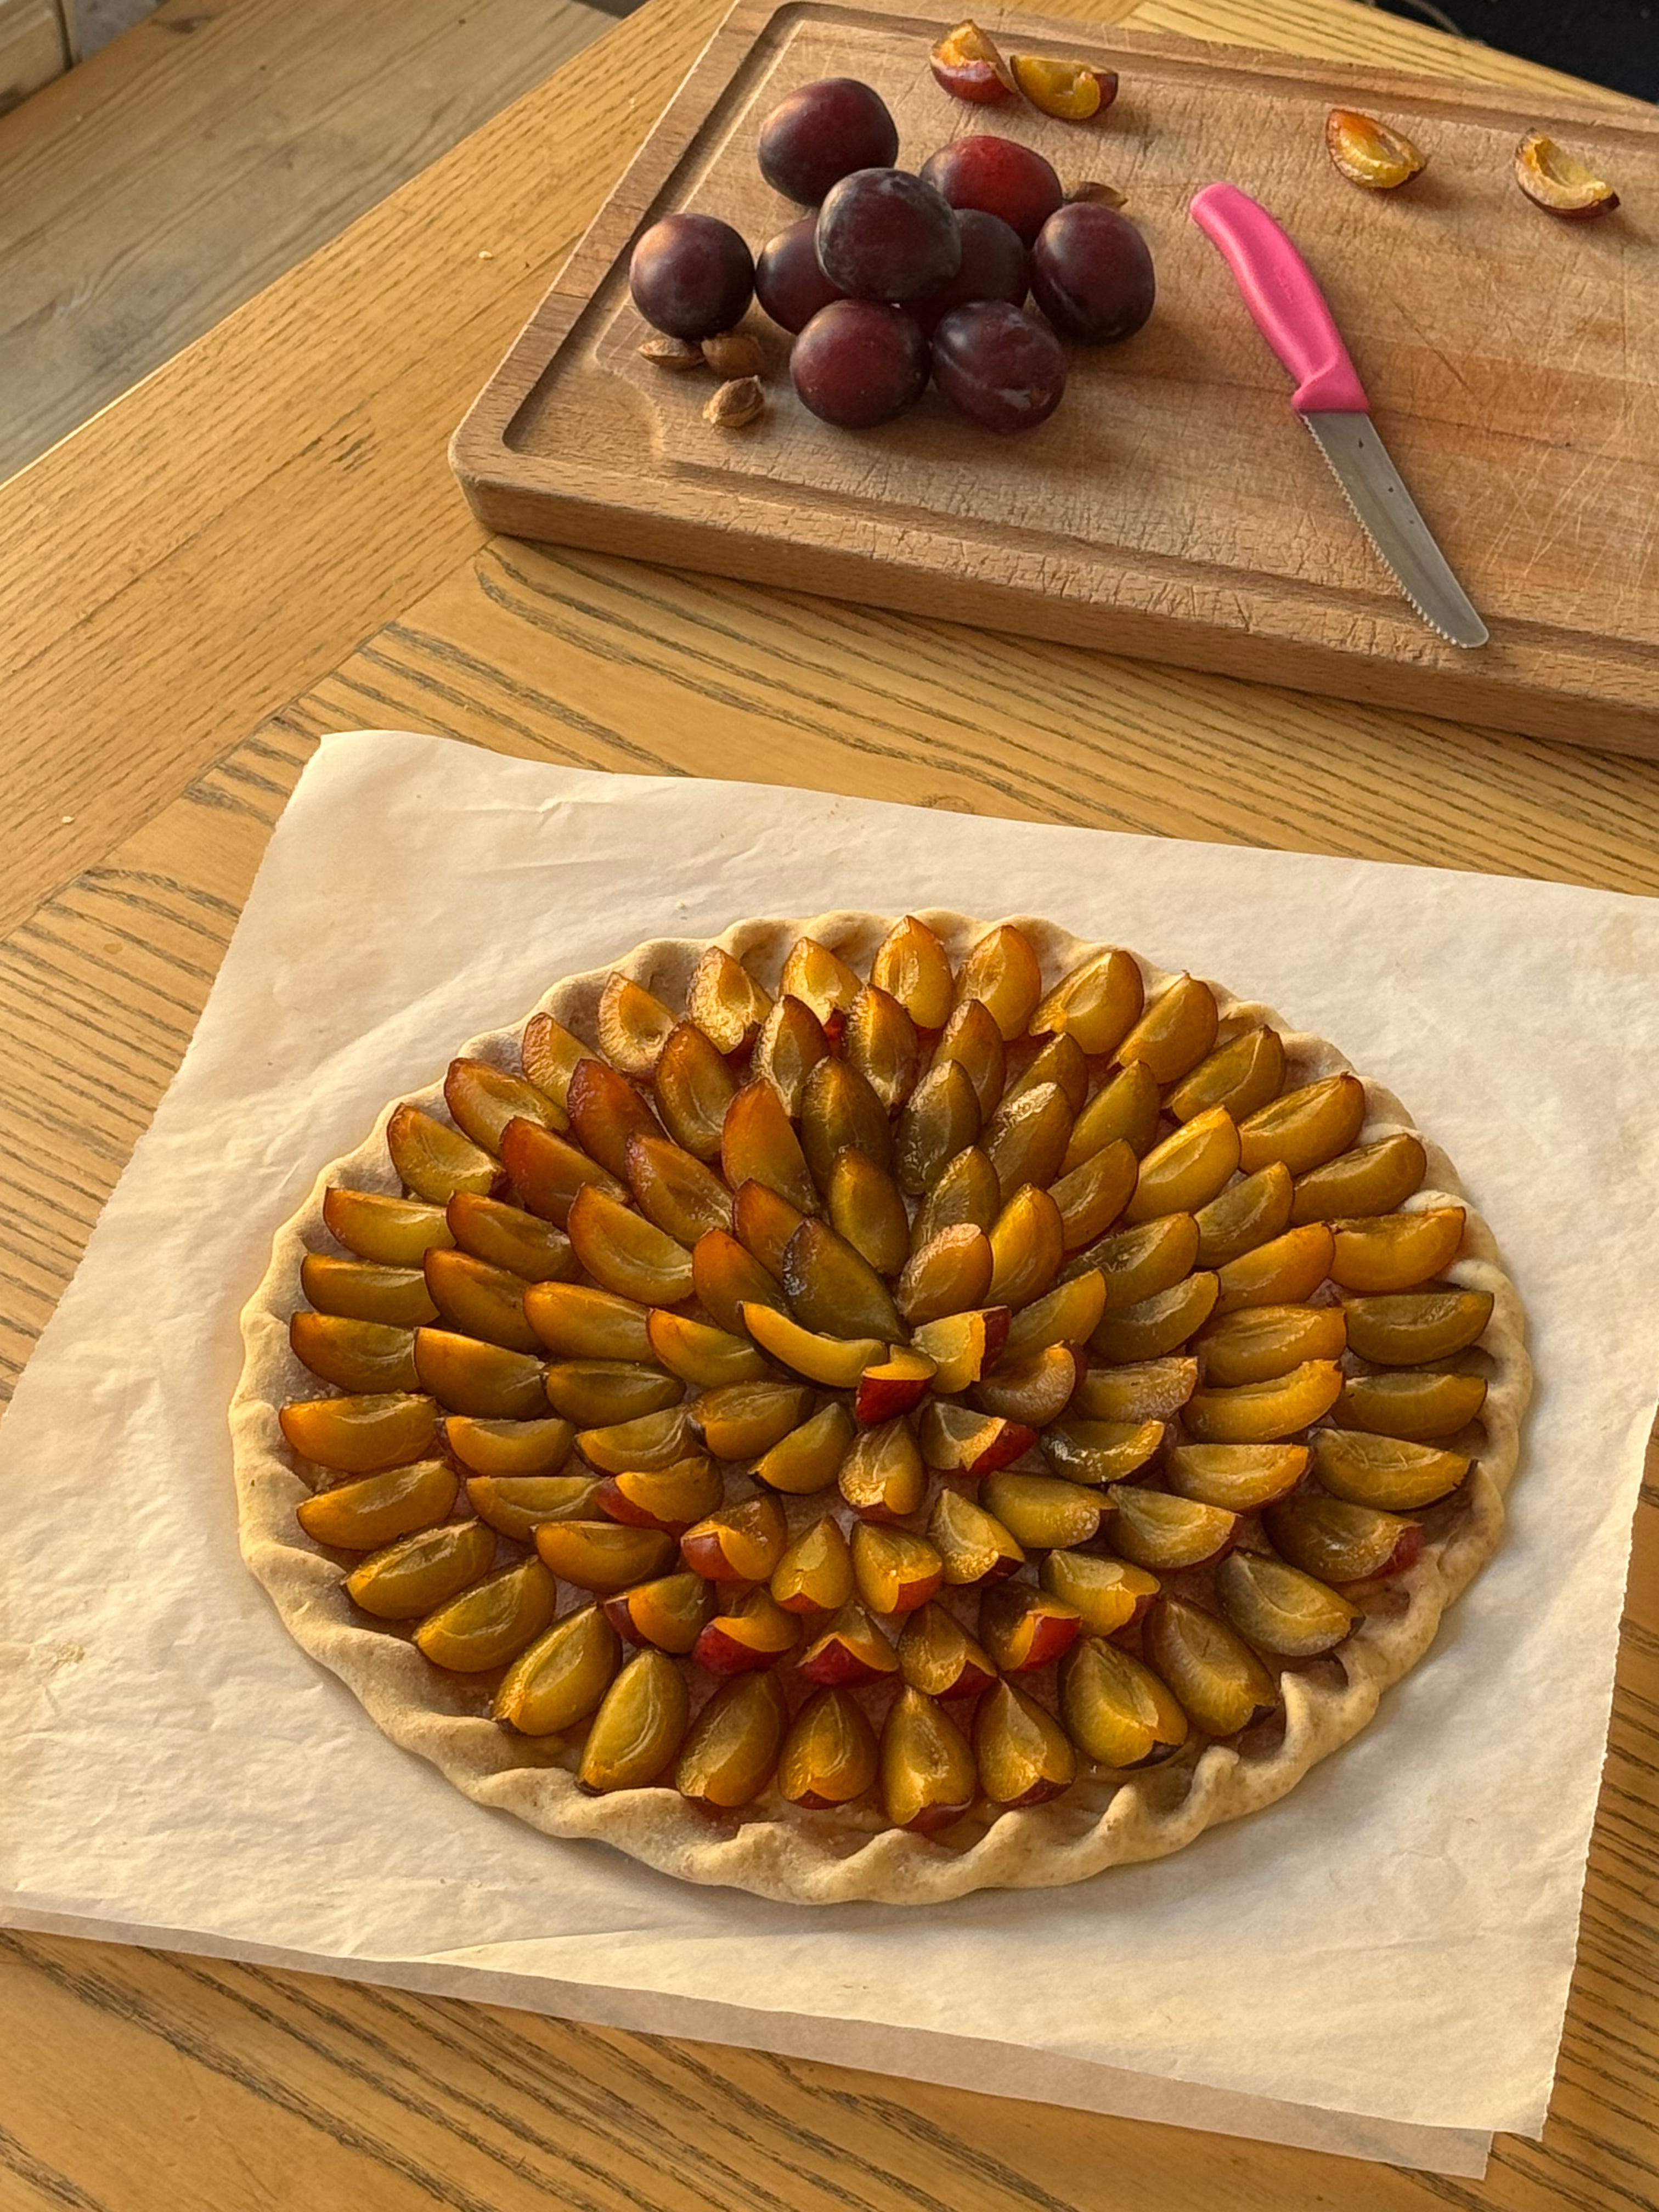
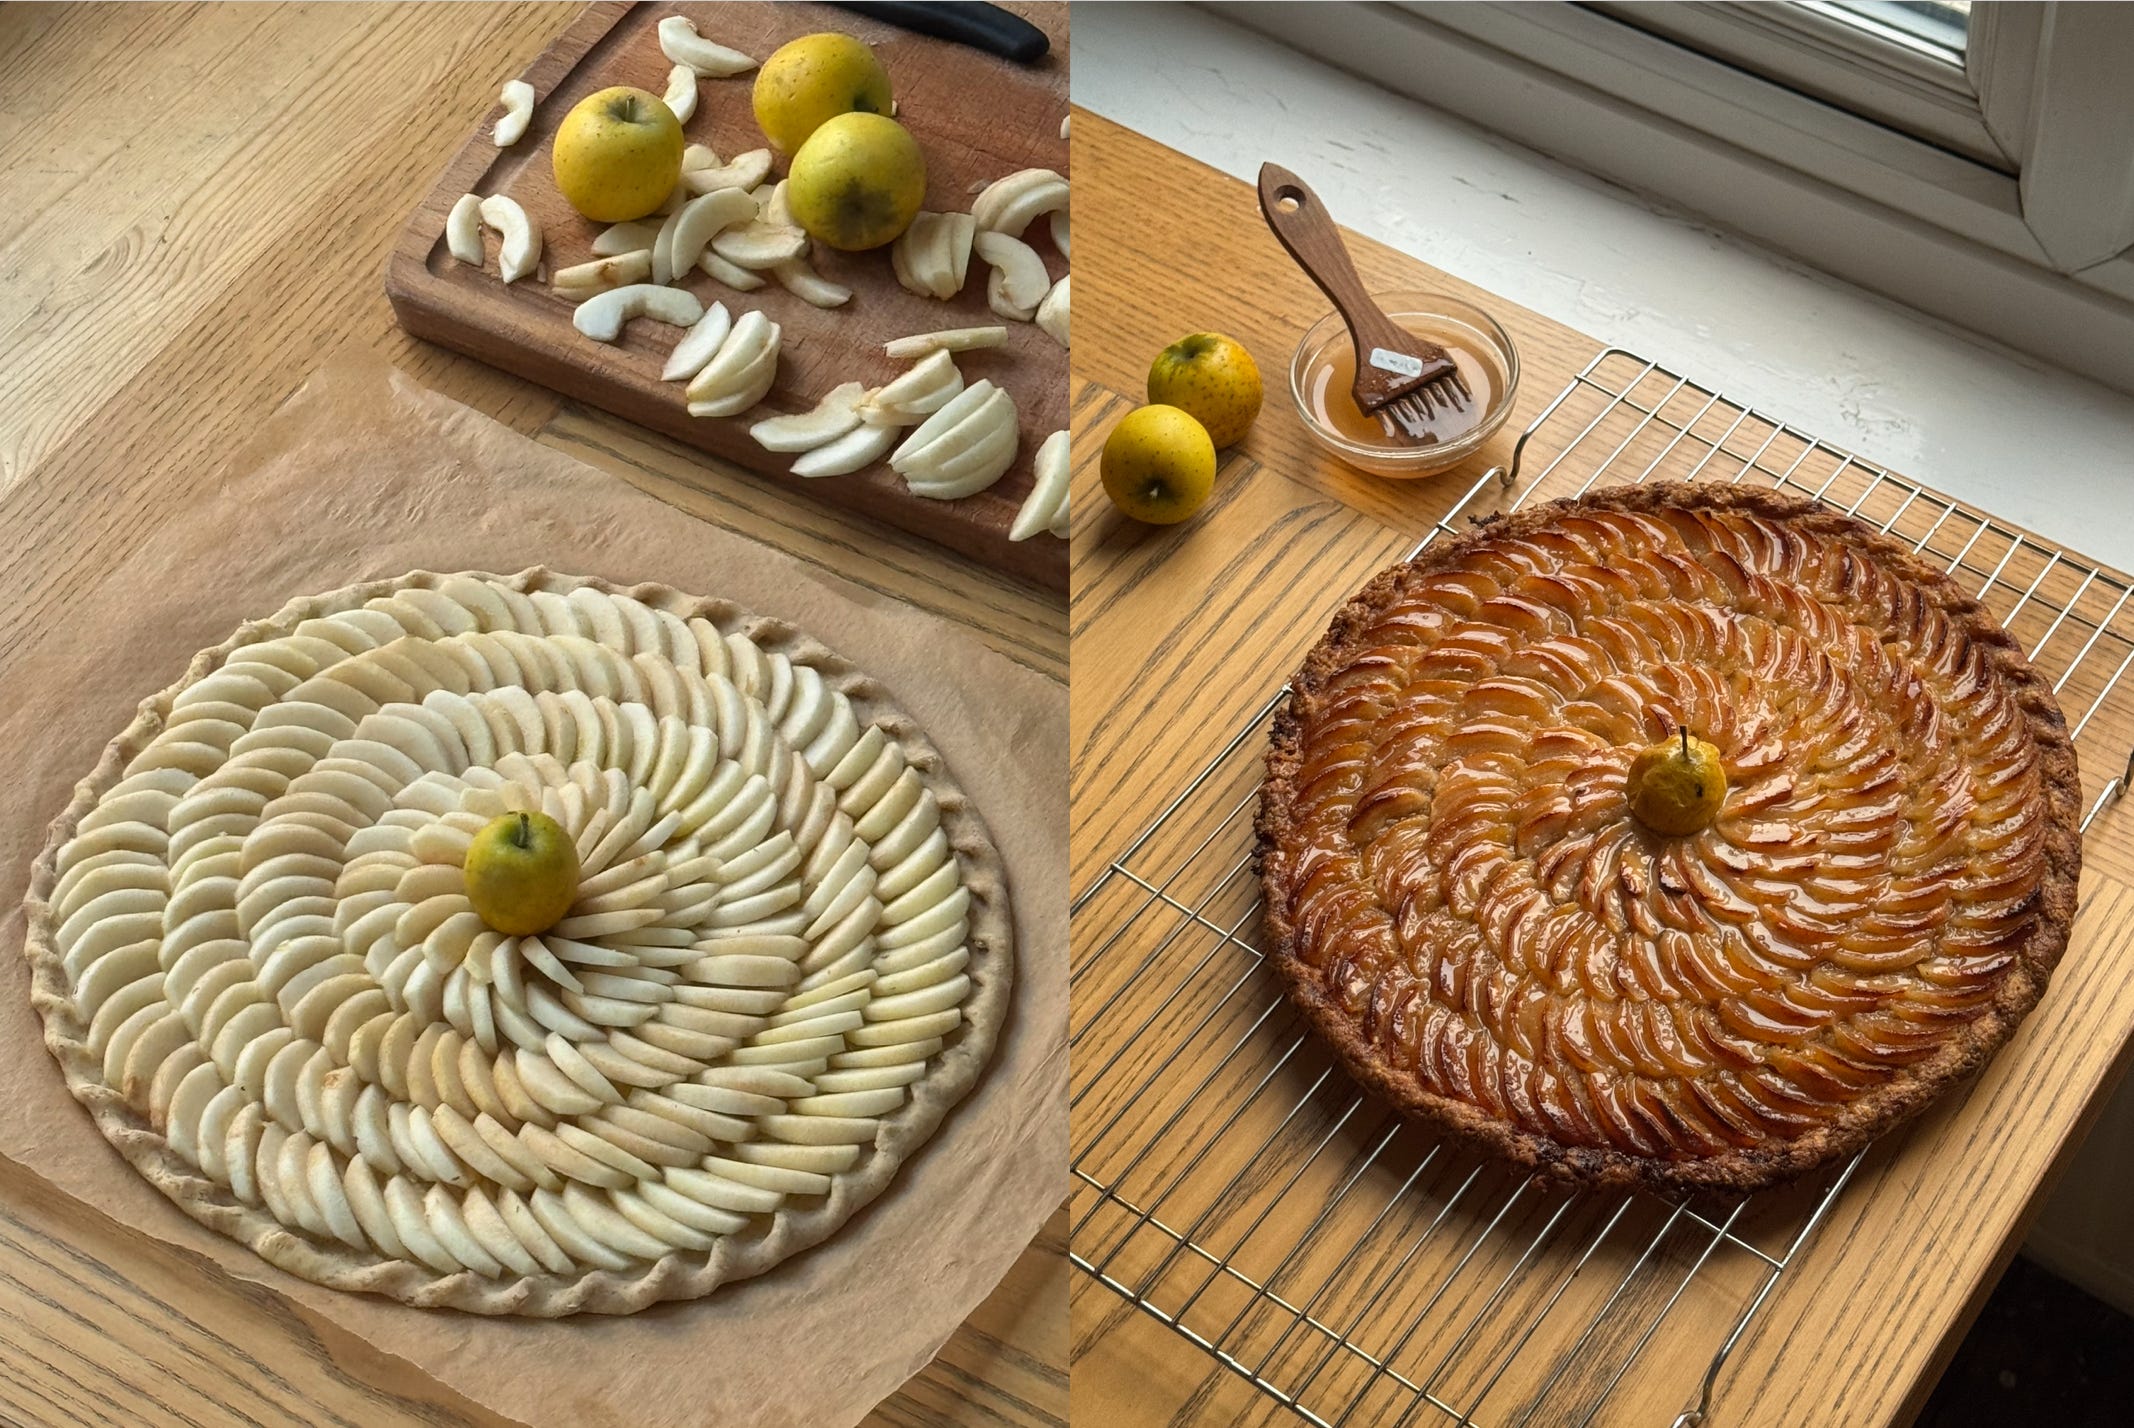
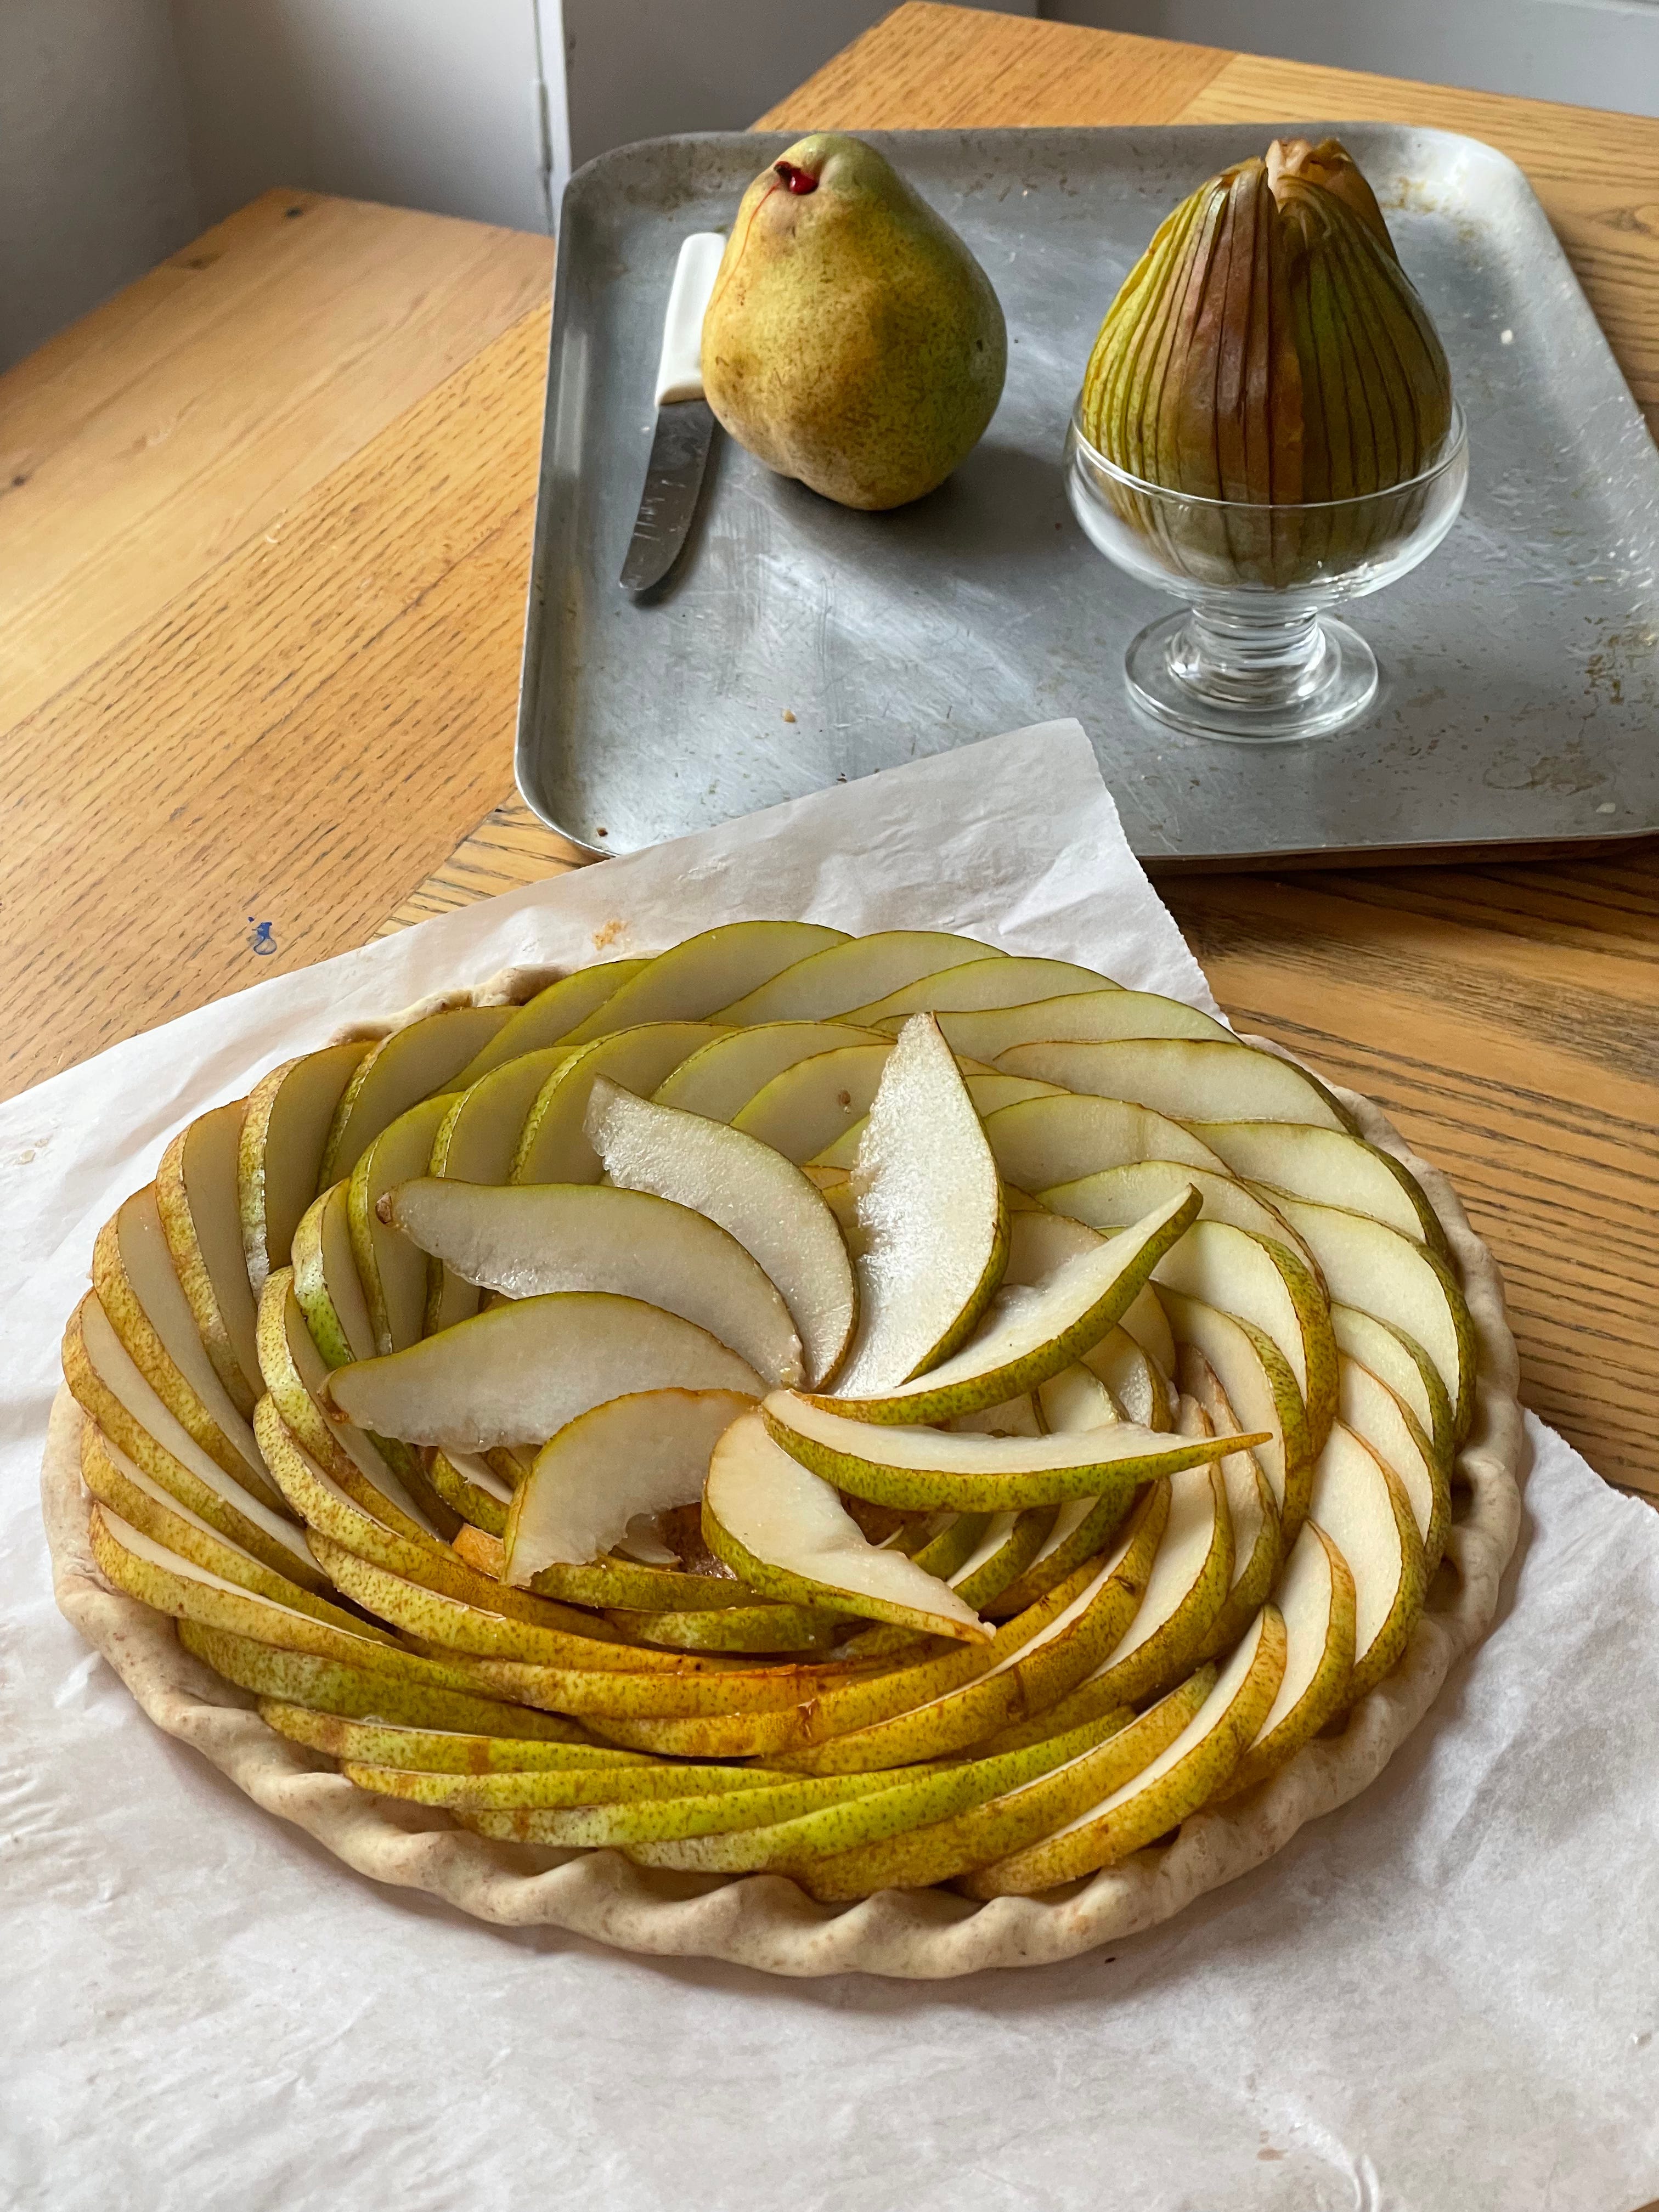
For a beautiful pattern, zoom in, not out.
If you are going for aesthetically pleasing symmetry, my advice is to pay attention to the details, not the overall pattern. Whatever design you choose, an aesthetically pleasing result comes from consistency. Having a mental guideline for the position of each fruit relative to the last, in terms of how much and where they overlap, is what will help achieve consistency. It is much easier to be procedurally neat, taking care with each piece, than to try to adjust once all your fruit has been laid down.
Place the fruit raw and unseasoned
This was perhaps the biggest revelation that came to me by way of Sarah Johnson. Borrowing lessons from galette’s cousin pie, I would often macerate my fruit first to remove excess water. However, this was a mistake, as it encouraged juices to flow before the pastry even went into the oven. Fruit baked without sugar will retain its shape better and leech less water. Instead, I lightly season the fruit throughout the baking process, only once the pastry has set.
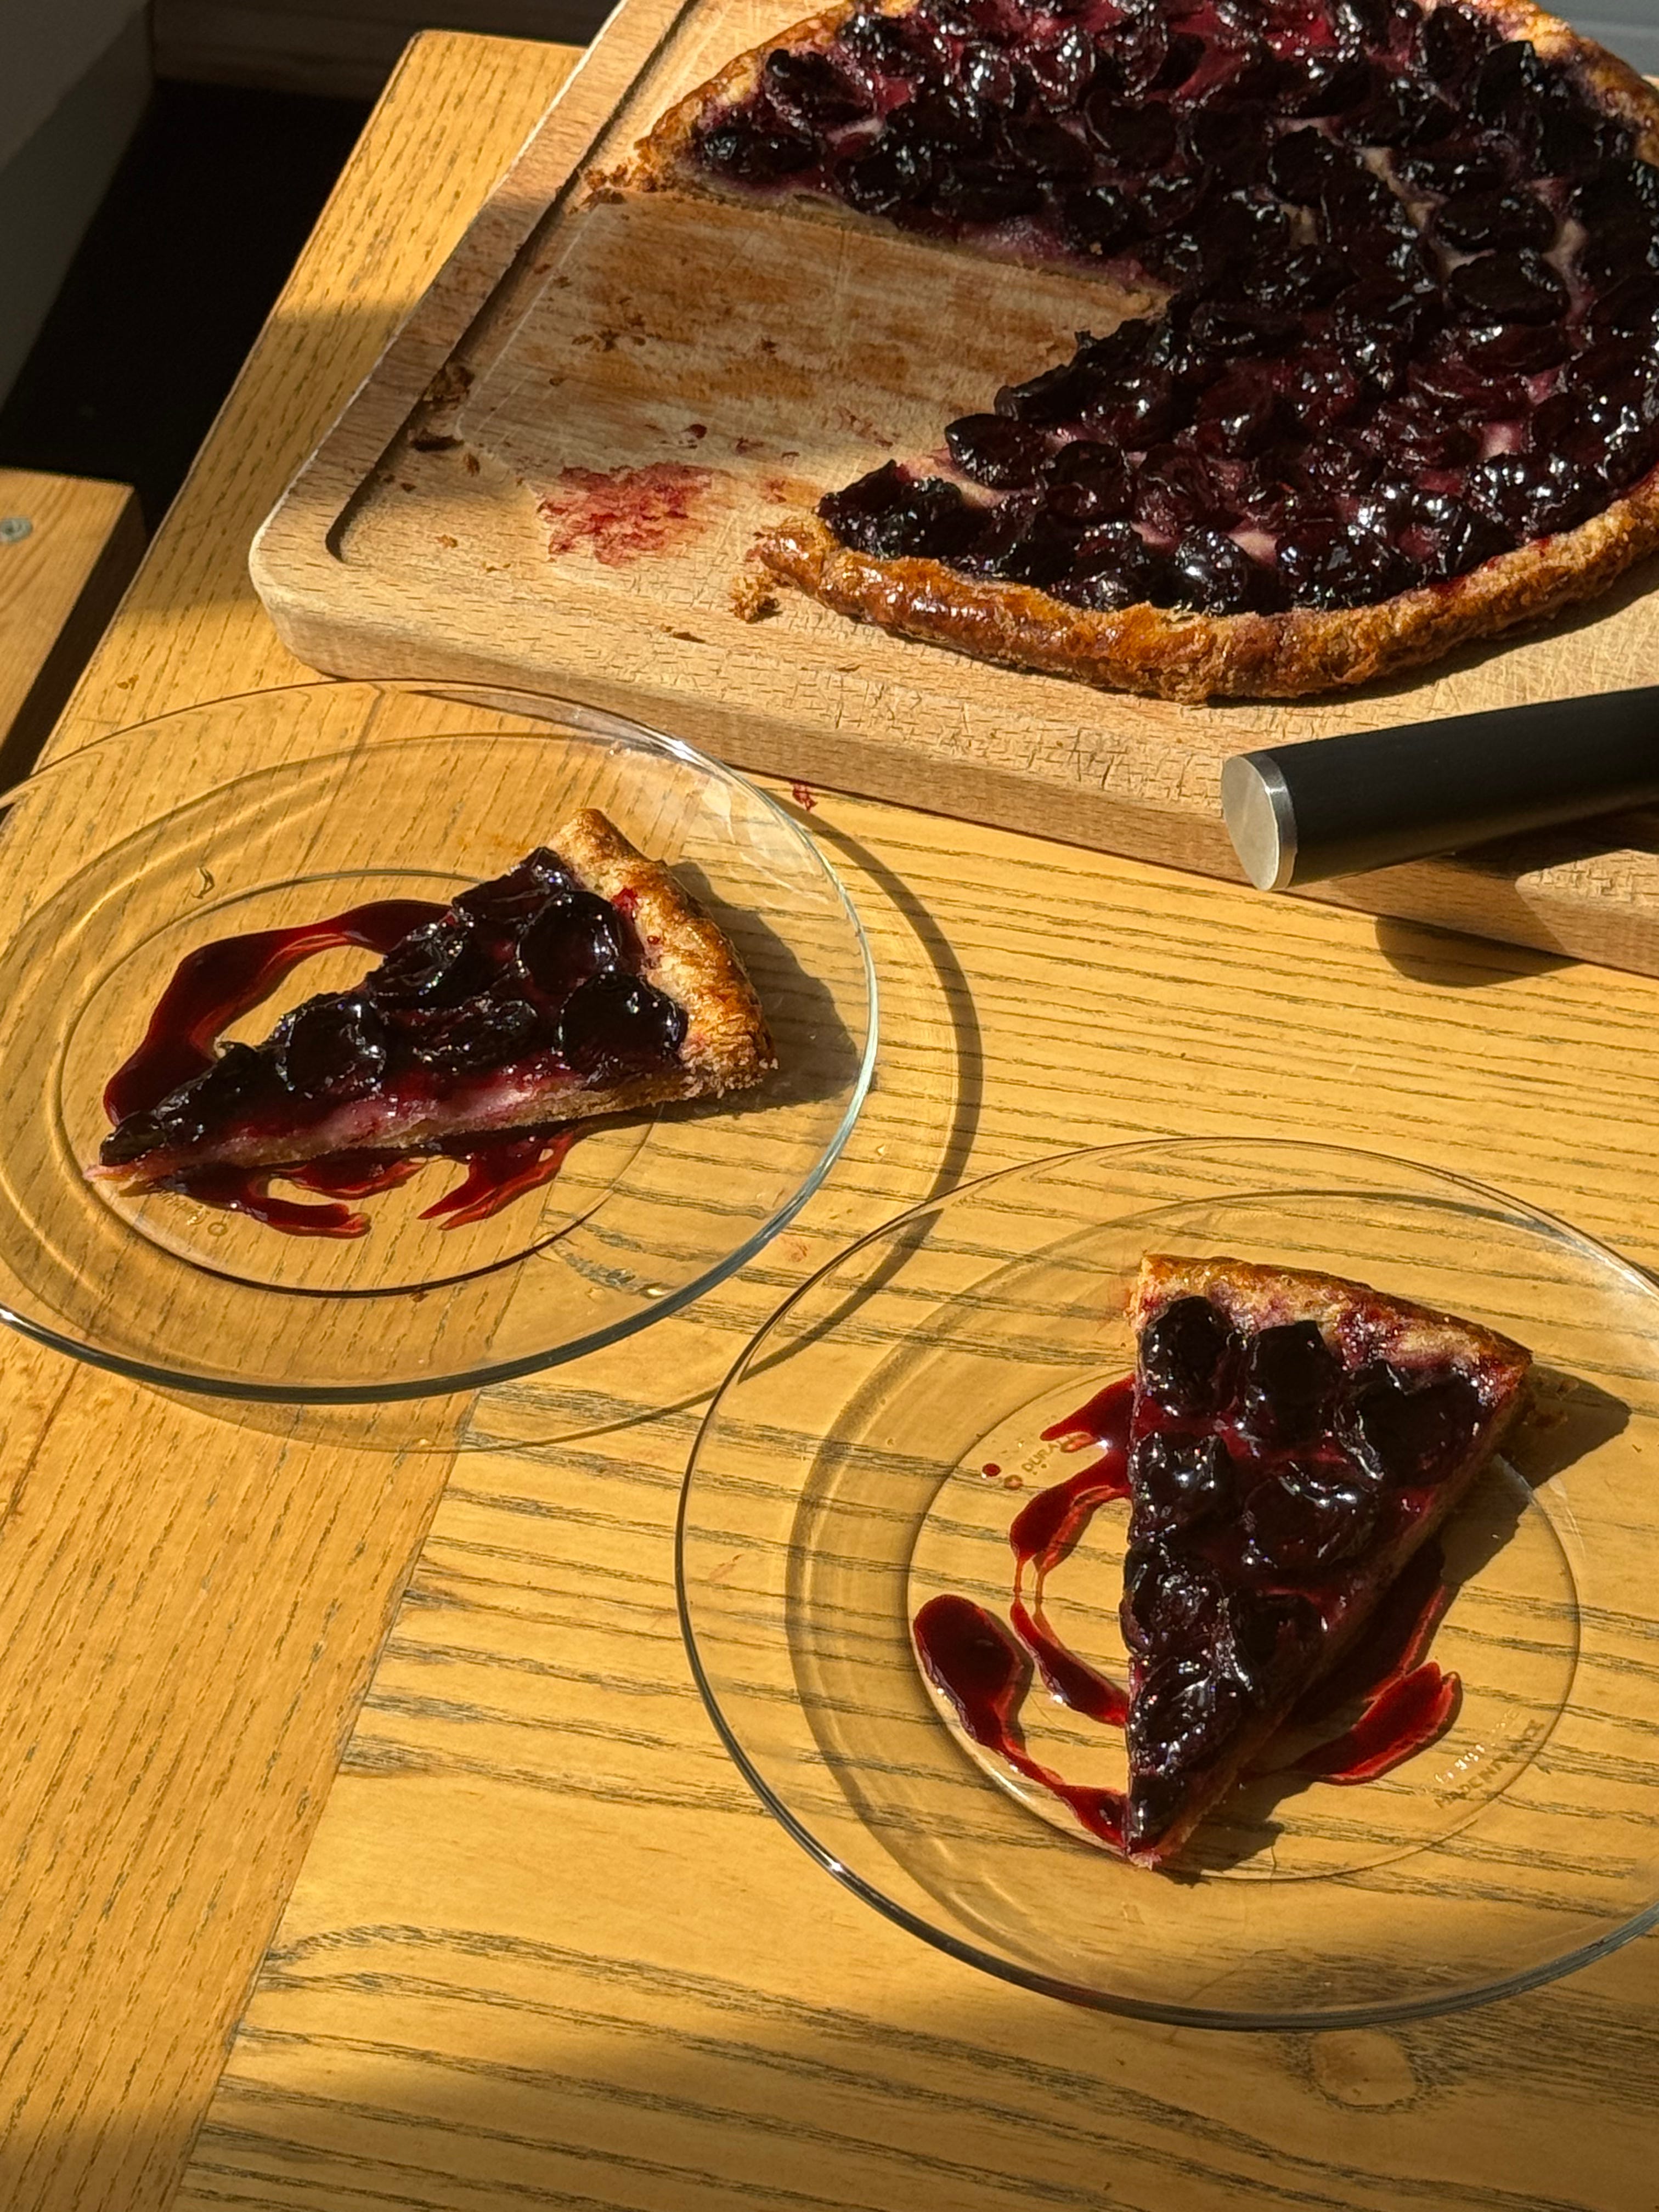
Additionally, sugar sprinkled on the tart during the baking process is spare, providing light seasoning and assisting browning. Managing the sweetness of the fruit instead comes from a flavourful glaze applied after baking. This rule applies to even the tartest of fruits, such as rhubarb and plums. In this case, it is actually extra important to avoid adding excess sugar during the bake as these are particularly juicy fruits which will leech buckets of juice.

A note on adapting to different fruits: For more tart fruit, resist dousing the fruit in sugar during the bake and instead exercise seasoning control through your glaze. For juicier fruit, increase the amount of frangipane and ‘moon dust’ under your fruit. While less frangipane makes for a more elegant galette, if you are nervous or unsure, just use more! It is still delicious, and there’s no need to be a hero. Further, if you know the fruit you’re using is particularly juicy, it is helpful to place it less densely and in larger slices - for apricot and plum galettes,I only cut the fruit into quarters. Finally, a more generous border can act as a literal line of defence against fruit juice leaking out. For real juice mongers like rhubarb, I would recommend creating your pleats over the fruit to encase them.
Make a glaze from your fruit scraps.
Out of everything here, this is my favourite tip. Leftover fruit scraps - excess pieces, along with cores, stones, and skins are simmered in water to create a ‘fruit stock’ which is then seasoned and thickened into a glaze. It’s just like a fruit gravy, allowing you to harness flavour from the fruit that would have otherwise been discarded!
Not only does this provide the all-important shine for your fruity jewels, but it also delivers a significant flavour boost and an extremely controlled way to manage seasoning and moisture. Rather than play an almost impossible balancing act with sugar and moisture in the volatile conditions of a hot oven, moisture and sweetness are applied to the fully baked finished product. Brush once immediately out of the oven so that the flavour can penetrate the fruit, and prevent drying out. Top up once it is cool/to serve for the ultimate sheen.
The Bake: You are in control!
I consider the baking time part of the active time for a galette. Unlike other baked goods, it is not a matter of setting and forgetting. During this time, I am monitoring how quickly the tart is browning and its moisture levels, adjusting the heat accordingly. I am also adding seasoning, watching for leaks, and repairing them.
The basic principle when baking a galette is to start hot and gradually reduce the temperature as it cooks. This allows the pastry to quickly set and encourages browning, then slows down to allow the entire tart to fully cook through and achieve a crisp base. Perhaps the most common mistake when making galettes is insufficient cooking time, leading to soggy bottoms. Once the tart has had a blast of heat to set and brown it, reduce the temperature to keep it cooking without burning.
As a guideline, I start at 200C fan for 15 minutes, apply 1tbsp sugar, reduce to 180 fan, bake 10, apply 1tbsp sugar, and reduce to 160 fan.
This is one of the most variable parts of the galette baking process, depending on your fruit, your oven, the temperature of the tart when it goes in, and the exact size and density of your tart. Treat your oven just like you would stovetop cooking, monitoring browning and moisture carefully.
Most galettes will take 45 min - 1hr to cook, with juicier fruits taking longer. To test if it is baked through, gently shake your pan. If your galette slides and moves on the tray, it is done. If it is still doughy on the bottom, its moisture will make it stick. Juices should be thick and syrupy, without being dry, and the crust should be a deep burnished brown - all the way past golden!
If the tart springs a leak, plug it with a wadded piece of kitchen towel to stop it wreaking havoc on the whole tart.
I also like to put my baking tray in the oven as it preheats, so that my tart goes directly onto a hot surface and the base starts cooking immediately. Use an upturned tray to prevent the lip from causing problems when moving the tart down the line.
When the tart is finished, transfer it to a wire rack, and pull the paper out so your tart sits naked on the rack. This will allow steam to evaporate, preserving the crisp bottom you have worked so hard to create.
The Recipe: Apple Galette

Pastry (Makes enough for 2 galettes)
250g all-purpose flour*
250g butter, divided
15g sugar
5g salt
10g vinegar
75g water (you may need a little more)
*see details in the ‘pastry’ section on how to introduce spelt / wholemeal and suggested ratios
Frangipane
55g skin-on almonds or other nuts
30g butter
30g caster sugar
1 egg yolk + enough white to make up 30g
Good pinch of salt
1/4tsp vanilla extract
Filling
5 medium apples (650g weight)
1tbsp flour
1/2tbsp cornstarch
3tbsp sugar (divided)
Egg wash
Leftover Egg white from filling
Double Cream
Glaze
Reserved apple peels and cores to make apple stock
50g sugar
1tsp cornstarch
Juice of 1 lemon
Method
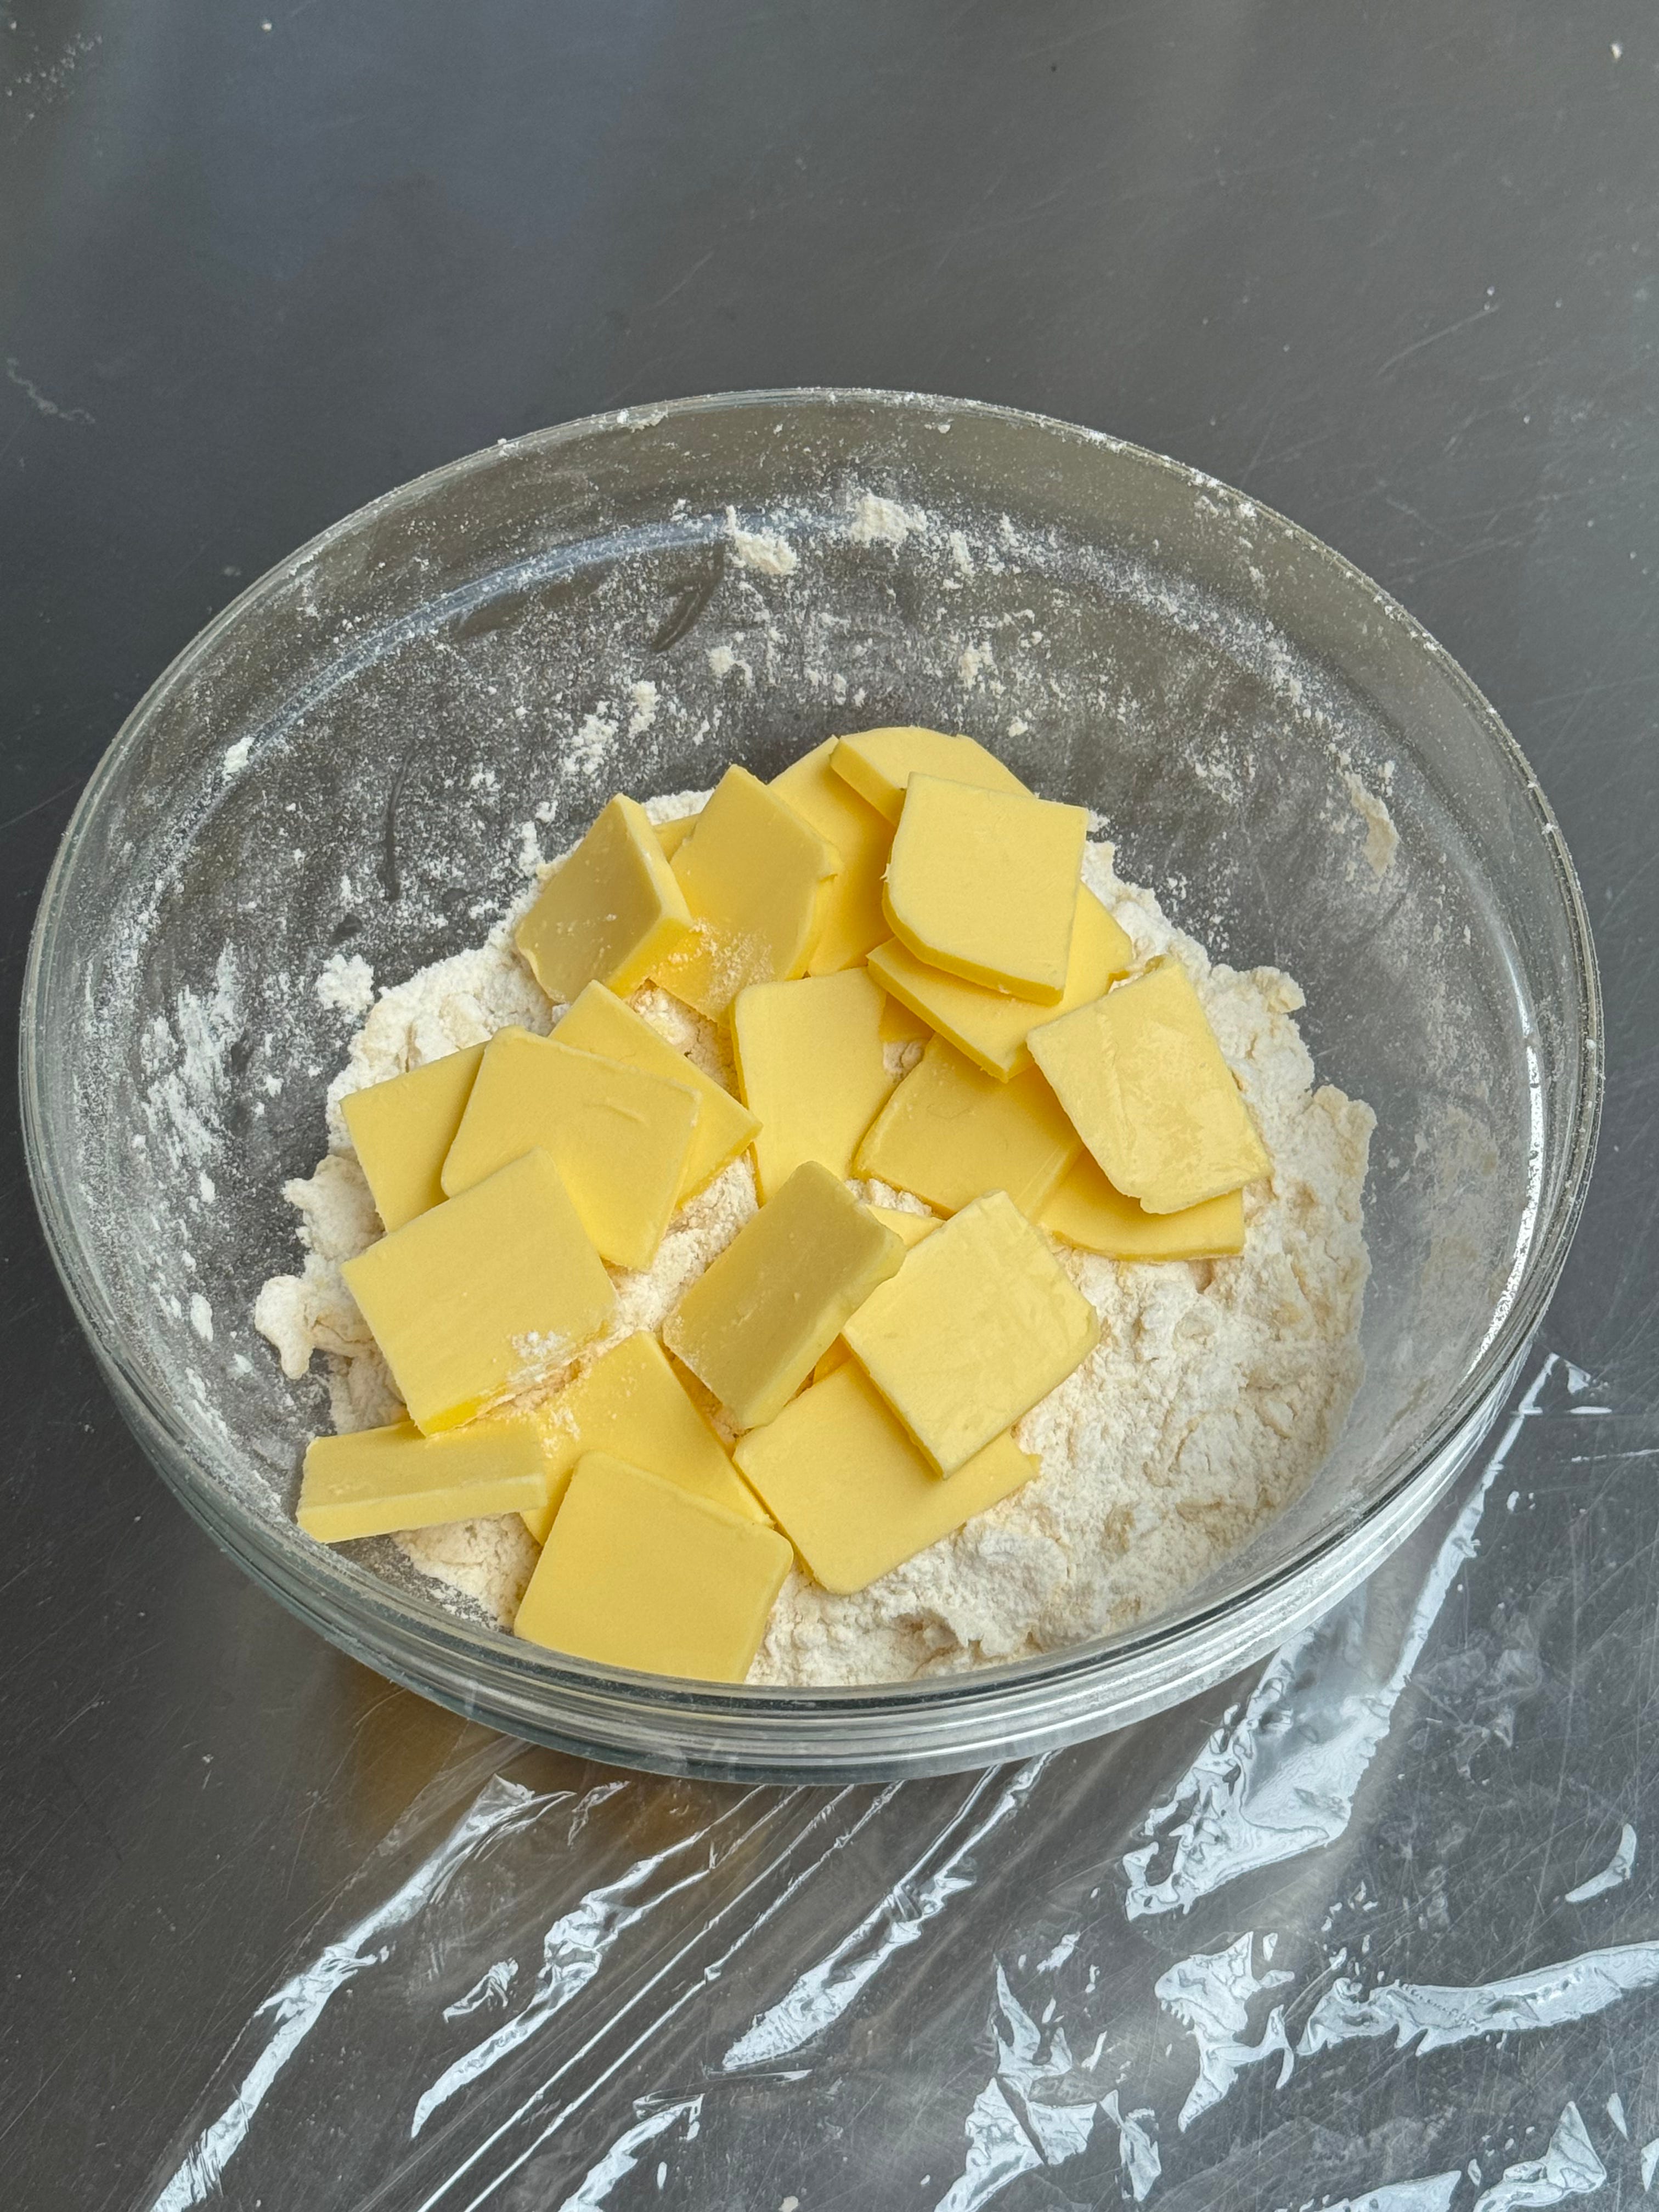
For the pastry: Combine flour, sugar, and salt in a bowl. Place in the freezer while you prepare your butter.
Divide your butter into 100g and 150g. Or, taking a standard 250g block, cut slightly off centre. Take the larger portion and slice it lengthwise, then cut it into 2-3mm-thick sheets. Refrigerate. Take the smaller portion and cut it into 1cm cubes.
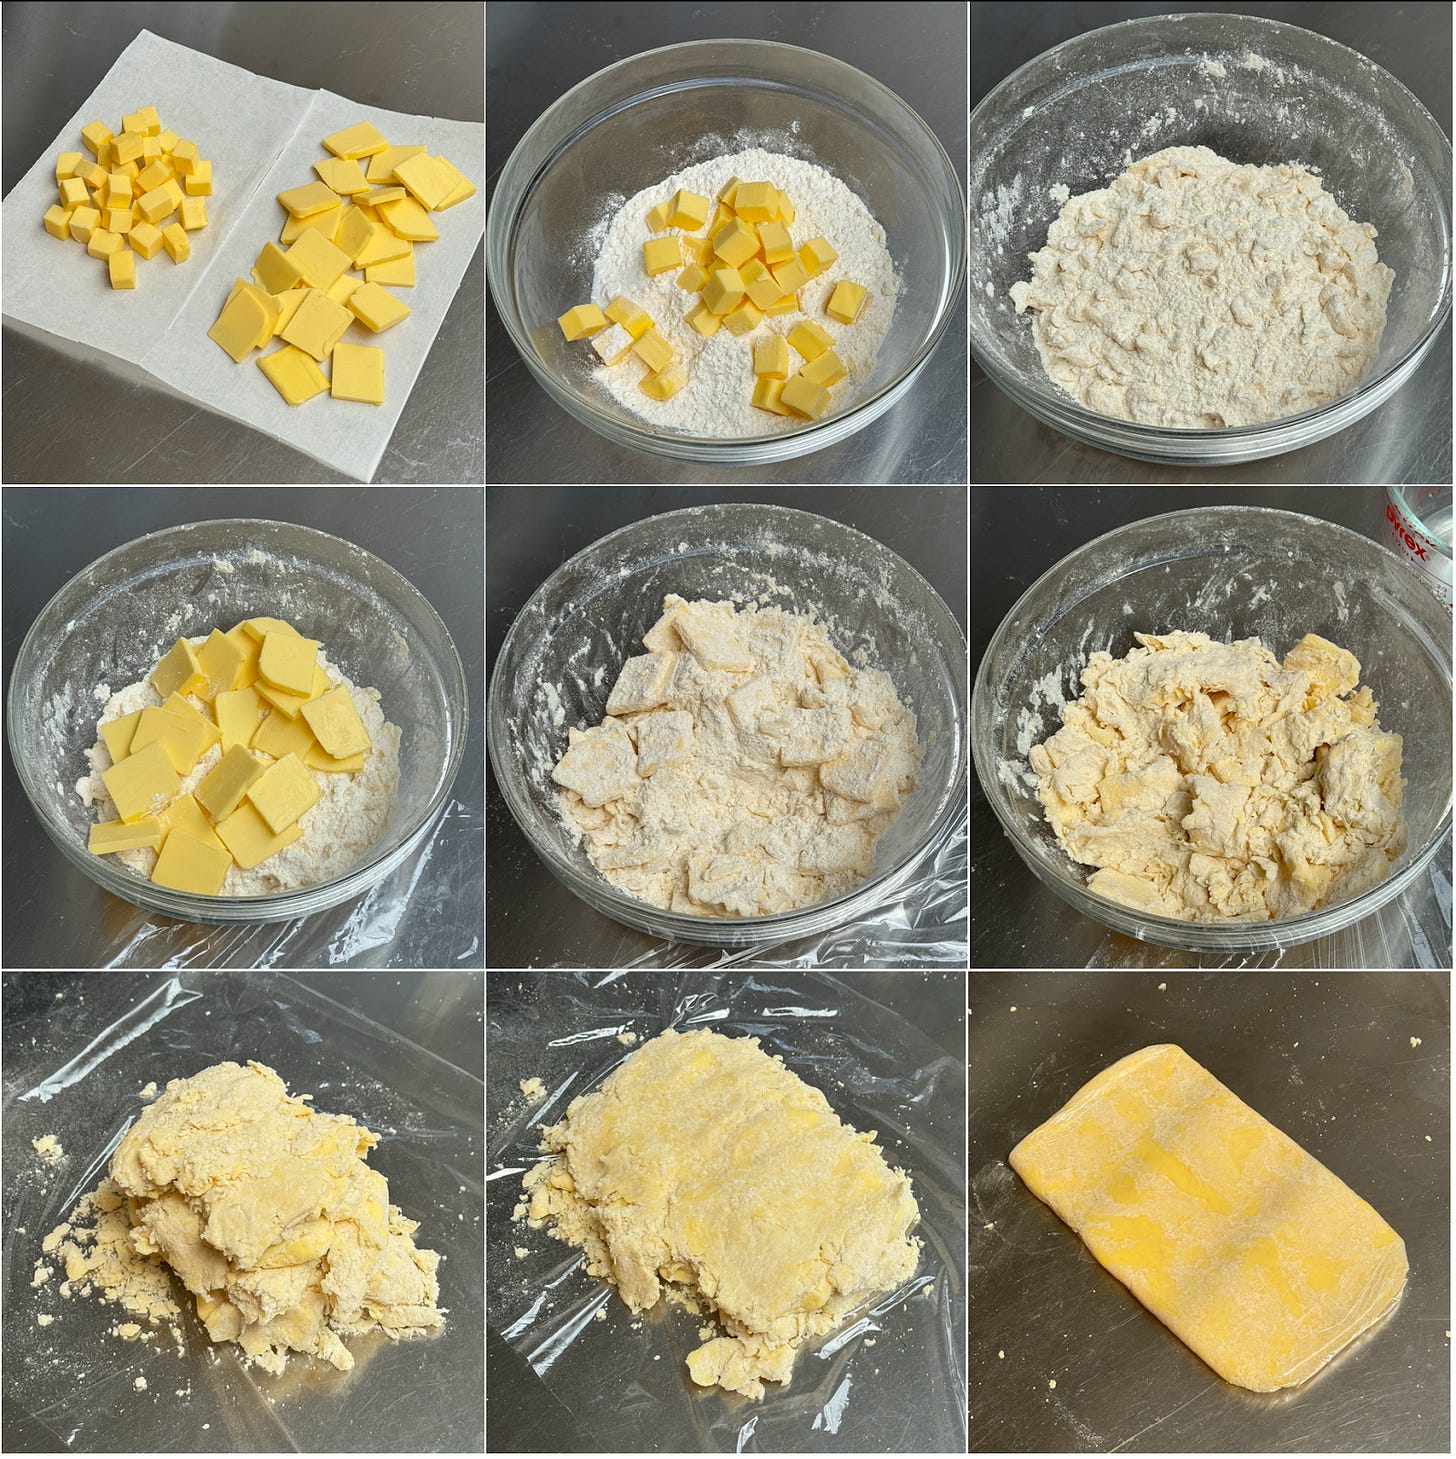
Pastry Process. Photo Credit Louis Thompson Toss the cubes of butter in the chilled flour and break them down with your fingers until they are the size of peas - they will continue getting smaller as you bring the dough together. Mix the thin sheets of butter through the mixture, gently tossing to separate each piece and ensure it is coated in flour. Add the vinegar and 50mL of water.
Gently toss together the mixture, not really mixing, just distributing the water. Use a gentle crumbling motion to find and break up gluey clumps of moist dough, ensuring even hydration. Continue adding water 1tbsp at a time, adding less towards the end. When parts of the dough hold together comfortably with a gentle squeeze, leaving just a few shaggy bits, remove them from the bowl one piece at a time, leaving behind any underhydrated parts. Continue adding ice water to the remaining dough until it is all adequately hydrated.
As you remove the hydrated dough, stack each handful/piece on a sheet of cling film, pressing them down to form a pre-emptive lamination. Flatten the dough to no more than 2cm thick and wrap in cling film. Roll over the wrapped dough to fill in any air pockets and finish bringing the dough together. Rapidly chill the dough in the freezer for 30 minutes.
Remove the dough and generously flour your work surface. Roll the dough out so it is approximately 3x longer than it is wide - exact dimensions aren’t important. The thinner you roll your dough, the more even your layers will be. Fold the top third down into the middle and the bottom third over, like a letter. Give the dough a gentle press to combine the layers and rewrap, rolling over once more to fill in air pockets. Refrigerate at least two hours or preferably overnight.
Once your dough has rested and thoroughly chilled, cut it in half to make two squares of pastry. You can save the other for your next galette.
Roll out the pastry on a sheet of parchment. Roll it into a circle by orienting the pastry like a diamond, focusing your rolling in the centre to round out its corners and turning it frequently. Don’t be afraid to use your hands to manually form it into a rounder shape. Roll into a circle approx 30cm wide and 2mm thick. The thickness is more important than the width, as we will trim it. Transfer to a plate or a baking sheet, then refrigerate.
For the Frangipane, toast the almonds at 160 °C fan for 12 minutes, until they are deeply toasted all the way through. Allow them to cool before blitzing to a couscous-like texture. If you don’t have a blender, put them in a zip-lock bag and bash with a rolling pin until they are as fine as you can achieve. In a small bowl, mix the softened butter with the sugar and salt until well combined. Mix in the nuts, egg and vanilla. Taste for seasoning. If it is not creamy and easily spreadable, you can let it down with more egg white or a dash of cream. Reserve remaining egg white.
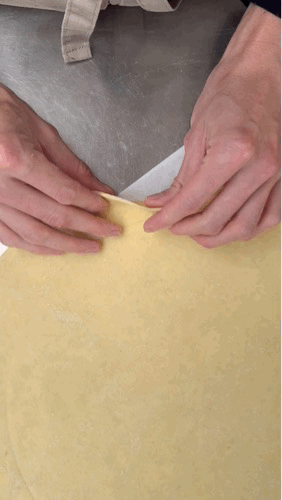
Remove the pastry from the fridge and trim uneven edges to create the largest circle you can. Gently mark an interior circle approx 3cm from the edge using an upturned dinner plate - be careful not to cut or damage the pastry, you are just making a guide.
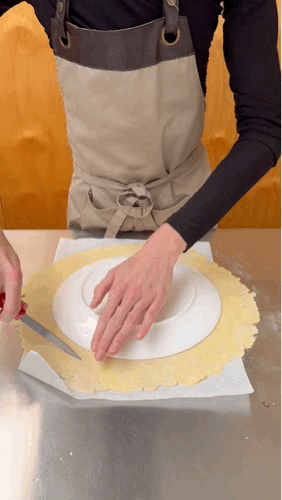
To make a pretty pleat, fold over a finger width of pastry, and taking the edge of the fold, create another pleat, repeating this motion around the tart - see video below. Use the mark from the dinner plate as a guide to form a neat circle. The border should be about 2cm.

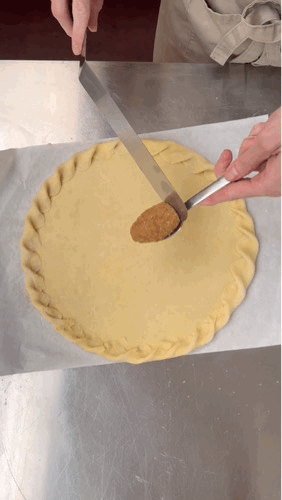
Using an offset spatula or the back of a spoon, spread around 2tbsp of frangipane as thinly as you can to the edge of the border without damaging the pastry. Mix 1tbsp flour, 1/2tbsp cornstarch, and 1tbsp sugar, then scatter evenly over the frangipane (you can also scale directly onto the chilled frangipane and mix with your fingers if you prefer!). Chill the pastry while you prepare your fruit.
Assembly and Baking.
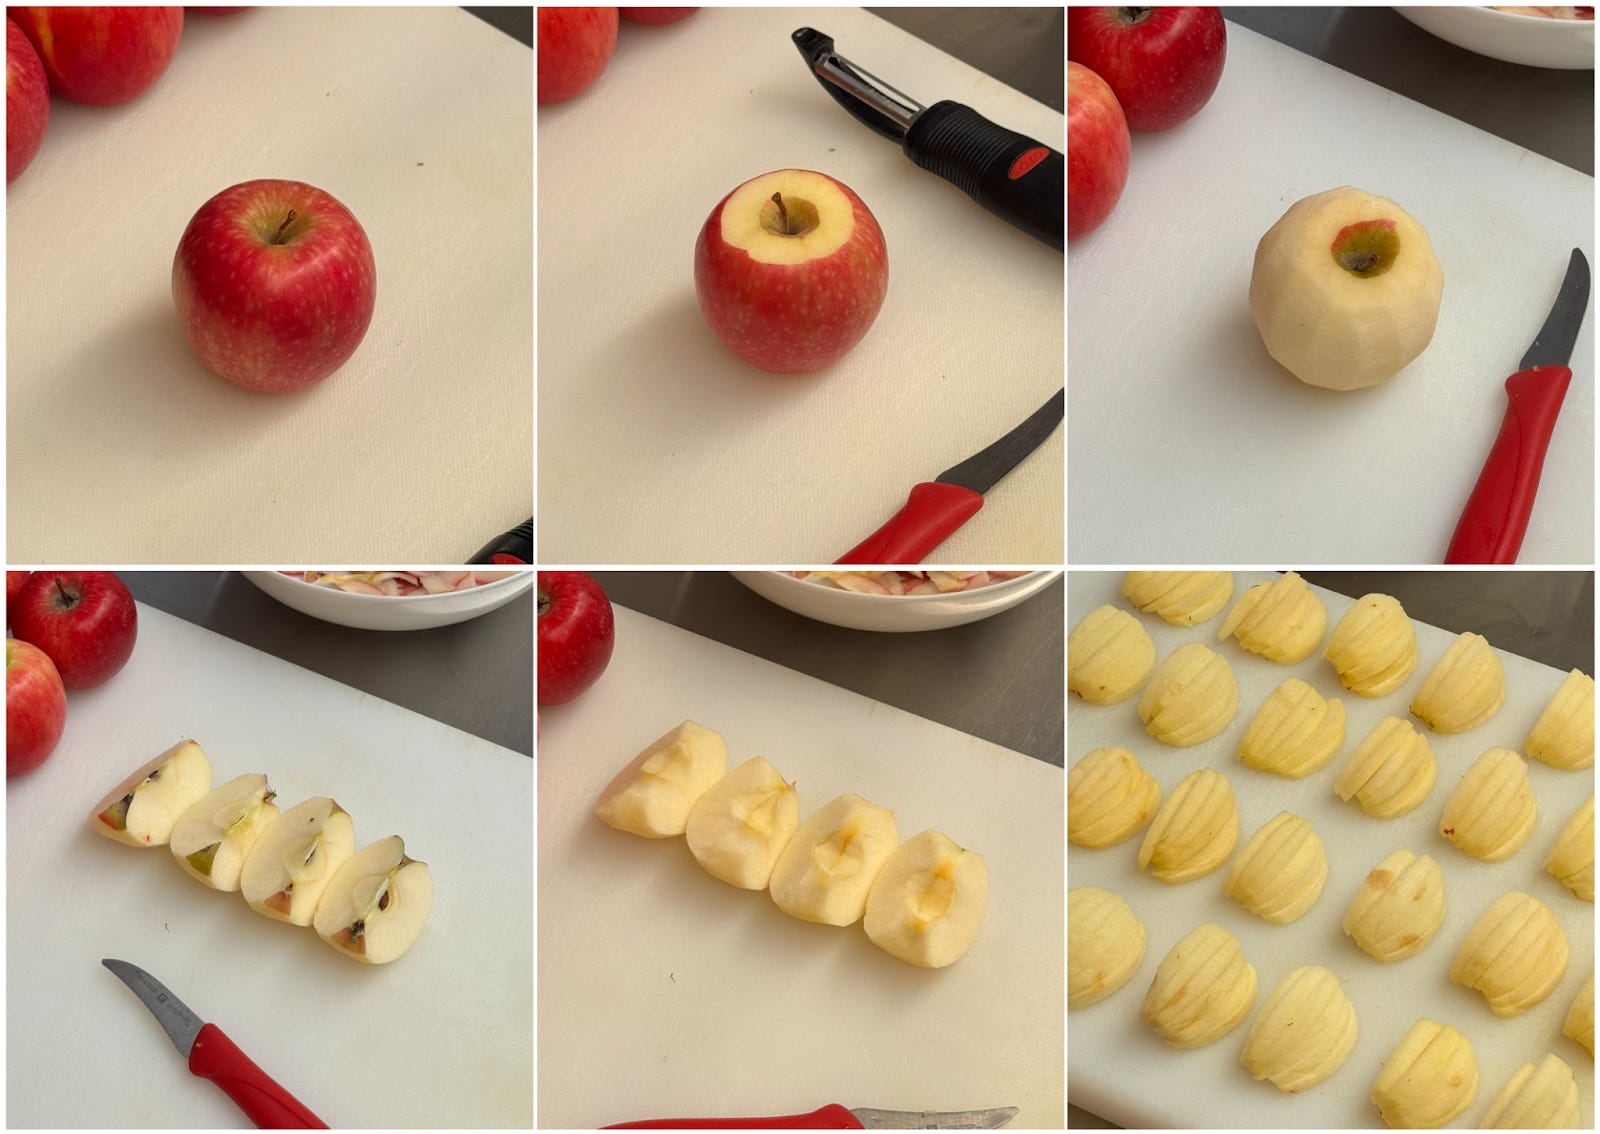
Peel and core all your apples. Peel a small ring at the top and bottom of the fruit and go around vertically to preserve the shape of the fruit. Cut into quarters and core using a bird-beak knife, removing as little fruit as possible. Slice each quarter into 3-4mm slices - thicker than you think. Keep the sliced quarters together as you work, grouping larger and smaller pieces. This will make for a nicer arrangement. Reserve all the skins and cores for the glaze (recipe below).
Starting with larger pieces and working down to smaller ones, place your apples in concentric circles, beginning with the outermost circle and having the edge of each apple lean gently against the edge of the pleated pastry border. Place each apple approximately halfway over the next so that the round end covers the removed core. Continue until the tart is filled.
Once you have fully assembled your tart, place it in the fridge to chill while your oven preheats. The tart can comfortably sit in the fridge for up to overnight, but if you aren’t baking immediately, carefully cover it with clingfilm. You can also freeze the raw, assembled tart at this point; it will keep for up to 3 months. Bake from frozen, adding 10 minutes to the oven time.
Preheat your oven to 200 °C fan and place an upturned baking tray on the bottom shelf. Mix your remaining egg white with an equal measure of cream (the combination of fat and protein is ideal for browning and shine, without having to crack another egg), then use it to brush your pastry border.
Remove the hot tray from the oven, immediately place the tart on it, and return it to the oven for 15 minutes.

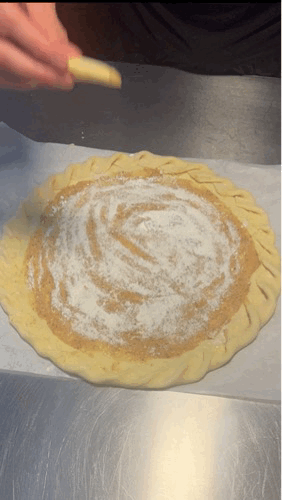
Through the baking process: raw, first introduction of sugar, finished (pre-glaze). After 15 minutes, remove the tart from the oven and sprinkle with 1tbsp sugar, rotating the tart if it is browning unevenly. Reduce the heat to 180 °C fan if it is still pale, or 160 °C fan if it is already looking browned and set.
After another 10 minutes, remove from the oven and sprinkle with another 1tbsp sugar. Return to the oven for at least 10 minutes, up to 20, until the crust is deeply golden brown and the tips of the apples have browned. Check for doneness by shimmying the tray to see if the tart can move freely. Remember, the bake is the most variable part of the process, so trust your judgement and adjust these timings accordingly.
Transfer it to a wire rack, and pull the paper out so your tart sits naked on the rack. This will allow steam to evaporate, preserving the crisp bottom you have worked so hard to create.
For the Glaze: Take any remaining apples, along with the reserved skins and cores, and place them in a small pot with just enough water to cover. Bring to a boil, then reduce the heat to a simmer. Place a piece of parchment paper on the surface to minimise reduction while the flavour and pectin are extracted. Allow to simmer for 30-45 minutes. Strain your apple stock. It will make more than you need to glaze a tart.
To make the glaze, combine 50g sugar with 1tsp cornstarch in a bowl, then mix until any lumps are broken up. Add 200ml apple stock and whisk until there are no lumps.
Bring to a boil and reduce until it is thick, viscous, and syrupy. Taste for flavour - it will be very sweet at this point, but you want to ensure it doesn’t taste watery. If so, continue reducing once its flavour is rich and apple-y, season with a generous amount of lemon juice.
Brush glaze over your tart once to season and lock in moisture. Brush once again just before you serve. The galette is best served the day it is baked.

What an absolute goldmine of wisdom from the master!!! So exciting. Curious for your thoughts on home bakers using baking steels or stones to help with crispy crusts? Mine has helped me with pies but worried it could be aggressive for a galette?
Moon dust! Absolutely loved reading this. Cannot wait to make a galette with all these super helpful tips. There is probably a reason mine always look “rustic”.