
Kitchen Project #159: Custard Slice
In Custard We Trust!

Hello, and welcome to today’s edition of Kitchen Projects.
Today we are doing a bit of custard conversion - if you’re already a fan, come on in, and if you are custard-curious-but-somewhat-unsure… I promise it’s good here.
I get to guide you through the glorious world of custard slice, the iconic, wobbly bake of dreams. From the custard slice that ignited it all (this newsletter has a spirit guide) to how to get the perfect set, we’ll tie it all up with a bay leaf and vanilla custard slice with blackcurrant icing.
Over on KP+, I’m sharing two alternative custard slice recipes - a gorgeous chocolate and caramel number, along with a rhubarb jelly & custard layered dream. Click here for the recipe.
What’s KP+? Well, it’s the level-up version of this newsletter. By joining KP+, you will support the writing and research that goes into the newsletter (including the commissioning - and fair payment - of all the writers), join a growing community, access extra content (inc., the entire archive) and more. Subscribing is easy and only costs £6 per month or £50 for the whole year. Why not give it a go? Come and join the gang!
Love,
Nicola
P.S. Live in Toronto or Chicago? I’m coming back to the US on a mini book tour end of Feb so I hope to see you there. Details soon!
Custard Slice For Life
One of my goals this year is to bring the joy of custard to all the corners of the world that don’t fully appreciate it. And one way of doing that is extreme exposure therapy. If you think we’re going to start with something gentle, like bread pudding, I’m afraid you’re wrong. We’re diving into a very deep, custard-filled pool, and all I can say is… come on in!
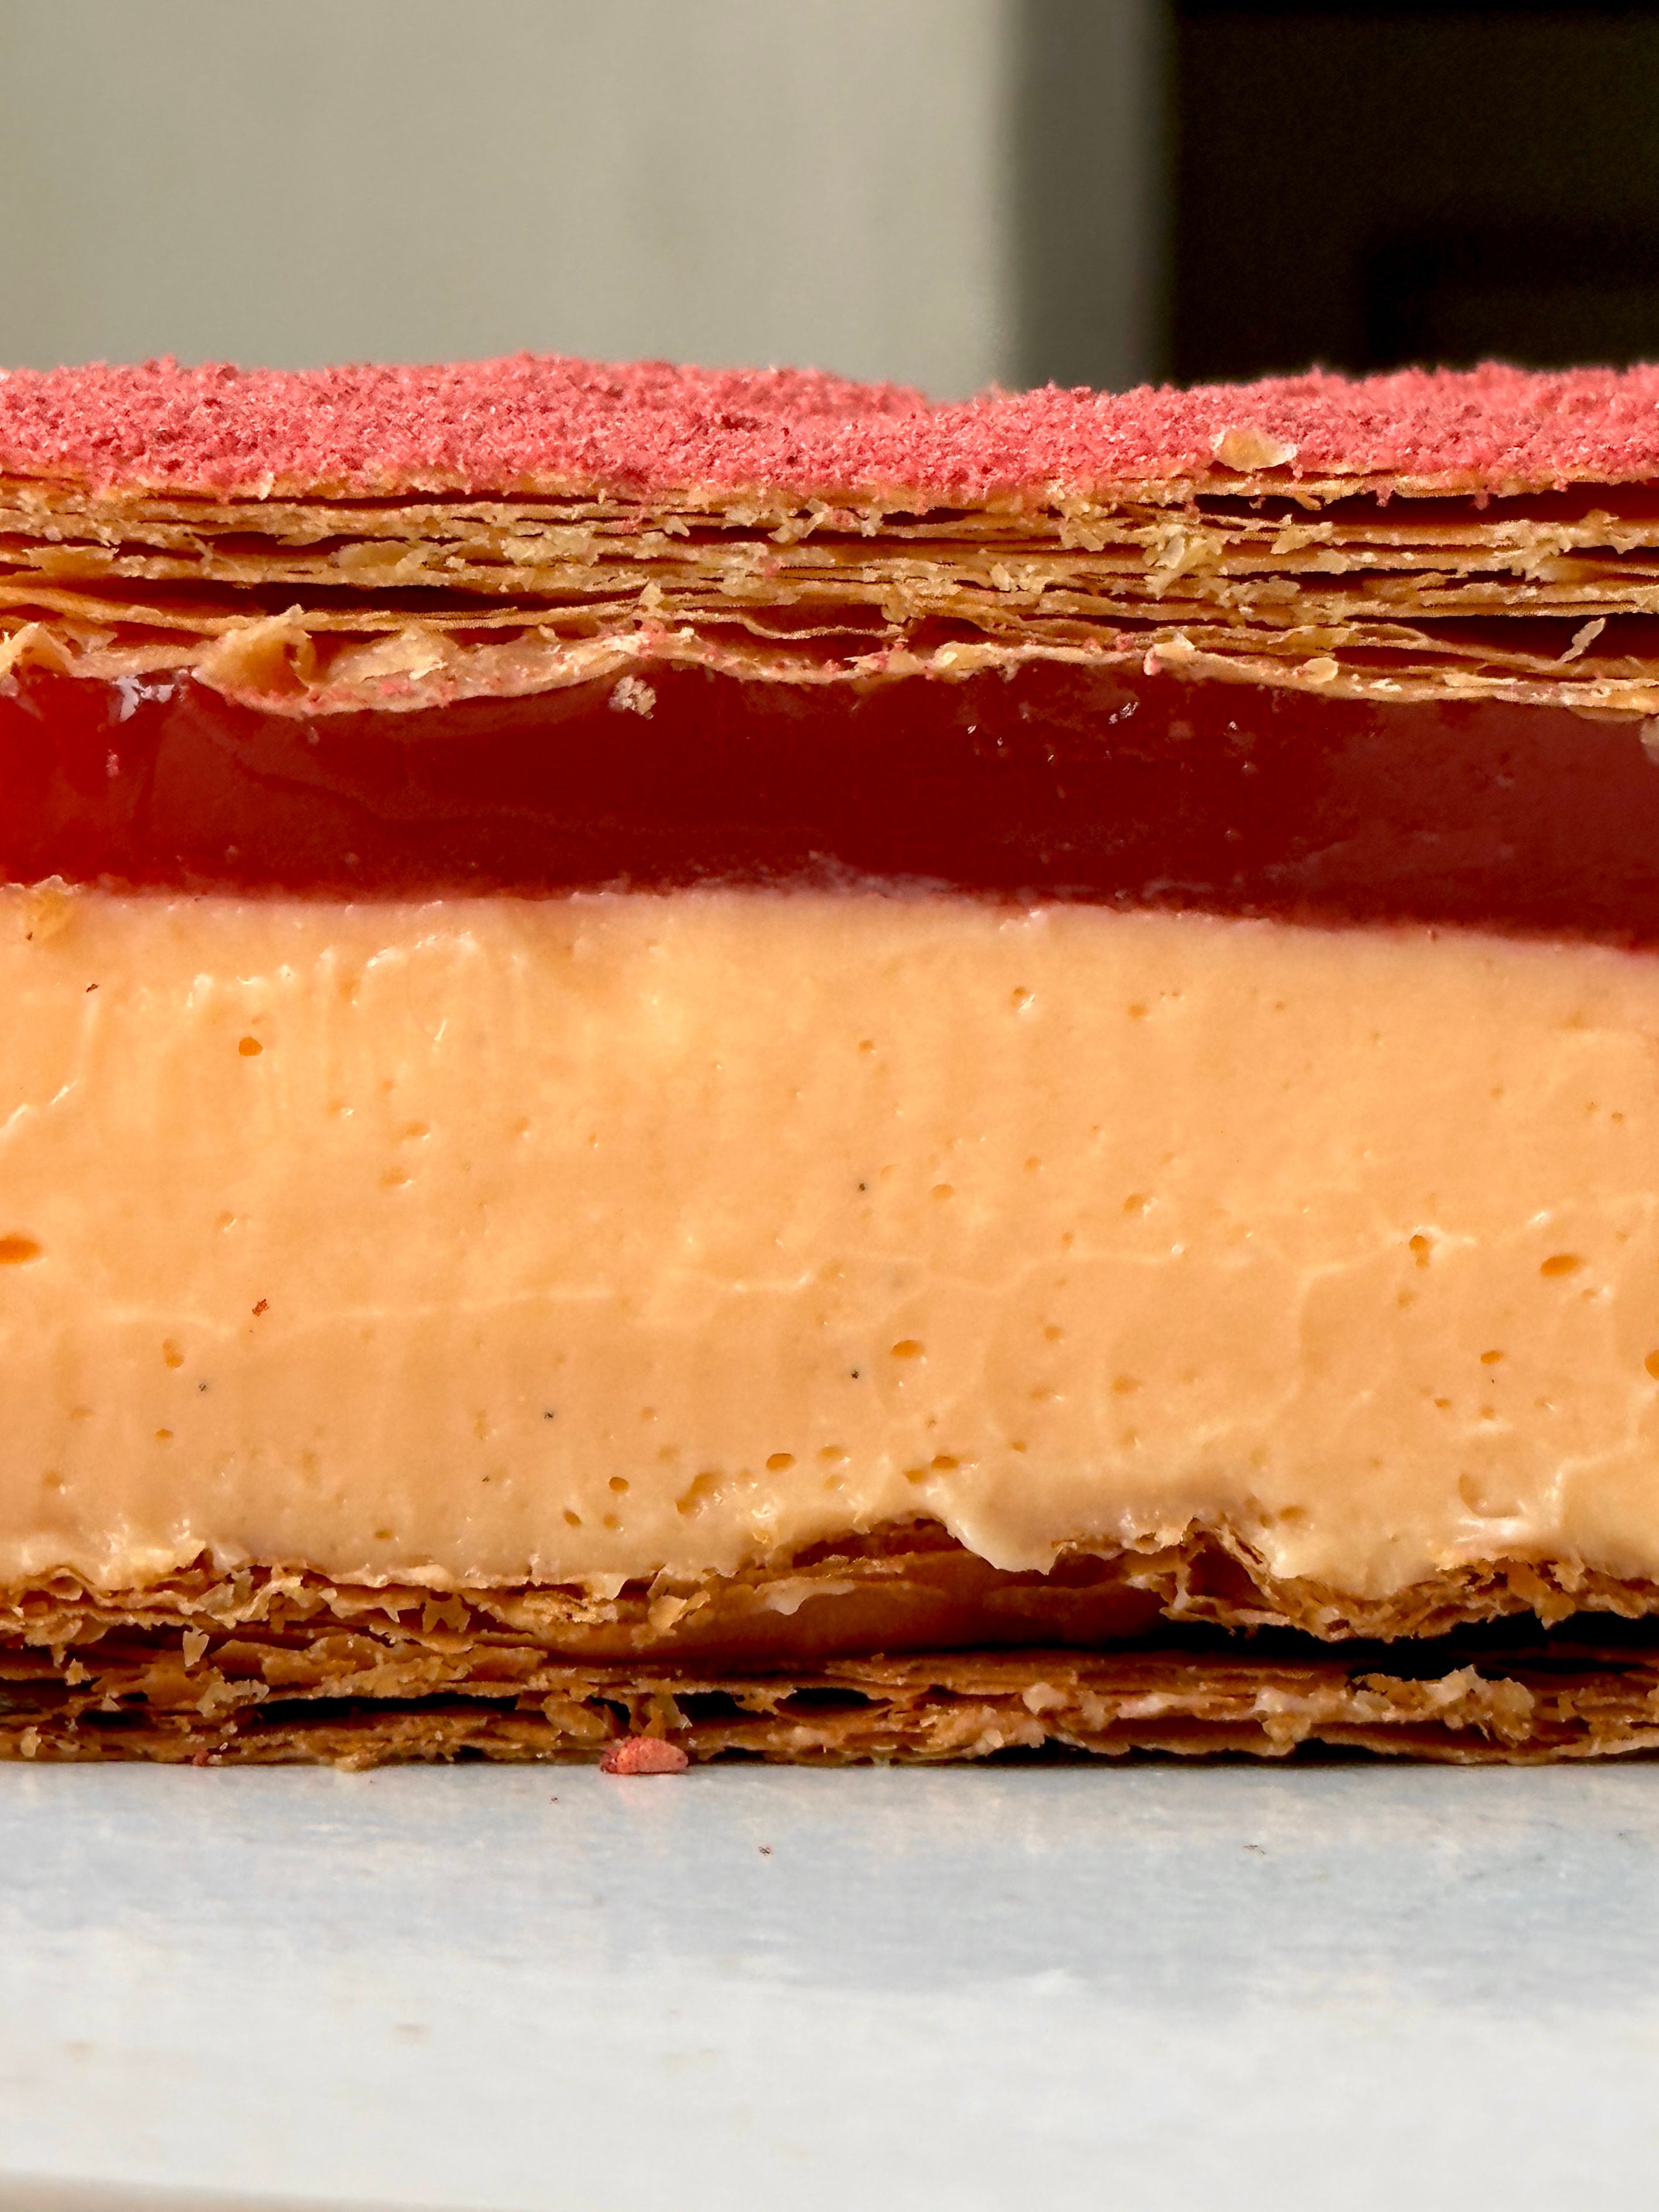
Welcome to the world of custard slices, a wobbling block of rich creaminess cradled with two sheets of crisp puff pastry, finished with a simple icing or a dusting of sugar. Think of it as the casual counterpart of a mille-feuille, the ‘10 things I hate about you’ version of ‘Taming Of the Shrew’. Custard slice has fabulously decadent proportions and, unlike some pastries (not naming any names), has a flavour and eating experience to match its visual appeal. It’s such a popular dessert that you can find a version of it in most cuisines - from Polish Napoleonka to German Cremeschnittes to Dutch Tompouces; the general message is: Our love for custard is universal. And Custard Slice is the most generous delivery method.
As ardent custard lovers, it’s no surprise that the custard slice is extremely popular here. It’s easy to tell whether a bake is part of the cultural fabric of our country by checking if there’s a supermarket version of it, and unsurprisingly, you can find a custard slice in every chilled aisle in the UK.
The Vanilla Slice
There is, however, one country that might run the UK’s custard-love - at least in this particular form - for its money. The custard slice, also known as the vanilla slice, is a national favourite in Australia. You know how you might come up with slightly cruel nicknames for your sibling or someone you really love, but the meanness is softened by how affectionately the nickname is intended? Well, Australia has that with the vanilla slice. And I know it’s only 8:30 AM that I’m sending this newsletter out, and I don’t want to ruin your morning, but it would be remiss of me not to mention that the Aussies fondly refer to the vanilla slice as … (gosh I don’t want to type this): Snot block.
NOW, let it be known that this is said with love, and I know, I know, I’m trying to convert people to custard, not to turn them against it, but think of it this way: Imagine how much you’d have to adore eating something to call it snot-block and still go on eating it? That, in my opinion, is a point to team custard, thank you very much.
It is so well-loved, in fact, that there’s an annual event to celebrate the vanilla slice and to find the best in the country. The ‘Great Australian Vanilla Slice Triumph’ sees thousands of slices entered and sold, with one bakery taking home the crown. Though you might think winning such a competition isn’t such a serious business, one bakery (who won in 2015) reported a 1000% increase in sales, going from selling 3000 slices a year to 32,000! That is a lot of custard.
In today’s newsletter, we’ll explore the best practices to get the creamiest custard, with enough body to be sliceable, how to assemble - and cut (spoiler alert, it’s very annoying) the slices, ft. my recipe for Blackcurrant and Bay Leaf Vanilla Custard slice. Over on KP+, we experiment with the form with a luxurious caramel chocolate version and - because ‘TIS THE SEASON - a Rhubarb Jelly and Custard slice.


Custard Slice: An Education in Edinburgh
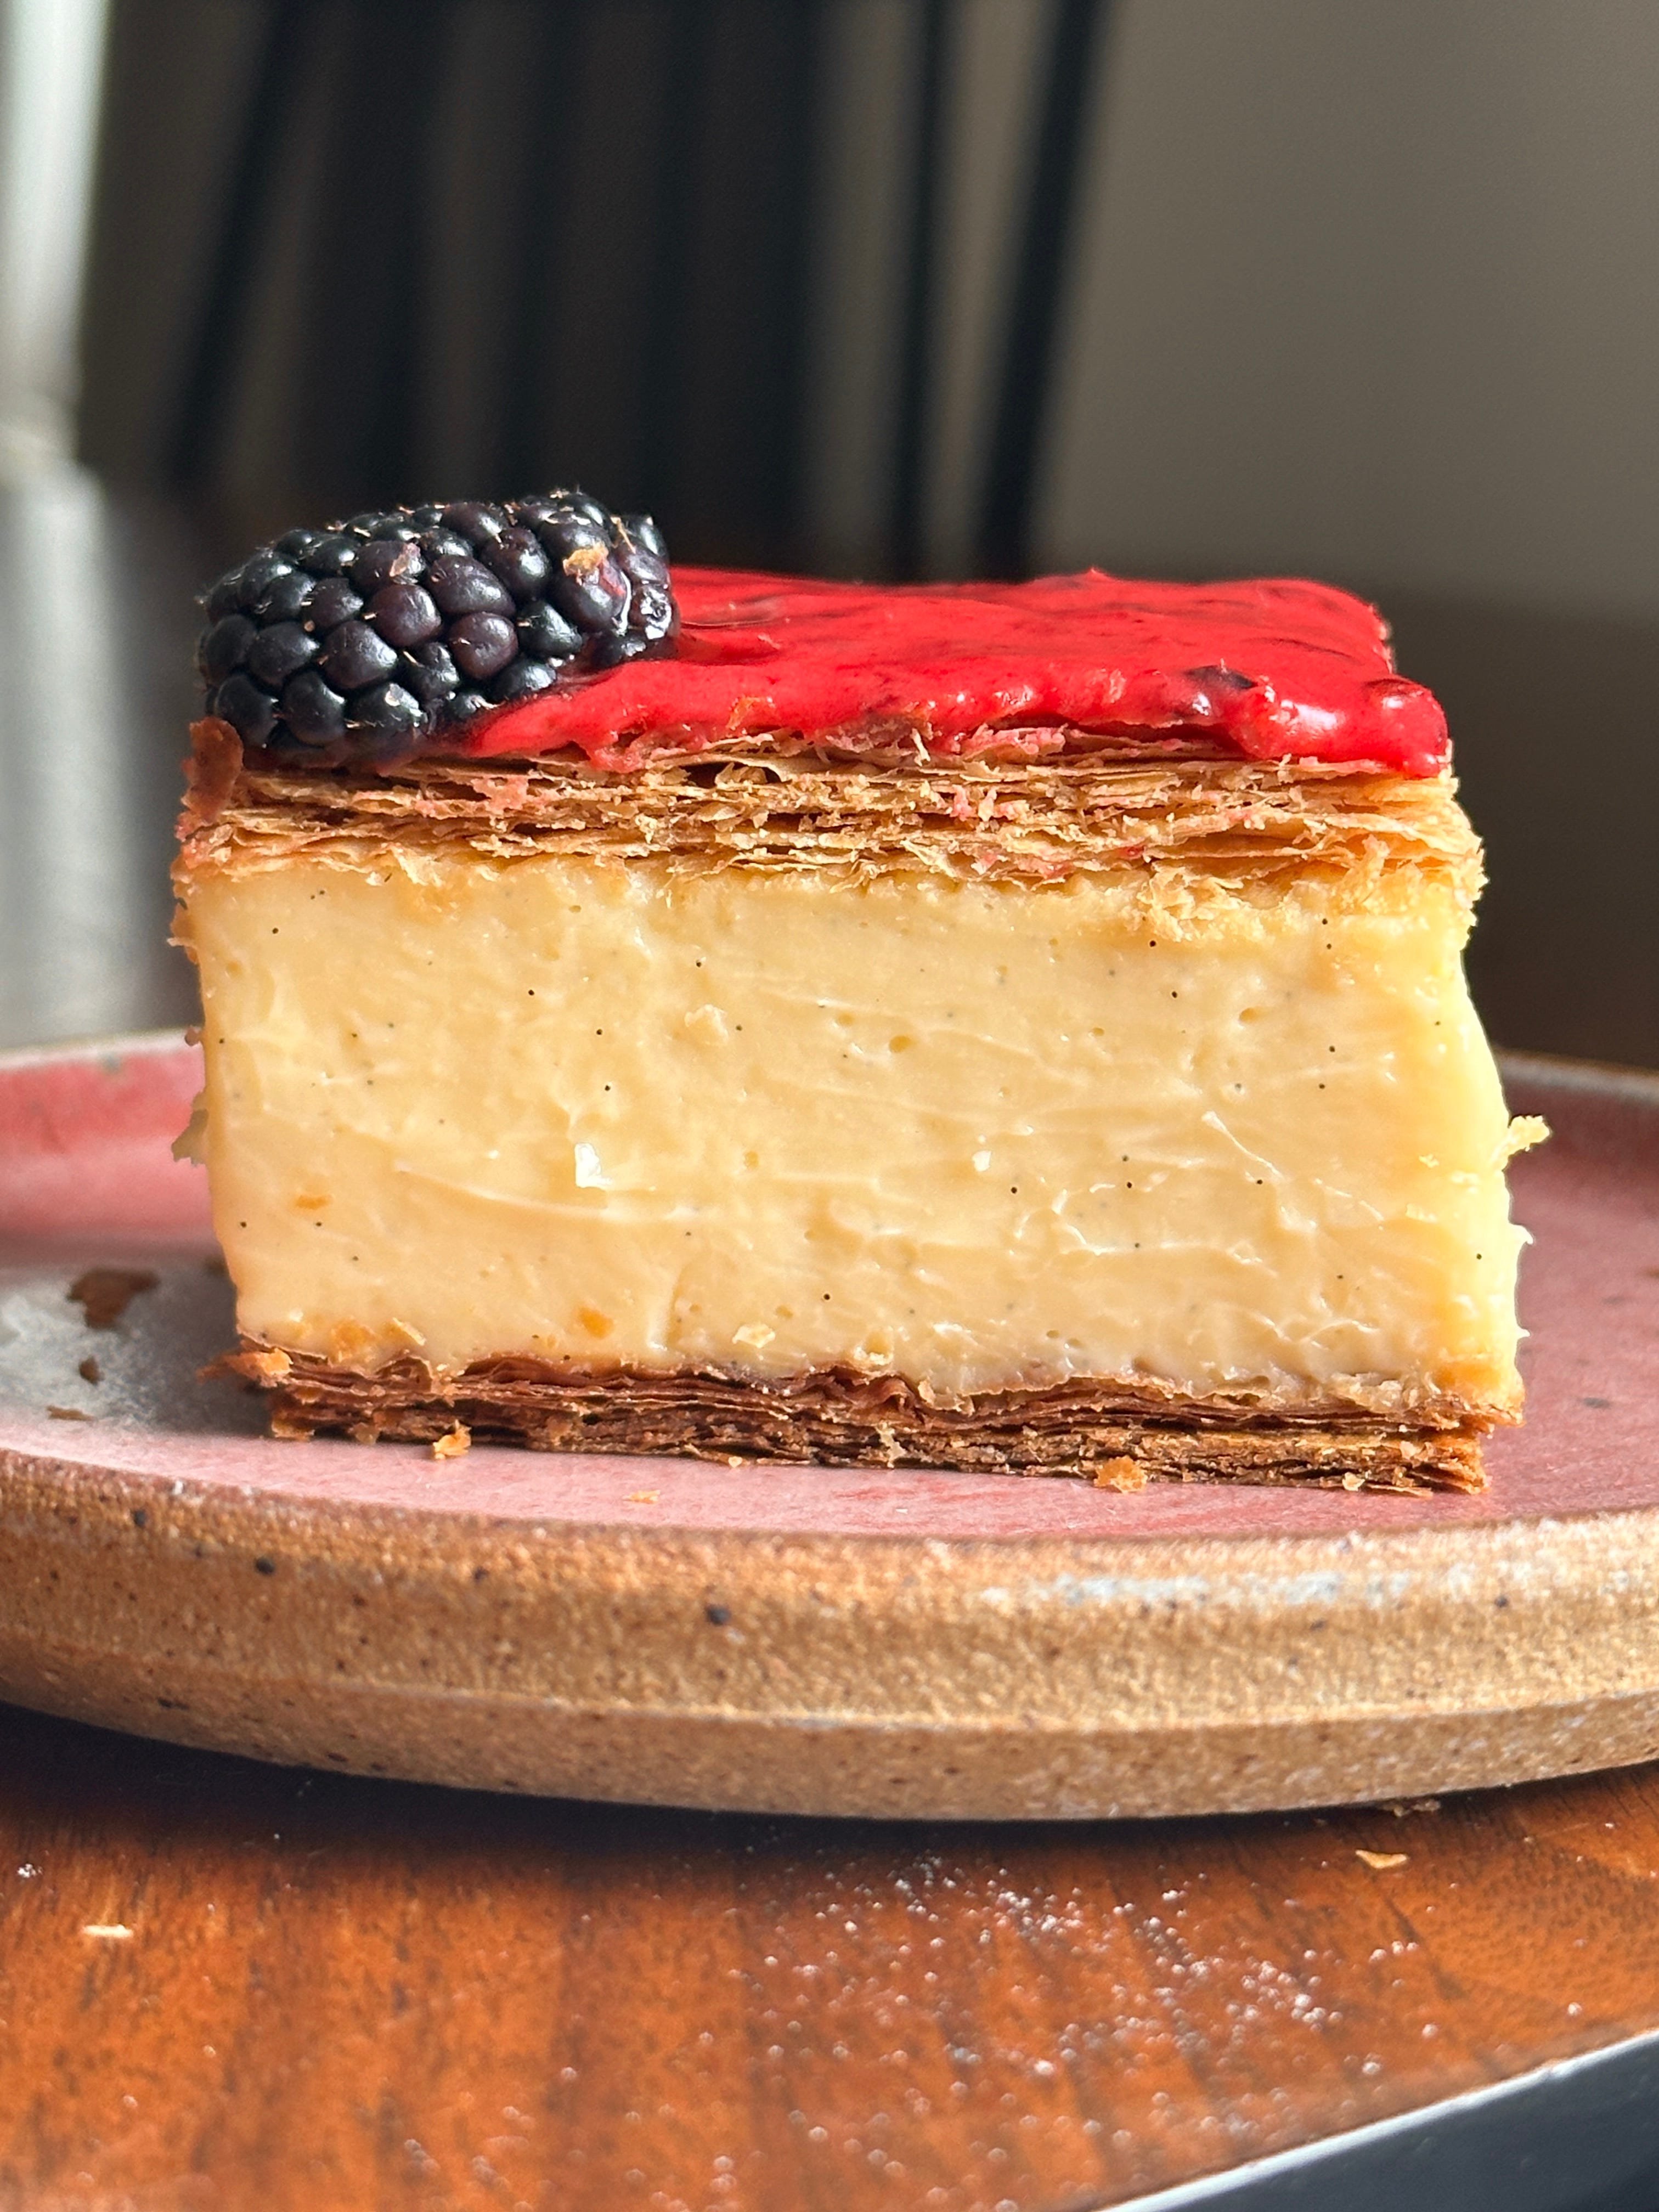
Though any old custard slice is easy enough to track down, there’s one that has made a huge impact on me recently - Darcie Maher’s version, ft creme fraiche, vanilla, buttermilk and sour cherry, at Lannan Bakery. It is a thing of beauty, and this edition of the newsletter certainly wouldn’t exist without it.
I’m sure you’ve all heard about this beautiful bakery in Edinburgh (which is currently closed for refurbishment but will be opening again soon), but in case you haven't, let me fill you in: Lannan, taking over a corner building in the charming Stockbridge, was opened by baker/owner Darcie Maher in the summer of 2023. With a custom dark wood counter, red awning and staff t-shirts (and tote bags, you can buy!) featuring a joyful woman munching on a croissant, it’s a mecca for pastry lovers like me.
Lannan specialises in and, in my opinion, sets the standard for modern viennoiserie. Of course, it does the classics perfectly, but its ever-rotating, highly seasonal menu truly goes the distance. From Damson custard to Amalfi lemon and meringue, Fontina, potato and pickled chanterelle, to Jerusalem artichoke dauphinoise and tête de moine, this isn’t your typical bakery. It’s no surprise that the signature view of Lannan is a queue of people snaking down the street, all waiting patiently for their chance to score one of their latest creations - the alphonso mango rice pudding croissant special last May, which took hours to assemble, was gone in minutes.
During my book tour, I was lucky enough to visit and work with Darcie and her lovely team for a few days in May last year. I knew I’d love Lannan - I’d wanted to go for months - but I didn’t realise how much it would inspire me. Watching how sensitively the team worked with ingredients, with genuine desire and respect for quality and technique, was something you expect to see in a Michelin-star restaurant rather than a bakery. That aforementioned mango rice pudding croissant? It took Darcie and her team hours to assemble. Each precious mango was diligently peeled, sliced, and placed carefully to fit the circular croissant base. Even though the Lannan team produces to the absolute maximum capacity each day, they are (rightly!) sold out within hours. If I were lucky enough to be local to Lannan, I’d happily be in that queue every day!
Among the extraordinary goods on offer at Lannan is the custard slice, with creme fraiche custard and sour cherry buttermilk icing. It’s been on the menu since day 1 (though the icing rotates occasionally it is currently blackcurrant, I think!) and has become a total classic. To keep up with the demand, the team makes 50L of custard per week! My heart goes out to their forearms and biceps for all that stirring.
Watching and learning from the team about the Lannan slice (and of course, eating plenty of it - being stationed near the person assigned to cut the slice is the pro move) reignited my love for this pastry. Just weeks later, I made my own version inspired by Lannan’s at a pop-up in London with a bay leaf-infused custard and a blackberry icing. So, you’ll find her wisdom laced through this newsletter. Thank you Darcie, my custard slice sensei. We salute you!
The Elements
In theory, custard slices are very simple. You bake two pieces of puff pastry, compressing them between sheets to limit their expansion, pour on custard, top it with the lid, chill, ice, chill again, and slice it. Easy, right? Well, sort of. A perfect custard slice can quickly become a soggy, lumpy mess with no structural integrity, so paying attention to how it is assembled is essential. With so few elements, it’s crucial to get each one right. Let’s run through them.
Puff Pastry
Puff pastry has been a real workhorse on this newsletter lately - from pithivier to galette, it’s incredibly versatile. For some pastries, we want puff pastry to fly, expand and rise as much as possible. Other times, we want all the layers without the height, resulting in an ultra-flaky bite that shatters in your mouth. To achieve this, we need to compress the puff as it bakes, usually weighing it down with a baking tray. I compared a few methods in this newsletter, and I’m still loyal to the method - letting it rise, unencumbered, then compressing halfway through baking. This way, the pastry bakes through properly, and all the layers are visible.
But even before we get to the bake, I have to tell you that the pastry's formula makes a difference: Darcie at Lannan has adapted her puff pastry to make it easier to slice, adjusting the number of turns so it’s flaky but not too flaky. This gives the team a fighting chance to cut the pastry tidily.
Due to the sheer number of tests this week, I mainly used good-quality shop-bought pastry. It works well, but you can’t control the number of layers, and I found the homemade pastry much easier to slice. So, if you plan to make your pastry for this recipe, while I love the classic puff pastry, your best bet is likely inverted pastry or rough puff. With rough puff, you’ll still get flakiness, but you won't have so many interlocking sliding layers.
When it comes to the bake, I prefer a deep golden pastry - it adds dimension to the custard slice and guarantees crunch. But, too dark, and the layers crisp up so much that they separate, making it hard to cut cleanly - the individual layers slide around on each other, preventing you from having one solid mass to slice through.
We’ll get to the best way to slice this pastry (definitely the hardest part of the recipe!), but it all starts with the pastry: Less-cooked pastry is softer and easier to cut, while well-baked pastry is crispier but trickier to handle.
Pastry Cream
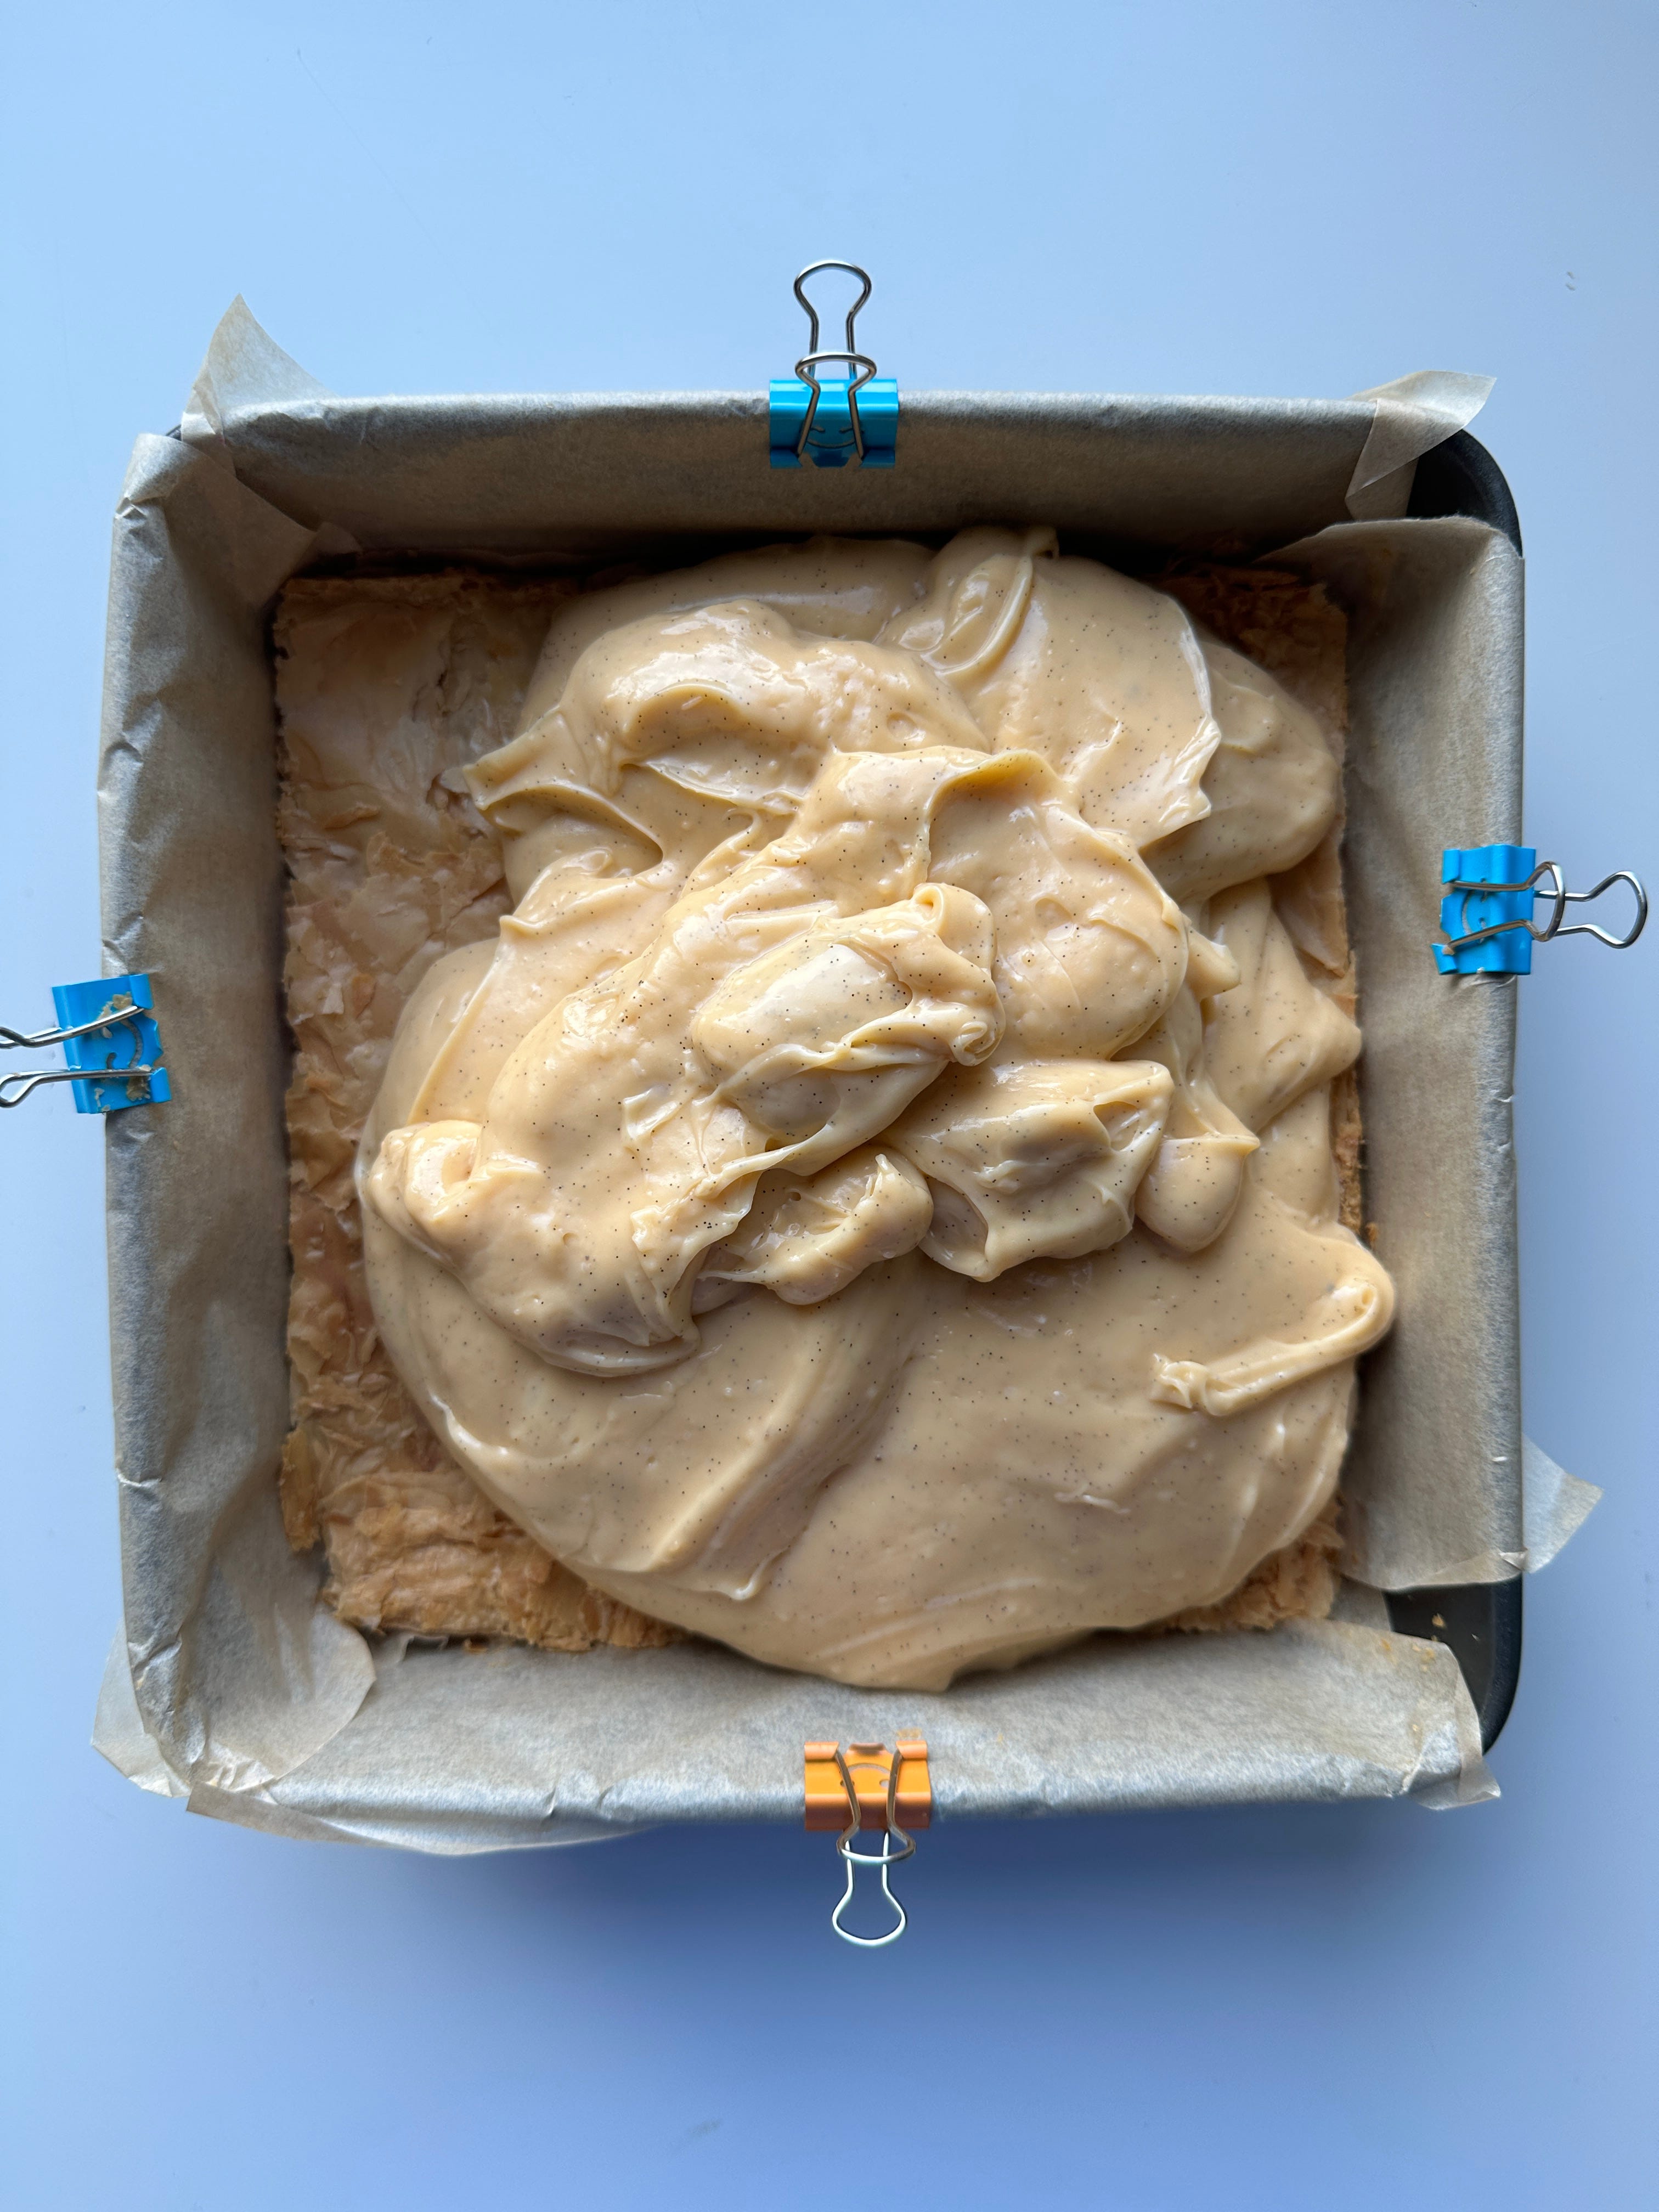
Okay, before you look at the recipe and get a jump scare, you have to know that you need a lot of custard in the slice, much more than you think. Remember, the custard slice needs to look generous, which means a big pile of pastry cream.
Pastry cream might be the most useful of all the fillings and techniques in the baking arsenal. Let’s go over the basics, shall we?
Pastry cream, or crème pâtissière, is a thick ‘starch-bound’ custard. It’s made by heating dairy, usually milk and sometimes cream, with flour or cornstarch until you get a glossy, velvety texture. As it heats, starch granules absorb liquid and swell, thickening the mixture - this is called starch gelatinisation. The amount of starch in a recipe will define the thickness. For context, a pie filling might have just 2-3% starch (depending on the fruit), while pastry cream needs at least 7% to achieve its signature luscious texture.
But that’s only part of the story in pastry cream; It also contains eggs that thicken via coagulation when heated. This is when the proteins unfurl and join together creating a thickened mesh network capable of holding liquid. Cooked for too long, or too hot, the coagulation process will be too successful and rather than holding liquid, the egg proteins get so firm that they separate, resulting in unpleasant splitting and curdling. Sadly, this is irreversible - you just can’t uncook an egg! (OK, actually, you can, but you need a high-speed centrifuge and a bunch of urea. It's fascinating, but there's not really a solution for us here.)
In the case of pastry cream, while we can attribute some of the rich texture to yolks, their role is more to do with flavour and colour. The bulk of the thickening is due to the starch, which prevents the eggs from curdling. Starch is so effective at swelling (gelatinising) that it disrupts the protein's ability to make a network, preventing it from curdling. This is fortunate since cornstarch needs to come to 95c to properly thicken, well past the point where eggs would typically curdle. Sometimes pastry cream gets lumpy because the starch particles aren’t evenly distributed - if this happens to you, you can hand blend a lumpy pastry cream til smooth, and it should be good as new.
Fat also makes a difference - recipes that add butter or cream will be thicker and have proportionally less liquid to ‘set’ with starch.
Tests for today’s recipe
You know how I mentioned that the amount of starch in a mixture defines how thick it will be? Well, pastry cream lives on a sliding scale. While it’s usually around 7% (my recipe in SIFT sits about here) starch to liquid, this increases depending on your desired texture. To find my perfect custard, I mixed up a series of tests with varying quantities of starch and fat:
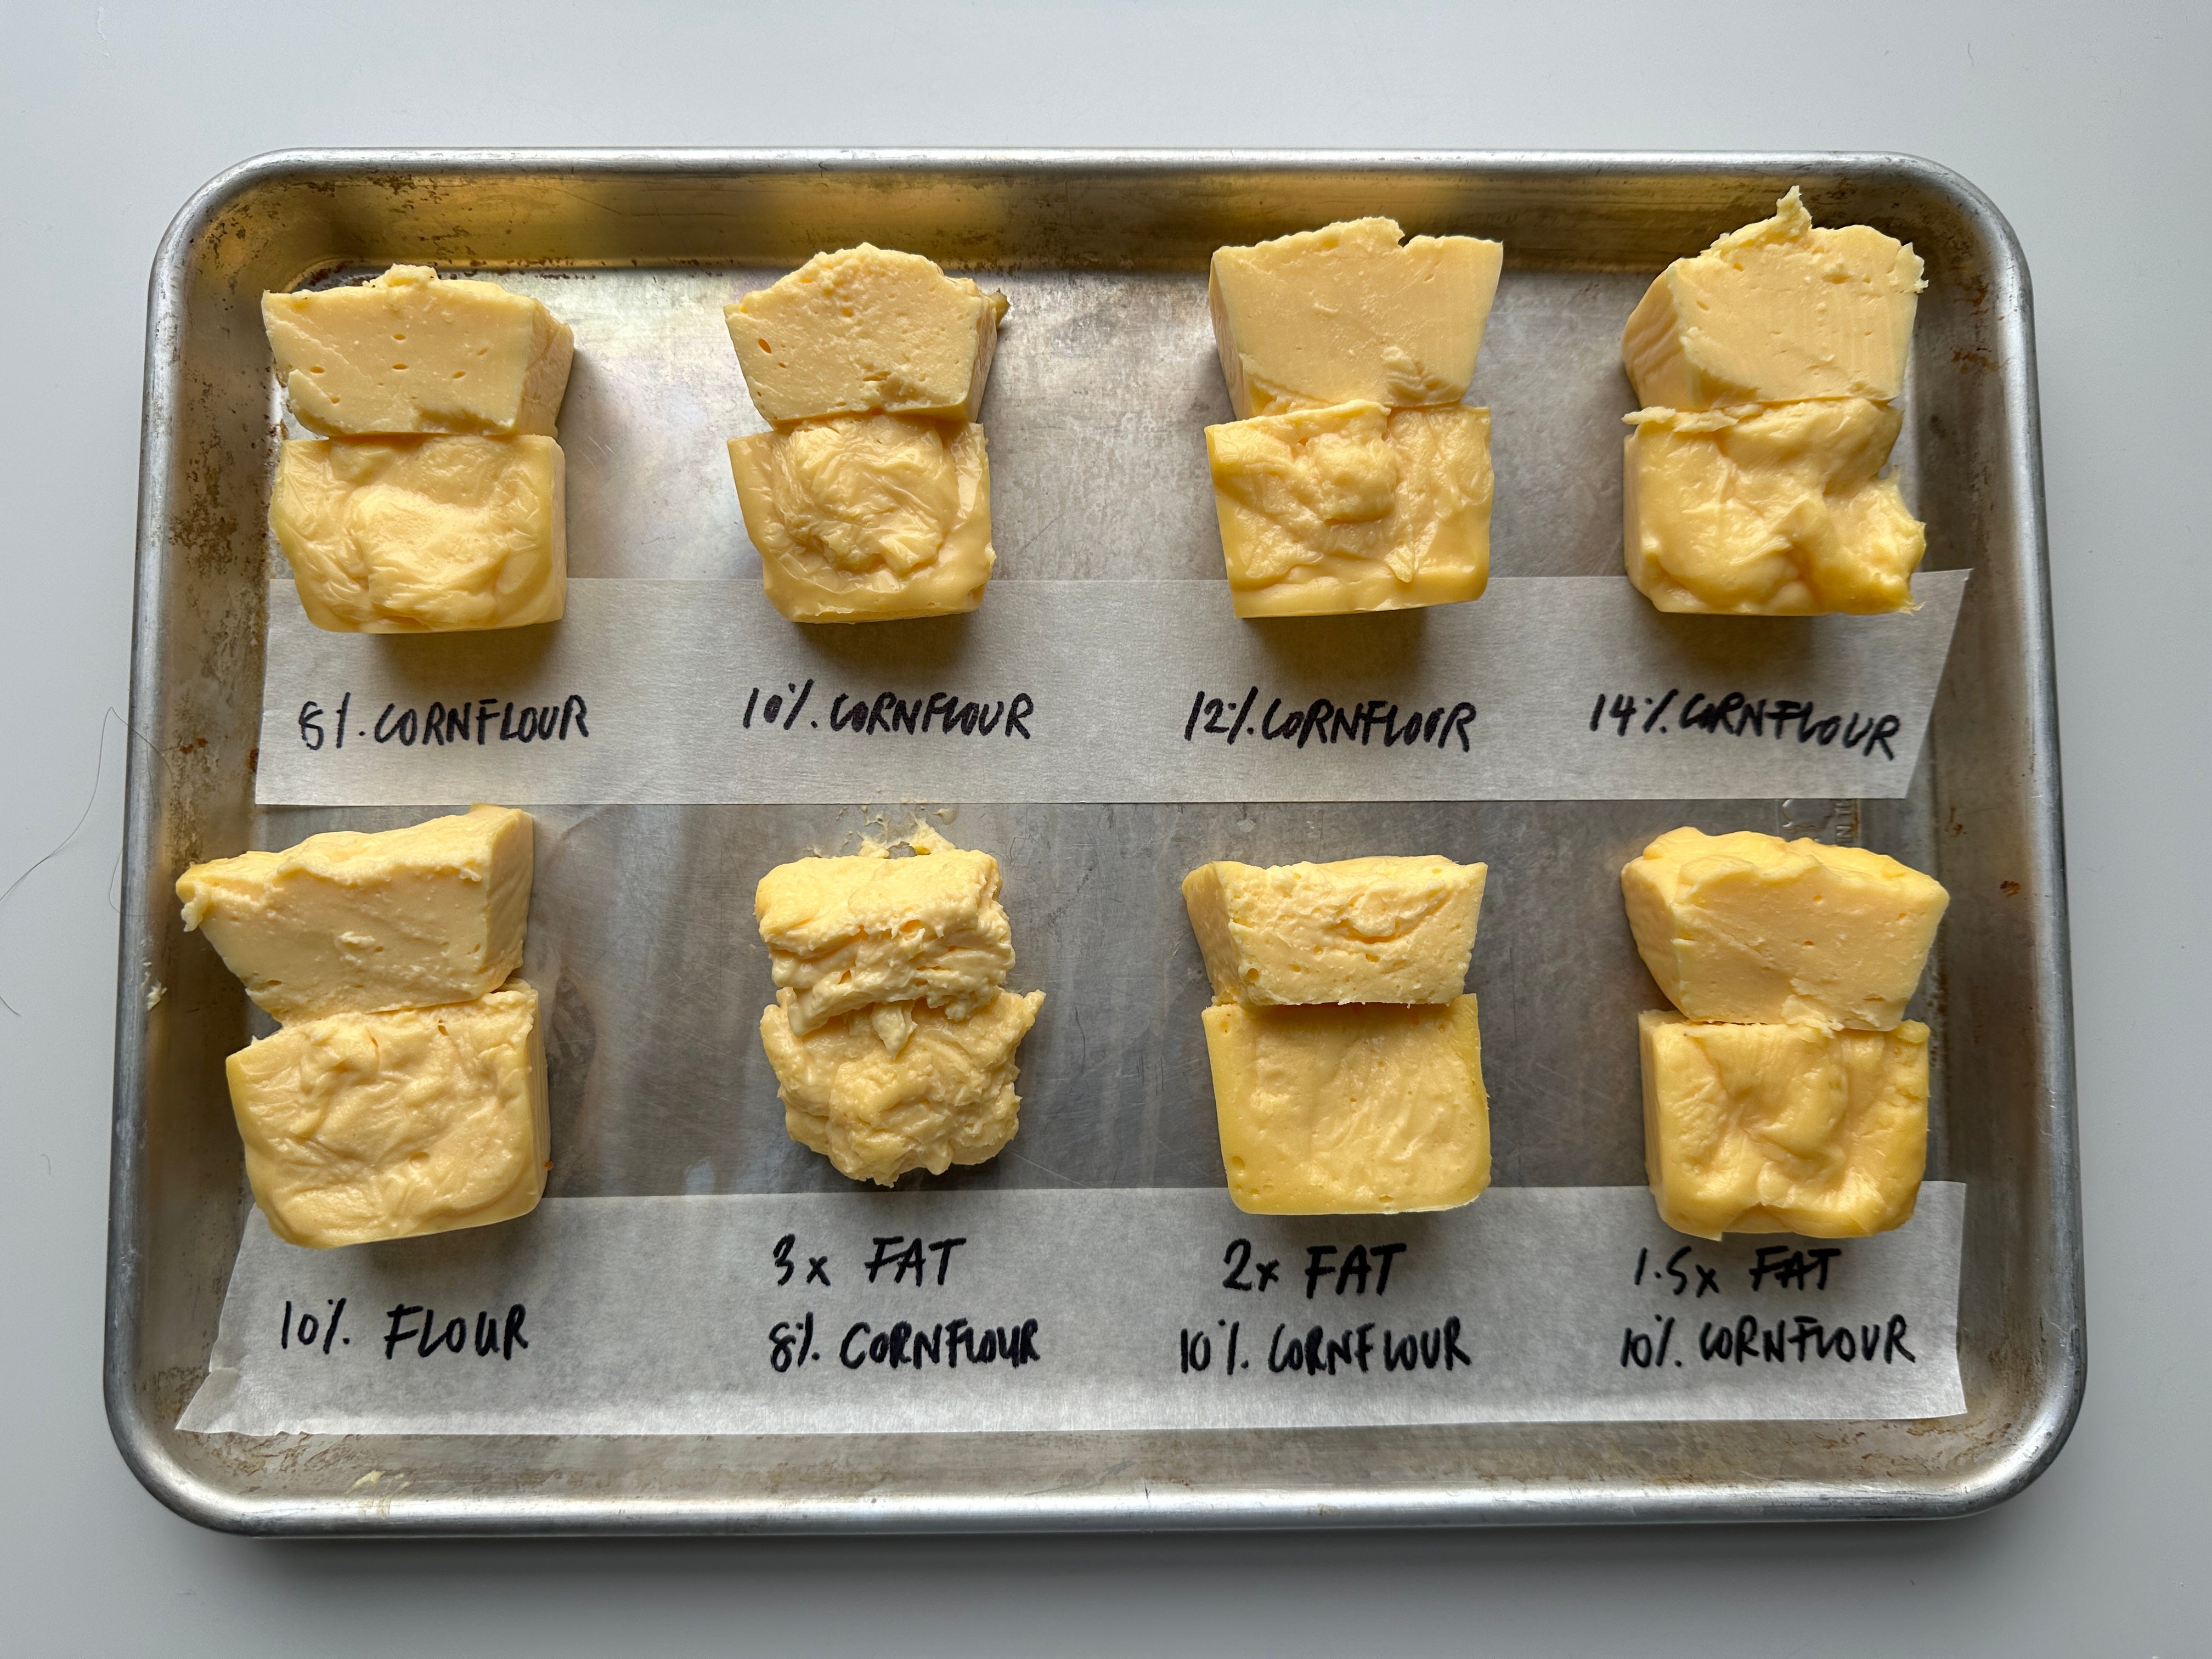
For starch, 10% was definitely the right amount. For fat, I do like cream and think it's a worthwhile addition, I love butter-rich pastry cream. For my final custard, I opt for overall 12% fat which is about 50% more fat than my usual pastry cream, and just a touch of double cream for mouthfeel. If you can’t get double cream, you can use all milk instead.
The deal with cooling and setting the custard
As pastry cream cools, it gels into a solid mass that needs to be beaten and loosened before using to prevent a jelly-like texture, and encourage creaminess. While the jelly-like texture isn’t unpleasant, it is far from ideal. As well as this, once beaten, the pastry cream never resets as firm as its original block, making it hard to slice. Another issue we have is with steam - if you pour your hot pastry cream straight into your mould and the pastry, it will soften it, and you’ll end up with an unpleasant soggy layer. AGH! So, what to do?
At Lannan, Darcie agitates the custard as it cools. Though it seems simple, this step is essential. It solves the two issues - it efficiently releases the heat, meaning we won’t have the issue with soggy pastry, and it helps the custard form a smooth yet stable and firm texture that is sticky enough to adhere to the top and bottom pastry! I made a few tests below to compare:
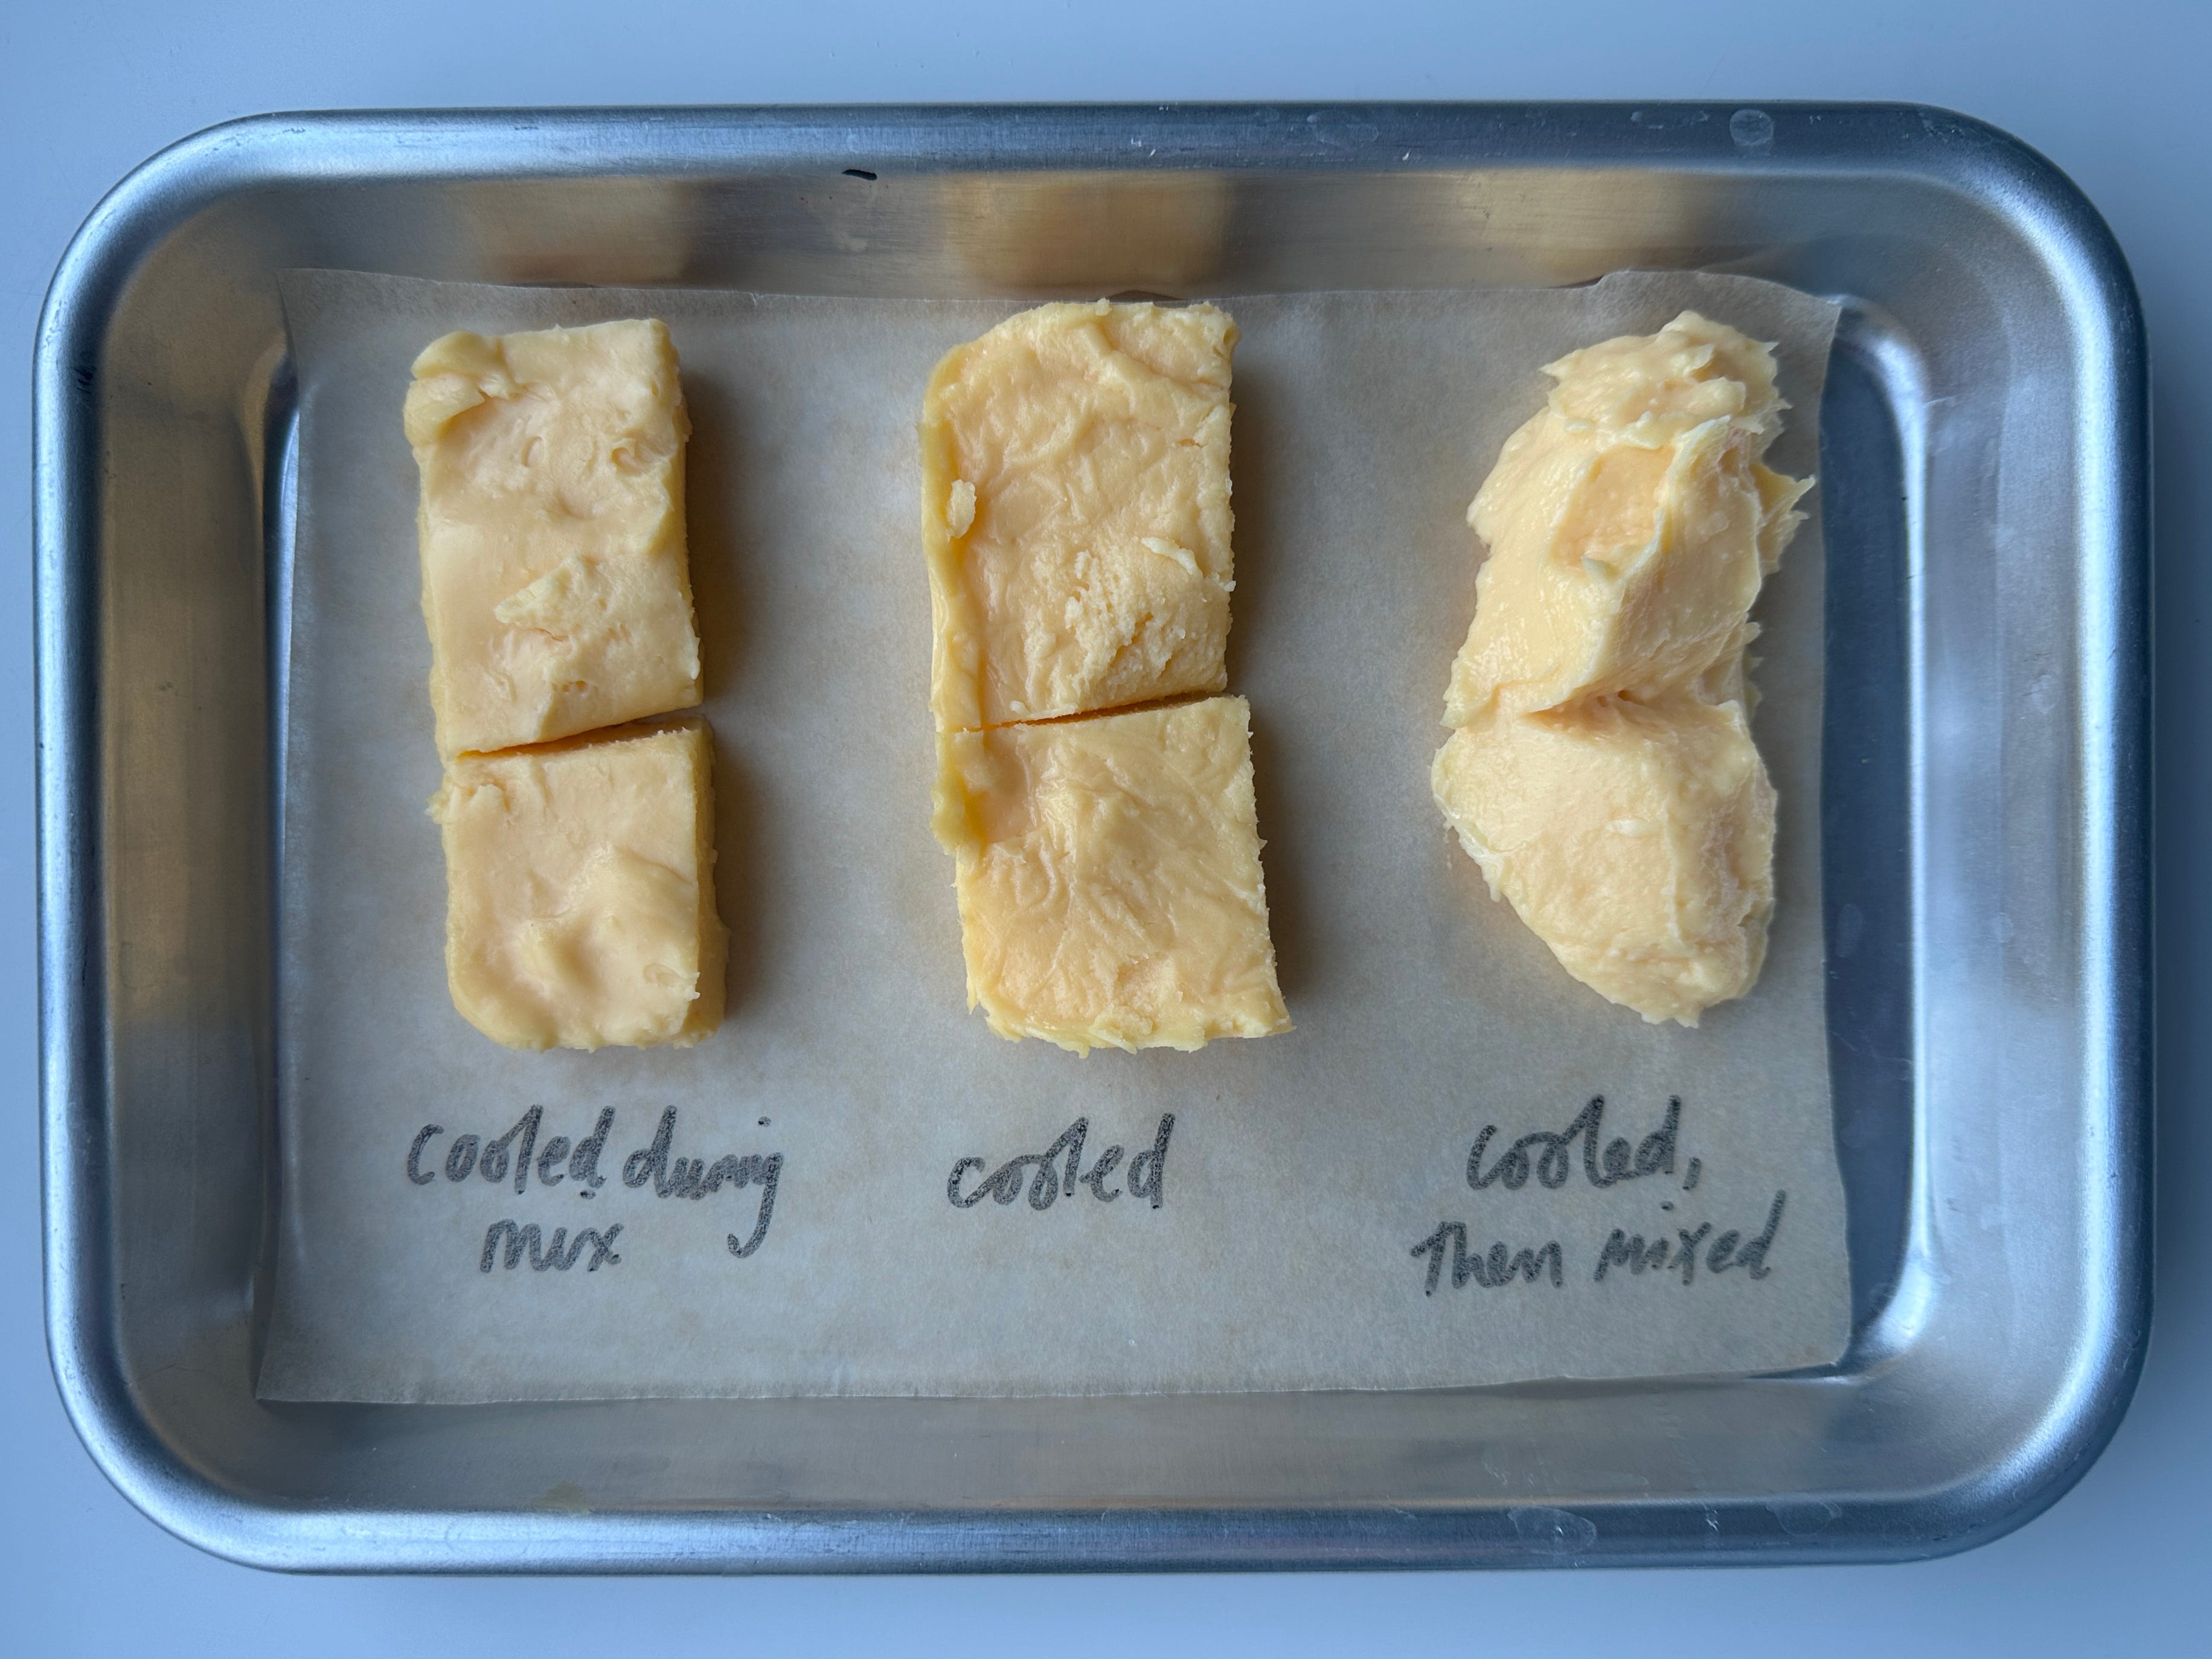
Just look at the difference - the test that was cooled in place has a denser, jelly-like consistency, while the version that was cooled and then beaten lacks structure. The version that was cooled and agitated is perfect, and soft! Bravo, Darcie!
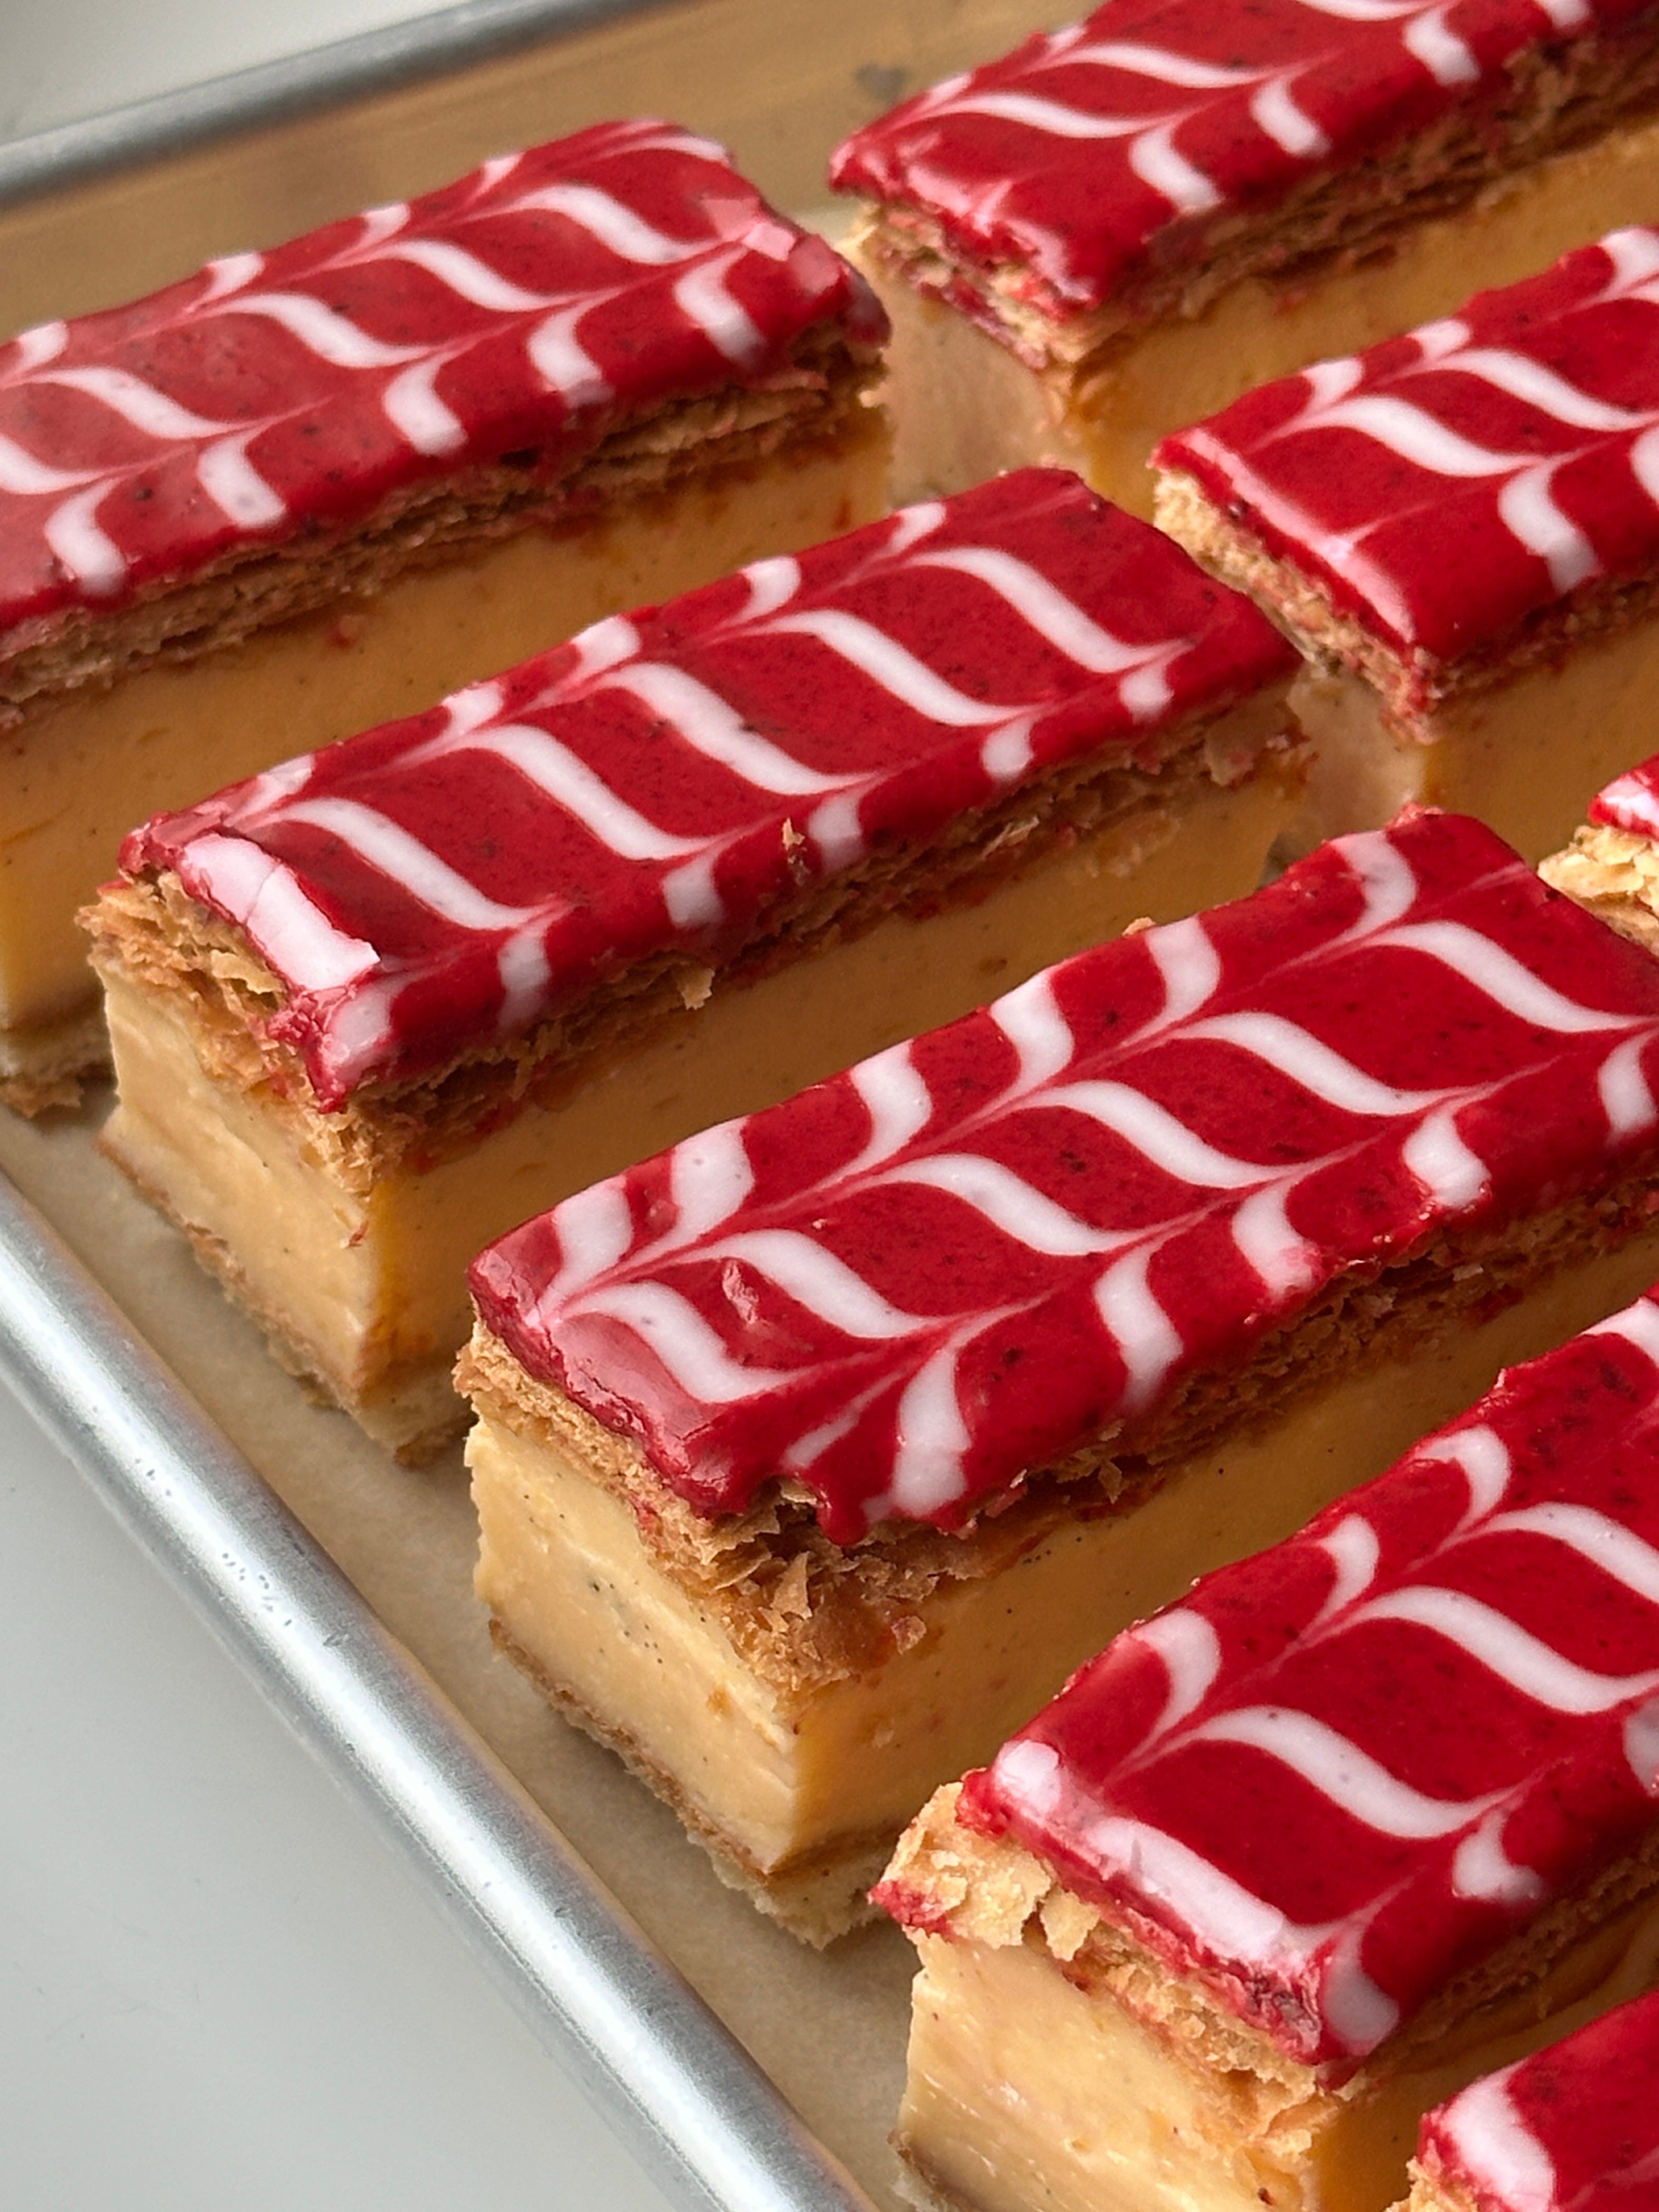
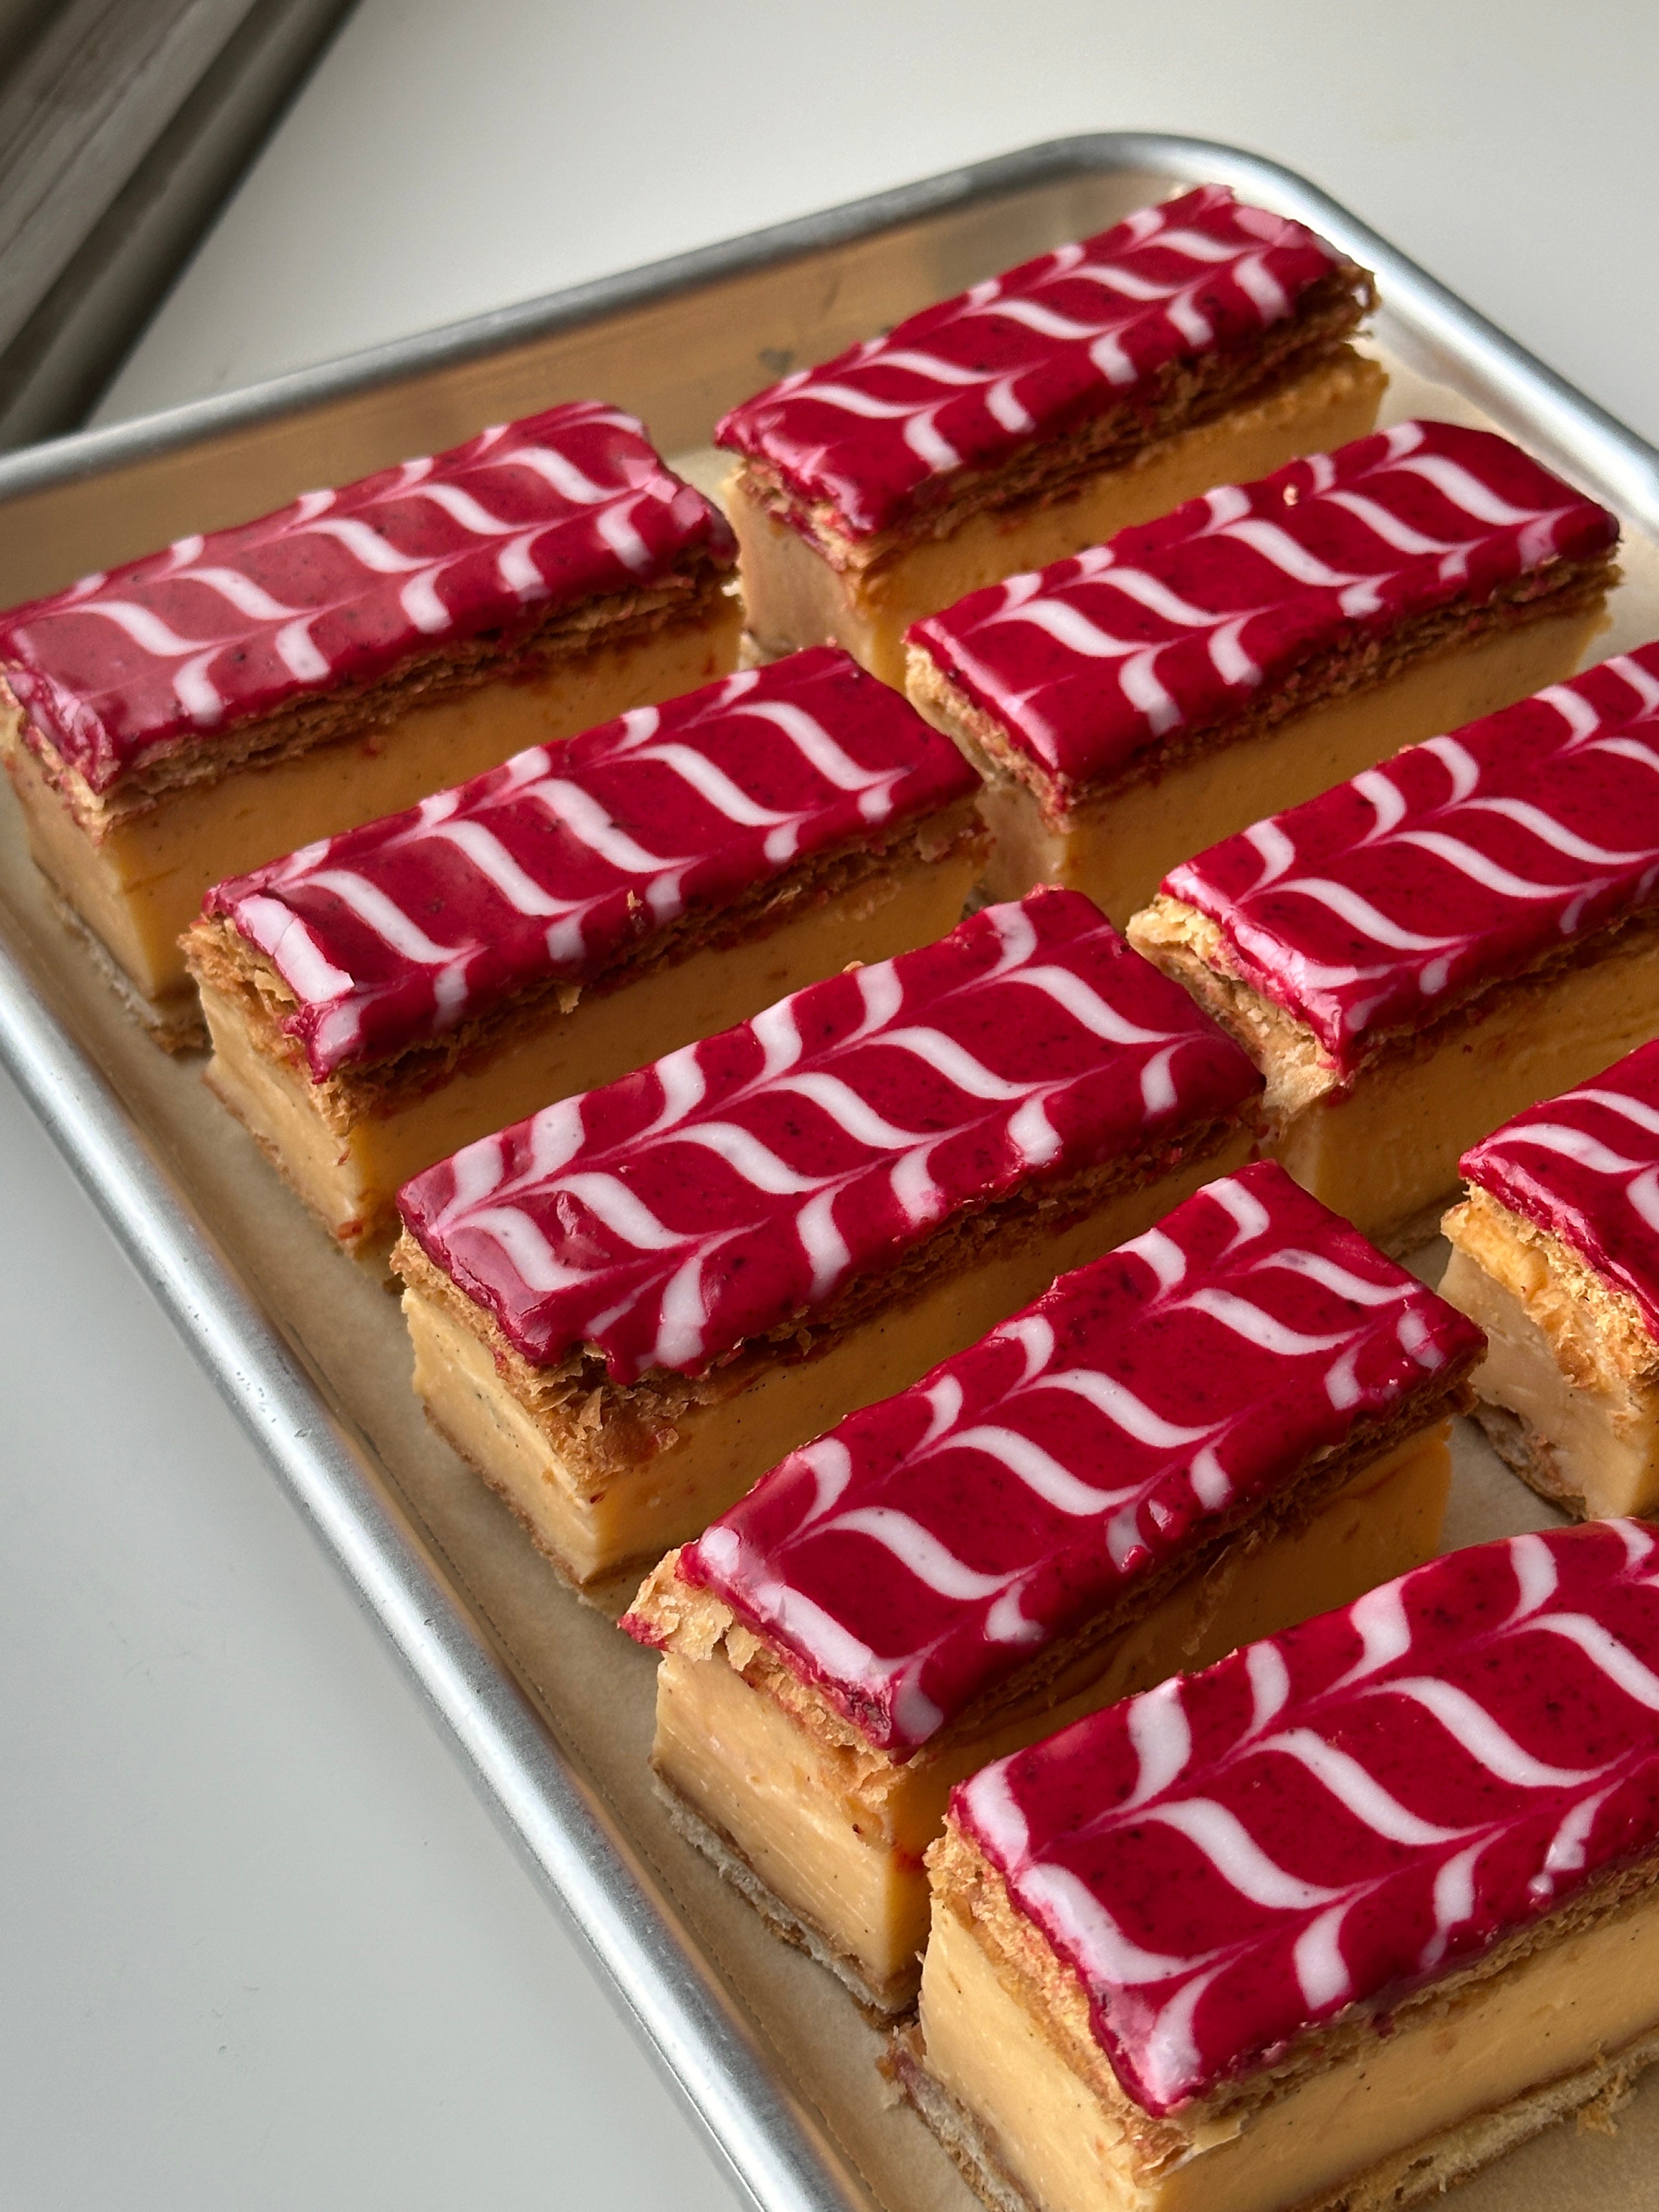
Finishing
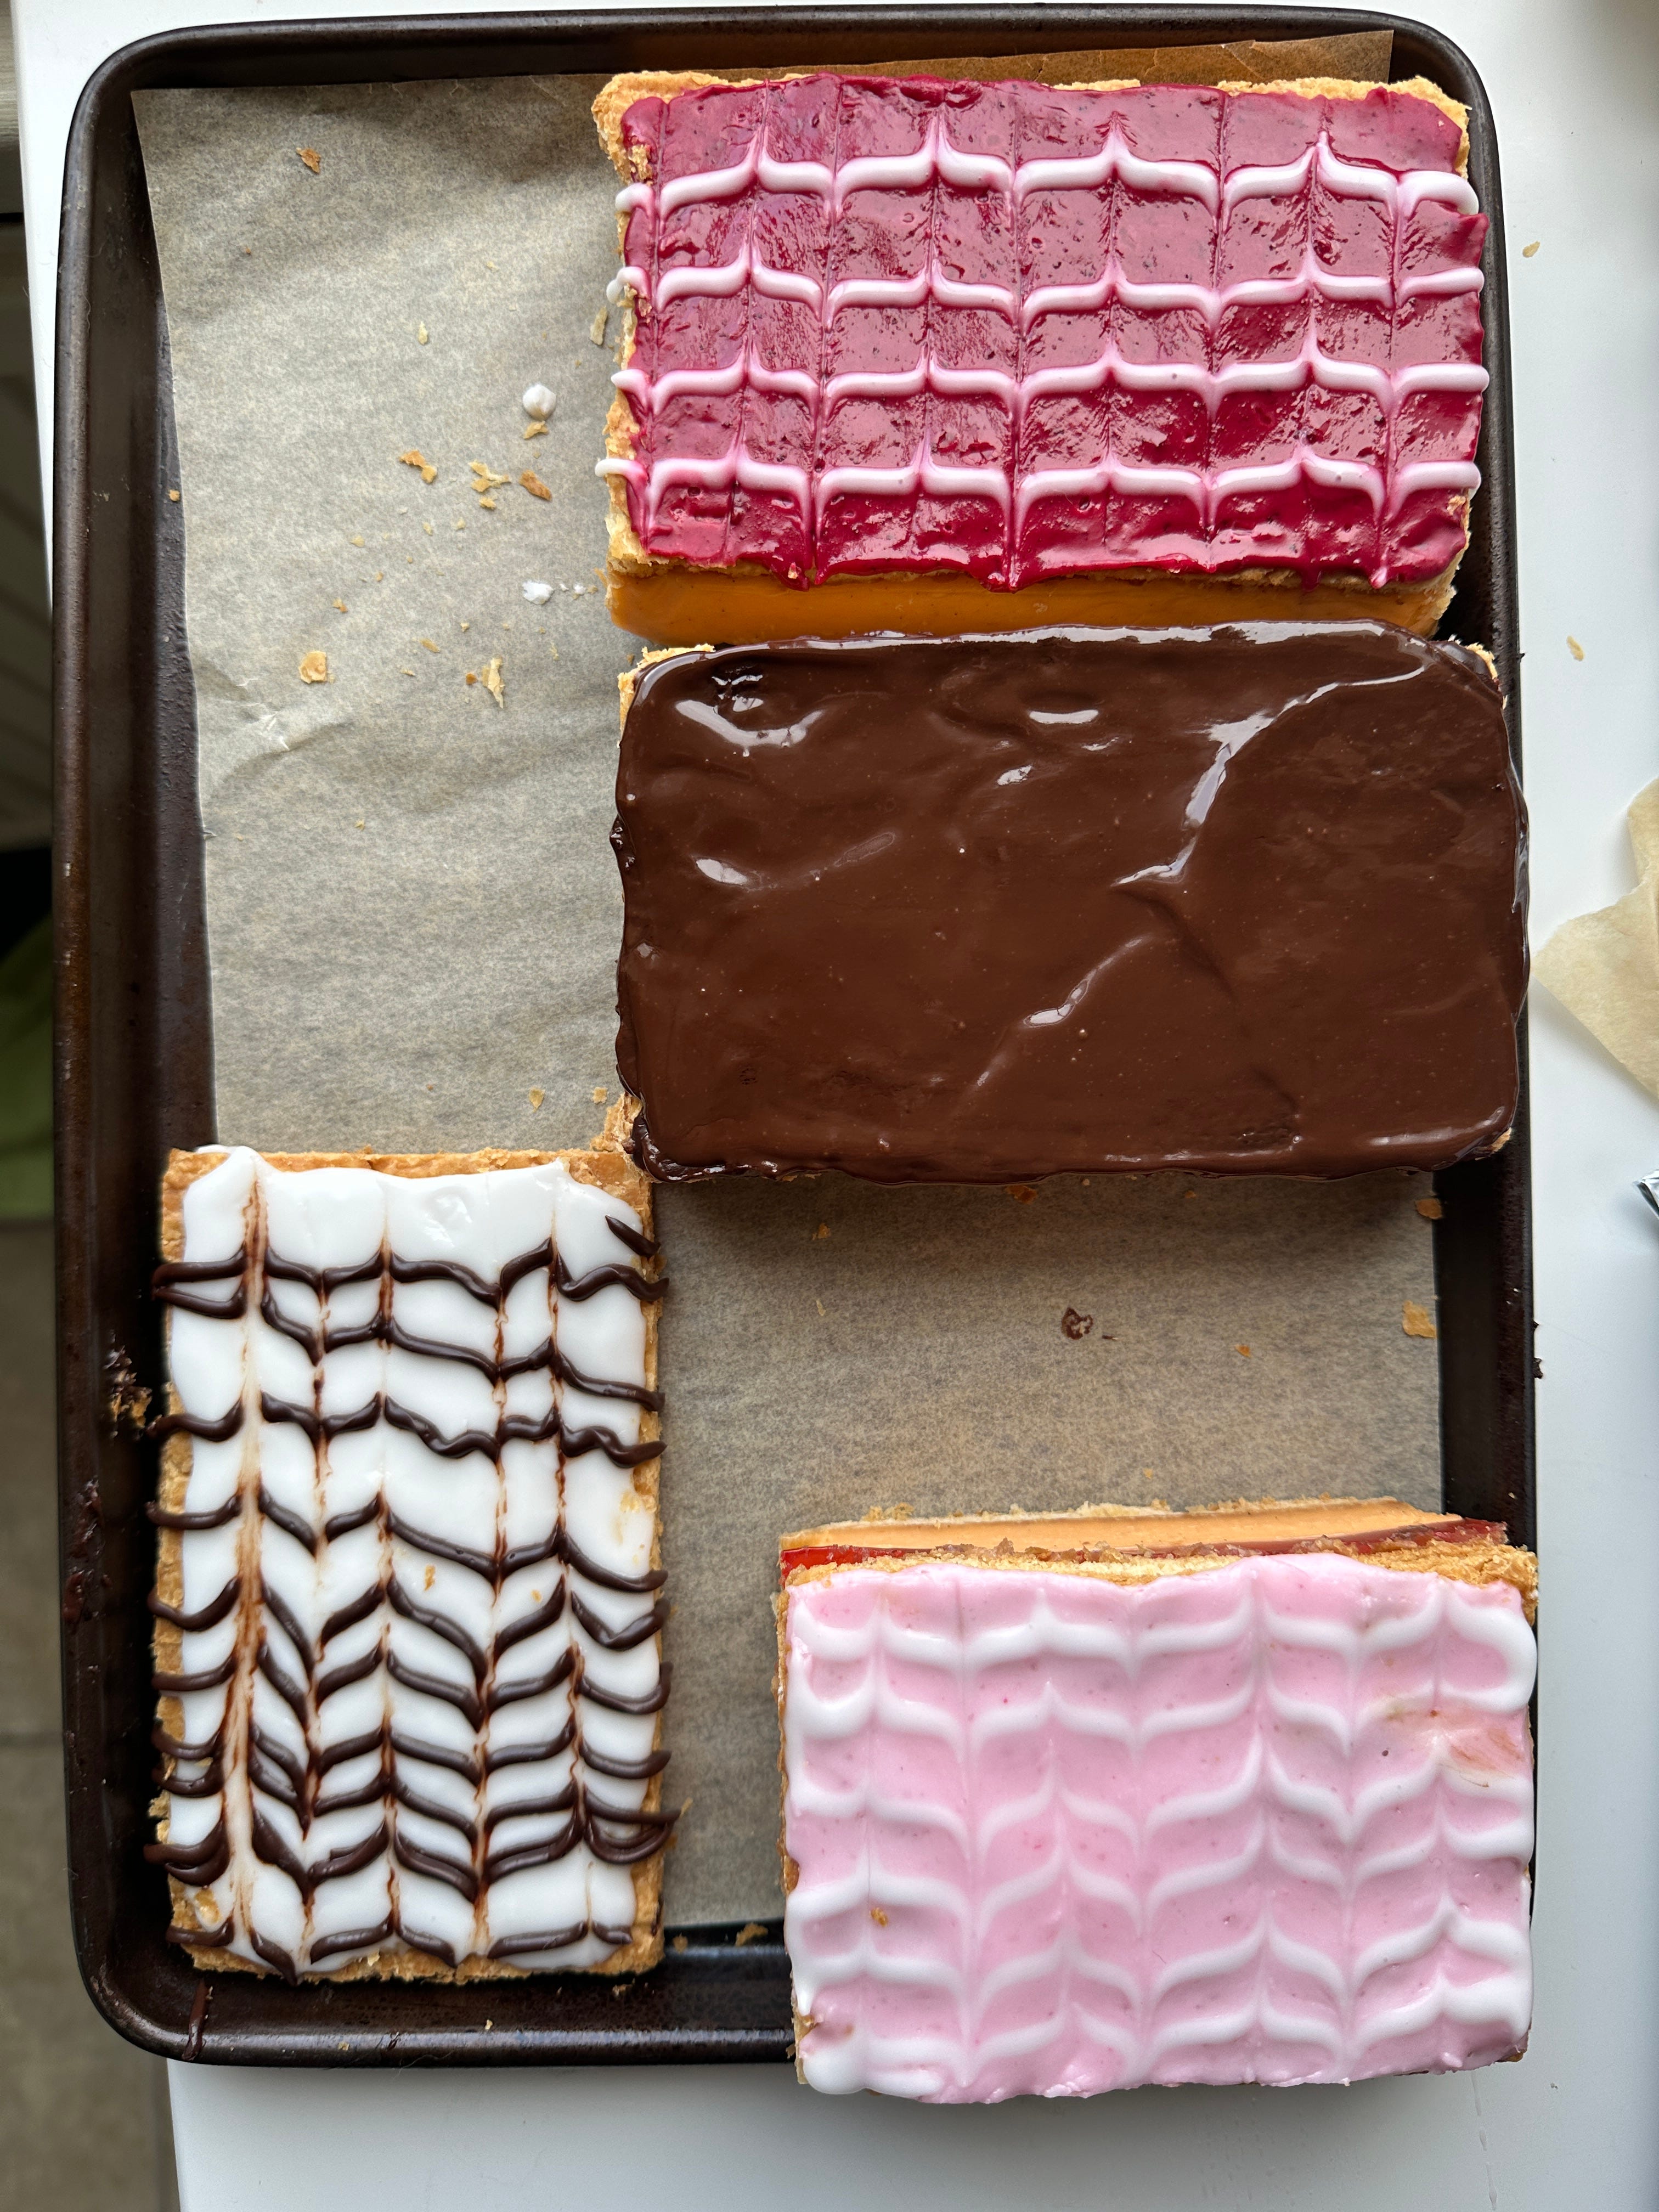
When it comes to finishing, you’ve got two camps: Icing, usually feathered, or icing sugar. Both have merits - the feathered icing is beautiful and classic but harder to cut through, while the icing sugar is understated and has a much simpler finish. Consulting with Darcie (as I did for most of this newsletter), she suggested freeze-dried fruit powder might make a smart finish, and she was right.
Cutting
I’m afraid I’ve left some bad news for last: Cutting the custard slice is a real pain. The worst culprit of all is the rhubarb jelly and custard version with its doubly unstable centre, but even the most simple version is a challenge. Firstly, the custard is wobbly (we want this!), we don’t have a stable or firm base to work with when slicing, and secondly, puff pastry is flaky! Which means it can get messy very quickly. Add icing into the mix, which can run and squish, and it can feel really frustrating. Not to mention that some tins are slanted, making them wider on the top than the base, meaning there is an overhang to deal with. All very annoying.
The answer? A very sharp serrated knife (the Lannan team uses the Victorinox pastry knife), hot water (you could also use a blow torch if you have one to warm your knife, but it doesnt solve the cleaning issue!), a cloth to wipe and dry between slices, and plenty of patience. Instead of cutting downward, you need to carve through the icing and pastry in a back-and-forth motion with relatively firm pressure. Once you get through to the custard, remove the knife, dip it in hot water, wipe it dry, and then finish slicing through. Simple - just do it twelve times in a row!
Or… To quote Darcie herself: “The best way is ‘saw saw squish saw saw’. And confidence!”
Another option is to alter the direction of the cut - turn the custard slice on its side so it is custard-down, and you can easily slice through it. This can be risky if you have icing (especially if it's a bit wet! Icing can take 3-4 hours to dry, and lets be honest, we are sometimes in a rush), but a good solution if your icing is fully dry, or you’re going for an icing sugar finish.
Alternative flavours
I realised this week that the custard slice is perfect for adaptation. Custard is easily flavoured through infusions, by caramelising sugar or stirring in chocolate. You could also add a portion of fruit puree, or nut paste, into the pastry cream and alter the flavour that way. The pastry itself could be a cocoa puff, or flavoured with spice, and the icing could be swapped for a chocolate glaze, or flavoured with different fruit purees. You could also make a marbled custard, or add a layer of jam or jelly.
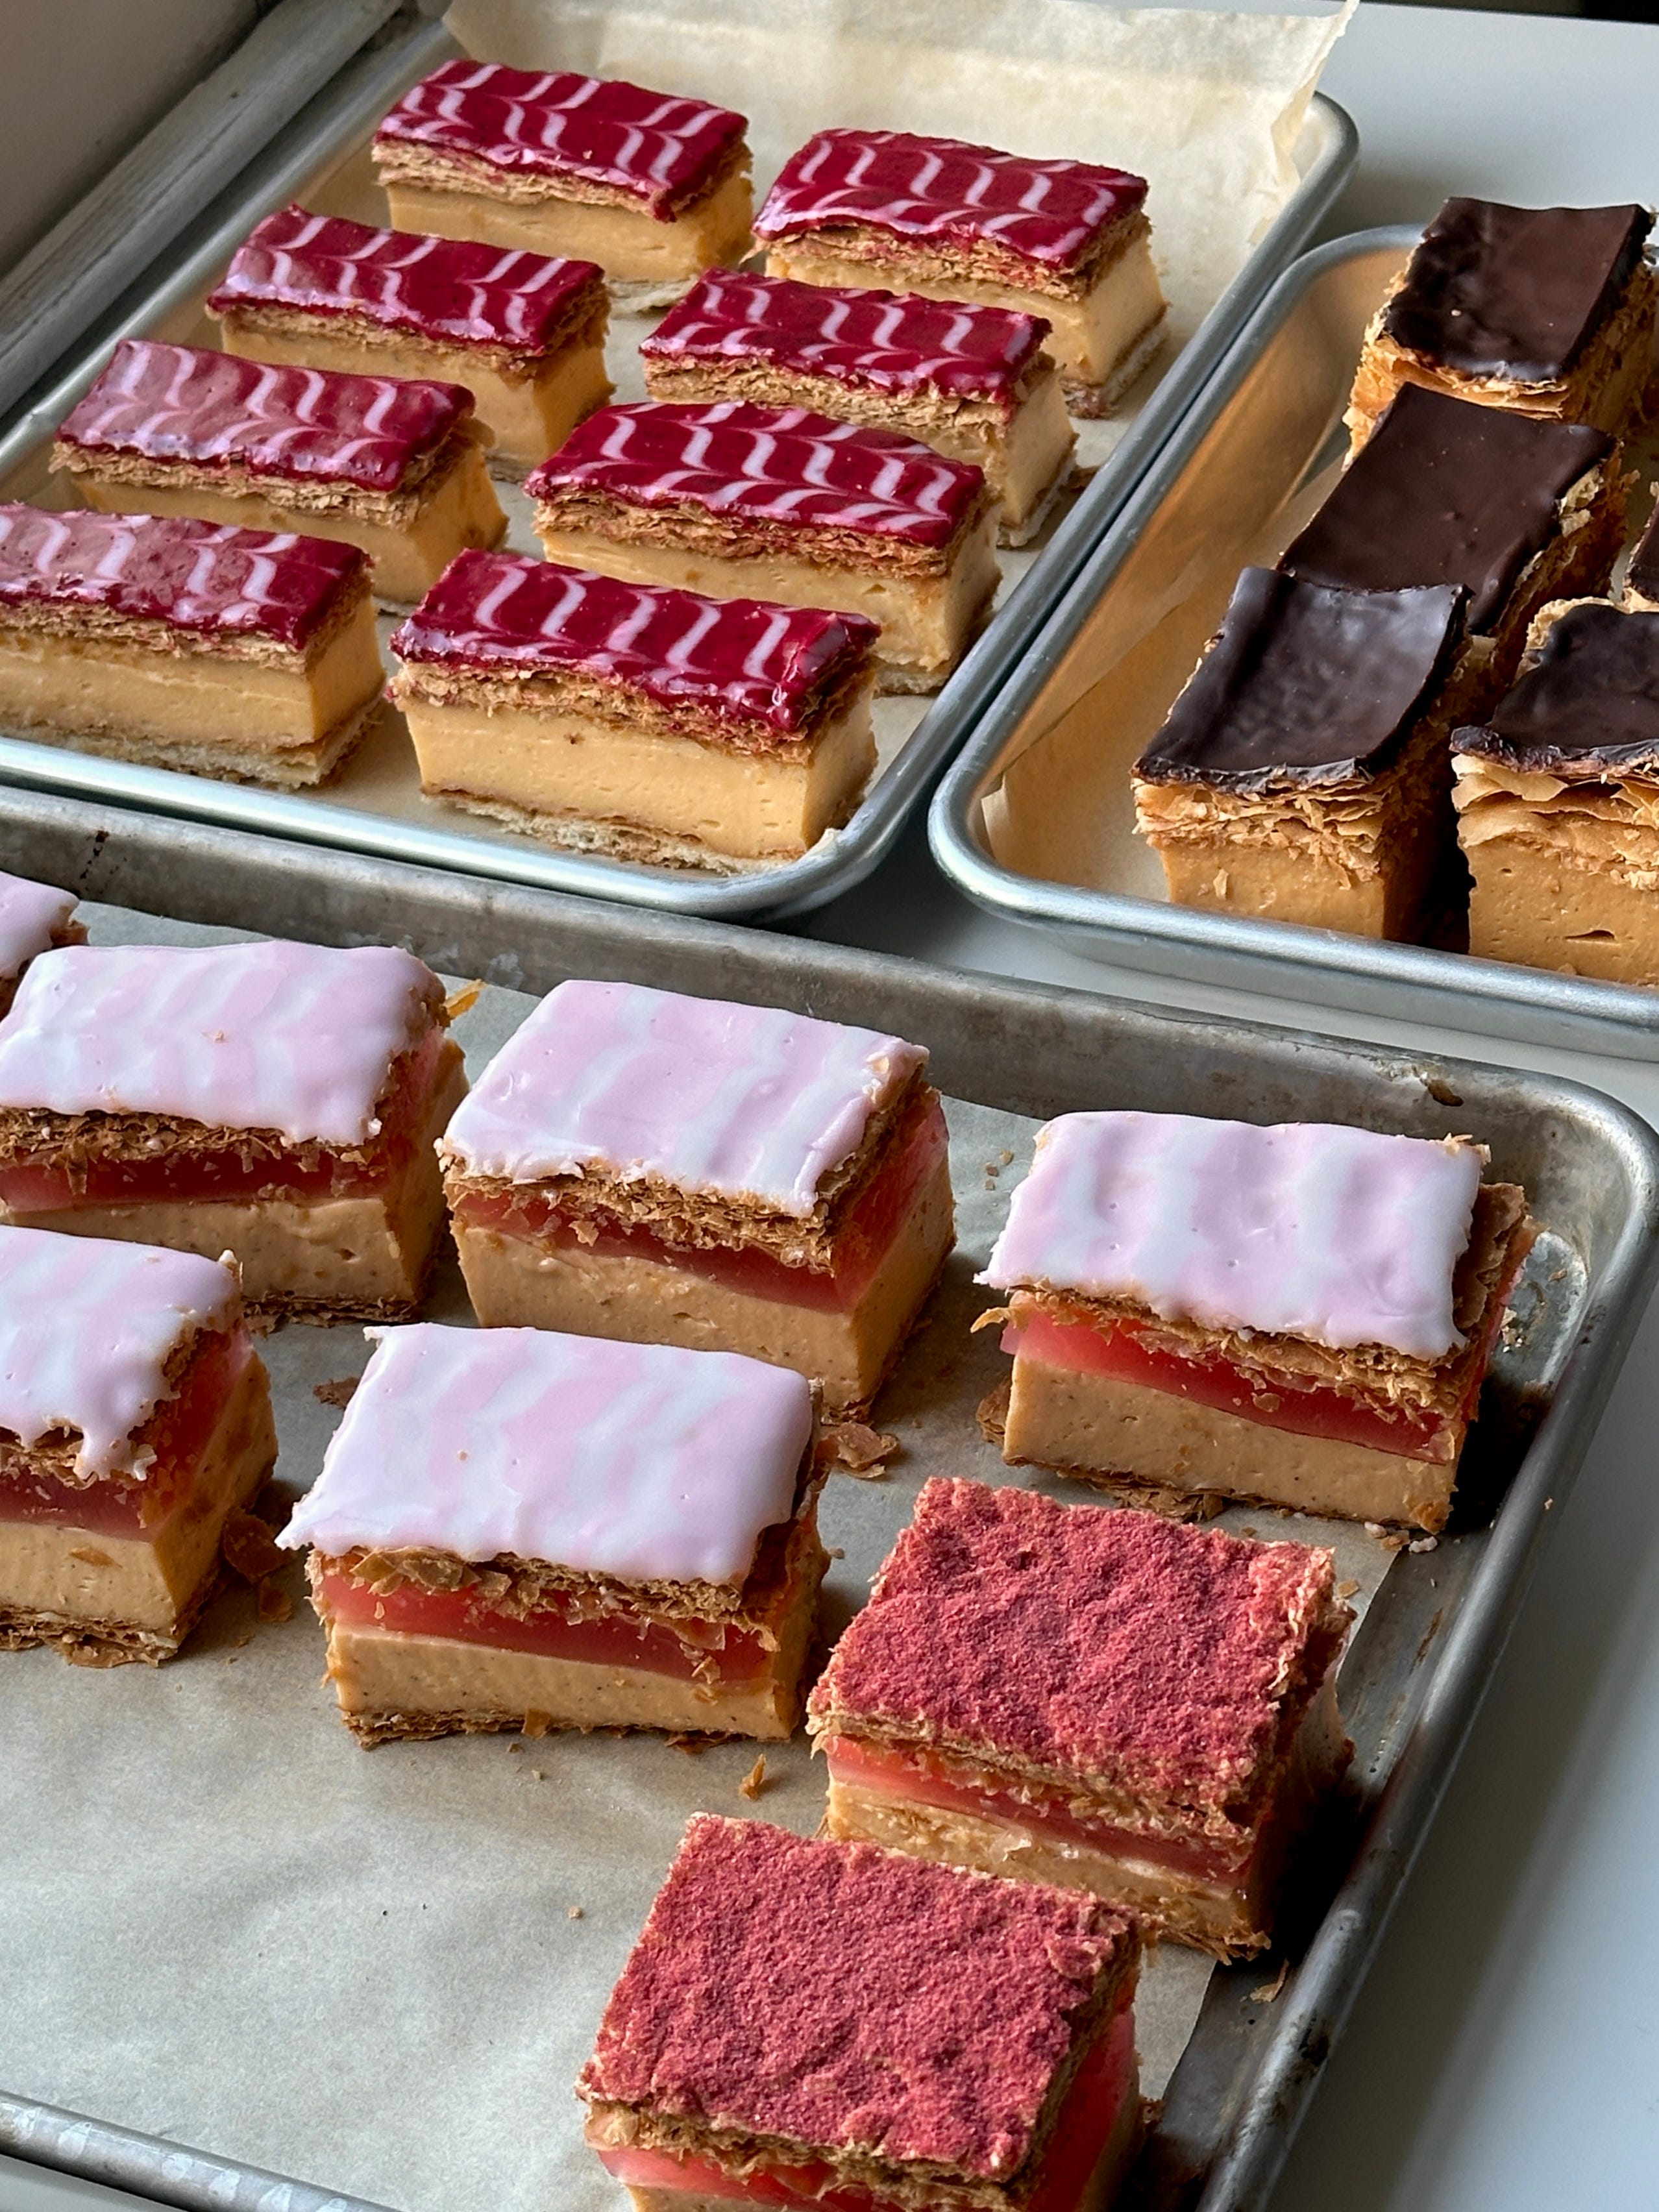
Over on KP+, I’ve shared two alternative versions inspired by the classic - a caramel custard with chocolate glaze, and a rhubarb jelly and custard, double layered version. I can’t wait to talk you through them (especially the trials and tribulations of jelly adhering). Click here for the recipes!
Equipment and size
I have formulated today’s recipes for an 8x8 inch tin, though it’s worth noting the one that I have has sloped edges, meaning the base is smaller than the top. If your 8x8inch tin is straight up and down, your custard layer will be a touch thinner than mine, in which case I recommend increasing the recipe by 1.2x. Also, if you don’t feel like making a full size quantity, you can halve it and make it in a loaf tin.
Blackcurrant and Bay Leaf & Vanilla Custard Slice
One 8x8 Square, around 12 portions, depending on how you choose to slice it.
1 batch of puff pastry
Custard
650g Whole milk
120g Double cream
1 Vanilla pod, scraped
2 bay leaves
150g Caster sugar
150g Egg yolks
75g Cornflour
½ tsp Flaky salt
40g Butter
Icing
15g-30g Blackcurrant puree (blend blackcurrant with a little lemon juice)
120g-150g icing sugar
5-10g Lemon Juice
50g-60g Icing sugar
Method
Roll out your puff pastry until it is 2mm thick, approximately 50cm long and 25cm wide. Place it on a tray, wrap it well, and chill for 30 minutes—1 hour. You can also do this a day in advance.
Preheat oven to 200c fan. Divide the puff pastry in half - you want squares at least 23cm x 23cm as it might shrink a little.
Place the puff pastry sheets onto two trays lined with baking paper. Bake for 15 minutes until well puffed and starting to brown. Remove the pastry out of the oven, cover with paper or a silpat, then squash with a tray. It will feel unnatural, but do it! You really want to compress it.

Reduce the oven to 180c fan, put it back into the oven for about 10-15 minutes then check the colour. You may want to go for 5-10 minutes more. I prefer a dark, crisp pastry. Leave to cool completely, then cut to size. If, like me, your tin has slightly different dimensions at the base and top, use the tin, flipped one way, then the other, as a guide.
Prepare your tin - line with greaseproof then place one of the puff pastry sheets into the tin.
In a saucepan, heat the milk and cream along with the scraped vanilla beans (seeds and pods) and bring to a simmer. Turn off the heat and cover. Leave to infuse for at least 1-2 hours at room temp, or cool and infuse for 24 hours in the fridge.
To make the custard, reheat the milk and cream with half the sugar until steaming. In a heatproof bowl, whisk the yolks and the other half of sugar together until combined. Once combined, whisk in the cornflour. When the milk/cream is steaming, turn off the heat, then pour ⅓ of it over the egg yolk mix whilst whisking to temper the mixture. Pass it through a sieve back into the warm saucepan. Turn the heat back to medium and whisk the custard constantly until you bring it to the boil and it has thickened, 5-6 minutes. Let it bubble (it will be thick, inconsistent and lava-like large bubbles) for 1 minute, then whisk in the salt and butter.

Pass the mixture through a sieve into the bowl of your stand mixer. Stir on a low speed with the paddle attachment for about 15-20 minutes or until the mixture is at least below 30, or closer to room temperature (close to “cool to the touch”) but still flexible and pourable.
Pour into your prepared baking dish on top of the puff pastry. Smooth with a palette knife, ensuring it goes right to the edges. Place the puff pastry top lid on top and press gently to adhere. Cool in the fridge til set.
To remove from the tin, loosen the unlined edges with a very sharp knife. Place a cutting board on top of the tin then flip it over. The custard slice should slide out. Remove the paper. You can decide whether you want to flip it back around - both sides should be good, but you might have one that is neater than another.
Prepare the icings - you need it to be thick; Mix together the icing sugar with a little of the blackcurrant puree and stir ‘til smooth. It should not easily drizzle off the spoon, and it should take about 30 seconds to fully settle, though you can still see a trail. Adjust as needed. For the lemon icing, it can be a touch thinner - it should easily pass through a piping bag with a 2mm hole cut. Adjust as needed then cover.
Spoon the blackcurrant icing on top of the pastry and smooth carefully and slowly with a palette knife. It should feel a bit difficult and slow if the icing is thick enough. Once you have spread it to the edges and before it sets, pipe thin lines across the cake. Use a sharp knife or toothpick to score through the lines, top to bottom, then back the other way. The result is a feathered pattern.

For the neatest slices, chill the custard slice for at least 1 hour until the icing is somewhat set. You can also chill it overnight before cutting if you prefer, though the icing may crack slightly in this case. You could possibly speed this up in the freezer, too.
To cut, first trim the edges to even out the shape.

Then, using a long knife and a ruler, gently mark the slices. You can decide the size - I usually go for approx 7x5cm for rectangles, or for slim, long pieces you can do 3.75cm x 9cm. Dip your knife in warm water, wipe dry then carefully saw back and forth through your marked lines. Once you get to the custard layer, dip your knife in the hot water then dry before slicing through the custard, sawing at the base to get through the pastry neatly. Repeat until finished.

Custard slice will last well in the fridge in a sealed container for 3-4 days, though the icing looks best on day one.


I love a good Vanilla Slice! Thanks!
And - just to bring the tone down - another Aus name for them is a “pus and cardboard sandwich” 😂
It is Australia Day / Invasion Day today (Jan 26th). 🖤💛❤️
Wow, absolutely fantastic, love your level of detail and research. Cannot wait to try this one 😃