Hello,
Welcome to the second edition of Kitchen Projects, a recipe development and kitchen journal. Part toolkit and part love letter to food, I want to show you behind the scenes of a recipe. You know, that bit before the perfect Instagram pic.
I’m so happy you’ve joined me! This week, I’m taking you on a deep dive of apple strudel, the classic Austrian/Bavarian pastry.
Strudel used to be one of those things I never thought I’d bother with. I mean, who has TIME to stretch dough across an entire table by hand?!
But the more I thought about it, the more I was romanced by it. And now, many strudels later, I can report that this is a pretty much perfect way to spend an afternoon. Although it may seem like quite an investment (and you will have to sacrifice a sheet), I promise you’ll feel a huge sense of achievement if you give it a go.
Once you’ve nailed this dough, there’s no end to what you could do with it - Potato Strudel? Yes please. Cheese Strudel? Absolutely. Chocolate? PLEASE.
Thank you so much for subscribing. And, if you enjoy this newsletter then please - share it with a friend! I’d love it if they joined us too.
Love
Nicola
PS. I got a rather fab DM from somebody telling me that they love the silly music choices I make when posting these projects on Instagram. So, I’ve made a Spotify account and playlist for the songs I picked to go along with my strudel adventures
Raindrops on roses... whiskers on Kittens... feeling happy yet?
Doesn’t apple strudel just feel so… familiar? so comforting? I hear the words “apple strudel” and I start picturing knitted jumpers, low glowy lighting and long socks, wooden board games and the sound of rain when you’re all bundled up inside. Perhaps I’ve just been conditioned by Maria von Trapp, but apple strudel just makes me feel good. It also helps that ‘strudel’ is such a delicious word to say. It’s a verbal self-snuggle. Strudel strudel strudel.
Conceptually, strudel is very much in my comfort zone, as weird as that sounds. But my IRL experiences of eating it fresh are actually very limited. From memory:
A portion larger than my entire face when I was on holiday in Austria aged 8 or 9
Once or maybe twice at Kipferl, an impossibly busy cafe in Islington, north London
In 2018, having recently watched Inglourious Basterds with my friend Oli, we sought out a big showy Bavarian cafe in central London. They did, indeed, have strudel but sold it WITHOUT ANY CREAM! Luckily, the Sainsbury’s Local next door had plenty of whippy cans in stock which quickly rectified the situ. Problem solved, vision restored.
NB. That was the day I also found out that there’s not many sounds or sights more pleasurable than the dispensing whoosh of a whipped cream can, especially in a fancy setting.
Growing up, the majority of my strudel experiences came straight from the freezer and into the oven. In my time, I’ve had many Tesco supermarket strudels (and have dabbled in the mixed berry category too) always served with scorching-hot microwaved custard.
Come to think of it, I’m not sure those freezer numbers even count as strudels... I’m pretty sure they were made with puff pastry, rather than fine and delicate phyllo-like dough. A good lesson to be learned here though: it’s probably best NOT to rely on British supermarket freezer sections for authentic cultural representations of food.
So shall we get onto the recipe?
Developing that dough
So let’s talk about REAL apple strudel dough. Apple strudel is not made with puff pastry at all. It is made with an extremely thin, delicate dough, which is wrapped around spiced apples, soaked raisins and breadcrumbs before being then baked till crisp in a hot oven. It’s the layers of delicate dough that give the impression of puff, that give you those lovely layers.
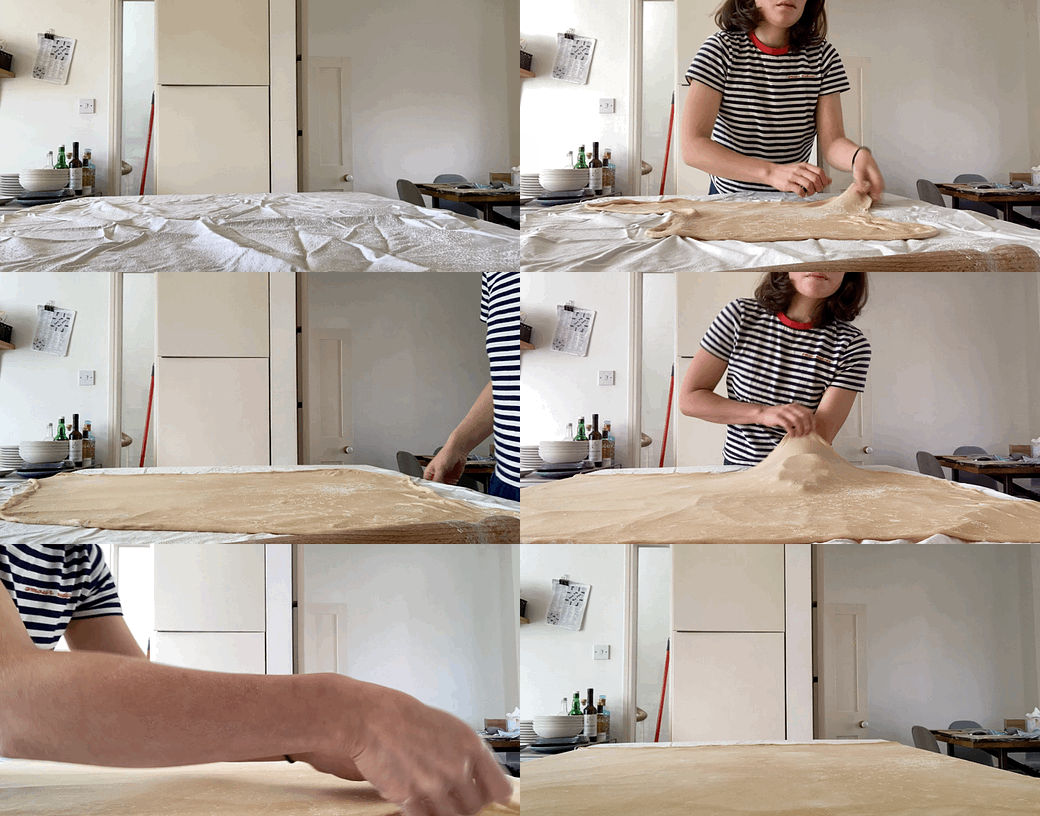
The stretching of the dough is an event in itself so if you have housemates, expect an audience: once the dough is mixed and has rested, REMOVE ALL RINGS and stretch it carefully by hand over a tablecloth or bedsheet, which feels pleasantly like going back in time. You want it to be so thin that you could read a page of a book through it. To achieve this feat, the dough must be resilient while also being very fine.
I began my Strudel adventure by asking my friend Piotr, who had been making strudel at The Giddy Grocer in Bermondsey, for guidance. He kindly shared a link to the Lil Vienna blog, where he had started his strudel journey. I also sought out the recipe from Bake Street, a brilliant website run by a genius named Eva, who is masterful at all things layered.
When it came to the flour, the recipes were at odds with each other. Bake Street called for a combination of plain and strong flour, while Lil Vienna opts for all strong flour, with a note saying you could substitute for plain flour. Confusing, right?
Strong flour = better, right?! RIGHT?!
All wheat flour contains proteins that, when hydrated, create gluten. The flour you buy will be categorised as such based on that %. If you’re not sure what type your flour is, you can check the nutritional values on the back of the packet.
My gut reaction, whenever I approach a recipe that requires a lot of volume or stretching, is that this MUST be made with strong bread flour. Strong flour contains a high % of protein which, in turn, creates gluten when hydrated. Something like strudel dough, which needs to be stretched to its limit, MUST use strong flour, right? Because strong flour = more gluten = more stretch, right? Well… no.
Although ‘strong’ flours are essential for bread baking, it doesn’t mean that they need to be used for other ‘stretchy’ doughs. Hand pulled noodles, for example, are perfectly happy being made from plain flour, which will stretch extreme lengths. Plain flour isn’t so great at creating the sort of expansive gluten network capable of trapping masses of CO2 that we need for bread – there just isn’t quite enough guten available to trap it all. That’s where strong flour excels.
When you are making a dough, there are two properties to consider: elasticity and extensibility. Although they may seem similar on the surface, they are actually quite opposite. Elasticity means your dough will go back to its shape/can hold a shape, whereas extensibility refers to the ability to stretch the dough, without consideration of it returning to form. A very extensible dough can actually be considered ‘weak’ as it doesn’t have any ability to hold its structure.
When it comes to bread, we want to promote elasticity and structure (think of all that structure in a big crusty loaf of sourdough). But when it comes to strudel, we don’t need to worry about that – we want to promote extensibility. We want that baby to stretch big time.
So, when you’re approaching a recipe that doesn’t need a chewy final texture and just needs to be stretched in one direction many times, you don’t need to reach for the strong bread flour. If your final product is flat or doesn’t have much structure, even if it needs to be stretched, plain flour will do just fine. For my ideal strudel, I end up using 50/50. You’ll see!
So, about that strudel dough
For my first attempt I decided to follow the Bake Street dough recipe word-for-word. I’m not going to lie to you - this dough takes a LOT of kneading. More on that later.
The dough felt good. When it was time to stretch it I suddenly felt a bit nervous. I gave myself a pep talk, grabbed a sheet from the cupboard and chucked it on the table, threw ample amounts of cornflour down and just got into it.
Immediate icky realisation – WAY TOO MUCH CORNFLOUR. The dough was slipping all over the place rather than stretching. I’m not sure how you guys feel about gluten-free starches but I actually hate the way they feel. I hate the placid smoothness, the nothing-y texture, the strange squeakiness of it. I would not be making that mistake next time.
Despite all of the starch, the dough was pretty good and it behaved. I rolled up the filling (SO. MUCH. FUN), and cut the strudel into two and baked them. The result? Pretty decent, but a bit dense.
For my next try, I decided to try and make the strudel dough even stretchier: First by increasing the % quantity of strong bread flour to a 50/50 split and secondly by including oil in the dough. A neutral oil, like vegetable oil, won’t affect the flavour but it will act as a lubricant, making it easier to stretch. Oil doesn’t hydrate the dough or create gluten, like water does, but it will make it softer without turning it all into soup.
Maximising flakiness (only the doughy kind)
Realising that, when baked, the flaky layers just weren’t thriving, I did what I always do when I need to increase the flakiness: I turn up the butter. By brushing the entire strudel with melted butter, the layers would be kept separate and, in turn, would be much flakier after baking.
So, when it came to rolling it up the second time, I was prepared. Armed with an absolutely huge saucepan of melted butter on hand, I ravished the strudel. And I mean ravished.
Not only was I much more generous for the initial brushing, I stopped to brush the strudel each time I flopped it over on itself. This meant there was ample butter on every surface of the dough which would surely lead to flaky success… right? Right. Absolute flaky heaven was achieved.
Thank you butter. You’ve always got my back.
The apples
I won’t muse too much on apple types right now because THAT is deserving of its own newsletter. For the meantime, just take my word for it when I say that Granny Smiths work fabulously - the tart flavour is exceptional in the strudel. Braeburn’s would also be great and will hold their shape better than Granny Smiths.
For my first two attempts, I followed the advice of a recipe and pre-cooked the apples slightly on the stove. Although the smell is amazing, I realised that this pre-cooking was the root cause of the mushiness later on. I’m not sure why it took me two attempts to realise this, but for the third I avoided the hob completely and just macerated the slices in lemon, sugar and spices and plopped them straight onto the pastry. Problem solved.
The other bits
My breadcrumb game really improved on taking advice from Ogi The Yogi, a wonderful baker in Texas, who suggested toasting them in butter before using. Genius.
Whilst not essential, toasted nuts bring something incredible to a strudel. I love hazelnuts, but I think walnuts would be killer here. For the raisins, you can go wild and soak them in booze or anything you fancy but for me, I always adore the flavour of raisins soaked in hot black tea.
Let’s make the Strudel
This recipe makes two standard tray length strudel… once you cut it in half. You can half the whole recipe if you’d prefer just to make a single one. BUT it’s no more work and btw, this strudel freezes exceptionally well.
Equipment List
Rolling Pin
Tablecloth / Bedsheet - it will get butter on it, so please be aware of that!
The Strudel Dough
125g plain flour
125g strong flour
110g water
4g lemon juice (we use the rest of the lemon juice in the filling so it’ll all be used. Remember to zest before juicing!)
10g VERY SOFT butter
20g vegetable oil
50g egg (one!)
1g salt
The apples
5 x granny smith or braeburn apples (pre-prep weight around: 1110g, prepped weight)
1 lemon, zested and juiced
4g Cinnamon
2g ginger
2g flaky salt
130g light brown sugar
The rest
50g hazelnuts, toasted and roughly chopped
50g panko breadcrumbs toasted in a pan in 20g butter
50g raisins soaked in hot tea. I use one teabag and just enough water to cover
For assembly
Cornflour, for dusting
125g butter, melted but a little cool
The strudel dough method
Weigh all of your dry ingredients into a bowl and mix. Rub soft butter into dough
Weigh all of your wet ingredients separately and whisk together
Create a well in the dries and pour in the wets. Use a fork to mix the two together in the centre of the bowl, slowly incorporating more of the dries into the liquid. It’ll look sticky and well… be sticky I’m afraid
Once it’s combined, tip the dough out onto the surface and now it’s really time to get to work
OK, my wonderful friends… I hope you’re ready. Strudel dough is pretty much the perfect recipe for you to practice your kneading skills. Strap yourself in - lets do this:
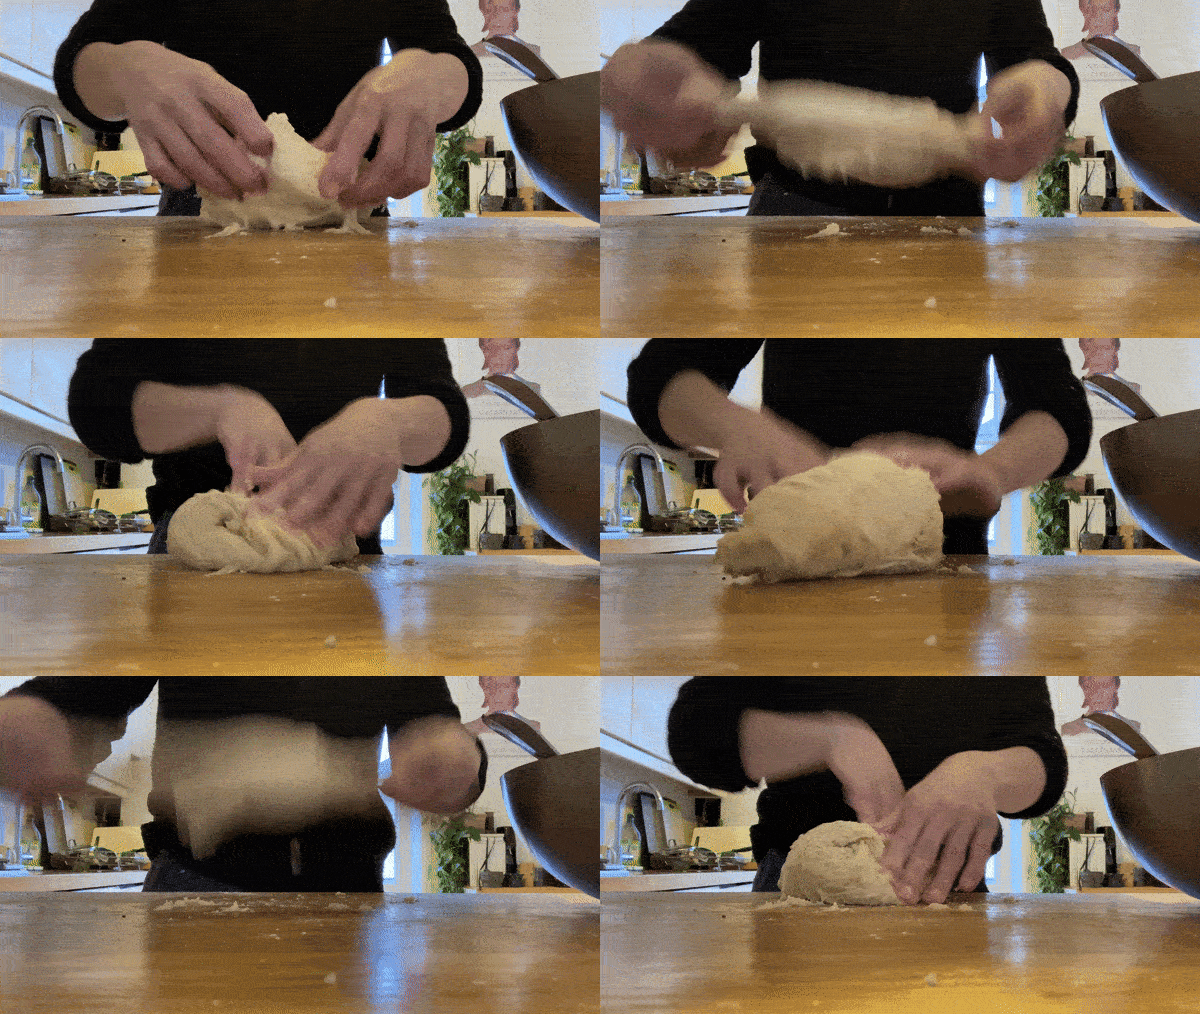
STEP 1: The approximate squish - the first minute
At this stage, the dough IS going to be sticky. And I mean sticky. It’s going to be all over your fingers and you’ll probably feel a bit deflated. DON’T GIVE UP - put on a show (I’m currently working my way through The Queens Gambit during long kneading phases) or a great playlist and get down to it.
The first step is pretty simple - stretch the corners of the dough and stretch it back into the centre until an approximate ball begins to form. Also observe the dough - when you stretch it, a slight skin begins to form. You want this.
STEP 2: The Slap and Fold - around 10 mins
This is the classic wet dough kneading method. Admittedly, it does take practice. The Slap and Fold is executed by lifting the dough up (around 1-2 feet) and slapping it down onto the table, with some force, before folding it over on itself.
Doing this action over and over is actually quite hypnotising. After a while, you’ll see the dough transform as the gluten strands develop and line-up. Whilst it is still sticky at this stage, and it might take a moment to master, you’ll get there. Don’t worry about all the bits stuck the table - as it develops, it’ll eventually be picked up by the dough.
My biggest tip - try to flick the dough off your fingers during the fold-over movement. Observe how the flipped over dough begins to get shiny and taut as you reform the skin forming over and over. You’re creating incredible tension in the dough and developing the gluten a whole bunch.
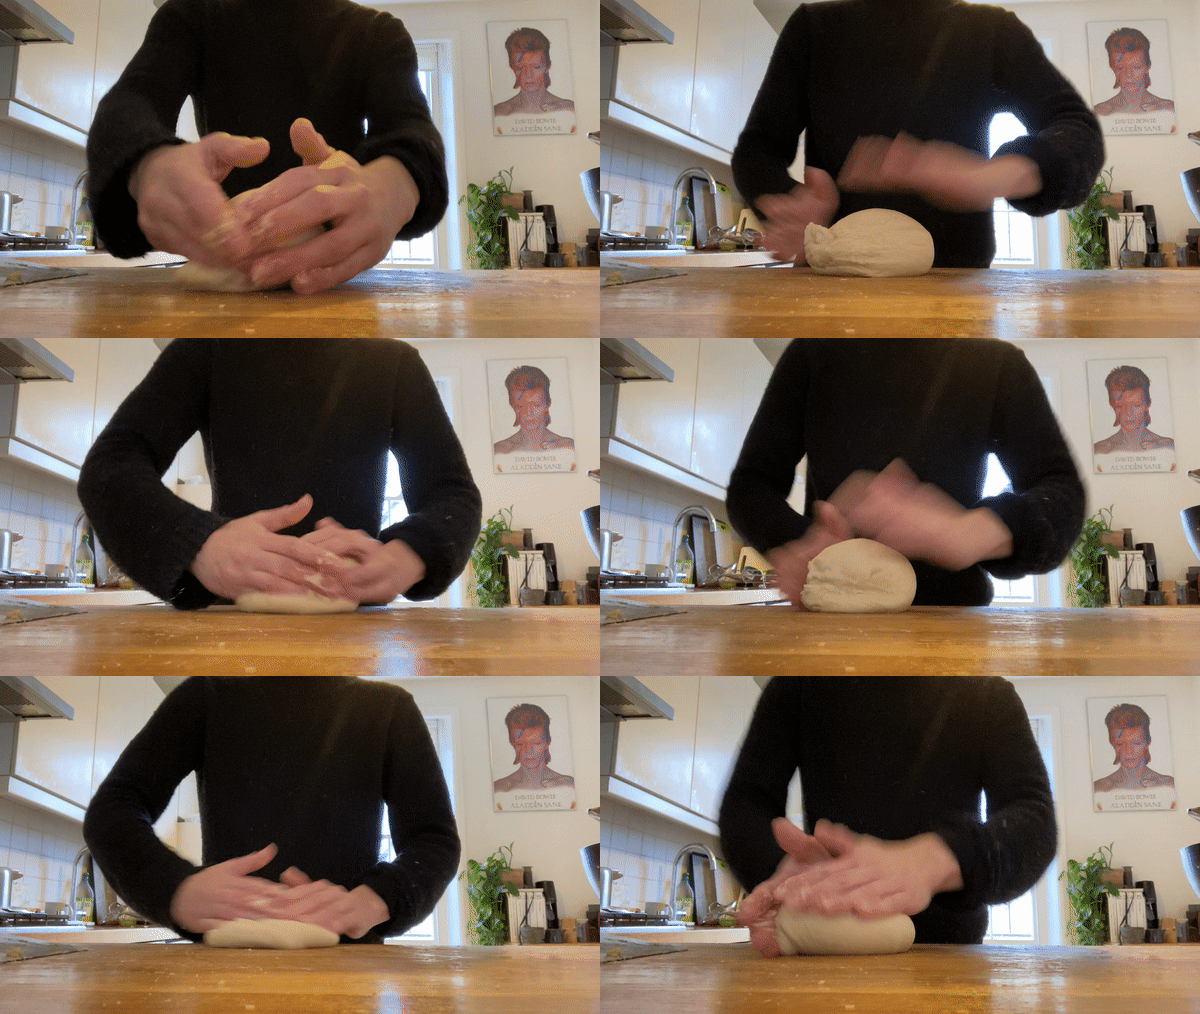
STEP 3: Balling it up: 1 min
Once you’ve slap folded the dough and it has begun to feel less sticky, it’s time to ball it up for its first rest. Balling up your dough with your hands will give you a taut skin, and it’s always good to rest your dough in a neat shape. It should feel fairly smooth and supple at this point.
STEP 4: Check your gluten development and rest for 10 mins
By this stage, we want to have achieved medium gluten development. Medium gluten development means you can stretch the dough a little but it doesn’t hold a windowpane and breaks quite easily. Remember to rest your dough covered. I like to put my upturned mixing bowl on it.
STEP 5: Observe how magical resting is!
After 10 mins of rest, you’ll see that the dough is even stretchier. Allowing the gluten to relax is key to any dough development process. I love that the best solution is, sometimes, simply to do nothing:
STEP 6: Another 10 mins of kneading
Although the dough does look pretty stretchy, we want to take this a step further. So, you’ve got another 10 mins of kneading ahead of you. This can be slap & folds or more of that balling action. However, once you’ve started to see some real extensibility, you can employ some of these ridiculously fun and quite silly techniques
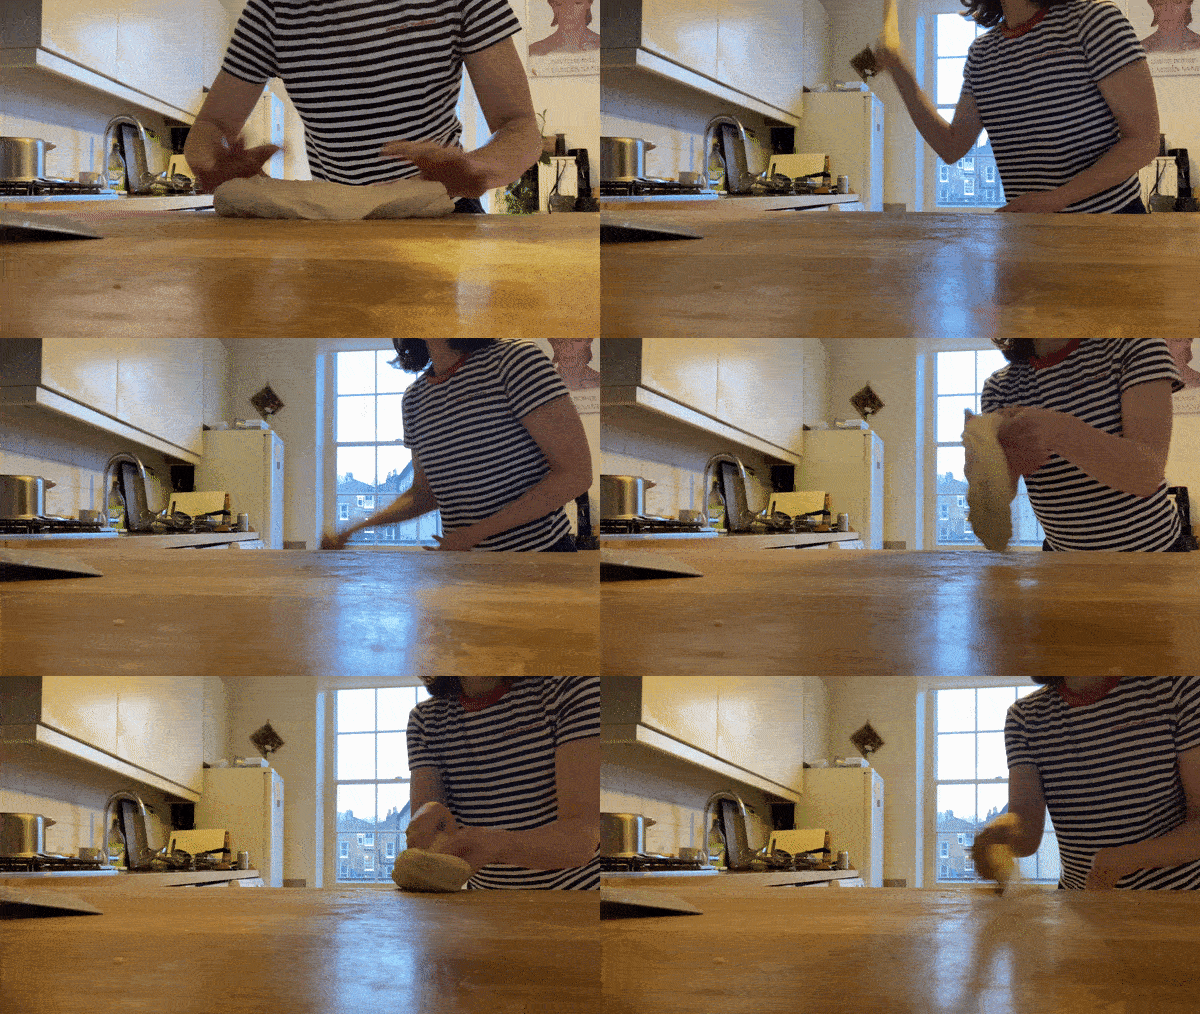
Exhibit a) The BANG BANG
If you’ve ever made hand pulled noodles then you’ll already have this nailed. Form an approximate sausage with your dough and bang it up and down on the table whilst stretching outwards with your hands
Exhibit b) The Lasso
Find your inner cowgirl/boy and stretch the dough out into a rope. Take a few steps back away from the counter and start throwing the sausage onto the side. It will stretch a little more and more each time. When you feel it’s reaching its limit, coil it back up, squish it into a sausage and start over. YEEEEHAW.
STEP 6: Rest for 5 mins to evaluate the ‘true’ gluten development
After you’ve been banging your dough around for 10 mins, it wont actually be able to reveal its full stretchy potential. To properly assess your dough, allow the gluten to relax by resting the dough (covered, I use an upturned bowl) for at 5 mins. After this short resting period, you’ll be amazed at how your hard work has paid off and you’ll get a mammoth windowpane. YOU DID IT!
Now its time to wrap your dough up securely (I use cling film or a ziploc vibe bag) and rest for at least 30 mins but ideally 2 hours. I picked up a great tip from an insta video of a german Oma making strudel (I can’t find the link anymore.. argh) - she boiled water in a pot and then pours it out, placing the strudel dough in the empty pot. Place the lid back on - this will create a lovely warm environment which will encourage your dough to relax and rest even more
The apples + other bits
First soak your raisins. If you’re using booze, you’ll want to start WAY in advance. Hot tea, however, only needs an hour or so to do it’s magic
Now to prepare the apples: Peel and slice into 0.25-0.5cm slices. Whilst you’re prepping the apples, place them straight into a bowl with the zest & lemon juice and give them a toss. This will prevent oxidisation
Once all the apples are chopped, add the spices and sugar and give it a stir. Allow to macerate for 30-40 mins. Set aside
Toast your breadcrumbs in the butter until crisp and golden, set aside
Chop your hazelnuts up. You want some larger pieces (for the strudel innards) and some smaller bits for sprinkling over the dough
Get your butter melted now! Nothing worse than waiting on melted butter when you’re ready to go with everything else
Assembly
Pre-heat your oven to 190c
Remove any rings/jewellery that might nick the dough
Lay down your strudel sheet and sprinkle lightly with cornflour
Unwrap your strudel dough and begin by rolling it into a rectangle
After this start stretching the dough carefully. Stretch from the centre outwards, always ensuring the middle is as thin as possible before moving on
Continue stretching until it’s as thin as you can - mine was about 95cm x 65cm by the end. If you want to test out your skills, see if you can easily read a page of writing through it. Don’t worry too much if there are little holes in the dough. Just stretch around them and pinch them back together. You won’t notice too much later on
Once it has been stretched to the max, trim the thick edges off (you can reserve these, rest and re-stretch - you could re purpose for more strudel or make a baklava… even spanikopita! Or anything you’d normally use phyllo in!) and brush the whole pastry with melted butter, liberally
Next, sprinkle 75% of the breadcrumbs along one edge of the dough. Sprinkle the other 25% on the rest of the dough
Place the apples along the breadcrumbs - avoiding the liquid that has collected at the bottom of the bowl. You can discard that liquid or you can reduce it and save it to glaze tarts in the future
Sprinkle 80% of the hazelnuts on top of the apples, sprinkling the other 20% over the rest of the dough
Finally, sprinkle the (drained) soaked raisins
Now it’s time for the REALLY FUN BIT - using the sheet, fold in the edges then gently flip the strudel over on itself. Each time you flip the dough, stop to liberally brush with melted butter
Continue flipping and buttering until it’s all wrapped up! Trim off the thick ends (these don’t eat well) and pinch the dough together, so you don’t have too many layers of pastry in one place
Now, cut your dough in half
To enclose the strudel, you’ve got two options - either push the filling in and then stretch the dough and pinch together OR use a piece of cut off dough and stretch it thin over the edge. You do want to make sure it’s enclosed otherwise the apple falls during baking and burns
Now, carefully move the strudel onto your baking tray and brush with even more butter. Stab a few vent holes with a sharp knife
Bake for 35-40 minutes until very golden
Allow to cool slightly before dusting with icing sugar
If you are serving it later, cover and rewarm in a hot oven to re-crisp
Serve with whipped cream whilst still a little warm
To store strudel, simply wrap it in tin foil and keep it at room temp. Definitely re-crisp it before eating though.
Thank you so much for coming on this Strudel journey with me!
If you’re enjoying Kitchen Projects, it would mean the world to me if you shared it with a friend so they can get behind the scenes of recipe development, too.


Alright I have one question -- Do you think this pastry could be used to make baklava as well??
Hi Nicola, sorry this is very late to the party but about to make the strudel. I live alone and just passing the time on this Sunday but I will be producing much more than I can eat! Do you have tips to successfully freeze the strudel ? Thank you for these wonderful recipes. :)