Kitchen Project #77: Ensaïmada
The fluffy, flaky, swirly pastry of your dreams!
Hello,
Welcome to today’s edition of Kitchen Projects. Thanks so much for being here!
This week I have fallen well and truly in love with Ensaïmada and I hope you will too. It’s a swirly, fluffy and flaky Mallorcan pastry that is somewhere between a croissant, a babka and a strudel. I can’t wait to tell you all about it!
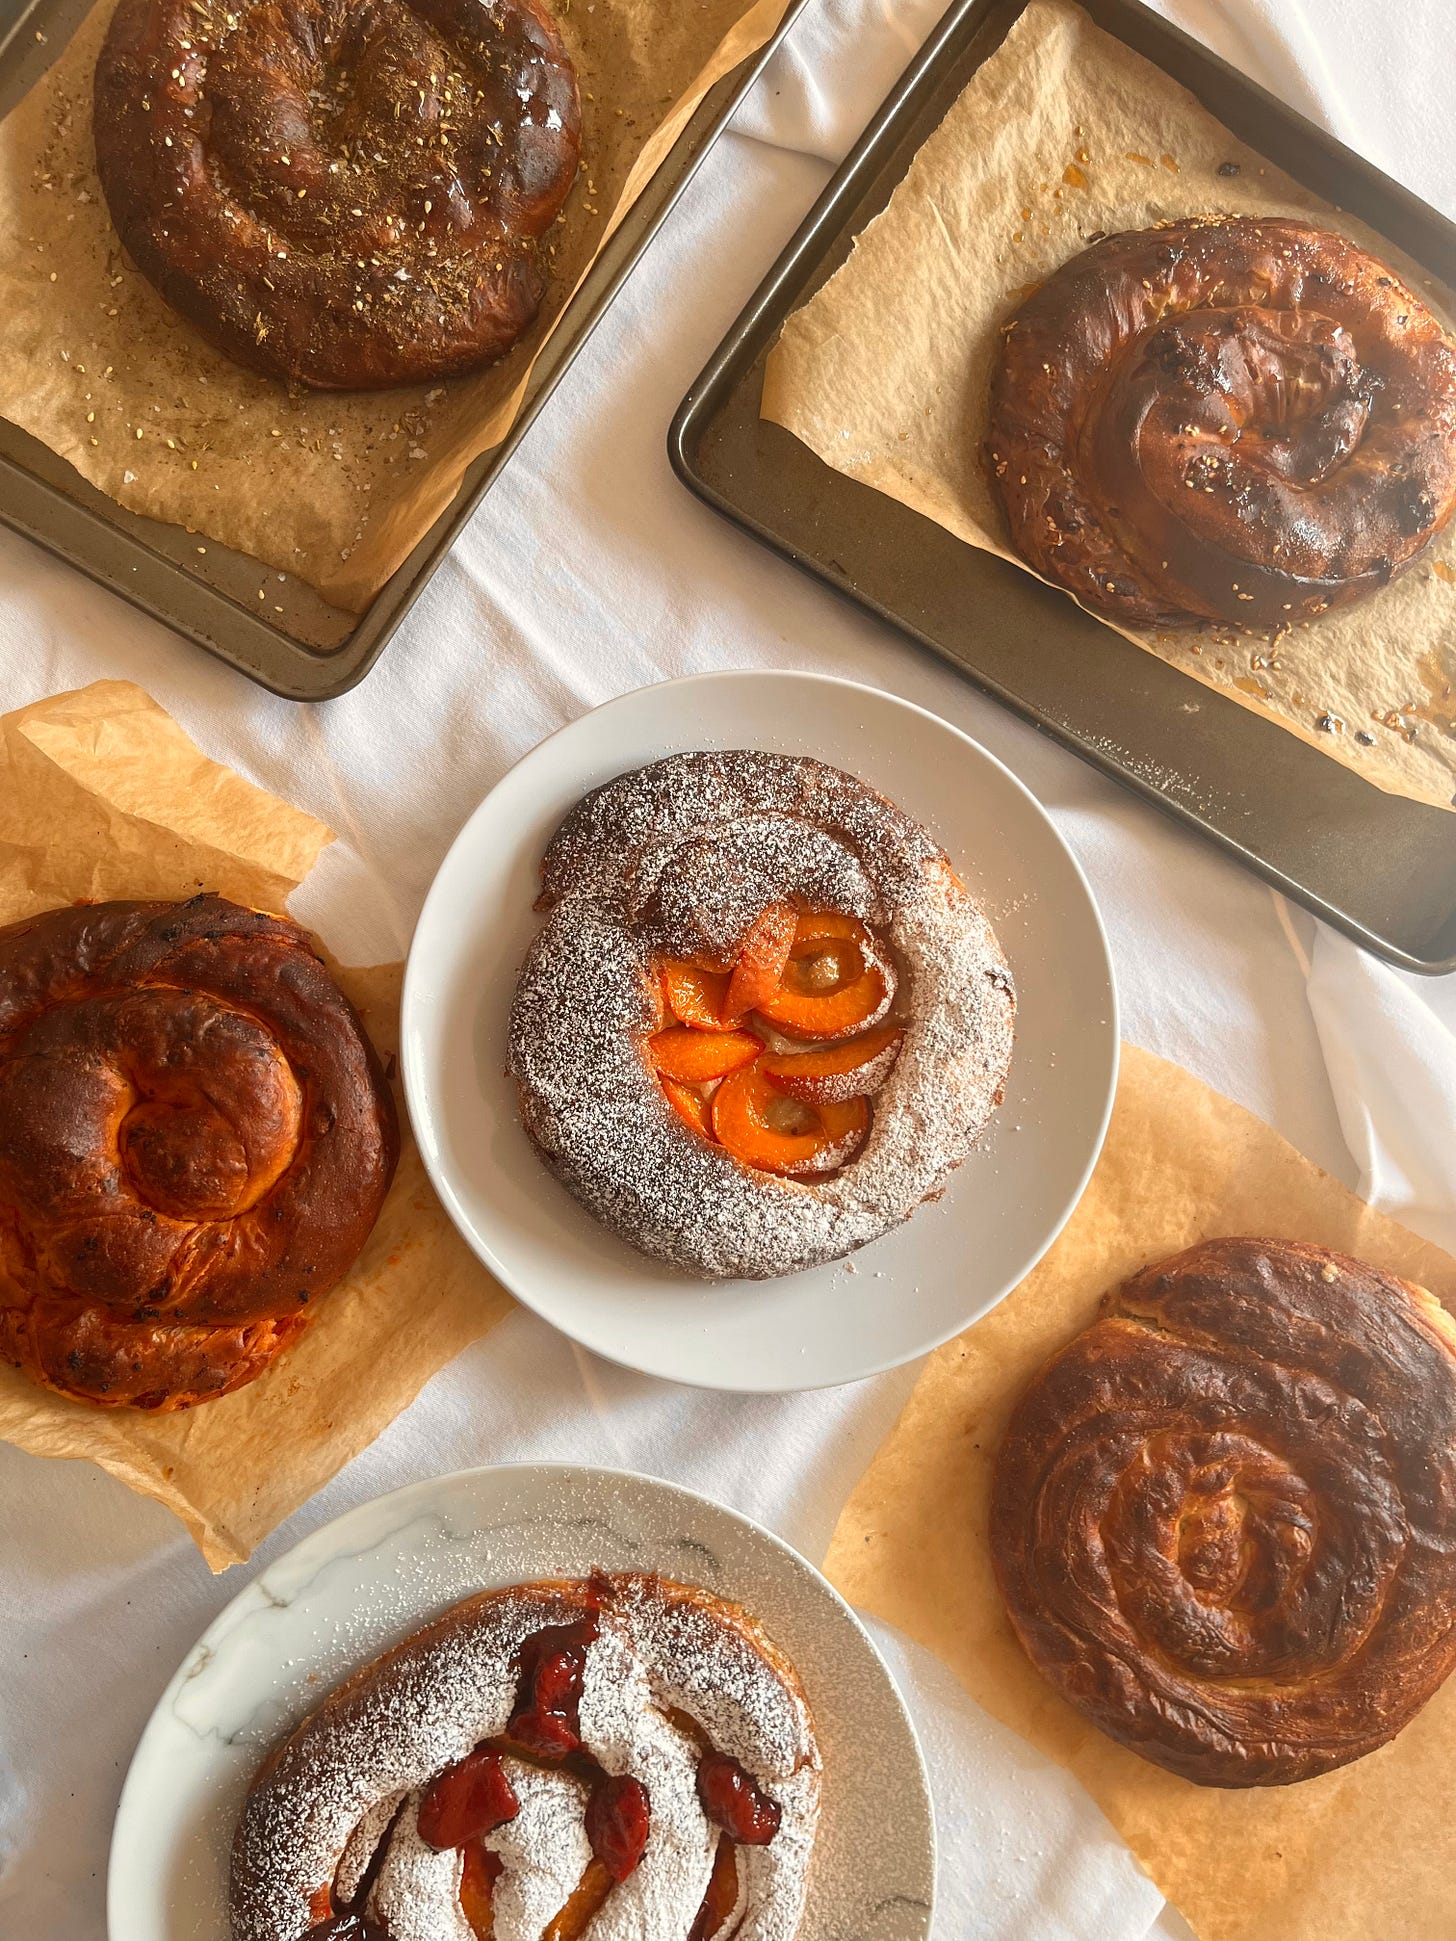
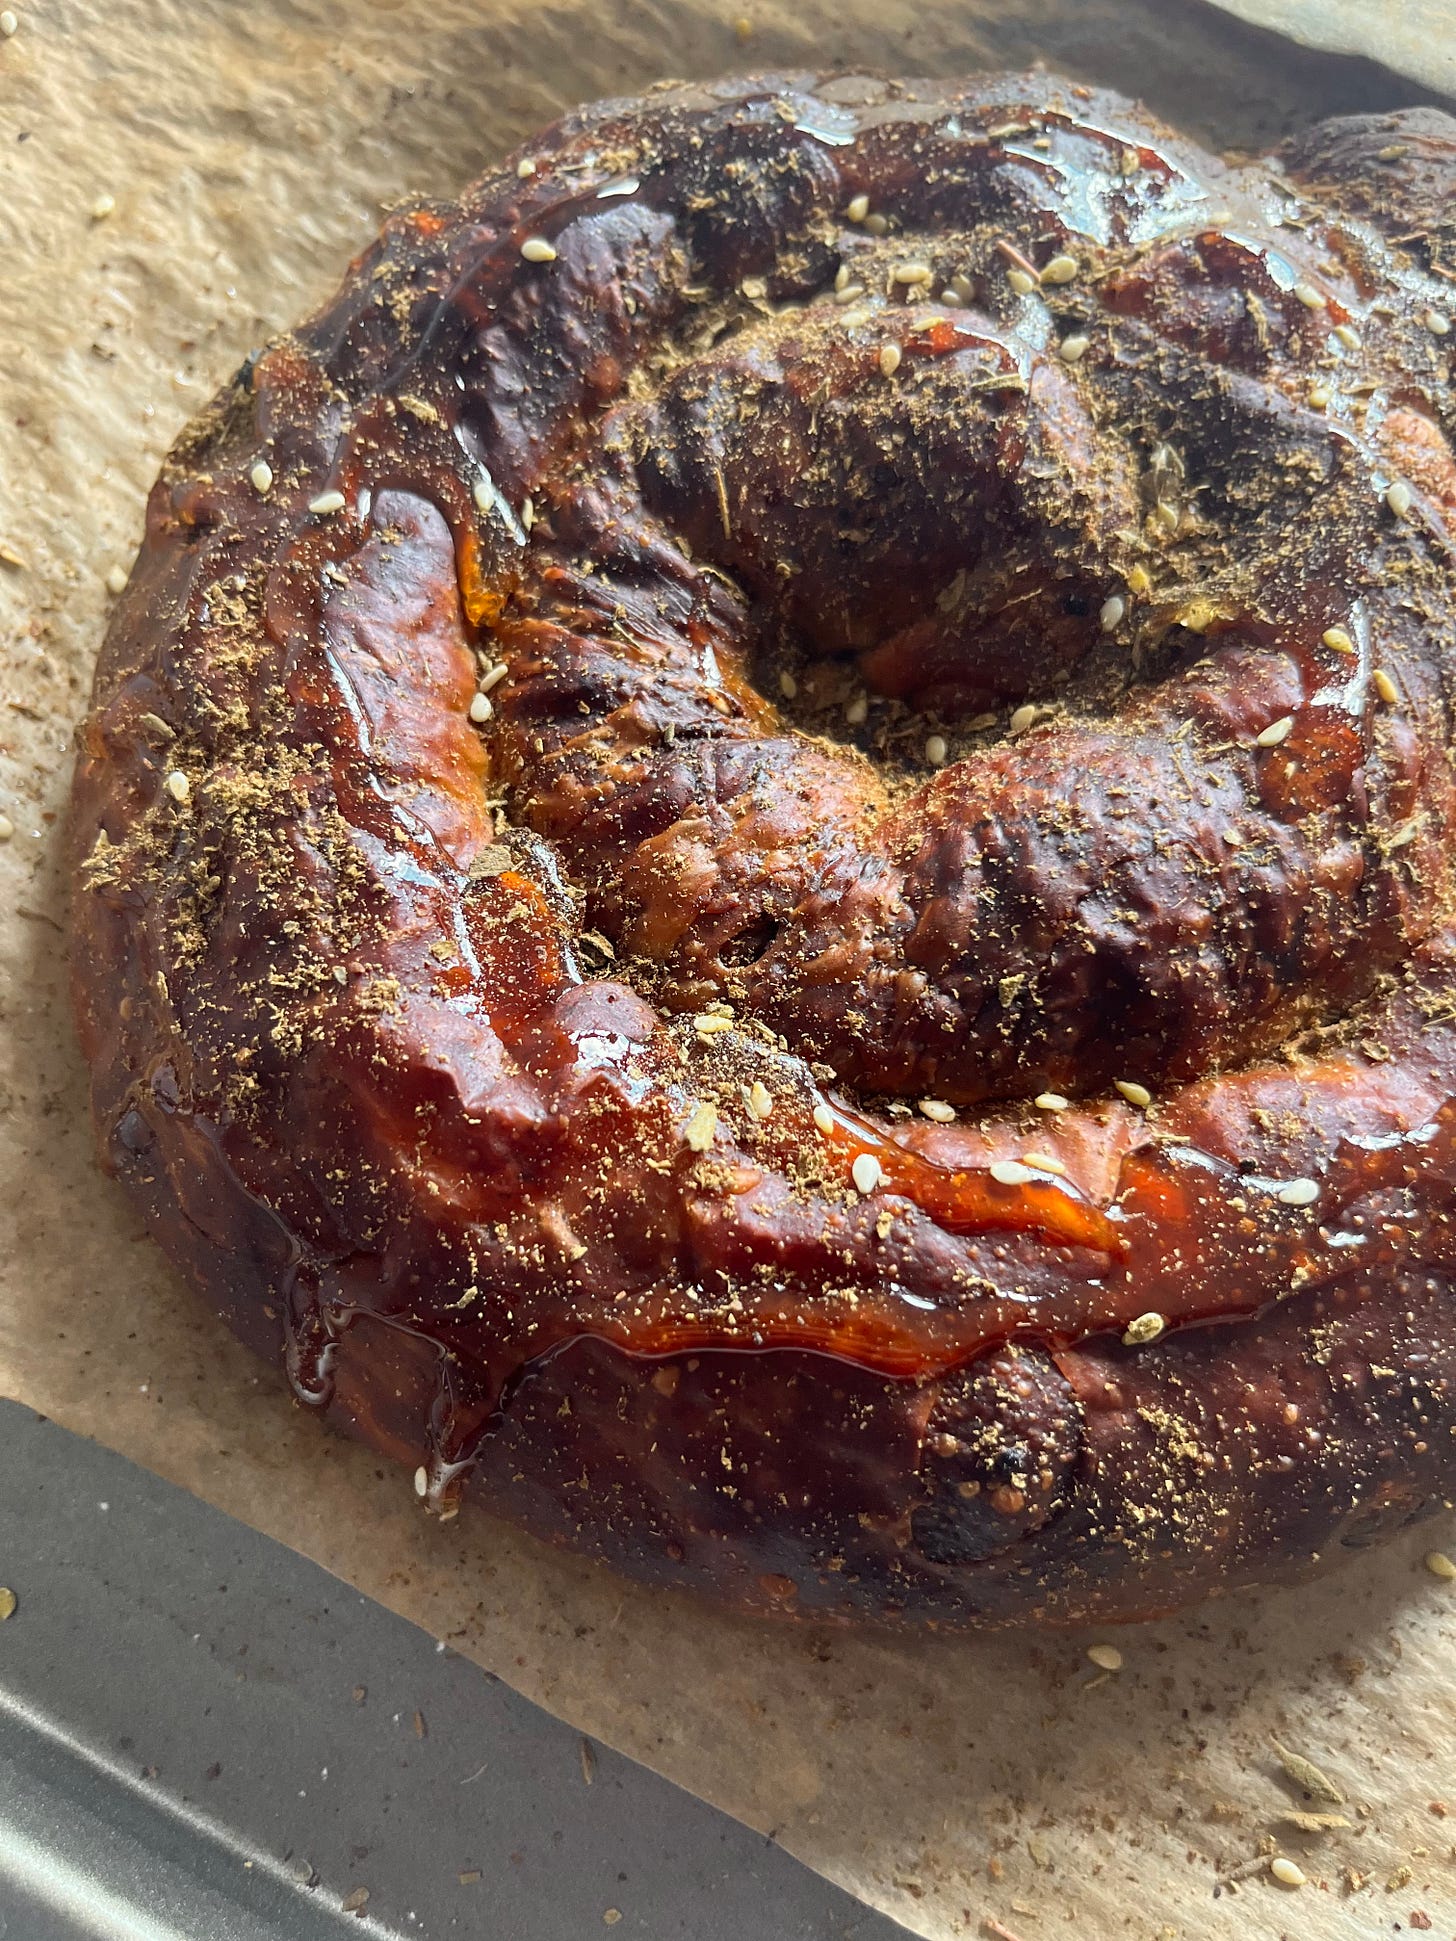
Over on KP+, I’m sharing a bunch of variations on the classic ensaïmada. From frangipane to roasted fruit to salty honey za’atar, I’m sharing all my experiments (including the failures) from the week. Click here to read it.
What's KP+? Well, Kitchen Projects+ aka KP+, is the level-up version of this newsletter. It only costs £5 per month, and your support makes this newsletter possible. By becoming a member of KP+, you directly support the writing and research that goes into the weekly newsletter and get access to lots of extra content, recipes and giveaways, including access to the entire archive. I really hope to see you there:
Love,
Nicola
The world of Ensaïmada
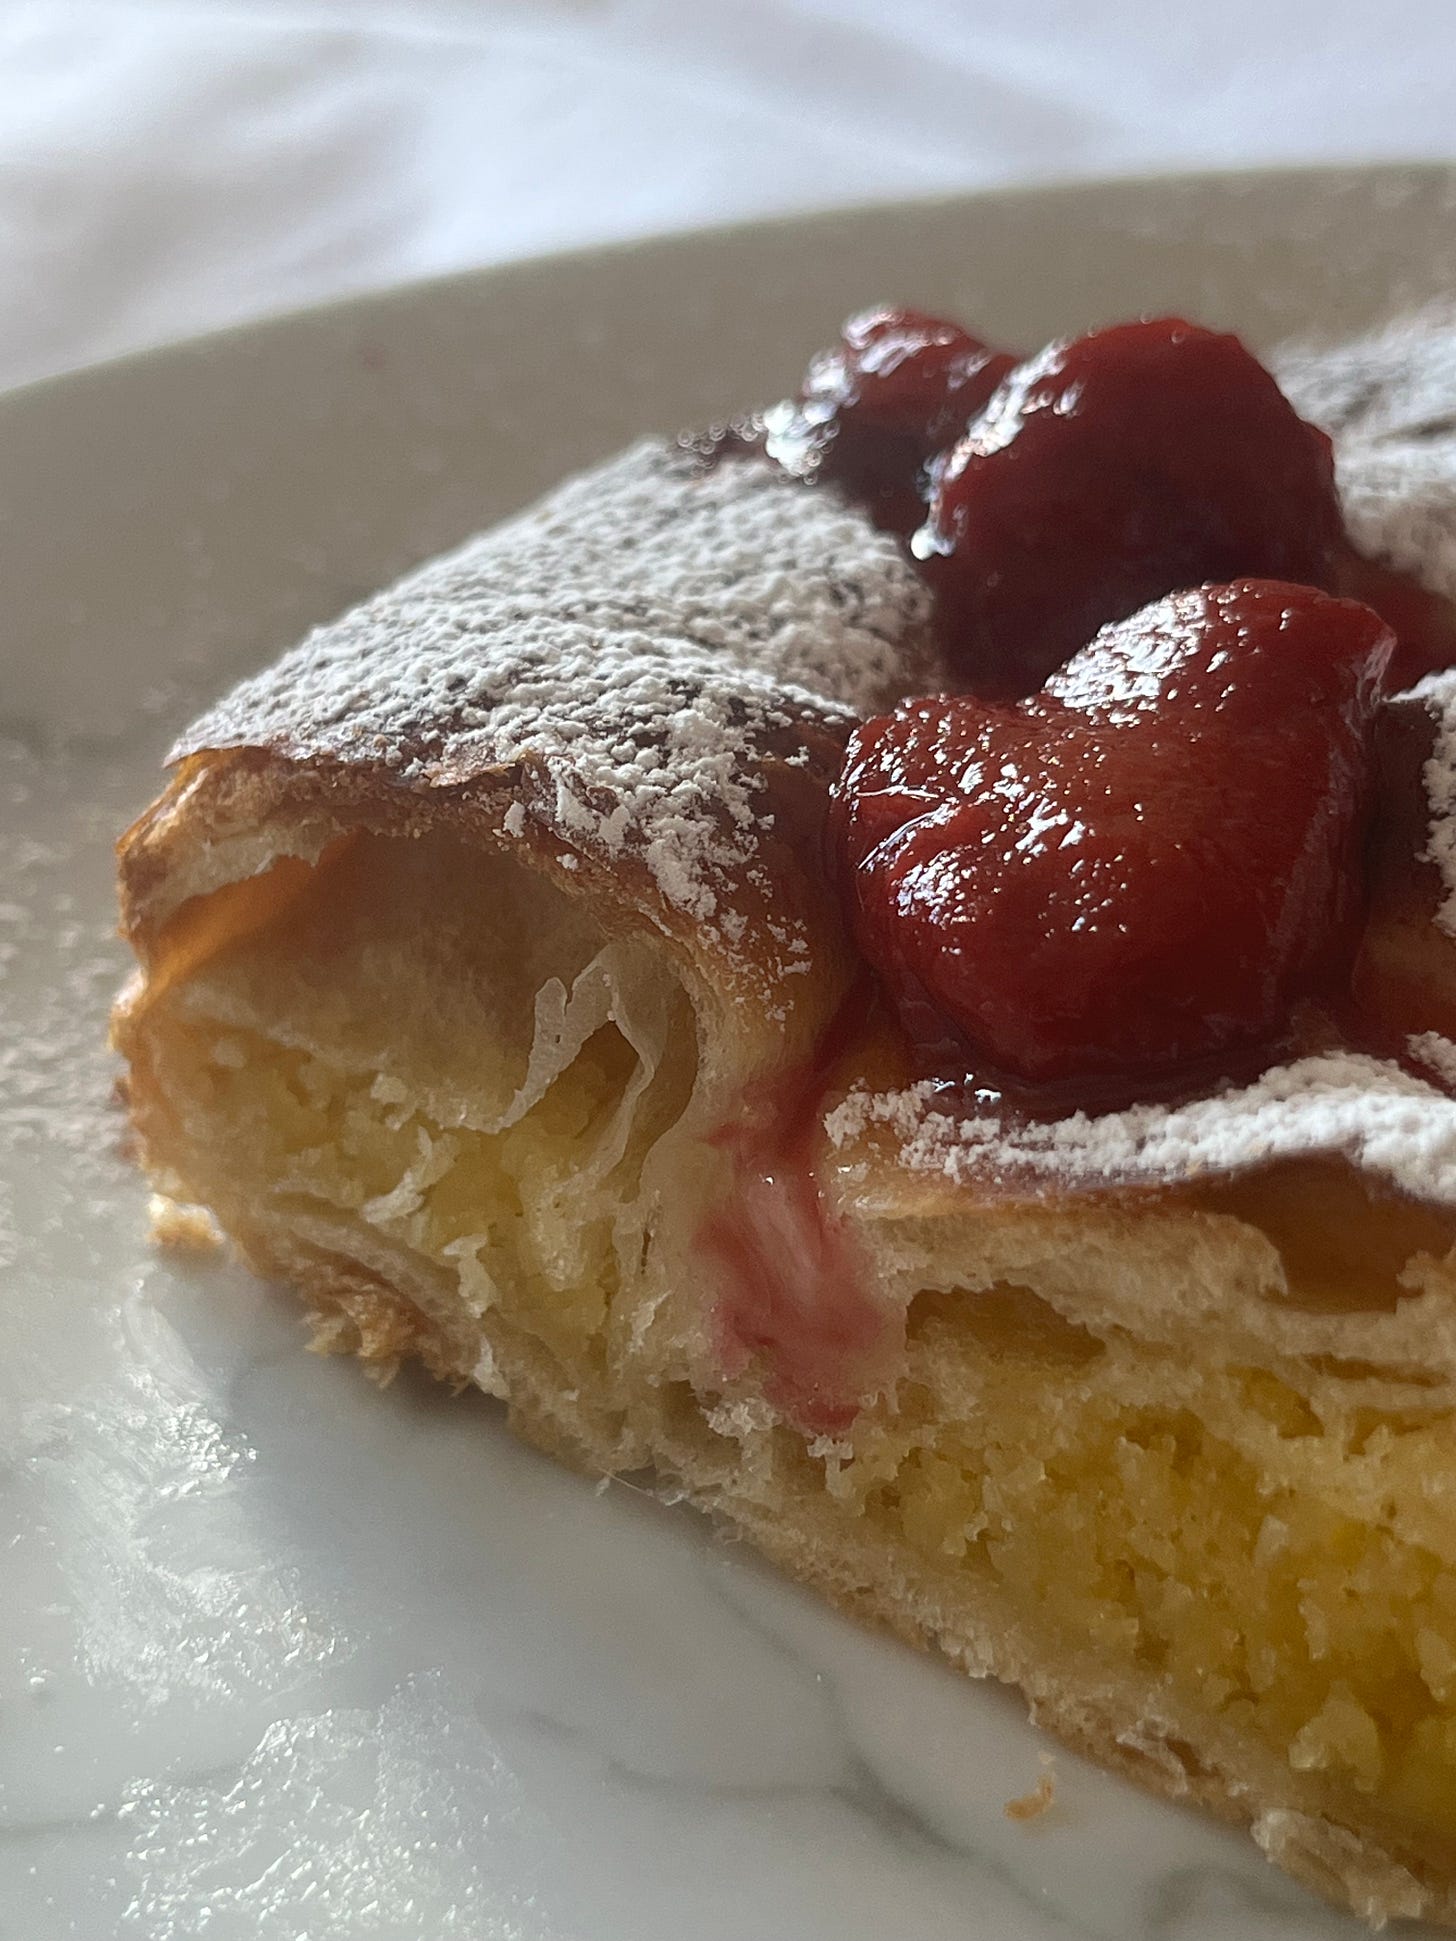
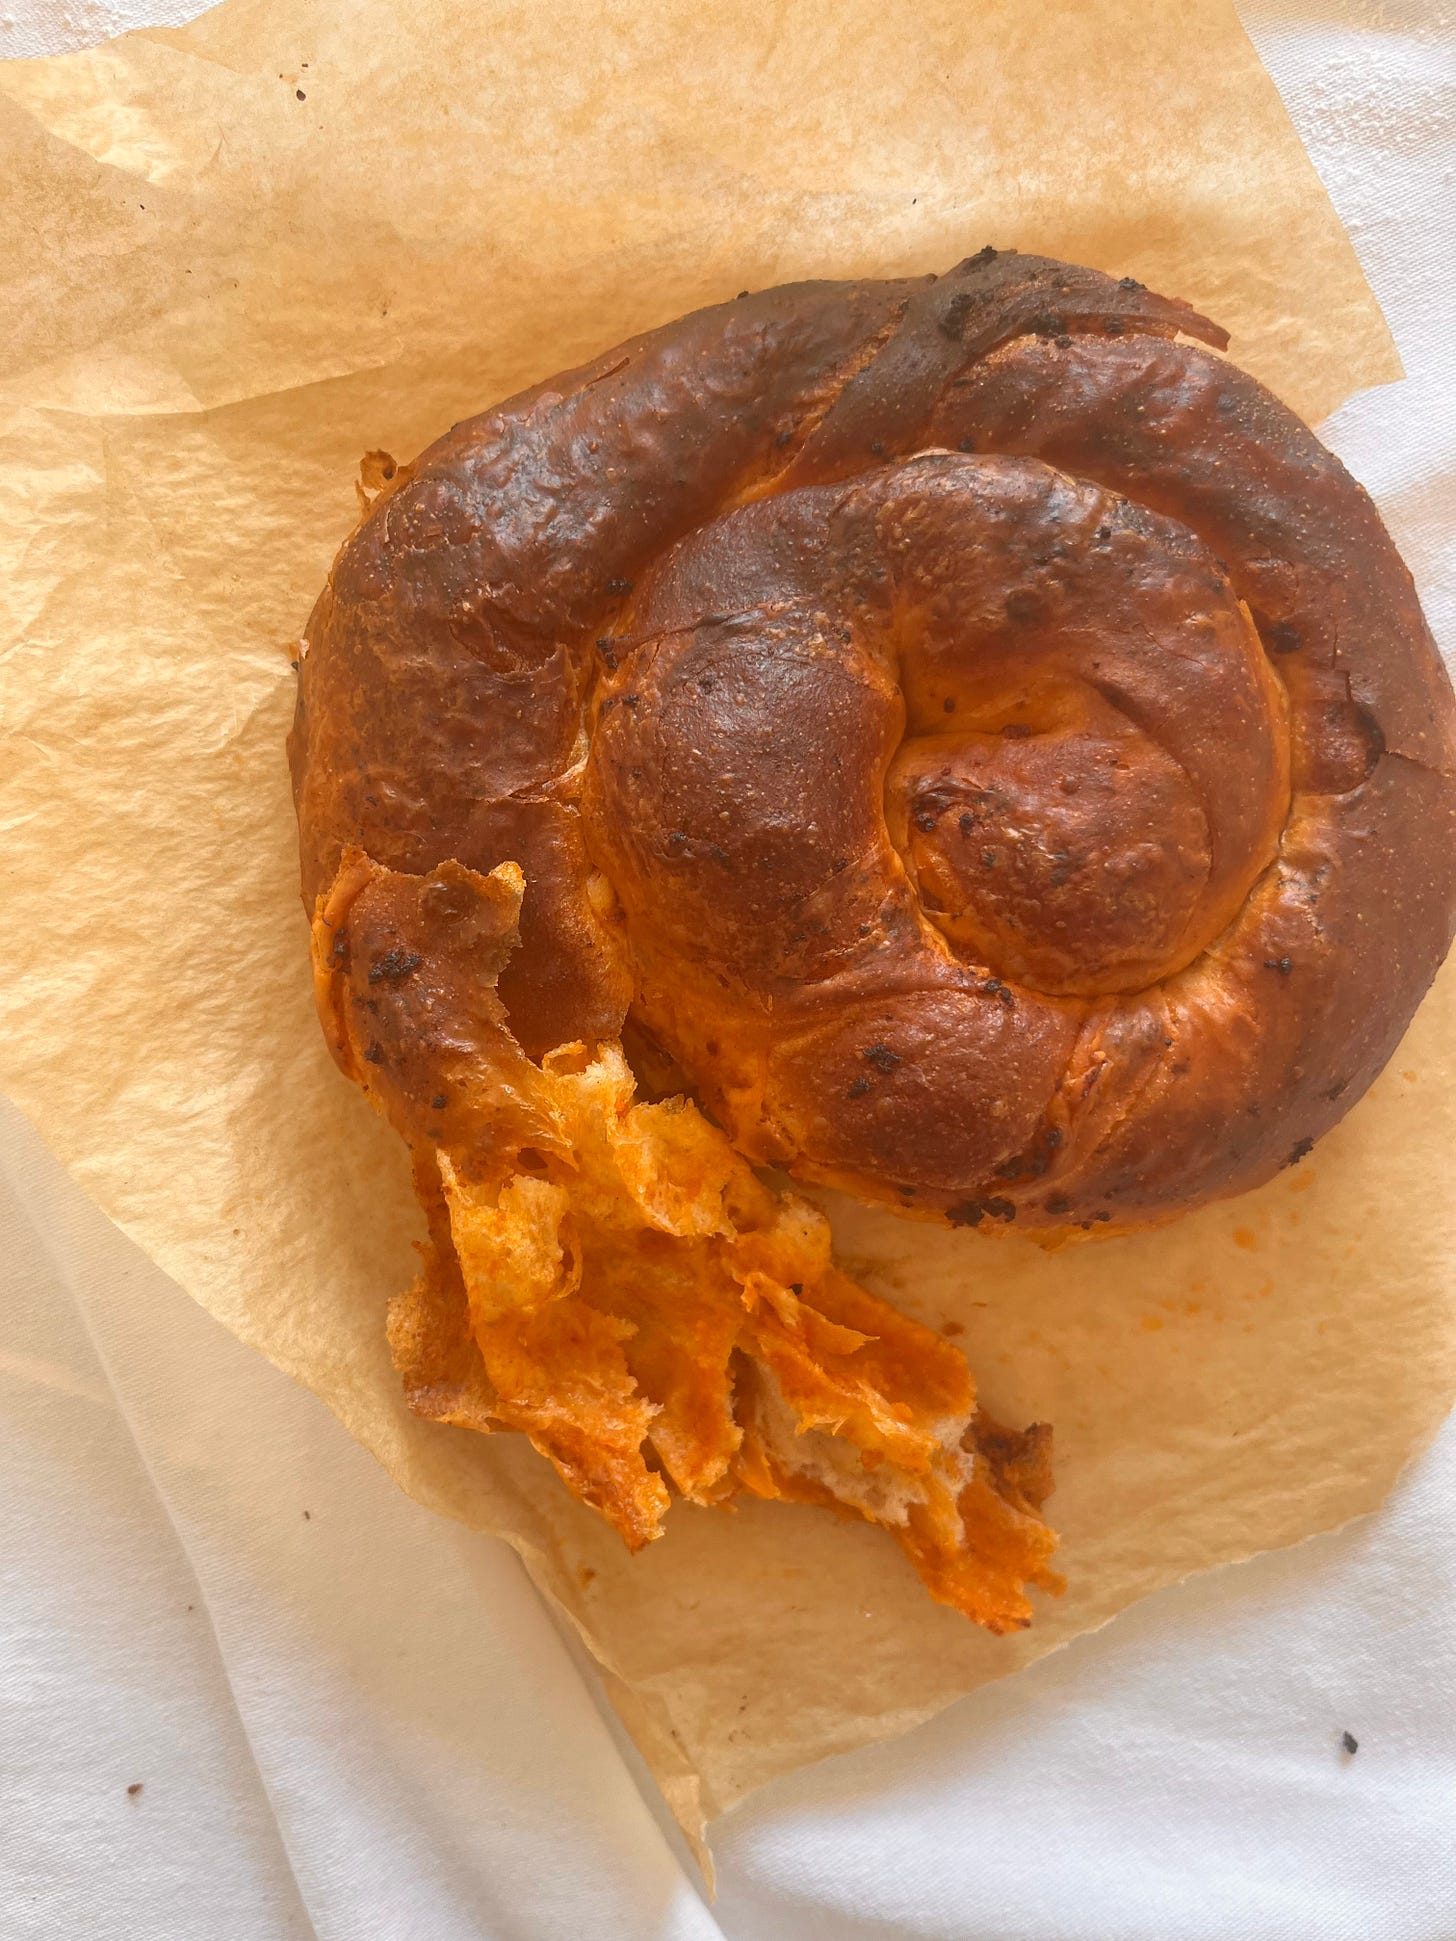
The ensaïmada (pronounced ‘ehn- say- mah- dah’) is the snail-shaped pastry that rules in Mallorca. Made with ultra-thin stretched dough and loaded with fat, traditionally lard, rolled up and coiled to proof its famous shape. Before eating, it is dusted liberally - and I mean liberally - with icing sugar. The name 'ensaïmada' comes from the Catalan word 'saim', meaning pork lard, making these pastries forever linked with this fat. If you've never tried it, it's a perfect combination of fluffy, flaky and soft. Much like a croissant, you can peel back the layers and unwind it like a spool of yarn or pull off little tufts of airy dough, following the spiral into the middle.
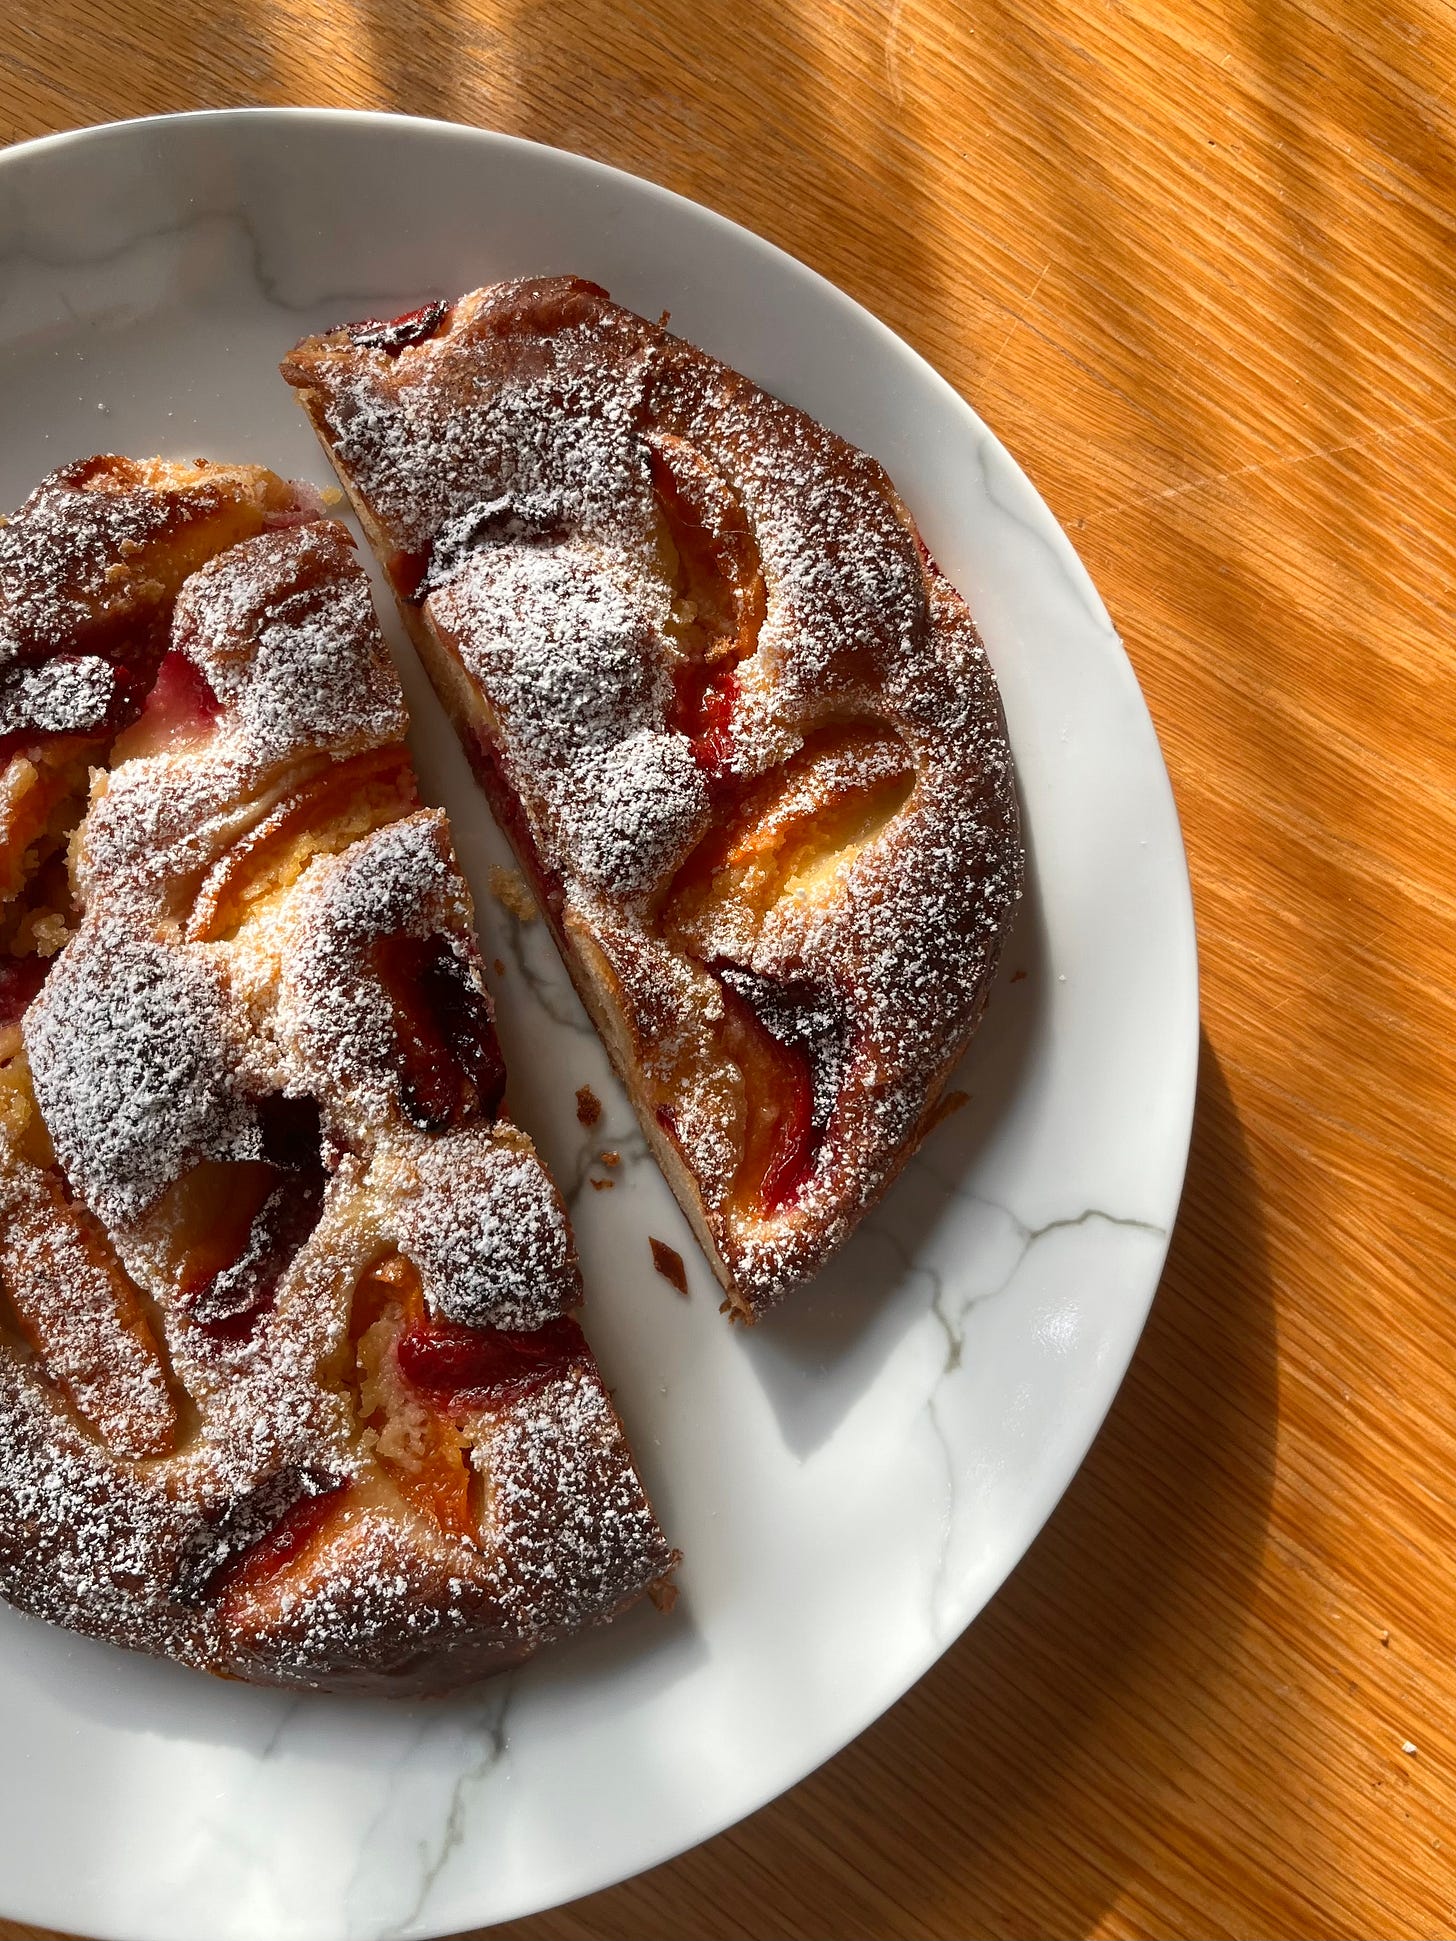
In Mallorca, you'll find these everywhere (as I did a few weeks ago)! They are often plain, but you can also find them laced with spicy sobrassada (a local cured sausage), baked with apricots, or split in half with custard or cream inside. You can also get them with candied spaghetti squash - I sadly missed trying these, but they sound divine. No matter what, they are usually doused with icing sugar in the style of a beignet - a liberal snowfall:
I really do love a hand-stretched pastry: From babka to strudel, I seem to relish any recipe that requires me to liberally oil my table and go to town. There's something so fascinating about seeing gluten work to the max! I love a quick cake like the rest of us, but isn’t there something so wonderful about having a craft project feel to an afternoon bake? We will, of course, talk about the classic ensaïmada here and respect the original. But I will admit early and without shame that this may be the perfect fusion vehicle for all your flavour dreams. Let’s get into it!
Origins of the Ensaïmada…
…and how it affects the recipe today!
The ensaïmada is a truly fascinating pastry in the context of its creation; We live in such a global world that I think we sometimes forget how linked the origins of pastries are with their geography - the origins of the ensaïmada are unclear. Still, it's believed to have originated sometime between the 12th and 14th centuries (!!! quite a range) with a few potential origin stories.
During this time, the Balearic Islands were a territory of the Emirate of Cordoba, a historic Islamic Kingdom. So, the ensaïmada may be a direct relative of the snail-snaped pastry called (translated) 'rose', typical of the Arabs living in Mallorca at the time. The most significant difference is, of course, that pork fat was not used in the original. Although this is the most popular theory, there is also evidence to suggest the ensaïmada may have been influenced by Sephardic Jewish cuisine - Bulema or Boyo are stuffed pastries shaped into snails and traditionally made for Shabbat and Jewish Holidays, which originated from Jews living in the Ottoman Empire. During this time Turkish food influenced the culture - swirly Borek, or bourekas, which are made with unleavened pastry, making them crispy rather than fluffy, were enthusiastically adopted.
Whatever the origin, the restriction of pork products in both Arabic and Jewish diets makes the Mallorcan lard-heavy version completely unique; In fact, it has been suggested that the ensaïmada may have been linked to the brutal 1492 expulsion of Jews from Spain. By eating the pork fat pastry, it was 'proof' that you were a Spanish citizen and had converted to Catholicism. Very dark.
The effect of climate on our ensaïmada recipe
So, how did the warm Balearic climate affect the development of the ensaïmada? Many recipes for ensaïmada suggest a 12-hour proof at 12c - warmer than a fridge but cooler than an ambient room. The average temperature in the summer in Mallorca is around 30c, with highs of 35c up. It's no surprise that pastries aren't proofed at ambient temperatures. In that heat, the fermentation would happen exceptionally quickly, and the fat would absorb into the dough before baking, creating a greasy rather than airy final product.
Fortunately (or unfortunately, whichever way you look at it), temperatures in the UK are much milder, and the chances of us having a 12c space in our home is unlikely. So, I've adapted today's recipe to suit UK climates. Instead of a 12-hour proof, you're looking at a 2-3 hour proof at room temp, which is much more sociable. It does still take a while since the dough is so paper-thin but you’ll know it’s there once the coils begin kissing one another!
Developing the dough (aka all about that stretch)
One of the best things about having an extensive back catalogue of recipes is always having some kind of starting point for development. So, to kickstart the ensaïmada recipe, I looked at several previous KP formulations. Firstly, the apple strudel. The ensaïmada is definitely strudel adjacent. The major difference is that the ensaïmada is leavened, aka contains yeast. This means the ensaïmada is fluffy and soft rather than crispy. Introducing yeast makes a fluffy, tender dough; As the yeast ferments the flour, CO2 is released and captured in the gluten network creating a network of air holes that give us a spongy, soft texture. This is why a product like puff pastry shatters and is crisp and flaky, whilst croissants are soft and flaky.
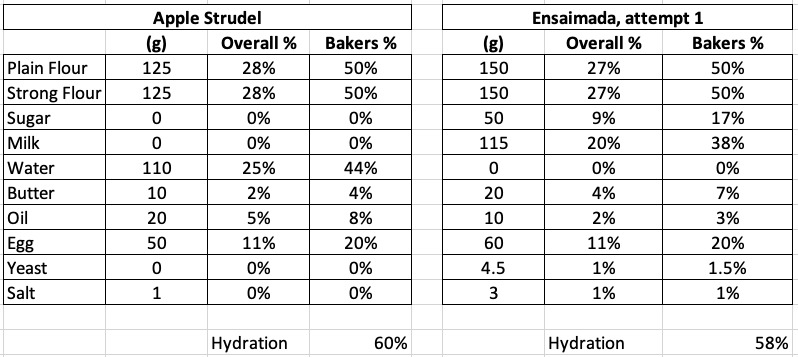
Beyond yeast, the doughs do have similar ingredients: Flour, egg, salt, water - or some liquid - and a little fat. ensaïmada dough traditionally contains quite a lot more sugar (we'll get into that in a moment). So, to get started, I adapted my strudel formulation to have a standard enriched dough % of yeast and sugar, also keeping the proportion of plain to strong flour at 50:50 as a starting point, but changing the water to milk, for flavour and for its softening effects:
When it came to the hydration, I took inspiration from the Babka recipe that I previously developed for the newsletter; Whilst working on that stretchy dough, I realised that associating high hydration with stretchiness was ill-advised and, as a result, ended up with 'low' hydration of 60%. I decided that would be an excellent place to start for the ensaïmada.
Regarding the fat, my babka dough was unashamedly rich - it has almost 30% butter in the dough itself. Although that is delicious, the ensaïmada does not have a rich fat flavour within the dough itself. I did take inspiration from the apple strudel and included a little fat in the dough. A neutral oil, like vegetable oil, won't affect the flavour, but it will act as a lubricant, making it easier to stretch. Oil doesn't hydrate the dough or create gluten like water does, but it will make it softer without turning it all into soup.
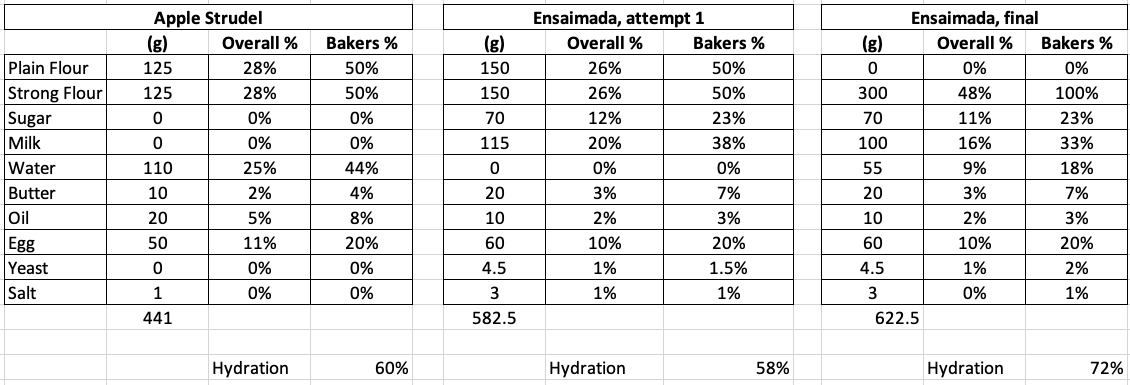
The result? Pretty good… but a bit dry. ensaïmada needs to be ethereally light, and, although the first few attempts were delicious, the dough was almost crumbly. Not what I wanted - fortunately, it has an easy fix; I simply upped the hydration. Compare the two here:
As we know, high gluten flour can absorb more water than low gluten flour - so I decided to ditch the plain flour. Although it would, in theory, make the crumb softer, it's not worth it for the longer mixing time and the additional water more than makes up for the missing tenderness. Here's the final recipe:
Butter vs Lard
Now we have the dough in check, let’s talk fat! Fat is key to achieving a successful, fluffy and airy ensaïmada. I know we are quite used to thinking that fat = fat… but it's not always that simple. As we know, the traditional product is made with lard, aka pork fat. I know, its reputation still precedes it - despite being the most popular cooking fat in many countries worldwide, the western world is… kind of freaked out by it. But I'm here to try and change that.
For a start, did you know that lard is known for creating light and airy bakes… but why? And, how does it compare with butter head-to-head? To start, we need to understand the properties of lard and butter, and hopefully, we can then understand how we can interchange the two.
Butter, we know well, is a dairy product derived from churned cream. It is approximately 84% fat, depending on the make, with the rest being made up of milk solids and water. Butter has around 32% monounsaturated fats. It is plastic at room temp 18c but is very solid at lower temperatures due to its high saturated fat. It has a rich flavour.
Lard is derived by rendering fat from pigs. It is 100% fat and around 50% monounsaturated fats, meaning it has a good range of plasticity without melting (more on that soon), i.e. it is easy to work with. It may have a subtle pork flavour, though depending on the render should be virtually unnoticeable. Lard separates well into large stable fat crystals that distribute well through baked goods, providing light, flaky products.
There are two key areas to compare for baking. The first, of course, is the fat content - as we know, butter is not *just* fat. As a result, it imparts moisture and colour (via the milk solids) to bakes. Lard, however, is 100% fat. The second, I think, is melting temperature. How fat behaves in the oven is key to the product's final characteristics. Butter has a melting point of 35c, whilst lard has a variable melting point. This is because each individual fatty acid may have a slightly different melting point, depending on what part of the pig the fat is rendered - this means lard may begin to melt at 29c but can be as high as 45c. This means you get an airier final product as more air and steam are created during the bake.
As well as this, lard has particularly large and stable fat crystals, which, in turn, produce larger 'holes' in the bake as they leave, giving a light mouthfeel.
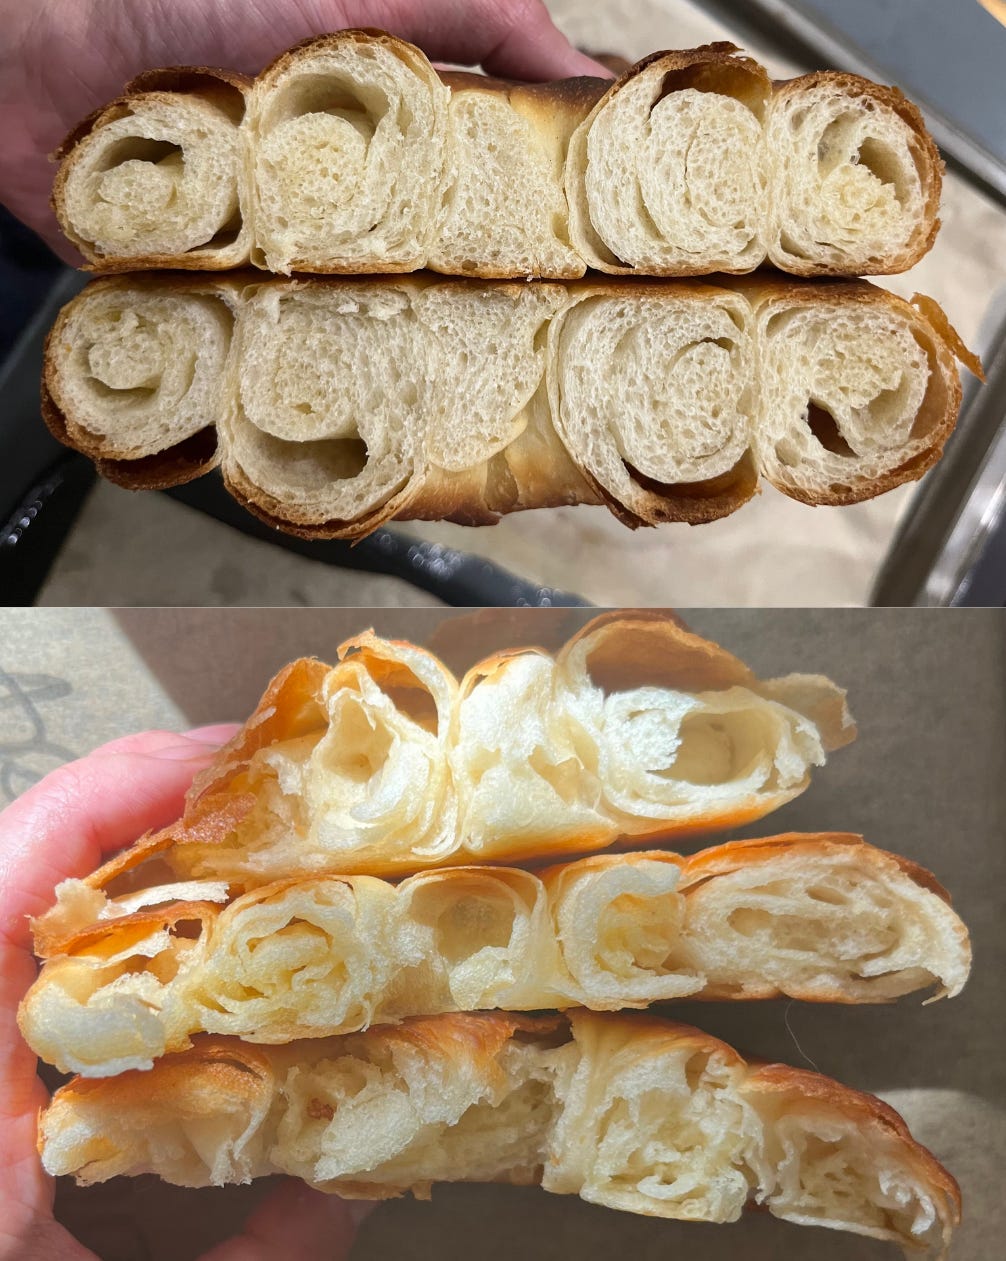
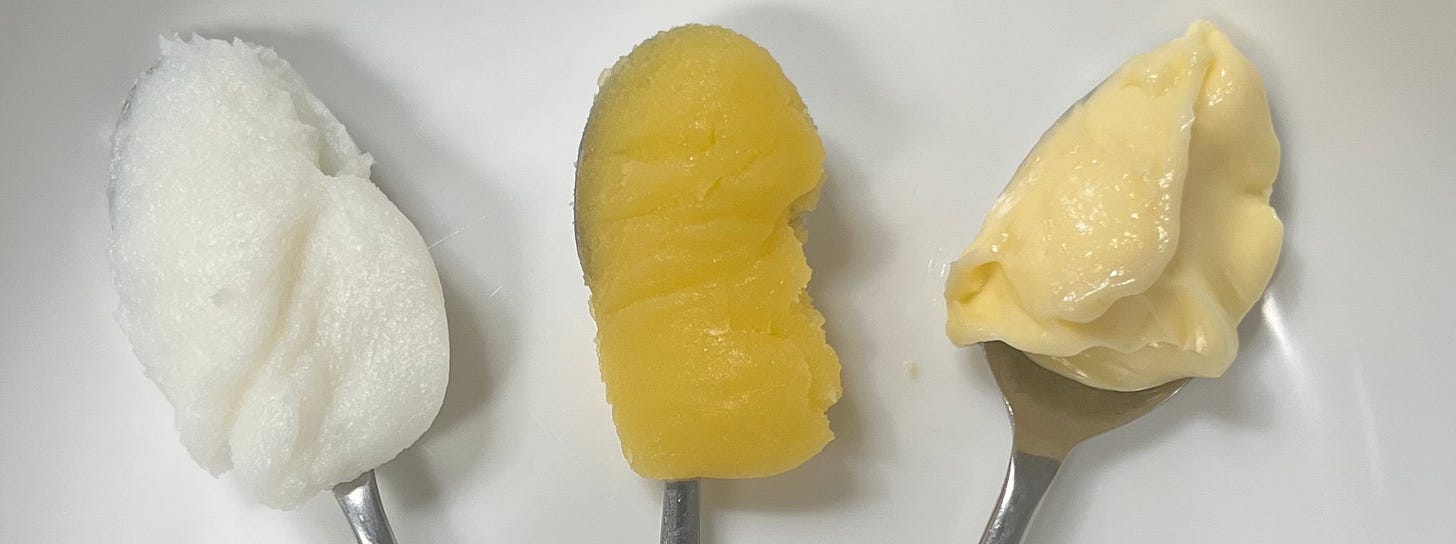
I made several ensaïmada to test this theory, comparing butter, clarified butter and lard:
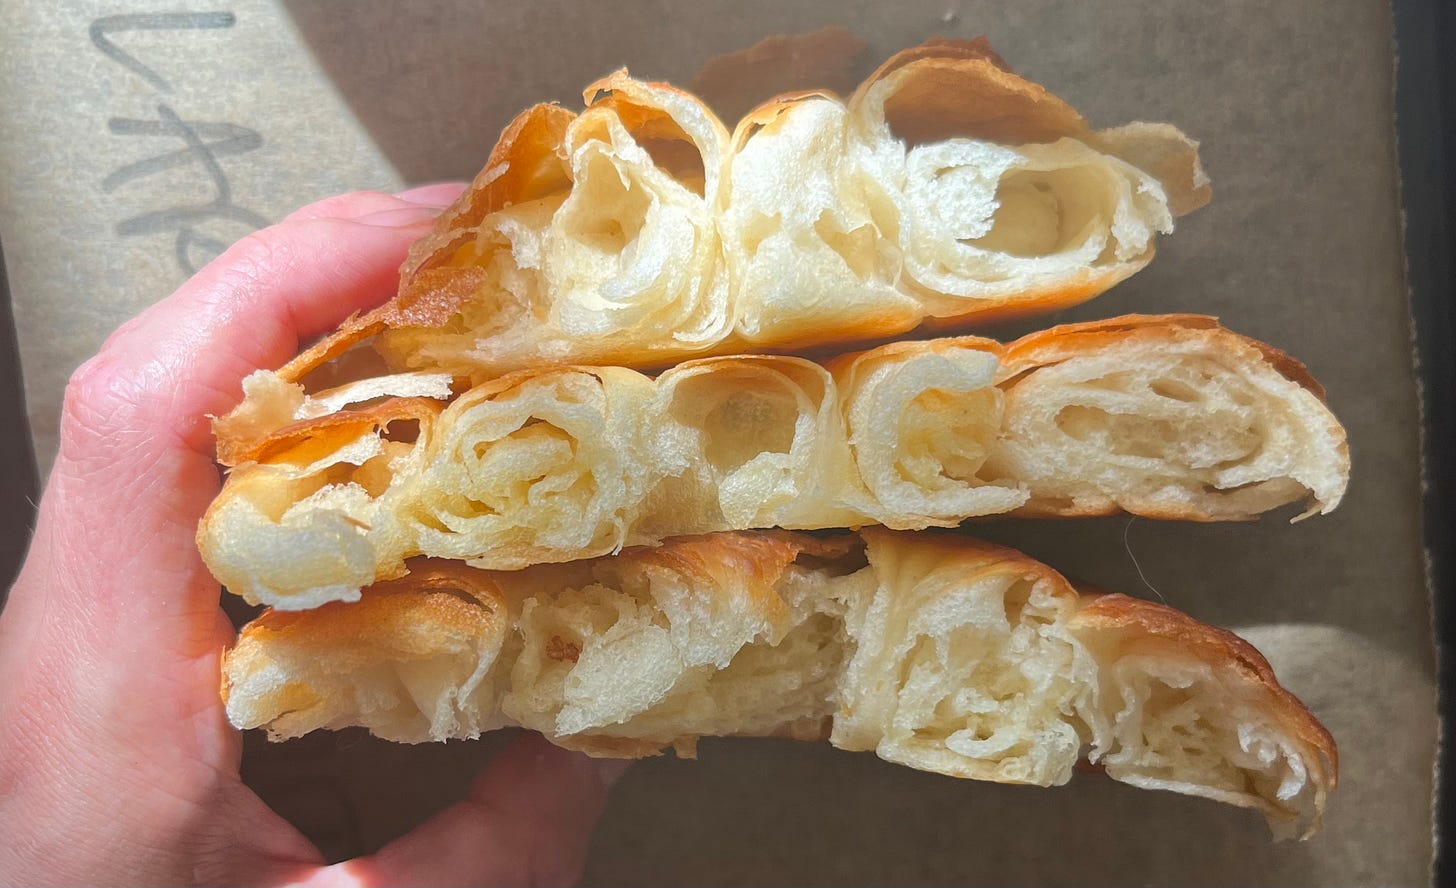
By far, the lard ensaïmada were the lightest and softest and as you can see from the pics had the airiest texture. The butter ensaïmada coloured more quickly and had a crisper crust. So, what was best? The lard is remarkable - the ensaïmada are unbelievably puffy and soft. The butter ensaïmada became quite hard as they cooled down and were denser - the flavour was great, but the lard texture is terrific if you can get your hands on some. The clarified butter did have a beautiful taste but was not much softer than the butter, and it did not colour as much due to the lack of milk solids. No matter what you choose, you'll be happy - but don’t forget to be generous! Mixing the two is also an option - I think 25% butter to lard is ideal.
The deal with yeast
As well as this, it was SLOW to ferment. I assume this is because of the high sugar %. Although a small amount (<5%) of sugar helps yeast ferment, a large amount of sugar actually hinders fermentation. This is because it dehydrates the yeast cells since sugar is hygroscopic, aka water-loving. Poor dried-out little yeasts!
I don't usually like to up the yeast for no reason, but the proportion of sugar in this dough makes it hard to avoid. I want to find a mix between authenticity and convenience with the newsletter, so considering proofing times for an at-home recipe was vital (and key to you not cursing me!), so I've upped the yeast to 2%, and it definitely makes this recipe flow better.
Understanding gluten: Extensibility vs Elasticity
One of the biggest lessons to learn when developing a stretchy dough is understanding the difference between extensibility and elasticity. In the apple strudel recipe, an unleavened dough, I was solving for extensibility which basically just means how far a dough can stretch rather than how strong it is (able to hold its shape). For the ensaïmada, we have a different goal. I know it's easy to think that when it comes to making a stretchy dough, strong flour = better, right?! But let's go deeper.
All wheat flour contains proteins that, when hydrated, create gluten. The flour you buy will be categorised as such based on that %. If you're unsure what type your flour is, you can check the nutritional values on the back of the packet.
My gut reaction whenever I approach a recipe that requires a lot of volume or stretching is that it MUST be made with strong bread flour. Strong flour contains a high % of protein which, in turn, creates gluten when hydrated. Something like ensaïmada dough, which needs to be stretched to its limit, MUST use strong flour, right? Because strong flour = more gluten = more stretch, right? Well… no.
Although 'strong' flours are essential for bread baking, it doesn't mean they need to be used for other 'stretchy' doughs. Hand-pulled noodles, for example, are perfectly happy being made from plain flour, which will stretch to extreme lengths. Plain flour isn't great at creating the sort of expansive gluten network capable of trapping masses of CO2 that we need for bread – there just isn't enough gluten available to trap it all. That's where strong flour excels.
When it comes to dough, there are two properties that are not opposites yet not quite equals: Elasticity and extensibility. Elasticity means your dough will go back to its shape/can hold a shape. In contrast, extensibility refers to the ability to stretch the dough without consideration of it returning to form. A very extensible dough can actually be considered 'weak' as it doesn't have any ability to hold its structure.
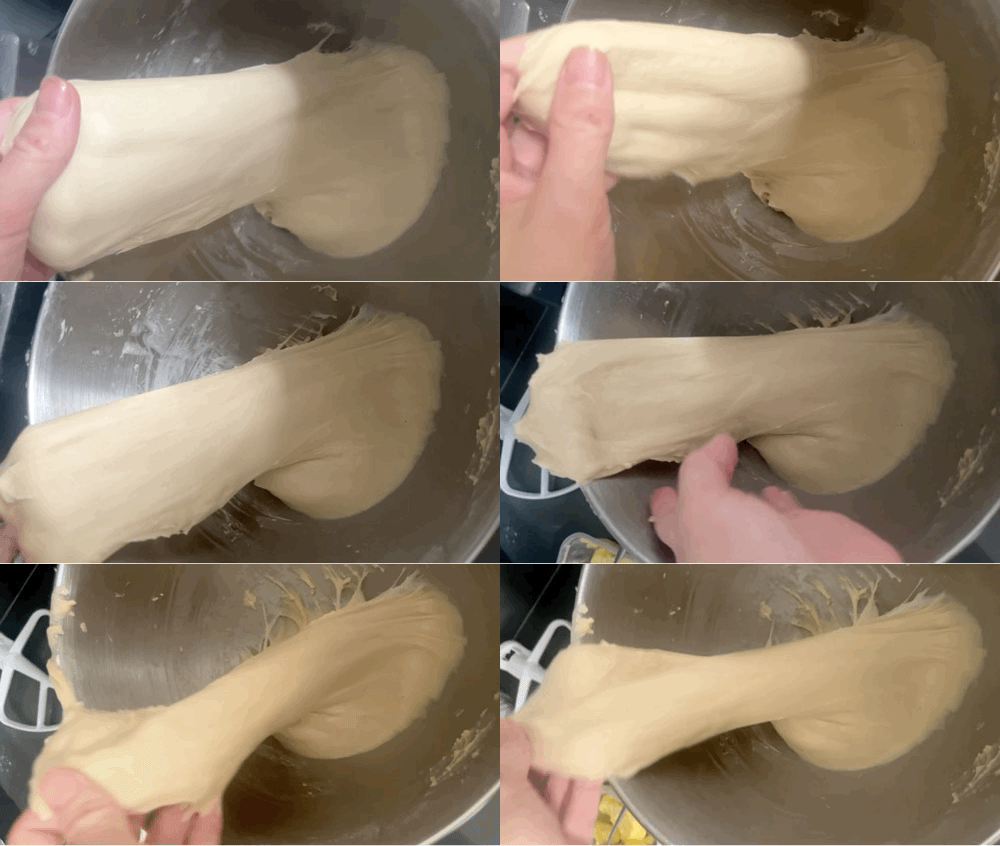
For today's ensaïmada, we want both: We need to promote elasticity and structure so the dough can effectively capture the steam and CO2 as it bakes, creating that all-important airy structure. But, we also need proper extensibility, so our dough can stretch enough to incorporate fat. We want that baby to stretch big time. Just like the strudel, we need to fully develop the gluten. If you want to mix by hand, it's totally possible (follow the directions in the strudel recipe!) but mixing in a KitchenAid is much easier.
Shaping and size
The ensaïmada is puff pastry/viennoiserie adjacent in many ways but with WAY less pressure. The fluffy middle is reminiscent of a perfect croissant - the methods, however, are very different. For viennoiserie, a relatively thick block of butter is encased in a relatively thick dough - turns are then performed so the layers become thinner and thinner. In contrast, the ensaïmada dough is stretched very thin, and fat is spread over it in a thin layer before being rolled up. You still get layers of fat and dough, but the focus is not on perfection.
For the ensaïmada, we are solving for horizontal length. Your dough needs to go the distance to get a good-looking coil. When we shaped babka together a few months ago, the shape was a broad rectangle, but we are solving for length this time. I know stretching dough into a very thin sheet might seem intimidating, but it's very doable. As well as this, if the dough tears, it doesn't really matter. Unlike viennoiserie or puff pastry, we are not trying to create a perfect spiral inside but rather just create overlapping layers of dough and fat, holes don't matter! The dough is so thin that you won't even notice.
As well as this, most Mallorcan recipes refer to the 'heart' of the ensaïmada - this refers to a long piece of dough (offcuts are ideal) that is placed along the top edge before rolling up. This ensures there's always a 'heart' of soft dough throughout the pastry.
Finally, this whole process is MUCH more manageable if you are willing to limit the size of the dough. In the recipe below, I've capped the weight at 130g, which gives you a 5-6inch ensaïmada. Of course, you could stretch the whole thing, but you'll need a massive table.
The deal with cold proofing
As we know, the classic ensaïmada has a long cool proof at 12c, which must help improve flavour. But since that isn't very practical for most home bakers… what to do?
Cold proofing, of course! We’ve discussed this before, but let me remind you of this fantastic tactic you can employ in ANY yeast-based recipe - it really pays off in the flavour department. To understand this, we must remember that yeast is a fungus and loves a warm environment and that temperature is the only real thing that speeds up fermentation. Beneficial as it is, if you're in a rush to get the bread filled with CO2, it doesn't favour flavour. Cold fermentation will slow the yeast activity, which is a good thing because when the yeast isn't going nuts digesting sugar and producing CO2, it is really helpful in a flavour-creating process called the… wait for it… Alpha Amylase Reaction.
I know; it's not a catchy name. But you don't need to know it by name. You just need to know that it's an action where complex starches are further broken down into sugars, and flavours are made. This reaction does happen if you just leave flour and water on their own, but yeast - when under control in a cold environment - can provide some helpful enzyme action to coax those flavours out and offer new dimensions to your bread.
But.. does it matter WHEN you cold-proof it? Does it make a difference if we cold-proof dough during the bulk phase or cold-proof it after shaping? I asked Adam Sellar, bread consultant and all-around dough genius. "The short answer is no; it doesn't make a difference." This is excellent news - if you want to cold-proof your dough, I recommend making it the night before and leaving it in the fridge overnight. As well as superior flavour, you also get the benefit of additional resting, so the dough relaxes and stretches more easily. The dough I proofed overnight didn't even need the rolling pin - it stretched happily just using my hands!
Fillings
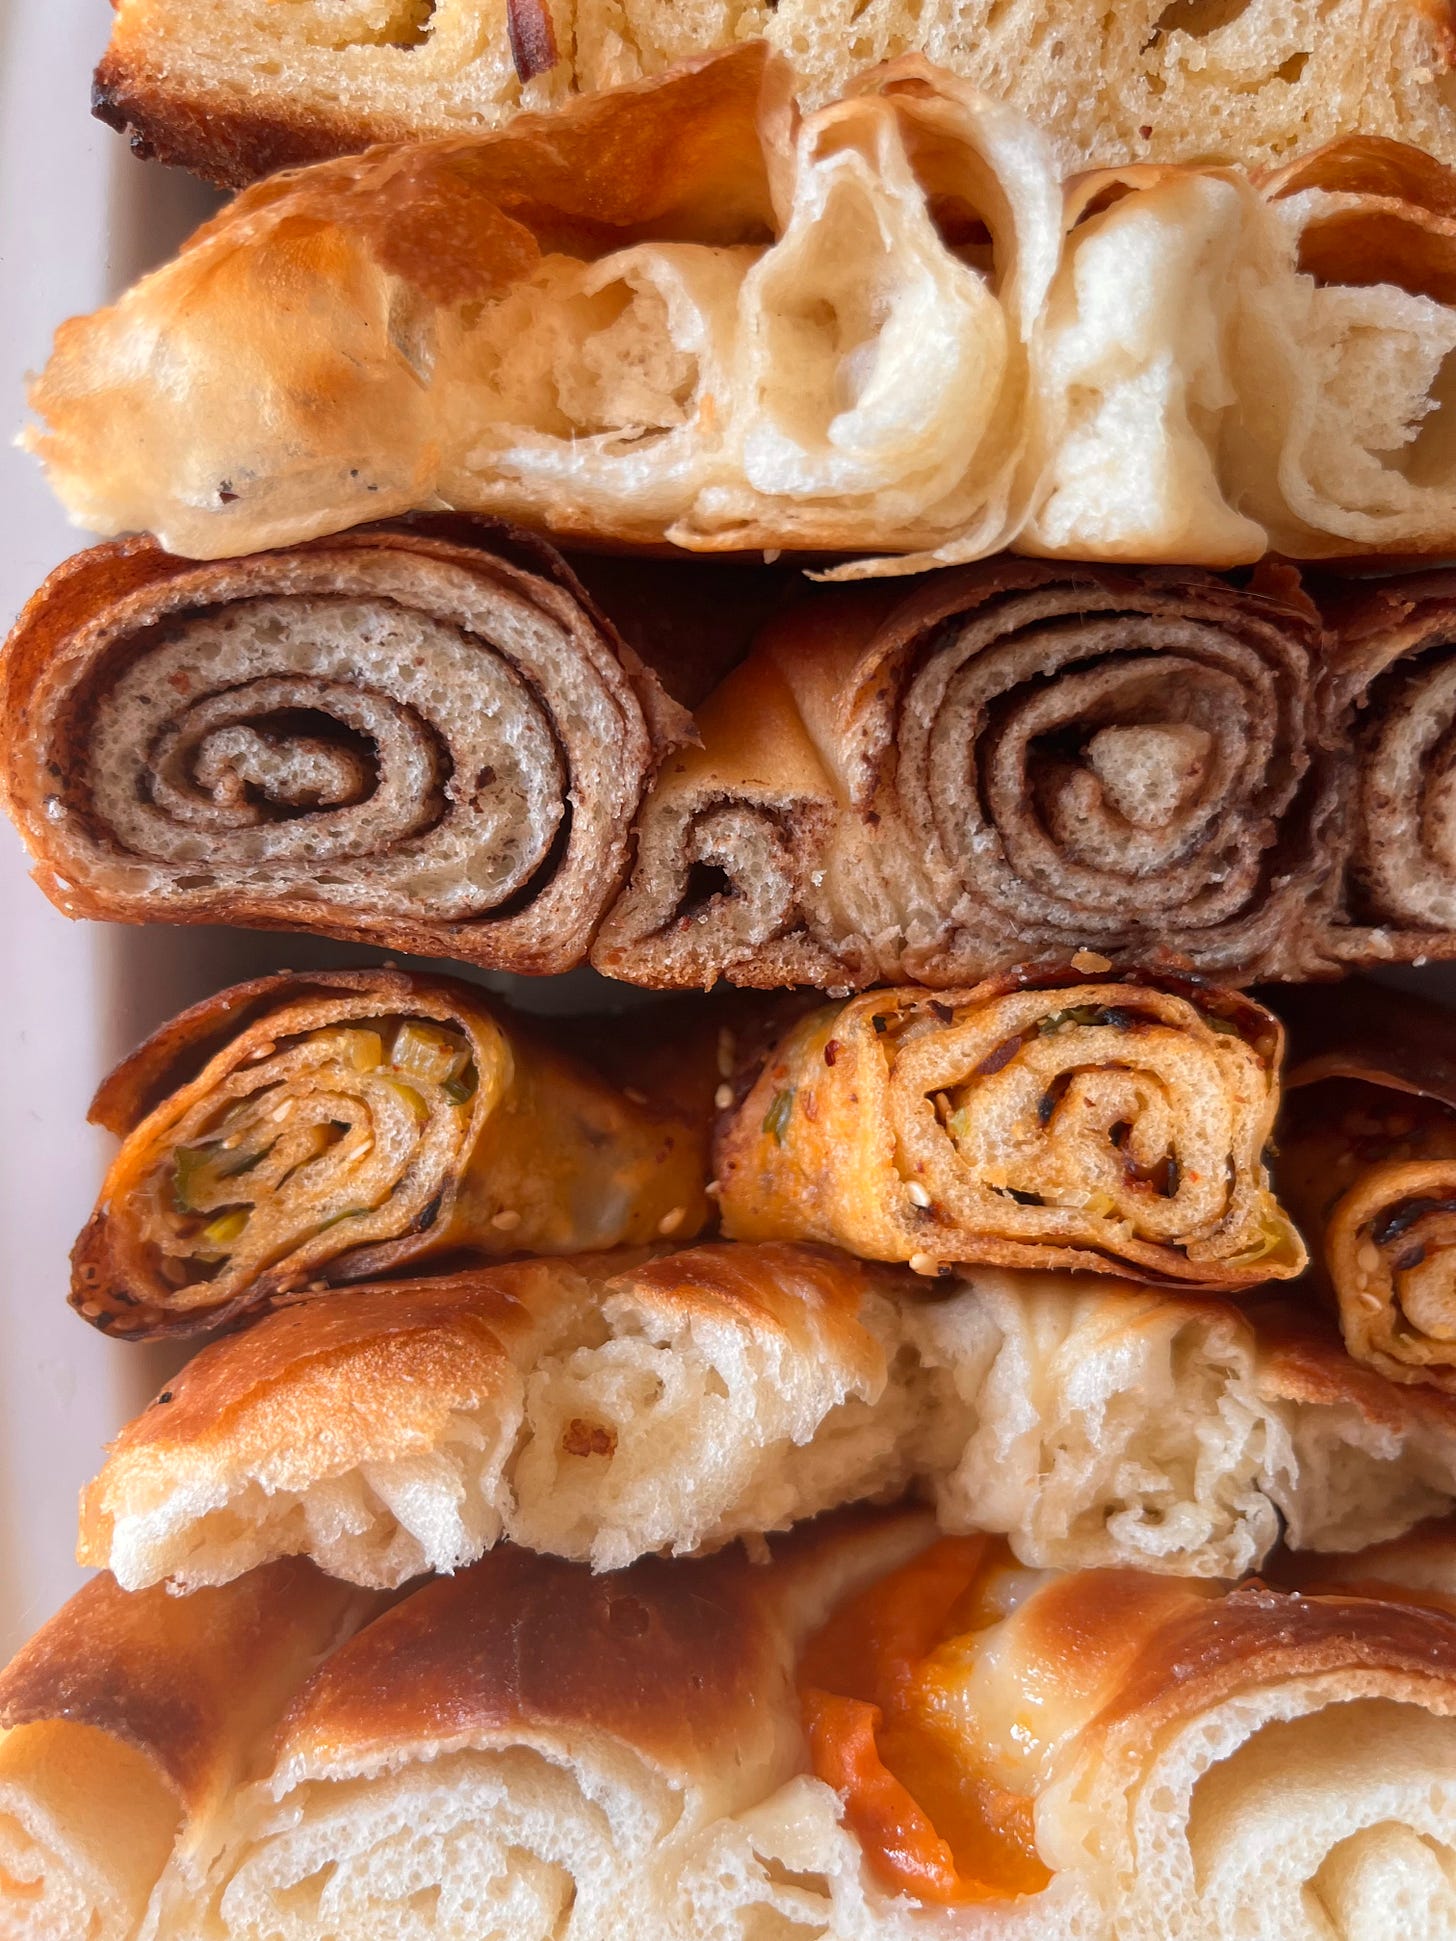
I know I often encourage you to adapt the newsletter recipes to your taste… but I REALLY mean it this time. Over on KP+, I'll fill you in on the options of adding fruit and incorporating frangipane in your ensaïmada (literally the swirled almond croissant of your dreams). I'll also take you through savoury options, including a divine salty honey feta za'atar number and a spicy sesame chilli oil. It's a very happy family:
Below, I'll share the formulation for classic ensaïmada and a sobrassada ensaïmada, which is typical of the region. Never heard of sobrassada? You're about to be VERY happy then: Sobrassada is a spicy cured sausage made with ground pork, paprika, spices and salt. It is not unlike nduja - it can be spread and used in dishes. It gives ensaïmada a BEAUTIFUL orange tinge - and it is also recommended this should be covered in icing sugar before eaten, too. If that seems too much to handle, consider a drizzle of honey. Still sweet, but it doesn't feel so wacky to my sometimes unadventurous British tastes.
The bake
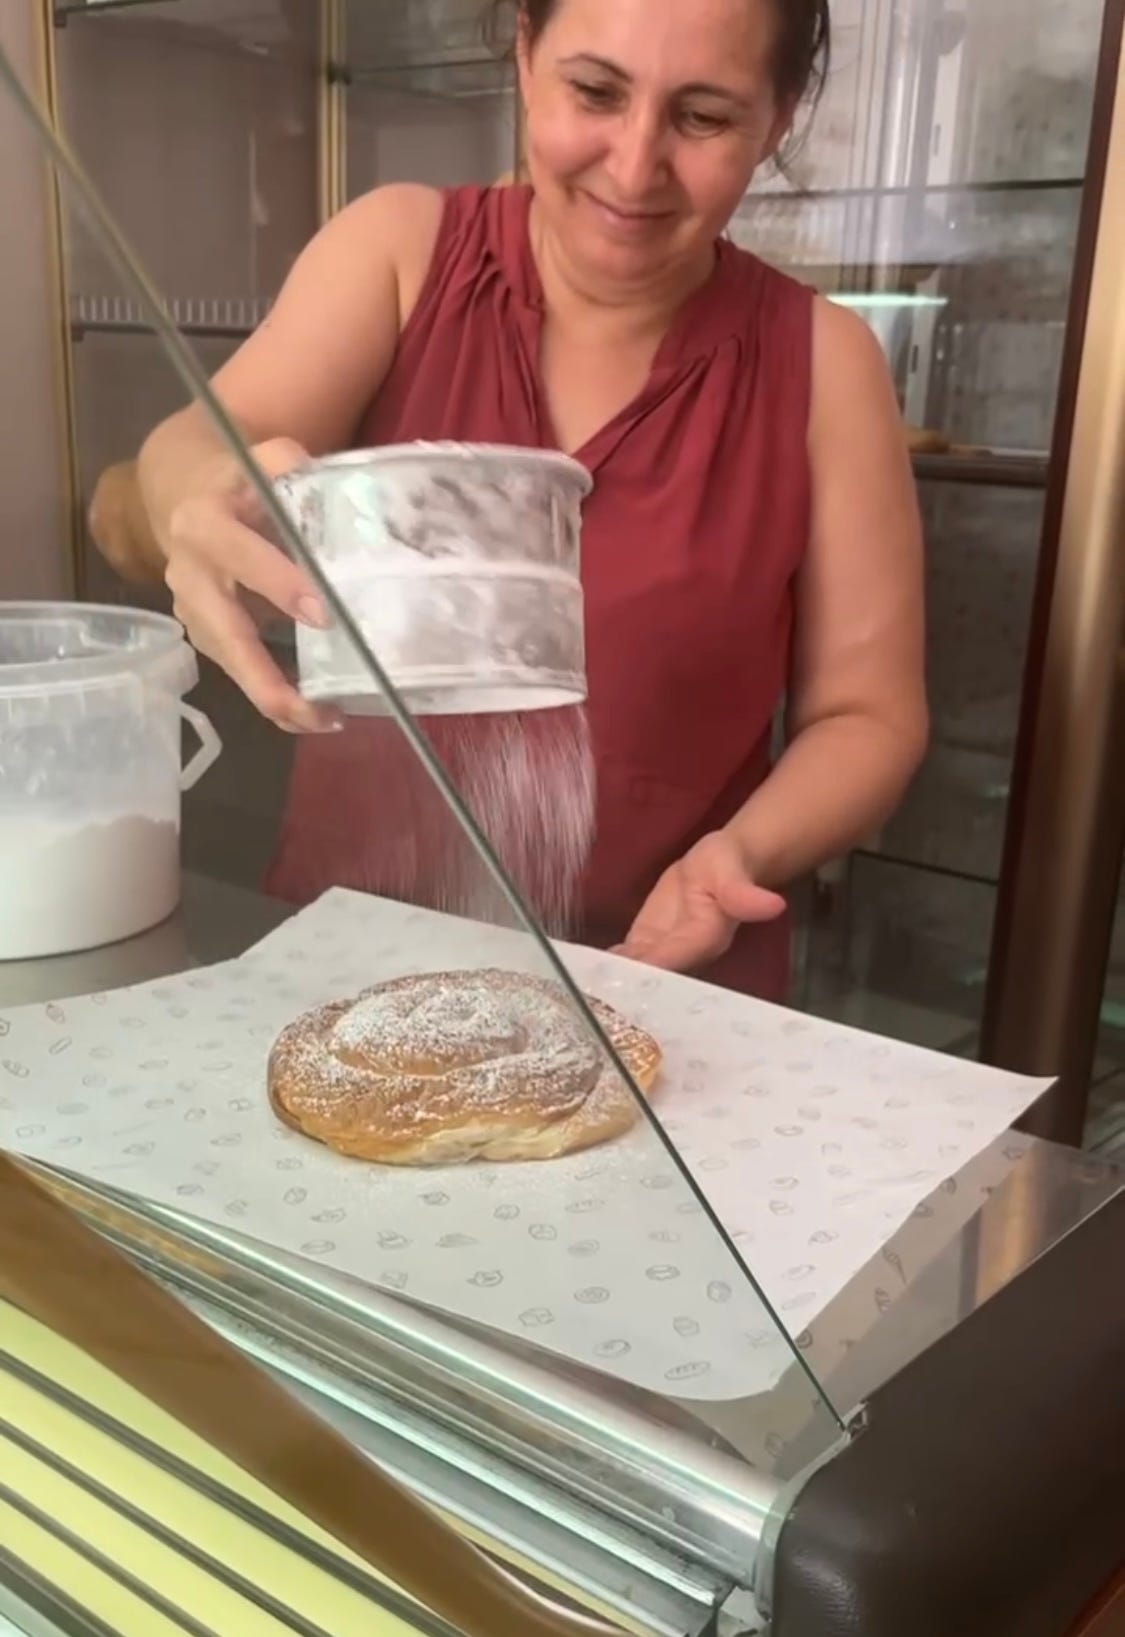
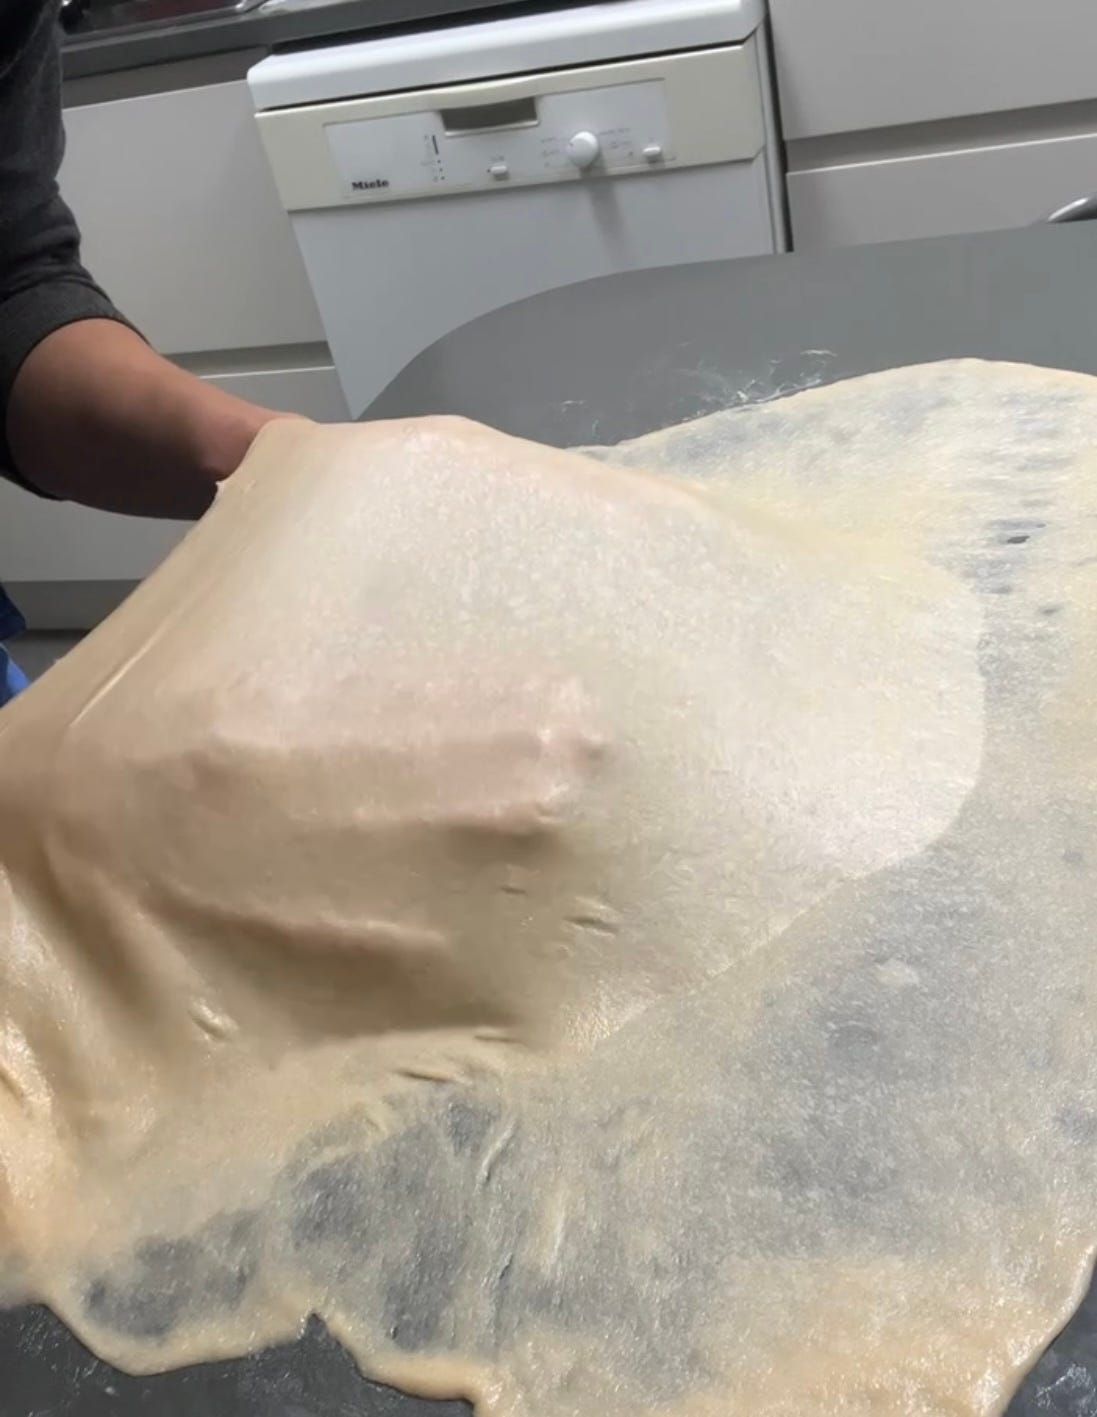
The bake is relatively straightforward, but one thing that really changed the final texture of the dough: Water! Well, steam, to be exact. I went deep into a youtube hole and found this video of homemade ensaïmada, and before baking, it has a light dousing/flicking of water. I tried it myself, and WOW, the steam helps create a beautifully puffy final product and thin, supple crispy crust. No spray bottle, no problem, just do as Abeula does here!
You definitely don't need egg wash - since the dough is so thin and in layers, it colours VERY quickly, especially if you use butter. Watch out!
Ok, let's make it!
Ensaïmada recipe
Makes 4 x 6-inch, small ensaïmada. If you don't want to make so many, you can fold up the dough, plonk it into a loaf tin, and bake it as a crispy, airy loaf OR cut it into buns (technique on KP+). Delicious!
The ingredients
300g strong bread flour
100g milk
55g water
50g egg (about one)
6g instant dry yeast
70g caster sugar
4g salt
20g butter or lard
10g vegetable oil
Please note this is a high hydration recipe - if you are new to making dough, I recommend omitting the water entirely and increasing the milk to 115g. It will still be great, promise - just easier to handle!
The ingredients to smear/fill
200g butter or lard, soft (you may not need this much, but better to have extra!)
For 2 x sobrasada filled ensaïmada
75g butter or lard
75g sobrassada
I used Brindisa Iberico lard and bought my sobrassada here.
Method
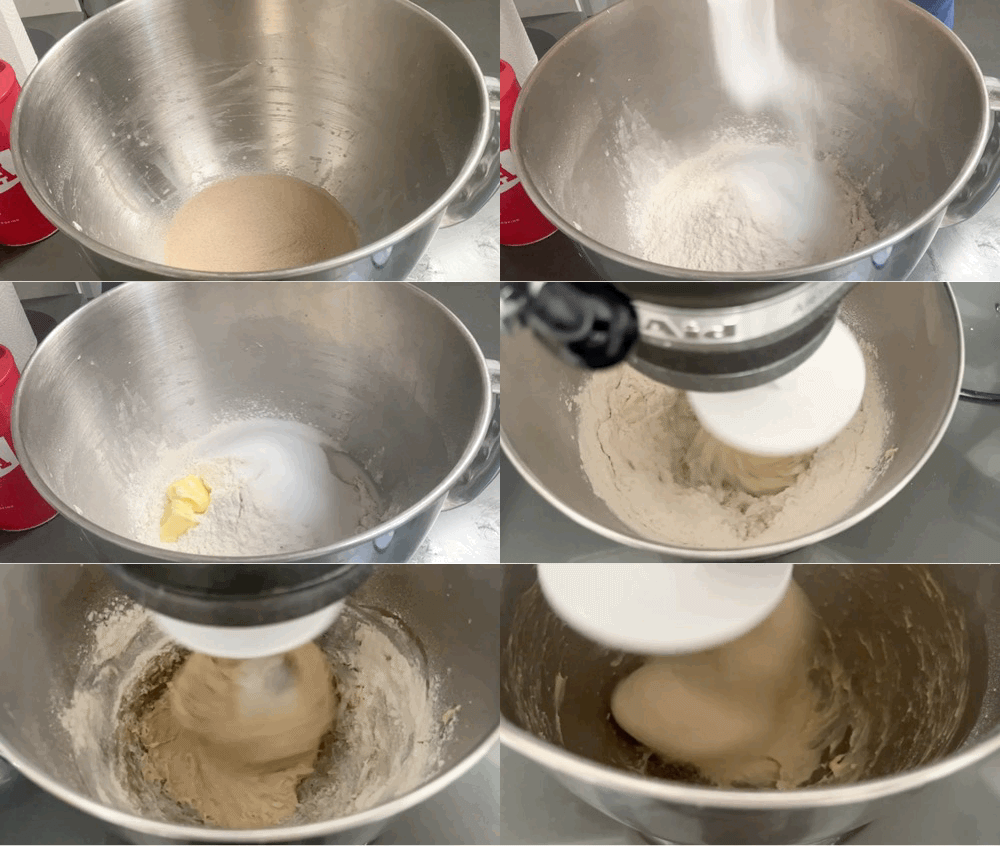
Weigh milk, water and eggs into your mixing bowl, followed by yeast, flour, sugar, salt, butter and vegetable oil (ALL the ingredients).
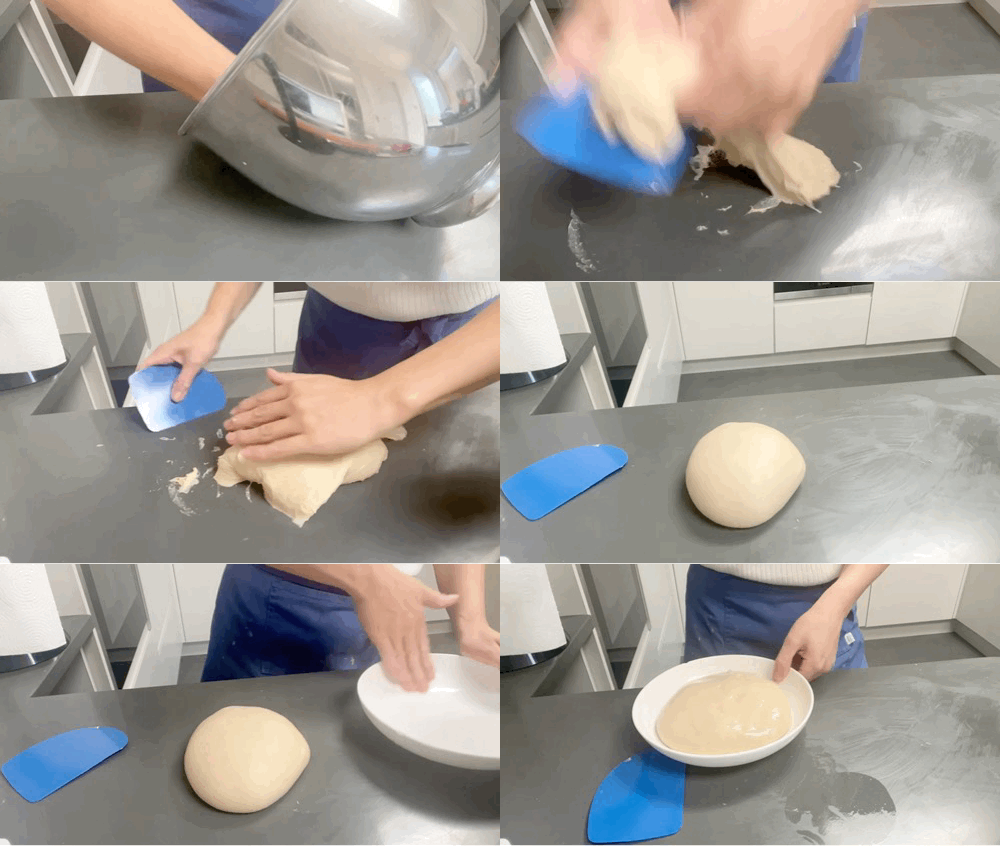
Mix on medium-high speed for 15 minutes. To ensure the dough doesn't overheat, I like to mix for 5 minutes, then break for 1 minute, and continue until the 15 minutes are up. After 15 minutes of mixing (however you break it up), leave the dough to rest for 5 minutes - check gluten development
It should be extremely stretchy and can be pulled ultra-thin. If not, mix for another 5 minutes, then rest again before checking.
Move onto table and perform a few slap and folds until the dough forms a nice smooth ball. Move into an oiled bowl and cover. If skipping cold fermentation, leave to rest for 1 hour at room temperature. If cold-fermenting, move to the fridge after the initial 1-hour proof and leave for up to 24 hours.
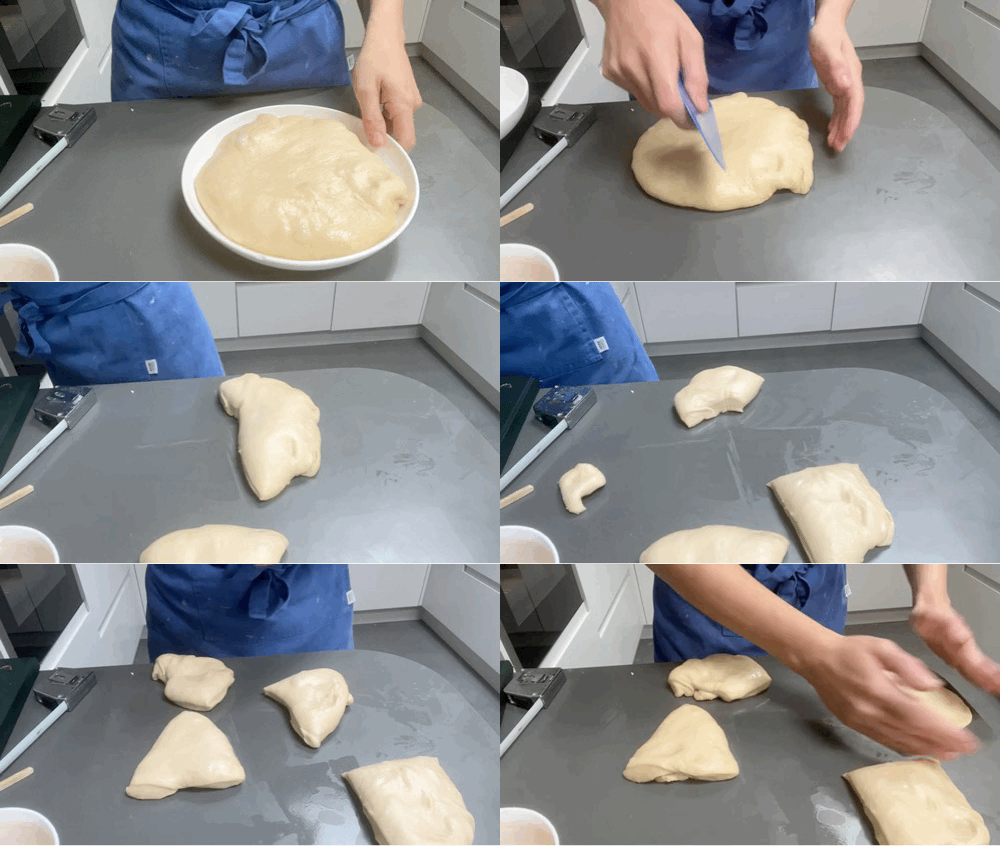
To shape, divide the dough into 130g pieces - as rectangular as possible for easier shaping - then set aside to rest, keeping covered.
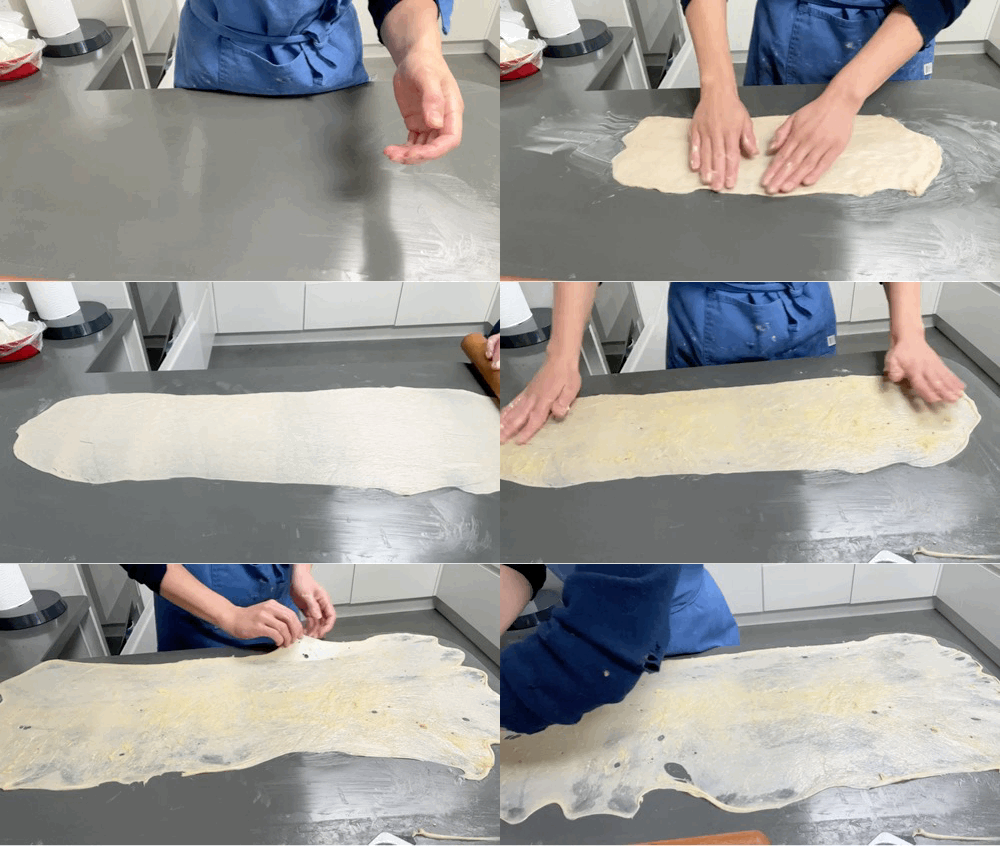
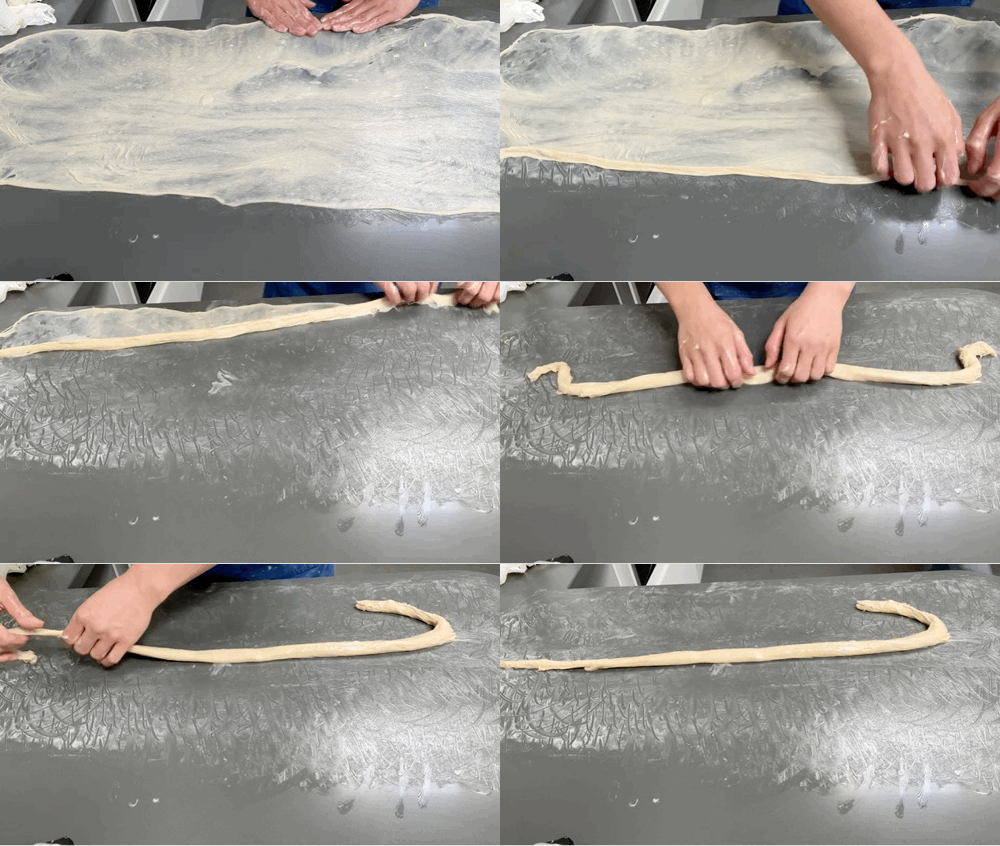
Spread your worktop liberally with fat, then place a piece of dough in the middle. Press into a rough rectangle with your hands. Once it springs back, grease a rolling pin and lengthen the dough until it is about 80cm.
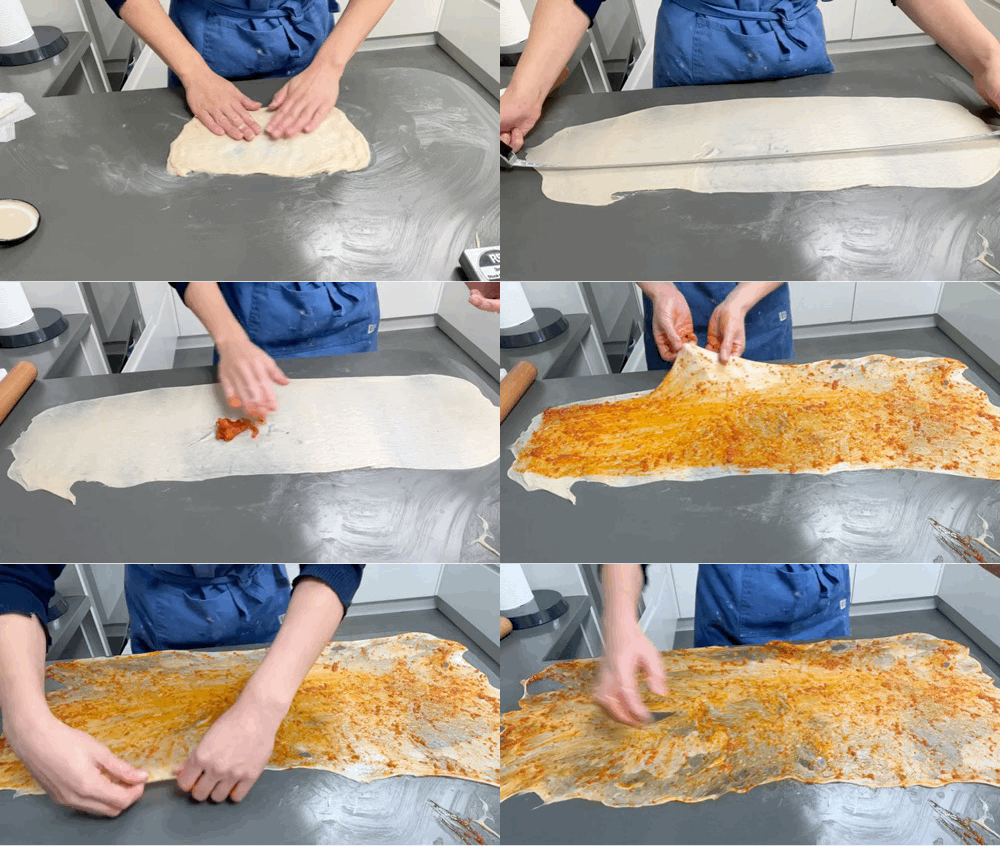
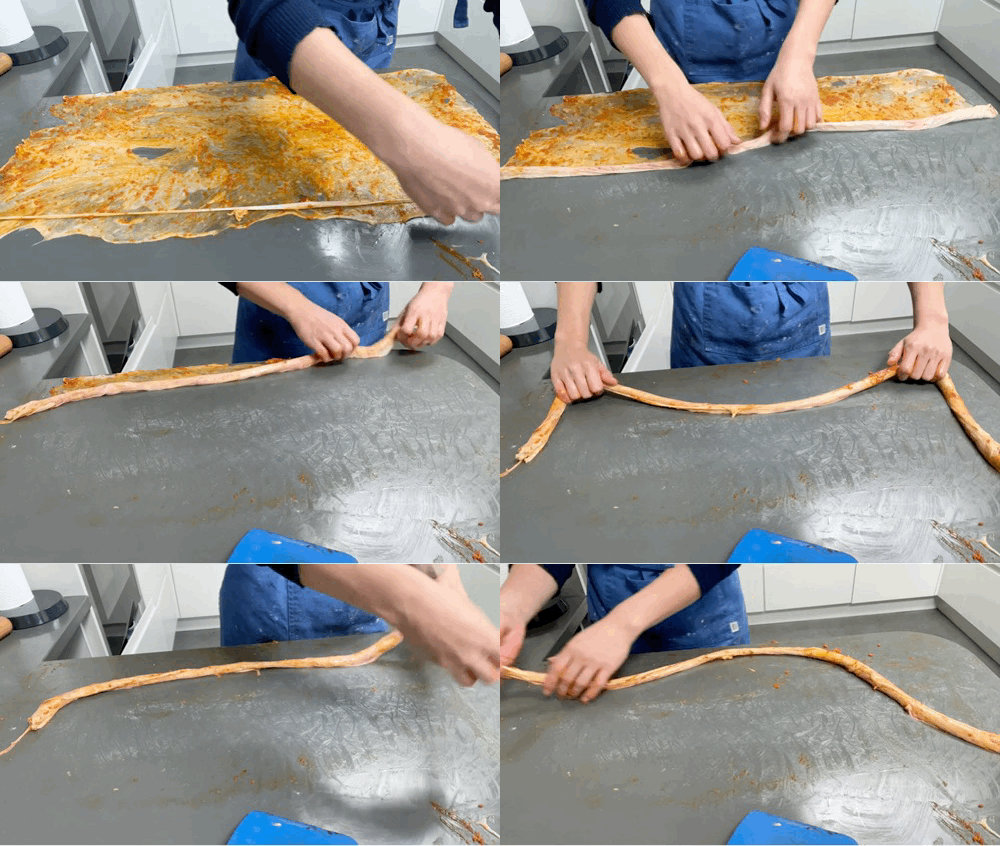
Spread the length of dough with around 30g of fat or 50g of the sobrassada/fat mix if you are using it. You don't need to weigh this, you just need to ensure it's covered generously - 30g puts it at the 23% fat to dough weight in the final pastry, and you need more of the sobrassada/fat mix. Then start stretching the dough even further - now is an excellent time to improve the height of the dough. If it rips, don't worry! Try to focus on stretching the thicker bits at the edges - it should be so thin you can see through it. It should be around 85cm x 30cm.
Once you are satisfied, trim off a few edge pieces, then line along the top length of the dough - this is the 'heart' of the ensaïmada, and it is traditional to put a little dough here, so you always have a soft bit in the middle.
Using a dough scraper, start flipping the dough over on itself and rolling it up into a long thin coil. It doesn't have to be neat and tidy. Once rolled up, stretch a little from the centre - it should be around or above 90cm long.
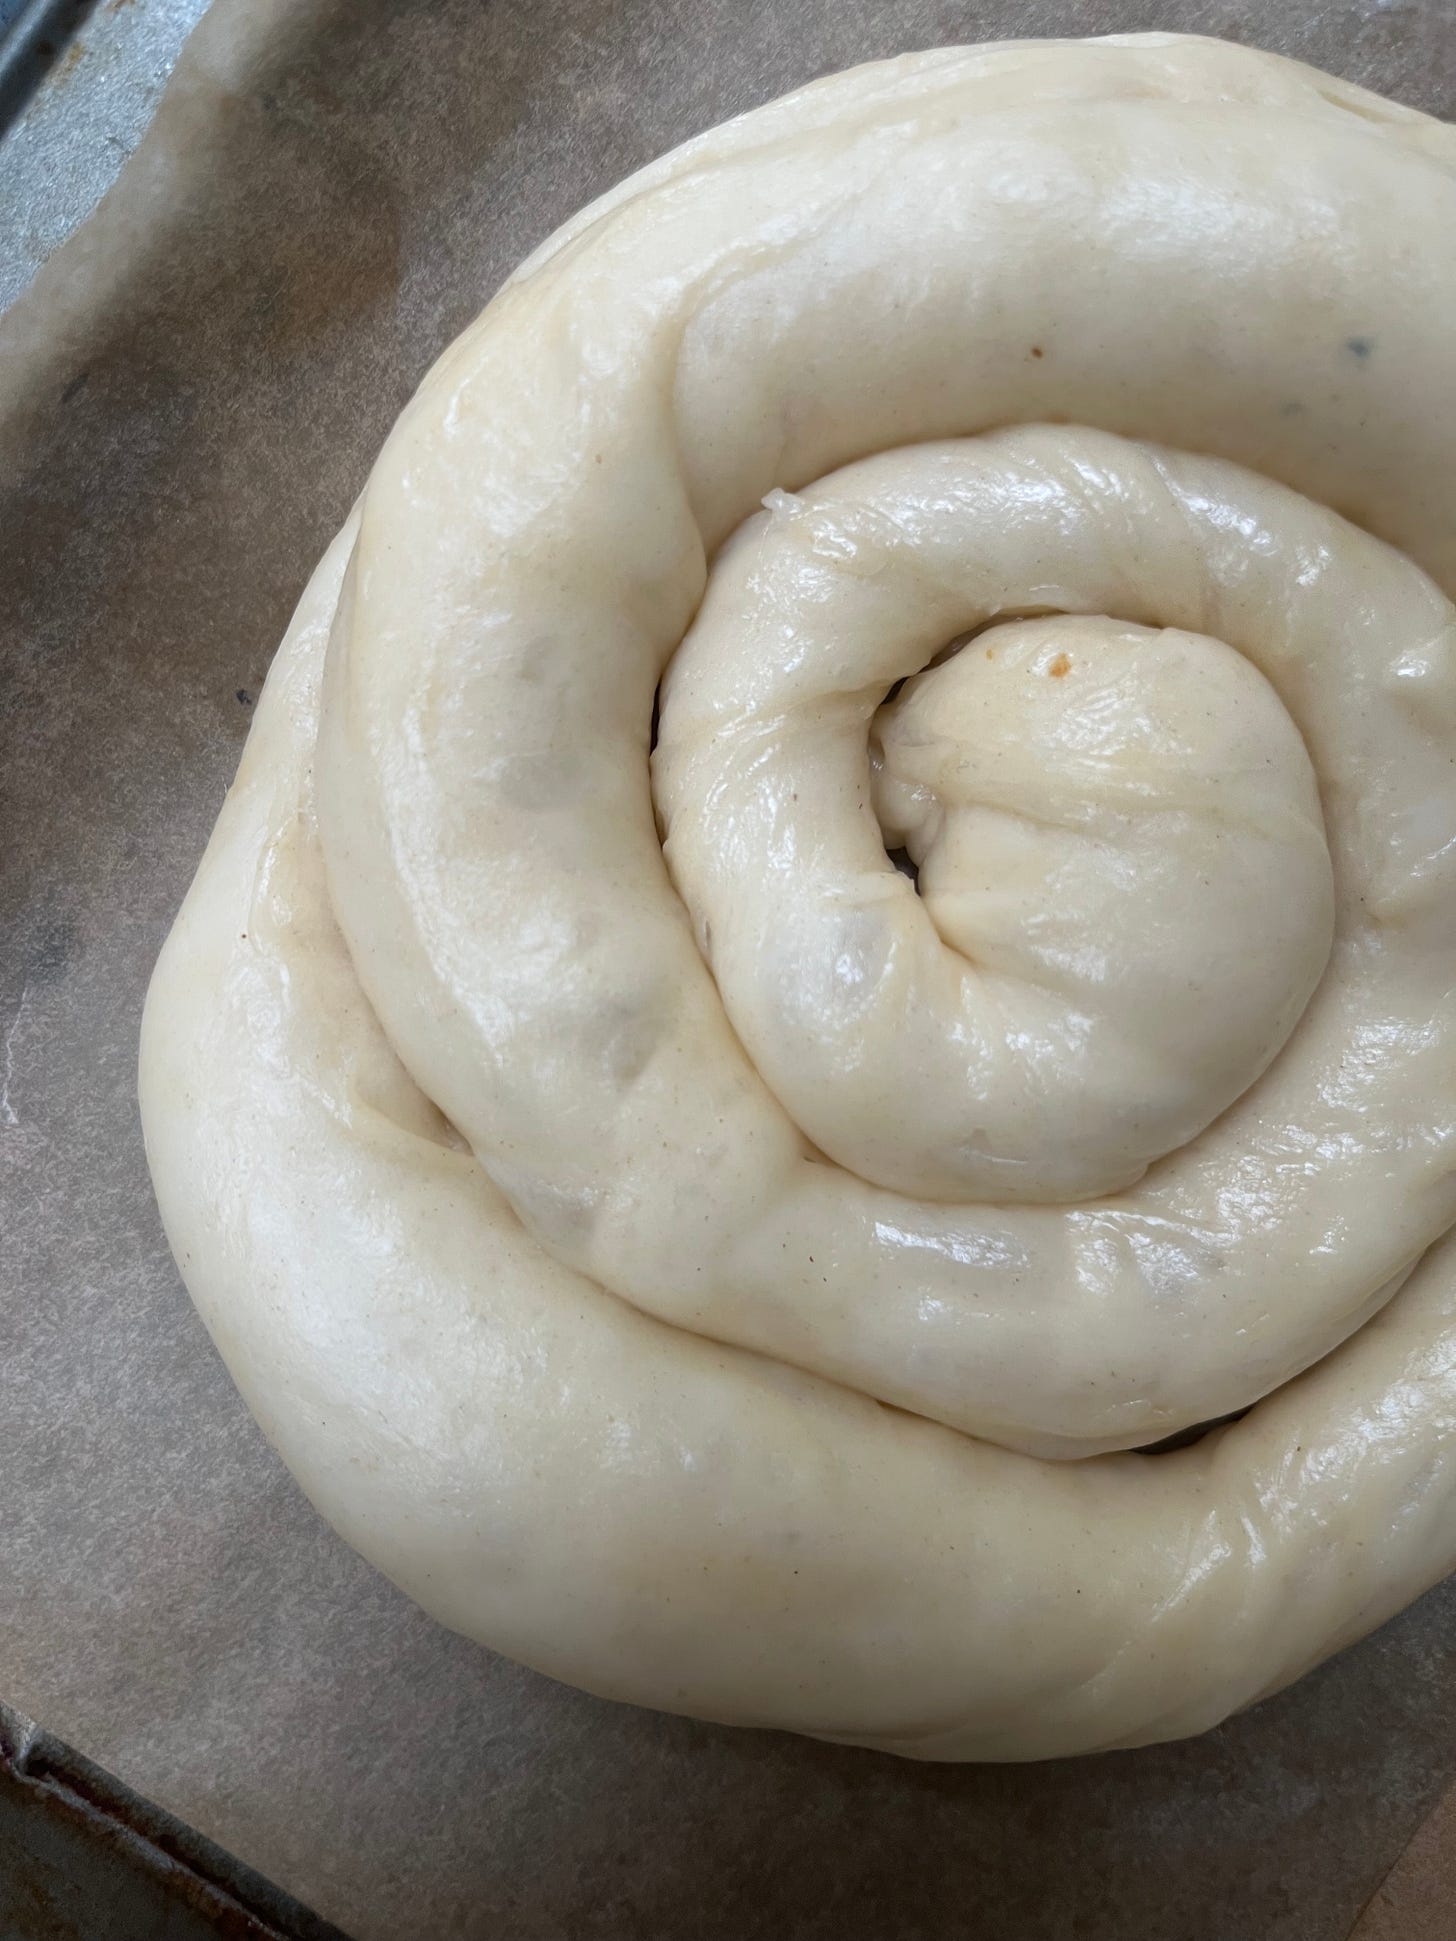
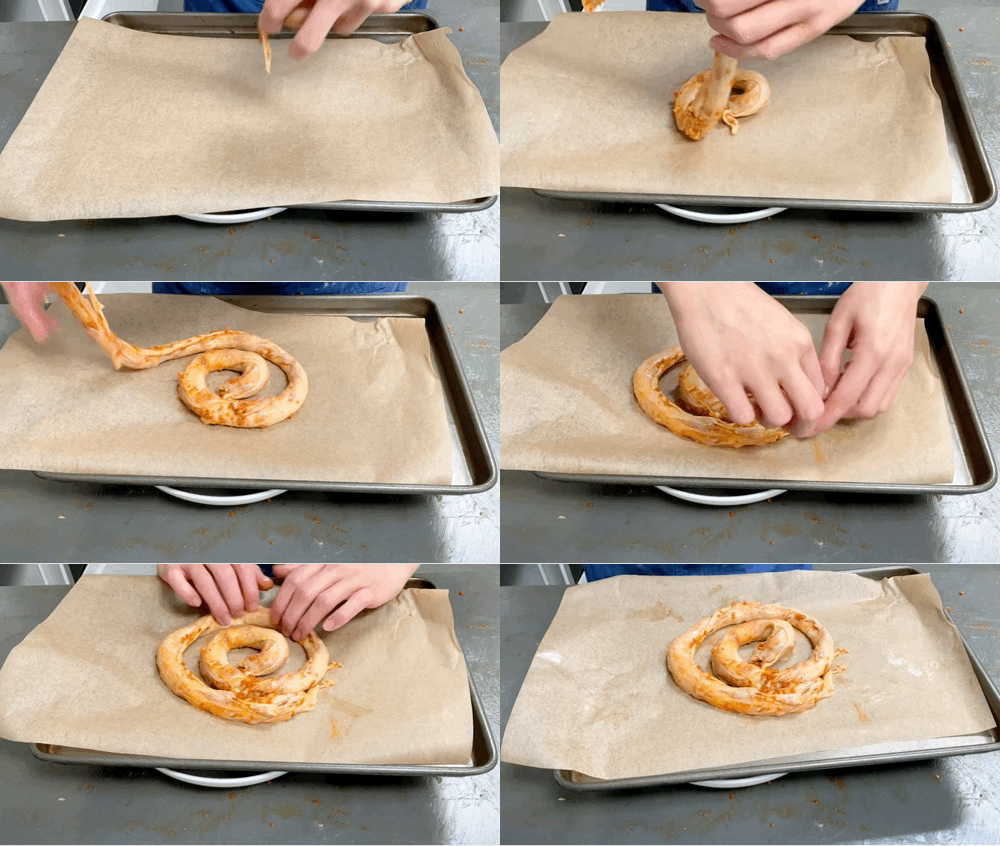
Coil the dough onto a lined baking sheet, leaving a 1cm gap between the rotations.
Leave to proof for 2-3 hours at room temperature until very puffy and the coils pushing into one another. You may wish to cover these or spray every now and again with a water bottle to keep the skin supple
Pre-heat oven to 180c fan
Spray with water (or flick with water) generously, then bake for 13-15 minutes, depending on your oven. If you use butter, it will get darker quicker, so watch out. Once baked, check the base; if it isn't brown and crisp, pop some foil on top of the ensaïmada and return to the oven for 5 minutes.
Once cool, douse with icing sugar and enjoy
If not eating on the same day, refresh in the oven for 10 minutes at 160c. Do not dust with icing sugar until ready to eat.
Thanks for reading! This newsletter is a reader-supported publication. The best way to support my work is to become a paid subscriber and help keep Sunday’s free for everyone.



I’m so excited about trying these - I had them in Majorca last year and can’t wait to recreate them! Plus very excited about the KP+ flavour variation!
These look great! I’m a big lard fan - and still make shortcrust with it if I’m not dealing with vegetarians...