Kitchen Project #68: Japanese curry bread
Aka kare pan, the savoury doughnut of dreams
Hello,
Welcome to another edition of Kitchen Projects, my recipe development newsletter. Thank you for being here.
*Cue celebratory music*: It’s ANOTHER bumper Japanese baking edition ft. a deep dive into the fantastical world of curry bread aka the savoury doughnut of joy you never knew you needed.
On KP+ I’m sharing a recipe for caramelised honey toast, an ultra simple recipe you can make with milk bread (I’ve updated my recipe, also in KP+!). As well as this, everyone subscribed to KP+ will be entered into a random giveaway prize draw to receive some Rackmaster goodies. The winner will be contacted by tomorrow.
What’s KP+? Well, Kitchen Projects+ aka KP+, is the level-up version of this newsletter. It only costs £5 per month and your support makes this newsletter possible. By becoming a member of KP+, you directly support the writing and research that goes into the weekly newsletter as well as get access to lots of extra content, recipes and giveaways, including access to the entire archive. Join the gang here:
Alright, let’s do this.
Love
Nicola
Pocket snacks > All other snacks
Last week I was walking through Golden Square in London on the way to the theatre - knowing I had three hours of very-serious-acting ahead of me, I knew I needed to fuel up. Like a sign from the fried food Gods, a golden glowing light caught my eye. The source of the glow? A three tiered heated cabinet, filled with something crispy and golden on sticks. To be honest, I’m already a sucker for anything that comes on a stick, but something deep fried on a stick? Take ALL of my money. Within two minutes, I was the proud owner of a Korean Hot Dog, a smoked chicken sausage dipped in a slightly tacky, sticky batter then deep fried, which the Golden Square Mart makes fresh every day in their kitchen.
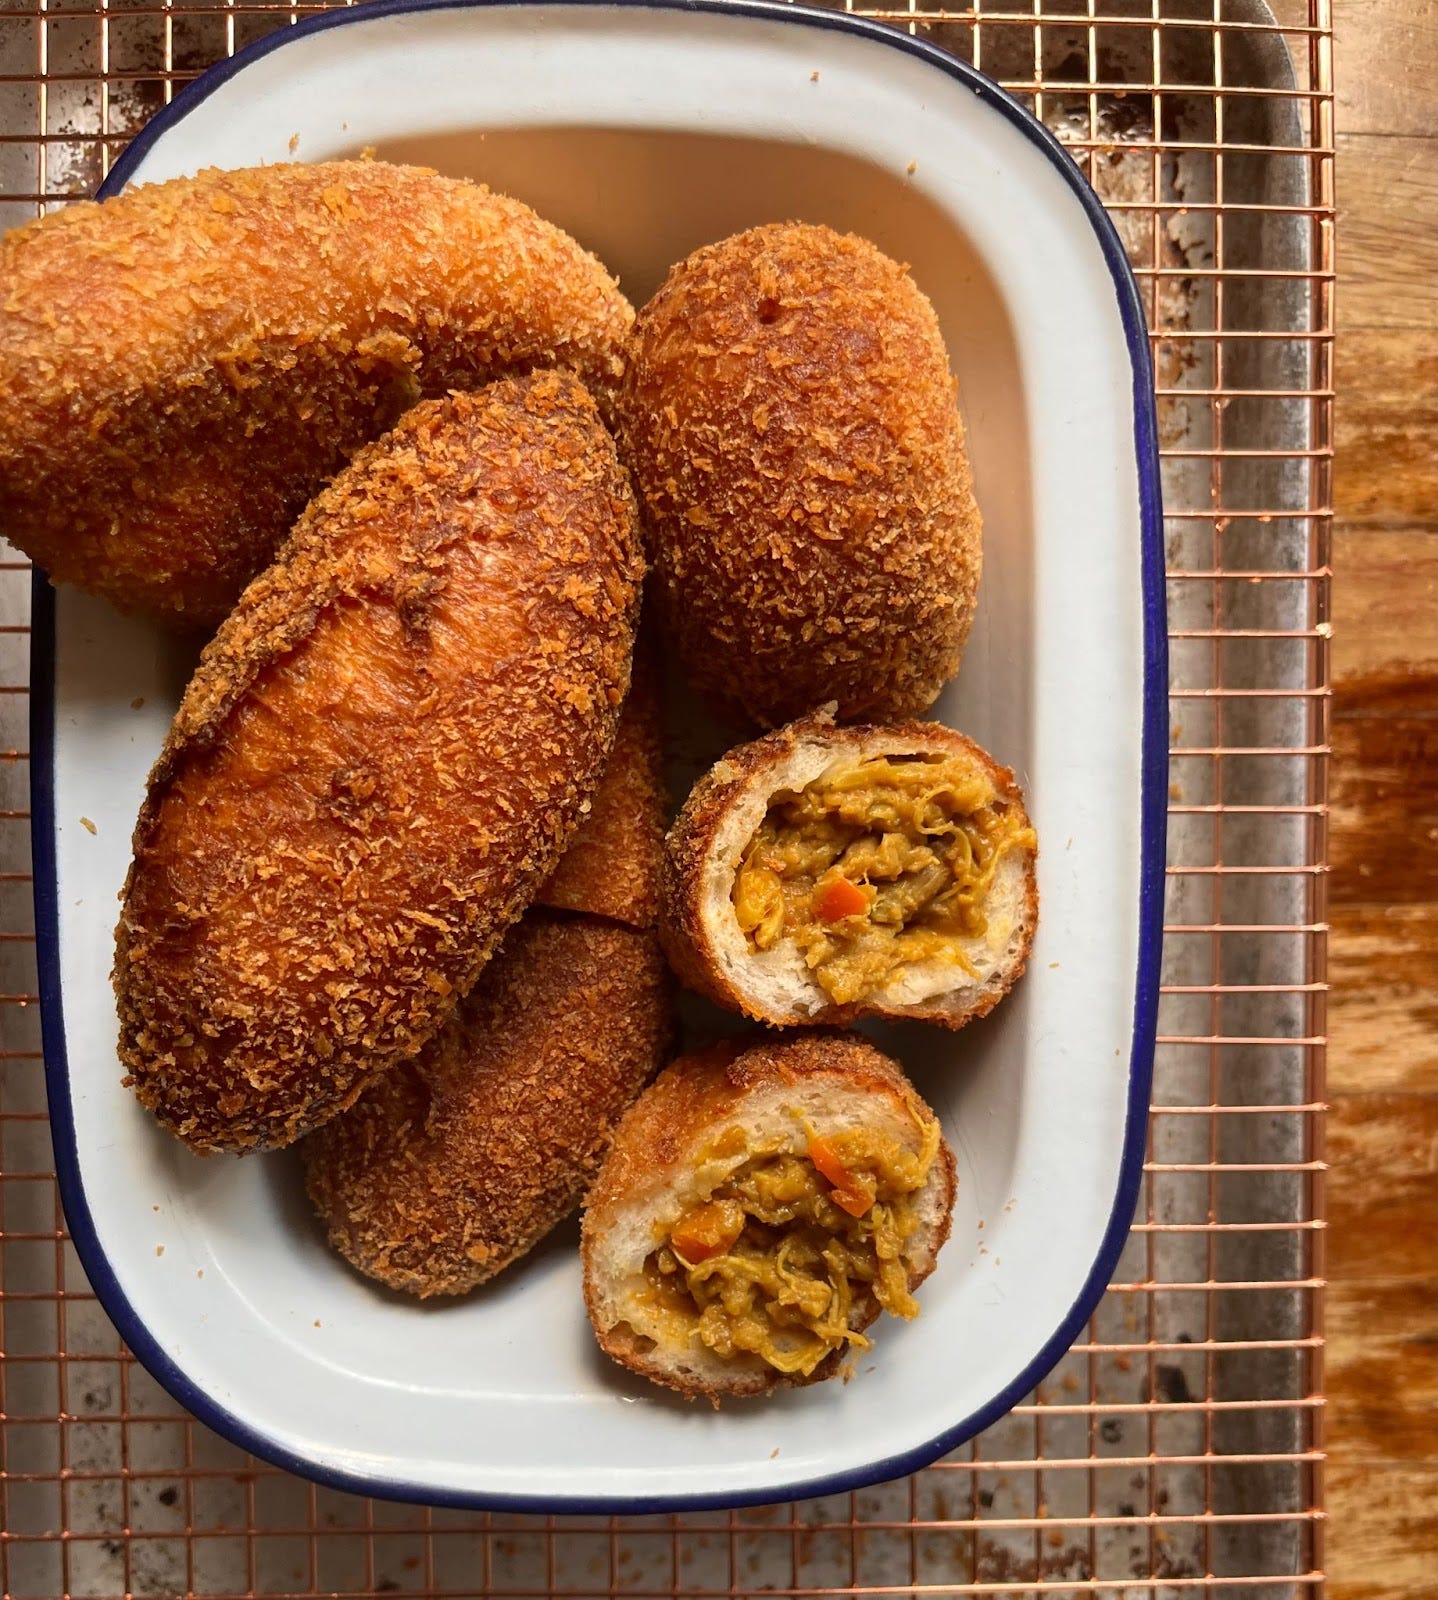
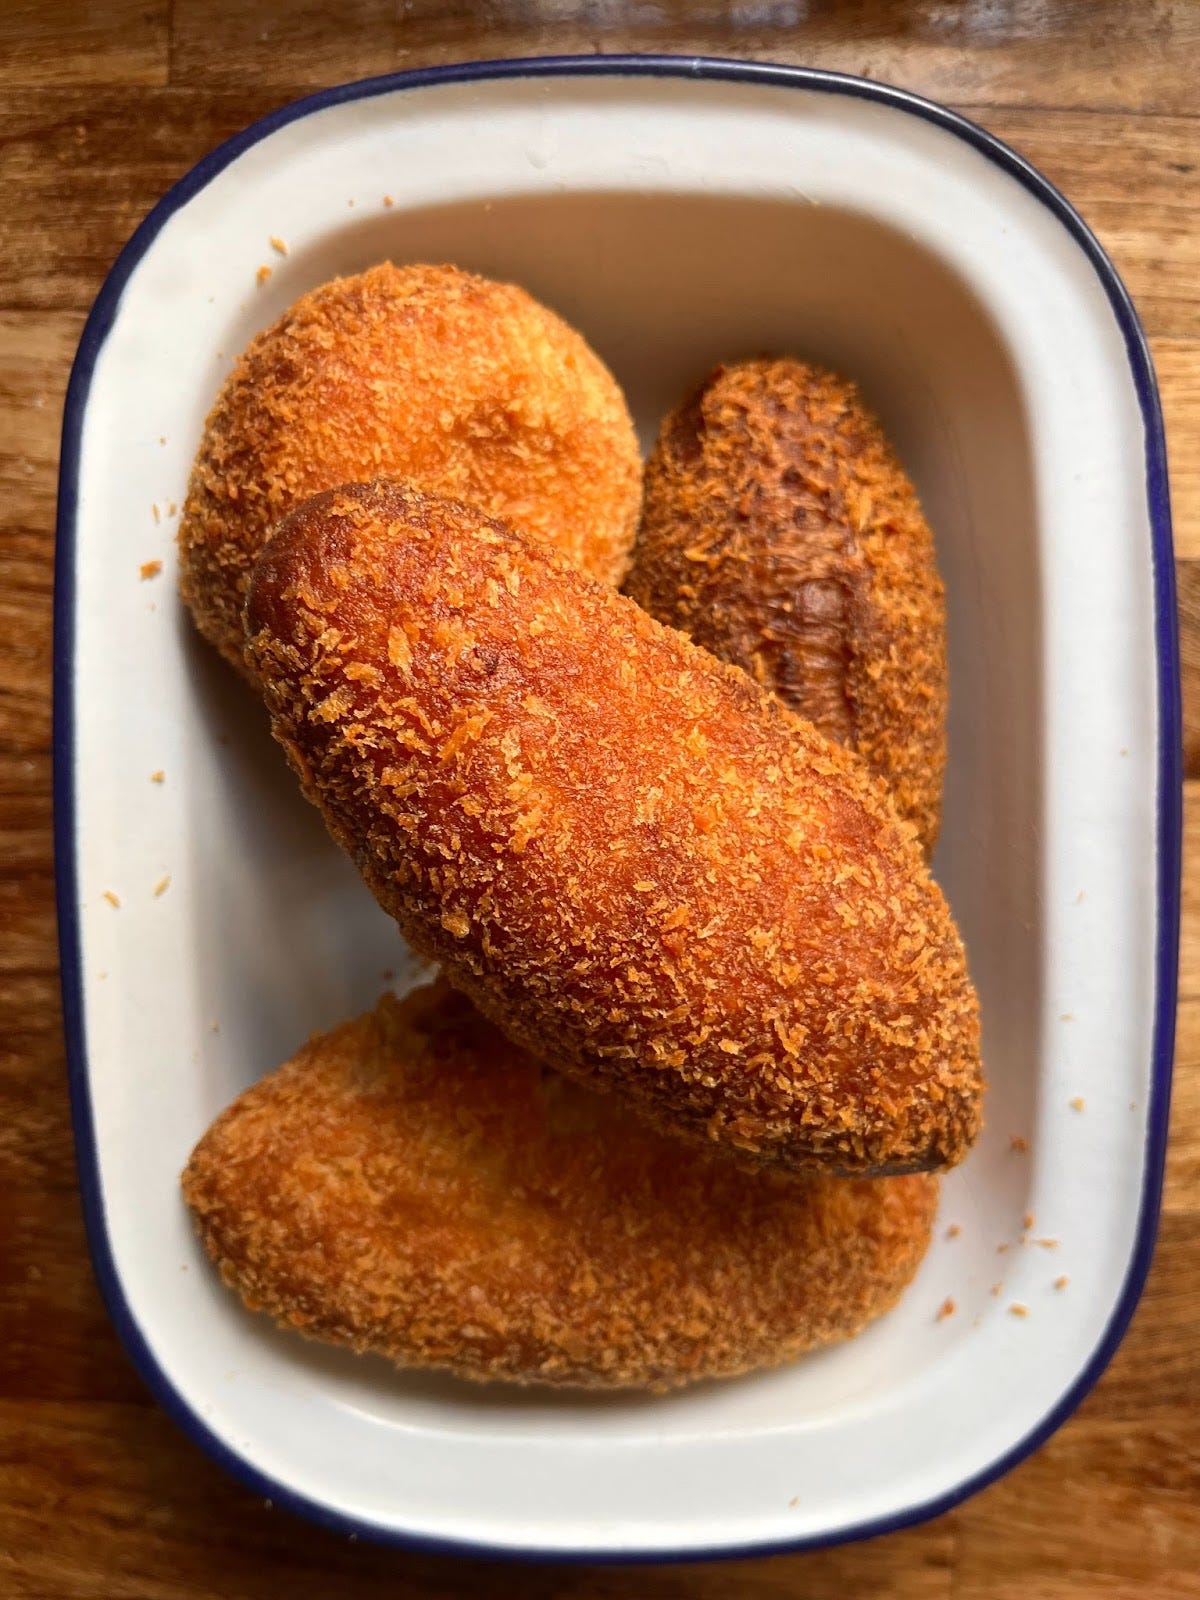
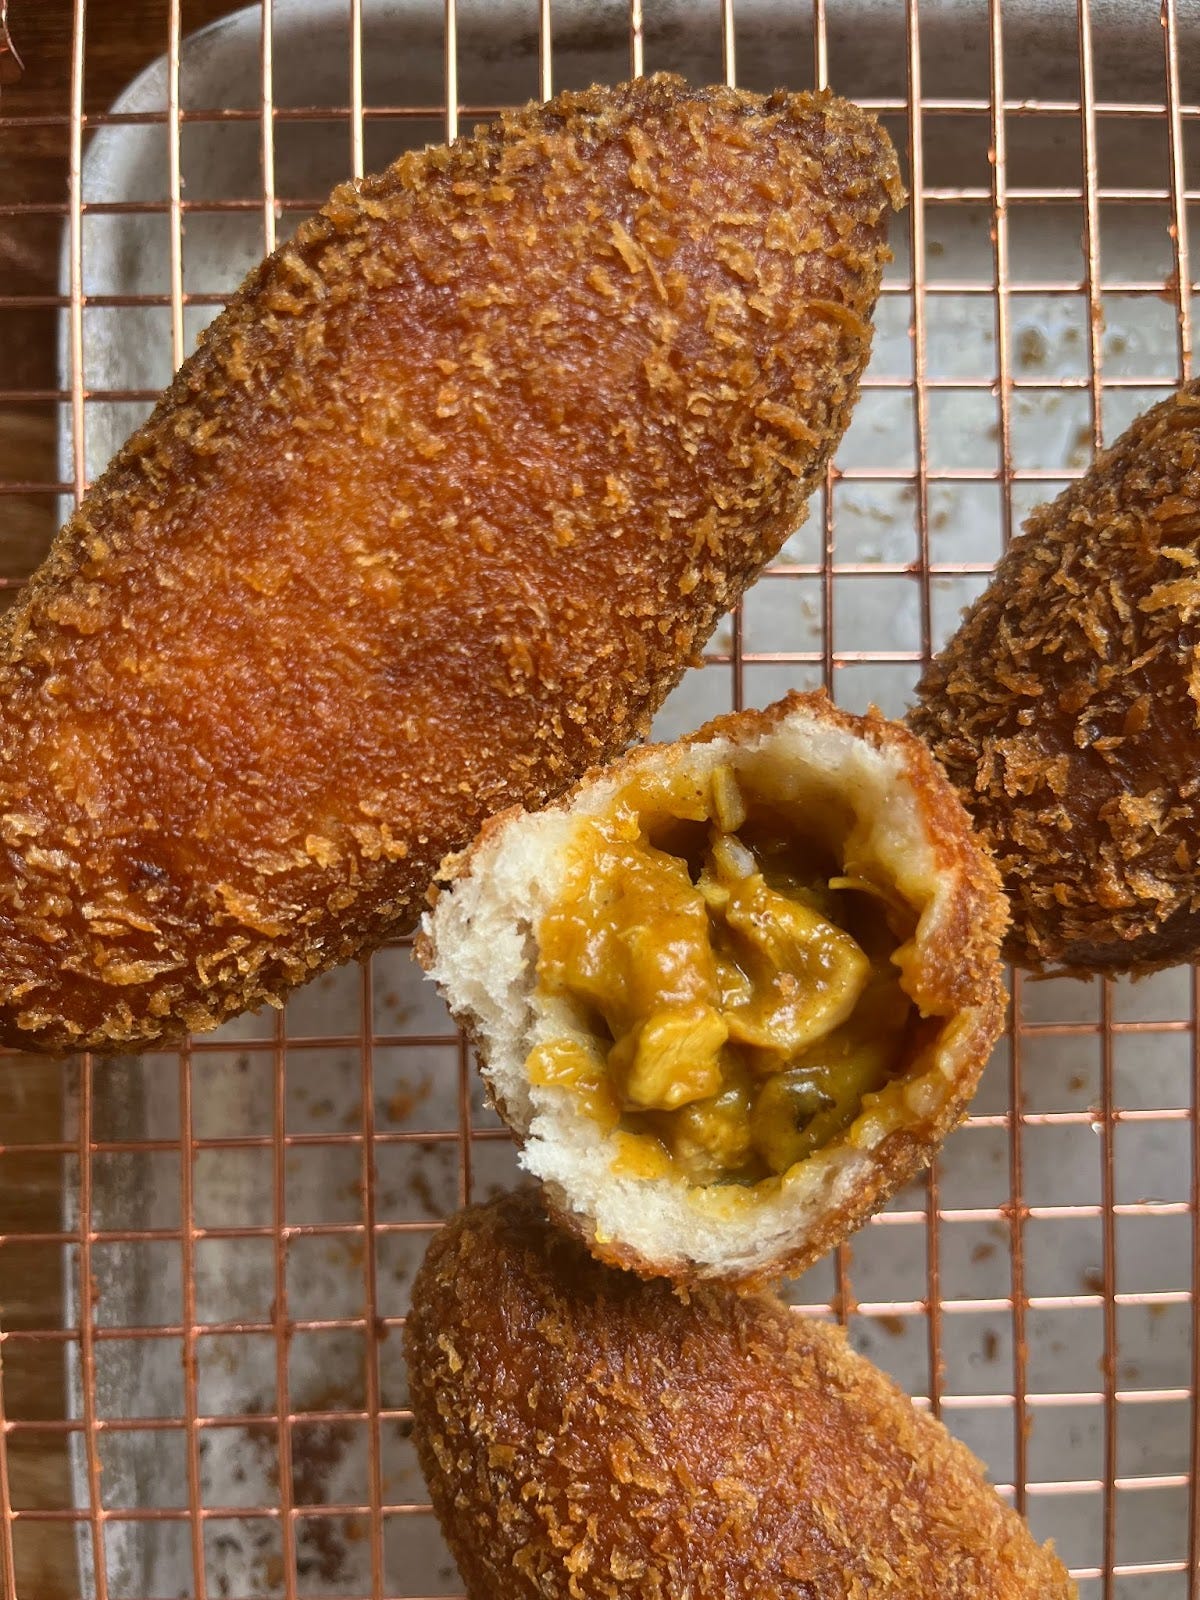
Tucking into this treat, I was reminded of another deep-fried pastry obsession of mine: The Japanese curry bread aka curry pan / kare pan. I stumbled upon the curry bread a few years ago and could not have dreamed of a more perfect snack: Spiced Japanese curry wrapped in soft bread, breaded in panko crumbs and deep fried to perfection. Just think of it as an inside out katsu curry in your pocket, a perfect marriage between soft, chewy dough and that sweet-savoury curry filling.
Much like the Korean hot dog, I have no idea why these pastries (Buns? Breads? What is this category?) aren’t sold in every bakery. Tragically, I’m yet to see a curry bread in London. Judging by the amount of doughnuts everywhere, deep frying isn’t the barrier to entry, so what gives?
If you’ve been reading this newsletter for a while you know I’m not a doughnut fan. And perhaps the idea of savoury doughnuts gives you flashbacks of slightly naff 2011-esque avant garde cooking but I want to convince you otherwise. These little pockets of joy are on another level, a deeply savoury elite level snack.
Despite the world opening up for travel somewhat, I still feel like the home kitchen is one of the greatest places to visit far away places when you don’t have any annual leave left, a place to transport yourself. And since running into a curry bread in the UK is relatively unlikely, you’ll have to take this snack situation into your own hands.
Toast notes for KP+
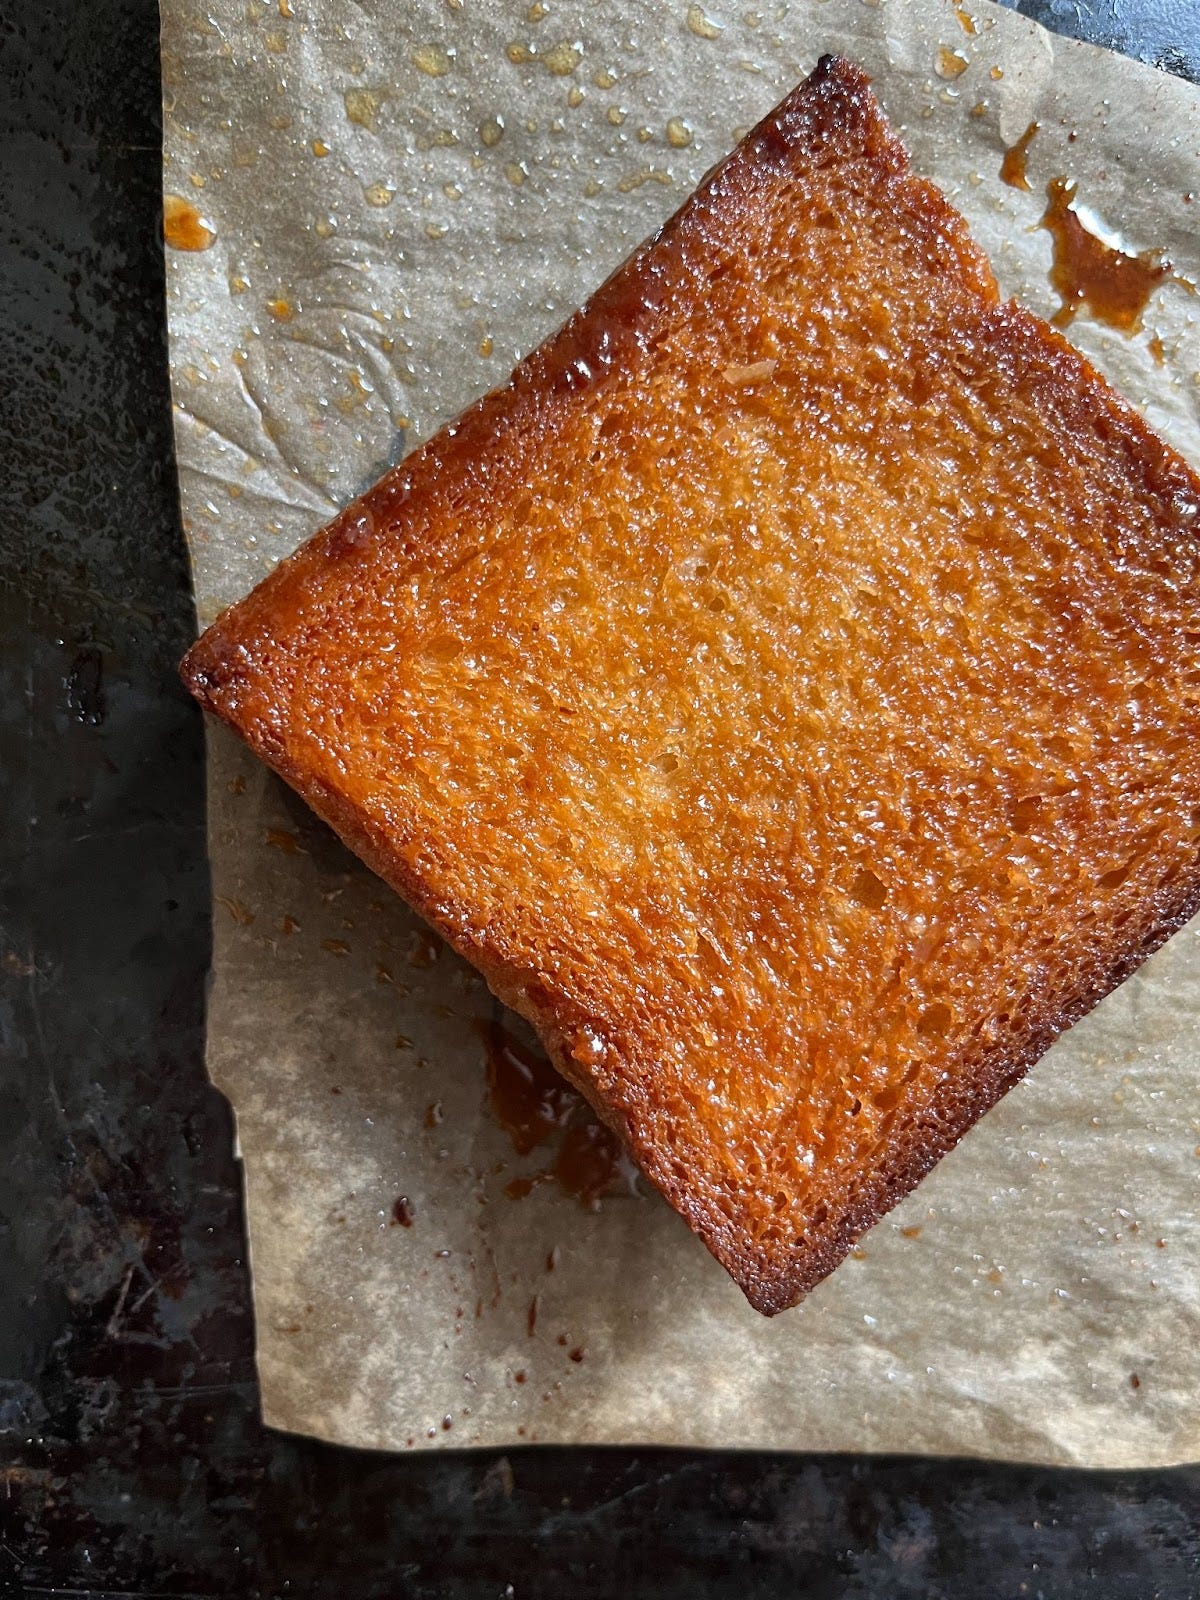
Over on KP+, I’m sharing my updated soft fluffy shokupan bread recipe, as well as something simple & beautiful you cam make with it… honey toast! It’s a homage to one of my favourite bakeries ever, Arôme! Arôme opened in 2020 and shot straight to the top of my must-visit places in the UK. Combining classic french technique with asian ingredients, like sables with kinako and chocolate schichimi, or sesame-miso loaf cake, the bakes are understated and harmonious in flavour and presentation. Just perfect. One of their greatest bakes is the caramelised honey butter toast, a perfectly square slice of golden, crispy toast with fluffy insides. Since I had so much shokupan around this week from the tests, I decided to try making my own version. All the details on making your own honey butter faux-st and info on making the perfectly rectangular shokupan is available on KP+ now. Click here for the recipe:
My rectangular pullman tins are made by Rackmaster, run by the absolute legend that is Campbell. Rackmaster is the industry’s -go to fabricator for ovens, racks, tins and all the best bakery bits - big and small, and they do custom work - so check out their website now. As an added bonus, KP+ subscribers will be entered into a giveaway to receive a set of Rackmaster goodies - all you need to do is be a subscriber to be in with a chance of winning.
The story of curry pan
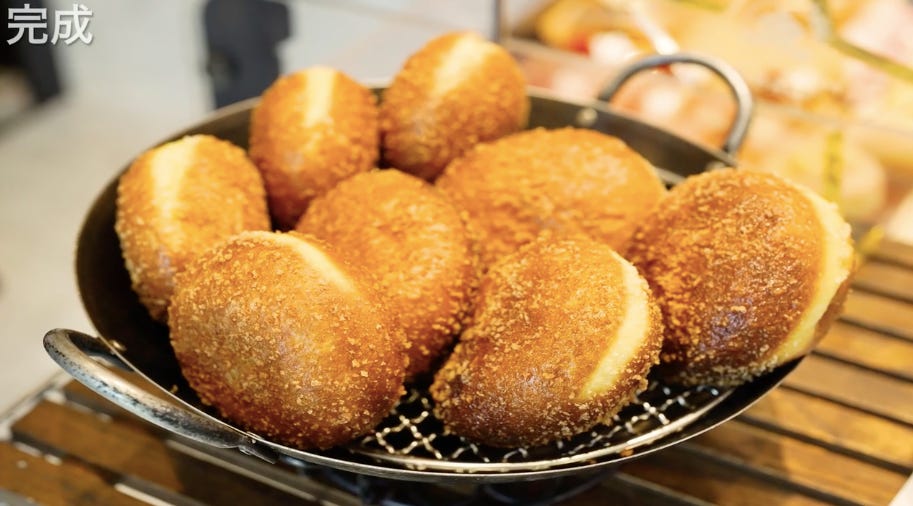
Curry bread aka curry pan or karepan is part of the furniture in Japan - it’s one of the most popular savoury snacks and is available in every bakery, convenience store and supermarket. Dating back to the 1930s, deep fried curry bread has been a fixture of the bakery scene, with every shop making its own version. From altering the shape (typical is a slightly pointed oblong) to the filling (vegetable, beef, chicken and egg is popular) the curry bread come in many different forms. And this bread is celebrated - there is even a Curry Bread Grand Prix every year, a competition run by the Japan Curry Bread Association, with some 300 entries. The Japan Curry Bread Association has one mission: “To make all the people of the world smile through curry pan” and has licensing tests for bakeries, as well as warning bakers to “never to put hate into currypan”
So where to begin on such a famous bread? And although we have become quite used to enjoying curry as part of Japanese cuisine here in the UK, what’s the origin in Japan? Having never actually tried a ‘real’ karepan, not in the least an officially licensed one, I turned my sights to my Japanese cooking field guide: Chef Ayako Watanabe.
Last year - almost to the day - I published a deep dive on genoise sponge and strawberry shortcake along with an interview with Chef Ayako, the brillant pastry chef, founder of Tough Cookie in Tokyo. In the interview, Ayako explained the difference between two key Japanese textures - mochi mochi (chewy) and fuwa fuwa (soft and fluffy), which will come in handy later. I wrote to her asking where to begin with curry bread, the what, where how and why. Chef Ayako filled me in with all the details.
“During the Meiji era (1864-1927), there were two trends that lead to the spread of Western food to the Japanese.” One influence was the return of students who had studied abroad, but the other, according to Ayako, “was influence by the navy.”
“Hiratsuka is located very close to Yokosuka which is a Japanese Navy base. The Japanese Navy modernised after the example of the British Royal Navy.” At the time, India was under British colonial rule and it was these Anglo-Indian Naval officers that brought curry powder to Japan. “Many British foods were introduced by the Japanese Navy” Ayako continued “The most famous one is Curry - one of the famous foods in the Yokosuka area is ‘The Navy Curry’”.
Before the introduction of the curry, the Japanese Navy mainly ate thiamine free, polished white rice which was a sign of prosperity and was offered in unlimited amounts to attract recruits. However, this ‘fancy’ diet lead to beriberi, a wasting disease caused by thiamine deficiency. Fortunately, curry was easy to make and could feed a crowd but most importantly, it helped prevent disease. Curry, with the mixture of flour, curry powder and stewed meat and vegetables was both tasty and nutritious, high in thiamine. It is still served every Friday in today’s Japanese Navy.
As it turns out, Ayako went to high school with Mariko Takaku of the Takaku Bakery Co, a dynasty of baked goods that was established in 1924. According to Chef Ayako, Takaku Bakery Co is a “pioneer of bread culture in Japan". It was during Mariko’s fathers tenure as CEO, that he “invented a Curry pan based on Murai Gensai’s (a journalist in Meiji era) best seller novel ‘Shokudoraku’, which means big gourmand, epicure.”
Gensai’s Shokudoraku is considered a masterpiece and is a best seller in Japan. First serialised in the Hochi newspaper in 1903 then later published as a book, it was centered around seasonal cooking and eating, where Gensai and his wife Murai Takako tested and explored some 600 dishes, including fried oysters, omlet rice, roll cakes, ketchup rice and, of course, curry, all inspired by the influx of Western food traditions arriving in Japan in the late 19th century.
“It was quite an interesting book and had a huge impact and influence on Japanese people” Ayako continued, “so honestly I am not surprised that Gensai Murai had introduced and written so many western foods into his book, especially those influenced by British culture.”
Regarding the Takaku curry bread, Ayako noted that “I was so impressed when I had Gensai Curry pan when I was 12 and since then, they are my no.1 Curry pan forever. I can’t count the number of gold medals they’ve won.”
Ayako kindly introduced me to Mariko Takaku, who continued filling in the currypan story. “Takaku Bakery has a history of about 100 years and we have been making curry pan for about 60 years. Our special curry bread, Gensai Curry Pan, was developed and launched 20 years ago. We have about 30 different types of curry bread, but we also have 5-8 different types depending on the season.” The special Gensai Curry pan fuses Gensai recipes and introduces rice into the bread dough, which gives the effect of having rice with curry, with a new dimension of flavour and texture.
Numbers wise, the Takaku Bakery produces “around 20,000 pieces, depending on the season” and has adapted for modern palates. “Curry bread has been fried in oil in Japan for a long time, but nowadays people are becoming more health conscious and baked curry buns are also becoming more and more popular.”
Speaking of her father’s development of the special Gensai curry pan, Mariko explained that “When he developed the Gensai curry pan, 20 years ago, he called it "mochi". There was no such thing as sticky bread dough. However, my father is Japanese and likes rice, so I thought he would like the "mochi" of the rice.”
“About five years later, Mister Doughnut and other companies introduced "mocchi", and the word "mocchi'' became famous in the United States. Nowadays, mocchi dough has become mainstream in Japan.” Fascinated by this process, I wondered if adding starchy rice had a similar effect to adding potato, as we sometimes do in the UK. “I think so. It makes the dough more sticky.”
Taking this opportunity to get some advice about making my own version at home, I enquired about some of the production methods. “We use strong flour, a special type of flour from a historical flour mill in Nara, Japan, which has a technique to grind the flour into very fine particles. This allows more water to be added to the dough than is normally possible.”
Having tried a few batches myself and struggled to get even a small batch right, I wondered how they perfect 20,000 a week in production. “For our curry buns, it is around 170-180 degrees.The time should be just long enough to make the curry buns look delicious. Darker is better than lighter” though Mariko assured me that “The only way is to try it a few times and eat it.”
As ever, experience and consistency is key, and experimenting often comes with its ups and downs: “We design and calculate from the time we make the dough to make sure it's always the same, and at the end of the day it's just a bunch of experience. I've made cube-shaped curry buns in the past, but they failed because they were hollow...”
But… what makes the ‘perfect’ curry pan, I wondered, surely it must exist? Mariko reminds me, ‘perfection’ is always subjective. “The ratio of dough to curry, the softness of the dough, the taste of the curry, the way it's fried” she says, “it all depends on the person.”
Thank you so much to Mariko Takaku who generously shared her time and expertise. To find more about the Takaku Bakery, please visit, or follow their instagram page @gensai_kun for updates.
Many thanks to Chef Ayako for her insights - you can follow Chef Ayako here, and support and follow her brilliant cookie business Tough Cookie here. Chef Ayako hopes to ship her tough cookies worldwide sometime in the future so I’ll keep you all posted on that.
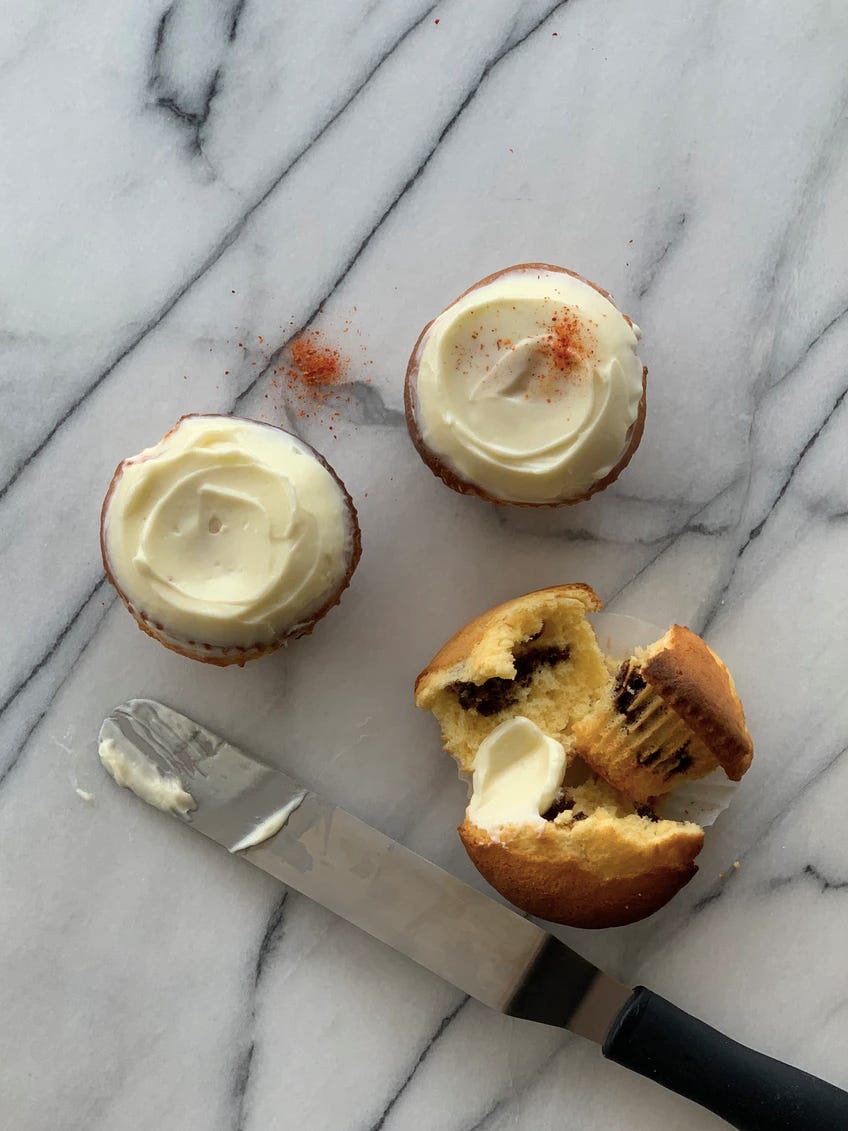
Last year Ayako shared her recipe TWO amazing miso muffins, which showcase the flavours of both white and red miso pastes: Shinshu miso muffins with yuzu crumble and Hatcho miso muffins with cream cheese frosting. Boom. Click here for the recipes
Creating the recipe
If I was enamoured with curry pan before, I’m on a whole new level of enchantment now. Armed with the intel provided by Chef Ayako and Mariko Takaku, I set to work on developing my own curry bread. Hugely inspired by creating a sticky, chewy “mochi” texture, let’s break down the elements.
The filling
Many recipe blogs will simply tell you to use leftover curry but I think that’s misleading - sure, leftover curry *could* work, but the chances of you creating a curry base that - when cold - is firm enough to be wrapped in bread dough? Quite slim, I think.
Japanese curry is based on a curry roux - it’s the starch in the roux that gives it that lovely thick texture. A curry roux is the same as a roux, a cooked mixture of fat and flour, except with a curry roux, spices are introduced along with the flour. This gives a highly flavoured base that thickens, thanks to the starch, as you add liquid. This creates the classic thick, yet mild, sweet-savoury curry that you’ve probably enjoyed before.
At this point I am ready to admit that I have never made my own Japanese curry base or roux. Although I’m sure it’s absolutely wonderful, I’ve come to rely on the unbelievably handy pre-made curry roux cubes. From the nation that considers instant ramen its best invention, are you even surprised that Japan has an instant (ish) answer for curry, too?
The first time I learnt about curry roux blocks I was thrilled. The brand I see the most commonly in asian supermarkets - and some uk supermarkets now too - is S&B Golden Curry, though there are many others on the market. I was kindly advised in the DMs by Amy (@Iamasuncake) “if you can find it, vermont curry (more hints of apple/honey), Java curry (super intense, a bit spicier), or kokomaru curry (most well rounded) have more complex flavours that make the curry even tastier!” - I’m yet to spot these in my day to day wandering, but I’ll absolutely look out for them. You can also make your own ℅ Sonoko Sakai (NY times recipe here).
Essentially they are pre-measured blocks of curry flavour, starch & fat to thicken and flavour - in need of curry? Simply braise the meat / veggies that you want to form the base of your curry and, when cooked, stir in your curry blocks - it’s advisable to chop them up first otherwise it’ll take forever to melt. The curry will thicken and transform into the Japanese curry sauce you know and love. Despite what the box says, I prefer to braise the base in water rather than stock since the curry cubes often have a lot of salt in already, then season to taste later.
Of course, once the base is added, you can begin to tweak the curry base to your liking - adding salt, chicken powder, stock cubes, honey, ketchup, bulldog sauce, grated apples, soy sauce, brown sugar, worcestershire sauce, butter, extra heat with spices or even chocolate to taste.
By all means, your filling should represent the way you like to eat but today I’ll be sharing a simple curry filling that works well in this format. Today’s filling has an additional starch slurry at the end - although the curry blocks have decent thickening power, they need additional starch to become really firm in the fridge so it is easy to work with later. Although you could continue adding the blocks, it would be incredibly salty by the time it had enough thickening power.
I also tested using flaked (ie. braised then shredded) and diced chicken. I preferred the diced chicken, but it’s really a preference thing. If you are veggie or vegan, just add extra vegetables in place of the chicken (g) and you’ll be good to go! You could also go straight up cheese, or even a bechamel, croquetas style - the possibilities are endless.
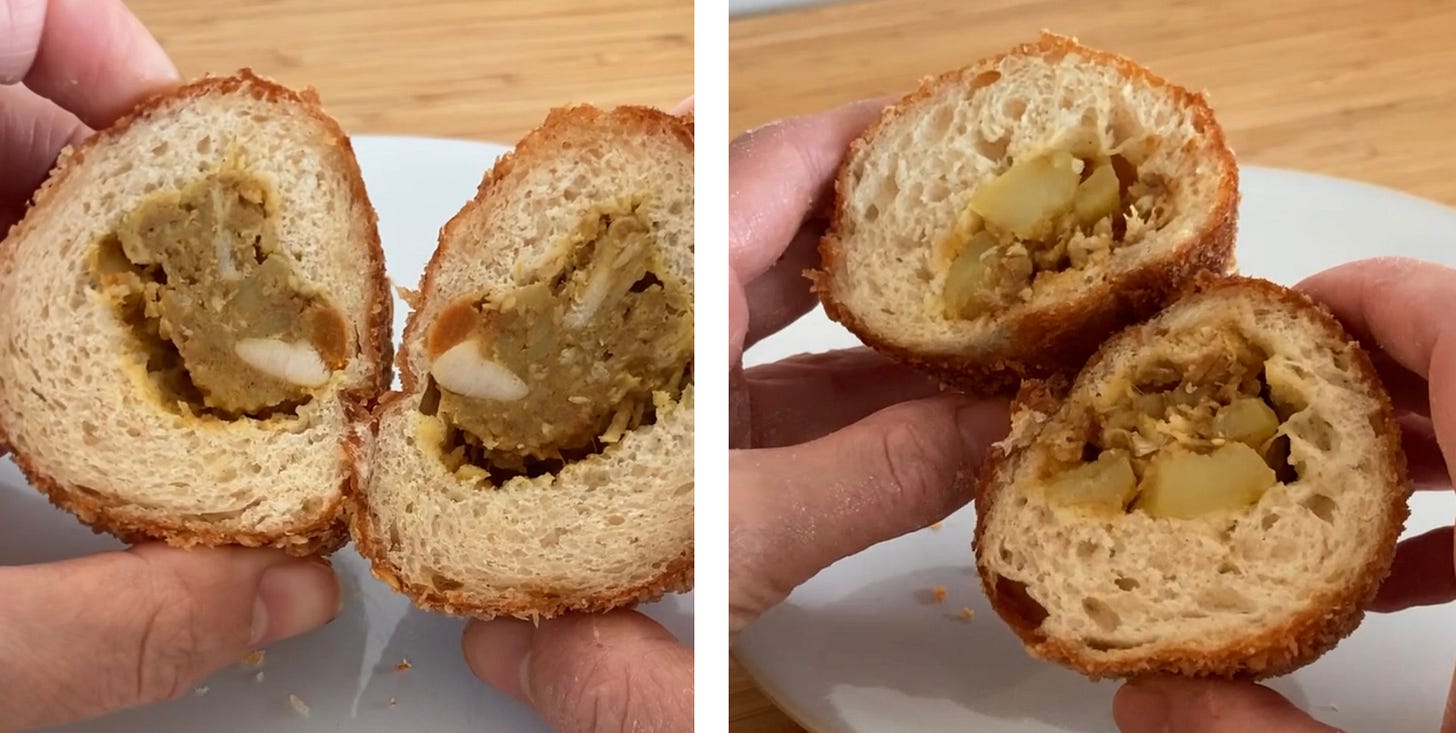
The ratio of bread to dough is key - as is the proofing - here are a few earlier renditions of my karepan where I didn’t get the filling quite wet enough/have enough in there - not so cute:
What a difference 6 months of just thinking about a recipe makes!
The bread
Entering today's development I knew I’d likely use a milk bread / shokupan base. We’ve talked about milk bread before - it’s an ultra soft and tender bread made with a portion of pregelatinzed flour.
To give you a quick reminder, tangzhong is a method whereby you pre-cook some of the recipe’s flour and liquid together until it thickens. The idea is that you are gelatinising a portion of the flour. This technique was pioneered by Yvonne Chen in the 1990s with her book The 65 degree bread doctor – she found that by using this technique, you could introduce a higher proportion of hydration into bakes in a stable way, as well as improving oven spring and texture.
In the past, I’ve always stuck to a 1:5 flour to water ratio for my tangzhong, but this week I decided to find out what happens when you play around with this ratio as well as change up the flour in question - although the gluten is not made entirely negligible after the flour is gelatinsed, the ability to form gluten bonds is radically lowered - the proteins are all busy with water and can’t form strong gluten bonds with eachother - creating a more tender bread. As a result, I was wondering how something sticky and bouncy like glutinous rice flour would behave within the dough. If you’re not familiar, glutinous rice flour is gluten-free, but gets its name for its incredibly sticky, gluten like behaviour when hydrated. Glutinous rice flour is milled from rice with very high amylopectin content.
As well as this, I wanted to take inspiration from the Takaku Bakery Co. Gensai Curry Pan and find a way to incorporate rice into the dough. As we learnt in potato buns last year, by adding potatoes into your bread, you are able to increase the overall moisture of your bread dough in the form of ‘busy water’, my term for water that is busy wrapped up in other ingredients, allowing you to incorporate more of it in a way that is more manageable to work with. This is because, just like the tangzhong, all of the water in the potato is ‘spoken for’ which allows the rest of the recipe to function. Would it be the same for rice?
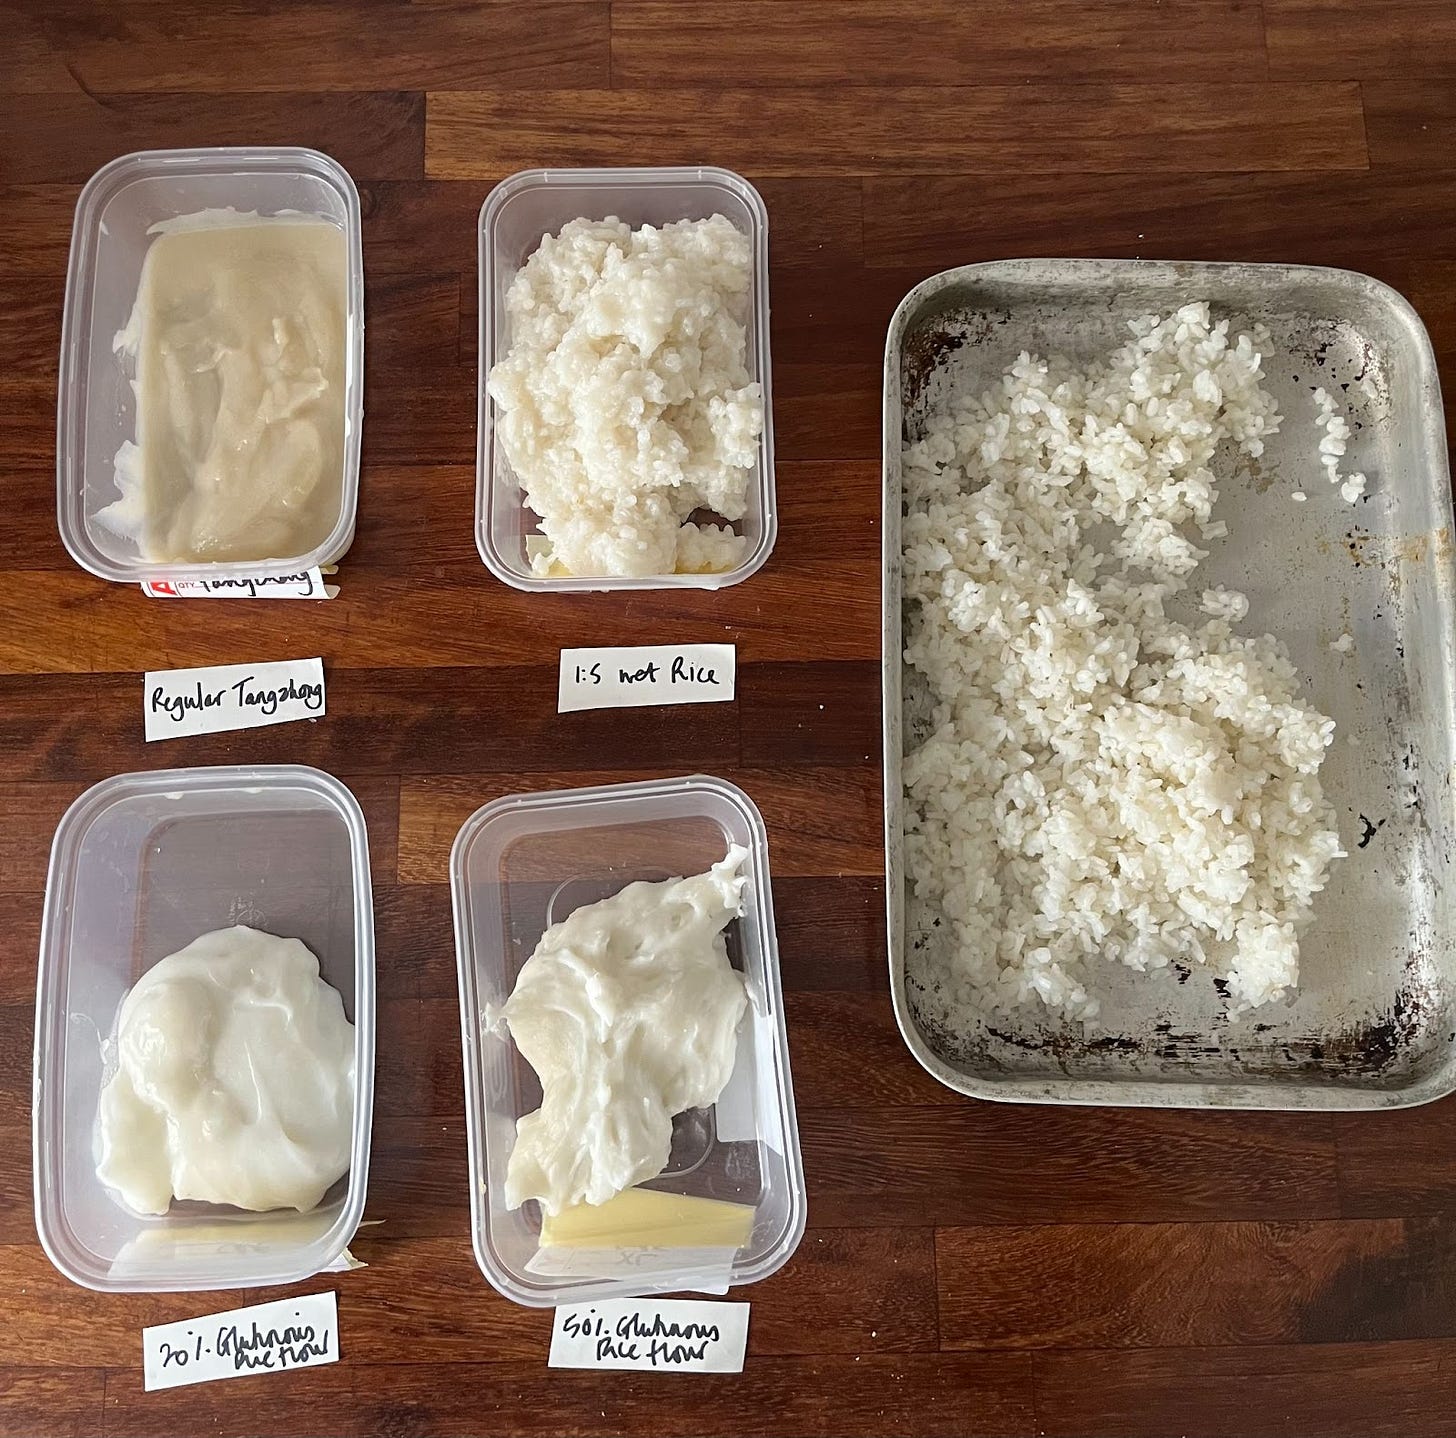
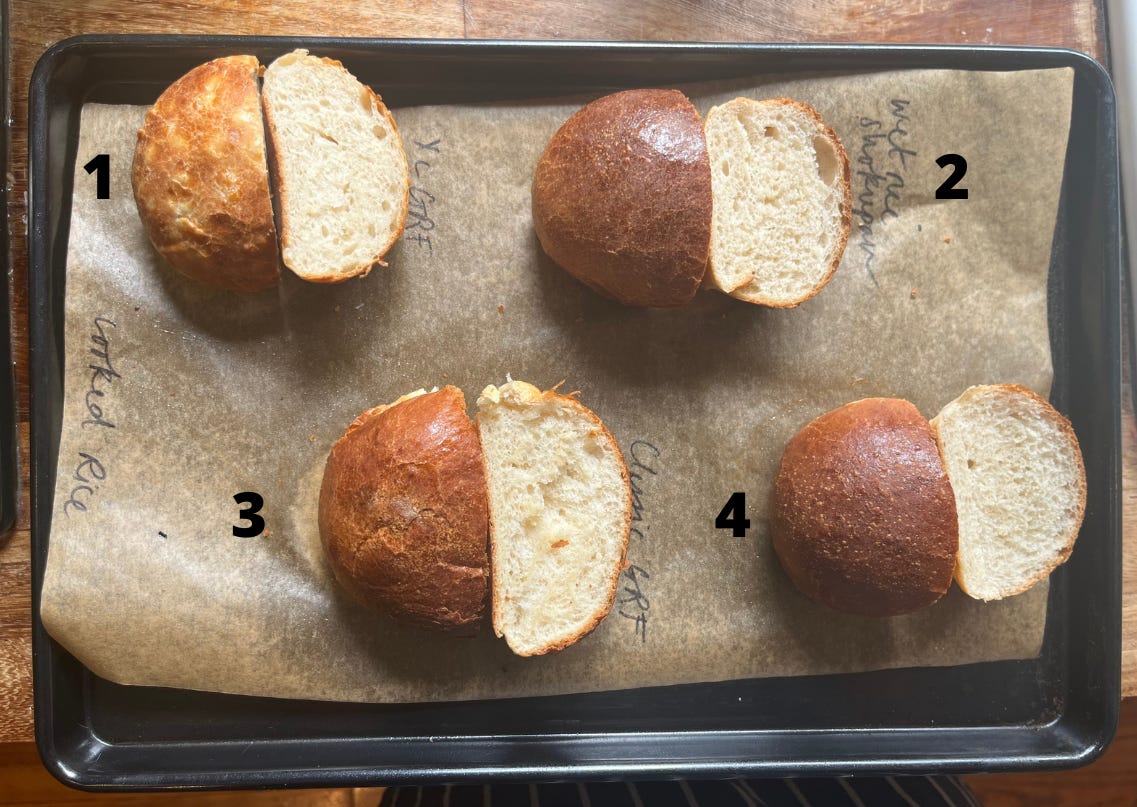
I mixed up four doughs by tweaking my classic milk bread recipe (which you can get here on KP+), lowering the hydration slightly so it is easier to work with.
Classic tangzhong (1:5 ratio water to flour) and cold, cooked rice folded in at the end
Classic tangzhong (1:5 ratio water to flour) then hydrated with overly wet, congee-esque rice
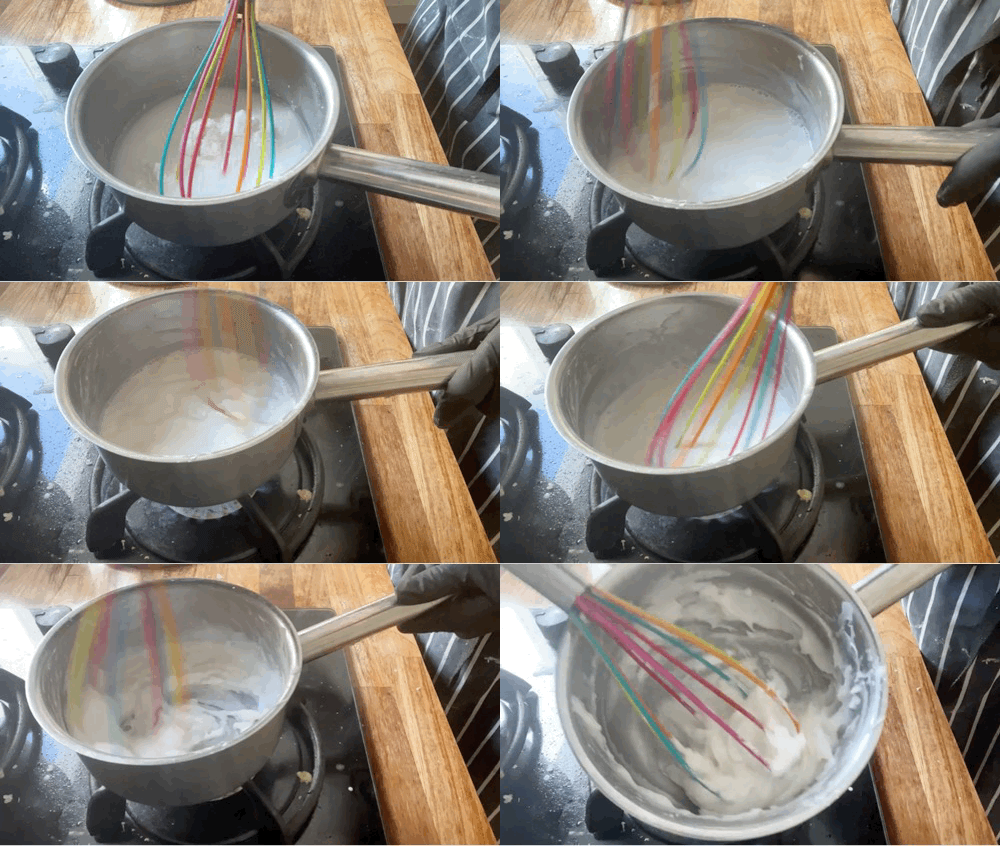
Tangzhong made with glutinous rice flour at a 1:1 ratio
Tangzhong made with glutinous rice flour at the classic 1:5 ratio
Overall, the doughs weren’t wildly different to look at. Bit of an anticlimax? You’re telling me! That being said, there were definitely improved characteristics in texture and taste. The bun (2) hydrated with congee was the most classic in flavour and visuals - it was sadly not that remarkable. The bun (1) with cooked rice folded through was really fun to eat and very bubbly - little holes formed around the rice grains, effectively aerating the dough, though a few grains remained whole. The glutinous rice flour tangzhong (3, 4) resulted in a springy, chewy bread that had a denser texture and mouthfeel - it was also VERY sticky to work with when mixing and had a totally unique feel - so fun!
During the SquishTest (literally pressing the dough with my hand and observing the spring back) the buns made with glutinous rice flour sprung back satisfyingly slowly, whilst the classic wheat tangzhong buns were quick to refill - this speaks to the chew and bounciness of the dough.
Though I initially looked to glutinous rice flour for its ultra sticky texture, glutinous rice flour is also known as sweet rice flour and its merits don’t end at texture. Glutinous rice flour has a unique sweet flavour which plays nicely with the savoury-sweet curry and crispy edges. For my final dough, I am going to combine the glutinous rice tangzhong with cooked rice. The cooked rice is optional, but it is lovely.
OK, let’s have a real talk moment about your (probably already overflowing) pantry. Although I really loved the glutinous rice flour and will be including it in my final recipe today, if you don’t fancy getting a bag - that’s ok! You can follow the recipe using standard wheat flour and you’ll get a good result. In fact, you could probably use any standard white bread dough and you’d have good results for curry pan, but I wouldn’t use classic rice flour - the texture would be claggy with a funny chalky taste - but if I CAN convince you to pick up a bag of glutinous rice flour, I promise I’ll be sharing some more mochi recipes very soon to make that bag worth it.
Note: Some milk bread recipes refer to ‘yudane’, which refers to another method of gelatinising the flour, where hot water is added to flour then stirred off the heat - it is the left for several hours before using. I admit now I haven’t put the tangzhong and yudane head to head, though I have on good authority - the brilliant Tiffany Chang that she didn’t see much of a difference.
The deal with proofing
According to *all of the internet* there is not an agreed upon amount of time to proof your buns after shaping but before frying/cooking. I pushed the pre-fry proof and found the curry pan became a bit unwieldy - if they go into the oil too puffy, they expand explosively and the size becomes out of control and you don’t get an even cocoon of dough. In order to have a good ratio of filling to dough, we need to use a decent amount of dough - around 60g. Any less and it’s impossible to wrap enough filling. However this means we need to limit the proof so we don’t end up with loads of dough, with only a little bit of curry inside. Depending on the warmth of your kitchen, this should take around 30 minutes to 1 hour is the max.
Deep Frying
One of the best things about deep frying is having the oil set up. Once it’s set up, I can deep fry with reckless abandon until my heart’s content. I generally try to make the most of having the pan on and double up on fried recipes (Milli Taylor’s fried chicken is truly brilliant). I know that deep frying can feel like a lot of admin, so rest assured these karepan can be baked in the oven. However, deep frying does several things - although the yeast will cause the curry pan to puff up in the hot oil, the hot oil also creates a crust that limits the expansion too. In the oven, it is a more humid environment so the bread will puff up more radically as the firming up of the starch happens more slowly.
Of course, for the very best karepan, it’s got to be deep fried! For those with an appetite for deep frying, here’s my top tips:
Use a large, tall pot. The height of the pot will minimise any scary seeming oil splashes and keep the whole process well contained
Make sure your pot is SPOTLESS - the outside and inside. If you have a tiny bit of water in your pan when you start heating the oil, it will suddenly splatter at 100c which can feel scary. Making sure the outside is clean and dry will set your mind at rest that there is a big, safe space between your heating element and the oil inside the pot
Use vegetable oil - I use rapeseed, but you can use sunflower or any combination of vegetable oil
Fill the pot until it is around half full. You want enough oil to submerge your curry bread but not so much that it can bubble too high on impact
Heat it up slowly so you feel in control - I like to put my oil on a low-medium flame when I am beginning to sheet out my dough. Knowing that the oil is coming to temperature at a manageable rate is always good for the pulse
Manage your temp - I use a standard pocket thermometer but if you are nervous about hot oil I recommend getting a probe thermometer with a long lead so you can monitor the temperature without being too close to the oil
Go slow - fry your curry pan one at a time. There’s no rush to get them through the oil and until you feel confident to do more than one
Equipment is your friend - I like using metal tongs or a metal ladle strainer
To dispose of your oil, invest in a funnel. Simply let the oil cool and funnel it back into the bottle that it came in. You can either reuse it (I reuse until the oil changes colour significantly), see if there’s a local oil recycling bank near you or put the cap back on and put it in the bin
Okay, let’s make it.
Curry bread
Makes 6-7 karepan, depending if you use the cooked rice.
Due to length restrictions, the (very useful) GIFs will be available in the web version.
Curry pan dough
115g water
50g glutinous rice flour
30g milk
3g dry yeast
190g strong bread flour
25g caster sugar
2g fine salt
10g soft butter
100-110g cooked rice - I used sushi rice made to this spec, but any old rice will do!
Curry filling (small batch! This makes slightly more than you need but realistically you cant make a smaller batch)
2 x boneless, skinless chicken thighs (around 175g)
15g ginger
3 x garlic cloves
½ white onion (75g)
50g carrot, diced
50g waxy potato, diced
50g (around 2) curry roux blocks (I used S&B, “hot” which isn’t v. hot)
120ml water
5g cornflour dissolved in 5g water
Salt/soy sauce and black pepper to taste
PLUS: Honey, chilli powder, spices, ketchup, tonkatsu sauce, brown sugar, soy sauce etc to taste!
To finish
1 x egg for dipping
Panko breadcrumbs
Dough - method
First proof yeast according to the instructions on the back of the packet
Next make the tangzhong - whisk the glutinous rice flour and water in a saucepan. Heat, whisking all the time until it thickens - it’ll be REALLY thick! Once its gelatinous, take it off the heat and put into the KitchenAid bowl to cool slightly
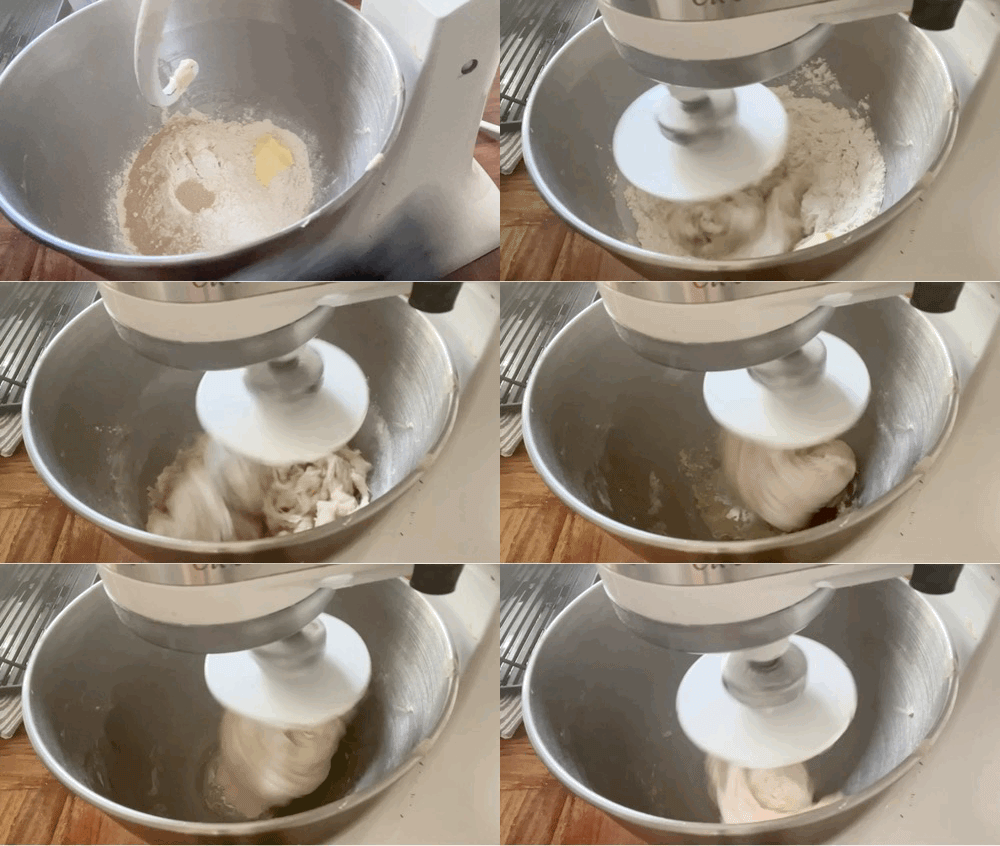
Add the rest of the ingredients and mix on a medium/low speed until it comes together - it may seem dry at first but it’ll become form a homogenous mass eventually
Once its a homogenous, increase the speed and mix until the dough comes together and reaches high gluten development. Due to the GF glutinous rice flour, it may take around 10-12 minutes. It should look smooth and shiny
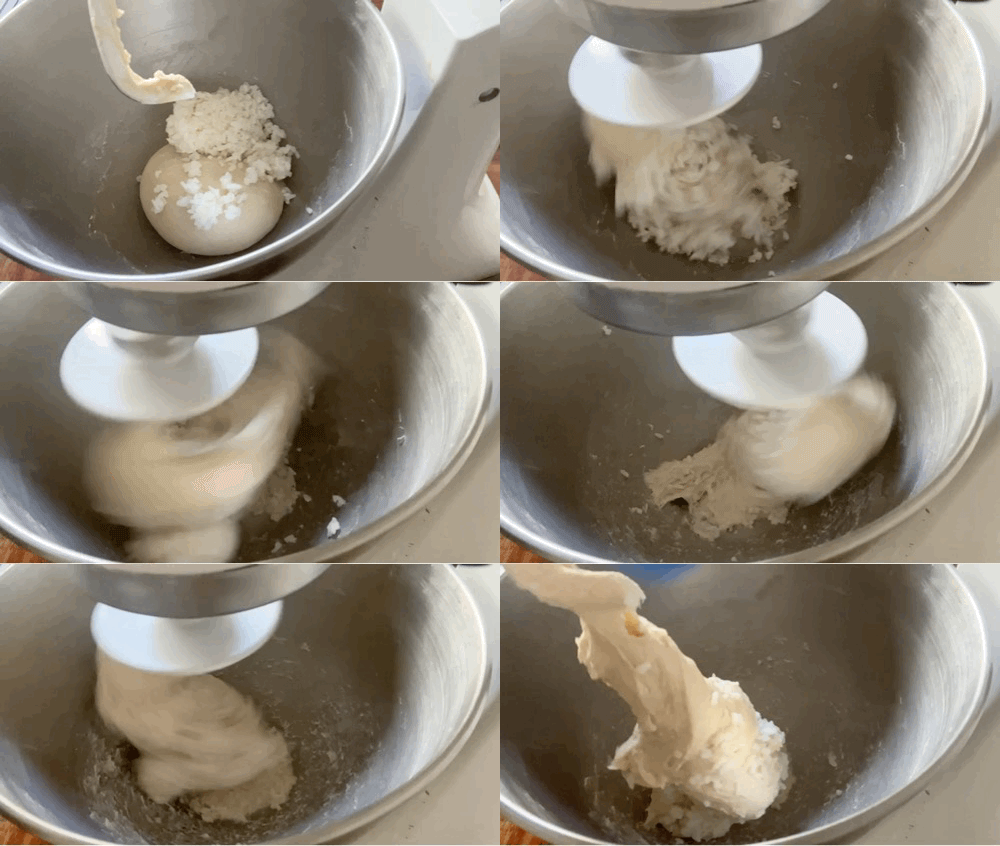
Once its fully developed, add in the cooked rice if using and mix on a low speed until its properly distributed
Move into a container and proof in a warm place until doubled in size
At this point you can move into the fridge and leave overnight, pressing down a few times, or you can use the dough right away (though it may be a bit sticky, you can do it with patience + much flour)
Curry - method
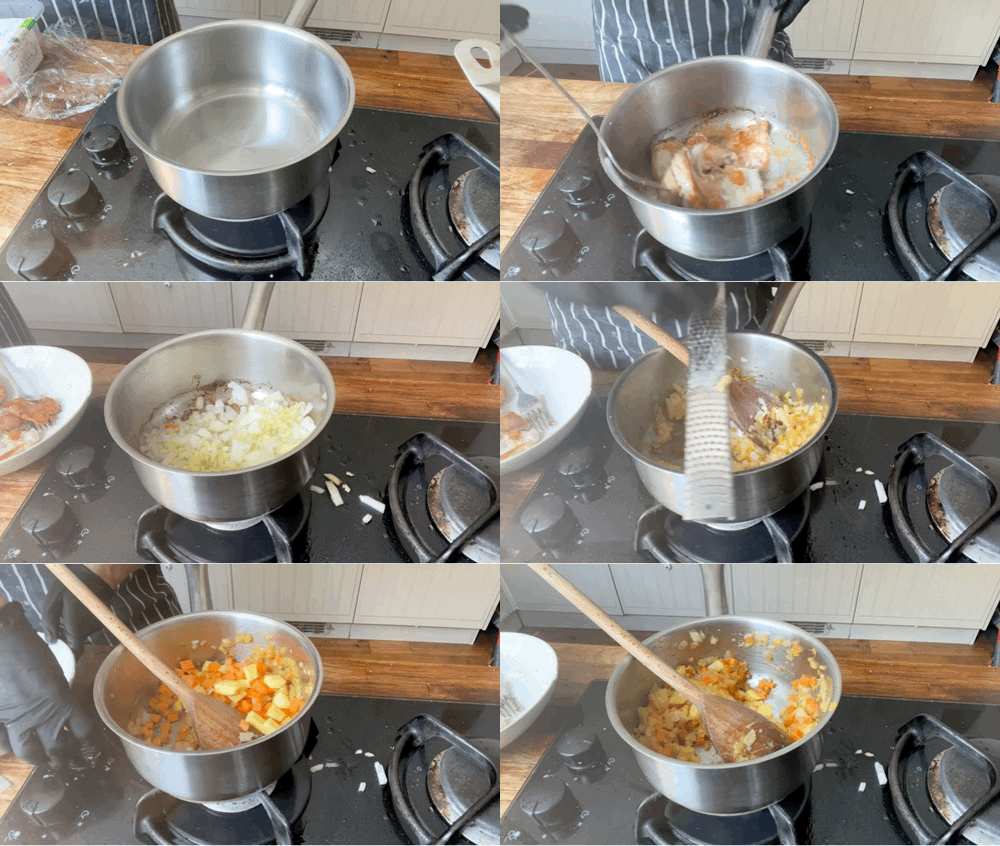
Heat a teaspoon of oil in a saucepan and when sizzling, add the chicken thighs. To extract the most flavour and get a nice crust, cover with greaseproof paper and put something heavy on top to flatten it and increase the surface area contact with the oil. Cook until ultra crisp, turning half way - some oils from the fatty thighs should come out and there will likely be delicious flavourful bits on the bottom of the pan. Remove the thighs from the fat and set aside
Next dice everything nice and small - for the garlic you can use a microplane, but I prefer to chop the ginger by hand. For the onions, carrots and potatoes, you want about 0.5cm please
In the same saucepan you cooked the chicken, add the ginger and garlic to the oil and sizzle for a minute, followed by the onion. Cook over medium heat until softened
Next add in the potato and carrot mix around. Next add the water bit by bit, scraping and incorporating all the jammy bits on the bottom
You can add the chicken in whole or chop into pieces then add back in - I prefer chopped into pieces (0.5cm!) for even, though if you prefer pulled chicken, you can shred it after braising
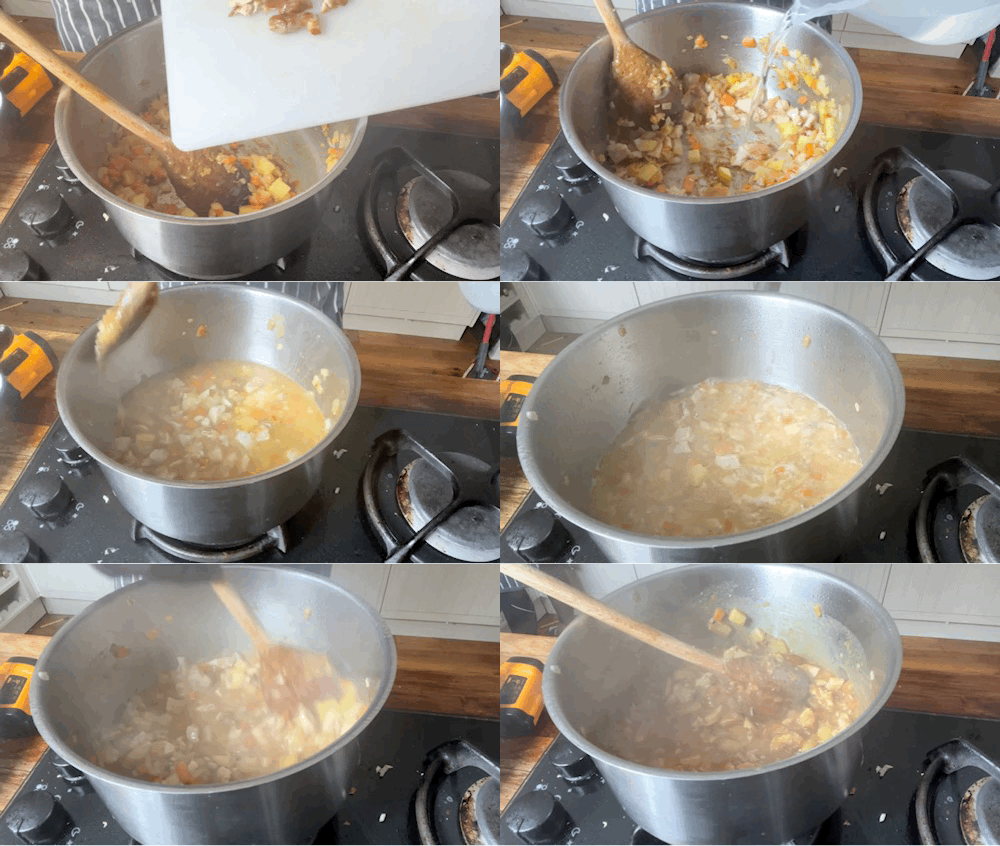
Simmer for 10 minutes until the potato and carrots are tender
Chop up the curry roux blocks so they dissolve easily then stir into the liquid and bring to the boil - it will thicken! Next mix the cornflour and water then whisk in - it’ll thicken further
Now season to taste - soy sauce/salt and pepper, followed by whatever you like - worcester sauce, honey, ketchup etc.
Spread into a low wide tray to cool quickly
Assembly
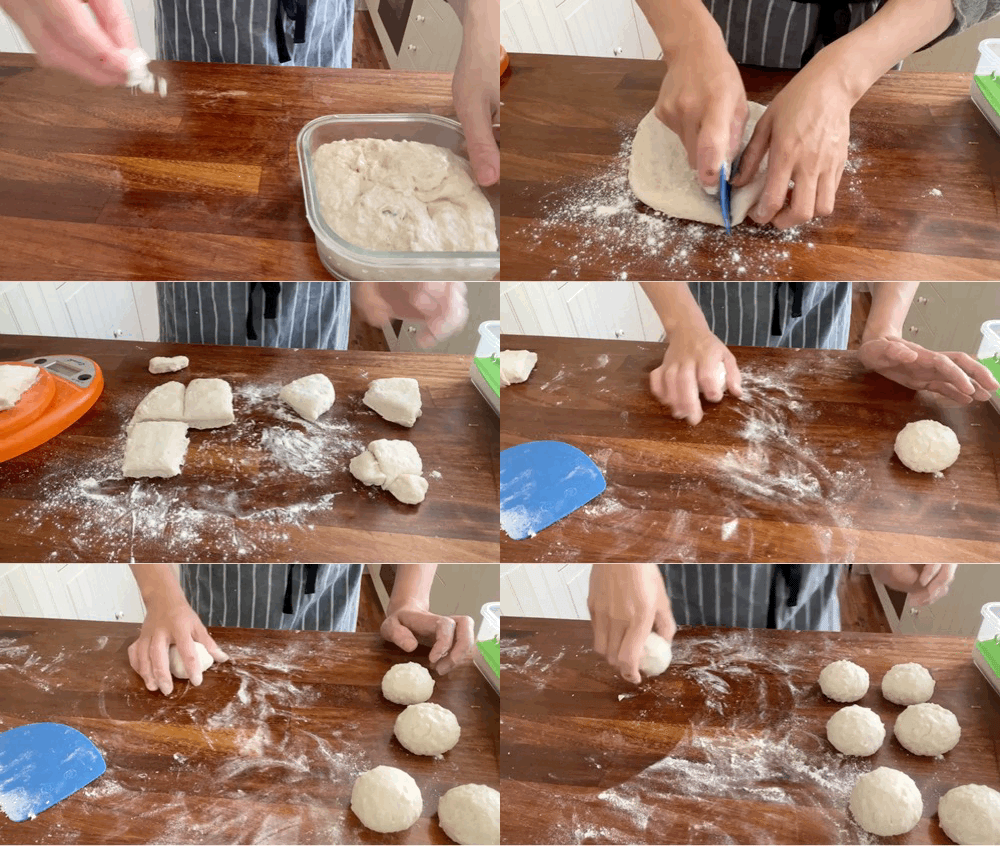
Divide the dough into 60g pieces using as much as flour as you need - it may be quite sticky
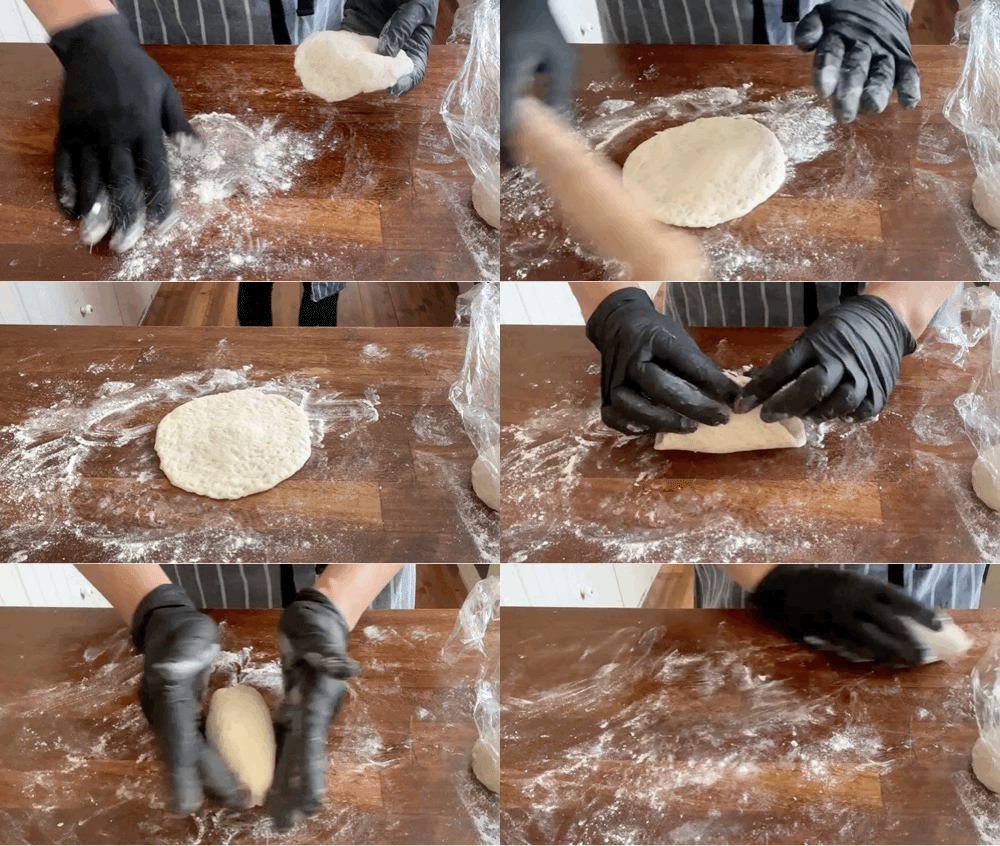
Roll around 12cm diameter focusing on the edges to make them a bit thinner and leaving it a bit thicker in the middle
Spoon around 45g-50g of curry mixture into the middle of the dough then bring up the sides of the bread and pinch to close. Make sure you pinch it really well because you don’t want it opening later - you can gather and regather it a few times to make sure its properly closed. Then using the curve of your hands, shape into a slightly pointed oblong
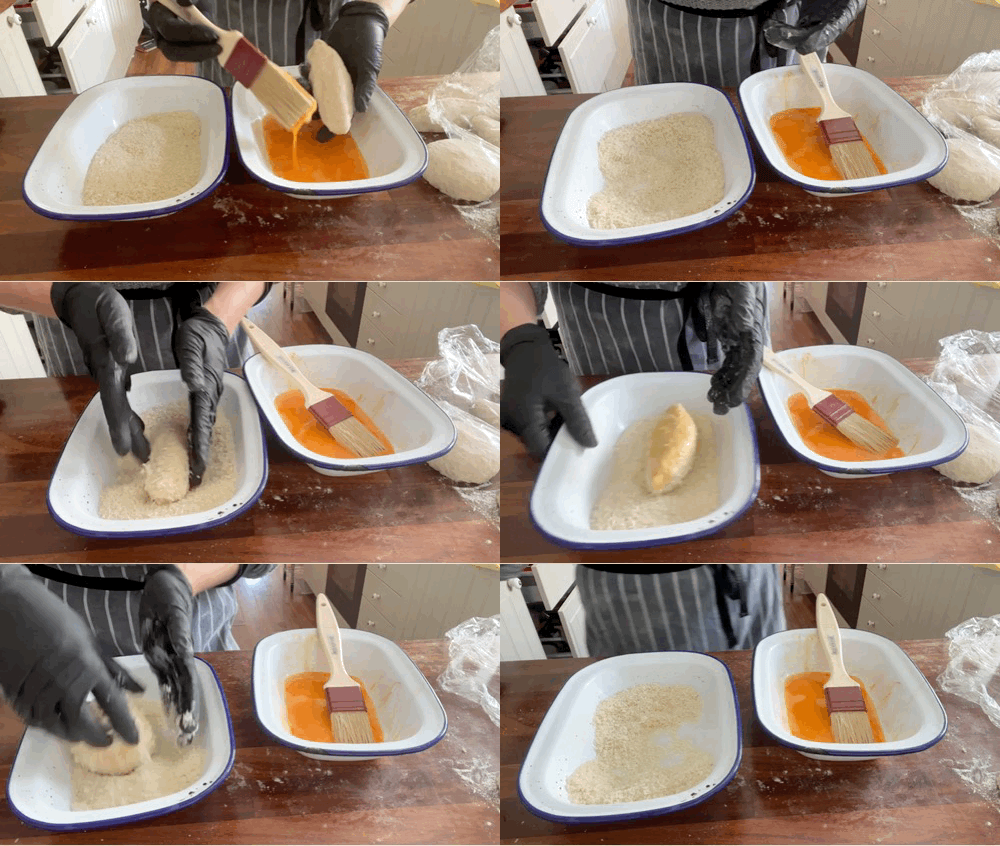
Using a pastry brush, brush with egg then tip into the breadcrumbs and shake to cover
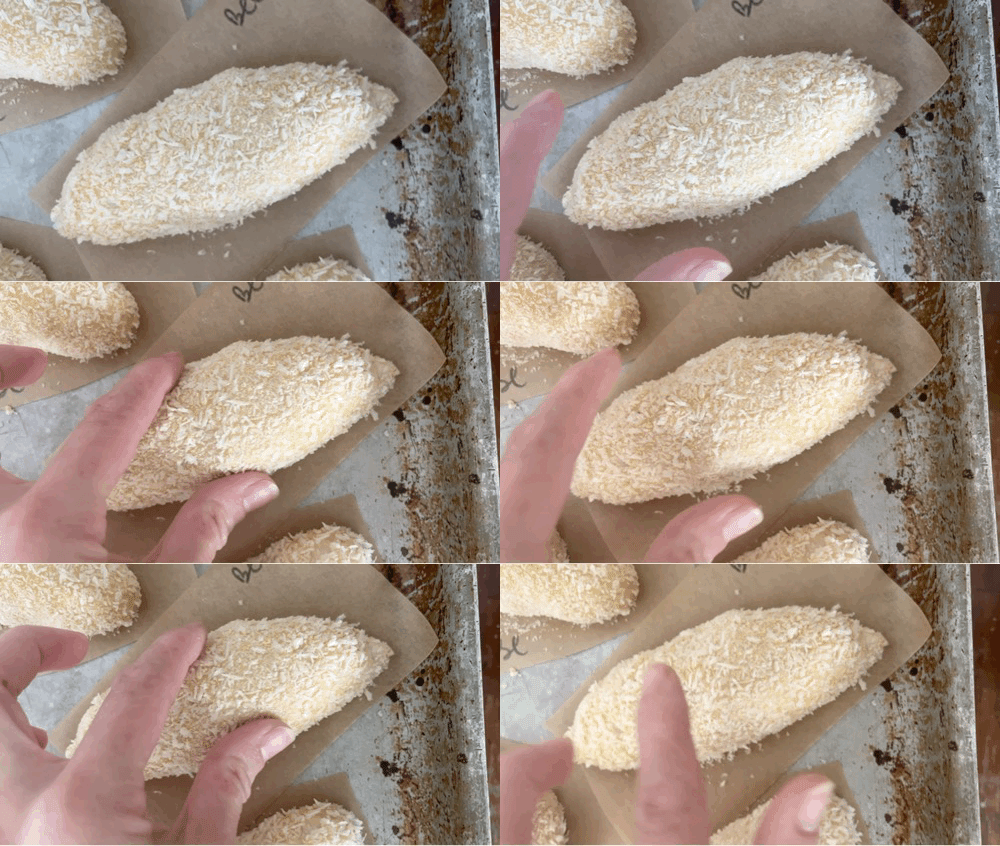
Repeat until all the dough is complete. Place curry bread on tray on separate pieces of paper - this makes it easier to put curry bread into the oil
Proof for about 40 minutes - 1hr until puffy - it should gently refill when you squeeze it
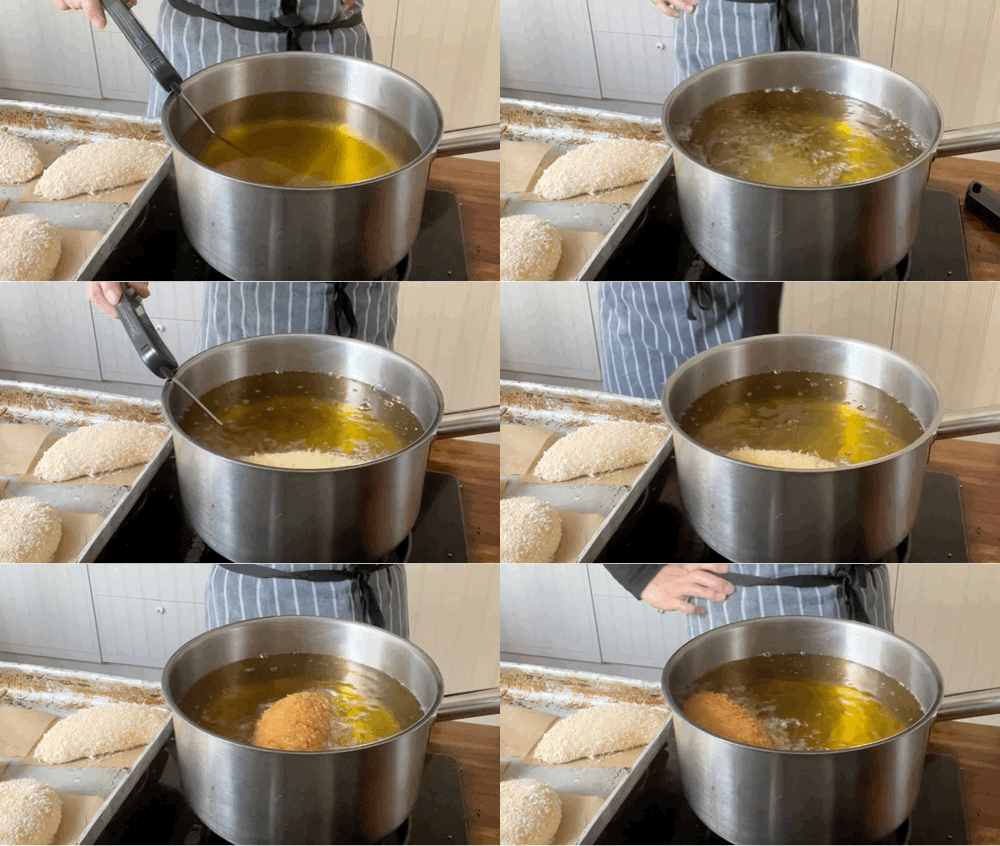
Heat oil to 175c OR pre-heat oven to 175c fan
Once heated, slip the karepan into the hot oil and cook for about 4 minutes, turning and flipping so they stay evenly golden. If the currypan splits, immediately turn that side into the hot oil to create a crust that will prevent the filling from coming out. If the curry pan splits, remove it from the oil and finish cooking in the oven
If cooking in the oven, bake for about 16-18 minutes
Drain on kitchen towel or rack
ENJOY! These are best within a few hours but you can keep in the fridge and re-heat for a pocket curry whenever you need it!
Thanks for reading. This newsletter is a reader-supported publication. The best way to support my work is to become a paid KP+ subscriber to help keep Sunday’s free for everyone. You also get extra recipes and access to the full archive:


What yeast do you use?
I’ve always wondered about how to make this delightful meal! I had written a post on Japanese Curry, https://hiddenjapan.substack.com/p/the-ever-innovating-japanese-curry . Have kept thinking if I ever moved away from Japan, how could I survive without Kare Pan? Now very excited to try your recipe!