Hello!
Welcome to the first edition of Kitchen Projects, a recipe development and cooking journal.
Thank you so much for subscribing - I’m so excited to share this space with you!
When it comes to food (especially on Instagram!), you usually only get to see a perfect final product and none of the glorious trial and error. I want to give you some behind the scenes insight and, in turn, the confidence to try things, even if it doesn’t work out exactly how you planned. Spoiler Alert - it probably won’t work out exactly how you planned.
Part toolkit and part love letter to food, I’ll take you on the journey of a specific dessert or dish. From Cannoli to Strudel to Lisbon Chocolate Cake, you can expect these to be serious deep dives.
I’ll also use this space to share some of the things I’ve learned about this whole food business thing. From costings spreadsheets to production ideas to conversations and information from others in our industry to give you real insight into the world of pastry.
If you haven’t already subscribed, you can do so here:
Nicola
Kitchen Project #001: A tale of (many) Cannolis
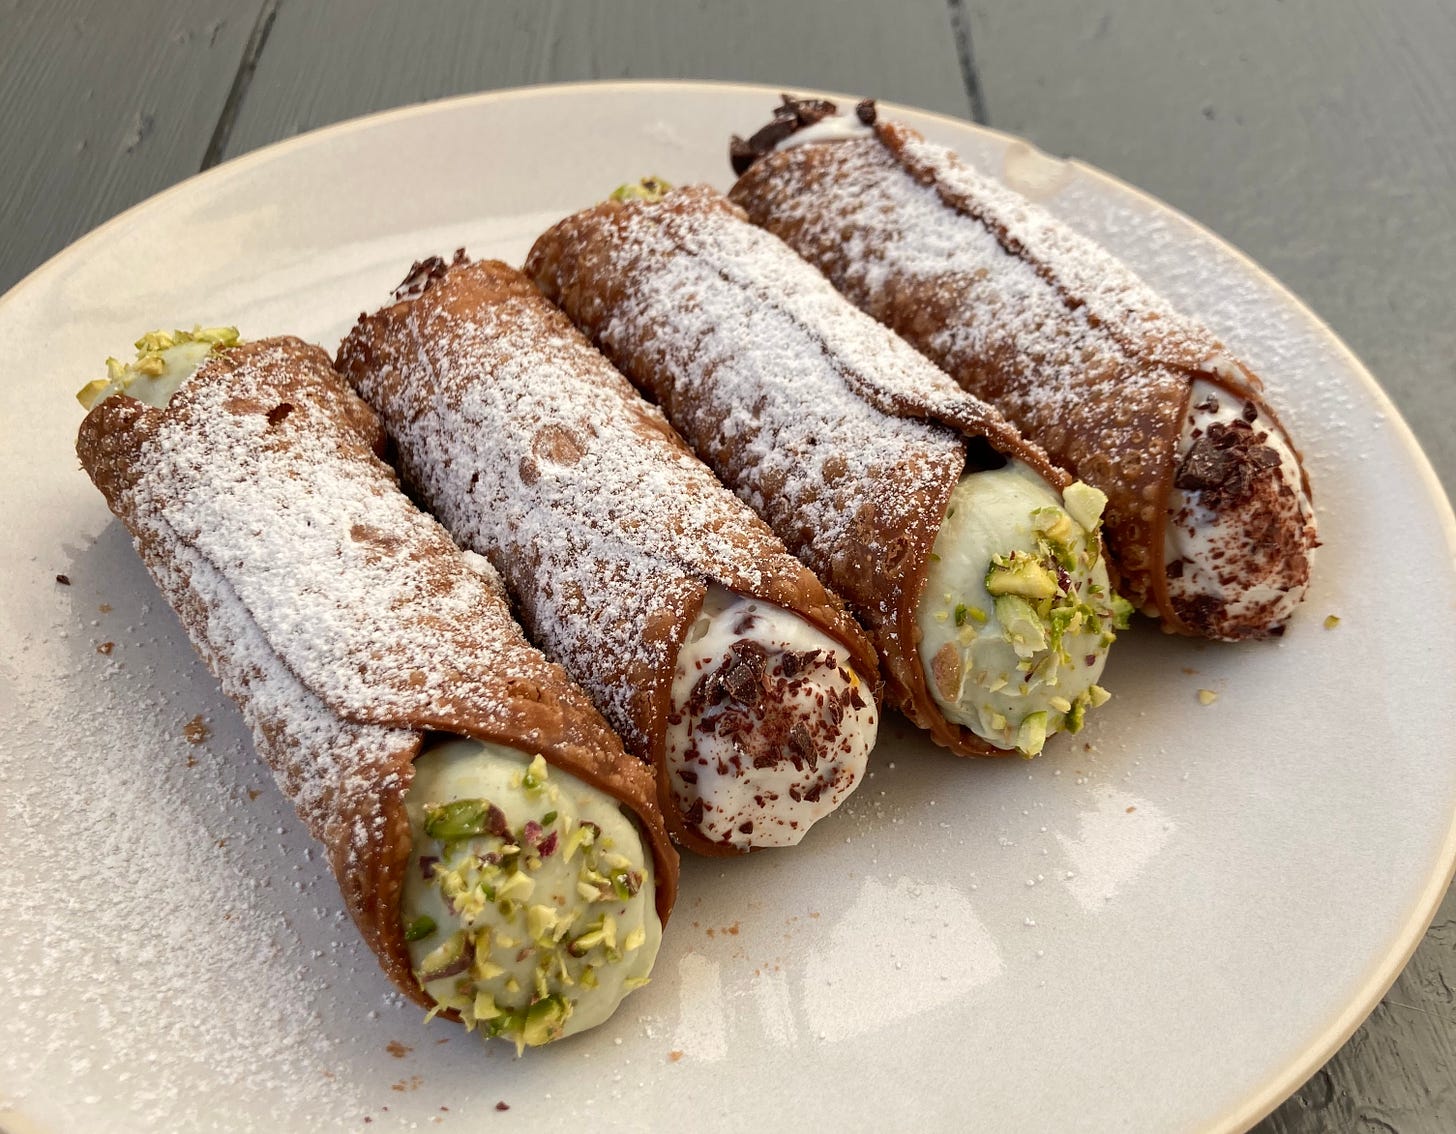
The cannoli is the iconic pastry of Sicily, a big fat crisp blistered shell filled with smooth, sweet ricotta, the ends dipped in chocolate chips and candied peel, finished with a hefty dose of icing sugar.
But before we continue, you need to know this: I’ve never actually eaten a Cannoli in Sicily. My experience of cannoli begins and ends in New York.
Back in 2015, I lived on the Lower East Side, a neighbourhood which slams directly into Little Italy once you cross Bowery. Laid out over five blocks, the streets of Little Italy literally sing to you. While the NYC fiefdoms all share the same bass notes (that perma soundtrack of frustrated yellow cabs, love it or hate it), each neighbourhood has its own melodic quirks. Little Italy quickly became one of my favourite compositions. From the endless chattering of wipe-clean menu sidewalk lunches, to the screeching gift shops selling ‘MAFIA’ bumper stickers, to the red-wine soaked Frank Sinatra karaoke bars, Little Italy happily penetrates any noise-cancelling headphones. I’d often take the long route home, just to walk through it and absorb some of its energy after being pushed around by an exhausting New York kitchen day.
One September, I wandered unknowingly into the belly of a sprawling street festival on Mulberry Street with shouty street vendors pushing piles of cannoli that would replenish almost instantly. I later found out that it was the San Gennaro Feast, an 11-day festival in celebration of the patron saint of Naples.
At this point, I’d never eaten a cannoli before. Most cannolis, in my experience, looked like they’ve been sitting around for (at least) months, if not years, the insides brushed with chocolate to extend their shelf life (even a delicious ploy is still a ploy). But not today. These cannoli were disappearing fast, to be replaced by fresh, hot shells, which were refilled like a Formula 1 pit stop – a well oiled Sicilian machine. That was it for me, watching the ricotta being squeezed freshly into the shells. I went in. And hard.
Three cannolis later I was hooked. I tried the classic ricotta with candied citrus peels, a pistachio one, and a choc chip variety. All magical and deserving of the top spot of a podium. I went back the next day – this festival was 11 days long after all... – and gorged again. It was on Mulberry St that I learned the rules of cannoli: they MUST be eaten immediately. Filled and then devoured within minutes – the mayfly of pastry*.
Months later, I left New York and moved back to London and, until last month, didn’t eat another cannoli. I’d just never been tempted by one again.
Six years and no cannoli? It was a long time coming. So, if you’ve read this far, let’s get onto the actual recipe bit.
*I’ve since heard of a bakery in Chicago that filled cannolis to order and wouldn’t sell you one until you promised to eat it immediately, in front of them, before you left the shop. This slightly scary approach to what should be an extremely pleasurable experience speaks to me, honestly.
The Cannoli Shell journey
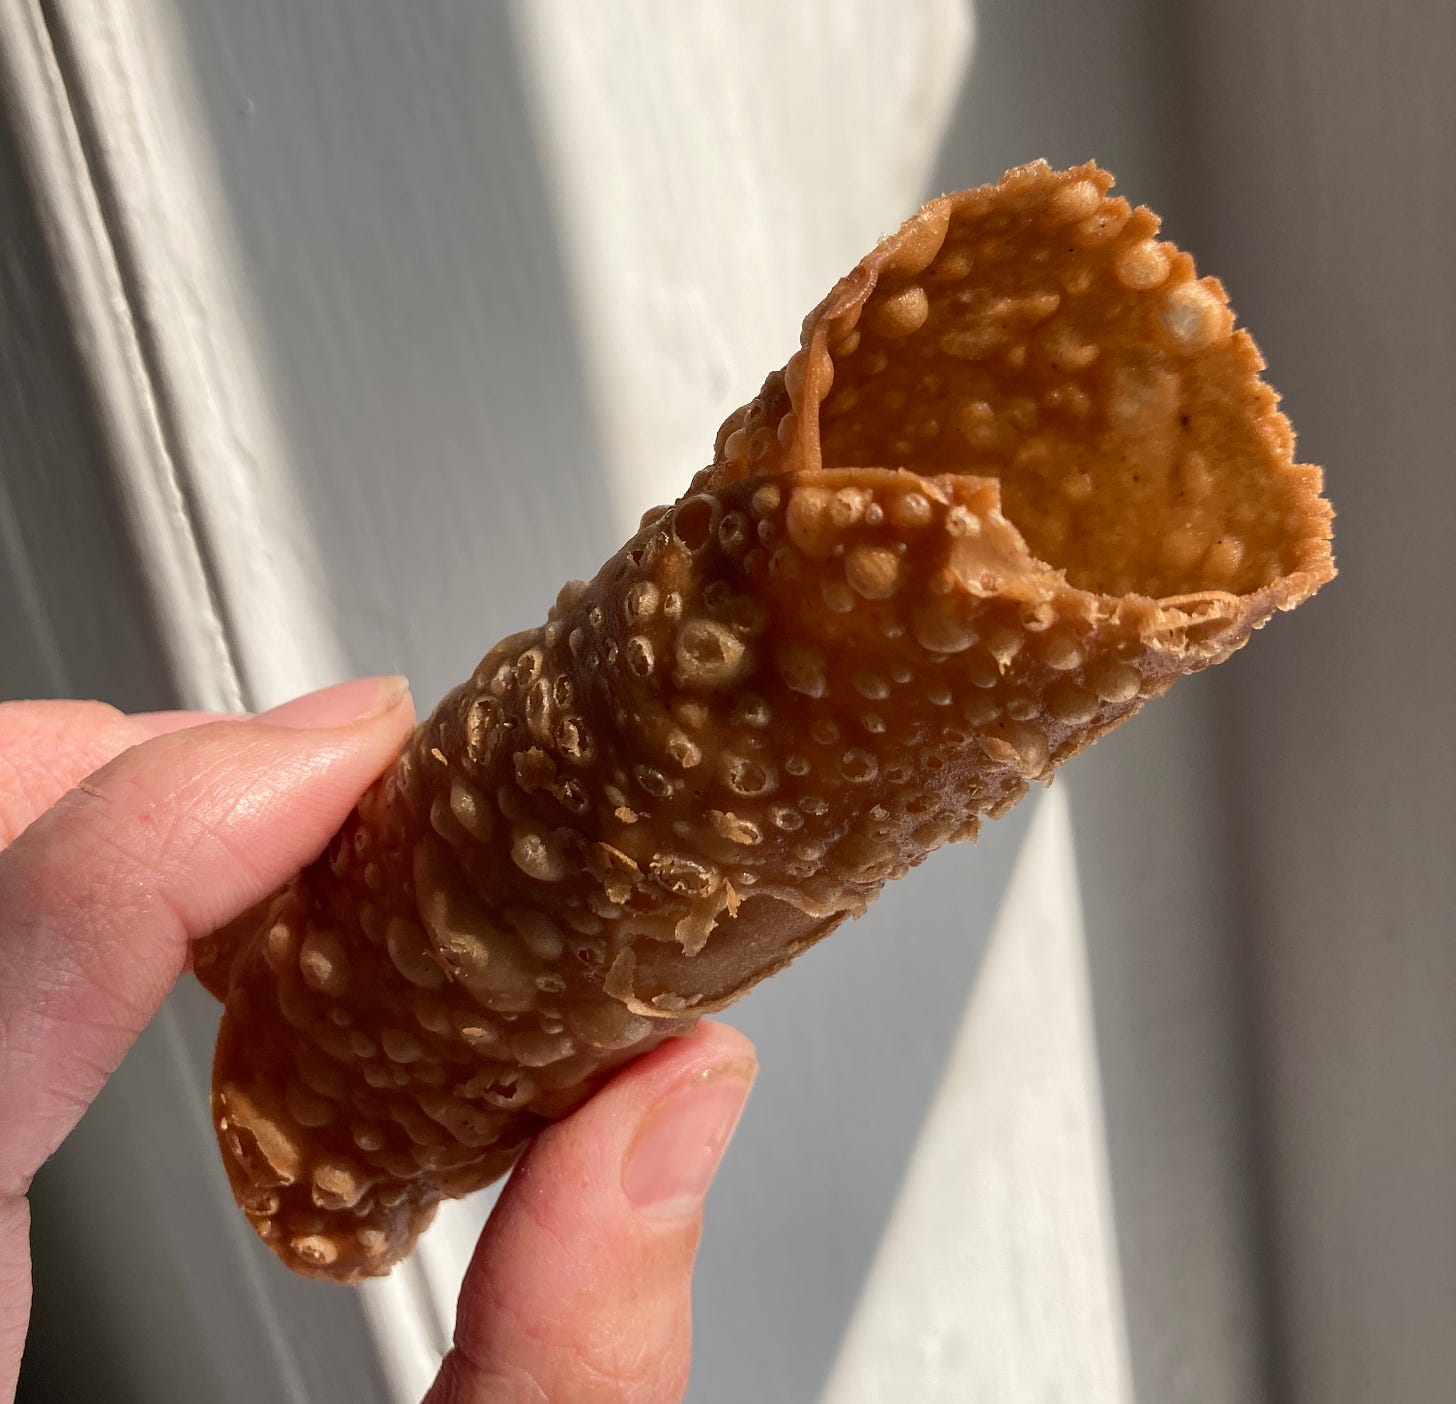
I started my cannoli journey rather simply: I googled “cannoli recipe”. Reading about these shells, I came to understand that the perfect one is thin, crisp yet tender and blistered. To achieve this, you need a dry (more on that later) firm dough that can hold its own when it meets the 180C oil, but can be passed through a pasta machine until almost translucent. Like a lot of Italian recipes, the formulations tended to call for lard. Although butter can’t be used as an exact swap, and since I rarely have lard to hand, I went ahead. Lard is pure animal fat – it’s white and is rendered from pigs, though really good quality lard shouldn’t taste too porky.
Butter v Lard
Butter is made from churning cream derived from cows. It’s about 80-84% fat, depending what brand you buy, with the rest made up of water and milk solids. Lard, on the other hand, is 100% fat – the real deal. Lard is often favoured for giving super defined and extremely crisp bakes thanks to its 100% fat rating. But what’s actually going on with these fats at a molecular level?
All fats are made up of molecules called triglycerides – a glycerol molecule attached to three fatty acids. It’s the length and angles of these chains that give different fats, like lard and butter, different properties. One of these key properties is melting point (butter, 32 degrees and lard, 35 degrees). It’s the other compounds, like water in butter, that also allow the fats to behave differently when you start. Ghee, by the way, is simply butter with all of the water removed. Butter also contains proteins (milk solids) which contribute to browning of final products.
The cannolis called for a relatively small % of lard (12%) so swapping like for like wasn’t too much of an issue for me here. In larger quantities, I might seek out easier to find vegetable shortening or even another pure, non-solid fat, like vegetable oil in a small quantity alongside the butter – with the latter – in place of the liquid ingredients. For crisp cannoli, I decided to focus more on the hydration of the dough and the technique and not sweat the fat too much.
Attempts #1,2,3
The first recipes I tried were far too dry: a 30-35% hydration (bakers percentages used here, referring to the relative % of liquids to the flour weight) was impossible for me to mix by hand.
The second recipe was the same and used so much cocoa that the dough itself was almost black – not what I had dreamed of when wistfully re-walking the imagined streets of Little Italy in search of the perfect at-home cannoli. The second dough had so much cocoa in it that it affected the gluten, too. As cocoa is gluten free, it can get in the way of important development that allows us to get to that final, thin shell. Also, it just didn’t look cute.
I went into this process knowing that the dough should be dry. Dry was the goal. A dry dough is far harder to wrangle than an over hydrated one in my opinion. But these doughs were OTT. Even long resting periods weren’t doing the trick. These doughs met their maker way before they met the oil, I’m sad to say.
The third dough was much easier to work with, with a hydration of 53%. Unlike the others, it had no red wine or cocoa in it - it was silky smooth and didn’t fight me… at first. The fight with dough three began when I was rolling it out. The higher hydration had made the first stage easier but had made the rolling out stage pretty much impossible. It stuck to itself and made the pasta machine wrangling even more painful than usual. However, once they hit the hot oil they bubbled up nicely and even looked like real cannoli. The final result was a light coloured but very oily cannoli. Look, it’s a deep fried shell, I get it needs to be oily. BUT, I have my limits. The shell shattered easily but didn’t feel substantial enough.
So, I went back to the drawing board and tried to aim for a middle of the road hydration %, finally landing on 38% - 42% (the range because honestly, I find it tricky to calculate the true ‘hydrating’ nature of an egg yolk). I liked the flavour the milk brought in the third dough and I felt the cocoa was a necessary addition to get a depth of colour I was after. The white wine vinegar and red wine (also acidic) help with the tenderness and shattering of the shell (acid v gluten, acid wins) and the latter also helps with the colour and flavour. This dough smells… curious. The cinnamon gives a wonderful spiced undertone and the red wine brings its own warmth. It’s quite complex for something you deep-fry.
Feel the deep-fry fear and do it anyway
One thing I've realised is that deep-frying really scares people. Although I’m quick to discredit these fears, I do appreciate there is something intimidating about a pot of 180c oil and a nearby flame. So, here are my tips for negating those fears:
Use a large, tall pot. The height of the pot will minimise any scary seeming oil splashes and keep the whole process well contained
Make sure your pot is SPOTLESS - the outside and inside. If you have a tiny bit of water in your pan when you start heating the oil, it will suddenly splatter at 100c which can feel scary. Making sure the outside is clean and dry will set your mind at rest that there is a big, safe space between your heating element and the oil inside the pot
Use vegetable oil - I use rapeseed, but you can use sunflower or any combination of vegetable oil
Fill the pot until it is around half full. You want enough oil to submerge your cannoli but not so much that it can bubble too high on impact with the Cannoli
Heat it up slowly so you feel in control - I like to put my oil on a low-medium flame when I am beginning to sheet out my dough. Knowing that the oil is coming to temperature at a manageable rate is always good for the pulse
Manage your temp - I use a standard pocket thermometer but if you are nervous about hot oil I recommend getting a probe thermometer with a long lead so you can monitor the temperature without being too close to the oil
Go slow - fry your cannoli one at a time. There’s no rush to get them through the oil and until you feel confident to do more than one
Equipment is your friend - I like using metal tongs or a metal ladle strainer
See it through to the end - Don’t forget that your cannoli might have hot oil trapped between the shells/the moulds. Watch out for these drips
To dispose of your oil, invest in a funnel. Simply let the oil cool and funnel it back into the bottle that it came in. You can either reuse it (for doughnuts/cannoli, I reuse until the oil changes colour significantly), see if there’s a local oil recycling bank near you or put the cap back on and put it in the bin
A note on moulds
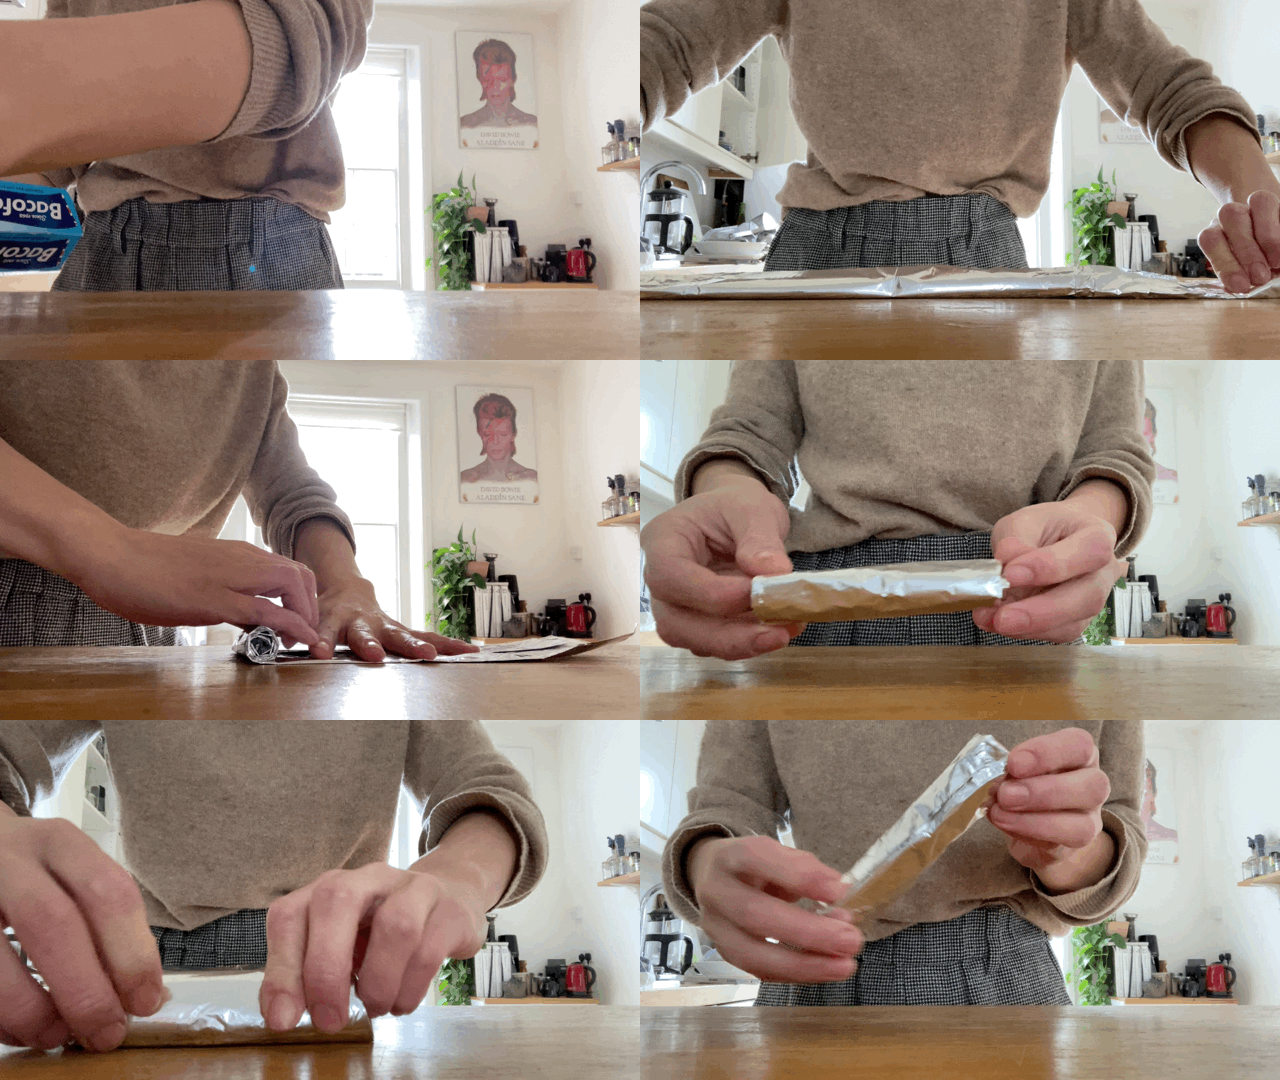
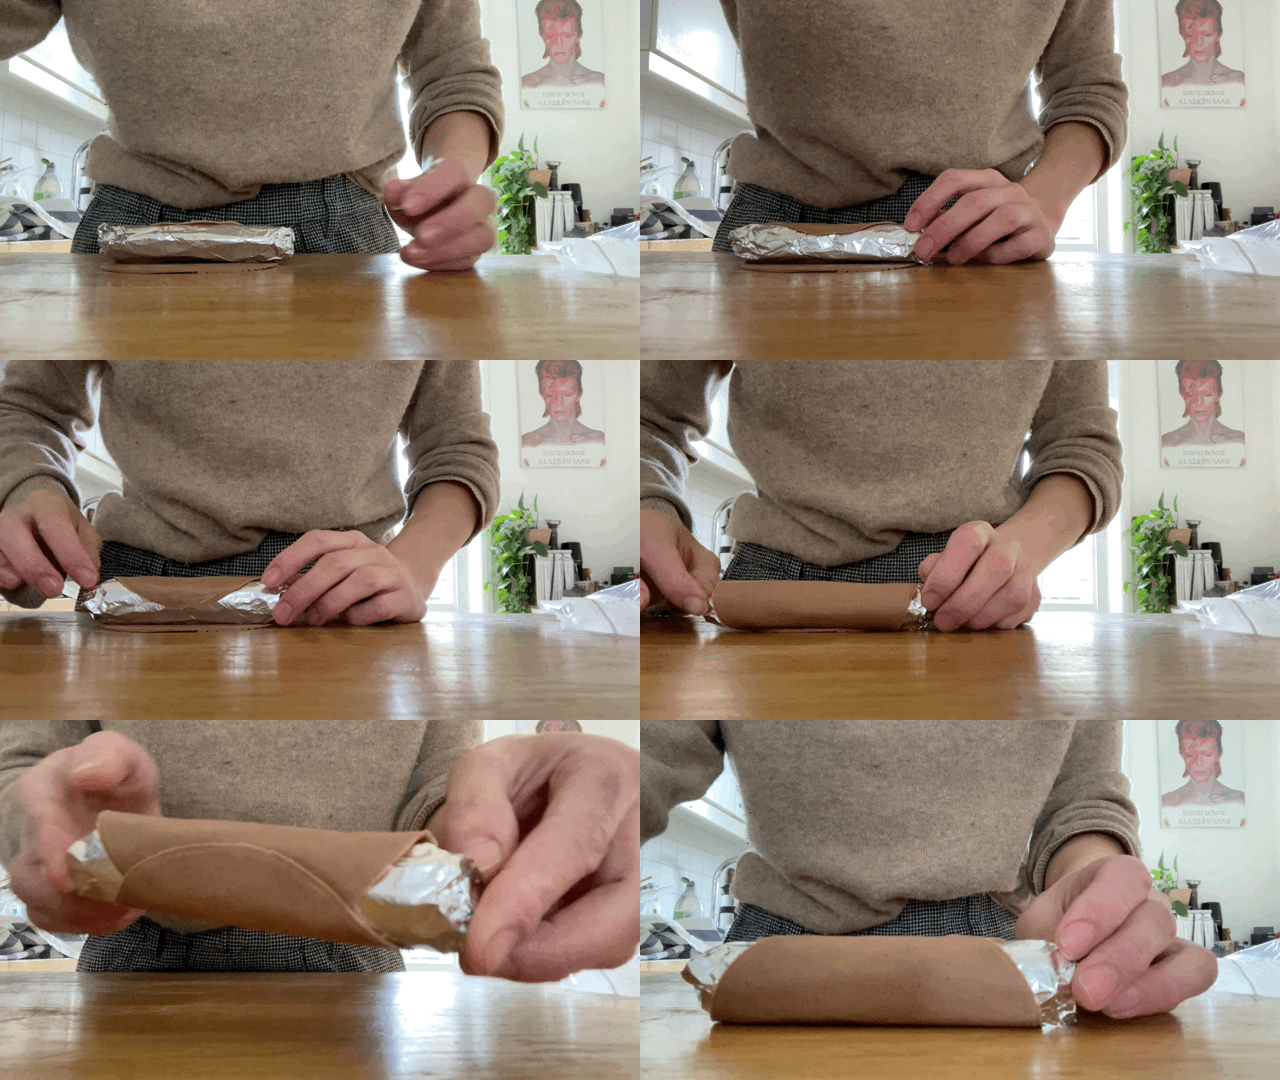
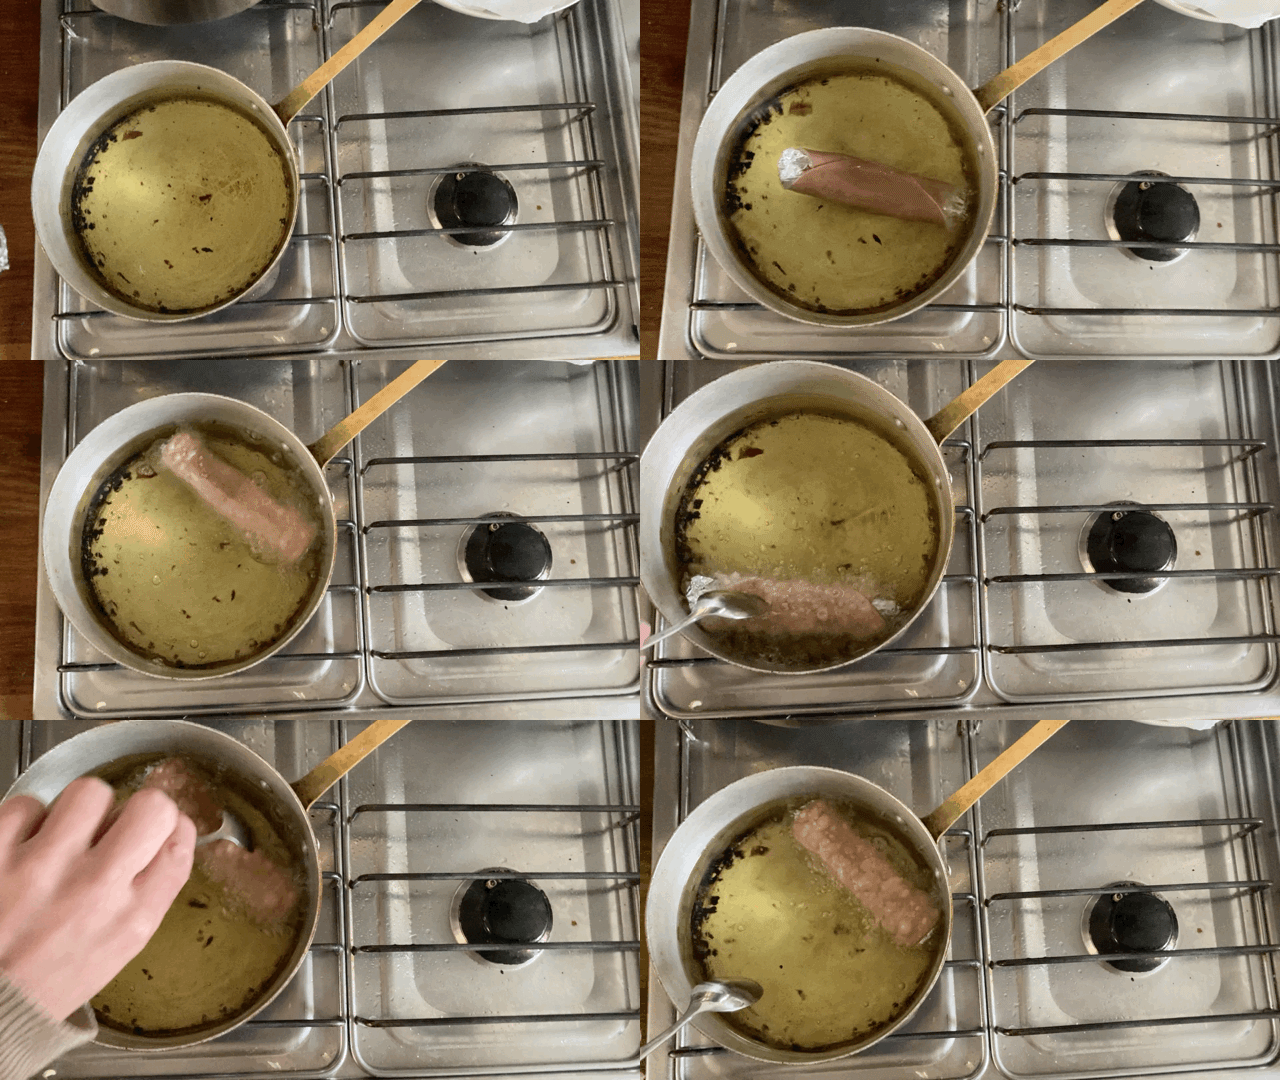
I purchased my cannoli moulds from Amazon (don’t hate me) but I’m pretty sure you can get them from lots of cook shops. If you’re not ready for a long-term relationship with cannolis then I’ve found you can make your own moulds from kitchen foil.
Take a sheet of foil, approx 50cm x 30cm. Fold in the long edge to make the width around 13cm and roll up the foil into a tube. Take another sheet of foil around 15cm x 30cm - the second sheet of foil will enclose the original tube and limit the amount of hot oil that gets stuck inside your make-shift mould. Enclose the spiralled edge with the second piece and roll it up, pinching the ends closed. You will end up with a fat tube around 2.5-3cm thick.
I don’t recommend going down to the thinnest setting on the pasta machine if you are using foil moulds - the thin dough gets stuck to all the craggy foil crevices and is impossible to remove. I found much more success on the second to thinnest. It also takes slightly longer to cook as the hot oil isn’t penetrating the hollow centre of the classic metal moulds. Also, the foil is very buoyant and will bob and float. You’ll need to stand by it and turn it manually and hold it down, if needs be!
One last thing: the reason cannolis stick to their moulds is usually due to overenthusiastic egg white placement on the dough. The slick shells will slide off happily, so long as there isn’t anything holding them down. If this does happen then rest assured it happens to us all. Simply smash it apart and move on. Pro tip for a common mistake: use the shells to scoop the ricotta filling directly into your mouth in a hideously amazing nacho/cannoli fusion dish. You win either way.
Let’s Make Cannoli
Equipment
Pasta roller
Rolling Pin
Big deep pot for deep frying
Thermometer
Cannoli moulds
The Cannoli Recipe
Makes about 24-30 big shells depending on how thick you roll them. Scale up and down as required! I haven’t tried freezing this dough but I see no reason why it wouldn’t work if wrapped tightly in the freezer for 30 days.
245g Plain Flour
30g VERY SOFT Butter
20g Caster Sugar
5g Cocoa Powder
2g Cinnamon
20g Egg Yolk
60g Red Wine
15g Milk
9g White Wine Vinegar
Reserve the egg white from separating the yolk for sticking together later on
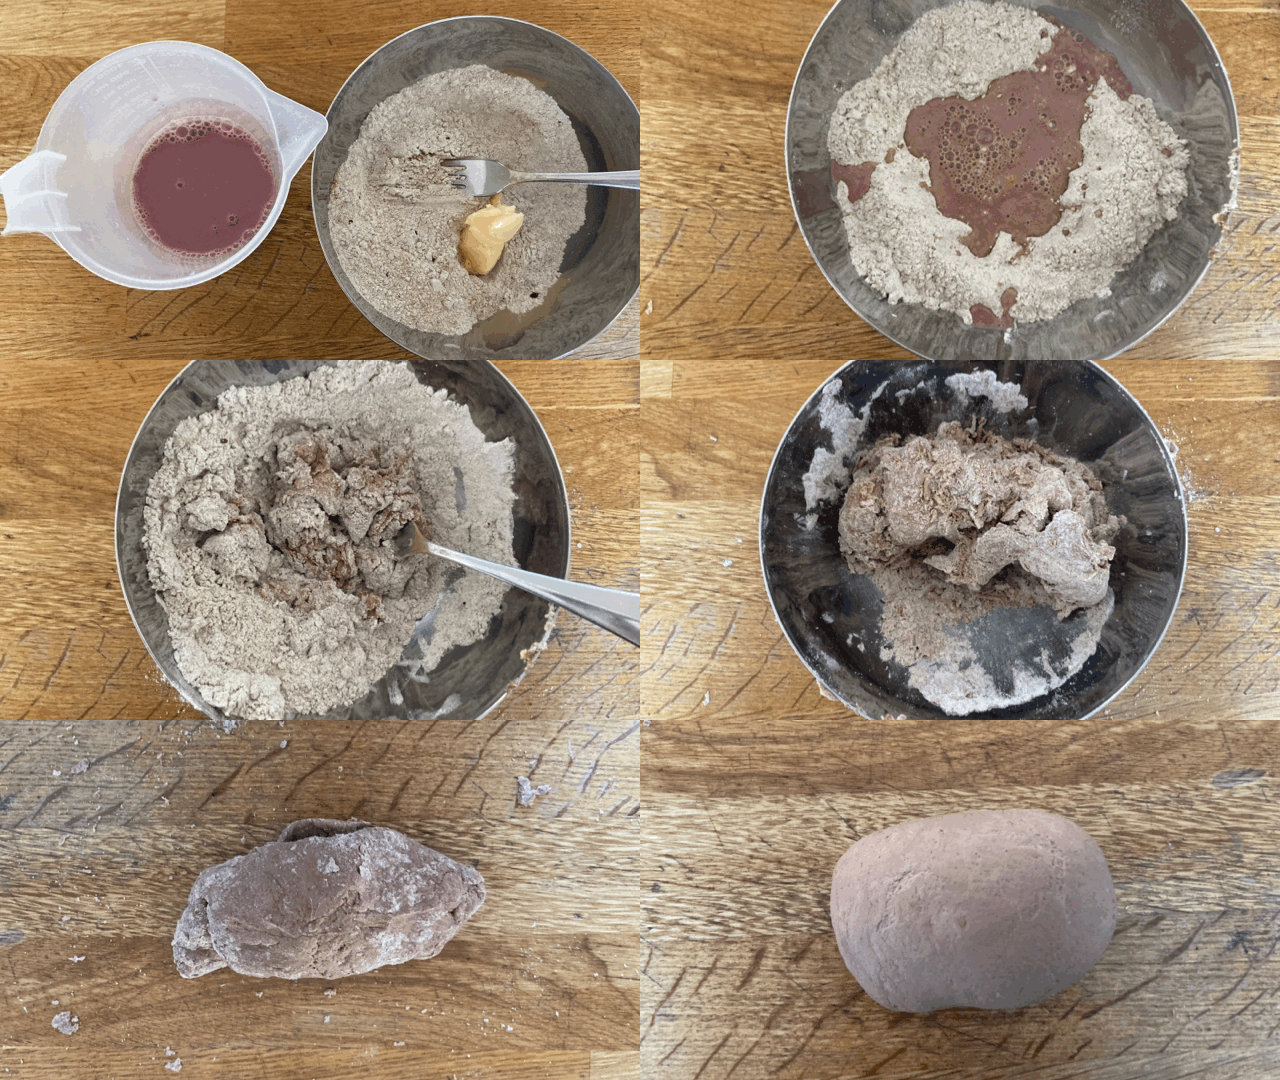
Weigh all of your dry ingredients into a bowl and mix. Rub soft butter into dough
Weigh all of your wet ingredients separately and whisk together
Create a well in the dries and pour in the wets. Use a fork to mix the two together in the centre of the bowl, slowly incorporating more of the dries into the liquid.
When it’s a rough dough and a rough homogenous ball forms – it will appear dry!
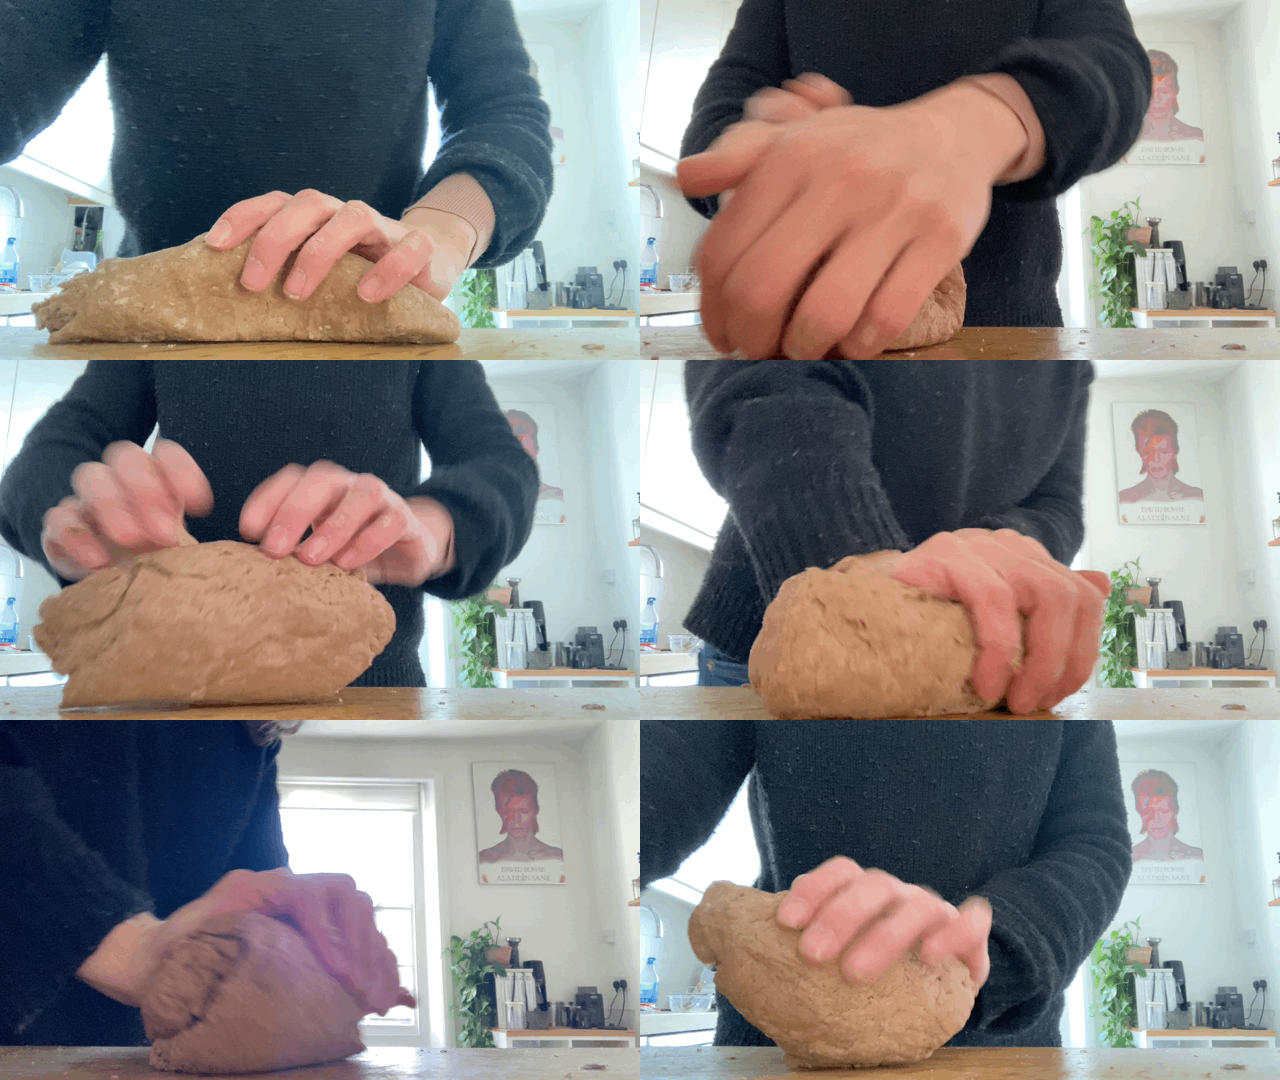
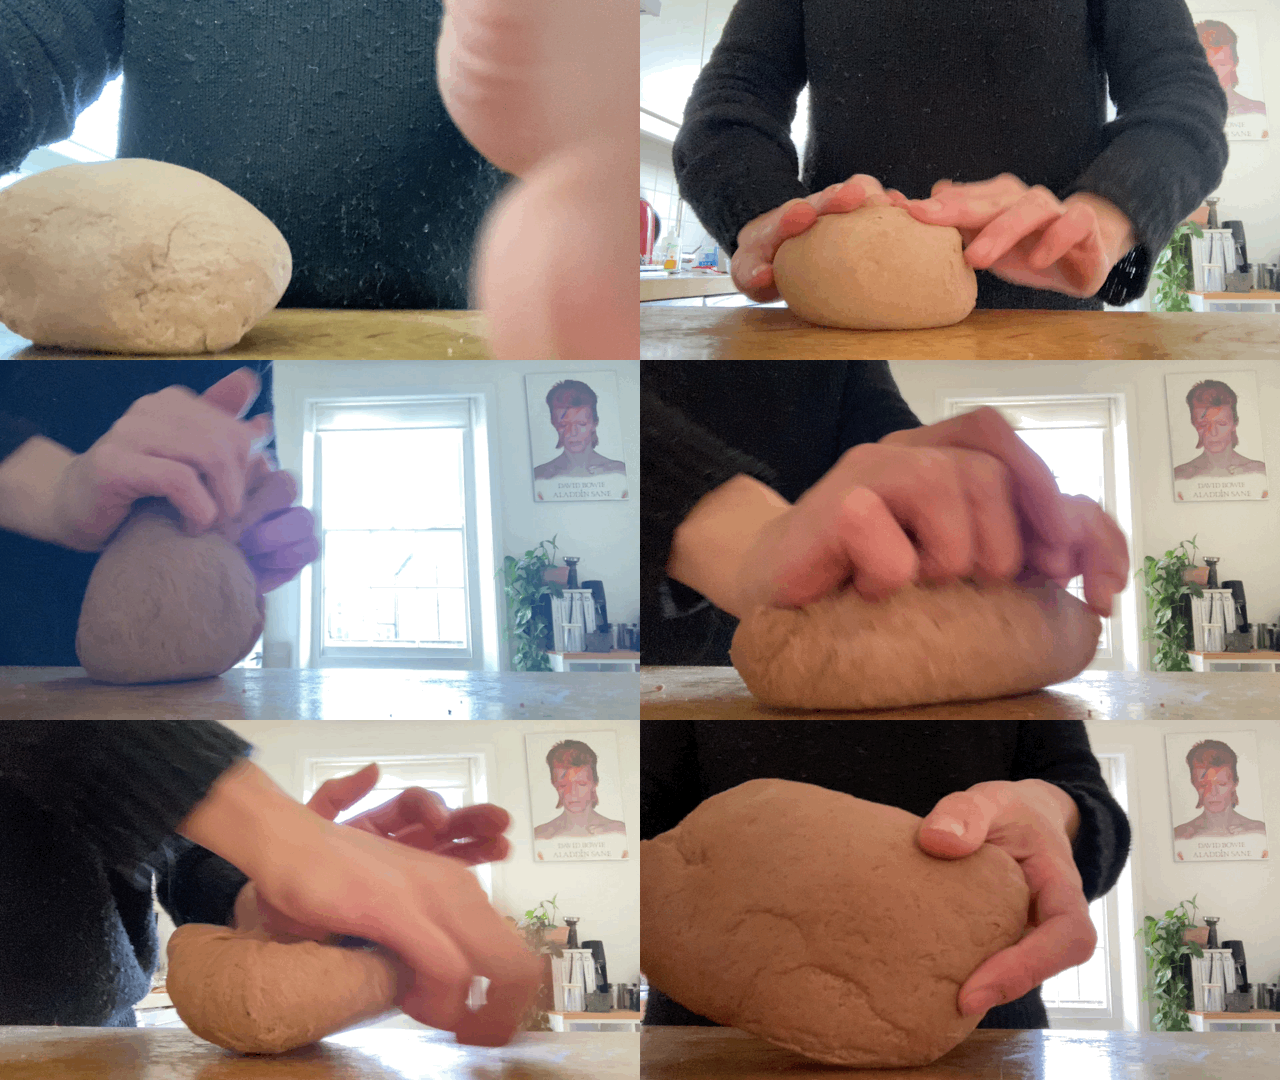
Tip the dough, dry bits and all, onto your work surface and knead together for about 10-15 mins until it becomes elastic and smooth and looks like a giant potato. Use the heel of your hand to knead and repetitively press and push the dough, folding it over itself:
It may take longer than this. To help make the process less frustrating, you can rest the dough (well covered) at room temp for 5 mins before continuing on with kneading. This will help the dough relax so you can get it smooth and strong before the fridge rest
Wrap securely and put into the fridge to rest for 30-40 mins minimum. The dough is happy in the fridge for 3 days, too
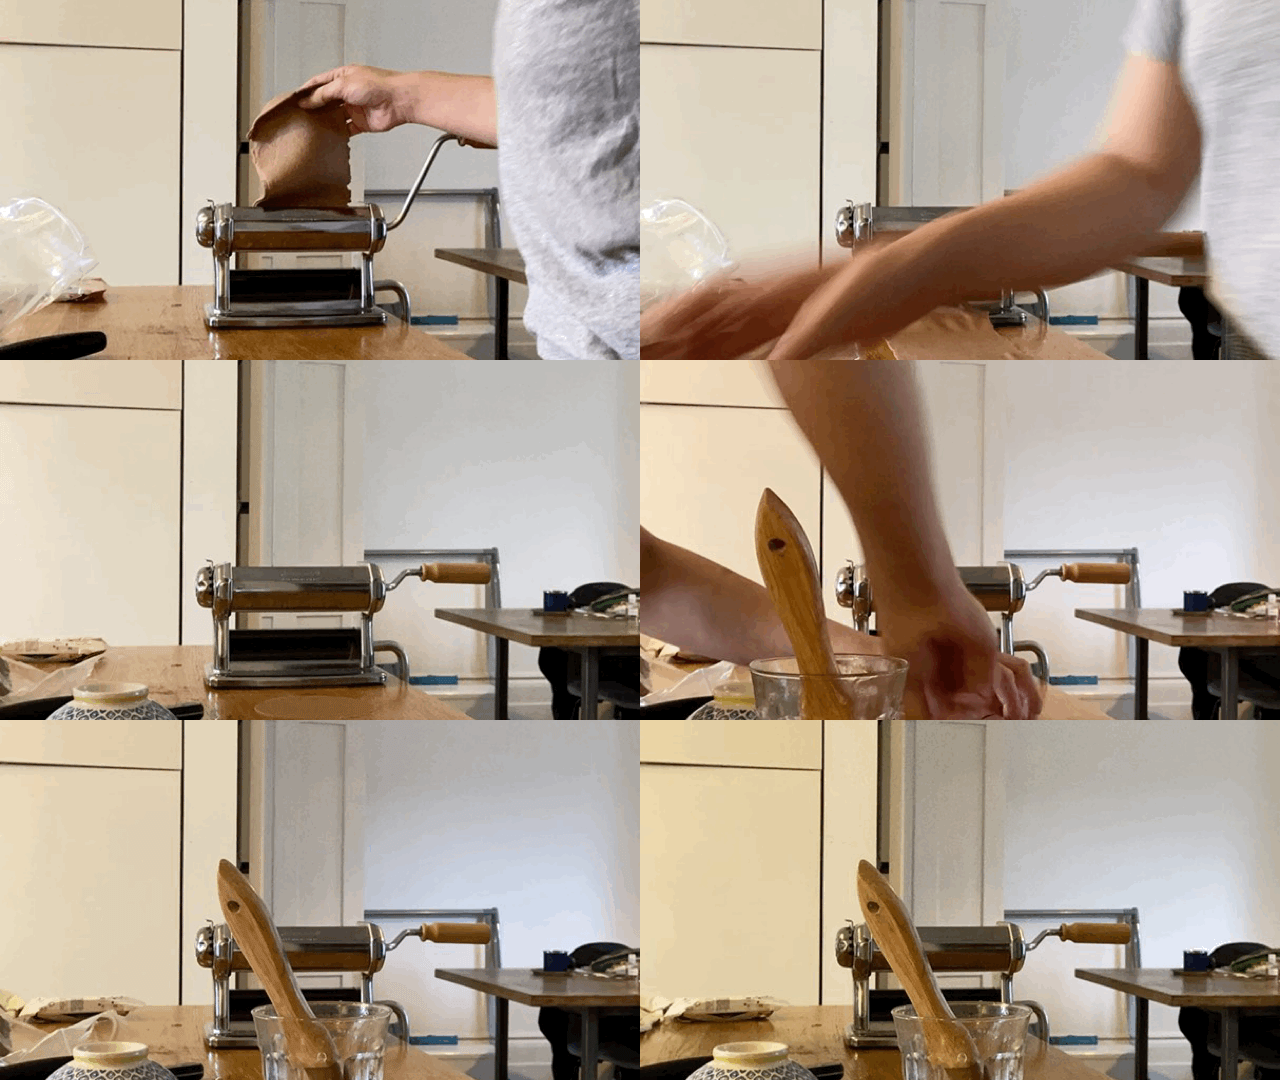
Once rested, set your pasta machine up. You can also do this by hand - I’ve heard… find your internal nonna! - but if you’ve got the machine, then 100% you should use it.
Squash and move the dough and warm slightly in your hands (if your dough has only been resting for 30-40 mins, you can likely skip this step as it shouldn't be too cold), allowing it to become more pliable.
Break off a 1/4 of the dough to begin with. It may not seem like much, but it will extend surprisingly quickly as you reduce the thickness on the pasta machine. Make sure you leave the rest of the dough well covered or it will dry out quickly
If you are rolling by hand, my recommendation is to be patient and use all the flour you need. I would definitely wait for the dough to come to room temp before rolling, too. And once you think you’ve got the dough thin enough, then roll over it another 5-10 times. We are looking for around 2mm for the final thickness
Start by ‘laminating’ the dough. By this, I mean pass the dough several times through the largest setting and fold it back over itself, occasionally rotating it 90 degrees so you aren’t always passing it in one direction. This step is essential to achieving the blistered crust. If, at first, your dough cracks – do not worry. This is likely because the dough is too cold. Continue passing it through and pressing back together until it forms a smooth and extensible mass
Once it is homogenous, pass the dough through to the thinnest, or one before thinnest, setting. You may prefer a slightly chunkier cannoli shell - both are delicious. See which you prefer
Using a 12cm cutter, or an upturned bowl, cut circles. The rest of the dough can be reformed and used again. I never reached a limit in how many times I could roll it out – this dough is forgiving and wants to make it into the fryer
Using a little egg white to seal, wrap the cannoli dough around the forms as neatly as possible. It took me 5-6 goes to even have a half usable one, so be patient and don’t add the egg white until you’re pretty sure you’ve got a good wrap. I use my fingertips to spread the egg white on but you can be fancy and use a pastry brush if you like. If you don’t use enough egg white at this stage, your cannoli might unfurl in the oil
Heat your vegetable oil to 180c. Carefully place your cannoli shells into the pot. Depending on the size, you can do a few at once. You don’t want things to be too crowded
The cannoli shells immediately blister and float to the top. For 1-2 mins, flip and turn the shells for even colouring. If you’re using the foil moulds you’ll need to go closer to 2 mins
Remove and drain immediately on kitchen paper. Blot if necessary. PLEASE be careful of dripping hot oil!
Once cooled, using a clean tea towel, grasp the cannoli shell and slide it off of the mould. It should release easily. Don’t forget your moulds will be HOT and you may need to wait a while before reusing them. Patience is key
Cannoli shells will – apparently – last in an airtight container for 3 days. But I wouldn’t wait longer than 24 hours (if you really must) and think a few hours is really the max for having the holy cannoli experience. These shells are crisp yet tender, satisfyingly oily without being overwhelming and light, in their own way, whilst still giving you a good mouthful.
The Ricotta filling
Traditionally, sheep’s milk ricotta is used here. But I found it impossible to get. I had to twist the arm of a chef friend (s/o Jordon) to order some in for me with the classic ‘minimum 3kg’ quantity. Not always practical. So, just find the best you can. I’ve heard great things about Westcombe Dairy Ricotta and La Latteria.
This is one of those annoying recipes that you actually SHOULD start the night before. Sorry. That being said, I’m sure you could plough ahead and still get good results. The draining just helps keep the ricotta firm when piping - this will vary from brand to brand so you’re free to make a judgement call based on the ricotta you have.
Just under 10% sugar (to ricotta weight) is perfect here to give you a not-to-sweet but very luscious filling. Any more sweetness will take away from the ricotta flavour, not to mention sugar is a bloody water hog and too much will cause havoc in your ricotta if allowed.
Makes 700g, enough for 12 BIG cannoli generously with 50-60g filling. Scale up & down as required.
550g Ricotta
45g Caster Sugar
4g Orange Zest
80g Small Chocolate Chips
Ricotta filling will last for 3 days in the fridge.
Drain ricotta in a colander overnight to remove any excess moisture
Once drained, mix in the caster sugar, zest and chocolate chips (if you are chopping your own chocolate up, I recommend sieving it to remove any fine bits of chocolate - these will make your filling look grey-ish, not so beautiful. Tastes great still)
Mix until combined and reserve in the fridge/in a piping bag until ready to use
To serve
Cannoli shells
Ricotta filling
+ Extra chocolate chips for dipping the ends
+ Icing Sugar to dust
+ A waiting and willing audience
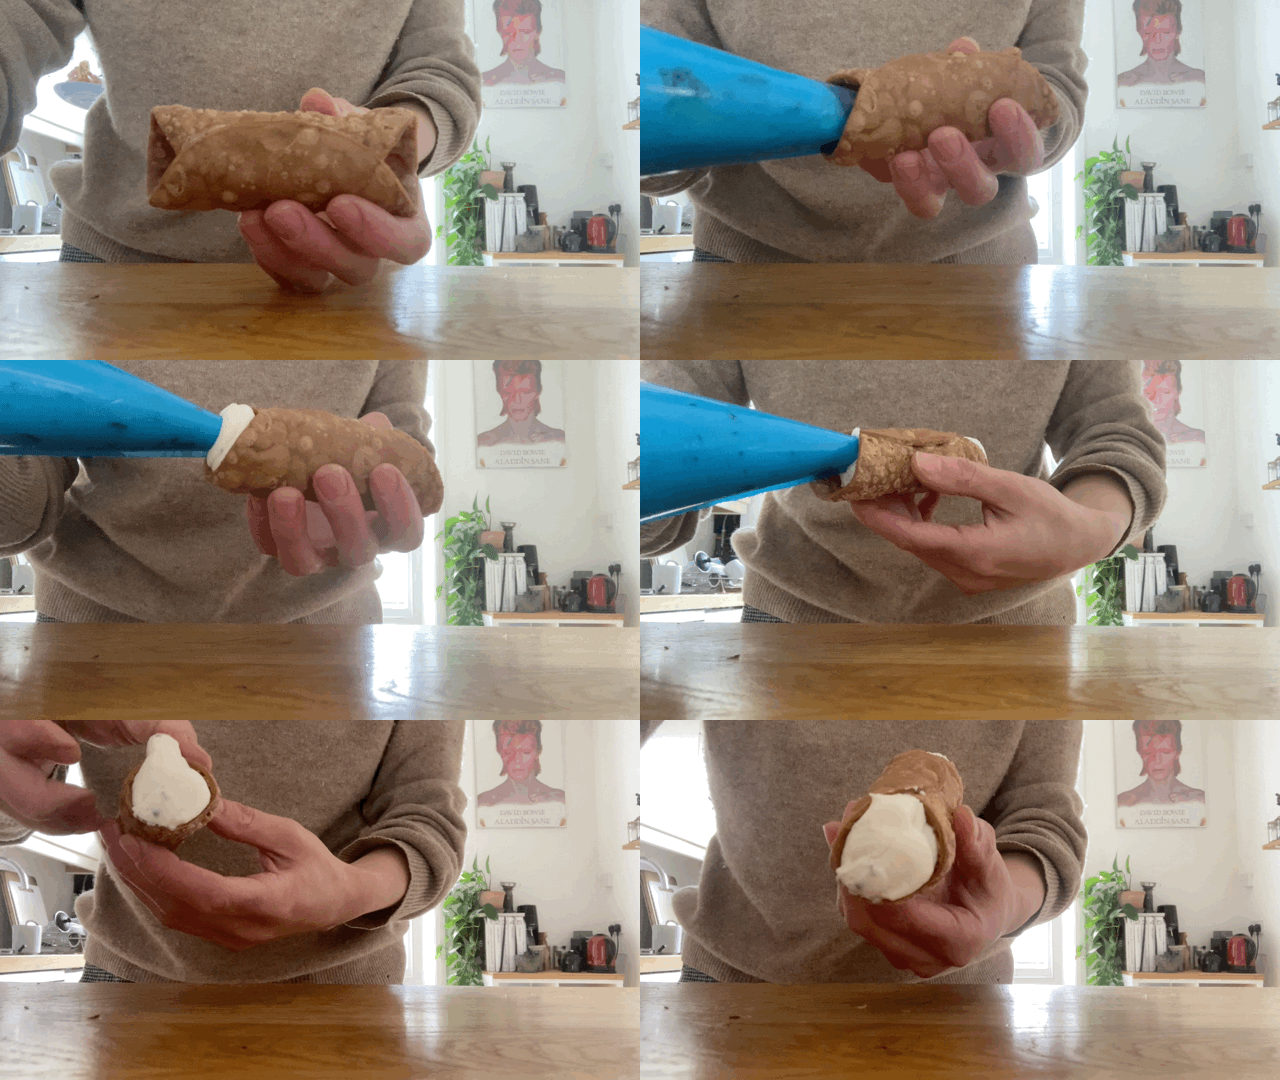
Fill the cannoli shells generously from either side: Trust me, you don’t want to skimp here
Dust liberally with icing sugar
Eat Immediately




fire content - keep it coming!
I loved this so much! I followed your cannoli journey on your stories. I’m particularly loving the science and trial & errors. Thanks for sharing your food memory - makes this cannoli special! I’m excited for Kitchen Projects and can’t wait to read future projects. xxoo