Kitchen Project #72: All about cake - The Victoria Sponge
Your ultimate guide to all things fluffy ft. THE Victoria sponge
Hello,
Welcome to today's edition of Kitchen Projects. Thank you so much for being here!
Today it's all about a subject close to *all of our* hearts: Cake! And not just any cake - it’s everyones favourite… the Victoria sponge! From changing the mixing method to playing with the ratios, this is the ultimate guide to understanding how cakes work, we’ll go through all the factors then finish off with my best recipe.
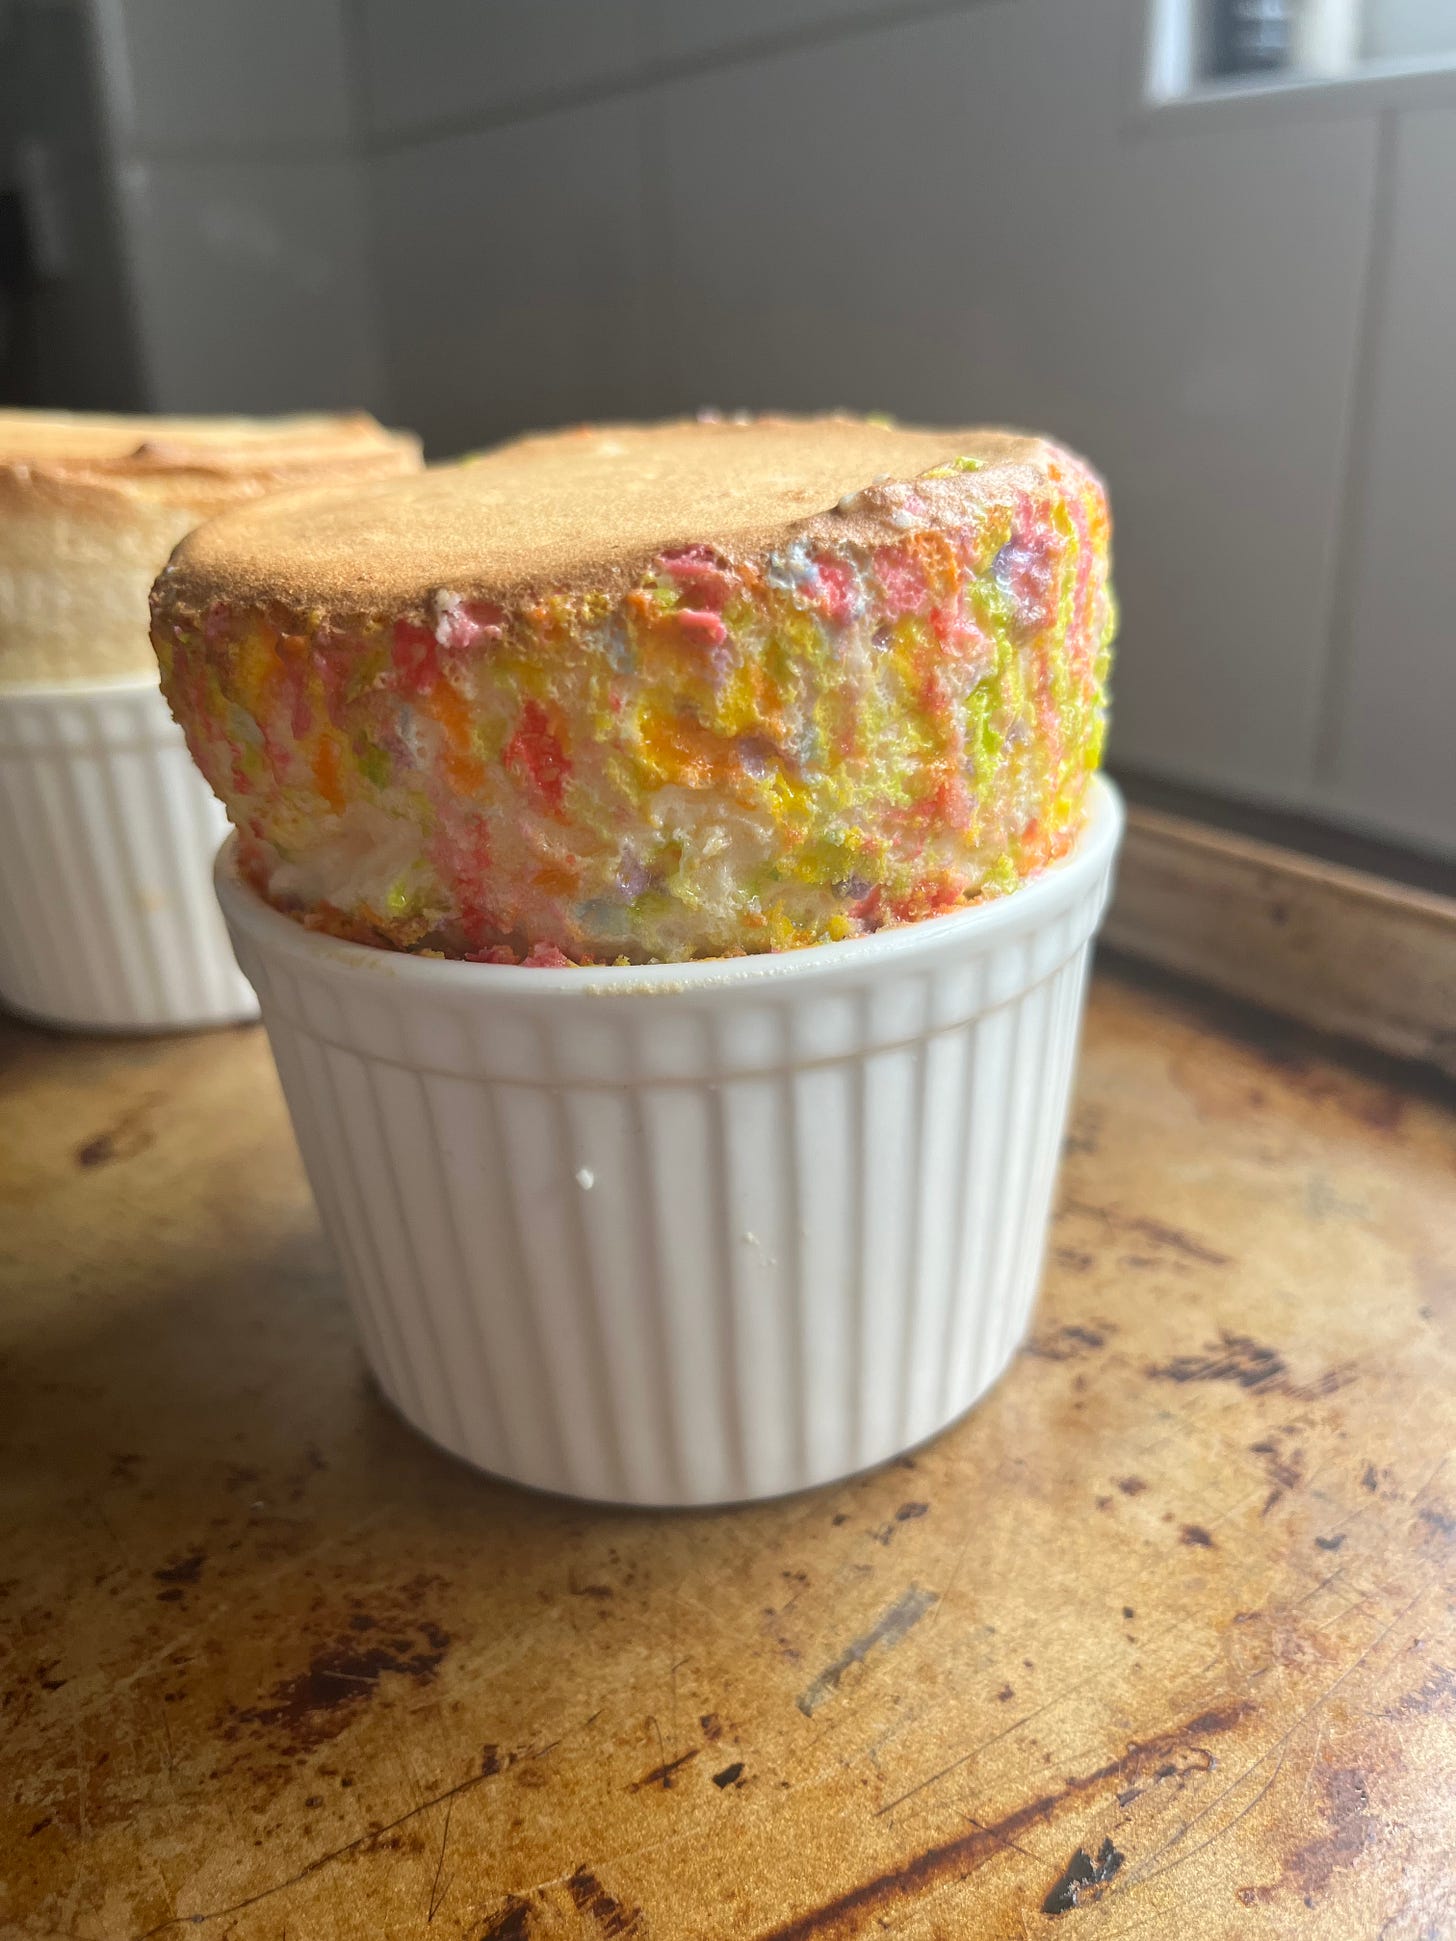
Over on KP+, I'm sharing a super fun alternative birthday cake recipe - birthday cake souffle! It’s a light as air blend of sprinkles, vanilla and, quite frankly, joy.
What's KP+? Well, Kitchen Projects+ aka KP+, is the level-up version of this newsletter. It only costs £5 per month, and your support makes this newsletter possible. By becoming a member of KP+, you directly support the writing and research that goes into the weekly newsletter and get access to lots of extra content, recipes and giveaways, including access to the entire archive. I really hope to see you there:
Love,
Nicola
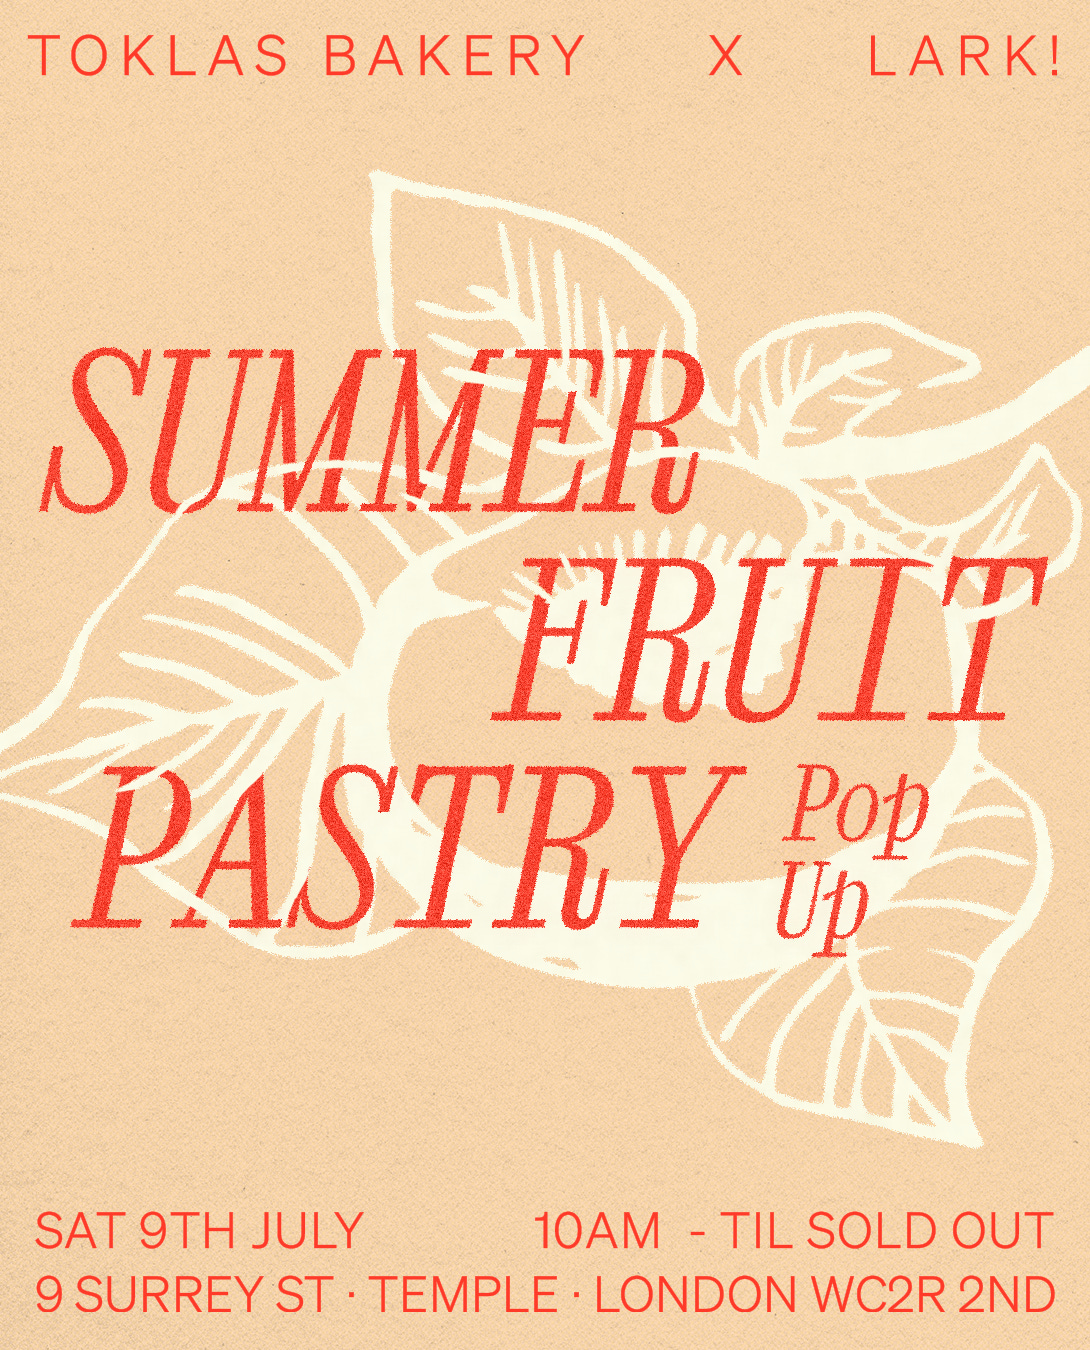
My summer fruits pop-up in London next weekend!
Before we get into, I’m so excited about my summer fruit pop-up next weekend!
When I'm not writing Kitchen Projects and doing development, I love to dream up fun food events for my pop-up bakery Lark! and figure out ways I can collaborate with some of my favourite chefs. Next week, I have the absolute pleasure of baking and cooking at Toklas bakery.
Toklas bakery opened late last year on Surrey St - the space is beautiful, right by the river in town, a stone's throw away from Somerset House. Along with the head baker Janine, I'll be dreaming up all the best pastries featuring all the very best summer fruits. The menu will have the juiciest peaches, the best berries the UK offers, and perfectly ripe apricots. I'm announcing the menu later this week, but you can expect laminated mango brioche, strawberry and rhubarb pies, peach and mascarpone tarts, ricotta and apricot cakes, crispy summer potato strecci and lots, lots more! I literally cannot WAIT!
The pop-up is next Saturday 9th July from 10AM at 1 Surrey St, Temple, London WC2R 2ND until sold out. Hope to see you there for all the fruity fun!
Let’s talk cake
Is there any cake more ubiquitous than the victoria sponge? Before I could commit to preparing an entire cake, my earliest memories of baking were fairy cakes. I would cream together that 90s margarine (shout out to my fellow flora kids) and caster sugar with a wooden spoon. Inevitably I would get tired after 5 seconds and pass the bowl to my nanny Carole, who would graciously finish the job. Spooning the mixture into cases and watching them rise in the oven was always an unparalleled pleasure - it still is.
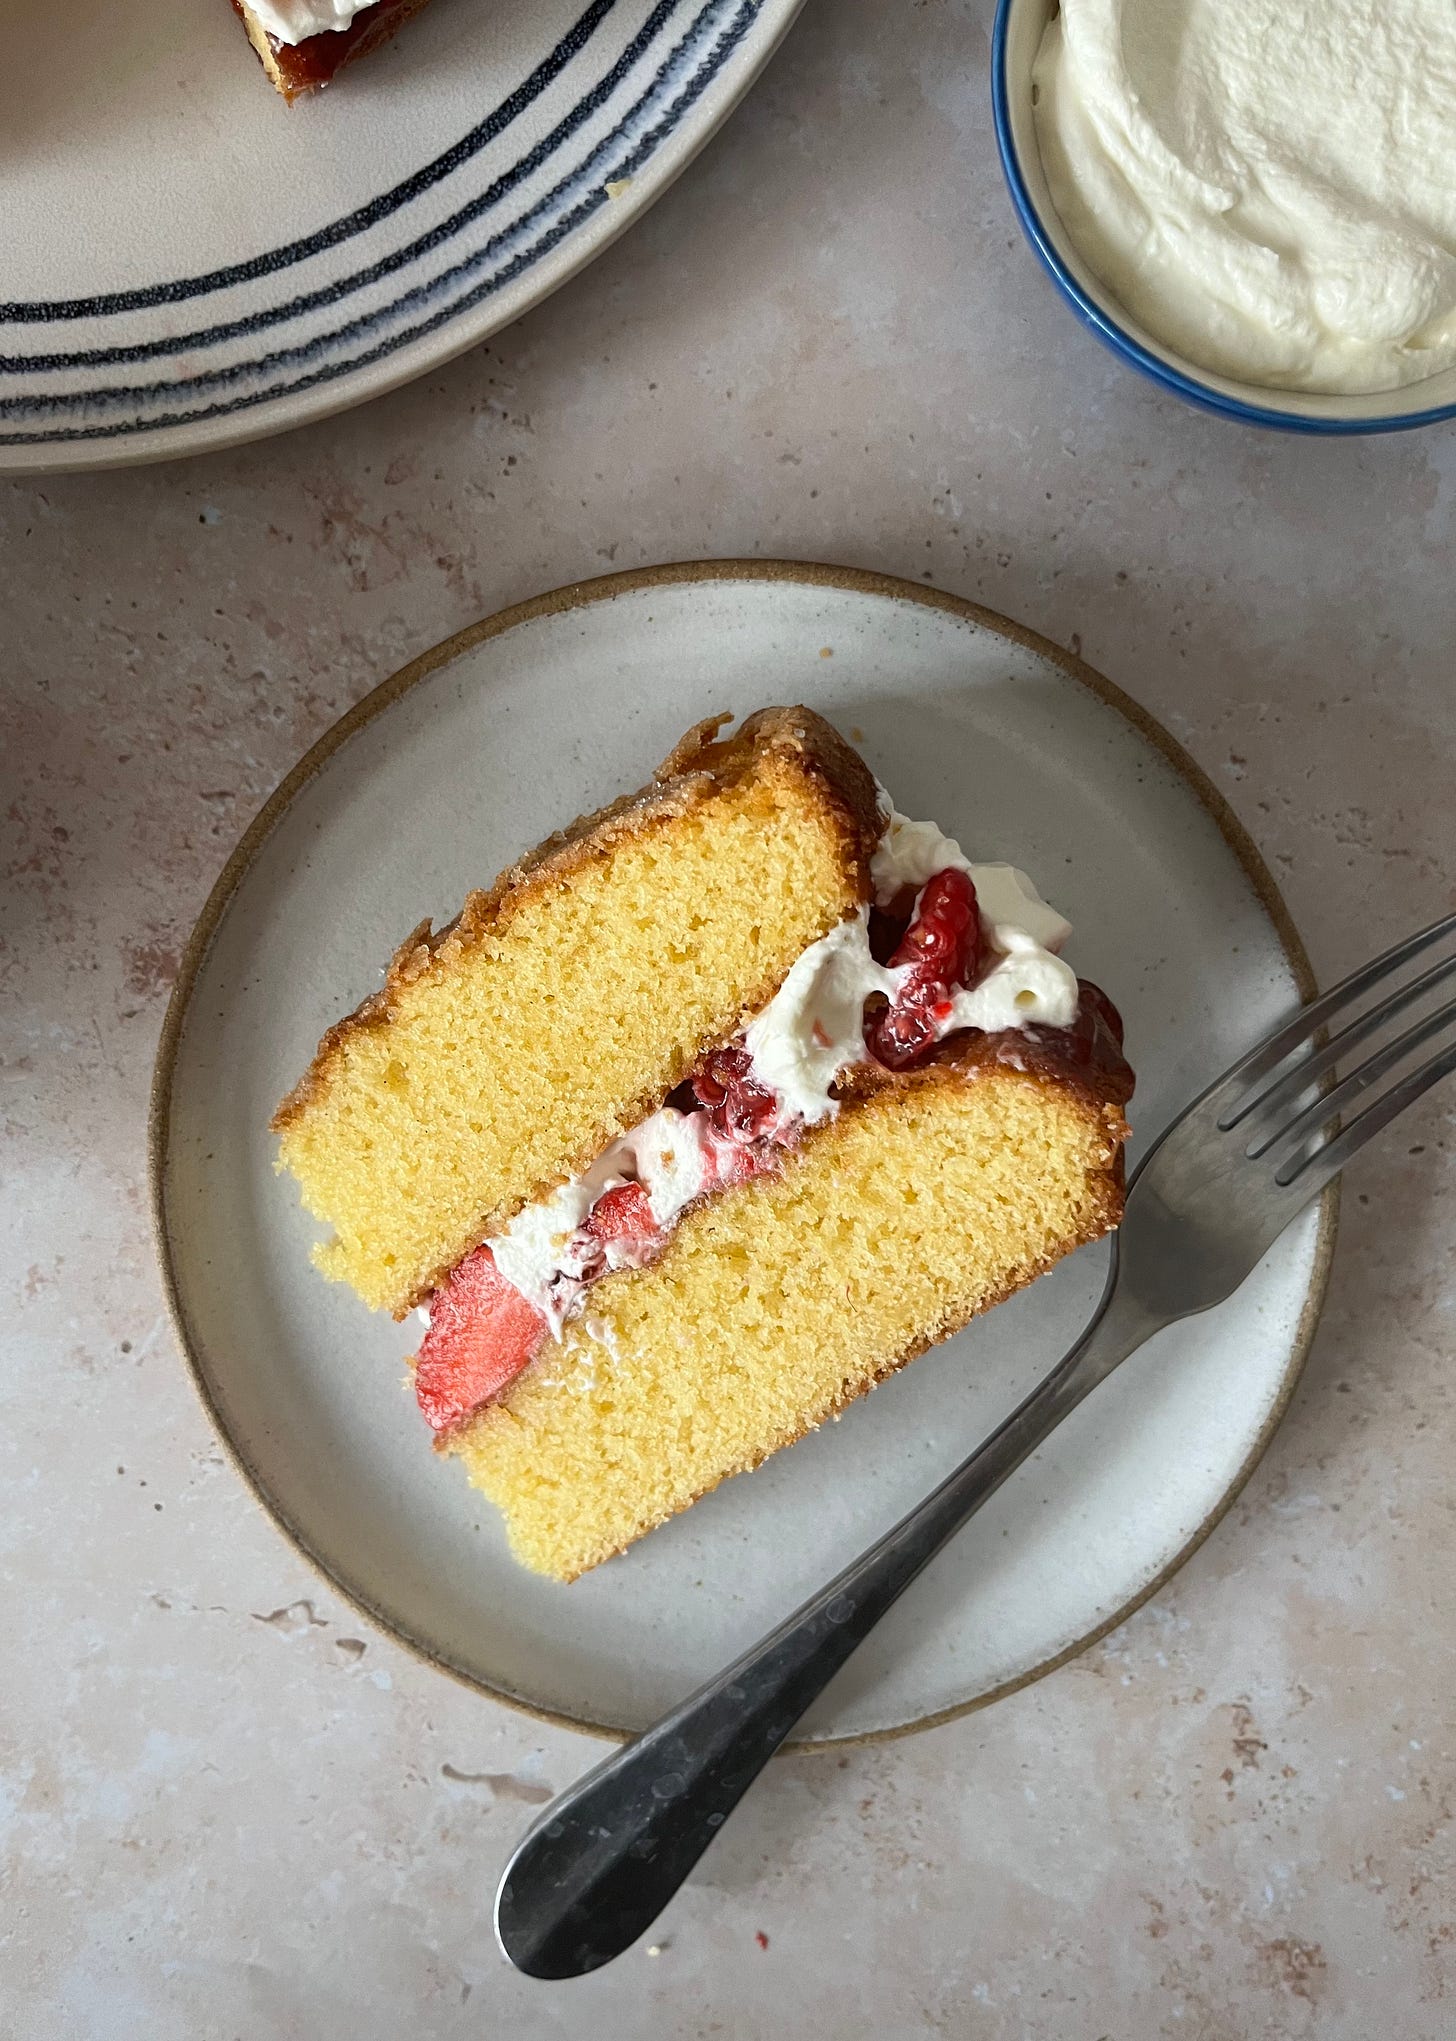
As I was taught, the Victoria Sponge is usually two buttery sponge cakes that sandwich jam, fruit and cream, or buttercream. It is a strictly rustic affair - cream and jam spilling over the edges, sugar going everywhere. The victoria sponge, strictly speaking, is not really a sponge at all and should be thought of as a pound cake. Sponge cakes, in a traditional sense, refer to cakes that are leavened solely by the expansion of air trapped by whisking eggs. Before baking powder, cakes were either leavened with eggs or yeast - think genoise or kugelhopf. The invention, in 1843 by Alfred Bird, changed the game for cakes.
Let me take a moment to honour Alfred Bird, a chemist living in Birmingham in the 19th century. Bird's wife Elizabeth was allergic to yeast and eggs, preventing her from enjoying two of life's greatest pleasures - cake and custard. I've always known that dessert is a love story, but this just shows how rooted our modern experience of cake and custard is in romance! Bird's egg-free, cornflour-based custard powder and his baking powder formula are still enjoyed today. Quite the legacy. We'll talk more about raising agents later.
The arrival of Bird's baking powder allowed a new type of cake to emerge: A more buttery, richer cake. When cakes relied solely on eggs to rise, the ratio of fat had to be relatively low to make the cake viable, since fat can destroy delicate egg foams and make the batter too heavy - in my genoise recipe, the butter is less than 10% of the total recipe and has to be incorporated incredibly gently. With baking powder, fat can be added in equal quantities to the other ingredients, resulting in a tender yet hefty sponge with a rich, flavourful crumb. This arrival of a new type of sponge coincided with the reign of Queen Victoria, hence the name 'Victoria Sponge'
The typical Victoria Sponge mixture outside the UK is known as a 'pound cake'. Pound cake gets its name from its quantity measurements, i.e. one pound of eggs, butter, sugar, and flour - the ultimate 'no recipe' recipe! Most modern recipes also include baking powder as an ingredient to add lightness to the batter. Pound cake is handy because you can quickly scale this up and down. This is the starting point if I'm making a butter-based cake.
This week I'm curious to go deeper, to delve past the 1:1 ratio. Sure, you can make a wonderful cake using equal parts butter, sugar, flour and eggs, but… can we do better?! And what does this ratio actually mean? I've always thought that the key to being a more confident baker is understanding what happens when you break down each ingredient. This gives you the power to tweak, adapt and change your recipes, as well as help you know what to expect from your bakes (and, of course, troubleshoot. We love a good troubleshoot.)
Before we get onto the tests, over on KP+ it’s a different type of celebration cake. Let me introduce you to the very cute Birthday Cake Soufflé ft. sprinkles, definitely a special recipe for someone you love (and that person can be YOURSELF!):
The tests
To really put butter cake through its paces, I made a list of all the factors that could affect the outcome of a sponge, from mixing method to level of creaming and more. We’ll go through those in detail, but here are the controls:
My test was based on a classic 1:1:1:1 ratio, with 7% baking powder and 0.5% salt to flour weight.
The 7% baking powder quantity is derived from the classic British use of self-raising flour PLUS baking powder.
The additional liquid ingredients were added at a ratio of 7% overall weight (i.e. I found 45g milk in 650g mixture gave me a 'dropping' consistency).
Each cake was scaled at 55g per case and baked at 170c fan for 12-15 minutes depending on if the cake was baked alone (shorter bake time) or if there were many cakes on one tray (longer bake time)
Unless testing an alternative method, the standard mixing method was creaming butter and sugar, then adding eggs, followed by the dries.
The testing factors are as follows:
Mixing method - Creaming, all-in-one, reverse creaming
Level of creaming - mixed vs creamed till fluffy vs whipped
Eggs - Whole eggs vs 50% fewer eggs vs Yolks. vs Whites only
Sugar - 50% less sugar vs double sugar vs honey
Fats - 50% less butter vs double butter vs margarine vs oil vs 50/50 oil and butter
Liquid add-ins - Milk (different amounts) vs double cream vs sour cream
Raising agents - No raising agents vs double raising agents
Flour - 50% less flour
Ingredient ratios head to head (what less or more of each ingredient does)
We'll make our way through each of these in detail now and finish up by applying all we’ve learnt for an *ultimate* sponge.
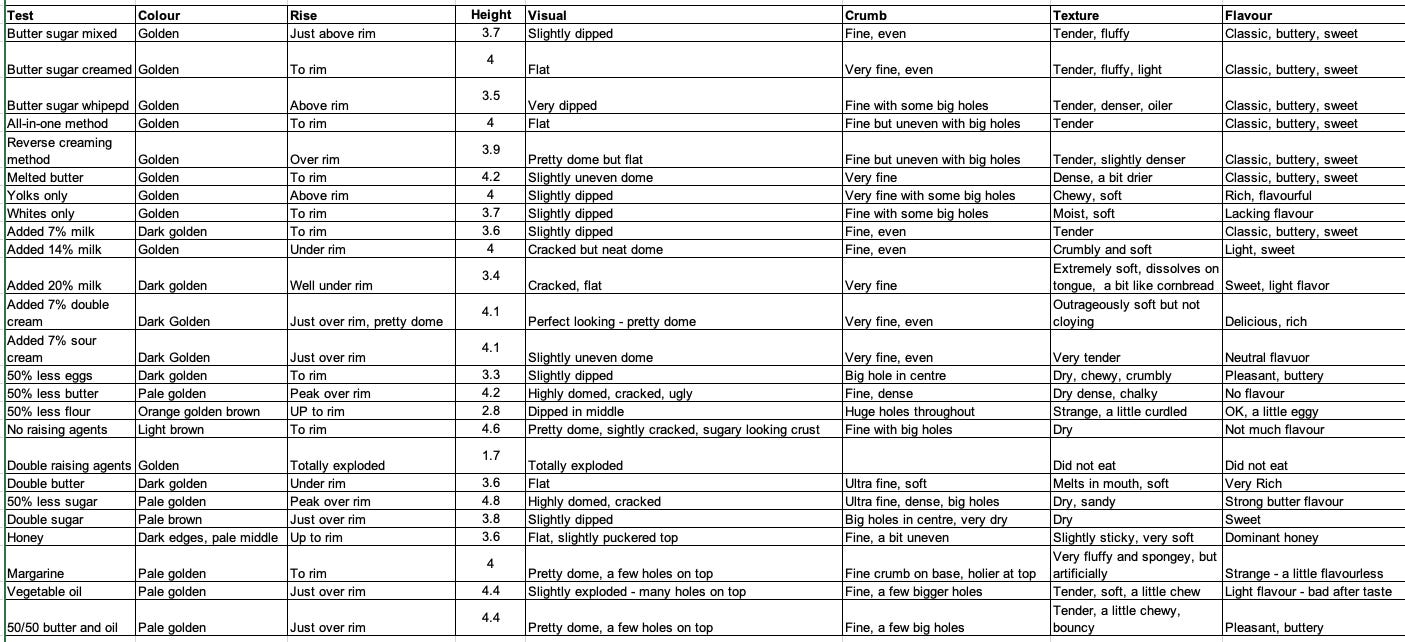
Here’s the overall matrix for the tests:
The deal with creaming
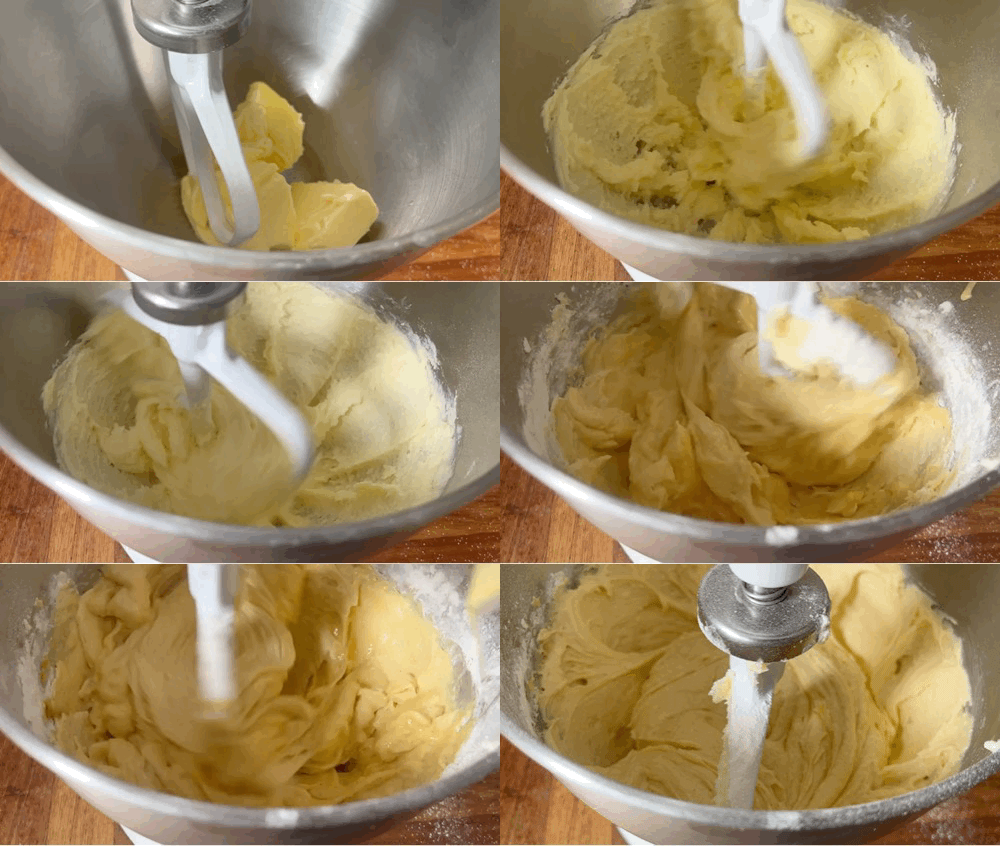
Creaming is the process of beating butter and sugar together - many cake recipes begin with this step. You've probably read about creaming before but let me fill you in: As you beat butter, air is incorporated and held in the structure, resulting in microscopic air pockets that make the butter seem lighter (in texture and colour). Sugar helps this along - jagged sugar crystals act like little stabby knives that dig into the butter, incorporating even more air. Once aerated, this mixture is stabilised by the fat molecules forming a protective layer around the air, preventing the mixture from falling in on itself. However, it is possible to take it too far - fat can only stabilise so much. If you keep whipping the butter, it will go bright white and eventually be unable to support itself, no matter how hard the fat tries.
The problem with creaming is that it looks different for everyone and will change depending on your environment. Everything makes a difference: From the warmth of your kitchen to the butter's temperature when you begin. Butter is best at holding air between 18c - 22c.
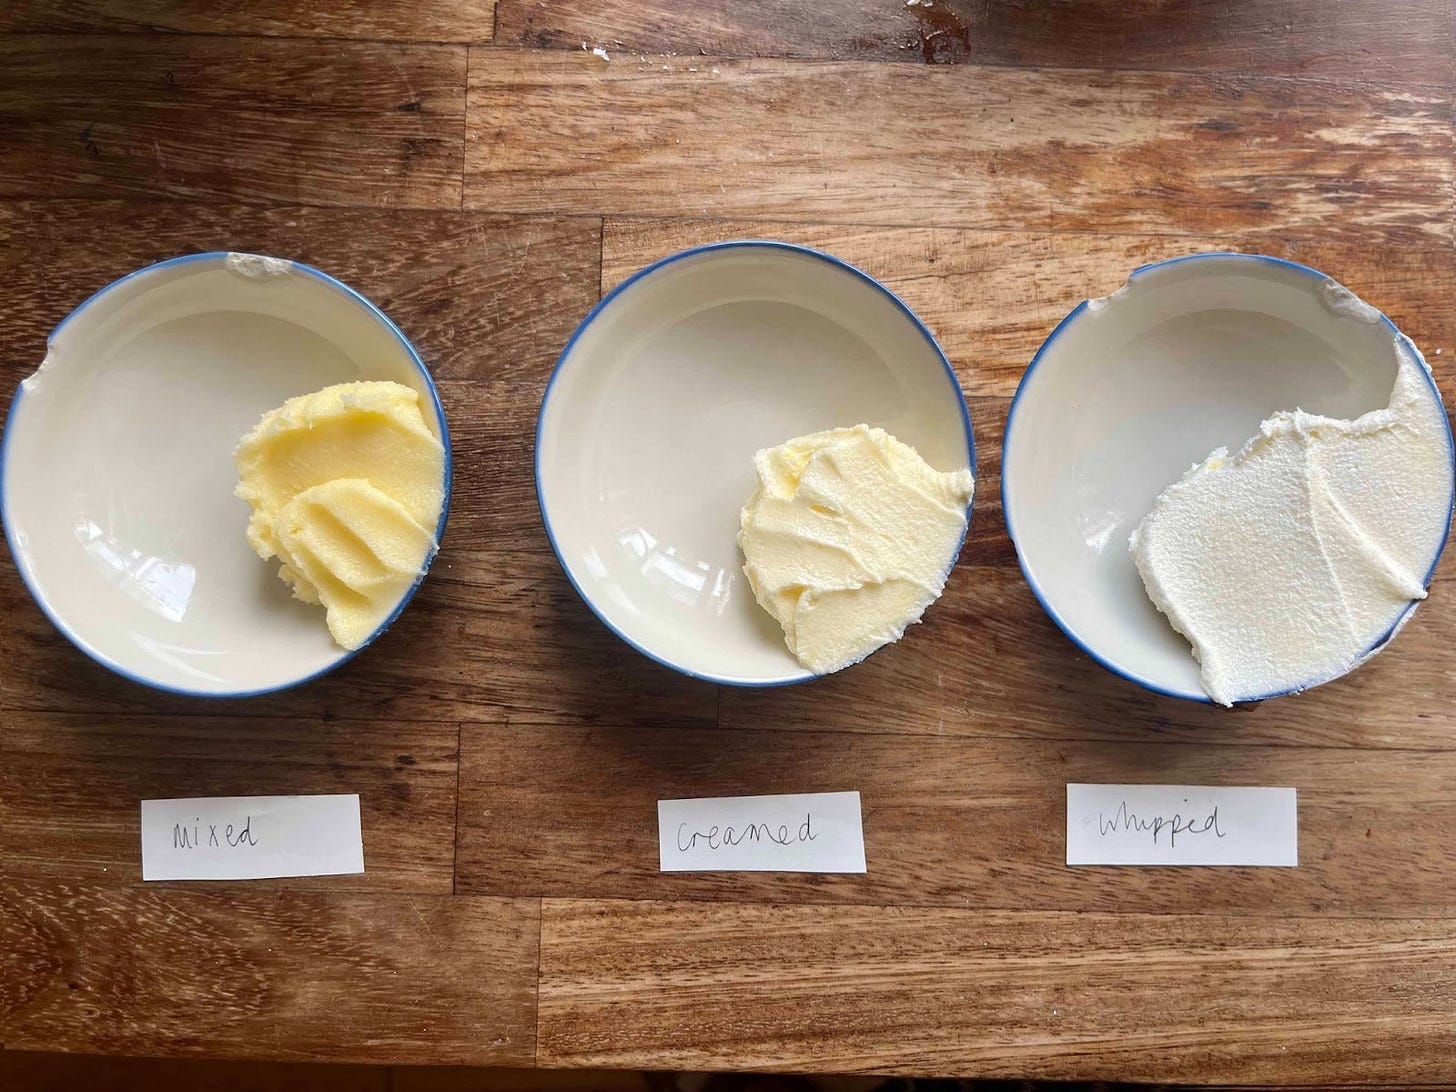
I wanted to compare the different stages of creaming and the effect on the final cake:
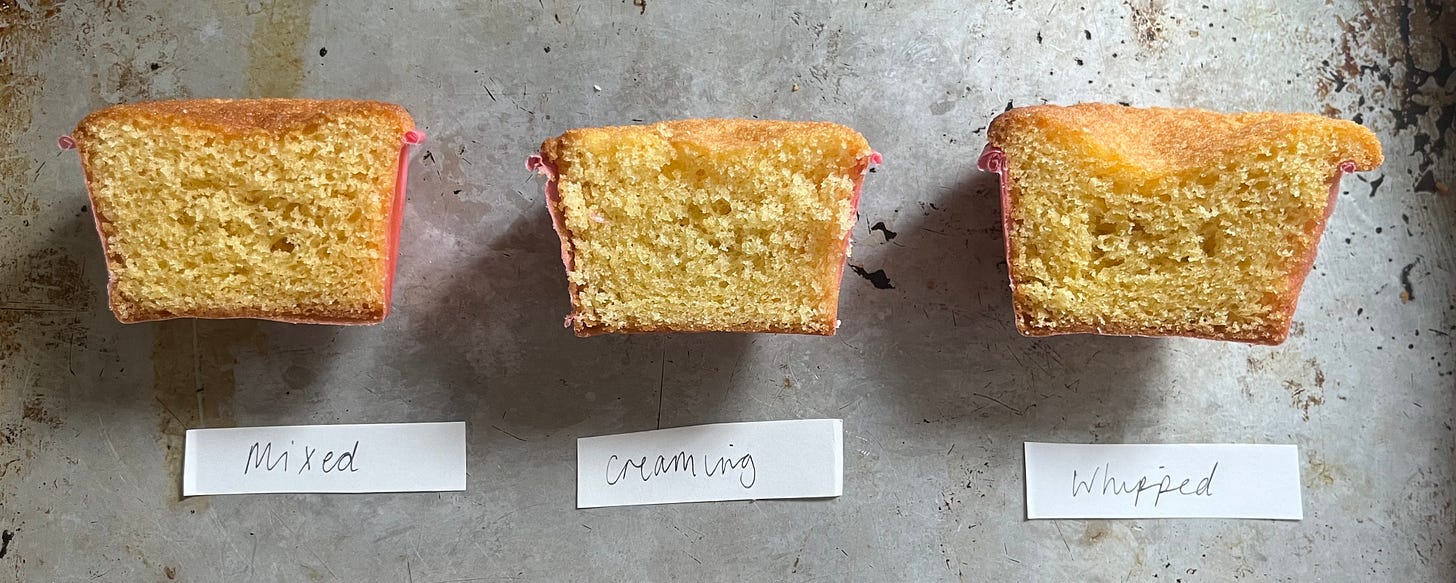
Notice how dramatically the volume increases - this is all the same weight of butter/sugar but at different stages of creaming. If you were unconvinced before, I hope this clear comparison shows you that creaming really does effectively trap air. The volume isn't so dramatic between the mixed and creamed - the colour has clearly changed, and the butter had a lighter texture. Here's how these creamed butter mixtures behaved once combined with the other ingredients:
The 'creamed' cake (middle) had a slightly more delicate crumb than the 'mixed' (left) with a lighter and comparatively more moist texture, though they were pretty similar. The whipped cake (right) fell in the centre, unable to support itself. As a result, the crumb was a bit denser and slightly oily.
Conclusion: Creaming = worth it, though you don't need to go nuts, and under-creaming is highly preferable to over-creaming.
Role of Eggs
Even without being beaten to a foam, Eggs implicitly aid leavening in your recipes - they provide hydration which turns to steam during baking - this is a primary way a cake lifts! As well as this, the proteins coagulate (harden) as they are heated and form a strong network with gluten, so they effectively 'support' themselves during a bake.
Eggs have two parts - the white and the yolk. The white is 90% water, with the rest being made up of proteins that float around doing their thing. The yolk is 50% water - the other 50% is a mixture of fat and protein. In their raw state, egg whites stay watery thanks to the bonds between proteins and water that repel each other. Thanks to the fat, which coats the proteins and helps prevent the repelling behaviour of the protein and water, egg yolks appear a bit more together, even in the raw state.
Eggs prepared with all whites, in theory, should be softer since they are higher in hydration. Yolks are a rich source of lecithin, an emulsifier that helps suspend the fat evenly throughout the batter. Let's compare:

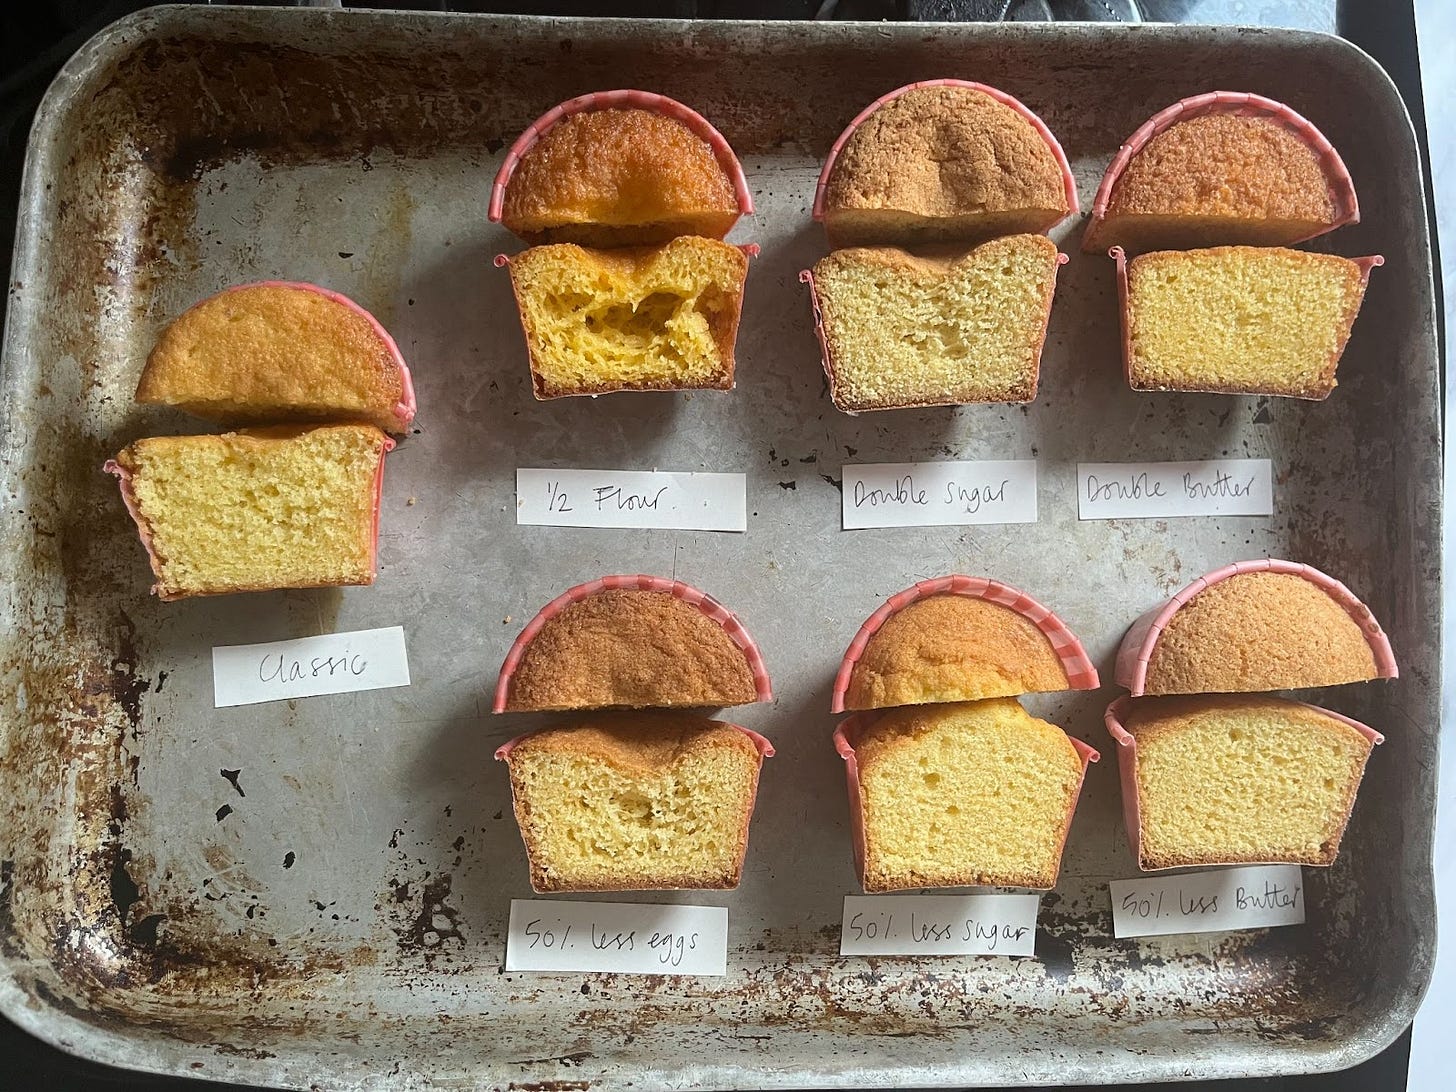
The cake made with all yolks is a bit chewier and denser, though very flavourful - the yolks also give the crumb an incredible golden hue. The egg white only cake is moist… but a bit flavourless, and the crumb is an elegant white. The cake with 50% fewer eggs was dry and crumbly and had a big hole in the middle, showing how vital eggs are for structure.
Conclusion: I love the richness of the yolks - it's worth including additional for premium texture and tenderness. Fat = good flavour and texture, so it's no surprise! If you are reducing or omitting eggs altogether, increasing the hydration and flour would be sensible to ensure you are not losing out on the hydration or structural elements.
Mixing method
At the heart of any cake recipe is the mixing method. There are three traditional methods: Creaming (as above), Reverse-creaming and the all-in-one. I also tested out incorporating melted butter, where I simply whisked the eggs and sugar into the melted fat, then folded in the flour at the end, much like an olive oil cake. Rather appealingly, the all-in-one method has you put everything into the mixer at once and hit 'go'.
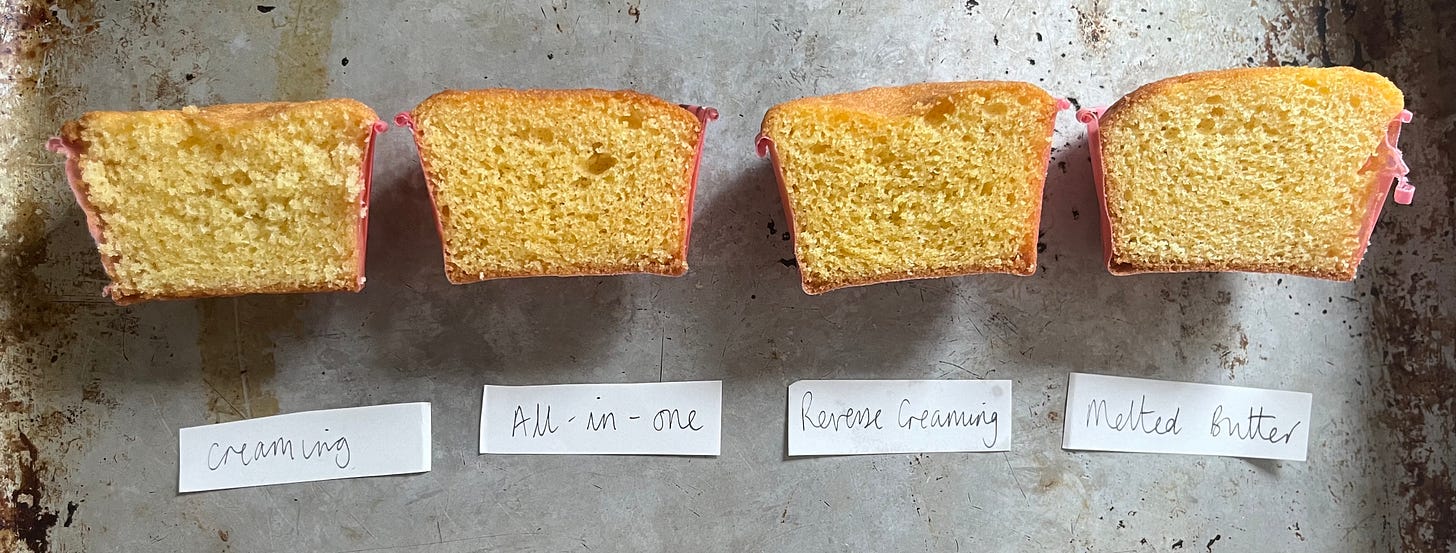
Reverse creaming, pioneered by Rose Levy Berenbaum (my queen!), involves mixing the flour, sugar and butter together into a paste before adding the wet ingredients. This technique is curious - in theory, it makes a lot of sense; the fat coats the flour, inhibiting gluten development. As well as this, the liquid is added last. Because gluten can only form in the presence of water, and since the flour is coated with butter, this should result in an ultra-tender cake. In terms of air, the butter/flour paste is creamed to incorporate air and help create structure. Let’s see these in action:
The creaming method gave me the fluffiest, lightest sponge. The all-in-one method was tender, too, but had some uneven holes. The reverse-creaming method was also acceptable but had some irregular holes - it was slightly denser, with more chew. The melted butter crumb was fine and even but dense and dry. The cakes all had similar rises, though the all-in-one and creaming had the flattest tops, whilst the reverse creaming and melted butter cakes domed slightly, though pretty.
You can also do funky things to the eggs - separating the whites, whisking, and then folding in. But I wanted to focus on simple mixing techniques this week.
Conclusion: Reverse-creaming is brilliant for a slightly denser cake, which is probably better for building layer cakes. All-in-one is easy but does leave you open for crumb irregularities. Melted butter was promising but weirdly dry and dense - the air was sorely missed. Creaming - it's there for a reason! It wins, but only by a whisker.
Role and type of Sugar
Sugar, besides sweetness, has an essential role in tenderising bakes. In fact, I like to think of sugar as a tenderiser before I think of it as a sweetener in this form. This is because sugar is hygroscopic, aka loves water! As a result, it holds onto moisture, resulting in a tender, soft crumb and keeping the water away from the flour (which, as a result, creates gluten). Introducing liquid sugar, like honey or maple syrup, also has a tenderising effect and can be added like-for-like as a substitution, bringing a significant addition of hydration.
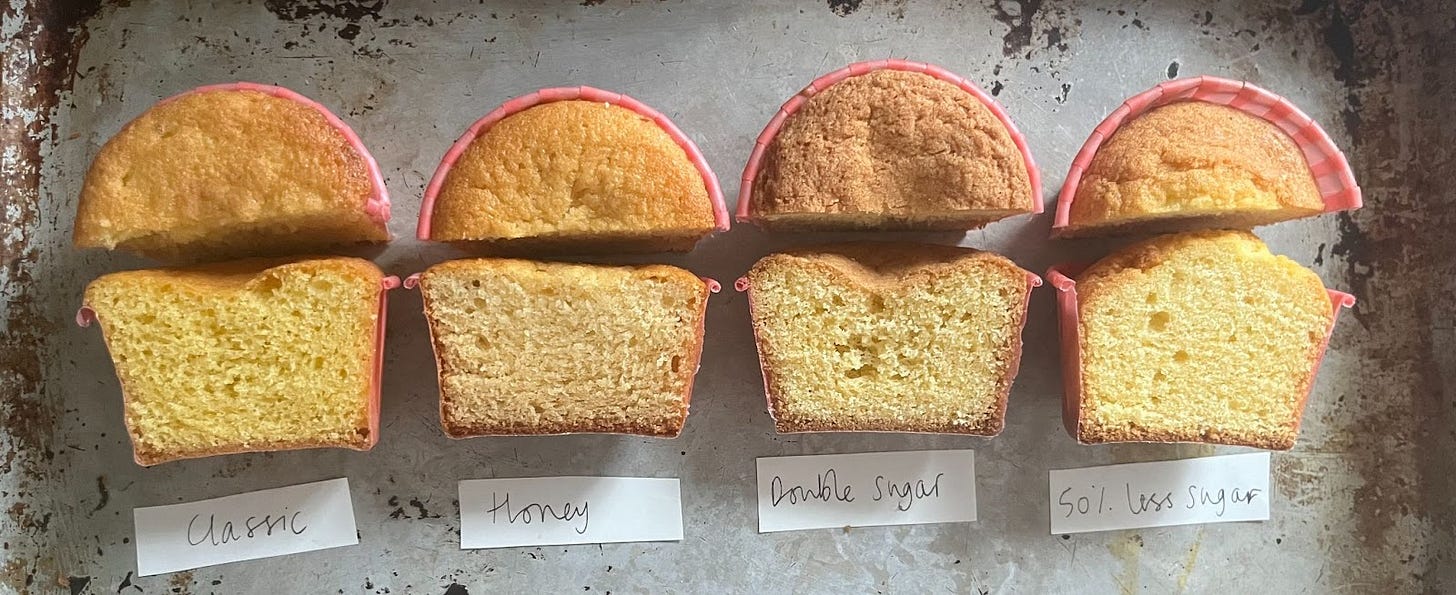
The cake with 50% less sugar was highly domed - the tallest of the cakes - and was very dense and dry. Since the sugar is not occupying the water, there is much more 'free water' available for steam, resulting in additional leavening power. As a result, more moisture is lost, resulting in a drier cake. On the other end of the spectrum, a cake made with double sugar is also extremely dry and has collapsed in the centre because too much tenderising has weakened the structure. Such a large amount of sugar also gave the cake a rusk-like, dry texture with a thick crust. The honey cake was very tender and moist with a robust flavour - to my surprise, it didn't rise more, despite having more liquid. I expect this is due to the lack of air incorporated/missing from the creaming stage.
Conclusion: Sugar is your friend! You could reduce/increase it up to 20% without causing much upset. Natural liquid sugars tend to have stronger flavours, so they may need to be added with caution, as well as noting you will not get such a high rise or fluffy crumb - it will be dense and moist.
Role of Fats
I was excited about this test - fat is where it's at! Fat is essential for tenderising cakes and is the predominant flavour. During the mixing process, fat coats the flour, which helps inhibit gluten formation in the presence of water, much like the 'rubbing in' process we know and love from pastry or biscuit making. As well as this, fat is really good at holding onto air (see 'creaming' section earlier).
Although butter is really the apex of baking fats to me, I do understand the appeal of oil cakes which tend to out-last their buttery siblings since the liquid-at-room-temp oil provides lasting moisture. As well as this, there are some die-hard margarine fans out there. Since margarine was the fat of my youth, I HAD to try it, too.

The 50/50 butter/oil had a pleasant bouncy, and airy texture. The margarine cake was fluffy and springy but strangely artificial - it tasted like a cake you would buy at a train station, one with a 5-year expiration date. It was also lacking in flavour and surprisingly un-nostalgic, though the texture WAS fun. The cake with double butter was divine - the first bite, I was worried it was dry but soon melted in the mouth - quite impressive actually, though a bit dense. The all-oil cake was pleasantly tender but relatively flavourless - it had a strange, not-nice-at-all after taste.
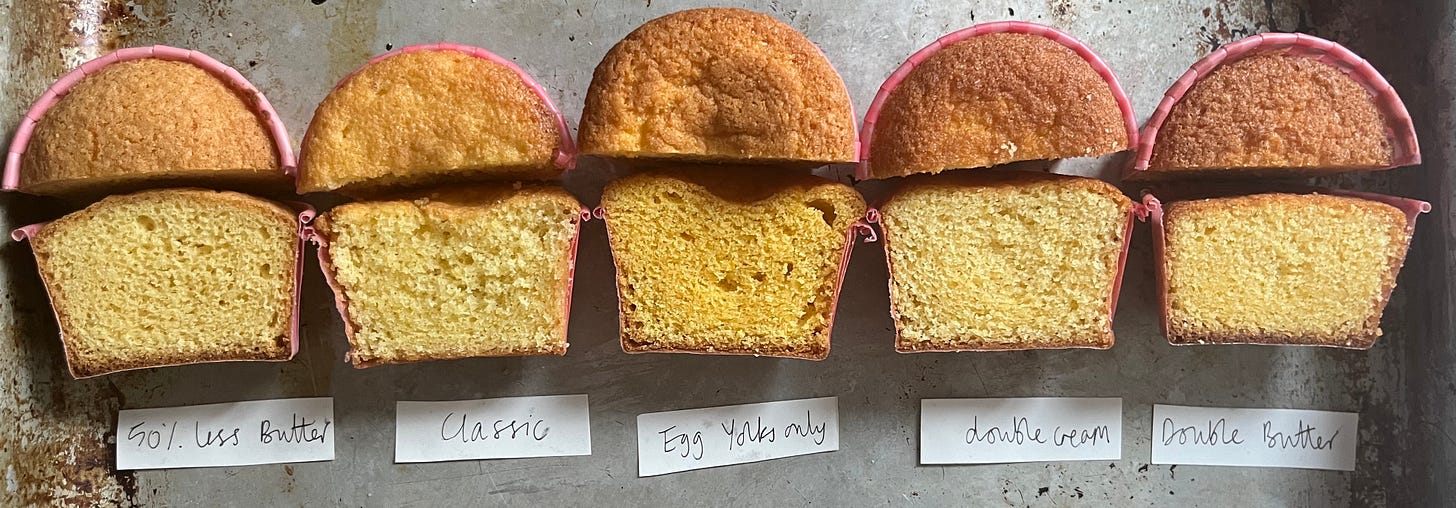
The cake with 50% less butter revealed how critical fat is - it was highly domed, owing to the relatively higher proportion of liquid. Fat is essential because it melts as we eat it, which is crucial for mouthfeel. As a result, the cake was quite chalky and lacked flavour since there is less temperature-based interaction between the cake and the mouth. Visually, the more fat, the more delicate the crumb. If the fat is solid, there is less rise; however, if fat is incorporated via a liquid (like yolks or double cream), the rise is encouraged.
I also compared the cakes from lowest to highest fat content (L-R):
Conclusion: Fat = good, but moisture = good, too. If you are reducing butter, then it's sensible to increase the fat through additional yolks or double cream, which will also help give a softer crumb. You can sub for vegetable oils or margarine, but the cake suffers. Proper butter is unmatched in flavour and texture. Butter is approximately 83% fat solids and 17% water, so although it does hydrate a bit, getting the balance between its role as a hydrating agent and an aerating/tenderising agent is an interesting problem, especially since it also delivers so much flavour.
Role of add-ins
Within the classic 1:1:1:1 structure of a pound cake, there is room for additions, and these tend to be in the form of liquid dairy - usually milk. By adding additional liquid, we are creating a more hydrated mixture that will have a more tender and fluffier crumb, as steam is made in the oven as it bakes.
This is also an excellent opportunity to add more fat and flavour - sour cream, double cream, buttermilk, yoghurt or creme fraiche are all popular options. Acidic dairy, like sour cream, adds a subtle tang that helps create balance in your cake - it calms the sweetness and helps sharpen the flavour overall. If it also has fat, then great! Mouthfeel is also improved. An element of acid may also provide a taller cake by promoting additional reactions from the raising agent and, in theory, be more tender.
Let's see how they behave:
To a point, increasing the hydration improves the spring and crumb of the cake - but the cake with 20% total milk was very flat and low. It was ultra-tender and quite wet - a bit like cornbread, in a nice way - there was something comforting about it! The cake made with double cream was a supermodel - it had the most perfect pretty dome and was tall, with a soft but firm crumb. It also had incredible shelf life - it was just as good on day 3 as it was on day 1, somehow. The cake made with sour cream was also good, but the flavour was disappointingly lacking - the acidity had balanced the flavours a little too much for me.
Conclusion: Double cream was a surprising front runner here - in its absence, a small amount (7%) of whole milk was a close second. Adding a lot of hydration without fat is not very effective for the victoria sponge - it dulls the buttery flavour and makes a wet crumb that is not unpleasant but is not suitable for this cake.
The effect of raising agents
Raising agents react either with themselves (baking powder) or acidic ingredients (baking soda) to release carbon dioxide. These bubbles get trapped within the network of the cake, making it rise and giving the cake its fluffy crumb.
Alfred Bird's 1843 baking powder was a single-acting baking powder, a combination of bicarbonate of soda and tartaric acid. As soon as these two ingredients are hydrated, they react to create carbon dioxide, and this means the reaction happens only one time.
Ten years later, in the US, scientist Eben Norton Horsford created the first double-action baking powder. This powder was a combination of ingredients that reacted initially as the ingredients were hydrated, like the single-acting baking powder, but would also react a second time when heated, releasing more carbon dioxide, hence 'double acting'.
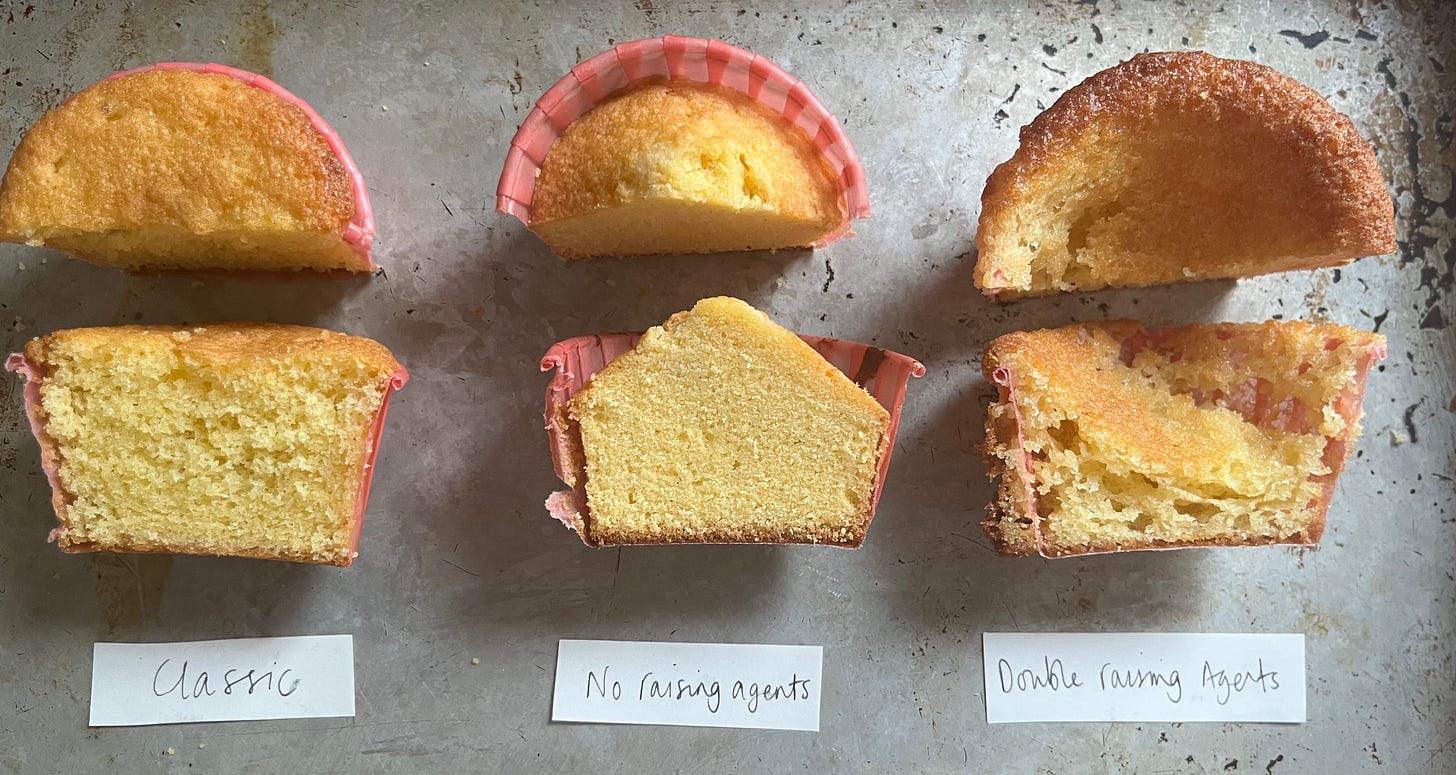
'Double acting' baking powder is the standard baking powder these days. Doves baking powder uses Mono Calcium Phosphate (acid) and Sodium Bicarbonate (base). It's worth noting here that if your mix is already acidic, then you should use a mixture of your baking powder and baking soda. Otherwise, the excess acids from the baking powder will leave an unpleasant, soapy taste. This is why recipes with acidic ingredients may use a mixture of bicarb and baking powder. Here we can see the raising agents in action:
As you can see, a properly balanced recipe has a light, fluffy crumb with a flat top. The cake with no raising agents is exceptionally dense - a cake doesn't *need* raising agents to rise since the rise comes implicitly from the air trapped in the cake during the mixing process and steam. However, a raising agent-free cake resulted in a dense, dry texture - the ratios of the ingredients are all out of whack! The cake with double raising agents was explosive - it busted right out of its case - the reaction happened more significantly and more quickly than the flour and egg proteins had time to set!
Conclusion: Scale the recipe carefully. For my final recipe, I have used a 7% baking powder to flour ratio. Harold McGee describes cake as "a web of flour, eggs, sugar and butter that readily disintegrates in the mouth and fills it with easeful flavour" - the essential word to focus on here is 'web'! You're in trouble if there's not enough 'stuff' to capture the air.
The role of flour
The role of flour is often interesting and changeable. We most associate flour with gluten - the sticky, stretchy mesh of proteins created when flour meets water - but flour is often used in recipes where we don't need elasticity, stretchiness or anything that we associate with gluten. So, what is the role of flour in cakes then?
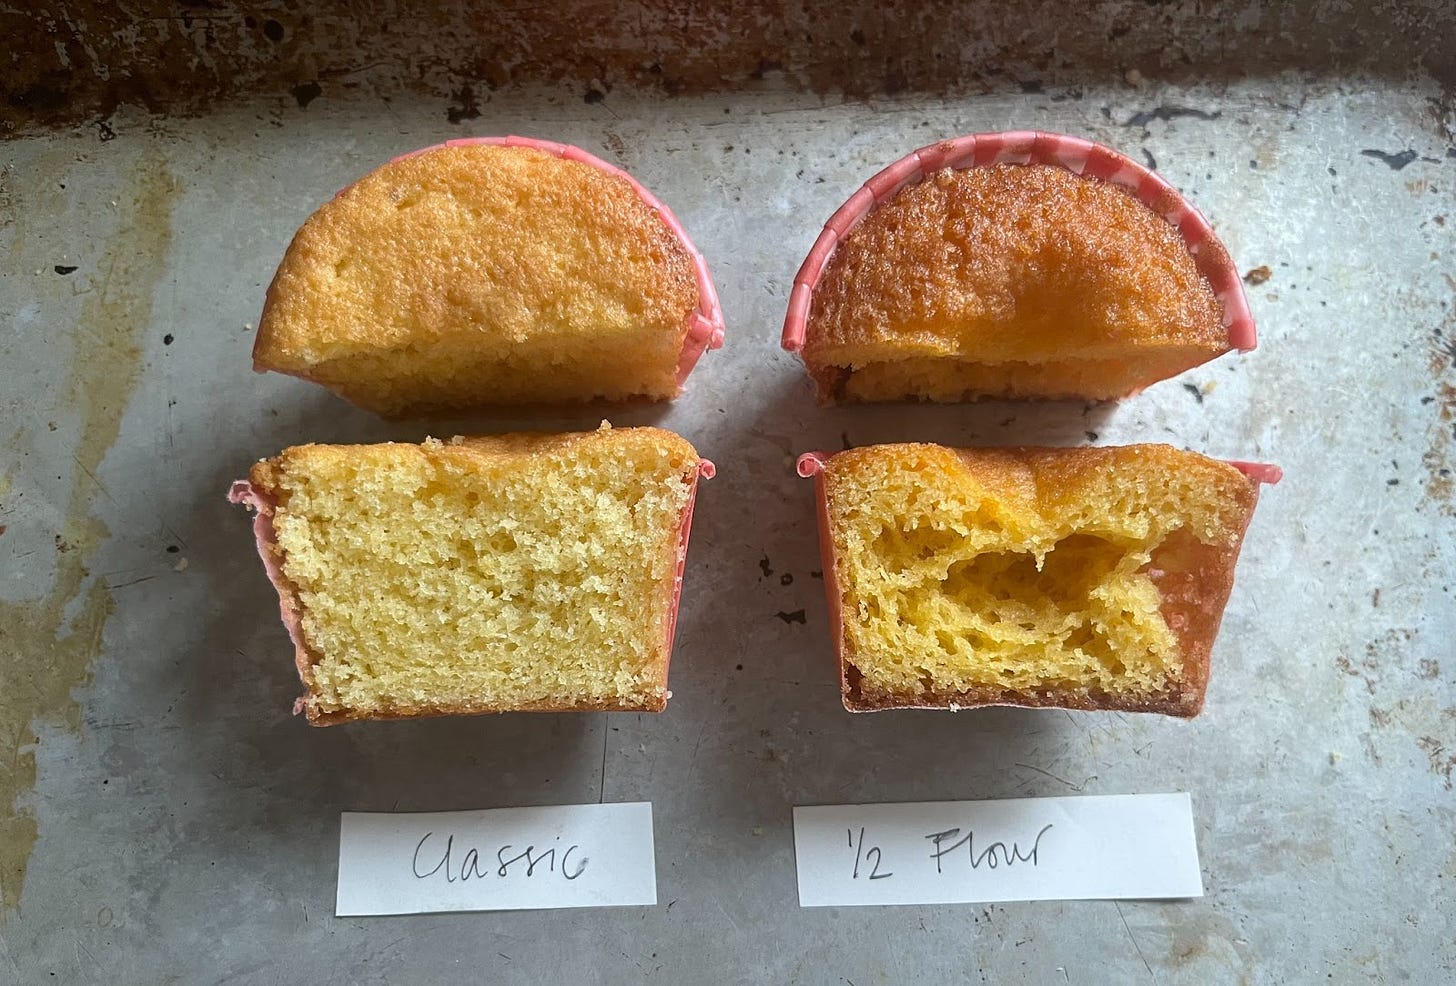
I like to think of flour as a bulking ingredient for cake. Although we can't help gluten from being formed - it will happen as soon as flour comes into contact with water - we don't want to encourage it. We need there to be enough structure for the cake to actually take form and for there to be enough of a protein mesh to capture the air bubbles as they expand in the oven, giving a cake its final texture. As you can see below, drastically reducing the flour is not a good idea:
As the air from the creamed butter expanded and the raising agent reacted, there was simply not enough of a web to capture it, resulting in a drastically holey cake. I did try it - it was a bit eggy but not totally unpleasant. Overall a little strange and not advisable without replacing with another bulker, like ground nuts. I did look into replacing a portion of the flour with cornflour to reduce the gluten-forming ability of the starch, but I actually liked a bit of bite from my pound cake, so I ditched this idea! I do use a mixture of cornflour and flour in my genoise sponge recipe. Click here to read it.
Ingredient ratios head to head
(what less or more of each ingredient does)
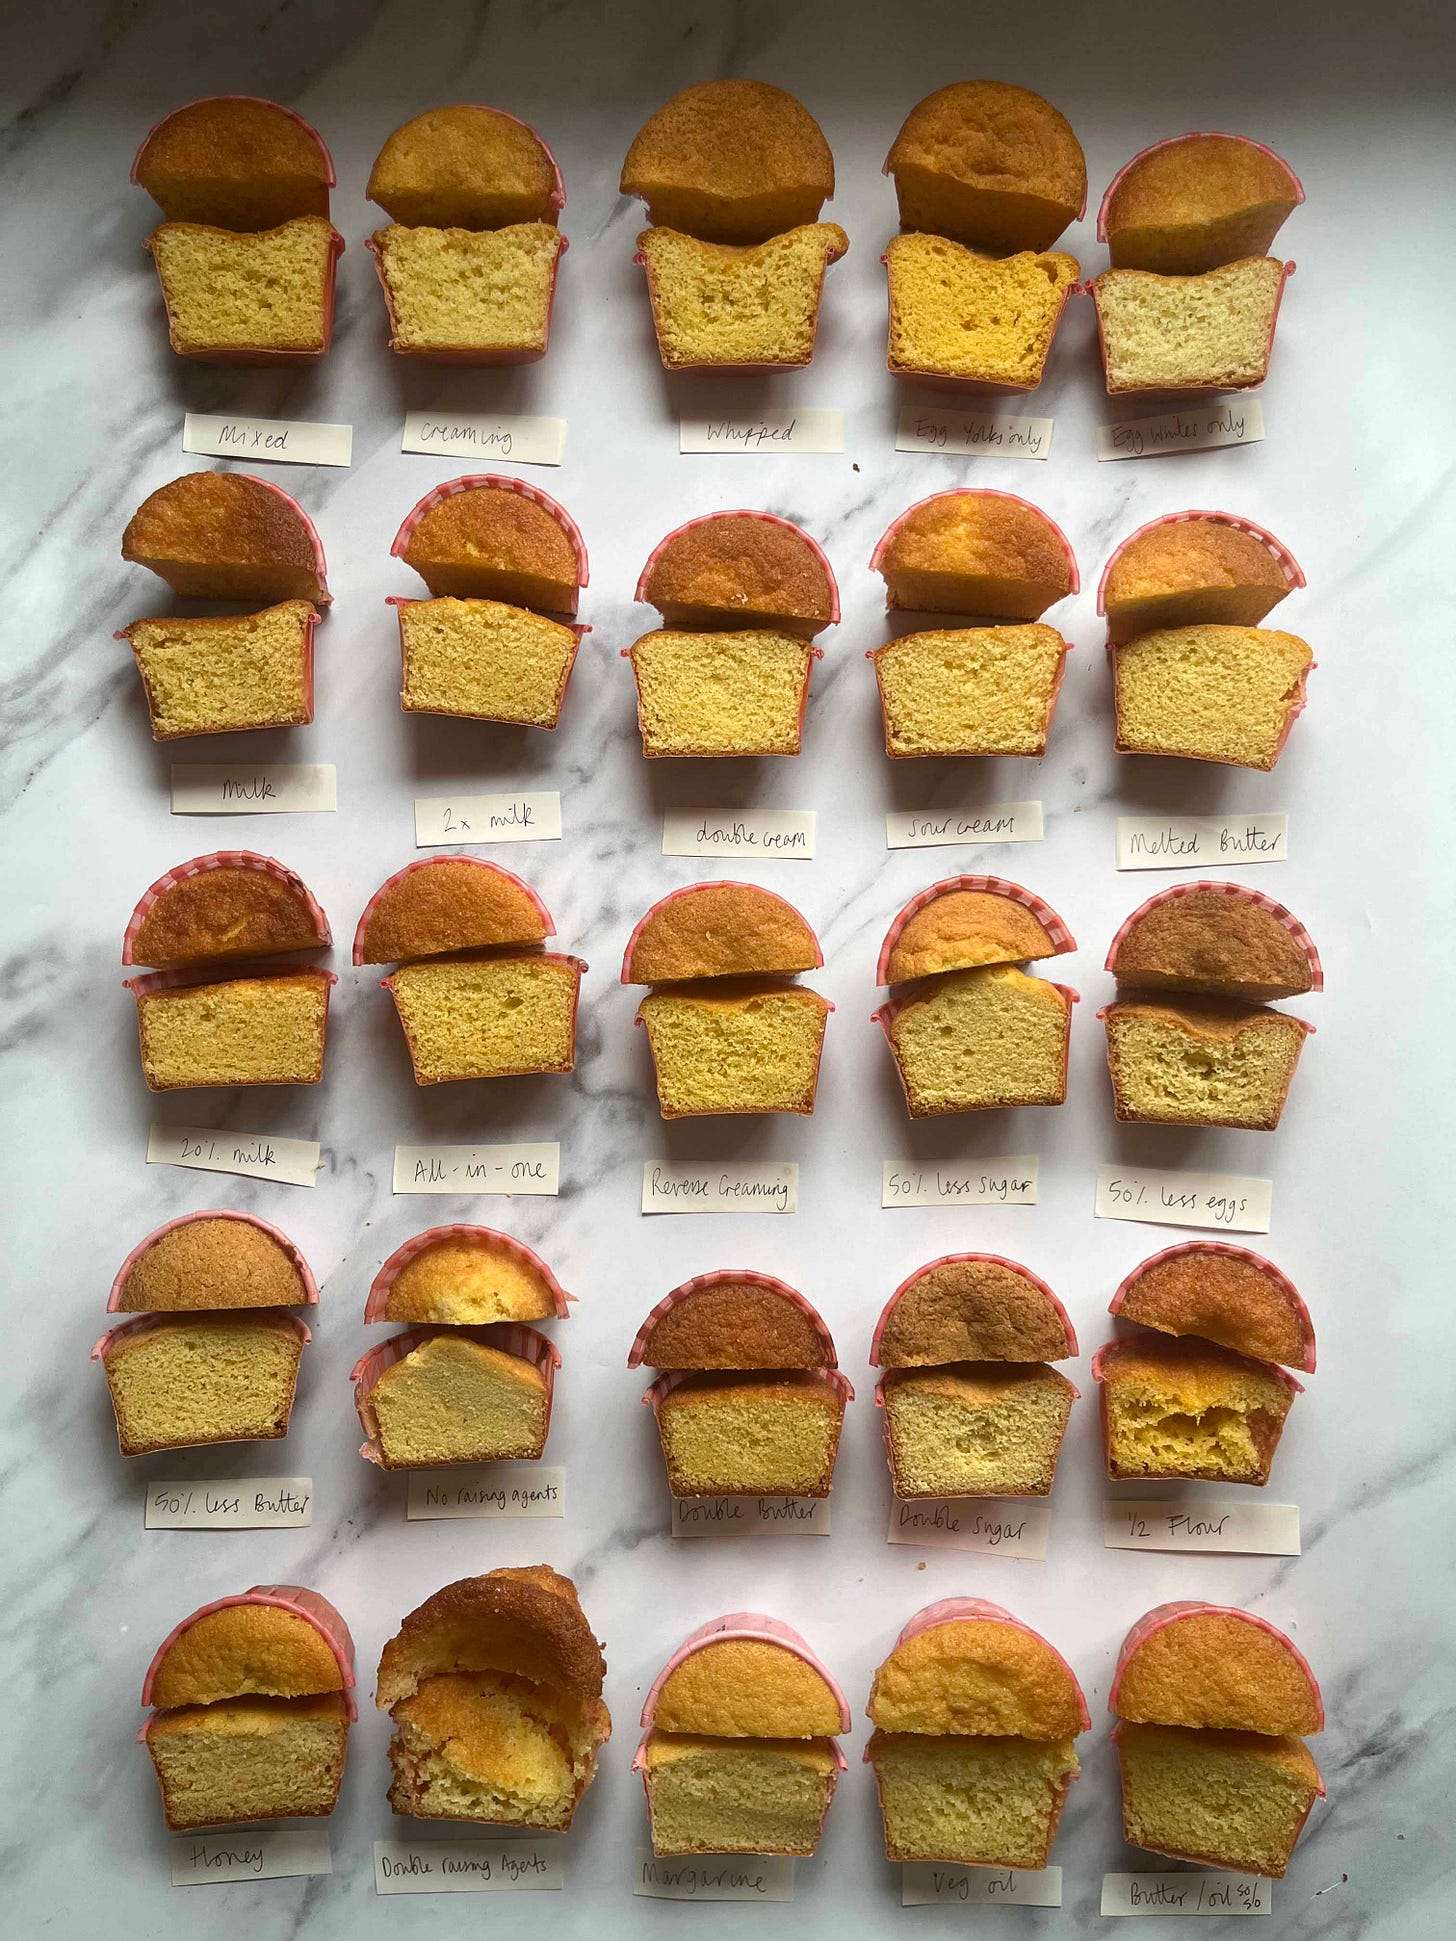
For the final visual comparison, I lined up all of the cakes with altered ratios:
As you can see, the crumb, browning and texture radically change as we deviate from the classic. From collapsing to rising, fine crumbs to wild crumbs, the way we marry ingredients together really matters. Other than the ½ flour, none of these cakes were inedible - they could all have been doused in cream or filled with jam, and you probably would have enjoyed them. But it's interesting to track cause and effect. And I'm still dreaming about that double butter one.
Overview (TLDR)
After all the tests, my broad observations are as follows:
More fat, whether in the form of cream, yolks or butter, gives you a finer crumb and slightly less rise
Higher hydration/oil = longer shelf life - the cake I made with double cream was really soft, even 5 days after baking
More sugar results in a thicker crust - low sugar cakes are less tender, but very sugary cakes are also dry. Going too dramatically in either direction is bad.
Adding milk or more liquid makes the cake taller and more tender, though if you add too much liquid, it has the opposite effect. More hydration = more water which converts to steam, implicitly helping the cake rise. However, too much hydration will result in a very tender but very flat, low cake since there is not enough structure to capture the steam.
Even without being beaten to a foam, Eggs implicitly aid leavening - they provide hydration. As well as this, the proteins coagulate (harden) as they are heated and form a strong network with gluten, so they effectively 'support' themselves during a bake.
Liquid fat, whether in the form of melted butter or oil, resulted in a higher rise. This deviated from my expectation. I have struggled to find any resources on this. Still, I wonder if it is to do with the mobile liquid fat keeping the hardening gluten network more elastic and flexible for longer, allowing for more significant rises.
Putting it into practice
So, how to use all this data to build my ultimate Victoria sponge? The tests showed me that the defining factors for a great crumb are 1) fat, 2) sugar and 3) hydration. To build the recipe, I started by noting down all the stand-out cakes and then breaking down the proportion of fat, sugar and hydration.
Classic (23% fat, 23% hydration, 23% sugar)
Double butter (35% fat, 20% hydration, 20% sugar)
Addition of Double Cream (25% fat, 24% hydration, 23% sugar)
20% milk (20% fat, 30% hydration, 21% sugar)
Yolks only (24% fat, 24% hydration, 21% sugar)
I love the flavour of the fatter cakes - those with lots of fat or liquid - but don't want to lose out on the fluffiness. The higher fat cakes are appealing but flat; A way to counteract this is to use yolks to our advantage. Not only do the emulsifying properties of the yolks help disperse fat well through the cake, but they also help with the rise. As well as this, I couldn't give up the double cream, it just tasted too good!
My final formulation doesn't deviate significantly from the classic 1:1:1:1, but we do change where the fat and hydration are coming from, to delicious effect, with a final breakdown of 23% fat, 26% hydration, 23% sugar
Rather than the fat from the butter only, I increased the egg yolks and added double cream. The additional egg yolks help with mouthfeel (see above), whilst the double cream helps keep things moist in texture. Reducing the butterfat allows the other flavours, like the milkiness of the double cream, to come through, providing a wonderfully rich and tender backdrop for your cream and jam.
I think I have the best of both worlds for the mixing method. I cream the butter and sugar and then add the liquid and flour alternately. There is a high proportion of liquid to butter which can end up in curdling, but don't stress! I wrote about the issue (or lack thereof) of curdling here. I admit, it's not pretty, but its bark is worse than its bite.
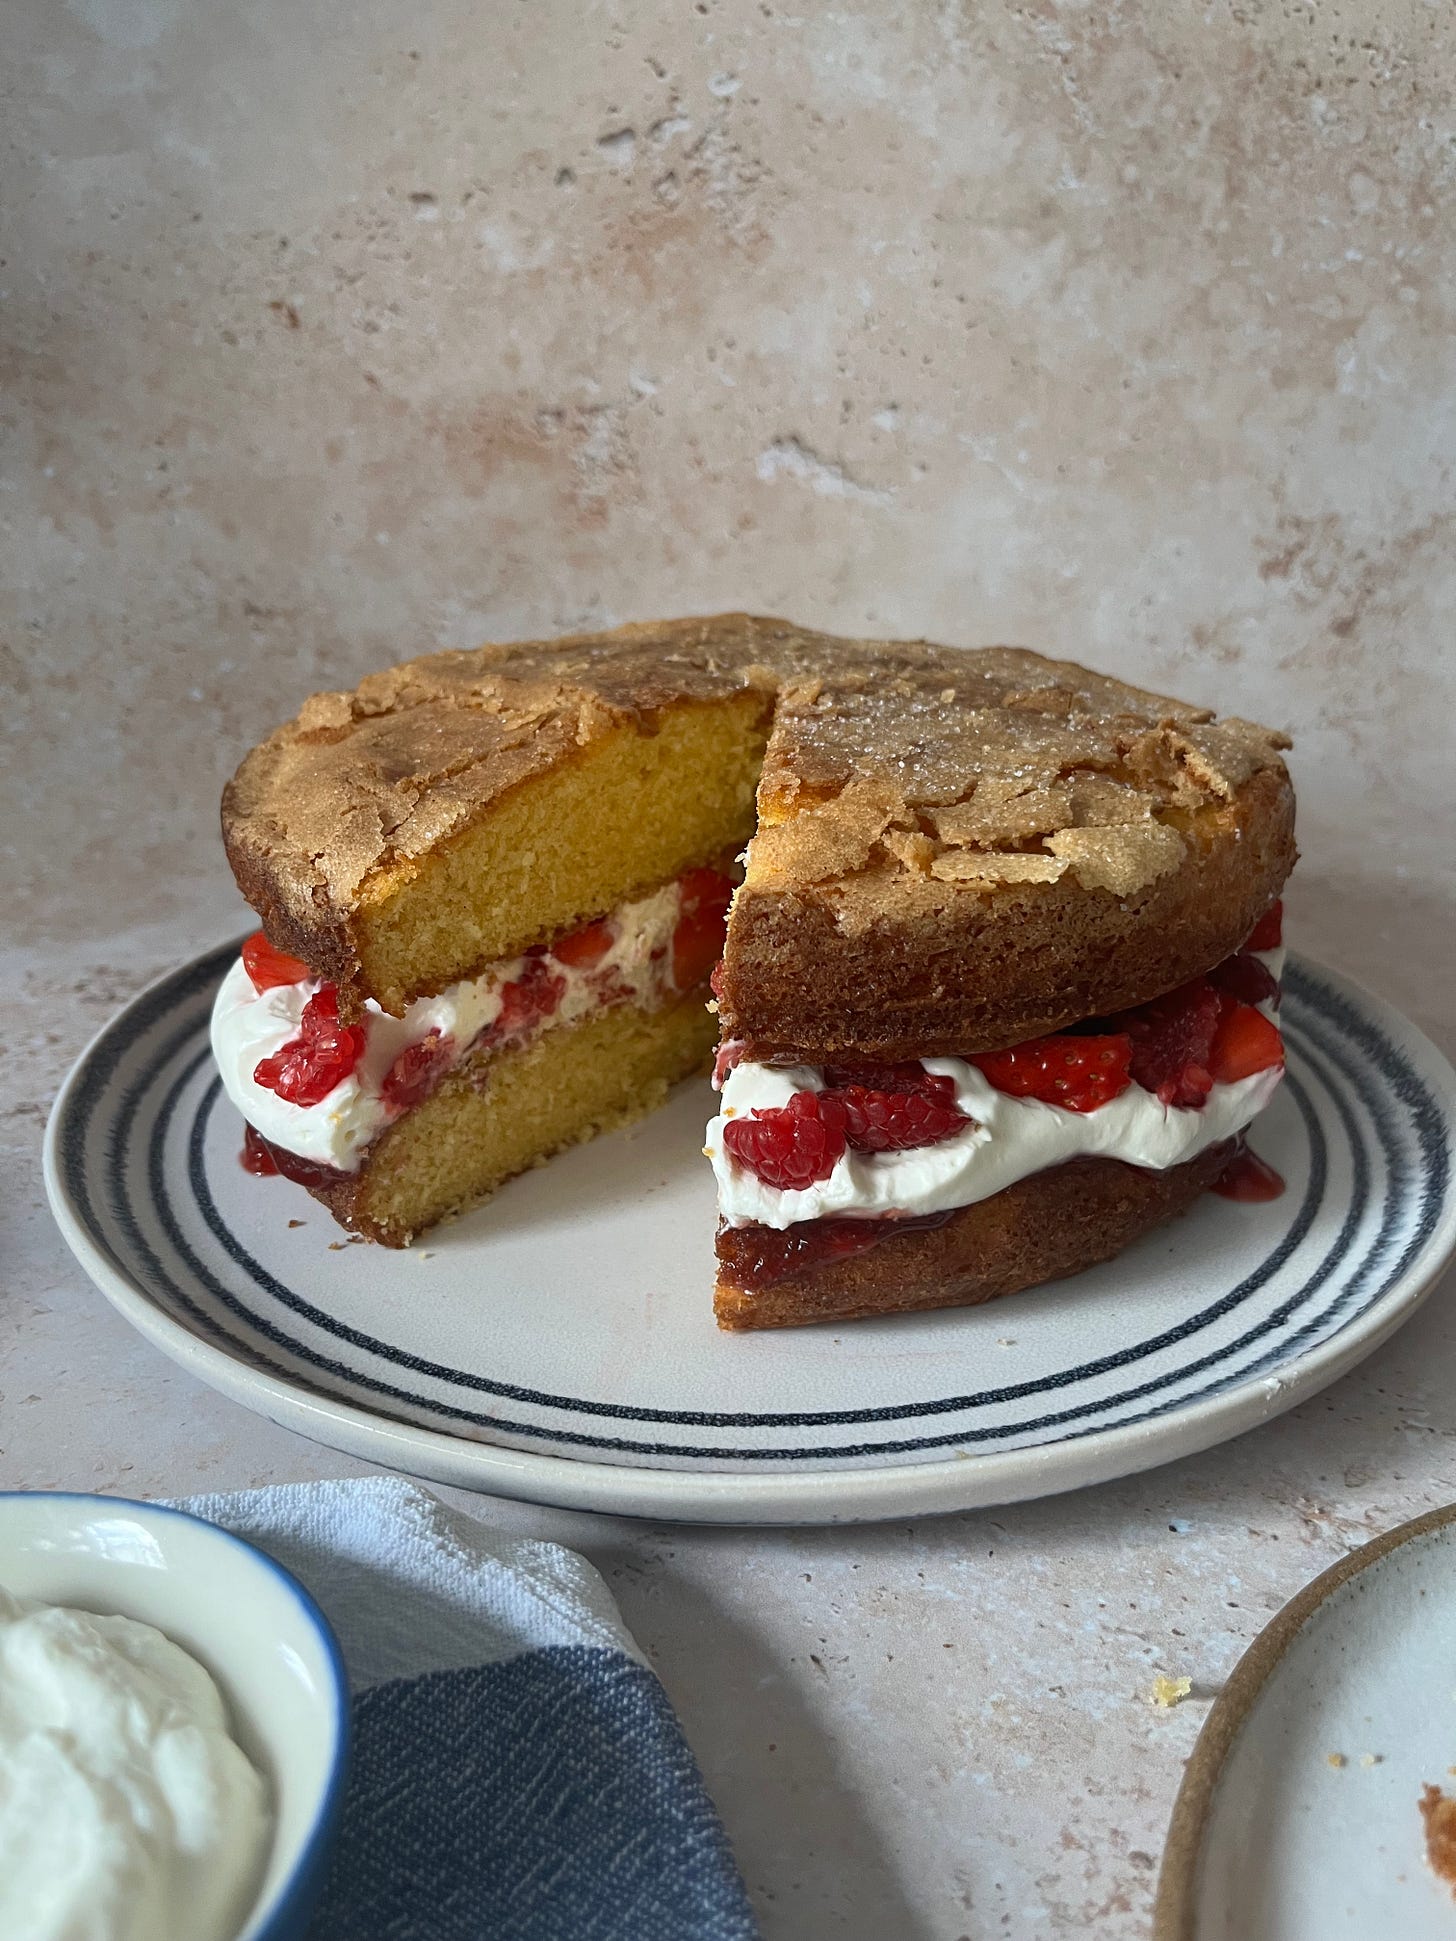
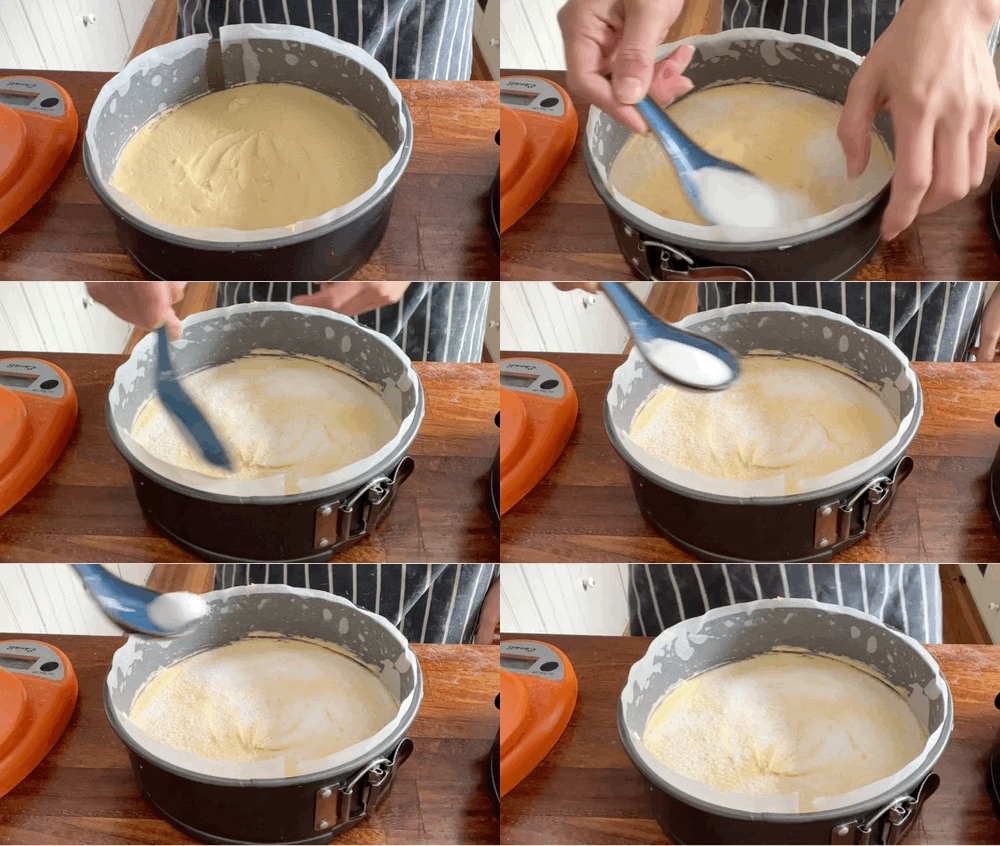
For the final touches, I am partial to a crispy sugar top - the victoria sponge is a marvel in its simplicity, so this is a fun way to top the cake with a bit of flair. The filling, I'm afraid, is non-negotiable: It HAS to be jam, fresh cream, and fresh berries. Icing sugar dusting is up to you. For me, the decor is strictly rustic - splurging cream is so inviting.
Right, let's make it!
Ultimate Victoria Sponge
Makes 1 x 8 inch Victoria Sponge
If you have sandwich tins, you will get better-shaped cakes as the edges are at a perpendicular angle. The cakes will be around 1.25 inches after baking.
Cake - ingredients
200g unsalted butter, soft (20c is great!)
5g Maldon salt
245g caster sugar
245g plain flour
17g baking powder (around 4 tsp)
160g whole eggs (about 3)
35g egg yolks (about 2)
65g double cream
90g whole milk
1-2 tsp vanilla extract
PLUS 25g granulated sugar for a crispy top
Filling - ingredients
200g double cream
40g creme fraiche (optional)
20g whole milk to prevent curdling
optional: 15g-20g sugar
Plus
100g strawberry jam - Camilla Wynne’s recipe here
Strawberries and raspberries to deco
Method - cake
Pre-heat the oven to 170c fan and line 2 x 8inch tins. Set aside.
Cream the soft butter with salt and sugar for 2 minutes on medium speed using a kitchen aid. This is enough for the butter and sugar to aerate slightly and become a little paler, but not so much that it is whipped. It is better to err on the side of caution.
Mix together cream, whole eggs, yolks, vanilla extract, double cream and milk. Set aside
Sift together plain flour and baking powder. Set aside
Starting with the liquid, alternate adding the liquid and dries, in around three batches, scraping down as necessary.
Divide the mixture between the two tins, around 475g-500g per cake. Sprinkle one cake with 25g granulated sugar
Bake for 25 minutes, then check if the sponge is golden and bouncy, and pulling away from the sides slightly. Bake for additional 5 minutes if seems underbaked
Leave to cool completely.
Method - filling
Whip cream with creme fraiche, if using, milk and caster sugar, if using, to very soft peaks, set aside
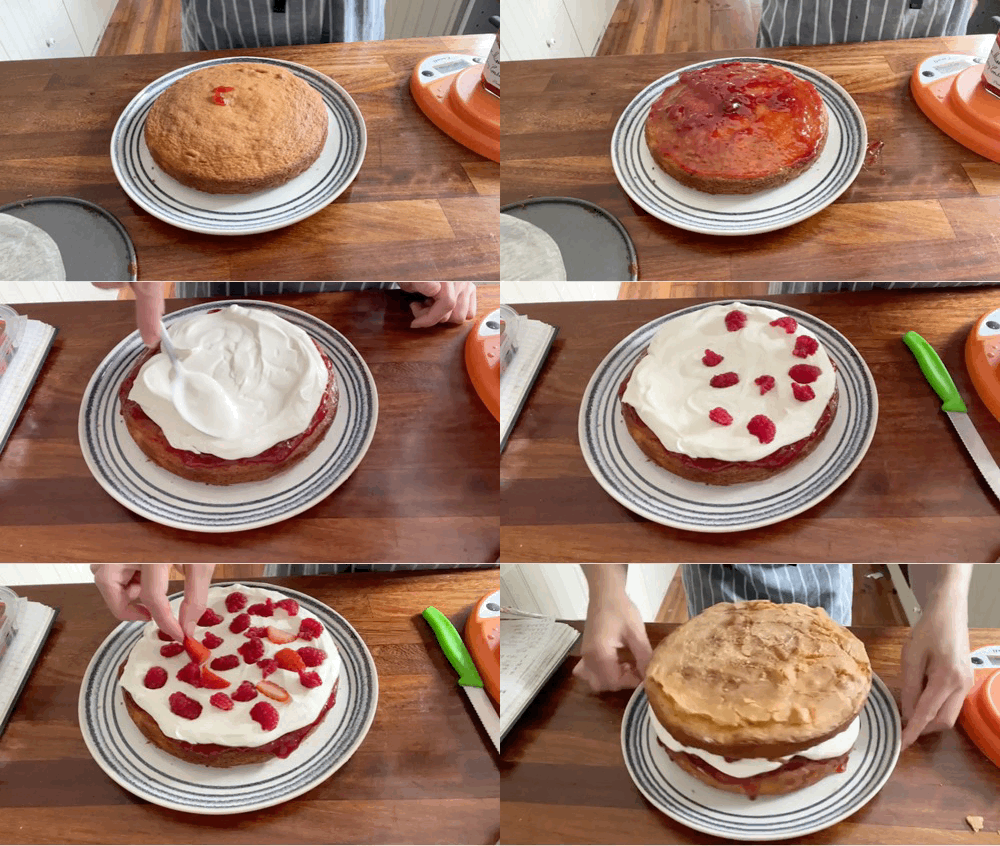
On the plain sponge, spread jam all over the base
Spoon cream and spread to the edges with the back of a spoon - leave a 1-inch border if you don't want it to splurge too much! Cover with berries
As a splurging insurance policy, you can pop your cake in the fridge or freezer to firm up the cream a bit
Place the sugared sponge on top. Sprinkle with icing sugar if desired
ENJOY! Keeps in the fridge for 3 days
Thanks for reading! This newsletter is a reader-supported publication. The best way to support my work is to become a paid subscriber and help keep Sunday’s free for everyone.



I’M SO EXCITED ABOUT THIS - an elderly family friend recently gave me some of her duck’s eggs and asked for a duck egg cake, and I’ve been waiting for your vicky sponge recipe to come out so I can make it for her! (I will update you with results 😊)
Just made this today and I am SOLD! I was never a fan of a Victoria sponge as whenever I made it, I found it quite boring and dry, but this is such a great recipe! My cake turned out just like your pictures. Taste 10/10.