Hello,
Welcome to today’s edition of Kitchen Projects. It’s so wonderful to see you here and I’m so happy to be back on our Sunday schedule!
I’m so excited to be sharing a deep-dive into one of my favourite baked goods ever… the bagel! These are SO fun to make at home and getting to get one fresh out the oven is an experience I want for everyone. Do it, do it!!!
Over on KP+, I’m sharing a springtime take on the bagel with a batch of ultra vibrant wild garlic bagels. Kitchen Projects+ aka KP+, is the level-up version of this newsletter. It only costs £5 per month and your support makes this newsletter possible! By becoming a member of KP+, you directly support the writing and research that goes into the weekly newsletter as well as get access to lots of extra content, recipes and giveaways, including access to the entire archive. I really hope to see you there:
Love,
Nicola
A hole lotta love
I am SO thrilled about today’s recipe. Bagels have the impressive quality of 1) being deceptively simple to make and 2) always making people happy. After an Easter filled with sweet treats, I’ve had a week of intense over-correction in the form of bagels, the fat ‘n’ round dough balls that everyone has a soft spot for. I don’t think I’ve ever met someone who doesn’t like bagels, what’s not to love? I mean, we are biologically programmed to love round things so is it any surprise we eat over 400 million per year in the UK?
Although I’m sure I’ll be hard pressed to find someone who doesn’t have first hand experience of bagels, here’s a little overview: Bagels are golden rounds of yeasted dough that are first boiled and then baked to provide that typical chewy & firm texture. The bagel origin story is a little bit foggy, but they can be traced as far back as the 14th century according to Maria Balinksa, the author of “The Bagel” as I found in this article. However they are closely associated with the Ashkenazi jews of 17th century Poland where they were widely consumed. Since then, they have become synonymous with Jewish food culture in Western cities - namely New York City which is often seen as a spiritual home for bagels. (Honourable shout out / mention to Montreal, who has its own sensational take on bagels, a sweeter, smaller type of bagel!)
There are lots of arguments about who makes the best bagels and why, but I think we can all agree on one thing - bagels are best FRESH! We’ll go into details about why this is, but I always think of the Seinfeld episode “The Strike” where Kramer returns to his job at the bagel shop and brings home day-old bagels to the dismay of Jerry & George; “The homeless guys won’t even touch them”. (S9,E10!)
And that is why I’m excited for us to go on this bagel making journey. For a long time I always thought bagels were firmly in the ‘hard’ recipes camp, but having made quite a few batches this week I’m really pleased with how straightforward and satisfying the process is. There are quite a lot of factors you can play around with - and we will go through ALL of them, and I mean all of them, but I found the bagels to actually behave really well under even the most hostile of circumstances.
What hostile circumstances? Well full disclosure - my fridge really packed up this week. Ah the joys of living in a rented home… Although it isn’t completely busted, I am worried that the internal temperature isn’t totally representative of a normal fridge so my cold-proofing tests come with a caveat that my fridge wasn’t as cold as it should be. Though I had to tragically throw away quite a lot of dairy, the not-cold-fridge situation did afford me the opportunity to test out how severely overproofed and wobbly bagels fare through the boil and bake and the answer is? Pretty darn well. Basically, bagels are pretty robust.
Over on KP+, I’ll be sharing the recipe for the v. Springtimey wild garlic bagels. Flavouring your dough is quite a fun adventure, so I hope I’ll see you there. Click here for the recipe.
Ingredients & what makes bagels special.
Bagels are minimalists - the ingredients are simply high gluten flour, water, salt and a little sugar. The dough tends to be very stiff and the sugar is usually in the form of malt syrup, helping with the traditional flavour notes. But if you don’t have malt syrup *please don’t shoot me bagel purists* you can use dark brown sugar as an approximation. One of my favourite things about bread is how similar all of the formulations are - it’s the technique, shaping and final cooking method that determines the final characteristics. For bagels, it’s the unique boil followed by bake that provides the signature chew. If you bake the bagel dough without boiling you just get a pretty unattractive bun, with the hole totally closed up.
Why? Well its all down to starch gelatinsation, one of our favourite topics! We’ve covered starch gelatinisation in terms of milk bread with the tangzhong, and also with choux pastry, but once proofed, the bagels are dropped into a pan of boiling water. As the dough hits the water, rapid gelatinisation of the outer crust of the bagel occurs. The gelatinisation of the starch occurs above 65c - during this process, the starch present in your dough swells, absorbing water and binding the starch molecules. As a result, a supple crust is formed; It is still a little bit flexible, but it does ‘set’ the shape of the bagel and reduces outward expansion during the bake which results in the dense chewy middle. So delicious!
So what happens to the yeast? Well, yeast begins to die around 50c but is completely destroyed around 60c, so when the dough enters the water, you get some expansion as the rise in temperature encourages rapid fermentation and release of CO2 at the same time as the crust setting. Since the boiling stage is fairly short, the heat doesn’t fully penetrate the middle of the bagels which means there is still a little yeast power available. I temped the bagels post boil and the internal temp was around 43c meaning not *all* of our yeast colonies die, so the shape of the bagels will ‘even out’ a little bit during the final bake, though the bagels will not increase significantly in size.
Let’s run through the DNA of bagels and start looking at the variables. There is an element of ‘choose your own adventure’ when it comes to bagels. I’m here to be your guide
Hydration
I know I’ve just said that the thing that makes bagels bagels is the boil n bake. Which is true… BUT (oh is there always a but?!), the low hydration contributes to the density, too. In theory, any dough could be ‘bageled’, that is, boiled to gelatinise the crust and then baked resulting in a chewy outside edge. Last year, Sam Kamienko of the brilliant Kamienkos Bagels (follow him!) and I spent a lot of time discussing courage bagels, an LA based bagel shop that makes quite ‘different’ bagels - holey, airy, wild. We ran a few tests and reported back and found that we could replicate this type of bagel by increasing the hydration quite a lot. Today’s recipe is around 50% hydration, but for a holier/wilder crumb you may want to increase to almost 70%, more in line with pizza dough.
The deal with yeast
Bagels have relatively low yeast. You can pretty much tell how much yeast a recipe is going to have based on the end shape of the bread - a super tall lofty bloomer has a lot more yeast than a flatbread, for example. But as we’ve discussed before in the focaccia recipe, this isn’t entirely accurate. A very small amount of commercial yeast - which is kind of like the SAS of yeasts, highly trained and specialised at what it does - can raise a large quantity of dough. But it needs TIME.
Most modern recipes favour speed and irrespective of the final product, recipes are generally developed so that only an hour or two of rising (aka waiting) is required.
Even pizza recipes (which clearly don’t need as much rising power as a white tin loaf) rarely deviate from the standard 7g to 500g ratio and simply cut the second rise short. You could comfortably slash the yeast weight in half without any ill effects - unless you count waiting around as an ill effect, of course.
I worked on recipes with yeast as low as 0.25%, but for home baking and for the sake of personal sanity, I finally decided on 1%. This is enough yeast to give us plenty of oomph for same-day bagel making and low enough not to go absolutely mental if you decided on a slower, longer proof. If you use higher yeast quantities, you may end up with bagels that burst during the bake/boil, so better to employ a bit of zen.
Overnight proofing / cold proofing
I know there are definitely eyes rolling/interest waning as soon as I start talking about leaving something overnight in the fridge, so I will start this section by saying you can make very decent bagels without this step, but I’m still going to try and convince you.
I’m sure at this point you’re well aware of the benefits of cold proofing - it really pays off in the flavour department. To understand this, we have to remember that yeast is a fungi and loves a warm environment and that temperature is really the only real thing that speeds up fermentation. Useful as it is if you’re in a rush to get the bread filled with CO2, it doesn’t favour flavour. Cold fermentation will slow the yeast activity right down which is a good thing, because when the yeast isn’t going absolutely nuts digesting sugar and producing CO2, it is really helpful in a flavour creating process called the… wait for it… Alpha Amylase Reaction.
I know, it’s not a catchy name. But you don’t need to know it by name. You just need to know that it’s an action where complex starches are further broken down into sugars and flavours are made. This reaction does happen if you just leave flour and water on its own, but yeast - when under control in a cold environment - can provide some useful enzyme action to coax those flavours out, and provide new dimensions for your bread.
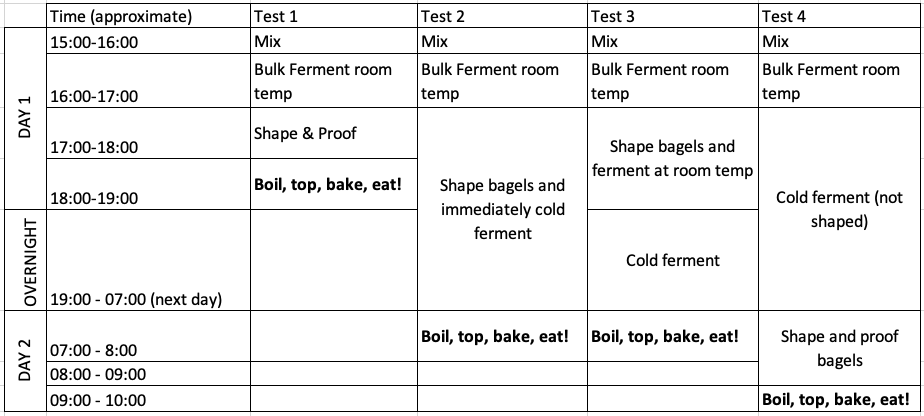
So, we stan cold proofing and we know we need to leave it for about 12-24 hours, but at what stage, and does it matter? I tested out a few options to show you the differences. Here’s the schedules with approximate timings:
Aaand… the results:
The flavour of the cold fermented doughs was, predictably, more complex and delicious. You can see the crumb pattern is slightly more diverse as a result of the longer fermentation. For test 3, which was fermented at room temp in shape and then cold, I was worried - it looked quite overproofed by the time I got it in the morning, but it actually held its shape well. Shape wise, test #4 was the tallest/most bountiful looking but the crumb is slightly less ‘open’. Logistically, for the cold ferment, I found test #2 and #3 to be slightly more annoying than #4 owing to the fact you have to make space in the fridge for a tray, rather than just keeping the dough in one big ball and dividing in the morning. Test #1, which was the direct dough, was pretty delicious though a bit less complex.
Overall, the most important contributing factor to how delicious the bagel was definitely the freshness! There was very little difference in behaviour during boil, bake and eating between tests #2,#3 and #4. The crumb for #2 and #3 was slightly arier (up to you if you think that’s a good thing for bagels!), however, I found #4 to be slightly nicer visually, though this process does take the longest owing to the longer proof from shaping cold dough.
Judging proof & proof times
Judging proof is always one of the hardest things about making bread. Visual cues are always the best - seeing that the bagel has visibly grown and is puffy - but if you’re worried about it, you can always see if your bagels float. This is a test that I used to use for a quick sense test on if a pre-ferment or poolish is ‘ready’ (ish) as a dough or mixture that floats in water suggests a proportion of gas is present/trapped, which is a strong indication of fermentation:
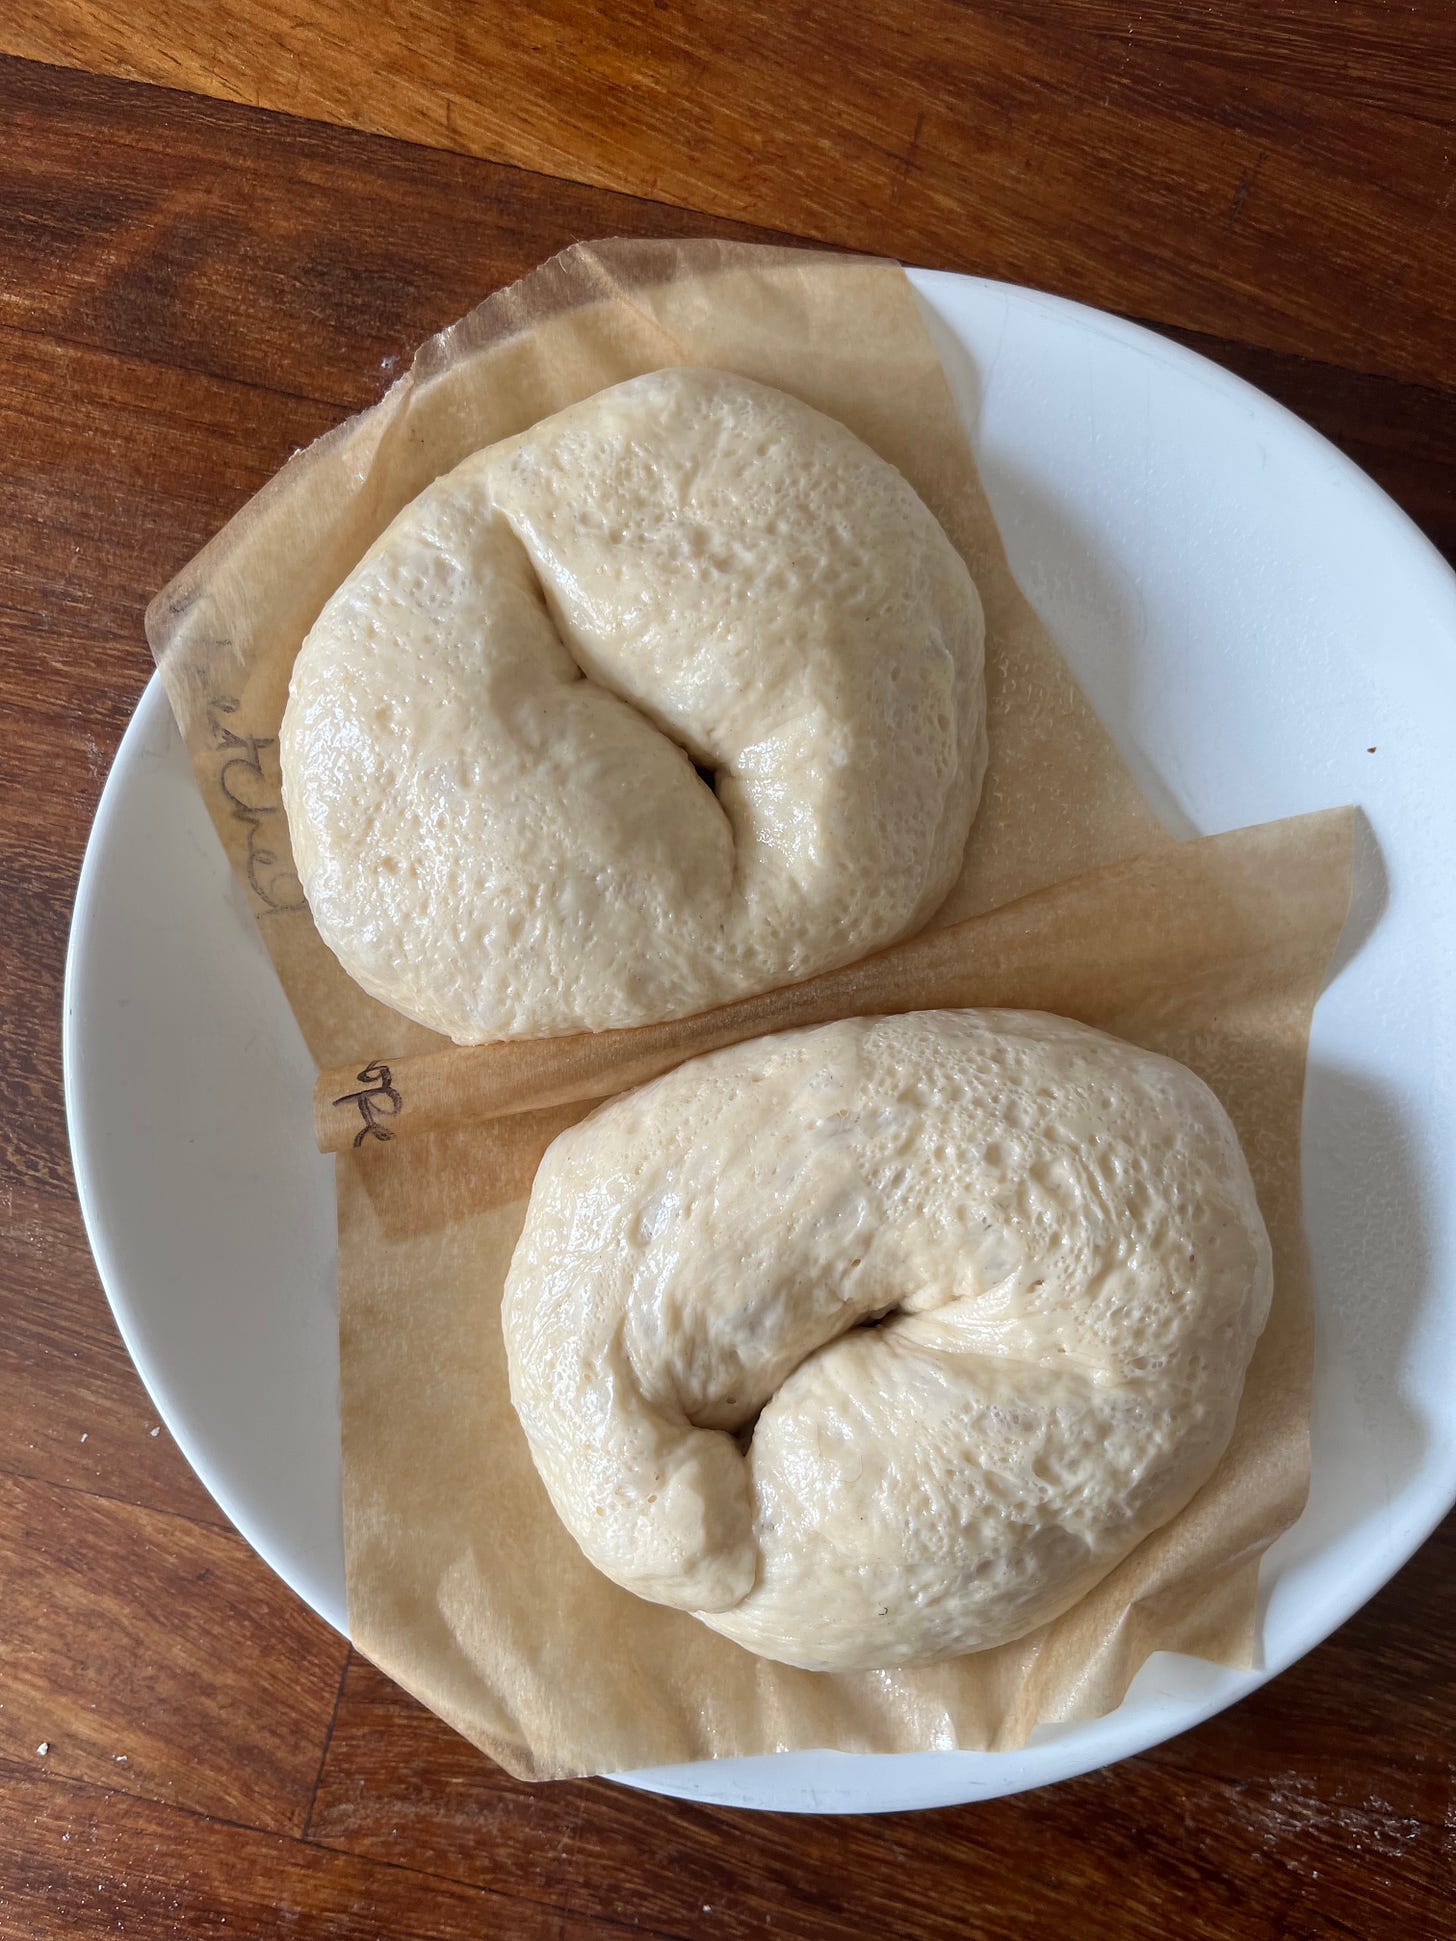
Here’s a visual guide, using the wild garlic bagels available on KP+, of the bagel journey from shaping to proof to boil to bake:
I found that the size from fully proofed to fully baked isn’t that extreme - it is more round and puffier, the hole always closes up a bit depending on the shaping method - but most of the growth happens during the final proof and boil, which I think is also a factor in the dense texture.
In terms of timings, a direct bagel dough (ie. no cold proofing) will take around an hour to proof at room temp, since the dough is already active. Bagels (tests #2 and #3) that have been proofed overnight in the cold can be boiled straight from the fridge, though out of habit I generally take them out whilst the oven is pre-heating. Bagels that have been shaped from cold-proofed dough took around 1.5-2 hours at room temp to be ready to bake.
To cover or not to cover
I have an absolute tome of a bread book called Modernist Bread - it is a giant, six volume epic with over 2500 pages that weighs about 20kg. Going against EVERYTHING I’ve read in other bagel recipes, Modernist Bread suggests leaving the bagels uncovered during the cold proof so a skin forms which, apparently, helps create a crackly and thin crust. I tested this out (pics above) and you can see the busted crust and skin. The bagels that formed a skin had a slightly smoother appearance but otherwise were not discernible, in my opinion, from the others. You can see it in the top right hand corner of the pic below.
Boil baby boil!
One of the most significant, if not the most significant, parts of the bagel making process is the pre-bake boil. Weve covered why this is important, but there are a few different factors at play here to get the typical bagel crust. Firstly, one area that no one seems to agree on is how long to boil the bagels for. Some recipes suggest 20-30 seconds per side is enough, whilst others go all the way up to 2 minutes per side. So what’s the right answer? I tested it out.
I found the results to be much less significant than expected. The bagels with the longer boil time meant there was more time for the heat and water to more deeply penetrate the dough, thus increasing the amount of starch gelatinisation. As a result, they were a little chewier, which I thought was great! Some articles had warned about overdoing in the boiling stage, even bagels that had been bathed for almost 5 minutes were fine and baked up well and weren’t ‘inedibly chewy’ like some recipes suggest. I found that between 1 minute - 1minute 30 gave me the best results:

Deflation and what to do
You will notice that the bagels ‘settle’ a little once they come of out the water but do not deflate dramatically. If your bagels deflate dramatically, it’s probably more due to poor handling of the dough rather than errors in overproofing. Even my really overproofed dough baked up okay, so gentle handling of the dough is key. Many recipes suggest placing your shaped bagels onto trays with cornmeal to stop them from sticking. I think this is an ok solution, but it’s quite messy for an at home set up, so I personally prefer to cut squares of greaseproof paper and spray with a little oil like I would do for doughnuts. I think this means you can safely transport and move the bagels around without fear of puncturing the dough. The squares are also endlessly reusable!
The lye factor
When reading about boiled-then-baked goods, the subject of lye comes up a lot. Lye is also known as caustic soda aka Sodium Hydroxide and has a pH of 14, very alkali, which also makes it quite dangerous to use. Much like a strong acid, strong alkalis can cause burns. So what’s its role in cooking?!
An alkaline solution is anything with a pH of 9 and above. pH, by the way, means the ‘potential for hydrogen’, which basically (no pun intended) means is in the market for hydrogen. It’s this difference in hydrogen that you get a reaction between something low pH, an acid, and something high pH, an alkaline aka baking soda. In an acid-base reaction, there is an exchange of hydrogen ions and CO2 is a by-product aka our leavening friend! However, we aren’t thinking about baking soda for its leavening today, rather we are considering it’s involvement in browning.
Baking soda is an alkali. It has a pH of 9. I don’t fancy messing around with Lye, plus I use it so irregularly it would seem silly to buy it, so baking soda can be used as a safe alternative, though its effects are less potent. By now you are quite used to hearing about the maillard reaction - this is the chemical reaction between proteins (amino acids present in gluten) and sugar that takes place in the heat. When an alkaline solution gets involved, the amino acid chains are broken down into separate proteins and the maillard reaction is accelerated resulting in deeper browning and the alkali is neutralised. That’s why you get such an inimitable and unique crust on pretzels and bagels (Pretzels tend to use a stronger solution hence the much darker crust).
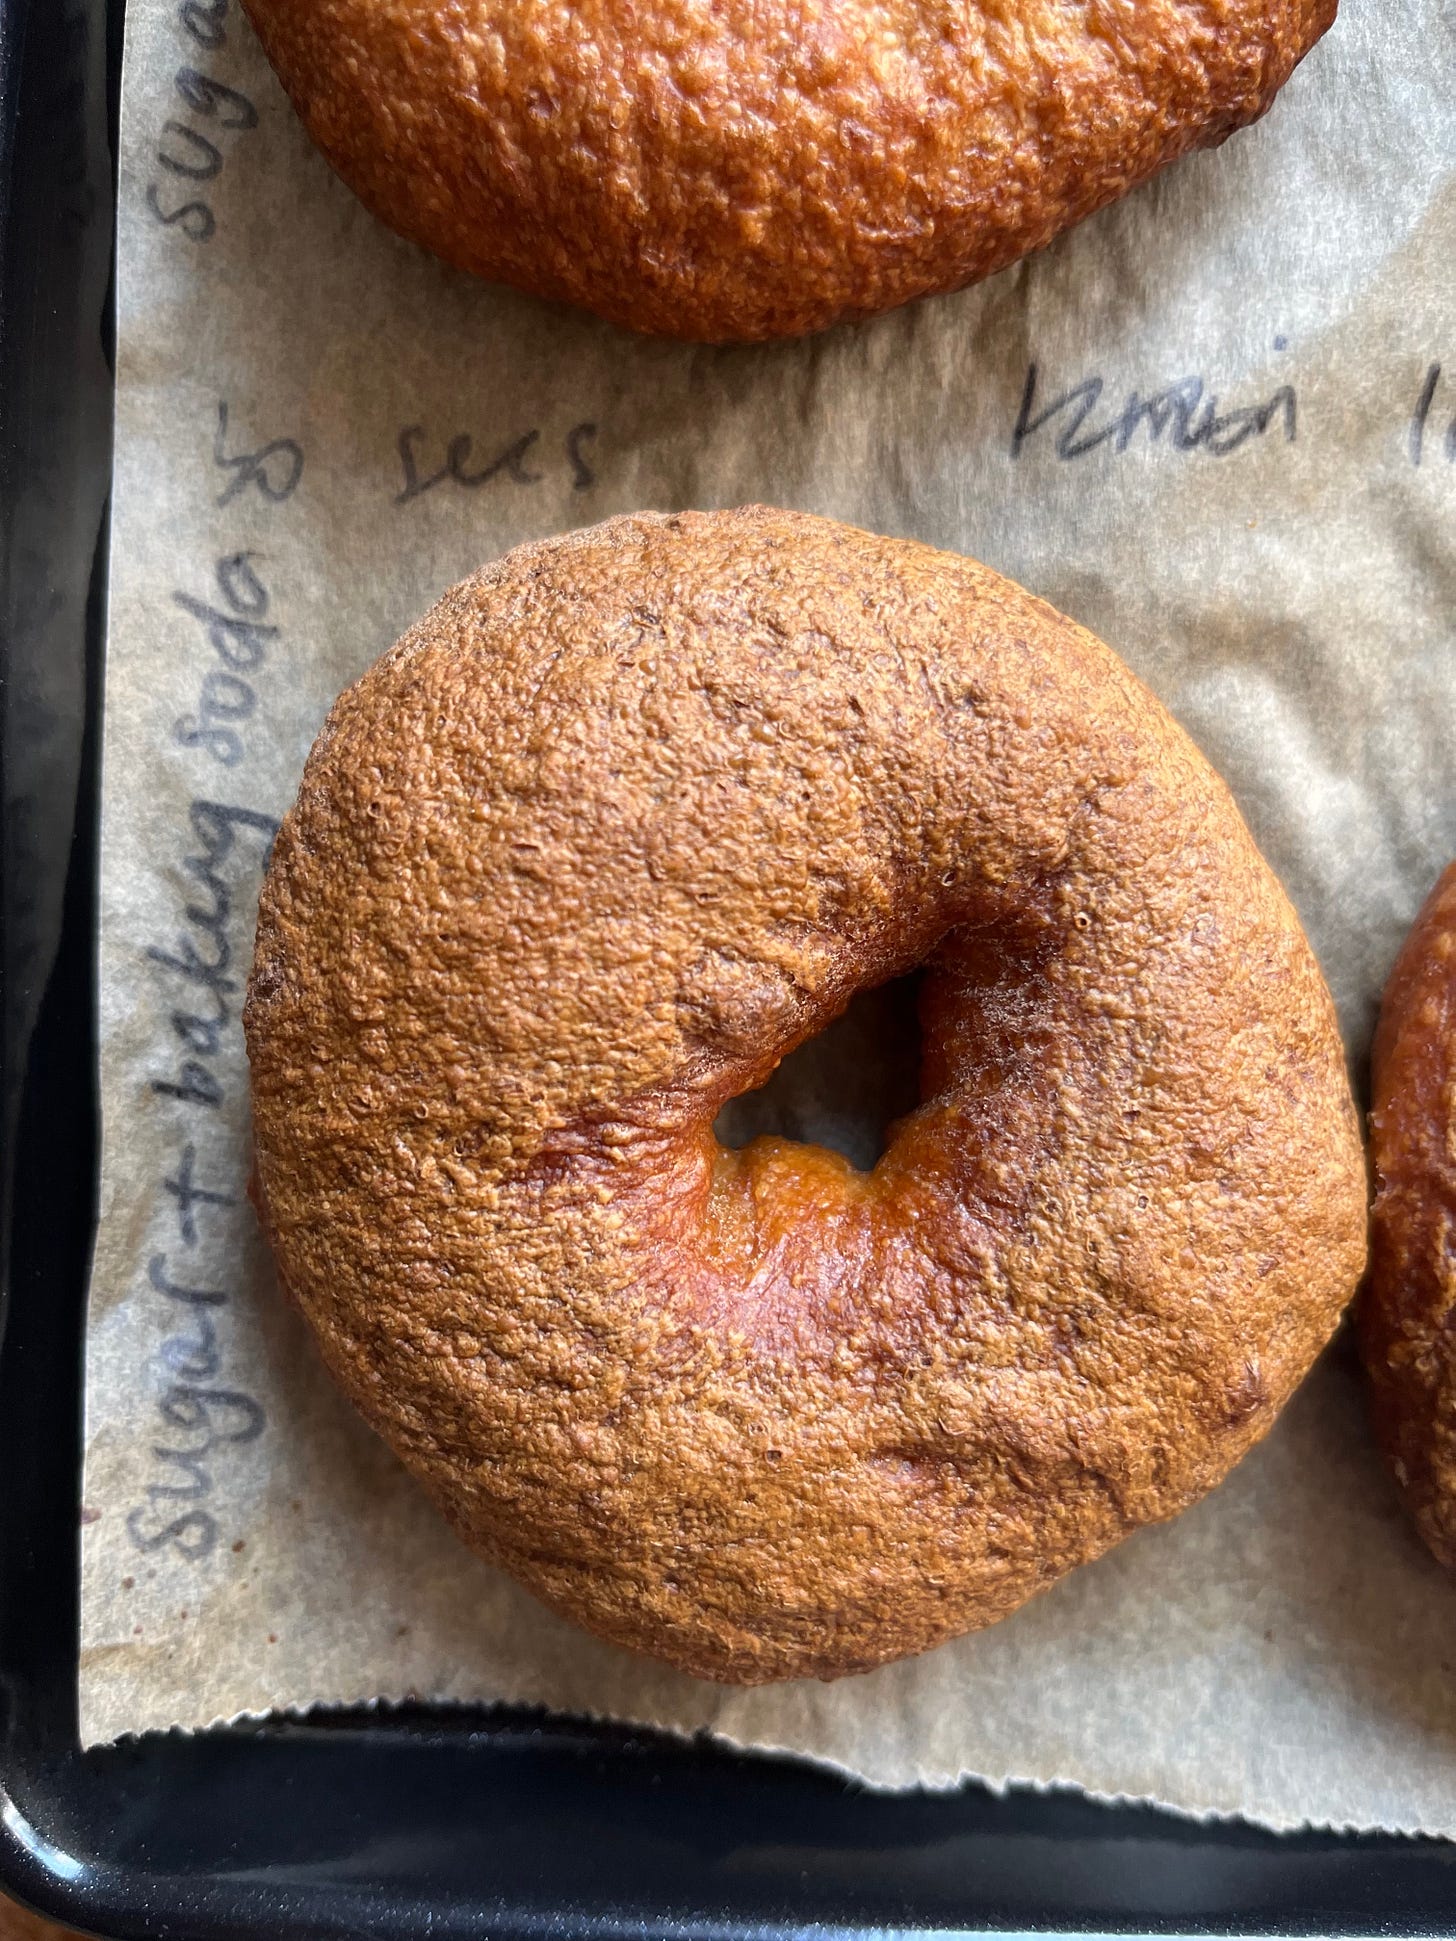
I compared and contrasted the crusts of bagels boiled in plain water, water with brown sugar/malt syrup and water with brown sugar/malt syrup and baking soda. I also tested out the different ratios of baking soda to water - some recipes suggested 10g per 5L, whilst others suggested 50g per 1L(!!!!). I found the former to be lacking in results and the latter to be quite unpleasant - the very high ratio of baking soda to water ended up going a weird colour during baking too:
Once I’d found the sweet spot, I found the crusts with baking soda a bit chewier and more fun to eat, though I was surprised at how undramatic the colour difference was though it was definitely darker. The lack of colour distinction is likely due to my own personal preference of baking the crusts dark, no matter if it has the help from an alkali solution or not.
Toppings
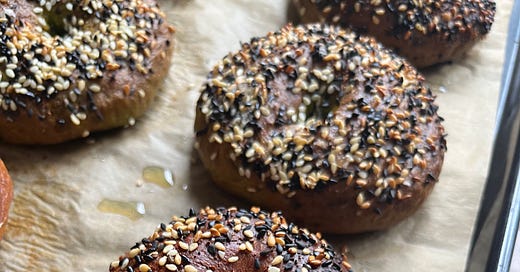
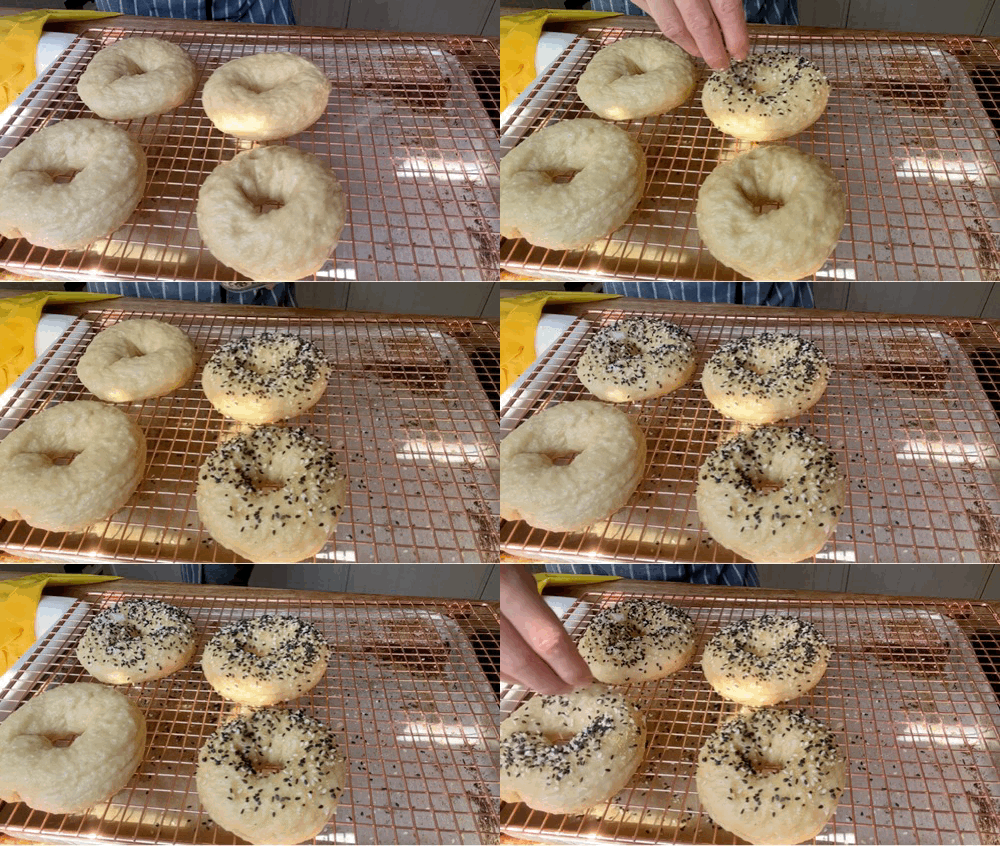
There are a few ways to top a bagel but I think the simplest is to drain the bagels on a cooling rack briefly then sprinkle the toppings on. My fave topping is half way between sesame and an ‘everything’ topping. You can also place them face down into a tray and shake it all about but I find it can end up being quite messy and you end up with clumpy leftover seed bits which no one wants. Controversially, maybe, I really like drizzling my bagels with a little olive oil before they bake. As we know, it’s quite hard to make something crispy if it’s wet and since the surface of the bagel is quite wet from the boil, I like the way the oil adds other dimension of texture. It’s totally optional but I rate it!
Hydration + staling
Traditional bagel dough is very stiff with a low hydration which means it’s already ‘closer’ to being ‘stale’. When bread goes stale, we tend to think of it ‘drying out’ but moisture loss isn’t the only culprit for stale bread, in fact dehydration and staling are totally different things. Dehydration is.. Dehydration, so bread losing moisture. Staling is actually due to the recrystallisation of starch molecules. Bread begins its life as individual granules of flour. Once we add water, it transforms into the bread dough we know and love. When the bread bakes, these swollen starch molecules burst. As the bread cools, the starch, with its lost water, tries to return to its crystallised state. You can reverse this a bit by heating it but since bagels are already low hydration they are victims to dehydration and staling. Fortunately, don’t we all LOVE a toasted bagel?
Shaping
Much like the cinnamon bun shaping, there are lots of ways to go about shaping the bagel. I think it’s fun to try all of them out, but here’s my guide for you:
The stretch
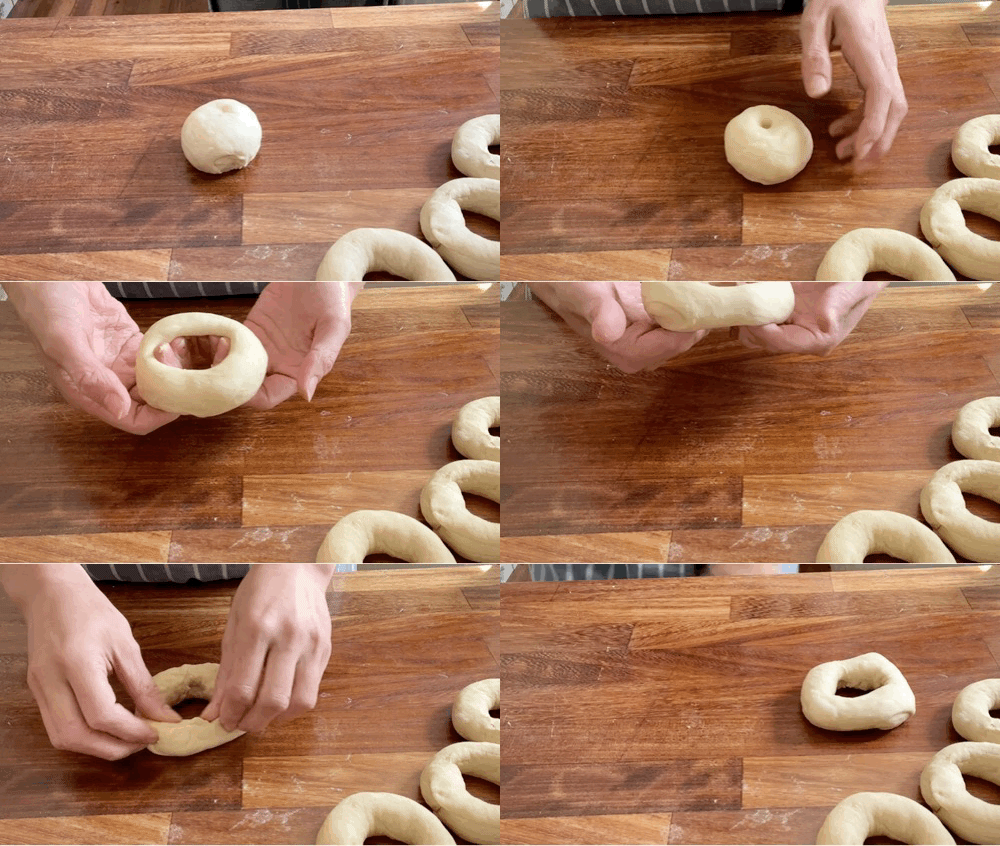
Technique: Divide the dough then squish into balls. Leave to rest for 5-10 minutes covered. Poke a hole with your finger, or the end of a wooden spoon, then stretch the hole. It will bounce back so feel free to stretch again/be quite aggressive the first time around
Result: Cute ‘n’ fat looking bagels that are a bit unique piece to piece
The rope
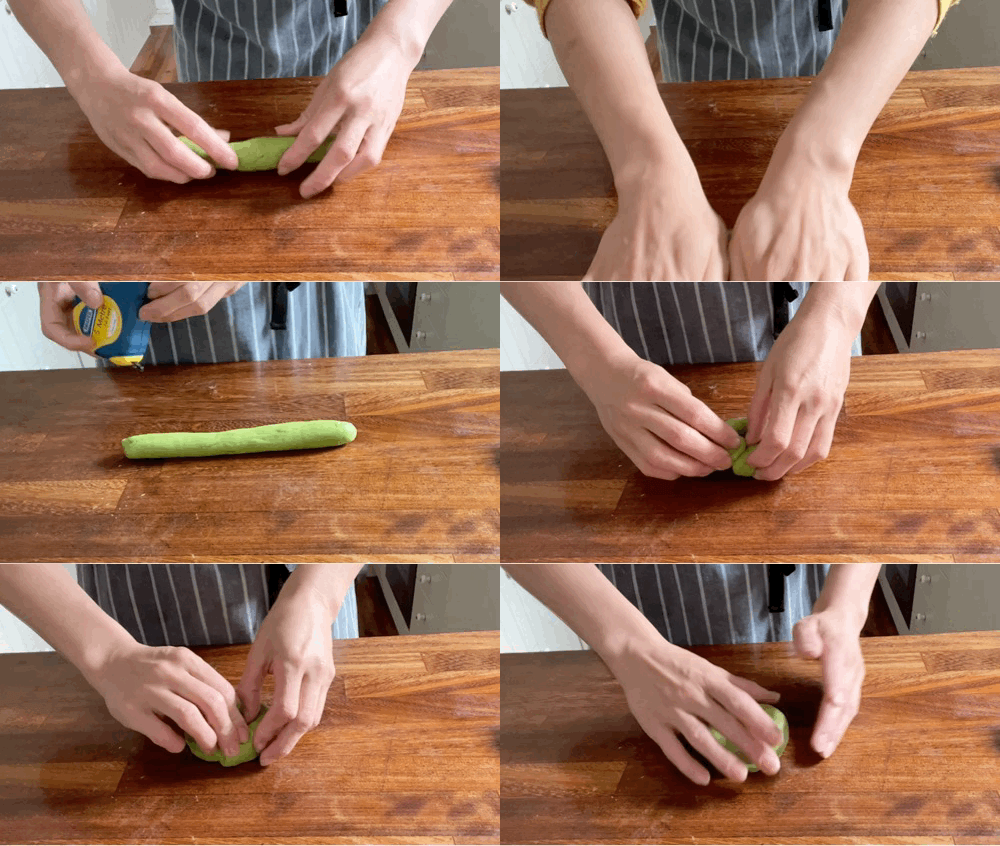
Technique: Divide dough and roll into sausages, around 7inches in length. Loop and stick the top and bottom together. Most resources suggest rolling back and forth with your hand in the middle but I found this made very uneven and ugly bagels. It’s just as effective to pinch it shut then finish with a roll if you want
Result: VERY tidy bagels!!! Best if you want to have bagels that retain their hole in the middle. If you want really dramatic holes, just stretch the initial sausage out thinner. Bear in mind that the larger the hole, the thinner the dough so you may want to boil for a bit less time as the water will penetrate more quickly
The poke
Technique: Divide dough and roll into balls. Proof in balls. When proofed and bountiful big mounds, gently pierce a hole in the middle and gently prise a space, around an inch, open. Feels so wrong but….
Result: Tall chunky looking bagels with teeny tiny holes. Quite cute!
A note on DDT
I feel guilty that I’ve never talked to you about DDT before. What is DDT? No it’s not a vaccine you need to take before going on holiday, it stands for Desired Dough Temperature. The DDT is the ‘goal’ temp you want to aim for when you’re fermenting your dough. As we know, yeast activity increases with temperature, so for efficient fermentation it’s sensible to have your dough around 25c for the initial bulk.
Ok, let’s make it!
Bagel recipe
Makes 6 decent size bagels (scale up as required!)
The dough
300g strong white flour
10g caster sugar
6g salt
15g dark brown sugar OR 15g malt syrup, but use 10g less water below
3g dry yeast
150g water, warm (use 100g boiling water with 50g cold water from the tap, about 45c)
To boil
2L water
10g baking soda
30g dark brown sugar OR 20g malt syrup
Almost everything topping
40g white sesame seeds
40g black sesame seeds
10g garlic granules
5-10g maldon salt, to taste
Method
Scale flour, yeast, salt, caster sugar and dark brown sugar into the bowl of the mixer. If you are using malt syrup, weigh this with the warm water and mix it well
Paddle the dries to mix then slowly pour in the liquids. It will be very stiff but persevere - give the KitchenAid some support if needed by physically stabilising it
Mix for 2-3 minutes until the dough forms, removing and reincorporating any wet bits that form around the paddle
Remove from the mixer then knead the dough for a minute. If its really rough then rest under the bowl for 5 minutes then reknead it - it will have relaxed and likely be smooth If you temp the dough, it should be around 25c, perfect yeast multiplying temp
Place into a container and cover then leave to proof for 1 hour or until doubled in size
At this point you can degas the dough and then put it into the fridge and leave the dough to develop further in the cold. You can also go straight onto shaping and proofing. Please refer back to the section “Overnight proofing / cold proofing”
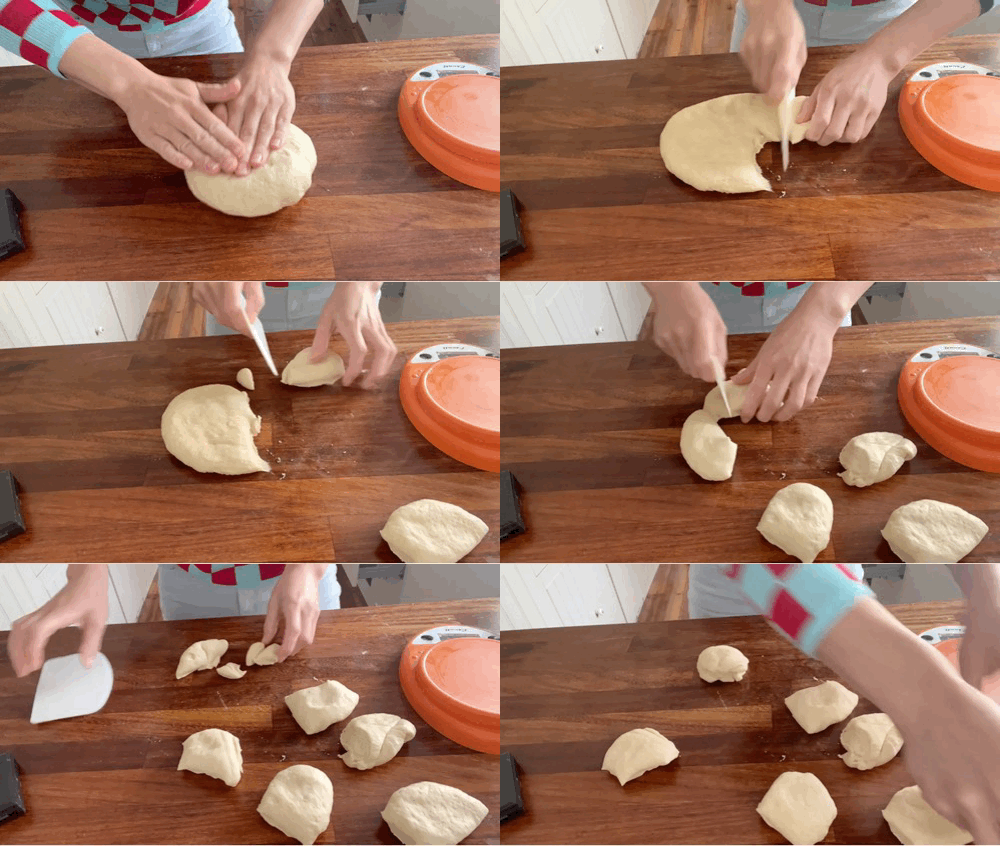
Divide dough into 80g pieces. Shape as you like (guide is above!) - if it’s your first time making bagels, it’s quite fun to try out all the different methods
Place dough on slightly oiled squares of baking paper. Proof until very puffy, at least an hour, though max two (closer to two if you’ve shaped the dough from cold or if you’re making bagels in the cooler months OR if you’re shaping the dough from cold )
Pre-heat oven to 210c fan
Heat 2L water and whisk in 30g dark brown sugar and baking soda. It’ll fizz up. Whisk until bubbles dissipate or you’ll get a weird gross bubbly foam
Drop bagels into boiling water - you want it to look like the bagels are bobbing around in a slightly aggressive hot tub. Boil for 1 minute per side, or up to 1min30 for chewier
Move onto a cooling wire rack to drain and cover with desired toppings whilst still wet so they stick well
Move onto a baking tray lined with paper and drizzle with olive oil bake for 16-20 minutes, turning half way. Watch out for the colour. If you want to have bagels with a softer crust, go gentle on the bake and take out when they’re still in the light golden phase
ENJOY! Best enjoyed within a few hours of baking or keep in an airtight container then toast








Hi Nicola. I loved making these bagels, they cheered me up, such a fun process. Can I ask though, my bagels were smaller than the standard bagel I've eaten. However, the inside crumb looks like yours, and as I would expect, so I am assuming that they were proofed enough (overnight in the fridge following your timings) and ready to bake? Is 80g of dough on the small side for a bagel? I loved them this size, it made me feel happier eating two, so I think I will make them like this again, I was just interested to check I shouldn't have left them to pouuuffff up more. Thanks xx
Heya Nicola!
Another amazing recipe, would it be possible do you think to mix the dough by hand? Thanks!