Kitchen Project #69: Trifle showdown
Every day I'm trifling
Hello,
Welcome to today’s edition of Kitchen Projects. As we head in to bank holiday jubilee extravaganza, I’m thrilled to be diving into one of most joy inducing desserts of all time - the trifle! In today’s newsletter we’ll talk about how to use the same ingredients to create new dessert concepts.
Over on KP+, to celebrate strawberry season, I’ve asked Jam Goddess (actual title) Camilla Wynne to share her classic Strawberry Jam recipe which we’ll be using in our final trifle. We’re so lucky to have access to amazing strawberries (pound a punnet szn is coming) so having a foolproof recipe is essential.
What’s KP+? Well, Kitchen Projects+ aka KP+, is the level-up version of this newsletter. It only costs £5 per month and your support makes this newsletter possible. By becoming a member of KP+, you directly support the writing and research that goes into the weekly newsletter as well as get access to lots of extra content, recipes and giveaways, including access to the entire archive. I really hope to see you there:
Love,
Nicola
P.S. The main newsletter will be on a bank holiday break next week but I’ll be sending a recipe round-up. A special KP+ edition will go out as usual.
The most jubilant trifle
As this year rattles on with reckless abandon, I woke up this week and realised that I almost ran head first into the jubilee weekend without even stopping to take a moment. I shamefully didn’t even notice the first strawberries of summer arriving. Perhaps you’d think by now I’d have organised the process of writing this newsletter a little better, planning ahead and the like, but I sat up like a shot on Tuesday morning and could only think of one thing: Trifle.
And so today’s newsletter was born, a conceptual adventure into the world of trifles. I knew I wanted to share a super fun, slightly camp & 70s recipe for next week’s bank holiday weekend and jubilee madness, but wanted to try and push the limits of the dessert, breaking it down and re-building it in new - and perhaps unexpected - ways.
This brings me to my existential question of what makes trifle. Trifle? Is it the assemblage of ingredients, or is it an ever evolving dessert? And what came first, the dessert or the word?
I think ‘trifle’ is tragically underused in day-to-day life. It’s definition, according to the Oxford English Dictionary, is “a thing of little value or importance.” As a word, it’s quite difficult to use in a sentence, though really evocative and funny - suggesting someone should perhaps “not to be trifled with” feels equal parts jolly and sinister. The etymology of the Middle English word ‘trifle’ comes from the French ‘trufe’ or ‘trufle’ which means ‘by form of deceit’, though may have also been used to mean ‘something of little importance’.
Though I can’t find any legitimate sources to back me up, my best guess is that it came to be known as ‘trifle’ since it related to ‘fools’, another creamy fruity dessert with a slightly demeaning name. The trifle, named as we know it now, first appeared in an 1585 cookbook ‘The Good Huswives Jewell’ as a creamy dessert flavoured with rose water and ginger and the names trifle and fool were used interchangeably. It was not until Hannah Glasse’s ‘The Art of Cookery’ that jelly was introduced in the 18th century, and in the 19th century, jelly within trifle was written into culture by poet Oliver Wendell Holmes who said “That most wonderful object of domestic art called trifle…with its charming confusion of cream and cake and almonds and jam and jelly and wine and cinnamon and froth.”
The trifle has inspired desserts around the world - the Italian ‘Zuppa Inglese’ or ‘English Soup’ has a base of sponge and custard, but it lives in its most luxurious form here in the UK. Although it comes in many forms (as we’ll explore today) I think we can agree on the key ingredients: Cake, jelly, custard and cream.
Whilst I’m most used to seeing trifles built in glass bowls, I thought it might be fun to spend some time working on free-form trifles (my DJ name) and finding a new take on this absolute classic. Before I started messing around with the presentation, I needed to nail each element. Let’s run through them.
The sponge
For the cake, a light sponge is essential - it needs to be dry (in a nice way) and bouncy, able to play nicely with the other ingredients. I wanted to use my classic genoise, but needed to adapt it to make it flexible and bendy enough to be used in different shapes and applications for my conceptual trifles. When a cake bakes, the structure is set as the eggs coagulate and the starch hardens, setting in place around the airpockets. To increase the flexibility, I took inspiration from the chiffon cake, separating some of the whites and reincoporating as a meringue to maximise the air in the sponge, and reduced the flour to keep things as supple as possible. Taking inspiration from many swiss roll recipes which use fatless sponges, I removed the fat completely. This increases the lightness and bendability of the sponge since there are no big fat molecules interrupting the egg foam structure - fat also hardens as it cools, so isn’t the best for promoting flexibility. As we have done with the genoise, I will use a mixture of plain flour and cornflour to replicate the ultra low protein flours for extra tender cake layers.
Strawberry Jam
Having a great strawberry jam recipe up your sleeve is essential for summer and very helpful for building desserts, including trifle. Whilst it may not be a clear standalone flavour for a trifle, think of it as the cement holding it together. It provides an important service in many of the concepts below, acting as a preventative measure for OTT jelly absorption and adding flavour. It’s also used to build trifles that use swirly swiss rolls as a base. Of course you could use a high quality shop bought jam, I’m handing over the reigns to the jam goddess Camilla Wynne, author of Jam Bake, for her classic Strawberry Jam recipe on KP+. Click here to read it.
The creamy bit
Custard and cream - two separate elements that, in some cases, can be combined though a ‘true’ trifle will always have a cream topping, I think. For the custard, a classic creme pat base is a great place to start. From here, you can begin to play with the add-ins depending on what structural role the custard needs to play.
Creme patisserie - Classic pastry cream - thick and lush but not very stable - would squish out of cakes etc if not supported
Creme legere - Pastry cream + whipped cream - lightened but not really able to support weight very well - works as a filling piped inside things but again, can be squashed easily
Creme diplomat - Pastry cream + whipped cream + gelatine - much more stable thanks to gelatine, can be piped and hold its own
Creme chiboust - Pastry cream + italian meringue - very light and sweet in taste, fairly stable at room temperature
Creme mousseline - Pastry cream + butter - rich! the most stable due to the butter but still has a pleasing mouthfeel, but is very cold when firm
Creme madame - Pastry cream + butter + whipped cream - Stable thanks to the butter but a lighter mouth feel from the cream - can be a bit temperamental
One of the key choices you get to make with creme pat is what sort of eggs you use - whole or yolks only. To be honest, almost all of the thickening power comes from the cornstarch, so you can dial up or down the richness. Creme pat made with whole eggs will have a lighter colour and less rich flavour.
Jelly forever
The jelly, to me, is the heart of the trifle. It’s the defining feature really - we’ve got so many desserts that combine fruit, cake and custard that it’s important to make jelly the star. I have developed today’s classic strawberry recipe using fresh strawberries, which at the time of writing are the same price as frozen ones. I have also used Dr Oetker gelatine as it is most widely available. For veggie friendly, I have had good results following the instructions on the back of the vege-gel packet, and for agar agar I am confident in the approximate 0.75% agar to liquid weight (as demo’d in this recipe which looks quite reliable!), though I would suggest mixing up a small batch and purchasing a microscale. I’m also not against using packet jelly to make this recipe - yes it’s nice to make your own, but I mixed up a batch of the Hartleys strawberry jelly and it felt nostalgic in its artificial taste. You can also get great vegan jelly mixes like this one which would cut out some of the work.
For my final ratio, I needed a jelly that was strong enough to hold its shape but also could provide structure for suspending fruit. Although the back of the packet suggests 4 leaves per pint (approx 1 per 142ml), but I think 1 leaf per 100ml is more sensible. Here’s what we are considering when balancing our gelatine recipes:
Firstly: ENZYME ACTION! Since gelatine is a protein (and it’s gelling capabilities are a result of proteins forming new bonds with other substances), any fruit that contains the ‘protease’ enzyme will wreak havoc with your panna cotta. These fruits include kiwi, pineapple, figs and papaya. Ginger is also a tricky area. Fortunately for us, strawberry does NOT contain protease so we don’t need to find a workaround for that.
Secondly, you need to consider acidity, as it can interfere with gelatine’s gelling ability as it can denature the protein involved with the setting. Strawberry is approximately 3.5 on the pH scale and has mild concentration of acid
Thirdly, sweetness. All fruits have their own level of sweetness and you need to adapt the sugar accordingly. However, this needs to be done carefully. Sugar can actually bolster gelatine and make your mix set-up even firmer. I err on the sweeter side for the strawberry jelly, though you could reduce it slightly to taste
To make a perfectly clear jelly, we want to extract the juice from the strawberries but we don’t want the fibre so we’ll pass it through a fine sieve a few times. I made the mistake of boiling up my strawberries then hand blending them - this created a beautiful thick puree that made a cloudy, chunky jelly. Lovely, but not for today’s recipe.
Temperature management of jelly is the key to success here. Too wet and the liquid jelly will absorb entirely into the sponge. It’s nice to have a bit of absorption, but we don’t want the cake to be structurally useless. Too firm is a problem too, if the jelly won’t fill gaps between the fruit. It’s also worth noting that demouding jelly can be one of the most stressful things ever but to try to relax whilst doing it - I swear jelly can smell fear/stress! Just make sure you take the demoulding process slowly and grease your tin with an oil spray if you’ve got one. I’ll be with you every step of the way.
To booze or not to booze?
The boozy bit - I actually don’t like boozy desserts that much but you could easily incorporate a boozy soak into any of the trifles below by simply brushing the cake with booze or a sugar syrup spiked with booze (boil 1:1 sugar and water then add booze to taste), depending on your mood.
Trifle showdown
So, those are my elements with tried and tested base recipes - the real fun is how to put them together! With the jubilee being a glorious four day weekend extravaganza, I think it’s the perfect time for a retro and quirky pudding. Let’s dive into the tests.
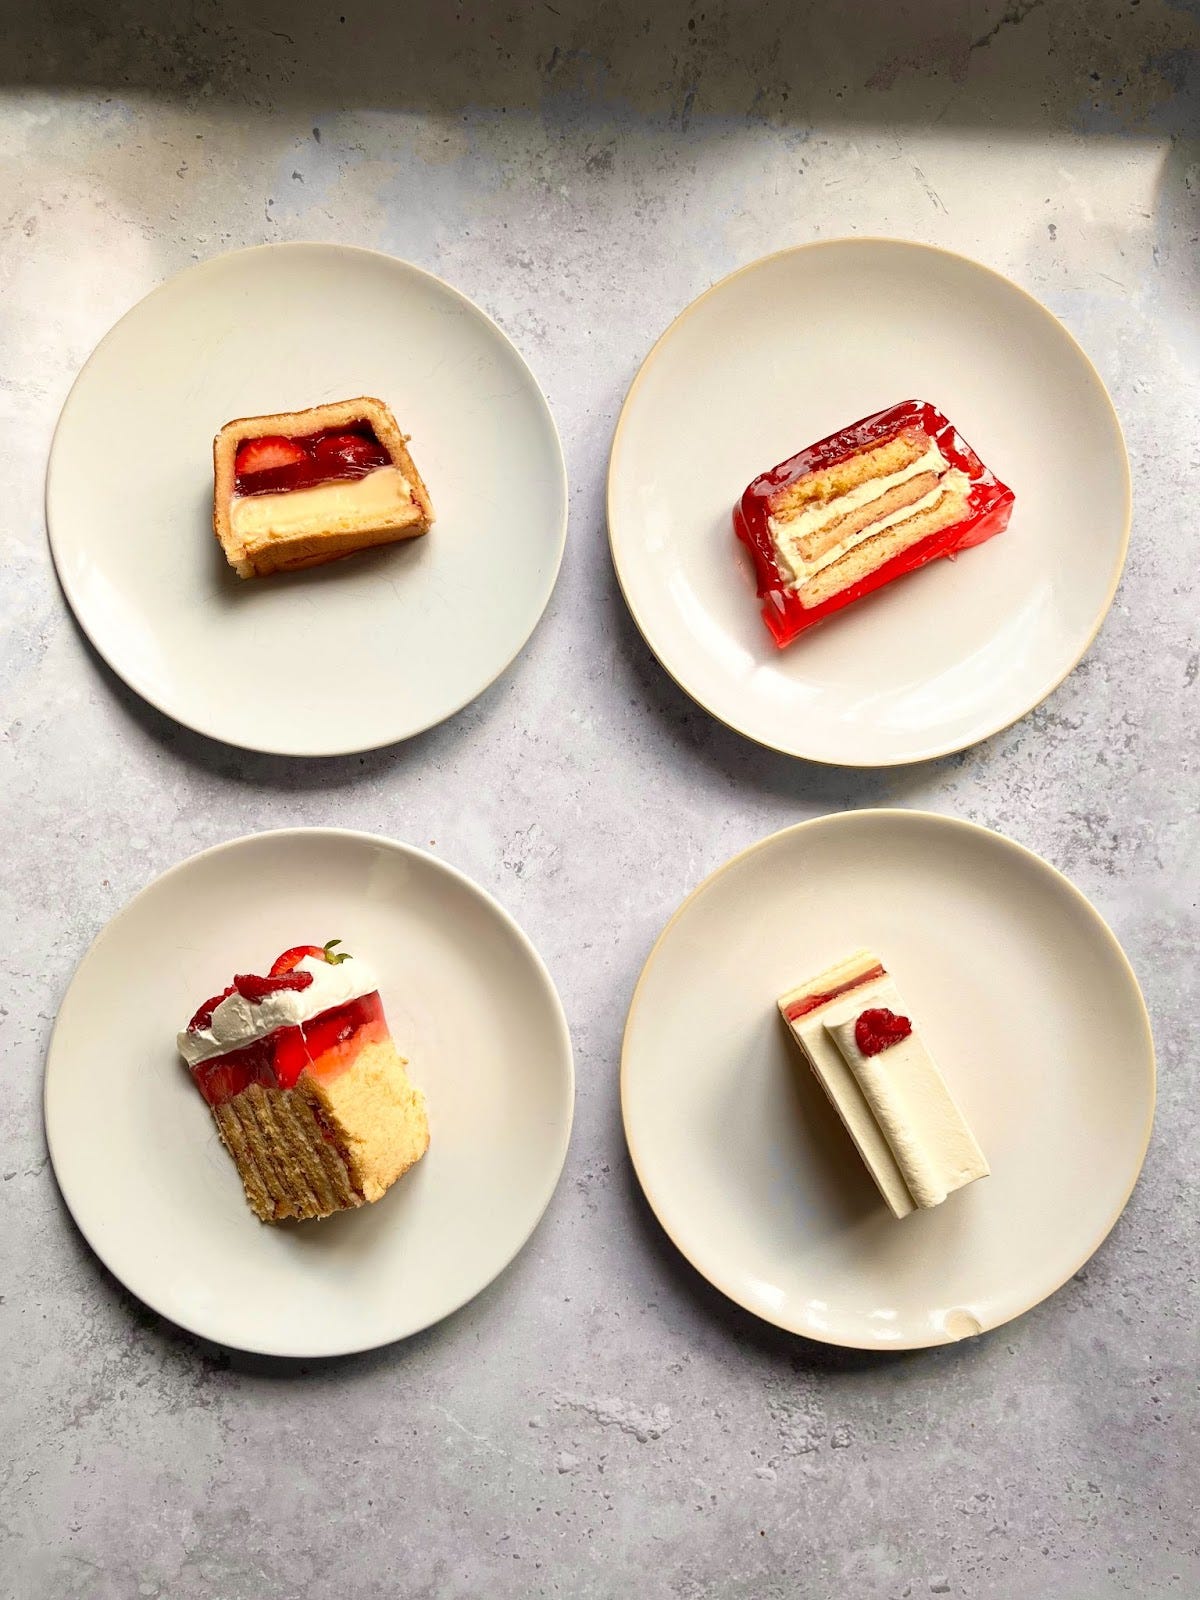
Trifle 1 aka wraparound pocket trifle
This was the first concept I wanted to try - I was inspired to try it after flicking past the cake wrapped chocolate mousse in Rose Levy Berenbaum’s Baking Bible. I immediately thought how this could work for trifle - sheets of sponge wrapped around a layer of jelly and custard. This was surprisingly easy to do with our newly bendy cake and it was nice to use the classic creme pat - I didn’t have to worry about the stability of the custard since the cake provided support. To be honest, I rushed this custard a bit and it was slightly grainy, but ultimately it worked and was quite fun to eat.
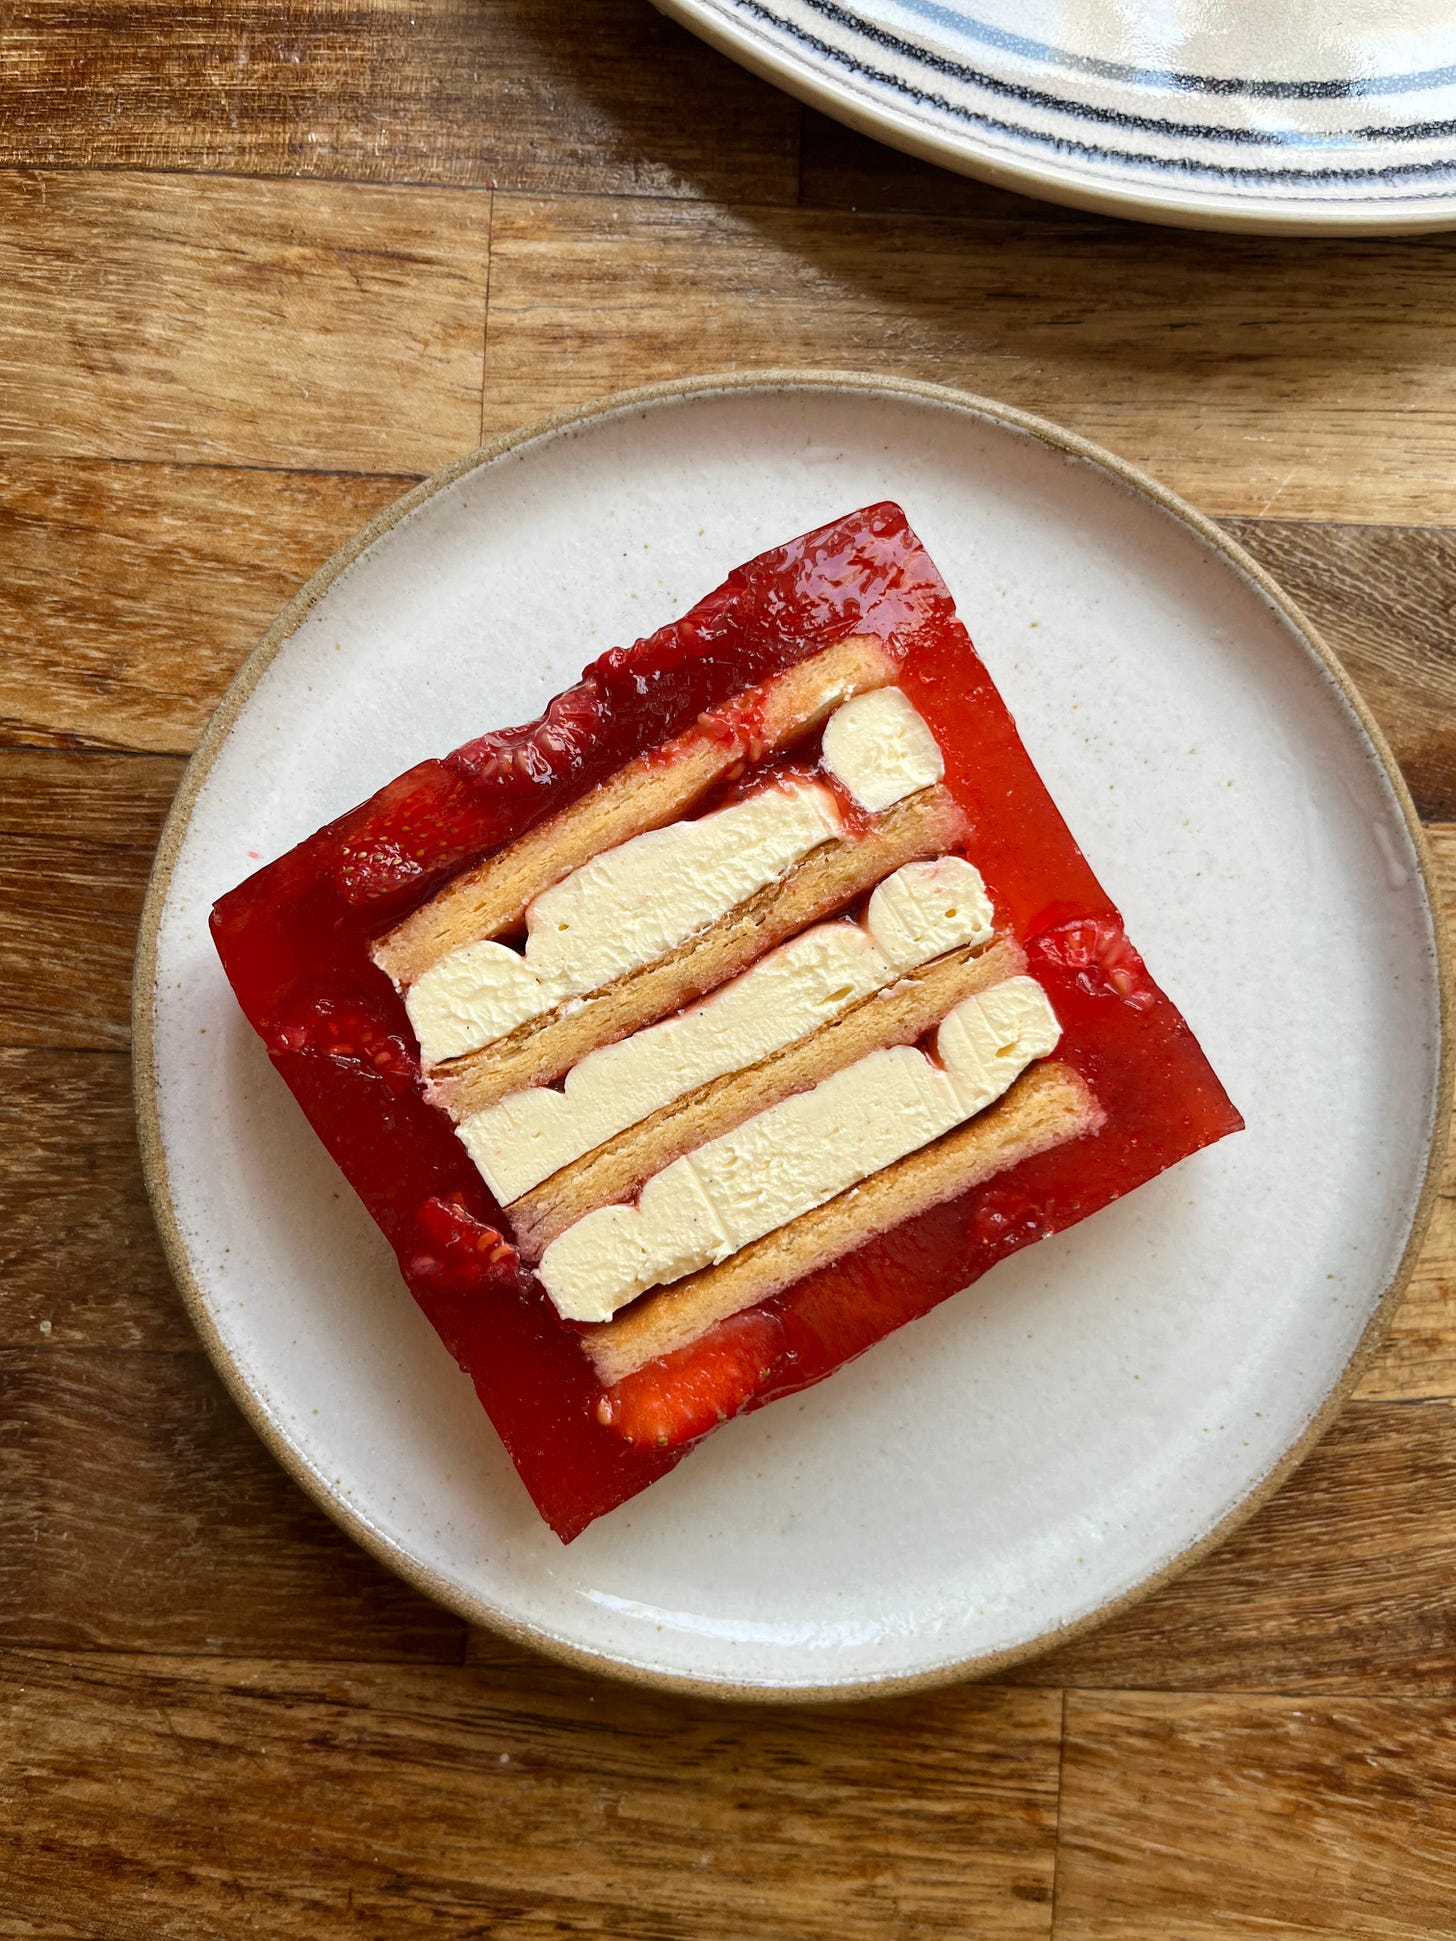
Trifle 2 aka SURPRISE! The inside out trifle
As I was putting together Trifle 1, I was inspired to see if could flip it further and ‘wrap’ the jelly around the cake. This was really fun and the chaotic kitschiness of it can’t really be beaten. For this trifle, I favoured stability over long chilling periods so I first chose to use the structurally effective creme mousseline. Creme pat doesn’t freeze very well - the starch breaks down - but mousseline can maintain its texture, allowing us to build this cake with some assurance it will be structurally sound. And it WAS sound - too sound - the filling was very firm. After umming and ahhing, I decided to remake using creme legere - it is a bit harder to work with but the final result is much better, since the firm mousseline can be a little bit jarring with the soft jelly. I also learnt the hard way that raspberries are much more suited to suspending in jelly - strawberries are too hard and chunky and fall out of the jelly. Even though you can see them in my pics, I recommend raspberries.
The jelly needs to be built carefully in stages. Warning, there is a level of maths to this trifle in order to calculate the amount of jelly needed and the size of cake to build, but this does mean you can make any size you like! I tried it in both my loaf tin and my rackmaster pullman tin. In my original test, I simply built the cake in a smaller loaf tin (6.5ish inch x 2.5ish inch) but I realised most people won’t have two russian doll nesting loaf tins, so decided to go free-form.
Due to the pure entertainment value that suspending a cake in jelly brings - it just feels jubilee-y - I’ll be sharing this recipe below and show you how to make it scalable for whatever tin you have on hand.
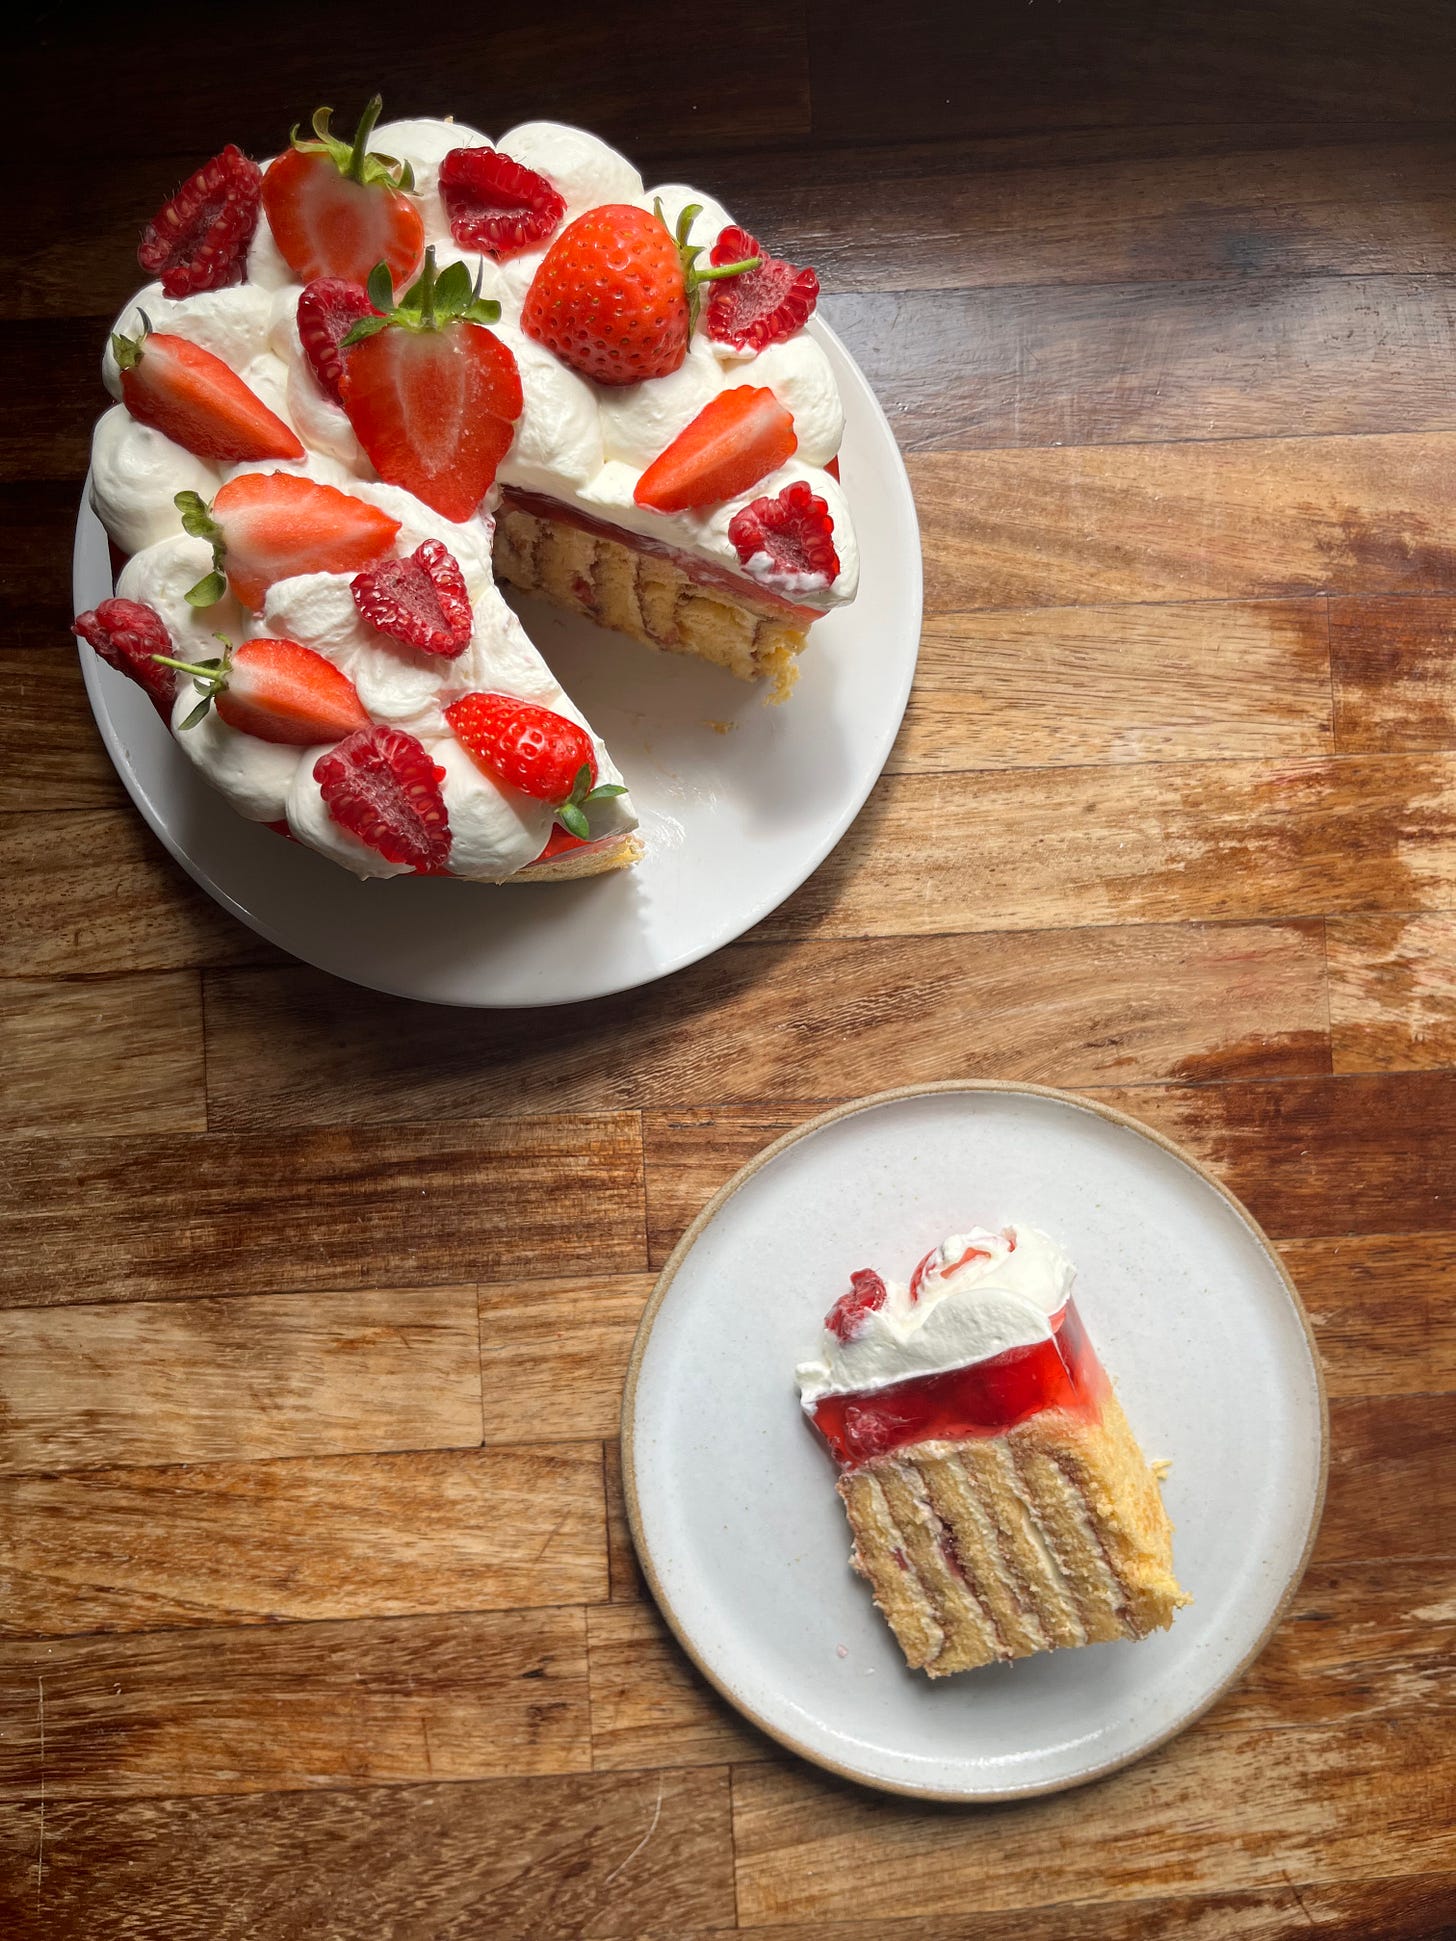
Trifle 3 aka the upright
This version is most structurally very similar to the classic trifle except it stands up on it’s own, so it is a feat of engineering in itself. Rather than the traditional layering, I used the vertical layering technique for the cake - this is when you bake sheets of cake and spread with filling, then roll up in strips to create a spiral of cake that has a vertical cut through. It’s visually very attractive but also very sturdy. I built my spiral cake in a loose bottomed cake tin with an acetate collar which I then filled up with jelly to create a 1 inch thick layer. I finished by piping blobs of cream and chilled before slicing. This trifle has a nice interplay of the expected and unexpected and would make a really fun birthday cake.
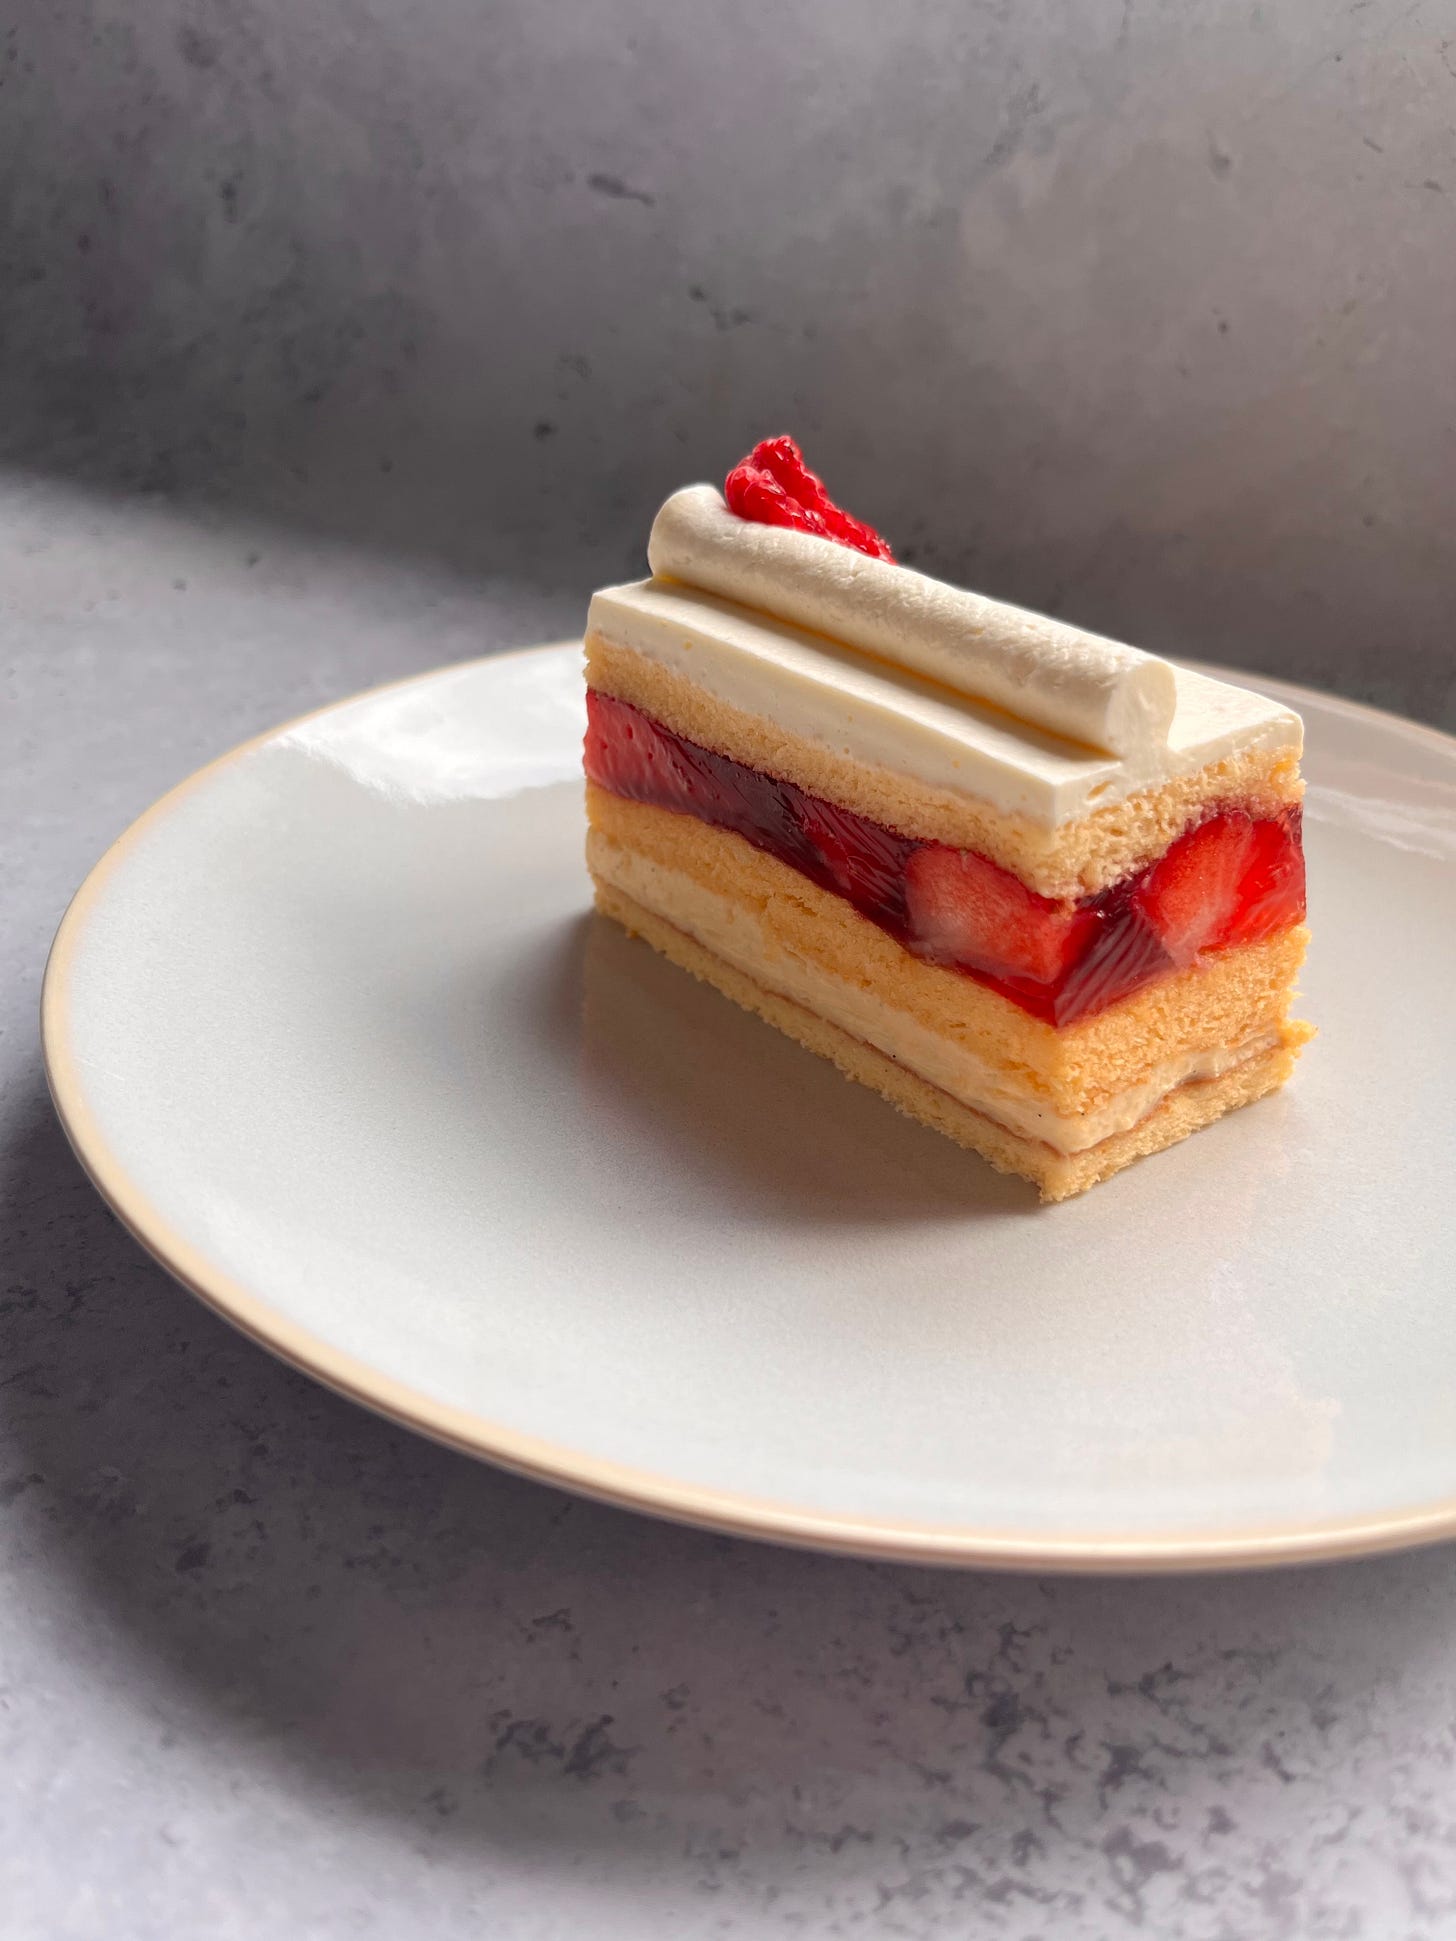
Trifle 4 aka Trifle Eleganza
If a trifle was originally meant to use up scraps, this is the total opposite and elevates the trash-trifle to something truly beautiful. Inspired by classic opera cakes, and the beautiful sheet cakes of Hannah Ziskin, I layered up the elements to create a perfect slice of trifle joy. I was also inspired by my friend Reu, who is making a beautiful cake for their brother’s wedding next week - they sent me some inspo pics of sheet cakes with lovely piping on top (From Keller Konditor) so I was totally inspired by that. Thanks Reu!
Since this would be chilling overnight and have a lot of time to set up, I went for a creme legere for my custard layer which I was really happy with. I used around 300g of custard, though I’d probably increase this. As well as this, I accidentally made two different thickness layers of the cake, though this ended up working really nicely - the two thinner layers sandwiching a slightly thicker layer of cake in the middle.
Since the cake doesn’t need to be bendy, I’ll probably use more of a classic genoise since I don’t need to worry about flexibility, and the fluffiness of genoise would probably work well. I also used a sugar syrup for this one. This was unbelievably satisfying to make and cut - it requires building in a few stages and a few rounds of chilling and you need a bit of patience and a ruler to make it really beautiful. I’ll be sharing the how-to on KP+ mid next week so subscribe now to get it direct to your inbox.
Okay let’s make it!
Inside out trifle
Notes on tins
There is a fair amount of faff required for this recipe but it IS worth it.
We’ve all got different size loaf tins, so I’ve formulated this recipe to fit my medium tin but I’ve explained below how to scale it up and down and you may need to adapt the measurements to work for you. The fatless sponge recipe makes one trays worth (mine are standard UK 30cm x 40cm / 11 inch x 15 inch) and you can keep the leftovers for other baking projects.
If you are using the rackmaster tins that I used for shokupan, you will need to times the jelly and custard recipe by around 1.5. You will also need to wrap the tin with cling film as it isn’t water tight (nightmare for jelly!)
First - the maths! We need to calculate the size of the cake to fit inside the jelly based on your tin
Pick whatever tin you are going to use and measure the dimensions. For example, my tin is approximately 7.5 (l) inches x 3.25 (w) inches at the base, but it gets wider at the top and is around 8.25 (l) inches x 4 (w) inches. The depth is 2.5 inches. I’ll use 7.75 (l) x 3.75 (w) x 2.5 (h) for my calculations
Use this website to calculate the volume. Using the measurements above, my tin can hold approx 1198ml. You can also fill your tin with water then measure how much it holds by pouring into a measuring jug. You do you.
Work out the ideal dimensions of your cake to fit inside the jelly with an approx 0.25 - 0.5ish inch border at the sides / bottom (larger at sides, smaller at bottom). For my tin, I use the smaller base dimensions to figure this out. this means my cake should be approx 6.5 (l) x 2.5 (w) x 2 (h) inches tall
Length = 7.5 - 0.5 (front space) - 0.5 (back space) = 6.5 inches
Width = 3.75 - 0.5 (left space) - 0.5 (right space) = 2.55 inches
Height = 2.5 - 0.25 (for top + bottom) = 2.0 inches (though 1.75 is better)
Use the website from before to calculate the volume. According to my measurements, it is approx 532ml
Now minus your cake volume from the tin volume. For my tin, this is 1198ml - 543ml = 655ml. Bearing in mind that I will be adding fruit to the jelly which will take up some volume, I will make 700ml jelly to comfortably encase my cake at the sizes above. If you have any extra jelly left over, just set it in a cup and enjoy. It is always an option to make a larger cake and thus will need less jelly, or use more fruit and then you would need less jelly
Ingredients
Strawberry and raspberry jelly ingredients - makes 700ml
420g strawberries
50g raspberries
150-175g sugar depending on how flavourful the strawberries are
60g lemon juice
225ml water
Plus extra water/ice (amount tbc, you’ll see in the method)
7 leaves of gelatin. I used Dr Oetker platinum (we want 1 leaf per 100ml)
Fluffy fatless sponge
4 whole eggs
Measure 2 whole eggs + 2 yolks into one bowl, keep the other 2 whites aside. Whites should measure at least 30g each
120g caster sugar split into 90g / 30g
40g plain flour
10g cornflour
Custard recipe
165g whole milk
½ vanilla pod, scraped
40g caster sugar
30g whole egg or 30g egg yolks, for a more custardy colour
15g cornflour
15g butter
140g double cream, whipped
Plus
Strawberry jam - make your own with the best recipe by Camilla Wynne here
Around 75g raspberries cut in half to suspend in the jelly. Strawberries are too heavy and tend to fall out/are hard to slice neatly later when in jelly, so I would use Rasps for best effect. I learnt this the hard way!
OPTIONAL: Brandy/Sherry to soak sponges
Cream to serve
An ice bath is really useful here.
Method - cake
Pre-heat oven to 200c fan
Line a 30cm x 40cm baking tray with a 1inch overhang
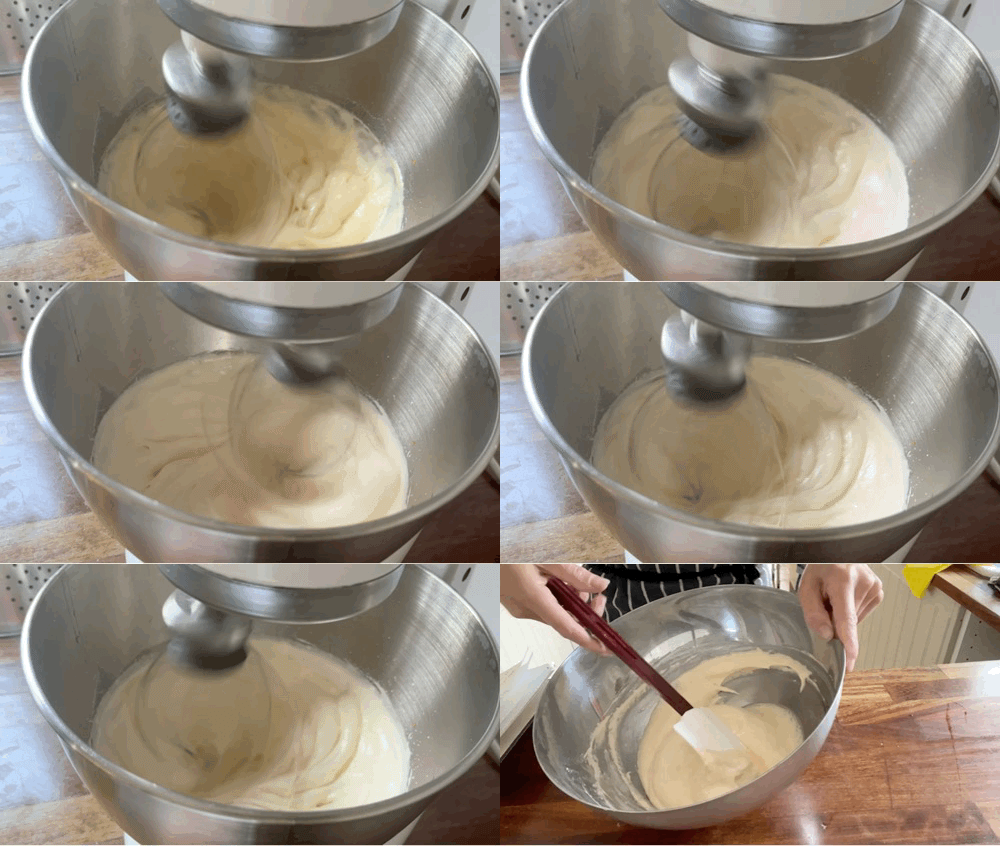
Whisk 2 whole eggs plus 2 yolks with 90g sugar until ultra thick and foamy - I do high speed for 3 minutes, medium speed for 3 minutes then low speed for 2 minutes to get the finest texture
Sift the cornflour and flour together several times
Move into a bowl then sift the cornflour/flour mix on top and fold with a ‘D’ motion to combine gently
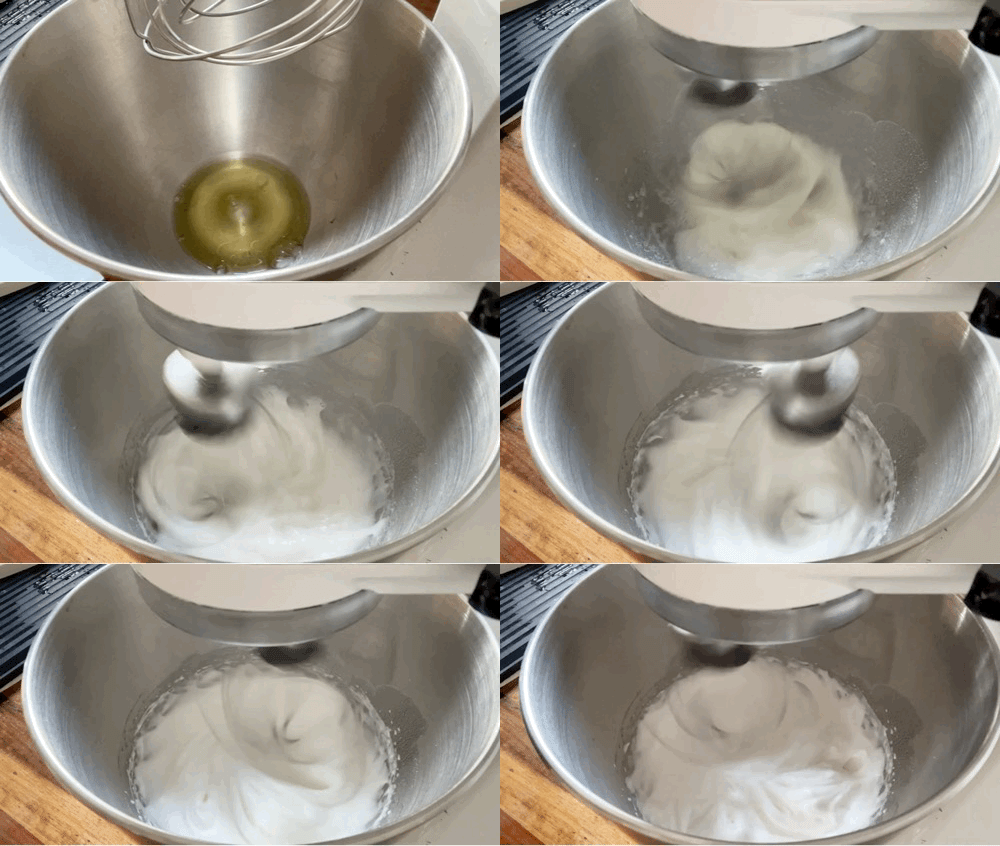
Clean your mixing bowl and whisk, then whisk the egg whites until frothy then add the sugar and whisk until a stiff meringue
Gently fold in the meringue to your other mixture, trying to retain as much air as possible
Spread evenly in your lined tin. Bake for 10-12 minutes until well baked - if you touch the top, it should not feel fizzy or crackly, it should be firm yet springy
Run a knife around the edge of the tray if needed then move cake straight onto a cooling rack, to help prevent shrinking
Can be made in advance and kept, well wrapped, in the freezer for a month
Method - custard
Heat milk with scraped vanilla pod and half the sugar
Whisk egg/yolks with sugar and cornflour
When almost boiling, pour half the milk on top of the eggs/yolks whilst whisking to temper then pour back into the saucepan, through a sieve to catch any lumps early!
Continue to whisk over a medium heat until thickened and boiling
Whisk in the cold butter and leave to cool completely
Beat the cooled creme pat til smooth. In another bowl, whip cream to stiff peaks then fold through the cool custard
Use immediately or place in the fridge to chill for a few hours before using if it doesn’t feel firm enough to pipe
Assembly - cake
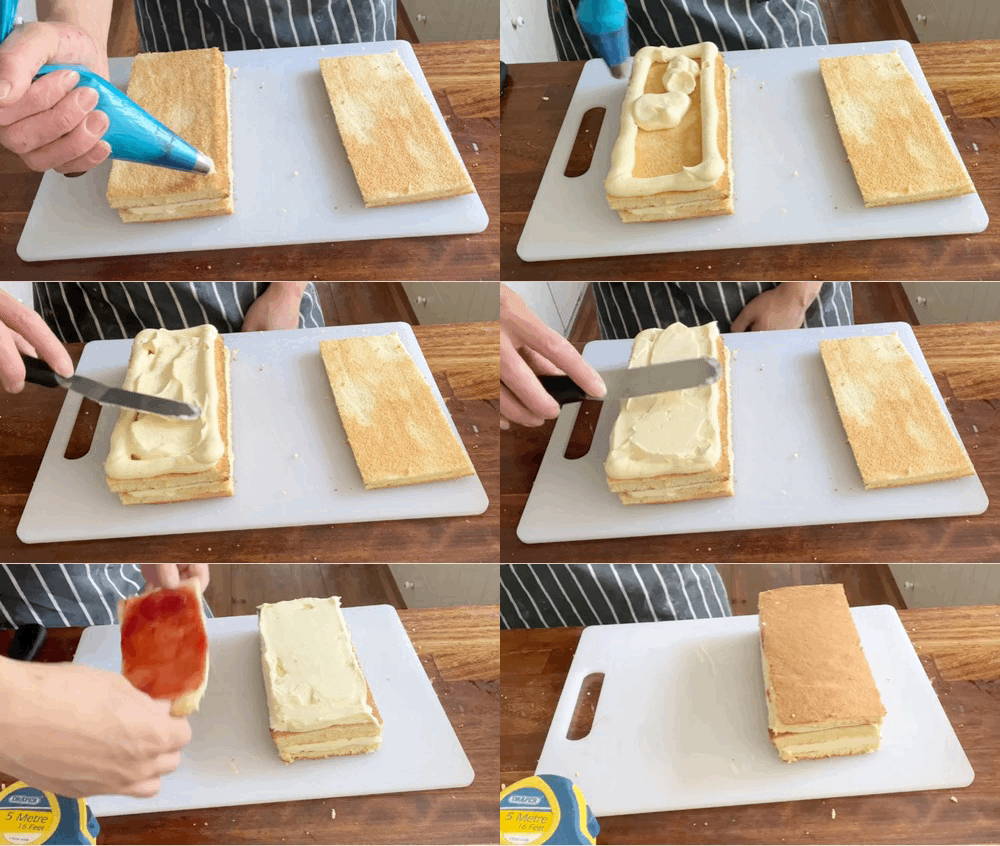
First assemble the cake - measure and cut three 6.5inch x 2.5-2.75 inch rectangles. Keep the rest for future recipes. You can also measure out a piece of paper to the right size and use this as a guide
If using, brush with booze, then spread the cake with jam then pipe creme diplomat to be around 1cm thick. It should be around 1.5-2 inches once you are finished, ideally 1.75. Build up the layers then put into the freezer to chill. Around 30-40 minutes should be good. In the GIF below I forgot the jam, so spread it on the top layer instead
NOTE: If you have a smaller loaf tin that comfortably ‘nests’ inside your jelly tin, you can build your cake in that
Method - jelly
Halve strawberries and add to saucepan with raspberries, lemon juice, sugar and water
Bring to a boil and cook for 10 minutes or until the strawberries are really soft and pale - they loose all of their colour
Meanwhile, soak the gelatin in cold water for 10 minutes
Pass through a fine sieve - ideally lined with muslin - pressing the strawberries to extract the juice. Save the pulp and enjoy over rice pudding, or yoghurt, or chuck into your strawberry jam recipe
Squeeze the excess water out the gelatin then whisk into the still very hot liquid until totally dissolved
Add cold water/ice cubes to make the jelly up to 700ml
Transfer jug to ice bath and stir regularly to cool down until thickened. If it sets too much, you can spoon a portion of the jelly into a pan and reheat then whisk back in, or simply run the sides of the jug under the hot tap then stir
Assembly - trifle
Prepare your jelly tin - spray with cake spray or a cover with a light coating of oil (dont use butter!). I also like to put a lightly greased piece of greaseproof in the base for insurance
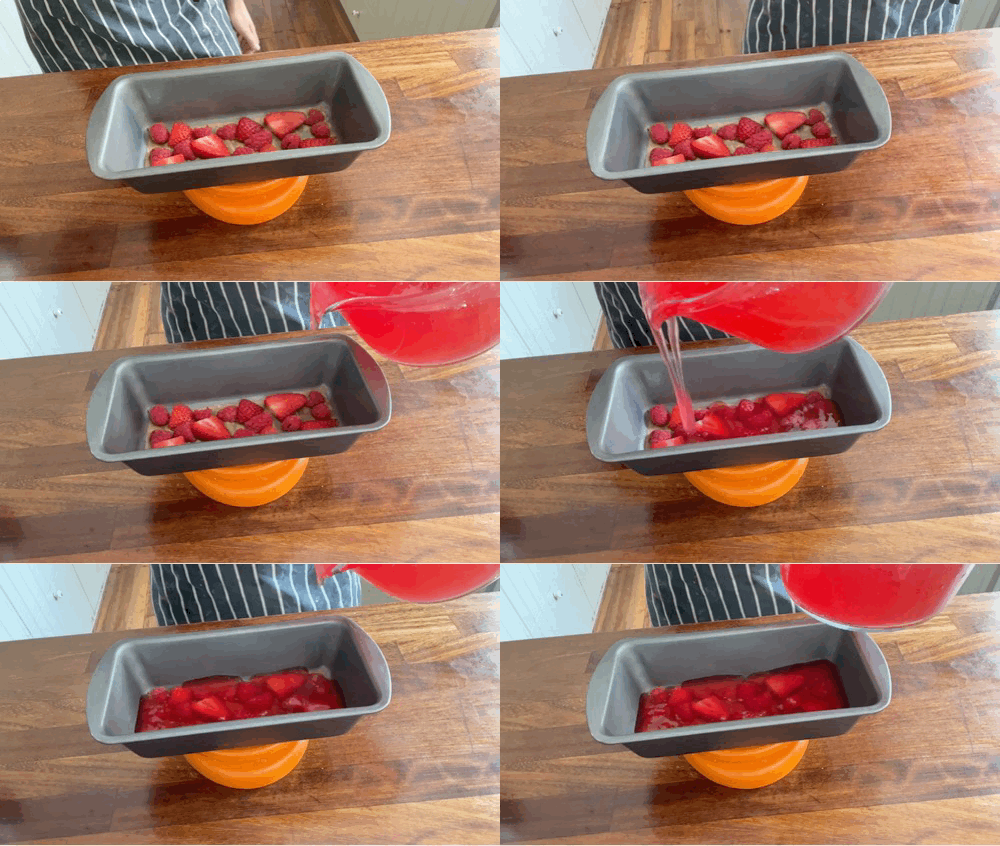
Place cut fruit into the tin and place in the freezer whilst you wait for your jelly to be the right consistency. You don’t want the pieces of fruit to stick up too much, so raspberries are much easier to use on the top layer since they are flatter. By chilling the tin, the jelly will set more quickly
With your jelly at the consistency of runny honey, pour evenly over the fruit. Use a toothpick/chopstick to ascertain how deep it is - this will depend on the size of your tin, but I aim for about 1cm with my loaf tin, around 120g. You don’t want it to be too thick or you won’t have room to put jelly on top. Place in the freezer to firm up for 10 minutes
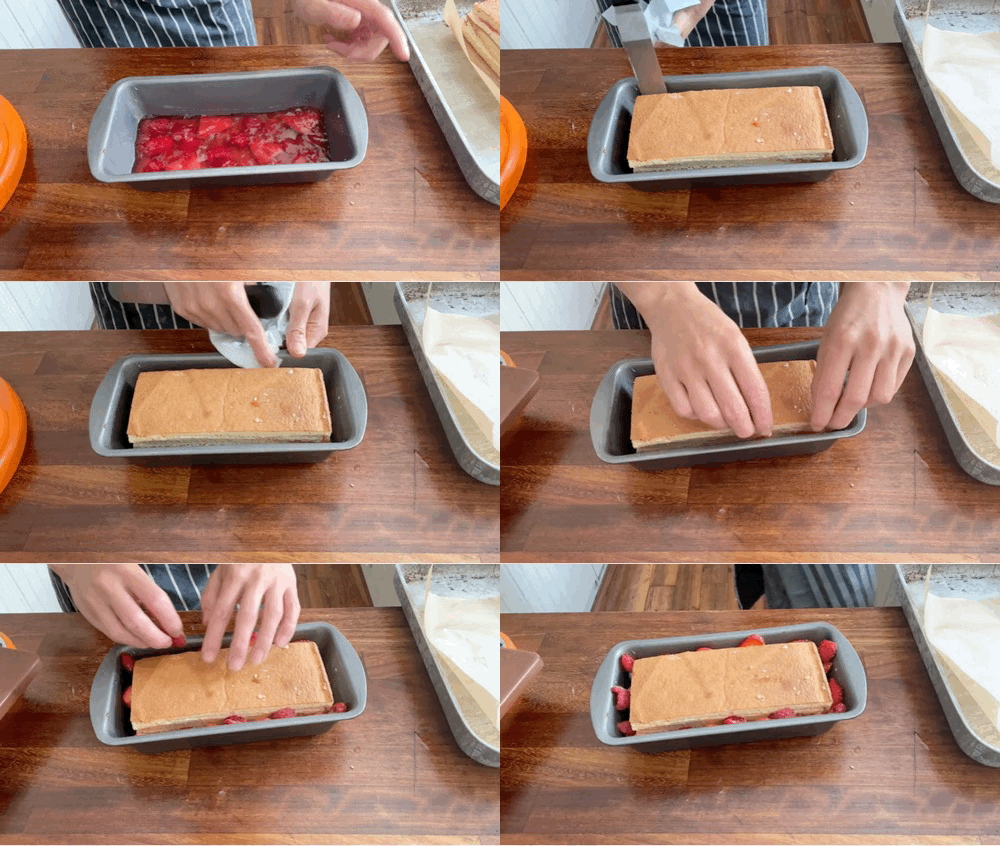
When the jelly is firm, gently lower your chilled cake onto it. If any cream smooshes on the sides, clean it with kitchen roll. Add a few small pieces of cut fruit in the gap - I would use thin pieces of strawb OR mainly raspberries. If the pieces of fruit are too big they will fall out the side of the jelly / make it hard to cut so watch out! vertical slices are best so when you cut it later the fruit isn’t too disruptive
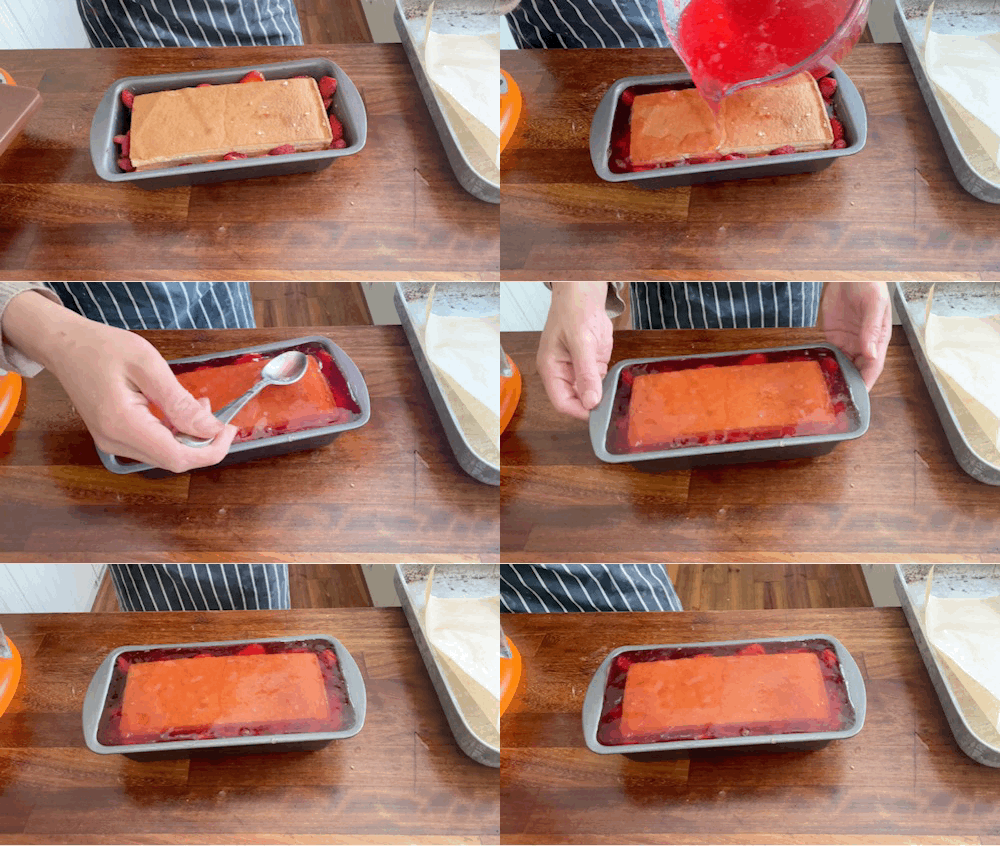
Now fill in the space around the cake with more thickened - but not set - jelly. Having the jelly at this thick but not set stage is important - this will prevent too much jelly from absorbing into the cake layers and help with definition
If there’s space, add a few cut pieces of fruit on top then finish off with jelly
Leave in the fridge overnight, or at least 3-4 hours, to set completely
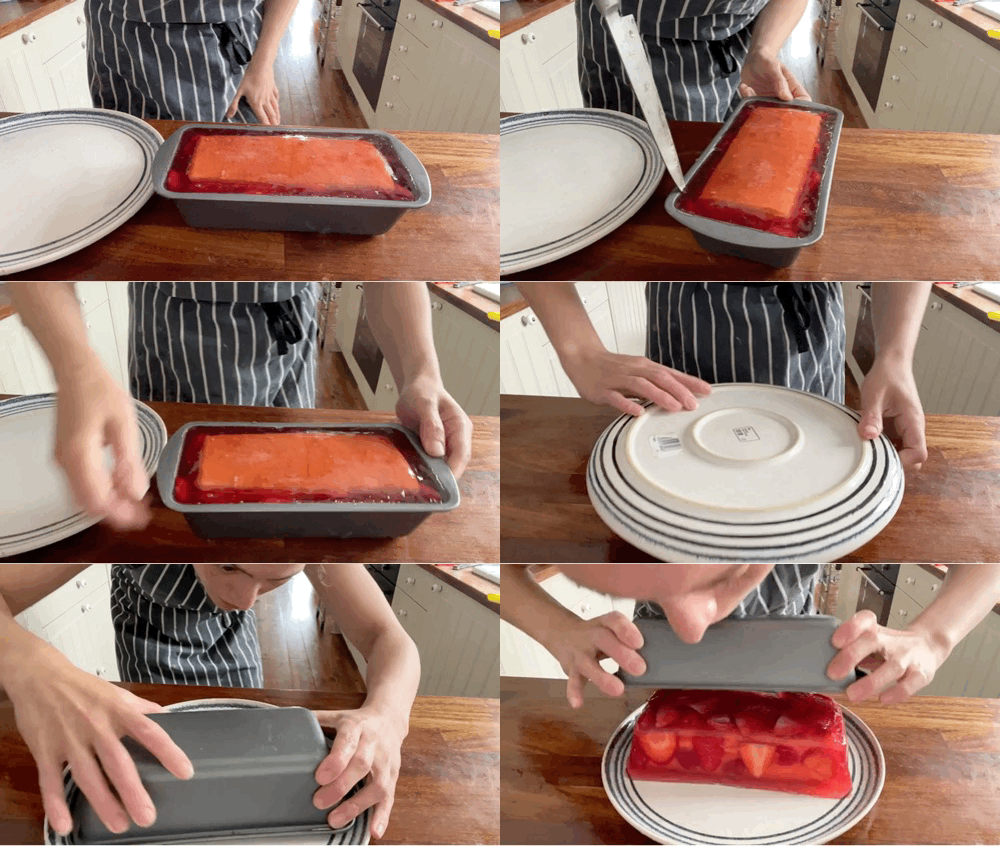
To demould, use a warm knife around the edges to release the jelly then place a plate on top then flip over. Make sure the plate is a bit wet, as this allows you to manuvere your jelly around after - otherwise it will just stick! Then shake and wiggle to demould. Alternatively warm a cloth with hot water and use this to warm the edges. If you have a blow torch, you can also use this but that’s usually a bit aggressive. The wiggle is important as it helps dislodge jelly.
To slice, use a very sharp, warm knife otherwise the jelly gets damaged when you cut it. You can also dip the knife in warm water to help get neat slices.
Thanks for reading! This newsletter is a reader-supported publication. The best way to support my work is to become a paid subscriber and help keep Sunday’s free for everyone.


