Hello,
Alright alright alright: Kitchen Projects is officially back!
First off, I’d like to wish you a very happy new year. Although 2021 may not feel too distinct from “the year that shall not be named” yet, I’m hopeful it’ll turn out to be a real vintage.
If you’re new here then… hello! Let me catch you up on this whole kitchen projects lark - I’m Nicola Lamb. I’m a pastry chef and recipe developer and bakery consultant based in London and this is my recipe development and cooking journal.
This week’s edition is a fun one. As ever, I’m here to talk, support, discuss lamination or whatever you need. We are all in this together, after all
Oh… and if you’re enjoying this newsletter then I’d love it if you shared with your friends:
Love,
Nicola
P.S. Here’s the playlist for this week. Dancing is highly recommended to also lift spirits in these times
Power to the cocoa puff
I’ve been trying to commit to chess for a few years now. Although this might not seem immediately relevant to recipe development, just bear with me for a moment.
In my weak pursuit of the game, I read an article about something called “hope chess”, a term coined by US national master Dan Heisman. It, despite my best efforts to improve, totally sums up my skills: Hope chess is when a player simply ‘hopes’ things will work out during a game, rather than making sufficient plans or effort to ensure it is a sound course of action. My bad.
The notion of ‘hope chess’ has really stuck with me. I’ve realised it’s a concept that extends way beyond any actual playing of chess and has since become my favourite catch-all term for when I’m getting a bit cavalier with whatever I’m working on. There are many, MANY times in my career where I play a bit too much ‘hope chess’ in the kitchen.
Whether it’s coming up with an idea with only two days before needing to execute it, or rushing into a recipe to get it out quickly, I’m totally guilty. Now, this isn’t all bad - ‘hope’ is a good word, after all, isn’t it?
By playing ‘hope chess’ in the kitchen, I’ve stumbled across various urgent workarounds and have occasionally created something new totally by accident. A total lack of focus, unfortunately, is sometimes rewarded. I’m really trying to wean myself off of it!
This week’s subject: Cocoa Puff
Cocoa puff is definitely one of the recipes I’ve played hope chess with for too long. At a pastry pop-up last year, we made a chocolate and vanilla mille-feuille, featuring cocoa puff pastry. Trying to get ahead of production the first week, I made 6kg of cocoa puff without rigorously testing the recipe - I guessed a cocoa percentage and method and ran with it. Surely it’ll work out, right? And even if it doesn’t, I can just make a new batch next week, right? Right?!
Surprisingly (or obviously, in hindsight), 6kg of puff pastry actually takes a long time to get through so I was stuck with it for the whole four weeks of pop-ups. On its own it was pretty, bitter and dark. Fortunately the fillings it was served with were sweet enough to counteract it and actually it’s depth of flavour became one of its strengths… but only just!
This week, it's time to revisit the formulation - PROPERLY - and finally get to the bottom of it.
Let’s do it!
Let’s talk about the OG puff pastry
If you’ve never made puff pastry then welcome to your favourite new infuriating but fun and time consuming kitchen hobby. Sure, shop bought puff is great! But if you’re trying to find ways to feel calm, purposeful and meditative in strange times, then the repetitive process of ‘lamination’ is definitely one of my go-to soothers.
Lamination refers to the process of putting layers of butter between dough. This is achieved by making two separate blocks - one is made of dough (we call this the ‘detrempe’) and the second is made of butter.
You begin by enclosing the butter into the dough. Then - bit by bit, roll by roll, fold by fold - the butter and dough are spread into fine, distinct layers. The result? When the pastry goes into the oven the butter melts which has two purposes:
The melted butter enriches the dough as it melts
The steam created by water evaporation forces the layers apart. The dough physically lifts and puffs up and you’re left with an ultra flaky crisp multi-layered pastry.
I’ve long been obsessed with pastries that totally transform. I love starting with something that looks totally unremarkable that requires a journey of absolute metamorphosis. In your hands, two blocks of beige looking stuff can become the sort of thing that makes you go ‘ooooh’ ‘ahhhh’ ‘wow’. Puff is definitely in that category.
Adding in the cocoa
So, if you can make plain puff pastry… Why stop there? Cocoa tinged puff pastry is a dramatic string to add to your bow. Learning to make your own puff pastry is a huge achievement in itself, so it’s good to find ways to add variety to the already earned skill-set. Side note: if you haven’t made puff pastry before then don’t worry, i’ll take you through all the steps anyway.
Before we can start changing things in a recipe, it’s important to understand the OG recipe and what every ingredient is responsible for. Let’s break down the classic ingredients of puff pastry (the ‘detrempe’ and ‘butter block’:
Flour - Flour is proportionally the main ingredient in puff pastry. It provides the body of the dough and most importantly it contains gluten. Gluten is the structural backbone to puff pastry
Water - Water hydrates the flour which allows gluten bonds to form. Without water, there is no gluten!
Vinegar - Vinegar is an acid which tenderises the dough. In classic puff it is also responsible for stopping oxidation. If your dough oxidises it goes a weird grey colour in the fridge. Vinegar counteracts this.
Salt - Salt adds flavour to the dough but it also strengthens gluten
Butter - Butter = Fat = Flavour! There is a little bit of butter in the detrempe itself which just helps to enrich it a bit. As for the butter block, it is responsible for creating the distinct layers. When you are making puff pastry you just have to imagine anytime you see a layer of butter, that will melt and ‘disappear’, leaving beautiful distinct layers in its path. The butter block is usually about 50% of the dough weight for classic puff pastry. Some kitchens reduce this to save money
So, when we think about adding cocoa in, we need to think about the properties of cocoa itself. When you’re adapting or amending a recipe it’s best to act… suspiciously. Generally, I try to see any new or added ingredients as an evil intruder that could potentially wreak havoc on your lovely stable formulation.
So, where does the cocoa go?
Since puff pastry is made from two distinct components, we’ve got options here:
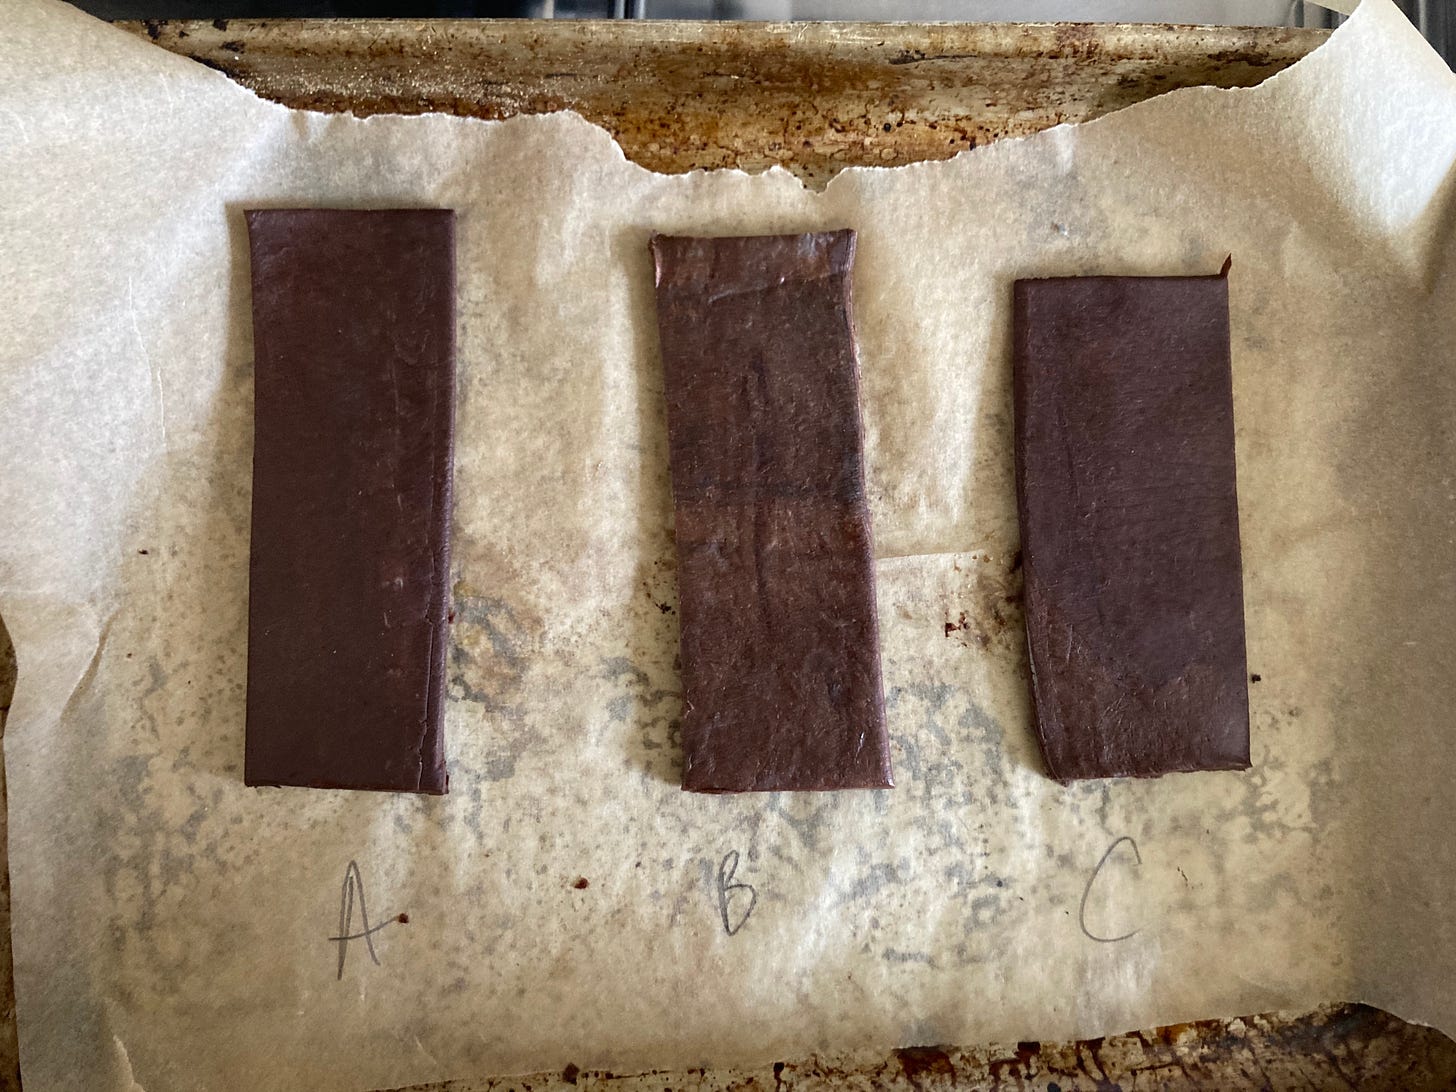
A. Cocoa detrempe, plain butter block
B. Plain detrempe, cocoa butter
C. Cocoa detrempe, cocoa butter
To get the bottom of this matter, I committed to testing all three. But before I could do this, it was time to sit down and cast my ‘hope chess’ tactics aside. It was time to properly figure out the true impact of cocoa, as well as think about my ideal final product and how to get there.
Thinking deeply about the detrempe
I went into detail about cocoa in the Landeau Chocolate Cake edition of Kitchen Projects so you can refresh your memory there for more details on it’s origin, but I’ll break down it’s properties with regard to the dough here:
Cocoa is gluten free. By adding cocoa to the dough, we are doing a straight swap on replacing some of the flour. By doing this, we are significantly weakening the structure of our dough. We are literally removing a % of the dough’s capacity to make strong bonds. With a dough like puff that is rolled out many times over, gluten is kind of a big deal
Cocoa loves water! It absorbs a higher volume of water than the same amount of flour would
Cocoa is acidic. Too much acid will mess with the gluten (hence it’s ‘tenderisation’ properties in vinegar) and make it weaker. Heavily dutched cocoa powder is alkaline - this has the same affect
Cocoa is bitter. It contains hardly any fat and not much sugar. Puff needs to be baked for quite a long time in the oven so what is the best way to mitigate this without ending up with something totally inedible?
So, with all of these potential interferences, how can we best make a plan for success and stop playing so much goddamn hope chess?!
Cocoa is gluten free - The best way to mitigate this concern is to limit the % of flour that we replace with cocoa. We won’t mess with the salt too much because of its strengthening quality on the dough
Cocoa loves water! - We’ll up the hydration a bit. This is also helpful for rolling out the dough, too. Makes it much easier - win win!
Cocoa is acidic (or very alkaline) - we’ll reduce the vinegar a little, limiting overall acidity. For a heavily dutched cocoa, we will reduce the overall cocoa powder quantity
Cocoa is bitter - alright, there’s a two step plan here:
Salt - as mentioned above, we don’t want to mess with it too much since it is really helping us on the gluten side of things. It’s flavour is important
Sugar isn’t usually included in puff pastry. Sugar is hygroscopic which is a fancy word to say it is a water hog. Flour needs water to make strong gluten bonds, so when sugar gets involved and takes more than its fair share of H20, the gluten structure is weaker. That being said, this dough could really use a bit of sweetness, so I'll add 10%-12% inclusion of sugar (similar to croissant dough)
Thinking slightly less deeply about the butter block
One of the challenges of making puff pastry is managing the butter block. The butter block can be a bit tricky because it has to be ‘just right’. This goldilocks behaviour means you have to manage its temperature for the first few rolls - if it’s too sticky or soft you won’t get distinct layers. But, if it’s too hard then it’ll crack and split up inside the dough and once again, you won’t get distinct layers.
When you add anything into butter, the result is a ‘compound butter’. Laminating with compound butters is a great way to add flavour into your dough (it literally melts in and infuses everything around it in the oven!) but altering the butter - by mixing it with other ingredients - at a structural level can make it harder to work with. For example, the compound butter might be more brittle or prone to splitting.
Luckily for us, cocoa doesn’t appear to cause too much trouble in the compound butter I tested. At least, not in the quantities that we’re using it in. As a starting rule of thumb, I like to mix in about 20%-25% of the compound (proportional to butter weight).
NB: If you’re reading this and thinking of all the possibilities that compound butters offer then GREAT! BUT It’s worth remembering that since you are ‘removing’ butter to make way for the compound, you might need to increase your overall butter quantity. We’ll go into that in more detail one day, promise!
The formulations
I tested three doughs. Test ‘A’ would be a cocoa dough with plain butter. Test ‘B’ would be plain dough with a cocoa butter. For Test ‘C’, I decided to go hard. I deviated from the total % of cocoa in the dough and upped it. I figured - go big, or go home! If I was going to do cocoa on cocoa, it may as well have a real punch to it.
The results
Overall, the doughs that contain cocoa (A+C) are definitely weaker and harder to work with. Due to the lower gluten content of the dough, it tended to rip in places. This made me PANIC initially. But fortunately the cocoa dough’s bark was far worse than the bite - the rips were only superficial and did not get in the way of successful laminating overall.
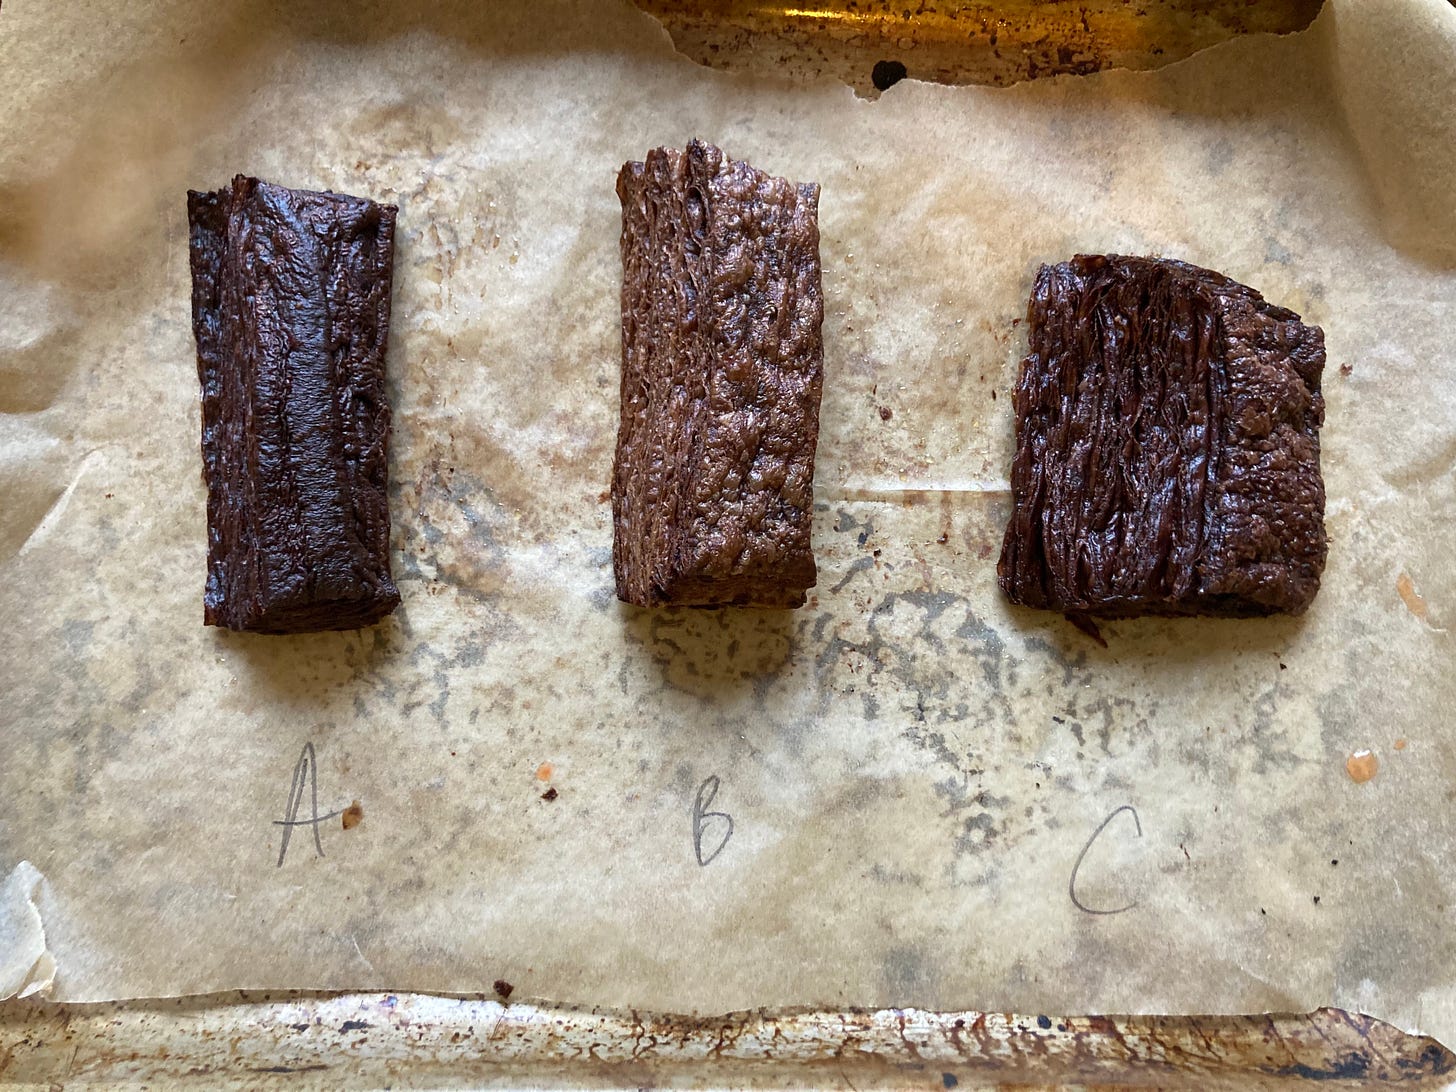
Test A: Cocoa dough, plain butter
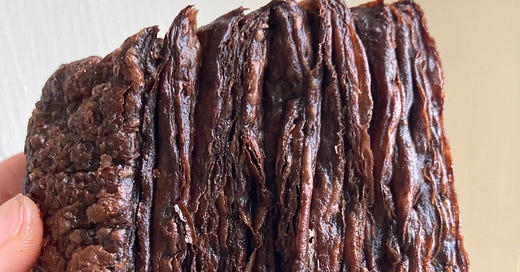
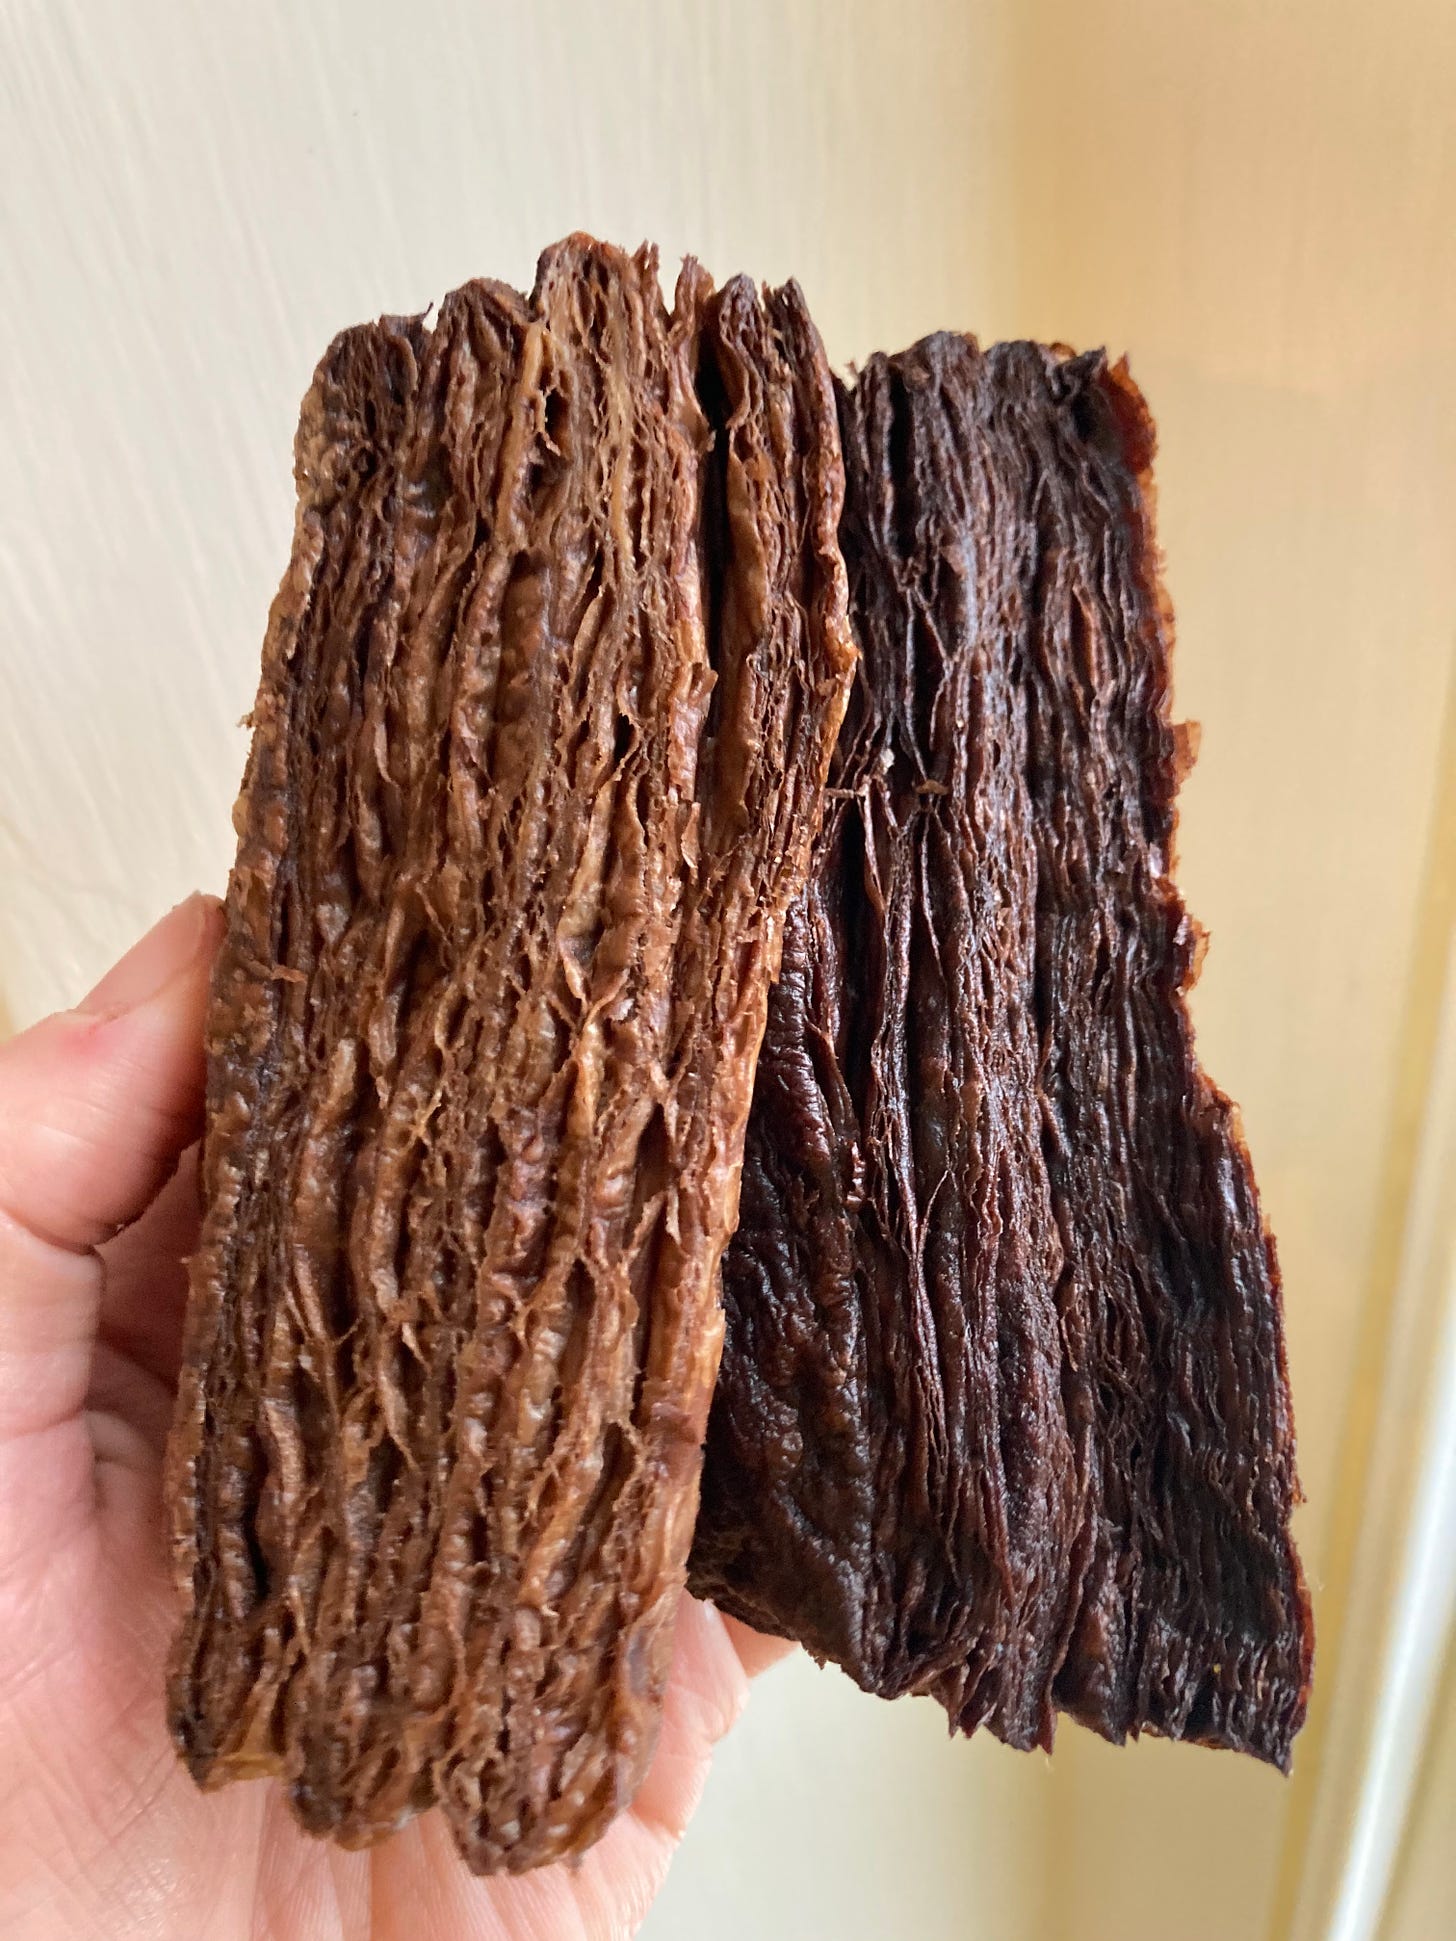
Results: Visually the dough is medium dark and quite dramatic looking. The dough puffed evenly with distinct, clear layers. It did leak a bit of butter when baking but it was re-absorbed by the end and the final texture was crisp but tender. Flavourwise, the dough is tinged with cocoa which develops on your palate as you eat it. It is slightly bitter and a little salty.
Tweaks: For the final recipe I’ll reduce the butter in the detrempe ever so slightly - it was a bit over the top and leaked a bit in the oven. I’ll also reduce the salt too
Test B: Plain dough, cocoa butter
Results: Visually the dough is a medium light brown in colour. Flavourwise it is a little sweeter and has a light cocoa flavour - it doesn’t pack as much as a punch. If you tasted it blind you may not be able to pick out the depth of the cocoa flavour immediately. That being said, this style would definitely play ball with other flavours and lacks bitterness. The final texture is light, airy and crisp
Tweaks: None! I was really happy with the flavour of this - you could up the cocoa if you wanted but I loved the subtlety.
Test C: Cocoa dough, cocoa butter
Results: Visually this dough is DARK. It is really dramatic - it has a deep, rich and strong cocoa flavour. It also leaked quite a bit of butter during baking. It also was less stable than the other tests - it fell over and changed shape during baking and was quite oily
Tweaks: Although the dramatic darkness is great, I think adding cocoa to both detrempe and butterblock is an unnecessary extra step. I wouldn’t use this technique again
Who’s the winner?
Although there are definitely pros and cons to each method I realise it’s a total cop out if i don’t pick my winner.
The result? It’s a joint win for tests ‘A’ and ‘B’! Although my preference for the fun of it has got to be ‘B’ - chocolate butter all the way.
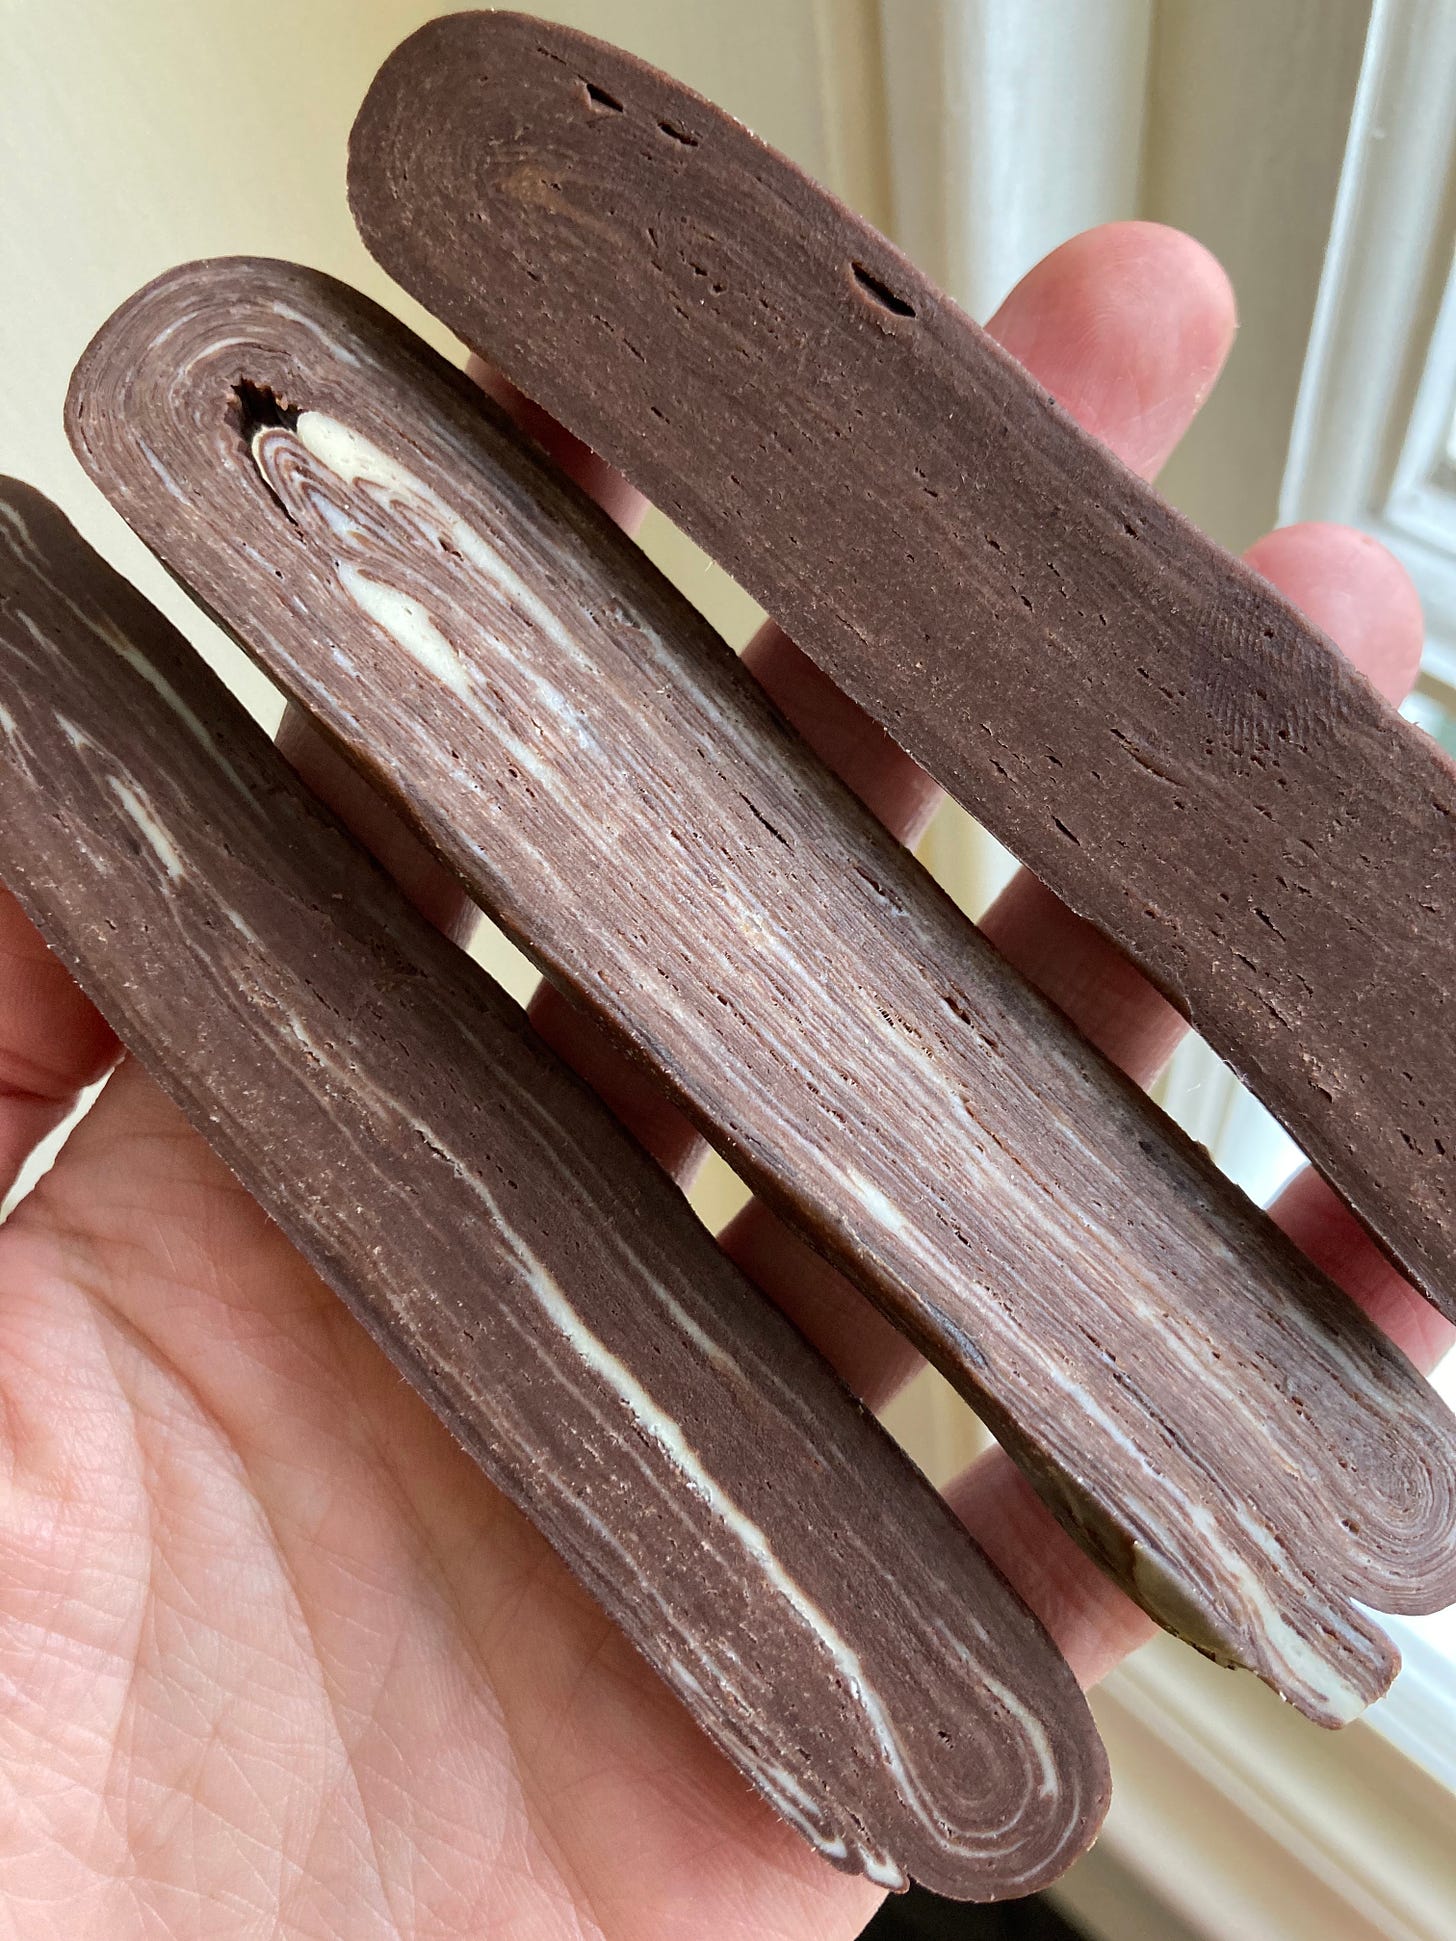
I think adding cocoa into your butter is a great first step to learning how to laminate with compound butters - it doesn’t affect the structure of the butter too much and it’s really fun to watch the plain dough transform in the oven as the cocoa ‘melts’ into it and enriches it. I think ‘B’ is a great opportunity to practice if you’d like to step-up your understanding of butters, compounds and all of that.
A word on Laminations
Laminating is just about my favourite thing in the world so I’m delighted I finally get to go off about it on this newsletter.
First off, when you are laminating, you might see a ‘leoparding’ effect - don’t worry! This is normal. The addition of cocoa will make the dough slightly harder to work with but the best thing to do is just proceed with confidence. Laminating takes practice - you can do this!
When it comes to classic puff, you want to put SIX turns into your dough with proper rest periods in between. Now, the below isn’t perfect maths but it’s a good rule of thumb:
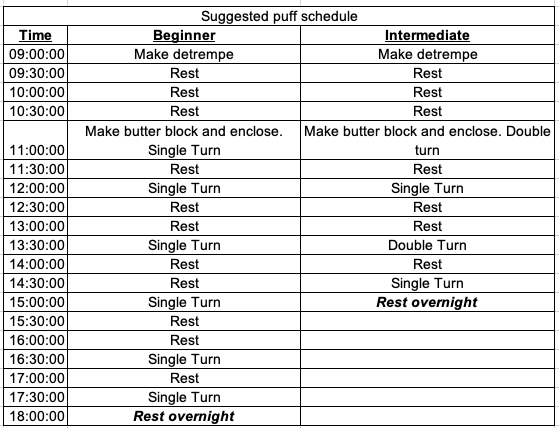
A single turn = 1 and a ‘double turn’ = 2. You can do whatever combination of these you want to get to six.
My preference is 1 + 2 + 1 + 2 as I find it to be the most efficient. Some french chefs would probably give me a death sentence for suggesting anything 6 x single turns. But, remember my friends - it’s your kitchen, it’s your life and you can do what you want!
I think it’s easier to be neat and tidy with single turns but double turns are a bit faster. So, here is my suggested schedule for beginners (first time or second time making puff, stick to single turns only) and for intermediate (faster version that combines single and doubles)
At the beginning of the lamination process, I think it is sensible to wait a ‘shorter’ (30 mins - 1 hour max) time between the first few folds. This is because the butter is still quite thick at this stage, meaning it is prone to cracking. Once you are a few folds into the process the butter is much thinner and won’t crack when you roll it so you can leave it for much longer periods.
Let’s talk about resting
Laminating by hand is definitely a challenge. When you roll out the puff dough, you’re really working the gluten. If you don’t have much experience rolling it out, there is a tendency to work it much harder without even realising it. Rushing puff pastry can cause lots of problems that you can’t fix later on, so it’s better to take it slow.
If you are having to work hard to roll your dough out then just think about how much gluten you’re developing. If you develop the gluten too much then your pastry will be prone to shrinking in the oven. Think of gluten like an elastic band - the more you work it, the stronger it recoils.
To mitigate this risk, here’s what you can do:
I can’t over express how important the resting time is. The gluten has been worked HARD each time you roll it out (especially by hand), so it needs a lot of time to ‘come down’ and truly relax. This is why it’s best to take the process slowly and meditate over it
If you go to roll out your dough and it is fighting you, STOP! Put it back in the fridge, have a cup of tea, watch a show, listen to a podcast. Come back to it later
Uneven or aggressive rolling of the dough will lead to uneven laminations which can also mean your dough shrinks and leaks butter during baking.
Once you’ve put all your laminations in and the dough has rested, I think like to roll my puff into sheets of desired thickness (usually 0.2 - 0.4cm)
Once it is rolled out you can rest it overnight in the fridge before using it. Or you can move it into the freezer for long term storage.
Despite the above all sounding a bit scary, I don’t want you to feel worried about this process! The reality is you cannot always expect perfection. Even though I’ve made puff (probably) hundreds of times, there are times where my pastry shrinks, the butter leaks or things just don’t work out quite right. Even if it isn’t “perfect”, I still take a moment to appreciate that I’ve created a gorgeously buttery piece of dough architecture. And you will too.
Alright, let’s make it: Cocoa Puff!
In my opinion, it is much easier to laminate with larger quantities of dough so feel free to double this recipe if you’re excited about eating lots of cocoa puff.
Cocoa Puff Pastry - makes 500g
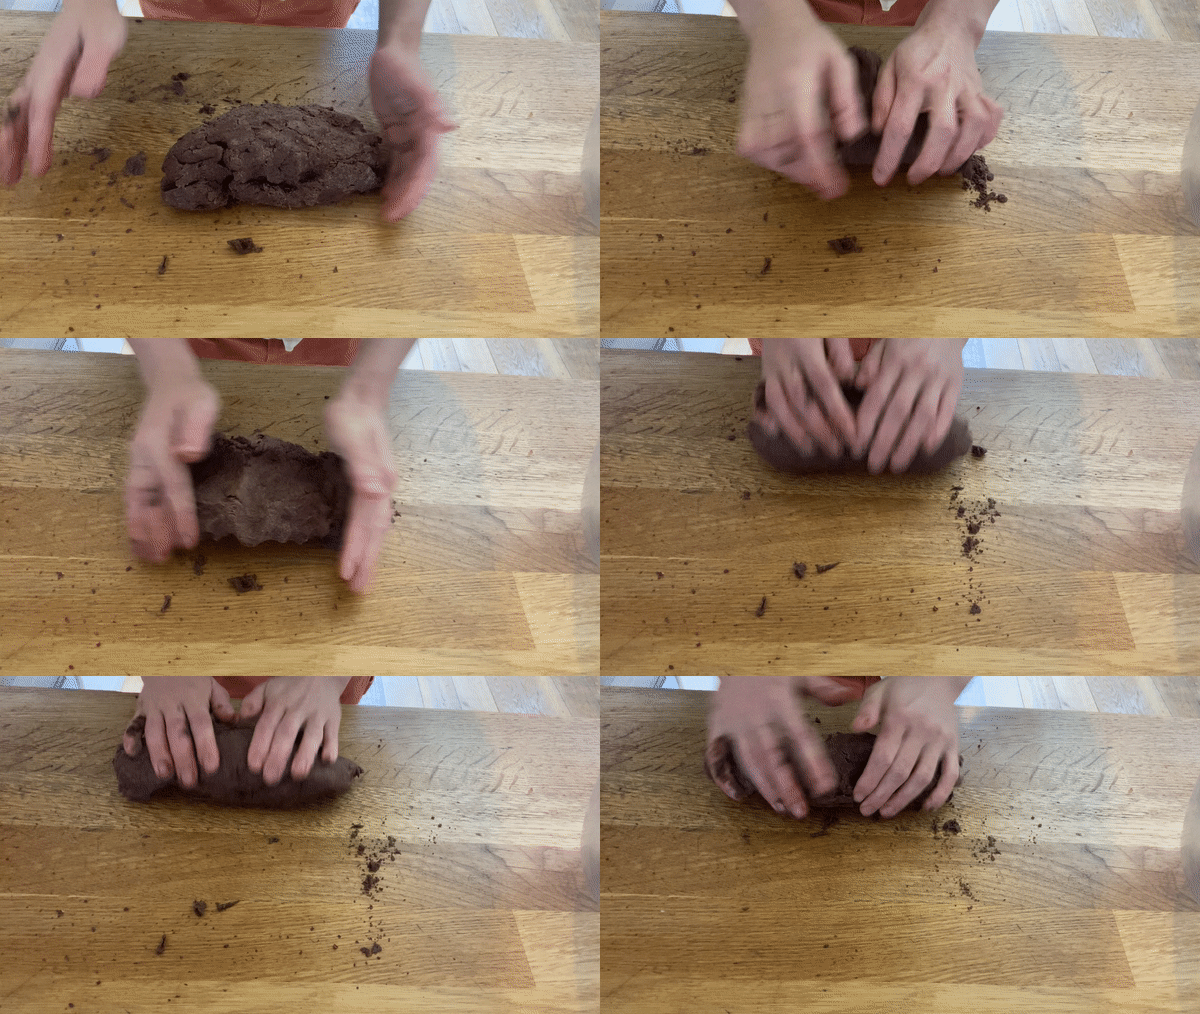
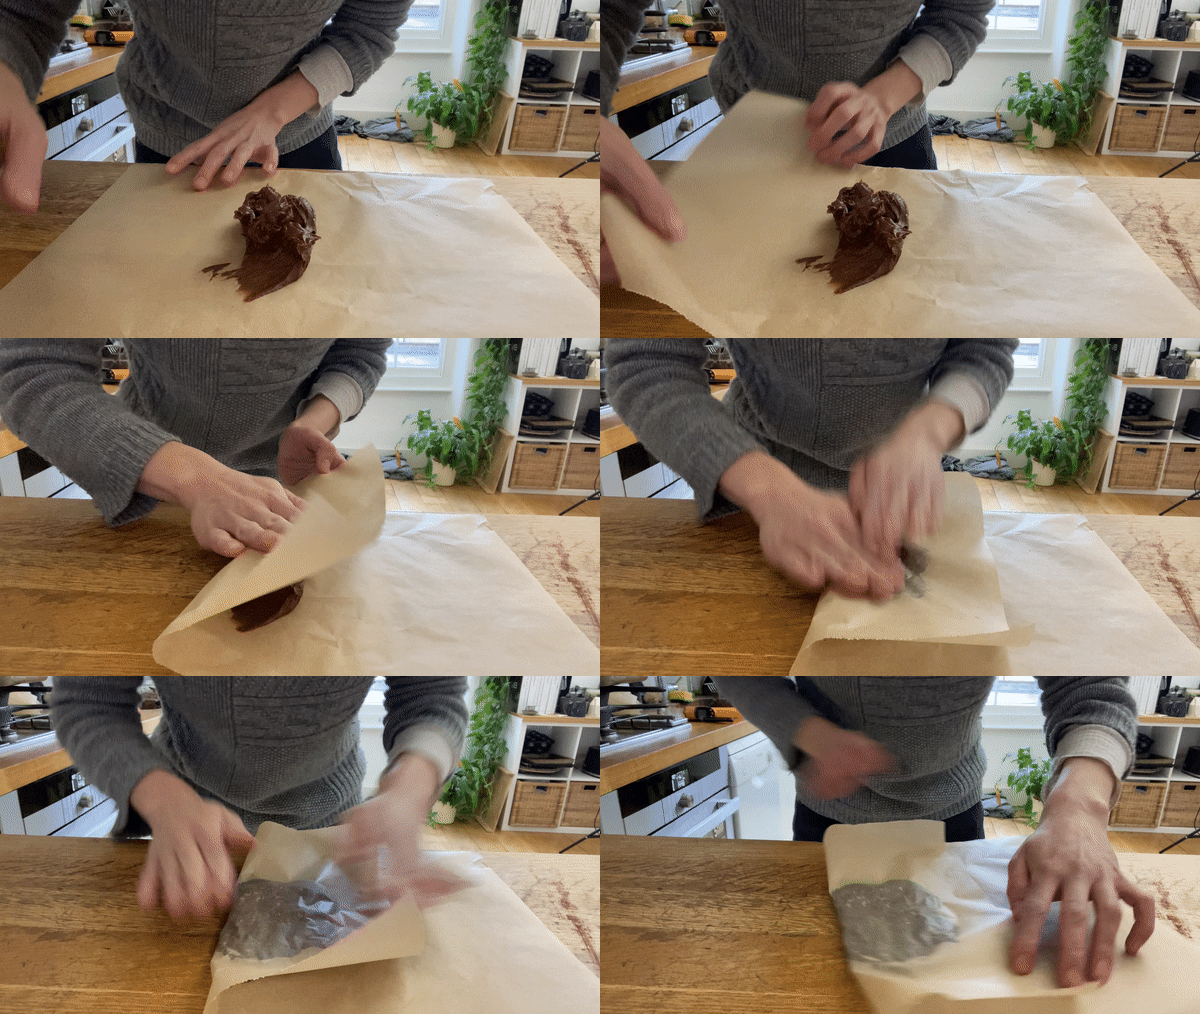
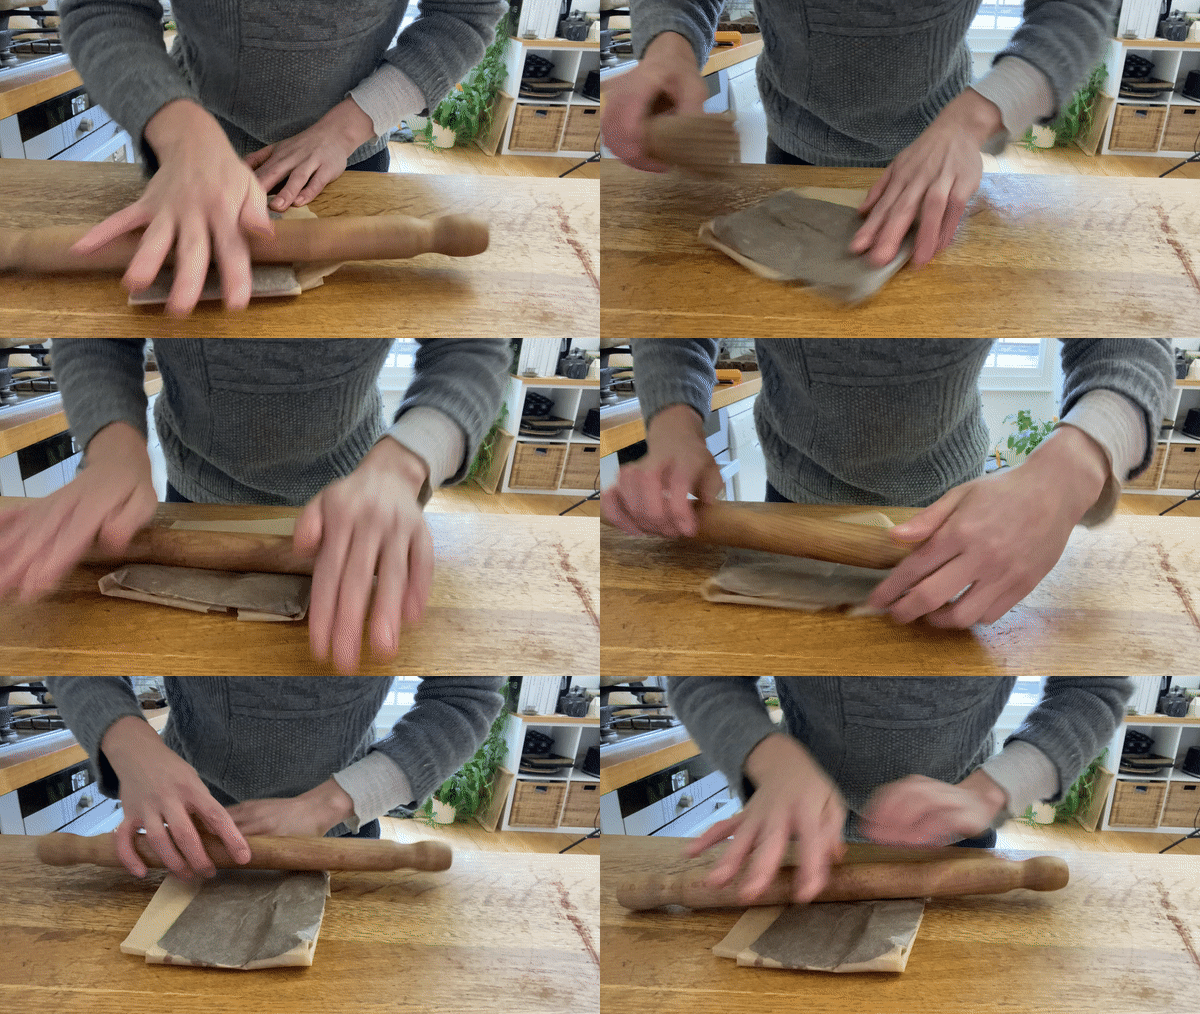
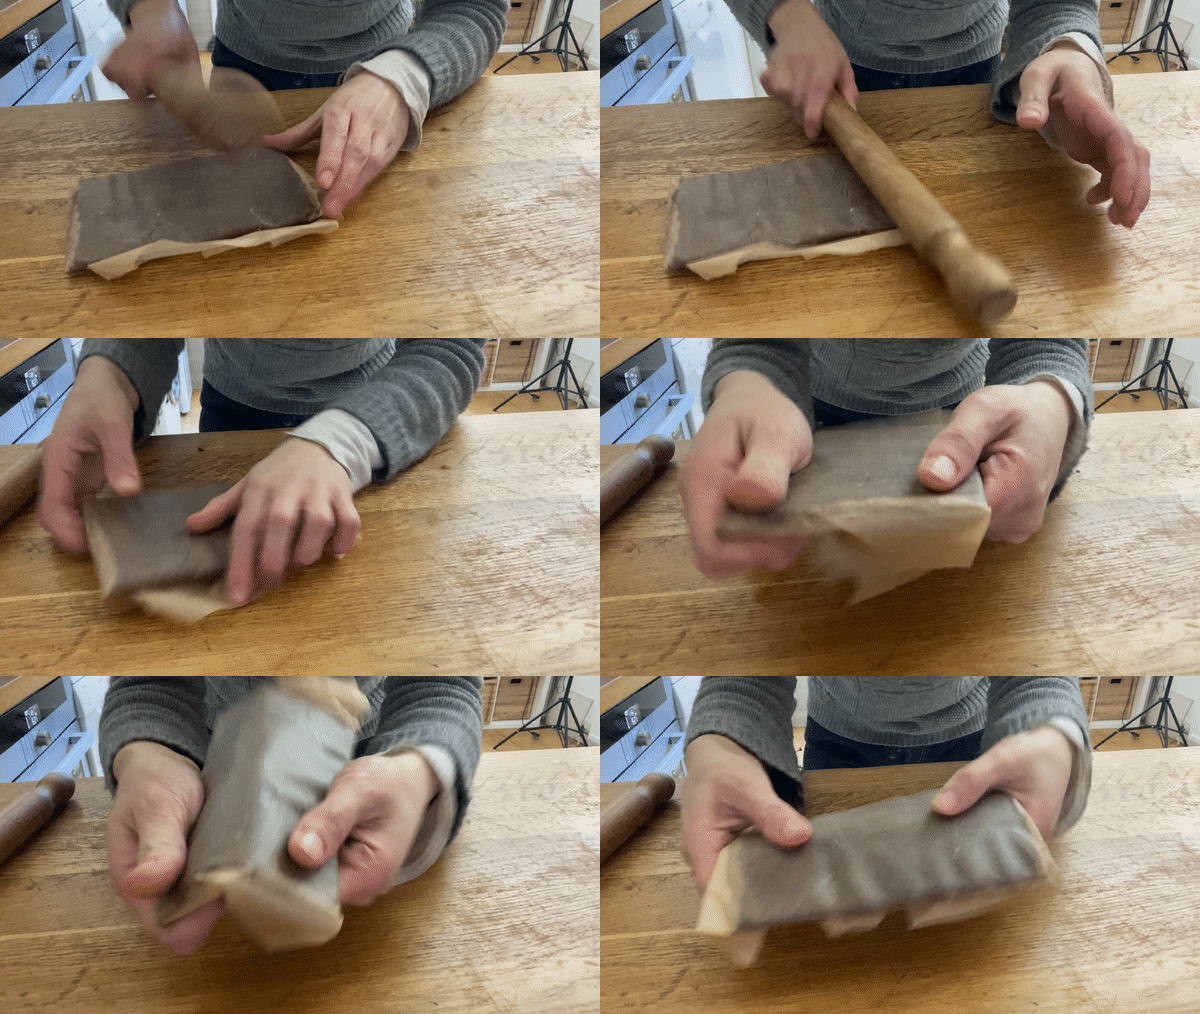
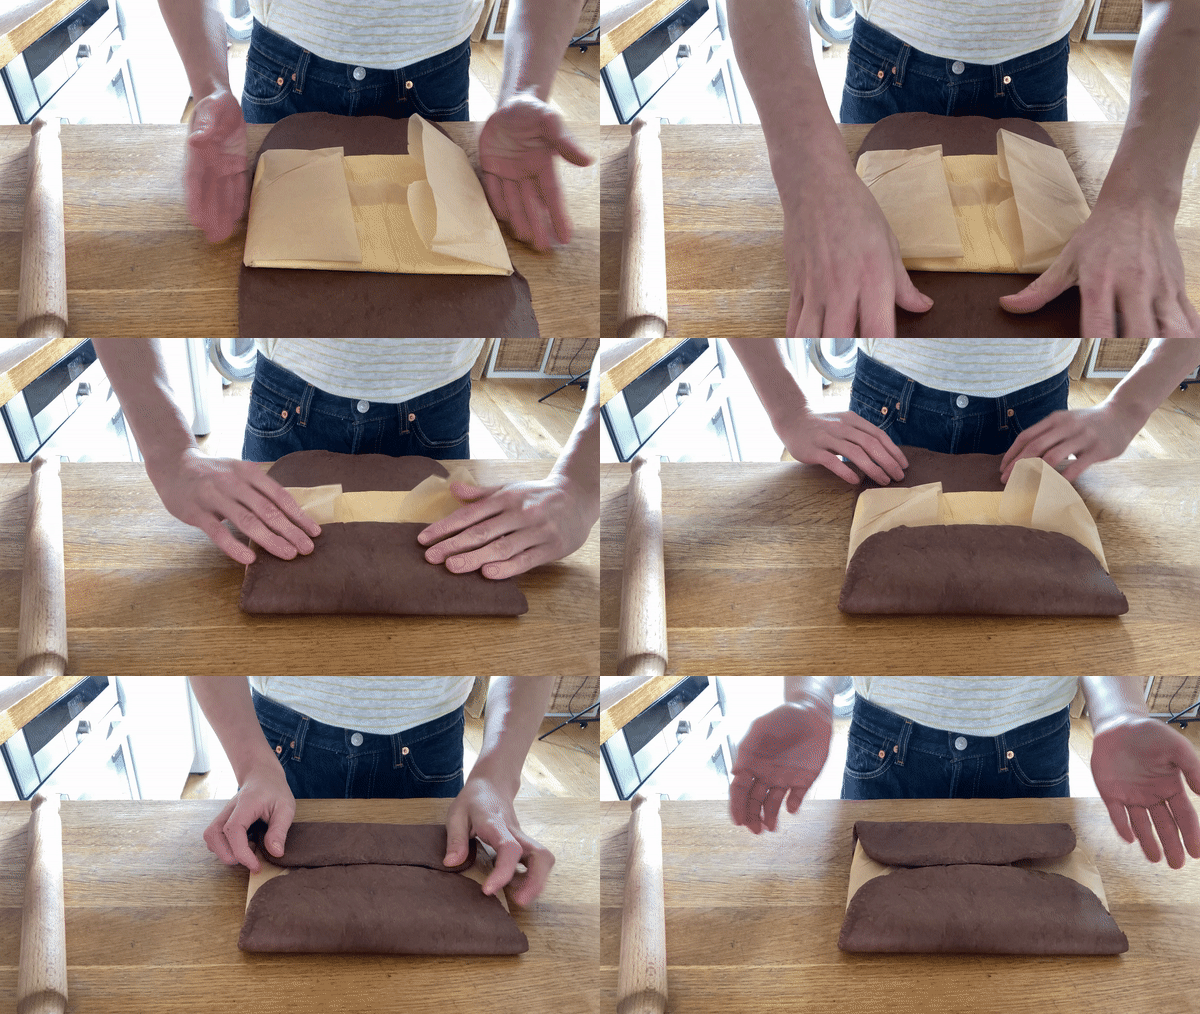
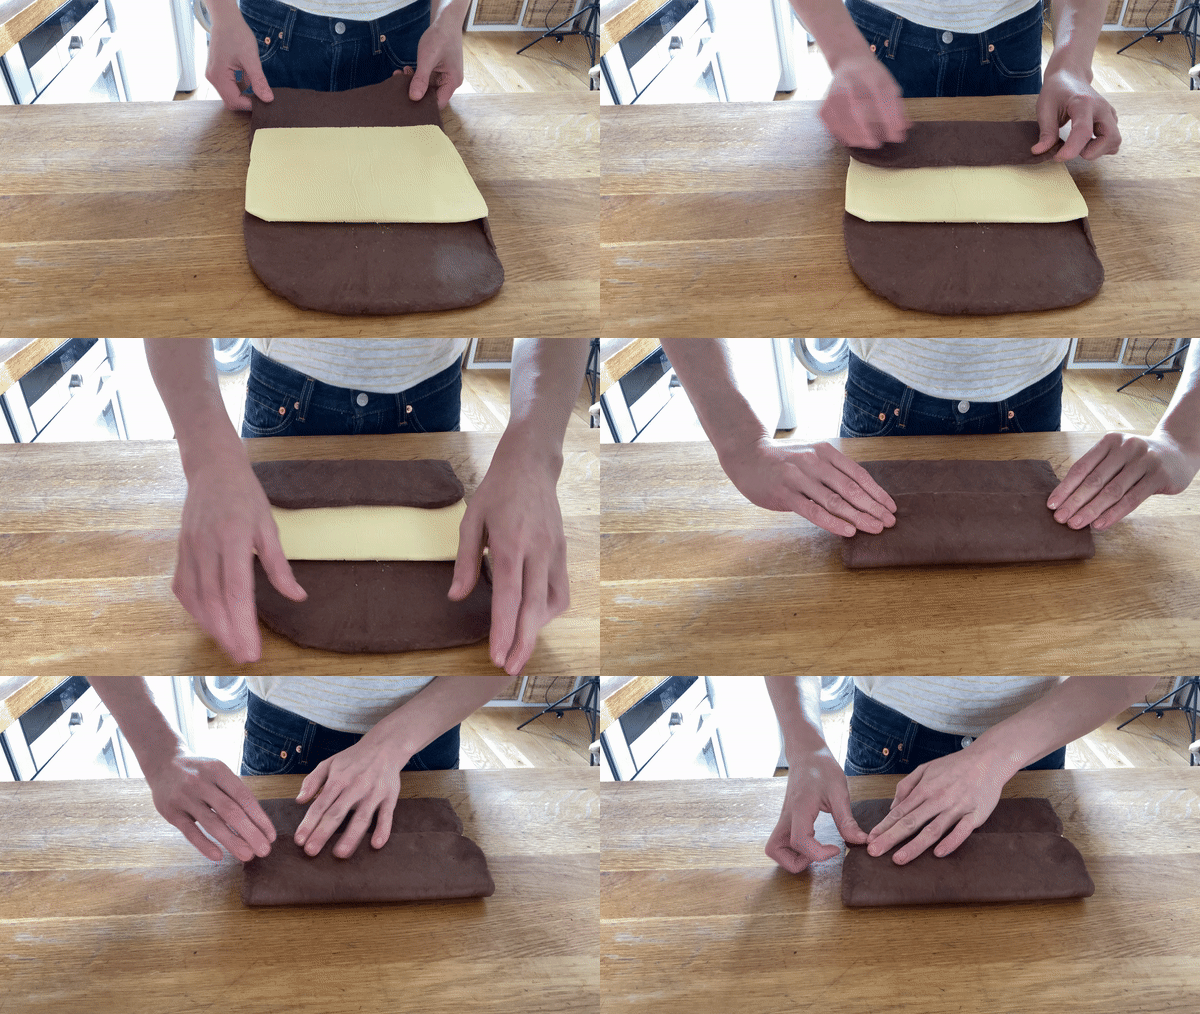
**Please note that the GIFs show the ‘A’ dough (as I forgot to film the other one, sorry) but it is the same method**
Detrempe
165g bread flour
20g sugar
4g salt
75g water
1g light vinegar, like cider or white wine
50g butter
Butterblock ‘B’ (with cocoa)
150g soft butter
35g cocoa powder
For both of these recipes, I used Menier cocoa powder here as I wanted something a bit lighter and sweeter. My initial tests had used Valrhona which is particularly dark. Check the chocolate cake recipe to see the different cocoa powder properties
Method - mixing your detrempe.
Put all of your dries into a bowl and mix. Breadcrumb the soft butter into the dries using your finger tips
Create a well in the middle of your dries and slowly pour in the water bit by bit, mixing with a fork so you are combining the liquid/dries carefully
Once everything is combined, turn onto your work surface and knead gently for 30 seconds until the dough is homogenous - don’t over work
Pat into a square, wrap (I like to use a sandwich bag) and rest in the fridge for at least 2 hours
Butter block ‘B’ method - cocoa butter block
Stir or beat your softened butter until completely soft
Add your cocoa and stir in. You want the cocoa to be well distributed through the butter
Once it is homogenous, use a spatula or dough scraper to mould it into shape on your paper
Fold the edges of the paper around your butterblock to make a rectangle shape
Using a rolling pin, push the butter into shape. Adjust the paper to keep the edges neat if needed
Put into the fridge for 30 mins
Before using, check it is pliable. If it is too cold, give it a few taps with the rolling pin Remember we want the butterblock to be cold but not too cold!
Locking in your butter
Roll your detrempe so it is double the width (but the same length) as your butter block. Use your butterblock to measure the size. You want the edges to be able to fold back over and cover the block completely
When you are satisfied it is the right size, unwrap the butter and stick it into the middle of your dough. Bring the edges in and pinch it together in the middle. Your butter is now in!
Turn your dough 90 degrees and now roll your dough out long, until it is approx 0.5cm. You will be rolling it so the seam is vertical. I am making a double batch in this example and mine is approx 50cm x 20cm.
I like to move my dough around quite a lot when rolling it out - this makes sure it doesn’t stick. It also lets me feel how the dough is doing - is it too hot? too thick? too cold? etc.
Lamination! (same for A & B)
Now it’s time to laminate. This is where you can make your own schedule - check the laminating table above for my recommendations:
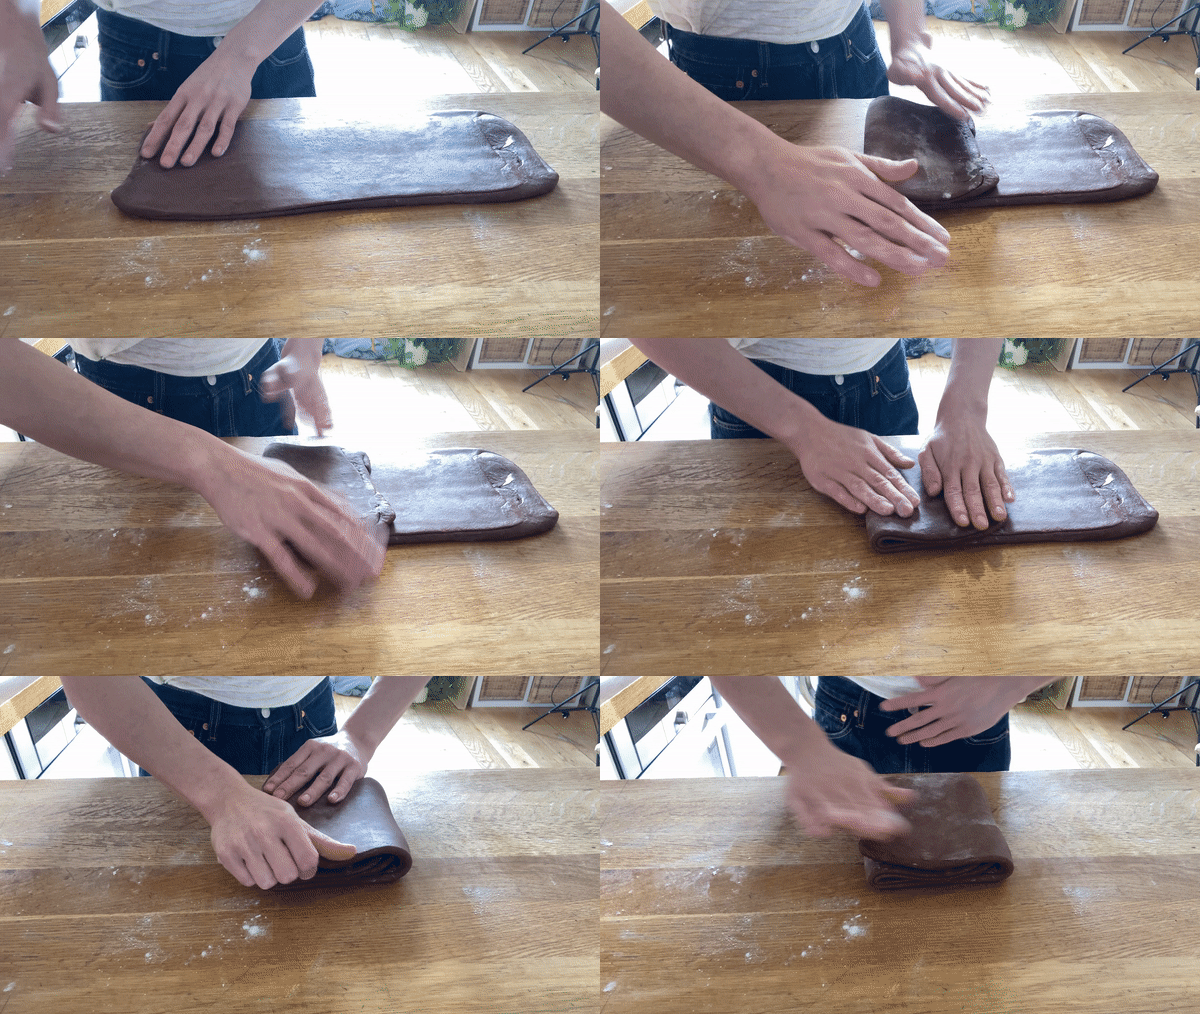
According to the table above, perform a turn. Here is a single turn. This is also known as a letter fold. Thinking of the dough in thirds, bring one into third into the middle then the other - as though you were folding a business letter.
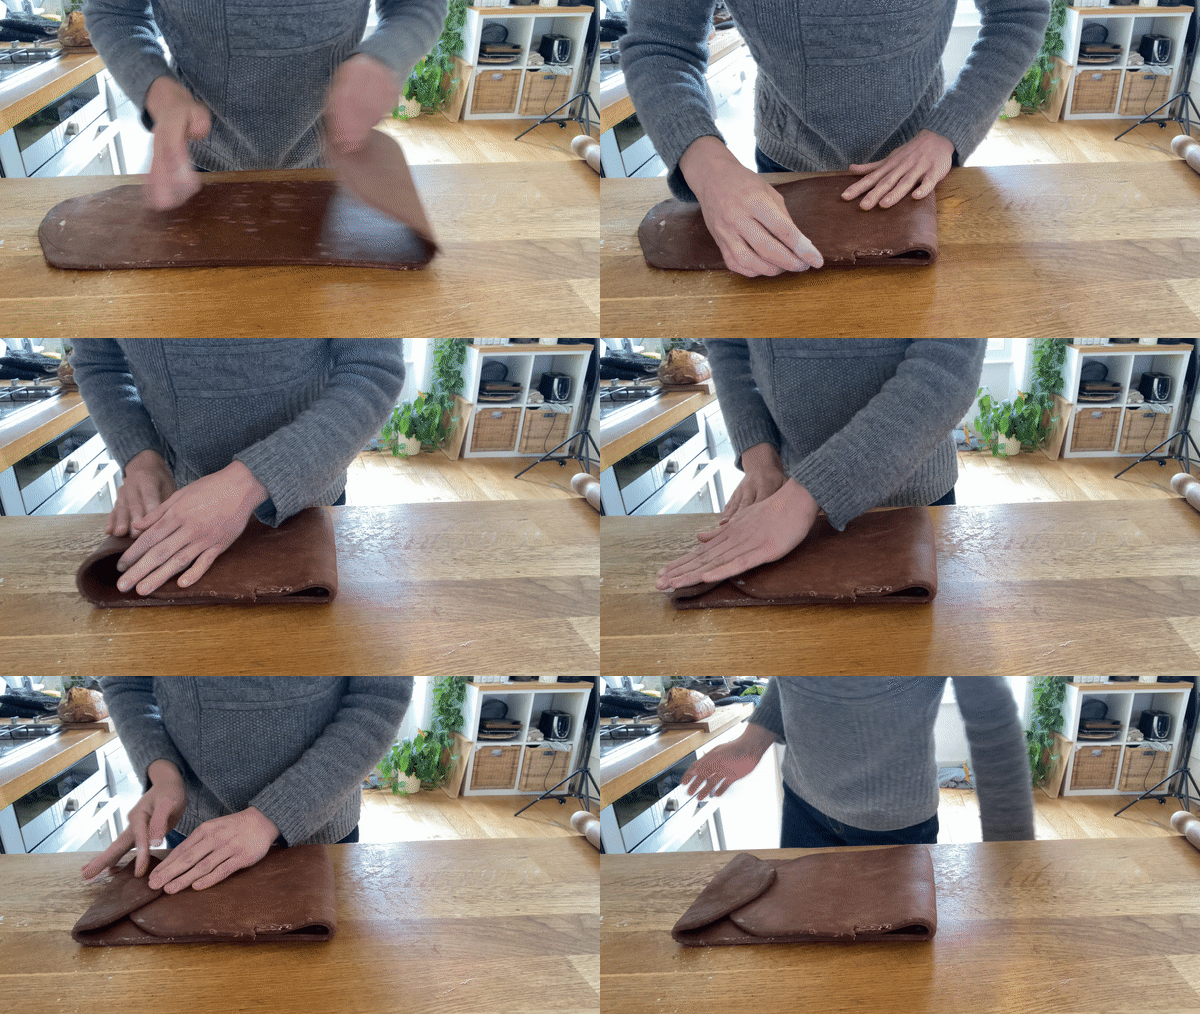
If you have extra flour on your dough during lamination, just brush off the excess before performing the turn:Here is a double turn. A double turn is when you take your dough a bit longer and then fold both sides into the centre. After this, the dough is then folded in half one more time (hence ‘double’ as there is two actions)
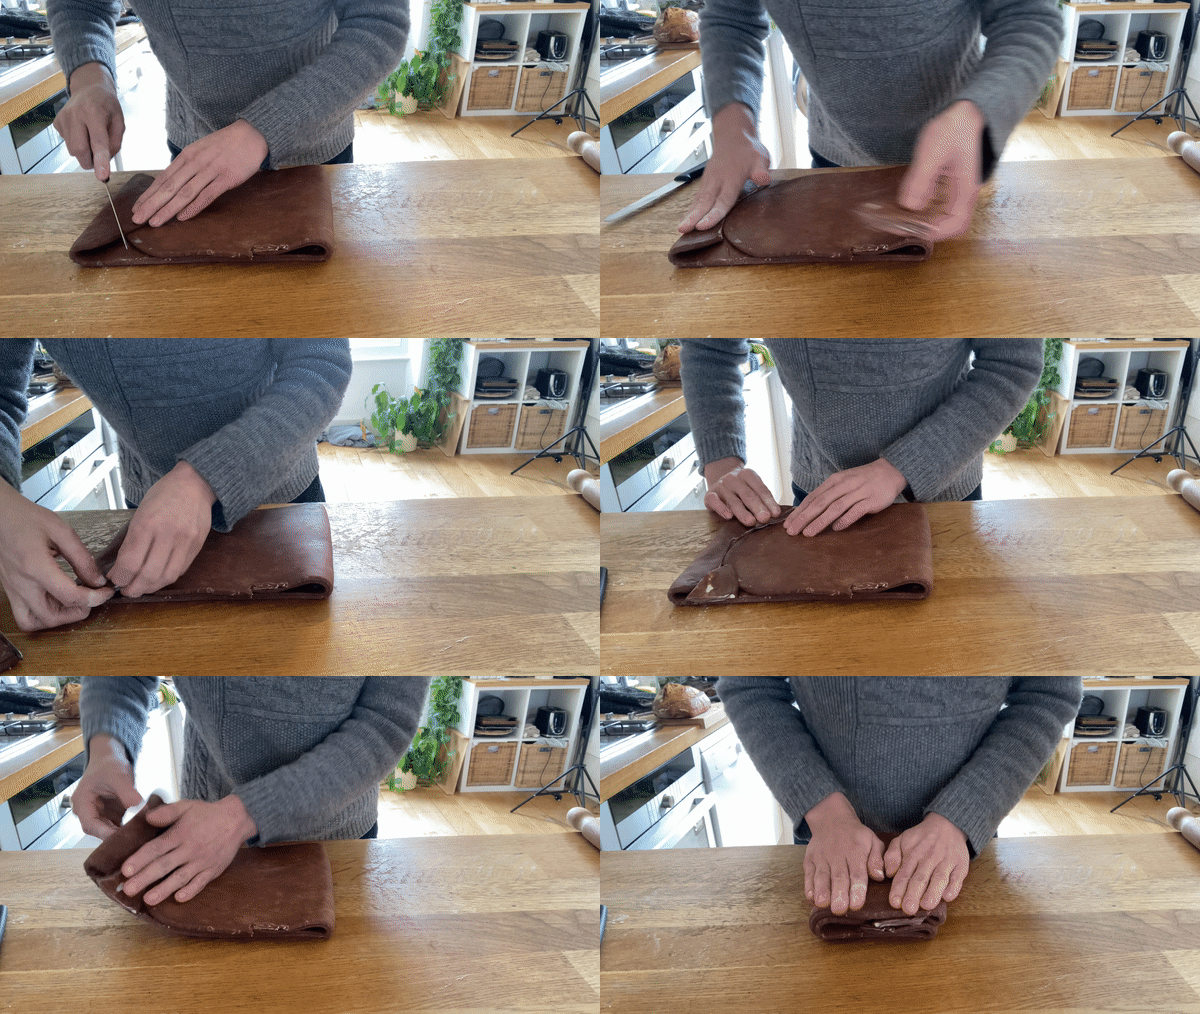
When you are doing double turns the dough sometimes gets a bit curved at the end. I’ll show you my tactic for minimising wastage whilst performing a turn with a curvy bit of pastryAccording to the schedule above, rest your dough and proceed with the rest of the turns.
Each time you laminate be sure to turn your dough 90 degrees - your dough can only stretch so many times in one direction so every time you roll it out you need to turn it. Once you are in the midst of the turns, just remember you want the seam/fold of the dough to be vertical
Make sure you take notes on how many turns you’ve done. I like to keep a piece of paper or write on the plastic wrap to keep track
The final roll out
Once all of your turns are in, it’s time for a nice long final rest before the final roll out. I like to do overnight.
When you are rolling out your pastry it’s important to think about what your final product will be. Your puff will rise approximately 6-8 times its height so keep that in mind when you are picking your final roll-out thickness
I like to store my pastry in sheets once it is rolled out. Here you can freeze them (lasts up to 3 months well wrapped!) or keep them in the fridge, depending on when you’re planning to bake it
If you are cutting a shape, for example a circle for a galette, you must allow the puff to relax before doing so. At least 30 mins is essential (otherwise you’ll end up with an oval)
The rules of baking Puff pastry
Puff pastry needs to be baked hot! Pre-heat your oven to 200c
You must make sure your puff is nice and cold when it goes in. It is the cold pastry going into the hot oven that creates the steam and layers
Depending on the thickness, your puff will need anywhere from 30 mins to 50 mins to fully bake. I like to start it at 200c and then reduce to 180c after the first 15 mins
If you do get your puff out of the oven and realise it isn’t fully baked then… get it back in! Don’t worry - it happens to us all. As long as it is still warm you can re-bake it and get it going again
So… what’s next?
Now you’ve got this puff there’s endless things you can do with it! Here’s a few ideas
Once rolled into thin sheets, sprinkle demerara sugar on it. Then roll up from each side to create the most incredible cocoa palmiers which are impossible not to immediately eat. Freeze for 1 hour and then slice and bake for 18-20 mins
Bake between two trays (to compress the puff) and make a mille-feuille
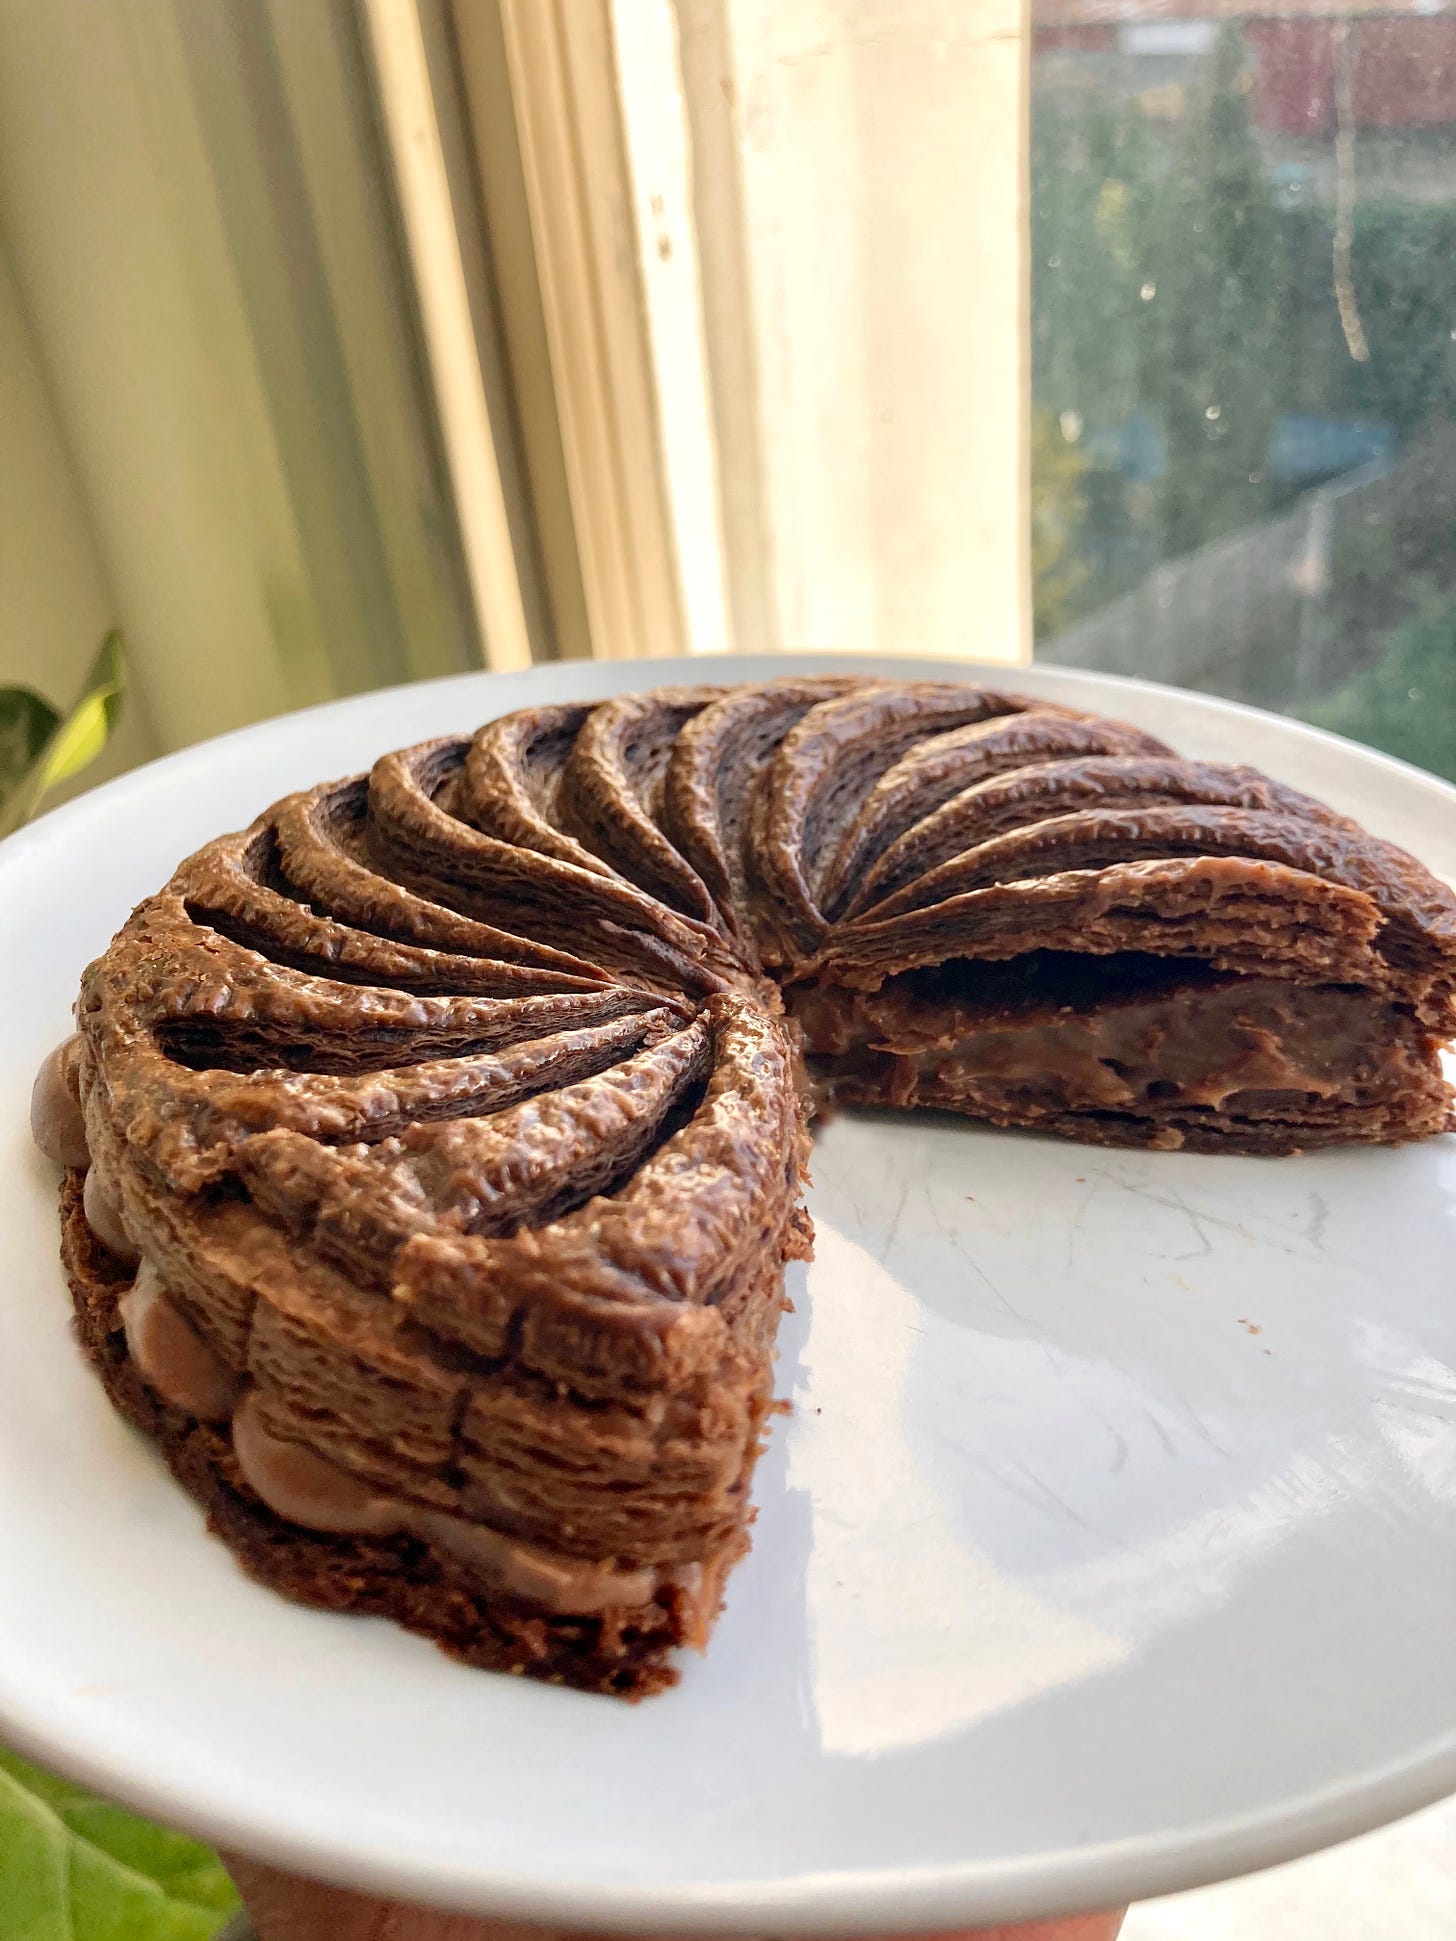
Or… how about a take on a galette using chocolate custard?
I’ll share a recipe for this chocolate custard later this week so you can make your own.







Nice one! 🤩 Are sfogliatelle still coming to kitchenprojects? 🙏😜
Need the galette des rois recipe ASAP 🤤