Kitchen Project #51: Puff pastry 101
Time to get flaky everybody
Happy New Year! We’re back with a bang.
First things first… let’s get one question out the way: Is it puff pastry worth making at home?
OBVIOUSLY! Sure, it is a bit time consuming on balance but it’s meditative, life-affirming and the joy you feel when those layers come up in the oven? Truly worth it.
Over on KP+ I’ll be sharing the lowdown on a beautiful apple galette des rois, basically an inside out tart tatin. KP+ is the paid version of this newsletter. Subscribing to KP+ costs just £5 and you get loads of extra content + get to support the newsletter so click here to check it out:
Let’s do this!
Love
Nicola
King of cakes
I find it hard to start the year WITHOUT deep diving into puff pastry.
Every January, after the images of turkey and roast potatoes have died down, my Instagram feed (and probably yours too!) is filled with the glorious Galette Des Rois aka. King’s Cake. Once again, I’ve failed to meet the *official* deadline of 6th January, but let’s not worry too much about that.
Never had one? Well, let me fill you in: A trad GDR is a perfect buttery marriage of puff pastry and frangipane, finished with a hefty dose of egg wash before it is scored and baked. Although the classic is heavenly - real almond croissant energy if you’re a fan of those - there’s lots of ways to play around with it. Last year, I covered a double chocolate version (click here) but this year I’m keeping it a bit more traditional:
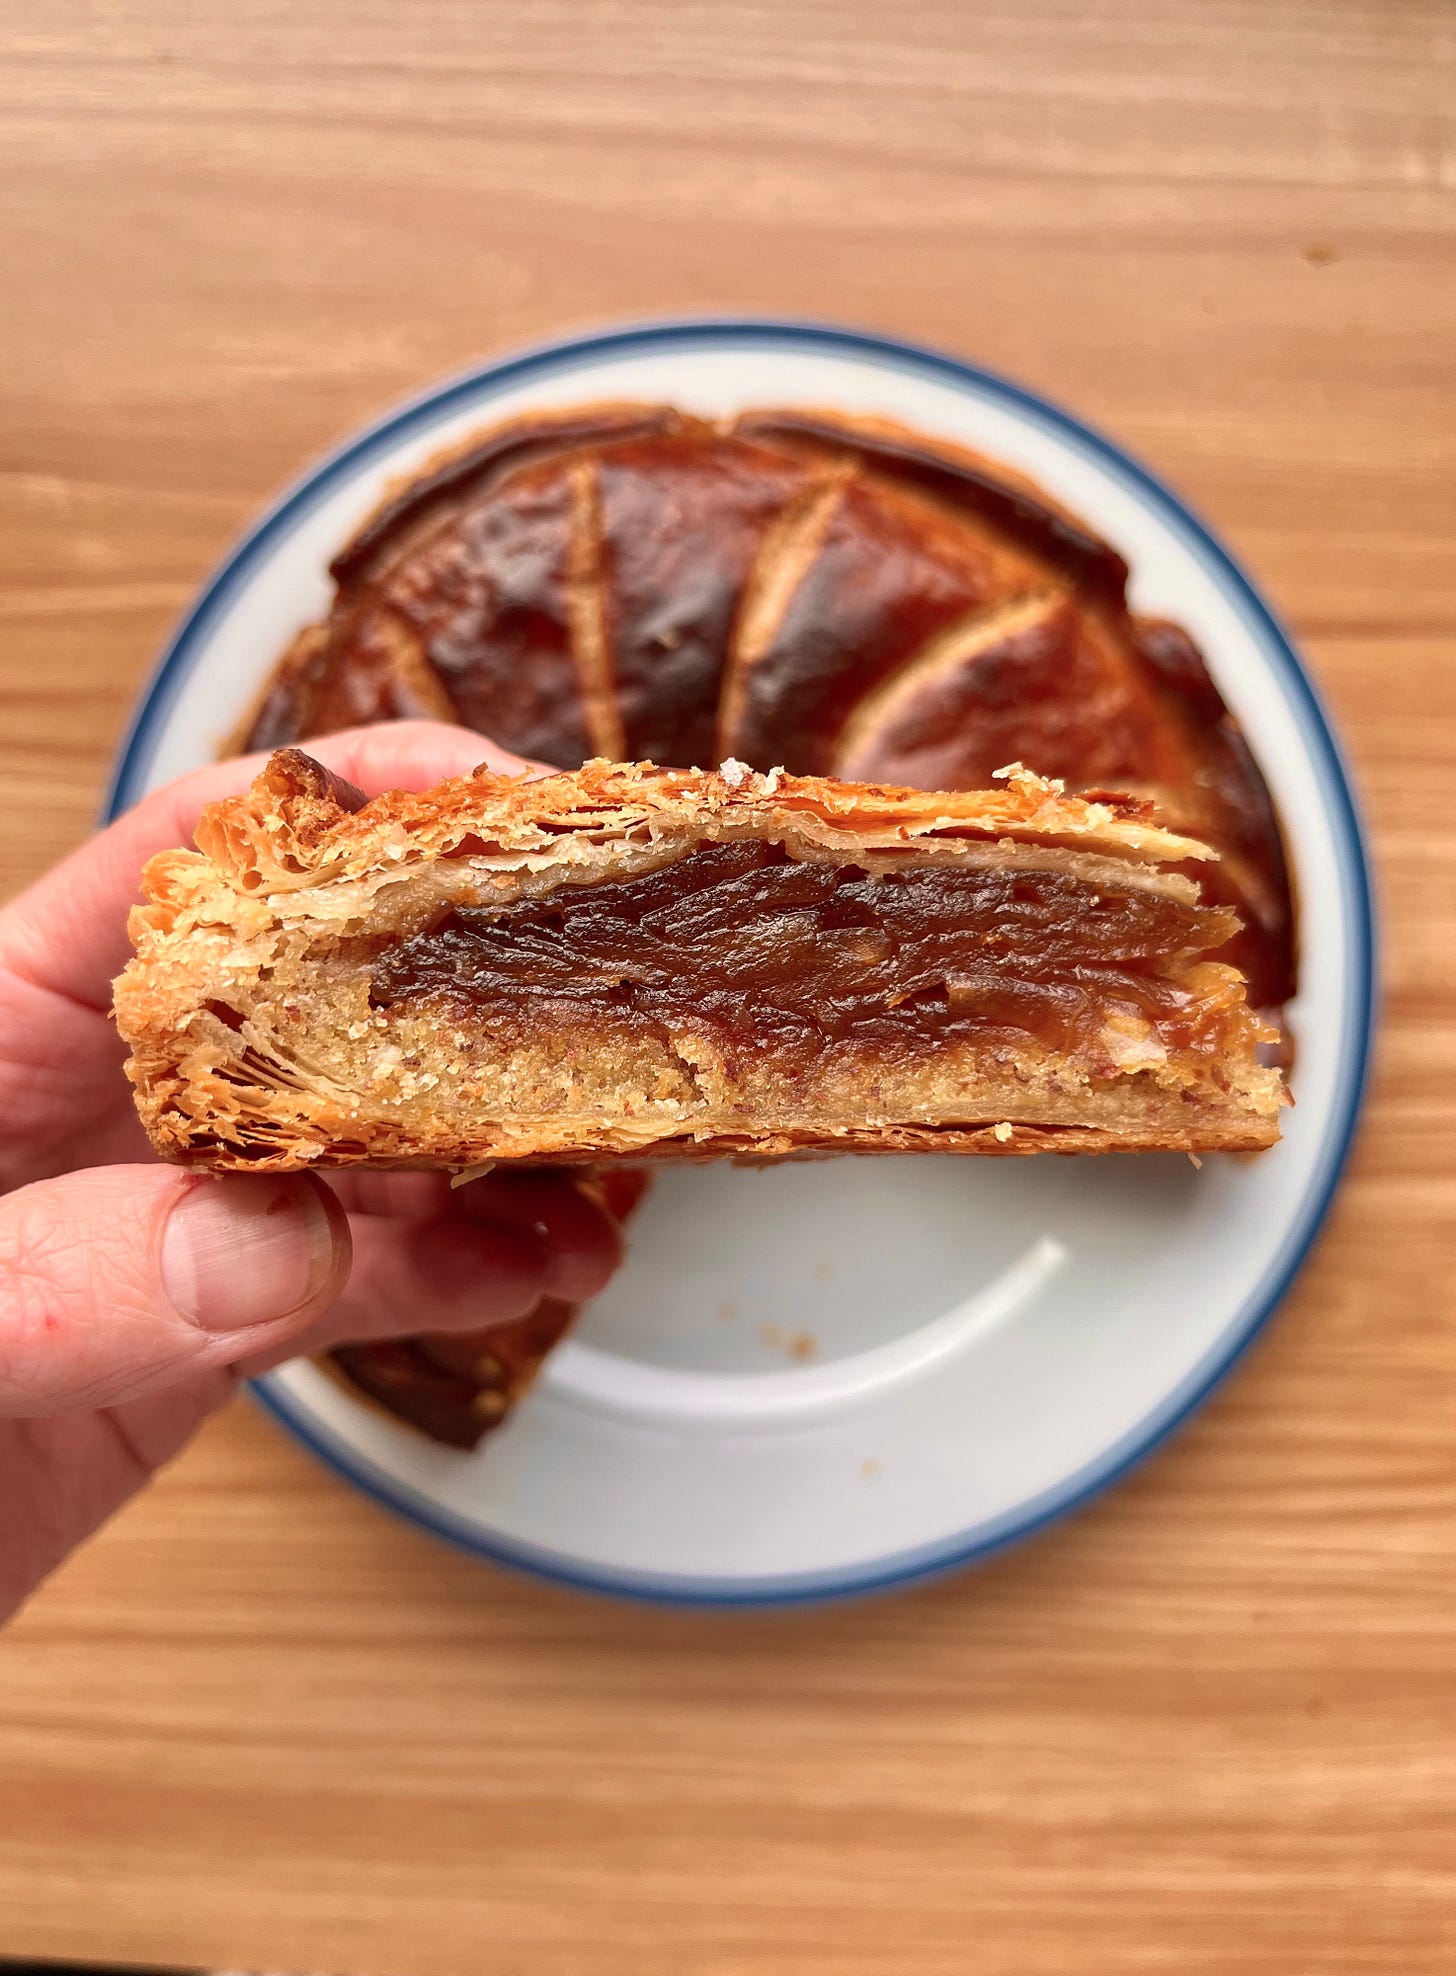
Over on KP+ I’ll be showing you how to build a “million layer apple” galette des rois - a disc of thinly sliced caramelised apple sitting on a bed of frangipane and enveloped in puff pastry. I’ve been obsessed with the idea of making this for the past year and so excited I finally got to do it - I love the way the layers on the outside continue on the inside. Click here to read it.
For this newsletter, I’ll be running down my best ever hand lamination recipe and break it down so you can see exactly how to make wonderfully flaky and light puff ever. As well as this, I’ll finally be answering a question that has been burning a hole in my mind for ages - does the turning technique *actually* impact the final product? Plus we’ll be doing a bit of maths (the fun kind)
Puff pastry 101 / refresher course
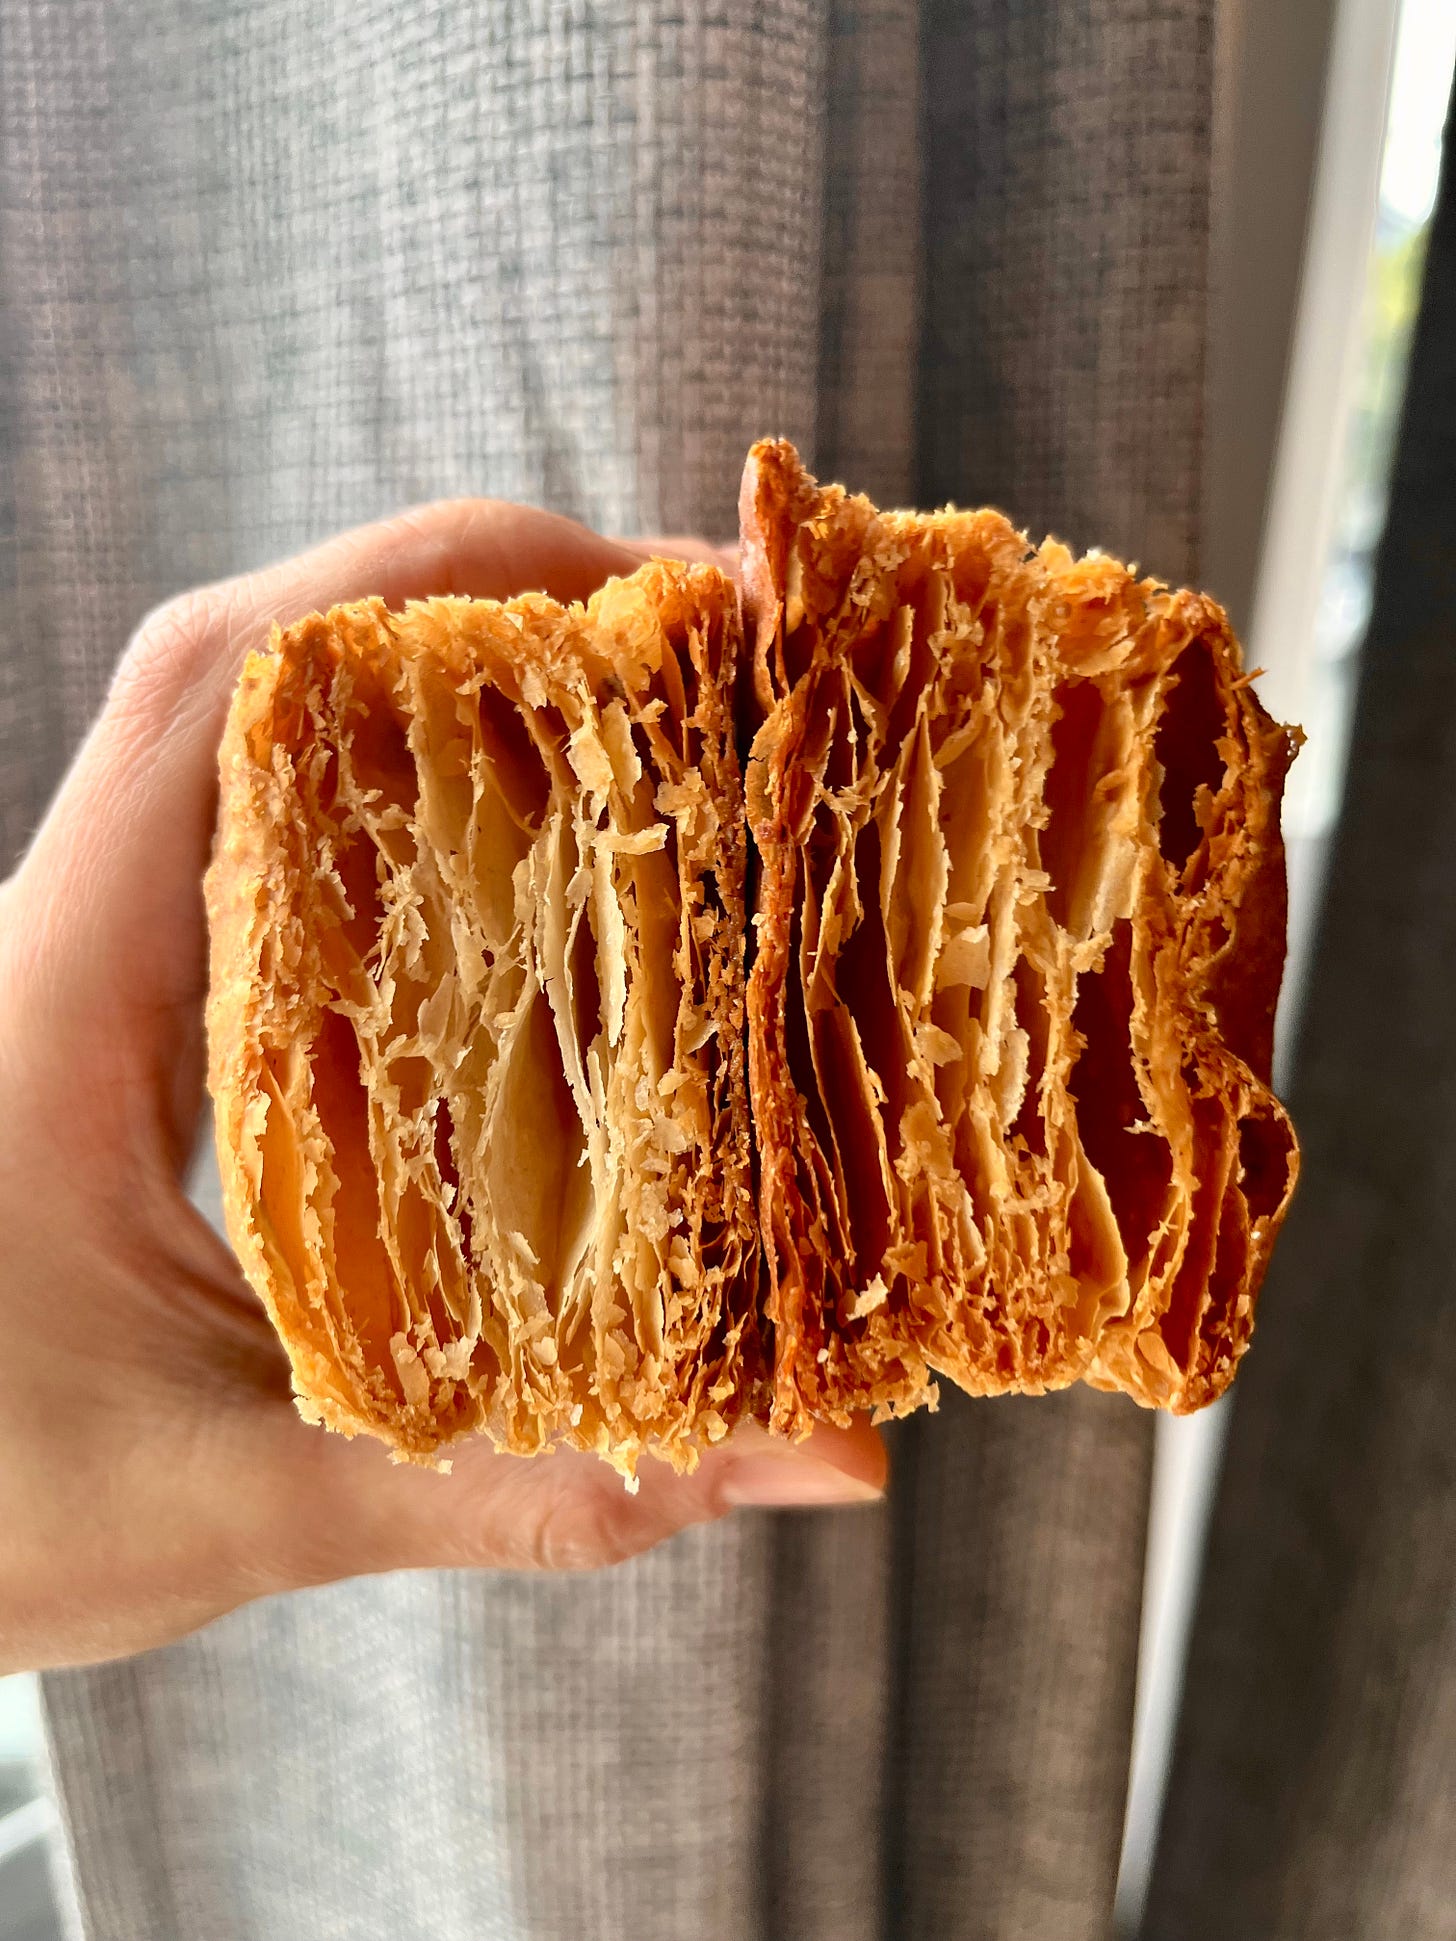
We’ve all seen puff pastry transform in front of our eyes. No matter how many times I see it happen, it always thrills me. It's a true transformation:
And the source of the transformation? Steam power.
All those amazing layers are created as steam forces apart the dough! The steam is provided by carefully placed layers of butter, in a process called lamination.
Lamination is the process of creating layers of butter between dough. This is achieved by making two separate blocks - one is a simple dough (we call this the ‘detrempe’) and the second is made of butter. You then enclose butter into the dough. After this, bit by bit, roll by roll, fold by fold, the butter and dough are spread into fine, distinct layers. The result? When the pastry goes into the oven the butter melts which has two purposes:
The melted butter enriches the dough as it melts
The steam created by water evaporation forces the layers apart. The dough physically lifts and puffs up and you’re left with an ultra flaky crisp multi-layered pastry
Although this is, in theory, simple, there are quite a few variables at play. From the detrempe itself, to the number of folds, there’s a lot to play around with. Let’s go deeper.
So, how do we refine the recipe?
When it comes to recipe development, it’s important to always have an end goal in mind, otherwise the parameters of the tests change in a way that is NOT conducive to good results. A lot of the recipes that I have inherited over the years have been formulated to work best as large batches that get rolled through pastry breaks/automatic laminators which makes them near impossible to work with by hand.
Before we get into tweaking the formula, it’s important to know what the role of each ingredient is:
Flour - Flour is proportionally the main ingredient in puff pastry. It provides the body of the dough and most importantly it contains gluten. Gluten is the structural backbone to puff pastry
Water - Water hydrates the flour which allows gluten bonds to form. Without water, there is no gluten!
Vinegar - Vinegar is an acid which tenderises the dough. But most importantly it is also responsible for stopping oxidation. If your dough oxidises it goes a weird grey colour in the fridge. Vinegar counteracts this.
Salt - Salt adds flavour to the dough but it also strengthens gluten
Sugar - Sugar, a new addition to my formulation, helps tenderise the dough
Butter - Butter = Fat = Flavour! There is a little bit of butter in the detrempe itself which just helps to enrich it a bit. As for the butter block, it is responsible for creating the distinct layers. When you are making puff pastry you just have to imagine anytime you see a layer of butter that will melt and ‘disappear’, leaving beautiful distinct layers in its path. The butter block is usually about 50% of the dough weight for classic puff pastry. Some kitchens reduce this to save money, or mix the dough with butter
Making this recipe work for hand lamination
Although it’s tempting to throw everything and the kitchen sink at the recipe development process, you can’t fuss with every variable, every time you make it. I no longer have access to a fancy pastry break (though I WISH I had one in my kitchen) so here’s how I have amended my formulation to make it hand lamination friendly.
Shout to one of my dough heroes Adam of the fantastic Grain and Hearth bakery for thinking through some of these points over DM:
Flour - As we know, flour has the ability to form gluten which is the backbone to our puff pastry. Gluten is developed as it’s rolled so you need to try and get a happy medium between a strong dough and a dough that literally-hurts-your-hands to roll it out. And the more you strengthen the gluten, the more elastic the dough will become which can result in major shrinkage in the oven and a final product that is lacking in tenderness. Given the layering process, the gluten needs to be as relaxed as possible to tolerate the whole process. So, as well as plenty of rest and proper treatment of the dough, we can use some other techniques to keep that gluten in check
Mixing - When you mix your detrempe, you want to work it as little as possible. There is literally no point developing gluten at this stage. Barely mix it, just so it forms a dough then leave it alone
Water / hydration - The hydration of your puff pastry is an interesting variable to play with: The lower the hydration, the more defined the layers will appear - bakeries often, for most dramatic effect, tend to use a seriously low hydration. However, the lower the hydration the more difficult it is to roll out. If you have a pastry break at hand, you can play around with a lower hydration, but for rolling out by hand, I tend to err on the ‘higher’ side. This also, I think, makes the layers more enjoyable to eat (softer/more moist), even if the layers aren’t as defined
Vinegar - This tends to be standard across recipes, but you could swap for lemon juice or another acidic liquid and get the same results
Salt - Salt adds flavour to the dough but it also strengthens gluten and again, tends to be standard across recipes
Sugar - Sugar, a new addition to my formulation, helps tenderise the dough. I used to avoid putting sugar in my dough like the plague, but I’ve now seen the light! As we know, sugar is hygroscopic which means it draws water AWAY from the flour. Since flour needs water to form gluten, if the water is being kept busy by sugar, it helps limit the strength of the gluten. I used to think this was a bad thing, but I actually think it makes the layers even more tender!
Butter (detrempe) - The butter in the detrempe is really important to limit gluten formation - we rub the butter into the flour meaning we are literally coating cells of flour in fat, which prevents water from getting to the flour and thus limiting the amount of gluten that can form.
Butter (lamination) - The amount of butter you fold into your puff pastry doesn’t really make it easier or harder - it will be harder to keep the integrity of a very small butter block compared to a larger one, since the layers become thinner and thinner as you roll it - I mean, you turn a single butter layer into 1500 in some cases! More on that next
Testing turns and results
When you come up in pastry kitchens, you often end up subscribing to the gospel of whatever chef you are working for - honestly, there usually just isn’t the time to develop your own theories with relentless production and hectic service. Although sometimes these rules defy logic (e.g. only being allowed to use a specific wooden spoon to make creme pat - this one was particularly traumatic) it can sometimes take a while to shake off some of the things you’ve been accepting as fact, without testing it yourself.
This week, I finally get to delve into how the folding lamination technique impacts the final product - one of the things that *every* pastry chef seems to have an opinion about, including me! Let’s start with the pros & cons.
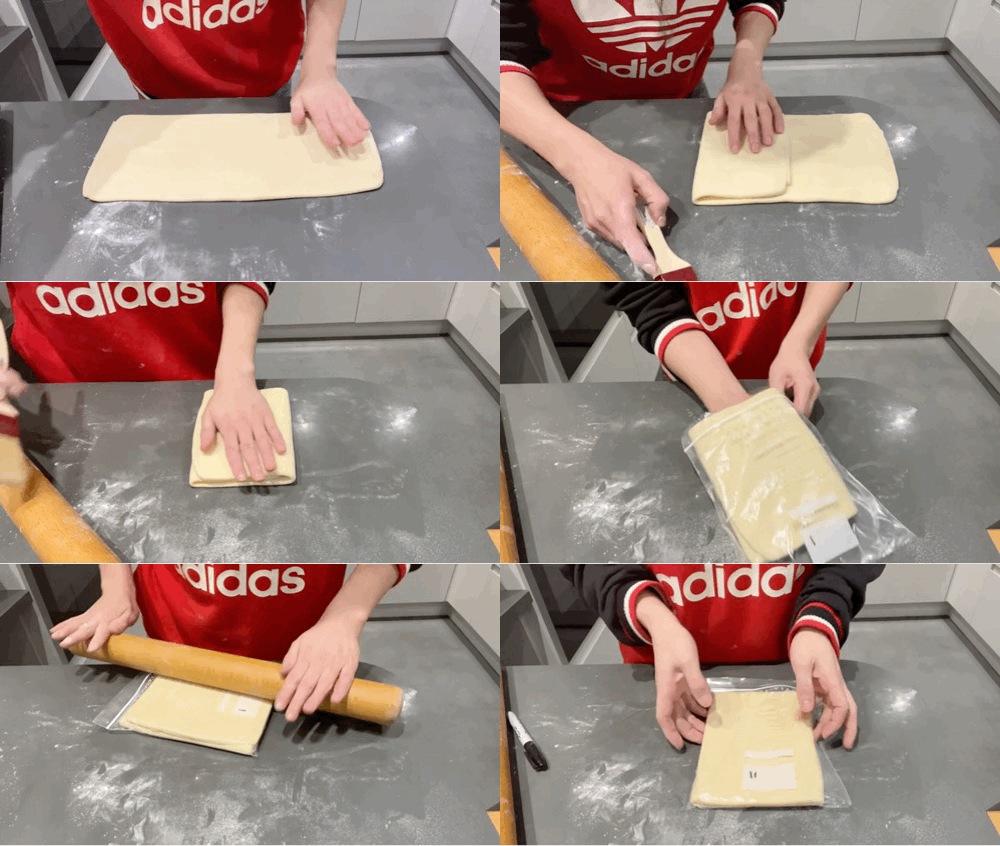
A single turn (a letter fold) is the simplest way to fold the dough. You don’t have to roll the dough out as long as you would for a double turn, meaning you can generally perform them quicker, especially if you are a beginner. Issues with lamination often come from accidental mistreatment of the dough - pressing too hard resulting in the butter breaking up or smearing, leading to uneven laminations, so single turns are often recommended. However, you need to do a lot of single turns to get the number of layers up, which means you end up working with the dough more than you would if you were using double turns.
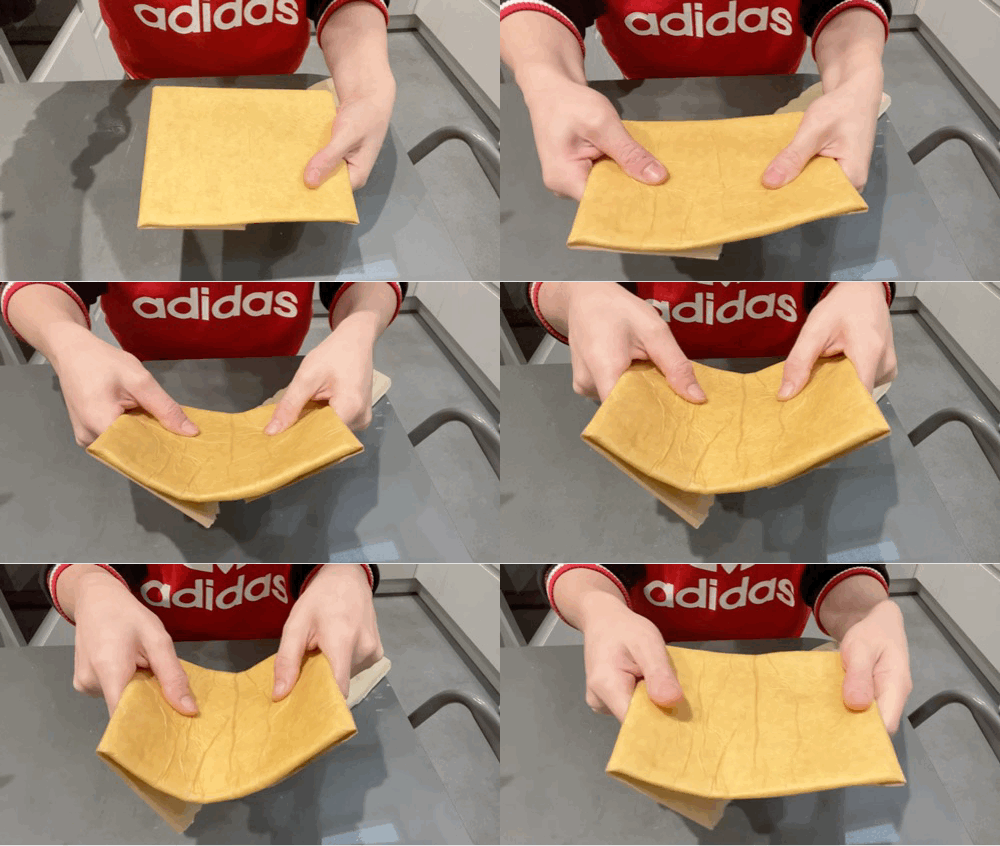
A double turn (a book fold) requires you to roll the dough out a bit longer than for a single, then to fold the edges into the middle, then over on itself again (like a book). This is a great way to build layers, although these can result in clunky layers. It also requires you to roll the dough out longer, which can result in the butter getting too warm if you aren’t careful, which can negatively impact your layers.
Let’s do some maths
So when it comes to puff pastry, how many layers *actually* are there? The whole ‘mille feuille’ aka thousand leaves thing leads us to think it’s in the four digits, but what is really going on? Now, even though I was decent at maths at school, my brain aways boggles when I think about this stuff. Fortunately I co-habit with a maths whizz, so dw, I got him to check this over.
First, some ground rules: We need to define what we mean by a layer as this can cause confusion when counting. Some methods consider one layer to mean a group of dough + butter + dough, resulting in a ‘lower’ number count. Today, we’ll be counting each ‘leaf’ separately, so dough + butter + dough = 3 layers.
As well as this whenever the dough is folded on itself so it’s dough touching dough, we’ll count it as a single layer.
Obviously the number of turns and the type of turns is going to radically impact the final product. Let’s look closer at how many layers you’re *actually* getting:
I’ve long been a fan of ‘A’ and ‘C’, rarely bothering to do ‘B’ and, honestly, this is the first time I’ve ever done the maths. I always knew that ‘A’ and ‘C’ would have fewer layers than ‘B’, but I didn’t realise it was so significant. Mille Feuille? More like Cent Feuille!
Layers in action
I rolled out three doughs in three ways to see how they looked against one another:
So even though methods ‘A’ and ‘C’ have only 1/4th or 1/8th of the layers of ‘B’, why isn’t this visually obvious?
I take the age old advice - bigger does not always equal better.
The number of layers is only one factor - thickness of layers is also important. The thicker the layers, the more dramatic the product with very defined layers of dough. The thicker layers will also have a better bite / offer a more substantial mouthfeel. As well as this, although layers in the hundreds don’t sound like much compared to 1000+ layers, the former is still a lot.
The issue with more layers is that they can become so fine that they are easily damaged when rolling out (especially by hand) and don’t keep their integrity during baking - some of the layers, if too fine, may merge into eachother which can end up undoing some of your hard work and you won’t get any visual reward for your extra effort.
When you are making puff pastry and choosing how many turns, it’s important to think of your final product. Less turns = thicker dough = more bite. More turns = thinner dough = fluffier bite! So, for ‘C’, the 3 x double turns, we are handling the dough much less and developing less gluten than methods ‘A’ and ‘B’ resulting in the most tender crumb.
To be honest, with my eyes closed, I’m not sure I would be able to tell the difference, I can imagine the fluffier pastry working better for a chausson aux pommes or a galette, and a slightly more bite-y pastry working better for a sausage roll, pie or mille feuille.
So, what’s the answer?
Ultimately, no matter what you choose, you’ll still end up with something delicious, but it’s knowing these little tweaks, and knowing how to take your pastry from good to exceptional.
Before we get to the recipe, here’s a reminder of the lamination commandments.
First and foremost, laminating by hand is a proper challenge, so be KIND TO YOURSELF! Take your time and know that it might take a few tries to nail it
Don’t forget that when you roll out the puff dough, you’re really working the gluten, which you should think of as an elastic band - the more you work it, the stronger it recoils…
… so REST, REST, REST!!!! The gluten has been worked HARD each time you roll it out (especially by hand), so it needs a lot of time to ‘come down’ and truly relax. This is why it’s best to take the process slowly and meditate over it
When you are rolling out your dough, use as much flour as you want. BUT have a pastry brush on hand to brush the excess off before you perform a turn
If you go to roll out your dough and it is fighting you, STOP! Put it back in the fridge, have a cup of tea, watch a show, listen to a podcast. Come back to it later
Uneven or aggressive rolling of the dough will lead to uneven laminations which can also mean your dough shrinks and leaks butter during baking
Don’t be scared to trim the dough if it gets into an uneven shape whilst rolling
Once you’ve put all your laminations in and the dough has rested, I think like to roll my puff into sheets of desired thickness (usually 0.2 - 0.4cm)
Once it is rolled out you can rest it overnight in the fridge before using it. Or you can move it into the freezer for long term storage.
Despite the above all sounding a bit scary, I don’t want you to feel worried about this process! The reality is you cannot always expect perfection. Even though I’ve made puff (probably) hundreds of times, there are times where my pastry shrinks, the butter leaks or things just don’t work out quite right. Even if it isn’t “perfect”, I still take a moment to appreciate that I’ve created a gorgeously buttery piece of dough architecture. And you will too.
Okay, let’s do this!
Classic puff pastry
Makes 500g, enough for a 7 inch galette
100% Fat recipe - super rich and buttery
Detrempe (dough block) ingredients
190g bread flour
7g sugar
5g salt
1/2 tsp white wine vinegar
80g water
50g butter, soft
Butter block
160g butter
85% Fat recipe - Good all purpose, slightly less rich
Detrempe (dough block) ingredients
200g bread flour
7g sugar
5g salt
1/2 tsp white wine vinegar
80g water
40g butter, soft
Butter block
130g butter
Detrempe Method (by hand - you can also do this in the Kitchen Aid)
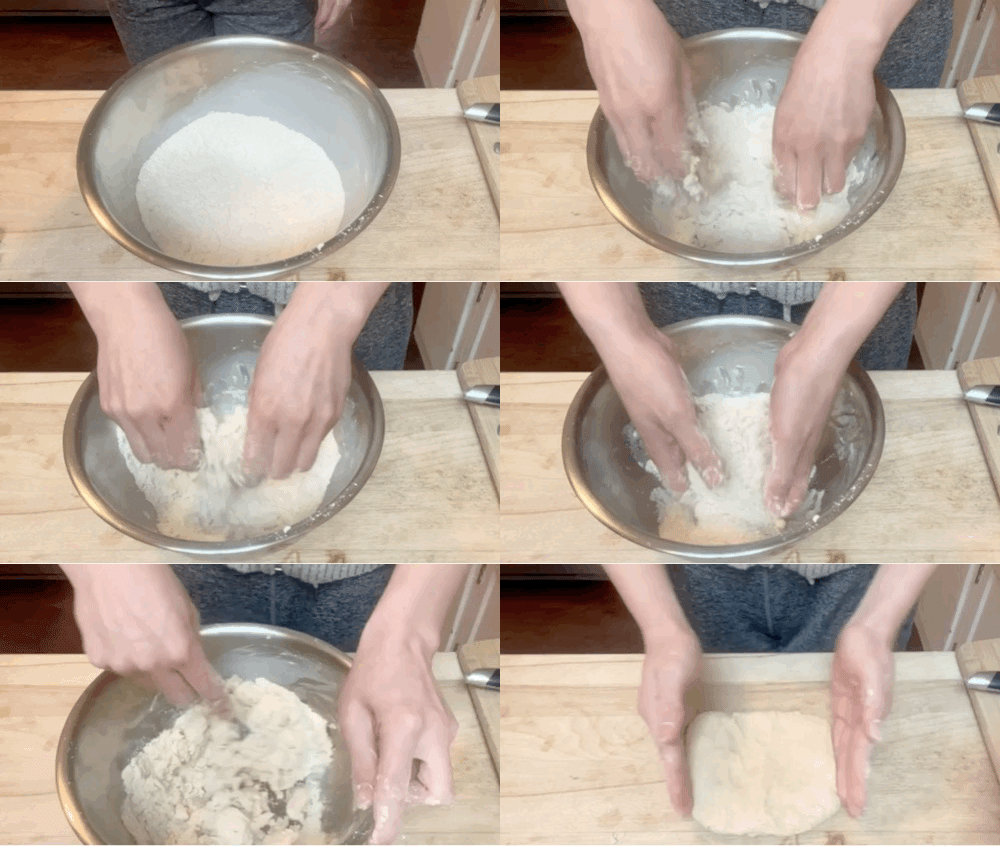
Put all of your dries into a bowl and mix
Breadcrumb the soft butter into the dries using your finger tips
Create a well in the middle of your dries and slowly pour in the water bit by bit, mixing with a fork so you are combining the liquid/dries carefully
Once everything is combined, turn onto your work surface squish together until just combined - don’t overwork at this stage
Pat into a square, wrap (I like to use a sandwich bag) and rest in the fridge for at least 2 hours to firm up
Butter block method
Do not make your butter block until you are ready to laminate. The most important thing about your butter is that it is pliable but not greasy or smeary. It is most plastic and pliable (and the ideal temp) as soon as you’ve bashed it into shape!
Make your butter block by cutting fridge cold butter into strips. Then put the strips into approximate shape on a piece of greaseproof paper. Fold the paper around the butter, leaving some room on each side
Using a rolling pin, bash the butter into shape. Once it is pliable, use a rolling motion to spread it into an even block:
It will be pliable and bendy but still cold when you’re done! It is now ready to use. If it feels soft or greasy, pop it in the freezer for 3 minutes and then check again. If it is too cold and is cracking when you bend it, leave it out for a minute and check again
Locking in your butter
Roll your detrempe so it is double the width of your butter block. Use your butterblock to measure the size. You want the edges to be able to fold back over and cover the block completely
When you are satisfied it is the right size, unwrap the butter and stick it into the middle of your dough. Bring the edges in and pinch it together in the middle. Your butter is now in!
Now turn your dough 90 degrees and roll your dough out long. Mine is approx 50cm x 20cm. You’re now ready to laminate
Lamination!
Now it’s time to laminate. You can decide how many turns you want to do, but I really like the 2 x single, double (Method ‘A’) OR 3 x double (Method ‘C’). Scroll up to be reminded of what the turn is. Everytime you wrap your dough up, make a note of how many turns it has - I like to use a reusable plastic bag or cling film. Remember, you always want to turn the dough 90 degrees so you are alternating the direction you are rolling in. The dough can only stretch so far in one direction, so you need to switch it up each time.
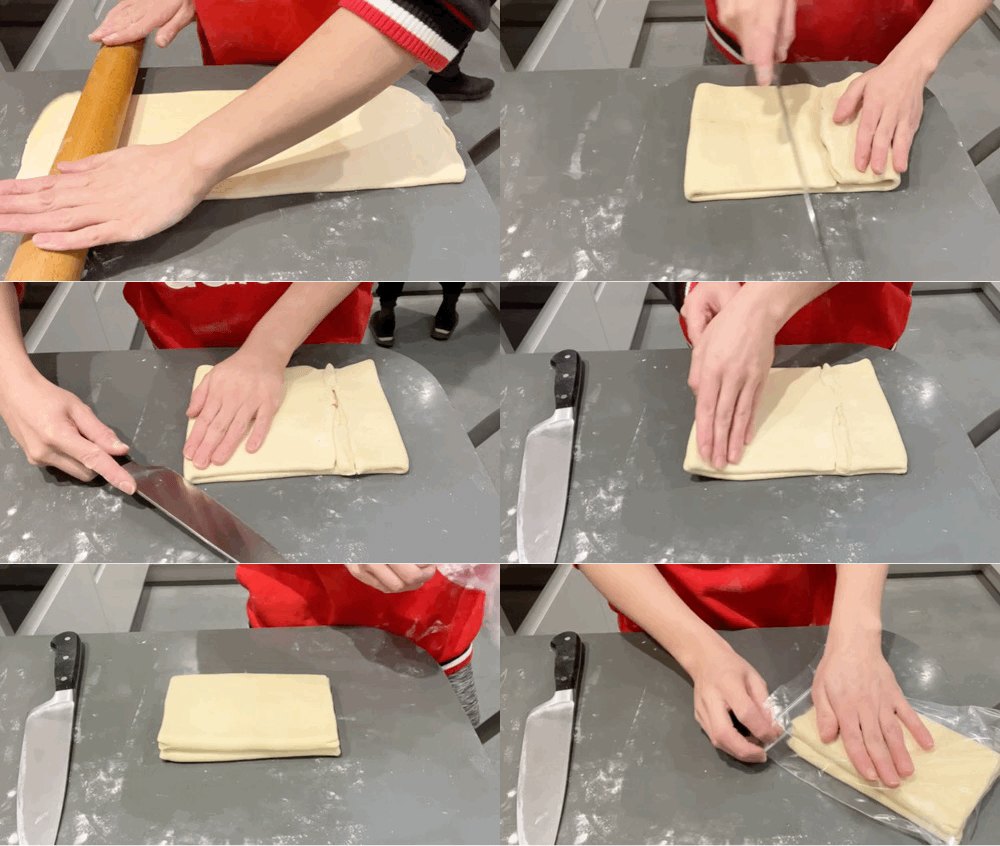
Here is a single turn:
Here is a double turn:
The final roll out
Once all of your turns are in it’s time for a nice long final rest before the final roll out - I like 2 hours or overnight
When you are rolling out your pastry it’s important to think about what your final product will be. Your puff will rise approximately 6-8 times its height so keep that in mind when you are picking your final roll-out thickness
I like to store my pastry in sheets once it is rolled out. Here you can freeze them (lasts up to 3 months well wrapped!) or keep them in the fridge, depending on when you’re planning to bake it
If you are cutting a shape, for example a circle for a galette, you must allow the puff to relax before doing so. At least 30 mins is essential (otherwise you’ll end up with an oval)
The rules of baking Puff pastry
Puff pastry needs to be baked hot! Pre-heat your oven to 200c
You must make sure your puff is nice and cold when it goes in. It is the cold pastry going into the hot oven that creates the steam and layers
Depending on the thickness, your puff will need anywhere from 30 mins to 50 mins to fully bake. I like to start it at 200c and then reduce to 180c after the first 15 mins
If you do get your puff out of the oven and realise it isn’t fully baked then… get it back in! Don’t worry - it happens to us all. As long as it is still warm you can rebake it and get it going again
To get the lowdown on the apple galette on KP+, click here!








This is so good!! One question - when you lock the butter in, why do you only seal it in the middle seam and not the edges?
Having recently fallen out of love with shop bought puff pastry I'm very pleased about this