
Kitchen Project #196: How to Bake Gluten-Free Bread
Brian Levy figures it out with expert Aran Goyoaga


Hello
Welcome to today’s edition of Kitchen Projects. Thank you so much for being here.
Today, we have a very special edition of Baking Remix with Brian Levy, the column all about baking beyond the norm. Today, Brian dives deep with the formidable Aran Goyoaga (you may know her as CanelleetVanille), whose game-changing book ‘The Art of Gluten-Free Bread’ is out now. You’ll get an insight into the development of the extraordinary recipes and get to try one for yourself - buckwheat cardamom buns.
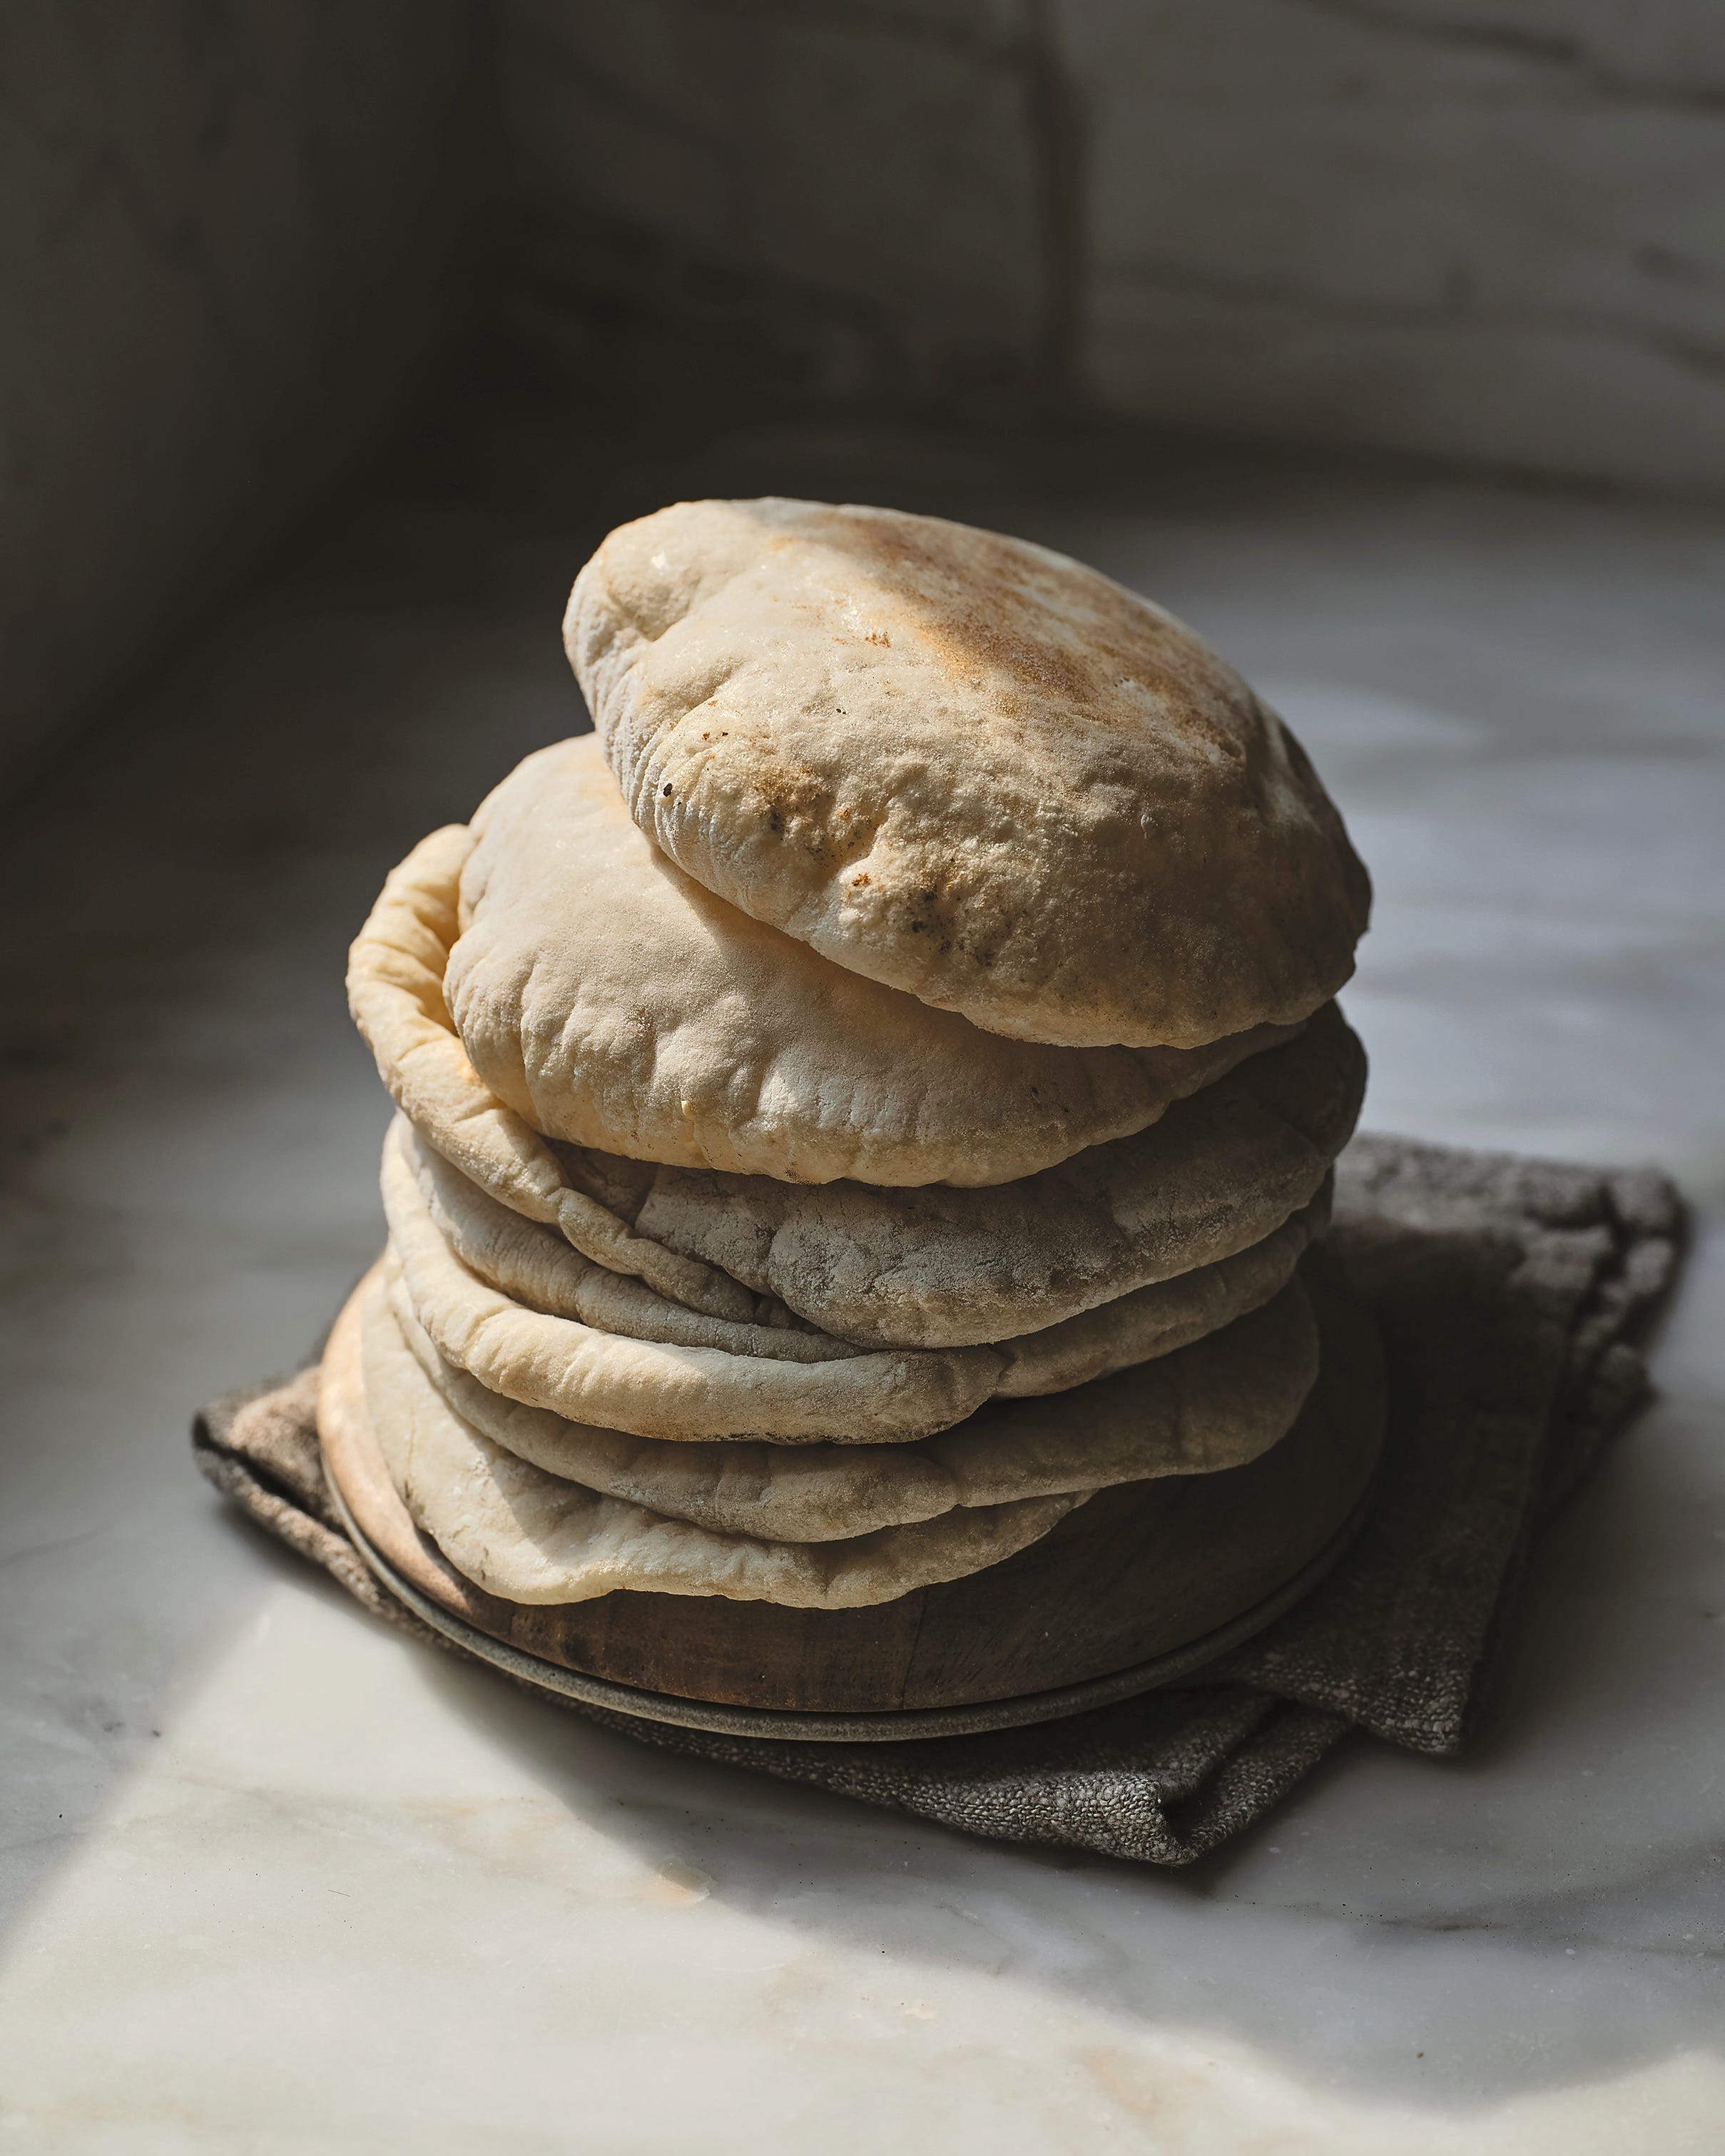
On KP+, Brian has tumbled further down the rabbit hole (specifically, a psyllium husk-shaped rabbit hole), with Aran’s Gluten-Free pita bread recipe. I made a batch earlier this week and they really are brilliant. Click here to read it. You can also win a copy of Aran’s book — all you need to do is sign up for KP+ and leave a comment!
What’s KP+? Well, it’s the level-up version of this newsletter. By joining KP+, you will support the writing and research that goes into the newsletter (including the commissioning - and fair payment - of all the writers), join a growing community, access extra content (inc. the entire archive) and more. Subscribing is easy and costs only £6 per month or £50 per year. Why not give it a go? Come and join the gang!
Love,
Nicola
Making an Art of Gluten-Free Bread
by Brian Levy
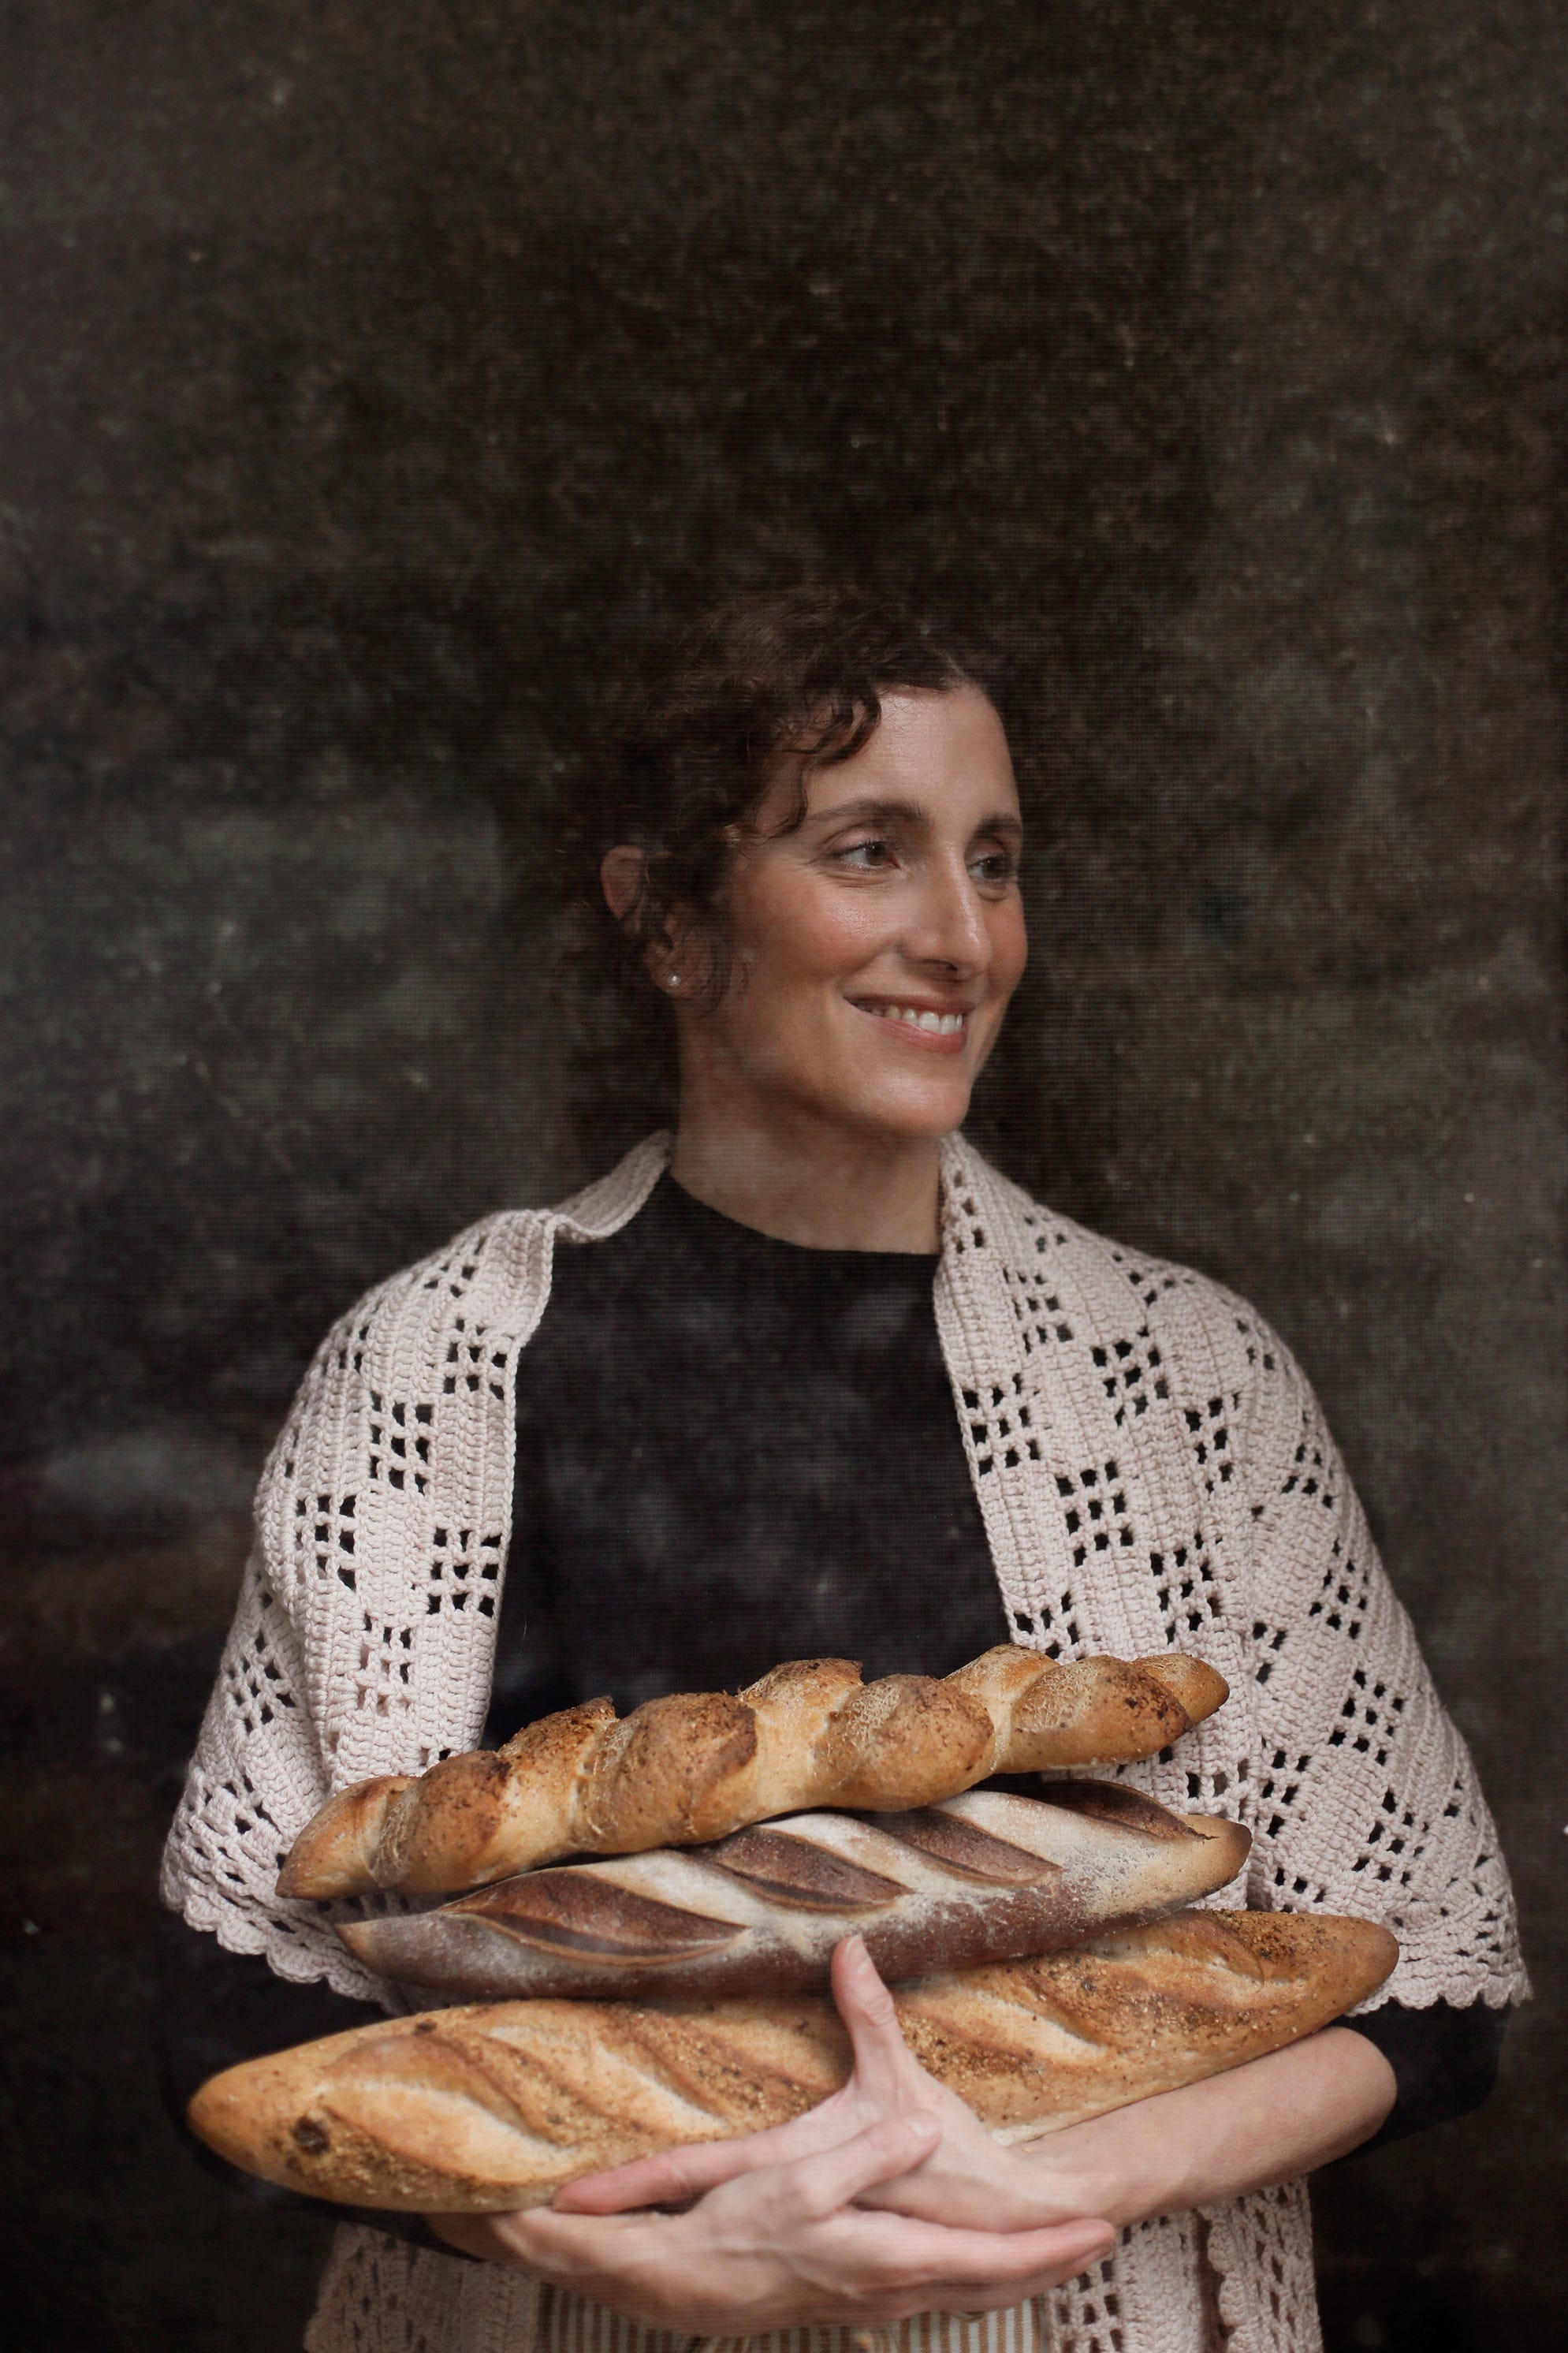
If you have any interest in gluten-free baking, you likely know of Aran Goyoaga, who’s had a strong hand in shaping the conversation about the discipline since 2010. That year, she was diagnosed with gluten intolerance, and it gave her Cannelle et Vanille blog, which she’d begun in 2007 and has since retired, a new, focused direction. Over the following decade, she’d produce two gorgeous, award-nominated books: Cannelle et Vanille: Nourishing, Gluten-Free Recipes for Every Meal and Mood (Sasquatch 2019) and Cannelle et Vanille Bakes Simple: A New Way to Bake Gluten-Free (Sasquatch 2021).
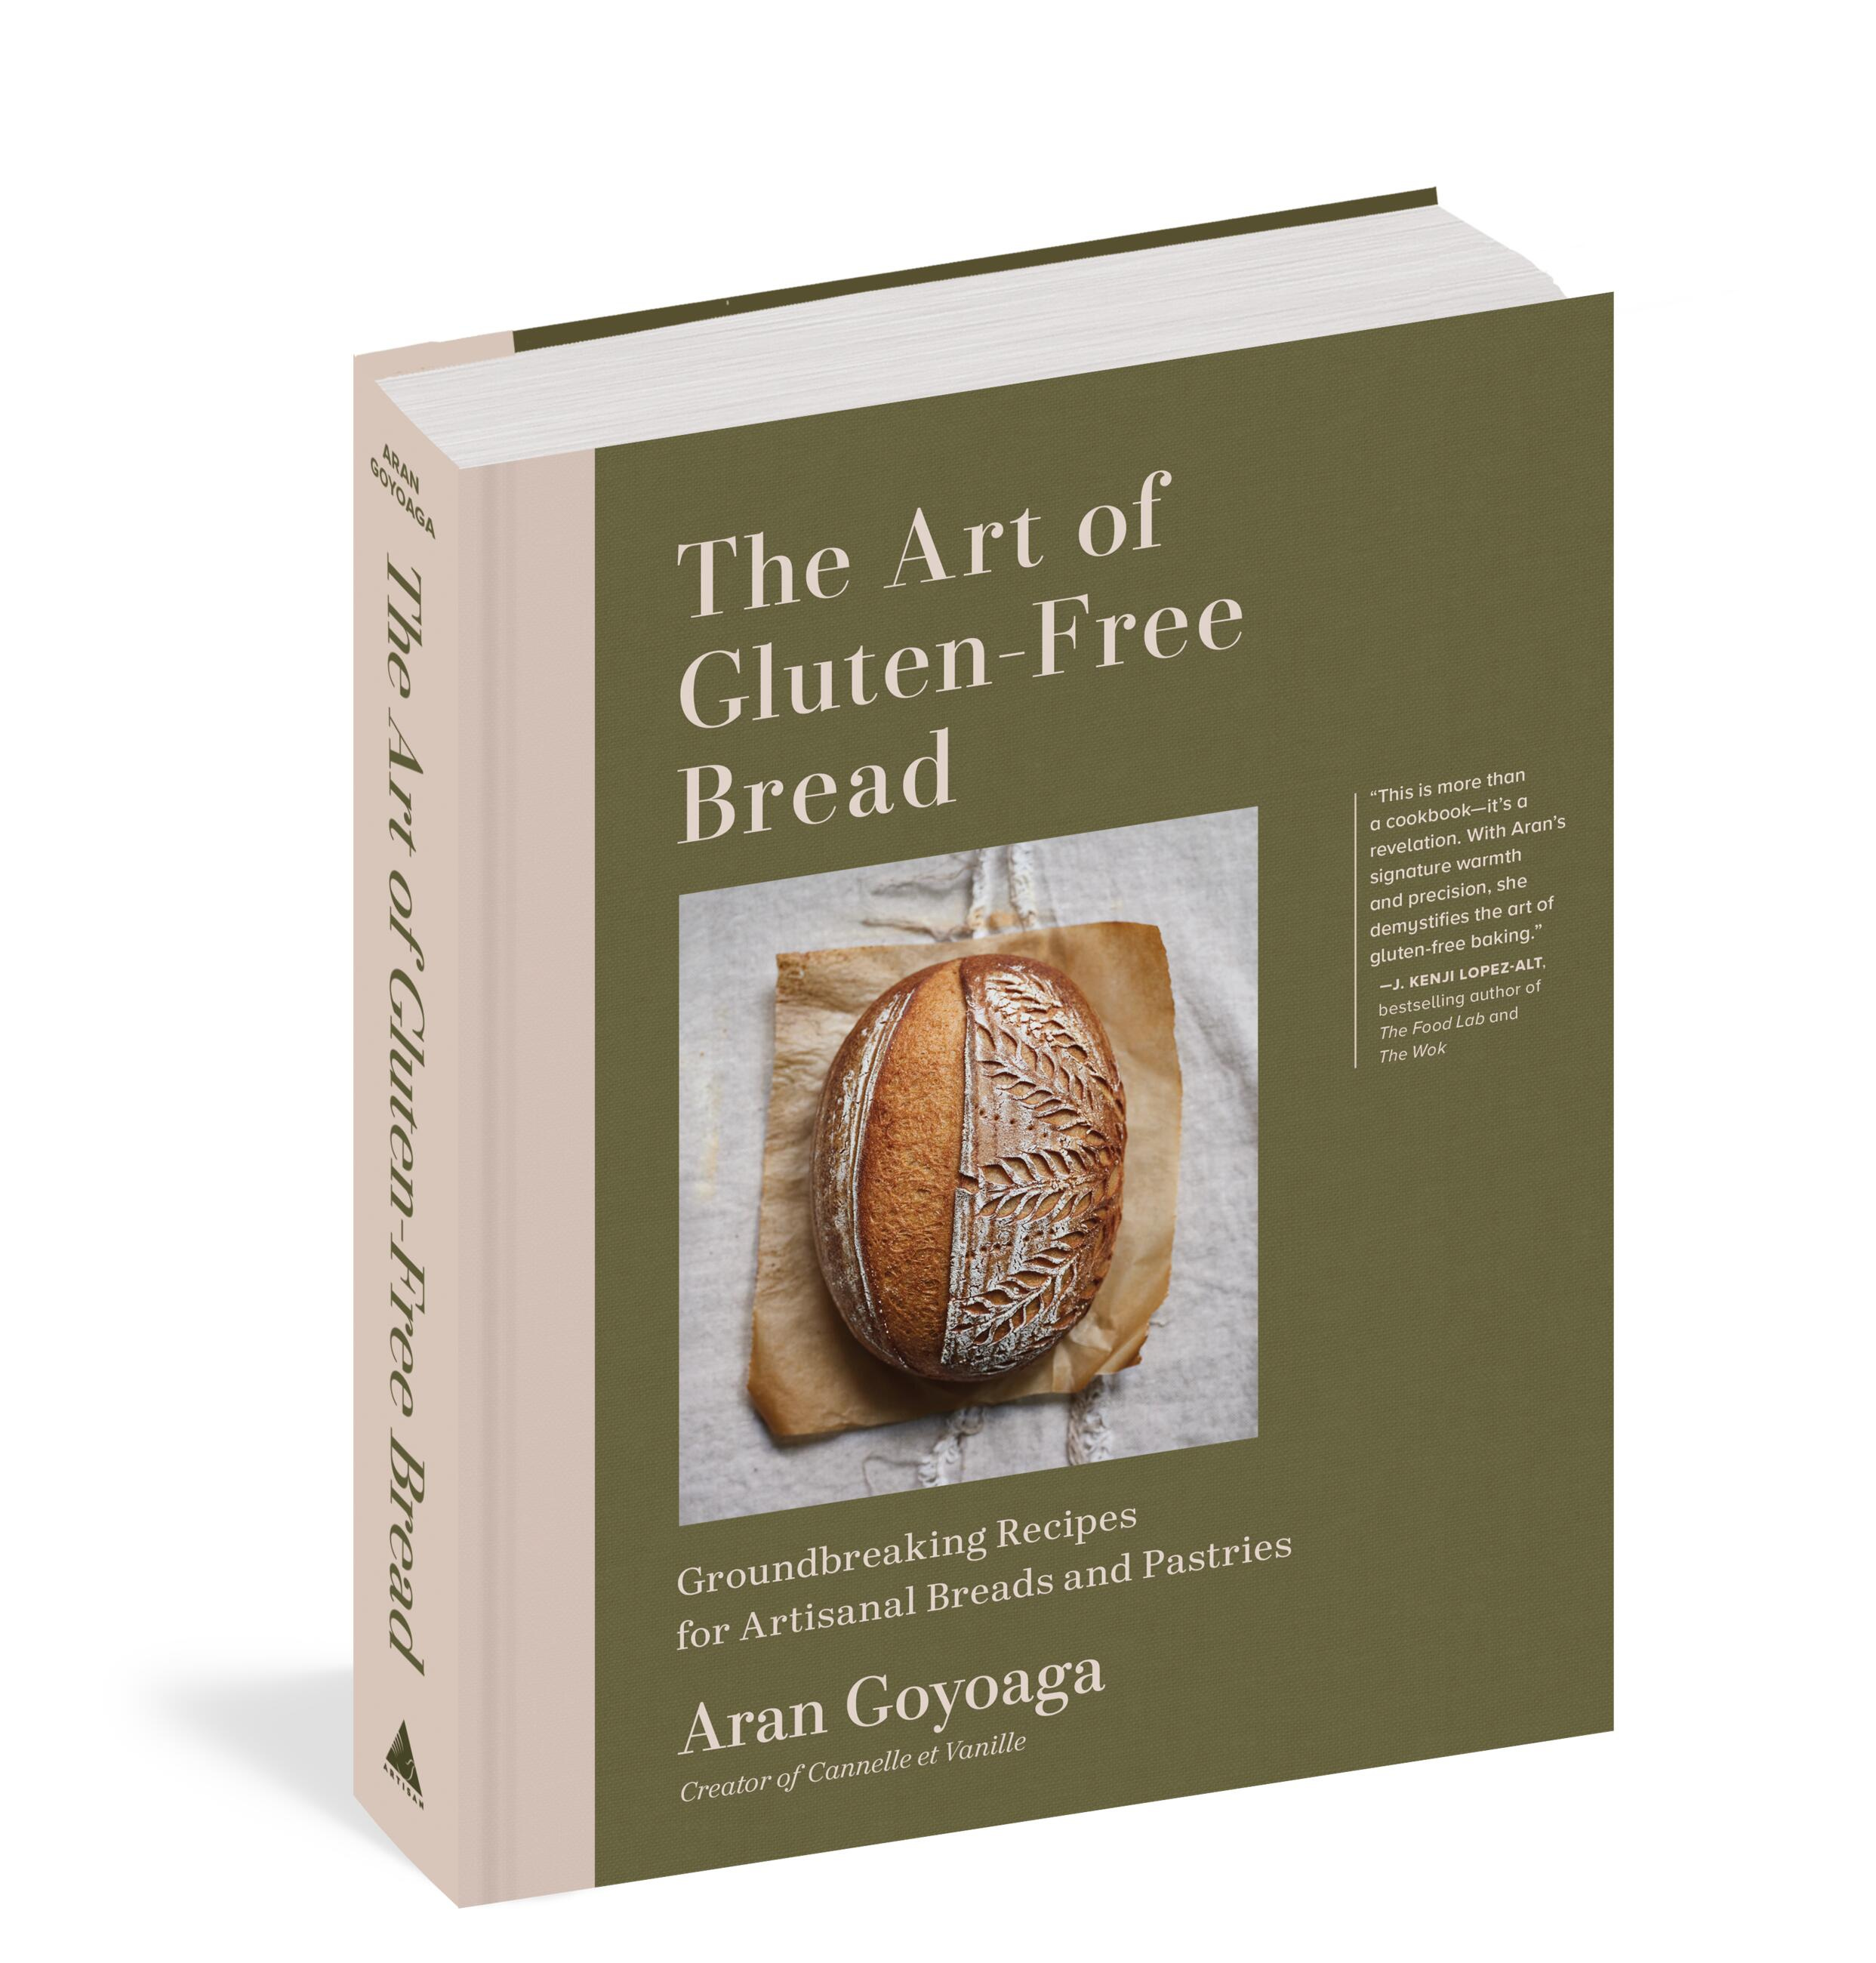
You might say that this trajectory was all building towards Aran’s latest, arguably most impressive, achievement: her new book, The Art of Gluten-Free Bread (Artisan 2025).
Bread is, of course, the holy grail of the gluten-free baker; it’s the quintessential food whose quality traditionally depends, in no small part, on the painstaking development of gluten, the set of proteins that give “our daily” bites their satisfying, substantial, and airy chewiness. That’s what makes The Art of Gluten-Free Bread a breathtaking accomplishment. Each artfully composed photo (all but a few of them shot by Aran herself) tempts the reader with what looks like chewy, crusty, yeast- and levain-risen bread and viennoiseries of all types: baguettes and boules, seedy loaves and bagels, brioches and challahs, sweet buns and croissants, even panetonne, people!—all without a speck of wheat, barley, or rye flour.
I arrived hungry to an event hosted by Odette Williams to celebrate Aran’s latest publication, and I was lucky enough to savour several breads, crackers, dips, and even a soup from the book. Shortly thereafter, I made the book’s Buckwheat and Cardamom Buns (recipe below) and Pillowy Pita (recipe in KP+), both of which impressed me as both doughs and as finished products.
After Aran returned home to Seattle from upstate New York, where she had attended an event with Amy Chaplin and visited her college-student son, we talked in depth (over Zoom) about her origins and the book. Below are excerpts from our conversation, edited for clarity.
From Basque to Beyond
Aran comes from a long line of pastry makers rooted in the Basque Country. It began with her great-grand-uncle, who worked in a renowned pastry shop (which still operates today) in Bilbao. At 14, her grandfather joined the same pastry shop as an apprentice, but just two years into his training, at the outbreak of the Spanish Civil War, he was drafted into the army. After returning home, he married Aran’s grandmother and initially balanced his baking with factory work.
In 1949, Aran’s grandparents opened Pastelería Ayarza, a traditional French-style pastry shop in Amorebieta, a small town outside Bilbao. It was, and still is, a true family business; All eight of their children worked there in different roles: the men as pastry cooks, the women in front of house. The bakery wasn’t just a business —it was the family hub. Aran’s grandparents lived upstairs and hosted large family gatherings on weekends for their big extended family of some 25 cousins. Aran lived across the street, and whenever she wasn’t at school, she would find herself in the bakery, helping her mother, running deliveries or assisting her grandmother. It wasn’t a “job”, of course — Aran was never paid. It was just the way of life - she lived and breathed the culture of the bakery.
Despite her family's deep roots in Amorebieta, where nearly all her relatives still live within walking distance, Aran’s geographical path extended far beyond it. Participating in various language exchange programmes in Ireland, London, Michigan, and Oregon, Aran completed a full year of high school in Colorado, where she later returned and met her husband.
After completing her degree in business and economics at the University of Deusto in Bilbao, Aran moved to Denver and initially worked outside the food industry. It wasn’t until she & her husband relocated to Florida that the prodigal return to baking began; Aran attended pastry school, where she studied under a German master baker, and then worked at the Ritz-Carlton for four years under an inspirational French Pastry Chef. After having children, she started her blog in 2007, building on a legacy that began generations earlier, above a small pastry shop in Amorebieta.
IT STARTED WITH A BLOG (AND GLUTEN!).
I noticed that The Art of Gluten Free Bread is the first of your books to not include in its title “Cannelle et Vanille,” the name of the blog that gained you a following.
So, actually, my last two books, I didn’t want to call them Cannelle et Vanille, but my publisher thought that’s what I’m known for, so I should use that. This one is a different publisher, and they really just wanted this book to be its own thing, very theme-driven and focused with the kind of title that’s going to last for years. And so, I think not using “Cannelle et Vanille” was the right thing to do.
Also, my blog [Cannelle et Vanille] doesn’t exist anymore! I mean, my Instagram is still @cannellevanille, but I feel like that’s kind of, somewhat in the past. I feel like I’ve really evolved from that style too. I love creating books, editing, having time to weed out things that are not good, really focusing.
NOW: A TRIO OF GLUTEN-FREE COOKBOOKS.
I made your Pillowy Pitas last night—we ate them with sausage and peppers--and they lived up to their name. Whether it’s with or without gluten, when pitas puff up like that, it really excites me.
Yeah, of course! Every time.
Let’s talk gluten-free bread development. Were there any big breakthrough moments in your gluten-free bread development over the course of your years of work on it?
I think that discovering psyllium [husk powder] as a really good binder--and also finding which type of psyllium works best. [For more on psyllium husk powder, read my deep dive with Aran over at KP+. Click here.] That has been super important.
I want to ask you about a few of the book’s recipes that most intrigued me, starting with that Black Rice and Sesame Mochi Bread. Is that based on anything traditional, or did you just come up with that?
No, I think I saw someone make a wheat sourdough and fold in black rice or something. I can’t remember how it came to be, but sometimes I’m just inspired by an ingredient or a combination that I like, or I see a video. I tried it and it was very wet. Once I knew it was a little bit gummy, I wanted to lean more into that mochi thing and then make it very briny; the rice is cooked with salt and then it has the black sesame, so it somehow evokes seaweed.
Then there’s the Flourless Fermented Buckwheat and Red Lentil Bread. I love that you make the batter in the blender.
So that batter, I was actually making flatbread with it. I think I shared that recipe in the newsletter maybe three or four years ago. You soak the red lentils and the buckwheat and then you make a batter with it, which you then ferment. And I didn’t realize that you could bake it. I just thought, It’s flatbread. But then I tried it; I thought, Well, I’ll just try to bake it in the loaf pan. And it worked; it still has a nice bubbly crumb, and it has a bit of a fishy flavour, I’d say. Almost like anchovies or something; it’s funky that way. And I really like it, but it might not be for everybody.
I like how you describe it as the kind of bread “you’d get in the 1970s at a vegetarian cafe.”
Yeah, you get the reference!
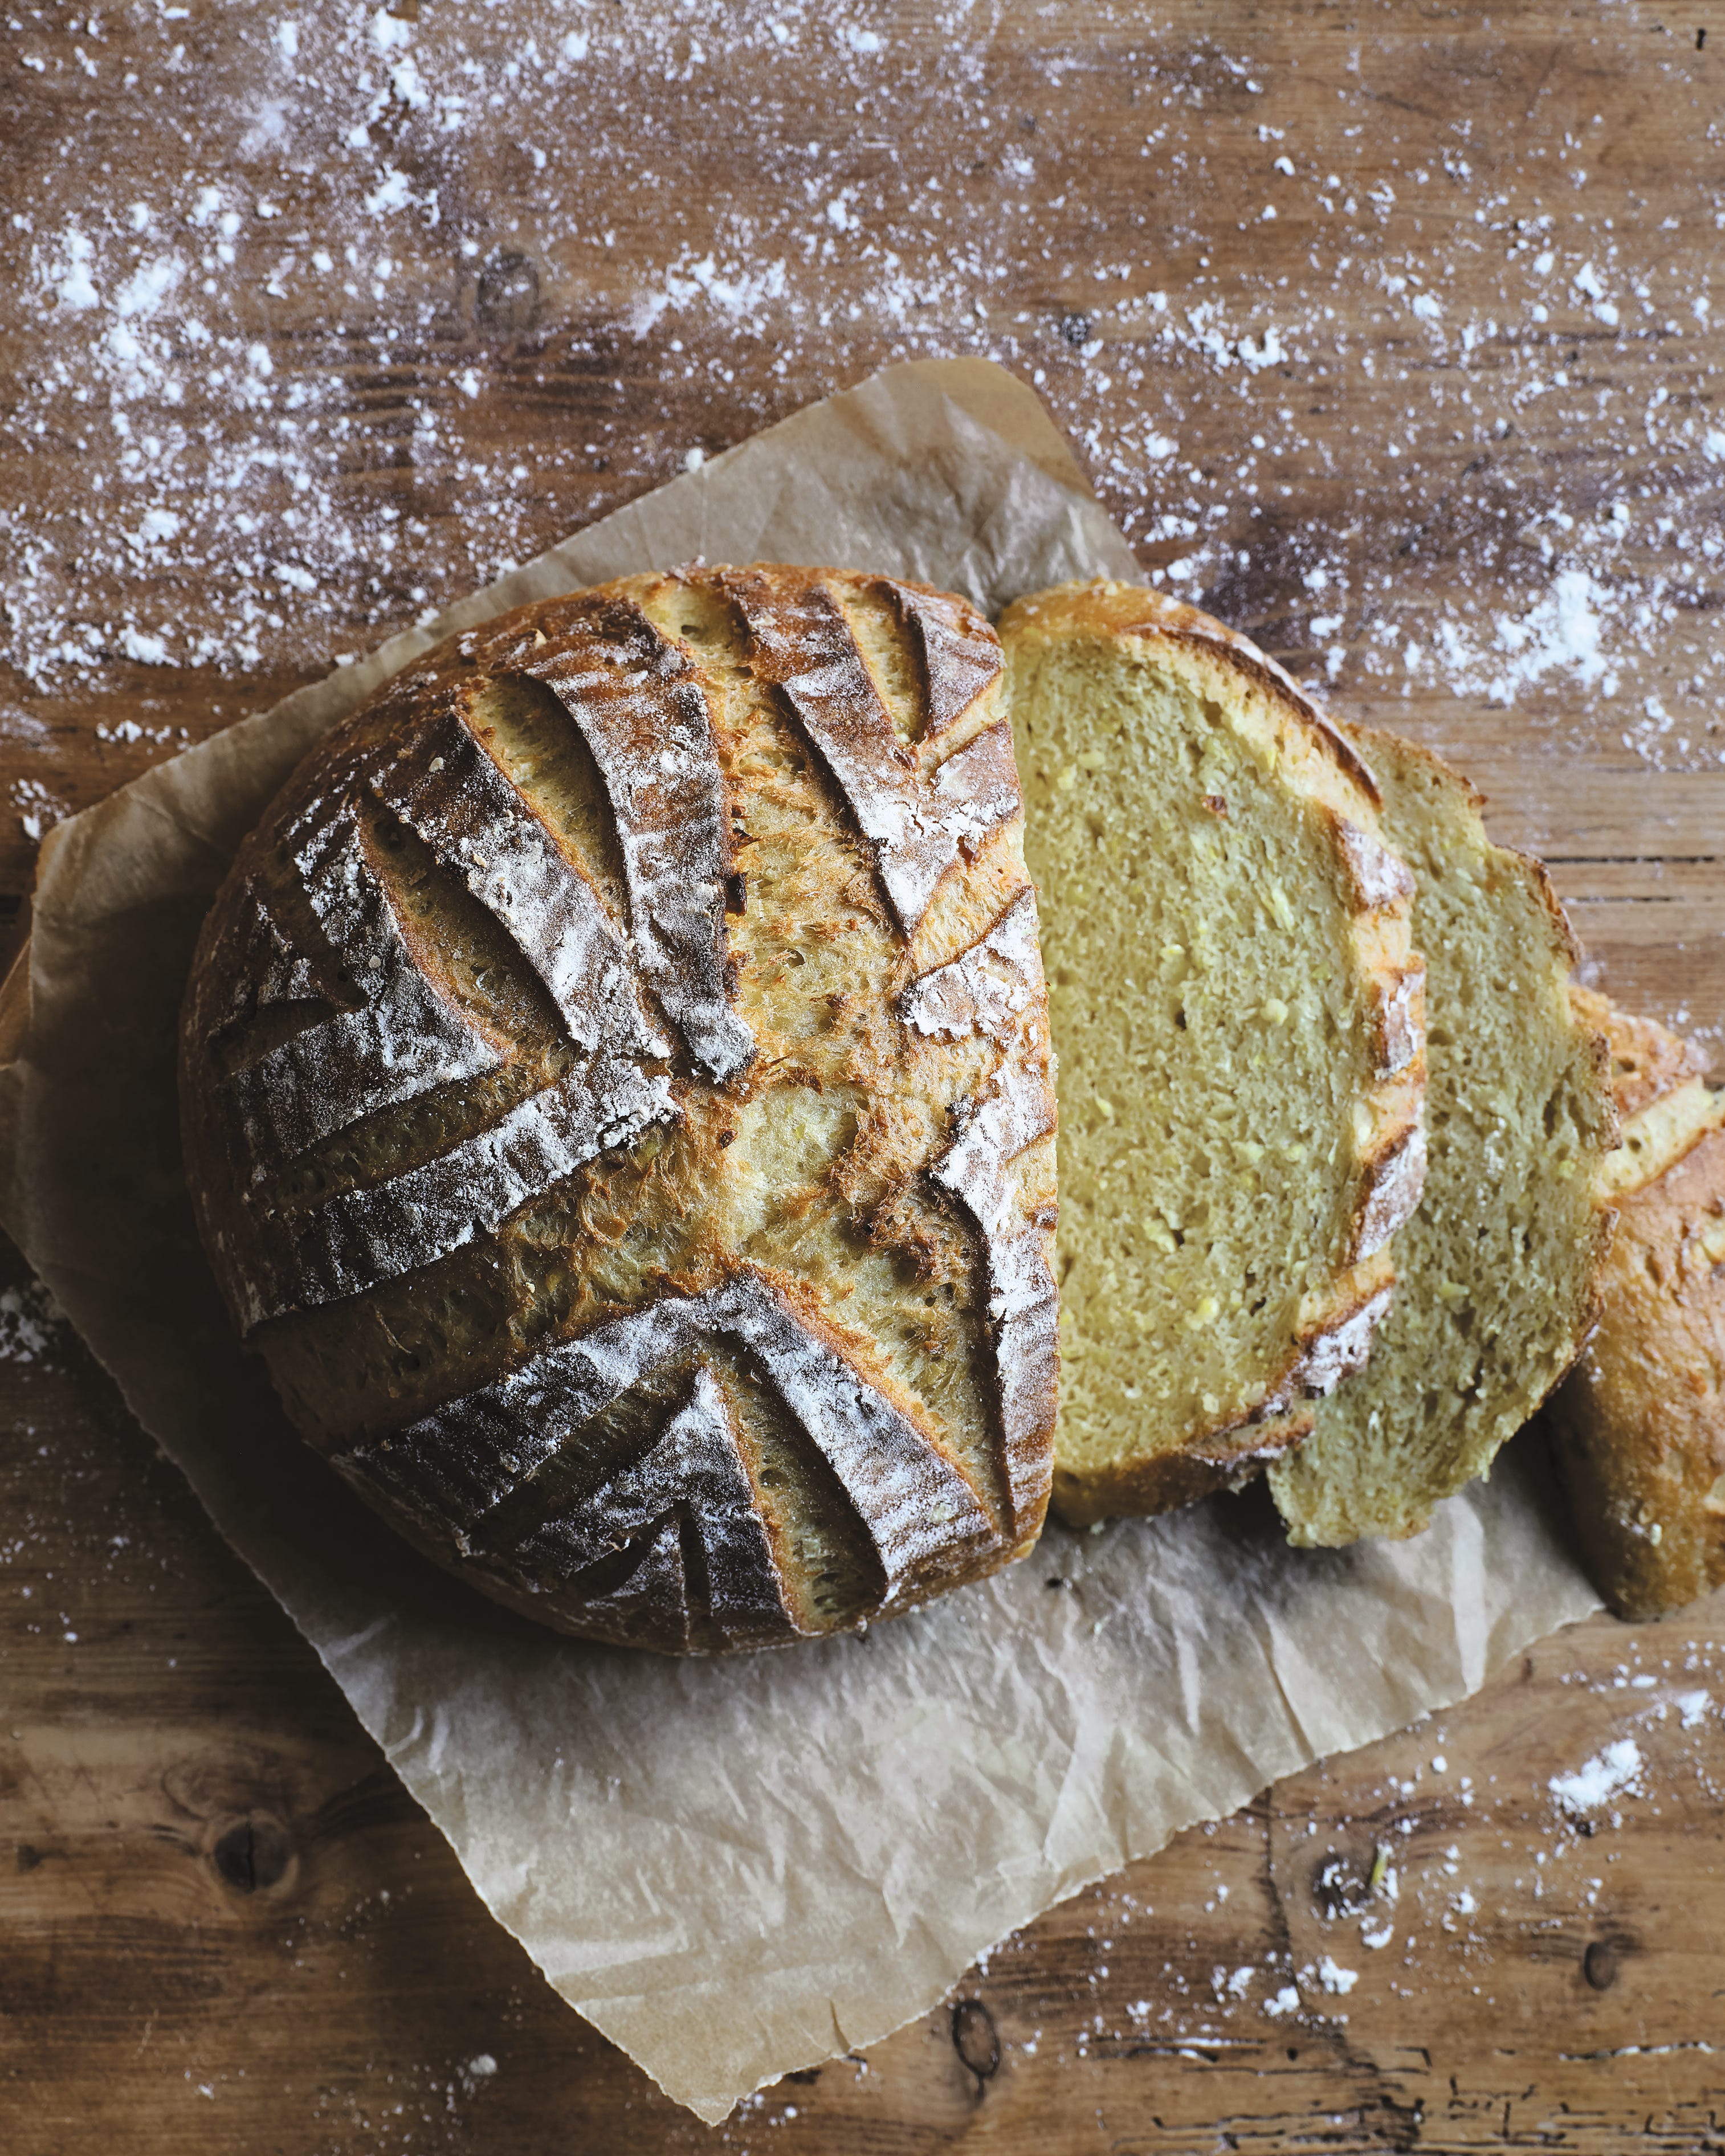
There are, of course, plenty of more traditional-looking and -tasting loaves among the recipes, albeit with a necessary creative twist given their eschewing of wheat flour. The Corn Milk Sourdough Bread, for instance, sounds so good to me. And that beautiful yellow color.
Yes, it’s really delicious, because it’s a little bit sweet. But it still has that yeasty sourdough flavor because of its sweet stiff sponge. And then it has really nice chew and the crust is very thin and crispy. It’s probably one of my favourites.
Do you have an ultimate favourite?
From the book? I really like baguettes in general. I love the baguettes.
PERFECTING THE ART OF GLUTEN-FREE BREAD:
Are there any recipes in the book for which the development was surprisingly simple?
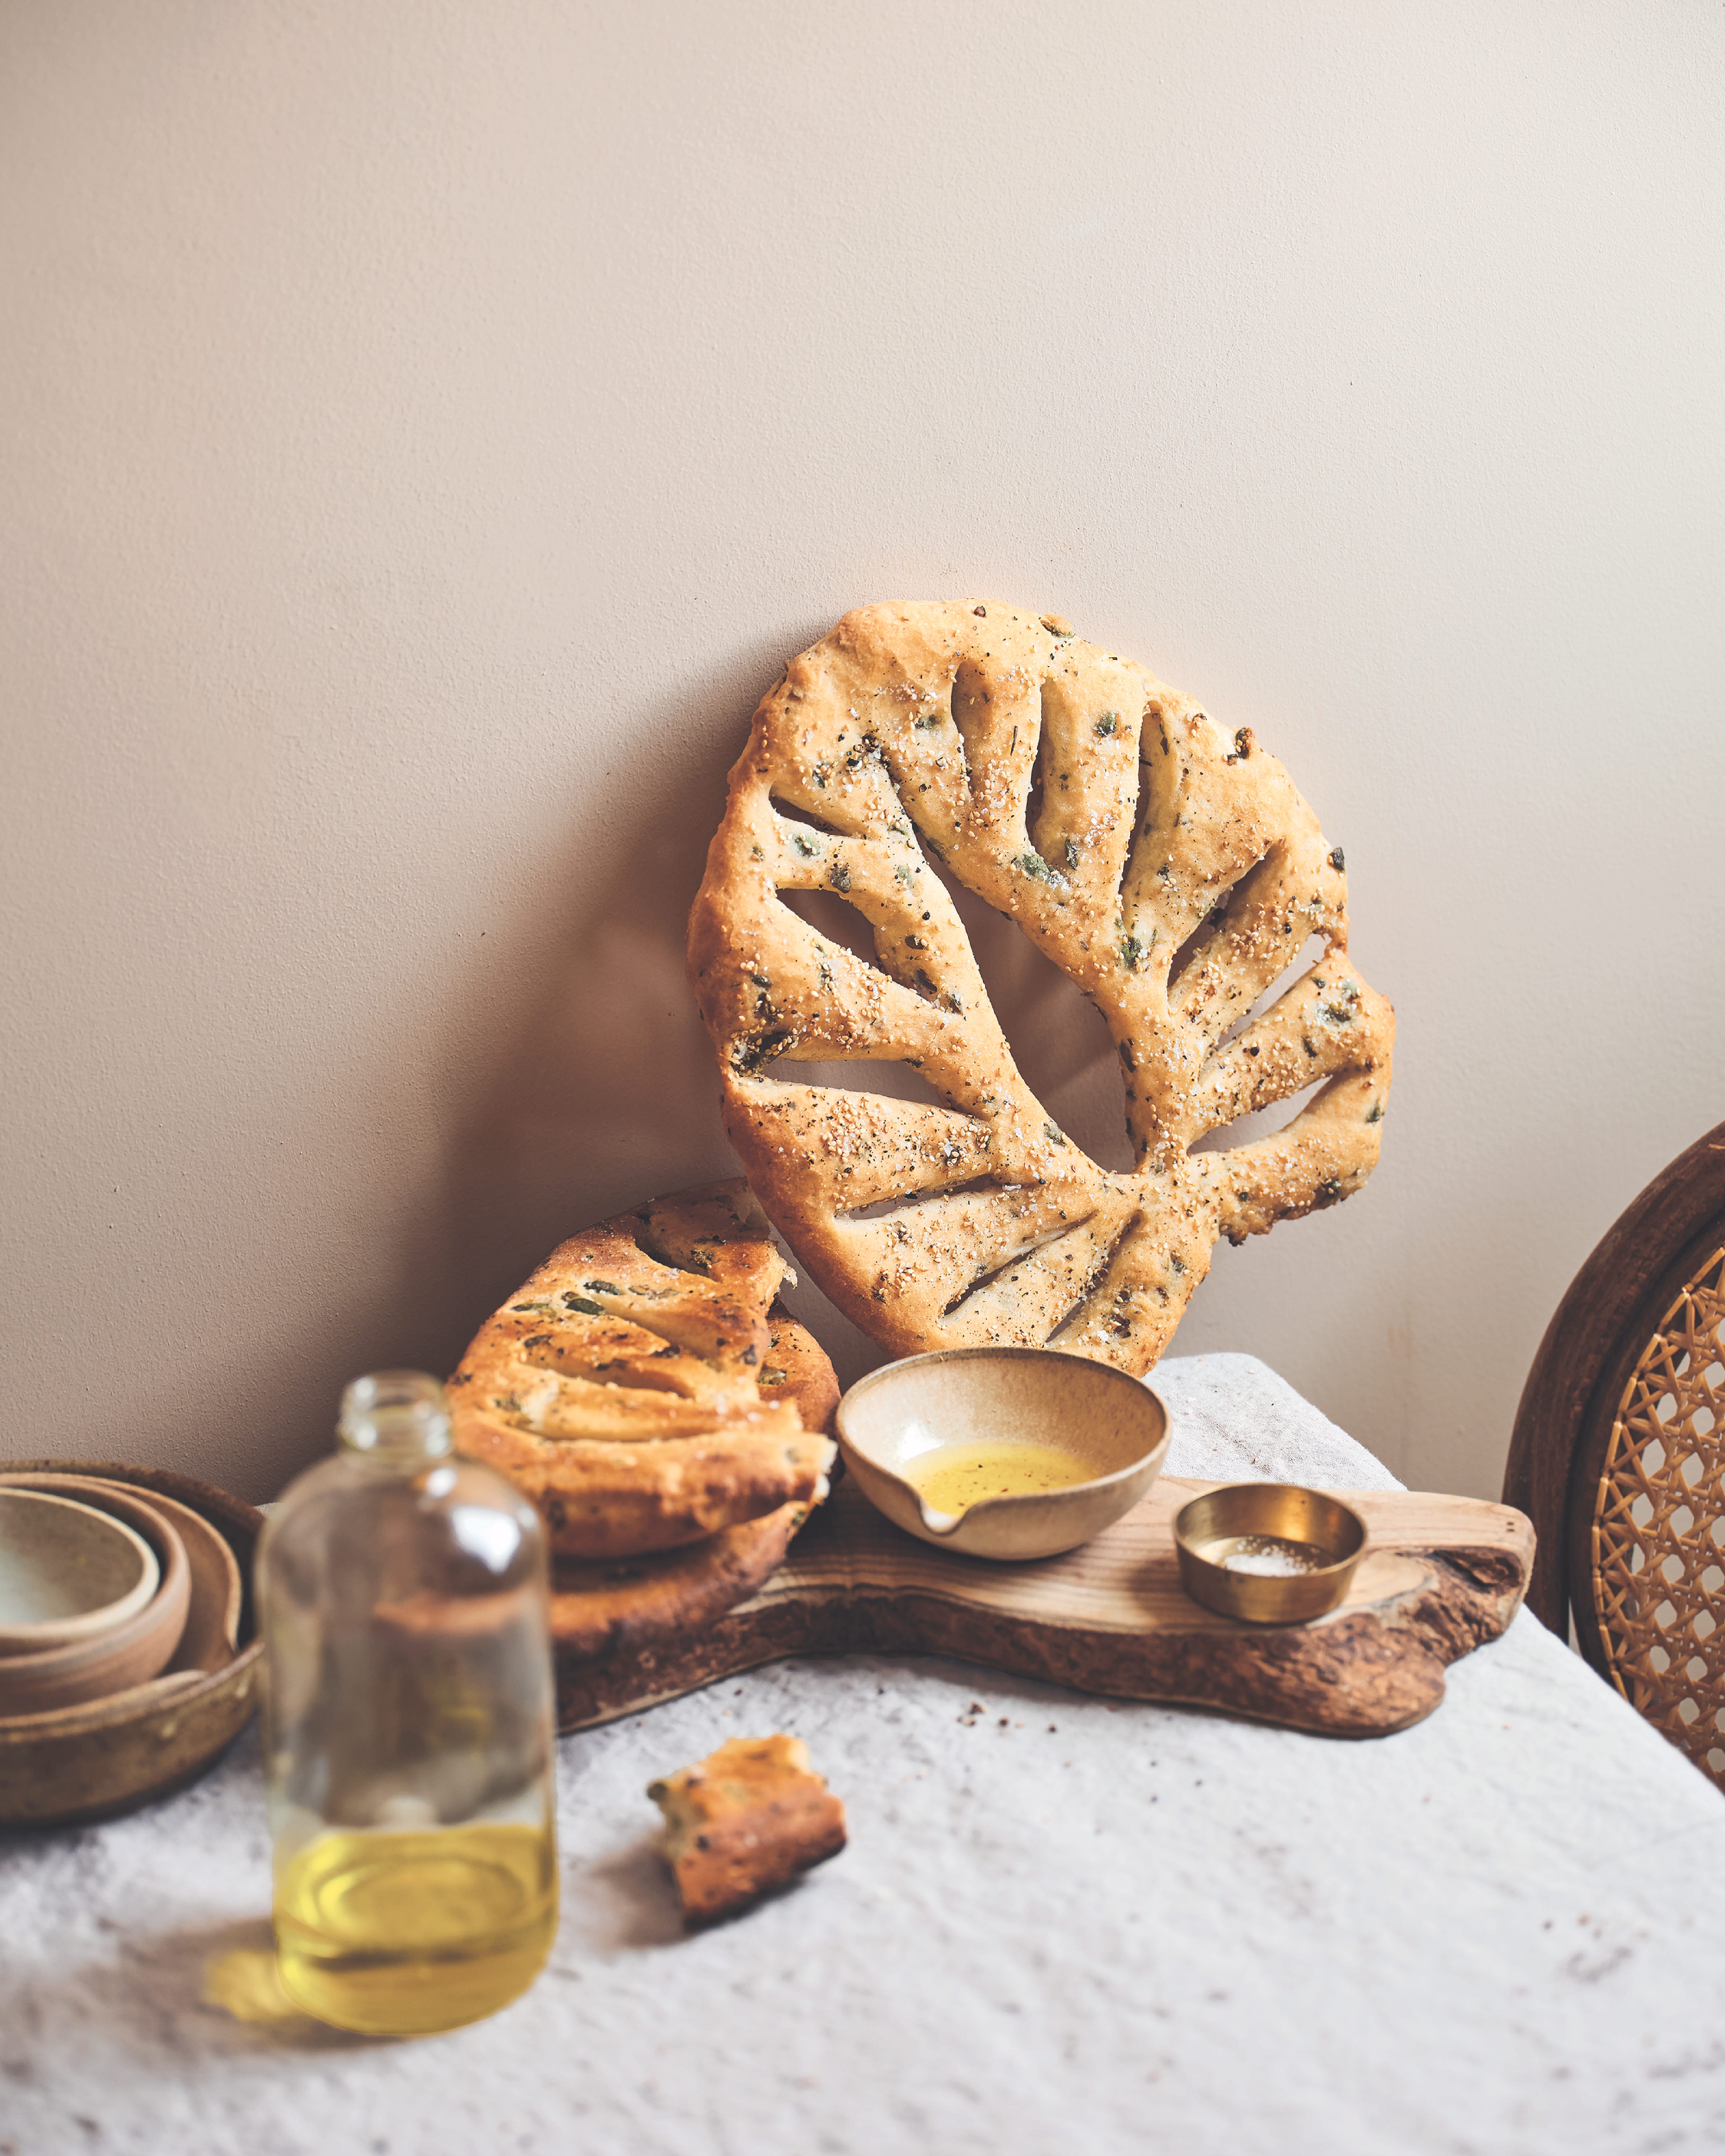
I find the fougasse really simple, and it’s a good low-effort, high-reward recipe.
It’s very impressive visually.
Yeah, and it’s really one bowl, ferment, shape, and bake. You’re not even proofing it a second time. The pain de mie, too, is actually simple. I found that the best rise was achieved by mixing, putting it in the mold, proofing, and baking.
The cinnamon raisin version of that looked great to me.
Yeah, it’s really good. And the other one that’s really simple and very, very flavorful is the No-Knead Oat Chia Bread. It has a very small amount of yeast so you proof it for a long time so it develops a very yeasty flavor in that time and it’s very oaty. You don’t have to do anything with it; you just need time to let it ferment.
I like that you admit that one is not much to look at; you describe it as “not a showstopper…”
It’s not, but it’s actually really tasty. It’s very textural, very crunchy and in that one I use xanthan gum. In general, in bread, I like to use psyllium because it absorbs a lot of moisture, but in this bread, when I used psyllium, the bread became softer, and when I used xanthan gum, it became crunchier on the outside because it doesn’t have that much moisture. And I know people don’t like to use xanthan gum--and in general I don’t like to use it--but I felt like, in this bread, the xanthan gum gave a superior loaf. But then I offer an option for how to use the psyllium instead.
What was maybe your biggest victory in terms of recipes you developed for this book?
Definitely the croissants and the Danish dough; being able to really have lamination. When I made morning rolls that were super flaky, that was really amazing. I like the croissants too, but I love how the morning rolls--with all the sugar and everything--they get baked in a mold so then the butter doesn’t ooze out as much, it kind of gets reabsorbed into it.
I call the dough Danish dough--I don’t call it croissant dough--because it has eggs, and traditionally croissants don’t have eggs. The eggs are really important, and--I don’t say this in the book and I feel like I need to add this note for future prints--you should definitely weigh the eggs in this recipe because having the right amount of egg white helps with a little bit more stretch. Having an egg that is 55 grams out of the shell--that’s really important. If your egg is 50 grams, even that 5 gram is going to make a difference in how elastic the dough is when you stretch it.
How does photography figure into your process? As you develop recipes, are you just constantly taking photos that could potentially be used as final images?
No, I usually work on the recipes until I have the manuscript put together. Once a manuscript is turned in and the recipes have been through third-party recipe testing--that’s when I shoot, so I have a chance reference the manuscript and to make every single thing again and make sure that the way it’s written is correct.
For bread, I shot maybe one or two recipes per day, if I was lucky, because it’s such a long process. It probably took me four to five months to shoot this book.
And can you tell me about the feat of shooting when your own hands are in the shot?
Oh yes. So I did have a photographer, Dorothy Brand, who shot my portraits and a few of my hands. But for some of the steps, I would have my camera on a tripod. I have a remote shutter. I have my computer next to me in live view using Capture One. And then I would set up my hands, and when I liked the composition, I would shoot it; I’d have the remote shutter in my mouth and I’d press it with my tongue. I’m probably going to get electrocuted at some point. I did that for the last two books too. Most of the shots with my hands are shot by me.
Do you ever fantasize, or plan more concretely, to open a gluten-free bakery?
I mean, when I went to Bub’s [the new allergen-free bakery in lower Manhattan], I was like, Oh, it’s so great. I love the idea of having a brick and mortar. It’s just so expensive. And also I love the idea of opening it, but operating it every day . . . I wonder. But then I think my grandparents, you know, they worked there all their lives and they loved it. My grandmother loved talking to people and I do love that aspect of hospitality, but it’s hard. And also, nowadays restaurants are such a financial risk. That scares me. If I was maybe 25 and I had no idea, but, you know, I’m 51; it’s a whole other mentality now. So I don’t know. I still think about it, but I don’t know if it will ever come true.
BY THE BOOK: MAKING ARAN’S BUCKWHEAT AND CARDAMOM BUNS
The first step of this recipe is making the yeast-psyllium mixture. This step is somewhat analogous to making a sponge in a typical bread recipe, but the novel purpose here is to allow the psyllium husk powder to absorb about ten times its weight in water (from the milk) over the course of a few minutes and to form an impressive gel that resembles…tuna salad? (Only in appearance and consistency!)
When the psyllium mixture is kneaded with the remaining dry ingredients and eggs (there’s an extra egg white to help with elasticity), it forms a rather stiff dough—as you’d expect from any dough that’s going to be further enriched with lots of butter. Once the butter is fully incorporated, the dough is impressively sticky, stretchy and similar to its gluten-y counterpart.
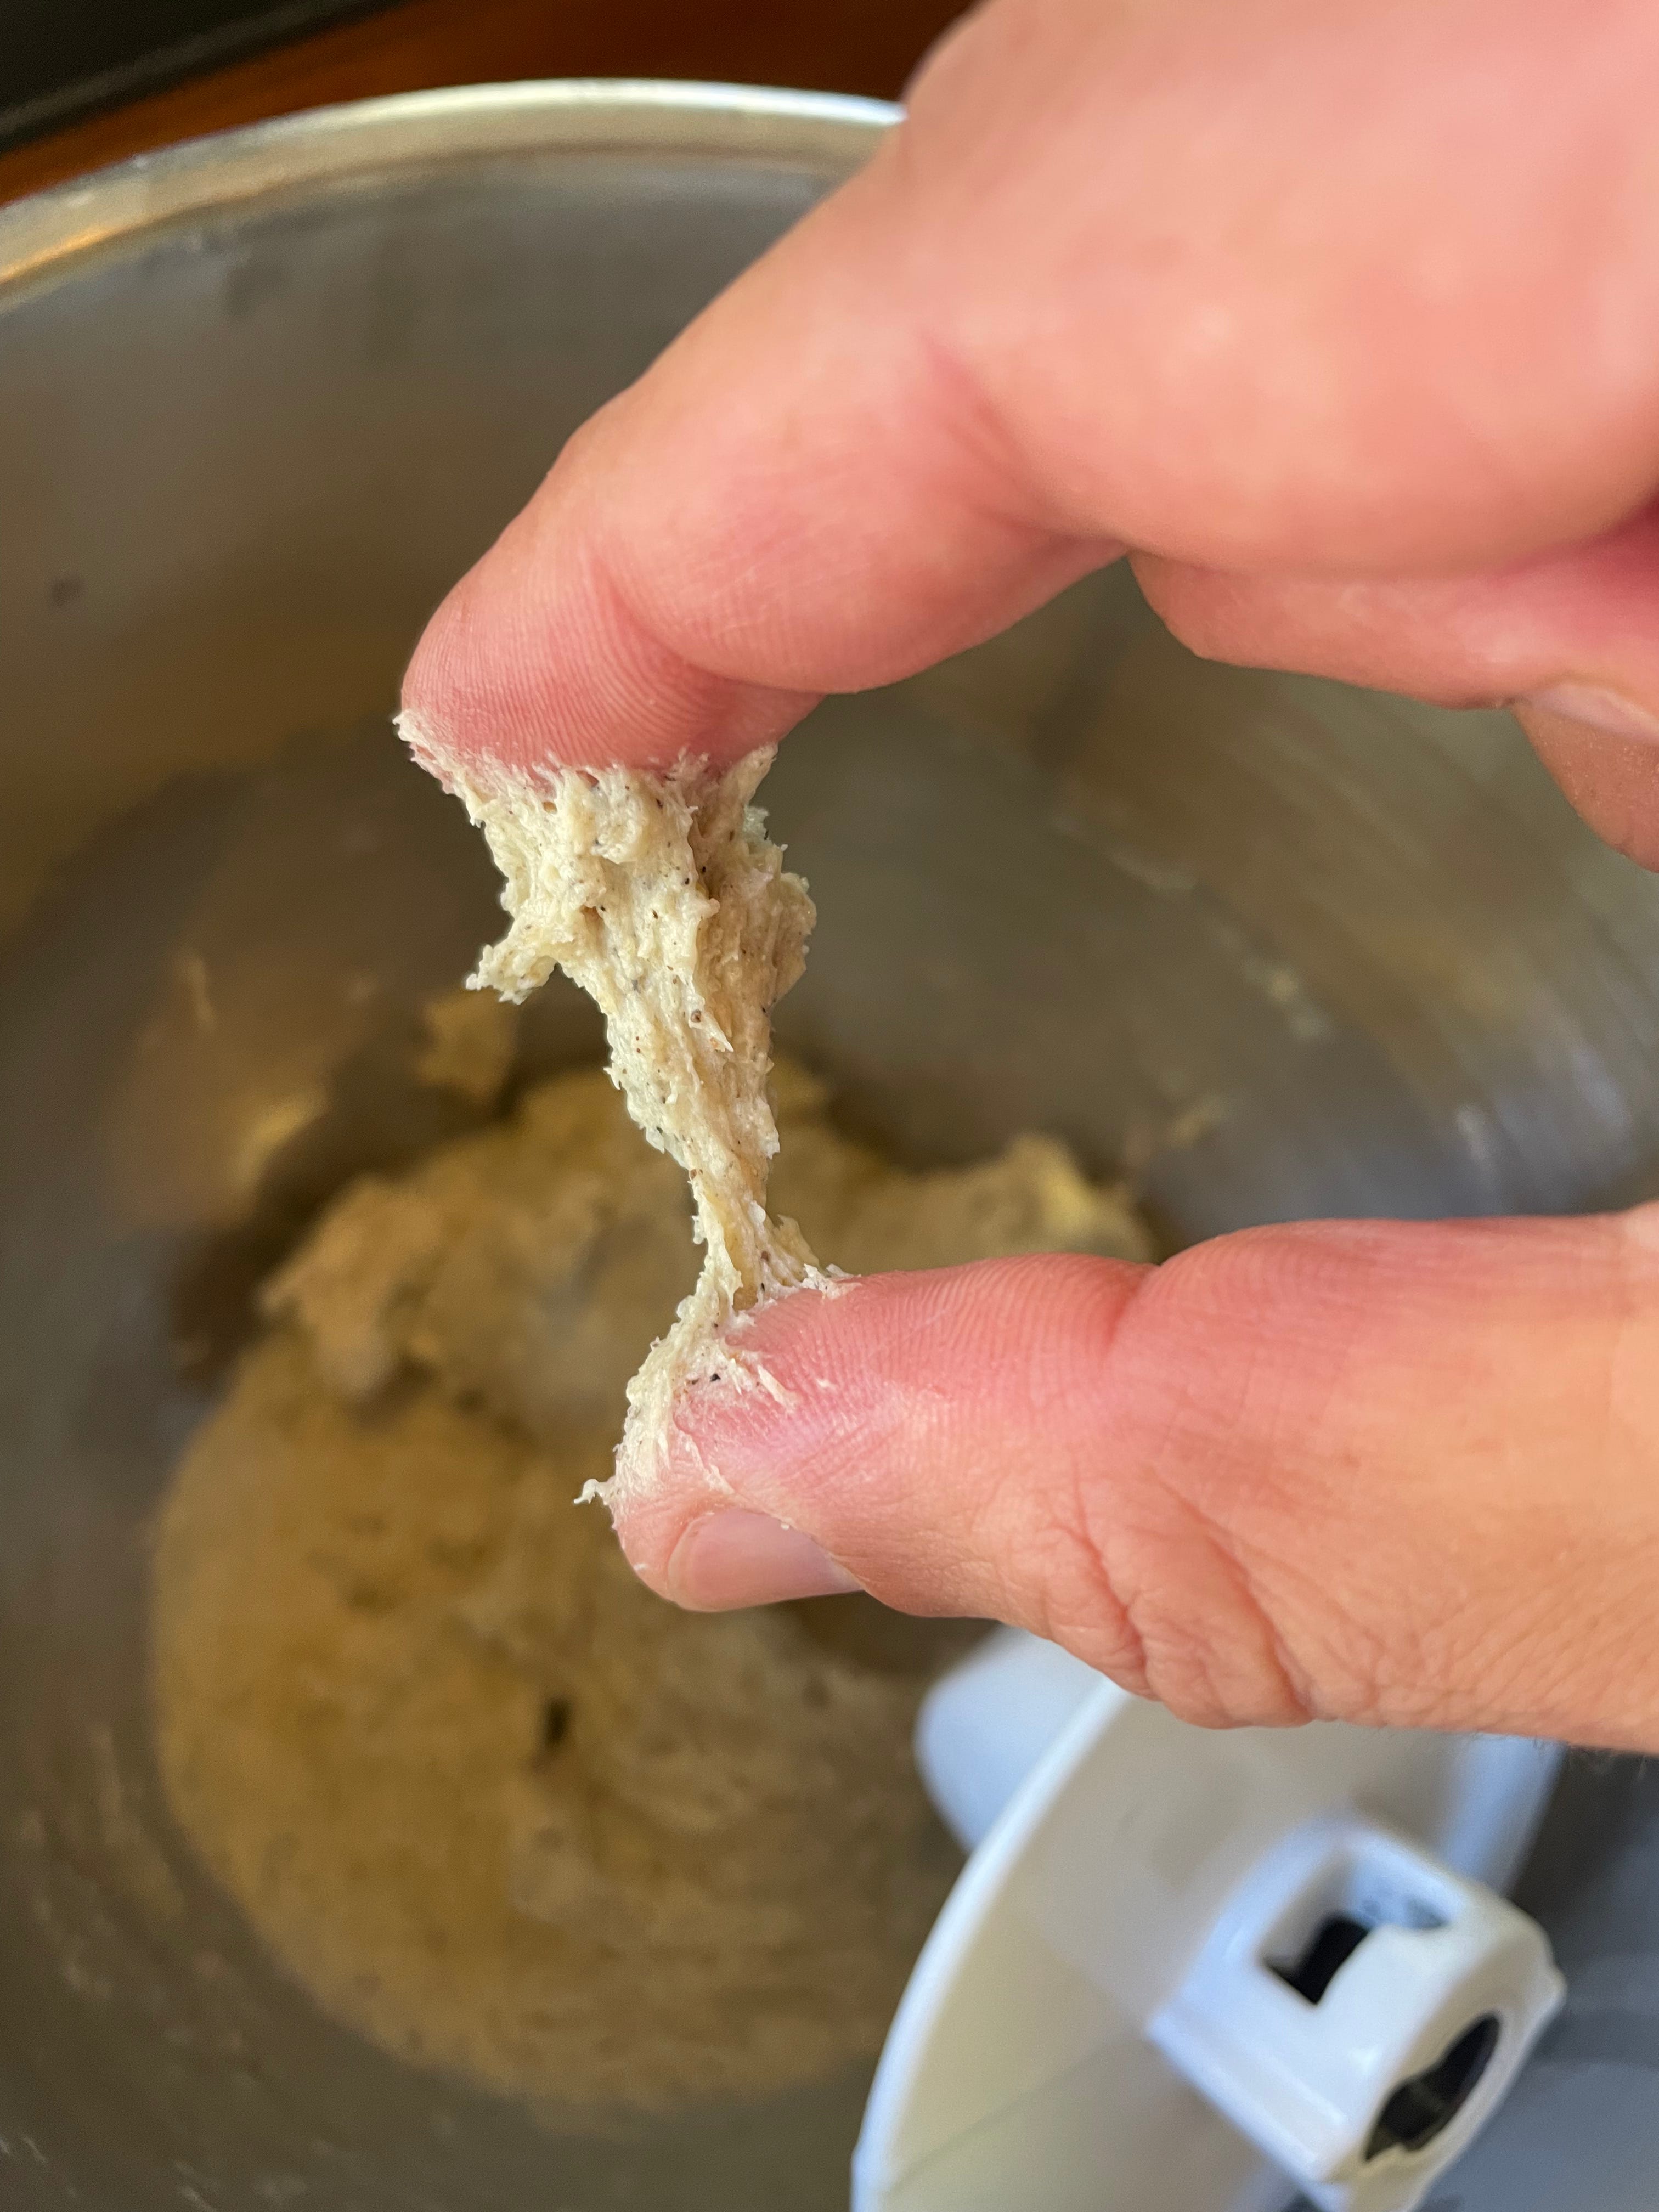
Now, I did make the mistake of using the darker-colored buckwheat flour against which Aran warns. You can see the difference in color between my dough and Aran’s:


It’s not a simple difference in color; the darker buckwheat flour contains more hull (which is near-black) and thus imparts a more whole-grain texture and character to the final product, not exactly welcome in something as decadent and almost candy-like as these cardamom buns are supposed to be. (Aran will later insist on sending me a package of her preferred buckwheat flour from Anthony’s. I’ll show you at KP+ how it compares to the one I used for these buns.)
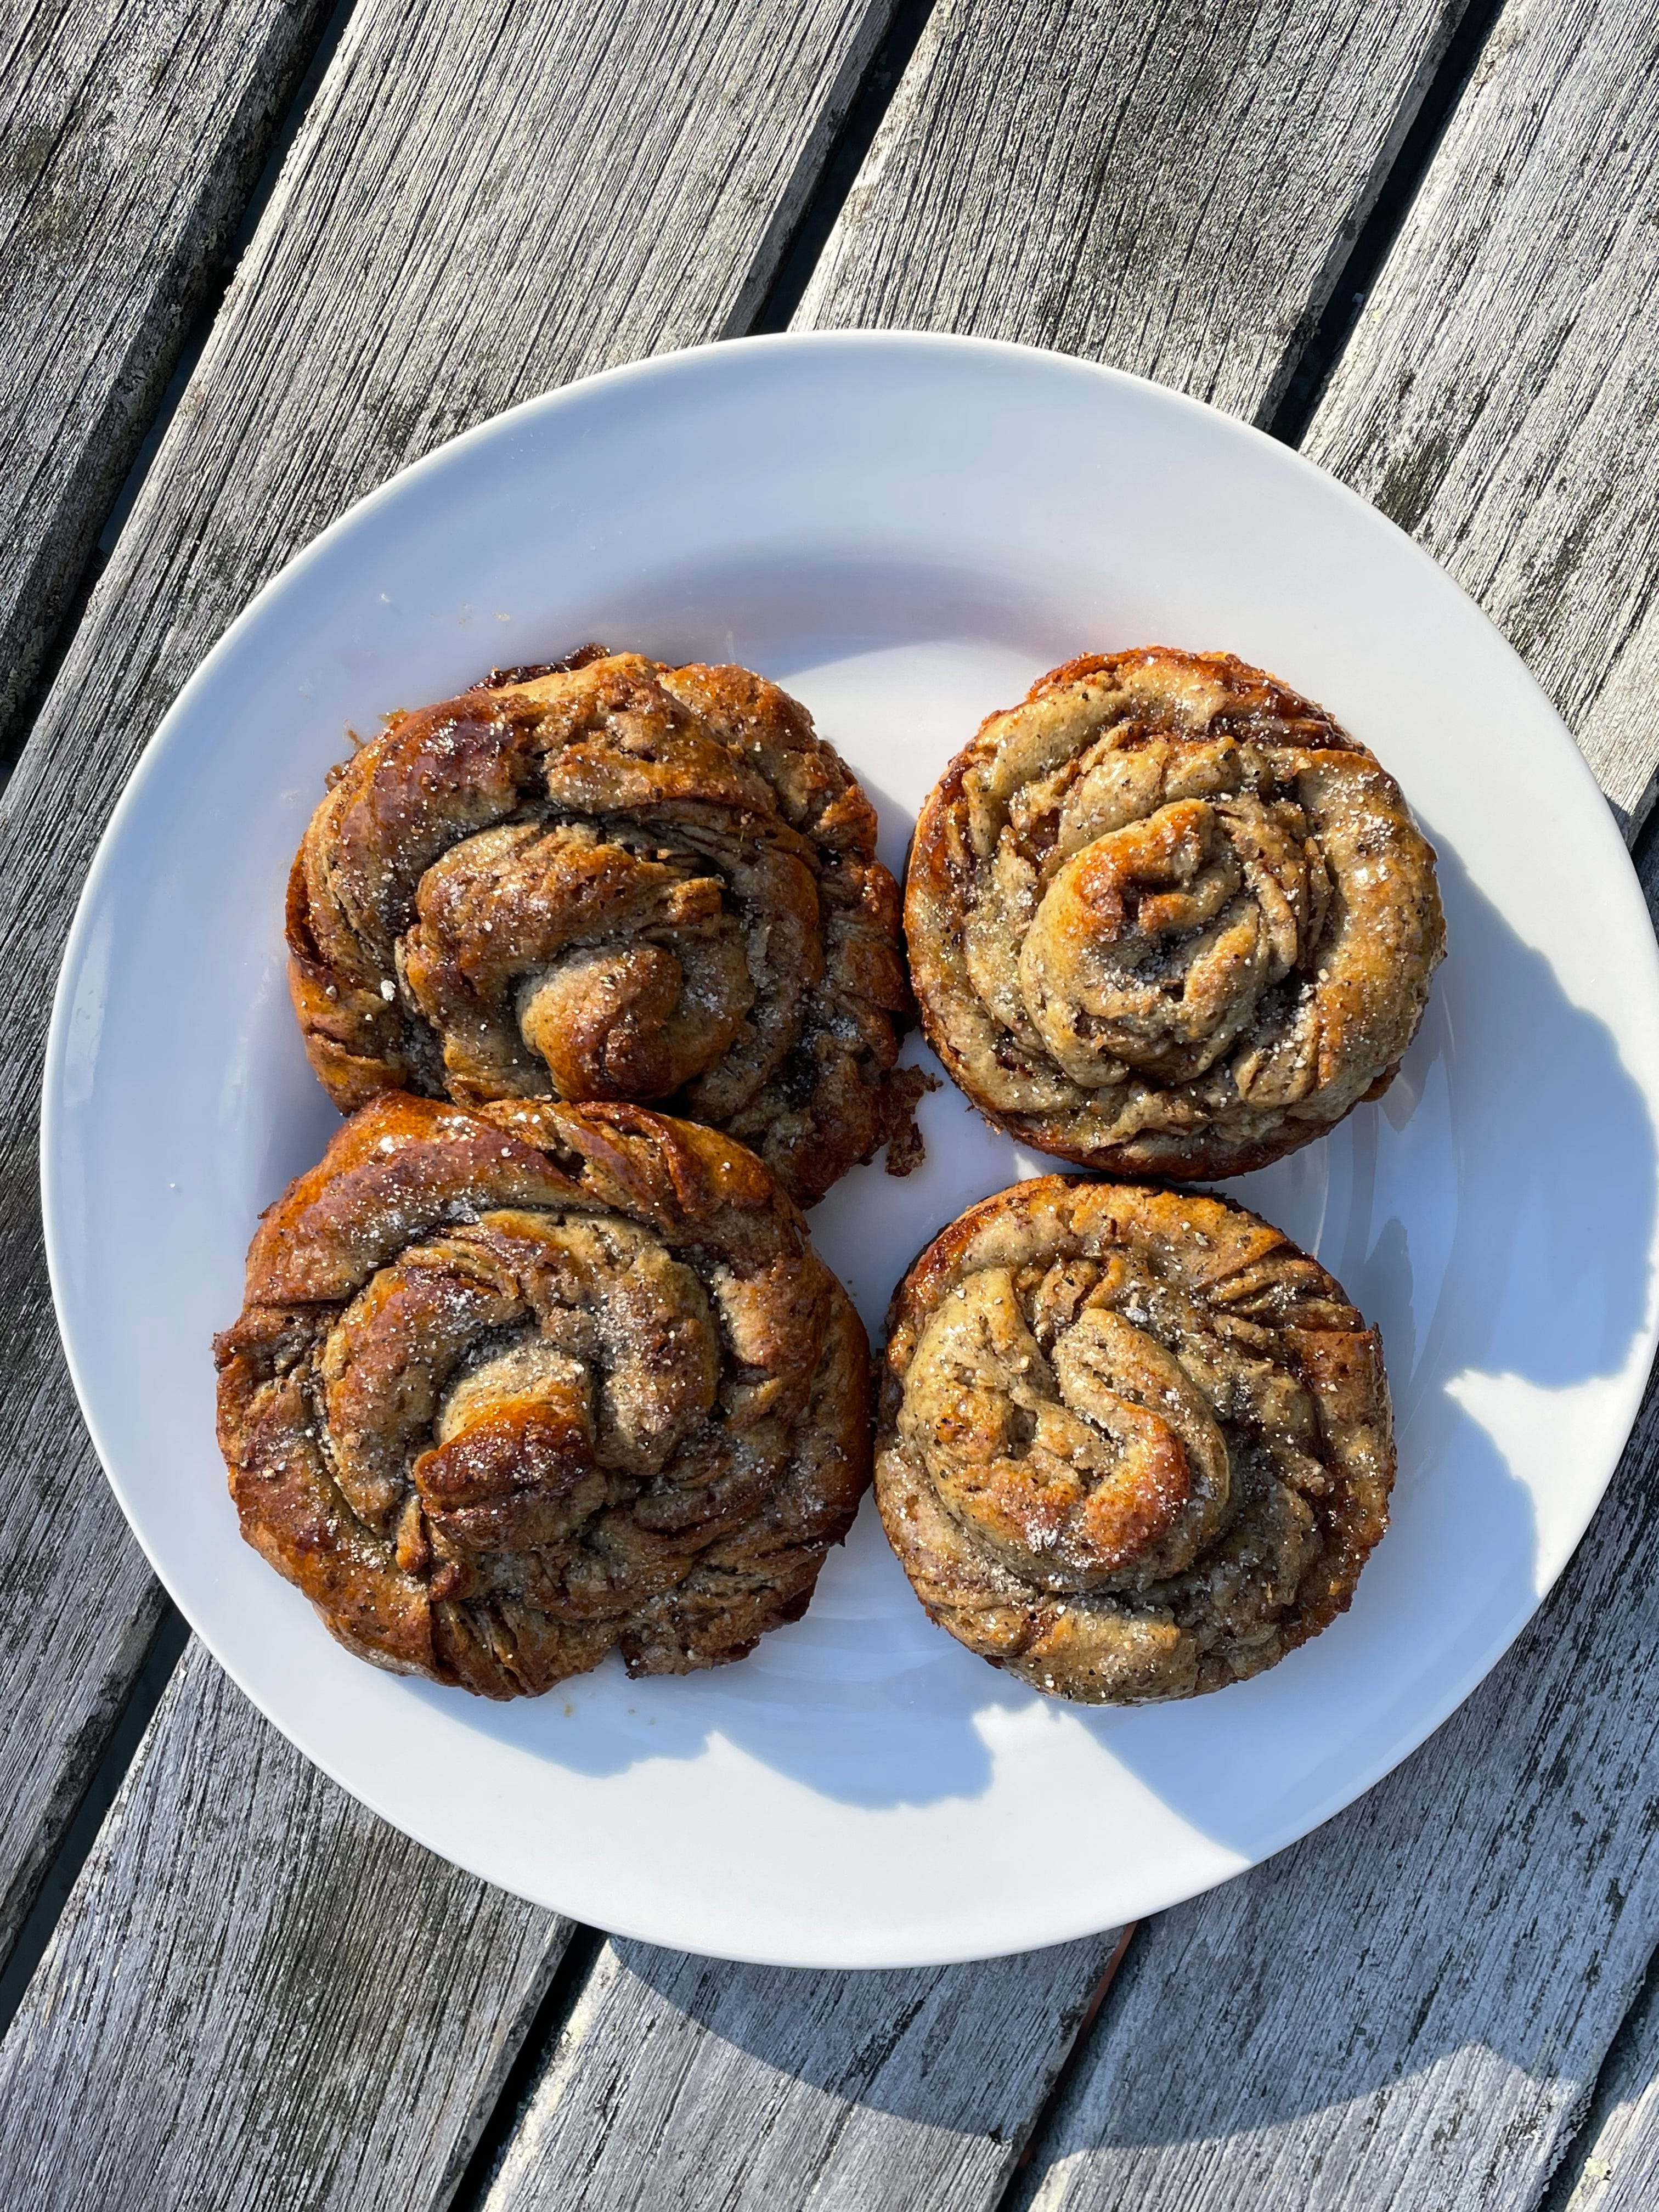
The chilled, the dough is a pleasure to work with. It has more of a marshmallow-y bounciness than a rubber band-like stretchiness, but it’s obedient and easy to roll out and shape, if a tad more delicate than a gluten-rich dough. I very much enjoyed the process of making these buns and of eating one warmed the following day. I imagine that if I were gluten-intolerant, I’d be very grateful for this recipe! And as a gluten-tolerant but alternative-curious person, I admire Aran’s dedication to this craft and the masterly advances she’s contributed to it.
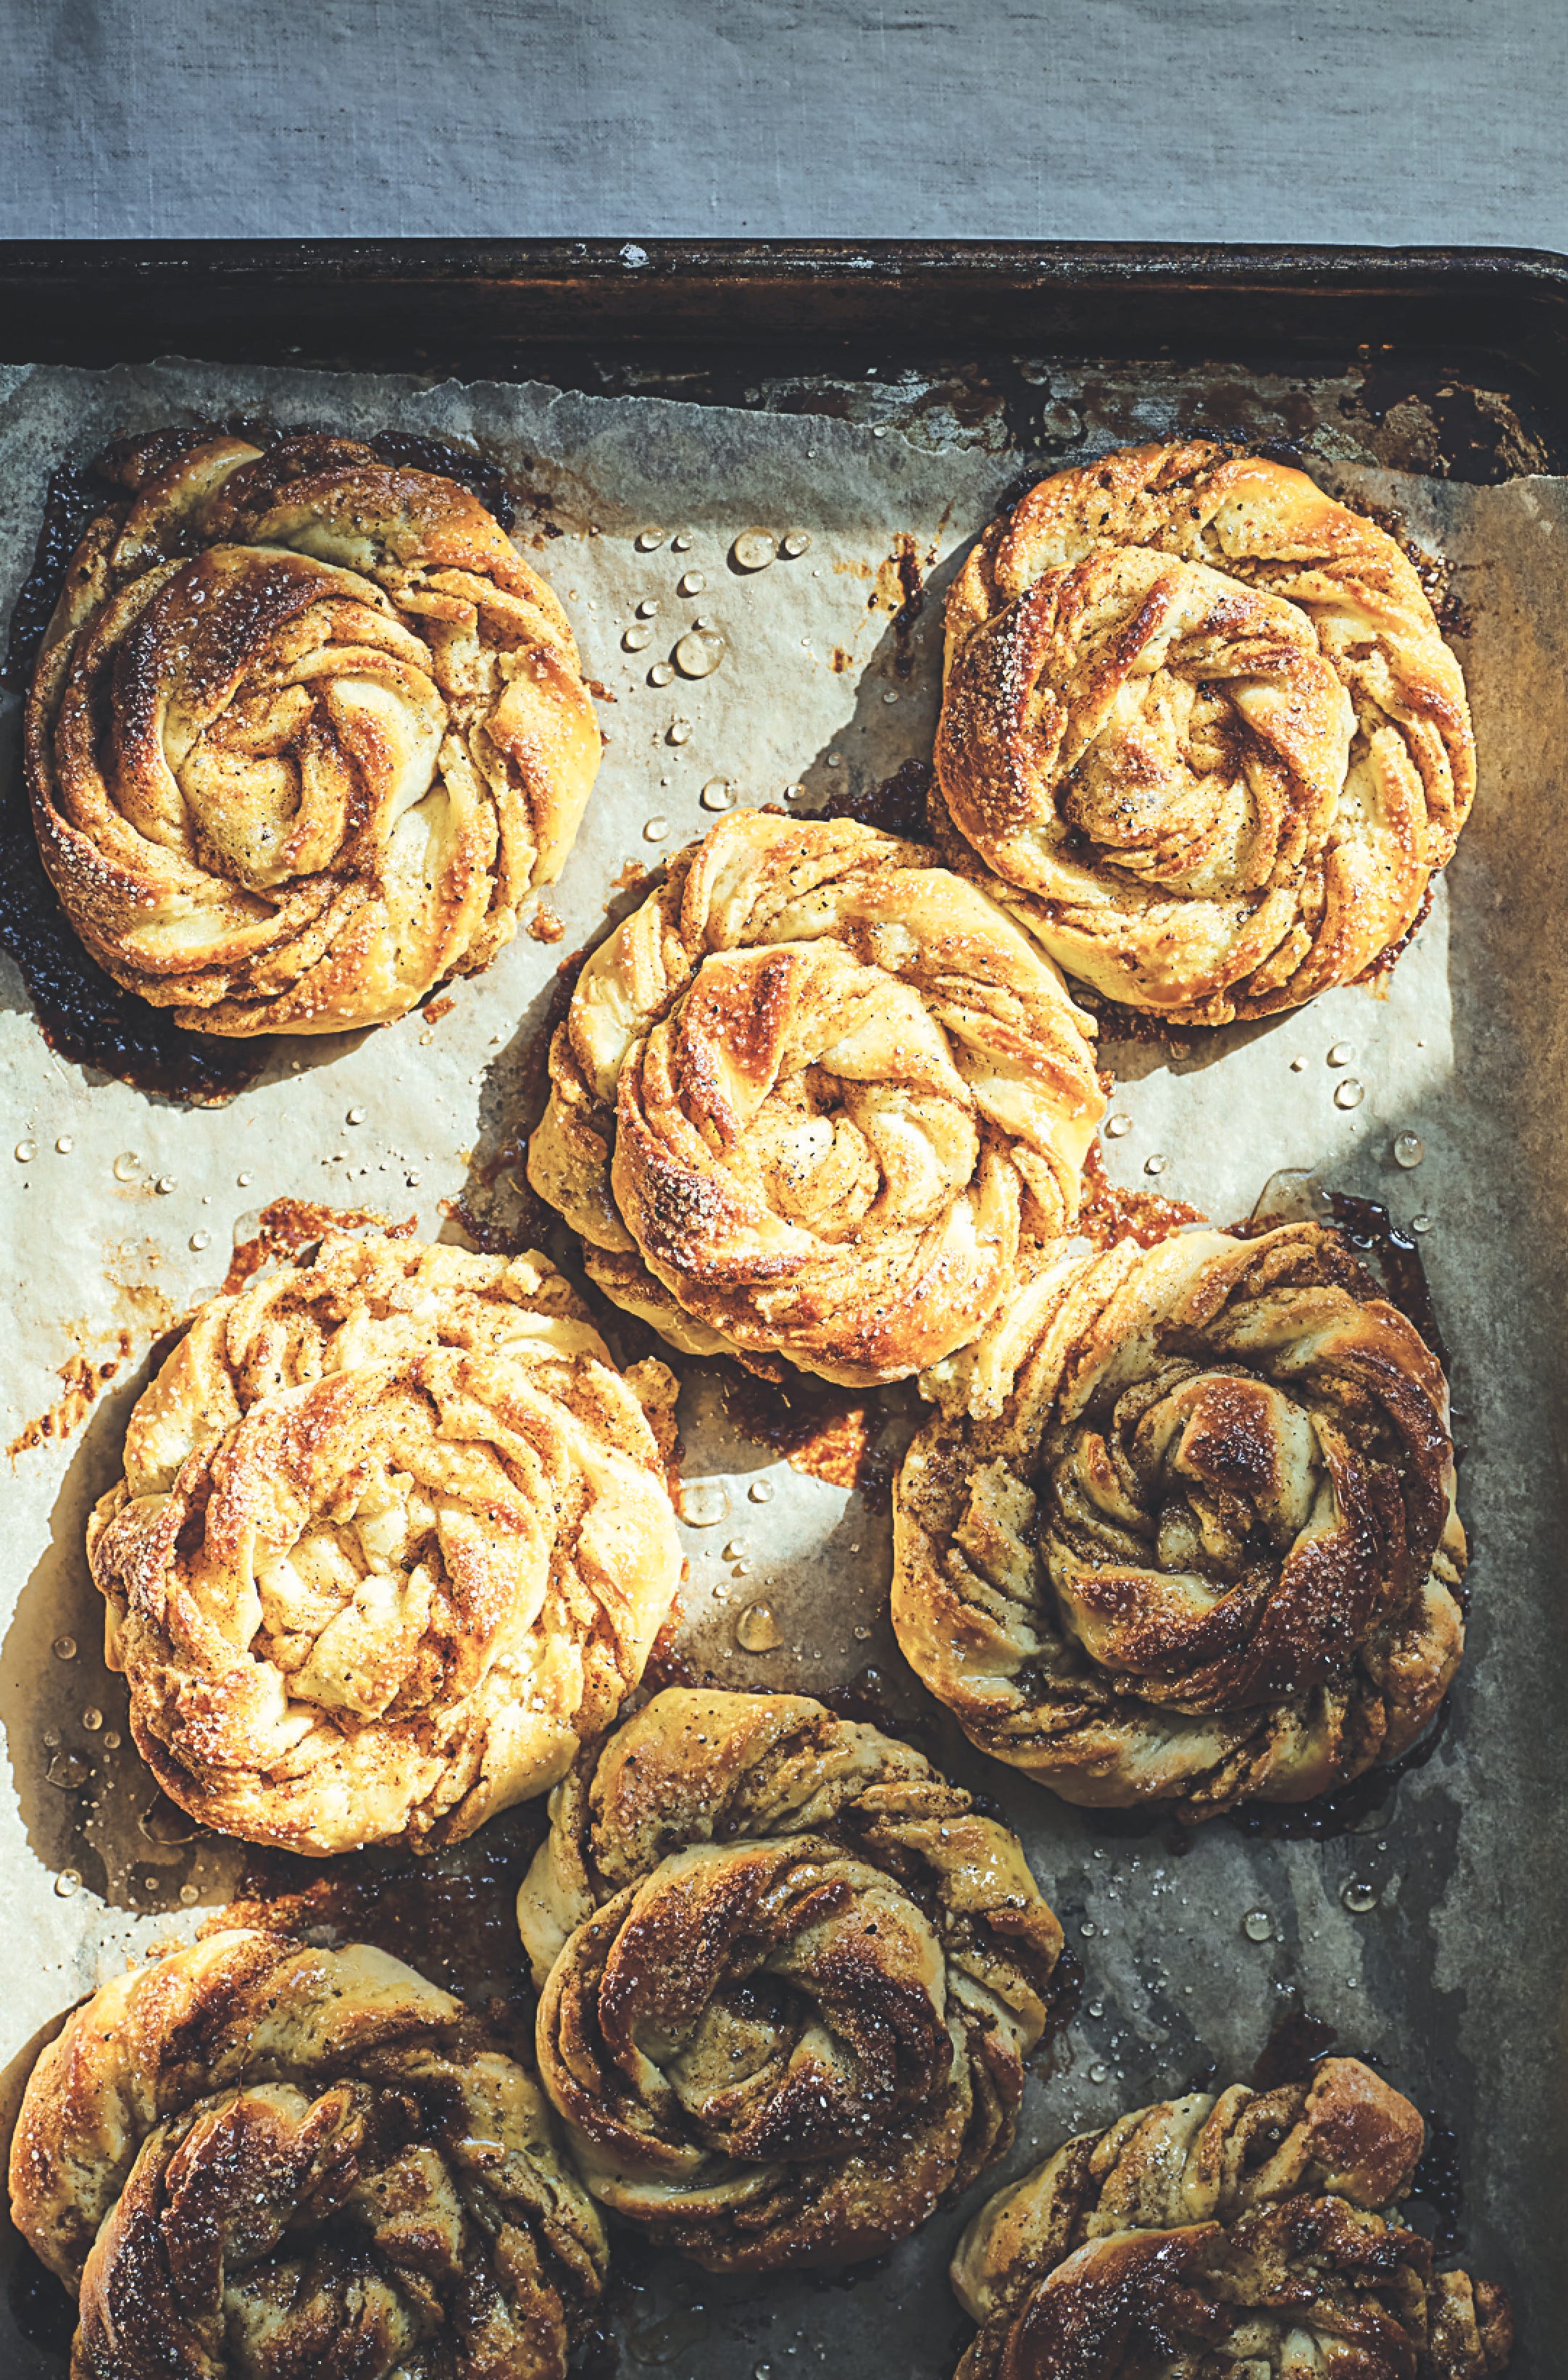
RECIPE: Buckwheat and Cardamom Buns
Excerpted from The Art of Gluten-Free Bread by Aran Goyoaga (Artisan Books). Copyright © 2025. Photographs by Aran Goyoaga. Link to purchase.
In Scandinavian countries, cardamom buns are an everyday affair and not reserved for holidays, but I make them mostly for special occasions; something about cardamom says holiday to me. For this recipe, I encourage you to buy green cardamom pods and grind the interior black seeds in a spice grinder or mortar and pestle immediately before using. Preground cardamom loses a lot of the strong spicy aroma that the buns need. It is also important that you use light buckwheat flour in this recipe, because very dark buckwheat will be dense and might overpower the cardamom. The dough needs to chill in the refrigerator overnight, so plan on starting the process the night before.
MAKES 8 BUNS
FOR THE DOUGH
2 teaspoons (8 g) active dry yeast
200 grams whole milk or oat milk, heated to 105°F (41°C)
80 grams granulated sugar
20 grams psyllium husk powder
120 grams potato starch
105 grams light buckwheat flour
90 grams tapioca starch, plus more for dusting
2 teaspoons (8 g) kosher salt
11/2 teaspoons (6 g) xanthan gum
1 teaspoon (3 g) freshly ground cardamom
2 large eggs, at room temperature
1 large egg white, at room temperature
55 grams soft (but not melted) unsalted butter or vegan butter
FOR THE FILLING
75 grams light brown sugar
70 grams soft (but not melted) unsalted butter or vegan butter
2 teaspoons (6 g) freshly ground cardamom
2 teaspoons (6 g) ground cinnamon
FOR THE CARDAMOM SUGAR
25 grams granulated sugar
1 teaspoon (3 g) freshly ground cardamom
1 large egg, lightly beaten
FOR THE GLAZE
50 grams granulated sugar
35 grams water
Method
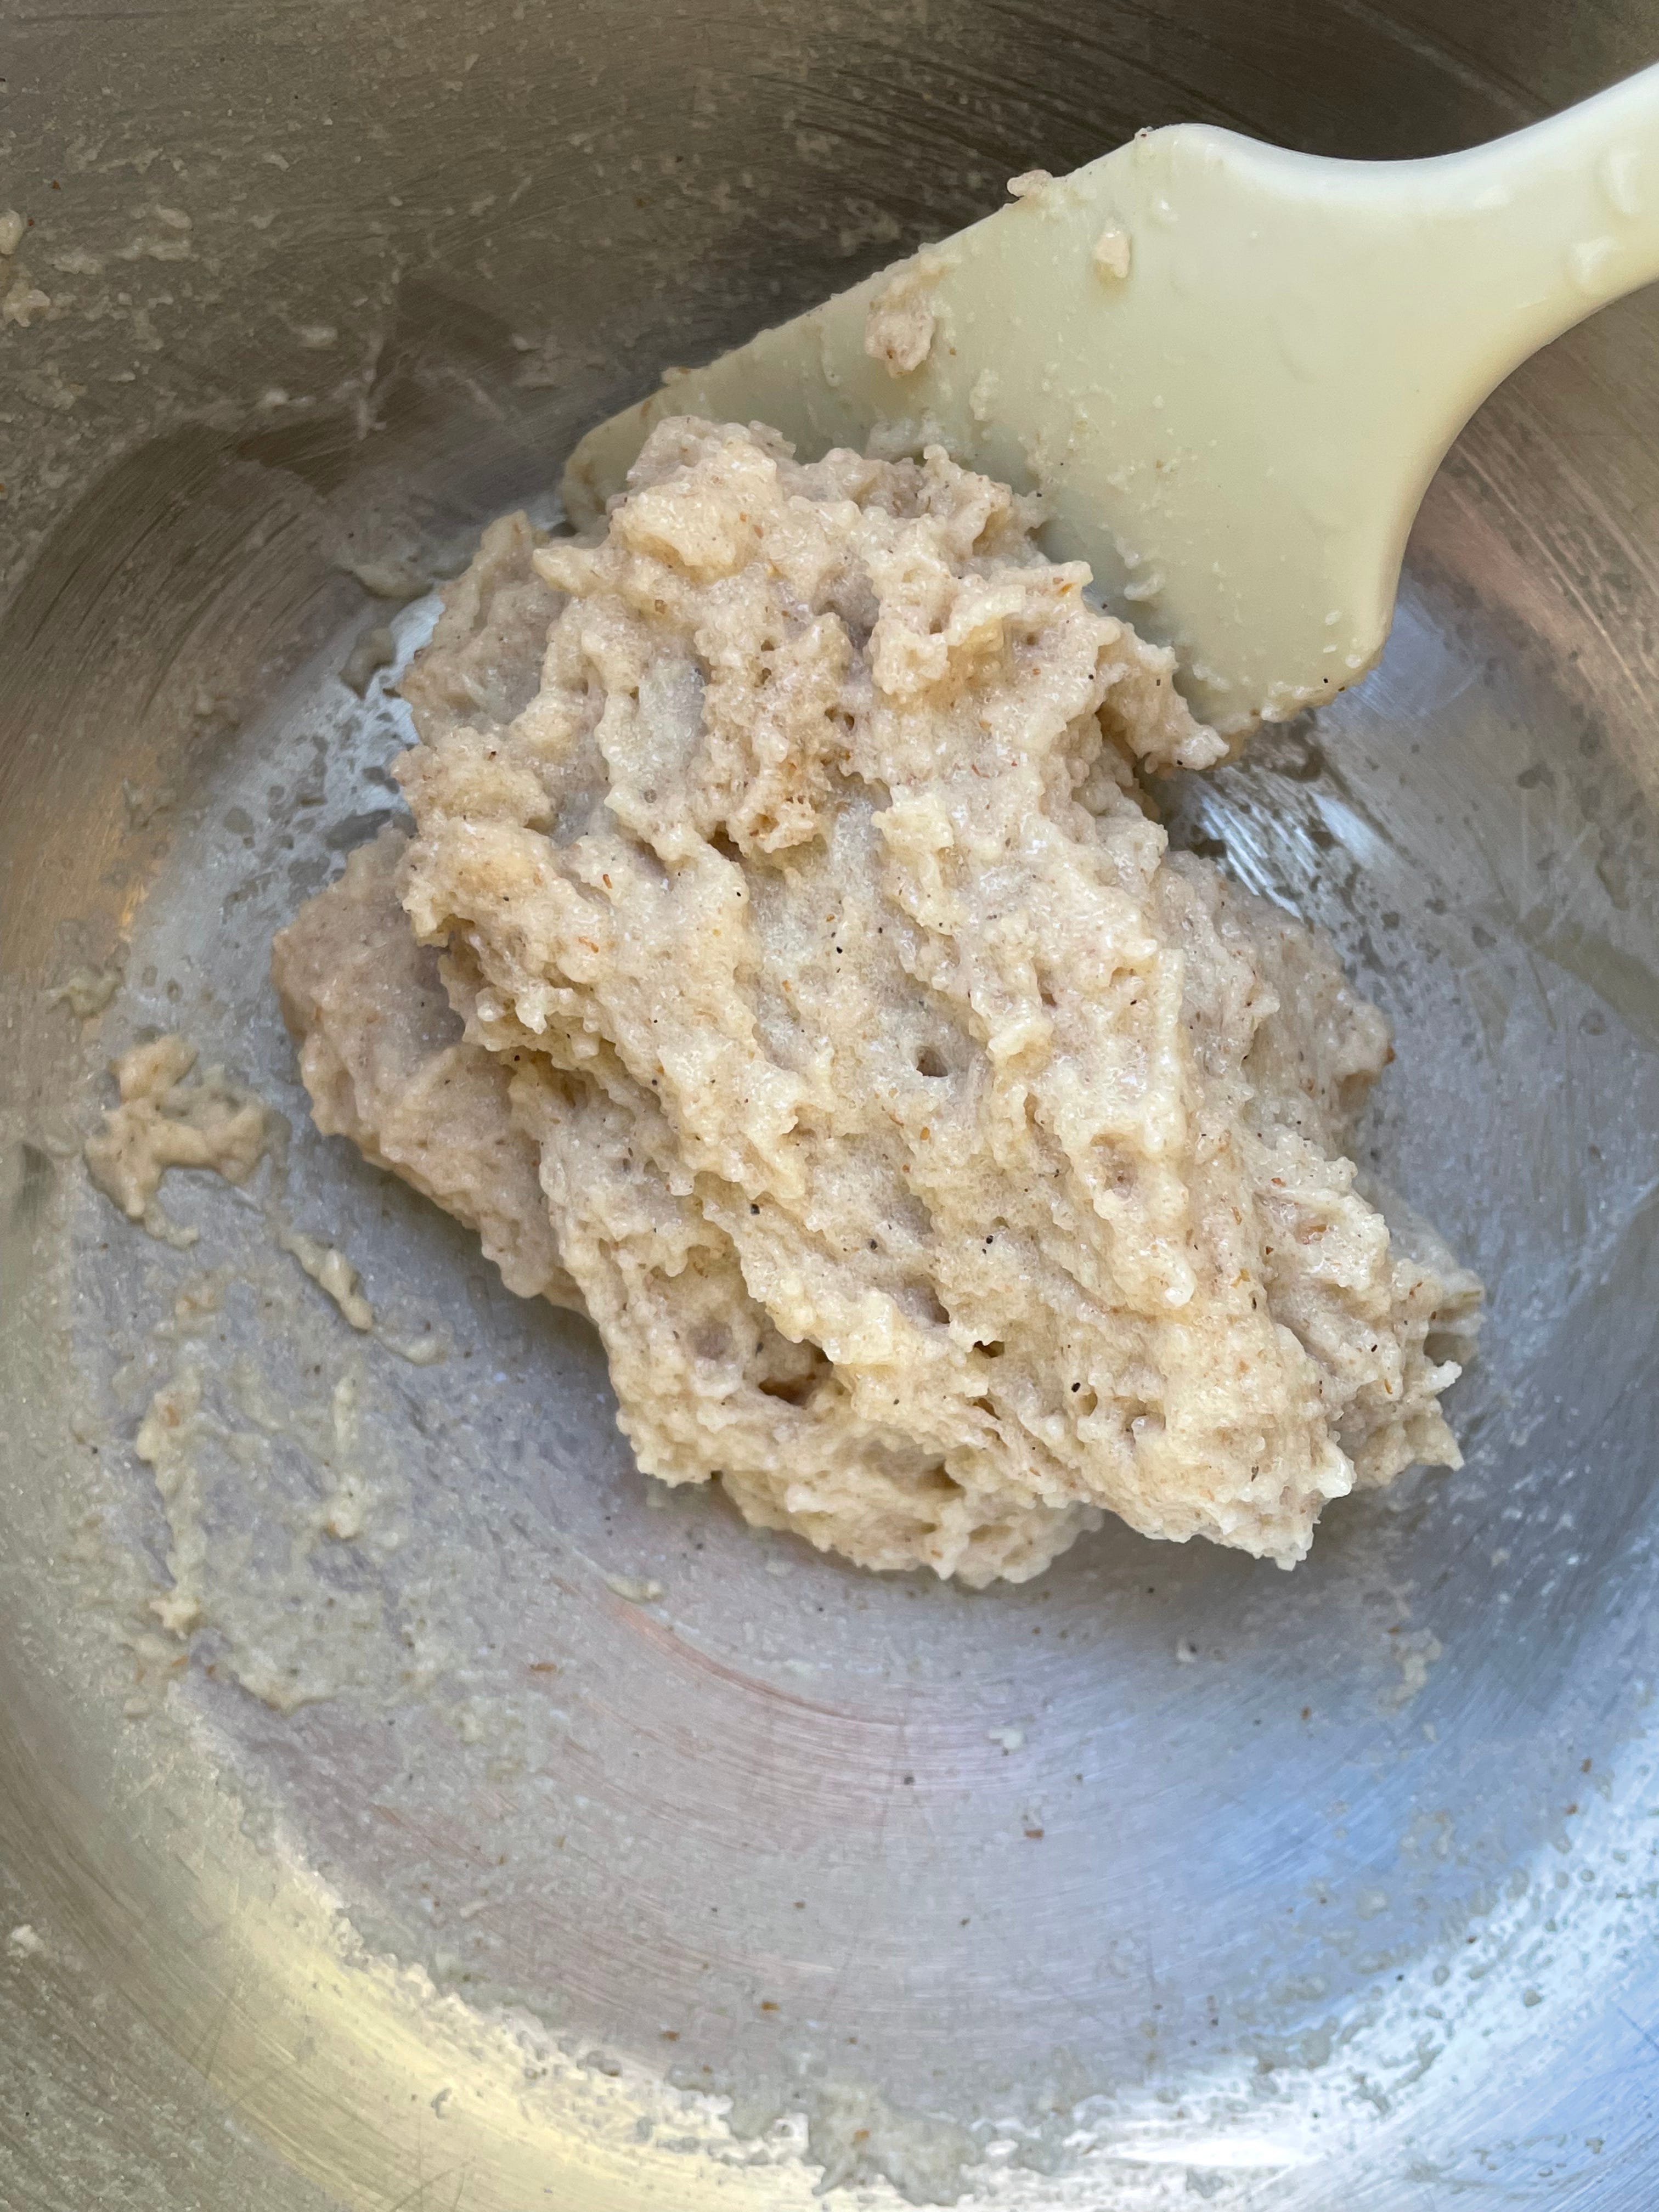
Make the yeast-psyllium mixture. Sprinkle the yeast into a medium bowl. Add the milk and 5 grams of the sugar and whisk until dissolved. Let the mixture sit until frothy, about 10 minutes. Whisk in the psyllium vigorously. Let it gel for 5 minutes.
Make the dough. In a stand mixer, stir together the remaining 75 grams sugar, the potato starch, buckwheat flour, tapioca starch, salt, xanthan gum, and cardamom. Add the yeast-psyllium mixture. Snap on the dough hook and begin mixing the dough on medium speed. Add the eggs and egg white and continue mixing for 2 minutes until the dough comes together. Add the softened butter 1 tablespoon at a time and continue mixing for another minute. The dough will be soft, moist, and sticky, but should hold together.
Chill the dough. Lay a large sheet of plastic wrap on a work surface and scrape the dough onto it. Lightly dust the work surface with tapioca starch. Shape the dough into a rectangle that is roughly 6 by 7 inches (15 by 18 cm). The exact size of the rectangle is not important at this stage. Place the dough in the refrigerator and chill overnight.
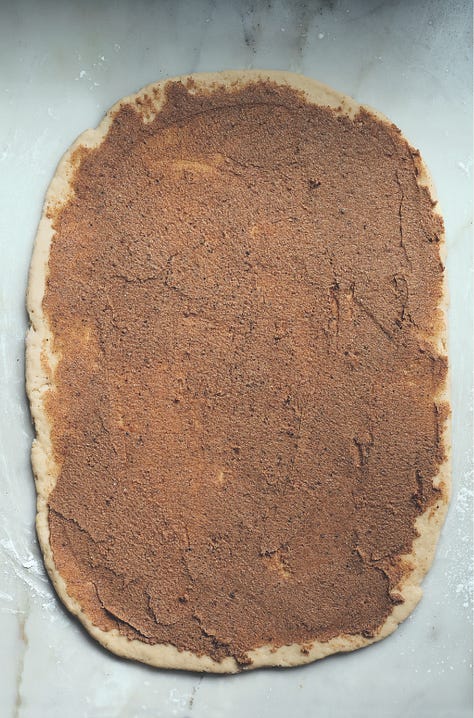
Make the filling. In a medium bowl, stir together the brown sugar, soft butter, cardamom, and cinnamon until it is easy to spread and very creamy. You can also do this in a stand mixer with the paddle, but it should work well with a wooden spoon if your butter is soft. It is important that the butter be soft so it is easy to spread and doesn’t tear the dough. If your room is cold, microwave the butter for 5 seconds to warm it up. Set aside.
Roll the dough. Lightly dust a work surface and a rolling pin with tapioca starch. Remove your dough from the refrigerator, unwrap, and place it on the work surface. Knead the dough a few times to bring back some elasticity and then let it sit for 10 minutes to take the chill off. If the dough is too cold, it will crack while rolling. Gently roll the dough to a rectangle that is roughly 16 by 11 inches (41 cm by 28 cm). Move the dough around and dust with tapioca starch as needed so it doesn’t stick to your surface. It’s okay if the edges crack a little. Gently pull the corners out to create more of a rectangle than an oval, but don’t pull too hard or the dough may crack. There is little elasticity, so you must work gingerly.
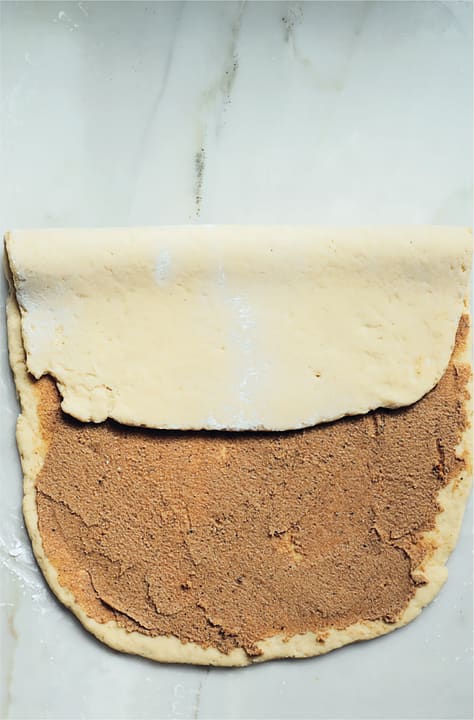
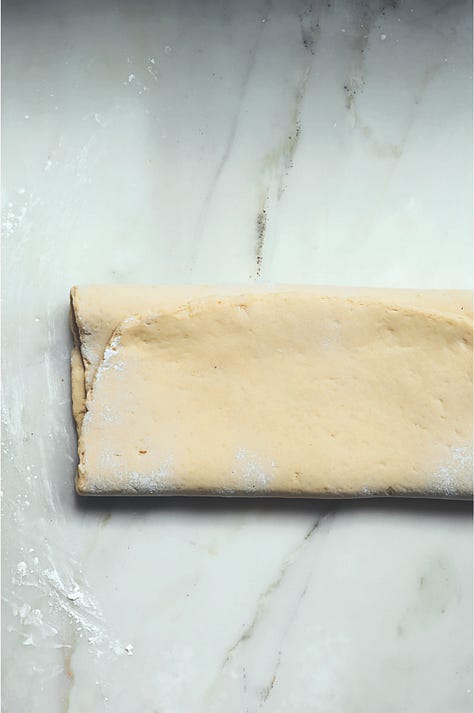
Add the filling and roll. Line a sheet pan with parchment paper. Spread the filling all over the surface of the dough, trying not to tear it. With a short side facing you, fold the top third onto the middle and the lower third up over it, creating a letter fold. Rotate the dough 90 degrees. Dust the dough and rolling pin with tapioca starch, if needed, and roll the dough to a rectangle that is roughly 81/2 by 15 inches (22 by 38 cm). Transfer the dough to the lined sheet pan and refrigerate for 20 to 30 minutes.
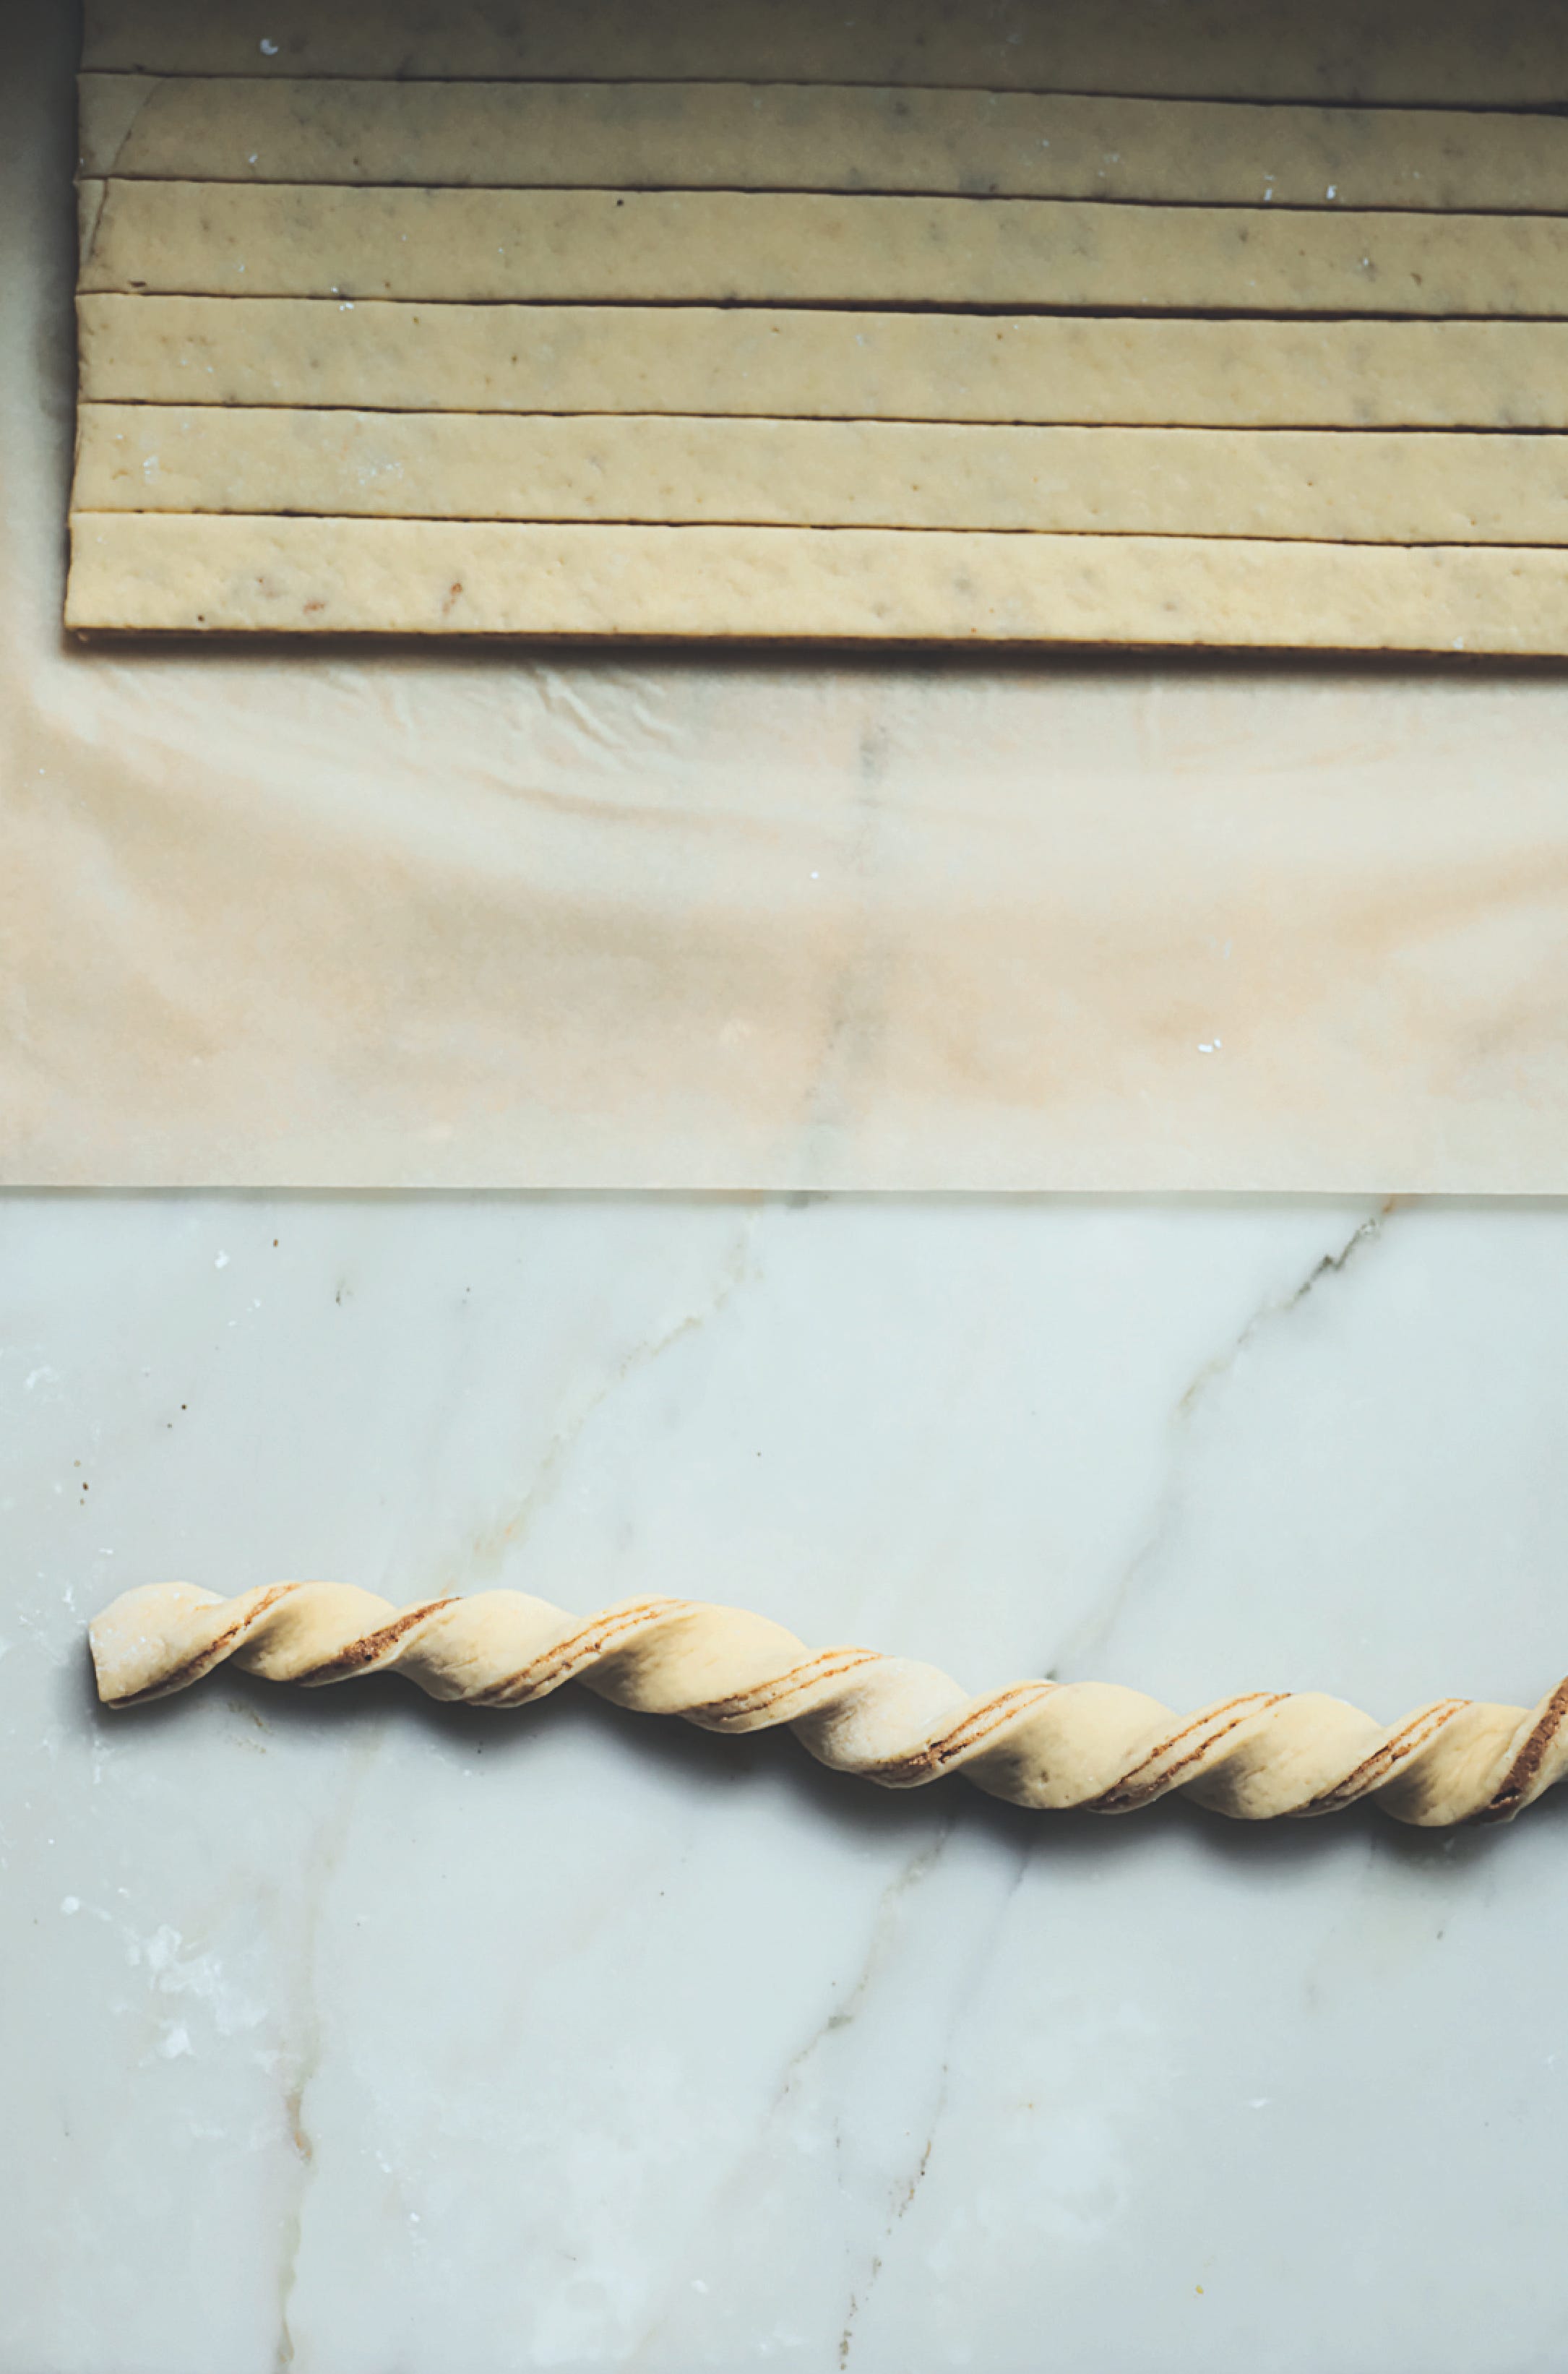
Cut the dough. Remove the dough from the refrigerator and place it on your work surface with a short side facing you. Trim the edges to create sharp corners. Make 8 small marks 1 inch (2.5 cm) apart, at both ends. Use a long ruler to help you line up the top and bottom marks and cut the dough vertically into 8 strips that are roughly 1 inch (2.5 cm) wide and 15 inches (38 cm) long.
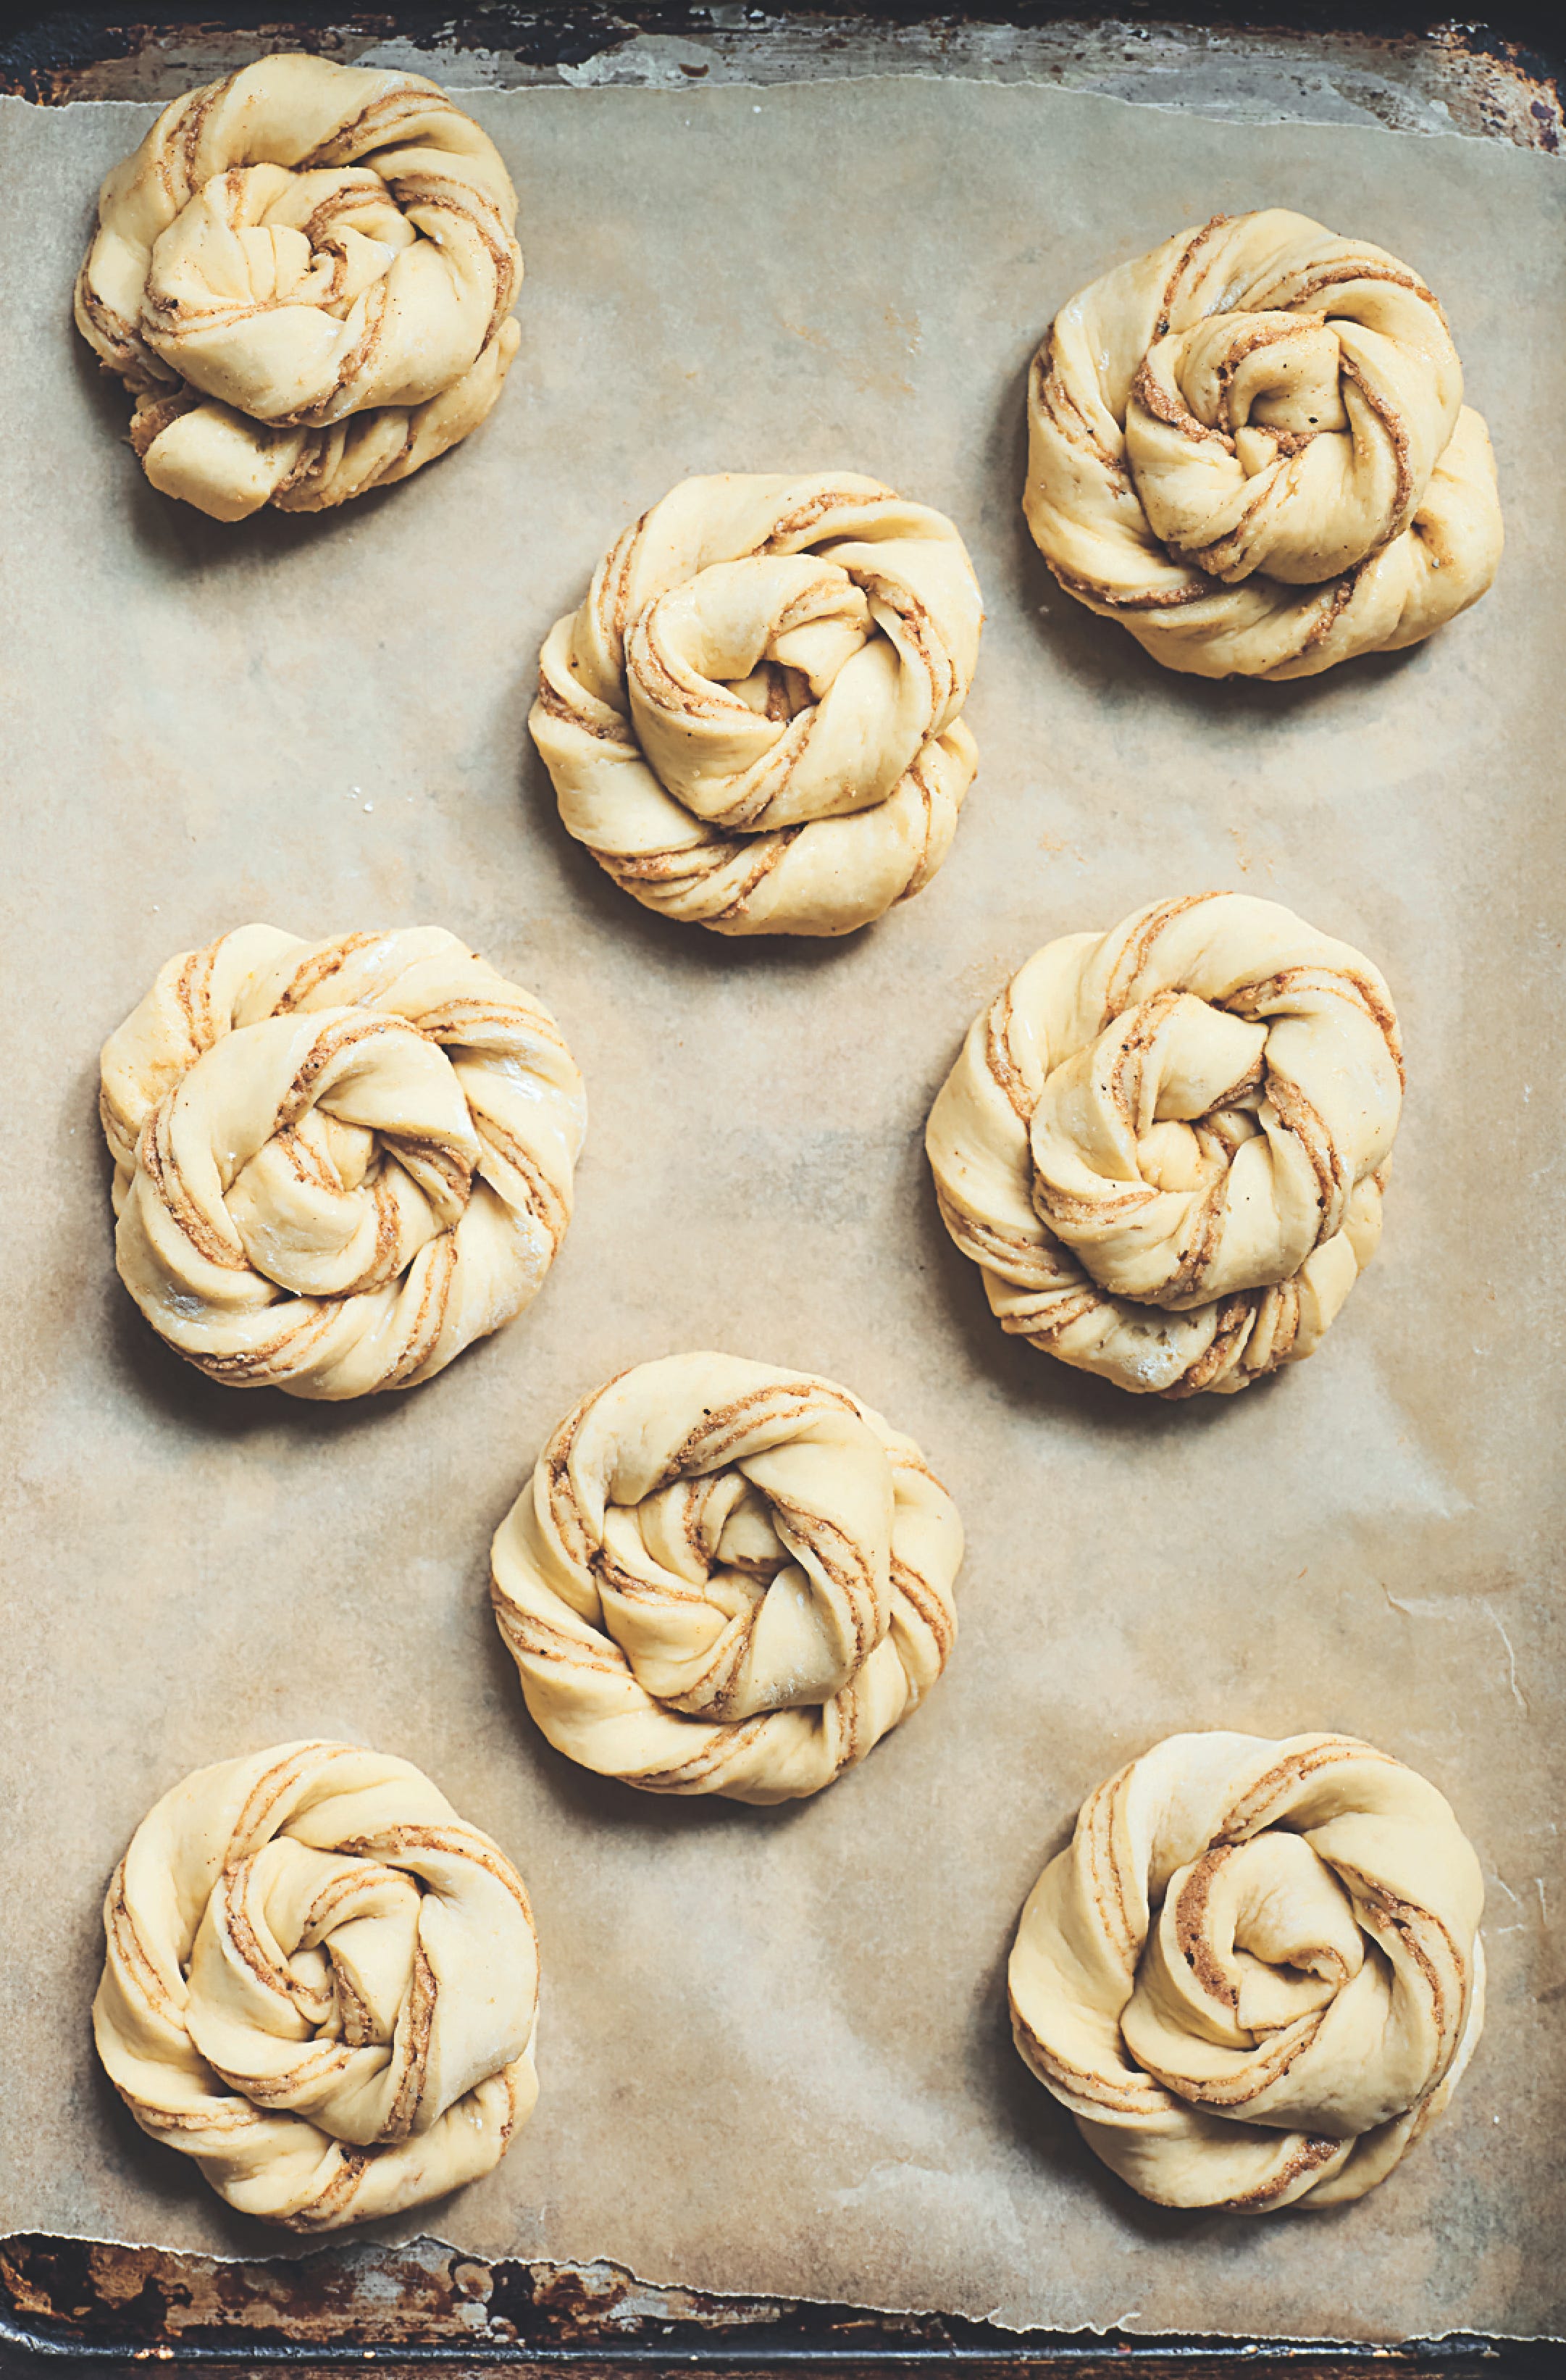
From The Art of Gluten Free Bread by Aran Goyoaga Shape the cardamom buns. Take one strip of dough and place it in front of you. Start twisting the dough in the middle toward one end and then twist toward the other end. Loosely coil the twisted dough into a spiral or a snail, tucking only the tip underneath at the end. Using both hands or a spatula, carefully transfer each spiral onto the lined sheet pan. Repeat with the remaining strips of dough until all the buns are shaped.
Proof the cardamom buns. Cover the pan with a linen towel or wrap it in a large plastic bag. Proof at room temperature until the buns feel lighter to the touch, about 40 to 45 minutes.
Preheat the oven and make the cardamom sugar. While the buns are proofing, position a rack in the bottom third of the oven and preheat the oven to 450°F (230°C). In a small bowl, stir together the sugar and cardamom. Set aside along with the lightly beaten egg, which will be used to brush the tops.
Make the glaze. In a small saucepan, cook the sugar and water together over medium heat until the sugar is completely dissolved. Set aside.
Bake the cardamom buns. When the buns are proofed, lightly brush the tops with the beaten egg and sprinkle some cardamom sugar on top. Transfer the pan to the oven and reduce the oven temperature to 425°F (220°C). Bake for 15 minutes, or until the buns are a deep golden brown. Don’t worry if your buns crack in spots. There is not a lot of elasticity in the dough, so this can happen if you twist the buns too tightly.
Glaze the buns. When the buns come out of the oven, brush them with the sugar syrup. Serve the buns while they are still warm. They can be reheated in the microwave for 20 seconds.


Note: If you have English muffin rings, you can place them around the shaped buns and let them proof in them. This gives a nice round shape to the buns and helps them rise up rather than sideways in the oven, but freeform buns will also work very well
 | A guest post by
|
I had the pleasure of interviewing Aran, Naomi Devlin, and Ian Lowe for a piece on gluten-free sourdough starters I wrote a few years ago: https://food52.com/story/26989-how-to-bake-gluten-free-sourdough-bread.
Getting to chat with these geniuses remains a writing highlight for me. Love this piece too -- very Actors on Actors.
Great post, very informative