Kitchen Project #82: Beignets
aka DOUGHNUTS! And the low-down on food processor brioche!
Hello,
Welcome to today’s edition of Kitchen Projects. Thank you so much for being here.
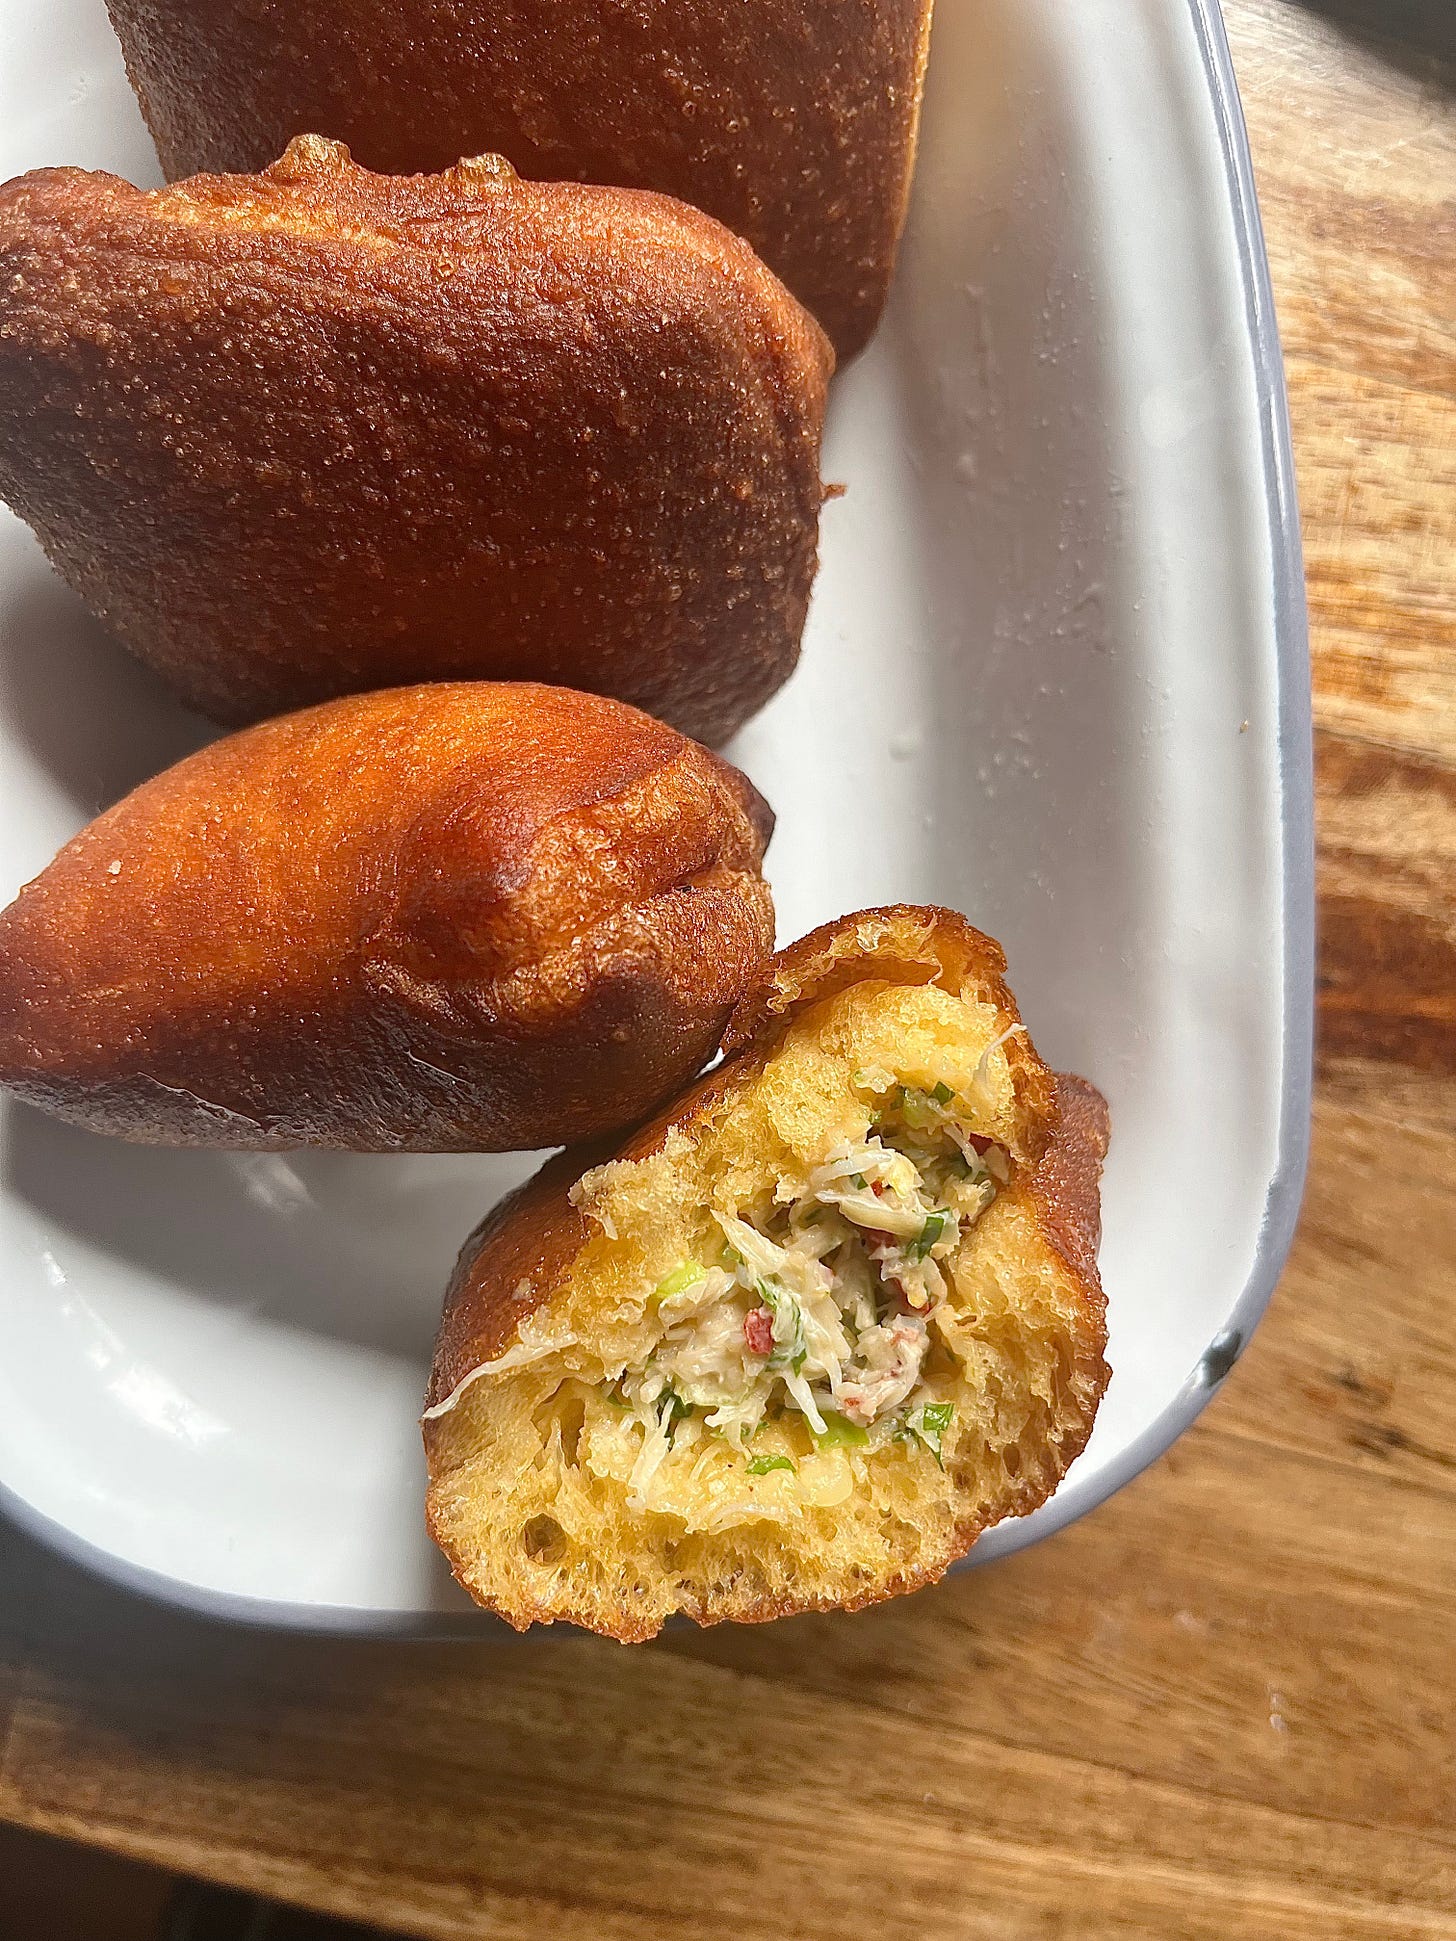
Today I am throwing aside my fried dough prejudices and sharing a recipe for beautiful little pillows of joy (aka beignets) but also a brioche technique that is a bit life-changing. Over on KP+, the beignet party is continuing in the form of stuffed crab beignets. You have to try these. It’s basically a legal requirement. I’ll also show you how to fill your doughnuts, should you so desire.
What’s KP+? Kitchen Projects+, aka KP+, is the level-up version of this newsletter. Kitchen Projects is an entirely reader-supported publication. It only costs £5 per month, and your support makes this newsletter possible! By becoming a member of KP+, you directly support everything that goes into the weekly newsletter and get access to community chat threads, more recipes and giveaways, including access to the entire archive. A few things on KP+ right now:
October baking Q&A thread launching next week
Community chat thread ‘What’s your comfort bake?’
Love
Nicola
My Dough-no-go areas
I’ve admitted this before, but I’m not the biggest fan of doughnuts. Ok, we’re friends here, and I can be honest with you - I actually really don’t like doughnuts. Well, most doughnuts, anyway. Lately, I feel like doughnuts in London have become canvases for chaos, with everywhere attempting to win the title of ‘most monstrous!’ I’m not denying that they are delicious. And I admit I find the scent of fried dough irresistible. But doughnuts as they are now? Just too much commitment.
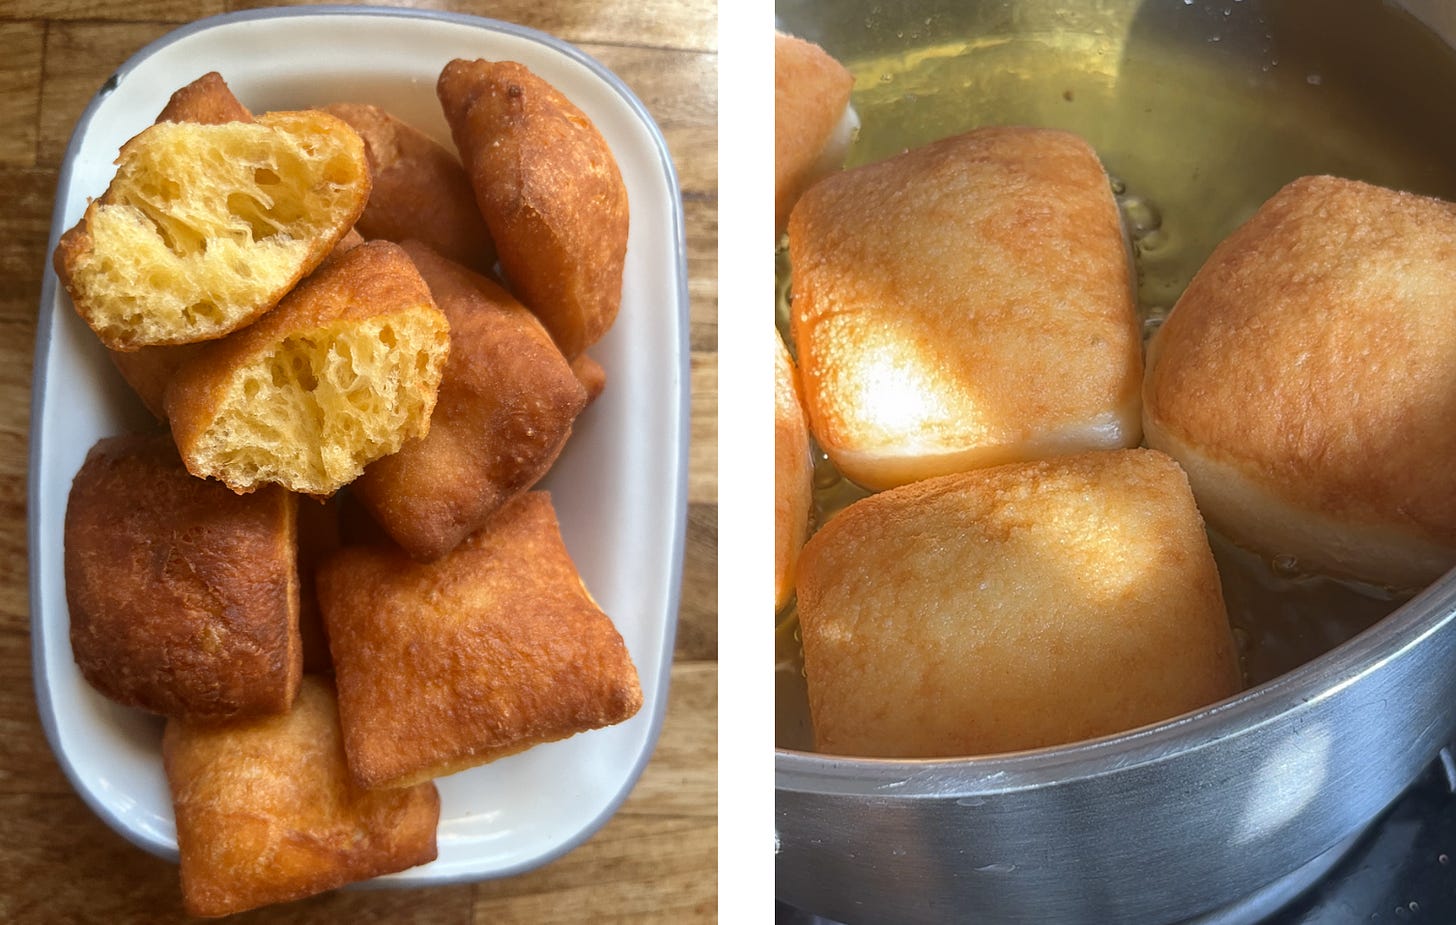
So there is only one answer: The beignet. Although it is simply the french word for a doughnut, beignets have their own spirit. They were originally pieces of deep-fried choux, but nowadays, I tend to associate beignets with small, square-fried pieces of yeasted dough covered in an almost criminal amount of powdered sugar. It can be filled, but usually, you enjoy them plain, as fresh out the fryer as possible and ideally still a little warm.
The New Orleans style beignet, which is the mould for any modern beignet, has a long history. Although not particularly well documented, it’s thought that beignets made their way to the US south via French colonists in the 18th century. For several hundred years, these small fried pieces of dough were simply called ‘fritters’ or ‘french market doughnuts’. Whilst it’s unclear when the beignet went from choux to yeasted dough - and there will still be variations from place to place - a deep-fried piece of choux is crisp and airy, whilst a deep-fried yeasted dough is more fluffy and pillowy.
Today, we’re covering the yeasted type. And I have to say, I am in love. I know there’s a bit of irony in not being able to eat a whole doughnut but being able to eat 5-6 beignets, but what can I say? Life is complex.
Your secret dough weapon
This recipe actually started with a technique. In what might be my favourite discovery of 2022 (along with tomato and mayonnaise sandwiches), you can mix great brioche in less than 5 minutes.
Yes. You read that right! Less than 5 minutes! In fact, the last time I made it, it was actually closer to 2. [insert brain exploding emoji]. Whilst I am sure there are specific attributes needed to make the famous beignets, like New Orleans style, today’s recipe is based on a pretty standard brioche dough with one big difference: It’s made in a food processor.
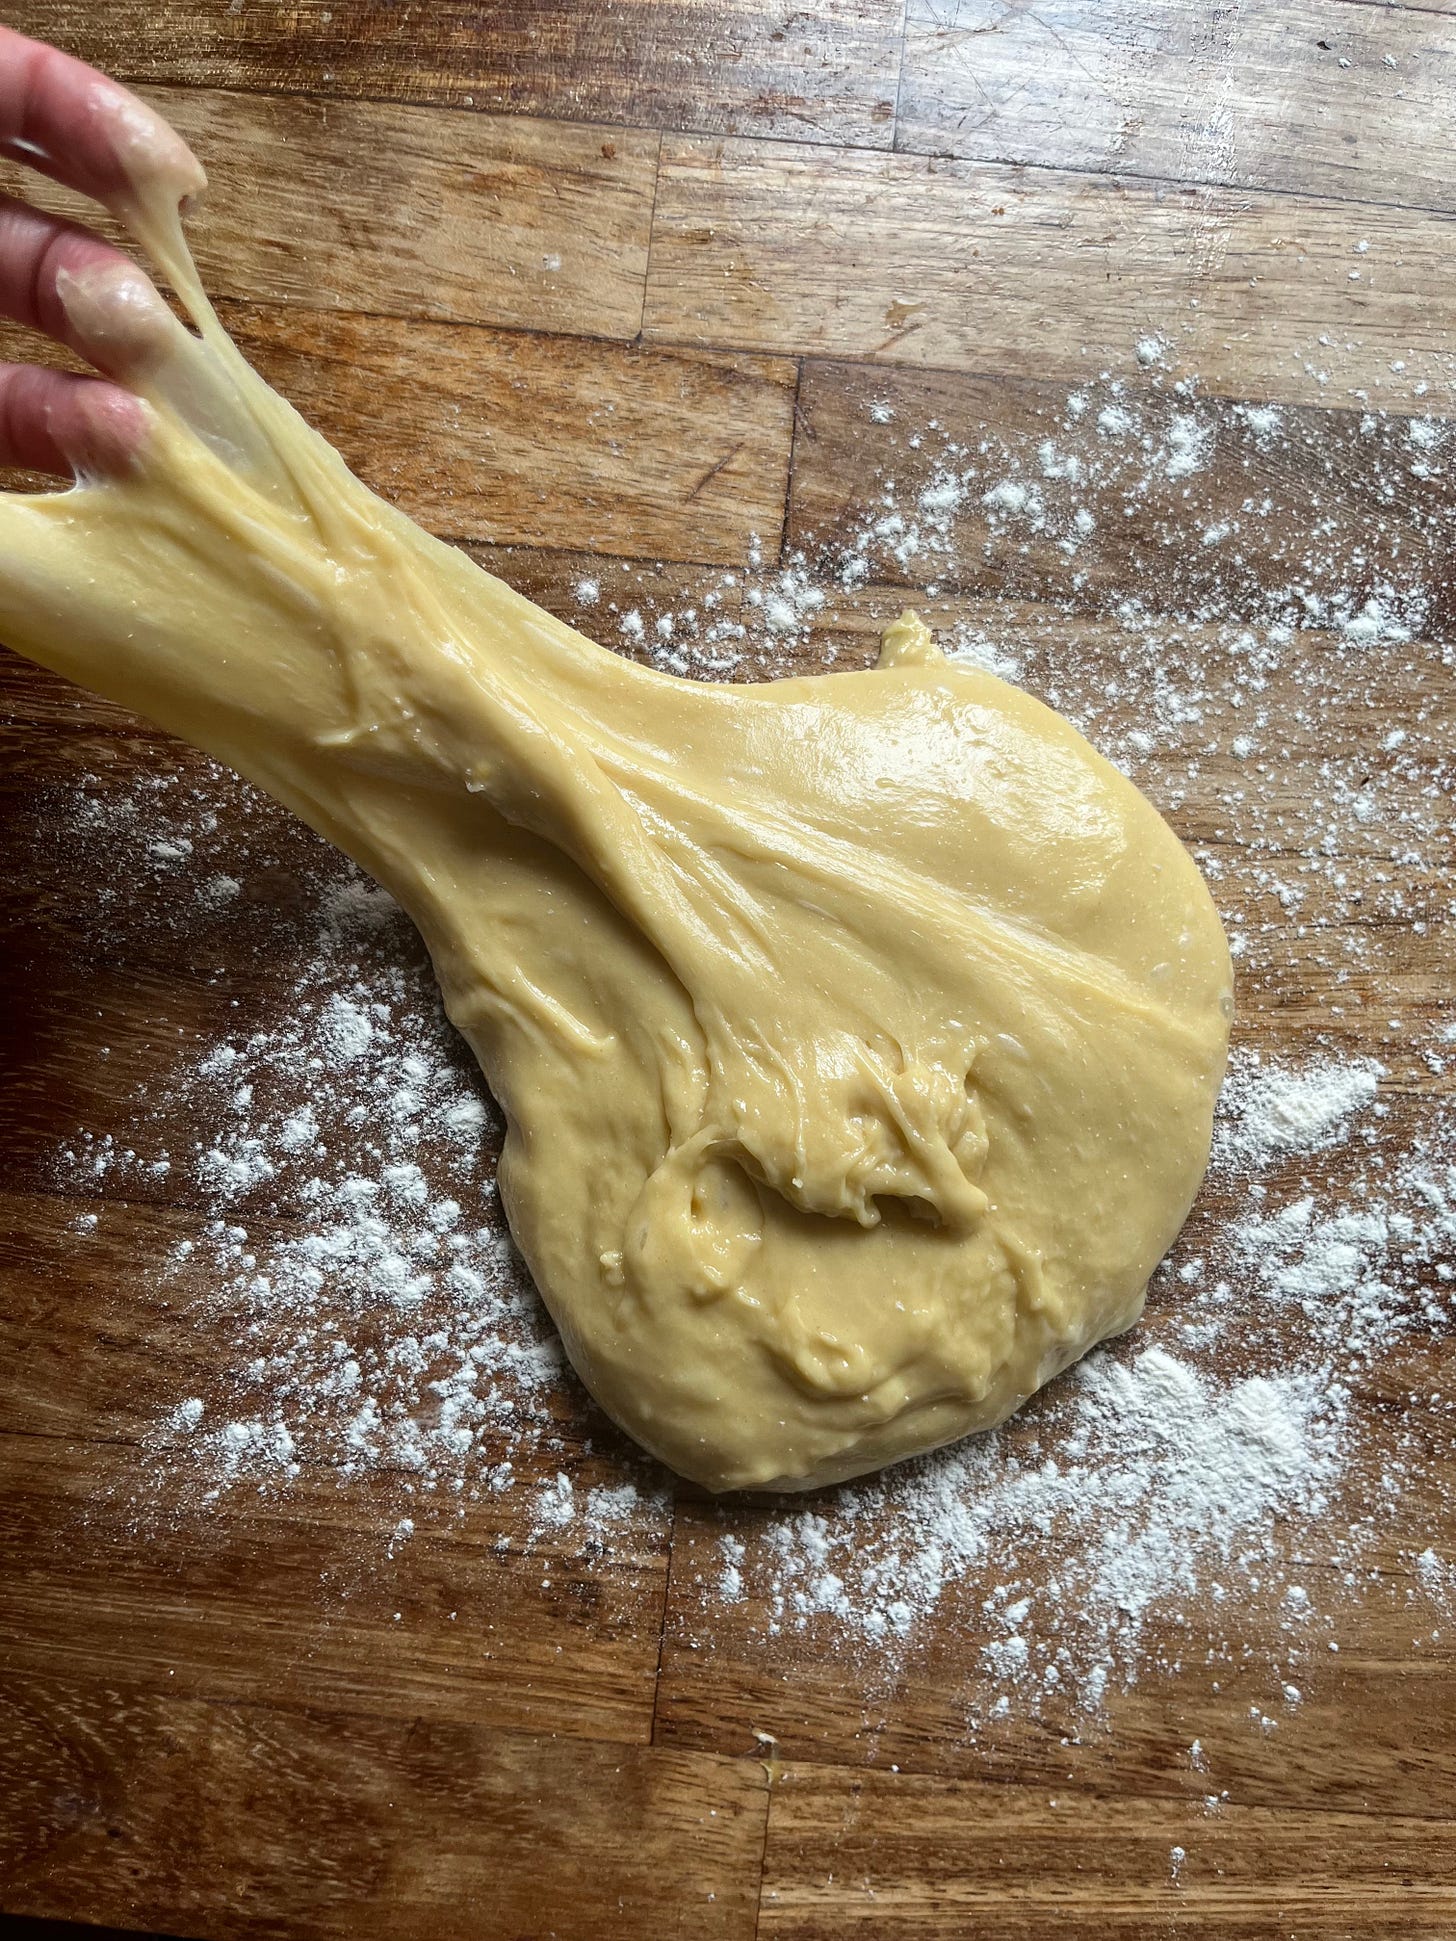
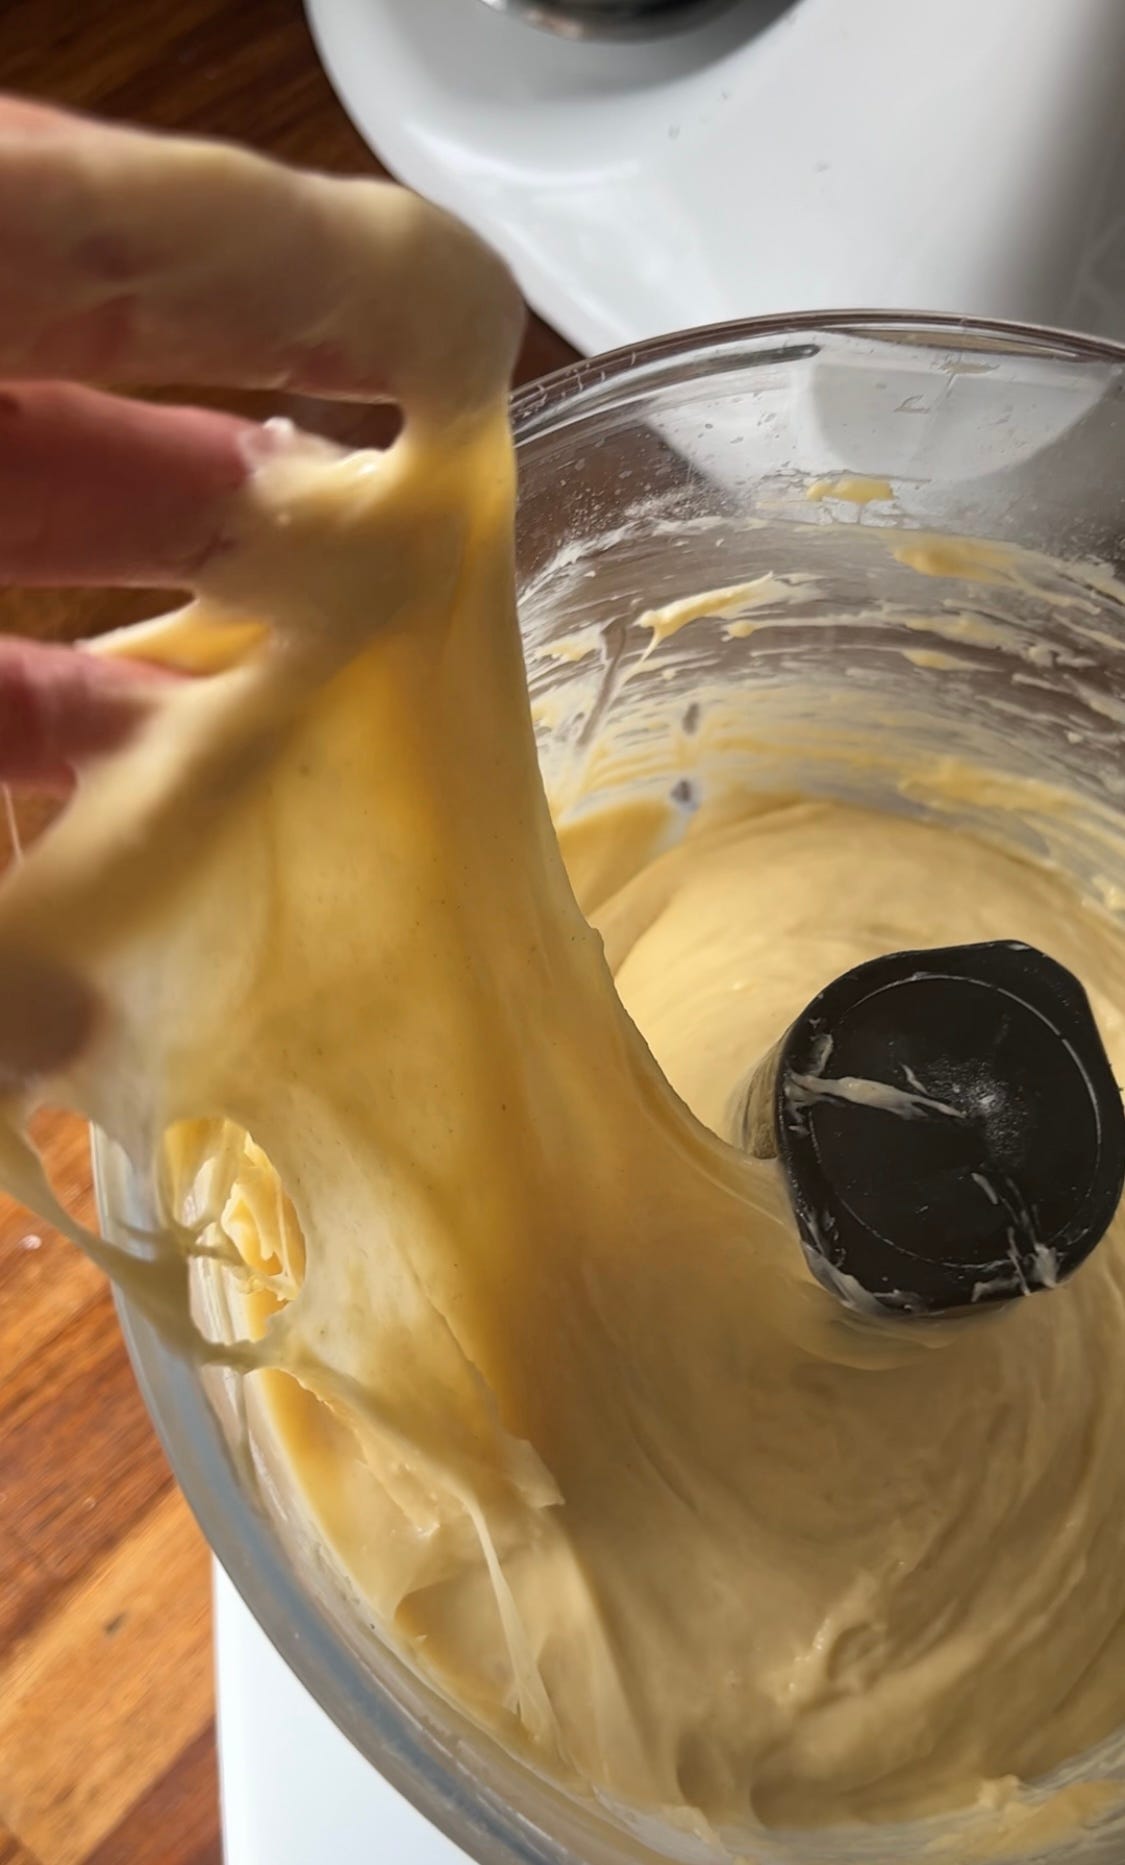
Instead of laboriously mixing your dough - classic brioche is seriously time-consuming, as much as I love it - you can go from zero to full gluten development with the help of a food processor. How? Brute force and speed.
Most food processors operate at an average of 1,700 rotations per minute. To put it in context, a KitchenAid has a max rpm of 200. As well as this, the food processor bowl is much smaller than the bowl of a stand mixer, which means there is maximum contact and impact between the dough, the blade and the bowl itself. This intense dough mixing session results in rapid gluten development, some 10x faster than if you were to use a stand mixer. I also choose to use the blade because it has most points of contact with the dough:
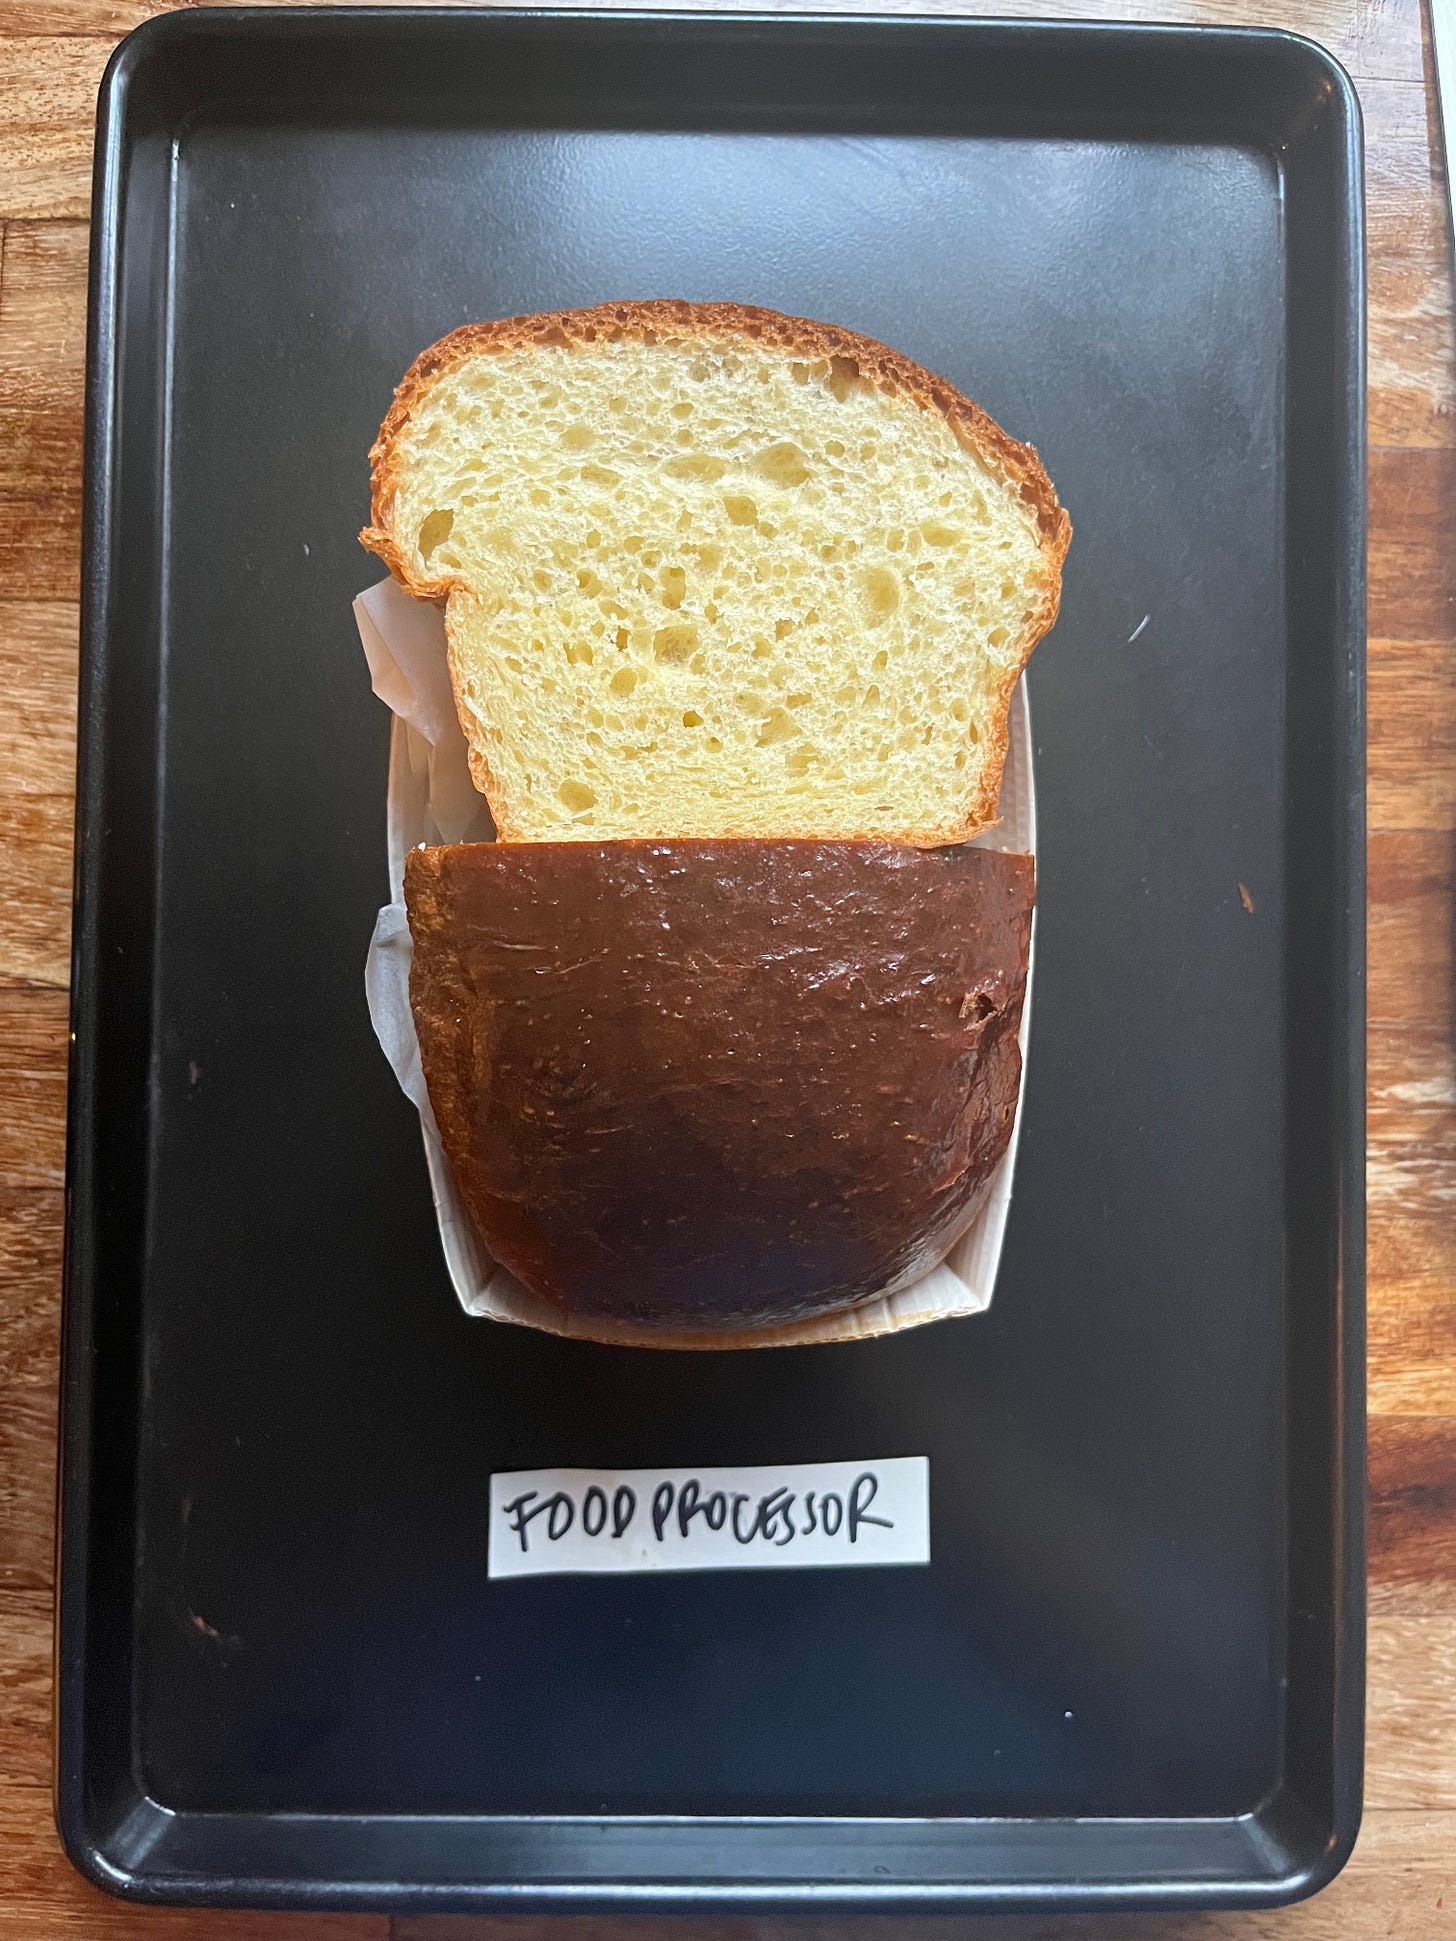
The crumb pattern of a food processor brioche is slightly different from one made with a dough hook or by hand. It still has a strong network, but rather than long chains of gluten, the structure of the dough is organised differently; As a result, the dough will not rise quite as high compared to a traditionally mixed brioche, but it will still have the fluffy crumb that is a little more open than the usual.
As well as this, you need to use cold butter. For me, this is a huge plus! There’s nothing worse than going to mix your brioche and trying to soften fridge-cold butter in a panic. Since the food processor produces so much heat from the kinetic energy, the cold butter helps prevent the dough from overheating. Remember, making bread is all about balancing gluten development with fermentation, which means keeping a close eye on the temperature. Too hot, your dough will be a sticky mess, and the yeast will be overactive before your gluten has developed, unable to capture the CO2.
Of course, there are limitations - you can’t make huge batches of brioche in the mixer, but you can easily make a single loaf or, in our case, a batch of beignets. The food processor actually bridges a useful gap for smaller batch sizes. I have also reduced the hydration to 60-65%, which makes it easier to work with and remove from the bowl, as well as limiting the butter to 40%; This ensures it is still rich but, again, easier to work with and less at risk of splitting or overheating from the hot food processor motor.
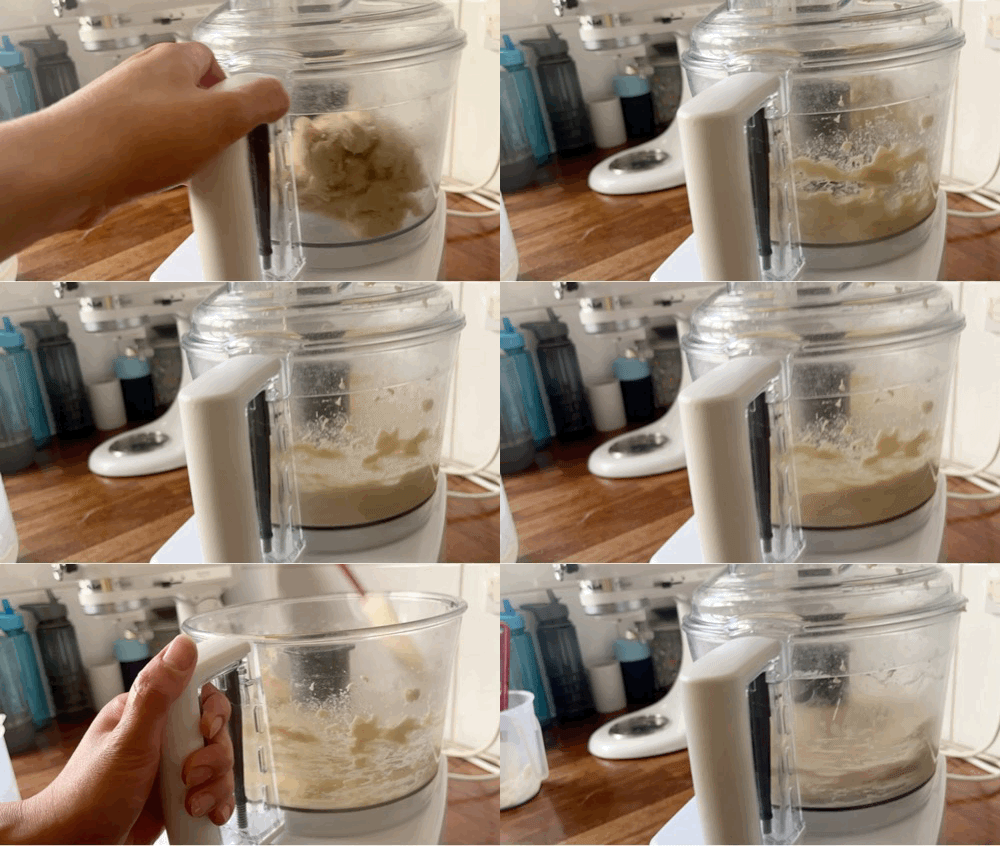
Now… the downsides. I can’t lie to you - the clean-up is pretty brutal. During the brief mixing process, the dough is able to climb its way up and under, into the blade and even climbing underneath the bowl a little
A note: I realise that not everyone has a food processor, but I thought this technique was essential to share! You can, of course, make this brioche in the classic way (or as a no-knead dough, as covered last year in the apple cinnamon buns). I also have a classic brioche deep-dive coming out on a website later this month, so watch out for that.
The deal with colour
For this recipe, I’m going to recommend a nice long rest in the fridge before frying. Not only does this allow you to break down the process over a long period of time, but it also allows the butter to resolidify and the dough to firm up, making it much easier to cut neat shapes.
One other massive benefit of cold fermentation is the impact on colour. A telling sign of both underfermented and over fermented dough is a pale crust. Cold fermentation generally allows for proper and full fermentation of the dough. You see, even after long periods of time in the fryer, the same-day beignets struggled to achieve deep golden brown colours in the crust. To understand why this is, we have to think about why things brown at all. There are two main factors beyond the colour of the ingredients themselves (i.e. a chocolate biscuit made with cocoa powder will be brown no matter what): Caramelisation and Maillard reactions.
Caramelisation occurs when sugar is heated - resulting from the decomposition of sucrose. As a result, the flavour and colour change. It is not a reaction between two compounds.
The Maillard reaction is a reaction between amino acids (proteins) and sugar. This is predominantly why things brown. The burnished tops of your pasteis de nata? Maillard reaction! The crust of your sourdough? Maillard reaction! Your egg-washed pastries? You guessed it… Maillard reaction! You need to reach temperatures of 140c for the reaction to take place. And as these two react, flavour compounds are created, and the colour of the food changes.
Although baked goods may appear caramel coloured, they have not undergone significant caramelisation. We have the Maillard reaction to thank for the colour. And to fully benefit from this reaction, we must get the fermentation right.
When the dough is underfermented, there may not have been enough time for the starch to break down properly into the sugars and proteins that take part in the Maillard reaction. Your dough will brown but in a more lacklustre fashion.
Overfermented dough also has the same issue but for different reasons - if the dough has fermented too much, it means the yeast has digested every last bit of sugar available, and, once again, a poor Maillard reaction will take place.
A cold fermentation process is recommended to fully benefit from the Maillard reaction. Look at the difference in colour between the same-day beignet vs the cold-proofed beignet:
You can also tell the difference in fermentation by the crumb structure. Notice how the same-day dough has a much tighter and more uniform crumb, whilst the cold-fermented dough has a more irregular and airy structure:
Why we stan Deep Frying
A doughnut is only a doughnut if it’s been deep fried. This dough is delicious but won’t magically convert to a tender-squishy doughnut if you bake it in the oven. Deep-frying is a unique cooking process because it is considered a ‘dry’ method since the oil rises above the boiling temperature of the water.
During the deep-frying process, the surface temperature of the dough rises very quickly, and the heat begins to radiate inwards. As a result, the water in the dough starts to turn to steam and tries to escape, explaining a large number of bubbles and sputtering in the first parts of the frying process. After this initial reaction, a barrier that the oil can’t penetrate is formed. After this point, the centre of the dough continues to cook due to the high heat but doesn’t take on any more oil.
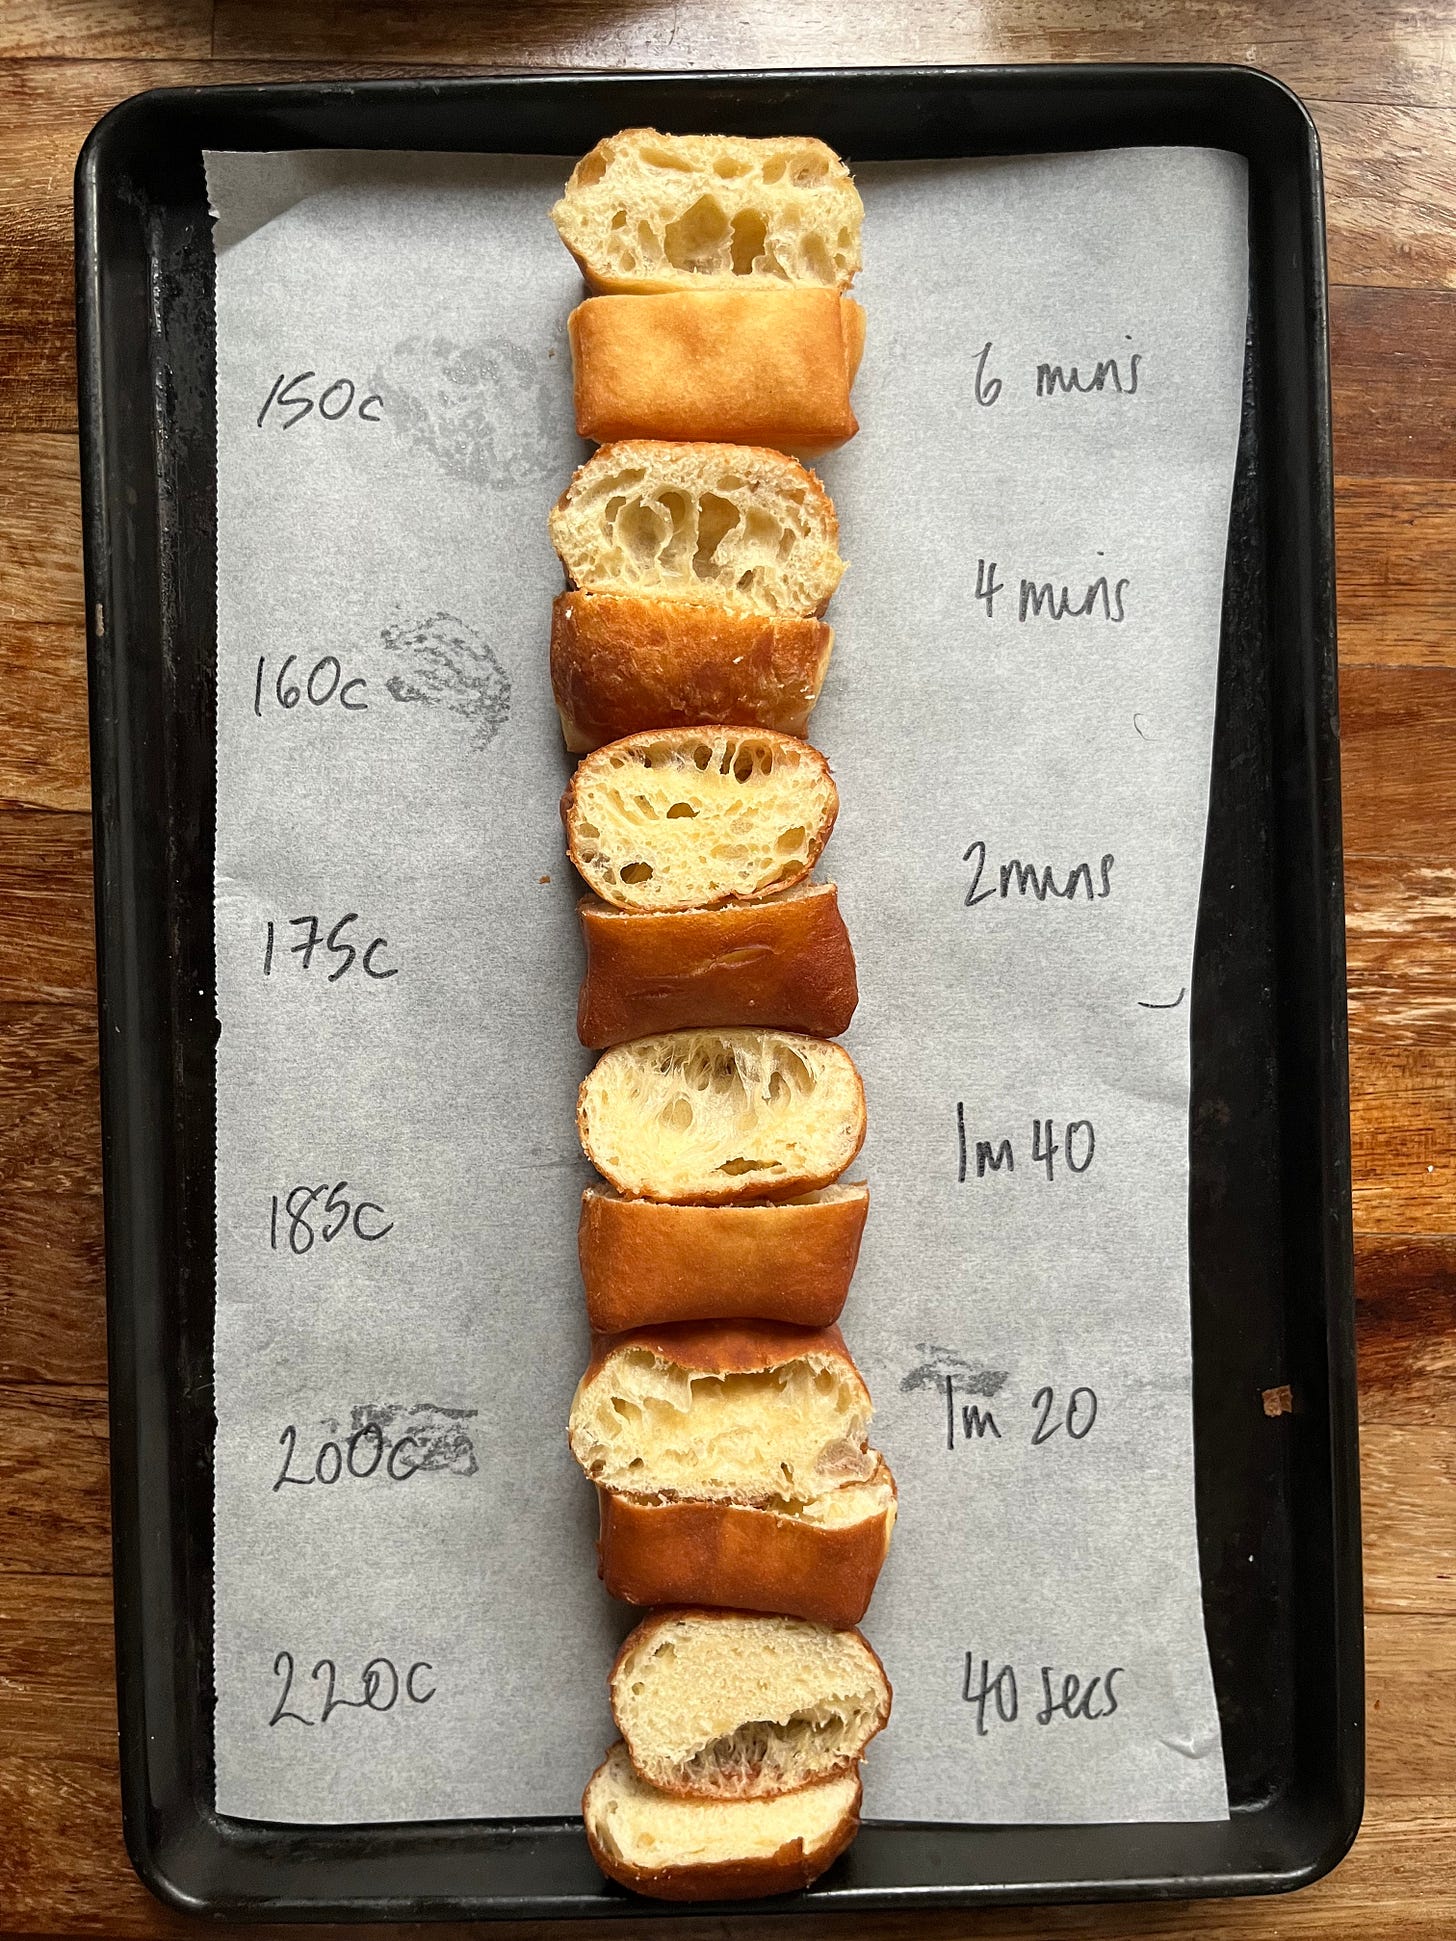
The key to all this? Frying at the perfect temperature. I put this to the test:
When our dough is fried at the correct temperature, it is golden brown and has crisp edges with a soft, tender centre. As well as this, it will have absorbed the right amount of oil; dough fried at too low a temperature will have less colour and have a greasy flavour and heavy texture. Too hot, and the outside is set too fast, preventing proper expansion and resulting in a thick, dark and unpleasantly chewy crust and a dense crumb. There is also a risk that you accidentally leave your dough raw in the centre.
The perfect temp for doughnuts, for me? Around 180c. The 175c doughnuts were good, but the 185c ones were slightly lighter.
Kitchen Projects is an entirely reader-supported publication. It only costs £5 per month, and your support makes this newsletter possible! By becoming a member of KP+, you directly support everything that goes into the weekly newsletter and get access to the extra content, recipes and giveaways, including the entire archive:
Judging proof and hollow beignets
After your beignets have been cut, you need to leave the dough to get puffy before frying it. If you have cold-fermented your dough, this could take an hour+ whilst a same-day dough could be less than 30 minutes. There is no hard and fast rule for this - since the dough is less than 1cm to begin with, it can be quite hard to track movement; You just want it to be puffy, which you can feel by nudging with your finger.
When I was learning about baking, one of the most surprising discoveries was how under proofed dough may rise more than perfectly proofed dough. What’s that about? And if you get more volume from under proofed dough, why do we even bother?
The yeast fermentation rate strongly correlates to temperature - the warmer things are, the more active yeast. Yeast ferments the dough by eating available sugars and burping out CO2 trapped in a gluten mesh, giving the rising effect. When we make recipes with yeast, the dough rises several times, but it has its most dramatic rise when it goes into the oven or meets hot oil. This is known as ‘spring’. Although yeast has been multiplying at ambient temperature, when it goes into a very hot environment, yeast activity will go into a frenzy which is why your bread/buns will shoot up. Once the internal temperature gets to around 55c, the yeast will die.
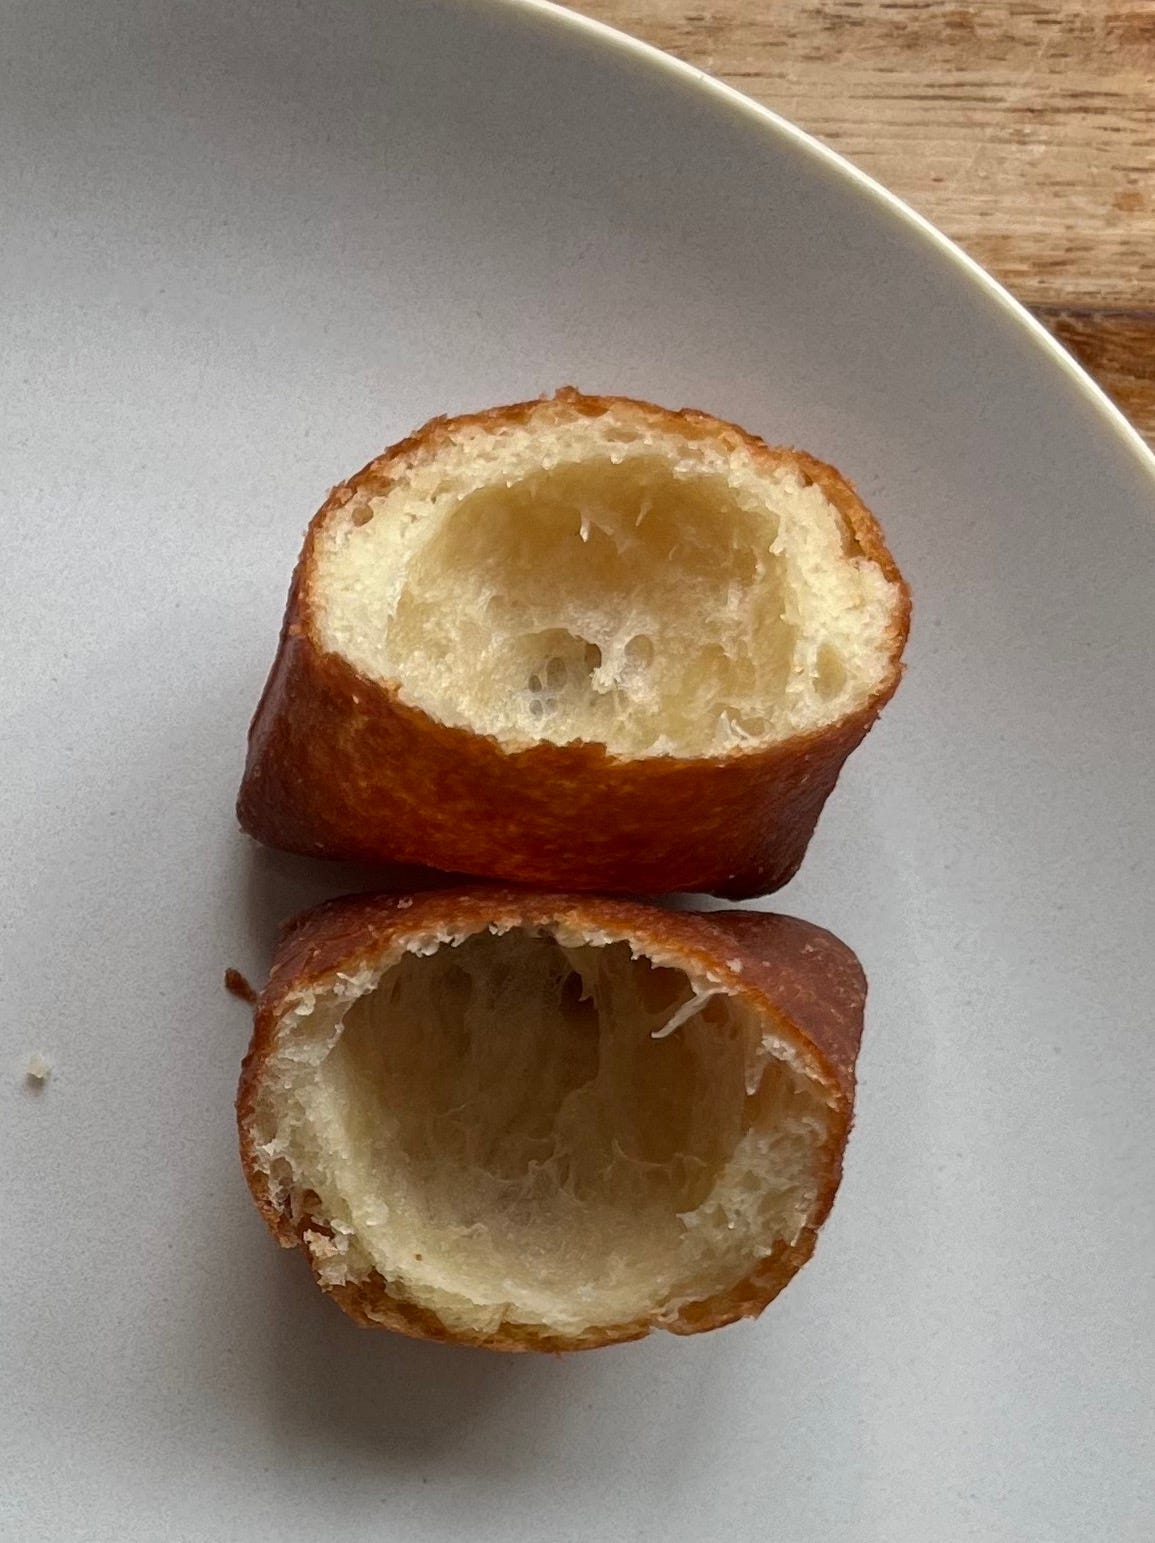
To get a good spring, you need to judge your proof correctly. If your dough is over-proofed, you will get a lacklustre spring - you need to leave a bit of ‘gas in the tank’ ready for its final lift! On the other end of the spectrum, if your dough is under proofed, your yeast reacts in a manic way, resulting in an uncontrolled rise - you are likely to get cracks and bursts in your dough. As well as this, the centre of your beignet may be hollow - the aggressive hole in the side of the dough and all the air escapes.
Plain flour vs Strong flour
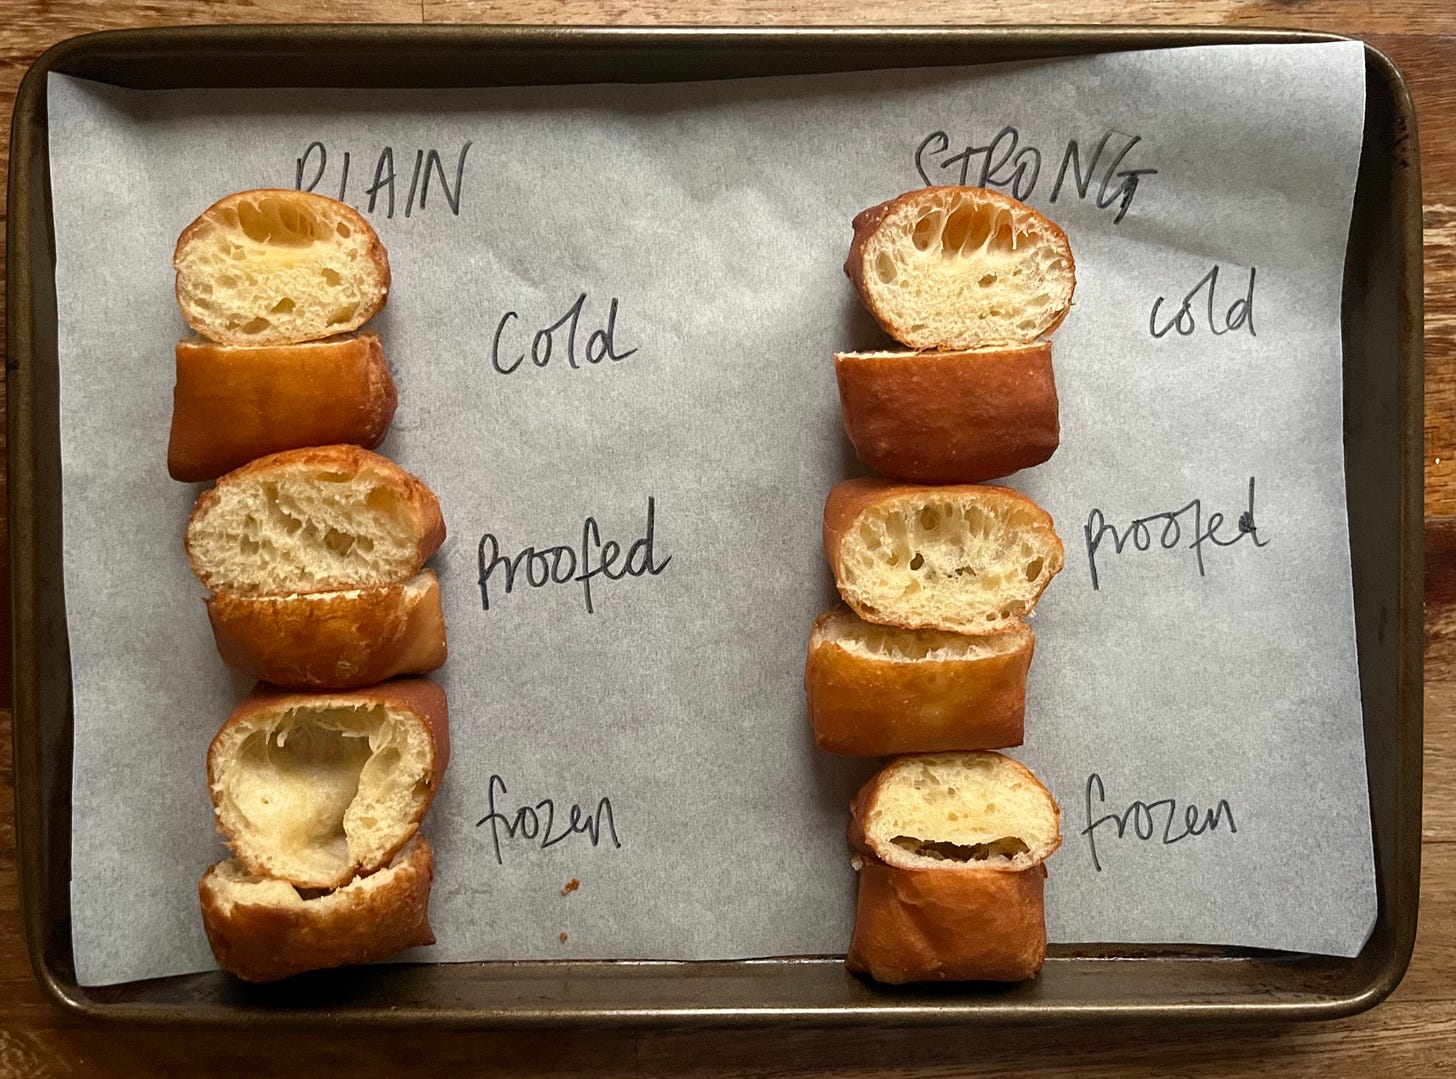
As well as testing the dough temp, I decided to also see what flour to use. Doughnut recipes seem to indiscriminately switch between plain and strong bread flour. I get it - higher gluten flour tends to lead to a more structured and chewier final product, so I can see why plain flour might appeal for a more cake-like, fluffy structure:
As you can see, the strong flour has better structure and shape - even when fried from frozen, it doesn’t lose its mind as much. The cold, unproofed dough has a much more uneven crumb structure and large holes, ranging from slightly dense to airy. As you can see, the frozen plain flour dough completely lost it’s mind and exploded, whilst the frozen strong flour dough held together but was quite dense. The well-proofed dough is clearly the winner - it is evenly airy. I also preferred the strong flour - it’s simply more robust, is more able to withstand the intensive deep-frying process and makes a better doughnut overall. Having slightly more texture is always massive plus for me.
Deep frying tips
One of the best things about deep frying is having the oil set up. Once it’s set up, I can deep fry with reckless abandon until my heart’s content. I generally try to make the most of having the pan on and double up on fried recipes (Milli Taylor’s fried chicken is genuinely brilliant). Here are the tips:
Use a large, tall pot. The height of the pot will minimise any scary seeming oil splashes and keep the whole process well contained.
Make sure your pot is SPOTLESS - the outside and inside. If you have a tiny bit of water in your pan when you start heating the oil, it will suddenly splatter at 100c, which can feel scary. Making sure the outside is clean and dry will set your mind at rest that there is a big, safe space between your heating element and the oil inside the pot.
Use a neutral oil - I use rapeseed, but you can use sunflower or any combination of vegetable oil.
Fill the pot until it is half full. You want enough oil to submerge your doughnut but not so much that it can bubble too high on impact.
Heat it up slowly, so you feel in control - I like to put my oil on a low-medium flame when I am beginning to sheet out my dough. Knowing that the oil is coming to temperature at a manageable rate is always good for the pulse.
Manage your temp - I use a standard pocket thermometer, but if you are nervous about hot oil, I recommend getting a probe thermometer with a long lead so you can monitor the temperature without being too close to the oil.
Go slow. There’s no rush to get them through the oil until you feel confident to do more than one.
Equipment is your friend - I like using metal tongs or a metal ladle strainer.
To dispose of your oil, invest in a funnel. Simply let the oil cool and funnel it back into the bottle that it came in. You can either reuse it (I reuse it until the oil changes colour significantly), see if there’s a local oil recycling bank near you or put the cap back on and put it in the bin.
Adapting your beignet
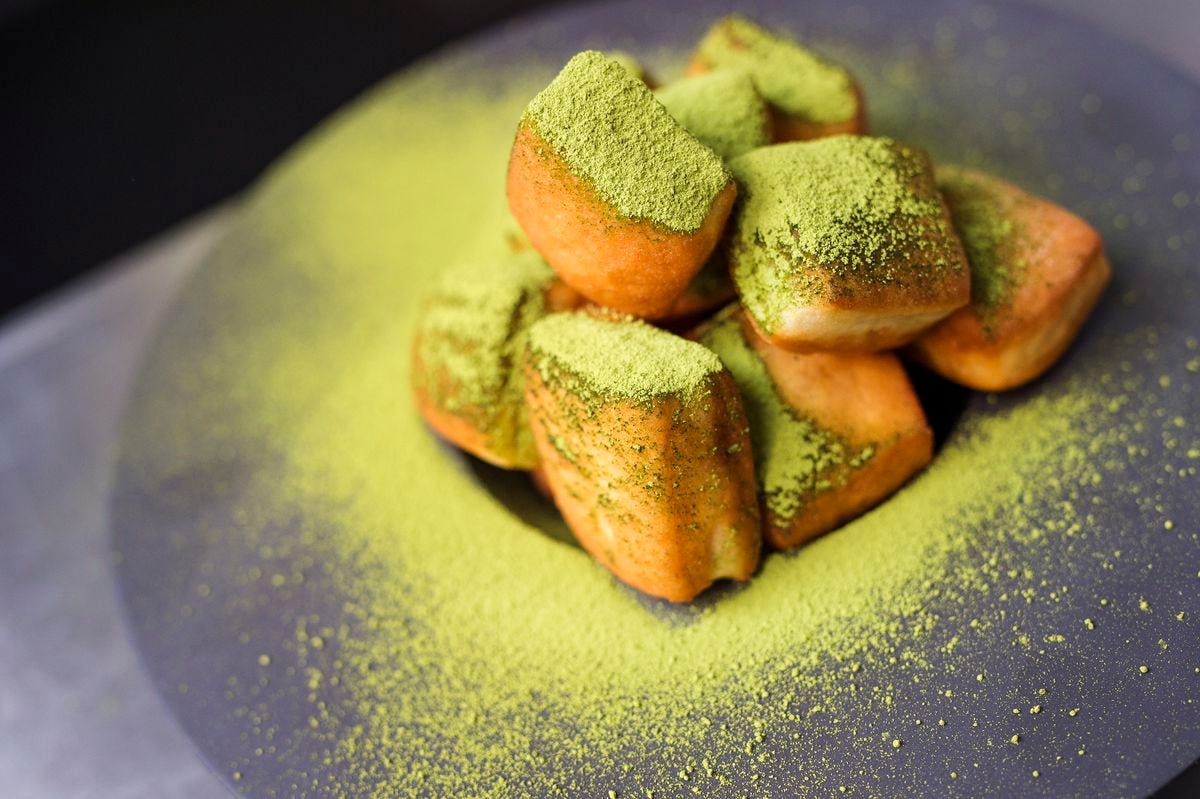
Back in the day at Dominique Ansel Kitchen in New York, we used to freshly fry beignets to order and cover them in matcha sugar - this is by far your easiest area of customisation. Consider blitzing up freeze-dried fruit with icing sugar to make fruity beignets or pulsing your sugar with espresso or cocoa powder for something a little bitter and rich. You could also blend your sugar with fruit zests, or in the spirit of Chef Dominique, try a variety of tea powders; An earl grey beignet could be a very delicious thing. Of course, you can pipe jam inside! I’m not against filled doughnuts, as long as they can be eaten in one or two bites.
And there’s always crab. Over on KP+, I’m sharing my recipe and technique for the outrageously good crab beignets as well as my guide to filling doughnuts. It must be eaten to be believed - this is probably one of my favourite things I’ve ever made. Like, ever. See you there!
Beignet recipe
Makes 16-20 beignets. If you are making this in the food processor, I would only maximum double this recipe.
Brioche dough
175g strong bread flour (can sub for plain flour for cakier texture)
3g instant yeast
3g salt
25g caster sugar
100g whole eggs
25g milk
70g butter
Icing sugar for decoration
Neutral oil for frying
Method
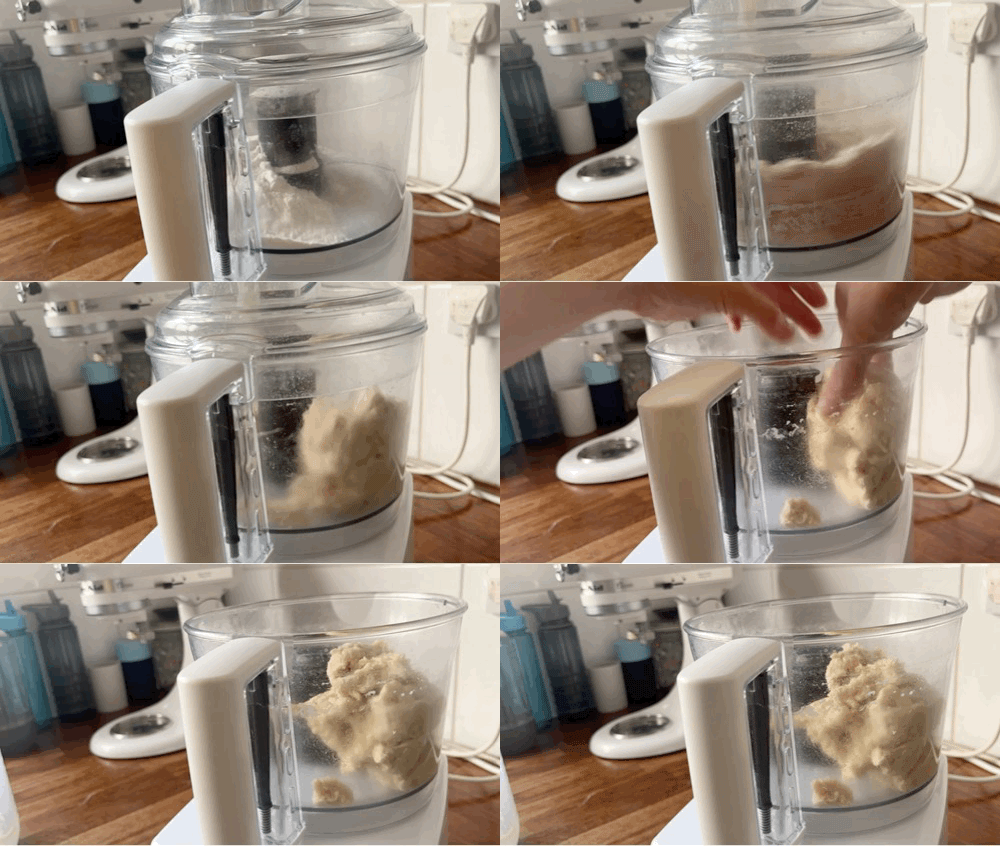
Scale flour, sugar, salt and yeast into the bowl of the food processor with the eggs & milk. Using the blade attachment, process until a rough dough forms, around 30 seconds - 1 minute. Scrape down the edge of the bowl.
Turn the food processor on and add the cold butter, in small pieces, one by one. Continue processing for another 1-2 minutes until the dough comes together and full gluten development is reached. It will be shiny and slick. If your dough has overheated, it may not appear to have reached full gluten development - remove it from the bowl anyway and leave it to rest.
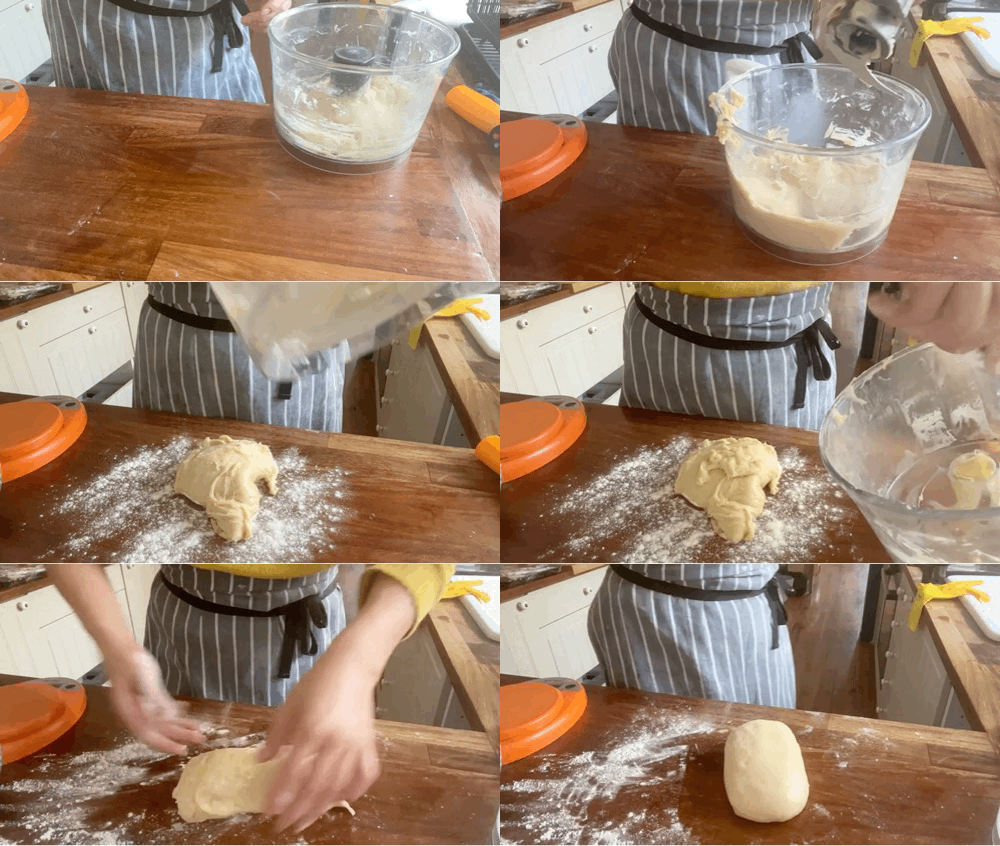
Perform a few slaps and folds on a floured bench until it is a cohesive, shiny dough. Move into an oiled container and leave to rise for 1 hour, or until very puffy.
Press down the dough and move into the fridge to chill, ideally overnight but at least 4 hours
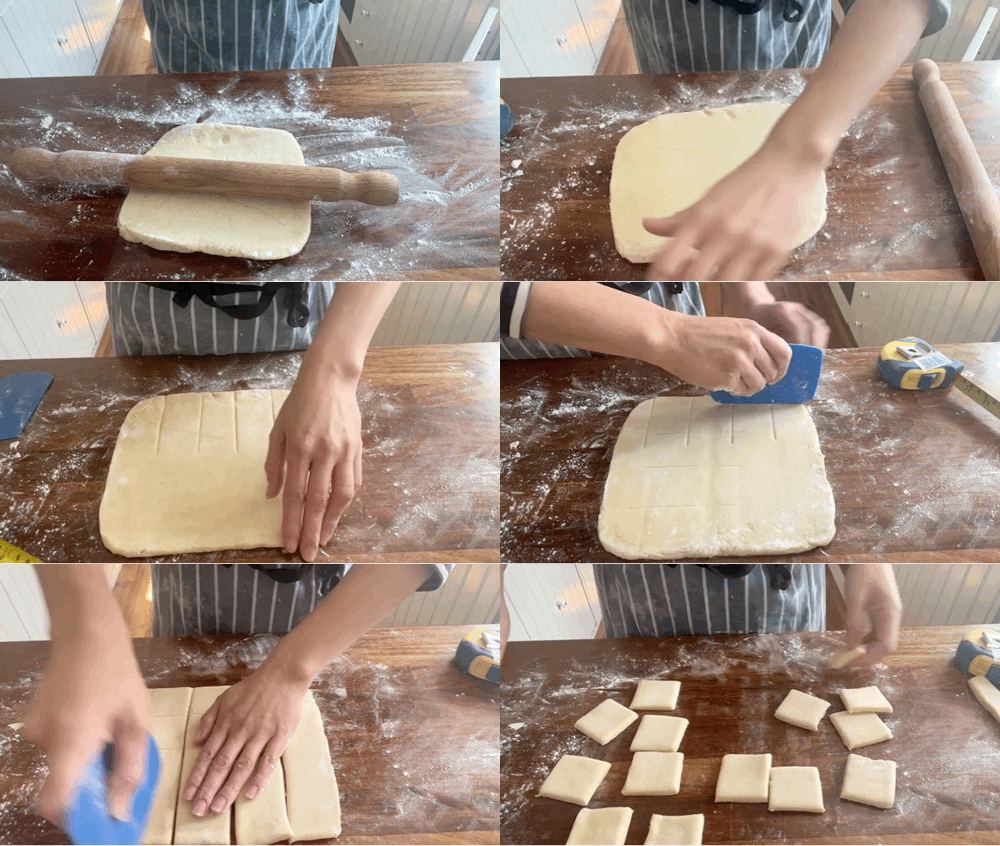
On a floured surface, roll out the dough until it is just under 1cm thick. Measure and cut 4.5cm squares. They should weigh about 20g. You can re-roll any offcuts
Place your beignets on oiled pieces of baking parchment so you can slide them easily into the oil later. Leave to proof until puffy - it should feel like a big puffy coat when you nudge it with your finger.
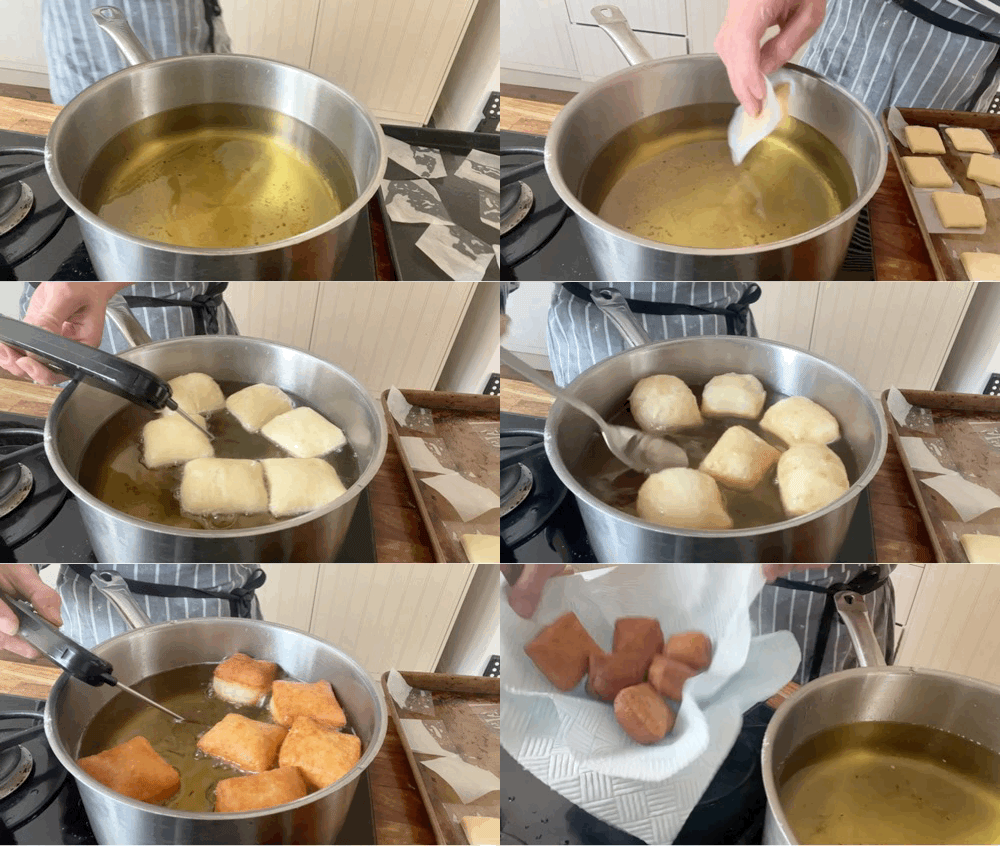
Heat your oil to 180c. Cook a test beignet - if it erupts in wild ways, leave your remaining dough to proof a bit longer. Slide the beignets into the oil, max 5 or so at a time or as many as you feel confident to do. There’s no rush. Monitor the oil temperature to ensure it stays at 180c for the best beignet. Cook for 1 minute, using a spoon to put oil on top to help encourage expansion and to create that oil barrier on the top, then flip, and cook for 30-45 seconds more.
Let drain on kitchen paper before tossing in the sugar of choice.



Love both of these posts, Nicola! I love a good food processor dough (though I don’t relish the cleanup of this one), and how it shows how there are a million ways to make a dough, even brioche, which has a reputation of being fussy and exacting. I’ve got eleventy different brioche formulas myself, and all work great!
Any idea if it’s possible to “par-fry” the beignets and then fry them again a la minute? Trying to figure out how to do this at scale. Thanks!